S2RADRW12E - Radio Sandstrøm - Free user manual and instructions
Find the device manual for free S2RADRW12E Sandstrøm in PDF.


| Product Type | Portable FM/AM Radio |
| Brand | Sandstrøm |
| Model | S2RADRW12E |
| Power Source | AC mains via adapter or rechargeable battery |
| Input Voltage | 100-240V ~50/60Hz, Max. 400mA |
| Adapter Output | 12V 1A |
| Battery Type | Rechargeable NiMH 8.4V 1500mAh (7xAA) |
| Frequency Range | AM: 531-1600 kHz, FM: 88-108 MHz |
| Speaker Power | 5W RMS |
| Dimensions (W x H x D) | 106 x 203 x 120 mm |
| Weight | 1.12 kg |
| Color | White |
| Charging Time | Approximately 8 hours for first full charge |
| Charging Indicator | Red when charging, green when fully charged |
| Controls | Tuning, Volume, Function (OFF/AM/FM/AUX) |
| Connectivity | 3.5mm AUX IN, 3.5mm Earphone jack |
| Antenna | Telescopic FM aerial, built-in AM aerial |
| Safety Features | Overcharge protection, do not expose to moisture |
| Cleaning Instructions | Wipe with slightly moist lint-free cloth |
| Included Accessories | Mains adapter, instruction manual |
| Use | Indoor use only |
Frequently Asked Questions - S2RADRW12E Sandstrøm
User questions about S2RADRW12E Sandstrøm
0 question about this device. Answer the ones you know or ask your own.
Ask a new question about this device
Download the instructions for your Radio in PDF format for free! Find your manual S2RADRW12E - Sandstrøm and take your electronic device back in hand. On this page are published all the documents necessary for the use of your device. S2RADRW12E by Sandstrøm.
USER MANUAL S2RADRW12E Sandstrøm
Portable FM/AM Radio
Instruksjonsmanual
Bærbar FM/AM Radio
Instruktionsbok
Portabel FM/AM-radio
Käyttöopas
Kannettava FM/AM-radio
Brugervejledning
Bærbar FM/AM Radio
GB
NO
SE
FI
DK

natural_image
Front view of a vintage electronic sound mixer device (no visible text or labels on the device body)S2RADRB12E

natural_image
Front view of a white audio amplifier with dual knobs and a mesh speaker grille (no visible text or symbols)S2RADRW12E
Contents
GB
Safety Warnings....4
Unpacking......9
Product Overview....10
Front View....10
Rear View....10
Power Source ....11
Mains Power....11
Connections....12
Using Earphones....12
Playing music from an Audio Device....12
General Operation....13
Switching On / Off and Selecting the Function ...13
Adjusting the Volume....13
Radio Reception....13
To Improve Radio Reception....13
Auxiliary Input 13
Maintenance 14
Cleaning the Unit....14
Hints and Tips......14
Specifications....15
Innehåll
SE
- Read all the instructions carefully before using the unit and keep them for future reference.
- Retain the manual. If you pass the unit onto a third party make sure to include this manual.
- Check that the voltage marked on the rating label matches your mains voltage.
- The rating label is at located at the bottom of the unit.
Damage
- Please inspect the unit for damage after unpacking.
- Do not continue to operate the unit if you are in any doubt about it working normally, or if it is damaged in any way - switch off, withdraw the mains adapter and consult your dealer.
Location of Unit
- The unit must be placed on a flat stable surface and should not be subjected to vibrations.
- Do not place the unit on sloped or unstable surfaces as the unit may fall off or tip over.
- The mains socket must be located near the unit and should be easily accessible.
• This unit is designed for indoor use only.
Temperature
- Avoid extreme degrees of temperature, either hot or cold. Place the unit well away from heat sources such as radiators or gas/electric fires.
- Avoid exposure to direct sunlight and other sources of heat.
Naked Flames
- Never place any type of candle or naked flame on the top of or near the unit.
Moisture
- To reduce the risk of fire, electric shock or product damage, do not expose this unit to rain, moisture, dripping or splashing. No objects filled with liquids, such as vases, should be placed on the unit.
- If you spill any liquid into the unit, it can cause serious damage. Switch it off at the mains immediately. Withdraw the mains adapter and consult your dealer.
Ventilation
- To prevent the risk of electric shock or fire hazard due to overheating, ensure that curtains and other materials do not obstruct the ventilation vents.
- Do not install or place this unit in a bookcase, built-in cabinet or in another confined space. Ensure the unit is well ventilated.
Safety
- Always disconnect the unit from the mains supply before connecting/disconnecting other devices or moving the unit.
- Unplug the unit from the mains socket during a lightning storm.
Mains Adapter
- The mains adapter will continue to draw electricity from the mains supply when plugged in the mains socket. In the interests of safety and to avoid
unnecessary energy consumption, never leave the mains adapter plugged in the mains socket wh9ile unattended for long periods of time. Disconnect the mains adapter from the power supply.
Earphones
- Listening to loud sounds for prolonged periods of time may permanently damage your hearing.
- Before putting on earphones, turn the volume down then put the earphones on and slowly increase the volume until you reach a comfortable listening level.

Interference
- Do not place the unit on or near appliances which may cause electromagnetic interference. If you do, it may adversely affect the operating performance of the unit, and cause a distorted picture or sound.
Supervision
• Children should be supervised to ensure that they do not play with the unit and the remote control.
- Never let anyone especially children push anything into the holes, slots or any other openings in the case - this could result in a fatal electric shock.


The lightning flash with arrowhead symbol, within an equilateral triangle, is intended to alert the user to the presence of uninsulated "dangerous voltage" within the unit's enclosure that may be of sufficient magnitude to constitute a risk of electric shock.

The exclamation point within an equilateral triangle is intended to alert the user to the presence of important operating and maintenance (servicing) instructions in the manual accompanying the unit.
Service
- To reduce the risk of electric shock, do not remove screws. The unit does not contain any user-serviceable parts. Please leave all maintenance work to qualified personnel.
- Do not open any fixed covers as this may expose dangerous voltages.
Maintenance
Thank you for purchasing your new Sandstrøm FM/AM Radio.
We recommend that you spend some time reading this instruction manual in order that you fully understand all the operational features it offers. You will also find some hints and tips to help you resolve any issues.
Read all the safety instructions carefully before use and keep this instruction manual for future reference.
Unpacking
Remove all packaging from the unit. Retain the packaging. If you dispose of it please do so according to local regulations.
The following items are included:

natural_image
Simple line drawing of a speaker with two speakers and a blank circular base (no text or symbols)Unit

Mains Adapter
Instruction Manual
Product Overview
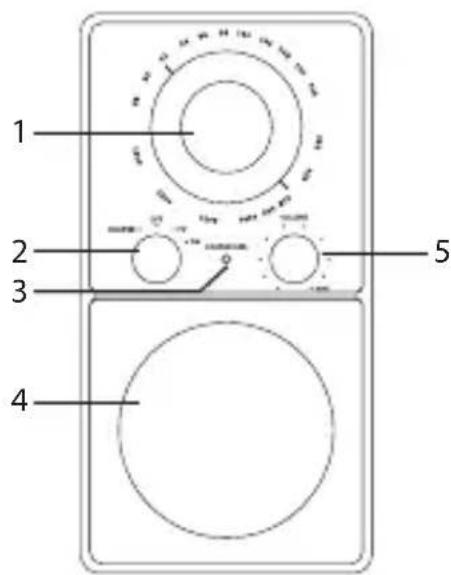
Front View
- Tuning Control
- Function Control
- CHARGE LED Indicator
- Speaker
- VOLUME Control

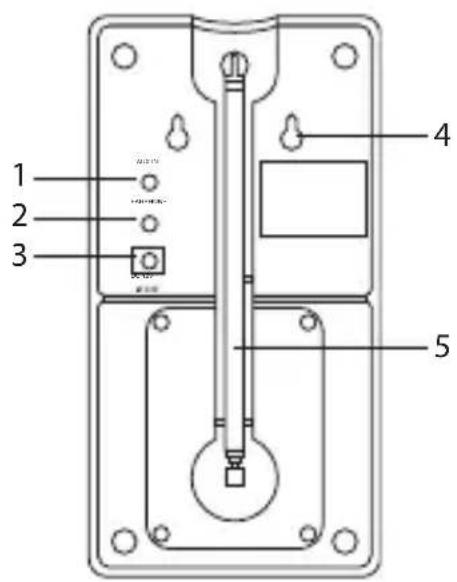
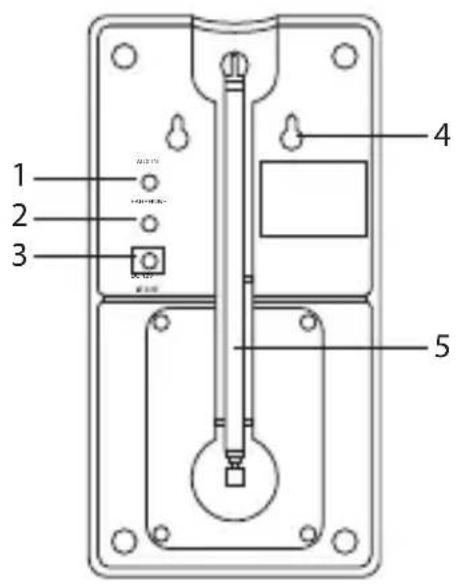
Rear View
- AUX IN Socket
- EARPHONE Socket
- DC 12V Socket
- Mounting Hole
- FM Aerial
Power Source
Mains Power
- This unit is designed to operate with an AC power supply or with the built-in battery.
- Connecting the unit to any other power source may cause damage to the unit. Unwind the mains adapter to its full length. Connect the end of the cable to the DC 12V socket at the rear of the unit and then connect the mains plug to the mains socket.
- Make sure the mains adapter is fully inserted into the mains socket. The unit will start charging after it is connected with the mains power.
- Charge the internal battery for 8 hours before first time use. Do not overcharge the unit. Disconnect the mains adapter plug from the mains socket to stop charging.
- While the battery is charging, the CHARGE LED indicator flashes in red. When the battery is charged to full capacity, the CHARGE LED indicator lights up green. Remove the mains adapter. The unit is now ready to use.
- To switch the unit off completely, turn the function control to OFF position, and withdraw the mains adapter from the mains socket.


- The battery is partially charged at shipment. Charge the battery to full for the first time use. It takes about 8 hours at fully charged.
- Make sure that the function control is turned to OFF position for battery charging.
- Do not disconnect the mains power adapter during charging.
- Ensure all necessary audio connections of the unit are connected before connecting to the mains power socket.
Connections
Using Earphones
Turn down the volume before connecting the earphones. Slowly raise the volume with the earphones on until you reach your desired volume. When earphones are connected, the speaker is automatically muted.
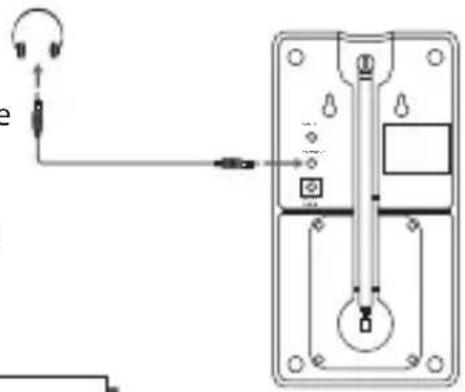

Long-term exposure to loud music may cause hearing damage. It is best to avoid extreme volume when using earphones, especially for extended periods.
Playing music from an Audio Device
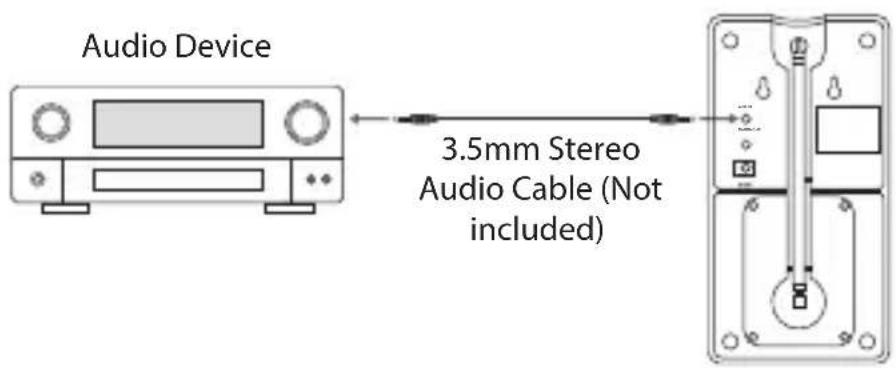
The AUX IN socket is located at the rear of the unit. Use a 3.5mm stereo audio cable (not included) to connect to the audio device through the AUX IN socket.
General Operation
Switching On / Off and Selecting the Function
• To listen the radio, adjust the Function Control to AM or FM position.
• To switch off the unit, adjust the Function Control to OFF position.

To avoid unnecessary energy consumption, always adjust the Function Control to OFF after using the unit.
Adjusting the Volume
Turn the VOLUME control to adjust the volume.
Radio Reception
- Adjust the Function Control to AM or FM position.
- Turn the Tuning control to tune to a station.
To Improve Radio Reception
For FM
Extend, incline and turn the telescopic aerial to get the best reception. Reduce its length if the signal is too strong.
For AM
The unit uses a built-in aerial. Direct this aerial for best reception by turning the whole unit.

natural_image
Simple line drawing of a radio with a pointer and sound waves (no text or symbols)Auxiliary Input
- Before connecting to the mains socket, use a 3.5mm audio stereo cable (not included) to connect your audio device through the AUX IN socket at the rear of the unit.
- Adjust the Function Control to AUX IN position.
- In AUX IN mode, you may operate your audio device directly for playback features.
Maintenance
Cleaning the Unit
GB
Ensure to unplug the unit from the mains socket before cleaning.
• To clean the unit, wipe the case with a slightly moist, lint-free cloth.
- Do not use any cleaning fluids containing alcohol, ammonia or abrasives.
- Do not spray an aerosol at or near the unit.
Hints and Tips
If a problem does occur, it may often be due to something very minor. The following table contains various tips.
| Problem Cause / Solution | |
| No power • Ensure the mains adapter is connected. | |
| Poor FM reception • | Make sure the FM aerial is fully extended.• Extend, incline and turn the aerial to get the best reception.• Electrical interference in your home can cause poor reception. Move the unit away from them. |
| Desired station not found | • Weak signal. Adjust the aerial or move the unit to a stronger signal location. |
Specifications
| System Section | |
| Model S2RADRB12E / S2 | RADRW12E |
| Power Supply Input 100 | -240V ~50/60Hz, Max. 400mA |
| Unit Input | 12V =1A [IMAGE] |
| Rechargeable Battery Pack | Ni MH “AA” x 78.4V 1500mAh |
| Frequency Range | AM 531 – 1600kHzFM 88 – 108.0MHz |
| Speaker 5W (RMS) | |
| Net Weight 1.12Kg | |
| Dimension 106(W) x 203 | (H) x 120(D) mm |
Features and specifications are subject to change without prior notice.
natural_image
Simple line drawing of a front panel with circular components and a top panel showing a circle (no text or symbols)Hovedenhet

Strømadapter
Instruksjonsmanual
Produkt Oversikt
Radioen sett forfra
NO

natural_image
Pure electrical circuit lines without any symbolsAuxiliary Input-AUX inntak
natural_image
Simple line drawing of a speaker with two speakers and a circle base (no text or symbols)Enhet

Strömadapter
Instruktionsbok
Produktöversikt
Sedd framifrån
- Tuning-kontroll
- Funktions-kontroll
- CHARGE LED-indikator
- Högtalare
- VOLUME-kontroll

Sedd bakifrån
- AUX IN-uttag (extrautrustning)
- EARPHONE-uttag (hörlurar)
- DC 12V -uttag (fikström)
- Monteringshål
- FM-antenn
Strömkälla
Nätström
natural_image
Simple line drawing of a device with a pointer and circular components (no text or symbols)natural_image
Simple line drawing of a speaker with two speakers and a blank circle (no text or symbols)Yksikkö

Verkkovirtalähde

Käyttöopas

natural_image
Simple line drawing of a handheld electronic device with a pointer and circular ports (no text or symbols)Lisäsisääntulo
natural_image
Simple line drawing of a two-panel device with circular and rectangular components (no text or symbols)Enhed

Netadapter
Brugervejledning
Produktoversigt
Forside
- Tuning kontrol
- Function kontrol
- CHARGE LED-indikator
- Højtaler
- VOLUME kontrol
DK
Bagside
- AUX IN Stik
- EARPHONE Stik
- DC 12V Stik
- Monteringshul
- FM antenne

Strømkilde
Lysnet
natural_image
Pure electrical circuit lines without any symbols
natural_image
Simple line drawing of a handheld device with a pointer and circular ports (no text or symbols)AUX indgang
The symbol on the product or its packaging indicates that this product must not be disposed of with your other household waste. Instead, it is your responsibility to dispose of your waste equipment by handing it over to a designated collection point for the recycling of waste electrical and electronic equipment. The separate collection and recycling of your waste equipment at the time of disposal will help conserve natural resources and ensure that it is recycled in a manner that protects human health and the environment.
For more information about where you can drop off your waste for recycling, please contact your local authority, or where you purchased your product.
For more information, please contact the local authority or your retailer where you purchased the product.
All trademarks are the property of their respective owners and all rights are acknowledged.

- Contents
- Innehåll
- Damage
- Location of Unit
- Temperature
- Naked Flames
- Moisture
- Ventilation
- Safety
- Mains Adapter
- Earphones
- Interference
- Supervision
- Service
- Maintenance
- Unpacking
- Product Overview
- Front View
- Rear View
- Power Source
- Mains Power
- Connections
- Using Earphones
- Playing music from an Audio Device
- General Operation
- Switching On / Off and Selecting the Function
- Adjusting the Volume
- Radio Reception
- To Improve Radio Reception
- For FM
- For AM
- Auxiliary Input
- Cleaning the Unit
- GB
- Hints and Tips
- Specifications
- Produkt Oversikt
- Radioen sett forfra
- Auxiliary Input-AUX inntak
- Produktöversikt
- Sedd framifrån
- Sedd bakifrån
- Strömkälla
- Nätström
- Lisäsisääntulo
- Produktoversigt
- Forside
- Bagside
- Strømkilde
- Lysnet
- AUX indgang
Brand : Sandstrøm
Model : S2RADRW12E
Category : Radio