SVTV0551UHD2 - TV SVAN - Free user manual and instructions
Find the device manual for free SVTV0551UHD2 SVAN in PDF.


| Product Type | LED TV |
| Brand | SVAN |
| Model | SVTV0551UHD2 |
| Screen Size | 55 inches (140 cm) |
| Display Resolution | 3840 x 2160 (4K UHD) |
| Energy Efficiency Class | A+ |
| On Mode Power Consumption | 86 W |
| Standby Power Consumption | 0.5 W |
| Annual Energy Consumption | 125 kWh/year |
| TV System | DVB-T/T2/C/S/S2 |
| HDR Support | HDR10, HLG |
| Smart TV | Yes, with Portal and HbbTV |
| Wi-Fi | 802.11 a/b/g/n, built-in |
| Ethernet | 1 x LAN (RJ45) |
| HDMI Inputs | Multiple (at least 2) |
| USB Inputs | 2 (for media playback and recording) |
| AV Input | 1 (via 3.5mm adapter) |
| Headphone Output | 1 (3.5mm) |
| Digital Audio Output | 1 x SPDIF (optical) |
| Remote Control | Included with batteries |
| Wall Mount | VESA compatible (size not specified) |
| Operating Voltage | 220-240V AC, 50Hz |
| Safety Features | Child lock, auto power off, tip-over protection |
| Accessories Included | Remote control, instruction book, power cord |
Frequently Asked Questions - SVTV0551UHD2 SVAN
User questions about SVTV0551UHD2 SVAN
0 question about this device. Answer the ones you know or ask your own.
Ask a new question about this device
Download the instructions for your TV in PDF format for free! Find your manual SVTV0551UHD2 - SVAN and take your electronic device back in hand. On this page are published all the documents necessary for the use of your device. SVTV0551UHD2 by SVAN.
USER MANUAL SVTV0551UHD2 SVAN
natural_image
Illustration of a flat-screen monitor with wireless signal icons above it (no text or symbols)| WARNINGDo not ingest the battery, Chemical Burn HazardThis product or the accessories supplied with the product may contain a coin/button cell battery. If the coin/button cell battery is swallowed, it can cause severe internal burns in just 2 hours and can lead to death.Keep new and used batteries away from children.If the battery compartment does not close securely, stop using the product and keep it away from children.If you think batteries might have been swallowed or placed inside any part of the body, seek immediate medical attention. |
| WARNINGNever place a television set in unstable or inclined locations. A television set may fall, causing serious personal injury or death. Many injuries, particularly to children, can be avoided by taking simple precautions such as:Using cabinets or stands recommended by the manufacturer of the television set.Only using furniture that can safely support the television set.Ensuring the television set is not overhanging the edge of the supporting furniture.Not placing the television set on tall furniture (for example, cupboards or bookcases) without anchoring both the furniture and the television set to a suitable support.Not standing the television set on cloth or other materials placed between the television and supporting furniture.Educating children about the dangers of climbing on furniture to reach the television set or its controls. If your existing television set is being retained and relocated, the same considerations as above should be applied. |
| WALL MOUNTING WARNINGSRead the instructions before mounting your TV on the wall.The wall mount kit is optional. You can obtain from your local dealer, if not supplied with your TV.Do not install the TV on a ceiling or on an inclined wall.Use the specified wall mounting screws and other accessories.Tighten the wall mounting screws firmly to prevent the TV from fall. Do not over-tighten the screws. |
| Caution | Serious injury or death risk |
| Risk of electric shock | Dangerous voltage risk |
| Maintenance | Important maintenance component |
Safety Information
| Safety Information......69 |
| Markings on the Product......60 |
| Environmental Information......61 |
| Features......61 |
| Accessories Included......61 |
| Standby Notifications......62 |
| TV Control Switch & Operation......62 |
| Inserting the Batteries into the Remote......62 |
| Connect Power......62 |
| Antenna Connection......62 |
| License Notification......63 |
| Remote Control......64 |
| Connections......65 |
| Switching On/Off......66 |
| First Time Installation......66 |
| Media Playback via USB Input......67 |
| Recording a Programme......67 |
| Timeshift Recording......67 |
| Instant Recording......68 |
| Watching Recorded Programmes......68 |
| Recording Configuration......68 |
| Media Browser Menu......68 |
| FollowMe TV (if available)......68 |
| CEC and CEC RC Passthrough......68 |
| E-Manual (if available)......69 |
| General TV Operation......73 |
| Using the Channel List......73 |
| Configuring Parental Settings......73 |
| Electronic Programme Guide (EPG)......73 |
| Teletext Services......74 |
| Software Upgrade......74 |
| Troubleshooting & Tips......74 |
| PC Input Typical Display Modes......75 |
| AV and HDMI Signal Compatibility......75 |
| Supported Video File Formats for USB Mode......76 |
| Supported Picture File Formats for USB Mode......76 |
| Supported Audio File Formats for USB Mode......77 |
| Supported Subtitle File Formats for USB Mode......78 |
| Supported DVI Resolutions......78 |
| Internet Portal......82 |
| Internet Browser......82 |
| HBBTV System......83 |
| Smart Center......84 |
directional buttons again to select or set an item. Press Return/Back or Menu button to quit a menu screen.
Input Selection Once you have connected external systems to your TV, you can switch to different input sources. Press the Source button on your remote control consecutively to select the different sources.
Changing Channels and Volu You can change the channel a by using the Volume +/- and Pr on the remote.
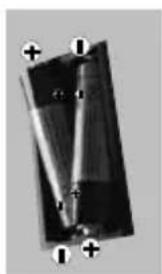
Inserting the Batteries into the Remote
Remove the screw that secure the battery compartment cover on the back side of the remote control first. Remove the cover gently. Insert two AAA batteries. Make sure the (+) and (-) signs match (observe correct polarity). Do not mix old and new batteries. Replace only with same or equivalent type. Place the cover back on. Then screw the cover back on again.
natural_image
Pure diagram of a conical object with two labeled points and directional arrows, no text or symbols present.Connect Power
IMPORTANT: The TV set is designed to operate on 220-240V AC, 50Hz socket. After unpacking, allow the TV set to reach the ambient room temperature before you connect the set to the mains. Plug the power cable to the mains socket outlet.
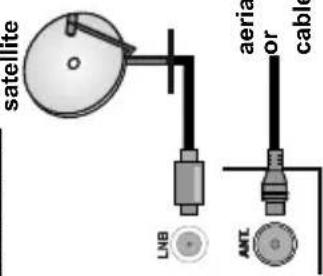
Antenna Connection
Connect the aerial or cable TV plug to the AERIAL INPUT (ANT) socket or satellite plug to the SATELLITE INPUT (LNB) socket located on the rear side of the TV.
Rear side of the TV
Standby Notifications
If the TV does not receive any input signal (e.g. from an aerial or HDMI source) for 3 minutes, it will go into standby. When you next switch-on, the following message will be displayed: "TV switched to stand-by mode automatically because there was no signal for a long time." Press OK to continue.
The Auto TV OFF option(in the System>Settings>More menu) may be set to a value between 1 and 8 hours by default. If this setting is not set as Off and the TV has been left on and not been operated during the
set time, it will switch into standby mode after the set time has expired. When you next switch-on the TV, the following message will be displayed. "TV switched to stand-by mode automatically because no operation was made for a long time." Press OK to continue. TV Control Switch & Operation
-
Up direction
-
Down direction
- Volume / Info / Sources List selection and Standby-On switch The Control button allows you to control the Volume / Programme / Source and Standby-On functions of the TV. To change volume:
Increase the volume by pushing the button up. Decrease the volume by pushing the button down.
To change channel: Press the middle of the button in, the information banner will appear on the screen. Scroll through the stored channels by pushing the button up or down.
To change source: Press the middle of the button in twice(for the second time in total), the source list will appear on the screen. Scroll through the available sources by pushing the button up or down.
To turn the TV off: Press the middle of the button in and hold it down for a few seconds, the TV will turn into standby mode.
To turn on the TV: Press the middle of the button in, the TV will turn on.
Notes:
- If you turn the TV off, this circle starts again beginning with the volume setting. - Main menu OSD cannot be displayed via control button.
Operation with the Remote Control
Press the Menu button on your remote control to display main menu screen. Use the directional buttons to select a menu tab and press OK to enter. Use the
English - 62 -
• HDMI inputs to connect other devices with HDMI
sockets
- USB input - OSD menu system - Stereo sound system - Teletext - Headphone connection
- Automatic programming system - Manual tuning - Automatic power down after up to
Classifying
- Sleep timer - Child lock - Automatic sound mute when no transmission. - NTSC playback - AVL (Automatic Volume Limiting)
- PLL (Frequency Search) - PC input
- Game Mode (Optional) - Picture off function
- Programme recording - Programme timeshiftin
- Ethernet (LAN) for Internet
- 802.11 a/b/g/n built in WIFI Support - Audio Video Sharing - HbbTV
High Dynamic Range (HDR) / Hybrid Log-Gamma (HLG): Using this feature the TV can reproduce greater dynamic range of luminosity by capturing and then combining several different exposures. HDR/HLG promises better picture quality thanks to brighter, more realistic highlights, more realistic color and other improvements. It delivers the look that filmmakers intended to achieve, showing the hidden areas of dark shadows and sunlight with full clarity, colour and detail. HDR/HLG contents are supported via native and portal applications, HDMI, USB inputs and over DVB-S broadcasts. Set the related HDMI source input as Enhanced from the Sources option in the Settings menu in order to watch HDR/HLG images, if the HDR/HLG content is received through an HDMI input. The source device should also be at least HDMI 2.0a compatible in this case.
Accessories Included
- Remote Control - Instruction Book
WARNING
Apparatus connected to the protective earthing of the building installation through the MAINS connection or through other apparatus with a connection to protective earthing – and to a television distribution system using coaxial cable, may in some circumstances create a fire hazard. Connection to a television distribution system has therefore to be provided through a device providing electrical isolation below a certain frequency range (galvanic isolator, see EN 60728-11)
Environmental Information
This television is designed to be environment friendly. To reduce energy consumption, you can follow these
steps:
If you set the Energy Saving to Minimum, Medium, Maximum or Auto the TV will reduce the energy consumption accordingly. If you like to set the Backlight to a fixed value set as Custom and adjust
the Backlight (located under the Energy Saving setting) manually using Left or Right buttons on the remote. Set as Off to turn this setting off. Note: Available Energy Saving options may differ depending on the selected Mode in the System>Picture menu.
The Energy Saving settings can be found in the System>Picture menu. Note that some picture settings will be unavailable to be changed.
If pressed Right button while Auto option is selected or
Left button while Custom option is selected, "Screen will be off in 15 seconds," message will be displayed.
Will be off in TO secreted message will be displayed on the screen. Select Proceed and press OK to turn the screen off immediately. If you don't press any button, the screen will be off in 15 seconds. Press any button on the remote or on the TV to turn the screen on again.
Note: Screen Off option is not available if the Mode is set to Game. When the TV is not in use, please switch off or disconnect the TV from the mains plug. This will also
reduce energy consumption.
Features
• TV supports Ultra HD (Ultra High Definition - also known as 4K) which provides resolution of 3840 x 2160 (4K:2K). It equals 4 times the resolution of Full HD TV by doubling the pixel count of the Full HD TV both horizontally and vertically. Ultra HD contents are supported from HDMI, USB inputs and over DVB-T2 and DVB-S2 broadcasts.
- Remote controlled colour TV - Fully integrated digital terrest (DVB-T-T2/C/S-S2)
English -61-
| 1. | Source: Shows all available broadcast and content sources |
| 2. | Netflix: Launches the Netflix application, if this feature is supported by your TV |
| 3. | YouTube: Launches the YouTube application |
| 4. | Play: Starts to play selected media |
| 5. | Record: Records programmes |
| 6. | Rapid reverse: Moves frames backwards in media such as movies |
| 7. | Language: Switches between sound modes (analogue TV), displays and changes audio/subtitle language (digital TV, where available) |
| 8. | Red button |
| 9. | Green button |
| 10. | Numeric buttons: Switches the channel, enters a number or a letter in the text box on the screen |
| 11. | TV:Switches to TV Source |
| 12. | Menu: Displays TV menu |
| 13. | Internet: Opens the portal page, where you can reach many web based applications |
| 14. | Volume +/- |
| 15. | Back/Return: Returns to previous screen, opens index page (in TXT mode) |
| 16. | Favourites: Displays user specified favourite channels |
| 17. | Screen: Changes the aspect ratio of the screen |
| 18. | My button 1 (*) |
| 19. | My button 2 (*) |
| 20. | Text: Displays teletext (where available), press again to superimpose the teletext over a normal broadcast picture (mix) |
| 21. | EPG (Electronic programme guide): Displays the electronic programme guide |
| 22. | Mute: Completely turns off the volume of the TV |
| 23. | Info: Displays information about on-screen content |
| 24. | Exit: Closes and exits from displayed menus or returns to previous screen |
| 25. | OK: Confirms user selections, holds the page (in TXT mode), views channel list (DTV mode) |
| 26. | Programme + / - |
| 27. | Directional buttons: Helps navigate menus, content etc. and displays the subpages in TXT mode when pressed Right or Left |
| 28. | Quick Menu: Displays a list of menus for quick access |
| 29. | Swap: Quickly cycles between previous and current channels or sources |
| 30. | Yellow button |
| 31. | Blue button |
| 32. | Subtitles: Turns subtitles on and off (where available) |
| 33. | Rapid advance: Moves frames forward in media such as movies |
| 34. | Stop: Stops the media being played |
| 35. | Pause: Pauses the media being played, starts timeshift recording |
| 36. | Media browser:Opens the media browsing screen |
| 37. | Standby: Switches On / Off the TV |
English - 64 -
Remote Control
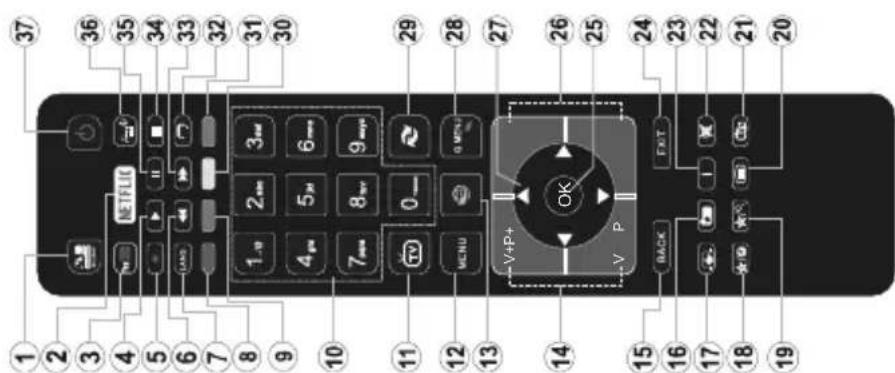
(\*) MY BUTTON 1 & MY BUTTON 2:
These buttons may have default functions depending on
Note that if you perform First Time Installation, MY BUTTON 1&2 will return to their default function.
the model. However you can set a special function to these | 32. Subtitles: Turns subtitles on and off (where available)
buttons by pressing on them for five seconds when on a | 33. Rapid advance: Moves frames forward in media such
desired source of channel. A confirmation message will be displayed on the screen. Now the selected MV BUTTON is as movies
- Stop: Stops the media being played
- Pause: Pauses the media being played, starts timeshift
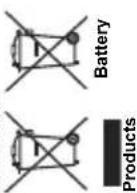
You should look for appropriate recycling facilities and systems for the disposal of these products.
Notice: The sign Pb below the symbol for batteries indicates that this battery contains lead.
Wireless LAN Transmitter Specifications
| Frequency Ranges | Max Output Power |
| 2400 - 2483,5 MHz (CH1-CH13) < 100 mW | |
| 5150 - 5250 MHz (CH36 - CH48) < 200 mW | |
| 5250 - 5350 MHz (CH52 - CH64) < 200 mW | |
| 5470 - 5725 MHz (CH100 - CH140) < 200 mW |
Country Restrictions
This device is intended for home and office use in all EU countries (and other countries following the relevant EU directive) without any limitation except for the countries mentioned below.
| Country Restriction | |
| Bulgaria | General authorization required for outdoor use and public service |
| France In-door | use only for 2454-2483.5 MHz |
| Italy | If used outside of own premises, general authorization is required |
| Greece | In-door use only for 5470 MHz to 5725 MHz band |
| Luxembourg | General authorization required for network and service supply(not for spectrum) |
| Norway | Radio transmission is prohibited for the geographical area within a radius of 20 km from the centre of Ny-Ålesund |
| Russian Federation | In-door use only |
The requirements for any country may change at any time. It's recommended that user checks with local authorities for the current status of their national regulations for both 2.4 GHz and 5 GHz wireless LAN's.
License Notification
The terms HDMI and HDMI High-Definition Multimedia Interface, and the HDMI Logo are trademarks or registered trademarks of HDMI Licensing Administrator, Inc. in the United States and other countries.

Manufactured under license from Dolby Laboratories. Dolby, Dolby Audio and the double-D symbol are trademarks of Dolby Laboratories. For DTS patents, see http://patents.dts.com. Manufactured under license from DTS Licensing Limited. DTS, the Symbol, & DTS and the Symbol together are registered trademarks, and DTS TruSurround is a trademark of DTS, Inc.® DTS, Inc. All Rights Reserved.


This product contains technology subject to certain intellectual property rights of Microsoft. Use or distribution of this technology outside of this product is prohibited without the appropriate license(s) from Microsoft.
Content owners use Microsoft PlayReady™ content access technology to protect their intellectual property, including copyrighted content. This device uses PlayReady technology to access PlayReady-protected content and/or WMDRM-protected content. If the device fails to properly enforce restrictions on content usage, content owners may require Microsoft to revoke the device's ability to consume PlayReady-protected content. Revocation should not affect unprotected content or content protected by other content access technologies. Content owners may require you to upgrade PlayReady to access their content. If you decline an upgrade, you will not be able to access content that requires the upgrade.
Information for Users on Disposal of Old Equipment and Batteries
[European Union only]
Equipment bearing these symbols should not be disposed as general household waste.
Direct, Single Satellite Cable or DiSEqC switch by using "◀" or "▶" buttons.
Direct: If you have a single receiver and a direct satellite dish, select this antenna type. Press OK to continue. Select an available satellite on the next screen and press OK to scan for services.
Single Satellite Cable: If you have multiple receivers and a single satellite cable system, select this antenna type. Press OK to continue. Configure settings by following instructions on the next screen. Press OK to scan for services.
DiSEqC switch: If you have multiple satellite dishes and a DiSEqC switch, select this antenna type. Then set the DiSEqC version and press OK to continue. You can set up to four satellites (if available) for version v1.0 and sixteen satellites for version v1.1 on the next screen. Press OK button to scan the first satellite in the list.
Analogue: If Analogue broadcast search option is turned on, the TV will search for analogue broadcasts after other initial settings are completed. Additionally you can set a broadcast type as your favourite one. Priority will be given to the selected broadcast type during the search process and the channels of it will be listed on the top of the Channel List. When finished, press OK to continue.
You can activate Store Mode option at this point. This option will configure your TV's settings for store environment and depending on the TV model being used, the supported features of it may be displayed on the top of the screen as an info banner. This option is intended only for store use. It is recommended to select Home Mode for home use. This option will be available in System>Settings>More menu and can be turned off/on later.
Depending on the model of your TV and the country selection Privacy Settings menu may appear at this point. Using this menu you can set your privacy privileges. Highlight a feature and use Left and Right directional buttons to enable or disable. Read the related explanations displayed on the screen for each highlighted feature before making any changes. You can use Programme +/- buttons to scroll up and down to read the entire text. You will be able to change your preferences at any time later from the Settings>Privacy Settings menu. If the Internet Connection option is disabled Network/Internet Settings screen will be skipped and not displayed. If you have any questions, complaints or comments
regarding this privacy policy of its enforcement, please contact by email at smarttvsecurity@vosshub.com. Press OK button on the remote control to continue and the Network/Internet Settings menu will be displayed, if you confirm the previously displayed message asking whether you want to do the network settings. Please refer to Connectivity section to
English - 66 -
Connections
| To Switch the TV OnConnect the power cord to a power source such as a wall socket (220-240V AC, 50 Hz).To switch on the TV from standby mode either:Press the Standby button, Programme +/- or a numeric button on the remote control.Press the middle of the side function switch on the TV in.To Switch the TV OffPress the Standby button on the remote control or press the middle of the side function switch on the TV in and hold it down for a few seconds, the TV will switch into standby mode.To power down the TV completely, unplug the power cord from the mains socket.Note: When the TV is switched into standby mode, the standby LED can blink to indicate that features such as Standby Search, Over Air Download or Timer is active. The LED can also blink when you switch on the TV from standby mode.First Time InstallationWhen turned on for the first time, the language selection screen is displayed. Select the desired language and press OK.On the next screen, set your preferences using the directional buttons.Note: Depending on the Country selection you may be asked to set and confirm a PIN at this point. The selected PIN cannot be 0000. You have to enter it if you are asked to enter a PIN for any menu operation later.About Selecting Broadcast TypeDigital Aerial: If Digital Aerial broadcast search option is turned on, the TV will search for digital terrestrial broadcasts after other initial settings are completed.Digital Cable: If Digital Cable broadcast search option is turned on, the TV will search for digital cable broadcasts after other initial settings are completed. According to your other preferences a confirmation message may be displayed before starting to search. Select YES and press OK to proceed. To cancel operation, select NO and press OK. You can select Network or set values such as Frequency, Network ID and Search Step. When finished, press OK button.Note: Searching duration will change depending on the selected Search Step.Satellite: If Satellite broadcast search option is turned on, the TV will search for digital satellite broadcasts after other initial settings are completed. Before satellite search is performed some settings should be made. Antenna Type menu will be displayed first. You can select Antenna Type as |
| Connector Type Cables Device | |||
| VGA Connection (back) | |||
| AUDIO IN | PC/YPbPr Audio Connection (back) | YPbPr/PC Audio Cable | |
| HDMI Connection (side&back) | |||
| SPDIF | SPDIF (Optical Out) Connection (back) | ||
| BACK AV | Back AV (Audio/Video) Connection (back) | Audio Video Cable | |
| HEADPHONE | Headphone Connection (side) | ||
| YPBPR | YPbPr Video Connection (back) | PC to YPbPr Connection Cable | |
If you want to connect a device to the TV, make sure that both the TV and the device are turned off before making any connection. After the connection is done, you can turn on the units and use them.

| Disk to one of the USB inputs located on the side of the TV. Pressing the Menu button while in the Media Browser mode will access the Picture, Sound and Settings menu options. Pressing the Menu button again will exit from this screen. You can set your Media Browser preferences by using the Settings menu. | |
| Loop/Shuffle Mode Operation | |
| Start playback with the Play button and activate | All files in the list will be continuously played in original order |
| Start playback with the OK button and activate | The same file will be played continuously (repeat) |
| Start playback with the Play button and activate | All files in the list will be played once in random order |
| Start playback with the Play button and activate | All files in the list will be continuously played in the same random order. |
| configure a wired or a wireless connection. If you want your TV to consume less power in standby mode, you can disable the Wake On option by setting it as Off. After the settings are completed press OK button to continue. To skip to the next step without doing anything select No and press the OK button when the message is displayed asking whether you want to do the network settings.After the initial settings are completed TV will start to search for available broadcasts of the selected broadcast types.After all the available stations are stored, scan results will be displayed. Press OK to continue. The Edit Channel List menu will be displayed next. You can edit the channel list according to your preferences or press the Menu button to quit and watch TV.While the search continues a message may appear, asking whether you want to sort channels according to the LCN(*) . Select Yes and press OK to confirm. (*) LCN is the Logical Channel Number system that organizes available broadcasts in accordance with a recognizable channel number sequence (if available).Note: Do not turn off the TV while initializing first time installation. Note that, some options may not be available depending on the country selection. |
| Media Playback via USB InputYou can connect 2.5" and 3.5" inch (hdd with external power supply) external hard disk drives or USB memory stick to your TV by using the USB inputs of the TV.IMPORTANT! Back up the files on your storage devices before connecting them to the TV. Manufacturer will not be responsible for any file damage or data loss. Certain types of USB devices (e.g. MP3 Players) or USB hard disk drives/memory sticks may not be compatible with this TV. The TV supports FAT32 and NTFS disk formatting but recording will not be available with NTFS formatted disks.While formatting USB hard drives which have more than 1TB (Tera Byte) storage space you may experience some problems in the formatting process. Wait a little while before each plugging and unplugging as the player may still be reading files. Failure to do so may cause physical damage to the USB player and the USB device itself. Do not pull out your drive while playing a file.You can use USB hubs with your TV's USB inputs. External power supplied USB hubs are recommended in such a case.It is recommended to use the TV's USB input(s) directly, if you are going to connect a USB hard disk.Note: When viewing image files the Media Browser menu can only display 1000 image files stored on the connected USB device. |
TV Menu Contents
| System - Picture Menu Contents | ||
| Mode | You can change the picture mode to suit your preference or requirements. Picture mode can be set to one of these options: Cinema, Game(optional), Sports, Dynamic and Natural. | |
| Contrast | Adjusts the light and dark values on the screen. | |
| Brightness | Adjusts the brightness values on the screen. | |
| Sharpness | Sets the sharpness value for the objects displayed on the screen. | |
| Colour | Sets the colour value, adjusting the colours. | |
| Energy Saving | For setting the Energy Saving to Custom, Minimum, Medium, Maximum, Auto, Screen Off or Off.Note: Available options may differ depending on the selected Mode. | |
| Backlight | This setting controls the backlight level. The backlight function will be inactive if the Energy Saving is set to an option other then Custom. | |
| Advanced Settings | ||
| Dynamic Contrast | You can change the dynamic contrast ratio to desired value. | |
| Noise Reduction | If the signal is weak and the picture is noisy, use the Noise Reduction setting to reduce the amount of noise. | |
| Colour Temp | Sets the desired colour temperature value. Cool, Normal, Warm and Custom options are available. | |
| White Point | If the Colour Temp option is set as Custom, this setting will be available. Increase the 'warmth' or 'coolness' of the picture by pressing Left or Right buttons. | |
| Picture Zoom | Sets the desired image size format. | |
| Film Mode | Films are recorded at a different number of frames per second to normal television programmes. Turn this feature on when you are watching films to see the fast motion scenes clearly. | |
| Skin Tone | Skin tone can be changed between -5 and 5. | |
| Colour Shift | Adjust the desired colour tone. | |
| HDMI Full Range | While watching from a HDMI source, this feature will be visible. You can use this feature to enhance blackness in the picture. | |
| PC Position | Appears only when the input source is set to VGA/PC. | |
| Autoposition | Automatically optimizes the display. Press OK to optimize. | |
| H Position | This item shifts the image horizontally to the right hand side or left hand side of the screen. | |
| V Position | This item shifts the image vertically towards the top or bottom of the screen. | |
| Dot Clock | Dot Clock adjustments correct the interference that appear as vertical banding in dot intensive presentations like spreadsheets or paragraphs or text in smaller fonts. | |
| Phase | Depending on the input source(computer etc.) you may see a hazy or noisy picture on the screen. You can use phase to get a clearer picture by trial and error. | |
| Reset | Resets the picture settings to factory default settings (except Game mode). | |
| While in VGA (PC) mode, some items in Picture menu will be unavailable. Instead, VGA mode settings will be added to the Picture Settings while in PC mode. | ||
| System - Sound Menu Contents | ||
| Volume Adjusts the volume level. | ||
| Equalizer | Selects the equalizer mode. Custom settings can be made only when in User mode. | |
| Balance Adjusts whether the sound comes from the left or right speaker. | ||
| Headphone | Sets headphone volume.Please ensure before using headphones that the headphone volume is set to a low level, to prevent damage to your hearing. | |
| Sound Mode You can select a sound mode (If the viewed channel supports). | ||
When ARC is active, TV does not mute its other audio outputs automatically. So you need to decrease TV
volume to zero manually, if you want to hear audio from connected audio device only (same as other
optical or co-axial digital audio outputs). If you want to change connected device's volume level, you
should select that device from the source list. In that case volume control keys are directed to connected
audio device.
Note: ARC is supported only via the HDMI2 input.
System Audio Control
Allows an Audio Amplifier/Receiver to be used with the TV. The volume can be controlled using the
remote control of the TV. To activate this feature set
the Speakers option in the System>Settings>More
menu as Amplifier. The TV speakers will be muted and the sound of the watched source will be provided from the connected sound system.
Note: The audio device should support System Audio Control
feature and CEC option should be set as Enabled.
E-Manual (if available)
You can find instructions for your TV's features in
the E-Manual. To use E-Manual, press to the Info button while main
menu is displayed on the screen or press Quick Menu
button, select Information Booklet and press OK.
By using the directional buttons select a desired category. Every category includes different topics
category: Every category includes different topics. Select a topic and press OK to read instructions.
To close the E-Manual screen press the Exit or Menu
button.
Note: The contents of the E-Manual may vary according to
the model.
| Auto TV OFF | Sets the desired time for the TV to automatically go into standby mode when not being operated. |
| Biss Key | Biss is a satellite signal scrambling system that is used for some broadcasts. If you need to enter Biss key on a broadcast, you can use this setting. Highlight Biss Key and press OK to enter keys on the desired broadcast. |
| Store Mode | Select this mode for store display purposes. Whilst Store Mode is enabled, some items in the TV menu may not be available. |
| Audio Video Sharing | Audio Video Sharing feature allows you to share files stored on your smartphone or tablet pc. If you have a compatible smartphone or tablet pc and the appropriate software is installed, you can share/play photos on your TV. See instructions of your sharing software for more information. Audio Video Sharing mode will not be available with internet portal feature. |
| Power Up Mode | This setting configures the power up mode preference. Last State and Standby options are available. |
| Virtual Remote | Enable or disable the virtual remote feature. |
| CEC | With this setting you can enable and disable CEC functionality completely. Press Left or Right button to enable or disable the feature. |
| CEC Auto Power On | This function allows the connected HDMI-CEC compatible device to turn on the TV and switch to its input source automatically. Press Left or Right button to enable or disable the feature. |
| Speakers | To hear the TV audio from the connected compatible audio device set as Amplifier. You can use the remote control of the TV to control the volume of the audio device. |
| Smart Remote | Press OK to open the Smart Remote menu screen. Using this screen you can discover and connect the remote controller devices to your TV wirelessly. |
| Show All Cookies (*) | Displays all saved cookies. |
| Delete All Cookies (*) | Deletes all saved cookies. |
| OSS Displays Open Source Software license information. | |
| (*) These features may not be available depending on the model of your TV and the selected country in the First Time Installation. | |
| Installation Menu Contents | |
| Automatic channel scan (Retune) | Displays automatic tuning options. Digital Aerial: Searches and stores aerial DVB stations. Digital Cable: Searches and stores cable DVB stations. Analogue: Searches and stores analogue stations. Satellite: Searches and stores satellite stations. |
| Manual channel scan | This feature can be used for direct broadcast entry. |
| Network channel scan | Searches for the linked channels in the broadcast system. Digital Aerial: Searches for aerial network channels. Digital Cable: Searches for cable network channels. |
| Analogue fine tune | You can use this setting for fine tuning analogue channels. This feature is not available if no analogue channels are stored. |
| Satellite Settings | Displays satellite settings. Satellite list: Displays available satellites. You can Add, Delete satellites or Edit satellite settings on the list. Antenna installation: You can change satellite antenna settings and/or start a satellite scan. |
| Installation Settings | Displays installation settings menu. Standby Search (Optional): Your TV will search for new or missing channels while in standby. Any new found broadcasts will be shown. |
| Clear Service List | Use this setting to clear channels stored. This setting is visible only when the Country option is set to Denmark, Sweden, Norway or Finland. |
| Select Active Network | This setting allows you to select only the broadcasts within the selected network to be listed in the channel list. This feature is available only for the country option of Norway. |
| First time installation | Deletes all stored channels and settings, resets TV to factory settings. |
| Audio Link | Press OK to open the Audio Link menu screen. Using this screen you can discover and connect the sound devices to your TV wirelessly. | |
| AVL (Automatic Volume Limiting) | Sets the sound to obtain fixed output level between programmes. | |
| Headphone/Lineout | When you connect an external amplifier to your TV using the headphone jack, you can select this option as Lineout. If you have connected headphones to the TV, set this option as Headphone. Please ensure before using headphones that this menu item is set to Headphone. If it is set to Lineout, the output from the headphone socket will be set to maximum which could damage your hearing. | |
| Dynamic Bass Enables or disables the Dynamic Bass. | ||
| DTS TruSurround HD | Enables or disables the DTS TruSurround HD. | |
| Digital Out Sets digital out audio type. | ||
| System - Settings Menu Contents | ||
| Conditional Access Controls conditional access modules when available. | ||
| Language You may set a different language depending on the broadcaster and the country. | ||
| Privacy Settings (*) | Manage your privacy privileges for smart TV related applications. Press OK to enter the menu and set according to your preferences. | |
| Parental | Enter correct password to change parental settings. You can easily adjust Menu Lock, Maturity Lock, Child Lock or Guidance in this menu. You can also set a new PIN or change the Default CICAM PIN using the related options.Note: Some menu options may not be available depending on the country selection in the First Time Installation. Default PIN can be set to 0000 or 1234. If you have defined the PIN (is requested depending on the country selection) during the First Time Installation use the PIN that you have defined. | |
| Timers | Sets sleep timer to turn off the TV after a certain time. Sets timers for selected programmes. | |
| Date/Time Sets date and time. | ||
| Sources | Enables or disables selected source options. There are Regular, Enhanced and Disabled options available for HDMI sources. Regular and Enhanced options are affecting the colour settings of the selected HDMI source. To be able to watch 4K or HDR/HLG images from an HDMI source related source setting should be set as Enhanced if the connected device is compatible with HDMI 2.0 and subsequent versions. Set as Regular if the connected device is HDMI 1.4 compatible. Set accordingly or disable the related HDMI source by setting as Disabled. | |
| Network/Internet Settings | Displays network/internet settings. | |
| Accessibility Displays accessibility options of the TV. | ||
| Hard of Hearing Enables any special feature sent from the broadcaster. | ||
| Audio Description | A narration track will be played for the blind or visually impaired audience. Press OK to see all available Audio Description menu options. This feature is available only if the broadcaster supports it.Note: Audio description sound feature is not available in recording or time shifting mode. | |
| Netflix | If this feature is supported by your TV, you can view your ESN(*) number and deactivate Netflix. (*) ESN number is an unique ID number for Netflix, created especially to identify your TV. | |
| More Displays other setting options of the TV. | ||
| Menu Timeout Changes timeout duration for menu screens. | ||
| Standby LED | If set as Off the standby LED will not light up when the TV is in standby mode. | |
| HBBTV (*) | You can enable or disable this feature by setting it as On or Off. | |
| Software Upgrade | Ensures that your TV has the latest firmware. Press OK to see the menu options. | |
| Application Version Displays current software version. | ||
| Subtitle Mode | This option is used to select which subtitle mode will be on the screen (DVB subtitle / Teletext subtitle) if both is available. Default value is DVB subtitle. This feature is available only for the country option of Norway. | |
| Rec./Stop (Record button): The TV will start to record the selected programme. You can press again to stop the recording.Now/Next ScheduleOptions (OK button): Displays event options.Event Details (Info button): Displays detailed information about selected programmes.Filter (Blue button): Views filtering options.Rec./Stop (Record button): The TV will start to record the selected programme. You can press again to stop the recording.Programme OptionsUse the directional buttons to highlight a programme and press OK button to display Event Options menu. The following options are available.Select Channel: Using this option, you can switch to the selected channel.Record / Delete Rec. Timer: Select the Record option and press the OK button. If the programme is going to be broadcasted at a future time, it will be added to Timers list to be recorded. If the selected programme is being broadcasted at the moment, recording will start immediately.To cancel an already set recording, highlight that programme and press the OK button and select the option Delete Rec. Timer. The recording will be cancelled.Set Timer on Event / Delete Timer on Event: After you have selected a programme in the EPG menu, press the OK button. Select Set Timer on Event option and press the OK button. You can set a timer for future programmes. To cancel an already set timer, highlight that programme and press the OK button.Then select Delete Timer on Event option. The timer will be cancelled.IMPORTANT: Connect a USB disk to your TV while the TV is switched off. You should then switch on the TV to enable the recording feature.Notes: You cannot switch to any other channel while there is an active recording or timer on the current channel.It is not possible to set timer or record timer for two or more individual events at the same time interval.Teletext ServicesPress the Text button to enter. Press again to activate mix mode, which allows you to see the teletext page and the TV broadcast at the same time. Press once more to exit. If available, sections in the teletext pages will become colour-coded and can be selected by pressing the coloured buttons. Follow the instructions displayed on the screen.Digital TeletextPress the Text button to view digital teletext information. Operate it with the coloured buttons, cursor buttons and the OK button. The operation method may differ depending on the contents of the digital teletext. Follow the instructions displayed on the digital teletext screen. When the Text button is pressed again, the TV returns to television broadcast. | Software UpgradeYour TV is capable of finding and updating the firmware automatically via the broadcast signal or via Internet.Software upgrade search via user interfaceOn the main menu select System>Settings and then More. Navigate to Software upgrade and press the OK button. In Upgrade options menu select Scan for upgrade and press OK button to check for a new software upgrade.If a new upgrade is found, it starts to download the upgrade. After the download is completed confirm the question asking about rebooting the TV by pressing the OK to continue with the reboot operation.3 AM search and upgrade modeYour TV will search for new upgrades at 3:00 o'clock if Automatic scanning option in the Upgrade options menu is set to Enabled and if the TV is connected to an aerial signal or to Internet. If a new software is found and downloaded successfully, it will be installed at the next power on.Note: Do not unplug the power cord while led is blinking during the reboot process. If the TV fails to come on after the upgrade, unplug, wait for two minutes then plug it back in.Troubleshooting & TipsTv will not turn onMake sure the power cord is plugged in securely to wall outlet. Check if batteries are exhausted. Press the Power button on the TV.Poor pictureCheck if you have selected the correct TV system.Low signal level can cause picture distortion. Please check antenna access.Check if you have entered the correct channel frequency if you have done manual tuning.The picture quality may degrade when two devices are connected to the TV at the same time. In such a case, disconnect one of the devices.No pictureThis means your TV is not receiving any transmission. Make sure the correct source has been selected.Is the antenna connected properly?Is the antenna cable damaged?Are suitable plugs used to connect the antenna?If you are in doubt, consult your dealer.No soundCheck if the TV is muted. Press the Mute button or increase the volume to check.Sound may be coming from only one speaker. Check the balance settings from Sound menu.Remote control - no operationThe batteries may be exhausted. Replace the batteries. | |
| General TV OperationUsing the Channel ListThe TV sorts all stored stations in the Channel List. You can edit this channel list, set favourites or set active stations to be listed by using the Channel List options. Press the OK button to open the Channel List. You can filter the listed channels by pressing the Blue button or open the Edit Channel List menu by pressing the Green button in order to make advanced changes in the current list.Managing the Favourite ListsYou can create four different lists of your favourite channels. Enter the Channel List in the main menu or press the Green button while the Channel List is displayed on the screen in order to open the Edit Channel List menu. Select the desired channel on the list. You can make multiple choices by pressing the Yellow button. Then press the OK button to open the Channel Edit Options menu and select Add/Remove Favourites option. Press the OK button again. Set the desired list option to On. The selected channel/s will be added to the list. In order to remove a channel or channels from a favourite list follow the same steps and set the desired list option to Off.You can use the Filter function in the Edit Channel List menu to filter the channels in the Channel list permanently according to your preferences. Using this Filter option, you can set one of your four favourite lists to be displayed every time the Channel list is opened. The filtering function in the Channel list menu will only filter the currently displayed Channel list in order to find a channel and tune in to it. These changes will not remain the next time the Channel list is opened if you don't save them. To save the changes on the list press the Red button after filtering while the Channel list is displayed on the screen.Configuring Parental SettingsThe Parental Settings menu options can be used to prohibit users from viewing of certain programmes, channels and using of menus. These settings are located in the System>Settings>Parental menu.To display parental lock menu options, a PIN number should be entered. After coding the correct PIN number, Parental Settings menu will be displayed.Menu Lock: This setting enables or disables access to all menus or installation menus of the TV.Maturity Lock: If this option is set, TV gets the maturity information from the broadcast and if this maturity level is disabled, disables access to the broadcast.Note: If the country option in the First Time Installation is set as France, Italy or Austria, Maturity Lock's value will be set to 18 as default.Child Lock: If this option is set to ON, the TV can only be controlled by the remote control. In this case the control buttons on the TV will not work. | Internet Lock: If this option is set to ON, the open browser application in the portal will be disabled. Set to OFF to release the application again.Set PIN: Defines a new PIN number.Default CICAM PIN: This option will appear as greyed out if no CI module is inserted into the CI slot of the TV. You can change the default PIN of the CI CAM using this option.Note: Default PIN can be set to 0000 or 1234. If you have defined the PIN(is requested depending on the country selection) during the First Time Installation use the PIN that you have defined.Some options may not be available depending on the model and/or on the country selection in the First Time Installation.Electronic Programme Guide (EPG)Some channels send information about their broadcast schedules. Press the Epg button to view the Programme Guide menu.There are 3 different types of schedule layouts available, Timeline Schedule, List Schedule and Now/Next Schedule. To switch between them follow the instructions on the bottom of the screen.Timeline ScheduleZoom (Yellow button): Press the Yellow button to see events in a wider time interval.Filter (Blue button): Views filtering options.Highlight Genre (Subtitles button): Displays Highlight Genre menu. Using this feature, you can search the programme guide database in accordance with the genre. Info available in the programme guide will be searched and results matching your criteria will be highlighted.Options (OK button): Displays event options.Event Details (Info button): Displays detailed information about selected programmes.Next/Prev Day (Programme +/- buttons): Displays the programmes of previous or next day.Search (Text button): Displays Guide Search menu.Now (Source button): Displays current event of the highlighted channel.Rec./Stop (Record button): The TV will start to record the selected programme. You can press again to stop the recording.List Schedule(*)(*) In this layout option, only the events of the highlighted channel will be listed.Prev. Time Slice (Red button): Displays the programmes of previous time slice.Next/Prev Day (Programme +/- buttons): Displays the programmes of previous or next day.Event Details (Info button): Displays detailed information about selected programmes.Filter (Text button): Views filtering options.Next Time Slice (Green button): Displays the programmes of next time slice.Options (OK button): Displays event options. |
Supported Video File Formats for USB Mode
| Video Codec | Resolution | Bit Rate | Container |
| MPEG1/2 | 1080Px2@30fps, 1080P@60fps | 40Mbps | MPEG program stream (.DAT, .VOB, .MPG, .MPEG), MPEG transport stream (.ts, .trp, .tp), MP4 (.mp4, .mov), 3GPP (.3gpp, .3gp), AVI (.avi), MKV (.mkv), ASF (.asf) |
| MPEG4 | MPEG program stream (.MPG, .MPEG), MP4 (.mp4, .mov), 3GPP (.3gpp, .3gp), AVI (.avi), MKV (.mkv), ASF (.asf) | ||
| XviD | MP4 (.mp4, .mov), AVI (.avi), MKV (.mkv), ASF (.asf) | ||
| Sorenson H.263 | FLV (.flv), AVI (.avi), SWF(.swf) | ||
| H.263 | MP4 (.mp4, .mov), 3GPP (.3gpp, .3gp), AVI (.avi), MKV (.mkv) | ||
| H.264 | 3840x2160@30fps, 1080P@60fps | 135Mbps | FLV (.flv), MP4 (.mp4, .mov), 3GPP (.3gpp, .3gp), MPEG transport stream (.ts, .trp, .tp), ASF (.asf), AVI (.avi), MKV (.mkv) |
| Motion JPEG 720P | @30fps 10Mbps | AVI (.avi), 3GPP (.3gpp, .3gp), MP4 (.mp4, .mov), MKV (.mkv), ASF (.asf) | |
| VP8 | 1080P@30fps 20Mbps | MKV (.mkv), WebM (.webm) | |
| HEVC/H.265 | 4K2K@60fps | 100Mbps | MP4 (.mp4, .mov), MKV (.mkv), MPEG transport stream (.ts, .trp, .tp) |
| 1080P@60fps 50Mbps | MP4 (.mp4, .mov), MKV (.mkv), MPEG transport stream (.ts, .trp, .tp), 3GPP (.3gpp, .3gp) | ||
| VP9 | 4K2K@30fps | 100Mbps | MKV (.mkv), WebM (.webm) |
| Supported Picture File Formats for USB Mode | |||
| Image | Photo | Resolution (width x height) | Remark |
| JPEG | Base-line | 15360x8640 | The limit for max resolution depends on DRAM size |
| Progressive | 1024x768 | ||
| PNG | non-interlace | 9600x6400 | |
| interlace | 1200x800 | ||
| BMP | 9600x6400 | ||
(X: Not Available, O: Available)
In some cases a signal on the TV may not be displayed
properly. The problem may be an inconsistency with
standards from the source equipment (DVD, Set-top
box, etc.). If you do experience such a problem please
contact your dealer and also the manufacturer of the
source equipment.
AV and HDMI Signal Compatibility
| Source Supported Signals Available | |||
| Side AV | PAL O | ||
| SECAM O | |||
| NTSC4.43 O | |||
| NTSC3.58 O | |||
| YPbPr | 480i, 480p | 60Hz | O |
| 576i, 576p | 50Hz | O | |
| 720p | 50Hz,60Hz | O | |
| 1080i | 50Hz,60Hz | O | |
| HDMI | 480i | 60Hz | O |
| 480p | 60Hz | O | |
| 576i, 576p | 50Hz | O | |
| 720p | 50Hz,60Hz | O | |
| 1080i | 50Hz,60Hz | O | |
| 1080p | 24Hz,25Hz,30Hz,50Hz,60Hz | O | |
| 3840x2160p | 24Hz,25Hz,30Hz,50Hz,60Hz | O | |
| 4096x2160p | 24Hz,25Hz,30Hz,50Hz,60Hz | O | |
Input sources - can not be selected
- If you cannot select an input source, it is possible that no device is connected. If not; - Check the AV cables and connections if you have tried to connect a device. - Check the AV cables and connections if you are trying to switch to the input source dedicated to the connected device.
Recording unavailable
To record a programme, you should first connect a USB disk to your TV while the TV is switched off. You should then switch on the TV to enable recording feature. If you cannot record, try switching off the TV and then re-inserting the USB device.
USB is too slow
If a "USB disk writing speed too slow to record" message is displayed on the screen while starting a recording, try restarting the recording. If you still get the same error, it is possible that your USB disk does not meet the speed requirements. Try connecting another USB disk.
PC Input Typical Display Modes
The following table is an illustration of some of the typical video display modes. Your TV may not support all resolutions.
| Index | Resolution Frequency |
| 1 | 640x350 85Hz |
| 2 | 0x480 60Hz |
| 3 | 0x480 72Hz |
| 4 | 0x480 75Hz |
| 5 | 0x600 56Hz |
| 6 | 0x600 60Hz |
| 7 | 0x600 72Hz |
| 8 | 0x600 75Hz |
| 9 | 24x768 60Hz |
| 10 | 24x768 70Hz |
| 11 | 24x768 75Hz |
| 12 | 24x768 85Hz |
| 13 | 52x864 75Hz |
| 14 | 30x768 60Hz |
| 15 | 30x768 75Hz |
| 16 | 30x960 60Hz |
| 17 | 30x960 75Hz |
| 18 | 30x1024 60Hz |
| 19 | 30x1024 75Hz |
| 20 | 50x768 60Hz |
| 21 | 56x768 60Hz |
| 22 | 00x1050 59Hz |
| 23 | 00x1050 60Hz |
| 24 | 00x1050 75Hz |
| 25 | 40x900 60Hz |
| 26 | 40x900 75Hz |
| 27 | 00x1200 60Hz |
| 28 | 30x1050 59Hz |
| 29 | 30x1050 60Hz |
| 30 | 20x1080 60Hz |
Supported Subtitle File Formats for USB Mode
| Internal Subtitles | ||
| Extension Container Subtitle Code | ||
| dat, mpg, mpeg, vob MPG, MPEG | DVD Subtitle | |
| ts, trp, tp | TS | DVB Subtitle |
| mp4 | MP4 | DVD SubtitleUTF-8 Plain Text |
| mkv | MKV | ASSSSAUTF-8 Plain TextVobSubDVD Subtitle |
| avi | AVI (1.0, 2.0),DMF0,1, 2 | XSUBXSUB+ |
| External Subtitles | ||
| Extension | Subtitle Parser | Remark |
| .srt | Subrip | |
| .ssa/.ass | SubStation Alpha | |
| .smi | SAMI | |
| .sub | SubViewer MicroDVD DVDSusbtitleSystem SubIdx (VobSub) | SubViewer 1.0 & 2.0 Only |
| .txt | TMPlayer | |
Supported DVI Resolutions
When connecting devices to your TV's connectors by using DVI converter cable(DVI to HDMI cable - not supplied), you can refer to the following resolution information.
| 56Hz 60Hz 66Hz 70Hz 72Hz 75Hz | ||||||
| 640x480 | ☑ | ☑ | ||||
| 800x600 | ☑ | ☑ | ☑ | |||
| 1024x768 | ☑ | ☑ | ☑ | |||
| 1280x768 | ☑ | ☑ | ||||
| 1280x960 | ☑ | |||||
| 1360x768 | ☑ | |||||
| 1366x768 | ☑ | |||||
| 1280x1024 | ☑ | ☑ | ☑ | |||
| 1400x1050 | ☑ | |||||
| 1600x900 | ☑ | |||||
| ☑ | ||||||
Supported Audio File Formats for USB Mode
| Audio Codec Sample rate Bit Rate Container | |||
| MPEG1/2 Layer1 16KHz ~ 48KHz | 32Kbps ~ 448Kbps | MP3 (.mp3), AVI (.avi), ASF (.asf), Matroska (.mkv, .mka), MPEG transport stream (.ts, .trp, .tp), MPEG program stream (.DAT, .VOB, .MPG, .MPEG), WAV (.wav) | |
| MPEG1/2 Layer2 16KHz ~ 48KHz | 8Kbps ~ 384Kbps | MP3 (.mp3), AVI (.avi), ASF (.asf), Matroska (.mkv, .mka), MPEG transport stream (.ts, .trp, .tp), MPEG program stream (.DAT, .VOB, .MPG, .MPEG), WAV (.wav) | |
| MPEG1/2 Layer3 16KHz ~ 48KHz | 8Kbps ~ 320Kbps | MP3 (.mp3), AVI (.avi), ASF (.asf), Matroska (.mkv, .mka), 3GPP (.3gpp, .3gp), MP4 (.mp4, .mov, m4a), MPEG transport stream (.ts, .trp, .tp), MPEG program stream (.DAT, .VOB, .MPG, .MPEG), FLV (.flv), WAV (.wav), SWF (.swf) | |
| AC3 | 32KHz, 44.1KHz, 48KHz | 32Kbps ~ 640Kbps | AC3 (.ac3), AVI (.avi), Matroska (.mkv, .mka), 3GPP (.3gpp, .3gp), MP4 (.mp4, .mov, m4a), MPEG transport stream (.ts, .trp, .tp), MPEG program stream (.DAT, .VOB, .MPG, .MPEG) |
| EAC3 | 32KHz, 44.1KHz, 48KHz | 32Kbps ~ 6 Mbps | EAC3 (.ec3), 3GPP (.3gpp, .3gp), MP4 (.mp4, .mov, m4a), MPEG transport stream (.ts, .trp, .tp), MPEG program stream (.DAT, .VOB, .MPG, .MPEG) |
| AAC, HEAAC 8KHz ~ 48KHz | AAC (.aac), AVI (.avi), Matroska (.mkv, .mka), 3GPP (.3gpp, .3gp), MP4 (.mp4, .mov, m4a), MPEG transport stream (.ts, .trp, .tp), MPEG program stream (.DAT, .VOB, .MPG, .MPEG), FLV (.flv), RM (.ra) | ||
| WMA 8KHz ~ 48KHz | 128bps ~ 320Kbps | ASF (.wma, .asf), AVI (.avi), Matroska (.mkv, .mka) | |
| WMA 10 Pro M0 48KHz < 192kbps | |||
| WMA 10 Pro M1 48KHz < 384kbps | |||
| WMA 10 Pro M2 96KHz < 768kbps | |||
| G711 A/mu-law 8KHz | 64Kbps ~ 128Kbps | WAV (.wav), AVI (.avi), Matroska (.mkv, .mka), 3GPP (.3gpp, .3gp), MP4 (.mp4, .mov, m4a) | |
| LBR (cook) | 8KHz, 11.025KHz, 22.05KHz, 44.1KHz | 6Kbps ~ 128Kbps | RM (.ra) |
| FLAC 8KHz~96KHz < 1.6Mbps Matroska (.mkv, | mka) | ||
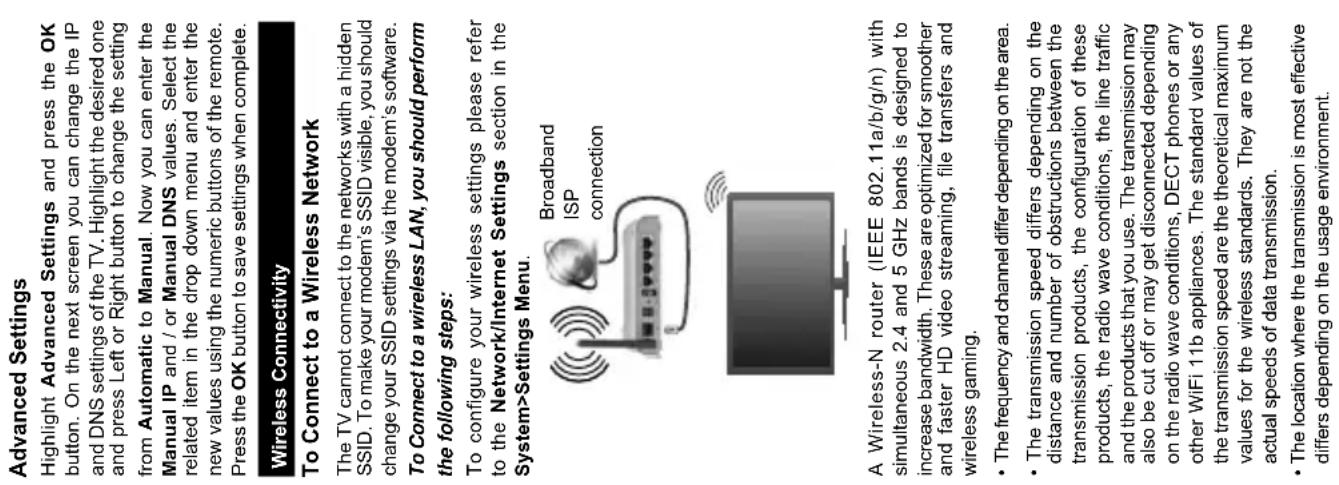
| • The Wireless feature of the TV supports 802.11 a,b,g & n type modems. It is highly recommended that you should use the IEEE 802.11n communication protocol in order to avoid any possible problems while watching videos.• You must change your modem's SSID when there are any other modems around with the same SSID. You can encounter connection problems otherwise. Use a wired connection if you experience problems with a wireless connection.Configuring Wireless Device SettingsOpen the Network/Internet Settings menu and select Network Type as Wireless Device to start connection process.The TV will scan the wireless networks automatically. A list of available networks will be displayed. Please select your desired network from the list.Note: If the modem supports N mode, you should set N mode settings.If the selected network is protected with a password, please enter the correct key by using the virtual keyboard. You can use this keyboard via the directional buttons and the OK button on the remote control.Wait until the IP address is shown on the screen.This means that the connection is now established. To disconnect from a wireless network, highlight Network Type and press Left or Right buttons to set as Disabled.Highlight Internet Speed Test and press the OK button to check your internet connection speed. Highlight Advanced Settings and press the OK button to open the advanced setting menu. Use directional and numeric buttons to set. Press the OK button to save settings when complete.Other InformationThe status of the connection will be displayed as Connected or Not Connected and the current IP address, if a connection is established.Connecting to your mobile device via WiFi• If your mobile device has WiFi feature, you can connect it to your TV via a router, in order to access the content in your device. For this, your mobile device must have an appropriate sharing software.• Connect to your router following the steps stated above in the Wireless Connectivity section.• Afterwards, engage your mobile device with the router and then activate the sharing software on your mobile device. Then, select files that you want to share with your TV.• If the connection is established correctly, you will be able to access the shared files from your mobile device via the Media Browser of your TV. | • Enter the Media Browser menu and the playback device selection OSD will be displayed. Select your mobile device and press the OK button to continue.• If available, you can download a virtual remote controller application from the server of your mobile device application provider.Note: This feature may not be supported on all mobile devices.Wake ONWake-on-LAN (WoL) and Wake-on-Wireless LAN (WoWLAN) are standards that allow a device to be turned on or woken up by a network message. The message is sent to the device by a program executed on a remote device connected to the same local area network, such as a smartphone.Your TV is WoL and WoWLAN compatible. To enable this feature set the Wake On option in the Network/Internet Settings menu as On. It is necessary that both the device, from which the network message will be sent to the TV, and the TV are connected to the same network. Wake On feature is only supported for Android OS devices and can only be used via YouTube and Netflix applications.In order to use this feature the TV and the remote device should be connected at least once while the TV is on. If the TV is powered off, the connection should be reestablished, the next time it is switched on. Otherwise this feature will be unavailable. This does not apply, when the TV is switched into the standby mode.If you want your TV to consume less power in standby mode, you can disable this feature by setting the Wake On option as Off.Wireless DisplayWireless Display is a standard for streaming video and sound content by Wi-Fi Alliance. This feature provides the ability to use your TV as wireless display device.Using with mobile devicesThere are different standards which enable sharing of screens including graphical, video and audio content between your mobile device and TV.Plug the wireless USB dongle to TV first, if the TV doesn't have internal WiFi feature.Then press the Source button on the remote and switch to Wireless Display source.A screen appears stating that the TV is ready for connection.Open the sharing application on your mobile device. These applications are named differently for each brand, please refer to the instruction manual of your mobile device for detailed information. |

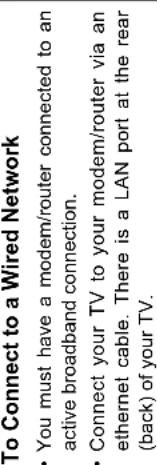
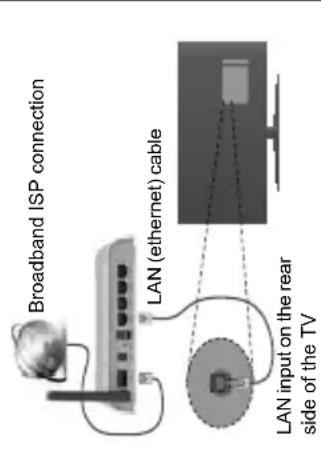
To configure wired settings please refer to the Network/Internet Settings section in the System>Settings Menu. You might be able to connect your TV to your LAN depending on your network's configuration. In such a case, use an ethernet cable to connect your TV directly to the network wall outlet.
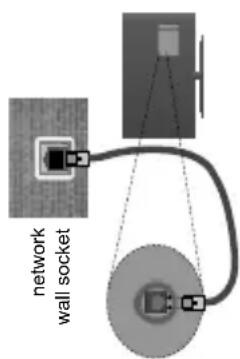
LAN input on the rear side of the TV
Configuring Wired Device Settings
Network Type
The Network Type can be selected as Wired Device, Wireless Device or Disabled, in accordance with the active connection to the TV set. Select this as Wired Device if you are connecting via an ethernet cable. Internet Speed Test Highlight Internet Speed Test and press the OK button. TV will check the internet connection bandwidth and display the result when complete.
| onto the companion device. Please prepare your PC with a proper server programme.2. Connect to a Wired or Wireless NetworkSee the Wired/Wireless Connectivity chapters for detailed configuration information.3. Play Shared Files via Media BrowserSelect Media Browser by using the directional buttons from the main menu and press OK. The media browser will then be displayed.Audio Video SharingSelect the desired media type on the main media browser menu and press OK. If sharing configurations are set properly, Device Selection screen will be displayed after selecting the desired media type. If available networks are found, they will be listed on this screen. Select media server or network that you want to connect to using the Up or Down buttons and press OK. If you want to refresh the device list, press the Green button. You can press Menu to exit.If you select the media type as Videos and choose a device from the selection menu. Then select the folder with video files in it on the next screen and all the available video files will be listed.To play other media types from this screen, you can go back to main Media Browser screen and select the media type as desired and then perform the network selection again. Or press the Blue button to switch to next media type quickly without changing the network.Refer to the Media Browser menu section for further information on file playback.If a problem occurs with the network, please switch your television off at the wall socket and back on again. Trick mode and jump are not supported with the Audio Video Sharing feature.PC/HDD/Media Player or any other devices that are compatible should be used with a wired connection for higher playback quality.Use a LAN connection for quicker file sharing between other devices like computers.Note: There may be some PC's which may not be able to utilize the Audio Video Sharing feature due to administrator and security settings (such as business PC's).Internet PortalHINT: A broadband internet connection is required for high quality viewing. You must set the country option accordingly in the First Time Installation for proper operation of the internet portalPortal feature adds your TV a feature that allows you to connect a server on the Internet and view the content provided by this server over your Internet connection. Portal feature allows you to view the music, video, clip or web content with defined short-cuts. Whether you can view this content without interruption depends | on the connection speed provided by your internet service provider.Press the Internet button on your remote control to open internet portal page. You will see icons of the available applications and services on the portal screen. Use the directional buttons on your remote to select the desired one. You may view the desired content by pressing OK after selecting. Press Back/Return button to return back to the previous screen. Moreover, you can access some features using the short-cut feature defined for the coloured or numeric buttons of your remote.Press the Exit button to quit the Internet portal mode.PIP Window (depending on portal service)Current source content will be displayed in the PIP window, if you switch to portal mode while on any active source.If you switch to portal mode while watching TV channels, current programme will be displayed in the PIP window. You can change channels using Programme +/- buttons.Notes:Possible application dependent problems may be caused by the content service providerPortal service content and the interface may be changed at any time without prior notice.Third party internet services may change, be discontinued or restricted at any time.Internet BrowserTo use the internet browser, enter the portal first. Then launch the Internet application on the portal.(*) The appearance of the internet browser logo may changeIn the initial screen of the browser, the thumbnails of the predefined (if any) links to web sites available will be displayed as Speed Dial options along with the Edit Speed Dial and the Add to Speed Dial options.To navigate the web browser, use the directional buttons on the remote or a connected mouse. To see the browser options bar, move the cursor to the top of the page or press the Back/Return button. History, Tabs and Bookmarks options and the browser bar which contains previous/next buttons, the refresh button, the adress/search bar, the Speed Dial and the Opera buttons are available.To add a desired website to the Speed Dial list for quick access, move the cursor to the top of the page or press the Back/Return button. The browser bar will appear. Highlight the Speed Dial - button and press the OK button. Then select Add to Speed Dial option and press the OK button. Fill in the blanks for Name and Address, highlight OK and press the OK button to add. Whilst you are on the site you wish to add to the Speed Dial list, highlight the Opera-button and press the OK button. Then highlight Add |
| Scan for devices. After you select your TV and connect, the screen of your device will be displayed on your TV.Note:This feature can be used only if the mobile device supports this feature. If you experience problems with the connection check if the operating system version you use supports this feature. There may be incompatibility problems with the operating system versions which are released after the production of this TV. Scanning and connecting processes differ according to the programme you use. | have a problem, check the internet connection of your modem.Connection is SlowSee the instruction book of your wireless modem to get information on the internal service area, connection speed, signal quality and other settings. You need to have a high speed connection for your modem.Disruption during playback or slow reactionsYou could try the following in such a case:Keep at least three meters distance from microwave ovens, mobile telephones, bluetooth devices or any other Wi-Fi compatible devices. Try changing the active channel on the WLAN router.Internet Connection Not Available / Audio Video Sharing Not WorkingIf the MAC address (a unique identifier number) of your PC or modem has been permanently registered, it is possible that your TV might not connect to the internet. In such a case, the MAC address is authenticated each time when you connect to the internet. This is a precaution against unauthorized access. Since your TV has its own MAC address, your internet service provider cannot validate the MAC address of your TV. For this reason, your TV cannot connect to the internet. Contact your internet service provider and request information on how to connect a different device, such as your TV, to the internet.It is also possible that the connection may not be available due to a firewall problem. If you think this causes your problem, contact your internet service provider. A firewall might be the reason of a connectivity and discovery problem while using the TV in Audio Video Sharing mode or while browsing via Audio Video Sharing feature.Invalid DomainEnsure that you have already logged on to your PC with an authorized username/password and also ensure that your domain is active, prior to sharing any files in your media server program on your PC. If the domain is invalid, this might cause problems while browsing files in Audio Video Sharing mode.Using Audio Video Sharing Network ServiceAudio Video Sharing feature uses a standard that eases the viewing process of digital electronics and makes them more convenient to use on a home network.This standard allows you to view and play photos, music and videos stored in the media server connected to your home network.1. Server Software InstallationThe Audio Video Sharing feature cannot be used if the server programme is not installed onto your PC or if the required media server software is not installed |
| Connecting Other Wireless DevicesYour TV supports another short range wireless connection technology too. A pairing is required before using these kind of wireless devices with the TV set. You should do the followings to pair your device with the TV:Set the device to pairing modeStart device discovery on the TVNote:Refer to the user manual of the wireless device to learn how to set the device to pairing mode.You can connect audio devices or remote controllers wirelessly to your TV. Unplug or switch off any other connected audio device in order for wireless connection feature to work correctly. For audio devices you should use the Audio Link option in the System>Sound menu, for remote controllers the Smart Remote option in the System>Settings>More menu. Select the menu option and press the OK button to open the related menu. Using this menu you can discover and connect the devices that use the same wireless technology and start to use them. Follow the on-screen instructions. Start the device discovery. A list of available wireless devices will be displayed. Select the device you want to connect from the list and press the OK button to connect. If "Device connected" message is displayed, the connection is successfully established. If the connection fails try it again.Note:Wireless devices may operate within the same radio frequency range and may interfere with one another. To improve the performance of your wireless device place it at least 1 meter away from any other wireless devices. | |
| Connectivity TroubleshootingWireless Network Not AvailableEnsure that any firewalls of your network allow the TV wireless connection.Try searching for wireless networks again, using the Network/Internet Settings menu screen.If the wireless network does not function properly, try using the wired network in your home. Refer to the Wired Connectivity section for more information on the process.If the TV does not function using the wired connection, check the modem (router). If the router does not | |
| selection may not work on a teletext application where the numbers indicate teletext pages.HbbTV requires AV streaming capability for the platform. There are numerous applications providing VOD (video on demand) and catch-up TV services. The user can use play, pause, stop, forward, and rewind keys on the remote control to interact with the AV content.Note: You can enable or disable this feature from the More menu in System>Settings menu. Smart CenterSmart Center is a mobile application running on iOS and Android platforms. With your tablet or phone, you can easily stream your favourite live shows and programmes from your smart TV. Also; you can launch your portal applications, use your tablet as a remote control for your TV and share media files.Note: Being able to use all functions of this application depends on the features of your TV. Getting StartedTo use Smart Center features, connections have to be done properly. To get connected to your network wirelessly, plug in the Wi-Fi dongle to one of the USB ports if your TV doesn't have internal wifi feature. To be able to use internet based features, your modem/ router must be connected to the internet.IMPORTANT: Make sure the TV and mobile device are connected to the same network.For media sharing feature Audio Video Sharing option should be enabled(if available). Press the Menu button on the remote, select System>Settings>More menu and press OK. Highlight Audio Video Sharing and change as Enabled. Your TV is ready to connect to your mobile device now.Install the Smart Center application onto your mobile device.Start the smart center application. If all connections are configured properly, you will see your TV's name on your mobile device. If your TV's name doesn't appear on the list, wait a while and tap on the Refresh widget. Select your TV from the list.Mobile Device screenOn the main screen you can find tabs to access various features.The application retrieves actual channel list from TV first when it starts.MY CHANNELS: The programmes of first four channels from the channel list retrieved from the TV are shown. You can change the listed channels. Press on the channel thumbnail and hold. A list of channels will be displayed and you can choose your desired channel to be replaced.TV: You can watch content through the TV tab. In this mode you can navigate through the channel list | retrieved from your TV and click on thumbnails to view the detail pages.RECORDINGS: You can view your active recordings(if available) and reminders through this tab. To delete any item, simply press on the delete icon found on each row.EPG: You can view the broadcast schedules of selected channel lists through this tab. You can also navigate through channels by pressing on the selected channel on the EPG grid. Please note that updating / refreshing the EPG information may take a while depending on your network and web service quality.Note: Internet connection is required for WEB based EPG informations.PORTAL: This tab displays the Portal applications in scrollable view. Unless FollowMeTV (if available) is active, the selected application will be displayed on your TV screen.Note: Internet connection is required. This tab is enabled if a portal page is in use.SETTINGS: Configure the application to your liking. You can change;Auto-lock (Only in IOS): The screen of the device automatically turns off after a certain amount of time. Default is off, which means the screen will always stay on.Auto-enable FollowMeTV: FollowMeTV function (if available) will start automatically when this setting is enabled. Default is disabled.Auto-connection to TV: When enabled, your mobile device will automatically connect to last connected TV and skips the TV search screen.Change TV (Only in IOS): Shows the currently connected TV. You can press on this setting to go to the "TV search" screen and change to a different TV.Edit custom channel list: You can edit your custom channel list using this setting.Choose channel list source: You can choose the channel list source to be used in the application. The options are "TV List" and "Custom List". Additionally you can activate "Remember my choice" option to set the selected channel list source as a constant choice. In this case if the selected source is available it will be used in the application.Version No: Displays the current version of the application.Detail PageTo open detail page tap on a programme. On the detail page screen you can get detailed information of the programmes you select. There are "Details", "Cast&Crew" and "Videos" tabs to find on this page.DETAILS: This tab provides summary and information about the selected programme. Also there are links |
| to Speed Dial option in the submenu and press the OK button again. Name and Address will be filled automatically according to the site you are visiting. Highlight OK and press the OK button to add.You can also use the Opera menu options to manage the browser. Highlight the Opera- 0 button and press the OK button to see available page specific and general options.There are various ways to search or visit websites using the web browser.Enter the address of a website(URL) into the search/ address bar and highlight the Submit button on the virtual keyboard and press the OK button to visit the site.Enter keyword/s into the search/address bar and highlight the Submit button on the virtual keyboard and press the OK button to start a search for the related websites.Highlight a Speed Dial thumbnail and press the OK button to visit the related website.Your TV is compatible with USB mice. Plug your mouse or wireless mouse adaptor into the USB input of your TV for easier and quicker navigation.Some web pages include flash content. These are not supported by the browser.Your TV does not support any download processes from the internet via the browser.All sites on the internet might not be supported. According to the site; content problems may occur. In some circumstances video contents might not be able to be played.HBBTV SystemHbbTV (Hybrid Broadcast Broadband TV) is a new industry standard that seamlessly combines TV services delivered via broadcast with services delivered via broadband and also enables access to Internet only services for consumers using connected TVs and set-top boxes. Services delivered through HbbTV include traditional broadcast TV channels, catch-up services, video-on-demand, EPG, interactive advertising, personalisation, voting, games, social networking and other multimedia applications.HbbTV applications are available on channels where they are signalled by the broadcaster (currently various channels on Astra broadcast HbbTV applications). The broadcaster marks one application as "autostart" and this one is started by the platform automatically. The autostart applications are generally launched with a small red button icon to notify the user that there is an HbbTV application on that channel. Press the red button to open the application page. After the page | icon state by pressing the red button again. You can toggle between the red button icon mode and full UI mode of the application via pressing red button. It should be noted that the red button switching capability is provided by the application and some application may behave differently.If you switch to another channel while an HbbTV application is active (either in red button icon mode or full UI mode), the following scenarios can occur.The application can continue running.The application can be terminated.The application can be terminated and another autostart red button application can be launched. HbbTV allows the applications to be retrieved both from broadband or broadcast. The broadcaster may enable both ways or one of them. If the platform does not have an operational broadband connection, the platform can still launch applications transmitted on broadcast.The autostart red button applications generally provide links to other applications. An example of this is shown below. The user then can switch to other applications by using the links provided. The applications should provide a way to terminate themselves, usually Exit button is used for this.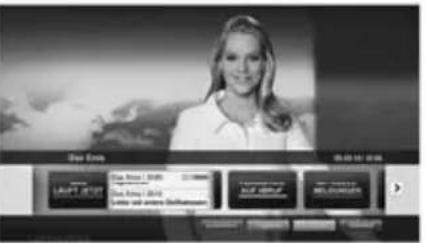 Figure a: Start bar application Figure a: Start bar application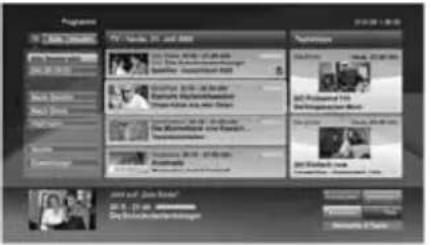 Figure b: EPG application, broadcast video is shown on the left bottom, can be terminated by pressing 0.HbbTV applications use keys on the remote control to interact with the user. When an HbbTV application is launched, the control of some keys are owned by the application. For example, numeric channel Figure b: EPG application, broadcast video is shown on the left bottom, can be terminated by pressing 0.HbbTV applications use keys on the remote control to interact with the user. When an HbbTV application is launched, the control of some keys are owned by the application. For example, numeric channel |
Keyboard Page
| The keyboard page can be opened in two ways; by pressing the Keyboard(■) widget on the application screen or automatically by receiving a command from the TV. |
Requirements
-
Smart TV
-
Network connection
-
Mobile Device based on Android or iOS platform (Android OS 4.0 or higher; IOS 6 or higher version)
-
Smart Center app.(to be found on online application stores based on Android and iOS platforms)
-
Router modem
-
USB storage device in FAT32 format (required for PVR feature, if available)
Notes:
For Android devices, Normal(mdpi), Large(hdpi) and Extra Large(xhdpi) screen sizes are supported. Devices with 3" or smaller screen sizes are not supported.
For iOS devices, all screen sizes are supported.
User interface of the Smart Center application is subject to change according to version installed on your device.
to facebook and twitter pages of the programme
selected.
CAST&CREW: Shows all the people contributed to the current programme.
VIDEOS: Provides videos on Youtube related to the
selected programme.
Note: For some functions an internet connection may be required.
FollowMe TV Feature (if available)
Tap on the FOLLOW ME TV widget located at the bottom left of the screen of your mobile device to
change the layout for FollowMe TV feature. Tap the play icon to start streaming of the content from
the TV to your mobile device. Avail is in your routers operation range.
Mirror Mode
This mode of FollowMe TV feature is enabled by deafult and allows streaming the content from any
other selected TV sources and Media Browser.
Notes: Note that only digital(DVB-T/C/S) SD and HD channels are
Note that only digitalDVD 1763, CD and HD channels are supported.
Multilanguage audio support not functional.
The streaming performance may change depending on the quality of your connection.
Media Share Page
To access the Media Share widget tap on the Up-
arrow on the bottom left side of the screen.
If the Media Share widget is pressed, a screen is displayed where you can select the media file type to share with your TV.
Note: Not all image file formats are supported. This function will not work if Audio Video Sharing feature is not supported.
Portal Launcher
To access the Portal Launcher(■) widget tap on
the Up-arrow on the bottom left side of the screen.
You can access the portal page by tapping on the Portal Launcher widget.
Note: Internet connection is a work if a portal page is not in
Smart Remote Feature
You can use your mobile device as a remote control for your TV once it has connected to the TV. To use smart remote's full features tap on the Up-arrow on the bottom left side of the screen.
Voice Recognition
You can tap on the Microphone(☐)widget and manage your application, giving voice commands such as "Portal!", "Volume Up/Down!", "Programme Up/Down!".
Note: This fea
| A | Product Fiche | ||
| B | Commercial Brand:SVAN | ||
| C | Product No. | 10116836 | |
| D | Model No. | SVTV0551UHD2 | |
| E | Energy efficiency class | A+ | |
| F | Visible screen size (diagonal,approx.) (inch/cm) | 55 inches | 140 cm |
| G | On mode average power consumption (Watt) | 86,0 | |
| H | Annual energy consumption (kWh/annum) (*) | 125 | |
| I | Stand by power consumption (Watt) | 0,50 | |
| J | Off mode power consumption (Watt) | N/A | |
| K | Display resolution (px) | 3840x2160 | |
| A | B | C | D | E | F | Visible screen size(diagonal, approx.) (inch/cm) | |
| English | Product Fiche Commercial Brand Product No | Model No. Energy efficiency class | Sichtbare Bildschirmgröße(diagonal,ca.) (Zoll /cm) | ||||
| Deutsch | Produkt-Datenblatt | Markenzeichen | Produkt-Nr. | Modell-Nr. | Energieeffizienzklasse | (الصوي) حجم Shanghai Military (الصوي) | |
| عربية | الإستعمال | الإستعمال الحرفية | الإستعمال | الإستعمال | الإستعمال | الإستعمال | (الإستعمال) حجم Shanghai Military (الإستعمال) |
| Български | Справочен лист с техническите данни | Търговска марка | Продукт No | Модел No | Клас на енергийна ефективност | Видим размер на екрана (диагонал,прибл.) (инча /см ) | |
| čeština | Produktový list | Značka výrobce | Číslo produktu | Model č. | Energetická třída | Viditeína velikost obrazovky (úhlopřička,přibl.(palců /см) | |
| Dansk | Produktoplysningsskema | Varemærke | Produktnr. | Model nr. | Energieffektivitetsklasse | Synlig skærmstørreise (diagonalt,ca.) (HK/cm) | |
| Suomi | Tuote fiche | Kaupallinen merkki | Tuote nro. | Malli nro. | Virran tehokkuusluokka | Nakyvan kuvaruudun koko (diagonaalinen,n.) (tuumaa/cm) | |
| Français | Fiche du produit | Marque commerciale | Produit N° | Modèle N° | Classe d'efficacité énergétique | Taille d'ecran visibile (diagonale,approx.) (pouces/cm) | |
| Hrvatski | SAŽETAK PROIZVODA | Trgovačka marka | Br. proizvoda | Br. modela | Klasa energetske učinkovitosti | Vidljiva velicina ekrana (díjagonalna,približno) (inča/cm) | |
| Nederlands | Productfiche | Commercieel merk. | Productnr. | Modelnr. | Energie efficiëntie klasse | Zichtbare schermigrootle (diagonaal,ca.) (inches/cm) | |
| Español | Ficha del Producto | Marca Comercial | N° de Producto | N° de Modelo | Clasificación Energética | Tamano de pantalla visibile (diagonal,aprox.) (pulgadas/cm) | |
| Svenska | Produktspecifikation | Varumärke | Produktnr. | Modellnr. | Energiklass | Synlig skærmstorlek (diagonal,ungefärlig) (tum/cm) | |
| Italiano | Scheda prodotto | Marchio commerciale | Numero prodotto | Numero modello | Classe di efficienza energetica | Dimensioni visibili dello schermo (diagonale,circa)(pollici/cm) | |
| Polski | KARTA PRODUKTU Marka produktu Nr produktu Nr modelu | Klasa efektywności energetycznej | Widoczny obraz ekranu (przekątna,okolo)(cali/cm) | ||||
| Magyar | Termékismertető adatlap | Kereskedelmi marka | Termékszám | Modellszám | Energiahatékonysági osztály | Lathato keptartomany (diagonalis,kb.) (inches/cm) | |
| Norsk | Produktinformasjon | Kommersiell merkevare | Produkt nr. | Modell nr. | Energieffektivitet klasse | Synlig skærmstørrelse (diagonal,ca.) (tommer/cm) | |
| Português | Ficha do produto | Marca Comercial | Produto N° | Modelo N° | Classificação eficiência energética | Tamanno ecra visivel (diagonal,aprox.) (polegadas/cm) | |
| Română | Fişă produs | Marcă comercială | Nr. Produs | Nr. Model | Clasa de eficiență energetică | Dimenslunea ecranului vizibili (diagonală,aprox.) (inch/cm) | |
| Русский | Справочный листок технических данных изделия | Торговая марка | Номер изделия | Номер модели | Класс энергопотребления | Видимый размер экрана (по диагонали,приблизительно) (дюймов/см) | |
| беларуская | Справочный листок технических данных изделия | Торговая марка | Номер изделия | Номер модели | Класс энергопотребления | Видимый размер экрана (по диагонали,Около)(дюймов/см ) | |
| македонски | Технички податоци | Комерцијална марка | Производ бр. | Модел бр. | Класа на енергетска ефикасност | Големина на видлив екран (ділгагонала,околу) (инчи/см) | |
| український | Технічні дані | Кормеційна марка | Артикул | Модель | Клас энергоспоживання | Видимий розмір екрана (ділгогональ, Приблизно) (дюймів/см) | |
| Srpski | Tehničke odlike | Komercijalna marka | Proizvod br. | Model br. | Klasa energetske efikasnosti | Veilcina vidljivog ekrana (diagonalala, tokom) (inča/cm) | |
| Slovenčina | Produktový list | Značka výrobcu | Číslo produktu | Model č. | Energetická trieda | Viditeína velikost obrazovky (uhlopriečka,zhruba) (palcov/cm) | |
| Slovenščina | Opis izdelka | Komercialna znamka | Št. Izdelka | Št. Modela | Razred energetske učinkovitosti | Vidna velikost zaslona (diagonalala, pribl.) (palcev/cm) | |
| Еллянік | Делтію проїєю тос | Емторію огімка | Ар. Проїєю тос | Ар. Монтелю | Каптуорія евруєкакің апобосты | Ороло резвідос обдівің (діжувідос,тер.) (інтос/см) | |
| Bosanski | Техніcki podaci | Komercijalna marka | Produkt br. | Model br. | Klasa energetske efikasnosti | Vidljiva velicina ekrana (diagonala približno.) (inča/cm) | |
| Украль | Місті 0013 | Чінки зімки | Чінки зімки | Чінки зімки | Чінки зімки | (о/у/к)(зінки,зімки) Чінки та та та та та та та та та та та та та та та та та та та та та та та та та та та та та та та та та та та та та та та та та та та та та та та та та та т | |
| Türkçe | Ürün fişi | Ticari Marka | Ürün No. | Model No. | Enerji verimliliği sınıfı | Görülen ekran boyutu (çapraz, yakışk.) (inch/cm) | |
| Shqip | Tě dhěnat e produktit | Marka tregtare | Nr. i produktit. | Nr. i modelit. | Klasa e eficiencês sê energjisë | Madhesia e ekranit te dukshem (diagonal, afersisht) (inch/cm) | |
| Lietuvių | Gaminio etiketė | Gamintojas | Gaminio Nr. | Modelio Nr. | Energetinio efektyvumo klasė | Matomas ekranо dydis (jstrizainė, approx.) (coliy/cm) | |
| Latviešu | Produkta apraksts | Marka | Produkta nr. | Modelja nr. | Energoefektivitătes klase | Ekranā izmērs (pa diognali, apmçram) (collas/cm) | |
| Eesti | TOOTEKIRJELDUS | Tootja firma | Toote nr. | Mudeli nr. | Energiaklass | Vaadalava ekraani suurus (diagonaal, umbes) (tolli/cm) | |
| فارمسی | مشخصات محصول | مارک تجاري | 朦داره محصول | 朦داره منل | گروه کارآي اززی | (شانز متر) (شانز متر) | |
| GH IJK | |||||
| English | On mode average power consumption (Watt) | Annual energy consumption (kWh/annum) | Standby power consumption (Watt) | Off mode power consumption (Watt) | Display resolution (px) |
| Deutsch | Durchschnittlicher Stromverbrauch im eingeschaltetem Zustand (Watt) | Jährlicher Energieverbrauch (kWh/Jahr) | Standby-Stromverbrauch (Watt) | Stromverbrauch im ausgeschaltetom Zustand (Watt) | Display-Auflösung (px) |
| عربية | متوسط للمؤاك احالة عند التغير (الط) | (السانيات الثاني طلابي جول وطلاط) | (سانيات الثاني طلابي وSubjectة (مط) | (سانيات الثاني طلابي وSubjectة (مط) | (سانيات الثاني طلابي وSubjectة (مط) |
| Български | Средна консумация на електроенергия във включено състояние (Watt) | Годишна консумация на електроенергия (kWh/Годишка) | Консумация на електроенергия в режим на готовност (Watt) | Консумация на електроенергия в изключено състояние (Watt) | Разделителна способност на дисплея(пиксела) |
| čeština | Prümérna spotřeba elektrické energie v zapnutém režimu (Wattü) | Ročni spotřeba energie (kWh/Ročni) | Spotřeba elektrické energie v pohotovostním režimu (Wattü) | Spotřeba elektrické energie ve rypnutém režimu (Wattü) | Rozlišení displeje (px) |
| Dansk | Gennemsnitligt stromforbrug i tændt tilstand (Watt) | Arligt energiforbrug (kWh/Arligt) | Strømforbrug (standby)(Watt) | Strømforbrug i slukket tilstand (Watt) | Skærmoppløsning (px) |
| Suomi | Päällä-tilan keskimääräinen virrankulutus (Wattia) | Vuositainen sähkönkulutu (kWh/Vuosittalnen) | Vakiovirran kulutus (Wattia) | Pois-tilan virrankulutus (Wattia) | Näytön erottelukyky (pikselia) |
| Français | Consommation énergétique moyenne en mode "marche" (Watt) | Consommation énergétique annuelle (kWh/annuel) | Consommation d'énergie en veille (Watt) | Consommation d'énergie en mode arrêt" (Watt) | Résolution de l'écran (px) |
| Hrvatski | Prosjéna potrošnja el. energije kada je proizvod uklıcen (Watta) | Godišnja potrošnja el. Energije (kWh/Godiśnia) | Potrošnja el. energije u modu pripravnosti (Watta) | Potrošnja el. energije kada je proizvod skiučen (Watta) | Rezolucija zaslona (piksela) |
| Nederlands | Aan-modus gemiddeld stroomverbruik (Watt) | Jaarlijks energieverbruik (kWh/Jaarlijks) | Stand-by stroomverbruik (Watt) | Uit-modus stroomverbruik (Watt) | Schermresolutie (px) |
| Español | Consumo eléctrico medio, en funcionamiento (Vatio) | Consumo eléctrico anual (kWh/anual) | Consumo en modo en espera (Vatio) | Consumo eléctrico modo apagado (Vatio) | Resolución de pantalla (px) |
| Svenska | Strömkonsumtion i PA-läge (Watt) | Energikonsumtion per år (kWh/Arlig) | Strömkonsumtion i viloläge (Watt) | Strömkonsumtion i AV-läge (Watt) | Skårmuppløsning (pixlar) |
| Italiano | Consumo di corrente medio da accesa (Watt) | Consumo annuale di energia (kWh/annuo) | Consumo di corrente in modalità standby (Watt) | Consumo di corrente da spenta (Watt) | Risoluzione dei display (px) |
| Polski | Srednie zużycie energii w trybie włączonym (Watów) | Roczne zużycie energii (kWh/Roczne) | Srednie zużycie energii w trybie oczekiwania (Watów) | Zużycie energii w trybie wyłączonym (Watów) | Rozdzielczość obrazu (pikseli) |
| Magyar | Energiafogyasztás bekapcsolva hagyott üzemmódban (Watt) | Eves energiafogyasztás (kWh/Eves) | Energiafogyasztás standby üzemmódban (Watt) | Energiafogyasztás kikapcsolt üzemmódban (Watt) | Képernyőfelbontás (px) |
| Norsk | Pámodus gjennomsnítlig strømforbruk (Watt) | Arlig strømforbruk (kWh/Arlig) | Hvilemodus strømforbruk (Watt) | Av-modus strømforbruk (Watt) | Skjermoppløsning (piksel) |
| Português | Consumo energia em modo médio (Watt) | Consumo annual energia (kWh/anual) | Consumo energia em stand-by (Watt) | Consumo energia em modo alimentação (Watt) | Resolução do visor (pixel) |
| Româna | Consum electric mediu în modul pornit (Wai) | Consum anual de energie (kWh/anual) | Consum electric în stare de repaus (Wai) | Consum electric în modul oprit (Wai) | Rezolutja ecranului (pixeli) |
| Русский | Средний расход энергии в режиме работы (Вт) | Ежегодный расход энергии (kBTV/Год) | Расход энергии в режиме ожидания (Вт) | Расход энергии в выключенном режиме (Вт) | Разрешение экрана (пикселей) |
| беларуская | Средний расход энергии в режиме включения (ватт) | Ежегодный расход энергии (kWh/надавое) | Расход энергии в режиме ожидания (ватт) | Расход энергии в режиме выключения (ватт) | Разрешение экрана (пикселей) |
| македонски | Просечна потрошувачка кога е яклучен | Годишна потрошувачка на энергия (kWh/Голишна) | Потрошувачка во мирување (вати) | Потрошувачка кога е исклучен (вати) | Резолуција на екран (пиксели) |
| український | Середня споживана потужність у робочому режимі (Вт) | Середньорічна споживана потужність (kWh/Річне) | Спохивана потужність у режимі рэйківання (Вт) | Спохивана потужність у вимкненому стані (Вт) | Роздільна здатність екрана (пикселів) |
| Srpski | Proşćna spotrošna kada je uključeni (Vati) | Godišnja potrošnja energije (kWh/Godiśnia) | Potrošnja tokom mirovanja (Vati) | Potrošnja kada je isključeni (Vati) | Rezolucija displeja (piks.) |
| Slovenčina | Priemerna spotreba elektrickej energie v zannutom režime (Wattov) | Ročna spotreba energie (kWh/Ročná) | Spotreba elektrickej energie v pohotovostnom režime (Wattov) | Spotreba elektrickej energie vo vynutom režime (Wattov) | Rozlišenie displeja (pixl.) |
| Slovenščina | Poraba električne energije v povorečnem načinu (Wattov) | Letna poraba energije (kWh/Letna) | Poraba energije v stanju pripravljenosti (Wattov) | Poraba energije načinu izklopa (Wattov) | Resolucija zaslona (piks.) |
| Елляник | Місін катановішан резуєдос катопруда (Watt) | Erfioid катановішан евріндід (kWh/Erfióda) | Катановішан резуєдос огінів аурові (Watt) | Катановішан резуєдос огінів аурові (Watt) | Авóluан об'юв'є (Піл'єз) |
| Bosanski | Prosjéna potrošnja kada je uključen (Watt) | Godišnja potrošnja energije (kWh/Godiśnia) | Potrošnja tokom mirovanja (Watt) | Potrošnja kada je isključen (Watt) | Rezolucija ekrana (piks.) |
| نام | (оки)الزيم تازا نام مزن بزن بزن | (оки)الزيم تازا نام مزن بزن | (оки)الزيم تازا نام مزن بزن | (оки)الزيم تازا نام مزن بزن | (оки)الزيم تازا نام مزن |
| Turkçe | Açık moddaki ortalama güç tükelimi (Watt) | Yillık enerji tükelimi (kWh/yillik) | Bekleme durumunda enerji tükelimi (Watt) | Kapali moddaki güç tükelimi (Watt) | Ekran çözünurlüğü (piks.) |
| Shqip | Konsumi mesatar i energjisë si i ndezur (Watt) | Konsumi vietor i energjisë (kWh/vietor) | Konsumi i energjisë si në gatishméri (Watt) | Konsumi i energjisë si i fikur (Watt) | Rezolucioni i ekranit (piks.) |
| Lietuvii | Vidutinês energijos sanaudos ljungus (Vatai) | Metinês energijos sanaudos (kWh/Metinês) | Energijos sanaudos budějimo režimu (Vatai) | Energijos sanaudos išjungus (Vatai) | Ekrano skiriamoji geba (pikselių) |
| Latviešu | Energijas patěrniş aktívă režimă (Vati) | Gada energijas patěrniş (kWh/gada) | Energijas patěrniş gaidišanas režimă (Vati) | Energijas patěrniş izslēglă stāvoklí (Vati) | Displeja rezolúcja (pikseliem) |
| Eesti | Koskmine energiakulu töörežimil (Vatti) | Aastane energiakulu (kWh/aastane) | Energiakulu ooterežimil (Vatti) | Energiakulu väljalultatud olekus (Vatti) | Ekraani resolutsioon (pikslt) |
| قارسي | (وزان متوسط مصرف برق در ح喆ت فعل (و」とا) | (وزان اززی مصرفی در سالکهیروات ساعتادار (م.) | ( Busref برق 解كت اساده به کار (و」とا) | ( Busref برق 解كت اساده به کار (و」とا) | (uzان مصرف برق در ح喆ت شيرفمن (و」とا) |
(*) English Energy consumption kWh per year, based on the power consumption of the television operating 4 hours per day for 365 days. The actual energy consumption will depend on how the television is used.
(*) Deutsch Energieverbrauch kWh/Jahr, auf der Grundlage eines täglich vierstündigen Betriebs des Femsehgerätes an 365 Tagen. Der tatsächliche Energieverbrauch hängt von der Art der Nutzung des Femsehgerätes ab.
(*) عربي
استهلاك الطاقة كنبو واط مسوي، kWh دناء على استهلاك طاقة تلفرiren بعمل 4 ساعات يومي لعدد 365 يوم. ي explosive الاستهلاك الفعلى للطقة على طربة استخدام الجمال
(*) Български Консумация на енергия KWh годишно, изчислена на базата на 4 работни часа дневно при 365 дни. Действително консумираната енергия ще зависи от начина на употреба на телевизора.
(*) čestina Spotřeba elektrické energie kWh za rok vycházející ze spotřeby elektrické energie televizního přijímače, který je v provozu 4 hodiny denně po dobu 365 dní. Skutečná spotřeba elektrické energie závisí na způsobu použití
televizního přilímače.
(*) Dansk Energiforbrug: kWh om året, beregnet som fjernsynets effektforbrug, hvis det er tændt 4 timer om dagen i 365 dage. Det faktiske energiforbrug vil bero på, hvordan fjernsynet bruges.
(*) Suomi Energiankulutus kWh:a vuodessa, kun oletetaan, että televisiota käytetään 4 tuntia päivässä 365 päivän ajan. Todellinen energiankulutus riippuu television käyttötavasta.
(*) Français Consommation d'énergie de kWh par an, sur la base de la consommation électrique d'un téléviseur fonctionnant quatre heures par jour pendant trois cent soixante-cinq jours. La consommation réelle dépend des conditions
d'utilisation du téléviseur.
(*) Hrvatski Utrošak energije iznosi kWh godišnje na temelju utroška energije televizora koji radi četiri sata dnevno 365 dana u godini. Stvarni utrošak energije ovisit će o tome kako se upotrebljava televizor,
(*) Nederlands Energieverbruik kWh per jaar, gebaseerd op het elektriciteitsverbruik van de televisie wanneer deze gedurende 365 dagen 4 uur per dag aanstaat. Het feitelijke energieverbruik is afhankelijk van de manier waarop de
televisie wordt gebruikt.
(*) Español Consumo de energía: kWh al año, suponiendo cuatro horas de funcionamiento diario durante 365 días. El consumo efectivo dependerá de las condiciones reales de uso de la televisión.
(*) Svenska Energiförbrukning kWh per år, beräknad utifrån effektförbrukningen för en tv-mottagare som används fyra timmar per dygn under 365 dygn. Den faktiska energiförbrukningen kommer att bero på hur tv-mottagaren
används.
(*) Italiano Consumo di energia kWh/anno calcolato sulla base del consumo di un televisore in funzione per 4 ore al giorno per 365 giorni. Il consumo effettivo di energia dipende dall'utilizzo reale del televisore.
(*) Polski Zużycie energii kWhrok na podstawie zużycia energii przez telewizor działający 4 godziny dziennie przez 365 dni. Rzeczywiste zużycie energii zależy od sposobu użytkowania telewizora.
(*) Magyar A televíziókészülék napi 4 órás üzem mellett az év 365 napjára vetítve évente kWh mennyiségű energiát fogyaszt. A tényleges energiafogyasztás a készülék üzemeltetési módjától függ
(*) Norsk Energiforbruk kWh per år, stromforbruket er basert på bruk av TV-en for 4 timer per dag for 365 dager. Det faktiske energiforbruket vil være avhengig av hvordan TV-en brukes.
(*) Português Consumo de energia de kWh por ano, baseado no consumo, em termos de potência, do televisor a funcionar 4 horas por dia durante 365 dias. O consumo de energia real dependerá do modo como o televisor é utilizado.
(*) Română Consumul de energie de kWh pe an, pe baza outerii consumate de aparatul TV atunci când este în functiune 4 ore pe zi timp de 365 de zile; consumul real de energie depinde de conditile de utilizare a aparatului TV
(*) Русский Энеогопотребление кВт-ч в год приводится из расчета потообления энергии телевизором при работе 4 часа в день на поотяжении 365 дней. Фактическое потоебление электроэнергии будет зависеть от того.
как используется телевизор.
(*) беларуская Энергаспажыванне квт-г у год прыводзіцца з разліку спажывання энергії төлевізарам пры працы 4 гадэіны ў дзень на працягу 365 дзён. Фактычнає спажыванне электраснергії будзе залежаць ад таго, як
выкарыстоўваеща талевізар.
(*) македонски Евенретската потрошувачка е kWh годишно, врз основа на потрошувачката на телевизиски уред што работи 4 часа дневно, 365 денови. Реалната енергетска потрошувачка іе зависи од тоа како се користи телевизискиют уред.
(*) українськии Значення енергоспоживання кВт-год на рік базується на потужності, споживаної телевізором, що працюс протягом 4 годин на день впродовок 365 днів. Фактичне споживання електроенергії залежить від
способу використання телевізора.
(*) Srpski Potrašnja struje od kWh na godišnjem nivou zasnovana je na potrošnji televizora koji je uključen 4 sata dnevno 365 dana godišnje. Stvarna potrošnja struje zavisiće o načina korišćenja televizora.
(*) Slovenčina Spotreba energie kWh za rok na základe spotreby elektrickej energie televizora, ktorý je v činnosti 4 hodiny denne počas 365 dní. Skutočná spotreba energie závisí od toho, ako sa televizor použiva,
(*) Slovenščina Poraba energije je kWh na leto, glede na napajalno energije televizorja, ki deluje 4 ure na dan v vseh 365 dneh. Dejanska poraba energije je odvisna od načina uporabe televizorja.
(*) Ελληνικ Κατανάλυση ευόνωσε κλθη αὐά τρος τω δέπη την κατανάλυση υνδίας από την τηλύσεσειαν νια τεταλυση κετρουνοία αὐά πυήσε επί 365 πυήσε. Η προνυμτικά κατανάλυση ευόνωσε εξαιμήται από του ταύτα νούτας τος
αυσκευής.
(*) Bosanski Energetska potrošnja je XYZ kWh na godišnjem nivou, na osnovu potrošnje TV-a koji radi 4 h dnevno, 365 dana. Stvarna energetska potrošnja zavisi od toga koliko e TV koristi.
. מַרְׁעֹת אַרְׁעֹת אַרְׁעֹת אַרְׁעֹת אַרְׁעֹת אַרְׁעֹת אַרְׁעֹת אַרְׁעֹת אַרְׁעֹת אַר
ה 365 לָבְק 4 לָבְק 4 לָבְק 4 לָבְק 4 לָבְק 4 לָבְק 4 לָבְק 4 לָבְק 4 לָבְק 4 לָבְק 4 לָב
ה 365 לָבְק 4 לָבְק 4 לָבְק 4 לָבְק 4 לָב
ה 365 לָבְק 4 לָב
ה 365 לָב
ה 365 לָב
ה 365 לָב
ה 365 לָב
ה 365 לָב
ה 365 לָב
ה 365 לָב
ה 365 לָב
ה 365 לָב
ה 365 לָב
ה 36
(*) Türkçe 365 gün boyunca günde 4 saat çalışan televizyonun tükettigi güç referans alınarak yılda kWh enerji tüketimi. Güncel enerji tüketimi televizyonun nasıl kullanıldığına bağlı olacaktır.
(*) Shaip Konsumi i energiisë kWh në vit, bazuar në konsumin e energiisë së televizorit kur punon për 4 orë në ditë për 365 ditë. Konsumi aktual i energiisë varet nga mënyra e përdorimit të televizorit.
(*) Lietuviu kWh enerilos sunaudolimas por metus nurodomas alsizvelgus i tai, kiek enerilos sunaudolama televizoriui veikiant 4 valandas per diena 365 dienas iš eilės. Faktini enerilos sunaudolima fems tai, kiek laiko bus
naudojamas televizorius
(*) Latviesu Energijas patērinš kWh gadā, nemot vērā televizora elektroenergijas patērinu, darbojoties 365 dienas, četras stundas dienā. Faktiskais energijas patērinš būs atkarīgs no tā, kā televizors tiks izmantots.
(*) Eesti Energiatarbimine kWh aastas, eeldusel et televisor töötab neli tundi päevas ja 365 päeva aastas. Tegalik energiatarbimine oleneb televisori kasutusviisist.
کیزان مصرف الارژی به میزان 365۰۱۷۸۱۶۲ کWh در هر سال بر انس میزان مصرف تلیزین به میزان 4 ساعت در روز برای میزان اصلی مصرف الارژی به میزان استفاده از ظلوبیزین بتنگی دارد.
- Connect Power
- Antenna Connection
- Standby Notifications
- Accessories Included
- WARNING
- Environmental Information
- reduce energy consumption.
- Features
- Remote Control
- (\*) MY BUTTON 1 & MY BUTTON 2:
- Wireless LAN Transmitter Specifications
- Country Restrictions
- License Notification
- Input sources - can not be selected
- Recording unavailable
- USB is too slow
- PC Input Typical Display Modes
- Requirements
- FollowMe TV Feature (if available)
- Mirror Mode
- Media Share Page
- Portal Launcher
- Smart Remote Feature
- Voice Recognition
Brand : SVAN
Model : SVTV0551UHD2
Category : TV