S40IP13E - Hi-Fi System Sandstrøm - Free user manual and instructions
Find the device manual for free S40IP13E Sandstrøm in PDF.


| Product Type | Smartphone |
| Model | S40IP13E |
| Brand | Sandstrøm |
| Display Size | 5.5 inches |
| Dimensions (H x W x D) | 152 x 76 x 8.5 mm |
| Weight | 175 g |
| Battery Capacity | 3000 mAh |
| Operating System | Android |
| Processor | Quad-core 1.3 GHz |
| RAM | 2 GB |
| Internal Storage | 16 GB |
| Main Camera | 8 MP |
| Front Camera | 5 MP |
| Connectivity | Wi-Fi, Bluetooth, GPS |
| SIM Type | Micro-SIM |
| Charging Port | Micro USB |
| Headphone Jack | 3.5 mm |
| Care and Cleaning | Wipe with a soft dry cloth; avoid liquids and abrasive cleaners. |
| Safety | Do not expose to extreme temperatures or moisture. Use only approved chargers. |
| Spare Parts and Repairability | Contact Sandstrøm support for authorized service centers. Battery is user-replaceable. |
Frequently Asked Questions - S40IP13E Sandstrøm
User questions about S40IP13E Sandstrøm
0 question about this device. Answer the ones you know or ask your own.
Ask a new question about this device
Download the instructions for your Hi-Fi System in PDF format for free! Find your manual S40IP13E - Sandstrøm and take your electronic device back in hand. On this page are published all the documents necessary for the use of your device. S40IP13E by Sandstrøm.
USER MANUAL S40IP13E Sandstrøm
HiFi system with dock for iPhone/ iPod/ iPad
GB
Instruksjonsmanual
NO
Hi-Fi-system med dokking for iPhone/iPod/iPad
Instruktionsbok
SE
natural_image
Product photo of a CD and audio recording device with white speakers, a smartphone, and a digital audio workstation (no visible text or symbols)Safety Warnings....7
Unpacking....11
Product Overview....12
Main Unit....12
Remote Control 14
Removing the Plastic Strip....16
Installation of Battery 16
Handling the Remote Control....16
Handling the Battery 17
Remote Control Operation Range....17
Connects....18
Connecting the Speakers....18
Connecting the Auxiliary Equipment....18
Connecting the MP3 Device 19
Connecting the Aerial 19
Connecting to the Mains Supply....20
Playing MP3's from a USB Device....20
General Operation 21
Switching ON / OFF....21
ECO-Power Mode....21
Selecting Modes....21
Adjusting the Volume....21
Auto Setting the Clock....21
Manual Setting the Clock....22
Time Display 22
Setting the Daily Timer 22
Switching the Alarm off....23
Setting the Sleep Timer 23
Adjusting the Sound Effect 23
Selecting Super Bass....23
Selecting the Loudness Effect....23
Adjusting the Display Brightness....23
FM Operation 24
Selecting the FM Mode....24
Searching for a Station Automatically....24
Searching for a Station Manually 24
Audio Mode 24
For Better Reception....24
Presetting Radio Stations....24
Recalling a Preset Station....25
FM Display modes 25
iPhone / iPod / iPad Operation 26
Inserting the iPhone/iPod and Selecting iPhone/iPod Mode....26
iPhone/iPod/iPad Playback....26
Control iPhone/iPod/iPad menu 27
Charging your iPhone/iPod/iPad 27
Bluetooth® Operation 28
USB Operation 28
Repeat Playback....28
AUX IN Operation 29
Maintenance 30
Cleaning the Unit....30
Hints and Tips....30
Specifications....31
Lade iPhone/iPod/iPad 48
Bluetooth ^® -betjening....49
Bruke USB....49
iPhone/iPod/iPad hantering....68
Ladda iPhone/iPod/iPad....69
Bluetooth®-hantering 70
USB-hantering 70
AUX IN hantering....71
Underhåll....72
Rengöra enheten 72
Tips och råd 72
Specifikationer....73
Sisältö
FI
Turvavaroitukset 8
- Read all the instructions carefully before using the unit and keep them for future reference.
- Retain the manual. If you pass the unit onto a third party make sure to include this manual.
- Check that the voltage marked on the rating label matches your mains voltage.
Damage
- Please inspect the unit for damage after unpacking.
- Do not continue to operate the unit if you are in any doubt about it working normally, or if it is damaged in any way - switch off, withdraw the mains adapter and consult your dealer.
Location of Unit
- The unit must be placed on a flat stable surface and not subjected to vibrations.
- Do not place the unit on sloped or unstable surfaces as the unit may fall off or tip over.
- The mains socket must be located near the unit and should be easily accessible.
- This unit is designed for indoor use only.
Temperature
- Avoid extreme degrees of temperature, either hot or cold. Place the unit well away from heat sources such as radiators or gas / electric fires.
- Avoid exposure to direct sunlight and other sources of heat.
Naked Flames
- Never place any type of candle or naked flame on the top of or near the unit.
Moisture
- To reduce the risk of fire, electric shock or product damage, do not expose this unit to rain, moisture, dripping or splashing. No objects filled with liquids, such as vases, should be placed on the unit.
- If you spill any liquid into the unit, it can cause serious damage. Switch it off at the mains immediately. Withdraw the mains plug and consult your dealer.
Ventilation
- To prevent the risk of electric shock or fire hazard due to overheating, ensure that curtains and other materials do not obstruct the ventilation vents.
- A minimum distance of 5cm around the unit should be maintained to allow for sufficient ventilation.
- Do not install or place this unit in a bookcase, built-in cabinet or in another confined space. Ensure the unit is well ventilated.
Safety
- Always disconnect the unit from the mains supply before connecting / disconnecting other devices or moving the unit.
- Unplug the unit from the mains socket during a lightning storm.
- In the interests of safety and to avoid unnecessary energy consumption, never leave the unit switched on while unattended for long periods of time, e.g. overnight, while on holiday or while out of the house. Switch it off and disconnect the mains plug from the mains socket.
Mains Cable
- Make sure the unit or unit stand is not resting on top of the mains cable, as the weight of the unit may damage the mains cable and create a safety hazard.
- If the mains cable is damaged it must be replaced by the manufacturer, its service agent, or similarly qualified persons in order to avoid a hazard.
Interference
- Do not place the unit on or near appliances which may cause electromagnetic interference. If you do, it may adversely affect the working of the unit, and cause a distorted sound.
Batteries
- Batteries used in the unit are easily swallowed by young children and this is dangerous.
- Keep loose batteries away from young children and make sure that the battery holder tray is secure in the unit. Seek medical advice if you believe a cell has been swallowed.
- Please dispose of batteries correctly by following the guidance in this manual.
- Do not expose the battery to direct sunlight or sources of excessive heat.
Supervision
• Children should be supervised to ensure that they do not play with the unit.
- Never let anyone especially children push anything into the holes, slots or any other openings in the case - this could result in a fatal electric shock.


The lightning flash with arrowhead symbol, within an equilateral triangle, is intended to alert the user to the presence of uninsulated "dangerous voltage" within the unit's enclosure that may be of sufficient magnitude to constitute a risk of electric shock.

The exclamation point within an equilateral triangle is intended to alert the user to the presence of important operating and maintenance (servicing) instructions in the manual accompanying the unit.
Service
- To reduce the risk of electric shock, do not remove screws. The unit does not contain any user-serviceable parts. Please leave all maintenance work to qualified personnel.
- Do not open any fixed covers as this may expose dangerous voltages.
Maintenance
Thank you for purchasing your new Sandstrøm Hi-Fi with docking.
We recommend that you spend some time reading this instruction manual in order that you fully understand all the operational features offered. You will also find some hints and tips to help you resolve any issues.
Read all the safety instructions carefully before use and keep this instruction manual for future reference.
Unpacking
Remove all items from the packaging. Retain the packaging. If you dispose of it please do so according to local regulations.
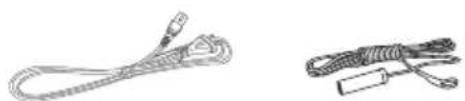
The following items are included:

The Main Unit Speakers x 2

natural_image
Simple line drawing of a speaker with two circular buttons (no text or symbols)
Remote Control


Instruction ManualMains Qabite 5MAA Griaide
Product Overview
Main Unit
Front View

- STANDBY Button Switches the unit between the ON and STANDBY modes.
- LED Indicator
- Remote Control Sensor Receives signal from remote control.
- Display
- Dock Insert iPod/iPhone/iPod.
- FUNCTION Button Switch between DOCK, AUX-IN, MP3 LINK, BLUETOOTH, USB and TUNER modes.
- VOLUME + Buttons Increases the volume.
- VOLUME – Buttons Decreases the volume.
-
USB Socket
-
Button
-
Allows fast reversing of the current track.
• Searches for a radio station going backwards through accessible radio frequencies. -
▶▶▶ Button
• Skips forwards to the next track.
- ▶Button
Plays/pauses/resumes playback.
-
▶▶ Button
-
Allows fast forwarding of the current track.
• Searches for a radio station going forwards through accessible radio frequencies. -
Button
• Skips backwards to the beginning of the track or to the previous track.
Rear View

- MP3 Link Socket Connects a MP3 device.
- FM Aerial Socket Connects the FM Aerial.
-
AUX IN (L/R) Sockets Connects the external audio device.
-
SPEAKER Sockets Connects the speakers.
- AC IN Socket Connects the mains cable to the mains socket.
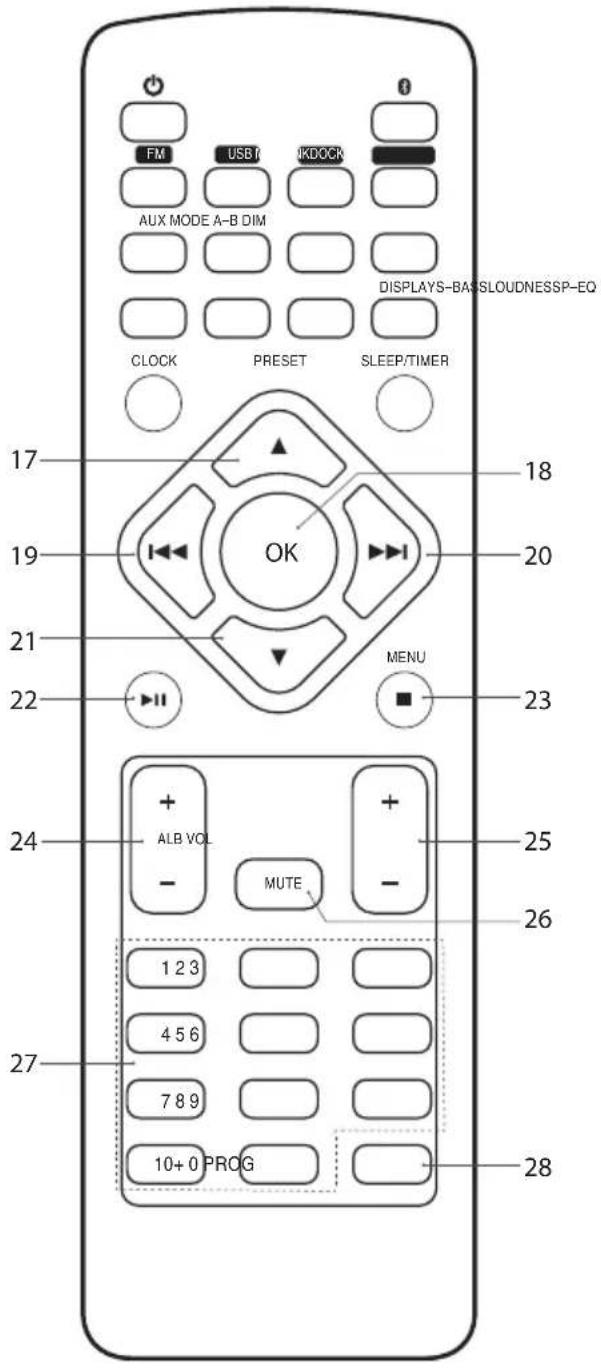
Remote Control
- STANDBY Button Switches the unit between the ON and STANDBY modes.
- Bluetooth Button Selects Bluetooth mode.
- FM Button Switches to FM mode.
- USB Button Selects USB mode.
- MP3 Link Buttons Selects MP3-Link mode.
- DOCK Button Selects DOCK mode.
- AUX Button Selects AUX mode.
- MODE Button Repeats/Random playback of a track(s).
- DIM Buttons Adjusts display brightness level.
- A-B Button Repeats a section of a soundtrack.
- P-EQ Button Switches the equalizer modes.
- LOUDNESS Button Switches LOUNDNESS function ON/OFF.
- DISPLAY Button Displays soundtrack playback information.
- S-BASS Button Switches S-BASS function ON/OFF.
- CLOCK Button Displays the time.
- SLEEP/TIMER Button • Selects an alarm timer. • Sets up a sleep timer.

17. Button
- Navigates up to select an item on a menu screen.
- Selects a preset station.
18. OK Button
Confirms the selection on a menu screen.
19. Button
• Skips backwards to the beginning of the track or to the previous track.
- Allows fast reversing of the current track.
20. ▶▶Button
• Skips forwards to the next track.
- Allows fast forwarding of the current track.
21. ▼Button
- Navigates down to select an item on a menu screen.
- Selects a preset station.
22. ▶IIButton
Plays/pauses/resumes playback.
23. ■ MENU Button
• Displays menu screen.
- Stops playback.
24. ALB + / - Buttons
Selects folder (USB mode).
25. VOL + / - Buttons
Increases or decreases the volume.
26. MUTE Button
Silences the unit or restores the sound.
27. 0-10+ Buttons
Selects a soundtrack.
28. PROG Button
• Programme soundtracks.
- Presets radio stations.
Removing the Plastic Strip
Remove the plastic strip from the battery if the battery is being used for the first time. It is located at the bottom back side of the remote control.

natural_image
Illustration of hands using a tool to lift a small object, no text or symbols presentInstallation of Battery
-
Unscrew the screw at the back of the remote control.
-
Pull out the battery compartment with your fingernails.
-
Replace a new battery (size 2025) correctly and fully insert the battery compartment back to the original position.

Handling the Remote Control
- Be aware of your fingernails when removing the battery cover and the battery.
- Do not drop the remote control.
- Do not allow anything to impact the remote control.
- Do not spill water or any liquid on the remote control.
- Do not place the remote control on a wet object.
- Do not place the remote control under direct sunlight or near sources of excessive heat.
- Remove the battery from the remote control when not in use for a long period of time, as corrosion or battery leakage may occur and result in physical injury, and/or property damage, and/or fire.
Handling the Battery
- Improper or incorrect use of batteries may cause corrosion or battery leakage, which could cause fire, personal injury or damage to property.
- Install the battery correctly by following the polarity (+ and -) indications in the battery compartment.
- When the battery is exhausted, the remote control will not function.
- Only use the battery type indicated in this manual.
- Do not dispose of the used battery as domestic waste. Dispose of it in accordance with local regulations.
- Small button cell batteries such as the one used in the remote control are easily swallowed by young children, this is dangerous. Keep loose button cells away from young children and make sure that the battery holder tray is secure in the remote control. Seek medical advice if you believe a cell has been swallowed.
Remote Control Operation Range
- The remote control sensor on the front unit is sensitive to the remote control's commands up to a maximum of 6 metres away and within a maximum of a 30^ arc.
- Please note that the operating distance may vary depending on the brightness of the room.

Connects
Connecting the Speakers
Connect the speaker cables at the back of the speakers to the SPEAKER OUT (L/R) Sockets at the rear of the unit.

Connecting the Auxiliary Equipment
Use a RCA stereo audio cable to connect an auxiliary equipment to the main unit's AUX IN sockets.

Connecting the MP3 Device
Use a 3.5mm audio cable to connect a MP3 device to the main unit's MP3 Link Socket.

GB
Connecting the Aerial
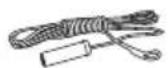
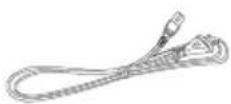
Connect one end of the aerial cable (included) to the FM socket at the rear of the unit. Then position the aerial to obtain optimum reception.

Connecting to the Mains Supply
- This unit is designed to operate with an AC 220V-240V \~ 50/60Hz power supply.
- Connecting the unit to any other power source may cause damage to the unit. Unwind the mains cable to its full length. Connect the mains plug to a mains socket. Make sure the mains plug is fully inserted into the mains socket. The unit is now connected and ready to use.
- To switch the unit off completely, remove the mains plug from the mains socket.
Ensure all connections are connected before connecting to the mains power socket.

Playing MP3's from a USB Device
When a USB device is connected to the unit, turn the FUNCTION dial on the unit or press the USB button on the remote control to select the USB mode.

natural_image
Line drawing of a device with a cable inserted into the front panel, showing ports and control buttons (no text or symbols)
- The unit can only play MP3 and WMA file formats in USB operation.
- If your USB device is loaded with MP3's but the display keeps showing "NO USB" on the display, the format of your USB device might not be compatible with the unit.
- The unit can support USB devices with up to 32GB of memory.
- The unit may not be compatible with all USB devices, this is not an indication of a problem with the unit.
General Operation
Switching ON / OFF
When you first connect the unit to the mains socket, the unit will be in STANDBY mode and the LED indicator will be red.
- Press the STANDBY ⏻ button on the unit or the remote control to switch the unit on. The word "HELLO" will show in the display.
- Press the STANDBY ⏻ button on the unit or the remote control to switch the unit back to standby mode.
- Disconnect the mains plug from the mains socket if you want to switch the unit off completely.
ECO-Power Mode
Your unit features an ECO-Power/Standby mode. Press and hold the STANDBY button to switch to ECO-Power mode. To save energy consumption, the clock will not be displayed. If you want to display the clock during standby mode, you can press the CLOCK button. The clock display will disappear after 90 seconds. The LED indicator glows red when the unit is in ECO-Power mode.

If the unit is idle for more than 15 minutes, it will automatically switch to ECO-Power mode.
Selecting Modes
Turn the FUNCTION button on the unit to switch between DOCK, AUX-IN, MP3 LINK, BLUETOOTH, USB and TUNER modes. The selected mode will show on the display. Alternatively press the FM, USB, DOCK, MP3 LINK or AUX button on the remote control to select desired mode.
Adjusting the Volume
- Press the VOL + / - buttons to adjust the volume.
- If you wish to turn the sound off, press the MUTE button on the remote control. Press the MUTE button again or press the VOL + / - buttons to resume normal listening.
Auto Setting the Clock
In TUNER mode, press and hold the DISPLAY button. The clock will automatically update.
Manual Setting the Clock
Manual Setting the clock can only be done in STANDBY mode.
- In STANDBY mode, press and hold the CLOCK button, 'CLOCK SET' will scroll across the display, then '24HR' will flash.
- Press the VOL + / - to select 24 or 12 hours, then press CLOCK.
- Press the VOL + / - to set the hours, then press CLOCK.
- Press the VOL + / - to set the minutes, then press CLOCK.

• To exit clock setting mode, press the PROG button on the remote control.
- If no buttons are pressed for 90 seconds the unit will exit clock setting mode.
- If your unit is disconnected from the mains supply the clock setting will be lost.
Time Display
- During ECO-Power mode, press the CLOCK button to display the clock for 90 seconds.
- While the unit is on, press the CLOCK button to display the clock for 3 seconds.
Setting the Daily Timer
You will not be able to set an alarm in ECO-POWER mode. Press the STANDBY button to switch the unit on and then off.
- In standby mode press and hold the SLEEP/TIMER button on the remote control. The words 'TIMER SET' will scroll across the display.
- Press the VOL + / - button to select USB, TUNER, DOCK modes. Then press the SLEEP/TIMER button.

- If you select TUNER mode make sure you have selected the radio station you want to be woken up to first.
- If you have selected USB mode make sure you have a USB device inserted into the USB port, if you forget to insert a USB device, the radio will switch on instead.
-
If you have selected DOCK mode make sure your iPhone/iPod/iPad is inserted into the dock. If you forget to dock your iPhone/iPod/iPad, the radio will switch on instead.
-
The hours will flash in the display, press the VOL + / - buttons to select the hour you would like the alarm to switch on. Then press SLEEP/TIMER.
-
The minutes will flash in the display, press the VOL + / - button to select the minute you would like the alarm to switch on. Then press SLEEP/TIMER.
-
The volume level will flash in the display, press the VOL + / - button to select the volume that you would like the alarm to switch on at. The volume will gradually increase the level you set when it switches on. Then press SLEEP/TIMER.
The alarm is now set and the ⏻ symbol will be displayed. The alarm will sound daily.
Switching the Alarm o
When daily timer has set. In standby mode press the SLEEP/TIMER button. The symbol will disappear from the display. Press the SLEEP/TIMER button again to re-active the alarm.
Setting the Sleep Timer
Use the sleep timer to turn the system off after a certain number of minutes in play mode. By setting the sleep timer, you can fall asleep to music and know that your system will turn off by itself rather than play all night.
- To set the sleep timer press the SLEEP/TIMER button on the remote control repeatedly to view the different timer settings. The number of minutes shown will display in this sequence:

flowchart
graph LR
    A["SLEEP 60 SLEEP 45"] --> B["SLEEP 30"]
    C["SLEEP OFF SLEEP 15"] --> B
- The system is now set to turn off after the number of minutes you have set. The display will show "SLEEP #", e.g. "SLEEP 15" means the unit will switch itself off after 15 minutes, "SLEEP 30" means the unit will switch itself off after 30 minutes, and so on.
- Press the SLEEP/TIMER button to show the reminding time till the unit switches off minutes and return back to previous screen.
- To cancel the sleep timer press the SLEEP/TIMER button repeatedly until "SLEEP OFF" shows on the display.
Adjusting the Sound E ect
Press the P-EQ button to select the sound effect modes.

flowchart
graph LR
    A["FLATPOPJAZZ"] --> B["ROCK"]
    B --> C["CLASSIC"]
Selecting Super Bass
- To add more bass you can press the S-BASS button. The word 'BASS' will be displayed.
- To switch off Super Bass press the S-BASS button again.
Selecting the Loudness E ect
- This setting adds more bass at low volume levels. Press the LOUDNESS button. The word 'LOUD' will be displayed.
- To switch off the loudness feature press the LOUDNESS button again.

You cannot activate Super Base and Loudness at the same time.
Adjusting the Display Brightness
Press the DIM button to scroll through the 3 brightness levels.
FM Operation
Selecting the FM Mode
The unit will automatically select a FM radio station with a good signal.
Select the TUNER mode by pressing the FUNCTION button repeatedly on the unit or pressing the FM button on the remote control until the display reads "TUNER".
Searching for a Station Automatically
In TUNER mode, press and hold the ◀◀▶▶ buttons on the unit or the I◀◀▶▶I buttons on the remote control until the tuner starts searching for a station. The tuner will stop searching after tuning into a radio station.

The search may not stop at a station with a very weak signal.
Searching for a Station Manually
In TUNER mode, repeatedly press the ◀◀▶▶ buttons on the unit or the ◀◀▶▶▶ buttons on the remote control until the desired frequency reception quality is found.

With FM radio it may be necessary to fine tune each station by pressing the ◀◀▶▶ buttons on the unit or the ◀◀▶▶ buttons on the remote control repeatedly. Each press will adjust the frequency by 0.05MHz. If reception is still poor adjust the position of the aerial or try moving the radio to another location.
Audio Mode
Press the OK button repeatedly to switch between STEREO or MONO modes. The display will show 'FM ST' for stereo mode and 'FM MONO' for mono mode.

The unit will automatically switch between stereo and mono mode, when stereo mode is selected but you can override this and switch this function manually by changing it to mono mode. This is helpful when receiving poor signal reception.
For Better Reception
Fully unwind the FM aerial. Extend the FM aerial and place it in the position that offers the best sound reception.

The unit will automatically switch between stereo and mono mode. This is helpful when receiving poor signal reception.
Presetting Radio Stations
Your unit can store up to 20 radio stations in its memory. If the unit is disconnected from the mains supply the preset stations will not be lost.
Automatically Presetting
Press and hold the PROG button on the remote control. The word 'AUTO' will briefly appear on the display. The unit will automatically search and store the first 20 radio stations it finds.
Manually Presetting
- Tune into a desired radio station as shown above.
- Press the PROG button. The programme number will flash in the display.
- Press the ▲ or ▼ buttons to select the programme position number (1-20).
- Press the PROG button to store the station.
- Repeat steps 1 - 4 above to store more radio stations.
Recalling a Preset Station
Once you have saved a station, you can recall it by pressing the ▲▼ or the 0-10+ buttons to select your desired preset number.

The stored stations will be saved into the memory and power off will not erase it. Storing a new station in a preset location will erase the previously stored station in that location.
FM Display modes
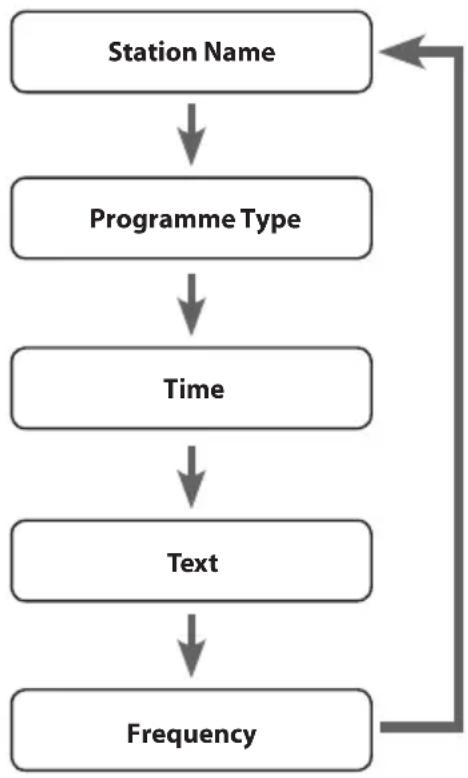
Every time you press the DISPLAY button, the display will cycle through the following display modes: the Station Name, PTY, Time, Text, Frequency.
The information is displayed on the lower segment of the display.
Station Name
When an RDS station is received, the "RDS" and the name of that station will be displayed.
PTY (Programme Type)
This describes the "Style" or "genre" of music that is being broadcast e.g. "Rock" or "Classical".
Time
The broadcaster (Radio station) provides clock and date information automatically so there's no need to manually set this information.
Text
The broadcaster can include a scrolling text that displays information about the current program.
Frequency
This shows the frequency of the current station e.g. 89.80MHz.
flowchart
graph TD
    A["Station Name"] --> B["Programme Type"]
    B --> C["Time"]
    C --> D["Text"]
    D --> E["Frequency"]
iPhone / iPod / iPad Operation
Using the iPhone/iPod/iPad dock you can use the unit to play music files stored on your iPhone/iPod/iPad.
This unit can support the following iPhone/iPod/iPad models.
| Type Support Model | |
| iPhone • iPhone 3GS | • iPhone 4/4S |
| iPod(with 30-pin dock connectors) | • iPod touch 1^st/2^nd/3^rd/4^th Generation• iPod nano 1^st/2^nd/3^rd/4^th/5^th/6^th Generation |
| iPad* • iPad | • iPad 2• iPad 3rd generation |
Inserting the iPhone/iPod and Selecting iPhone/iPod Mode
Press the FUNCTION button on the unit or press the DOCK button on the remote control to select DOCK mode.
- Flip the docking cover up.
- Insert your iPhone/iPod/iPad into the iPhone/iPod/iPad dock.
- If the iPhone/iPod/iPad is connected, it will take around 5 seconds for the unit to identify the iPhone/iPod/iPad.
- Press the ▶II button on the unit or the remote control to playback the current track.
- Select your desired music, or videos, etc., and play the connected iPhone/iPod/iPad as usual.
iPhone/iPod/iPad Playback
You can use either the iPhone/iPod/iPad or the remote control.
- Press the ▶I button on the unit or the remote control to start / pause / resume playback.
- Press the OK button on the remote control to select next music file.
- Press the ◀◀◀buttons on the remote control to perform previous/next soundtrack.
- Press and hold the ◀◀◀buttons on the remote control to perform fast forward/reverse playback. Release the button to resume normal playback.
- Press the ■ MENU button on the remote control to stop the playback and to go to the previous iPhone/iPod menu.
- Press the MODE button repeatedly to select Repeat Once, Repeat All, Repeat off and shuffle playback.

- Your iPhone/iPod/iPad will automatically start charging once it is docked.
- Switch off your iPhone/iPod/iPad while listening to the radio to prevent signal interference.
- While your iPhone/iPod/iPad is docked, you can control it from the main unit, the remote control or from the iPhone/iPod/iPad directly.
- Use your iPhone/iPod/iPad controls to manually select your iPhone/iPod/iPad's music menu, then proceed to the next operation.
Control iPhone/iPod/iPad menu
- During the DOCK mode, Press the ■ MENU button on the remote control to enter the iPhone/iPod/iPad MENU mode.
- Press the ▲ buttons on the remote control to navigate in the iPhone/iPod/iPad menu.
- Press the OK button on the remote control to confirm selection.
- Press the ■MENU button on the remote control to return to the previous iPhone/iPod/iPad menu.
Charging your iPhone/iPod/iPad
- Your iPhone/iPod/iPad has an internal non-removable battery. The battery may need to be charged if it has not been used for a while.
- During the STANDBY or ON mode, you can automatically charge the iPhone/iPod/iPad through the unit when it is docked.

The iPhone/iPod/iPad battery is fully charged in about a few hours. If you charge it while playing music, it may take longer.

- You can control the iPhone/iPod/iPad player with the remote control or iPhone/iPod/iPad player itself while the unit is in DOCK mode.
- The unit can support most generations of the iPod. Check your particular model for the iPod generation supported.
Bluetooth® Operation
The unit has a Bluetooth function that can receive a signal within 10 metres.
Pairing the unit with a Bluetooth device to listen to music:
- While in the ON mode, press the FUNCTION button on the unit or press the Ⓞ button on the remote control to select BLUETOOTH mode.
- The LED indicator will flash in blue for searching Bluetooth device.
- Activate your Bluetooth device and select the search mode.
- "S40IP13E" will appear on your Bluetooth device.
- Select "S40IP13E" and enter "0000" for the password if necessary.
- The LED indicator will illuminate blue when connection successful.
- To disconnect the Bluetooth function, switch to another function on the unit or disable the function from your Bluetooth device.

- If the signal strength is weak, your Bluetooth receiver may disconnect, but it will re-enter pairing mode automatically.
- Press and hold the ■ MENU button for approx. 5 seconds to clear all pairing settings.
- The signal reception distance may vary substantially between the unit and Bluetooth device.
- This unit supports A2DP (Advanced Audio Distribution Profile).
- Compatibility with all devices and media types is not guaranteed.
- Some mobile phones with Bluetooth function may connect and disconnect as you make and end calls. This is not an indication of a problem with your unit.
USB Operation
- While in the ON mode, press the FUNCTION button on the unit or press the USB button on the remote control to select USB mode.
- Connect a USB device to USB port directly or with a USB cable (not included).
- The unit will automatically starts playback.
- Press the ▶II button to start /pause / resume playback.
- Press the ◀◀◀▶buttons to skip backwards or skip forwards.
- Press the ALB + / - buttons on the remote control to select the desired folder (if the USB memory device has more than one folder).
- Press the ■ button to stop playback.
Repeat Playback
You can repeat one track, one album and the whole USB.
- Press the MODE button to repeat the current track playing. 'REP' and 'TRK' will flash in the display.
- Press MODE again to repeat the album if you are playing. 'REP' and 'ALB' will flash in the display.
-
Press MODE again to repeat the whole USB. 'REP' will illuminate.
-
Press MODE again to shuffle playback. 'SHUFFLE' will show on the display.
- Press MODE again to cancel repeat playback. 'REPEAT OFF' will show on the display.
- You can use this function to enjoy the part of a track which you like repeating.
When it is playing, press the repeat A-B button (A-B) on the remote control at the beginning of the content that needs repeat playing. Press the repeat A-B button (A-B) again at the end of the content that needs repeat playing. Then the player will repeatedly play between A and B until you press the repeat A-B button (A-B) again to cancel the repeat setting and return to normal playback.

- The unit can only play MP3 and WMA file formats in USB operation.
- This unit supports USB versions 1.1 and 2.0.
- The unit can support USB devices with up to 32GB of memory.
- The unit cannot play WMA files protected by "DRM FILE".
- The unit may not be compatible with all USB devices, this is not an indication of a problem with the unit.
AUX IN Operation
There are AUX IN (L/R) sockets located at the rear of the unit. Analogue audio sound signals from other sources can be connected to the unit through these sockets.
- Connect to another audio device using the AUX IN (L/R) sockets via a RCA stereo audio cable (not included).
- While in the ON mode, press the FUNCTION function on the unit or press the AUX button on the remote control to select AUX mode.
- Press the VOL + / - buttons to adjust the volume to your desired level.
- In AUX mode, operate your audio device directly for playback features.

Alternative,
- Connect to another audio device using the AUX IN socket via a 3.5mm AUX IN cable.
- While in the ON mode, press the FUNCTION dial repeatedly on the unit or press the AUX IN button on the remote control to select AUX IN mode.
Maintenance
Cleaning the Unit
GB

Ensure the unit is fully unplugged from the mains socket before cleaning.
• To clean the unit, wipe the case with a slightly moist, lint-free cloth.
- Do not use any cleaning fluids containing alcohol, ammonia or abrasives.
- Do not spray an aerosol at or near the unit.
Hints and Tips
If a problem occurs, it may often be due to something very minor. The following table contains various tips:
| Problem Solution | |
| No power • Ensure the mains cable is connected securely at both ends.• Make sure that the ON mode is selected. | |
| The remote control does not function | • Use the remote control near the unit.• Point the remote control at the remote sensor on the unit.• Replace the battery in the remote control with a new one.• Remove any obstacles between the remote control and the unit. |
| The unit does not respond when pressing any buttons | • The unit may freeze up during use. Switch the unit off and then on again at the mains socket to reset the unit. |
| Radio | |
| Desired station not found | • Weak signal. Use the Manual Tune function. |
| iPhone/iPod/iPad | |
| iPod/ iPhone/iPad does not respond to the speaker system | • iPhone/iPod/iPad may not be docked properly or installed properly. Remove your iPhone/iPod from the dock and check for obstructions on the connectors in the dock and on your iPhone/ iPod/iPad.• Make sure that your iPhone/iPod/iPad is working properly before docking. Please refer to your iPhone/iPod/iPad manual for details. |
| The unit doesn’t play iPhone/ iPod/iPad files or doesn’t function as expected | • Make sure the iPhone/iPod/iPad is connected properly.• Standby mode may be activated; press the STANDBY ⏻ button again.• Make sure the iPhone/iPod/iPad is switched on.• Vibrations may have caused the iPhone/iPod/iPad to come loose from the docking station.• Check DOCK mode is selected.• Reinsert iPhone/iPod/iPad. |
| USB | |
| Unable to insert USB device | • Insert the USB device the other way round. |
| Cannot play some files from USB device | • Some USB devices may not be compatible with the unit.• Only MP3/WMA file formats are supported. |
| Bluetooth | |
| I cannot find “S40IP13E” on my bluetooth device | • Ensure the bluetooth function is activated on your bluetooth device. |

If any functional abnormality is encountered, unplug the unit from the mains socket and reconnect it again.
Specifications
| Model S40IP13E | |
| Frequency Range FM: 87.5 – 108 | MHz |
| Power SupplyPower Consumption | AC 220V-240V~50/60Hz30W |
| Standby Power Consumption ≤ | 0.5W |
| Output Power 20W x 2 | |
| Net Weight:Main UnitSpeaker | 1.14 kg1.71 kg |
| Dimensions:Main UnitSpeaker | 160mm (W) x 225mm (D) x 78mm (H)130mm (W) x 176mm (D) x 205mm (H) |
Features and specifications are subject to change without prior notice.
natural_image
Simple line drawing of a speaker with two circular buttons (no text or symbols)Fjernkontroll


natural_image
Two types of cable connectors shown side by side: a straight cord with plug and a coiled cord with clasp (no text or symbols)
natural_image
Illustration of a hand holding a medical device with an arrow indicating force or movement (no text or symbols present)NO
Installere batteriet
Behandle fjernkontrollen
natural_image
Line drawing of a digital camera with an attached cable, showing no text or symbols on the device itself.
flowchart
graph LR
    A["SLEEP 60 SLEEP 45"] --> B["SLEEP 30"]
    C["SLEEP OFF SLEEP 15"] --> B
Lade iPhone/iPod/iPad
- iPhone/iPod/iPad-en har et innebygget batteri som ikke kan fjernes. Batteriet må kanskje lades hvis det ikke har vært brukt på en stund.
- Når enheten er i VENTEMODUS eller PÅ, kan du lade en forankret iPhone/iPod/iPad automatisk via enheten.

iPhone/iPod/iPad-batteriet er fullstendig ladet opp etter et par timer. Hvis du spiller av musikk samtidig med ladningen, kan det gå lenger tid.

natural_image
Simple line drawing of a speaker with two circular buttons (no text or symbols)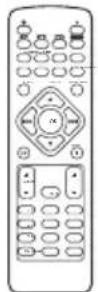
Fjärrkontroll


natural_image
Illustration of hands using a tool to lift a small object, no text or symbols presentSE
natural_image
Line drawing of a smartphone with a screwdriver inserted, showing the base and top view (no text or symbols)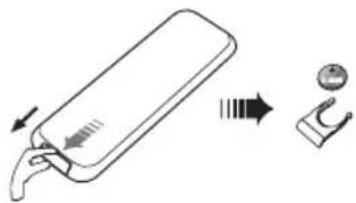
natural_image
Diagram showing a device with a handle and a separate view of a small object (no text or symbols present)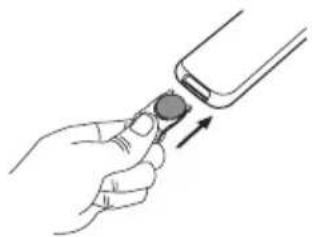
natural_image
Illustration of a hand holding a small device with an arrow indicating motion (no text or symbols)natural_image
Line drawing of a device with a cable inserted into the front panel, showing ports and control buttons (no text or symbols)
flowchart
graph LR
    A["SLEEP 60 SLEEP 45"] --> B["SLEEP 30"]
    C["SLEEP OFF SLEEP 15"] --> B
iPhone/iPod/iPad hantering
Ladda iPhone/iPod/iPad
natural_image
Simple line drawing of a speaker with two circular buttons (no text or symbols)
natural_image
Line drawing of a remote control with keypad and buttons (no text or symbols)Kaukosäädin

natural_image
Two types of cable connectors shown side by side: a coiled wire with a plug and a coiled cord with a clip (no text or symbols)

natural_image
Illustration of a hand holding a medical device with an arrow indicating force direction (no text or symbols)Pariston asentaminen
natural_image
Line drawing of a digital camera with a hand inserting a cable to the left panel (no text or symbols)
flowchart
graph LR
    A["SLEEP 60 SLEEP 45"] --> B["SLEEP 30"]
    C["SLEEP OFF SLEEP 15"] --> B
natural_image
Simple line drawing of a speaker with two circular buttons (no text or symbols)
Fjernbetjening


BrugervejledningEI-ledningSgFtMojhetning
Produktoversigt
Hovedenhed
Set forfra

natural_image
Illustration of hands using a tool to lift a small object, no text or symbols presentnatural_image
Simple line drawing of a smartphone with a screwdriver inserted, showing the base and top view (no text or symbols)
natural_image
Diagram showing a device with a handle and a separate mechanical component (no text or symbols)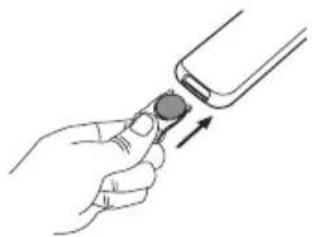
natural_image
Illustration of a hand holding a smartphone with an arrow pointing to the screen (no text or symbols present)DK
natural_image
Line drawing of a device with a hand inserting a cable into the front panel (no text or symbols)
flowchart
graph LR
    A["SLEEP 60 SLEEP 45"] --> B["SLEEP 30"]
    C["SLEEP OFF SLEEP 15"] --> B
natural_image
Simple line drawing of a speaker with two circular buttons (no text or symbols)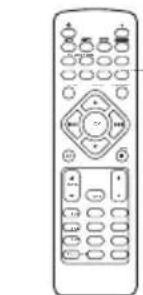
natural_image
Line drawing of a remote control with buttons and dials (no text or symbols)Dálkový ovladač
natural_image
Two types of cable connectors shown side by side: a coiled wire and a coiled cord (no text or symbols)

natural_image
Illustration of a hand holding a medical device with an arrow indicating motion (no text or symbols present)Vložení baterie
natural_image
Line drawing of a digital camera module with a hand inserting a cable to the left panel (no text or symbols)
flowchart
graph LR
    A["SLEEP 60 SLEEP 45"] --> B["SLEEP 30"]
    C["SLEEP OFF SLEEP 15"] --> B
natural_image
Simple line drawing of a speaker with two circular buttons (no text or symbols)
Dialkový ovládač


natural_image
Illustration of hands using a tool to lift a small object, no text or symbols presentVkladanie batérie
natural_image
Line drawing of a smartphone with a screwdriver inserted, showing the base and top view (no text or symbols)- Nechtami vytiahnite priehradku pre batériu.

natural_image
Diagram showing a device with a handle and a separate mechanical component (no text or symbols)natural_image
Illustration of a hand holding a smartphone with an arrow indicating the right-hand rule (no text or symbols present)natural_image
Line drawing of a device with a hand inserting a cable into the front panel (no text or symbols)
flowchart
graph LR
    A["SLEEP 60 SLEEP 45"] --> B["SLEEP 30"]
    C["SLEEP OFF SLEEP 15"] --> B
This symbol on the product or in the instructions means that your electrical and electronic equipment should be disposed at the end of its life separately from your household waste. There are separate collection systems for recycling in the EU. For more information, please contact the local authority or your retailer where you purchased the product.
Notes for battery disposal
The batteries used with this product contain chemicals that are harmful to the environment.
To preserve our environment, dispose of used batteries according to your local laws or regulations. Do not dispose of batteries with normal household waste.
For more information, please contact the local authority or your retailer where you purchased the product.
The Bluetooth ^® word mark and logos are registered trademarks owned by Bluetooth ^® SIG, Inc. and any use of such marks by DSG Retail Limited is as an Affiliate under the License held by DSG International Sourcing Ltd. Other trademarks and trade names are those of their respective owners and all rights are acknowledged.
In the unlikely event of a problem developing, please contact the store where you purchased your equipment.
We continually strive to improve our products; specifications may change without prior notice.
For advice on where to purchase accessories, please contact the store where you purchased your equipment.
All trademarks are the property of their respective owners and all rights are acknowledged.
NO

"Made for iPod", "Made for iPhone" and "Made for iPad" mean that an electronic accessory has been designed to connect specifically to iPod, iPhone and iPod, respectively, and has been certified by the developer to meet Apple performance standards.
Apple is not responsible for the operation of this device or its compliance with safety and
regulatory standards.
Please note that the use of this accessory with iPod, iPhone or iPad may affect wireless performance.
iPhone, iPad, iPod, iPod classic, iPod nano, and iPod touch are trademarks of Apple Inc., registered in the U.S. and other countries.
All other trademarks appearing herein are the property of their respective owners.
- Sisältö
- Damage
- Location of Unit
- Temperature
- Naked Flames
- Moisture
- Ventilation
- Safety
- Mains Cable
- Interference
- Batteries
- Supervision
- Service
- Maintenance
- Thank you for purchasing your new Sandstrøm Hi-Fi with docking.
- Unpacking
- Product Overview
- Main Unit
- Front View
- Rear View
- Remote Control
- Button
- OK Button
- Button
- ▶▶Button
- ▼Button
- ▶IIButton
- ■ MENU Button
- ALB + / - Buttons
- VOL + / - Buttons
- MUTE Button
- 0-10+ Buttons
- PROG Button
- Removing the Plastic Strip
- Installation of Battery
- Handling the Remote Control
- Handling the Battery
- Remote Control Operation Range
- Connects
- Connecting the Speakers
- Connecting the Auxiliary Equipment
- Connecting the MP3 Device
- Connecting the Aerial
- Connecting to the Mains Supply
- Playing MP3's from a USB Device
- General Operation
- Switching ON / OFF
- ECO-Power Mode
- Selecting Modes
- Adjusting the Volume
- Auto Setting the Clock
- Manual Setting the Clock
- Time Display
- Setting the Daily Timer
- Switching the Alarm o
- Setting the Sleep Timer
- Adjusting the Sound E ect
- Selecting Super Bass
- Selecting the Loudness E ect
- Adjusting the Display Brightness
- FM Operation
- Selecting the FM Mode
- Searching for a Station Automatically
- Searching for a Station Manually
- Audio Mode
- For Better Reception
- Presetting Radio Stations
- Automatically Presetting
- Manually Presetting
- Recalling a Preset Station
- FM Display modes
- Station Name
- PTY (Programme Type)
- Time
- Text
- Frequency
- iPhone / iPod / iPad Operation
- Inserting the iPhone/iPod and Selecting iPhone/iPod Mode
- iPhone/iPod/iPad Playback
- Control iPhone/iPod/iPad menu
- Charging your iPhone/iPod/iPad
- Bluetooth® Operation
- USB Operation
- Repeat Playback
- AUX IN Operation
- Alternative,
- Cleaning the Unit
- Hints and Tips
- Installere batteriet
- Behandle fjernkontrollen
- Lade iPhone/iPod/iPad
- SE
- iPhone/iPod/iPad hantering
- Ladda iPhone/iPod/iPad
- Pariston asentaminen
- Produktoversigt
- Hovedenhed
- Set forfra
- Vložení baterie
- Vkladanie batérie
- Notes for battery disposal
- NO
Brand : Sandstrøm
Model : S40IP13E
Category : Hi-Fi System