
M71PDT11E - DVD player MATSUI - Free user manual and instructions
Find the device manual for free M71PDT11E MATSUI in PDF.


| Product Type | Portable DVD Player (Master & Slave Units) |
| Brand | Matsui |
| Model | M71PDT11E |
| Region Code | 2 |
| Disc Formats | DVD, DVD+R/RW, DVD-R/RW, CD-DA, CD-R/RW, MP3, JPEG, Kodak Picture CD, MPEG-4 |
| Video System | PAL |
| LCD Display | 7" Wide-Screen Active-Matrix TFT |
| Audio | 2-Channel Analog, Dolby Digital Decoding |
| Speakers | 2 Built-in Stereo Speakers (per unit) |
| Terminals (Master Unit) | AV IN x1, AV OUT x1, Headphone x2 |
| Terminals (Slave Unit) | AV IN x1, Headphone x1 |
| Power Supply | 12V Car Cigarette Lighter Adapter |
| Power Consumption | Approx. 10W (12V, 0.83A) |
| Remote Control | Infrared with 3V Lithium Battery (CR2025) – Master Unit only |
| Master Unit Dimensions (LxWxH) | 211 x 155 x 44 mm |
| Master Unit Weight | 800 g |
| Slave Unit Dimensions (LxWxH) | 211 x 155 x 23 mm |
| Slave Unit Weight | 360 g |
| Accessories Included | Remote Control, 2-in-1 Car Adapter, Headphone, 3.5mm AV Cable, Car Straps x4 |
| Special Features | Portable dual-unit design, car strap mounting, OSD setup, parental control, multiple playback modes |
| Safety Certifications | Class 1 Laser Product, CE |
Frequently Asked Questions - M71PDT11E MATSUI
User questions about M71PDT11E MATSUI
0 question about this device. Answer the ones you know or ask your own.
Ask a new question about this device
Download the instructions for your DVD player in PDF format for free! Find your manual M71PDT11E - MATSUI and take your electronic device back in hand. On this page are published all the documents necessary for the use of your device. M71PDT11E by MATSUI.
USER MANUAL M71PDT11E MATSUI
natural_image
Two black-and-white portable electronic devices with ports and buttons, enclosed in a circular frame (no text or symbols visible)Contents
GB
Usage and Safety Information ...... 3
Safety Warnings 4
Product Overview 6
Using in a Car 8
Remote Control 10
CHATPER 1: DVD Playback .....12
Basic DVD Playback 12
Stopping Playback and Returning to the
Menu Screen (If a Menu Screen is Avail-
able on the Disc) .... 12
Stopping Playback 12
Pausing Playback....12
Frame Advance (Step) 12
Fast Forward and Backward....12
Skipping a Chapter Ahead or Back......12
Muting the Player 12
Repeat Viewing....13
Displaying Scene Information 13
Changing Audio Soundtrack Language .....13
Changing Subtitle Languages 13
Viewing from Different Angles 13
Using a DVD Menu....13
Using the Menu Function....13
CHAPTER 2: Audio/MP3 CD Playback .. 14
Basic Audio CDs Playback 14
Finding File Types.... 14
Sorting Files.... 14
Stopping Playback.... 14
Pausing Playback.... 14
Skipping a Track Ahead or Back......15
CHAPTER 3: Kodak and JPEG Picture CDs Playback .... 15
Basic Picture CDs Playback 15
Finding File Types.... 15
Sorting File s. 15
Rotating Pictures 15
Viewing the Next or Previous Picture ..... 15
CHAPTER 4: MPEG-4 Playback ..... 16
Basic MPEG-4 Playback 16
Finding File Types....16
Sorting Files....16
Stopping Playback 16
Pausing Playback 16
CHAPTER 5: OSD Setup ...... 17
Language Setup 17
- OSD Language 17
- Menu Language 17
- Audio Language 17
- Subtitle Language 17
- External Subtitle Language 17
Screen Setup.... 18
- Screen Saver 18
- TV Type.... 18
- TV System.... 19
Audio Setup.... 19
- Analog Out 19
Custom Setup.... 19
- Parental Ctrl 20
- Password....20
- Angle Mark....21
- Default....21
LCD Setup 22
- Panel Setting 22
- Colour Setting.... 22
- Brightness Setting.... 22
- LCD Setting.... 22
Troubleshooting 23
Disc Handling and Maintenance .... 24
Specifications 25
This product incorporates copyright protection technology that is protected by method claims of certain U.S. patents and other intellectual property rights owned by Macrovision Corporation and other rights owners. Use of this copyright protection technology must be authorized by Macrovision Corporation, and is intended for home and other limited viewing uses only unless otherwise authorized by Macrovision Corporation. Reverse engineering or disassembly is prohibited.
GB
Region Management Information
This unit is designed and manufactured to respond to the Region Management Information recorded on DVD discs. If the region number of a disc does not correspond to the region number of this unit, it will not be able to play the disc.
The region number of this product is 2.
Icon used on DVDs (example)

Region code indicator

aspect ratio

reo sound format
81 DMDT length
ENGLISHUAGES
Never make or change connections with the power switched on.
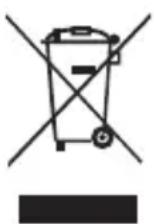
This symbol on the product or in the instructions means that your electrical and electronic equipment should be disposed at the end of its life separately from your household waste.
There are separate collection systems for recycling in the EU.
For more information, please contact the local authority or your retailer where you purchased the product.
Safety Warnings
Follow Instructions - All operating and maintenance instructions should be followed and warnings adhered to.
Screen Burn - ATTENTION! Please note that some programmes are broadcast with a logo that will appear in the corner of your TV screen. Some of these logo's can be very bright and may cause damage by permanently marking the logo on the screen. To prevent this, avoid leaving channels displaying a logo for a prolonged periods of time, particularly when the TV is not being watched.
Car Use - On no account must this unit be used by the driver of a moving motor vehicle. If the unit is being used by a passenger in your vehicle, make sure that it does not cause distraction to the driver, is secured or held safely and does not obstruct any safety device (e.g. airbag, seat belt, etc.) that is fitted. It is advised that this product is installed in the rear of the vehicle only. Make sure that it is always securely fastened before use. Never place the product in a position where a sudden stop will cause it to become dislodged.
Standby - The standby button on the remote control doesn't switch off the DVD completely and the DVD will continue to draw electricity from the mains supply. Therefore in the interests of safety and to avoid unnecessary energy consumption, never leave your DVD in standby while unattended for long periods of time (eg. Overnight, while on holiday or while out of the house) and make sure the unit is unplugged from the mains power supply.
Cleaning - Unplug this product from the wall outlet before cleaning. Do not use liquid or aerosol cleaners.
Accessories - Do not use accessories not recommended in this instruction book as they may be hazardous.
Water and Moisture - Hazard of electric shock. Do not use this product near water or in rainy/moist situations.
Objects and Liquid - Never allow objects of any kind or liquids to be pushed/spilled into this product through openings as they may come into contact with dangerous voltage or other hazards. Do not place objects filled with liquids, such as vases, on the unit.
Condensation - Moisture will form in the operating section of the player if the player is brought from cool surroundings into a warm room or if the temperature of the room rises suddenly. When this happens, the player's performance will be impaired. To prevent this, let the player stand in its new surroundings for about an hour before switching it on, or make sure that the room temperature rises gradually. Condensation may also form during the summer if the player is exposed to the breeze from an air conditioner. In such cases, change the location of the player.
Placing or Moving - Do not place on an unstable cart, stand, tripod, bracket or table. The product may fall, causing serious injury to a child or adult, and serious damage to the product. A product and cart combination should be moved with care. Quick stops, excessive force, and uneven surfaces may cause the product and cart combination to overturn.
Ventilation - To ensure proper ventilation and proper operation, never cover the unit with a cloth or other material and make sure there is a gap of at least 10mm around the outside of the unit.
Damage Requiring Service - Disconnect this product from the wall outlet and all power sources including batteries, and refer servicing to qualified service personnel under the following conditions:
a) When the power-supply cord or plug is damaged.
b) If any liquid has been spilled onto, or objects have fallen into the product.
c) If the product has been exposed to rain or water.
GB-4
d) If the product does not operate normally even if you follow the operating instructions. Adjust only those controls that are covered by the operating instructions. Improper adjustment of other controls may result in damage and will often require extensive work by a qualified technician to restore the product to its normal operating condition.
e) If the product has been dropped or the cabinet has been damaged.
f) When the product exhibits a distinct change in performance. This indicates a need for service.
GB
Servicing - Do not attempt to service this product yourself as opening or removing covers may expose you to dangerous voltage points or other hazards. Refer all servicing to qualified service personnel.
Replacement Parts - When replacement parts are required be sure the service technician has used replacement parts that are specified or that have the same characteristics as the original part. Unauthorized substitutions may result in fire, electric shock or other hazards.
Safety Check - Upon completion of any service or repairs to this product, ask the service technician to perform safety checks to determine that the product is in safe operating order.
Overloading – Do not overload wall outlets and extension cords as this can result in risk of fire or electric shock.
Lightning - For added protection of this product during a lightning storm, or when it is left unattended and unused for long periods of time, disconnect it from the wall outlet. This will prevent damage to the product due to lightning and power-line surges.
Naked flames - Keep the unit away from naked flame sources such as fire and candles, etc and do not place naked flames on the unit.
Power Cord Protection - Power cords should be routed so that they are not likely to be walked on or pinched by items placed upon or against them. Pay particular attention to plugs and the point from which the cords exit the product.
Important Warning
A DVD player is a Class 1 laser product, however this player uses a visible laser beam which could cause hazardous radiation exposure.
Be sure to operate the player correctly as instructed.
The following caution label is located on the rear panel of the player.

- When this player is plugged into the wall outlet, do not place your eyes close to the opening of the disc tray and other openings to look into the inside of this player.
- Use of controls or adjustments or performance of procedures other than those specified herein may result in hazardous radiation exposure.
- Do not open covers and do not repair yourself. Refer servicing to qualified personnel.
● To reduce the risk of fire or electric shock, do not expose this equipment to rain or moisture. - To reduce the risk of fire or electric shock and annoying interference, use the recommended accessories only.
Master Player
GB
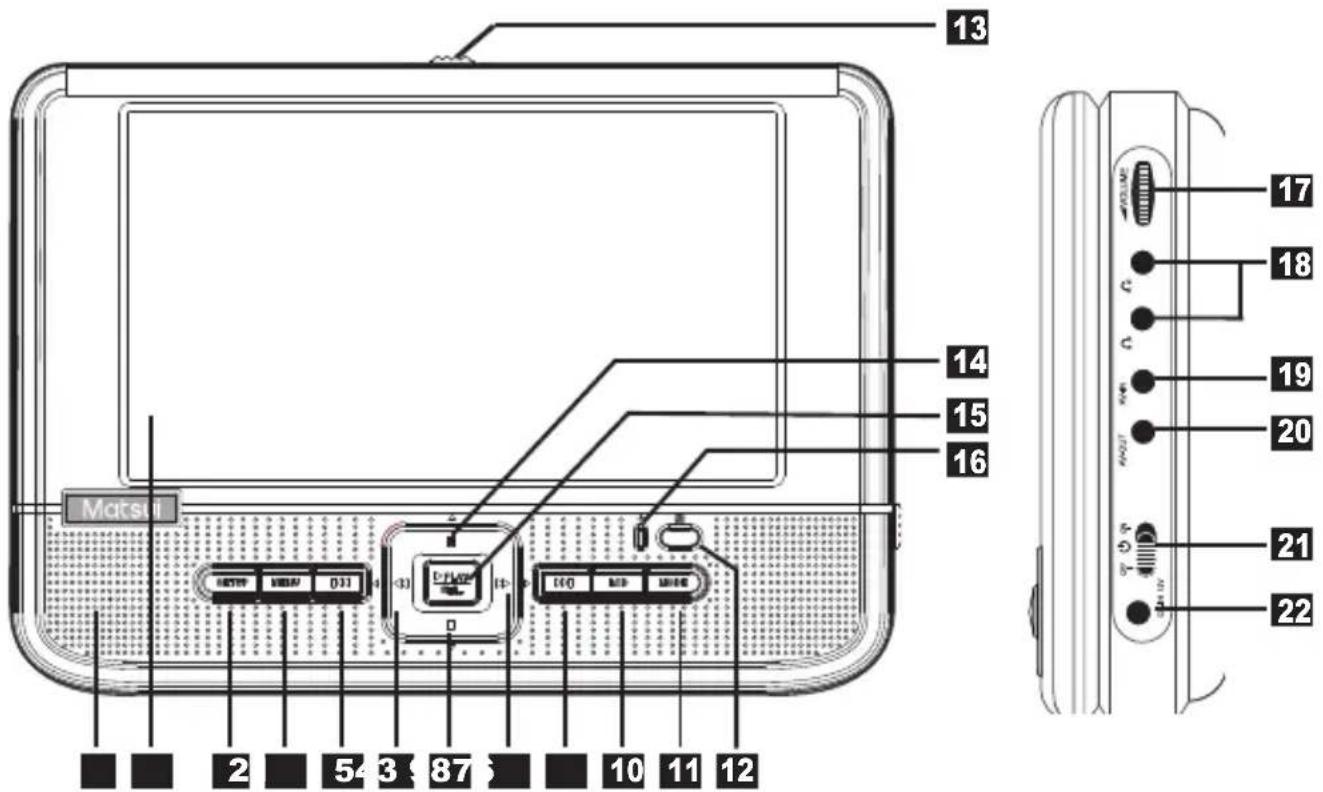
1 Speakers
2 LCD Screen
3 SETUP Button
4 MENU Button
5 PREVIOUS(◀)Button
6 SKIP BACKWARD/
LEFT(◀◀/◀) Button
7 STOP/DOWN(■)Button
8 SKIP FORWARD/
RIGHT(▶▶/▶) Button
9 NEXT(▶)Button
10 LCD Button
11 MODE Button
12 Remote Sensor(回)
13 OPEN Switch
14 PAUSE/UP(11▲Button
15 PLAY/SEL.(▶)Button
16 LED Power(↓) Indicator
17 VOLUME Dial
18 Earphone Socket
19 AV-IN Socket
20 AV-OUT Socket
21 POWER Switch
22 DC IN Socket
Slave Player
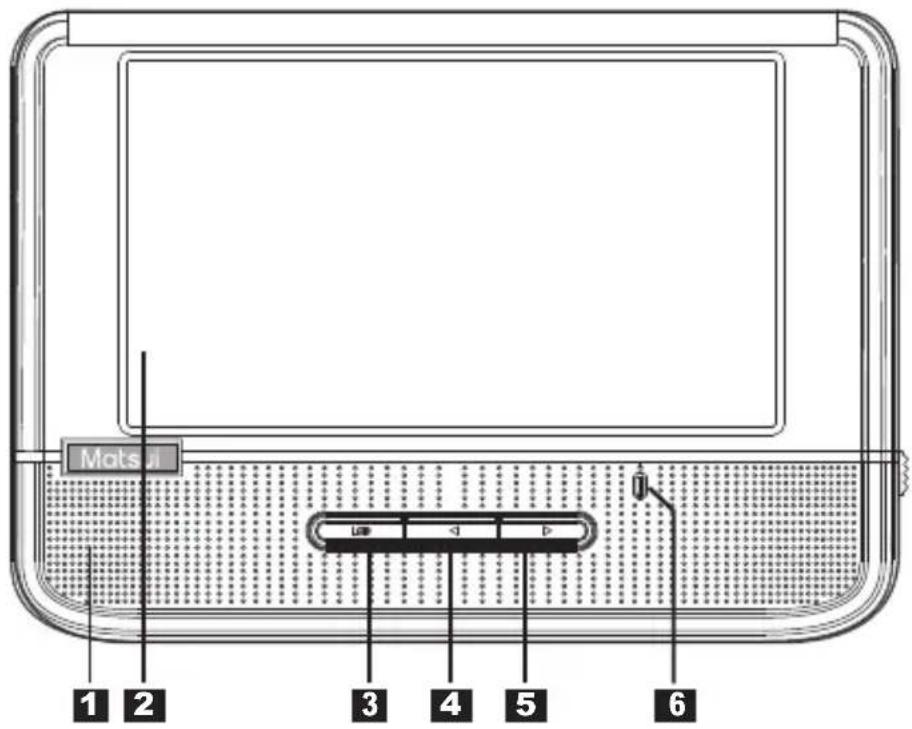

GB
1 Speakers
2 LCD Screen
3 LCD Button
4 LEFT(◀) Button
5 RIGHT(▶) Button
6 LED Power(↓) Indicator
7 VOLUME Dial
8 Earphone Socket
9 AV-IN Socket
10 POWER Switch
11 DC IN Socket
1 Thread both strap ends through the strap eyelets.
Note: Make sure the buckles are properly assembled to avoid accidental loosening.

2 Loop the straps around the headrest, with the DVD player facing the rear seat, then fasten the straps with the clip.
Note: Always remember to lock the clips and tighten the straps to ensure safety of your passengers.

natural_image
Illustration of hands adjusting a device with a magnified view of the device (no text or symbols present)3 Connect the Master and Slave DVD players to your car's DC12V cigarette lighter socket with the cigarette adapter.
4 Connect 3.5mm to 3.5mm AV cable with the Master and Slave DVD player.

Optional: External Audio Setup
- You may connect earphones to both Master and Slave players' earphone jacks. The Master DVD player has two earphone sockets. One is reserved for the Slave player.
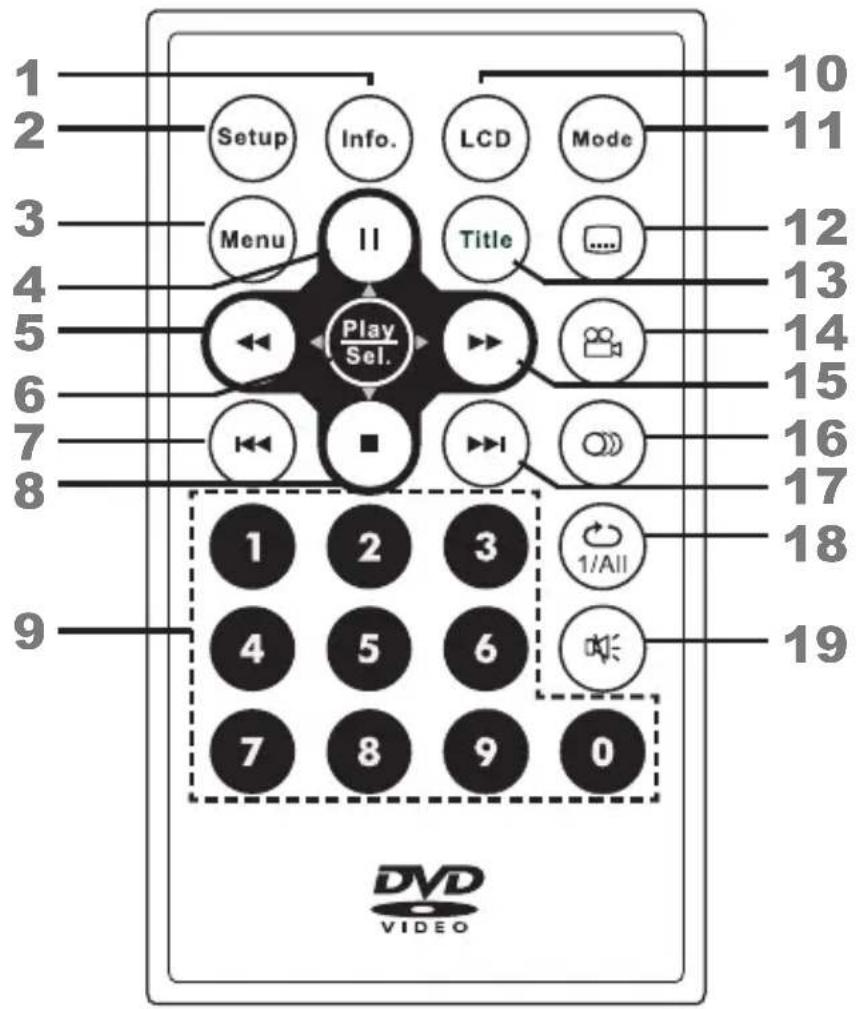
1 INFO. Button
2 SETUP Button
3 MENU Button
4 PAUSE/UP(Ⅱ)▲ Button
5 SKIP BACKWARD/
LEFT(◀) Button
6 PLAY/SEL. Button
7 PREVIOUS Button
8 STOP/DOWN(■)Button
9 Number Buttons
10 LCD Button
11 MODE Button
12 SUBTITLE(...).Button
13 TITLE Button
14 ANGLE(☐)Button
15 SKIP FORWARD/
RIGHT(▶) Button
16 AUDIO(○)Button
17 NEXT(▶)Button
18 REPEAT 1/ALL(+/All) Button
19 MUTE(☐) Button
Remote Control Operation Range
Point the remote control unit no more than 5 meters from the remote control sensor and within 60^ of the front of the unit. The operating distance may vary according to the brightness of the room.

Battery Installation for the Remote Control
Insert the battery and match the (+) and (-) on battery to the marks inside the battery compartment. Remember to remove the insulating mylar strip from the battery if the battery is being used for the first time.
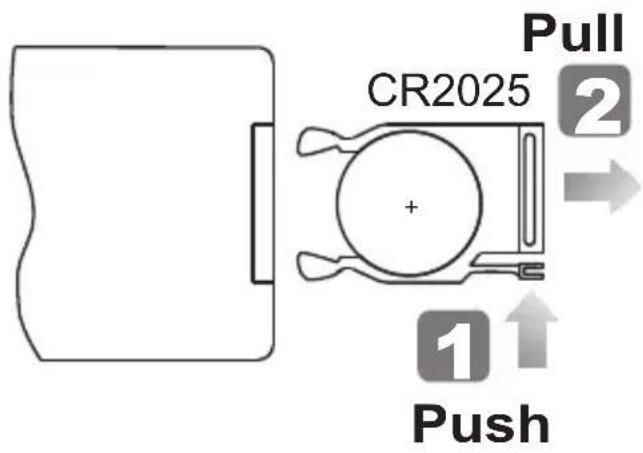

Note:
The battery in the Remote Control normally lasts for about one year, although this depends on how often and for what operations the Remote Control is used.
• If the remote control unit fails to work even when it is operated near the player, replace the battery.
• Use a 3V lithium battery (No. CR2025 or equivalent).
Basic DVD Playback
1 Turn on the player. Open the disc cover.
2 Hold the edge of the disc to put it in the disc tray with the printed side up.
3 Close disc cover.
- Close the disc cover and the portable DVD player starts playback if the disc does not have any menus recorded on it.
- If the disc has one or more titles recorded on it, a menu screen will appear on the screen.
4 To play a title, press ☐ Up / ☐ Down / ☑ Left / Right or Number Button(s) to highlight it and then press Play/ Sel. Play/Sel..
Stopping Playback and Returning to the Menu Screen (If a Menu Screen is Available on the Disc)
Press ⓂMenu.
Stopping Playback
1 Press ☐ Stop once to enter prestop mode. In prestop status, the disc can be played from where the playback has been stopped by pressing Play/Sel..
2 To completely stop the disc playback, press Stop again.
Pausing Playback
1 Press Pause.
2 To return to normal playback, press Play/Sel.
Frame Advance (Step)
1 Press ☉ Pause to pause playback.
- The disc is advanced by one frame each time pressing 📄 Pause.
2 To return to normal playback, press Play/Sel.
Fast Forward and Backward
1 Press ➕ Fast Forward or ➕ Fast Backward during playback.
The speed of advance ( x2, x4, x8, x16 and x32) or reverse ( x2, x4, x8, x16 and x32) changes for each press of ⊙ Fast Forward or ⊙ Fast Backward.
2 To return to normal playback, press Play/Sel..
Skipping a Chapter Ahead or Back
Skipping Ahead
Press Next during playback.
- Skip a chapter each time pressing the button.
Skipping Back
Press ⏻ Previous during playback.
- When pressing the button once midway through a chapter, the player returns to the beginning of the chapter being played back. The player skips a chapter each time you press the button.
Muting the Player
1 Press 📄 Mute.
2 To resume the sound, press 📄 Mute again.
Repeat Viewing
During playback, press ⏱/All Repeat repeatedly to select the following options:


Chapter
Title
Off
: Repeat Chapter
: Repeat Title
: Repeat Off
Displaying Scene Information
1 Press Info. during playback
- Press Info. a number of times, the title number, chapter number, and other information will show on the screen.
2 To stop displaying scene information, press Info. a number of times until the information disappears.
Changing Audio Sound track Language
1 Press Ⓓ Audio during playback.
2 Press Audio a number of times until a preferred language is selected.

Note:
- When the preferred language is not selected even after pressing the button several times, it may indicate that language is not available on the disc.
Changing Subtitle Languages
1 Press 📄 Subtitle during playback.
2 Press 📄 Subtitle a number of times until a preferred language is selected.
3 To clear the subtitle display, press Subtitle until Subtitle Off appears on the screen.
Viewing from Different Angles
1 Press Angle during playback.
2 Press Angle a number of times until the preferred viewing angle is selected.

Note:
- This operation works only with discs on which multiple viewing angles are recorded.
Using a DVD Menu
1 Press Title in stop mode. The DVD menu available on the disc appears.
2 Press Up / Down Left Right to select the preferred item.
3 Press Play Sel. Play/Sel. to enter to the selected item.
4 To return to the previous menu screen, press Title.

Note:
• The above operation instructions only works with disc with Title Function.
Using the Menu Function
1 Press ☐Menu.
2 Press Up / Down / Left / Right or Number Button(s) to select the preferred title.
3 Press
Basic Audio CDs Playback
1 Load an Audio CD.
- For audio CDs without playback control, the DVD player starts playback.
- For audio CDs provided with playback control, a menu appears after a few seconds.

2 To play a music track in the menu, press Left in the Stop mode to enter the folder list on the left of the screen. Press Up / Down to highlight a folder.

3 Press Right to enter the file list on the right of the screen. Press Up / Down to highlight a track and then press Play/Sel. to play.
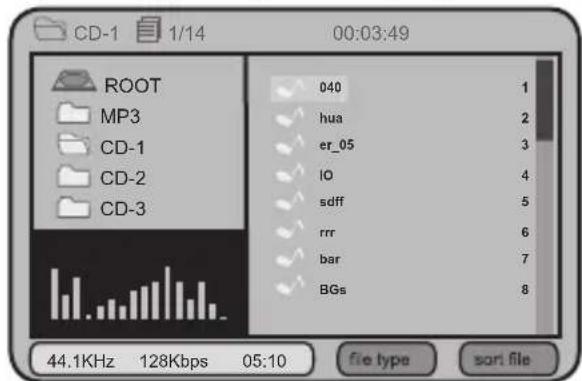
Finding File Types
1 Press ← Left/ → Right to select file type in the Stop mode and press Play/Sel.. 2 Press ↑ Up / □ Down to select a preferred option and press Play/Sel..


Note:
• The deselected file types will not be displayed on the menu.
Sorting Files
1 Press Left/ Right to select sort file in the Stop mode and press Play/Sel.. 2 Press Up / Down / Left/ Right to select a preferred option and press Play/Sel..
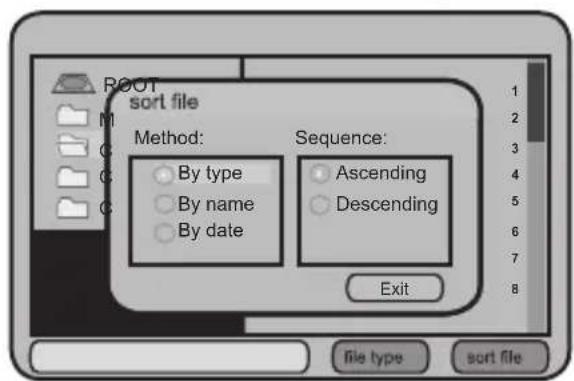

Note:
- Press Up / Down to select Exit and press Play/Sel. to leave file type or sort file.
Stopping Playback
Press Stop.
Pausing Playback
1 Press ☐ Pause.
2 To return to normal playback, press Play/Sel..

Skipping a Track Ahead or Back
Skipping Ahead
Press ⏻ Next during playback.
- Skip a track each time you press the button.
Skipping Back
Press ⏻ Previous during playback.
- When you press the button once midway through a track, the player returns to the beginning of the track being played back. The player skips a track each time you press the button.
Basic Picture CDs Playback
1 Load a Picture CD.
2 Press ☐Menu and ◀Left to enter the folder list on the left screen. Press ☐Up / ☐Down to highlight a folder and then press Play/Sel..

3 Press ☐ Up / ☐ Down to highlight a picture and picture review is shown on the left screen. Then press Play/Sel. to start picture slide show.
Finding File Types
1 Press ☐ Menu and press ◀ Left/Right to select file type, press Play/Sel..
2 Press ☐ Up / ☐ Down to select a preferred option and press Play/ Sel..


Note:
• The deselected file types will not be displayed on the menu.
Sorting Files
1 Press Menu and press Left/Right to select sort file, press Play/Sel.. 2 Press Up / Down / Left/Right to select a preferred option and press Play/Sel.


Note:
- press Up / Down to select Exit and press Play/Sel. to leave file type or sort file.
Rotating Pictures
Press Right during playback to rotate the picture clockwise by 90° or press Left to rotate the picture counter-clockwise by 90°.
Viewing the Next or Previous Picture
Press 🎋 Next to view the next picture or 🔊 Previous to view the previous picture.
Basic MPEG-4 Playback
1 Load a disc that contains MPEG-4 files.
2 Press ☐ Menu and ◀ Left to enter the folder list on the left screen. Press ☐ Up / ■ Down to highlight a folder and then press 📊 lay/Sel..
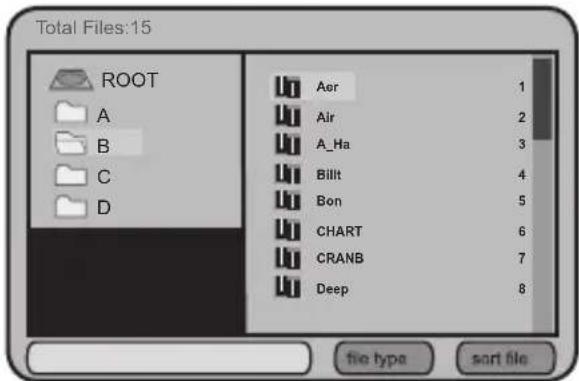
3 Press Up / Down to highlight a file and then press Play/Sel..
Finding File Types
1 Press Menu and press Left/Right to select file type,press Play/Sel..
2 Press 📄 Up / ⏻ Down to select a preferred option and press 🌘lay/ Sel..


Note:
• The deselected file types will not be displayed on the menu.
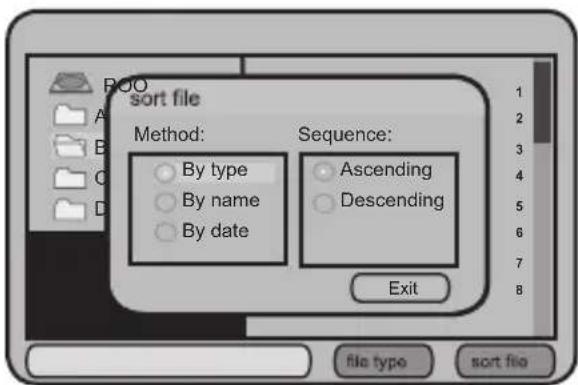
Sorting Files
1 Press ☐ Menu and press ☑ Left/☐ Right to select sort file, press Play/Sel.. 2 Press ☐ Up / ☐ Down / ☑ Left/☐ Right to select a preferred option and press Play/Sel..

Note:
- press Up / Down to select Exit and press Play/Sel. to leave file type or sort file.
Stopping Playback
To stop playback and return to the menu screen, press Stop.
Pausing Playback
1 Press Pause playback.
2 To return to normal playback, press Play/Sel..
Language Setup
1 Press Setup in stop mode.
2 Press ☐ Up / ☐ Down to select Language Setup icon and then press Play/Sel.

3 Press ☐ Up / ☐ Down to select an option and then press Play/Sel..
OSD Language

Menu Language

Audio Language
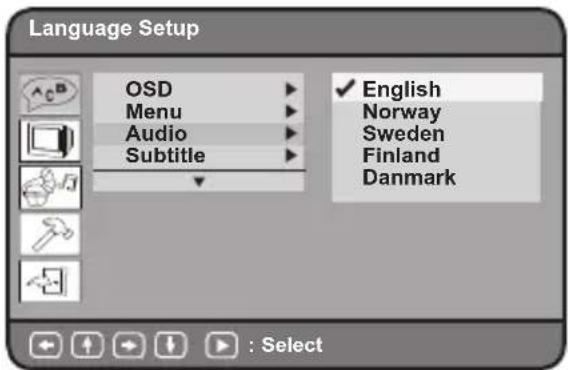
Subtitle Language

External Subtitle Language
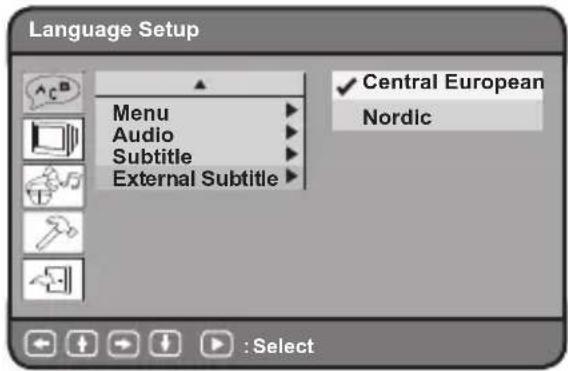
4 Press 📋 Up / ⚙ Down to select a preferred language and then pres Play/Sel..
- To leave SETUP MENU, press Setup.
Notes:
• If the language selected is not recorded on the disc, the player will play the top-priority language of the disc.
- The menu, audio, and subtitle language can be set only when the device does not have disc or the CD door is open.
Screen Setup
1 Press Setup in stop mode.
GB
2 Press ☐ Up / ☐ Down to select Screen Setup icon and then press Play/Sel..
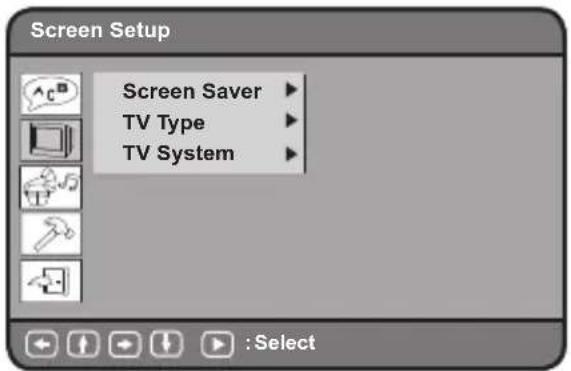
Screen Saver
3 Press ☐ Up / ☐ Down to select Screen Saver and then press Play/Sel..

4 Press ☐ Up / ☐ Down to select a preferred option and then press Play/Sel..
- To leave SETUP MENU, press Setup.


TV Type
3 Press Up / Down to select TV Type and then press Play/Sel..

4:3 Pan Scan : Select "4:3 PS" for a conventional size TV set.
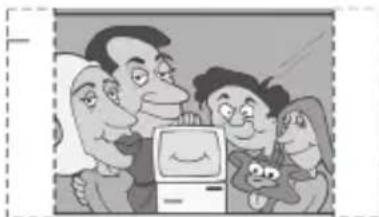
natural_image
Cartoon illustration of a group of people gathered around a computer monitor (no text or symbols visible)b 4:3 Letter Box : Select "4:3 LB" for a conventional size TV set. Black bands appear at top and bottom of screen (letter-box style).
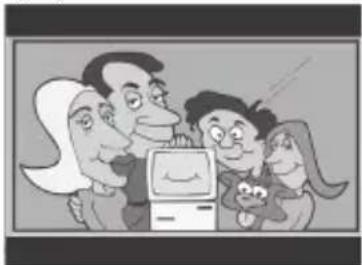
natural_image
Cartoon illustration of a family of people gathered around a computer monitor (no text or symbols visible)c 16:9 Wide : Select "16:9" for a wide-screen TV set to played in "FULL" size.

natural_image
Cartoon illustration of a family of people gathered around a computer monitor (no text or symbols visible)- To leave SETUP MENU, press Setup.

Setup Note:
- The TV type can be set only when the unit is connected with TV.
TV System
3 Press ☐ Up / ☐ Down to select TV System and then press Play/ Sel..

4 Press ☐ Up / ☐ Down to select a preferred option and then press Play/Sel..
- To leave SETUP MENU, press Setup.

Audio Setup
1 Press Setup in stop mode.
2 Press ☐ Up / ☐ Down to select Audio Setup icon and then press Play/Sel..

Analog Out
3 Press Up / Down to select Analog Out and then press Play/ Sel..
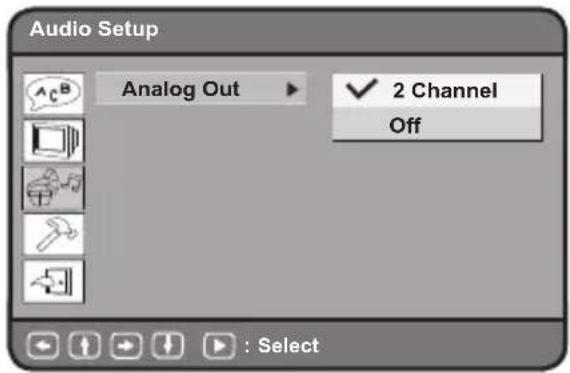
4 Press Up / Down to select a preferred option and then press Play/Sel..

- To leave SETUP MENU, press Setup.

Custom Setup
1 Press Setup in stop mode.
2 Press ☐ Up / ☐ Down to select Custom Setup icon and then press Play/Sel..
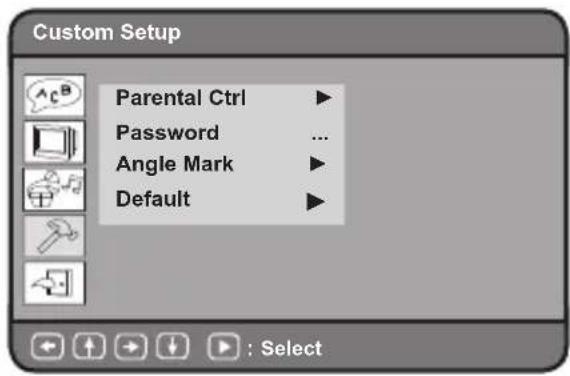
Parental Ctrl
3 Press ☐ Up / ☐ Down to select Parental Ctrl and then press Play/Sel..
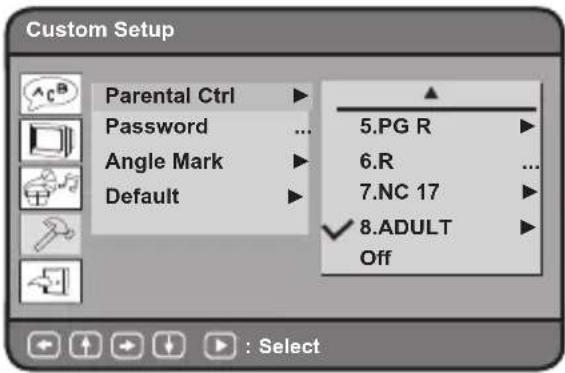
4 Enter 4-digit password and press Play/Sel..

- Enter factory pre-set password "0000" for the first time setup.

5 Press 📌 Up / ⚙ Down to select a preferred rating and then press Play/Sel..
- To leave SETUP MENU, press Setup.

Rating Explanations
- KID: Kid safe; it is safe even for kids.
- G: General audience; recommended as acceptable for viewers of all ages.
- PG: Parental Guidance suggested.
- PG-13: Material is unsuitable for children under the age of 13.
5.PG-R: Parental Guidance-restricted; recommended that parents restrict children under age 17 from viewing or allow children to view only when supervised by a parent or adult guardian. - R: Restricted, children under 17 would not be admitted without an accompanying parent or adult guardian.
- NC-17: No children under the age of 17, not recommended viewing for children under age 17.
- ADULT: Adult only.

Notes:
- You can use the parental control lock ONLY with DVD discs featured with the parental lock function.
- Please keep in mind that discs not encoded with rating lock protection will play regardless of rating and content.
Password
3 Press 📋 Up / ⏻ Down to select Password and then press 📋 lay/ Sel.
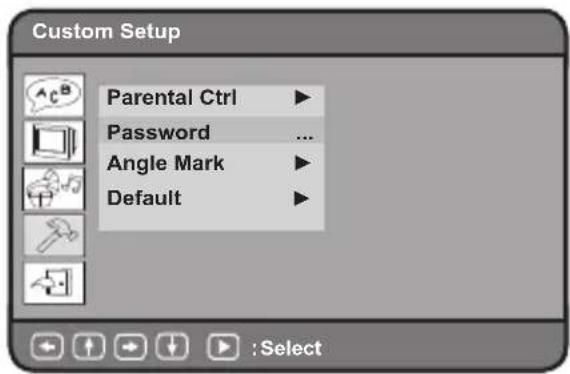
4 Enter the previously set password or factory pre-set password "0000".

5 Enter new password.
6 Enter the password again to verify.
- To leave SETUP MENU, press Setup.

Angle Mark
3 Press ☐ Up / ☐ Down to select Angle Mark and then press Play/Sel..

4 Press ☐ Up / ☐ Down to select a preferred option and then press Play/Sel..
- To leave SETUP MENU, press Setup.
Default
3 Press ☐ Up / ☐ Down to select Default and then press 📋 lay/ Sel..

4 Press ☐ Up / ☐ Down to select a preferred option and then press Play/Sel..
- To leave SETUP MENU, press Setup.
Note:
- Choosing this function will restore all your settings to the factory's default except your own password. Please use this function with caution.
Panel Setting
1 Press LCD a number of times to select PANEL.
2 Press Left / Right to choose a preferred panel setting.
PANEL: NORMAL
PANEL: 4:3
- Press LCD again until the LCD setting box disappears.
Colour Setting
1 Press LCD a number of times to select COLOR.
2 Press Left / Right to choose a preferred colour setting.
COLOR: 🏠 +3 🏠
- Press LCD again until the LCD setting box disappears.
Brightness Setting
1 Press LCD a number of times to select BRIGHT.
2 Press Left / Right to choose a preferred brightness setting.
| BRIGHT: | +3 | |
| BRIGHT: | +2 | |
| BRIGHT: | +1 | |
| BRIGHT: | 0 | |
| BRIGHT: | -1 | |
| BRIGHT: | -2 | |
| BRIGHT: | -3 |
- Press LCD again until the LCD setting box disappears.
LCD Setting
1 Press LCD a number of times to select LCD.
2 Press Left / Right to choose "ON" or "OFF", and then press Play/Sel. button to confirm.
LCD: OFF
LCD: ON
- Press LCD to turn on the LCD again.
Before requesting service for the DVD Player, check the chart below for a possible cause of the problem you are experiencing. Some simple checkups or a minor adjustment on your part may eliminate the problem and restore proper operation.
| SYMPTOM (COMMON) | REMEDY |
| No power. • Insert the power plug securely into the power outlet.• Check if the ON/OFF button on the top of the player is set to on.• Check if no power at the AC outlet by plugging in another appliance for a test. | |
| The player does not start playback when• Condensation has formed: wait about 1 to 2 hours to allow the player to dry out.PLAY is pressed. • The player cannot play discs other than DVDs, audio CDs and picture CDs.• Check if the disc is defective by trying another disc.• Check the region (local) code. | |
| The player starts playback but stops • The disc may be dirty and may require cleaning.immediately. • Ensure that the disc is correctly placed in the disc frame. | |
| No picture. • Ensure that the equipment is connected properly.• Select the same channel and source on the TV as on the player. | |
| No sound. • Ensure that the equipment is connected properly. | |
| Distorted sound. • Ensure that the input settings for the TV and stereo system are proper.• No sound is heard during still picture (pause) or slow-motion playback. | |
| Distorted picture.• Sometimes a small amount of picture distortion may appear. This is not a mal-function. | |
| Completely distorted picture or no colorin picture. | • The disc format is not according to the TV-set used (PAL/NTSC). |
| Picture is distorted during rapid advanceor rapid reverse. | • The picture will be somewhat distorted at times: this is normal. |
| No rapid advance (or rapid reverse)playback. | • Some discs may have sections which prohibit rapid advance (or rapid reverse). |
| No 4:3 (16:9) picture. | • Choose the correct setup “TV Aspect” item. |
| No operations perform with the remotecontrol. | • Check the batteries are installed with the correct polarities (+ and -).• The batteries are depleted: replace them with new ones. |
| • Point the remote control unit at the remote control signal sensor and operate.• Operate the remote control unit at a distance of not more than 6 meters from theremote control signal sensor. | • Remove the obstacles between the remote control unit and remote control signal sensor |
| No subtitles.• | • Subtitles appear only with discs that contain them.Subtitles are hidden from the TV screen. Press SUBTITLE to display the subtitles. |
| Alternative audio soundtrack (or subtitle)language available. | • If an alternative language can not be selected, which indicates no more thandefault language is available on the disc. |
| Angle cannot change.angles recorded, these angles may be recorded for specific scenes only. | • This function depends on software availability. Even if a disc has a number from |
| No key operation (by the DVD Playerand/or the remote control) is effective.properly due to lightning, static electricity or some other external factor.) | • Turn the unit off and then back to on. Alternatively, turn off the unit, disconnectthe AC power cord and then re-connect it. (The player may not be operating |
| Distorted picture or no image• check if the video output menu setting matches the physical connection. | • Check if the TV system setting is correct. |
| OSD setting | • Some setting must be stored by pressing left button. |
Handling Precautions
- Hold the disc by the edges so the surface will not be soiled with fingerprints. (A)
Fingerprints, dirt and scratches can cause skipping and distortion.
- Do not write on the label side with a ball-point pen or other writing utensils.
- Do not use record cleaning sprays, benzine, thinner, static electricity prevention liquids or any other solvent.
- Be careful not to drop or bend the disc.
- Do not install more than 1 disc on the disc tray.
- Do not try to close the disc tray when the disc is not installed properly.
- Be sure to store the disc in its exclusive case when not in use.
If the surface is soiled (B)
Wipe gently with a soft, damp (water only) cloth.
When wiping discs, always move the cloth from the center hole toward the outer edge.
(If you wipe the discs using a circular motion, circular scratches are likely to occur, which will cause noise.)
If the disc is brought from a cold to a warm environment, moisture may form on the disc
Wipe the moisture off with a soft, dry, lint-free cloth before using the disc.
Improper disc storage
You can damage discs if you store them in the following places:
- Areas exposed to direct sunlight
• Humid or dusty areas - Areas directly exposed to a heat outlet or heating appliance
playable disc format
- MPEG4, DVD, DVD+RW, DVD+R, DVD-RW, DVD-R, CD-DA, MP3, Mixed CD-DA, JPEG file disc and Kodak Picture Disc.
Disc which cannot be played with this player
- CD-ROM
• CVD - CD-G
Maintenance
- Be sure to turn the unit off and disconnect the AC power cord before maintaining the unit.
- Wipe this unit with a dry soft cloth.
If the surfaces are extremely dirty, wipe clean with a cloth which has been dipped in a weak soap-and-water solution and wrung out thoroughly, and then wipe again with a dry cloth.
- Never use alcohol, benzine, thinner, cleaning fluid or other chemicals. And do not use compressed air to remove dust.
(A)
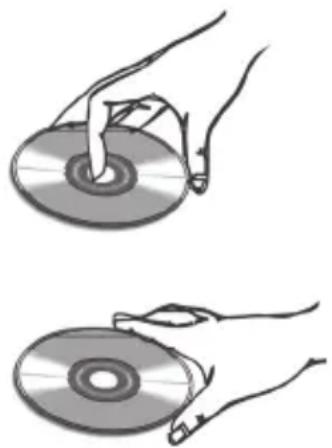
(B)

| M71PDT11E | |
| Disk Format. DVD,CD,CD-R,CD-RW,Kodak Picture CD&JPEG | |
| Video System PAL | |
| Video Decompression MPEG-4,MPEG-2,MPEG-1 | |
| LCD Display 7" Wide-Screen Active-Matrix TFT Type | |
| Audio: | |
| Audio Characteristic 2-Channel Analog | |
| Dolby Digital Decoding Yes | |
| Speaker 2 Built-in Stereo Speakers | |
| Terminals: | |
| Master Unit AV IN Socket x1AV OUT Socket x1Headphone Socket x2 | |
| Slave Unit AV IN Socket x1Headphone Socket x1 | |
| Power Adaptor: | |
| Power Supply | 12V Car Cigarette Lighter Adapter |
| Power Consumption Approx. 10W (12V, 0.83A) | |
| Remote Control Infra-red with 3V Battery (for the Master unit use only) | |
| Battery None | |
| Dimensions & Weight: | |
| Master Unit 211 mm (L) x 155 mm (D) x 44 mm (H)800g | |
| Slave Unit 211 mm (L) x 155 mm (D) x 23 mm (H)360g | |
| Accessories Remote control unit2 in 1 Car adaptorHeadphone3.5mm to 3.5mm Audio/ Video CableCar straps X 4 | |
GB
| Note: If you require a replacement for any of the items listed below, please quote their corresponding part numbers: | |
| Instruction Manual 82-230-00950 | |
| Quick Start Guide 82-230-00730 | 82-230-00740 |
| Remote Control 92-201-12010 | |
| Headphone 54-401-00038 | |
| Car Adaptor 54-201-00105 | |
| 3.5MM to 3.5MM Audio/Video Cable 54-201-00098 | |
| Car Strap 86-230-00020 | |
Innhold
Stoppe avspilling ....14 L2D oppsett mmlmlmlmlmlmlmlmlmlmlmlmlmlmlmlmlmlmlmlmlmlmlmlmlmlmlmlmlmlmlmlmlmlmlmlmlmlmlmlmlmlmlmlmlmlmlmlmlmlmlmlmlmlmlmlmlmlmlmlmlmlmlmlmlmlmlmlmlmlmlmlmlmlmlmlmlmlmlmlmlmlmlmlmlmlmlmlmlmlmlmlmlmlmlmlmlmlmlmlmlmll Formatonnsett 22
natural_image
Illustration of hands adjusting a device with a belt buckle (no text or symbols)3 Koble hoved- og parallellspilleren til bilens DC 12 V sigarettenneruttak med sigarettenneradapteren.
4 Koble en 3,5 mm til 3,5 mm lyd-/videokabel til hoved- og parallellspilleren.
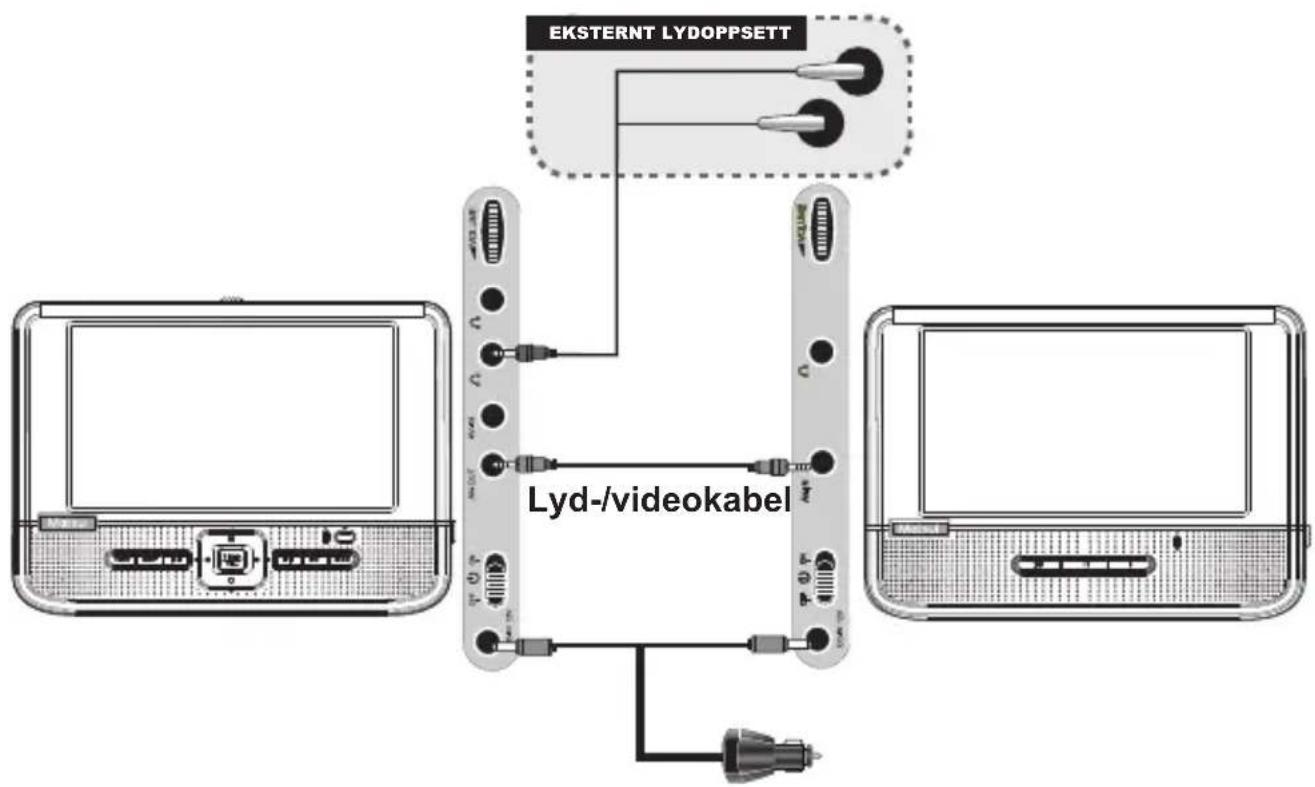
Valgfritt: Eksternt lydoppsett
natural_image
Cartoon illustration of a family gathered around a computer monitor (no text or symbols visible)natural_image
Cartoon illustration of a family with a computer monitor, no text or symbols presentnatural_image
Cartoon illustration of a family of four gathered around a computer monitor (no text or symbols visible)
SE
1 Högtalare
2 LCD-skärm
3 LCD-knapp
4 VÄNSTER-knapp (◄)
5 HÖGER-knapp (▶)
6 LED-strömindikator (◀)
natural_image
Illustration of a hand adjusting a wristband with a magnified view of the belt (no text or symbols present)natural_image
Cartoon illustration of four people gathered around a computer monitor, no text or symbols presentnatural_image
Cartoon illustration of a family with a computer monitor, no text or symbols presentnatural_image
Cartoon illustration of four people gathered around a computer monitor, no text or symbols presentnatural_image
Illustration of hands adjusting a belt buckle with a magnified inset showing the same buckle (no text or symbols present)natural_image
Cartoon illustration of four people gathered around a computer monitor (no text or symbols visible)natural_image
Cartoon illustration of a family with a computer monitor, no text or symbols presentnatural_image
Cartoon illustration of a family with a computer monitor, no text or symbols present- Voit poistua ASETUSVALIKOSTA painamalla Setup Asetukset.
Huomautus:
natural_image
Illustration of a hand adjusting a device with a close-up of the device's belt (no text or symbols present)Vise scene information
Changing Subtitle Languages
Bemærk:

Bemærk:
natural_image
Cartoon illustration of four people gathered around a computer monitor, no text or symbols presentnatural_image
Cartoon illustration of a family of people gathered around a computer monitor (no text or symbols visible)natural_image
Cartoon illustration of four people gathered around a computer monitor, no text or symbols present- Afslut KONFIGURATIONSMENU ved at tryk på Setup Konfiguration.
Bemærk:
This symbol on the product or in the instructions means that your electrical and electronic equipment should be disposed at the end of its life separately from your household waste. There are separate collection systems for recycling in the EU. For more information, please contact the local authority or your retailer where you purchased the product.
Rovi Proprietary Rights
This item incorporates copy protection technology that is protected by U.S. patents and other intellectual property rights of Rovi Corporation. Reverse engineering and disassembly are prohibited.
Restriction on Use & Rovi Trade Mark Rights
Use of the copyright protection technology contained in this product must be authorised by Rovi Corporation and is intended for home and other limited viewing uses only unless otherwise authorised by Rovi Corporation. The names "Rovi Corporation" and "Macrovision" are protected by trademarks.
Notes for battery disposal
Your product contains batteries covered by the European Directive 2006/66/EC, which cannot be disposed of with normal household waste. Please inform yourself about the local rules on separate collection of batteries. The correct disposal of batteries helps prevent potentially negative consequences on the environment and human health.
NOS
- Contents
- GB
- Region Management Information
- Icon used on DVDs (example)
- Never make or change connections with the power switched on.
- Safety Warnings
- GB-4
- Important Warning
- Master Player
- Slave Player
- Optional: External Audio Setup
- Remote Control Operation Range
- Battery Installation for the Remote Control
- Note:
- Basic DVD Playback
- Stopping Playback
- Pausing Playback
- Frame Advance (Step)
- Fast Forward and Backward
- Skipping Ahead
- Skipping Back
- Muting the Player
- Repeat Viewing
- Displaying Scene Information
- Changing Audio Sound track Language
- Changing Subtitle Languages
- Viewing from Different Angles
- Using a DVD Menu
- Using the Menu Function
- Basic Audio CDs Playback
- Load an Audio CD.
- Finding File Types
- Sorting Files
- Skipping a Track Ahead or Back
- Basic Picture CDs Playback
- Rotating Pictures
- Viewing the Next or Previous Picture
- Basic MPEG-4 Playback
- Language Setup
- OSD Language
- Menu Language
- Audio Language
- Subtitle Language
- External Subtitle Language
- Notes:
- Screen Setup
- Screen Saver
- TV Type
- TV System
- Audio Setup
- Analog Out
- Custom Setup
- Parental Ctrl
- Rating Explanations
- Password
- Angle Mark
- Default
- Panel Setting
- Colour Setting
- Brightness Setting
- LCD Setting
- Handling Precautions
- If the surface is soiled (B)
- Improper disc storage
- playable disc format
- Disc which cannot be played with this player
- Maintenance
- Innhold
- Valgfritt: Eksternt lydoppsett
- Vise scene information
- Bemærk:
- Rovi Proprietary Rights
- Restriction on Use & Rovi Trade Mark Rights
- Notes for battery disposal
- NOS
Brand : MATSUI
Model : M71PDT11E
Category : DVD player