CKS3144V - Freezer Elvita - Free user manual and instructions
Find the device manual for free CKS3144V Elvita in PDF.


| Product Type | Freezer |
| Brand | Elvita |
| Model | CKS3144V |
| Energy Class | A+ |
| Total Net Capacity | 100 L |
| Freezing Capacity | 4 kg/24h |
| Storage Time (Power Failure) | 10 h |
| Climate Class | N-ST |
| Noise Level | 40 dB |
| Dimensions (W×D×H) | 550 × 550 × 850 mm |
| Weight | 30 kg |
| Power Supply | 220-240 V, 50 Hz |
| Defrosting Method | Manual |
| Refrigerant | R600a |
| Adjustable Thermostat | Yes |
| Reversible Door | Yes |
| Interior Light | No |
| Fast Freeze Function | Yes |
| Temperature Range | -18°C to -24°C |
| Annual Energy Consumption | 200 kWh |
| Warranty | 2 years |
Frequently Asked Questions - CKS3144V Elvita
User questions about CKS3144V Elvita
0 question about this device. Answer the ones you know or ask your own.
Ask a new question about this device
Download the instructions for your Freezer in PDF format for free! Find your manual CKS3144V - Elvita and take your electronic device back in hand. On this page are published all the documents necessary for the use of your device. CKS3144V by Elvita.
USER MANUAL CKS3144V Elvita
Before using this product, please read the user manual carefully. Save the user manual for future reference.
natural_image
Line drawing of a mechanical component with an arrow indicating rotation, no text or symbols presentnatural_image
Line drawing of a mechanical component with a circular knob and curved arrow indicating rotation (no text or symbols)natural_image
Line drawing of a rectangular table with a curved top and side legs, no text or symbols presentnatural_image
Line drawing of a simple rectangular table with two side supports and a central tray (no text or symbols)natural_image
Isometric line drawing of a square frame with a small rectangular component at the bottom (no text or symbols)natural_image
Technical line drawing of a square mechanical component with mounting holes and an arrow indicating direction (no text or symbols)natural_image
Line drawing of a rectangular frame with a small inset showing a labeled component (no text or symbols present)natural_image
Simple line drawing of a mechanical component with no text or symbolsnatural_image
Technical line drawing of a mechanical assembly with labeled components (no text or symbols present)Varning!
natural_image
Technical line drawing of a door frame structure with labeled components A and B (no text or symbols beyond labels)natural_image
Diagram showing two views of a door with directional arrows indicating movement, no text or symbols presentKassera enheten
natural_image
Line drawing of a mechanical component with an arrow indicating rotation, no text or symbols presentnatural_image
Line drawing of a mechanical component with a circular knob and curved arrow indicating rotation (no text or symbols)natural_image
Simple line drawing of a rectangular table with a curved top and side legs, no text or symbols present.natural_image
Line drawing of a simple rectangular table with two side supports and a central tray (no text or symbols)natural_image
Isometric line drawing of a square frame with a small rectangular component attached (no text or symbols)natural_image
Technical line drawing of a square mechanical component with mounting holes and an arrow indicating direction (no text or symbols)- Ta av den øvre hengseltappen, flytt den til venstre side og trekk den godt til. Legg hengselbraketten et trygt sted.
natural_image
Line drawing of a rectangular frame with a handle and a small protrusion, no text or symbols presentnatural_image
Simple line drawing of a cabinet or shelf with no text, numbers, or symbols present.- Skru ut den nedre hengseltappen, snu braketten og skru tilbake tappen. Sett tilbake braketten med den nedre hengseltappen.
natural_image
Diagram of a conveyor belt system with directional arrows indicating flow or movement (no text or symbols)Advarsel!
natural_image
Technical line drawing of a door frame structure with labeled components (A and B), no text or symbols present.natural_image
Diagram showing two views of a door with directional arrows indicating movement, no text or symbols presentFirst use and installation 35
Operation 36
Helpful hints and tips 36
Cleaning and care 37
Troubleshooting 38
Description of the appliance 39
Reversing the door 39
Disposal of the appliance 41
CE
This appliance complies with the following EU guidelines: 2014/35/EU and 2014/30/EU and 2009/125/EC and EC.643/2009 and 2002/96/EC

Safety and warning information
For your safety and to ensure correct use, please read this user manual carefully, including the tips and warnings, before you install and use the appliance for the first time. To avoid unnecessary mistakes and accidents, it is important that everyone who uses the appliance is thoroughly familiar with its operation and safety features. Save these instructions and be sure that they remain with the appliance if it is moved or sold, so that anyone who uses it throughout its life is informed how to use the appliance and what safety precautions are required.
To ensure the safety of life and property, please follow the safety precautions in this user manual as the manufacturer is not responsible for damage caused by neglect.
Safety of children and other vulnerable groups
This appliance can be used by children aged from the age of 8 upwards, and by individuals with reduced physical, sensory or mental capabilities or lack of experience, on condition that they are supervised or instructed in how to use the appliance safely, and that they understand the hazards involved. Children must not be allowed to play with the appliance. Cleaning and user maintenance must not be carried out by children without supervision.
Keep all packaging away from children to avoid the risk of suffocation.
If you are discarding the appliance, unplug the appliance from the power socket, cut off the power cord (as close to the appliance as possible) and remove the door so that playing children cannot get an electric shock or become trapped in the appliance.
If this appliance replaces an older appliance that has a spring lock (latch) on the door or lid, be sure to make the spring lock unusable before you discard the old appliance. This will prevent it from becoming a death trap for a child.
General safety
WARNING —This appliance is intended to be used in household and similar applications such as
- staff kitchen areas in shops, offices and other working environments;
- farm houses and by clients in hotels, motels and other residential type environments;
- bed and breakfast environments;
- catering and similar non retail applications.
WARNING - Do not store explosive substances such as aerosol cans that contain flammable propellant in this appliance.
WARNING - If the power cord is damaged, it must be replaced by the manufacturer, the manufacturer's service agent or similarly qualified persons in order to avoid a hazard.
WARNING - Keep ventilation openings, in the appliance enclosure or in the built-in structure, clear of obstruction.
WARNING - Do not use tools or other means to accelerate the defrosting process, other than those recommended by the manufacturer.
WARNING - Do not damage the refrigerant circuit.
WARNING - Do not use electrical appliances inside the food storage compartments of the appliance, unless they are of the type recommended by the manufacturer.
WARNING - The refrigerant and insulation foam are flammable. When disposing of the appliance, do so only at an authorized waste disposal centre. Do not expose to flame.
Refrigerant
Isobutene refrigerant (R600a) is contained within the refrigerant circuit of the appliance. This is a natural gas that is relatively environmentally friendly, but is still flammable.
During transportation and installation of the appliance, ensure that none of the components of the refrigerant circuit becomes damaged.
The refrigerant (R600a) is flammable.
WARNING: Risk of fire flammable materials
If the refrigerant circuit is damaged:
- Avoid open flames and sources of ignition.
- Thoroughly ventilate the room in which the appliance is situated.
It is dangerous to alter the specifications or modify this product in any way. Any damage to the cord may cause a short circuit, fire, and/or electric shock.
Electrical safety
Do not extend the power cord by using an extension cord.
Make sure that the plug is not crushed or damaged. A crushed or damaged plug may overheat and cause a fire.
Make sure that you have access to the appliance's plug.
Do not pull on the power cord.
If the power socket is loose, do not plug in the appliance. Otherwise there is a risk of electric shock or fire.
You must not operate the appliance without the interior lighting lamp cover.
The appliance is designed to be powered by a single-phase AC supply of 220–240V/50Hz. If local voltage variations mean that the voltage may vary outside this range, an automatic voltage regulator rated for a minimum of 350W should be
connected between the power socket and the appliance. Do not connect the appliance to the same power socket as other electrical appliances. The power socket and plug must be earthed.
Daily use
Do not store flammable gases or liquids in the appliance. Otherwise there is a risk of explosion.
Do not use any electrical devices inside the appliance (e.g. electric ice cream makers, blenders etc.).
Always unplug the appliance by pulling out the plug, not by pulling on the power cord.
Do not place hot items near the plastic components of this appliance.
Store pre-packed frozen food in accordance with the frozen food manufacturer's instructions.
The appliance manufacturer's storage recommendations should be strictly adhered to. Refer to the relevant instructions for storage.
Do not place the appliance in direct sunlight.
Keep burning candles, lamps and other items with naked flames away from the appliance to avoid the risk of fire.
The appliance is intended for storing food and drink in normal domestic use, as described in this user manual.
The appliance is heavy. Care should be taken when moving it.
Never use the base, drawers, doors
etc. to stand on or as supports.
To avoid items falling and causing injury or damage to the appliance, do not overload the door racks or put too much food in the crisper drawers.
Caution! Care and cleaning
Before carrying out maintenance, switch off the appliance and unplug it from the power socket.
Do not clean the appliance with metal objects, steam cleaner, essential oils, organic solvents or abrasive cleansers.
Do not use sharp objects to remove frost from the appliance. Use a plastic scraper.
Important during installation!
When plugging in the appliance, carefully follow the instructions in this user manual.
Unpack the appliance and check that there is no damage to it. Do not plug in the appliance if it is damaged. Report any damage to the retailer immediately. Keep the packaging material in case of damage.
It is advisable to wait at least four hours before plugging in the appliance to allow the oil to flow back into the compressor.
Make sure there is adequate air circulation around the appliance, otherwise it may overheat. Follow the installation instructions to ensure adequate ventilation.
If possible the appliance should not be installed with its back too close to
the wall, to prevent contact with hot components (compressor, condenser). Follow the installation instructions to avoid the risk of fire.
Do not place the appliance close to a radiator or oven.
Make sure that the mains plug is accessible after the appliance has been installed.
Service
Any electrical work that is required during servicing of the appliance must be carried out by a qualified electrician or competent person.
This product must be serviced by an authorized service centre, and only genuine spare parts must be used.
Note: Children aged from 3 to 8 years are allowed to load and unload refrigerating appliances.
Control panel
Starting up and temperature regulation
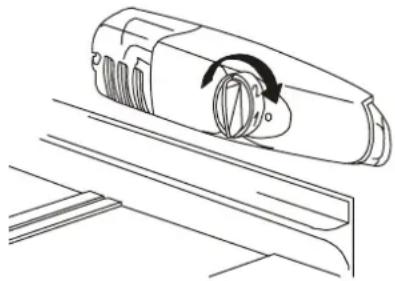
Insert the plug on the power cord into an earthed power socket. When the refrigerator compartment door is opened, the internal lighting is switched on.
The temperature selector knob is located on the right side of the refrigerator compartment.
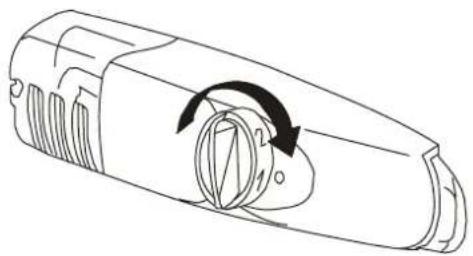
Setting "O" means: Off. When the knob is turned clockwise it turns on the appliance, which then operates automatically.
Setting “1” means: Highest temperature, warmest setting. Setting “7” (end-stop) means: Lowest temperature, coldest setting.
At a low ambient temperature of
around 16^ C, setting 1 should be selected. At ambient temperatures of around 25^ C, select setting 2. If you require a lower temperature, select setting 3 or 4.
Important! Normally we advise that you select a setting of 2
or 3 or 4. If you want the temperature to be warmer or colder please turn the knob to a lower or higher setting accordingly. When you turn the knob to a lower setting it improves energy efficiency, while a higher setting increases energy consumption.
Important! High ambient temperatures (e.g. on hot summer days) and a cold setting (position 6 or 7) may cause the compressor to run continuously!
Reason: When the ambient temperature
is high, the compressor has to run continuously to maintain a low temperature in the appliance
natural_image
Line drawing of a mechanical component with a rotating arrow indicating rotation (no text or symbols)First use and Installation
Cleaning before use
Before using the appliance for the first time, wash the interior and all internal accessories with lukewarm water and neutral soap to remove the typical smell of a brand-new product, then dry thoroughly.
Important! Do not use detergents or abrasive powders, as these will damage the finish.
Installation position
Warning!
Before installing, read the instructions carefully for your safety and correct operation of the appliance.
Position the appliance away from sources of heat such as stoves radiators, direct sunlight etc.
Maximum performance and safety are guaranteed by maintaining the correct indoor temperature for the class of unit concerned, as specified on the rating plate.
This appliance performs well in climate classes N to ST. The appliance may not work properly if it is left for a longer period at a temperature above or below the indicated range.
Important! Good ventilation is essential around the appliance to effectively dissipate heat and ensure efficient operation and low power consumption. So make sure there is adequate free space around the appliance. We recommend there is at least 75 mm clearance at the rear, at least 100 mm above the appliance and at the sides, and enough free space in front to allow the doors to be opened through 160°.
| Climate class Ambient temperature | |
| SN +10°C to +32°C | |
| N +16°C to +32°C | |
| ST +16°C to +38°C | |
| T +16°C to +43°C |
The appliance must not be exposed to rain. Sufficient air must be allowed to circulate around the lower rear area of the appliance, as poor air circulation can affect performance. Built-in appliances should be positioned away from heat sources such as heaters and direct sunlight.
Levelling
The appliance should be level in order to eliminate vibration. To make sure the appliance is level, it should stand upright with both adjusters firmly in contact with the floor. You can also adjust the level by screwing out the appropriate level adjuster at the front (use your fingers or a suitable spanner).
Electrical connection
Caution! Any electrical work required to install this appliance should be carried out by a qualified or competent person.
Warning! This appliance must be earthed. The manufacturer declines any liability if these safety measures are not followed.
Daily use
Accessories
Movable shelves/trays
Various glass or plastic storage shelves or wire trays are included with your appliance – different models have different combinations and different models have different quality.
The walls of the refrigerator are equipped with a series of runners so that the shelves can be positioned as desired.
Positioning the door shelves
To permit storage of food packages of various sizes, the door shelves can be placed at different heights.
To make these adjustments, proceed as follows: gradually pull the shelf in the direction of the arrows until it comes free, then reposition as required.
Vegetable drawer
The drawer is suitable for storing fruit and vegetables.
Helpful hints and tips
Noises from the appliance
The sounds listed below are perfectly normal for refrigeration appliances:
Clicks Whenever the compressor switches on or off, a click can be heard.
Humming As soon as the compressor is in operation, you can hear it humming.
Bubbling When refrigerant flows into thin tubes, you can hear bubbling or splashing noises.
Splashing Even after the compressor has been switched off, this noise can be heard for a short lime.
Energy-saving tips
Do not install the appliance near cookers, radiators or other sources of heat.
Do not open the door too often or leave the door open any longer than necessary.
Do not set the temperature colder than necessary.
Make sure there is clearance between the sides and rear of the appliance and the wall; follow the relevant installation instructions.
If the illustration shows the recommended configuration of the drawers, crisper and shelves, do not change this configuration as it will lead to increased energy use.
Tips for fresh food refrigeration
To obtain the best performance:
Do not store warm foods or evaporating liquids in the appliance.
Do cover or wrap the food, particularly if it has a strong flavour.
Position food so that air can circulate freely around it.
Tips for refrigeration
Meat (all types): wrap in polythene bags and place on the glass shelf above the vegetable drawer. For safety, only store meat in this way for one or two days at the mast.
Cooked foods, cold dishes, etc.: these should be covered and may be placed on any shelf.
Fruit and vegetables: these should be thoroughly cleaned and placed in the special drawer(s) provided.
Butter and cheese: these should be placed in aluminium foil or polythene bags to exclude as much air as possible.
Milk bottles: these should have a cap and should be stored in the bottle rack on the door.
Cleaning and care
Cleaning and care
For hygienic reasons the appliance interior, including interior accessories, should be cleaned regularly.
The fridge should be cleaned and maintained at least every two months.
Warning! Danger of electrical shock!
The appliance should not be plugged in during cleaning.
Before cleaning switch the appliance off and unplug the appliance from the power socket, or switch off or remove the circuit breaker or fuse.
Important!
Remove the food from the appliance before cleaning. Store it in a cool place, well covered.
Never clean the appliance with a steam cleaner. Moisture could accumulate in electrical components.
Hot vapour can damage plastic parts.
Essential oils and organic solvents can attack plastic parts, e.g. lemon juice or the juice from orange peel, butyric acid, cleanser that contains acetic acid. Do not allow such substances to come into contact with appliance parts.
Do not use any abrasive cleansers.
Clean the appliance and the interior accessories with a cloth and lukewarm water. Commercially available dish washing detergents may also be used.
After cleaning, wipe with fresh water and a clean dish cloth.
Dust that settles on the condenser increases energy consumption. Clean the condenser at the back of the appliance once a year with a soft brush or a vacuum cleaner.
Check the water drain hole on the rear wall of the refrigerator compartment.
If the drain hole is blocked, clean it with the aid of something like a soft peg, taking care not to damage the cabinet with sharp objects.
After everything is dry, reconnect and turn on the appliance.
Defrosting
Why defrost?
Water contained in food or from the air inside the fridge may form a frost layer inside. If this becomes thick it will impair refrigeration. If it is more than 10 mm thick, you should defrost.
Defrosting fresh food storage compartment
This is automatically controlled by switching the temperature regulator on or off,
so there is no need for manual defrosting. Water from defrosting will drain into a drip tray through a drain pipe at the back of the fridge automatically.
If the appliance is not used for a long time
Remove all refrigerated packages.
Switch off the appliance by turning the temperature regulator to position "O".
Unplug the appliance or switch off or disconnect the electricity supply.
Clean thoroughly (see section: Cleaning and care).
Leave the door open to avoid the build up of odours.
What to do if...
Warning! Before troubleshooting, unplug the appliance. Only a qualified electrician or competent person may carry out troubleshooting that is not covered by this manual.
Important! There are some sounds during normal use (compressor, refrigerant circulation).
Important! Repairs to refrigerators/freezers may only be performed by competent service engineers. Incorrect repairs can give rise to significant hazards for the user. If your appliance needs repairing, please contact your specialist dealer or your local service centre.
| Problem Possible cause Solution | ||
| Appliance does not work. Appliance is not switched on. Switch on the appliance. | ||
| Appliance is not plugged in or plug is loose. | ||
| Fuse has blown or is defective. Check fuse, replace if necessary. | ||
| Socket is defective. Faults in the electrical supply must be repaired by an electrician. | ||
| Temperature inside appliance is too cold. | Temperature is set too cold. Turn the temperature regulator to a warmer setting temporarily. | |
| Food is too warm. Temperature is not properly adjusted. Please refer to the section on "Starting up". | ||
| Door was open for an extended period. Open the door only as long as necessary. | ||
| A large quantity of warm food was placed in the appliance within the last 24 hours. | ||
| The appliance is near a heat source. Please refer to the section on "Installation position". | ||
| Interior lighting does not work. Light bulb is defective. Please refer to the section on "Changing the light bulb". | ||
| Heavy build-up of frost, possibly also on the door seal. | Door seal is not air-tight (possibly after reversing the door). | Carefully warm the leaking sections of the door seal with a hair dryer (on a cool setting). At the same time shape the warmed door seal by hand so that it sits correctly. |
| Unusual noises. Appliance is not level. Readjust the feet. | ||
| The appliance is touching the wall or other objects. | ||
| A component, e.g. a pipe, at the rear of the appliance is touching another part of the appliance or the wall. | ||
| The compressor does not start immediately after changing the temperature setting. | This is normal, no fault has occurred. | The compressor starts after a period of time. |
| Water on the floor or storage shelves. | Water drain hole is blocked. | See the section on "Cleaning and care". |
Changing the light bulb
Warning! If the LED light bulb is damaged, IT MUST NOT BE REPLACED BY THE USER!
If the light bulb is replaced by an unqualified person it may cause injury or serious malfunction. It must be replaced by a qualified person in order to avoid a hazard. Contact your local service centre for help.
Before changing the light bulb, switch off the appliance and unplug it, or remove the fuse or circuit breaker.
Light bulb data: 220–240V, max. 1.5W.
To switch off the appliance, set the temperature regulator to position "O".
Unplug the appliance.
To change the light bulb, undo the screw.
Press the light bulb cover and slide it backwards.
Change the defective light bulb.
Refit the light bulb cover and the screw.
Reconnect and turn on the appliance.
natural_image
Line drawing of a mechanical component with a circular knob and directional arrow (no text or symbols)Description of the appliance
View of the appliance
- Butter/cheese compartments with flap and egg storage insert.
- Door storage compartment.
- Bottle shelf
- Temperature regulator
- Storage shelves
- Vegetable drawer cover
- Vegetable drawer
- Levelling foot
Note! Due to continuous development of our products your refrigerator may appear slightly different to the illustration in this user manual, but its operation remains the same.
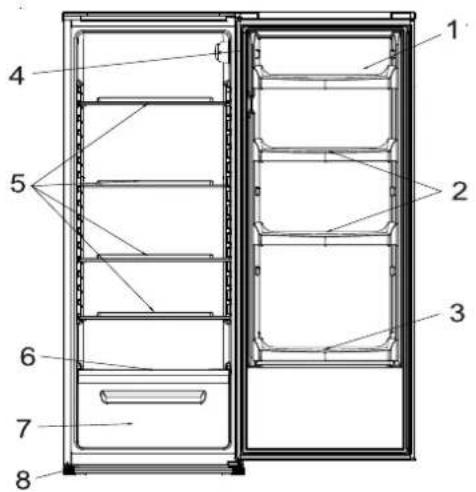
Reversing the door
The side at which the door opens can be changed from the right side (as supplied) to the left side, if the installation site requires. Tools you will need:
Tools you will need:
- 8 mm socket driver
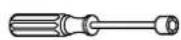
- Cross-head screwdriver
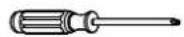
- Putty knife or thin-blade screwdriver
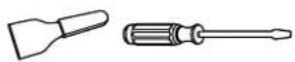
Before you start, lay the refrigerator on its back in order to gain access to the base. You should rest it on soft foam packaging or similar material to avoid damaging the cooling pipes at the rear of the refrigerator.
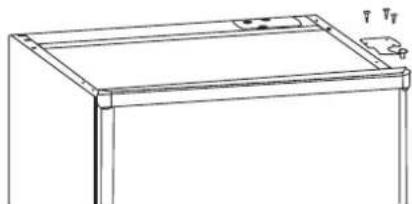
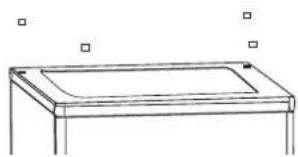
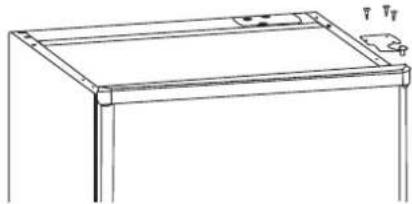
- Stand up the refrigerator and use a flat-bladed screwdriver to remove the 4 screw covers at the rear of the refrigerator lid.
natural_image
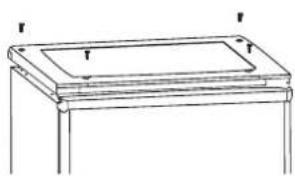
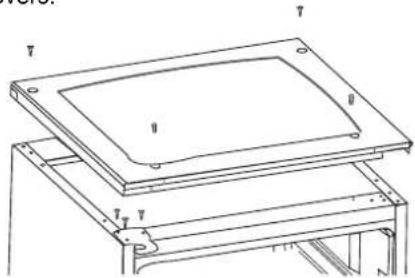
Line drawing of a rectangular table with a curved top and side legs, no text or symbols present- Unscrew and lift the lid from the rear and remove it, then lift the upper door and place it on a padded surface to prevent it from getting scratched.
natural_image
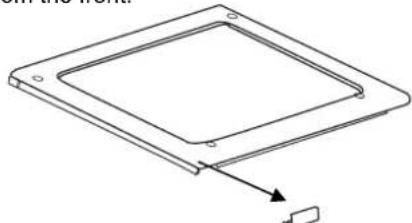
Line drawing of a simple wooden table with a flat top and two side supports (no text or symbols)- Use a flat-bladed screw driver to remove the top cover plate from the front.
natural_image
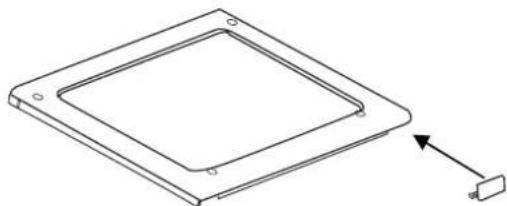
Isometric line drawing of a square frame with an arrow pointing to a small object on the right side (no text or symbols)- Refit the top cover plate on the other side.
natural_image
Technical line drawing of a square mechanical component with mounting holes and an arrow indicating direction (no text or symbols)- Remove the upper hinge pin, transfer it to the left side and tighten securely, then put the hinge bracket in a safe place.
natural_image
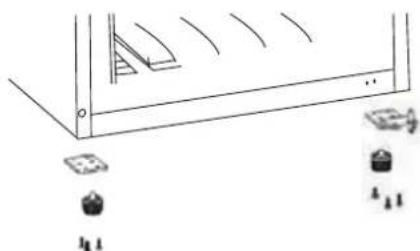
Line drawing of a rectangular frame with a small inset showing a labeled component (no text or symbols present)- Remove both adjustable feet and remove the bottom hinge bracket by unscrewing the bolts.
natural_image
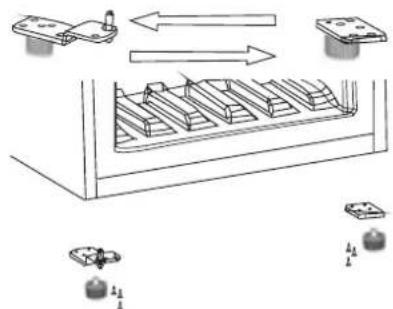
Simple line drawing of a mechanical component with no text or symbols- Unscrew and remove the bottom hinge pin, turn the bracket over and refit the pin. Refit the bracket with the bottom hinge pin.
Replace both adjustable feet. Transfer the lower door to the new position. Ensure that the door is level and insert the bottom hinge pin into the lower hole in the door, then tight the bolts.
natural_image
Diagram of a mechanical assembly with components and directional arrows, no visible text or symbols- Replace the lid by fitting the upper hinge pin into the hole in the upper door, securing it with the 4 screws. Refit the screw covers.
natural_image
Technical line drawing of a layered electronic device with mounting brackets and mounting holes (no text or symbols)Warning!
The appliance must not be connected to the power socket while changing the side on which the door opens. Unplug the appliance from the power socket first.
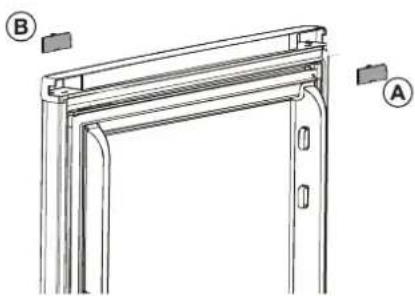
When you reverse the door, please do this first:
- Remove accessory B from the upper cover of the upper door and fit accessory A,
which is a small detachable part from a small bag.
natural_image
Technical line drawing of a door frame structure with labeled components (A and B), no text or symbols present.After you reverse the door, please do this:
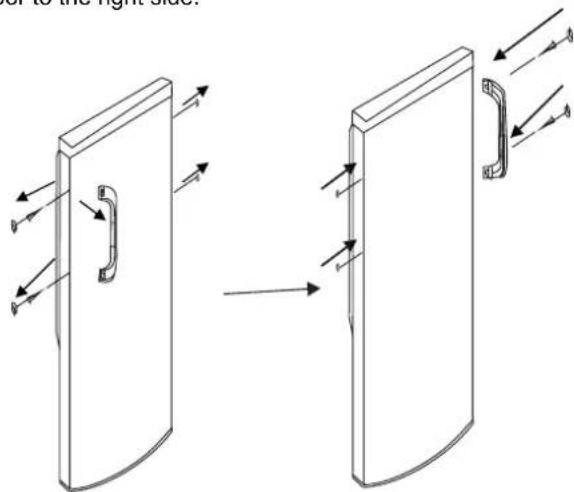
Move the handle from the left side of the upper door to the right side.
natural_image
Diagram showing two mechanical components with directional arrows indicating movement, no text or symbols presentDisposal of the appliance
It is prohibited to dispose of this appliance in domestic household waste.
Packaging materials
Packaging materials with the recycle symbol are recyclable. Dispose of the packaging in a suitable waste collection container to recycle it.
Before disposal of the appliance.
- Unplug the appliance from the power socket.
- Cut off the power cord and discard it.
Correct disposal of this product
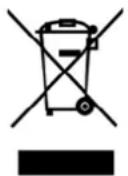
This symbol indicates that this product should not be disposed of with other household waste throughout the EU. To prevent possible harm to the environment or human health due to uncontrolled waste disposal, recycle it responsibly to promote the sustainable reuse of material resources. To return your used device, please use the return and collection systems or contact the retailer where the product was purchased. They can take this product for environmentally safe recycling.
To avoid contamination of food, please respect the following instructions:
- Opening the door for long periods can cause a significant increase in the temperature in the compartments of the appliance.
- Regularly clean surfaces that can come in contact with food and the accessible parts of the drainage system.
- Store raw meat and fish in suitable containers in the refrigerator, so that they do not come in contact with or drip on to other food.
- Two-star frozen-food compartments are suitable for storing pre-frozen food, storing or making ice cream and making ice cubes.
- One-, two- and three-star compartments are not suitable for the freezing of fresh food.
| Order Compartment type | Target storage temp. (°C) | Appropriate food | |
| 1 Fridge | +2 ≤ +8 Eggs, cooked food, | packaged food, fruit and | vegetables, dairy products, cakes, drinks and other foods that are not suitable for freezing. |
| 2 (***)* | Freezer ≤ -18 Seafood (fish, shrimp, shellfish), freshwater | fish and shellfish, and meat products (recommended for 3 months, the longer the storage time, the poorer the taste and nutrition); suitable for frozen fresh food. | |
| 3 *** | Freezer ≤ -18 Seafood (fish, shrimp, shellfish), freshwater | fish and shellfish and meat products (recommended for 3 months, the longer the storage time, the poorer the taste and nutrition); not suitable for frozen fresh food. | |
| 4 ** | Freezer ≤ -12 Seafood (fish, shrimp, shellfish), freshwater | fish and shellfish and meat products (recommended for 2 months, the longer the storage time, the poorer the taste and nutrition); not suitable for frozen fresh food. | |
| 5 * | Freezer ≤ -6 Seafood (fish, shrimp, shellfish), freshwater | fish and shellfish and meat products (recommended for 1 month, the longer the storage time, the poorer the taste and nutrition); not suitable for frozen fresh food. | |
| 6 0-star | -6 ≤ 0 Fresh pork, beef, fish, chicken, some packaged | processed foods, etc. (Recommended to be eaten on the same day, preferably no more than 3 days).Partially packaged processed foods (non-freezable foods). | |
| 7 Chill | -2 ≤ +3 Fresh/frozen pork, beef, chicken, freshwater | fish and shellfish, etc. (7 days below 0°C, or if above 0°C consumption is recommended the same day, and preferably within 2 days).Seafood (up to 15 days below 0°C; it is not recommended to store above 0°C). | |
| 8 | Fresh Food | 0 ≤ +4 | Fresh pork, beef, fish, chicken, cooked food, etc. (recommended to be eaten on the same day, preferably no more than 3 days). |
| 9 | Wine | +5 ≤ +20 | Red wine, white wine, sparkling wine etc. |
Note: please store different types of food in the appropriate compartments to suit the target storage temperature for your products.
- If the refrigerating appliance is left empty for long periods, switch off, defrost, clean, dry, and leave the door open to prevent mould developing inside the appliance.
• Water dispenser cleaning (applies only to water dispenser products): - Clean water tanks if they have not been used for 48 hours; flush the water system by connecting to a water supply if water has not been drawn for 5 days.
GB
INDHOLD
natural_image
Line drawing of a mechanical component with an arrow indicating rotation, no text or symbols presentnatural_image
Line drawing of a mechanical component with a circular knob and curved arrow indicating rotation (no text or symbols)natural_image
Line drawing of a rectangular table with a curved top and legs, no text or symbols presentnatural_image
Line drawing of a simple rectangular table with two handles and a central tray (no text or symbols)natural_image
Technical line drawing of a square mechanical component with an arrow indicating direction (no text or symbols)natural_image
Technical line drawing of a square mechanical component with mounting holes and an arrow indicating direction (no text or symbols)natural_image
Line drawing of a rectangular frame with a small inset showing a labeled component (no text or symbols present)natural_image
Simple line drawing of a mechanical component with no text or symbolsnatural_image
Technical line drawing of a mechanical assembly with labeled components (no text or symbols present)Advarsel!
natural_image
Technical line drawing of a door frame structure with labeled components A and B (no text or symbols beyond labels)natural_image
Diagram showing two views of a door with directional arrows indicating movement, no text or symbols presentnatural_image
Line drawing of a mechanical component with an arrow indicating rotation, no text or symbols presentnatural_image
Line drawing of a mechanical component with a circular knob and curved arrow indicating rotation (no text or symbols)Laitteen kuvaus
Laitteen osat
natural_image
Simple line drawing of a rectangular table with a curved top and side legs, no text or symbols present.natural_image
Line drawing of a simple wooden table with a flat top and two side legs (no text or symbols)natural_image
Pure technical line drawing of a square component with an arrow pointing to a small rectangular feature (no text or symbols)natural_image
Technical line drawing of a square mechanical component with mounting holes and a small attached component (no text or symbols)natural_image
Line drawing of a simple rectangular table with a small inset showing a small object, no text or symbols present.natural_image
Simple line drawing of a roof structure with support fixtures and a small object, no text or symbols present.natural_image
Diagram of a mechanical assembly with components and directional arrows, no visible text or symbolsnatural_image
Technical line drawing of a layered electronic device with mounting brackets and mounting holes (no text or symbols)Varoitus!
natural_image
Technical line drawing of a door frame structure with labeled points A and B (no text or symbols beyond labels)natural_image
Diagram showing two views of a door with directional arrows indicating movement, no text or symbols presentnatural_image
Technical line drawing of a mechanical component with an arrow indicating rotation (no text or symbols)natural_image
Line drawing of a mechanical component with a circular knob and directional arrow (no text or symbols)Lýsing á vörunni
Teikning af tækinu
- Smjör/osta hólf með lokum og eggjabakka
- Hurðargeymsluhólf
- Flöskuhilla
- Hitastigstakki
- Geymsluhillur
- Grænmetislok
- Grænmetissküffa
- Stillifætur
Snúa hurđ viđ
natural_image
Line drawing of a rectangular table with a curved top and legs, no text or symbols presentnatural_image
Line drawing of a simple wooden table with a flat top and two side legs (no text or symbols)natural_image
Pure technical line drawing of a square component with an arrow pointing to it, no text or symbols present.natural_image
Technical line drawing of a square mechanical component with mounting holes and a small attached component (no text or symbols)natural_image
Line drawing of a simple rectangular frame with a small inset showing a small object, no text or symbols present.natural_image
Simple line drawing of a roof structure with supports and a small object, no text or symbols presentnatural_image
Diagram of a mechanical assembly with rotating components and directional arrows (no text or symbols)Viðvörun!
natural_image
Technical line drawing of a door frame structure with labeled components A and B (no text or symbols beyond labels)natural_image
Diagram showing two views of a door with directional arrows indicating movement, no text or symbols presentFörgun täekis
natural_image
Gray circular icon with three white gears, no text or symbols presentGARANTI WARRANTY TAKUU ÁBYRGĐ
Quality warranty applies to consumers
- Kassera enheten
- CE
- Safety and warning information
- Safety of children and other vulnerable groups
- General safety
- Refrigerant
- WARNING: Risk of fire flammable materials
- Electrical safety
- Daily use
- Caution! Care and cleaning
- Important during installation!
- Service
- Control panel
- Starting up and temperature regulation
- First use and Installation
- Cleaning before use
- Installation position
- Warning!
- Levelling
- Electrical connection
- Accessories
- Movable shelves/trays
- Positioning the door shelves
- Vegetable drawer
- Helpful hints and tips
- Noises from the appliance
- Energy-saving tips
- Tips for fresh food refrigeration
- Tips for refrigeration
- Cleaning and care
- Important!
- Defrosting
- Why defrost?
- Defrosting fresh food storage compartment
- If the appliance is not used for a long time
- What to do if...
- Changing the light bulb
- Description of the appliance
- View of the appliance
- Reversing the door
- Disposal of the appliance
- Packaging materials
- Before disposal of the appliance.
- Correct disposal of this product
- INDHOLD
- Laitteen kuvaus
- Laitteen osat
- Lýsing á vörunni
- Teikning af tækinu
- Snúa hurđ viđ
- Förgun täekis
- GARANTI WARRANTY TAKUU ÁBYRGĐ
Brand : Elvita
Model : CKS3144V
Category : Freezer