
JUKEBOX RECORDER - Media player ARCHOS - Free user manual and instructions
Find the device manual for free JUKEBOX RECORDER ARCHOS in PDF.

| Product Type | Portable multimedia player with MP3 recorder |
| Hard disk capacity | 6, 10, 15 or 20 GB depending on model |
| Supported audio formats | MP3 (30 to 320 kbps, VBR) playback; MP3 encoding up to 160 kbps in real time |
| Recording | From stereo analog input, built-in microphone or SPDIF digital input |
| Interface and transfer | USB 1.1 up to 1 MB/s, compatible with PC and Mac |
| Buffer | 2 MB |
| Screen | Backlit graphical LCD, 8 lines of characters |
| Playback battery life | Up to 10 hours |
| Power | 4 rechargeable NiMH AA batteries (provided) or AC/DC power adapter |
| Dimensions | 115 x 83 x 34 mm (with plug) |
| Weight | 350 g |
| System requirements | PC: Pentium 233 MHz, Windows 98SE/ME/2000/XP, 32 MB RAM; Mac: OS 8.6 or higher, G3 |
| Maintenance and cleaning | Avoid shocks, use only ARCHOS adapter and batteries, do not expose to moisture |
| Safety | Do not open the device (risk of electric shock), observe battery polarity, do not use in a humid environment |
| Spare parts and repairability | Replaceable NiMH AA rechargeable batteries; technical support via archos.com or telephone support |
| General information | Brand ARCHOS, model Jukebox Recorder, manual available in multiple languages, firmware downloadable |
| Warranty | Limited warranty covering manufacturing defects; excludes accidental damage, batteries, and unauthorized modifications |
Frequently Asked Questions - JUKEBOX RECORDER ARCHOS
User questions about JUKEBOX RECORDER ARCHOS
0 question about this device. Answer the ones you know or ask your own.
Ask a new question about this device
Download the instructions for your Media player in PDF format for free! Find your manual JUKEBOX RECORDER - ARCHOS and take your electronic device back in hand. On this page are published all the documents necessary for the use of your device. JUKEBOX RECORDER by ARCHOS.
USER MANUAL JUKEBOX RECORDER ARCHOS
Manual Version 4.0 Please see the Archos website for the latest manual and software updates for this product. www.archos.com
English - Table of Contents
Warranty and Warnings 3
Introduction To Jukebox Recorder 5
Operating the Jukebox Recorder 6
ARCHOS Jukebox Recorder Menu Structure 8
1 - Menu 12
Jukebox Recorder Operation Modes
2 - File 21
3 - Time 22
4 - Carrying the Jukebox Recorder 23
5 - PC USB Driver and MusicMatch™ Software Installation 24
6 – Installation of the MusicMatch™ Software for PC 25
7 - MAC USB Driver and MusicMatch™ Software Installation 25
8 - MAC MusicMatch™ Software Installation 26
9 - Maintenance 26
10 - Changing NiMH Batteries 27
11 - Trouble shooting 28
12 - Customer Support 30
Warranty and Limited Liability
This product is sold with a limited warranty and specific remedies are available to the original purchaser in the event the product fails to conform to the limited warranty. Manufacturer's liability may be further limited in accordance with its sales contract.
In general, the manufacturer shall not be responsible for product damages caused by natural disasters, fire, static discharge, misuse, abuse, neglect, improper handling or installation, unauthorized repair, alteration or accident. In no event shall the manufacturer be liable for loss of data stored on disk media.
MANUFACTURER SHALL NOT BE LIABLE FOR ANY SPECIAL, INCIDENTAL OR CONSEQUENTIAL DAMAGES. EVEN IF INFORMED OF THE POSSIBILITY THEREOF IN ADVANCE.
Archos licensor(s) makes no warranties, express or implied, including, without limitation, the implied warranties of merchantability and fitness for a particular purpose, regarding the licensed materials. Archos's licensor(s) does not warrant, guarantee or make any representations regarding the use or the results of the use of the licensed materials in terms of its correctness, accuracy, reliability, correctness or otherwise. The entire risk as to the results and performance of the licensed materials is assumed by you. The exclusion of implied warranties is not permitted by some jurisdictions. The above exclusion may not apply to you.
In no event will Archos's licensor(s), and their directors, officers, employees or agents (collectively Archos' licensor) be liable to you for any consequential, incidental or indirect damages (including damages for loss of business profits, business interruption, loss of business information, and the like) arising out of the use of inability to use the licensed materials even if Archos' licensor has been advised of the possibility of such damages. Because some jurisdiction do not allow the exclusion or limitation of liability for consequential or incidental damages, the above limitations may not apply to you.
Please see your sales contract for a complete statement of warranty rights, remedies and limitation of liability.
Furthermore, warranty does not apply to:
• Damages or problems resulting from misuse, abuse, accident, alteration or incorrect electrical current or voltage.
• Any product tampered-with or damaged warranty seal or serial number label.
• Any product without a warranty or serial number label.
- Batteries and any consumable items delivered with or in the equipment.
Warnings and Safety Instructions
CAUTION
To prevent risks of electric shock, this unit must only be opened by qualified service personnel.
Power off and disconnect the power supply cable before opening the unit.
WARNING
To prevent fire or shock hazard, do not expose the unit to rain or moisture.
Use of this product is for personal use only. Copying CDs or loading music, video, or picture files for sale or other business purposes is or may be a violation of copyright law. Copyrighted materials, works of art, and/or presentations may require authorization to be fully or partially recorded. Please be aware of all such applicable laws concerning the recording and use of such for your country and jurisdiction.
FCC Warning Statement
FCC Compliance
This equipment has been tested and found to comply with limits for a Class B digital device, pursuant to Part 15 of the FCC Rules. These limits are designed to provide reasonable protection against harmful interference in a residential installation. This equipment generates, uses and can radiate radio frequency energy and, if not installed and used in accordance with instructions, may cause harmful interference to radio communications. However, there is no guarantee that interference will not occur in a particular installation. If this equipment does cause harmful interference to radio or television reception, which can be determined by turning the equipment off and on, the user is encouraged to try to correct the interference by one or more of the following measures:
• Reorient or relocate the receiving antenna.
- Increase the separation between the equipment and receiver.
- Connect the equipment into an outlet on a circuit different from that to which the receiver is connected.
- Consult the dealer or an experienced radio/TV technician for help.
Note: During file transfer or in the PC mode, if the EUT or computer suddenly freezes or does not respond, it may be due to the electrostatic phenomenon. Please follow the procedures below to recover the operation:
Unplug the USB cable from the EUT
Close the software application in the computer (or re-boot the computer if necessary)
Re-connect the USB cable to the EUT.
CAUTION : Modifications not authorized by the manufacturer may void users authority to operate this device.
FCC Part 15 - Operation is subject to the following two conditions:
- This device may not cause harmful interference;
- This device must accept any interference received including interference that may cause undesired operation.
Copyright Notice
Copyright ARCHOS © 2002 All rights reserved.
This document may not, in whole or part, be copied, photocopied, reproduced, translated or reduced to any electronic medium or machine-readable form without prior consent, in writing, from ARCHOS. All brands and products names are registered trademarks and the property of their respective owners. Specifications are subject to change without notification. Errors and omissions accepted. Images and illustrations may not always match contents. Copyright ® ARCHOS. All rights reserved.
Disclaimer of warranty: to the extent allowed by applicable law, representations and warranties of non-infringement of copyrights or other intellectual property rights resulting from the use of the product under conditions other than as here above specified, are hereby excluded.
Disclaimer of warranty : To the extent allowed by applicable law, representations and warranties of non-infringement of copyrights or other intellectual property rights resulting from the use of the product under conditions other than as here above specified, are hereby excluded.
Introduction to ARCHOS Jukebox Recorder
The Archos Jukebox Recorder is the first, portable MP3 recorder and 6, 10, 15 or 20 GB* Hard Drive, which gives you real-time, on-the-fly recording of up to 100, 160, 250, or 320 hours* of top quality music in MP3 format. You can record directly from any audio source, including your stereo set, radio, or microphone via the stereo line-in jacks. It will also work as a voice recorder. You can record from any analog or digital sources at bit-rates up to 160 kbps and can port your recordings back to the PC without any specialized software. It also doubles as an extremely portable 6, 10, 15 ou 20 GB* hard drive for PC or Mac laptops or desktop computers, and you are able to store your data and photos at the same time. This exciting new Jukebox Recorder is the first palm-sized, real-time MP3 encoder, plus an MP3 player and 6,10, 15 or 20 GB* hard drive that connects to the computer through an USB interface. There's no need for special software to download MP3 songs. Just drag & drop MP3 files from Explorer to your computer. You can also use your Jukebox Recorder as an optional hard drive to store all your data, images, software, etc. Update with a simple click at the ARCHOS website and download the latest firmware that supports additional software extensions. Merge your entire collection of MP3s and CDs (150, 20, 250, 370, or 500 audio CD's* : 1500, 2500, 3700 or 5000 songs*) into one hand-held device. Slip it into your pocket, and listen to all your favorite music wherever you go.
Caution: batteries must be charged at normal room temperature. Do not charge below 5 ^ ( 40^ ) or above 35 ^ ( 95^ ).
Technical Specifications
Capacity: 6, 10, 15 or 20 GB* HD (6000, 10000, 15000 or 20000 minutes MP3 at 128 kbps)
Internal Buffer: 2MB
Interface and transfer rate to computer: USB (compatible for PC and Mac), Up to 1 MB/sec.
Format supported: MP3 (30 to 320 kbps – VBR) Reading, MP3 (selectable 30 to 160 kbps) real-time encoding.
Display: Graphic backlit LCD (up to 8 lines of characters)
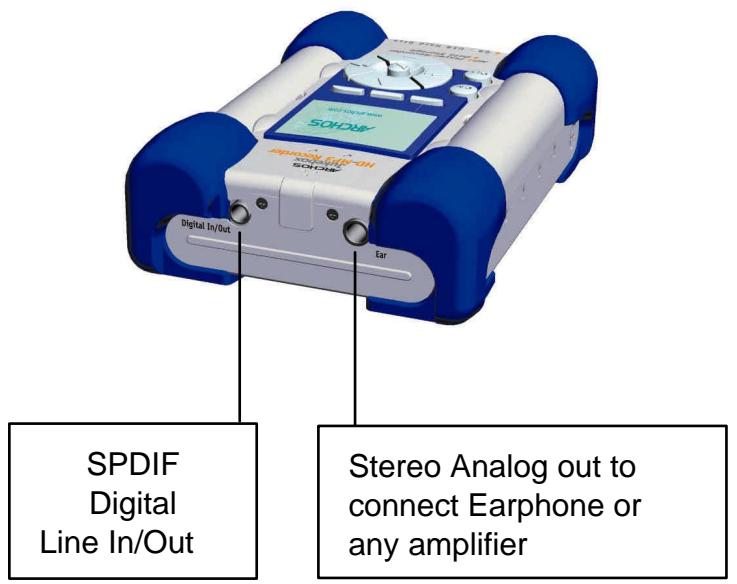
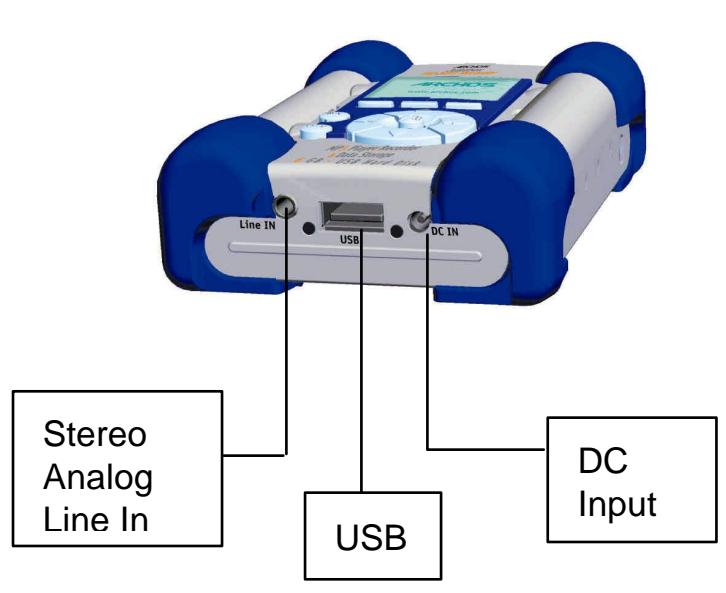
Audio Specifications: Stereo Digital Line In/Out, Stereo Analog Line In, Stereo Analog Line Out/Earphone Jack. Signal to noise ratio > 90 dB. Max. Output power: 100 mW Freq. Response 20 Hz – 20 KHz. Harmonic distortion: < 0.1% Internal microphone.
Playback autonomy: Up to 10 hours.
Software scalability: Downloadable firmware updates from ARCHOS web site.
Power Source: Internal Power: 4 x AA Rechargeable NiMH batteries provided by ARCHOS.
External Power: AC/DC Charger/ Adapter delivered with product only.
Dimensions: 115 x 83 x 34 mm (4.5" x 3.2" x 1.3") with footing.
Weight: 350g (12.3 oz)
System requirements: For PC: Pentium 233 MHZ or higher. Windows 98 SE, ME, 2000, XP. 32 MB RAM (64 MB recommended). CD-ROM Drive with digital audio extraction support. For Mac: OS 8.6 or higher. iMac, G3 or higher. USB manager version 1.2 or higher.
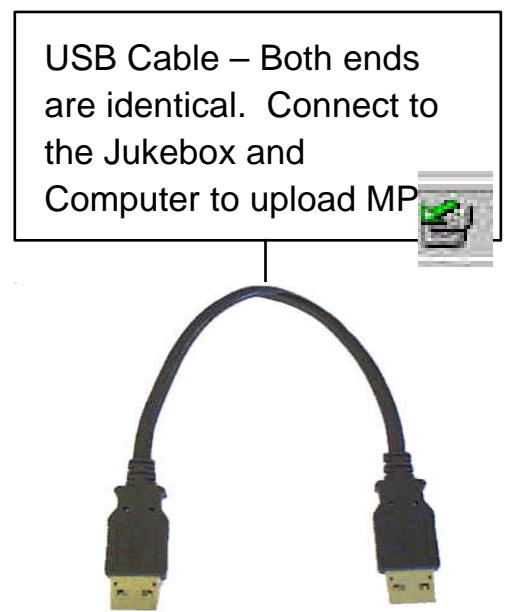
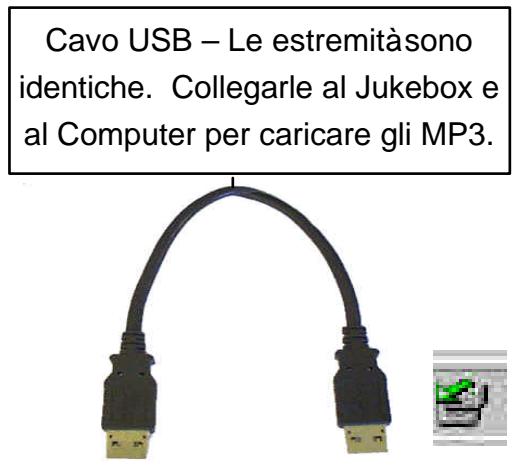
Package included: USB cable (AA), AC/DC adapter, stereo headphones, carrying pouch, driver plus MusicMatch™ Software on CD and 3 language manual.
NOTE: Each computer should have the appropriate port according to the selected interface.
(*) depending on model
Operating Jukebox Recorder
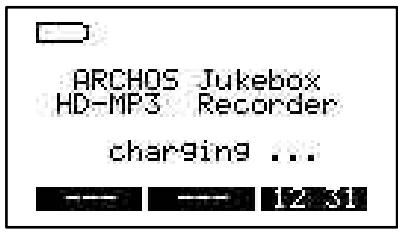
Before using the Jukebox Recorder for the first time, you are required to recharge the built-in batteries for a minimum of 6 hours. You can also use the ARCHOS Jukebox Recorder with the power adaptor during charging.
Charging Batteries: (use ONLY the included ARCHOS AC power adaptor)
The batteries are required to be fully charged for 6 hours. Plug the ARCHOS AC power adaptor into an available wall outlet, then plug the mini power connector to the “DC In” of the Jukebox. While charging, the Jukebox Recorder can be used after an hour. Charging time may then be increased up to 15 hours depending on the extent of use.
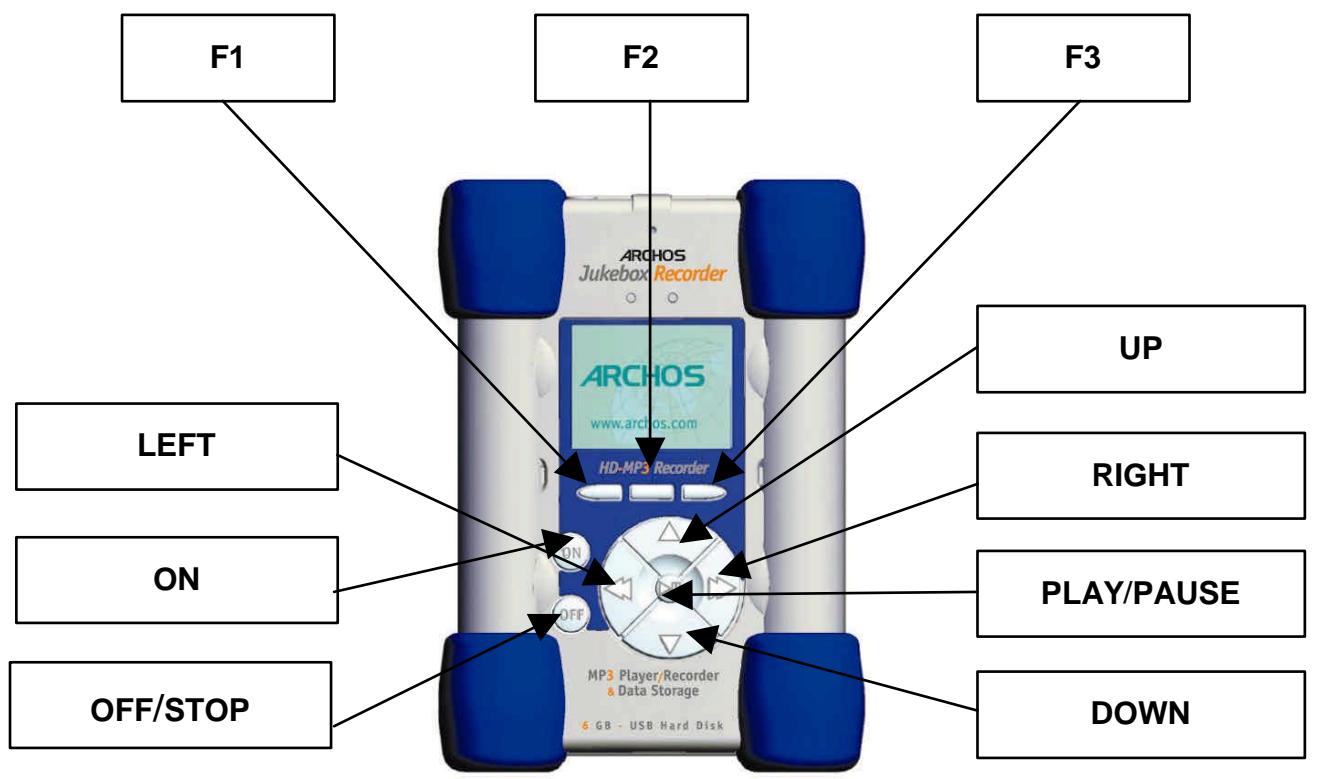
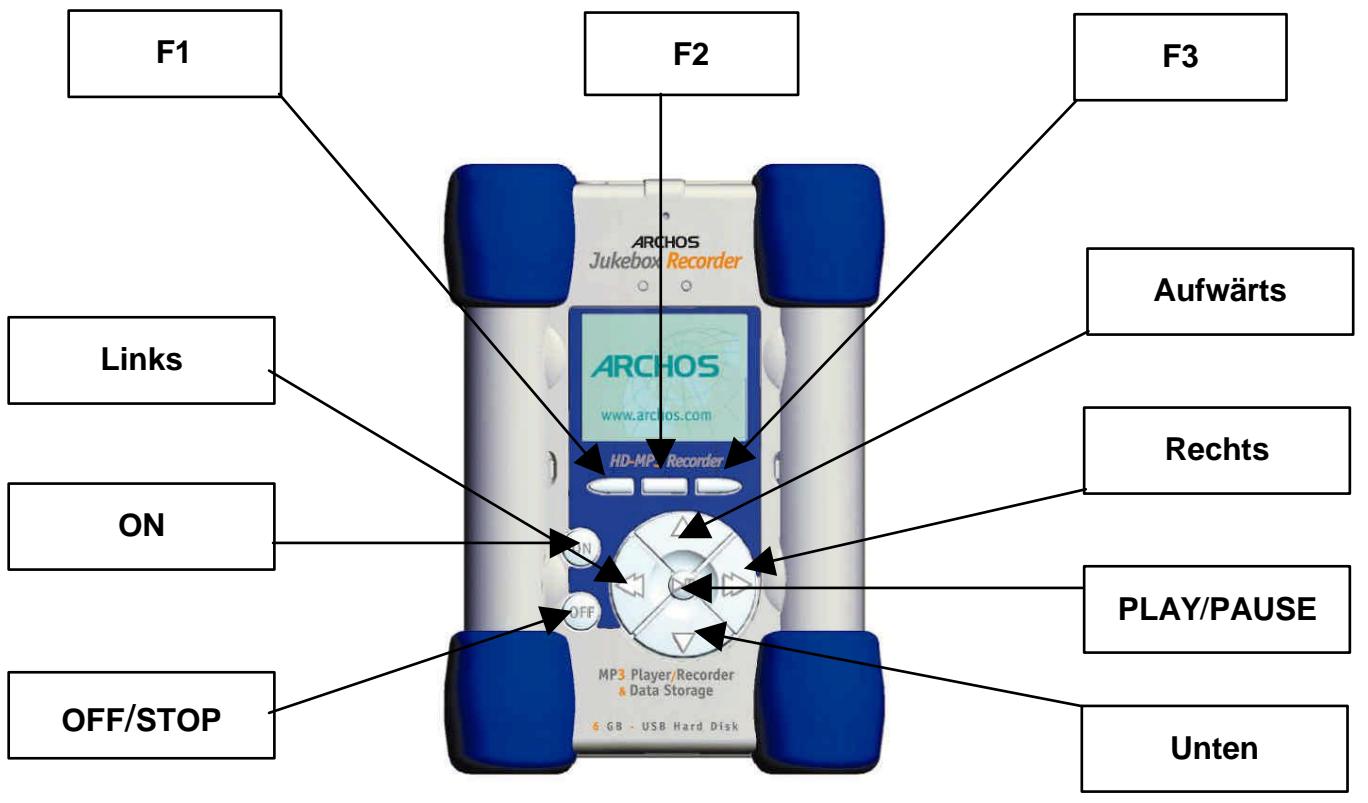
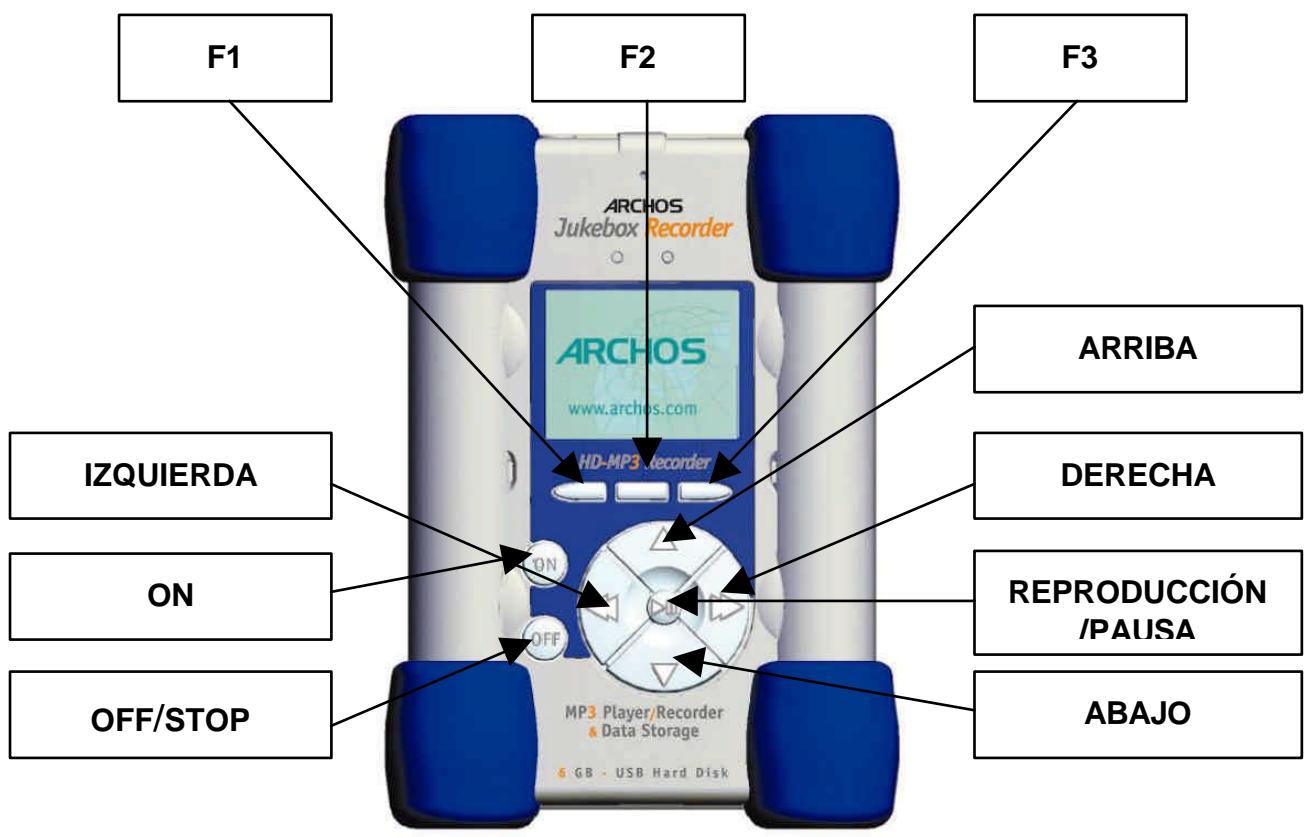
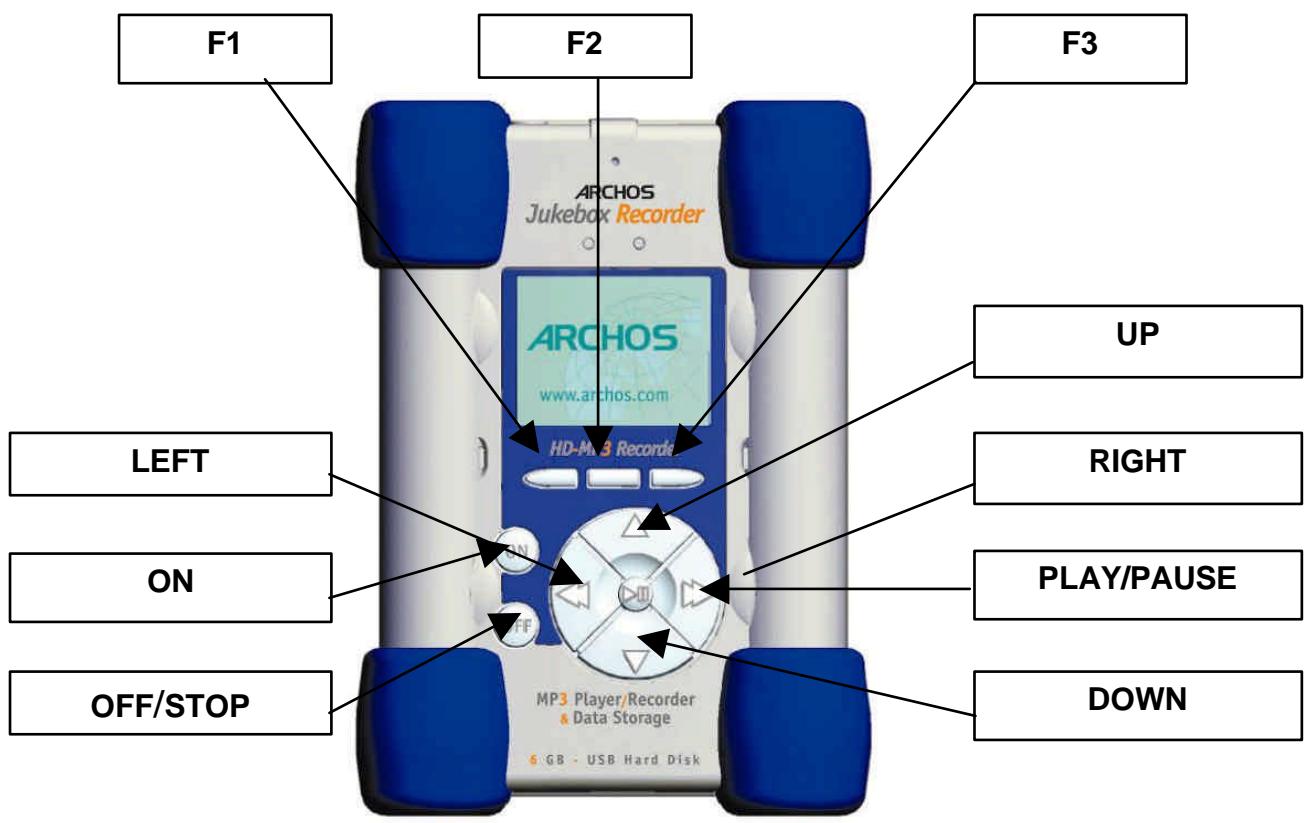
F1, F2 or F3 : these buttons perform several operations, dependant upon the function you are in. UP or DOWN : these buttons allow you to navigate between files or subfolders in the current folder or choose an option in a menu. They can also increase or decrease the volume when playing a song.
LEFT or RIGHT : these buttons allow you to enter or exit a folder, to adjust level for contrast, power-off timeout, backlight duration or recording level for microphone.
PLAY/PAUSE : this button allows you to play/pause/resume a song or enter a directory, to select an option in a menu or enter a submenu.
ON : this button allows you to turn on the Jukebox Recorder.
OFF/STOP : this button allows you to turn off the Jukebox Recorder or stop a song.
flowchart
graph TD
    A["Menu"] --> B["F1"]
    A --> C["F2"]
    A --> D["F3"]
    E["Vola"] --> A
    F["000 ( Root )"] --> A
    G["Dossier de test de"] --> A
    H["Ben - Blacksabbat"] --> A
    I["Dido - Afraid to"] --> A
    J["Dido - Aria"] --> A
    K["Dido - My Lover i"] --> A
    L["12.0s"] --> A
ARCHOS Jukebox Recorder Menu Structure:
Playing Mode
When song is playing
Browse
Browse mode during playing - use ">II" to play a new song
Info
Technical information concerning the song
In any menu, press "back" to go out without any change except for "Change Artist", "Change Album" and "Change Title" press "OFF"
Menu button
Press menu button to enter in menu
Record MP3
Record and setting
flowchart
graph TD
    A["Start\nAdjust Rec Level, Press Play to Start"] --> B["Press >II to start recording\nPress menu to go back"]
    A --> C["Change Artist\nEdit name of the Artist"]
    A --> D["Change Album\nEdit name of the Album"]
    A --> E["Change Title\nEdit name of the Title of the song"]
    A --> F["Source\nSelect the source of recording with Up or Down and ">II " for validation"]
flowchart
graph TD
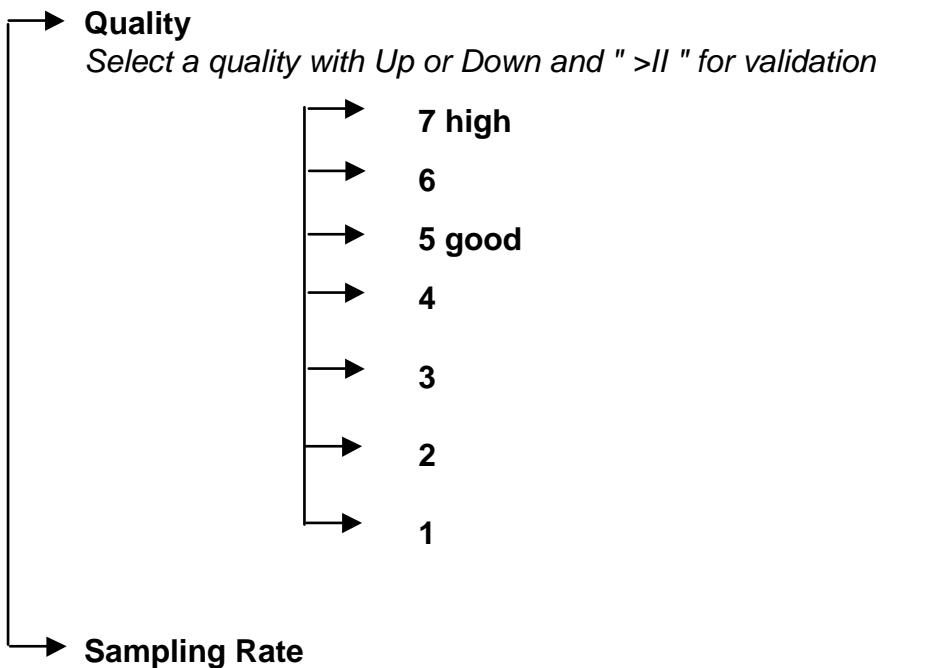
A["Quality\nSelect a quality with Up or Down and " >II " for validation"] --> B["7 high"]
B --> C["6"]
C --> D["5 good"]
D --> E["4"]
E --> F["3"]
F --> G["2"]
G --> H["1"]
I["Sampling Rate"] --> B
Sampling frequency with Up or Down and " >II " for validation
tree
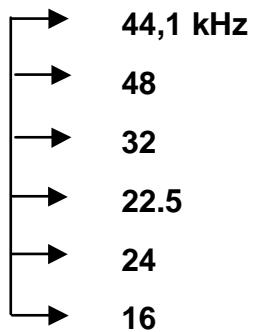
| Node | Frequency (kHz) | |---|---| | 1 | 44,1 | | 2 | 48 | | 3 | 32 | | 4 | 22.5 | | 5 | 24 | | 6 | 16 |Sound
Sound setting
flowchart
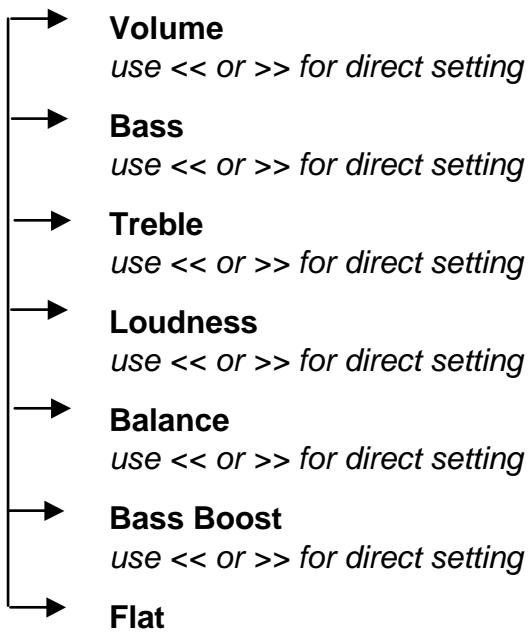
graph TD
    A["Volume\nuse << or >> for direct setting"] --> B["Bass\nuse << or >> for direct setting"]
    B --> C["Treble\nuse << or >> for direct setting"]
    C --> D["Loudness\nuse << or >> for direct setting"]
    D --> E["Balance\nuse << or >> for direct setting"]
    E --> F["Bass Boost\nuse << or >> for direct setting"]
    F --> G["Flat"]
Playmode
Choose your Playing Mode with Up or Down and " >II " for validation
flowchart
graph TD
    A["Normal"] --> B["Single"]
    B --> C["Repeat All"]
    C --> D["Shuffle"]
    D --> E["Scan"]
Playlist
Start, Edit, Save or Clear your playlist
flowchart
graph TD
    A["Start Playlist"] --> B["Edit Playlist"]
    B --> C["Select, Delete, Move entries in Playlist"]
    D["Save Playlist"] --> E["Clear Playlist"]
Language
Choose your language

Hard Disk
Free space on HD
Not a submenu, direct info
Diagnose
Checking Hard Drive
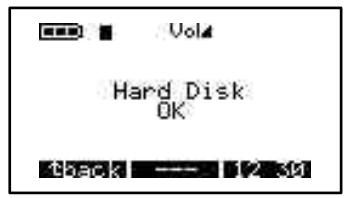
Hard Disk OK
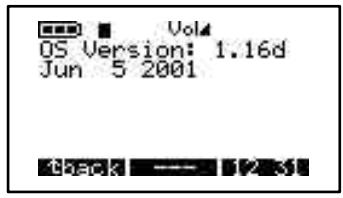
Firmware
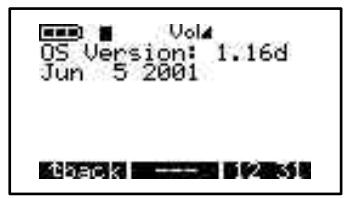
Firmware version
Not a submenu, direct info
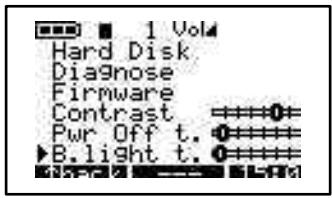
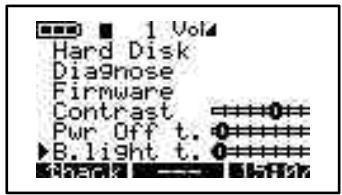
Contrast
Set contrast
Not a submenu, direct setting
PW OFF Time
Shutting down time
Not a submenu, direct setting
BL Time
Back light time
Not a submenu, direct setting
File button and mode
Make a directory or delete a file
flowchart
graph TD
    A["MkDir"] --> B["Create Directory"]
    B --> C["New folder"]
    C --> D["Enter name of the file by using ->ABC or ->123 or ->abc touch. confirm each character by pressing >II"]
    D --> E["Enter"]
    D --> F["Del"]
    G["Delete"] --> H["Delete selected file"]
    H --> I["Remove file :"]
    I --> J["Yes"]
    I --> K["No"]
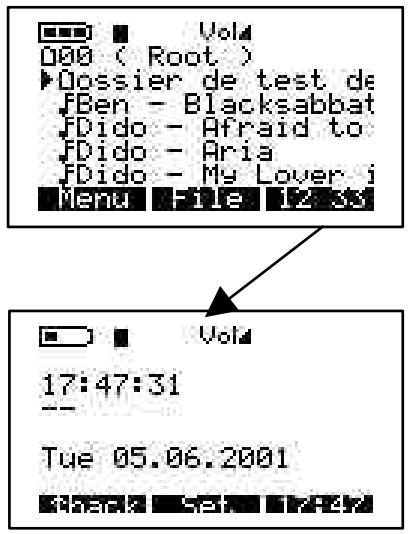
Time button
Set time and date
Press on Time button to enter
Use << or >> to move
Use Up and Down to change value
Set
Use set to confirm
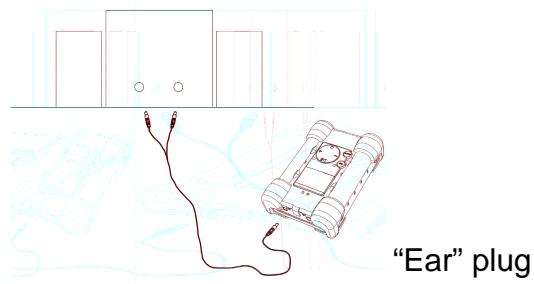
Included - Stereo cord for hi-fi connection
The stereo cord is ideal for connecting to a HI-FI or to a stereo amplifier.
- Connect the cord to the 3.5mm « Ear » plug of your Jukebox.
- Connect the 2 RCA plugs (red and white) to the Auxiliary (Aux) or CD or MD socket of your HI-FI system. If your Hi-FI has red and white plug colors, match the colors for correct left and right control.
- Set your HI-FI on the Aux (or CD or MD) position
- Start your Jukebox. Select your music and press « Play ».
- Set the volume for your convenience.
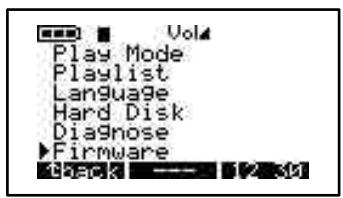
1 - MENU
Press F1 to enter general menu.
Jukebox Recorder Operation Modes
There are 11 functions in the menu of the Jukebox Recorder and some of the menus consist of submenus. Below is the list of the menus and submenus. To access these menus, follow these steps:
- Turn on Jukebox Recorder by pressing the ON button.
- Press MENU button. You will see 11 functions which they are:

- Recording into MP3, 2. Sound, 3. Play mode, 4. Playlist, 5. Language, 6. Hard disk, 7. Diagnostics, 8. Firmware, 9. Contrast, 10. Power OFF Time, 11. Backlight Time.
1 / RECORDING MP3 MODE: To access recording MP3 mode of Jukebox Recorder:
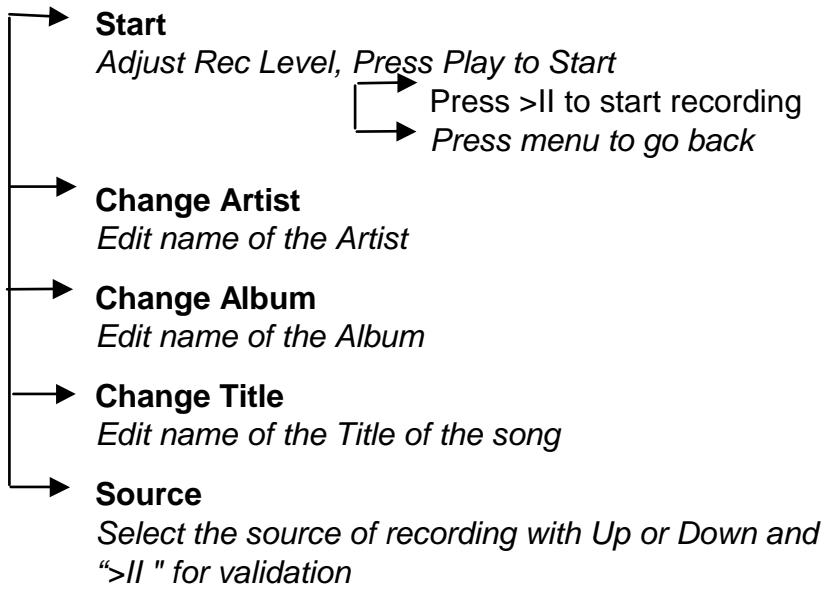
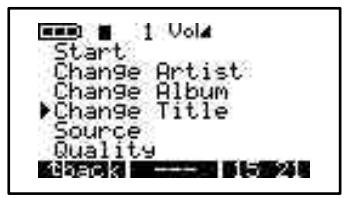
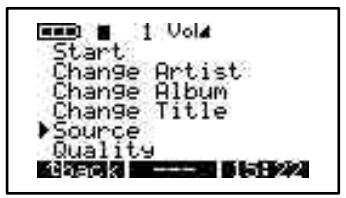
Turn on Jukebox Recorder by pressing the ON button. Press Menu button to go to menu items. Select recording MP3 and press play/pause button. In the Submenu of Recording MP3 mode, they are 8 functions available. These functions are:
a) Start. When this function is chosen, you are ready to begin recording MP3. Please adjust RECORDING level and press PLAY to start recording. You should see on the LCD screen, the Recording MP3, name of your song, size in kilobytes and the kbit / VBR.
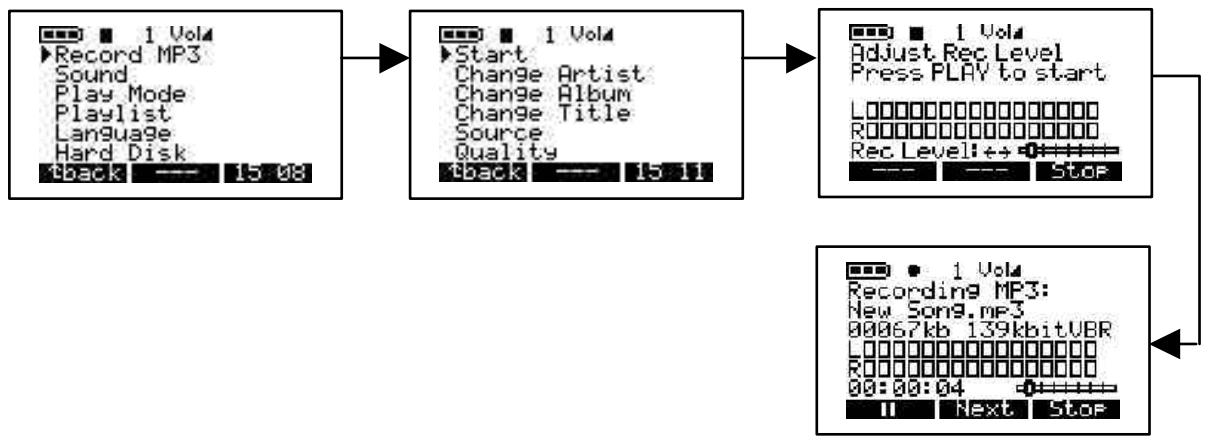
flowchart
graph TD
    A["Record MP3\nSound\nPlay Mode\nPlaylist\nLanguage\nHard Disk\ntback --- 15:08"] --> B["Start\nChange Artist\nChange Album\nChange Title\nSource\nQuality\ntback --- 15:11"]
    B --> C["Adjust Rec Level\nPress PLAY to start\nL0000000000000000\nR0000000000000000\nRec Level:++ 0#####---\n--- --- Stop"]
    C --> D["Recording MP3:\nNew Song.mp3\n00067kb 139kbitVBR\nL0000000000000000\nR0000000000000000\n00:00:04 0#####---\nII Next Stop"]
    D --> E["Stop"]
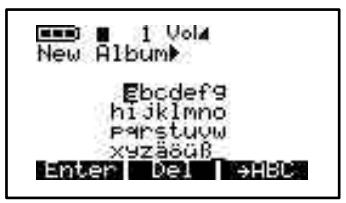
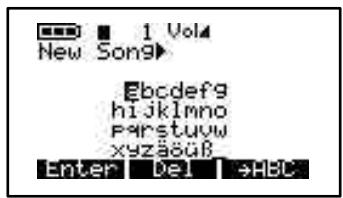
b) Change Artist. Use this option if you are adding a new artist name or renaming artist name. To access change artist, click on menu button, choose Recording MP3, click play/pause to go to submenu of Recording MP3 and arrow down to change artist item. Click play/pause button to start editing new name of artist. To input new artist name, use letter followed by play/pause button to add the letter to the new artist list. Continue using letter follow by play/pause button until all letters showing up on the new artist line. You can delete a letter by clicking DEL button or clear the entire line by pressing DEL button for a long time. You can also change to capital letters by pressing the button associated with ABC or digits by pressing the button associated with 123. Once you complete inputing artist name, press ENTER button to accept and exit to previous menu. Press BACK button to exit submenu for Recording MP3. Press BACK button to go to root directory. For example if you want to input new artist name PRINCE, Click on P followed by play/puse button, click on R followed by play/pause button, click on I followed by play/pause button and so on.
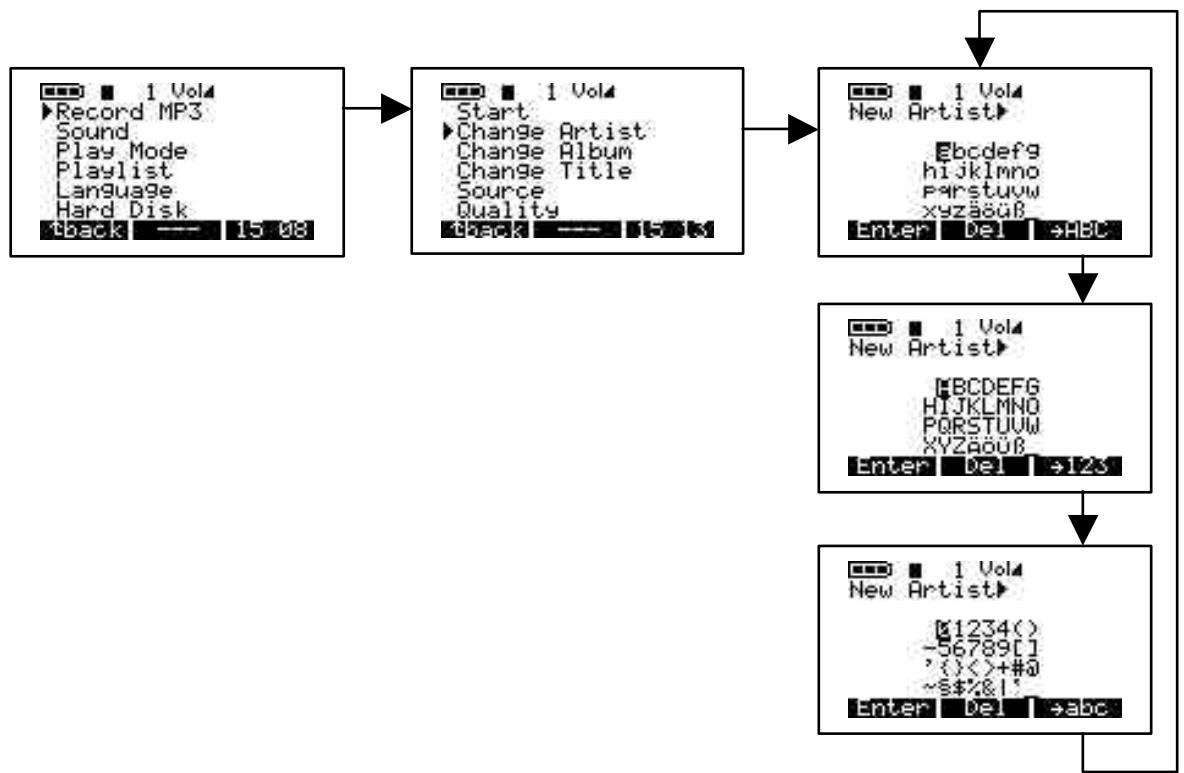
flowchart
graph TD
    A["Record MP3\nSound\nPlay Mode\nPlaylist\nLanguage\nHard Disk\nback --- 15.08"] --> B["1 VolA\nStart\nChange Artist\nChange Album\nChange Title\nSource\nQuality\nCheck --- 15.08"]
    B --> C["1 VolA\nNew Artist\nEbcdefg\nhijklmno\nFARSTUW\nyzäöüB\nEnter Del →ABC"]
    C --> D["1 VolA\nNew Artist\nBCDEFG\nHIJKLMNO\nPORSTUW\nyzäöüB\nEnter Del →123"]
    D --> E["1 VolA\nNew Artist\n1234(-56789[1"]\( ^' \) <>+#0\~%&!'\nEnter Del →abc]
c) Change Album. Use this option if you are changing the album name. To access Change Album, click on MENU button, click on Recording MP3, click on play/pause to access submenu of Recording MP3, arrow down to Change Album and press play/pause to enter edit mode. Enter new album name. Follow same steps as change artist to add name. Once finished adding new album, press ENTER button to accept changes and press BACK button to exit to Recording MP3 submenu, press BACK to go to root directory.

flowchart
graph LR
    A["1 VolA Record MP3 Sound Play Mode Playlist Language Hard Disk tBack --- 15.08"] --> B["1 VolA Start Change Artist Change Album Change Title Source Quality TBack --- 15.20"]
    B --> C["New Album Ebcdefg hi jklmno Parstuvw xyzäüB Enter Del →HBC"]
d) Change Title. Use this option if you are changing the Title name. To access Change Title, click on MENU button, click on Recording MP3, click on play/pause to access submenu of Recording MP3, arrow down to Change Title and press play/pause to enter edit mode.
Enter new Title name. Follow same steps as change artist to add name. Once finished adding new Title, press ENTER button to accept changes and press BACK button to exit to Recording MP3 submenu, press BACK to go to root directory.

flowchart
graph LR
    A["1 VolA Record MP3 Sound Play Mode Playlist Language Hard Disk"] --> B["1 VolA Start Change Artist Change Album Change Title Source Quality Check"] --> C["1 VolA New Song Ebcdef9 hijklmno Parstuw xyzäü8 Enter Del sHBC"]
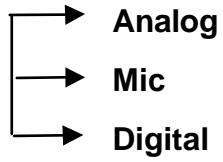
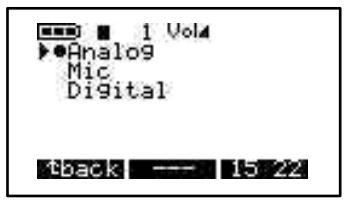
e) Source. There are 3 options you can choose. Use analog, Microphone or digital that fits for your need. To access these 3 options, turn on Jukebox MP3 Recorder by pressing ON button. Press MENU button, select Recording MP3, press play/pause button to go to Recording MP3 submenu, arrow down to Source and press play/Pause to select option you desire. Once your selection is done, press play/pause button to save your selection. Press BACK button to go to previous menu. Press BACK button again to go to root directory.

flowchart
graph LR
    A["1 Volq"] --> B["Record MP3"]
    B --> C["Sound"]
    C --> D["Play Mode"]
    D --> E["Playlist"]
    E --> F["Language"]
    F --> G["Hard Disk"]
    G --> H["tback --- 15.08"]
    B --> I["1 Volq"]
    I --> J["Start"]
    J --> K["Change Artist"]
    K --> L["Change Album"]
    L --> M["Change Title"]
    M --> N["Source"]
    N --> O["Quality"]
    O --> P["tback --- 15.22"]
    I --> Q["1 Volq"]
    Q --> R["Analog"]
    R --> S["Mic"]
    S --> T["Digital"]
    T --> U["tback --- 15.22"]
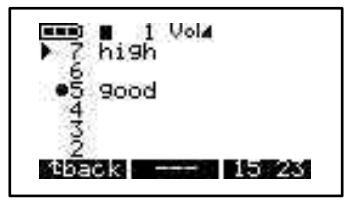
f) Quality. Choose this option to adjust the play quality of your MP3 recording. To access Quality, turn on your Jukebox Recorder by pressing ON button, press MENU button, select Recording MP3 and press play/pause button. Arrow down to Quality and press play/pause button. Select 7 for highest quality or 5 for good quality recording. Once selection completed, press play/pause button to save your changes, press BACK button to go to previous menu. Press BACK button again to go to root directory.

flowchart
graph LR
    A["1 Vol"] --> B["Change Artist"]
    B --> C["Change Album"]
    C --> D["Change Title"]
    D --> E["Source"]
    E --> F["Quality"]
    F --> G["Track"]
    G --> H["1 Vol"]
    H --> I["7 high"]
    I --> J["6"]
    J --> K["5 good"]
    K --> L["4"]
    L --> M["3"]
    M --> N["2"]
    N --> O["tback --- 15.08"]
g) Sampling Rate. Use this option to select sampling rate of your MP3 recording. To access Sampling Rate, turn on your Jukebox Recorder by pressing ON button, press MENU button, select Recording MP3 and press play/pause button. Arrow down to Sampling Rate and press play/pause button. Highest sampling rate is 44.1 KHZ or use lowest 16 KHZ for lower sampling rate. Once selection completed, press play/pause to save changes, press BACK button to go to previous menu. Press BACK button to go to root directory.

flowchart
graph LR
    A["1 Vol4 Record MP3\nSound\nPlay Mode\nPlaylist\nLanguage\nHard Disk\ntback"] --> B["1 Vol4 Change Artist\nChange Album\nChange Title\nSource\nQuality\nSampling Rate\nCheck"] --> C["1 Vol4 44.1 kHz\n48 kHz\n32 kHz\n22.5 kHz\n24 kHz\n16 kHz\ntback"] --> D["1 Vol4 15.23"]
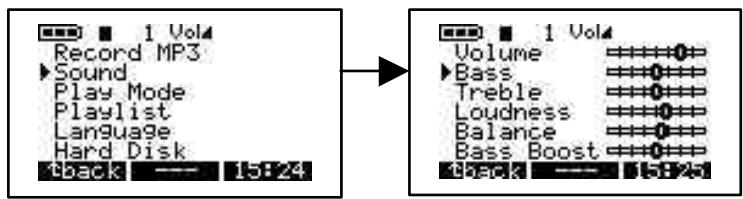
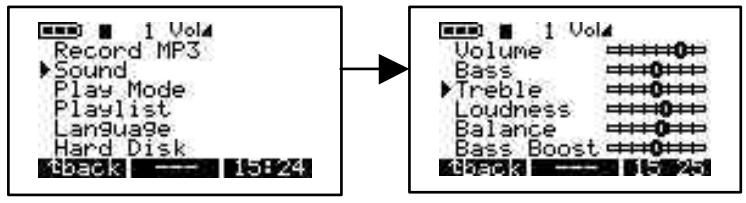
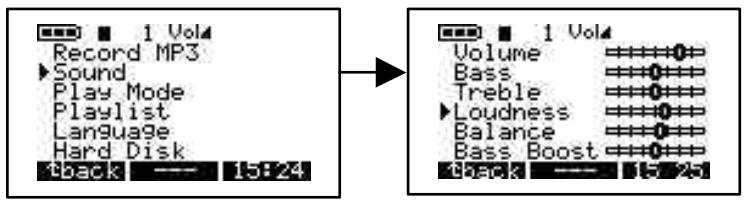
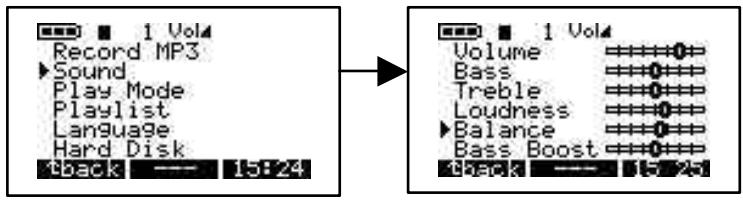
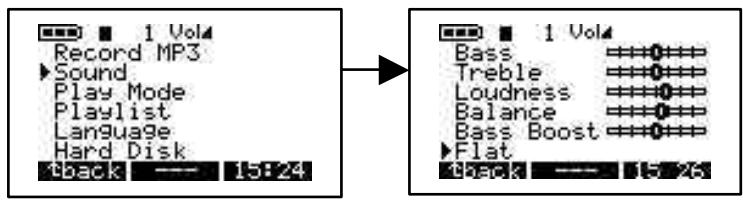
2 / SOUND:
There are 7 options in this menu. These options are:
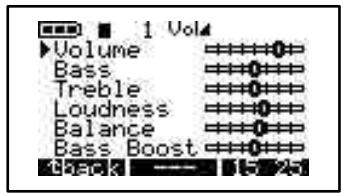
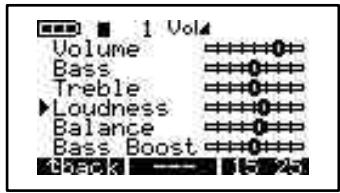
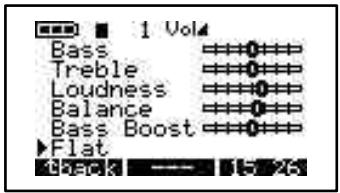
a) Volume. Use this option to adjust volume in your MP3 Recorder. To access volume, Turn on your MP3 Recorder by pressing ON button. Press MENU button to go to menu items. Arrow down to Sound and press play/pause button. Select volume from the menu and use left or right arrow to adjust volume. Once your selection completed, press BACK button to go to previous menu, Press BACK button again to go to root directory.
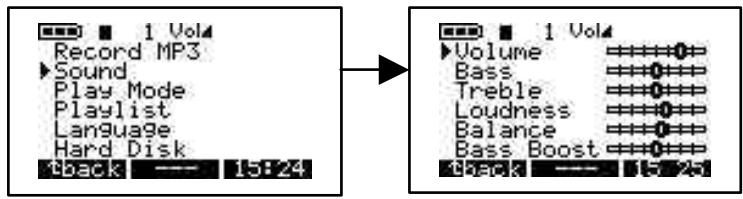
b) Bass. To access Bass, Turn on your MP3 Recorder by pressing ON button. Press MENU button to go to menu items. Arrow down to Sound and press play/pause button. Select Bass from the menu and use left or right arrow to adjust Bass. Once your selection completed, press BACK button to go to previous menu, Press BACK button again to go to root directory.
c) Treble. To access Treble, Turn on your MP3 Recorder by pressing ON button. Press MENU button to go to menu items. Arrow down to Sound and press play/pause button. Select Treble from the menu and use left or right arrow to adjust Treble. Once your selection completed, press BACK button to go to previous menu, Press BACK button again to go to root directory.
d) Loudness. To access Loudness, Turn on your MP3 Recorder by pressing ON button. Press MENU button to go to menu items. Arrow down to Sound and press play/pause button. Select Loudness from the menu and use left or right arrow to adjust Loudness. Once your selection completed, press BACK button to go to previous menu, Press BACK button again to go to root directory.
e) Balance. To access Balance, Turn on your MP3 Recorder by pressing ON button. Press MENU button to go to menu items. Arrow down to Sound and press play/pause button. Select Balance from the menu and use left or right arrow to adjust Balance. Once your selection completed, press BACK button to go to previous menu, Press BACK button again to go to root directory.
f) Bass Boost. To access Bass Boost, Turn on your MP3 Recorder by pressing ON button. Press MENU button to go to menu items. Arrow down to Sound and press play/pause button. Select Bass Boost from the menu and use left or right arrow to adjust Bass Boost. Once your selection completed, press BACK button to go to previous menu, Press BACK button again to go to root directory.

g) Flat. To access Flat, Turn on your MP3 Recorder by pressing ON button. Press MENU button to go to menu items. Arrow down to Sound and press play/pause button. Select Flat from the menu. Once your selection completed, press BACK button to go to previous menu, Press BACK button again to go to root directory.
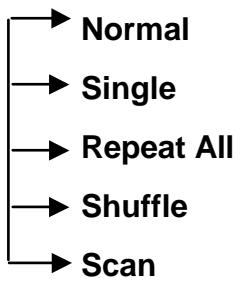
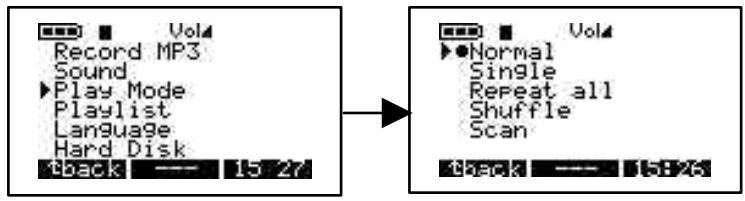
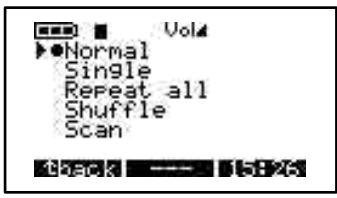
3 / PLAY MODE :
There are 5 different modes of playing Jukebox Recorder. To access these modes, turn on your Jukebox Recorder by press the ON button. Press MENU button to go to menu option, arrow down to Play Mode, press play/pause to select play Mode menu. Select proper option by using up or down arrow. After selecting proper option in Play Mode, press play/pause button to accept changes, Press BACK button to go to root directory of Jukebox Recorder.
a) Normal. Use this option to play MP3 songs one after another.
b) Single. Use this option to repeat play the same MP3 song.
c) Repeat all. Use this option to repeat all MP3 songs.
d) Shuffle. Use this option to shuffle between MP3 songs.
e) Scan. Use this option to scan through your MP3 songs. This option will allow you to listen to portion of song (about 30 seconds) and then goes on to next song.
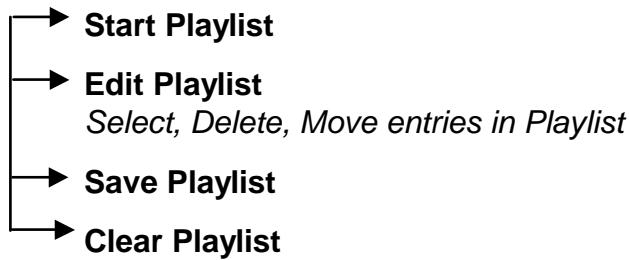
4 / PLAYLIST :
There are 4 modes of Playlist in the playlist menu. To access these modes, turn on your Jukebox Recorder by press the ON button. Press MENU button to go to menu option, arrow down to Playlist, press play/pause to select Playlist menu. Select proper option by using up or down arrow. After selecting proper option in Playlist, press play/pause button to accept changes, press BACK button to go to previous menu. Press BACK button again will take you to root directory of Jukebox Recorder.
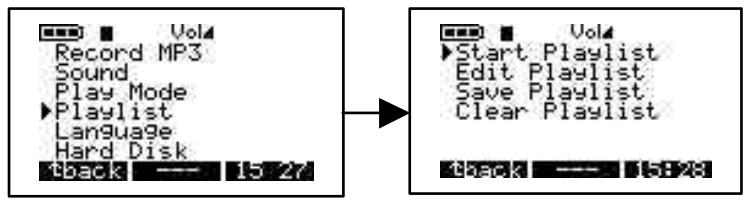
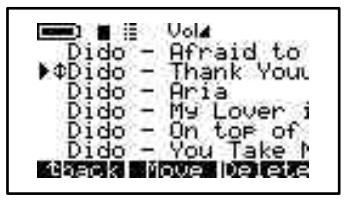
a) Start Playlist. Use this option to start your Playlist.
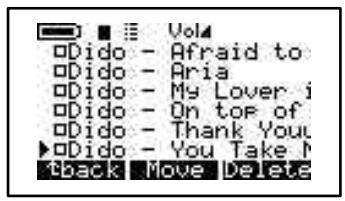
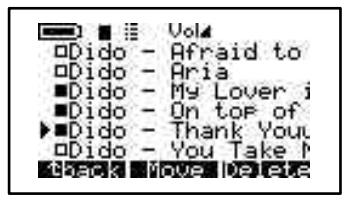
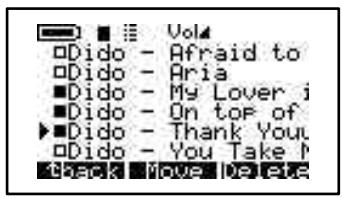
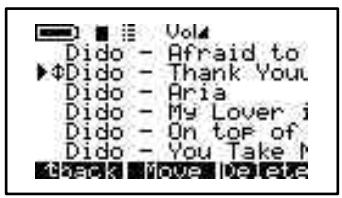
b) Edit Playlist. Use this option to edit Playlist. You can MOVE Playlist by pressing the MOVE button or delete Playlist by pressing DELETE button.
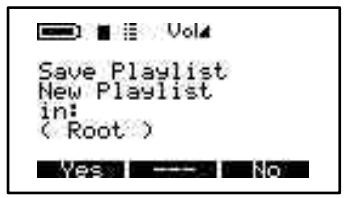
c) Save Playlist. Use this option to Save your changes on the Playlist. Type in your New Playlist by using up, down, left and right arrow to choose character followed by play/pause button, press ENTER button once your selection is complete. Your Save Playlist will show you the New name in the root directory. Once you satisfy with name, press YES button to save changes or press NO button to discard changes.
d) Clear Playlist. To clear existing Playlist, select Playlist you like to clear, press Yes button to clear Playlist or NO button to discard your selection.
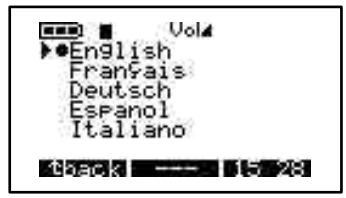
5 / LANGUAGE :
There are 5 different languages you can select to see your Jukebox Recorder files. To access Language menu, Turn on Jukebox Recorder. Press MENU button to go to menu items. Arrow down to Language and press play/pause button. In the Language menu choose proper option followed by play/pause button to save your selection. Press BACK button to go to root directory. These languages are:
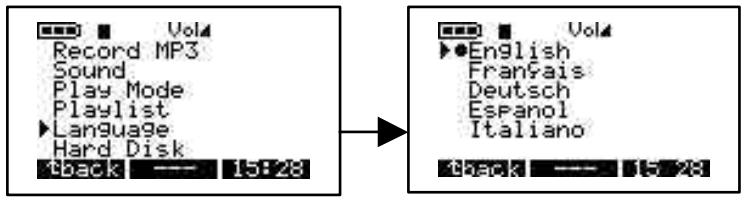
a) English.
b) Francais.
c) Deutsch.
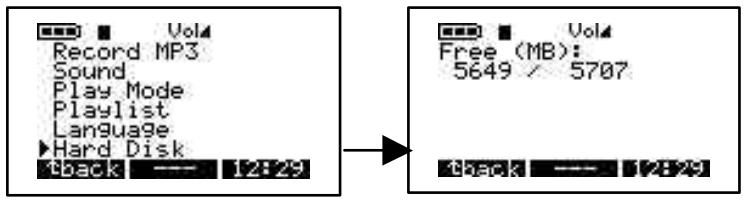
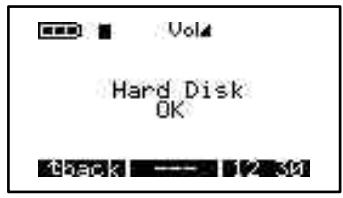
6 / HARD DISK :
Use this option to check total hard disk space and remainig space left. To select Hard Disk, turn on Jukebox Recorder by pressing ON button. Press MENU button to go to Menu option, arrow down to Hard Disk and press play/pause button. On the left side you will see free space and on the right side you will see total space in Mega Bytes. Press BACK button to go to root directory of Jukebox Recorder.
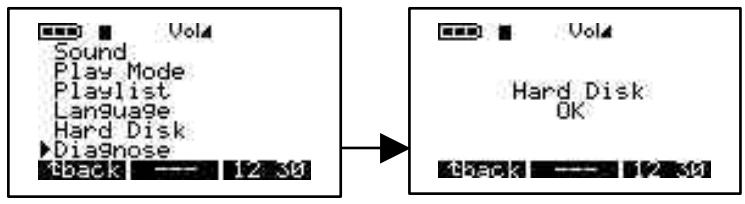
7 / DIAGNOSTICS :
This option is used to check hard disk status. To access Diagnostics option, turn on Jukebox Recorder by pressing ON button. Press MENU button to go to menu options. Arrow down to Diagnostics and press play/pause button. It should indicate the hard disk status is OK.
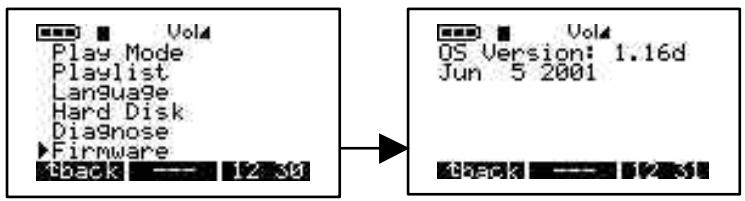
8 / FIRMWARE :
This option will give you information regarding the version of Firmware you currently using. To access this option, turn on Jukebox Recorder by pressing ON button. Press MENU button to go to menu options. Arrow down to Firmware and press play/pause button. It should indicate OS version with date of creation.
9 / CONTRAST :
Use this option to adjust contrast. To access this option, turn on Jukebox Recorder by pressing ON button. Press MENU button to go to menu options. Arrow down to Contrast. Use right arrow for darker contrast, use left arrow for brighter contrast. Press BACK button to go to root directory.
10 / POWER OFF TIME:
Use this option to adjust the length of time before the machine goes into automatic power off mode. To access this option, turn on Jukebox Recorder by pressing ON button. Press MENU button to go to menu options. Arrow down to Power Off. Use right arrow for longer timeout, use left arrow for shorter timeout. A zero timeout sets no auto power-off.
11 / BACKLIGHT TIME:
Use this option to adjust the length of time the backlight remains on. To access this option, turn on Jukebox Recorder by pressing ON button. Press MENU button to go to menu options. Arrow down to Backlight Time. Use right arrow for longer duration, use left arrow for shorter duration. A zero duration sets no backlight.
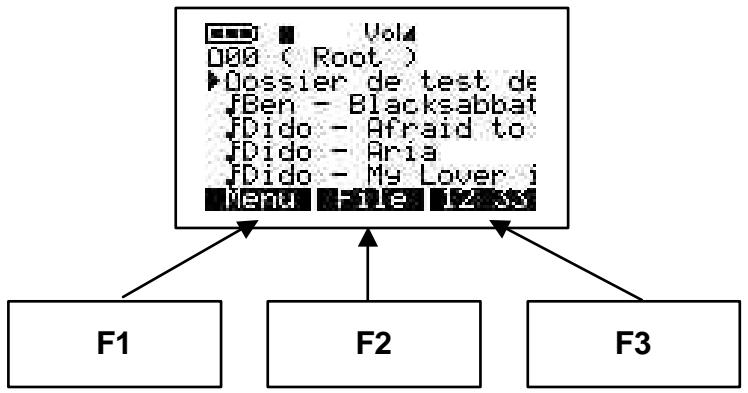
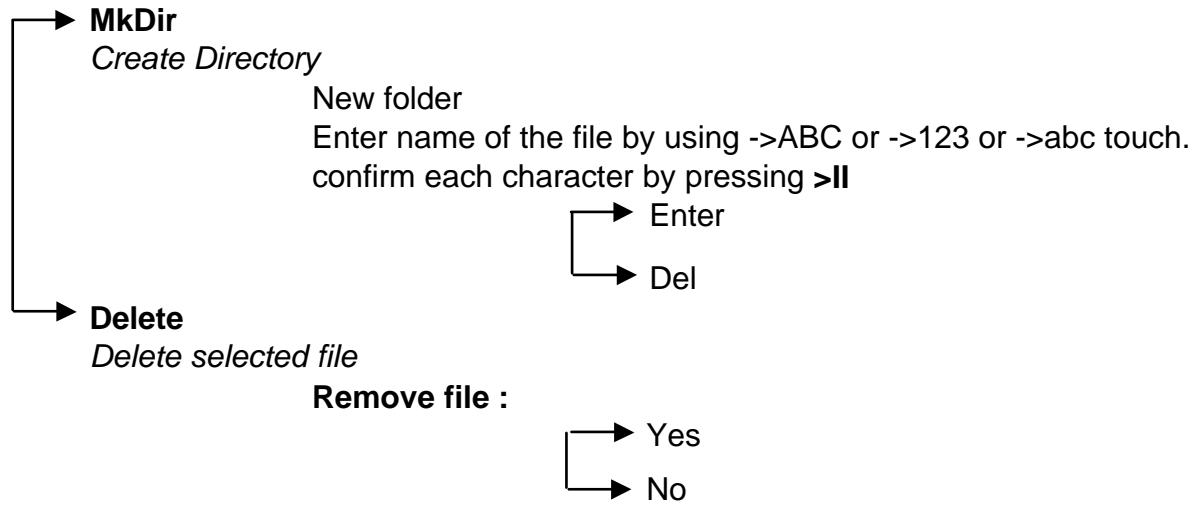
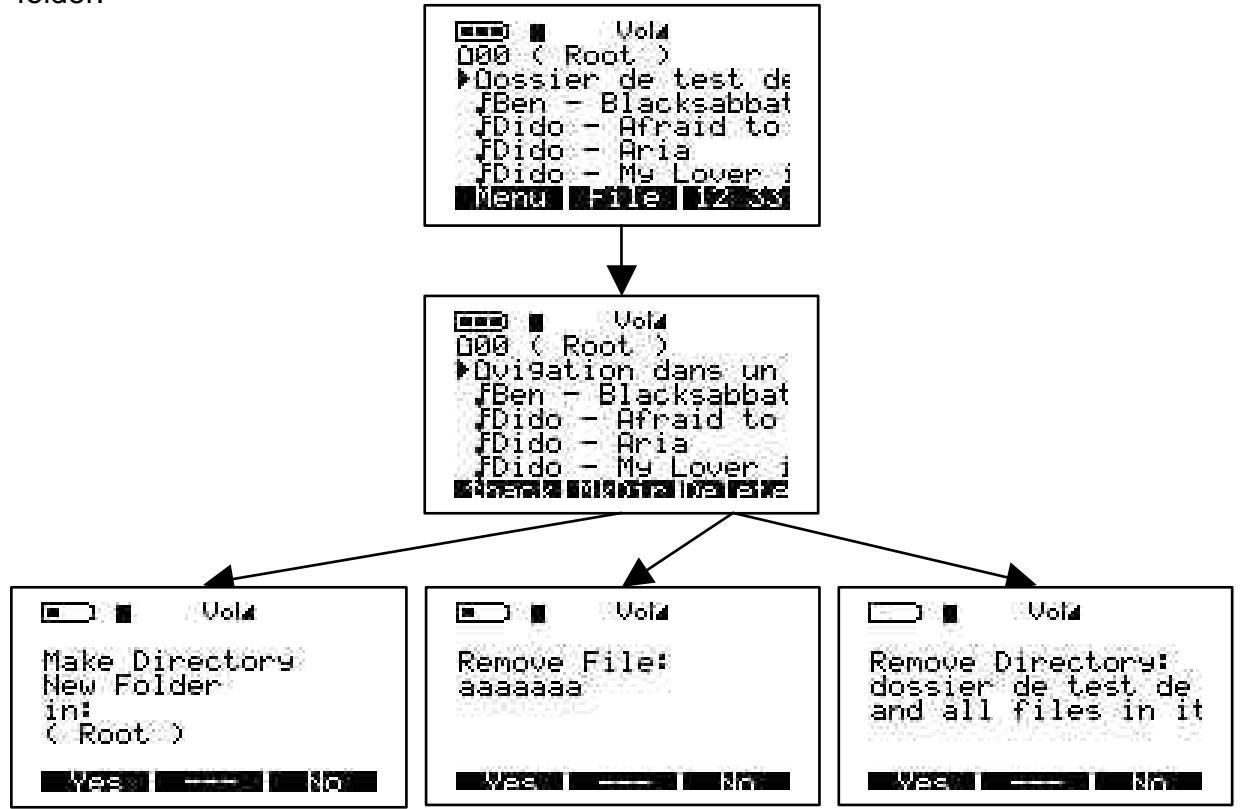
2 - FILE
Press F2 to enter file menu
Select this option to create or delete file or folder. To access it, press ON button to turn on Jukebox Recorder. Press FILE button to go to File menu. MkDir button will let you to create a subfolder in the current folder and Delete button to delete a file or a subfolder in the current folder.
flowchart
graph TD
    A["Terminal"] --> B["Directory"]
    B --> C["Make Directory\nNew Folder\nin:\n(Root)"]
    B --> D["Remove File:\naaaaaaa"]
    B --> E["Remove Directory:\ndossier de test de\nand all files in it"]
    B --> F["Terminal 000 (Root)\n►Dossier de test de\nFBen - Blacksabbat\nFDido - Afraid to\nFDido - Aria\nFDido - My Lover j\nMenu File 12 ss"]
    B --> G["Terminal 000 (Root)\n►Ovigation dans un\nFBen - Blacksabbat\nFDido - Afraid to\nFDido - Aria\nFDido - My Lover j\nName: Vl###t# In## ####"]
3 - TIME
Press F3 to enter time and date menu.
Select this option to set time and date. To access and Set Time & Date, press ON button to turn on Jukebox Recorder. Press button marked "TIME". Use up arrow to increase hour, use down arrow to decrease hour. Use right arrow to go to minute, use up arrow to increase minutes, use down arrow to decrease minutes. Use right arrow to go to seconds, use up arrow to increase seconds, use down arrow to decrease seconds. Select down arrow to go to Date field. Select up arrow to increase months, select down arrow to decrease months. Use right arrow to select day field. Use up arrow to increase day, use down arrow to decrease day. Use right arrow to select year. Use up arrow to increase year, use down arrow to decrease year. Once all selection completed, press SET button to accept changes and exit.
USB CONNECTION :
When connecting the Jukebox Recorder to a USB port, on PC or Mac, this logo will appear on the screen.

The Jukebox Recorder is included with a carrying pouch. The Jukebox Recorder was designed to protect sudden impact. However, maximum protection is obtained using the pouch.

5 - PC USB DRIVER AND MUSICMATCH™ SOFTWARE INSTALLATION Connecting Jukebox Recorder to PC & Adding MP3 Tracks to Jukebox Recorder
PC USB (1 & 2) Driver Installation :
• Turn on your computer and wait until it has finished booting.
• Gently connect one end of the USB cable to the Jukebox Recorder.
- Turn on the Jukebox Recorder. ARCHOS power adaptor may be required if there isn't enough power from the batteries.
- Connect the other end of the USB cable to a free USB port on computer.
• A "Welcome to the Found New Hardware Wizard"(Win98se/2000) appears.
- Click on the Next button
- Select the Recommended option to search for best driver, and click Next
- Insert the included Jukebox software CD into your CDROM drive.
- Check CDROM box or specify your CDROM drive letter such as d:\drivers
- Click Next again when new hardware is found, and follow the on-screen instructions to complete the installation.
- Click Finish when prompted, and Restart your computer.
- You will recognize an additional drive letter is added for the Jukebox Recorder
Note : If your Jukebox hard disk is not recognized, please refer to Trouble Shooting
- Drag and Drop, or Copy and Paste your MP3 tracks to the Jukebox Recorder hard disk drive letter.
In order to disconnect the Jukebox, click on the icon “peripheral” of the sytem bar
Click on the drop-down window requiring the cancellation
Wait until a message appears saying that the peripheral may be unplugged.
- Disconnect the USB cable on both ends, and Play the MP3 Tracks (as shown in the above steps)
6 - INSTALLATION OF THE MUSICMATCH™
MusicMatch™ software is included with the Jukebox Recorder. Indeed, you will find many useful
options such as recording audio CD tracks to MP3, creating and saving a playlist that will allow you to play specific tracks of your favorite music on the Jukebox Recorder. Furthermore, you can download additional MP3 tracks from MusicMatch at http://www.musicmatch.com/get_music/
Installation of the MusicMatch™ Software
Insert the CD software included with your CDROM Player
- Wait for the start of the setup software
- Click on MusicMatch English in order to install MusicMatch then click OK.
- Follow the instructions on the screens to complete the installations, and Restart your computer
Setting MusicMatch™ As Your Default MP3 Player
- Launch MusicMatch software
- Choose Settings from the program's Option menu, on the top left of MusicMatch
- From General, check the MP3 Files box under Use MusicMatch As The Default Player For
Note: Additional helps can be viewed under Help menu, or can be viewed at www.musicmatch.com
7 - MAC USB DRIVER AND
MUSICMATCH™ SOFTWARE INSTALLATION
Connecting Jukebox Recorder to Mac & Uploading MP3 Tracks
Mac USB Driver Installation
• Turn on your computer and wait until it has finished booting.
• Gently connect one end of the USB cable to the Jukebox Recorder.
- Turn on the Jukebox Recorder. ARCHOS power adaptor may be required if there isn't enough power from the batteries.
- Connect the other end of the USB cable to a free USB port on your computer.
- Insert the included software CD into your CDROM drive
• Double click on the software CD shows on your computer desktop
- Double click on USB Installation\Mac OS 9x\Install Cypress MSC Driver or Installation\Mac OS X\Cypress USB Storage
- Follow the on-screen instructions, then Restart your computer
- You should recognize an additional hard disk icon displayed on the desktop
- Drag and Drop MP3 tracks to Jukebox Recorder Drive
- Disconnect the USB cable on both ends, and play the MP3 tracks
8 - MAC MUSICMATCH™ SOFTWARE INSTALLATION
MusicMatch™ software is included with the Jukebox Recorder. Indeed, you will find many useful options such as recording audio CD tracks to MP3, creating and saving a playlist that will allow you to play specific tracks of your favorite music on the Jukebox Recorder. Furthermore, you can download additional MP3 tracks from MusicMatch at http://www.musicmatch.com/get_music/
- Insert the Jukebox Recorder software CD into your CDROM drive.
- Double click on the CD icon (just being mounted on the desktop).
- Double click on MusicMatch Jukebox software to install.
- Follow the on-screen instructions to complete the installation and restart your computer.
- Double click on the MusicMatch folder, and launch MusicMatch Jukebox.
9 - MAINTENANCE
- Avoid sudden impact of the unit.
- Use ONLY the power adapter and NiMH AA batteries supplied by ARCHOS.
- Use ONLY the power adapter to recharge your Jukebox Recorder, not others
- You can connect the Jukebox Recorder to your computer at any time either before or after boot-up. Make sure the USB cable is connected to Jukebox Recorder first, turn on Jukebox Recorder, then connect the USB cable to your computer USB port. Reverse the order for disconnecting.
- For proper operation of the Jukebox Recorder, the unit has to be inserted upside down in its pouch.
10 - CHANGING BATTERIES
Jukebox Recorder is equipped with 4 x AA NiMH Rechargeable batteries. The batteries are required to be changed only when they can no longer hold charge. Use ONLY AA NiMH RECHARGEABLE BATTERIES. To remove the batteries covers, locate the small holes, one on each side, on the inner top middle of the batteries covers (see picture below). Use a small flat screwdriver or the like and gently, slowly push the battery covers out sideway just far enough to lift up the battery covers by the top end of the cover.
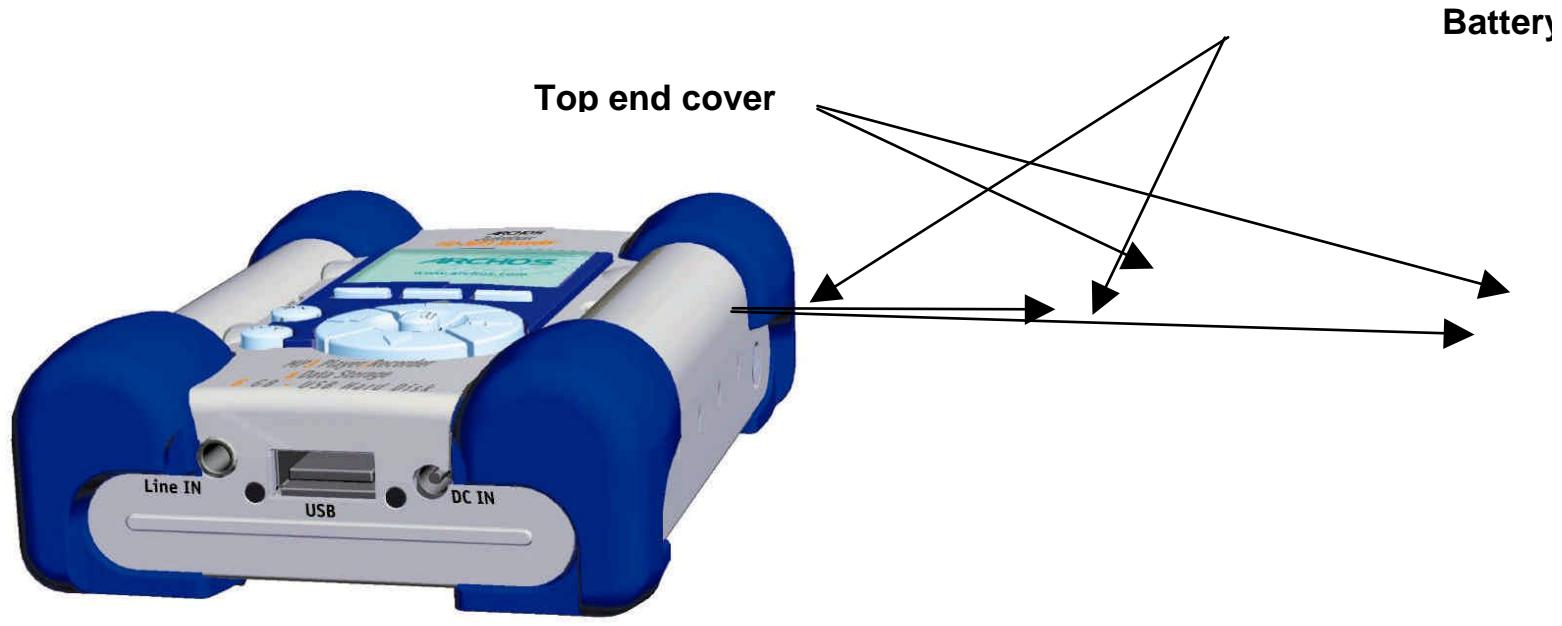
Since the batteries are tightly fit in the compartments, remove the bottom battery first while gently holding down the blue cushion rubber to keep it from falling out of place.
Reverse the procedure to replace the batteries. Make sure new batteries polarities (+ and -) are aligned correctly with the + and - markings as printed behind the batteries covers. Repeat the procedure for the other side.
Important: Failing to insert the batteries correct could damage the Jukebox Recorder.
Attention: After replacing batteries, you have to reprogram the settings of the user's parameters as Time, Volume, bass...
Note : It's the same if you don't use the Jukebox during a very long time and batteries get too low.
11 - TROUBLE SHOOTING
Problems
Solutions
| Jukebox Recorder Hard Disk is not recognized after USB drivers are installed on PC | - Make sure to restart your computer |
| Jukebox Recorder Hard Disk is not recognized after USB drivers are installed on MAC | - Make sure to restart your computer- Enable PC Exchange, the hard disk needs to be formatted with MAC/PC Exchange. |
| Error Light (red) is on : . | - Read error from hard disk usually due to insufficient power from batteries: recharge batteries using included power adaptor. |
| Jukebox will not turn on or will not play : | - Recharge the Jukebox using Only ARCHOS included power adaptor.- Check Battery Levels on LCD.- Jukebox is disable when USB cable is connected |
| Can’t find or play the Playlist : | - Make sure the playlist is saved on the Jukebox drive or manually copy the playlist to the Jukebox. The default location of playlist is located at :C:\ProgramFiles\MusicMatch\MusicMatchJukebox\Playlist\Default |
| Computer Locks up : | - Make sure to stop accessing the Jukebox before disconnecting the USB cable.- Never remove the USB connector or the power jack before removing your Jukebox from computer port. |
Problems
Solutions
| Jukebox Recorder is not recognized:(Check additional USB Issues below) | - Connect USB cable to Jukebox Recorder first, turn Jukebox On, then connect USB cable to computer, in the exact order- Avoid using USB Hub.- Not enough battery power, try to use the included ARCHOS DC power adapter.- Make sure USB driver has been installed. |
| USB Issues : | - If you are connected through a USB hub, ensure that the hub is connected and powered on.- Check that you are not connected to a USB port repeated through a keyboard.- Try to connect to the USB port directly without going through a USB hub. |
| Can’t Access Jukebox Drive : | - Out of battery power, use ARCHOS DC power adapter to recharge and to power on unit. |
12 - CUSTOMER SUPPORT
• Only the unit is under warranty and not the accessories
- If technical support determines that your product needs to be returned, please contact the place of purchase to have your product repaired or replaced (depending on problem type).
- There is an FAQ – Frequently Asked Questions section at the Archos Website www.archos.com that can help answer many of your questions.
- If you need technical help, you may contact ARCHOS directly in your own language via these phone numbers. For other countries, please use e-mail technical support.
Telephone Support:
| 949-609-1400 | (USA, Canada) | 09-1745-6224 | (Spain) |
| 01 70 20 00 30 | (France) | 02-4827-1143 | (Italy) |
| 0207-949-0115 | (UK) | 02-050-405-10 | (Netherlands) |
| 069-6698-4714 | (Germany) |
E-mail Support:
technical-support@archos.com (United States and Canada customers) English
support-technique@archos.com (Europe and rest of the planet) English and French
To respond to your e-mails efficiently, when sending one, please indicate the product name and question type in the Subject of the e-mail.
For example:
To: technical-support@archos.com
Subject: Jukebox Multimedia 120 – USB connection to Macintosh
United States & Canada
| ARCHOS Technology3, Goodyear – Unit AIrvine , CA 92618 USAPhone :1 949-609-1400Fax: 1 949-609-1414 | ARCHOS S.A.12, rue Ampère91430 IgnyFrancePhone : +33 (0) 169 33 169 0Fax : +33 (0) 169 33 169 9 | ARCHOS (UK) LimitedRegus HouseWindmill Hill Business ParkWhitehill WaySwindonWiltshire SN5 6QR UKPhone: +44 (0) 1793 44 15 10Fax: +44 (0) 1793 44 16 10 |
http://www.archos.com
12 – Support clients 61

natural_image
Completely black image with no visible content, text, or symbols.Prise « Ear »
1 - MENU
3 / MODE LECTURE:


8 / VERSION DE LOGICIEL :
| 949-609-1400 | (USA, Canada) |
| 0207-949-0115 | (UK) |
| 0696-698-4714 | (Germany) |
| 09-1745-6224 | (Spain) |
| 01-7020-0030 | (France) |
| 02-4827-1143 | (Italy) |
| 02-050-405-10 | (Netherlands) |
technical-support@archos.com (United States and Canada customers) English
support-technique@archos.com (Europe and rest of the planet) English and French
To respond to your e-mails efficiently, when sending one, please indicate the product name and question type in the Subject of the e-mail.
For example:
To: technical-support@archos.com
Subject: Jukebox Multimedia 120 – USB connection to Macintosh
United States & Canada
| ARCHOS Technology3, Goodyear – Unit AIrvine , CA 92618 USAPhone :1 949-609-1400Fax: 1 949-609-1414 |
Europe & Asia
(Support in English language)
support-technique@archos.com


3/ ABSPIELMODUS


a) English
b) Francais
c) Deutsch
6/ FESTPLATTE
8/ FIRMWARE:
9/ KONTRAST:
| 949-609-1400 | (USA, Canada) |
| 0207-949-0115 | (UK) |
| 0696-698-4714 | (Germany) |
| 09-1745-6224 | (Spain) |
| 01-7020-0030 | (France) |
| 02-4827-1144 | (Italy) |
| 02-50-405-10 | (Netherlands) |
| 02-50-405-11 |
(Support in English language)
United States & Canada
ARCHOS Technology
3, Goodyear – Unit A
Irvine, Ca 92618
USA
Phone :1 949-609-1400
Fax: 1 949-609-1414
support-technique@archos.com
Windmill Hill Business Park
Whitehill Way
Swindon
Wiltshire SN5 6QR
UK
Phone: + 44 (0) 1793 44 15 10
Fax: + 44 (0) 1793 44 16 10
http://www.archos.com
Español - Índice
natural_image
Diagram showing a tank connected to a cable with wires, against a stylized background (no text or symbols)Conector "Ear"
1 - MENÚ


8 / FIRMWARE:
9 / CONTRASTE:
(Support in English language)
United States & Canada
ARCHOS Technology
3, Goodyear – Unit A
Irvine, Ca 92618
USA
Phone :1 949-609-1400
Fax: 1 949-609-1414
support-technique@archos.com
(English and French language)
Europe & Asia
ARCHOS S.A.
12, rue Ampère
91430 Igny
France
Windmill Hill Business Park
Whitehill Way
Swindon
Wiltshire SN5 6QR
UK
Phone: + 44 (0) 1793 44 15 10
Fax: + 44 (0) 1793 44 16 10
http://www.archos.com
Italiano - Sommario
Come usare Jukebox Recorder
natural_image
Diagram showing a vehicle connected to a device with cables, no text or symbols presentPresa "Ear"
1 - MENU
8 / FIRMWARE :
9 / CONTRASTO:
| 949-609-1400 | (USA, Canada) |
| 0207-949-0115 | (UK) |
| 0696-698-4714 | (Germany) |
| 09-1745-6224 | (Spain) |
| 01-7020-0030 | (France) |
| 02-4827-1146 | (Italy) |
| 02-050-405-10 | (Netherlands) |
technical-support@archos.com (United States and Canada customers) English
support-technique@archos.com (Europe and rest of the planet) English and French
To respond to your e-mails efficiently, when sending one, please indicate the product name and question type in the Subject of the e-mail.
For example:
To: technical-support@archos.com
Subject: Jukebox Multimedia 120 – USB connection to Macintosh
United States & Canada
| ARCHOS Technology3, Goodyear – Unit AIrvine , CA 92618 USAPhone :1 949-609-1400Fax: 1 949-609-1414 |
Europe & Asia
- English - Table of Contents
- Warranty and Limited Liability
- Furthermore, warranty does not apply to:
- Warnings and Safety Instructions
- CAUTION
- WARNING
- FCC Warning Statement
- FCC Compliance
- Copyright Notice
- Copyright ARCHOS © 2002 All rights reserved.
- Introduction to ARCHOS Jukebox Recorder
- Technical Specifications
- Operating Jukebox Recorder
- ARCHOS Jukebox Recorder Menu Structure:
- Playing Mode
- Browse
- Info
- Menu button
- Record MP3
- Sound
- Playmode
- Playlist
- Language
- Hard Disk
- Diagnose
- Firmware
- Contrast
- PW OFF Time
- BL Time
- File button and mode
- Time button
- Included - Stereo cord for hi-fi connection
- - MENU
- Jukebox Recorder Operation Modes
- / SOUND:
- / PLAY MODE :
- / PLAYLIST :
- / LANGUAGE :
- / HARD DISK :
- / DIAGNOSTICS :
- / FIRMWARE :
- / CONTRAST :
- / POWER OFF TIME:
- / BACKLIGHT TIME:
- - FILE
- Press F2 to enter file menu
- - TIME
- Press F3 to enter time and date menu.
- USB CONNECTION :
- - PC USB DRIVER AND MUSICMATCH™ SOFTWARE INSTALLATION Connecting Jukebox Recorder to PC & Adding MP3 Tracks to Jukebox Recorder
- PC USB (1 & 2) Driver Installation :
- Installation of the MusicMatch™ Software
- Setting MusicMatch™ As Your Default MP3 Player
- - MAC USB DRIVER AND
- MUSICMATCH™ SOFTWARE INSTALLATION
- Connecting Jukebox Recorder to Mac & Uploading MP3 Tracks
- Mac USB Driver Installation
- - MAC MUSICMATCH™ SOFTWARE INSTALLATION
- - MAINTENANCE
- - CHANGING BATTERIES
- - CUSTOMER SUPPORT
- E-mail Support:
- For example:
- / MODE LECTURE:
- / VERSION DE LOGICIEL :
- 3/ ABSPIELMODUS
- 6/ FESTPLATTE
- 8/ FIRMWARE:
- 9/ KONTRAST:
- Español - Índice
- - MENÚ
- / FIRMWARE:
- / CONTRASTE:
- ARCHOS Technology
- ARCHOS S.A.
- Italiano - Sommario
- Come usare Jukebox Recorder
- / CONTRASTO:
Brand : ARCHOS
Model : JUKEBOX RECORDER
Category : Media player