IR 100 - Radio Block - Free user manual and instructions
Find the device manual for free IR 100 Block in PDF.


| Product Type | Portable Radio |
| Brand | Block |
| Model | IR 100 |
| Color | Black |
| Dimensions (W x H x D) | 150 x 80 x 30 mm |
| Weight | 250 g |
| Power Supply | 2 x AA batteries (not included) or 3V DC adapter |
| Battery Life | Up to 30 hours |
| Tuning Type | Digital PLL |
| FM Frequency Range | 87.5 – 108 MHz |
| AM Frequency Range | 530 – 1710 kHz |
| Preset Stations | 20 (FM) + 20 (AM) |
| Display | LCD with backlight |
| Speaker Output | 1W RMS mono |
| Headphone Jack | 3.5 mm stereo |
| Antenna | Telescopic for FM/AM |
| Clock Function | Yes |
| Alarm Function | Yes |
| Sleep Timer | 30/60/90 minutes |
| Carrying Handle | Yes |
| Warranty | 1 year |
| Manual Languages | English, German (PDF available) |
Frequently Asked Questions - IR 100 Block
User questions about IR 100 Block
0 question about this device. Answer the ones you know or ask your own.
Ask a new question about this device
Download the instructions for your Radio in PDF format for free! Find your manual IR 100 - Block and take your electronic device back in hand. On this page are published all the documents necessary for the use of your device. IR 100 by Block.
USER MANUAL IR 100 Block
Initialising network
Connecting to network
Dann:
Network OK
Assigned to Preset #
FM FREQUENCY RANGE: 87.5 - 108 MHz
Speicherplätze: 6
Safety instructions 23
What you need before you can use your Internet radio 24
Controls (Front Panel, Remote Control, Rear Panel)....24
Steps for connecting your radio to your wireless network....27
Step 1 - Power up the radio .....27
Step 2 - Scan for a wireless network connection....27
Step 3 - Connect to the wireless network .....28
Choosing a radio station to listen to....28
Returning to the menu while a station is playing....29
Storing a radio station in a preset....29
Playing a preset radio station....30
Requesting a station that is currently unavailable....30
Stations which enable you to choose what you listen to....30
Using your radio for tuning into FM stations 31
Setting the clock 31
Setting the alarm....32
Media Player
Set up a Windows PC to allow the radio to access your audio files via a UPnP server.....33
Locating and playing media files using the radio and UPnP 34
Browsing the list of tracks currently queued up for playback....35
Queuing up UPnP tracks for playback later....35
Queuing up albums for playback later 35
Controlling playback 35
Removing tracks from the queue....35
Playing tracks in random order....35
Playing tracks in the queue repeatedly....36
Settings menu 36
Choosing the option you want from the Configure menu....36
Configuring the radio to use a static IP address....37
Configuring the radio to only use a wired Ethernet connection ....37
Configuring the radio to only use a Wi-Fi connection ....37
Configuring the radio to use either an Ethernet or a wireless connection ....37
(Language>38
Configuring 'My Stuff' 38
Registering an account on Reciva's website....38
Configuring 'My Profile' 39
Configuring 'My Stations' 39
Configuring 'My Streams' 39
Configuring 'My Podcasts' 39
Troubleshooting 40
Specifications 41
Safety instructions
Safety Instructions
CAUTION: To reduce the risk of electric shock, do not remove any cover.
NO USER-SERVICEABLE PARTS INSIDE, REFER ANY SERVICING TO QUALIFIED SERVICE PERSONNEL.
IMPORTANT SAFETY INSTRUCTIONS
* Read and keep these instructions available for future reference.
* For indoor use only.
* The unit must only be connected to a suitable mains power supply using the mains power lead provided.
* To reduce the risk of fire or electrical shock, do not expose this unit to rain or moisture.
* The apparatus shall not be exposed to dripping or splashing
* No objects filled with liquids, such as vases, shall be placed on the apparatus.
* Unplug the unit from the wall socket during lightning storms and when it is not going to be used for a long period of time.
* Take care that foreign objects do not enter, or liquids are not spilled, into the enclosure through any openings. If this should happen, refer to qualified service personnel before attempting to use.
* Ensure adequate ventilation - do not cover this unit with curtains, etc.
* Do not install near any heat source, such as radiators, or other equipment that produces heat.
* Protect the mains power cable from being damaged.
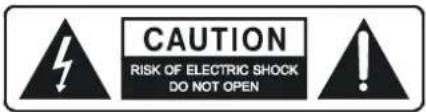
The lightning flash symbol with the arrowhead within an equilateral triangle is intended to alert the user to the presence of uninsulated 'dangerous voltage' within the product's enclosure that may be sufficient to constitute a risk of electric shock to persons.
The exclamation point within an equilateral triangle is intended to alert the user to important operating and maintenance instructions in the service literature relevant to this appliance.

"Information for the consumer"
Disposal of your old product
Your product is designed and manufactured with high quality materials and components.
which can be recycled and reused.
When this crossed out wheeled bin symbol is attached to a product it means the product is
covered by the European Directive 2002/96/EC
Please make yourself aware of the local collection system for electrical and electronic products.
Please act according to your loca rules and do not dispose of your old products with your normal household waste. The correct disposal of your old product will help prevent potential negative consequences for the environment and human health.

This product complies with European low voltage (73/23/EEC) and electromagnetic compatibility (89/336/EEC) directives.
Notes On Use
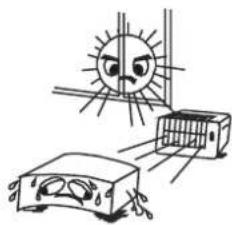 Avoid high temperaturesAllow for sufficient heat dispersionwhen installed on a rack. Avoid high temperaturesAllow for sufficient heat dispersionwhen installed on a rack. | 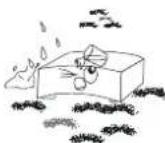 Keep the set free from moisture.water,and dust. Keep the set free from moisture.water,and dust. | 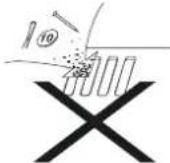 Do not let foreign objects in the set. Do not let foreign objects in the set. |
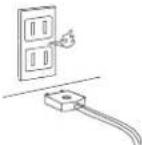 Unplug the power cord when notusing the set for long periods oftime Unplug the power cord when notusing the set for long periods oftime | 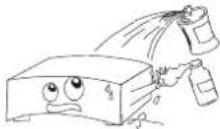 Do not let insecticides,benzene,andthinner come in contact with the set. Do not let insecticides,benzene,andthinner come in contact with the set. | |
| Handle the power cord carefully.Hold the plug when unplugging thecord. | 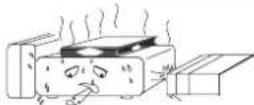 *(For sets with ventilation holes)Do not obstruct the ventilationholes *(For sets with ventilation holes)Do not obstruct the ventilationholes | 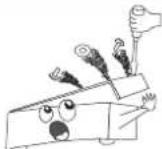 Never disassemble or modify the setin any way. Never disassemble or modify the setin any way. |
What you need before you can use your Internet radio
Before you can use your Internet radio, you need the following:
• A broadband Internet connection.
- A wireless access point (Wi-Fi) connected to your broadband Internet, preferably via a router.
- If you have not wireless network, you can use Lan wire connected to your broadband internet, preferably Via a router.
- You can select to use wireless or LAN wire in the setting menu.
- If your wireless network is configured to use Wired Equivalent Privacy (WEP) or Wi-Fi Protected Access (WPA) data encryption then you need to know the WEP or WPA code so you can get the Internet radio to communicate with the network.
Before you continue, make sure that your wireless access point is powered up and connected to your broadband Internet. To get this part of the system working you must read the instructions supplied with the wireless access point.
Controls
Front panel
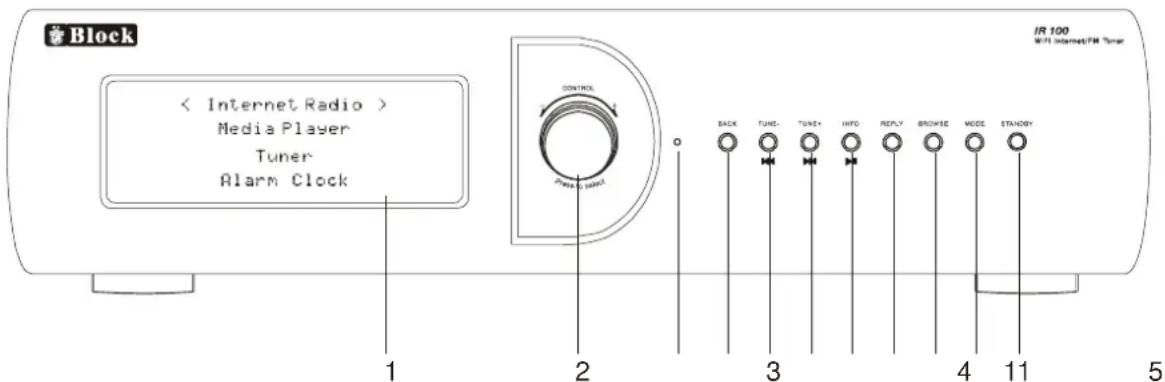
- VFD Display. Once power switch turn to ON place, VFD come up screen after about 15 seconds.
- Up/down move.
FM mode: adjust the frequency by manual
Internet Radio mode: up/down move in the menu.
Press the knob to go to main menu or select item on the menu. - LED Indicator: The indicator turn on in red colour when the unit is in standby clock mode.
- BACK: Press to go back to previous menu
5/6. Tune+/-: When unit in FM mode, press to auto search next/previous station.
|<< / >>| : When unit in Media player mode, press to skip to previous/next track. -
II: When unit in Media play mode, press to start play or pause. Info: For future upgrade function of FM mode.
- Reply. For future spare function, communication with the internet service. existing this key is no function.
- Browse: When unit in Media play mode, press this key, and use the knob to browse the play list, press the knob to select one track to play.
- Mode: FM and Internet radio mode change
- Standby: press to turn to standby clock mode, press again to back to normal mode.
Remote Control
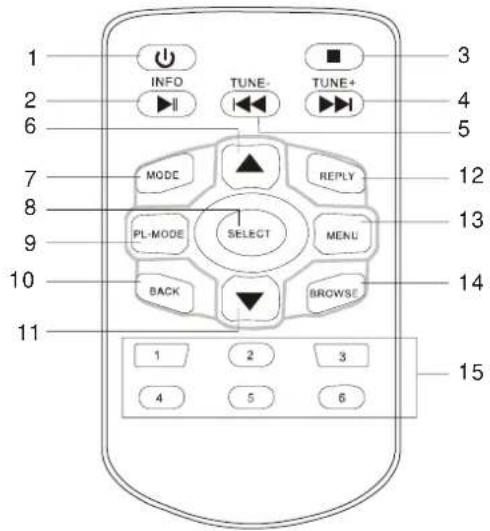
-
Standby: press to turn to standby clock mode, press again to back to normal mode.
-
II ; When unit in Media play mode, press to start play or pause.
Info: For future upgrade function of FM mode.
- Stop key: When unit in Media play mode, press to stop playing.
4/5. Tune+/-: When unit in FM mode, press to auto search next/previous station. I<< / >>1 : When unit in Media player mode, press to skip to previous/next track.
6/11. Up/down move key
FM mode: adjust the station frequency by manual.
Internet Radio mode: up/down move in the menu.
-
MODE: FM and Internet radio mode change
-
SELECT: Press to go to main menu or select item on the menu
-
PL-Mode: When unit in Media mode, press to change media play mode.
Media play mode with 4 statuses:
-
Shuffle (OFF), Repeat (OFF) 2. Shuffle (ON), Repeat (OFF)
-
Shuffle (OFF), Repeat (ON), 4. Shuffle (ON), Repeat (ON)
-
BACK: Press to go back to previous menu.
-
REPLY: For future spare function, communication with the internet service. existing this key is no function.
-
When unit in Media play mode, press this key, and use the knob to browse the play list, press the knob to select one track to play.
-
(1-6) are radio preset station numbers.
When the unit is in FM mode or Internet Radio mode, Press the number key and hold for about 2 seconds to save the present station to the number.
Rear Panel
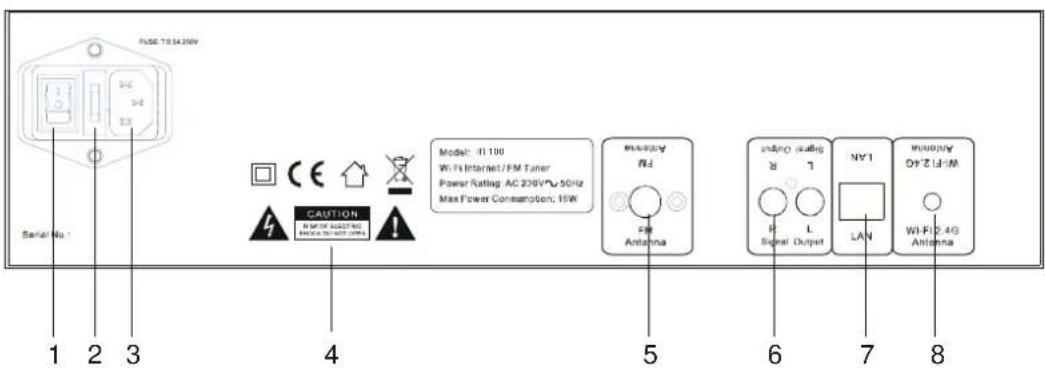
-
POWER SWITCH: Switches mains over on/off to internal components.
-
FUSE HOLDER: fitted with 20mm T0.5A 250V fuse.
"IMPORTANT:"
Remove the mains plug from the mains socket before attempting to check/replace the fuse located on this fuse holder.
-
MAINS CABLE INLET JACK: Please ensure that the input cable strain relief not been damaged.
-
WARNING ICONS: Please be aware that
this unit contains high voltages, and
should not be opened.
-
FM tuner Antenna input jack.
-
Music Signal Output jack.
-
LAN wire input jack
-
2.4G internet Wi-Fi antenna input jack.
Making The Connection
It is necessary to connect this tuner to an external amplifier and loudspeaker set up, (It is not possible to connect loudspeakers directly to this radio). Please see the following diagrams which detail required connections:
INTERNET RADIO IR 100
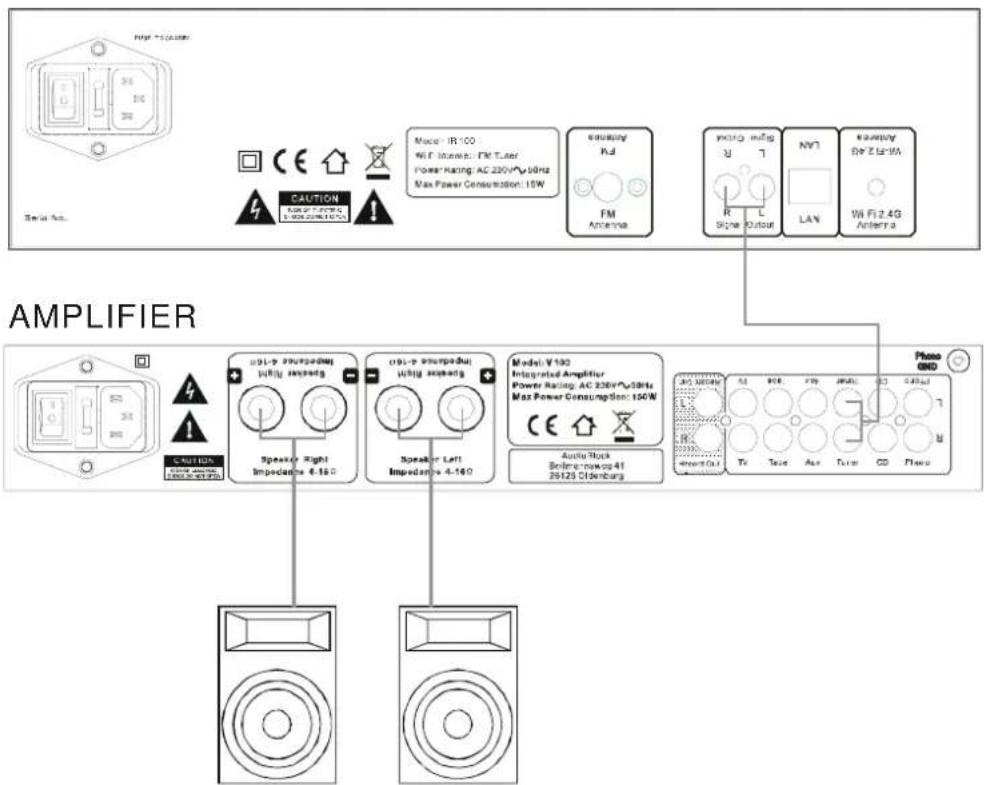
SPEAKERS
Steps for connecting your radio to your wireless network
Step 1 - Power up the radio
Connecting a power supply with a correct rating, turn power switch on, wait for about 15 seconds, Display light up.
Note: if you would like to give your radio a static IP address then please see the 'Network config' section under the 'Settings' section at the end of the guide.
The display on the front of the radio will light up and say:
Initialising network
After a few seconds, this will change to show:
Scanning
Step 2 - Scan for a wireless network connection
When the display says
(Note: if you make a mistake at any point, press the BACK button to go back to the previous screen.)
The radio will now scan for all available wireless networks and will display:
Scanning
If it can't find one then the display will say:
No Wireless Networks Found
If this happens then you will have to get your wireless access point working - see the instructions supplied with it.
When the radio finds your wireless network, it displays the ESSID for the access point on the screen - this is a name that is allocated to the access point by the person who set up the network - for example:
<
My Home Network
It is possible, and in some locations highly likely, that your radio will find more than one wireless access point, in which case you can choose which one you want to connect to. Turn the knob on the radio to see the ESSID for each access point the radio has found.
Step 3 - Connect to the wireless network
When the ESSID for the access point you want to connect to is displayed on the screen, press the SELECT button.
If your network is not configured to need an encryption code, the screen should say:
Connecting to Network
Then:
Network OK
If the screen displays either:
Enter WEP key
Or:
Enter WPA key
Then the network is using one of the encryption systems: Wired Equivalent Privacy (WEP) or Wi-Fi Protected Access (WPA). You therefore need to enter the correct WEP or WPA code into the radio to get it to communicate with your network.
Only the person who set up the network in the first place knows this code; if that person is not you then you need to find out what it is.
After 3 seconds, the display goes into the code entry mode. To enter the code, use the knob to select each character of the code in turn, pressing the SELECT button after each character. Note that WEP and WPA codes are sensitive to upper and lower case characters so you must enter them exactly.
After the final character, use the knob to select the END character and press the SELECT button.
The radio should now be able to connect to the network.
Choosing a radio station to listen to
- Press the SELECT button to return to the top-level menu.
(Note: if you make a mistake at any point, press the BACK button to go back to the previous screen.)
| < | Stations | > |
- If the screen does not say < Stations > as shown above, turn the knob until it does.
- Press the SELECT button.
- Turn the knob to choose from
or .
- Press the SELECT button to choose the option you want.
- Turn the knob until the display shows the region you want (or select 'All' to display all countries),
- Press the SELECT button.
- Turn the knob until the display shows the country you want.
- Press the SELECT button.
- Turn the knob until the display shows the station you want.
- Press the SELECT button and wait until the radio connects to that station.
Note that some radio stations do not broadcast 24 hours per day, and some stations are not always on-line.
If this station has on-demand content (that is, it gives the option of listening to programmes which have already been broadcast), see “Stations which enable you to choose what you listen to”.
- Turn the knob until the display shows the type of content you want, then press the SELECT button.
- Turn the knob until the display shows the station you want.
- Press the SELECT button and wait until the radio connects to that station.
Note that some radio stations do not broadcast 24 hours per day, and some stations are not always on-line.
If this station has on-demand content (that is, it gives the option of listening to programmes which have already been broadcast), see “Stations which enable you to choose what you listen to”.
- Press SELECT on
section. - Enter some character that you want to search, use the knob to select each character in turn, pressing the SELECT button after each character. After the final character, use the knob to select the END character and press the SELECT button
- The unit will search all station name with characters that you entered, use the knob to select one station, and press the SELECT button.
Returning to the menu while a station is playing
When the Internet radio is playing a radio station it will display the station's name and bit rate. You can return to the radio's menu section at any time by either pressing the SELECT button – which will take you to the 'Stations' menu - or the BACK button to return to the previous menu item.
Storing a radio station in a preset
Whilst a radio station is playing, hold down one of the preset buttons (numbered 1 to 6 on remote control) until the screen says
Assigned to
Preset #
Where # is the number of the button you held down.
Playing a preset radio station
When a radio station is playing, briefly press one of the preset buttons, 1 to 6, for the station you want. (Note, do not hold the button down - if you do then the station currently playing will overwrite the one stored in the preset; be careful).
Requesting a station that is currently unavailable
If you want to listen to a particular radio station which is currently not available online, you can visit the Reciva website at http://www.reciva.com/ and put in a request to add the station to the list.
Stations which enable you to choose what you listen to
Some radio stations can provide a number of options associated with their station; for example, some stations enable you to listen to programmes that have already been broadcast. When you select a radio station that has this facility, the station does not start playing immediately, but instead the display shows:

Live

- Turn the knob to choose
or , then press the SELECT button.
If you choose
If you choose
What is displayed will depend on the station you have chosen - the following steps are only a guide.
-
When you choose
, the display shows the names of the programmes. Turn the knob to choose the program you want, then press the SELECT button. -
When you have chosen the programme you want to listen to, either it will just start playing, or the display may show a list of days for you to choose from - use the knob to set the day the programme was broadcast, then press the SELECT button.
-
After you have chosen the day, you may be able to choose the Start Time. Set the Start Time using the knob and press the SELECT button.
-
Programmes which enable you to choose the time also enable you to fast-forward and rewind to the part you want while the radio is playing. When you press the SKIP TO PREVIOUS TRACK or SKIP TO NEXT TRACK button, the elapsed time that the programme has been playing is displayed. You can now turn the knob to change this time. You can also use the SKIP TO PREVIOUS TRACK or SKIP TO NEXT TRACK buttons to adjust the time. When you press the SELECT button again, the programme will play from that point.
-
Once the Internet radio is playing a programme that allows you to choose its start time, the radio's preset buttons become playback-control buttons for the stream; e.g. you can press PAUSE at any time to pause the stream, and then press PLAY to resume playing. It is only possible to assign this type of stream to a preset numbered 1 - 6.
Using your radio for tuning into FM stations
If your radio supports an FM tuner, then you will be able to access standard FM stations from it.
- You can access the radio's FM tuner by pressing the 'Mode'. Pressing the 'Mode' button again, turn to Internet radio again.
You can also access the FM tuner by selecting the 'Tuner' menu item from the radio's main menu. - Whilst the radio is in its FM tuner state, it will display what FM frequency it is currently tuned into. Turning the rotary encoder clockwise will increase the FM frequency the radio is tuned into and turning it anticlockwise will decrease the frequency.
- Press TUNE+/- button on front panel or remote control to auto search next / previous station.
- To save an FM frequency to the radio's memory, press and hold down a preset button in the same way that you would save an Internet station to a preset.
- To access a saved FM frequency, simply press the preset button assigned to the saved frequency.
Setting the time and date
- Press the SELECT button. (Note: if you make a mistake at any point, press the BACK button to go back to the previous screen.)
- Turn the knob until the display says
.
| < | Settings | > |
-
Press the SELECT button.
-
Turn the knob until the display says
.
| < Set Time/Date > |
- Press the SELECT button.
| Set Time 14:03 |
- Turn the knob until the hour setting is correct, then press the SELECT button.
| Set Time 15:03 |
- Turn the knob until the minute setting is correct, then press the SELECT button.
- After finished set time, display will come to Set Date section, the operation is same as Set Time.
| Set Date 15:06 |
Setting the alarm
- Press the SELECT button. (Note: if you make a mistake at any point, press the BACK button to go back to the previous screen.)
- Turn the knob until the display says
. Note, on some radios, you will need to access the 'Alarm' menu from the radio's 'Setting' menu.

- Press the SELECT button.
- Turn the knob until the display says
.
| < | Set Alarms | > |
- Turn the knob until the display says
.

- Turn the knob to swap between the various alarms and 'Disable All'. Pressing the SELECT button on 'Disable All' will cause all the alarms to be turned off. The display will then say 'All alarms disabled' for 3 seconds, then returns to the radio station display.
| All alarms disabled |
- If you select one of the numbered alarms, then the radio will allow you to select the time for the alarm.

- Turn the knob until the hour setting is correct, then press the SELECT button.

- Turn the knob until the minute setting is correct, then press the SELECT button.
| Alarm Set: 07:45 |
- Turn the knob to choose between ‘Once’, ‘Every day’, ‘Weekly’, ‘Weekdays’ and ‘Weekends’. If you choose ‘Once’ or ‘Weekly’, then you will need to choose which day you would the alarm to be activated on and then press the SELECT button.
- Finally, you will need to select which type of alarm you would like to use: the radio's buzzer or a station that is assigned to a preset and then press the SELECT button.
Media Player
Set up a Windows PC to allow the radio to access your audio files via a UPnP server
- If your PC is running Microsoft Windows XP or Windows Vista, then you can use Windows Media Player 11 (WMP11) to act as your UPnP (Universal Plug and Play) media server 1.0. Windows Media Player 11 may be downloaded from Microsoft's website and installed by following the instructions detailed in its installation wizard.
- Once installed, Windows Media Player 11 will create a library from all the media files available to it on your PC. To add new media files to the library, select 'File > Add to Library... > Advanced Options', click 'Add' and choose the files you wish to add and click 'OK'.
- You will now need to connect your Internet radio to Windows Media Player 11 and configure it to allow the radio to access your media library. In order to this, you will need to do the following:
a. Keep pressing BACK to get to the radio's top-level menu and then turn the rotary knob to select 'Media Player'.
b. Press SELECT and then turn the knob to section 'UPNP Servers'.
c. Press SELECT and the radio will scan for all available UPnP servers. Note, this may take a few seconds for the radio to complete its scan and before the scan has completed, the radio will display '[Empty]'. The radio will continue to display '[Empty]' if no UPnP servers are found.
d. After a successful scan, select your UPnP server, by rotating the knob if there is more than one UPnP server, and then press SELECT (note, your radio will display 'Access Denied' at this stage).
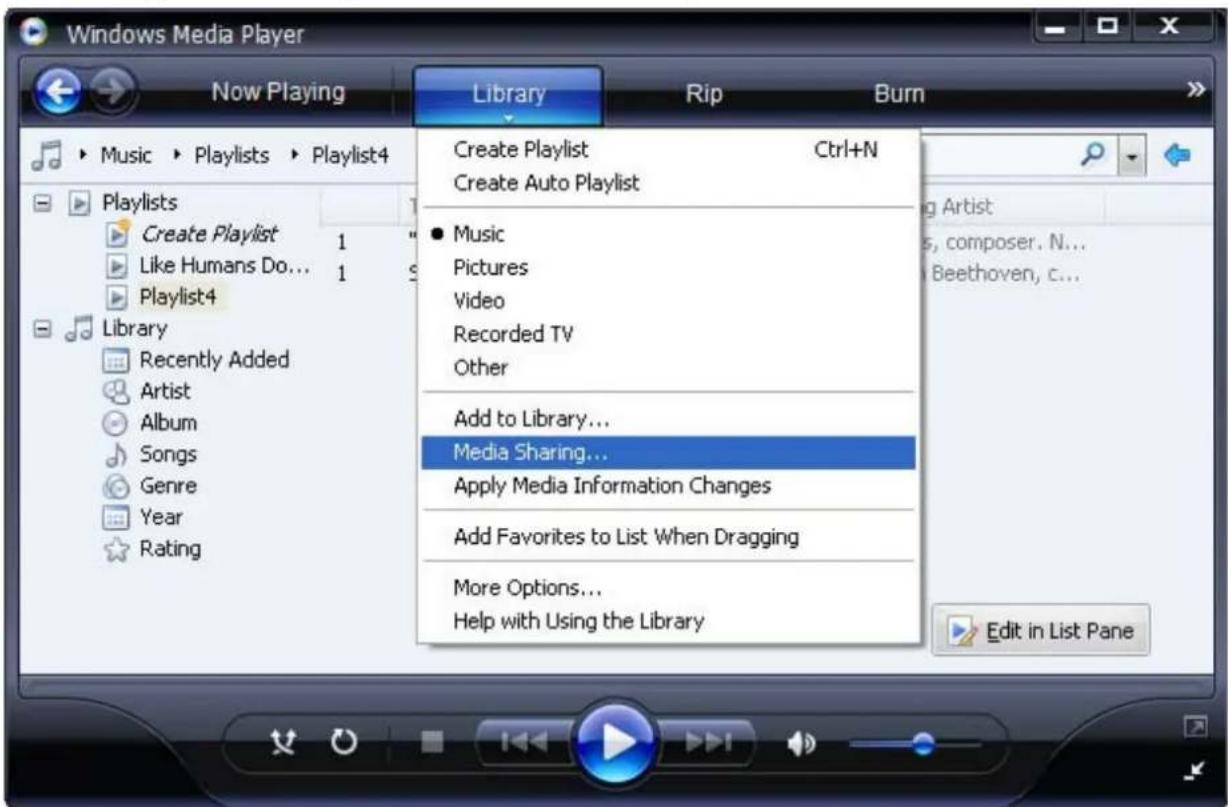
- Your PC will now prompt you that a device has attempted to connect to your UPnP server. In order to allow the radio to have access to the media files, you will need to click the 'Library' tab from Windows Media Player 11 and select the 'Media Sharing...' item to open the 'Media Sharing' window.
Selecting 'Media Sharing...' for Windows Media Player 11:
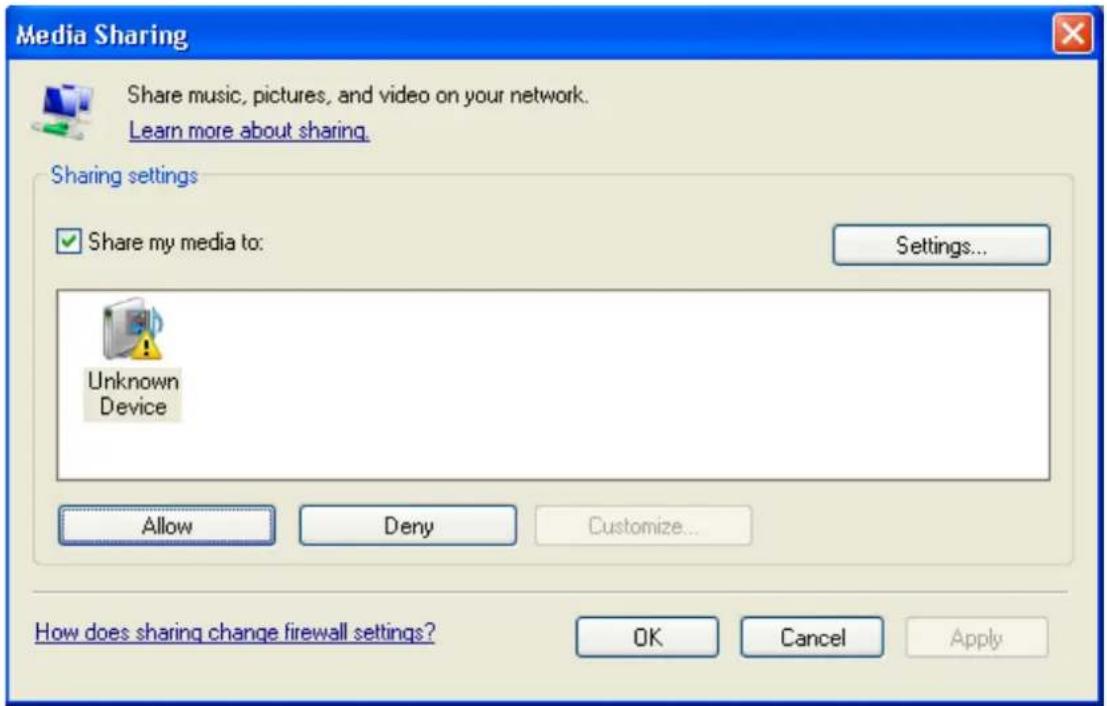
- From the 'Media Sharing' window, the radio will be listed as an unknown device. Click on the unknown device listed, then click the 'Allow' button and then click 'OK'.
Allowing the Radio to Connect:
Locating and playing media files using the radio and UPnP
- Once the UPnP server is configured to share media files with the Internet radio, you can play the files by doing the following on the radio.
- Keep pressing BACK to get to the radio's top-level menu and then turn the knob to select 'Media Player'.
- Press SELECT and then turn the knob to section 'UPNP Servers'.
- Press SELECT and the radio will scan for all available UPnP servers. Note, this may take a few seconds for the radio to complete its scan and before the scan has completed, the radio will display '[Empty']. The radio will continue to display '[Empty]' if no UPnP servers are found.
- After a successful scan, select your UPnP server, by rotating the knob if there is more than one UPnP server, and then press SELECT.
- The radio will now list the media categories available from the UPnP server, e.g. 'Music', 'Playlists' etc. Turn the knob to select which category you wish to browse, press SELECT and turn the knob to a sub category and press SELECT again. For example, you could select 'Music' and then 'Album'.
- Turn the knob to the media files that you wish to play and press SELECT.
- The radio will display '[Add to Queue]', press SELECT and the radio will add the tracks to its queue and begin playing them automatically.
Browsing the list of tracks currently queued up for playback
- Press the BROWSE button. The currently playing track name will be displayed.
- Turn the knob to see which tracks are queued up for playback.
- If you want to jump to a particular place in the queue then press the SELECT button when the required track is displayed.
Queuing up UPnP tracks for playback later
- Move to the required track.
- Press the SELECT button. 'Track Added To Queue' will be displayed.
Queuing up albums for playback later
- Highlight the required album.
- Press the SELECT button.
- Turn the knob until '[Add To Queue]' is displayed.
- Press the SELECT button. 'Tracks Added to Queue' will be displayed.
Controlling playback
- Use the STOP button to stop playback.
- Use the PLAY/PAUSE button to either pause a currently playing track or to restart a currently paused track or to restart a stopped track.
- Use the SKIP TO PREVIOUS TRACK button to start playback of the previous track in the queue.
- Use the SKIP TO NEXT TRACK button to start playback of the next track in the queue.
Removing tracks from the queue
- Press the BROWSE button. The currently playing track name will be displayed.
- Turn the knob to select the track you want to remove from the queue.
- Press and hold the STOP button for 2 seconds.
- Turn the knob to section 'Yes' or 'No'.
- Press SELECT to confirm whether you actually want to delete the track from the queue.
- If 'Yes' was selected then 'Removed From Queue' will be displayed.
- To remove all tracks from the queue, keep pressing BACK until the 'Media Player' menu item is selected, press SELECT and then turn the knob to select 'Clear Queue' and press SELECT again.
Playing tracks in random order
- Select the individual tracks as described previously.
-
Navigate to top-level menu item 'Media Player' using the SELECT and BACK buttons.
-
Press the SELECT button.
- Turn the knob until 'Playback Mode' is displayed.
- Press the SELECT button.
- Turn the knob until 'Shuffle' is displayed.
- Press the SELECT button.
- Turn the knob to select YES/NO to confirm that shuffle mode should be enabled.
Playing tracks in the queue repeatedly
- Select the individual tracks as described previously.
- Navigate to top-level menu item 'Media Player' using the SELECT and BACK buttons.
- Press the SELECT button.
- Turn the knob until 'Playback Mode' is displayed.
- Press the SELECT button.
- Turn the knob until 'Repeat' is displayed.
- Press the SELECT button.
- Turn the knob to select YES/NO to confirm that repeat mode should be enabled.
Settings menu
Choosing the option you want from the Settings menu
- Press the SELECT button.
(Note: if you make a mistake at any point, press the BACK button to go back to the previous screen.)
- Turn the knob until 'Settings' is displayed
- Press the SELECT button.
- Turn the knob until the display shows the option you want.
- Press the SELECT button to choose the option shown on the display. The options are explained below.
This menu enables you to configure your radio's network settings, scan again for a connection to another wireless network, or to manually configure the network parameters. This is useful if you take your Internet radio to another building where you want to use it.
Configuring the radio to use a static IP address
In order for your radio to use a static IP address on your network, you will need to do the following:
- From your radio, select the 'Settings > Network config > Edit Config' menu and then press SELECT.
- The radio will now display 'Auto (DHCP)? YES / NO'. Turn the radio's rotary encoder to select 'NO' and then press SELECT.
- You will now be able to enter the IP address you wish to give your radio by using the rotary encoder to select the desired numbers followed by pressing SELECT to end inputting the address.
-
The radio will now prompt you to enter the required network mask for the network. You will be able to enter this in the same way as before for entering the IP address.
-
You will now need to enter the default gateway's IP address used by the radio on the network.
-
Finally, you will need to enter the DNS IP address for the radio. On some networks, you may need to enter your ISP's DNS IP address, which should be available on your ISP's support page on their website.
-
After entering the above information, the radio will now connect successfully to your network. In order to make the radio use DHCP again (to automatically get its network information when it attempts to connect to a network), you will need to select 'Configure > Network config > Edit Config' and then set 'Auto (DHCP)? YES / NO' to 'YES'.
If your radio supports wired networking then you will be able to configure your radio to connect to your network via an available Ethernet connection (RJ45) or via a Wi-Fi router:
Configuring the radio to only use a wired Ethernet connection
From the radio's ‘Network config’ menu, select ‘Wired/Wireless’. This menu will present you with three options: ‘Wireless Only’, ‘Wired’ and ‘Auto’. Selecting ‘Wired Only’ will allow cause the radio to reboot and then only use its Ethernet connection to communicate with the network. The radio will also disable its wireless network capabilities.
Configuring the radio to only use a Wi-Fi connection
Selecting the ‘Wireless Only’ option from the ‘Wired/Wireless’ menu will allow cause the radio to reboot and then only use its Wi-Fi connection to communicate with the network. The radio will also disable its Ethernet connection.
Configuring the radio to use either an Ethernet or a wireless connection
Selecting the ‘Auto’ option from the ‘Wired/Wireless’ menu will allow cause the radio to reboot and then attempt to establish an Ethernet connection, if it is available, to communicate with the network. Otherwise, the radio will attempt to establish a Wi-Fi connection to the network.
Once the radio has established a certain type of connection to the network, then this type of connection will remain in use while the radio is on.
The ‘Network Config’ menu also allows you to choose whether or not the Internet radio displays a warning message when its network signal strength is low. You can enable this feature by selecting ‘Signal Warning’ and then selecting ‘Yes’.
Displays the versions numbers of the various parts of software and hardware on your Internet radio.
Use this option to download new firmware for the radio from the Reciva portal on the Internet. If there is new firmware available, then the radio will prompt you if you want to download it or not. Note, at this stage, you can press the radio's BACK button to cancel the radio beginning a firmware upgrade. A Firmware upgrade may take several minutes, so do no switch off the power to the radio until the operation is complete otherwise the radio may become permanently damaged.
(Language>
Allows you to change the display language.
Puts all the settings back to their defaults as they were when they left the factory. If you perform a factory reset on your radio you will lose all your presets and your wireless network connection.
This will display a key that can be used to register the radio on the Reciva Customer portal: http://www.reciva.com/
Use this option to set the time and date, to set an alarm and to view the current alarm setting, see “Setting the alarms”.
Configuring 'My Stuff'
Registering an account on Reciva's website
-
Open the website, http://www.reciva.com from your Internet browser.
-
Click on the 'Register' link and follow the on-screen instructions to register an account. Please note, during the registration process, a validation code will be sent to you via email. Please enter this code when prompted to do so.
- After logging into your account, you will be able to edit your information for 'My Profile', 'My Stations', 'My Streams', 'My Radios' and 'My Podcasts' from the left-hand side of the website.
- You can now add your Internet Radio to your account on the website by accessing the 'My Radios' link. From the 'My Radios' section, you will need to enter in your radio's eight digit serial number, which can be found from the 'Settings > Version' menu on the radio, and you will also need to enter in your radio's seven digit registration code, which can be found from the 'Configure > Register' menu on the radio.
Configuring 'My Profile'
Once logged into you Reciva account, you can edit your account's details from your 'My Profile' section.
Click on the ‘My Profile’ link to view your account’s current information. This information will include various details such as your address, user name, password etc. Edit your details and then click on the ‘Update’ button to save them.
Configuring 'My Stations'
- It is possible to search for radio stations that are available in Reciva's stations' database from Reciva's website. Whenever stations are searched for on the website, they will be displayed in a list of search results together with a link to 'Add to My Stations'.
- Clicking on the 'Add to My Stations' link, will add the station to your account's 'My Stations' list. Clicking on 'My Stations' and then selecting the station will allow you to edit this list.
- Once you have Internet stations available in your 'My Stations' list, you may play these stations from your Internet Radio. These stations will be available on your radio from the menu item: 'Stations > My Stuff > My Stations'. Please note, the stations will only be available to your radio once your radio has downloaded a new stations' list. To cause the radio to download a new stations' list immediately, please remove and reconnect the power to your radio.
Configuring 'My Streams'
- Once logged into your Reciva website account, you can add your own Internet radio streams to your 'My Streams'.
- Clicking on ‘My Streams’ will prompt you to enter the station’s name and its media stream URL. The media stream URL should be a link to a website’s actual audio stream. If you have any doubt about locating the media stream URL from a webpage, then please refer to the FAQs section on Reciva’s website, http://www.reciva.com.
- Once you have Internet radio streams available in your 'My Streams' list, you may play these stations from your Internet Radio. These stations will be available on your radio from the menu item: 'Stations > My Stuff > My Streams'. Please note, the streams will only be available to your radio once your radio has downloaded a new stations' list. To cause the radio to download a new stations' list immediately, please remove and reconnect the power to your radio.
Configuring 'My Podcasts'
-
It is possible to add audio podcasts (RSS feeds) to your Reciva account that can be accessed on your Internet radio. To add a podcast, simply login to your account and then click on the 'My Podcasts' link.
-
From your ‘My Podcasts’ section, you can add your chosen podcast by entering in the podcast’s name and its URL as prompted by the website. Please note, the podcast URL will have to be a direct RSS feed which will end with the ‘.xml’ extension e.g. http://someurl.com/podcast.xml
- Once you have podcasts available in your 'My Podcasts' list, you may access these feeds from your Internet Radio. These podcasts will be available on your radio from the menu item: 'Stations > My Stuff > My Podcasts'. Please note, the podcasts will only be available to your radio once your radio has downloaded a new stations' list. To cause the radio to download a new stations' list immediately, please remove and reconnect the power to your radio.
Troubleshooting
If you experience any trouble with your wireless Internet radio, then you may find it useful to visit the help section on our webpage: http://www.reciva.com
If you have trouble connecting the radio to your wireless network, these steps may help to resolve the problem:
- Confirm that a Wi-Fi connected PC can access the Internet (i.e. can browse the web) using the same network.
- Check that a DHCP server is available, or that you have configured a static IP address on the radio. You can configure a static IP address on the radio using the menu item 'Settings -> Network Config -> Edit Config', and then select 'No' for 'Auto (DHCP)'.
-
Check that your network's firewall is not blocking any outgoing ports. As a minimum, the radio needs access to UDP and TCP ports 80, 554, 1755, 5000, 6000 and 7070.
-
Check your access point does not restrict connections to particular MAC addresses. You can view the radio's MAC address using the menu item 'Settings -> Network Config -> View Config -> MAC address'.
-
If you have an encrypted network, check that you have entered the correct key or passphrase into the radio. Remember that text-format keys are case sensitive. If, when attempting to connect to an encrypted network, your radio displays: 'Wireless error' followed by a 5-digit number, then please ensure that you enter the correct passphrase for the network. If the problem persists, then you may need to consult your network configuration.
If your radio can connect to the network successfully, but is unable to play particular stations, it may be due to one of the following causes:
- The station is not broadcasting at this time of the day (remember it may be located in a different time zone).
- The station has reached the maximum allowed number of simultaneous listeners.
-
The station is not broadcasting anymore.
-
The link on the radio is out of date.
- The Internet connection between the server (often located in a different country) and you is slow.
Try using a PC to play back the stream via the broadcaster's web site.
If you can play back the station with a PC, use the form at http://www.reciva.com/ to notify us so that we can change the station data that is used by the radio.
SPECIFICATIONS
| FM FREQUENCY RANGE: | 87.5 – 108 MHz |
| FM PRESET STATIONS: | 6 |
| INTERNET RADIO PRESET STATIONS: | 6 |
| POWER SUPPLY: | AC 230V 50 Hz |
| MAX POWER CONSUMPTIONS: | 15W |
| DIMEMSIONS: | 430 X 283 X 117 mm (with feet) |



- Assigned to Preset #
- Safety instructions 23
- What you need before you can use your Internet radio 24
- Media Player
- Settings menu 36
- Configuring 'My Stuff' 38
- Troubleshooting 40
- Specifications 41
- Safety instructions
- What you need before you can use your Internet radio
- Controls
- Making The Connection
- Steps for connecting your radio to your wireless network
- Step 1 - Power up the radio
- Step 2 - Scan for a wireless network connection
- Step 3 - Connect to the wireless network
- Choosing a radio station to listen to
- Returning to the menu while a station is playing
- Storing a radio station in a preset
- Assigned to
- Preset #
- Playing a preset radio station
- Requesting a station that is currently unavailable
- Stations which enable you to choose what you listen to
- Using your radio for tuning into FM stations
- Setting the time and date
- Setting the alarm
- Set up a Windows PC to allow the radio to access your audio files via a UPnP server
- Allowing the Radio to Connect:
- Locating and playing media files using the radio and UPnP
- Browsing the list of tracks currently queued up for playback
- Queuing up UPnP tracks for playback later
- Queuing up albums for playback later
- Controlling playback
- Removing tracks from the queue
- Playing tracks in random order
- Playing tracks in the queue repeatedly
- Settings menu
- Choosing the option you want from the Settings menu
- Configuring the radio to use a static IP address
- Configuring the radio to only use a wired Ethernet connection
- Configuring the radio to only use a Wi-Fi connection
- Configuring the radio to use either an Ethernet or a wireless connection
- (Language>
- Configuring 'My Stuff'
- Registering an account on Reciva's website
- Configuring 'My Profile'
- Configuring 'My Stations'
- Configuring 'My Streams'
- Configuring 'My Podcasts'
- Troubleshooting
- SPECIFICATIONS
Brand : Block
Model : IR 100
Category : Radio