
GMINI SP - Media player ARCHOS - Free user manual and instructions
Find the device manual for free GMINI SP ARCHOS in PDF.

| Product type | Portable media player with FM remote control |
| Brand | ARCHOS |
| Model | GMINI SP |
| Main functions | MP3 playback, stereo FM radio, voice recording (via built-in microphone of the remote control, except on GMINI SP), FM recording, Retro-recording function, audio editing |
| Supported audio formats | MP3 (via GMINI), recorded audio files in WAV or MP3 |
| Storage | Internal hard drive (capacity not specified, estimated 20 GB for the Gmini series) |
| Connectivity | 3.5 mm headphone jack, multi-pin connector for FM remote control, USB (for file transfer) |
| FM radio | FM bands USA (87.5-108 MHz), Europe (87.5-108 MHz), Japan (76-91 MHz), 20 presets |
| FM remote control | Wired remote control with built-in microphone, LCD screen, navigation and volume controls |
| Power supply | Built-in rechargeable battery (battery life not specified, estimated 10-15 hours) |
| Dimensions (estimate) | Approximately 10 x 6 x 2 cm |
| Weight (estimate) | Approximately 150 g |
| Maintenance and cleaning | Clean with a soft, dry cloth. Do not use abrasive cleaners. |
| Safety | Do not expose to moisture or rain. Do not open the device (risk of electric shock). Use only by qualified personnel for maintenance. |
| Spare parts and repairability | Contact ARCHOS after-sales service. The battery is not user-replaceable. |
| General information | Manual available in PDF on notice-facile.com. Compatible with Gmini SP, 100, 200 and 400 models. |
Frequently Asked Questions - GMINI SP ARCHOS
User questions about GMINI SP ARCHOS
0 question about this device. Answer the ones you know or ask your own.
Ask a new question about this device
Download the instructions for your Media player in PDF format for free! Find your manual GMINI SP - ARCHOS and take your electronic device back in hand. On this page are published all the documents necessary for the use of your device. GMINI SP by ARCHOS.
USER MANUAL GMINI SP ARCHOS
ARCHOS FM Remote Control
Stereo FM Radio / Remote Control / Microphone for ARCHOS Gmini Series
ARCHOS™
User Manual for ARCHOS Gmini SP, 100, 200, 400 FM Remote Control v3.0.
Please visit our web site to download the most recent manual and software for this product.
Table of Contents
1 The Archos FM Remote Control 3
1.1 Operation Modes 3
1.2 Connecting to your Gmini 3
2 How to Use the Radio and MP3 Function 5
2.1 Playing Music 5
2.2 Tuning the Radio 5
2.3 Making a Radio Preset 5
2.4 Setting the HOLD mode 6
2.5 Recording from the Microphone 6
2.6 Recording from the Radio 6
2.7 Retro Recording and Editing 7
Retro-recording 7
Editing 7
2.8 Setting Parameters 10
FM Band 10
Radio & Microphone Recording 11
Retro-Recording 11
3 Technical Support 12
4 Troubleshooting 13
5 Warranty and Limited Liability 14
Warnings and Safety Instructions 15
FCC Warning Statement 15
Copyright Notice 16
1
The Archos FM Remote Control
This FM Remote control will allow you to:
• Play songs that are on your Gmini.
• Record your voice* with its microphone.
- Listen to FM Stereo radio.
• Record off the FM stereo* radio into music files.
1.1 Operation Modes
- Browse Mode: Allows browsing through files and folders on the Gmini
• Play Mode: Plays music files from the Gmini
• Voice Record Mode: Allows the recording of voice from the remote's microphone
• FM Play Mode: Plays from the built-in FM radio
• FM Record Mode: Records from the built-in FM radio
1.2 Connecting to your Gmini
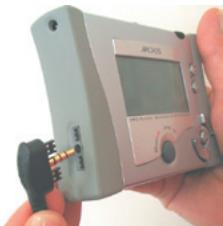
Gmini SP* and Gmini 100
natural_image
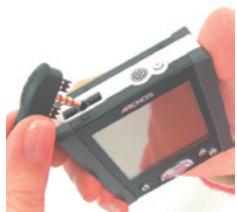
Close-up of hands holding a black and white electronic device with a screen, no visible text or symbols.Gmini 200
natural_image
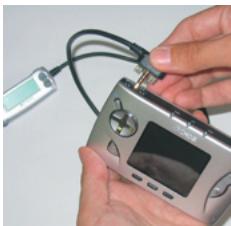
Close-up of hands holding a silver electronic device with attached cable and display screen (no visible text or symbols)Gmini 400
The FM Remote Control is hot pluggable. You do not have to shut off the Gmini in order to plug in the FM Remote Control or remove it. First, plug in the Remote into the Gmini's multi-connect jack as shown. Next, plug your headphones into the FM Remote Control itself. Once connected, the regular buttons on the Gmini will still work in addition to the remote control buttons.
* Gmini SP model does not support microphone or FM recording.
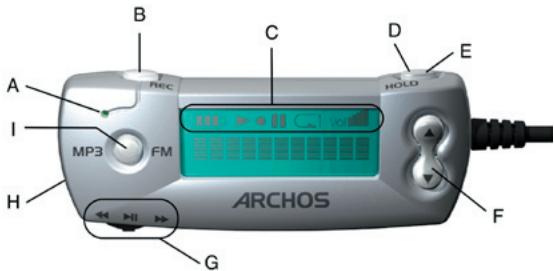
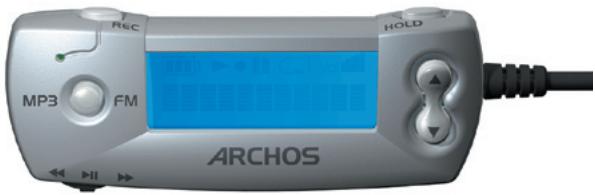
| A | Built-in microphone |
| B | Record voice or FM Radio |
| C | Battery level / Playing / Recording / Paused / Repeat play / Volume level |
| D | HOLD: Press Hold for 3 seconds to de-activate/reactivate all buttons |
| E | FM Mode: Short press changes between Stereo and mono receptionBrowse Mode: Short press moves browser up to the parent directory |
| F | Increase +: Volume UpDecrease -: Volume Down |
| G | Rocker Control:(left, right, center click)Browse Mode: Left: Previous item in current directoryRight: Next item in current directoryCenter: Play song / Pause / Enter directoryFM Mode: Left: Go down the FM band or to previous presetRight: Go up the FM band or to next presetCenter: Change FM mode (Preset/Manual/Search)Center: (Long) Make a preset at the current frequency or delete current preset (preset mode) |
| H | 3.5mm jack for headphones |
| I | (Quick press) Switch between FM mode and MP3 (browse) mode. Stop playing current MP3.(Long press) Go back to home <Music> icon.Hold for 3 seconds to turn off Gmini. |
2.1 Playing Music
You can connect your FM Remote to the Gmini at any time. If you connect the Remote before turning on your Gmini, once you start it up, it will give you the choice of one of the two main screen icons, either
2.2 Tuning the Radio
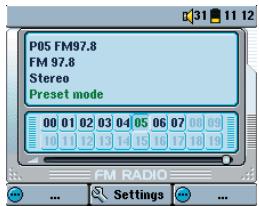
Once the remote is plugged in, click on the mode button MP3/FM to go to the radio mode. Use the rocker control Left ◀ and Right ▶ to go up and down the frequency range. A short press on the rocker button will rotate through the three FM tuning modes, Preset (you can choose one of your 20 preset stations), Manual (tune your station manually), Search (let the radio search for the next clear station). Press the MP3/FM button to leave the Radio mode and go back to the MP3 mode.
2.3 Making a Radio Preset
You can save up to 20 preset stations with the FM remote control. Once you have found the radio frequency you want to save as a preset, press and hold the rocker PLAY button for 3 seconds. The Remote will show P2 Saved, for example, indicating that this radio station is now program number 2. If you would like to erase a preset station, go to the tuning Preset mode, scroll to the preset number you want to clear, then hold down on PLAY for three seconds. You now have a free program slot to make a different FM preset.
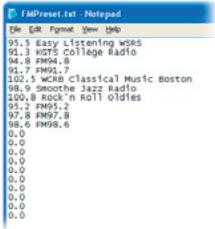
If you would like to name your Preset radio stations, you can do this by editing, with a text editor such as Notepad (Windows®) or SimpleText (Macintosh®), the file FMPreset.txt which you will find in the System folder on the root directory of the Gmini hard drive. Please note that you should not use a word processor such as Microsoft Word® to edit the preset text file. Each line of the text file should contain the station frequency, a space, and then the name of the station. You can name the station whatever you want, some examples are 90.1 Easy Jazz or 90s Hits FM Radio 107.8 or 91.3 KGTS. You are limited to 32 characters for naming a station preset. The entry on a line of 0.0 represents an empty preset slot.
2.4 Setting the HOLD mode
Use this feature if you would like to prevent the FM Remote from changing stations, songs, or settings accidentally if a button is pressed or hit. Hold down for three seconds on the HOLD button to activate this. The buttons will be locked and not respond if pressed. To de-activate HOLD and make the buttons usable, press the HOLD button again for 3 seconds. Using the HOLD on the Remote will lock both the Remote's buttons and the Gmini buttons.
2.5 Recording from the Microphone
First make sure you are in the MP3 mode (MP3/FM button to change modes) and in the folder you want the voice file to be recorded to. Simply click once on the REC button and the recording starts. The REC button will light up red to indicate that you are making a recording. When you are done, click on REC again and the recording will finish and write to your hard drive. Your recording will be saved in same folder of the last radio or voice recording. Typically this location is the Music folder. This default location is changed when you make a recording using the F3 'Record' button (Gmini 400) or Record menu item (Gmini 100 & 200) in any given folder from the Music browser.
2.6 Recording from the Radio
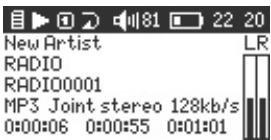
When you hear something on the radio you would like to record, click once on the remote control's REC button. The REC button will light up red to indicate that a recording is taking place. Click it again when you want to stop the recording. Your recording will be saved in same folder of the last radio or voice recording. Typically this location is the Music folder. This default location is changed when you make a recording using the F3 'Record' button (Gmini 400) or Record menu item (Gmini 100 & 200) in any given folder from the Music browser. The file name for this recording will be RADIOxxxx, where xxxx are incremental numbers. During the recording, the gain is fixed so that you get the best possible radio recording.
Retro-recording
This is a feature that allows you to capture the 30 seconds of radio broadcast before the record button is pressed. It does this by continuously recording a 30 second loop of music in a buffer. Then, when you click on REC to record the radio, it adds this 30 seconds to the beginning of your recording. This way, if you start recording a radio song after it has started, you will actually have the entire song in the recording. The Retro-record setting must be set to On in order for this to work. See the description in section 2.8 on how to turn on or off the Retro-record function.
Editing
Once a retro-recorded song has been recorded, it can be edited on the Gmini itself. Often, the beginning of the recording will include a commercial or announcer talk that you do not want to keep, but was also recorded during the buffered 30 seconds.
1. Choose the Radio Recording to Edit.
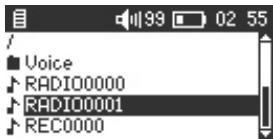
Gmini SP & Gmini 100
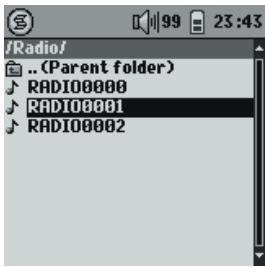
Gmini 200
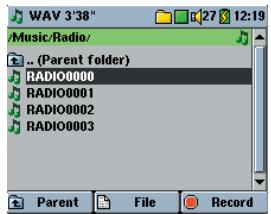
Gmini 400
2. Choose the Menu item, Edit Track.
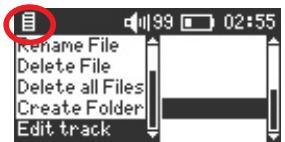
Gmini SP & Gmini 100
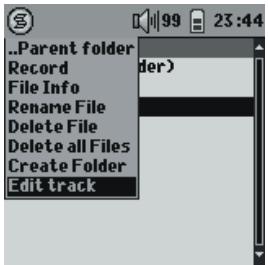
Gmini 200
Gmini 400
Cut-In & Cut-Out (Gmini 100 & Gmini 200)
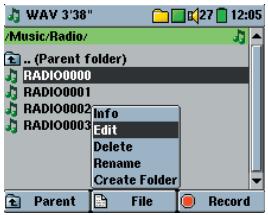
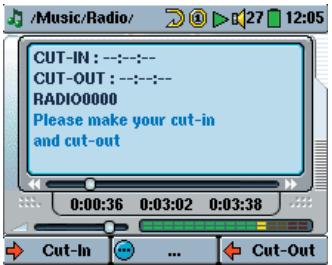
To go to the Audio Edit screen and remove unwanted sections, locate the recorded radio file on your Gmini and click on the menu item Edit Track. Shown here is the Audio Edit mode. It looks similar to the music play screen. You will notice that your radio recording has started to play. It will continuously loop so that you can hear the changes to it as the Cut-ins and Cut-outs are made.
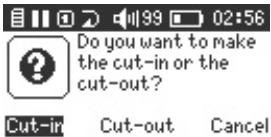
As normal, when playing a song, you can use the Reverse □ and Forward ▶ buttons to move back and forward within the song. While the song is playing, wait for the precise moment that you want the edited song to start and then click the Pause 📋 button. The question screen will come up and ask if this will be the Cut-in or the Cut-out. Since the Cut-in button is already highlighted, just click on the Play 📋 button
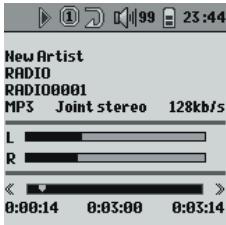
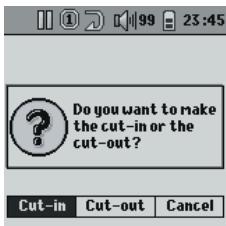
to accept that you are making the Cut-in point. After this, the Gmini will go back to edit screen and start playing the song again. To make the point where you want the newly edited song to end, let the song play to the point that you wish it to stop, and then click on Pause ☐ at that precise moment. This time however, use the Right button to highlight the Cut-out option and then click on Play ☐ to validate the Cut-out choice. You will now hear your song played with the undesired parts completely removed. If you would like to make further cuts, you can still do so. If you are happy with the results, click on ESC ☐/☐ to exit the Audio Edit screen and it will ask if you would like to save your edit. If you select No, your recorded file will be left untouched. If you select Yes, the Gmini will execute a read/write process and create a new file named originalfilename_Edit.mp3 and place it in the same directory as the original file. You can now delete the original final if you desire.
Cut-In & Cut-Out (Gmini 400)
To go to the Audio Edit screen and remove unwanted sections, locate the recorded radio file on your Gmini, click on the F2 File button, and select the item Edit. Shown here is the Audio Edit mode. It looks similar to the music play screen. You will notice that your radio recording has started to play. It will continuously loop so that you can hear the changes to it as the Cut-ins and Cut-outs are made.
As normal, when playing a song, you can use the Reverse and Forward buttons to move back and forward within the song. While the song is playing, wait for the precise moment that you want the edited song to start and then click on the F1 button Cut-In. The song will now start to play from that cut-in point as if it was the beginning of the song. Let the song play (Or fast forward) to the point you want the song to end. Wait for the precise moment that you want the edited song to end and then click on the F3 button Cut-Out. Your song is now edited in the beginning and end. You can use the Forward and Reverse buttons to listen to your new start and end
points and judge if the cuts are as you wanted. If you are happy with the results, click on F2 Save to your edit. It will ask if you would like to save your edit. If you select No, your recorded file will be left untouched. If you select Yes, the Gmini will execute a read/write process and create a new file named and place it in the same directory as the original file. You can now delete the original file if you desire.
2.8 Setting Parameters
Gmini SP & Gmini 100
Gmini 200
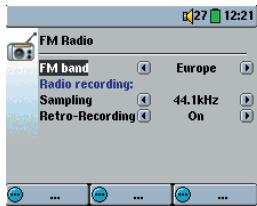
Gmini 400
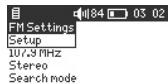
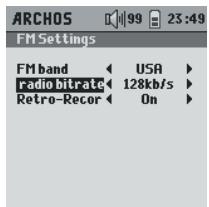
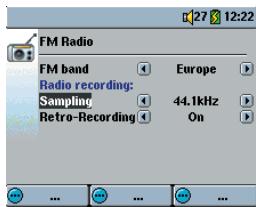
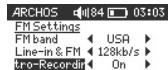
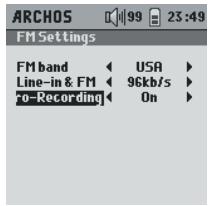
To change the Remote FM parameters, you must attach the FM Remote Control, enter FM mode, click on the Gmini's Menu button (Settings on Gmini 400) and then select FM Settings.
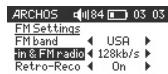
FM Band
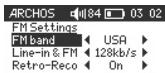
Gmini SP & Gmini 100
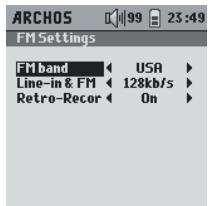
Gmini 200
Gmini 400
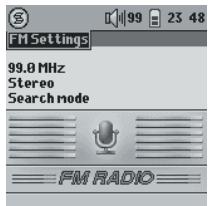
Make sure you have the correct FM setting. Go to the parameter FM Band. The specifications for the modes are as follows:
USA: 87.5 - 108 Mhz de-emphasis 75 μs
Europe: 87.5 – 108 Mhz de-emphasis 50 μs
Japan: 76 - 91 Mhz de-emphasis 50 μs
Radio & Microphone Recording
Gmini SP & Gmini 100
Gmini 200
Gmini 400
You can adjust the quality of the FM and Microphone recordings with this setting (this will also change the Gmini's analog line-in settings). A setting of 128kb/s (Gmini 100 & 200) or 44.1 kHz (Gmini 400) corresponds to CD quality. This is recommended for Radio recordings. For recordings from the microphone where high quality is not necessary, you can set it as low as 64kb/s (Gmini 100 & 200) or 16 kHz (Gmini 400). This will take up the least amount of space on the Gmini's hard drive.
Retro-Recording
Gmini SP & Gmini 100
Gmini 200

Gmini 400
To activate the Retro-Recording function, set it to On. Each time you make a recording from the radio, you will get approximately 30 seconds of what was playing from the radio before you had pressed the REC button. When off, radio recordings start within a second of the moment you click the REC button.
3
Technical Support
- If technical support determines that your product needs to be returned, please contact the place of purchase to have your product repaired or replaced (depending on problem type). Customers who purchased directly from the Archos web site should fill out the form on the web site under Support: Product Returns: RMA Request form.
- There is an FAQ - Frequently Asked Questions section at the ARCHOS Website www.archos.com that can help answer many of your questions.
- If you need live technical help, you may contact ARCHOS directly in your country's language via the below phone numbers. For other countries, please use e-mail technical support.
-Telephone Support-
DO NOT USE PHONE OR E-MAIL SUPPORT FOR MARKETING AND SALES QUESTIONS. These numbers are to aid those who have technical difficulties / malfunctions.
| 949-609-1400 | (USA, Canada) | 09-1745-6224 | (Spain) |
| 01 70 20 00 30 | (France) | 02-4827-1143 | (Italy) |
| 0207-949-0115 | (UK) | 02-050-405-10 | (Netherlands) |
| 069-6698-4714 | (Germany) |
-E-mail Support-
tech-support.us@archos.com
tech-support.eu@archos.com
tech-support.de@archos.com
tech-support.jp@archos.com
tech-support.kr@archos.com
English (United States and Canada customers)
English or French (Europe and the rest of the planet)
German (Germany)
Japanese (Japan)
Korea (Korean)
To respond to your e-mails efficiently, when sending one, please indicate the product name and question type in the Subject of the e-mail.
For example:
To: tech-support.us@archos.com
Subject: FM Remote on Gmini – Retro-Recording
Problem: None of the buttons on the remote control respond.
Solution: Did you press and hold the HOLD button? This locks the operation of all buttons on the remote control. Hold the HOLD button for 3 seconds to turn the hold function on or off.
Problem: The sound quality of the FM radio is not so good.
Solution: Your headphone cable acts as the antenna for the FM radio. Try moving the cable or turning it toward another direction. You could also check to make sure the correct region is selected under the parameter FM Band (USA, Europe, Japan).
Problem: My preset radio stations do not work correctly or are no longer available.
Solution: This could be due to the fact that either the file FMPreset.txt file has incorrect lines in it or that this file had been deleted from the System folder of your Gmini. Make sure that your text file has only 20 lines and that each line has a valid frequency, a space, and then a text string that is up to 32 characters long. If you delete the file, the Gmini will re-create a new, but empty, preset list.
Question: I always miss the beginning of the songs I want to record, what can I do?
Answer: Set the Retro-Record to On. This way, when you start a radio recording, the Gmini will actually include the previous 30 seconds in the recording. You can then later edit out the parts you don't want with the Audio Edit function.
Question: Why can't I edit all of my recorded music files?
Answer: For Gmini 100 & 200 only radio recordings can be edited. For Gmini 400, only radio, microphone, and line-in recordings can be edited.
Question: How can I shut off my Gmini with the remote FM?
Answer: Hold down on the MP3/FM button for 3 seconds.
Question: How can I turn on my Gmini with the Remote FM?
Answer: This cannot be done. You must turn on the Gmini the normal way.
This product is sold with a limited warranty and specific remedies are available to the original purchaser in the event the product fails to conform to the limited warranty. Manufacturer's liability may be further limited in accordance with its sales contract.
In general, the manufacturer shall not be responsible for product damages caused by natural disasters, fire, static discharge, misuse, abuse, neglect, improper handling or installation, unauthorized repair, alteration or accident. In no event shall the manufacturer be liable for loss of data stored on disk media.
MANUFACTURER SHALL NOT BE LIABLE FOR ANY SPECIAL, INCIDENTAL OR CONSEQUENTIAL DAMAGES. EVEN IF INFORMED OF THE POSSIBILITY THEREOF IN ADVANCE.
Archos licensor(s) makes no warranties, express or implied, including, without limitation, the implied warranties of merchantability and fitness for a particular purpose, regarding the licensed materials. Archos's licensor(s) does not warrant, guarantee or make any representations regarding the use or the results of the use of the licensed materials in terms of its correctness, accuracy, reliability, correctness or otherwise. The entire risk as to the results and performance of the licensed materials is assumed by you. The exclusion of implied warranties is not permitted by some jurisdictions. The above exclusion may not apply to you.
In no event will Archos's licensor(s), and their directors, officers, employees or agents (collectively Archos' licensor) be liable to you for any consequential, incidental or indirect damages (including damages for loss of business profits, business interruption, loss of business information, and the like) arising out of the use of inability to use the licensed materials even if Archos' licensor has been advised of the possibility of such damages. Because some jurisdiction do not allow the exclusion or limitation of liability for consequential or incidental damages, the above limitations may not apply to you.
Please see your sales contract for a complete statement of warranty rights, remedies and limitation of liability.
Furthermore, warranty does not apply to:
- Damages or problems resulting from misuse, abuse, accident, alteration or incorrect electrical current or voltage.
- Any product tampered-with or damaged warranty seal or serial number label.
- Any product without a warranty or serial number label.
- Batteries and any consumable items delivered with or in the equipment.
Warnings and Safety Instructions
CAUTION
To prevent risks of electric shock, this unit must only be opened by qualified service personnel.
Power off and disconnect the power supply cable before opening the unit.
WARNING
To prevent fire or shock hazard, do not expose the unit to rain or moisture.
Use of this product is for personal use only. Copying CDs or loading music, video, or picture files for sale or other business purposes is or may be a violation of copyright law. Copyrighted materials, works of art, and/or presentations may require authorization to be fully or partially recorded. Please be aware of all such applicable laws concerning the recording and use of such for your country and jurisdiction.
ELECTROSTATIC PHENOMENA
In case of Electrostatic Discharge, the GMINI may stop functioning. Please power off and on in order to restore functionality.
FCC Warning Statement
FCC Compliance
This equipment has been tested and found to comply with limits for a Class B digital device, pursuant to Part 15 of the FCC Rules. These limits are designed to provide reasonable protection against harmful interference in a residential installation. This equipment generates, uses and can radiate radio frequency energy and, if not installed and used in accordance with instructions, may cause harmful interference to radio communications. However, there is no guarantee that interference will not occur in a particular installation. If this equipment does cause harmful interference to radio or television reception, which can be determined by turning the equipment off and on, the user is encouraged to try to correct the interference by one or more of the following measures:
• Reorient or relocate the receiving antenna.
- Increase the separation between the equipment and receiver.
- Connect the equipment into an outlet on a circuit different from that to which the receiver is connected.
- Consult the dealer or an experienced radio/TV technician for help.
Note: During file transfer or in the PC mode, if the EUT or computer suddenly freezes or does not respond, it may be due to the electrostatic phenomenon. Please follow the procedures below to recover the operation:
Unplug the USB cable from the EUT
Close the software application in the computer (or re-boot the computer if necessary)
Re-connect the USB cable to the EUT.
CAUTION : Modifications not authorized by the manufacturer may void users authority to operate this device.
FCC Part 15 - Operation is subject to the following two conditions:
- This device may not cause harmful interference;
- This device must accept any interference received including interference that may cause undesired operation.
Copyright Notice
Copyright ARCHOS © 2004 All rights reserved.
This document may not, in whole or part, be copied, photocopied, reproduced, translated or reduced to any electronic medium or machine-readable form without prior consent, in writing, from ARCHOS. All brands and products names are registered trademarks and the property of their respective owners. Specifications are subject to change without notification. Errors and omissions accepted. Images and illustrations may not always match contents. Copyright © ARCHOS. All rights reserved.
Disclaimer of warranty: to the extent allowed by applicable law, representations and warranties of non-infringement of copyrights or other intellectual property rights resulting from the use of the product under conditions other than as here above specified, are hereby excluded.
| ARCHOS Worldwide Offices | |||
| United States & Canada | Europe & Asia | United Kingdom | Germany |
| ARCHOS Technology 3, Goodyear – Unit A Irvine, CA 92618 USA Phone: (949) 609-1483 Fax: (949) 609-1414 | ARCHOS S.A. 12, rue Ampère 91430 Igny France Phone: +33 1.69.33.16.90 Fax: +33 1.69.33.16.99 | ARCHOS (UK) Limited 3 Galileo Park Mitchell Close West Portway Andover Hampshire SP10 3XQ United Kingdom Phone: +44 1264.36.60.22 Fax: +44 1264.36.66.26 | ARCHOS Deutschland GmbH Bredelaerstrasse 63 40474 Düsseldorf Germany Phone: +49 211.1520.384 Fax: +49 211.1520.349 |