
Nina - Air conditioner ARGO - Free user manual and instructions
Find the device manual for free Nina ARGO in PDF.


| Product Type | Portable Air Conditioner |
| Brand | ARGO |
| Model | Nina |
| Cooling Capacity | 9000 BTU/h |
| Energy Efficiency Ratio | 2.6 |
| Power Supply | 220-240 V ~ 50 Hz |
| Power Input (Cooling) | 1000 W |
| Airflow Volume | 350 m³/h |
| Noise Level (Low/High) | 52 / 62 dB(A) |
| Refrigerant Type | R290 |
| Dimensions (WxDxH) | 350 x 300 x 680 mm |
| Net Weight | 22 kg |
| Operating Modes | Cool, Fan, Dry |
| Timer Function | 24-hour programmable timer |
| Remote Control | Included |
| Installation Type | Window exhaust kit |
| Maintenance | Clean filter monthly; coil cleaning annually |
| Safety Features | Overheat protection, auto-restart |
| Spare Parts Availability | Filters, remote, exhaust hose available via authorized service |
| Repairability Index | 7.5 / 10 |
Frequently Asked Questions - Nina ARGO
User questions about Nina ARGO
0 question about this device. Answer the ones you know or ask your own.
Ask a new question about this device
Download the instructions for your Air conditioner in PDF format for free! Find your manual Nina - ARGO and take your electronic device back in hand. On this page are published all the documents necessary for the use of your device. Nina by ARGO.
USER MANUAL Nina ARGO
natural_image
White vertical air conditioner tower with black ventilation grille and control panel (no visible text or symbols)OPERATING INSTRUCTIONS
Read the instructions carefully before operating the appliance or carrying out maintenance operations. Observe all the safety instructions; failure to observe the instructions may lead to accidents and/or damage. Keep these instructions in a safe place for future reference.
GENERAL SAFETY INFORMATION
- Only use this appliance as described in this manual. Any other use not recommended by the manufacturer may cause fire, electric shock or injury to people.
- Make sure that the type of mains power complies with the electrical requirements of the appliance (220-240V\~/50 Hz).
- This appliance can be used by children aged from 8 years and above and people with reduced physical, sensory or mental capabilities or lack of experience and knowledge if they have been given supervision or instruction concerning use of the appliance in a safe way and understand the hazards involved.
• Children shall not play with the appliance. - Cleaning and user maintenance shall not be made by children without supervision.
- This product is not a toy. Children should be adequately supervised to ensure that they do not play with the appliance.
- Disconnect the mains power when the appliance is not used or for cleaning operations.
In the event of any problems, switch off the appliance immediately, do not attempt to repair it, and take it to your local After-Sales Service Centre.Do not remove or replace individual parts, as this could affect product safety. Do not disassemble the appliance! Do not disassemble the appliance! | Do not touch the power cord with wet or damp hands; risk of electric shock. Warning!!! Do not touchRisk of electric shock! Warning!!! Do not touchRisk of electric shock! |
Do not insert objects into the appliance grilles.This could cause leaks, short-circuits and damage to the product.  Warning!!! Do not touchRisk of electric shock! Warning!!! Do not touchRisk of electric shock! | Do not spray flammable substances or pesticides near the product as they could damage it. Prohibited! Prohibited! |
Do not use the appliance if the cord or plug is damaged. Do not attempt to change the power cord yourself. If the power cord is damaged, it must be replaced by the manufacturer, dealer or a similarly qualified person so as to avoid any safety risks. Warning!!! Do not touchRisk of electric shock! Warning!!! Do not touchRisk of electric shock! | Do not bend or stand heavy objects on the power cord. |
| Turn the switch off and unplug before carrying out any maintenance work or moving the appliance.Always unplug from the socket when the appliance is not in use. | To disconnect the appliance, press the OFF button and unplug from the socket. Only pull on the plug.Do not pull the cord. Otherwise the cable may be damaged or leaks, etc. may occur. |
| Do not pour water over the product: risk of short-circuits and damage to the product. | Do not leave the airflow directed towards children for long periods of time: it is not good for their health. |
DESCRIPTION OF PARTS

- Control panel
- LCD Display
- Air outflow
- Adjustable flaps
- Water tank indicator
- Multidirectional wheels

- Air filter
- Evaporative honeycomb panel
- Power cord
- Water Tank opening
- Water Tank
HOW TO USE THE APPLIANCE
The appliance does not need to be installed.
Position the unit on a flat, stable surface and connect the power cord to a suitable power socket (230 V\~): the appliance can be switched on using the ON/OFF button. The unit can be switched off using the OFF button and you will hear a sound.
Do not use this cooler in an area with high humidity, rich in dust or with a temperature above 40^ C.
This product can be used either as a fan, with 3 modes (Normal, Natural, Sleep) and 3 fan speed options (low, medium and high), or as a cooler/humidifier: in this case the rear tank should be filled with demineralized water, up to but not exceeding the maximum level as indicated. When the water in the tank falls below the minimum level, marked on the tank, the appliance emits a continuous sound for a few seconds to signal a low water level, then cooling mode is stopped and the appliance continues to work in ventilation mode.
The fan takes in air from the room and passes it through the dust filter and the evaporative panel, which is constantly humidified thanks to a system which draws water from the tank and sprays it onto the panel. The incoming hot air makes part of the water contained in the panel evaporate and is therefore cooler when released back into the room, which makes it feel as though the temperature has dropped.
DISPLAY AND CONTROL PANEL
Control Panel

LCD Display
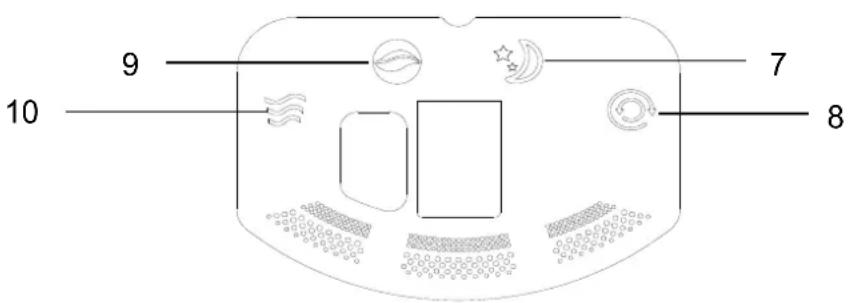
- ON/OFF button
- SPEED button
- SWING button
- TIMER button
- MODE button
-
COOLER/HUMIDIFIER button
-
SLEEP mode
- Swing
- NATURE mode
- HUMIDIFIER ON mode
REMOTE CONTROL
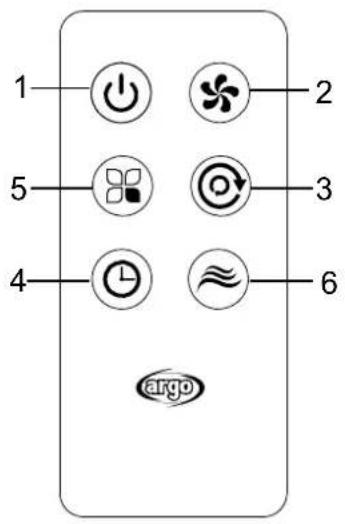
1) ON/OFF BUTTON
In power on state, press this button, the unit turns off and enters standby mode.
In power off state, press this button and all LED lights will turn on; then it enters default working state.
2) SPEED BUTTON
In power state, press the SPEED button to switch among low medium and high level.
3) SWING BUTTON
In power state, press this button to switch on/off the rotation of the product; the corresponding indicator displays its function.
4) TIMING BUTTON
a. After turning on, the timer indicator displays 0; when the button is first pressed, the timer sets to 1 hour; the time increases by 1 hour when the button is pressed every time, and the timer can be set up to 9 hours; if the button is pressed again, the digital tube displays 0, and the timer turns off; press the button again to repeat the cycle;
5) MODE BUTTON
In power on state, press this button to switch the working mode among Normal, Natural, and Sleep.
- Normal mode: the unit runs at a constant speed setting;
- Natural mode: the unit runs at changing wind speed; in natural wind state, LED only displays the set level, which doesn't change with the wind speed, same as natural wind.
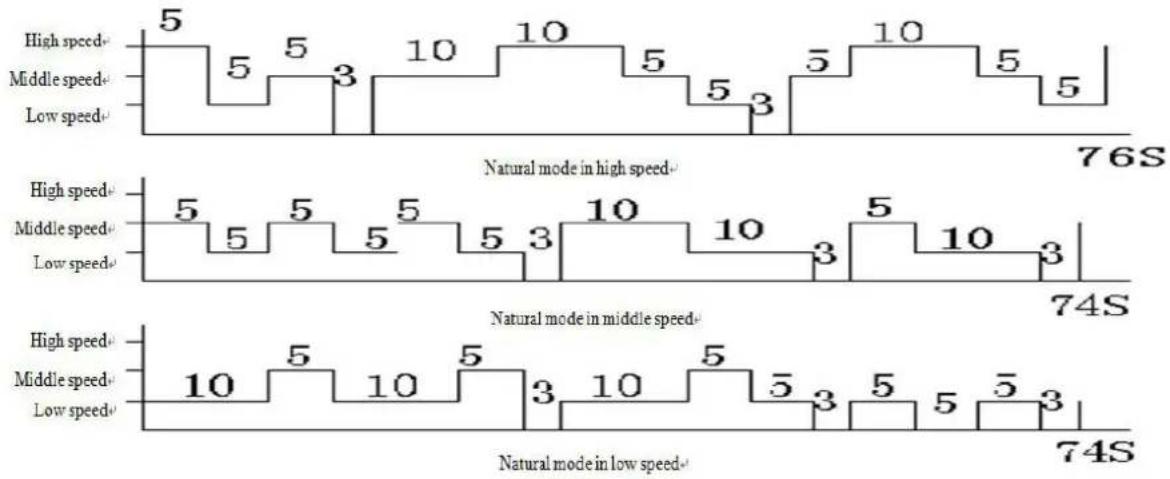
Sleep mode: the unit runs at natural wind, decreasing by one level every 30 minutes;
- High speed: the unit works for 30 minutes at high speed in natural mode, 30 minutes at medium speed in natural mode and keep working at low speed always in natural mode.
- Medium speed: the unit works for 30 minutes at medium speed in natural mode and keep working at low speed always in natural mode.
- Low speed: the unit works at low speed in natural mode.
COOLING/HUMIDIFY BUTTON
Press this button to turn on or turn off the "Cooler/Humidifier" mode: the correspondent LED lights up.
PROTECTION FUNCTIONS
- Water pump protection
When the software detects water shortage for few seconds, the cooling function stops working, the ventilation function keeps going on and the buzzer sends bibi alarm sound.
HOW TO INSERT / REMOVE THE REMOTE CONTROL BATTERIES (refer to the diagram below)
Open the battery cover on the back of the remote control (press and pull the cover).
Place the battery inside the cover, making sure the polarity is correct.
Slot the cover back into position on the remote control.
Use Lithium/Manganese button cells, model no. CR2032 -3 V, compliant with Battery Directive no. 2006/66/EC (supplied with the remote control).

natural_image
Diagram showing a device casing with internal components and a separate labeled component (no text or symbols present)
INFORMATION FOR CORRECT DISPOSAL OF THE PRODUCT IN ACCORDANCE WITH EUROPEAN DIRECTIVE 2006/66/EC
Please replace the battery when its electrical charge has been exhausted: at the end of its useful life, it must not be disposed of together with unsorted waste. It must be must be delivered to appropriate separated waste disposal plants or to dealers that provide a similar service. Separate waste disposal of batteries prevents potential negative effects on the environment and human health resulting from inadequate disposal, and also allows the materials from which it is made to be recovered and recycled in order to achieve significant savings in terms of energy and resources. The separate disposal obligation is underlined by the crossed-out dustbin symbol appearing on the battery. Illegal disposal of the product by the user shall result in the application of administrative sanctions as defined by current regulations.
FILLING THE WATER TANK
THE TANK MUST BE FILLED WITH DEMINERALIZED WATER FOR THE APPLIANCE TO OPERATE IN COOLER/HUMIDIFIER MODE.

natural_image
Technical line drawing of a vertical industrial machine with internal grid structure and mounting base (no text or symbols)CLOSED TANK

natural_image
Technical line drawing of a vertical industrial machine with internal grid structure and mounting base (no text or symbols)OPENED TANK

natural_image
Line drawing of a vertical industrial or storage unit with internal grid structure and a hand pointing to a component (no text or symbols)FILL TANK WITH DEMINERALIZED WATER
Open the tank and fill it with demineralized water, up to the maximum level mark. Close the tank after filling it.
If you wish to keep the water in the tank below room temperature in order to maximize cooling in warmer months, leave one of the two synthetic ice packs supplied in the freezer until solid, then add it to the water in the tank.
The ice will absorb heat from the water. We recommend continuous use of the ice for optimal cooling capacity.
The first time it is used, you may detect a smell or the water may turn an unusual color: this does not constitute a health risk.
MAINTENANCE AND STORAGE
WARNING: ALWAYS UNPLUG THE APPLIANCE BEFORE CLEANING OR MAINTENANCE PROCEDURES.
IMPORTANT: DO NOT SUBMERGE THE PRODUCT IN WATER
Cleaning the outside surface of the appliance
Use a soft cloth to remove any dust from the product.
If this is not enough, use a soft cloth dampened with water and a mild detergent at a temperature not exceeding 50^ C. Let the appliance dry completely before using it.
Do not use corrosive detergents or solvents such as petrol. Do not wash the appliance with water. Do not use oils, chemical substances or other items that may damage the surface to clean it.
Use a vacuum cleaner to remove dust from the air inlet/outlet grilles.
Cleaning the dust filter, the cooling panel and the tank
Clean the dust filter frequently, at least once a month.
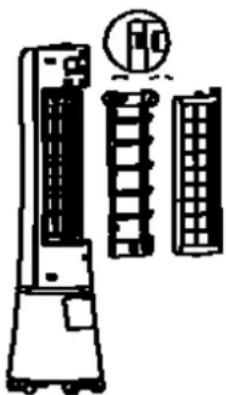
Remove the dust filter by pulling the knob on the cooling panel, as indicated in the diagram below.
Panel Filter
natural_image
Diagram of a tower-mounted air conditioner unit with two vertical heat sinks and a circular inset showing a device (no text or symbols)Clean the dust filter using a soft brush or a vacuum cleaner, and wash it in a solution of water and mild detergent.
Remove the cooling panel at the same time and soak it in a solution of water and mild detergent.
Take out the tank and and rinse it under running water, removing any residue.
Let the filter, the panel and the tank dry completely after washing them; then re-fit the components in the following order: water tank, cooling panel and dust filter.
STORAGE
If the appliance is not used for prolonged periods, disconnect the power cord and store the appliance with this manual in its original packaging, in a cool and dry place.
Before packaging, the honeycomb filter and dust-proof filter should be dry, and there is no water in the tank.
INFORMATION FOR THE CORRECT DISPOSAL OF THE PRODUCT IN ACCORDANCE WITH EUROPEAN DIRECTIVE 2012/19/EU
This appliance may not be scrapped with domestic waste at the end of its life cycle. We call your attention to the crucial role played by the consumer in the re-use, recycling and other forms of recovery of such waste.
The appliance must be scrapped by a sorted waste disposal centre or by returning it to the retailer (no charge is levied for this service), when you purchase a new equivalent appliance.
Sorted disposal of electric and electronic equipment prevents the negative effects on the environment and human health resulting from improper scrapping, and also allows the materials from which it is made to be recovered and recycled, with significant savings in terms of energy and resources. The sorted disposal requirement is indicated by the crossed waste bin label affixed to the appliance.


- OPERATING INSTRUCTIONS
- GENERAL SAFETY INFORMATION
- DESCRIPTION OF PARTS
- HOW TO USE THE APPLIANCE
- DISPLAY AND CONTROL PANEL
- REMOTE CONTROL
- 1) ON/OFF BUTTON
- 2) SPEED BUTTON
- 3) SWING BUTTON
- 4) TIMING BUTTON
- 5) MODE BUTTON
- COOLING/HUMIDIFY BUTTON
- PROTECTION FUNCTIONS
- - Water pump protection
- HOW TO INSERT / REMOVE THE REMOTE CONTROL BATTERIES (refer to the diagram below)
- INFORMATION FOR CORRECT DISPOSAL OF THE PRODUCT IN ACCORDANCE WITH EUROPEAN DIRECTIVE 2006/66/EC
- FILLING THE WATER TANK
- THE TANK MUST BE FILLED WITH DEMINERALIZED WATER FOR THE APPLIANCE TO OPERATE IN COOLER/HUMIDIFIER MODE.
- MAINTENANCE AND STORAGE
- WARNING: ALWAYS UNPLUG THE APPLIANCE BEFORE CLEANING OR MAINTENANCE PROCEDURES.
- IMPORTANT: DO NOT SUBMERGE THE PRODUCT IN WATER
- Cleaning the outside surface of the appliance
- Cleaning the dust filter, the cooling panel and the tank
- STORAGE
- INFORMATION FOR THE CORRECT DISPOSAL OF THE PRODUCT IN ACCORDANCE WITH EUROPEAN DIRECTIVE 2012/19/EU
Brand : ARGO
Model : Nina
Category : Air conditioner