
Professional 1800EP-FD - Elliptical bike Athletic - Free user manual and instructions
Find the device manual for free Professional 1800EP-FD Athletic in PDF.


| Product Type | Elliptical Bike (Elliptical Cross Trainer) |
| Brand | Athletic |
| Model | Professional 1800EP-FD |
| Intended Use | Professional (condominiums, hotels, construction companies, personal trainer studios) |
| Maximum User Weight | 150 kg (330 lbs) |
| Monitor Type | LCD Computer TZ-6103 |
| Workout Programs | 9 programs: Quick Start, Manual, User Program, Interval Program, Watt Program, HRC Program, Test Program, BMI/BMR/Fat Program, Climbing Program |
| Resistance Type | Magnetic (motorized) |
| Resistance Adjustment | Via +/- keys during workout (20-400 Watts in Watt/Test program) |
| Power Supply | External adapter (DC) |
| Hand Pulse Sensors | Yes (grip pulse) |
| Heart Rate Control | Yes (HRC program with target heart rate setting) |
| Frame Warranty | 3 years |
| Parts and Labor Warranty | 1 year |
| Frame Material | Steel |
| Pedals | Included (with safety nuts) |
| Bottle Holder | Yes |
| Assembly Required | Yes (10 steps) |
| Cleaning Instructions | Use damp cloth only; no abrasives, alcohol, or solvents |
| Safety Features | Auto shut-off after 4 minutes inactivity; heart rate alert if exceeding target zone |
| Motor | Yes (for resistance adjustment) |
| Belt Drive | Yes (belt wheel and belt included) |
| Flywheel | Dual discs (φ400 mm each) |
Frequently Asked Questions - Professional 1800EP-FD Athletic
User questions about Professional 1800EP-FD Athletic
0 question about this device. Answer the ones you know or ask your own.
Ask a new question about this device
Download the instructions for your Elliptical bike in PDF format for free! Find your manual Professional 1800EP-FD - Athletic and take your electronic device back in hand. On this page are published all the documents necessary for the use of your device. Professional 1800EP-FD by Athletic.
USER MANUAL Professional 1800EP-FD Athletic
ELIPTICO PROFESSIONAL
1800EP
GARANTÍA PARA USO PROFESIONAL
CONDOMINIOS · HOTELES · CONSTRUCTORA
Athletic
BEST FOR LIFE

Fonte: American College of Sports Medicine
Z3 – Área de Riesgo
DIAGRAMA DE PARTES Y PIEZAS - 2

LISTA DE PARTES Y PIEZAS
| NO | DESCRIÇÃO | QDE | NO | DESCRIÇÃO | QDE | |
| 1 | Terminal Seta φ31.8*2.5 | 2 | ||||
| 2 | Rollo de Espuma φ37*φ30*680 | 2 | 60 | Eje Gemel Pequeño φ12*83 | 2 | |
| 3 | Manubrio R φ31.8*2.5 | 1 | 61 | Perno Allen M6*40 | 2 | |
| 4 | Cojinete (para φ38*1.8 &φ31.8*1.5) | 2 | 62 | Cojinete del Volante φ10*23.5 | 2 | |
| 63 | Volante φ50 | 2 | ||||
| 6 | Anillo de Plástico φ38*φ19*2 | 2 | 64 | Golilla φ6 | 2 | |
| 7 | Tapa del rodamiento φ55 | 2 | 65 | Tuerca de Seguridad M6 | 2 | |
| 8 | Golilla de Presión φ8 | 14 | 66 | Perno Allen M8*16 | 6 | |
| 9 | Perno Allen M8*20 | 4 | 67 | Asta de Manubrio | 1 | |
| 10 | Capa de Tuerca M8 | 2 | 68 | Cable Inferior Computadora | 1 | |
| 11 | Perno de cabeza cuadrada M8*50 | 4 | 69 | Estructura | 1 | |
| 12 | Tubo Oscilante Superior R | 1 | 70 | Porta Botella | 1 | |
| 13 | Cojinete (para φ38*1.8 &φ31.8*1.5) | 2 | ||||
| 14 | Tubo Oscilante Inferior | 2 | 72 | Adaptador | 1 | |
| 15 | Cojinete 6001 | 4 | 73 | Terminal | 4 | |
| 16 | Golilla φ8 | 16 | 74 | Tubo-pie Frontal | 1 | |
| 17 | Tuerca de Seguridad M8 | 4 | 75 | Tuerca de Seguridad | 3 | |
| 18 | Pedal | 2 | 76 | Perno M8*80 | 1 | |
| 19 | Tapa del eje Gemel R | 2 | 77 | Tuerca Allen M8 | 2 | |
| 20 | Tornillo Phillips | 22 | 78 | Perno Allen M8*20 | 1 | |
| 21 | Tubo-pedal R | 1 | 79 | Placa de la Polea de Presión | 1 | |
| 22 | Eje Gemel Trasero φ12*73 | 2 | 80 | Guanteφ16*φ8.2*4 | 1 | |
| 23 | Tapa Trasera Superior R | 1 | 81 | Cojinete 6301ZZ | 2 | |
| 24 | Golilla Grande φ8 | 4 | 82 | Eje de la Polea φ12*43 | 1 | |
| 25 | Cojinete 6004ZZM | 8 | 83 | Brida Tuerca M10*1 | 2 | |
| 26 | Eje Gemel Trasero | 2 | 84 | Allen M6 | 2 | |
| 27 | Eje Gemel Trasero R | 1 | 85 | Bloqueador en U | 2 | |
| 28 | Perno Phillips ST4.2*19 | 4 | 86 | Rueda Magnética | 1 | |
| 29 | Tubo-pie Trasero | 1 | 87 | Golilla de Presión φ6 | 2 | |
| 88 | Perno Ajustable M6 | 2 | ||||
| 89 | Perno Phillips ST4.2*40 | 5 | ||||
| 32 | Porta-Manilla | 2 | 90 | Tapa de Correa R | 1 | |
| 91 | Cable del Motor | 1 | ||||
| 34 | Guante Inferior φ50*φ20*37.5 | 2 | 92 | Inductor de Velocidad | 1 | |
| 35 | Eje Gemel Trasero L | 1 | 93 | Porta Inductor | 1 | |
| 36 | Tapa Trasera Superior Gemel L | 1 | 94 | Imán | 1 | |
| 37 | Tuerca de Seguridad M6 | 4 | 95 | Rueda de la Correa φ260,J6 | 1 | |
| 38 | Tubo - pedal L | 1 | 96 | Mandril | 1 | |
| 39 | Tapa del eje Gemel L | 2 | 97 | Perno Phillips ST4.2*15 | 16 | |
| 40 | Perno Phillips ST2.9*20 | 2 | 98 | Armazón de Disco | 2 | |
| 41 | Pasador M16*1.5 | 2 | 99 | Brida Tuerca M12*1.25 | 2 | |
| 42 | Tubo Oscilante Superior L | 1 | 100 | Disco φ400 | 2 | |
| 43 | Golilla en Arco φ8 | 12 | 101 | Tapa de Disco φ45 | 2 | |
| 44 | Tuerca M8 | 4 | 102 | Tapa de Correa L | 1 | |
| 45 | Manubrio L φ31.8*2.5 | 1 | 103 | Perno Phillips M6*12 | 3 | |
| 46 | Rollo de Espuma φ30*φ23*670 | 2 | 104 | Correa (450, J6) | 1 | |
| 47 | Perno Phillips M5*12 | 9 | 105 | Golilla de Presión φ25 | 2 | |
| 48 | Computadora TZ-6103 | 1 | 106 | Golilla de Presión φ26.3 | 1 | |
| 49 | Perno Allen M8*20 | 12 | 107 | Cable de Fuerza | 1 | |
| 50 | Pulso/mano | 2 | 108 | Motor | 1 | |
| 51 | Descansa-brazo L | 1 | 109 | Cojinete 6205ZZ | 2 | |
| 52 | Descansa-brazo R | 1 | 110 | Tapa inferior del monitor | 1 | |
| 53 | Cable Computadora | 2 | 111 | Tornillo | 2 | |
| 54 | Cable Computadora | 1 | 112 | Buje | 4 | |
| 55 | Perno del Pulso/Mano | 2 | ||||
| 56 | Cable del Pulso/ Mano | 2 | ||||
| 57 | Cable Superior Computadora | 1 | ||||
| 58 | Guante Superior φ55 | 2 |
The Athletic equipment and services offer people guidance, motivation and the opportunity of practicing aerobic and muscular exercises, and so gaining the physical preparation required to feel good.
THE INDIVIDUAL AND THE PHYSICAL PREPARATION.
Physical preparation is an option of the individual to benefit himself or herself. In many cases the quest for having the right physical form to live the day-to-day life well appears to be a sacrifice at first. It is important to understand that those people who do not try to have suitable physical form are gradually giving up their long-term well-being.
As the person invests in physical preparation and rediscovers the pleasure of firm and sure movement, of having strength and resistance to face the day-to-day, he or she understands that it is a fundamental condition for living well and ensuring his or her physical and mental health.
In order to have a preparation which provides full, safe and pleasurable activity, the individuality of each person must be preserved. As Athletic sees it, the best way of ensuring this is to teach the individual about monitoring his or her heartbeat range, in the case of aerobic preparation, and about the suitable combination of exercises and loads in muscular physical preparation.
Aerobic physical preparation will ensure resistance. Muscular preparation will ensure strength.
Regardless of one's age, it is important to be aware that living well involves maintaining one's resistance and strength throughout one's life.
In this manual you will find everything which you need to know about assembling and maintaining the equipment which you have just acquired, as well as the information about how to use it correctly.
Athletic is at your side to answer queries and guide you. At our site www.athletic.com.br, you can make your evaluation On-Line and see more information about the best way of managing to have strength and resistance in your daily life.
ATHLETIC PREPARES YOU TO IMPROVE YOUR PHYSICAL FORM, HELP YOUR PHYSICAL REHABILITATION, INCREASE YOUR PERFORMANCE IN THE SPORTS WHICH YOU PRACTICE AND FOR WHATEVER ELSE YOU WANT.
CONTENTS
TARGET HEARTBEAT RANGE 24
HOW TO KNOW YOUR PULSE IN EACH OF TRAINING ZONE 24
SESSIONS OF EXERCISES AND STRETCHING.... 25
EXPLODE-VIEW 26
PART LIST 28
ASSEMBLY INSTRUCCION 29
INSTRUCTION MANUAL FOR EXERCISE MONITOR.... 34
APPEARANCE....34
POWER UP 34
PAUSE....34
KEY FUNCTION 34
WORKOUT SELECTION 35
SETTING WORKOUT PARAMETERS 35
SAFETY INFORMATION 40
CONSERVATION / CLEANING....40
GENERAL CONSIDERATIONS....40
WARRANTY TERM....41
ATTENTION! Consult your doctor before commencing any exercise programme. This is especially important for people over 35 years of age or those people with pre-existing health problems. The heartbeat sensor is not a medical instrument. Numerous factors, including the movement of the user, can affect the accuracy of the heartbeat readings. The heartbeat sensor is a resource that merely indicates the general heartbeat tendency of a person.
TARGET HEARTBEAT RANGE
- The monitoring of the heartbeat range is still little known, but it is a very efficacious resource for obtaining results. It should be used especially in aerobic physical preparation.
- As shown in the table below, each age range corresponds to a heartbeat range, i.e. a minimum limit and a maximum limit of heartbeats in the period of executing the exercise. It is only when a person works within this range of heartbeats that he or she really begins to produce results as regards his or her aerobic physical preparation.
| TARGET HEARTBEAT RANGE |
| AGE 25 YEARS (Example)Maximum heart frequency - 195 bpm*Target heartbeat range - min. 117 bpm* until max. 156 bpm* |
| AGE 55 YEARS (Example)Maximum heart frequency - 165 bpm*Target heartbeat range - min. 99 bpm* until max. 132 bpm* |
| *Beats per minute |
Chek our site at www.athletic.com.br to learn more about our exclusive on-line personal trainer service and do your physical evaluation. This will enable you choose the programme that best fits your needs.
HOW TO KNOW YOUR PULSE IN EACH OF TRAINING ZONE
Begin the exercise with low speed and low effort for five minutes, for the heating, activating the circulation and liberating oxygen for the muscles.

Fonte: American College of Sports Medicine
Z3 - Risk Zone
It is not recommended to train above 80% of the maximum heart rate, as it is in the heart risk zone.
Z2 · Aerobic Zone
Cardio-respiratory training zone, between 70% and 80% of the maximum heart rate.
Z1·Weight Loss Zone
Training zone for weight loss, cardiorespiratory, between 60% and 70% of the maximum heart rate.
Z0 · Moderate Activity Zone
Below 60% of the maximum heart rate. Recommended for people who are inactive, who have special conditions or need rehabilitation for a medical problem.
SESSIONS OF EXERCISES AND STRETCHING
Minimum frequency of sessions of exercises per week: Three times so that the phenomenon of reversibility, whereby the organism loses the physiological gains in 48 hours if there is no continuity, does not occur.
Target time of the exercise session: It is associated with attaining the heartbeat range without exceeding the maximum limit. If this occurs, the process of slowing down should be started immediately.
Maximum time of the exercise session: It is associated with attaining the heartbeat range.
| LegsWith the arms supported on a wall, push one of the legs backwards keeping the other semi-flexed to the front. | 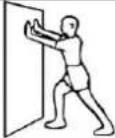 | |
| FistsPress the palms of the hands forward and down for 20 seconds. |  | |
| Stretching the legsSitting down with the legs together moving with the trunk of the body towards the feet. | 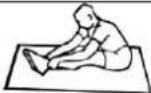 | |
| ShouldersPass the arm in front of the body and press the arm in direction to the log with the other arm.Change the position after 20 seconds. | 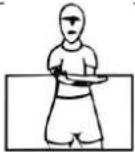 | |
| ArmsRaise the arms upwards with the hands interlinked forcing them up, stretch the front and back of the arms for 20 seconds. | 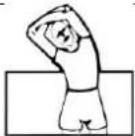 |
| ShouldersMove the head and the arm in the same direction for 20 seconds, changing the position to the end. | 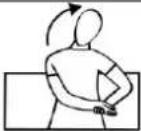 |
| NeckMove the head for 20 seconds, changing the side to the end. |  |
| Spine and legsLying down, crossing one leg over the other, pull it with the arms towards the thorax. | 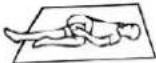 |
| ArmsTo elevate the arms upward with the hand in the elbow, forcing down and prolongating the area previous and posterior of the arms. Change the position after 20 seconds. | 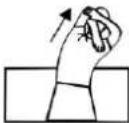 |
| QuadricepsLeaning on a wall, flex one of the legs towards the bottom. |  |
EXPLODE VIEW

Athletic
BEST FOR LIFE
Professional 1800EP
EXPLODE VIEW - 2
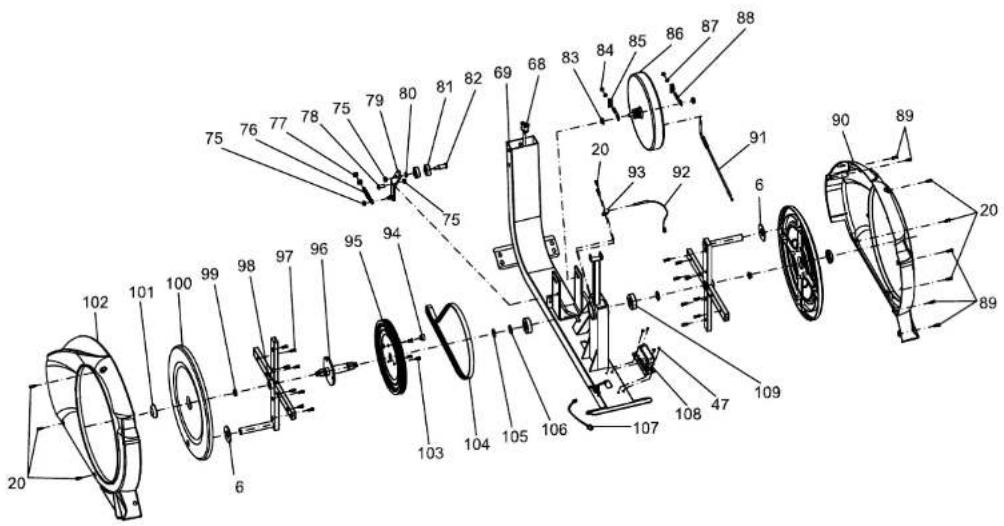
PARTS LIST
| NO. | DESCRIPTION | QTY | NO. | DESCRIPTION | QTY | |
| 1 | Mushroom Endcap φ31.8*2.5 | 2 | 57 | Computer Upper Wire | 1 | |
| 2 | Foam Roller φ37*φ30*680 | 2 | 58 | Upper Nylon Sleeve φ55 | 2 | |
| 3 | Handlebar R φ31.8*2.5 | 1 | ||||
| 4 | Bush (for φ38*1.8 &φ31.8*1.5) | 2 | 60 | Small Gemel Axle φ12*83 | 2 | |
| 61 | Allen Screw M6*40 | 2 | ||||
| 6 | Plastic Ring φ38*φ19*2 | 2 | 62 | Bush of Idler Wheel φ10*23.5 | 2 | |
| 7 | Bearing cap φ55 | 2 | 63 | Idler Wheel φ50 | 2 | |
| 8 | Spring Washer φ8 | 14 | 64 | Washer φ6 | 2 | |
| 9 | Allen Screw M8*20 | 4 | 65 | Safety Nut M6 | 2 | |
| 10 | Nut Cap M8 | 2 | 66 | Allen Screw M8*16 | 6 | |
| 11 | Square-head Screw M8*50 | 4 | 67 | Handlebar Post | 1 | |
| 12 | Upper Swing Tube R | 1 | 68 | Lower Wire of Computer | 1 | |
| 13 | Bush (for φ38*1.8 &φ31.8*1.5) | 2 | 69 | Main Frame | 1 | |
| 14 | Lower Swing Tube | 2 | 70 | Bottle Holder | 1 | |
| 15 | Bearing 6001 | 4 | ||||
| 16 | Washer φ8 | 16 | 72 | Adapter | 1 | |
| 17 | Safety Nut M8 | 4 | 73 | Endcap | 4 | |
| 18 | Pedal | 2 | 74 | Front Foot-tube | 1 | |
| 19 | Gemel Cover R | 2 | 75 | Safety Nut | 3 | |
| 20 | Phillips Screw M8 | 22 | 76 | Screw M8*80 | 1 | |
| 21 | Pedal-tube R | 1 | 77 | Allen Nut M8 | 2 | |
| 22 | Rear Gemel Axle φ12*73 | 2 | 78 | Allen Screw M8*20 | 1 | |
| 23 | Upper Rear Gemel Cover R | 1 | 79 | Board of Pressure Pulley | 1 | |
| 24 | Big Washer φ8 | 4 | 80 | Sleeveφ16*φ8.2*4 | 1 | |
| 25 | Bearing 6004ZZM | 8 | 81 | Bearing 6301ZZ | 2 | |
| 26 | Rear Gemel | 2 | 82 | Axle of Pressure Pulley φ12*43 | 1 | |
| 27 | Lower Rear Gemel Cover R | 1 | 83 | Flange Nut M10*1 | 2 | |
| 28 | Phillips Screw ST4.2*19 | 4 | 84 | Allen M6 | 2 | |
| 29 | Rear Foot-tube | 1 | 85 | U Blocker | 2 | |
| 86 | Magnetic Wheel | 1 | ||||
| 87 | Spring Washer φ6 | 2 | ||||
| 32 | Foot Pad | 2 | 88 | Adjustable Screw M6 | 2 | |
| 89 | Phillips Screw ST4.2*40 | 5 | ||||
| 34 | Lower Nylon Sleeve φ50*φ20*37.5 | 2 | 90 | Chain Cover R | 1 | |
| 35 | Lower Rear Gemel Cover L | 1 | 91 | Motor Wire | 1 | |
| 36 | Upper Rear Gemel Cover L | 1 | 92 | Speed Inductor | 1 | |
| 37 | Saftety Nut M6 | 4 | 93 | Inductor Holder | 1 | |
| 38 | Pedal-tube L | 1 | 94 | Magnet | 1 | |
| 39 | Gemel Cover L | 2 | 95 | Belt Wheel φ260,J6 | 1 | |
| 40 | Phillips Screw ST2.9*20 | 2 | 96 | Mandrel | 1 | |
| 41 | Spring Pin M16*1.5 | 2 | 97 | Phillips Screw ST4.2*15 | 16 | |
| 42 | Upper Swing Tube L | 1 | 98 | Disc Frame | 2 | |
| 43 | Arc Washer φ8 | 12 | 99 | Flange Nut M12*1.25 | 2 | |
| 44 | Nut M8 | 4 | 100 | Disc φ400 | 2 | |
| 45 | Handlebar L φ31.8*2.5 | 1 | 101 | Disc Cap φ40 | 2 | |
| 46 | Foam Roller φ30*φ23*670 | 2 | 102 | Chain Cover L | 1 | |
| 47 | Phillips Screw M5*12 | 9 | 103 | Phillips Screw M6*12 | 3 | |
| 48 | Computer TZ-6103 | 1 | 104 | Belt (450, J6) | 1 | |
| 49 | Allen-socket Screw M8*20 | 12 | 105 | Spring Washer φ25 | 2 | |
| 50 | Handpulse | 2 | 106 | Spring Washer φ26.3 | 1 | |
| 51 | Armrest L | 1 | 107 | Power Wire | 1 | |
| 52 | Armrest R | 1 | 108 | Motor | 1 | |
| 53 | Computer Wire | 2 | 109 | Bearing 6205ZZ | 2 | |
| 54 | Computer Wire | 1 | 110 | Computer lower cover | 1 | |
| 55 | Handpulse Screw | 2 | 111 | Screw | 2 | |
| 56 | Handpulse Wire | 2 | 112 | Powder bushing | 4 |
ASSEMBLY INSTRUCCION
STEP 1

Put Main Frame (69) on the flat floor. Install Front Foot-tube (74) to Main Frame (69) by 4pcs of Allen-socket Screw M8*20 (49) and Arc Washer φ8 (43); Install Rear Foot-tube (29) to Main Frame (69) by 4pcs of Allen-socket Screw M8*20 (49) and Arc Washer φ8 (43). After the installation, you could adjust the stability by the knob on Rear Foot-tube (29).
STEP 2

Install 2pcs of Spring Pin M16*1.5 (41) to Upper Swing Tube L/R(42/12). Please make sure the low end of Upper Swing Tube L/R(42/12) is the same length.
STEP 3

Connect Computer Upper Wire(57) and Lower Wire of Computer (68) together, than insert Handlebar Post (67) into Main Frame (69) and fix by 6pcs of Allen Screw M8*16(66), Spring Washer φ8 (8) and Washer φ8 (16) in order as picture.
STEP 4

Make the holes of Upper Swing Tube L (42) and Pedal-tube L (38) in a line; Make Small Gemel Axle 12*83 (60) through the front holes of Pedal-tube L (38), than fix them by Washer 8 (16) and Safety Nut M8(17). Install the end of Pedal-tube L (38) to Main Frame (69) by Rear Gemel Axle
φ12*73 (22), Washer φ8 (16) and Safety Nut M8(17). Attach Gemel Cover L/R (39/19) at the front of Pedal-tube L (38) and fix them by Phillips Screw M8 (20) and Phillips Screw ST2.9*20 (40). Upper Rear Gemel Cover L (36) and Lower Rear Gemel Cover L(35) at the end of Pedal-tube L (38) by Phillips Screw M8(20) and Phillips Screw ST4.2*19 (28).
STEP 5
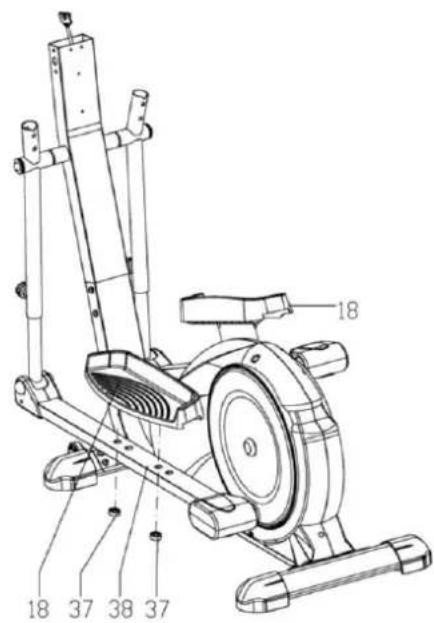
Fasten Pedal (18) to Pedal-tube L/R (38/21) by Saftety Nut M6 (37).
STEP 6

Make Handpulse Wire(56) through Handlebar Post (67). Install Armrest L/R (51/52) to Handlebar Post (67) by Allen-socket Screw M8*20 (49) and Washer φ8 (16).
STEP 7

Fix Bottle Holder (70) on Handlebar Post (67) by Phillips Screw M5*12 (47).
STEP 8

Attach Computer Wire(53) with Handpulse Wire (56) and Computer Wire(54) with Computer Upper Wire (57). Insert and fix Computer TZ-6103 (48) to Handlebar Post (67) by Phillips Screw M5*12 (47).
STEP 9

Insert the bare end of Handlebar L (45) into Upper Swing Tube L (42). Make Square-head Screw M8*50 (11) through the screw holes of Handlebar L (45) and Upper Swing Tube L (42), than put Arc Washer φ8 (43) and Spring Washer φ8 (8) on the other end of Square-head Screw M8*50 (11), fastened by Nut M8 (44).
Assemble the right side in the same way as above.
STEP 10

Insert the plug of Adapter (72) into the jack c back Main Frame(69).
Attention: Please make sure the handlebars are in correct direction before you fasten the whole equipment.
INSTRUCTION MANUAL FOR EXERCISE MONITOR
APPEARANCE
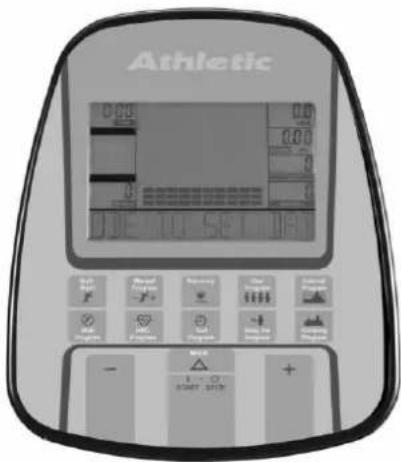
POWER UP
When turned on, the display will emit 3 beep sounds as all LCD displays light up.
The text window will display "WELCOME" by scrolling.
Note: When there is no signal or data input for 4 minutes, the machine will enter sleep mode. Pedaling the machine or key selection will wake-up the computer.
PAUSE
Workout can be paused by pressing the START/STOP key. Workout will resume when the START/STOP key is pressed again.
KEY FUNCTION
Mode: To input desired value or workout mode. This may advance flashing prompt to next parameter or mode for selection.
Start/Stop: Pauses & Resume workouts. Back up for the previous prompt during data entry. Operates only when in pause mode. Holding key for 3 seconds will reset computer to power-up condition.
- : Decrease value of selected workout parameter: TIME, DISTANCE, etc. During the workout, it will decrease the resistance load.
+: Increases value of selected workout parameter. During the workout, it will increase the resistance load.
QUICK PROGRAM KEY: Workout mode selection: Quick Start, Manual, User Program, Interval Program, Watt program, HRC Program, Test Program, BMI-BMR-FATT Program, Climbing Program.
RECOVERY: After workout or during workout press Recovery and Recovery Measurement will start. Wait some seconds.
WORKOUT SELECTION
After power-up using program keys to enter desired mode, the text window will display the desired program by scrolling for 3 seconds.
There are nine basic workout modes: Quick Start, Manual, User Program, Interval Program, Watt Program, HRC Program, Test Program, BMI-BMR-FATT Program, Climbing Program.
Then, the text window will display start pedaling or press mode to set data by scrolling, this will vary depending on the different programs.
SETTING WORKOUT PARAMETERS
After selecting desired workout mode: Quick Start, Manual, User Program, Interval Program, Watt Program, HRC Program, Test Program, BMI-BMR-FATT Program, Mountain Program
Several workout parameters may be pre-set for desired results.
Workout parameters
TIME / DISTANCE / WATTS / KILOJOULE / PULSE
Note: Some parameters are not adjustable in certain programs. Once a program has been selected, pressing MODE.
The text window will display “Select Time” for 3 seconds then display “PRESS MODE TO ACCEPT”. At the same time “0:00” time parameter will flash.
By using the + ou - key you may select desired time value. Press Mode to input value. Flashing prompt will move to the next parameter. Continue using the + ou - key to select desired value then press Mode to input value. Once the workout parameters have been set, the text window will display “START PEDALING” by scrolling. User can start the workout by starting to pedal.
More about Workout Parameters
| Field | Display Range | Default Value | Increase/ Decrease | Description |
| Time | 0:00~99:00 | 00:00 | ±1:00 | When display is 0:00, Time will count up.When time is 10:00-99:00, it will count down to 0. |
| Distance | 0.00~99.90 | 0.00 | ±0.10 | When display is 0:00, Distance will count up.When Distance is 0.1~99.0, it will count down to 0. |
| KILOJOULE | 0~9995 | 0.0 | ±5 | When display is 0.0, KILOJOULE it will count up.When KILOJOULE is 5~9995, it will count down to 0. |
| WATT | 20~400 | 20/100 | ±5 | WATT value can be set only in Watt/Test program |
| Pulse | 40~220 | 90 | ±1 | When Heart Rate exceeds set range, user will be alerted. |
1. PROGRAM OPERATION
After power-up, press Quick Start Program key to enter Quick Start Program, start pedaling to begin workout at this time.
Use the + or - key to adjust resistance load during workout.
2. MANUAL PROGRAM
Select "MANUAL" using Manual program key then press Mode.
Setting Parameters for Manual.
1° parameter "Time" will flash so value can be adjusted using the + or - key.
Press Mode key to save value & move to next parameter to be adjusted. Continue through all desired parameters, start pedaling to start workout.
Start Pedaling to start Workout, the + or - key adjusts resistance load during workout.
3. USER PROGRAM
User program allows users to create their own program which can be used immediately and on subsequent workouts.
Create User Profile
Select user mode with User program key by pressing Mode to select "User" mode. The text window will display "Select Profile" for 4 seconds, meanwhile Segment 1 will flash. Adjust the + or - key to set desired resistance load. Press Mode to move to next segment, continue for all 10 segments.
Setting Parameters for User Program
After 1st parameter "Time" will flash so value can be adjusted using + or -.
Press Mode to save value & move to next parameter to be adjusted. Continue through all desired parameters, start pedaling to begin workout.
Note: The final 10 segments of the profile will be saved for future workouts.
Start pedaling to start Workout. The resistance cannot be adjusted by + or - during workout.
4. INTERVAL PROGRAM
Select "INTERVAL" by pressing Interval program, then press Mode.
The text window will display "SELECT LEVEL" 3 seconds.
There are 3 levels (L1,L2, L3) select by using + or - then press mode to confirm.
Setting Parameters for Interval
After 1° parameter “Time” will flash so value can be adjusted using + or - .Press mode to save value & move to next parameter to be adjusted. Continue through all desired parameters, start pedaling to start workout.
The resistance cannot be adjusted by + or - during workout.
5. WATT PROGRAM
Select “WATT” by pressing WATT PROGRAM and then pressing Mode. The text window will display “SELECT WATT” 3 seconds. Meanwhile “20” will flash. Select WATT value from 20 W using + or - key then press mode to confirm.
Setting Parameters for WATT
After 1° parameter “Time” will flash so value can be adjusted using + or -.
Press mode to save value & move to next parameter to be adjusted. Continue through all desired parameters, start pedaling to begin workout.
Note: The profile will show the desired Watt value.
Start Pedaling to start Workout. WATT value can be adjusted during workout using + or -.
6. HRC PROGRAM
Setting Parameters for Heart Rate Control
Select “HRC” by pressing HRC PROGRAM key then press mode. The 1 st parameter “Time” will flash so value can be adjusted using + or -.
Press mode to save value & move to next parameter to be adjusted. Continue through all desired parameters, start pedaling to start workout.
Note: the profile will show the current resistance load.
7. TEST PROGRAM
Select "TEST" by pressing the TEST Program key, then press Mode.
The display will show average speed, total Distance, total Kilojoules and average Pulse of last workout for 4 seconds.
After that the text window will display "SELECT WATT" for 3 seconds, meanwhile "100" will flash.
Select WATT value from 100 W by using + or - and then pressing mode to confirm.
Time display will show 10:00, it cannot be changed.
After 10 minutes, Average Speed, Total Distance, Total Kilojoule and Average Pulse will be displayed.
8.BMI BMR FATT PROGRAM
Setting Data for BMI BMR FATT
Select "BMI BMR FATT" by pressing BMI BMR FATT Program key, then press mode.
The text window will display "SELECT AGE" for 3 seconds, meanwhile "30" will flash so Age can be adjusted using + or -, press mode to save value & move to next data.
The text window will display "SELECT GENDER" for 3 seconds, meanwhile "♂" of Gender will flash so Gender can be adjusted using + or -, press mode to save gender & move to next data.
The text window will display "SELECT WEIGHT" for 3 seconds, meanwhile "70" of Weight will flash so weight can be adjusted by using + or - , press mode to save value & move to next data.
The text window will display "SELECT HEIGHT" 3 seconds, meanwhile "175" of Height will flash so Height can be adjusted by using + or -, press mode to save value
Press mode to start measurement, hold onto hand pulse grips while doing so.
After performing the measurement the display will show Body Fat %, BMI and BMR.
(Body Fat % and BMI will switch display to another in every 4 seconds)
9. CLIMBING PROGRAM
Select "CLIMBING" by pressing CLIMBING Program Key, then press mode.
The text window will display "SELECT LEVEL" 3 for seconds.
There are 3 levels (L1, L2, L3) select, using + or -, then press mode to confirm.
Setting Parameters for Climbing
After that, 1° parameter “Time” will flash so value can be adjusted using + or - .
Press mode to save value & move to next parameter to be adjusted. Continue through all desired parameters, start pedaling to begin workout.
The resistance cannot be adjusted by using + or - during workout.
SAFETY INFORMATION
Before using the equipment, read this manual sincerely and conserve him for future consultations. It is of the proprietor's responsibility to guarantee that all of the users of the equipment are informed appropriately of safety's precautions.
CONSERVATION / CLEANING
- Cleaning of the equipment should only be done with a dampened cloth. Never use abrasives, alcohol or cleaning solvents.
- Do not place it in dusty, damp environments, saunas or in an unventilated place.
- Always use original replacement parts.
- The incorrect upkeep / maintenance may damage the product, as well as lead to the loss of warranty.
GENERAL CONSIDERATIONS
- Position the product on a level surface, at least 30 cm away from any wall, maintaining free of any obstacle.
- Do not place it in dusty or humid environments, saunas or in places which are not ventilated and do not insert or leave objects in the openings.
- Never allow more than one person to use the product at one time.
- Keep distant of the equipment, children and animals domestic, mainly during the use, avoiding possible accidents.
- Adjust the effort so that the exercise is smooth and uniform.
- Consult your doctor before starting and during any exercise programme. Special attention should be paid to children, pregnant mothers, elderly people, those with heart problems and those who have any handicap.
- Wear suitable sporting clothes. Do not use loose clothes which may become tangled in the equipment. Always use training shoes for exercising.
- This equipment was designed for people of up to 150 Kg.
- The drawings and photos contained in this manual are merely illustrative. The factory reserves the right to alter the technical specifications and the design without prior notice. This manual can illustrate optional that don't make part of the acquired equipment.
WARRANTY TERM - ATHLETIC PROFESSIONAL - CONDOMINIUMS, HOTELS, CONSTRUCTION COMPANIES AND PERSONAL TRAINER STUDIOS
General Warranty Conditions
A. Any service performed under warranty will be conducted on presentation of an original sales receipt and within the limits established by this Warranty Term. The warranty service is provided by the Athletic Technical Assistance Network which covers the main municipalities in the national territory.
B. Warranty period and coverage from the date the sales receipt is issued, including the legal period of 90 (ninety) days.:
- 3 (three) years for frame;
- 1 (one) year for monitor, motor power regulator, belts, pedals, crank sets, seat, saddle, back rest, rubber and plastic parts in general, when existing in product;
- 1 (one) year for paint including rust;
- 1 (one) year labor;
- 1 (one) year dislocation to authorized technician.
C. Any parts repaired or exchanged under the terms of this warranty, do not interrupt nor postpone the period of warranty originally stipulated.
D. For this warranty to be effective, the equipment must have been installed by an Athletic Authorized Technical Assistant.
E. The warranty does not include product installation, cleaning and lubrication services.
F. No reseller is authorized to receive the product from the customer for forwarding to the Athletic Authorized Technical Assistant or remove it for return to same or supply information in the name of Athletic about the progress of the service. Athletic or the Athletic Authorized Technical Assistant are not responsible for eventual damage or delay due to non compliance.
G. The lubricants (silicones, greases and oils) used must be those recommended in this manual (found in the Athletic Authorized Technical Assistance Network).
H. Athletic will keep a stock of spare parts available unless they cease to be manufactured or the equipment imported. In the case of ceasing production or import of the equipment, Athletic will continue to offer replacement of its equipment line for a reasonable period of time, according to law.
I. Expenses for transporting the equipment or freight to the technical assistant, displacement or technical visit by authorized technical assistant, will be under the responsibility of the buyer, whether or not this equipment is under guarantee.
J. The conditions established in this Warranty Term are applicable to the first buyer/user of this equipment.
Extinction of Warranty
This Warranty will be considered without effect when:
A. The normal period of validity has expired.
B. The equipment is taken for repair by a person (persons) who are not authorized by Athletic, and/or signs of violation to its original characteristics or assembly not within factory standards, are verified.
C. Failure to use lubricants (silicones, greases and oils), recommended in this manual.
D. Damage caused due to improper use, rust caused by external agents, weathering, negligence, alterations, use of improper accessories, unsuitable dimensioning for the application for which it is intended, falls, perforations, use and installation not in accordance with the instruction manual, connected to incorrect voltages or to electrical supply subject to excessive fluctuations or overloading, use in places such as heated swimming pool and/or sauna.
E. The product is used in gymnasiums, saunas, submersed in water or any other type of similar use, or whether exploited for commercial purposes related to gymnasium, which is not the purpose for which it is intended.
Observations:
A. No reseller or Athletic or the Athletic Authorized Technical Assistant is authorized to alter this Warranty Term or assume commitments in the name of Athletic.
B. Athletic is not responsible for any eventual accidents, or their consequences, attributed to violation of the original characteristics of the equipment or assembly not within factory standards.
Note: Athletic reserves the right to perform alterations without giving prior notice.
Athletic
BEST FOR LIFE
ASISTENCIA TÉCNICA/ TECHNICAL SERVICE
ANGOLA
LUANDA
CASACON
info@bienestarsport.com as
naphersan@yahoo.com.ar
EMUNA SRL
fabian_csv@hotmail.com
BOLÍVIA
COCHABAMBA
IMPORTADORA TAMIVA
waterhealthIMPORTATION.COM
SANTIAGO
LOS ALAMOS LTDA (Pacific SA)
Calle, 134A No. 13-57
fitlineeu@yahoo.com
TECNIFITNESS DE COLOMBIA SAS
proshapegym@yahoo.com
GUATEMALA
CIUDAD GUATEMALA
SERVICIOS INDUSTRIALES
Y AGRICOLAS S.A.
service@athletic.com.mac
NICARÁGUA
MANAGUÁ
CENTRO DESPORTIVO GARSA
cecilia@ciafitness.com.pe
SURINAME
PARAMARIBO
PROTRADE INTERNATIONAL
Nahous Complex, Boundary Road,
West Indies, San Juan - Port of Spain
brentsmali@live.com
URUGUAY
MONTEVIDEO
MOTOCICLO
Av Macaray Zone Industrial
San Vicente I
serviciotechnolog@athletic.com,ve sportsteppico@athletis.com,ve
superbancho@athaniel.com
CUSTOMER SERVICE
SERVICIO AL CLIENTE
+55 47 3461 1000
www.athletic.com.br
- ELIPTICO PROFESSIONAL
- 1800EP
- ATHLETIC
- BEST FOR LIFE
- Z3 – ÁREA DE RIESGO
- DIAGRAMA DE PARTES Y PIEZAS - 2
- THE INDIVIDUAL AND THE PHYSICAL PREPARATION
- CONTENTS
- TARGET HEARTBEAT RANGE
- HOW TO KNOW YOUR PULSE IN EACH OF TRAINING ZONE
- Z3 - RISK ZONE
- Z2 · AEROBIC ZONE
- Z1·WEIGHT LOSS ZONE
- Z0 · MODERATE ACTIVITY ZONE
- SESSIONS OF EXERCISES AND STRETCHING
- EXPLODE VIEW
- EXPLODE VIEW - 2
- ASSEMBLY INSTRUCCION
- STEP 1
- STEP 2
- STEP 3
- STEP 4
- STEP 5
- STEP 6
- STEP 9
- STEP 10
- INSTRUCTION MANUAL FOR EXERCISE MONITOR
- PAUSE
- KEY FUNCTION
- WORKOUT SELECTION
- SETTING WORKOUT PARAMETERS
- PROGRAM OPERATION
- MANUAL PROGRAM
- USER PROGRAM
- CREATE USER PROFILE
- SETTING PARAMETERS FOR USER PROGRAM
- INTERVAL PROGRAM
- SETTING PARAMETERS FOR INTERVAL
- WATT PROGRAM
- HRC PROGRAM
- TEST PROGRAM
- 8.BMI BMR FATT PROGRAM
- CLIMBING PROGRAM
- SAFETY INFORMATION
- CONSERVATION / CLEANING
- GENERAL CONSIDERATIONS
- WARRANTY TERM - ATHLETIC PROFESSIONAL - CONDOMINIUMS, HOTELS, CONSTRUCTION COMPANIES AND PERSONAL TRAINER STUDIOS
- GENERAL WARRANTY CONDITIONS
- EXTINCTION OF WARRANTY
- OBSERVATIONS
- ASISTENCIA TÉCNICA/ TECHNICAL SERVICE
- ANGOLA
- BOLÍVIA
- SANTIAGO
- GUATEMALA
- NICARÁGUA
- SURINAME
- URUGUAY
- CUSTOMER SERVICE
- SERVICIO AL CLIENTE
Brand : Athletic
Model : Professional 1800EP-FD
Category : Elliptical bike