670104 - Heating appliance Melissa - Free user manual and instructions
Find the device manual for free 670104 Melissa in PDF.


| Product Type | Electric Radiator |
| Brand | Melissa |
| Model | 670104 |
| Power Supply | 230 V, 50 Hz |
| Power Rating | 2000 W (estimated) |
| Plug Type | BS 1363 13-amp (UK) |
| Dimensions (approx.) | 60 cm x 20 cm x 50 cm |
| Weight (approx.) | 5 kg |
| Mounting | Wall-mounted with included bracket |
| Controls | On/Off button, Thermostat dial |
| Heating Elements | Heating ribs (oil-filled or similar) |
| Thermostat | Adjustable with frost protection setting (+5°C) |
| Overheat Protection | Automatic shut-off if overheating |
| Safety Features | Overheat protection, safety distances required |
| Clearance Requirements | 50 mm bottom/sides, 150 mm top |
| Cleaning Method | Wipe with damp cloth, no strong solvents |
| Usage Environment | Indoor, domestic only |
| Warranty | Standard guarantee (refer to manual) |
| Repairability | Authorized repairer only; do not self-repair |
| Accessories Included | Wall mount, screws, plug (UK) |
Frequently Asked Questions - 670104 Melissa
User questions about 670104 Melissa
0 question about this device. Answer the ones you know or ask your own.
Ask a new question about this device
Download the instructions for your Heating appliance in PDF format for free! Find your manual 670104 - Melissa and take your electronic device back in hand. On this page are published all the documents necessary for the use of your device. 670104 by Melissa.
USER MANUAL 670104 Melissa
natural_image
White rectangular electronic device with ventilation grilles and a black control knob (no visible text or symbols)670104/16530021

natural_image
Exterior view of a white rectangular electronic device with a small circular button on the side (no text or symbols visible)16530022
670104/ 16530021/ 16530022
DK Elradiator 2
UK Electric radiator....18
OVERSIGT OVER APPARATETS DELE
- Varmeribber
- Tænd/sluk-knap
- Termostatknap
- Vægbeslag
F∅R F∅RSTE ANVENDELSE
INNAN FÖRSTA ANVÄNDNING
F∅R APPARATET TAS I BRUK F∅RSTE GANG
ENNEN ENSIMMÄISTÄ KÄYTTÖKERTAA
To get the best out of your new appliance, please read this user guide carefully before using it for the first time. Take particular note of the safety precautions. We also recommend that you keep the instructions for future reference, so that you can remind yourself of the functions of your appliance.
SAFETY MEASURES
General
- Incorrect use of this appliance may cause personal injury and damage.
- Use for the intended purpose only. The manufacturer is not responsible for any injury or damage resulting from incorrect use or handling (see also Guarantee Terms).
- For domestic use only. Not for outdoor or commercial use.
• For connection to 230 V, 50 Hz only. - Check appliance is intact when unpacking for the first time. There should be no visible damage. Do not use the appliance if it is damaged.
- Never submerge the appliance in water and make sure no water enters the appliance.
- Do not use the appliance near water, for instance near a bath or a swimming pool.
- Never touch the appliance, cord or plug with wet or damp hands.
-
Do not expose the appliance to direct sunlight, high temperatures, humidity, dust or corrosive substances.
-
This appliance can be used by children aged from 8 years and above and persons with reduced physical, sensory or mental capabilities or lack of experience and knowledge if they have been given supervision or instruction concerning use of the appliance in a safe way and understand the hazards involved. Children shall not play with the appliance. Cleaning and user maintenance shall not be made by children without supervision.
- The appliance shall not be operated by means of an external timer, or a separate remote control system
Use
- Always place the appliance at a safe distance from flammable objects such as curtains, carpets or similar.
- The appliance must not be covered and the ventilation openings must not be blocked as this could result in overheating and risk of fire.
- The appliance is intended for wall mounting. There must be clearance of at least 50 mm from the bottom and sides of the appliance and 150 mm from the top of the appliance to ensure sufficient ventilation.
- Do not install the appliance immediately below a power socket as the radiant heat from the appliance may cause damage to the electrics.
- Caution! Do not touch the appliance while it is in use. Surfaces that radiate heat may get hotter than 60 °C.
Cord and plug
- Check that it is not possible to pull or trip over the cord or any extension cord.
- Keep the cord and appliance away from heat sources, hot objects and naked flames.
- Do not use with other cords than that supplied.
- Turn off and unplug the appliance as soon as you have finished using it, before cleaning it or if the appliance is not in use. Avoid pulling the cord when removing the plug from the socket. Instead, hold the plug.
- Ensure that the cord is fully extended.
- The cord must not be twisted or wound around the appliance.
- Check regularly that neither cord nor plug is damaged and do not use if they are or if the appliance has been dropped in water or damaged in any other way.
- If either the appliance, cord or plug has been damaged, have the appliance inspected and if necessary repaired by an authorised repairer. Never try to repair the appliance yourself. Please contact the store where you bought the appliance for repairs under the guarantee. Unauthorised repairs or modifications to the appliance will invalidate the guarantee.
KEY TO THE MAIN COMPONENTS OF THE APPLIANCE
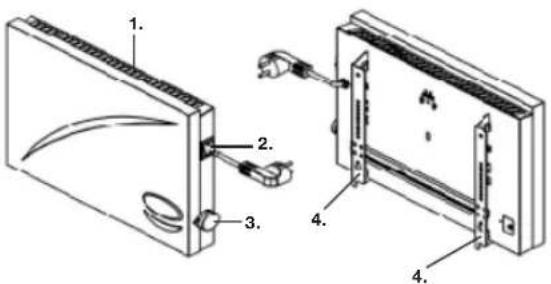
- Heating ribs
- On/Off button
- Temperature control dial
- Wall fitting

PRIOR TO FIRST USE
- Remove all packaging and transport materials from the inside and outside of the appliance.
- Check that the appliance has no visible damage and that no parts are missing. Do not use the appliance if it is damaged.
USING THE APPLIANCE
Installation
-
Press down the 2 clamps on the top of the wall mount (4) and push the mount down so that it loosens from the appliance (fig. 1).
-
Drill 4 holes in the wall with an internal distance that matches the 4 holes in the wall mount, and install the mount on the wall using the 4 screws supplied (fig. 2). There must be a clearance of at least 50 mm from the bottom and sides of the appliance and 150 mm from the top of the appliance to ensure sufficient ventilation (fig. 4).
-
Install the appliance on the wall mount: Hook the 2 hooks at the bottom of the mount into the 2
holes at the bottom of the back of the appliance (triangle markings). Ensure that the 2 clamps at the top of the mount are level with the 2 holes at the top of the back of the appliance. Press the clamps in so that they lock into place with a click (fig. 3).
Use
- Connect the appliance and switch it on using the on/off button (2).
- Turn the thermostat button (3) clockwise to the maximum setting. Let the thermostat button stay in this position until the desired room temperature has been reached.
- Turn the thermostat button anti-clockwise until you hear a click and the thermostat switches off. This means that the thermostat setting now corresponds to the actual room temperature.
- The heating ribs (1) will activate and deactivate automatically to maintain the temperature that has been set.
- Always turn off the appliance using the on/off button and unplug it when you are finished with it. Please note that the appliance will remain hot for a while after you switch it off.
Caution! The appliance is equipped with overheat protection which automatically stops the appliance if it becomes too hot during use or if a technical fault occurs. Turn the appliance off, remove the plug from the mains socket and allow the appliance to cool down before using again. Should the appliance be faulty, it should be repaired by a professional.
Frost protection
If you wish to avoid the room temperature falling below +5 °C, e.g. because you will be away for prolonged periods, you can turn the thermostat button to the frost protection setting.
CLEANING
When cleaning the appliance, you should pay attention to the following:
- Remove the plug from the mains socket, and allow the appliance to cool down completely before cleaning it.
- Never submerge the appliance in water and make sure no water enters the appliance.
- Clean the appliance by wiping it with a damp cloth. A little detergent can be added if the appliance is heavily soiled.
- Do not use scouring pads, steel wool or any form of strong solvents or abrasive cleaning agents to clean the appliance, as they can damage the external surfaces of the appliance.
- Keep the ventilation openings free of dust and dirt.
- IMPORTANT! Allow to dry completely after cleaning. Do not use the appliance if it is damp.
- Always clean the appliance before putting it away if it is not to be used for a prolonged period.
FOR UNITED KINGDOM ONLY
Plug wiring:
This product is fitted with a BS 1363 13-amp plug. If you have to replace the fuse, only those that are ASTA or BSI approved to BS1362 and with a rated current of 13 amps should be used. If there is a fuse cover fitted, this cover must be refitted after changing the fuse.
If the fuse cover is lost or damaged, the plug must not be used. You must also check if the socket outlets in your home fit with the plug of the appliance. If the socket outlet in your home does not fit with the plug, the plug must be removed and disposed of safely as insertion of the plug into the socket is likely to cause electric hazard. A replacement plug should be wired according to following description.
Important
This appliance must be earthed. The wires in the cord set are coloured thus:
BLUE- Neutral, Brown-Live, Green& Yellow-earth (For detachable plug only)
As the colours of the wires in the mains lead of this appliance may not correspond with the coloured markings identifying the terminals in your plug, proceed as follows:
The wire that is coloured Green& Yellow must be connected to the terminal in the plug that is marked with the letter E or by the earth symbol,or coloured green & yellow.
The wire that is coloured blue must be connected to the terminal that is marked with the letter N or coloured black.
The wire that is couloured brown must be connected to the terminal that is marked with the letter L or coloured red.
INFORMATION ON DISPOSAL AND RECYCLING OF THIS PRODUCT
Please note that this Adexi product is
marked with this symbol:

This means that this product must not be disposed of along with ordinary household waste, as electrical and electronic waste must be disposed of separately.
According to the WEEE directive, every member state must ensure correct collection, recovery, handling and recycling of electrical and electronic waste. Private households in the EU can take used equipment to special recycling stations free of charge. In some member states you can in certain cases return used equipment to the retailer from whom you purchased it, if you are purchasing new equipment. Contact your retailer, distributor or the municipal authorities for further information on what to do with electrical and electronic waste.
GUARANTEE TERMS
The guarantee does not apply:
- if the above instructions have not been followed
- if the appliance has been interfered with
- if the appliance has been mishandled, subjected to rough treatment, or has suffered any other form of damage
- if the appliance is faulty due to faults in the electricity supply.
Due to the constant development of our products in terms of function and design, we reserve the right to make changes to the product without prior warning.
FREQUENTLY ASKED QUESTIONS
If you have any questions regarding the use of the appliance and cannot find the answer in this user guide, please try our website at www.adexi.eu.
Go to the “Consumer Services” menu and click on “Frequently Asked Questions” to view the most frequently asked questions.
You can also see contact details on our website if you need to contact us for technical questions, repairs, accessories or spare parts.
IMPORTER
Adexi Group
www.adexi.eu
We cannot be held responsible for any printing errors.
DE
EINLEITUNG
VOR DEM ERSTMALIGEN GEBRAUCH
- 670104/ 16530021/ 16530022
- OVERSIGT OVER APPARATETS DELE
- F∅R F∅RSTE ANVENDELSE
- INNAN FÖRSTA ANVÄNDNING
- F∅R APPARATET TAS I BRUK F∅RSTE GANG
- ENNEN ENSIMMÄISTÄ KÄYTTÖKERTAA
- SAFETY MEASURES
- General
- Use
- Cord and plug
- KEY TO THE MAIN COMPONENTS OF THE APPLIANCE
- PRIOR TO FIRST USE
- USING THE APPLIANCE
- Installation
- Frost protection
- CLEANING
- FOR UNITED KINGDOM ONLY
- Plug wiring:
- Important
- BLUE- Neutral, Brown-Live, Green& Yellow-earth (For detachable plug only)
- INFORMATION ON DISPOSAL AND RECYCLING OF THIS PRODUCT
- GUARANTEE TERMS
- FREQUENTLY ASKED QUESTIONS
- IMPORTER
- DE
- EINLEITUNG
- VOR DEM ERSTMALIGEN GEBRAUCH
Brand : Melissa
Model : 670104
Category : Heating appliance