16310110 - Ice Maker Melissa - Free user manual and instructions
Find the device manual for free 16310110 Melissa in PDF.


| Product Type | Countertop Ice Maker |
| Brand | Melissa |
| Model | 16310110 |
| Ice Production Capacity | 12 kg per 24 hours |
| Ice Cube Size | Small / Large selectable |
| Ice Storage Capacity | 0.6 kg |
| Water Reservoir Capacity | 1.2 L |
| Cycle Time | 6 - 13 minutes per batch |
| Refrigerant | R600a |
| Dimensions (W x D x H) | 22 x 29 x 32 cm |
| Net Weight | 5.5 kg |
| Power Supply | 220-240 V, 50 Hz |
| Power Consumption | 100 W |
| Noise Level | < 45 dB |
| Control Panel | Touch buttons with LED indicators |
| Automatic Shut-off | Yes (ice bin full or water shortage) |
| Self-cleaning Function | Yes |
| Maintenance | Clean air filter and condenser every 2 weeks |
| Spare Parts Availability | Contact manufacturer for replacement parts |
| Safety Certifications | CE, RoHS |
| Warranty | 1 year |
Frequently Asked Questions - 16310110 Melissa
User questions about 16310110 Melissa
0 question about this device. Answer the ones you know or ask your own.
Ask a new question about this device
Download the instructions for your Ice Maker in PDF format for free! Find your manual 16310110 - Melissa and take your electronic device back in hand. On this page are published all the documents necessary for the use of your device. 16310110 by Melissa.
USER MANUAL 16310110 Melissa
natural_image
White ceramic kitchen appliance with lid and matching cup, no visible text or symbols16310077/16310081/16310079/16310110
DK Ismaskine....2
SE Glassmaskin....4
NO Iskremmaskin....6
FI Jäätelökone....8
UK Ice cream maker....10
DE Speiseeismaschine....13
OVERSIGT OVER APPARATETS DELE
F∅R F∅RSTE ANVENDELSE
INNAN FÖRSTA ANVÄNDNING
F∅R APPARATET TAS I BRUK F∅RSTE GANG
ENNEN ENSIMMÄISTÄ KÄYTTÖKERTAA
To get the best out of your new appliance, please read this user guide carefully before using the appliance for the first time. Take particular note of the safety precautions. We also recommend that you keep the instructions for future reference, so that you can remind yourself of the functions of your appliance.
SAFETY MEASURES
General
- Incorrect use of this appliance may cause personal injury and damage.
- Use for its intended purpose only. The manufacturer is not responsible for any injury or damage resulting from incorrect use or handling (see also Guarantee Terms).
- For domestic use only. Not for outdoor or commercial use.
- For connection to 230 V, 50 Hz only.
- Never submerge the appliance, cord or plug in water, and no water must be allowed to enter the motor section.
- Never touch the appliance, cord or plug with wet or damp hands.
- Do not expose the appliance to direct sunlight, high temperatures, humidity, dust or corrosive substances.
- Never leave the appliance unattended when it is switched on.
- Keep the appliance under constant supervision while in use. Keep an eye on children in the vicinity of the appliance when it is being used. The appliance is not a toy.
- The appliance is not to be used by persons with reduced sensitivity, physical or mental disabilities or persons who are unable to use the appliance, unless supervised or instructed by a person responsible for their safety.
- The appliance contains sharp parts – keep out of the reach of children.
- Use only accessories supplied with the appliance or those recommended by the manufacturer.
Use
• Always place the appliance on a dry, level and firm surface, and well away from the edges.
- Never place warm food in the freezer bowl. Always allow warm, freshly prepared ice cream or sorbet mixture to cool before pouring it into the bowl.
- Never fill the freezer bowl completely with ice cream or sorbet mixture, as the mixture expands as it freezes.
- Do not use the freezer bowl if it is cracked or damaged in any way.
- Never put tools or your fingers into the filling port while the appliance is switched on.
- Do not use metal utensils to remove the ice cream from the bowl, as they can scratch the coating on the inside of the bowl.
- Avoid touching the internal surfaces of the freezer bowl with your fingers, as your fingers can freeze to the cold surfaces.
- Do not leave the freezer bowl in the freezer for more than 48 hours at a time, as this can cause the appliance to malfunction.
Cord and plug
- Do not let the cord hang out over the edge of the work surface.
- Check that it is not possible to pull or trip over the cord or any extension cord.
- Keep the cord and appliance away from heat sources, hot objects and naked flames.
- Turn off the appliance and remove the plug from the socket when cleaning or when not in use. Avoid pulling the cord when removing the plug from the socket. Instead, hold the plug.
• Ensure that the cord is fully extended. -
The cord must not be twisted or wound around the appliance.
-
Check regularly that neither cord nor plug is damaged and do not use if they are, or if the appliance has been dropped or damaged in any other way.
- If the appliance, cord or plug have been damaged, have the appliance inspected and if necessary repaired by an authorised repairer. Never try to repair the appliance yourself. Please contact the store where you bought the appliance for repairs under the guarantee. Unauthorised repairs or modifications to the appliance will invalidate the guarantee.
KEY TO THE MAIN COMPONENTS OF THE APPLIANCE
- Motor section
- ON/OFF button
- Feed tube
- Filling port
- Lid
- Spindle (underneath the lid; not visible on picture)
- Paddle
- Freezer bowl
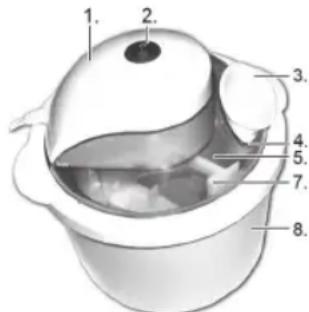
PRIOR TO FIRST USE
- Remove all packaging and transport materials from the inside and outside of the appliance.
- Check that the appliance has no visible damage and that no parts are missing.
- Before using for the first time (or after prolonged storage without use), wash any parts that will come into contact with food. See "Cleaning".
- Place the freezer bowl (8) in the freezer, and leave it there for at least 12 hours, until you are ready to make ice cream. The bowl must be in upright position; do not place it in a horizontal position. The temperature in the freezer must be at least -17^ to allow the ice cream to freeze properly.
USING THE APPLIANCE
Mounting the appliance
- Remove the freezer bowl from the freezer and place it on a stable surface.
- Fit the motor section (1) into the lid (5) and push it forward until the pins on the motor section fit into the slots in the lid.
- Fit the paddle (7) onto the spindle (6).
- Lower the lid with motor section, spindle and paddle into the bowl. Make sure the pins along the edge of the lid align with the notches in the white edge of the bowl.
- Place the feed tube (3) in the filling port (4).
Procedure for making ice cream or sorbet
- Check that the appliance is correctly assembled.
-
Connect the appliance.
-
Switch on the appliance by turning the on/off button (2) to "I".
o The machine must be switched on before the ice cream or sorbet mixture is added, as otherwise the mixture may freeze solid, making it impossible for the paddle to turn!
-
Add the ice cream or sorbet mixture by pouring it through the filling port (4).
o Always make sure that there is at least 2.5 cm between the mixture and the top of the bowl, as the mixture expands as it freezes. -
Do not allow the appliance to run for more than approx. 40 minutes. The appliance must NOT be stopped during preparation, since mixture may freeze solid, making it impossible for the paddle to turn if switched on again.
Do not add ingredients like chocolate pieces, nuts or alcohol through the filling port until the ice cream is almost ready.
- When the ice cream is ready, switch off the appliance by pushing the on/off button to position "0" and remove the lid.
o The finished ice cream is quite soft in consistency, so it can be served using a spoon. If you would like the ice cream to have a firmer consistency, transfer the bowl to the freezer (at -18^ ) for 30-60 minutes, depending on how firm you want it to be.
-
Always remove the plug from the socket once you have finished using the appliance.
-
Dissemble the appliance and clean all parts before storing. See "Cleaning".
-
Always clean the freezer bowl before returning it to the freezer.
Note: The interlayer of the freezer bowl is filled with the mixture of polysaccharides and saline water, which is nontoxic, and environment friendly
RECIPES TO INSPIRE YOU
General instructions
• Use caster sugar, as it dissolves easily.
- Mix all the ingredients in a bowl before pouring the mixture into the appliance and starting the churning. Do not add ingredients like chocolate pieces, nuts or alcohol through the filling port until the ice cream is almost ready.
- Use ripe fruit. Wash fruit thoroughly, peel it, and remove any pips or stones as necessary.
- Use pure fruit juice. This produces a stronger and richer flavour.
- Do not fill the freezer bowl completely with ice cream or sorbet mixture.
- Certain ingredients require heating, for example boiling of fruit or berries with sugar or melting of chocolate. Mixtures with hot ingredients must be left to cool in the fridge for two hours before being used to make ice cream.
If you start with a basic recipe, you can create the flavour you want by adding different ingredients.
Basic recipe, dairy ice cream
3 pasteurised egg yolks
350 ml milk
70 g sugar
Slowly heat the milk until tiny bubbles form. Whisk egg yolks and sugar until the sugar has completely dissolved. Gradually pour the egg mixture into the milk and heat the mixture until it starts thickening. Leave the mixture to cool in the fridge for about 2 hours. Pour the mixture into the appliance while the paddle is rotating. Leave the mixture to churn until it has the desired consistency.
Tip:
- Add ingredients like blended fruit, grated chocolate or the like to create the desired flavour.
- Depending on how creamy you want the ice cream to be, you can replace the milk either partially or wholly with double cream.
- You can also substitute yoghurt for the milk to make yoghurt ice cream instead.
Basic recipe, sorbet
200 ml water
200 g sugar
200 g blended fruit or 200 ml fruit juice
Pour the water into a saucepan, add the sugar, and stir until the sugar is completely dissolved. Bring to the boil and allow to boil for 2 minutes. Remove the pan from the heat and allow to cool. Add blended fruit or fruit juice to the cold mixture. Then pour the entire mix into the bowl while the paddle is rotating. Leave the mixture to churn until it has the desired consistency.
CLEANING
When cleaning the appliance, you should pay attention to the following:
- Remove plug from the mains socket, and allow the appliance to cool down before cleaning it.
- Do not immerse the motor section of the appliance in water and make sure no water enters the appliance.
- Clean the appliance by wiping it with a damp cloth. A little detergent can be added if the appliance is heavily soiled.
- The parts are not dishwasher—safe. Clean the freezer bowl, lid, paddle and feed tube in warm water with a little detergent.
- Do not use scouring pads, steel wool or any form of strong solvents or abrasive cleaning agents to clean the appliance, as they may damage the external surfaces of the appliance.
- IMPORTANT! Allow to dry completely after cleaning. Do not use the appliance if it is damp.
- Always clean the appliance before putting it away if it is not to be used for a prolonged period.
- Always clean the freezer bowl before returning it to the freezer.
FOR UNITED KINGDOM ONLY
Plug wiring:
This product is fitted with a BS 1363 5-amp plug. If you have to replace the fuse, only those that are ASTA or BSI approved to BS1362 and with a rated current of 5 amps should be used. If there is a fuse cover fitted, this cover must be refitted after changing the fuse. If the fuse cover is lost or damaged, the plug must not be used. You must also check if the socket outlets in your home fit with the plug of the appliance. If the socket outlet in your home does not fit with the plug, the plug must be removed and disposed of safely as insertion of the plug into the socket is likely to cause electric hazard.
As this product is a class II appliance, the pin of BS plug for earth connection is false.
INFORMATION ON DISPOSAL AND RECYCLING OF THIS PRODUCT
Please note that this Adexi product is marked with this symbol:
This means that this product must not be disposed of along with ordinary household waste, as electrical and electronic waste must be disposed of separately.
In accordance with the WEEE directive, every member state must ensure correct collection, recovery, handling and recycling of electrical and electronic waste. Private households in the EU can take used equipment to special recycling stations free of charge. In certain member states, used appliances can be returned to the retailer where they were bought on the condition you buy new products. Contact your retailer, distributor or the municipal authorities for further information on what to do with electrical and electronic waste.
GUARANTEE TERMS
The guarantee does not apply:
• if the above instructions have not been followed
• if the appliance has been tampered with
- if the appliance has been mishandled, subjected to rough treatment, or has suffered any other form of damage
- if the appliance is faulty due to faults in the electricity supply.
Due to the constant development of our products in terms of function and design, we reserve the right to make changes to the product without prior warning.
FREQUENTLY ASKED QUESTIONS
If you have any questions regarding the use of the appliance and cannot find the answer in this user guide, please try our website at www.adexi.eu.
Go to the "Consumer Services" menu and click on "Frequently Asked Questions" to view the most frequently asked questions.
You can also see contact details on our website if you need to contact us for technical questions, repairs, accessories or spare parts.
IMPORTER
Adexi Group
www.adexi.eu
We cannot be held responsible for any printing errors.
DE
EINLEITUNG
VOR DEM ERSTMALIGEN GEBRAUCH
PRZED PIERWSZYM UŻYCIEM

- OVERSIGT OVER APPARATETS DELE
- F∅R F∅RSTE ANVENDELSE
- INNAN FÖRSTA ANVÄNDNING
- F∅R APPARATET TAS I BRUK F∅RSTE GANG
- ENNEN ENSIMMÄISTÄ KÄYTTÖKERTAA
- SAFETY MEASURES
- General
- Use
- Cord and plug
- KEY TO THE MAIN COMPONENTS OF THE APPLIANCE
- PRIOR TO FIRST USE
- USING THE APPLIANCE
- Procedure for making ice cream or sorbet
- RECIPES TO INSPIRE YOU
- Basic recipe, dairy ice cream
- Tip:
- Basic recipe, sorbet
- CLEANING
- FOR UNITED KINGDOM ONLY
- INFORMATION ON DISPOSAL AND RECYCLING OF THIS PRODUCT
- GUARANTEE TERMS
- FREQUENTLY ASKED QUESTIONS
- DE
- EINLEITUNG
- VOR DEM ERSTMALIGEN GEBRAUCH
- PRZED PIERWSZYM UŻYCIEM
Brand : Melissa
Model : 16310110
Category : Ice Maker