651-046 - Oven Melissa - Free user manual and instructions
Find the device manual for free 651-046 Melissa in PDF.


| Product Type | Mini Oven with Rotisserie |
| Brand | Melissa |
| Model | 651-046 |
| Power Supply | 230 V ~ 50 Hz |
| Power Consumption | Approx. 1500 W |
| Temperature Range | 100 °C to 250 °C |
| Timer Range | 0 to 60 minutes (auto shut-off with bell) |
| Heating Elements | Upper and lower (independent or combined) |
| Rotisserie Function | Yes, with forks and handle (max load 3 kg) |
| Functions | Upper heat, lower heat, both heat, rotisserie with each setting |
| Oven Capacity | Approx. 20 liters (estimated) |
| Dimensions (Approx.) | 45 x 35 x 30 cm (WxDxH) |
| Weight (Approx.) | 10 kg |
| Material | Metal body with glass door |
| Accessories Included | Baking tray, grid, rotisserie forks, rotisserie handle, tray handle |
| Safety Features | Auto shut-off, indicator light, heat-resistant handle, ventilation clearance required |
| Cleaning | Wipe with damp cloth; wash tray and grid in warm soapy water |
| Plug Type | BS 1363 13 A (UK) |
| Warranty | Standard terms, excludes misuse |
| Certifications | CE, WEEE compliant |
Frequently Asked Questions - 651-046 Melissa
User questions about 651-046 Melissa
0 question about this device. Answer the ones you know or ask your own.
Ask a new question about this device
Download the instructions for your Oven in PDF format for free! Find your manual 651-046 - Melissa and take your electronic device back in hand. On this page are published all the documents necessary for the use of your device. 651-046 by Melissa.
USER MANUAL 651-046 Melissa
natural_image
Black-and-white photo of a small electric toaster oven with a baked pie on the inner tray (no visible text or symbols)DK Miniovn med rotisseri.... 2
SE Mini-ugn med grillspett.... 7
NO Miniovn med grillspyd.... 12
OVERSIGT OVER APPARATETS DELE
natural_image
Close-up of a black industrial temperature control dial with no visible text or symbols on the dial faceIndstil temperaturen ved at dreje knappen med uret til den rette temperatur til den ret, du skal tilberede. (Temperature Control ranging from 100 °C to 250 °C) (Temperaturen kan indstilles fra 100 °C til 250 °C).
natural_image
Close-up of a black circular device with a glossy surface and control buttons at corners (no readable text or symbols)KLARG∅RING AF APPARATET
natural_image
Diagram of a mechanical or electrical component with internal flow arrows and no visible text or symbolsnatural_image
Simple line drawing of a Y-shaped object with no text or symbolsnatural_image
Simple line drawing of a mechanical component or tool with no visible text or symbols- Övre värmeelement
- Temperaturkontroll
- Funktionsväljare
- Timer
- Indikatorlampa
- Nedre värmeelement
- Bakplåt
- Galler
- Handtag
- Ugnslucka
- Handtag till plåt
- Handtag till grillspett
- Grillspettsgafflar
Funktionskontroll
- Temperaturkontroll

natural_image
Close-up of a black industrial temperature control dial with degrees and a metallic object inside (no readable text or symbols beyond 'TEMP' and numeric scale)natural_image
Close-up of a black circular device with a glossy surface and control buttons at corners (no readable text or symbols)natural_image
Diagram of a mechanical or electrical device with internal components and directional arrows indicating flow or movement (no text or symbols)natural_image
Simple line drawing of a Y-shaped object with no text or symbols-
Skruva fast en gaffel på köttspettet.
-
Spetta det kött som ska grillas.
-
Skruva fast den andra gaffeln på köttspettet. Spettgafflarna med kött på ser ut så här:

natural_image
Simple line drawing of a mechanical component or tool (no text or symbols)- ∅vre varmeelement
- Temperaturbryter
- Funksjonsbryter
- Timer
- Kontrollampe
- Nedre varmeelement
- Bakebrett
- Rist
- Håndtak
- Ovnsdør
- Håndtak til brett
- Håndtak til grillspyd
- Gafler til grillspyd
Funksjonsregulering
- Temperaturbryter
natural_image
Close-up of a black industrial temperature control dial with no visible text or symbols on the dial facenatural_image
Close-up of a black circular device with a metallic rim and control buttons at corners (no readable text or symbols)Velg passende varmeelement for rettene du skal tilberede.
KLARGJ∅RING AV APPARATET
natural_image
Diagram of a mechanical or electrical device with internal components and directional arrows, no visible text or symbols.natural_image
Simple line drawing of a Y-shaped object with no text or symbolsnatural_image
Simple line drawing of a mechanical component or tool (no text or symbols)natural_image
Close-up of a black industrial temperature control dial with degrees 0 to 250 (no text or symbols beyond labels)natural_image
Close-up of a black circular device with a glossy surface and control buttons at corners (no readable text or symbols)natural_image
Diagram of a mechanical or electrical system with directional arrows and internal components (no text or symbols)natural_image
Simple line drawing of a Y-shaped object with no text or symbolsnatural_image
Simple line drawing of a mechanical component or tool with no visible text or symbolsTo get the best out of your new appliance, please read this user guide carefully before using it for the first time. Take particular note of the safety precautions.
We also recommend that you keep the instructions for future reference, so that you can remind yourself of the functions of your appliance.
SAFETY MEASURES
General
- Incorrect use of the appliance may cause personal injury and damage.
- Use for its intended purpose only. The manufacturer is not responsible for any injury or damage resulting from incorrect use or handling (see also Warranty Terms).
- For domestic use only. Not for outdoor or commercial use.
- For connection to 230 V, 50 Hz only. Do not immerse the appliance, cord or plug in water and make sure no water enters the appliance.
- Never touch the appliance, cord or plug with wet or damp hands.
- Do not expose to direct sunlight, high temperatures, humidity, dust or corrosive substances.
- Keep the appliance under constant supervision while in use. Keep an eye on children.
- Do not use the appliance if there are cleaning agent residues inside it.
Positioning the appliance
- Always place the appliance on a dry, level, firm and heat-resistant surface well away from any edges.
- Do not place on untreated wooden surfaces, as they may be damaged by the heat. Always place the appliance at a safe distance from flammable objects such as curtains, tablecloths or similar.
- There must be a clearance of at least 10 cm from the sides of the appliance (including the rear) and 30 cm above to ensure sufficient ventilation. The appliance is not suitable for built-in fitting.
Use
- Do not place objects on top of the appliance while in use.
- The appliance will become very hot during use. Never move whilst hot. When the oven is hot, only touch the oven door handle and the controls, and be very careful when handling hot dishes, oven accessories or foods – use oven gloves!
- Take care when handling hot food and liquids to avoid burns and scalding. Do not heat food in closed containers in the appliance, as the heat can cause them to explode.
-
Check that the vent holes in the cabinet are not covered. If they are covered while the appliance is in use, there is a risk of overheating. Do not use the appliance until it has cooled down.
-
Never insert anything into the ventilation slots or other openings.
- Make sure you do not scratch the glass in the oven door, and never place objects on the oven door when it is open.
- Do not pour water on the glass in the oven door while hot, as this can cause the glass to crack.
Cord, plug and mains socket
- Do not let the cord hang out over the edge of the work surface.
- Check that it is not possible to pull or trip over the cord or any extension cord.
- Keep cord and appliance away from heat sources, hot objects and naked flames, including gas burners and electric hotplates.
- Turn off and unplug the appliance as soon as you have finished using it, before cleaning it or if the appliance is not in use. Avoid pulling the cord when removing the plug from the socket. Instead, hold the plug.
- Ensure that the cord is fully extended.
- Do not twist the cord.
- Check regularly that neither cord nor plug is damaged and do not use if they are, or if the appliance has been dropped or damaged in any other way.
- If the appliance, cord or plug has been damaged, have the appliance inspected and if necessary repaired by an authorized repairer. Never try to repair the appliance yourself. Please contact the store where you bought the appliance for repairs under the guarantee. Unauthorized repairs or modifications to the appliance will invalidate the guarantee.
Fire hazard!
To reduce the risk of fire occurring in the oven compartment, please note the following points:
- Do not cover the appliance's heating elements or sides with tin foil.
- Do not use steel scourers for cleaning, since it is possible for steel fragments to break off, increasing the risk of electric shock.
• Food must not touch the heating elements. - Use only dishes and containers intended for use in ovens, e.g. items made of glass, fireproof ceramics or metal.
- Do not use the oven compartment for storing anything other than the accompanying accessories.
- Do not cook food for too long or at too high a temperature. Do not leave unattended if hot and baking parchment or other flammable materials have been used.
- If materials in the appliance catch fire, leave the door closed. Switch off immediately, and remove the plug from the wall socket.
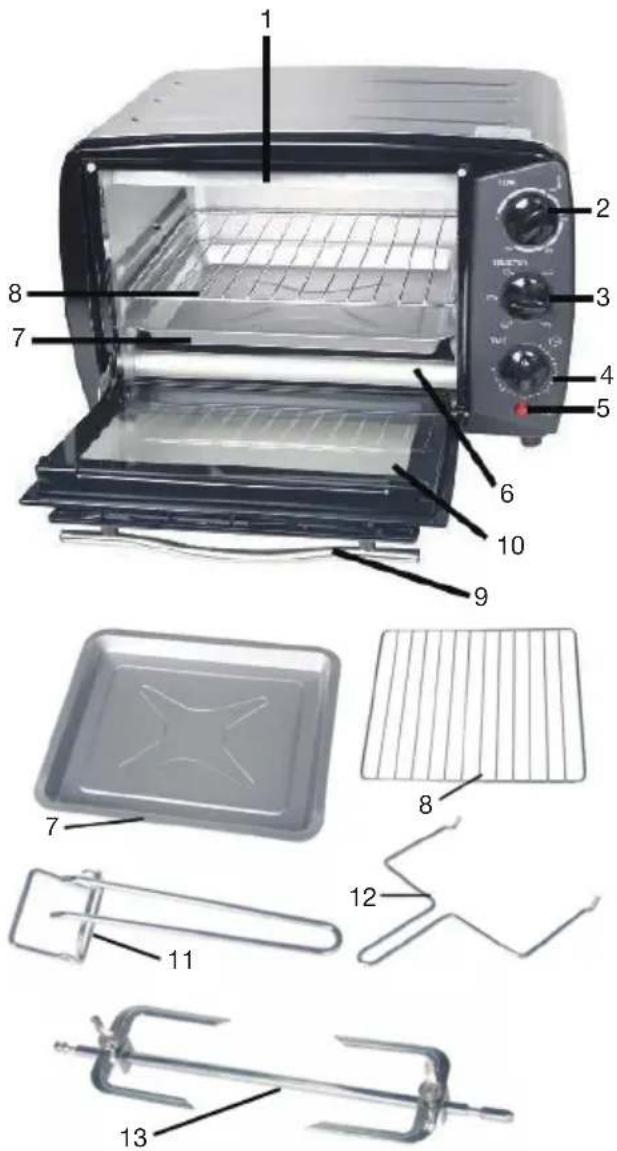
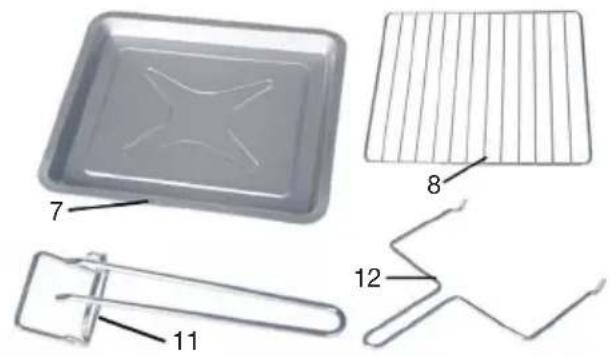
KEY TO THE MAIN COMPONENTS OF THE APPLIANCE

- Upper heating element
- Temperature control
- Function selector
- Timer
- Indicator light
- Lower heating element
- Baking tray
- Grid
- Handle
- Oven door
- Tray handle
- Rotisseri handle
- Rotisseri forks
Functional Control
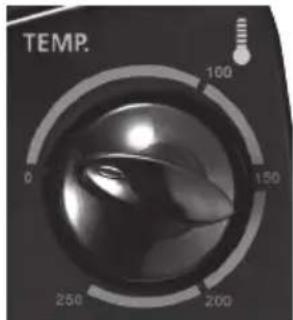
- Temperature Control

natural_image
Close-up of a temperature control knob with scale markings (no text or symbols beyond 'TEMP' and numeric values)Set the “Temperature Control” by turning clockwise to select the suitable temperature according to the dishes you are going to cook. (Temperature Control ranging from 100°C to 250°C)
- Function Control

natural_image
Close-up of a black circular device with a metallic knob and control buttons, labeled 'SELECTOR' (no additional text or symbols visible)Select the suitable heating element according to the dishes you are going to cook.
For details, please refer to the different settings for Rotisserie and non-Rotisserie functions as shown in the following table:
| Symbol | Function Used for | |
| Both heating elements active for Rotisserie | Roasting with upper and lower heating | |
| Upper heating element (1) active for Rotisserie | Roasting with upper heating | |
| Lower heating element (6) active for Rotisserie | Roasting with lower heating | |
| Upper heating element (1) active | Baking and grilling with upper heating | |
| Lower heating element (6) active | Baking and grilling with lower heating | |
| Both heating elements active | Baking and grilling with upper and lower heating |
- Timer

-
Set the arrow on the "Timer" to the number which indicates the cooking time (minutes) according to the dishes you are going to cook.
-
Set the "Timer" by turning it clockwise. The oven will turn off automatically at the end of the selected time and a bell will ring.
- When setting the Timer to less than 5 min, turn it to more than 6 min. and then back to the selected time.
- The oven can be turned off manually during cooking by turning the "Timer" anti-clockwise to the "OFF" position.
PREPARING THE APPLIANCE
Each individual appliance is checked at the factory, but for safety's sake, after unpacking it, you should check carefully that it has not been damaged during transport.
- Check whether there is any visible damage (e.g. in the form of dents or similar), if the door (10) closes properly, and if the hinges are in order.
- If the appliance appears to have been damaged, contact the shop where you bought it, and do not use it until it has been checked by an authorized specialist.
- Before use, check that you have removed all packaging inside and out.
- Wash and wipe the baking tray (7) and the grid (8) before use.
The heating elements were oiled during manufacture and these will therefore smoke slightly when the oven is first used. This is entirely harmless and will stop after a few minutes. However, so that the food does not taste of this smoke, we recommend that you take the following action before using the appliance for the first time:
- Place the baking tray and the grid in the appliance.
- Select upper or lower heat, set the temperature at 250 °C and set the cooking time for 10 minutes (See "Operating the Appliance" below). The appliance starts automatically.
- The appliance automatically switches off after 10 minutes.
The smoke will now have completely disappeared, and you can use the appliance to cook food.
USE
- Plug in and switch on the power.
- Place the food in the oven (unless the oven has to preheat).
- Close the oven door.
- Use the function selector (3) to choose the desired function (see the above table with function selector settings). The appliance has three settings for both Rotisserie and non-Rotisserie functions:
° Heat from above
o Heat from below
o Heat from above and below
-
Turn the temperature control (2) clockwise to the desired oven temperature. The temperature can be set at 0-250°C.
-
Turn the timer (4) clockwise to the desired preparation time. The timer can be set at 0-60 minutes.
o The oven switches on when the timer is activated. At the same time, the indicator light (5) is lit and remains lit as long as the appliance is switched on.
o If the desired preparation time is less than 5 minutes, initially turn the timer past this setting and then back to the 5 minutes.
- At the end of the preparation time, a bell rings, and the appliance automatically switches off.
- You can switch the appliance off manually during preparation by turning the timer anti-clockwise to the "OFF" position.
Rotisserie Function

natural_image
Diagram of a mechanical or electrical component with internal flow arrows and no visible text or symbolsRotisserie forks can carry food under 3 kilograms.
Note: At the left side within the oven there is a Rotisserie tray, while at the right side is a Rotisserie hole. When installing the Rotisserie Forks, please be aware that the square end is to be installed on the left, while the arrow end is for the right.
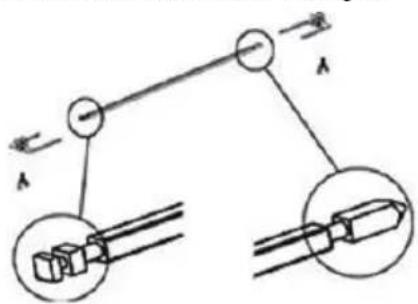
Left
Right
Note: Please always use Rotisserie Handle to take out the Rotisserie Forks.

natural_image
Simple line drawing of a Y-shaped object with no text or symbols-
Screw one fork onto the Rotisserie stick.
-
Fork the food to be toasted.
-
Screw the other fork onto the Rotisserie stick. The Rotisserie forks with food is shown as follows:

natural_image
Simple line drawing of a mechanical component or tool interacting with a surface (no text or symbols)- Install the arrow end of the Rotisserie Forks to the right rotisserie hole, and then the square end to the left Rotisserie tray.

- Use Rotisserie Handle to take out the square end of the Rotisserie Forks from left the Rotisserie tray, and then remove the arrow end from the right Rotisserie hole.

CAUTION: Beware of HOT dripping oil!
CLEANING
When cleaning the appliance, you should pay attention to the following points:
- Remove plug from the mains socket, and allow the appliance to cool down before cleaning it.
- Never submerge the appliance in water and make sure no water enters the appliance.
- Clean the appliance by wiping it with a damp cloth. A little detergent can be added if the appliance is heavily soiled.
- Never use a scouring pad or any form of strong solvent or abrasive cleaning agent to clean the appliance, as those may damage the inside and outside surfaces of the appliance.
• Make sure that no water gets into the vent holes. - The baking tray and the grid can be washed in warm water and washing-up liquid.
FOR UNITED KINGDOM ONLY
Plug wiring:
This product is fitted with a BS 1363 13-amp plug. If you have to replace the fuse, only those that are ASTA or BSI approved to BS1362 and with a rated current of 13 amps should be used. If there is a fuse cover fitted, this cover must be refitted after changing the fuse. If the fuse cover is lost or damaged, the plug must not be used. You must also check if the socket outlets in your home fit with the plug of the appliance. If the socket outlet in your home does not fit with the plug, the plug must be removed and disposed of safely as insertion of the plug into the socket is likely to cause electric hazard. A replacement plug should be wired according to following description.
Important
This appliance must be earthed. The wires in the cord set are coloured thus:
BLUE- Neutral, Brown-Live, Green& Yellow-earth (For detachable plug only)
As the colours of the wires in the mains lead of this appliance may not correspond with the coloured markings identifying the terminals in your plug, proceed as follows:
The wire that is coloured Green& Yellow must be connected to the terminal in the plug that is marked with the letter E or by the earth symbol, or coloured green& yellow.
The wire that is coloured blue must be connected to the terminal that is marked with the letter N or coloured black.
The wire that is couloured brown must be connected to the terminal that is marked with the letter L or coloured red.
ENVIRONMENTAL TIPS
Once any electrical product is no longer functional, it should be disposed of in such a way as to cause minimum environment impact, in accordance with the regulations of your local authority. In most cases you can take such products to your local recycling station.
INFORMATION ON DISPOSAL AND RECYCLING OF THIS PRODUCT
Please note that this Adexi product is marked with this
symbol:

This means that this product must not be disposed of together with ordinary household waste, as electrical and electronic waste must be disposed of separately.
In accordance with the WEEE directive, every member state must ensure correct collection, recovery, handling and recycling of electrical and electronic waste. Private households in the EU can take used equipment to special recycling stations free of charge. In some member states you can, in certain cases, return the used equipment to the retailer from whom you purchased it, if you are purchasing new equipment. Contact your retailer, distributor or the municipal authorities for further information on what you should do with electrical and electronic waste.
WARRANTY TERMS
The warranty does not apply:
• if the above instructions are not followed
• if the appliance has been interfered with
- if the appliance has been mishandled, subjected to rough treatment, or has suffered any other form of damage
- if faults have arisen as a result of faults in your electricity supply.
- Due to the constant development of our products in terms of function and design, we reserve the right to make changes to the product without prior warning.
FREQUENTLY ASKED QUESTIONS
If you have any questions regarding use of the appliance and cannot find the answer in this user guide, please try our website at www.adexi.eu.
Go to the "Consumer Services" menu, click on
“Frequently asked questions” to see the most frequently asked questions.
You can also see contact details if you need to contact us for technical issues, repairs, accessories and spare parts.
IMPORTER
Adexi Group
www.adexi.eu
We cannot be held responsible for any printing errors.
DE
EINLEITUNG

natural_image
Close-up of a metallic tool with a handle and labeled part '13' (no other text or symbols visible)natural_image
Close-up of a black industrial temperature control dial with no visible text or symbols on the dial facenatural_image
Close-up of a black circular device with a metallic knob and control buttons, labeled 'SELECTOR' (no additional text or symbols visible)natural_image
Diagram of a mechanical or electrical system with directional arrows and internal components (no text or symbols)Hinweis:
Links
Rechts
Hinweis:
natural_image
Simple line drawing of a Y-shaped object with no text or symbolsnatural_image
Simple line drawing of a mechanical component or tool (no text or symbols)VORSICHT!
natural_image
Close-up of a black industrial temperature control dial with degrees and scale (no text or symbols beyond 'TEMP' and numeric markings)natural_image
Close-up of a black circular device with a metallic knob and control buttons, labeled 'SELECTOR' (no additional text or symbols visible)natural_image
Diagram of a mechanical or electrical system with internal components and directional arrows, no visible text or symbols.Strona lewa
Strona prawa
natural_image
Simple line drawing of a Y-shaped object with no text or symbolsnatural_image
Simple line drawing of a mechanical component or tool (no text or symbols)
- KLARG∅RING AF APPARATET
- Funktionskontroll
- Funksjonsregulering
- KLARGJ∅RING AV APPARATET
- SAFETY MEASURES
- General
- Positioning the appliance
- Use
- Cord, plug and mains socket
- Fire hazard!
- Functional Control
- PREPARING THE APPLIANCE
- CLEANING
- FOR UNITED KINGDOM ONLY
- Plug wiring:
- Important
- BLUE- Neutral, Brown-Live, Green& Yellow-earth (For detachable plug only)
- ENVIRONMENTAL TIPS
- INFORMATION ON DISPOSAL AND RECYCLING OF THIS PRODUCT
- WARRANTY TERMS
- FREQUENTLY ASKED QUESTIONS
- IMPORTER
- DE
- EINLEITUNG
- Hinweis:
- VORSICHT!
Brand : Melissa
Model : 651-046
Category : Oven