640-058 - Vacuum Cleaner Melissa - Free user manual and instructions
Find the device manual for free 640-058 Melissa in PDF.


| Product Type | Canister Vacuum Cleaner |
| Brand | Melissa |
| Model | 640-058 |
| Bag Change Indicator | Red indicator when bag is full or airflow restricted |
| Suction Force Regulation | Electronic button and manual air valve on handle |
| Cord Rewind | Automatic with button |
| Air Filter Type | HEPA filter (99.97% filtration) |
| Motor Filter | Located behind dust bag, replaceable |
| Dust Bag | Replaceable, must always be fitted |
| Telescopic Tube | Adjustable length with locking mechanism |
| Floor Nozzle Settings | Two modes: brushes extended for hard floors, retracted for carpets |
| Accessory Storage | Built-in compartment for furniture and joint nozzles |
| Vertical Parking Holder | Allows upright storage with tube attached |
| Carrying Handle | Built-in for transport |
| Safety Features | Do not vacuum liquids, hot ashes, sharp objects; keep away from water |
| Filter Replacement Interval | Air filter every 4-6 months; motor filter as needed |
| Cleaning | Wipe with damp cloth; no abrasive cleaners |
| Indoor Use Only | Yes |
| Warranty | Subject to terms; does not cover misuse or unauthorized repairs |
Frequently Asked Questions - 640-058 Melissa
User questions about 640-058 Melissa
0 question about this device. Answer the ones you know or ask your own.
Ask a new question about this device
Download the instructions for your Vacuum Cleaner in PDF format for free! Find your manual 640-058 - Melissa and take your electronic device back in hand. On this page are published all the documents necessary for the use of your device. 640-058 by Melissa.
USER MANUAL 640-058 Melissa
natural_image
Black and white photo of a Capelle vacuum cleaner with coiled handle and control panel (no visible text or symbols)DK Støvsuger....2
SE Dammsugare 6
FI Pölynimuri 10
NO Støvsuger....14
UK Vacuum Cleaner ....18
DE Staubsauger....22
PL Odkurzacz ....27
RU пылесос....31
DK
INTRODUKTION

KLARG∅RING AF ST∅VSUGEREN

TRANSPORT OCH FÖRVARING

KLARGJ∅RE ST∅VSUGEREN
To get the best out of your new vacuum cleaner, please read through these instructions carefully before using it for the first time. We also recommend that you keep the instructions for future reference, so that you can remind yourself of the functions of the vacuum cleaner.
SAFETY MEASURES
- The vacuum cleaner, cord or plug must not be placed in water or any other liquid.
- Never touch the vacuum cleaner, cord or plug with wet or damp hands.
- Never leave the appliance unattended when it is switched on. Children should be supervised when they use the vacuum cleaner.
- Switch the vacuum cleaner off when it is not in use, and before you change the dust bag, motor filter or air filter.
- A void pulling the cord when removing the plug from the socket. Instead, hold the plug. Hold on to the plug when rewinding the cord, so that it does not strike the vacuum cleaner. Keep the cord and appliance away from heat sources, hot objects and naked flames.
- Never use the appliance if it, the cord or plug is damaged or if the appliance is not functioning correctly. Never use the vacuum cleaner without a dust bag, air filter or motor filter fitted.
- Only use accessories manufactured or recommended by the manufacturer.
-
The appliance is only for use indoors. Do not use the appliance on wet surfaces. Take particular care when vacuuming stairs.
-
Do not use the appliance to clean up matches, hot ashes, cigarette butts, hard and sharp objects, wet or damp substances, combustible materials (petrol, solvents, etc.) or vapour from these.
- Do not cover the appliance's suction or exhaust port. Ensure that you keep clothing, hair and body parts away from the nozzle and moving parts of the vacuum cleaner.
- Never try to repair the appliance yourself. If the appliance, cord or plug needs to be repaired, it should be taken to an authorised service centre. Contact your retailer if the repairs fall under the terms of the warranty.
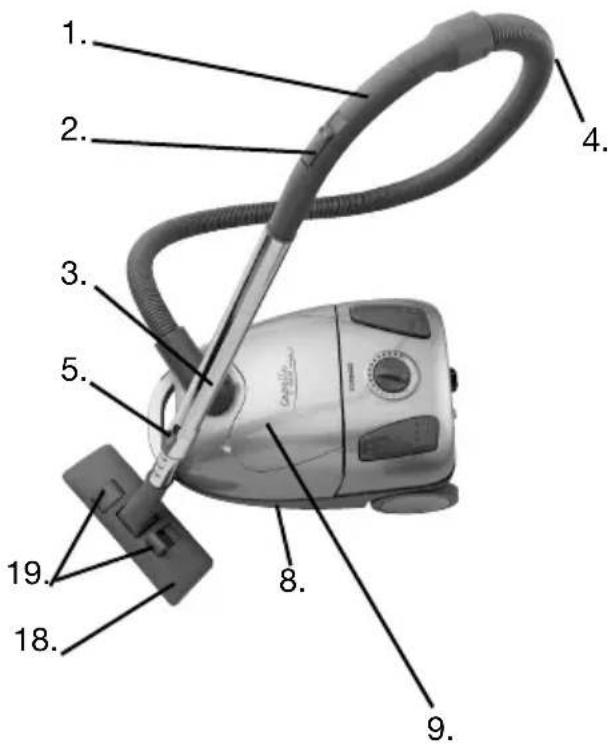
KEY TO THE VACUUM CLEANER'S PARTS
- Handle
- Air valve
- Telescopic tube
- Hose
- Locking mechanism
- Hose connector
- Carrying handle
- Vertical parking holder
- Storage compartment for special nozzles
- Handle for opening dust bag container
- Exhaust grille
- Handle for removal of exhaust grille
- Start/stop button
- Suction force regulation
- Button for automatic cord rewind
- Bag change indicator
- Vertical parking holder
- Floor nozzle
- Brush change button
- Furniture nozzle
- Joint nozzle

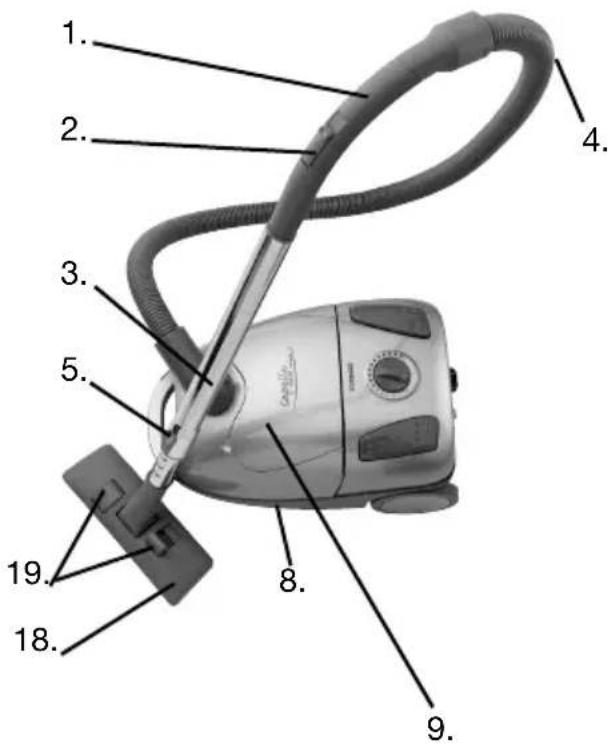
- Fit the hose on the vacuum cleaner by inserting the rotating hose connection (6) into the vacuum cleaner until you hear a click. To remove the hose, press the button at the side of the hose connection and pull it out.
- Fit the telescopic tube (3) into the other end of the hose, and fit the floor nozzle (18) to the end of the tube.
- You can adjust the length of the telescopic tube by pushing the locking mechanism (5) down and pulling in the bottom section of the tube to a suitable length. When parking, shorten the tube as far as possible.
- The vacuum cleaner's 2 special nozzles (20& 21) are kept in the storage compartment (9). Remove the floor nozzle and fit the special nozzle required to the end of the telescopic tube.
USE
- Pull the cord out of the vacuum cleaner. The cord may not be pulled out further than the red mark. Plug in and switch the current on.
- Press the on/off button (13) to start and stop the vacuum cleaner.
- While in use, the suction force can be regulated by opening and closing the air valve (2) on the handle (1). It can also be adjusted electronically using the suction force regulation button (14).
- The nozzles are to be used as follows:
Floor nozzle (18):
Floors, carpets and rugs
Furniture nozzle (20):
Furniture, curtains, drapes, etc.
Joint nozzle (21):
Radiators, corners, skirtings, etc.
- The floor nozzle (18) has two settings. When cleaning hard surfaces (parquet flooring, flooring tiles, etc.), the nozzle brushes should be extended. When cleaning carpets and mats, the brushes should be retracted into the nozzle. Press the brush change button (19) to switch between the two settings.
-
If the bag change indicator (16) is red when using the vacuum cleaner, or if the suction force is significantly reduced, the dust bag must be changed. If the indicator is still red after the bag has been replaced, it may be due to one of the following reasons:
-
The hose or nozzle is blocked/clogged.
- The motor filter or air filter is dirty.
- Investigate what is causing the indicator to show red and deal with the problem. The vacuum cleaner must not be used if the indicator is red. This may cause irreparable motor failure.
CHANGING THE DUST BAG
- If the vacuum's suction force is reduced, this may be because the bag needs changing. Raise the floor nozzle off the floor, set the suction force regulation (14) to MAX, switch on the vacuum cleaner using the on/off button (13), and keep an eye on the bag change indicator (16). If it is red, the bag must be changed.
- Remove the hose. Pull the handle for opening the dust bag container (10), and open the vacuum cleaner.
- Flip the release button backwards, and lift the dust bag holder out of the vacuum cleaner.
- G rasp the millboard at the top of the dust bag and carefully remove the bag from the vacuum cleaner.
- Throw the bag in the bin. Make sure that there are no holes in it. Do not fold it.
- Insert a new dust bag in the vacuum cleaner. The vacuum cleaner must never be used without a dust bag.
- Insert the dust bag holder, with the new dust bag in place, back in the vacuum cleaner. Press the dust bag holder down until it is in place and the release button flips back over the holder.
- Close the vacuum cleaner again.
- Always replace the bag after sweeping up large quantities of (very) fine material such as fine sand, cement, flour, etc.
REPLACING THE MOTORFILTER
The motor-filter is the filter placed behind the dustbag:
Open the front cover, and gently pull out the filter free of the holder.
Insert a new motor-filter.
CHANGING THE AIR FILTER
- The air filter filters the exhaust air from the vacuum cleaner. The filter is a HEPA type and filters up to 99.97 % of the air that flows through the vacuum cleaner.
- The filter can be found under the exhaust grille (11). Press the release-button (12) on the exhaust grille and pull it out at the same time.
- Remove the used filter and replace it with a new one. Replace the exhaust grille.
- We recommend replacing the air filter after 4 to 6 months' use, when it becomes dirty, or if the vacuum cleaner's suction force is reduced.
TRANSPORT AND STORAGE
- You can lift and carry the vacuum cleaner using the carrying handle (7). Never pull or lift the vacuum cleaner by the cord.
- Before putting the vacuum away, rewind the cord. Switch off the socket, unplug, and press the cord rewind button (15) until the cord is fully rewound.
- T o save space, the vacuum can be stored upright on its end cover. The telescopic tube can be hung on the vacuum cleaner by inserting the parking fixture into the vertical parking holder (8).
CLEANING
Clean the vacuum cleaner by wiping it with a damp cloth.
You must not use any form of strong, solvent or abrasive cleaning agent.
INFORMATION ON DISPOSAL AND RECYCLING OF THIS PRODUCT
Please note that this Adexi product is marked with this symbol: 📄
This means that this product must not be disposed of together with ordinary household waste, as electrical and electronic waste must be disposed of separately.
In accordance with the WEEE directive, every member state must ensure correct collection, recovery, handling and recycling of electrical and electronic waste. Private households in the EU can take used equipment to special recycling stations free of charge. In some member states you can in certain cases return the used equipment to the retailer from whom you purchased it, if you are purchasing new equipment. Contact your retailer, distributor or the municipal authorities for further information on what you should do with electrical and electronic waste.
GUARANTEE TERMS
The guarantee does not apply:
- if the above instructions are not followed
- if the equipment has been interfered with
- if the appliance has been mishandled, subjected to rough treatment, or has suffered any other form of damage
- if faults have arisen as a result of faults in your electricity supply.
Due to the constant development of our products in terms of function and design, we reserve the right to make changes to the product without prior warning.
IMPORTER
Adexi Group
DE
BEDIENUNGSANLEITUNG


- DK
- INTRODUKTION
- KLARG∅RING AF ST∅VSUGEREN
- TRANSPORT OCH FÖRVARING
- KLARGJ∅RE ST∅VSUGEREN
- SAFETY MEASURES
- KEY TO THE VACUUM CLEANER'S PARTS
- USE
- CHANGING THE DUST BAG
- REPLACING THE MOTORFILTER
- CHANGING THE AIR FILTER
- TRANSPORT AND STORAGE
- CLEANING
- INFORMATION ON DISPOSAL AND RECYCLING OF THIS PRODUCT
- GUARANTEE TERMS
- The guarantee does not apply:
- IMPORTER
- DE
- BEDIENUNGSANLEITUNG
Brand : Melissa
Model : 640-058
Category : Vacuum Cleaner