
4830 - Weather Station OBH NORDICA - Free user manual and instructions
Find the device manual for free 4830 OBH NORDICA in PDF.


| Product Type | Wireless Indoor/Outdoor Weather Station |
| Brand | OBH Nordica |
| Model | 4830 |
| Receiver Power | 2 x AAA 1.5V batteries |
| Transmitter Power | 2 x AAA 1.5V batteries (alkaline recommended) |
| Indoor Temperature Range | -10°C to +70°C |
| Outdoor Temperature Range | -50°C to +70°C |
| Temperature Accuracy | ±1.1°C |
| Transmission Frequency | 433 MHz |
| Maximum Transmission Range | 30 meters (open area) |
| Number of Channels | Up to 3 (supports up to 3 transmitters) |
| Clock Display | 12/24 hour format with date and weekday |
| Alarm Functions | 2 programmable alarms (A1, A2) with snooze |
| Temperature Alert | Adjustable high/low alert for indoor and each outdoor channel |
| Timer | Countdown timer (hours, minutes, seconds) |
| Display Features | °C/°F switchable, min/max memory, channel cycling |
| Battery Low Indicator | Yes (battery icon on receiver display) |
| Cleaning | Wipe with damp cloth; do not immerse |
| Safety | Indoor use only; keep away from water and heat |
| Warranty | According to local law; requires proof of purchase |
Frequently Asked Questions - 4830 OBH NORDICA
User questions about 4830 OBH NORDICA
0 question about this device. Answer the ones you know or ask your own.
Ask a new question about this device
Download the instructions for your Weather Station in PDF format for free! Find your manual 4830 - OBH NORDICA and take your electronic device back in hand. On this page are published all the documents necessary for the use of your device. 4830 by OBH NORDICA.
USER MANUAL 4830 OBH NORDICA
OBH NORDICA
thermometer //
wireless in/out thermometer //


Wireless in/out thermometer //

Multi channel (up to 3 sensors) //

Clock //

Alarm function //
Type 4830
Bruksanvisning – svenska ......sida 3 – 17


OBH Nordica Denmark A/S
Ole Lippmanns Vej 1
2630 Taastrup
Tlf.: 43 350 350
www.obhnordica.dk
Tekniske data
OBH Nordica 4830
Modtager:
Indendørs temperaturområde....-10°C til +70°C
OBH Nordica Norway AS
Postboks 5334, Majorstuen
0304 Oslo
Tlf: 22 96 39 30
www.obhnordica.no
Tekniske data
OBH Nordica 4830
Mottaker:
Innendørs temperaturområde....-10°C til +70°C
OBH Nordica wireless thermometer and alarm clock
Safety instructions
-
Read the instruction manual carefully before use, and save it for future use.
-
The appliance must not be immersed into water or other liquids. Should it get wet, it must be wiped off immediately, as liquids contain minerals which may result in rust in the electronic parts or which may totally destroy the electronic parts.
-
If the appliance gets dirty, the dirt can be wiped off with a slightly humid cloth, and then wiped with a dry cloth.
-
This appliance can be used by children aged 8 years and above and persons with reduced physical, sensory or mental capabilities, or lack of experience and knowledge, if they have been given supervision or instruction concerning the use of the appliance in a safe way by a person responsible for their safety and they understand the hazards involved.
-
Children should be supervised to ensure that they do not play with the appliance. Children are not always able to understand potential risks. Teach children a responsible handling of electrical/electronic appliances.
-
Cleaning and user maintenance shall not be made by children, unless they are over the age of 8 and supervised.
-
Keep the appliance out of reach of children aged less than 8 years.
-
Do not place the appliance on or near hotplates, open fire or the like.
-
The appliance should only be used under supervision.
-
The appliance is not for outdoor use.
-
The appliance must not be used if it has been dropped on the floor, or if it is clear that the appliance is damaged.
-
Use only new batteries of the correct size. Used batteries should always be removed, as they may leak chemicals which may damage the circuits of the appliance
-
In the event of battery leakage, prevent skin contact and dispose batteries according to local law
-
The appliance is for domestic use only.
-
If the appliance is used for other purposes than intended, or is it not handled in accordance with the instruction manual, the full responsibility for any consequences will rest with the user. Any damages to the product or other things are not covered by the warranty.
Before use
Before you use the wireless indoor/outdoor thermometer for the first time, please read the instruction manual carefully and keep it for future use.
General description
The thermometer comprises a receiver and a transmitter that can be placed outdoor as well as indoor.
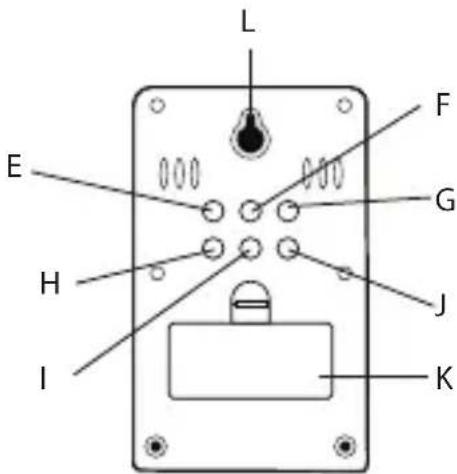
The receiver features the following:
A. Display showing: Time, calendar, indoor and outdoor temperatures.
B. MODE button
C. CHANNEL button (display of measurements from more than one separate transmitter)
D. MAX/MIN button (display of min. and max temperatures)
E. UP C/F button (display of temperature in Celsius or Fahrenheit)
F. SET/AL ON/OFF button (setting of clock and alarm function)
G. DOWN 12/24 button (for 12/24 hours' display of time)
H. SNOOZE button
I. ALERT button
J. RESET button
K. Battery cover and compartment
L. Suspension eye


The transmitter features the following:

A. LED indicator
B. Suspension eye
C. Battery cover
D. Battery compartment
E. TX button
F. Channel button (1, 2, 3)
G. Reset button

Mounting and changing of batteries
IMPORTANT!
When the thermometer is put into use, it is important to insert the batteries in the receiver before inserting batteries in the transmitter
The receiver takes 2 AAA 1.5V batteries. Remove the battery cover on the back of the receiver and insert the batteries in the battery compartment.
Make sure to position the batteries with the +pole and the -pole as shown at the inside of the battery compartment. Mount the battery cover again.
When the batteries have been inserted in the receiver you will hear 1 short beep. “--.- °C” will appear at the bottom of the display to indicate that the receiver is waiting for a signal from the transmitter.
When the batteries have been inserted in the receiver, insert the batteries in the transmitter.
The transmitter takes 2 AAA 1.5V batteries. For insertion of the batteries, open slightly the battery cover on the back of the transmitter.
Before inserting the batteries, choose a channel number (1, 2 or 3) inside the battery compartment at the back of the transmitter in order that the receiver can distinguish the various signals, if you want to install more than one transmitter. Choose the channel number by positioning the channel button (F) at the wanted channel number.
Remember!
You must choose a channel number, even if there is only one transmitter. If you do not choose a channel number, the receiver cannot receive the temperature measurements from the transmitter.
When you have chosen a channel number, insert the 2 batteries in the battery compartment. Make sure to position the batteries with the +pole and the -pole as shown at the inside of the battery compartment.
The transmitter will now start transmitting signals. Finally, mount the battery cover again.
When the batteries in the transmitter are low, an indicator of battery change (a small battery) will appear in the display of the receiver. In case of more than one transmitter, locate the channel number in question in the display to see the battery change indicator. Replace the batteries as described above.
Positioning
Position the receiver on an even surface or fix it on a wall.
If you want to fix the receiver on the wall, use the suspension eye (L) at the back of the receiver.
Position the transmitter within a radius of about 30 metres from the receiver. It can be positioned in an upright position on an even surface or be suspended on e.g. a wall or a brick wall by positioning the transmitter on e.g. a nail in the suspension eye.
RESET-button
The receiver comprises a RESET-button (J) to be used if the receiver does not work correctly or cannot receive a signal from the transmitter. Use a thin object, e.g. the tip of a paper clips for pressing and the receiver will delete all data.
This is how the wireless indoor/outdoor thermometer works
When batteries have been inserted in the receiver, the display shows “--.-°C”. At the same time the indicator of the separate transmitter will start flashing to indicate that the receiver is searching for a signal from the separate transmitter.
When batteries have been inserted in the transmitter, the transmission of temperature measurements will start.
When the receiver has caught the signal, the temperature measurement of the individual channel will be displayed at the bottom of the display.
Temperature measurements are shown from one channel at a time. If you install more than one transmitter, the procedure for reception of signal from transmitters 2 and 3 is the same as for reception from transmitter 1.
If more than one transmitter has been installed, you can switch from one transmitter to another on the display by pressing the CHANNEL button. The transmitter showing the temperature measurement is shown at the display of the receiver. The receiver can automatically switch among temperature measurements from the installed transmitters. To do this, press the CHANNEL button until a small arrow icon appears in the bottom right corner of the display.
Note!
If no signal is received from the transmitter for more than 3 minutes, “--.- °C” will be displayed until the receiver again registers correct reception. The following should be checked:
• The transmitter works and has been correctly mounted.
- The batteries in the transmitter and in the receiver work perfectly. If not, change the batteries. Please note that when the temperature drops to below the freezing point, the batteries in a transmitter mounted outdoor, will freeze and be weakened. If batteries have already been inserted in the transmitter and in the receiver, press either the TX or the Reset button in the battery compartment of the transmitter to receive signal from the transmitter.
- The transmitter and the receiver are not too far from each other and other signals do not interfere with the temperature transmission (e.g. from other electronic equipment, such as alarm systems, door bells, computers etc.). If so, you may shorten the distance between the transmitter and the receiver or reposition the transmitter and the receiver in relation to each other.
The wireless indoor/outdoor thermometer has a transmission reach of about max 30 metres (measured in open land). However, in urban areas the transmission reach will be shorter due to the existence of other transmission installations (as described above).
If the receiver does not catch a signal from the transmitter, “- - °C” will appear at the bottom of the display. You might shorten the distance between the transmitter and the receiver. If this does not result in an optimum signal from the transmitter, remove the batteries from the transmitter. Wait for a few seconds and reinsert the batteries. Now press the CHANNEL button for 3 seconds and the signal transmission from the transmitter to the receiver will be activated.
If the temperature is beyond the temperature areas within which the receiver and the transmitter are working, “- - °C” will be displayed. The temperature areas are defined in “Technical Data” in this manual.
Wire
The wireless thermometer is designed to measure down to -50°C , but when the temperature drops to about or below -20°C , there is a big risk that the batteries in the transmitter freeze and stop functioning. Consequently, the wireless thermometer is delivered with a 2 metre wire comprising an external sensor.
Connect the wire connector by removing the small rubber stopper at the side of the casing and place the wire connection on the side of the transmitter. Next, place the transmitter indoor and pull the wire with the sensor out of e.g. a window, after which the temperature will be measured and transmitted to the receiver.
The receiver shows the outdoor temperature down to -40°C in the display, but if the temperature measured by the wire sensor is below -40°C , "LL" will be displayed.
When the temperature rises again, the transmitter can be mounted outdoor again. Remove the wire and reposition the stopper in the transmitter.
Take care that the wire is not damaged/cut if led through a window. A wire that has been cut is not covered by the warranty.
Display of minimum and maximum temperatures
Minimum and maximum temperatures of the individual transmitter are automatically saved in the receiver. To have them displayed, choose the wanted channel number by first pressing the CHANNEL button. Next press the MAX/MIN button once to see the maximum temperature in the display (indicated by MAX). Press the MAX/MIN button once again to see the minimum temperatures (indicated by MIN in the display). Press the MAX/MIN button to see the actual temperature again.
Switching between °C and °F
The receiver can be set to show either °C (Celsius) or °F (Fahrenheit). This is done by using the UP C/F button (H) at the back of the receiver.


This is how the clock works
The top line of the display on the receiver shows a series of functions relating to the clock. The following is displayed:
• Time (of day)
- Date
• Weekday in English
- Alarm function
Setting the clock
The clock is set in the following way:
Press the SET/AL ON/OFF button until time is displayed, and keep it down for 3 seconds, after which the following will be displayed:
| Display flashes Setting | |
| Time - Set by means | of the UP C/F (E)or the DOWN 12/24 (G) button- Confirm by pressing the SET/AL ON/OFF button (F) |
| Minutes - Set by means | of the UP C/F (E)or the DOWN 12/24 (G) button- Confirm by pressing the SET/AL ON/OFF button (F) |
| Month in date - Set | by means of the UP C/F (E)or the DOWN 12/24 (G) button- Confirm by pressing the SET/AL ON/OFF button (F) |
| Day in date - Set by | means of the UP C/F (E)or the DOWN 12/24 (G) button- Confirm by pressing the SET/AL ON/OFF button (F) |
| Year in date - Set by | means of the UP C/F (E)or the DOWN 12/24 (G) button- Confirm by pressing the SET/AL ON/OFF button (F) |
Confirm by pressing the SET/AL ON/OFF button and proceed to the next setting option. If you do not want to set the flashing segment, just press the SET/AL ON/OFF button to proceed to the next setting option. Remember to press the SET/AL ON/OFF button after the last setting. The different selections shall be made within about 20 seconds. If not, the clock will leave the setting.
12/24 hours display
Press the DOWN 12/24 button to switch between 12 and 24 hours display. 12 hours display is indicated by "AM/PM" in the top left corner of the display.
Setting of alarm
The wireless thermometer has two alarm functions (A1 and A2) that can be connected in the following way:
- Press the MODE button, until A1 (alarm 1) is displayed
- Keep the SET/AL ON/OFF button down for 3 seconds and the number of hours starts to flash.
- Set the hours by means of the UP C/F or the DOWN 12/24 button at the wanted time.
- Press the SET/AL ON/OFF button and the number of minutes starts to flash. Set the minutes by means of the UP C/F or the DOWN 12/24 button at the wanted time
- Press the SET/AL ON/OFF button again and alarm 1 is set. A small clock icon indicates that the alarm is set.
Alarm 2 (A2) is set and activated in the same way as alarm 1; however, A2 shall be displayed instead of A1, when time is set and the alarm activated.

When the wanted alarm time is in, the alarm will sound. If it has not been switched off, the alarm will be on for about 2 minutes. However, you can also switch off the alarm before it stops by itself by pressing any button on the thermometer. The alarm will sound again 24 hours later.
The clock comprises a snooze-function that is activated by pressing the SNOOZE button at the back of the thermometer within the 2 minutes when the alarm is on. Subsequently, the alarm will be repeated after about 5 minutes, until you switch off the alarm completely by pressing any button.
If you want to disconnect the alarm function before it is activated, press the MODE button, until A1 or A2 is displayed and then press the SET/AL ON/OFF button. The icon will disappear from the display and the alarm function is disconnected.
Temperature alert
The wireless indoor/outdoor thermometer comprises an indoor and an outdoor temperature alert that sounds if the indoor temperature or the temperature of the separate transmitter is above or below a fixed temperature range.
The indoor temperature alert is set as follows:
- Press and keep the ALERT button (I) down for 3 seconds until the max temperature limit flashes indicating that the temperature limit can be set. Use the UP C/F or the DOWN 12/24 button to set the wanted upper temperature limit of the indoor temperature.
- Press the ALERT button (I), and the min. temperature limit will start flashing. Press the UP C/F or the DOWN 12/24 button to set the wanted lower temperature limit.
- Press the ALERT button (I) again. The temperature alert has now been set and is displayed. When the upper or the lower temperature limit is exceeded, a sound signal will be activated and the temperature alert icon will flash. Deactivate the sound signal by pressing the ALERT button (I).
If you want to disconnect the temperature alert completely, press the ALERT button (I), until the temperature alarm icon disappears from the display.
Set the outdoor temperature alert as follows:
- Press and keep the ALERT button (I) down for 3 seconds.
- Press the CHANNEL button to choose the wanted transmitter (1-3).
-
The maximum temperature limit of the chosen transmitter will flash to indicate that the temperature limit can be set. Use the UP C/F or the DOWN 12/24 button to set the wanted upper temperature limit of the indoor temperature.
-
Press the ALERT button (I), and the minimum temperature limit of the chosen transmitter will start flashing. Press the UP C/F or the DOWN 12/24 button to set the wanted lower temperature limit.
-
Press the ALERT button (I) again. The temperature alert is now activated and ☒.is displayed. When the upper or the lower temperature limit is exceeded, a sound signal will be activated and the temperature alert icon will flash. Deactivate the sound signal by pressing the ALERT button (I).
If you want to disconnect the temperature alert completely, press the ALERT button (I), until the temperature alarm icon disappears from the display.
Timer
The wireless indoor/outdoor thermometer comprises a timer function (countdown).
The timer is set as follows:
- Press the MODE button, until the word TIMER is displayed.
- Press and keep the SET/AL ON/OFF button down until the number of hours flashes.
- The number of hours is now set by means of the UP C/F and the DOWN 12/24 buttons
- Press the SET/AL ON/OFF button and the number of minutes starts to flash.
- Minutes are set by means of the UP C/F and the DOWN 12/24 buttons
- Press the SET/AL ON/OFF button again, seconds will flash and can be set by means of the UP C/F and the DOWN 12/24 buttons.
- Press the SET/AL ON/OFF button to confirm the setting and press the SET/AL ON/OFF button again to start the timer.
When the time has elapsed, 0:00 will be displayed and the alarm will be activated sending out beep sounds. Stop the timer by pressing one of the buttons on the front of the receiver.
If you want to switch off the timer before the time has elapsed, press the SET/AL ON/OFF button. Restart the timer by pressing the SET/AL ON/OFF button, and the timer will continue the countdown.
You can reset the timer before the time has elapsed by pressing the SET/AL ON/OFF button to stop the timer and then enter a new time setting as described above.
Cleaning and maintenance
- Do not immerse the appliance in water or other liquids. If it gets wet, wipe it off immediately, as liquids contain minerals that can make the electronic parts corrode. This applies to the transmitter as well as the receiver.
- If the appliance gets dirty, wipe it off with a damp cloth and dry it with a dry cloth.
- Do not position the transmitter at places where it could be exposed to downpour. The transmitter is constructed to comply with the leakage rate IP33, which means that it is protected against water falling as rain in an angle up to 60° from a vertical plane. This means that it will work in Danish weather, but, in case of periods with heavy downpour, you should check that the transmitter is not constantly wet. Do not expose the transmitter to direct sunlight, as this will influence the measurements. The transmitter is made of a material that can resist the impact of light under normal temperature conditions, but a slight miscolouring of the transmitter can occur over time due to various airborne particles and UV light.
- Do not expose the appliance to rough treatment, dust, extreme fluctuations of temperatures or air humidity, which might affect the optimum functioning of the appliance.
- Only use new batteries of the correct size. We recommend Alkaline batteries of a recognized mark. Used batteries shall always be removed, as they can leak chemicals that damage the electronic circuit of the thermometer.
• Do not use rechargeable batteries for the transmitter.
- If you install the appliance in buildings of concrete and steel, this might influence the reception, as it may be difficult for the receiver to catch the signal from the transmitter. In such case, reposition the receiver and the transmitter to find the optimum position of both parts.
Note!
The present product complies with the requirements relating to teleterminal equipment (RTTE) and with current CE-marked regulations as to radio interference. In particular cases other electronic equipment (such as alarm systems, doorbells, computers and similar) may interfere with the transmitter/receiver. This does not mean that the product is defective.
IMPORTANT!
The transmitter of the wireless indoor/outdoor thermometer works down to -20°C , but at low temperatures, especially for a long period of time, the batteries may freeze, which may prevent the transmitter from transmitting the signal to the receiver and at the same time the transmission range is reduced at very low temperatures. When the temperature rises again, the batteries will usually function perfectly again. If the batteries are old, they should be changed after a period of low temperatures to ensure the optimum function of the transmitter.
Environmental considerations and disposal of batteries
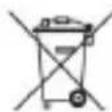
When disposing of batteries it is essential to take the environment into consideration. Used batteries must never be disposed of with domestic garbage. Batteries marked with the icon indicating separate waste collection must be returned to one of the authorized collection points. Batteries must be removed from the appliance before it is disposed of. Also take care that the batteries have not expired or have become worn-out, as there may be a risk that the batteries will leak acid. Check the best-before-date on the batteries.
Disposal of the appliance
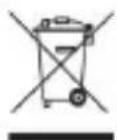
Legislation requires that all electrical and electronic equipment must be collected for reuse and recycling. Electrical and electronic equipment marked with the symbol indicating separate collection of such equipment must be returned to a municipal waste collection point.
Warranty
Claims according to current law. Any claim shall be accompanied by the cash receipt with purchase date. When raising a claim the appliance must be returned to the store of purchase.
OBH Nordica AB
Löfströms Allé 5
Tel: +46 08-629 25 00
www.obhnordica.se

Technical data
OBH Nordica 4830
Receiver:
Indoor temperature range....-10°C to +70°C
Temperature accuracy....+/- 1.1°C
Battery type 2 units AAA 1.5V batteries
Calendar Year 2000 – year 2099
Transmitter (type OBH Nordica 4892):
Outdoor temperature range....-50°C to +70°C
Temperature accuracy....+/-1.1°C
Frequency / intensity......433
Battery type 2 units AAA 1.5V batteries


OBH Nordica Denmark A/S hereby confirms that transmitter type 4892 and receiver type 4830 comply with all pertinent and essential requirements as per the EU directive 1999/5/EC.

These instructions are subject to alterations or improvements.





OBH NORDICA
thermometer //
wireless in/out thermometer //

SE/UL/4830/UVN_100214


- OBH NORDICA
- THERMOMETER
- OBH NORDICA DENMARK A/S
- TEKNISKE DATA
- OBH NORDICA NORWAY AS
- OBH NORDICA WIRELESS THERMOMETER AND ALARM CLOCK
- SAFETY INSTRUCTIONS
- BEFORE USE
- GENERAL DESCRIPTION
- MOUNTING AND CHANGING OF BATTERIES
- IMPORTANT
- REMEMBER
- POSITIONING
- RESET-BUTTON
- THIS IS HOW THE WIRELESS INDOOR/OUTDOOR THERMOMETER WORKS
- NOTE
- WIRE
- DISPLAY OF MINIMUM AND MAXIMUM TEMPERATURES
- SWITCHING BETWEEN °C AND °F
- THIS IS HOW THE CLOCK WORKS
- SETTING THE CLOCK
- 12/24 HOURS DISPLAY
- SETTING OF ALARM
- TEMPERATURE ALERT
- TIMER
- CLEANING AND MAINTENANCE
- ENVIRONMENTAL CONSIDERATIONS AND DISPOSAL OF BATTERIES
- DISPOSAL OF THE APPLIANCE
- WARRANTY
- OBH NORDICA AB
- TECHNICAL DATA
Brand : OBH NORDICA
Model : 4830
Category : Weather Station