
TRIO FOR ME POUSSETTE - Stroller CHICCO - Free user manual and instructions
Find the device manual for free TRIO FOR ME POUSSETTE CHICCO in PDF.
Download the instructions for your Stroller in PDF format for free! Find your manual TRIO FOR ME POUSSETTE - CHICCO and take your electronic device back in hand. On this page are published all the documents necessary for the use of your device. TRIO FOR ME POUSSETTE by CHICCO.
USER MANUAL TRIO FOR ME POUSSETTE CHICCO
DŮLEŽITÉ: USCHOVESTE PRO PŘÍPADNÉ DALŠÍ POUŽITÍ – POZORNĚ SI PŘEČTĚTE!
IMPORTANT: PLEASE READ THESE INSTRUCTIONS
CAREFULLY BEFORE USE AND KEEP THEM FOR FUTURE REFERENCE. FOR YOUR CHILD’S SAFETY, READ THESE INSTRUCTIONS CAREFULLY.
WARNING: BEFORE USE, REMOVE AND DISPOSE OF ALL
PLASTIC BAGS AND PACKAGING MATERIALS AND KEEP THEM OUT OF REACH OF CHILDREN.
WARNING: The stroller must not be used while running or
skating. Prevent the stroller from coming into contact with salt water. It may cause the formation of rust. Do not use the stroller on the beach.
WARNING: This product must only be pushed by an adult.
CLEANING AND MAINTENANCE
The cleaning and maintenance of this product must be carried out on a regular basis by the user. The cleaning and maintenance of the stroller must only be carried out by an adult. WARNINGS
- WARNING: A child’s safety is your responsibility.
- WARNING: before assembly, check that the product and all of its components have not been damaged during transportation. Should any part be damaged do not use, and keep out of reach of children.
- This stroller is intended for use for children aged between birth and 36 months of age, up to 15 kg of weight maximum.
- It is recommended that the backrest should be used in its most reclined position for children from birth to 6 months of age.
- WARNING: before use, ensure that all the safety devices are correctly engaged. In particular, ensure that the stroller is locked in the open position, by checking that the rear locking device is effectively locked.
- Do not overload the storage basket. Maximum weight 5 kg.
- Do not carry more than one child at a time.
- Do not use accessories, spare parts, or any component not supplied or approved by the manufacturer, as they may make the stroller unsafe.
- WARNING: be careful, any items attached to the handles, may affect the stability of the stroller.
- WARNING: the use of the crotch strap and safety harness is necessary to guarantee the safety of your child. Always use the safety harness together with the crotch strap.
- Ensure that the person using the stroller knows how to use it safely.
WARNING: when opening or closing the stroller, ensure that
your child is at a safe distance. Do not attempt to open or close the stroller with a child on board. Ensure that during these operations, the movable parts of the stroller do not come into contact with your child.
- Always apply the brakes whenever the stroller is stationary.
- WARNING: never leave the stroller on a sloped surface with a child on board, even with the brakes applied.
- Do not let other children play unattended close to the stroller or climb on it. To prevent the risk of choking, do not give to your child, or place near it, any objects with strings.
WARNING: Do not use the stroller on stairs or elevators:
it could cause the loss of control of the stroller. Pay special attention when manoeuvring the stroller up or down pavements or a step.
- If the stroller is left exposed to direct sunlight for a long time, allow it to cool before placing your child in it. Prolonged exposure to direct sunlight may cause the materials and fabric to fade.
- Do not use the product if some of its parts are broken, torn or missing.
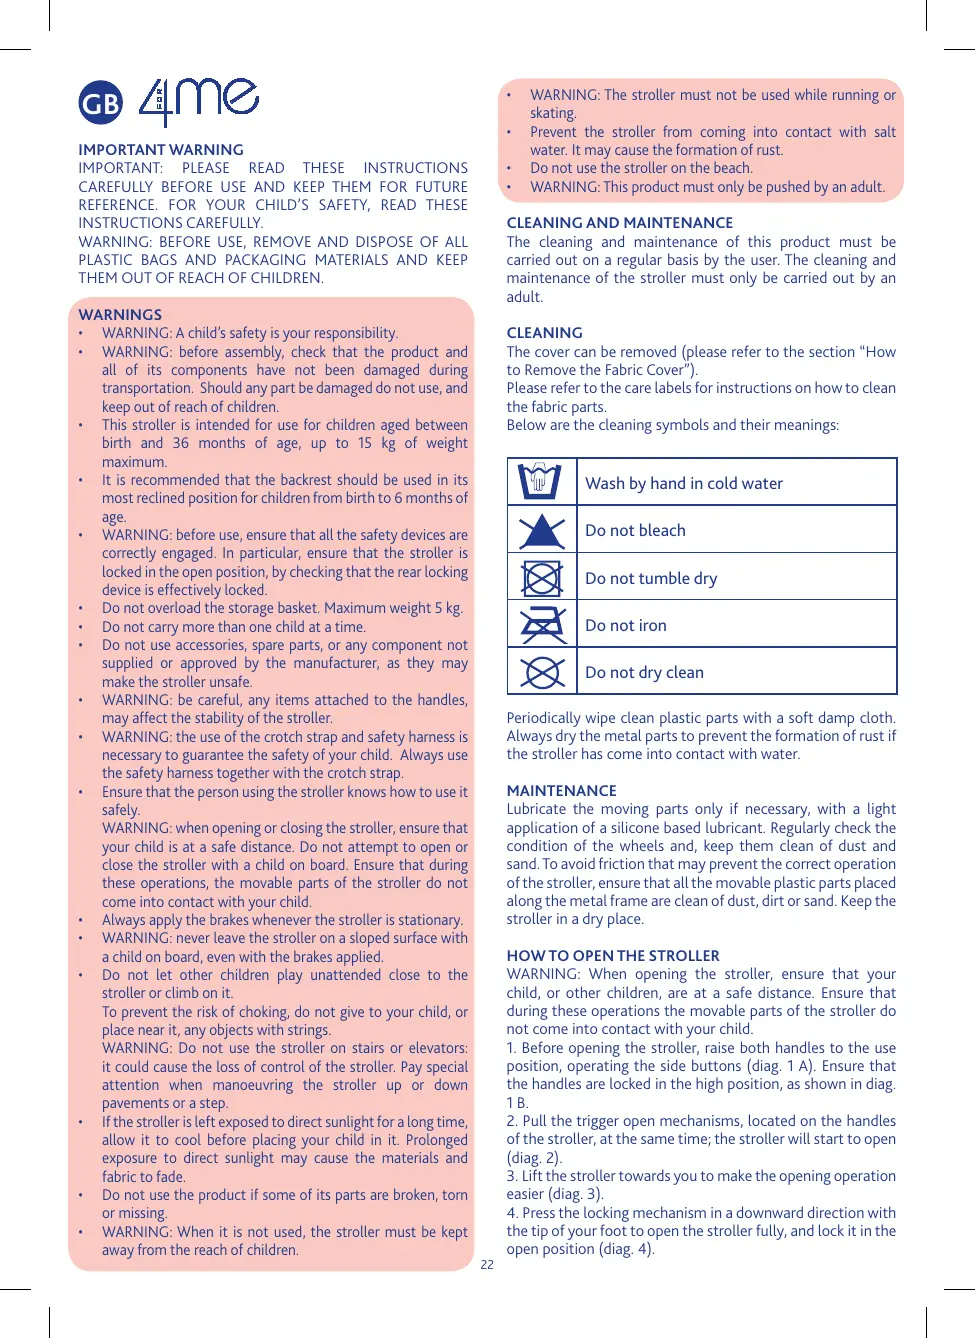
- WARNING: When it is not used, the stroller must be kept away from the reach of children. CLEANING The cover can be removed (please refer to the section “How to Remove the Fabric Cover”). Please refer to the care labels for instructions on how to clean the fabric parts. Below are the cleaning symbols and their meanings: Wash by hand in cold water Do not bleach Do not tumble dry Do not iron Do not dry clean Periodically wipe clean plastic parts with a soft damp cloth. Always dry the metal parts to prevent the formation of rust if the stroller has come into contact with water. MAINTENANCE Lubricate the moving parts only if necessary, with a light application of a silicone based lubricant. Regularly check the condition of the wheels and, keep them clean of dust and sand. To avoid friction that may prevent the correct operation of the stroller, ensure that all the movable plastic parts placed along the metal frame are clean of dust, dirt or sand. Keep the stroller in a dry place.
HOW TO OPEN THE STROLLER
WARNING: When opening the stroller, ensure that your
child, or other children, are at a safe distance. Ensure that during these operations the movable parts of the stroller do not come into contact with your child.
1. Before opening the stroller, raise both handles to the use
position, operating the side buttons (diag. 1 A). Ensure that the handles are locked in the high position, as shown in diag. 1 B.
2. Pull the trigger open mechanisms, located on the handles
of the stroller, at the same time; the stroller will start to open (diag. 2).
3. Lift the stroller towards you to make the opening operation
4. Press the locking mechanism in a downward direction with
the tip of your foot to open the stroller fully, and lock it in the open position (diag. 4).
it, always check that the seat is correctly assembled to the stroller.
WARNING: Ensure that the stroller is locked in the open
position, by checking that the rear locking mechanism is effectively secured. HOW TO ASSEMBLE THE SEAT IN THE FORWARD FACING POSITION
17. To fit the seat in the forward facing position, open the seat
and align the housings to the tubes, as shown in diagram 17. To carry out this operation more easily, refer to the positions of points A and B shown in diagram 17.
18. When the holes located on the seat are aligned to the
joints located on the frame, push the seat in a downward direction, until a click is heard, indicating that the seat is locked correctly into position (diag. 18). Repeat the operation on the other side of the seat.
WARNING: Before using the stroller with the seat fitted to
it, always check that the seat is correctly assembled to the stroller. HOW TO FIT/REMOVE THE FABRIC COVER To fit/remove the fabric cover more easily, these operations must be carried out after removing the seat from the stroller.
5. Fit the cover by inserting first the upper side of the fabric flap
(diag. 5 A) and then the lower flap located on the side of the seat (diag. 5 B). Repeat the same operation on the other side.
6. Insert the “D” rings into the appropriate holes (diag. 6).
7. Insert the waist belt into the “D” rings, as shown in diagram 7.
8. WARNING: the crotch strap is fixed to the seat support
that is attached to the frame. To ensure the correct and safe use of the crotch strap, it is necessary to insert it through the hole located on the fabric cover, as shown in diagram 8. Please refer to the paragraph “Safety Harness” for instructions on how to use the harness correctly”.
9. Fix the fabric cover to the seat, fastening the press studs as
10. First fix the fabric flaps, fastening buttons A and then the
Velcro strap B (diag. 10). Repeat the same operation on the other side.
11. Fix the two armrest covers by fastening the press studs
WARNING: Check that the fabric cover is fitted correctly to
the frame of the stroller. To remove the fabric seat cover carry out the above operations in the reverse order.
HOW TO REMOVE THE SEAT
The seat can be removed without removing the fabric cover.
19. Push the side knob A, located under the seat, and raise the
seat in an upward direction (diag. 19). Repeat the operation on the other side of the seat.
HOW TO ADJUST THE BACKREST
20. To adjust the inclination of the backrest to the desired
position, press the button located on the backrest (diag. 20). Release the button to lock the backrest in the nearest position. To raise the backrest simply push it in an upward direction.
WARNING: The child’s weight can make these operations
HOW TO USE THE SAFETY HARNESS
This stroller has a 5-point safety harness that features two shoulder straps, a waist strap and a crotch strap with buckle.
WARNING: When using the safety harness with children from
birth up to approximately 6 months of age, it is necessary to first fit the shoulder straps through the two adjustment holes on the fabric backrest.
12. Insert the shoulder straps through the appropriate holes
in the fabric backrest (diag. 12 A) and check that the shoulder straps are adjusted at the correct height for your child. If they are not at the correct height, adjust them as required (diag. 12 B).
13. After sitting the child in the stroller, insert the 2 prongs
into the buckle and, if necessary, adjust the width of the waist belt operating the buckles (diag. 13).
14. To unfasten the waist strap, press and pull the side prongs
at the same time (diag. 14).
WARNING: To ensure your child’s safety, it is necessary to
always use the safety harness.
HOW TO ADJUST THE LEG REST
21. Press the two buttons located inside the joint of the leg
rest (diag. 21) to adjust the leg rest to the desired position.
REMOVABLE BUMPER BAR
22. To remove the bumper bar, press the two buttons located
under the armrests (diag. 22) and pull the bumper bar towards you. Open only one side of the bumper bar to place the child into the stroller more easily.
WARNING: Always fasten the child with the safety harness.
The bumper bar is NOT a child restraint device.
WARNING: Never use the bumper bar to lift the stroller with
the child sitting in it.
ADJUSTABLE DOUBLE TWIST ERGONOMIC HANDLE
23. Press the button, located on the handle, to turn the
handle to the desired position and adjust its height to the position that is most comfortable for the user (diag. 23). The handle can be adjusted to 8 different positions.
24. WARNING: During use, the handle must not be used in
the lowered position (diag. 24 A). During use, the handles must be in the high position, as shown in diagram 24 B. HOW TO ASSEMBLE THE SEAT IN THE REAR FACING POSITION WARNING. When the seat is used in this position, the bumper bar should not be used.
15. To assemble the seat in the rear facing position, open
the seat and align the housings to the tubes, as shown in diagram 15. To carry out this operation more easily, refer to the positions of points A and B shown in diagram 15.
16. When the holes located on the seat are aligned to the
joints located on the frame, push the seat in a downward direction, until a click is heard, indicating that the seat is locked correctly into position (diag. 16). Repeat the operation on the other side of the seat.
WARNING: Before using the stroller with the seat fitted to
JOINABLE HANDLE The stroller has a joinable handle.
25. To fit the joinable handle, press the two central levers
inside, at the same time (see diag. 25 A); then align and insert the joints A and B into the respective holes (diag. 25 B). A click will be heard, indicating that the joints have been fitted correctly into position.
26. To remove the joinable handle, press the two central
levers inside, at the same time (diag. 26 A), and remove the handle pulling it in an upward direction (diag. 26 B).
WARNING: Before using the stroller with the “joined handle”,
always check that the handle has been fitted correctly.
WARNING: To close the stroller, it is always necessary to
remove the joinable handle.
WARNING: Never use the joinable handle to lift the stroller
with the child sitting in it. WARNING. To close the stroller, it is always necessary to remove the joinable handle (if present).
HOW TO REMOVE THE FABRIC COVER
Hold the stroller in a semi-closed position with the safety harness open:
35. Unfasten the press studs in the points shown in diagram 35.
36. Raise the leg rest and remove the fabric cover, taking care
to slide the safety harness through the cover (diag. 36 A); remove the cover from the backrest, pulling it in an upward direction (diag. 36 B). SAFETY BRAKE The safety brake locks both of the rear wheels of the stroller at the same time. To ensure maximum functionality during use, the stroller has a STOP & GO braking system marked by specific coloured labels located on the rear braking levers.
27. To operate the brakes of the stroller, push the right lever
in a downward direction (diag. 27). The red STOP label will appear automatically and the left lever will move upwards.
28. To release the brake, press the left lever in a downward
direction (diag. 28). The green GO label will appear automatically and the right lever will move upwards.
WARNING: Always apply the brakes whenever the stroller is
stationary. Never leave the stroller on a sloped surface, with a child on board, even with the brakes applied. HOW TO USE THE CHILD CAR SEAT AND CARRYCOT The CHICCO strollers featuring the CLIK CLAK system on the armrests allow you to fit the carrycot and/or child car seat to the frame of the stroller without using any additional devices. To fit or remove the carrycot or child car seat, please refer to the specific instructions supplied
37. Before fitting the child car seat or carrycot, unfasten the
upper part of the armrest covers or remove them completely (diag. 37 A and B).
WARNING: Only the CHICCO child car seats and carrycots
featuring the CLIK CLAK devices can be fitted to the stroller. Before using the stroller with the carrycot or child car seat fitted to it, always check that the locking system is locked into the correct position. ONLY USE ACCESSORIES FITTED WITH THE SPECIFIC CLIK CLAK SYSTEM.
38. WARNING: The incorrect locking of these accessories to
the stroller frame may jam the locking system and prevent their removal. In this case, unlock the locking devices manually with a screwdriver, by turning the levers located under the armrests. The levers can be accessed through the appropriate opening (diag. 38). SWIVEL WHEELS The stroller has front swivel or fixed wheels. It is recommended to use the wheels in the fixed mode when manoeuvring the stroller on particularly uneven surfaces. The use of the wheels in the swivel mode is recommended to increase the manoeuvrability of the stroller on a normal road surface.
29. To use the front wheels in the swivel mode, push the front
lever in a downward direction with your foot, as shown in diagram 29. To use the front wheels in the fixed mode, raise the lever with the foot: the wheel will lock in the straight position regardless of its previous position.
WARNING: Both wheels must always be locked or unlocked
at the same time. ACCESSORIES:
WARNING: The accessories described below may not be
available for some versions of this product. Please read carefully the instructions on the accessories available for the model purchased.
CLOSING THE STROLLER
WARNING: When closing the stroller, ensure that your child,
or other children, are kept at a safe distance. Ensure that during these operations the moveable parts of the stroller do not come into contact with your child. The stroller can be closed with the seat both in the FORWARD FACING and in the REAR FACING position. The instructions to be followed are the same for both positions. However, to make the frame ultra compact when the stroller is closed, it is recommended to close the stroller with the seat fitted in the FORWARD FACING position.
30. Raise the calliper shaped mechanisms on the sides of the
hood and fold the hood (diag. 30).
31. Pull both of the trigger open mechanisms, located on the
handles, in an upward direction; while keeping them pulled, unlock the rear locking mechanism, pushing it in an upward direction with the tip of the foot (diag. 31).
32. Hold the close handle and pull in an upward direction,
until the stroller is completely closed and locked (diag. 32).
33. To make the stroller more compact when closed, recline
the backrest to the horizontal position (diag. 33).
34. Fold the handles in a forward direction (diag. 34).
When the stroller is closed and locked, it stands upright on its own. COMFORT KIT The Comfort Kit includes 2 shoulder strap covers and an abdominal band, both in mesh. The abdominal band is particularly recommended when the seat is used in the rear facing position, when the child is small.
39. Insert the shoulder straps into the strap covers, as shown
40. Insert the crotch strap into the appropriate hole (diag. 40
A) and the buckles of the waist belt into the holes located on the sides (diag. 40 B).
WARNING: Insert the abdominal band after sitting the child
WARNING: If necessary, adjust the width of the waist belt
operating the buckles.
WARNING: To ensure your child’s safety, it is necessary to
always use the safety harness.
WINTER HOOD/SUMMER CANOPY
41. The seat has two slots, located on the sides, which allow
you to fit the hood. To fit the hood, insert the locking systems into the slots, as shown in the diagram 41. As it is fitted to the seat, the hood does not need to be turned every time the
Do not overload the shopping basket. Maximum weight 5 kg. It is necessary to remove all objects from the shopping basket before closing the stroller. seat is used either in the forward facing or in the rear facing position.
42. To open the hood, push the front arch in a forward
direction and lock it, operating the two side calliper shaped mechanisms, as shown in diagram 42.
43. To remove the fabric panel and use the hood as a summer
canopy, open the press studs A located on the two sides and the central zip (diag . 43).
44. Once the fabric panel has been removed, it is possible to
extract the rear sun visor, pulling it externally (diag. 44).
45. To use the hood as a sun canopy, it is also possible to
remove the two side flaps. To carry out this operation, unfasten the appropriate buttons (diag. 45 A), turn the two side flaps inside (diag. 45 B) and fix them inside the canopy with the Velcro straps (diag. 45 C).
46. To remove the canopy, simply slide the fastening devices
in an upward direction (diag. 46).
WARNING: The canopy must be fixed on both sides of
the stroller. Check that the canopy is fitted correctly into position. BAG Some versions come with a practical carrying bag, which is supplied with a changing mat.
54. Fit the bag, as show in diagram 54.
55. To ensure maximum functionality when using the stroller,
a specific compartment has been created inside the bag, where you can store the joinable handle (diag. 55).
WARNING: Do not overload the bag. Maximum weight 2 Kg.
WARNING: Overloading the bag may affect the stability of
the stroller and overturn it. Important Note: The pictures and instructions contained in the booklet refer to the complete stroller model. Some of the components and functions described here may vary according to the model purchased. RAIN COVER The stroller may come with a rain cover.
47. Fit the rain cover, fixing it with the clips located at the
ends (diag. 47). After use, if the rain cover is wet, let it dry in the air before folding the rain cover to store it.
WARNING: Be extremely careful when using the rain cover.
WARNING: Do not use the rain cover if the stroller is not fitted
with hood or sun-canopy to prevent the risk of suffocation. When the rain cover is fitted to the stroller, never leave the stroller with the child onboard to prevent the risk of the child overheating.
FLEECE FOOTMUFF – LEGCOVER
Some versions have a fleece footmuff, which is ideal in cold weather.
48. Fit the fleece footmuff on the seat and slide the upper part
of the fleece footmuff under the bumper bar. Fix the fleece footmuff in the highest position, fastening the buttons into the openings located on the side flaps of the seat (diag. 48).
49. The footmuff has holes that allow you to slide through
and use the safety harness even when you use the footmuff (diag. 49).
50. The footmuff can be used as a legcover by opening the
zip and removing the lower part in fleece (diag. 50). To fit the legcover, please refer to the next paragraph.
WARNING: Always use the fleece footmuff after inserting
the safety harness into the appropriate holes. LEGCOVER
51. To fit the legcover, fasten the press stud to the leg rest
(diag. 51 A), slide the upper part of the legcover under the bumper bar and fix it in the highest position, inserting the buttons into the holes located on the side flaps of the seat (diag. 51 B).
52. The legcover can be turned over the bumper bar and fixed
using the holes shown in diagram 52. SHOPPING BASKET The stroller has a practical shopping basket.
53. To fit the shopping basket to the stroller, fasten the spring
catches A, located on the basket, to the two hooks located on the upper part of the stroller, then fix the 4 rings to the hooks B (diag. 53).
FOR FURTHER INFORMATION: Artsana S. P. A. Customer Service Via Saldarini Catelli, 1 22070 GRANDATE – Como – Italy Telephone: 800-188 898 www.chicco.com 0-36 ARTSANA S.p.A. - Via Saldarini Catelli, 1 - 22070 Grandate (CO) - Italy Tel. (+39) 031 382 111 - Fax (+39) 031 382 400 - www.chicco.com