TWC-7.87 - Wine cellar TecLime - Free user manual and instructions
Find the device manual for free TWC-7.87 TecLime in PDF.


| Product Type | Wine Cooler |
| Model | TWC-7.87 Compressor |
| Capacity | 7 bottles (Bordeaux size) |
| Volume | 22 liters |
| Temperature Range | 5°C to 22°C (41°F to 72°F) |
| Voltage / Frequency | 230V AC / 50 Hz |
| Power Consumption | 75 W |
| Refrigerant | R600a |
| Noise Level | 39 dB(A) |
| Net Weight | 19.5 kg |
| Dimensions (WxDxH) | 150 x 864 x 554 mm |
| Climate Class | SN, N, ST, T (10°C to 43°C ambient) |
| Control Panel | Touch panel with LED display, lock function, temperature setting |
| Interior Light | LED interior light, manually controlled |
| Shelves | Pull-out shelves with stoppers (telescopic rails on some models) |
| Door Reversal | Reversible door hinge (right to left) |
| Installation | Freestanding or built-in; 10 cm clearance at back |
| Warranty | 24 months from date of purchase |
| Safety Features | Child safety (not for young children), grounded plug, 10A fuse recommended |
| Maintenance | Clean interior with soda water; avoid soap/detergents; defrost manually if frost forms |
Frequently Asked Questions - TWC-7.87 TecLime
User questions about TWC-7.87 TecLime
0 question about this device. Answer the ones you know or ask your own.
Ask a new question about this device
Download the instructions for your Wine cellar in PDF format for free! Find your manual TWC-7.87 - TecLime and take your electronic device back in hand. On this page are published all the documents necessary for the use of your device. TWC-7.87 by TecLime.
USER MANUAL TWC-7.87 TecLime
Manual
TWC-7.87 Compressor
Vinkyl Wine Cooler
SE ANVÄNDARHANDBOK
GB USER MANUAL
Directions for Use (GB)....11
-
Specification....11
-
Safety warnings ....11
-
Components....12
-
Installation and operation ...... 12
Installation 13
Operation 13
-
Care and cleaning....15
-
Troubleshooting....16
-
Reverse the door swing....16
-
Warranty Provisions....18
-
Environmental Protection....18
GB The features described in this manual are published with reservation to modifications.
Bruksanvisning (SE)
OBS!
Please read the instructions carefully before using the product and keep it for future reference. This product is intended for household use only.
1. Specicaon
| Model nr. | TWC-7.87 Compressor |
| Description | Wine Cooler |
| Voltage / Frequency | 230V AC / 50 Hz |
| Power consumption | 75 W |
| Volume | 22l / 7 bottles |
| Temperature range | 5°C - 22°C |
| Refrigerant | R600a |
| Noise | 39dB(A) |
| Weight | 19,5 kg |
| Dimension (WxDxH) | 150x864x554 mm |
2. Safety warnings
Before using the appliance, please properly position and install it as described in this manual. To avoid the risk of ire, electrical shock, or injury when using the appliance, follow these basic precautions:
- The appliance is intended to be used exclusively for the storage of wine.
- Make sure that the voltage/current marked on the rating label corresponds with your supply voltage.
- Plug into a grounded 3-pin outlet, do not remove the grounding pin, do not use an adapter, and do not use an extension cord.
- It is recommended that a separate circuit, serving only your appliance should be provided.
- Never clean the appliance parts with lammable luids, which may create a ire hazard or explosion.
Do not store or use gasoline or other lammable vapors and liquids near the appliance.
- Do not connect or disconnect the electric plug when your hands are wet.
- Unplug the appliance or disconnect power before cleaning, maintenance or servicing. Failure to do so can result in electrical shock or death.
- Do not attempt to repair or replace any part of the appliance unless it is recommended in this manual. All other servicing should be referred to a qualified technician.
- Ensure enough peoples to move and install the appliance to avoid any damage to the appliance or injury to the peoples.
- To ensure proper ventilation for the appliance, the front of the unit must be completely unobstructed.
- Locate the unit away from direct sunlight and sources of heat (stove, heater, radiator, etc.).
- The fuse (or circuit breaker) size should be 10 amps or higher.
- It is important for the appliance to be leveled in order to work properly. You may adjust the appliance's feet to level it.
- This appliance is not intended for use by young children. Never allow children to operate, play with or crawl inside the appliance.
- Do not use solvent-based cleaning agents of abrasives on the interior. These cleaners may damage or discolor the interior.
- Do not use this appliance for other than its intended purpose.
- The use of attachments not recommended by the manufacturer may be hazardous.
- When you dispose the appliance, take off the door and leave the shelves in place so that children may not easily climb inside. Make sure that the coolant circuit, particularly the heat exchanger at the back/bottom of the unit not be damaged. This product is not to be handled as normal household waste and it is to be taken to a recycling collection point for electrical and electronic goods.
3. Components
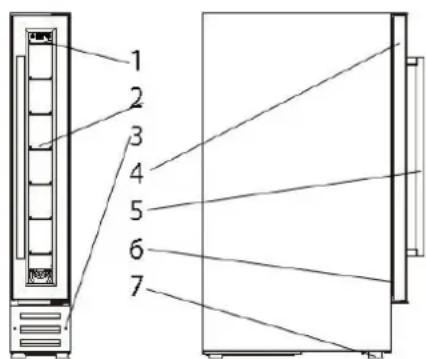
TWC-7.87
1 Control panel
2 Shelf
3 Front louver
4 Door
5 Handle
6 Gasket
7 Adjustable foot
4. Installaon and operaon
Unpacking and cleaning the wine cooler
- Remove the exterior and interior packing materials.
- Let the appliance stand upright for approximately 2 hours before connecting it to the power source, which helps to reduce the possibility of a cooling-system malfunction from handling during transportation.
- Use a soft cloth to clean the interior surface with lukewarm water.
-
Install the door handle provided with the appliance by following these steps:
-
Remove the gasket at the inner side of the door to expose the two screw holes.
• Install the handle tightly with the screws and washers provided - Tidy and restore the gasket

Working climate
- The appliance is designed for operating from SN to T climate (see below climate class chart). It is recommended to maintain the ambient around 22-25°C which helps the appliance working with low power consumption.
- If the ambient temperature is above or below the designed climate range, the performance of
the unit may be affected. For example, the appliance operating in extreme cold or hot conditions may cause interior temperatures to lactuate, and the temperature set 5-22°C may not be reached sometimes.
| Climate Class | Ambient Temp. |
| SN | 10 - 32 °C |
| N | 16 - 32 °C |
| ST | 18 - 38 °C |
| T | 18 - 43 °C |
Installaon
Height adjustable 870 - 890 mm
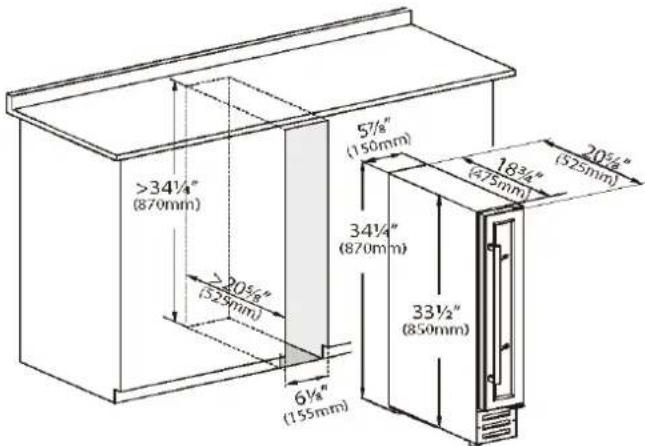
Particular precautions
- In order to function at its highest potential, this wine cooler needs be placed on lat loor, with 10cm space at the backside.
- Use the adjustable iron case to place the cellar fully horizontal.
- Avoid direct sunshine and high temperature.
- Avoid this wine cooler to fall; it must be embedded in cabinet or other furniture.
Wine storage
- The standard shelves are optimized for Bordeaux bottle storage. The maximum loaded bottles may vary subject to the different size or dimension of the wine bottles you store, as well as the shelves quantity pre-installed in the Wine Cooler.
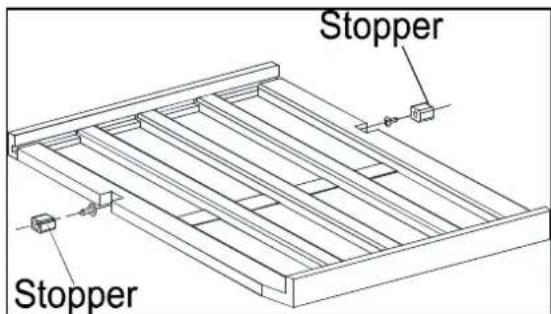
- There are two designs for the pull-out shelves: 1. The shelves are without telescopic rails, but with a plastic stopper on each sides of the shelf track to prevent bottles from falling. See the right igure. 2. The shelves are with telescopic rails, which has stoppers by themselves.
- To prevent damaging the door gasket, make sure to have the door opened fully all the way before pulling the shelves out.
- Please store wine in sealed bottles.
- Should the wine cooler be left empty for long periods is it suggested that the appliance is unplugged, and after careful cleaning, leave the door ajar to allow air to circulate inside the cabinet in order to avoid possible condensation, mold or bad smell forming.
- Recommended Temperatures for chilling/storage your wines.
| Red Wines | 15 - 18 ° C |
| Dry/White Wines | 9 - 14 ° C |
| Rose Wines | 10 - 11 ° C |
| Sparkling Wines | 5 - 8 ° C |
Operaon
This product is for storage of wine with temperature range from 8°C to 22°C.
The Control panel is at the top of the box with a LED temperature display.
Control Panel

Power on/off control
- When the appliance is plugged in to a power outlet, it powers on automatically.
- Touch the power mark ⏻ and hold for 10 seconds to turn off (or turn on) the appliances.
- No matter it is under a locked or unlocked situation, you can turn off the appliance by touching ⏻ the power mark and holding for 10 seconds.
- Warning: To avoid damaging the compressor, please do not turn on the appliance again within 5 minutes after you turn it off
Unlocking the Control Panel
- To unlock the control panel, touch the power mark and lighting mark ⏻ with 2 ingers at the same time and hold for 3 seconds. When unlocked a buzz sound will be heard.
- The control panel will be automatically locked with a buzz sound heard after 10 seconds without being touched.
- Under the locked situation, the control panel will not react to any touching order for Lighting On/Off and Temperature Setting.
Temperature setting
• The temperature setting range is 5-22 °C (41-72 °F).
- Directly touch the ⊖ or ⊕ mark to set the wine cooler temperature as you want.
- The irst touch on ⊖or ⊕mark will recall the previous set temperature displayed. Touch the mark ⊕ to increase the set temperature by 1°C (or by 1°F). On the contrary, touch the ⊖ mark to decrease the set temperature by 1°C (or by 1°F).
- The digital will change to display the real temperature of the inside cabinet after 10 seconds, without being touched.
Interior lighting on/off control
- Under the unlocked situation, touch the lighting mark interior cool LED lighting.
- The lighting will stay on until it is manually turned off.
to turn on (or turn off) the
Temperature display window
- The temperature is displayed in digital which is the best way to be read out. The digital is shown as the set temperature when you are setting the temperature, and it will change to be the real temperature of the inside cabinet after 10 seconds _without being touched.
- When the temperature probe is out of order, the display window will show with "HH" or "LL" instead of a digital igure while continuous buzz sound will be heard. In case of this happens, this appliance is considerably designed to keep periodical running of compressor and fans which helps to keep the coldness of the inside cabinet to protect your stored wines.
Warning: To avoid destroying your stored wines, it is strongly recommended to have the appliance repaired immediately, as the spare periodical running can not ensure the appliance to achieve the temperature you have set.
5. Care and cleaning
Cleaning
- Shut off power supply before cleaning cabinet.
- Take out wine and shelves, and then clean the cabinet with soda water irst and with clean water last.
- Do not use soap or detergent for the cabinet.
- Clean the wine cooler regularly.
Moving the wine cooler
- Remove all items.
- Securely tape down all loose items (shelves) inside your appliance.
• Turn the adjustable leg up to the base to avoid damage. - Tape the door shut.
- Be sure the appliance stays secure in the upright position during transportation. Also protect outside of appliance with a blanket, or similar item.
Energy saving tips
- The appliance should be located away from heat producing appliances, and away from direct sunlight.
- Ensure that the unit is adequately ventilated. Never cover air vents.
- Only open the door when necessary. Avoid leaving the door open for long periods or opening/closing the door frequently.
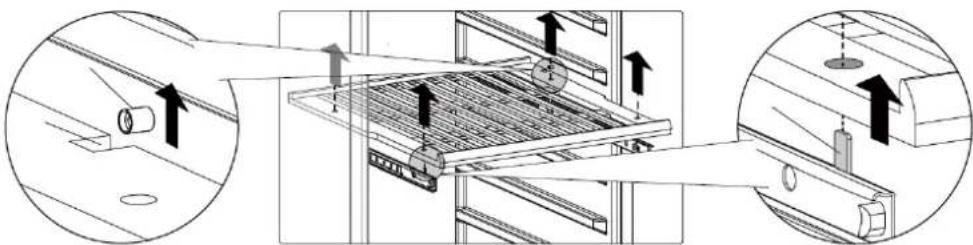
Removing the shelves
- Before removing a Shelf from the appliance, it is necessary to remove all the bottles on the Shelf:
- Pls. pull the shelf outwards slowly, and keep the left & right Cut of Shelf exactly below the left & right Stopper;
- For a model without Telescopic Rail, pls. just lift the whole Shelf upwards horizontally to take out the Shelf:
- For a model with Telescopic Rail, pls. lift the whole Shelf upwards horizontally to get it off from the 4 Locating Pins of Telescopic Rail.
6. Troubleshoong
Before calling for service, review the chart below irst yourself
| Problem | Possible cause | Solutions |
| No cooling | Plug not put connected | Put in plug |
| Low voltage | Ensure normal voltage | |
| Fuse broken | Change fuse | |
| Temperature inside not cold enough | The refrigerator is placed too close to a heat source | Keep the refrigerator away from sunshine or other heat source |
| Bad ventilation | Place the refrigerator in the area with good ventilation and keep things away from the fans | |
| Fans do not work | Check whether the plug is connected or change the fan | |
| The door is not closed tightly or opened too frequently or for too long time. | Close the door tightly and don’t open the door too frequently or for too long time | |
| Peculiar smell inside refrigerator | Check whether there is anything sour inside | Wrap the source or take it out |
| Inside light lashes | Set temperature higher than inner | Adjust the adjustor |
| The automatic defrost function start to work | Normal function. No repair needed | |
| Frost on the cold sink | Too much humidity or too low temperature inside the case | Output the plug, stop the power, and defrost by hand, connect power again when the ice thaws. |
The instruction is based on a unit with Right Hinge installed already.
To reverse the door from right hinge to left hinge, you need to get ready 2 new spare
parts:
Upper Left Hinge
Bottom Left Hinge.
All removed parts is suggested to be saved in case of door re-reversal.
Open the door, and loosen the 2 screws from Pivot Hinge of the Bottom Right Hinge.
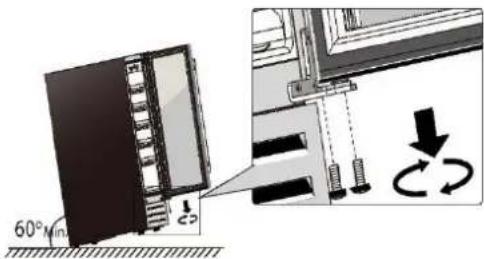
Carefully remove the door from the Upper Right Hinge and prevent it from scratching. Take out the Pivot Hinge from the door hinge hole.

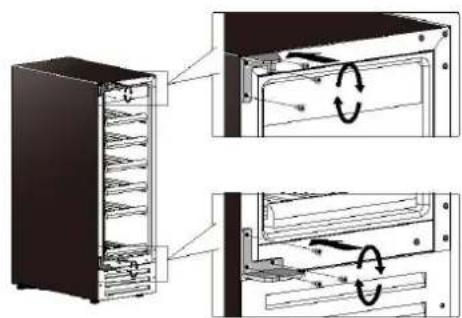
Unscrew the Upper Right Hinge and Bottom Right Hinge from the cabinet. Keep them well for door re-installation.

Pull out the 6 Plastic Caps at the front left corner of the cabinet. And move them all to the right side.

Install the Upper Left Hinge and Bottom Left Hinge to the left side of the cabinet. Make sure the screws are tightened.
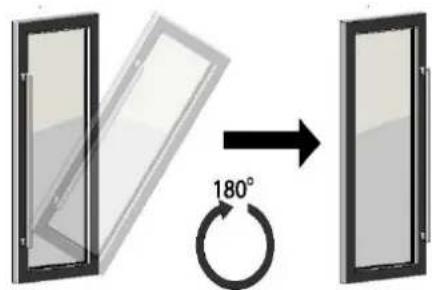
Turn the door by 180° (upside down).
Insert the Pivot Hinge into the bottom hinge hole of the door.

Install the door to the left hinge side by tightening the Pivot Hinge with the 2 screws.

8. Warranty Provisions
This product comes with a 24-month warranty starting on the date of purchase. Within this period, any defects in material or workmanship will be repaired without any charge. The following provisions shall apply regarding this warranty:
- We expressly dismiss all other claims for damage, including consequential damages;
- Any repairs or replacements of components within the term of the warranty will not result in an extension of the term of the warranty;
- The warranty will no longer apply if the product has been modified, non-original parts have been used, or if it has been repaired by third parties;
- The warranty will only apply, when you present the original, dated proof of purchase, provided no changes have been made to it;
- The warranty will not apply to damage caused by actions not in compliance with the Directions for Use, neglect, vandalism;
- Transportation costs and the risk involved during the transportation of the product or its components will always be the responsibility of the purchaser.
In order to avoid unnecessary costs, we recommend that you always read the Directions for Use carefully irst. If they offer no solution, please take the product to your dealer for repair.
9. Environmental Protecon

Waste electrical products should not be disposed of with household waste. Please recycle where facilities exist. Check with your Local Authority or retailer for recycling advice.
- MANUAL
- TWC-7.87 COMPRESSOR
- DIRECTIONS FOR USE (GB)....11
- BRUKSANVISNING (SE)
- OBS
- SPECICAON
- SAFETY WARNINGS
- COMPONENTS
- TWC-7.87
- INSTALLAON AND OPERAON
- UNPACKING AND CLEANING THE WINE COOLER
- WORKING CLIMATE
- INSTALLAON
- PARTICULAR PRECAUTIONS
- WINE STORAGE
- OPERAON
- CONTROL PANEL
- POWER ON/OFF CONTROL
- UNLOCKING THE CONTROL PANEL
- TEMPERATURE SETTING
- INTERIOR LIGHTING ON/OFF CONTROL
- TEMPERATURE DISPLAY WINDOW
- CARE AND CLEANING
- CLEANING
- MOVING THE WINE COOLER
- ENERGY SAVING TIPS
- REMOVING THE SHELVES
- TROUBLESHOONG
- WARRANTY PROVISIONS
- ENVIRONMENTAL PROTECON
Brand : TecLime
Model : TWC-7.87
Category : Wine cellar