SMI 2.1 - Iron Andersson - Free user manual and instructions
Find the device manual for free SMI 2.1 Andersson in PDF.


| Product Type | Steam Iron |
| Brand | Andersson |
| Model | SMI 2.1 |
| Water Tank Capacity | Approximately 350 ml (MAX level) |
| Anti-Calc System | Permanent resin filter inside water reservoir, uses tap water only |
| Anti-Drip System | Automatically activates at low temperatures to prevent water dripping on delicate fabrics |
| Steam Control | Variable steam selector (0 to max) for continuous steam when horizontal |
| Shot Steam Function | Powerful burst of steam for tough creases; also usable for vertical steaming |
| Spray Function | Adjustable spray (dense or vaporized) with button |
| Temperature Control | Adjustable thermostat knob with indicator light |
| Auto Shut-Off | Yes, with indication light |
| Self-Cleaning Function | Built-in, recommended every 10-15 days |
| Safety Features | Do not immerse; unplug when filling; cool before storage; use on stable surface |
| Soleplate Material | Metal with steam vents |
| Care and Maintenance | Clean soleplate with damp cloth; self-clean regularly; use tap water only |
Frequently Asked Questions - SMI 2.1 Andersson
User questions about SMI 2.1 Andersson
0 question about this device. Answer the ones you know or ask your own.
Ask a new question about this device
Download the instructions for your Iron in PDF format for free! Find your manual SMI 2.1 - Andersson and take your electronic device back in hand. On this page are published all the documents necessary for the use of your device. SMI 2.1 by Andersson.
USER MANUAL SMI 2.1 Andersson
SMI 2.1 | Steam iron

natural_image
Red and black electric iron with a white base, no visible text or symbols on the device itself.User manual
English | Svenska | Norsk
Copyright
This manual is the copyright of CI no 556520-4137. No part of this manual may be revised, copied or transmitted in any way without written permission from CI no 556520-4137.
Statement
This manual does not provide any warranty or related declarations. All information in this manual including the product specification, pictures and literatures is just for reference, CI no 556520-4137 reserves the rights to update contents of this manual without further notice.
Copyright
A NOTE ABOUT RECYCLING
This product's packaging materials are recyclable and can be reused. This product and the accessories packed together are the applicable product to the WEEE directive except batteries. Please dispose of any materials in accordance with your local recycling regulations. When discarding the unit, comply with your local rules or regulations. Batteries should never be thrown away or incinerated but disposed of in accordance with your local regulations concerning chemical wastes.


ANGÄENDE ÅTERVINNING
Safety instructions 4
Product components 5
Using the iron 6-9
Svenska
Säkerhetsinstruktioner 10
To protect against a risk of electric shock, do not immerse the iron in water or other liquids.
The iron should always be turned to Off before plugging or unplugging from an outlet. Always grasp the plug and pull to disconnect.
Do not allow the cord to touch hot surfaces. Let the iron cool completely before putting it away. Loop cord loosely around iron when storing.
Always disconnect iron from electrical outlet when filling with or emptying of water.
Do not operate iron with a damaged cord or if the iron has been dropped or damaged. To avoid the risk of electric shock, do not disassemble the iron take it to a qualified serviceman for examination and repair. Incorrect reassembly can cause a risk of electric shock when the iron is used.
Close supervision is necessary for any appliance being used near children. Do not leave iron unattended while connected.
Burns can occur from touching hot metal parts, hot water, or steam. Use caution when you turn a steam iron upside down – there may be hot water in the reservoir.
If the malfunction indicator goes on, the flatiron is not operating normally. Disconnect from the power supply and have the flatiron serviced by qualified service personnel.
The iron must be used and rested on a stable surface.
Do not use chemical additive, scented substances or decalcifiers.
Product components
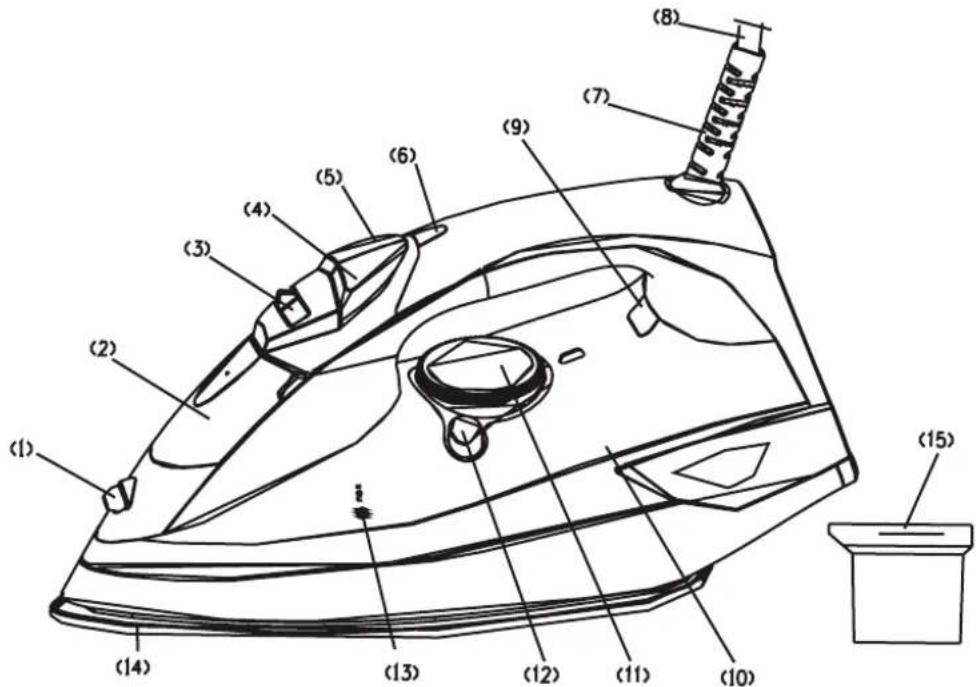
- Spray outlet
- Filler lid
- Steam dial
- Shot-steam button
- Spray button
- Auto shut off indication light
- Cord
- Electricity cord
- Temperature control light
- Water tank
- Knob for temperature regulation
- Self-cleaning button
- Maximum filling level
- Plate with steam vents
- Water measurer
Using the iron
Anti-calc system
A special resin filter inside the water reservoir softens the water and prevents scale from building up in the plate. The resin filter is permanent and does not need replacing.
Please note:
Use tap water only. Distilled and/demineralised water makes the "Zero-Calc" anti-calc system ineffective by altering its physicochemical characteristics.
Anti-drip system
With the anti-drip system, you can perfectly iron even the most delicate fabrics. Always iron these fabrics at low temperatures. The plate may cool down to the point where no more steam comes out, but rather drops of boiling water that can leave marks or stains. In these cases, the Anti-drip system automatically activates to prevent vaporization, so that you can iron the most delicate fabrics without risk of spoiling or staining them.
General instructions
When using the iron for the first time, you may notice a slight emission of smoke and hear some sounds made by the expanding plastics. This is quite normal and it stops after a short while. We also recommend passing the iron over an ordinary cloth before using it for the first time.
Preparations
Sort the laundry to be ironed according to the symbols on the garment label, or if this is missing, according to the type of fabric.
Start ironing the garments requiring a low temperature. This reduces the waiting times (the iron takes less time to heat up than to cool down) and eliminates the risk of scorching the fabric.
Using the iron
Steam ironing
- Filling the reservoir
- Check that the plug is disconnected from the socket.
- Move the steam selector to "0".
- Open the lid.
- Raise the tip of the iron to help the water enter the opening without overflowing.
- Slowly pour the water into the reservoir using the special measure and taking care not to go over the maximum level (about 350ml) indicated by "MAX" on the reservoir.
-
Close the lid.
-
Selecting the temperature
-
Put the iron in a vertical position.
- Put the plug in the socket.
- Adjust the temperature according to the symbol on the garment label. The temperature control light indicates that the iron is heating up. Wait until the plate temperature control light goes off before ironing.
Warning: during ironing, the temperature control light comes on at intervals, indicating that the selected temperature is maintained. If you lower the thermostat temperature after ironing at a high temperature, do not start ironing until the temperature control light comes on again.
3. Selecting the steam
- The quantity of steam is regulated by the steam selector.
- Move the steam selector to a position between minimum and maximum depending on the quantity of steam required and the temperature selected.
Warning: the iron gives off steam continuously only if you hold the iron horizontally. You can stop the continuous steam by placing the iron in a vertical position or by moving the steam selector to "0". You can only use steam at the highest temperatures. If the selected temperature is too low, water may drip onto the plate.
-
Selecting shot steam / steam when ironing vertically
-
Press the shot steam button to generate a powerful burst of steam that can penetrate the fabrics and smooth the most difficult and tough creases.
- Wait for a few seconds before pressing again.
- By pressing the shot-steam button at intervals you can also iron vertically (curtains, hung garments, etc).
Using the iron
Warning: the shot-steam function can only be used at high temperatures. Stop the emission when the temperature control light comes on, than start ironing again only after the light has gone off.
Dry ironing
To iron without steam, follow the instructions in section "steam ironing", leaving the steam selector on position "0".
1. Spray Function
Make sure that there is water in the reservoir. Press the spray button slowly (for a dense spray) or quickly (for a vaporized spray).
Warning: for delicate fabrics, we recommend moistening the fabric beforehand using the spray function, or putting a damp cloth between the iron and the fabric. To avoid staining, do not use the spray on silk or synthetic fabrics.
Cleaning
Any deposits, starch residue or size left on the plate can be removed using a damp cloth or an unabrasive liquid detergent. Avoid scratching the plate with steel wool or metallic objects. The plastic parts can be cleaned with a damp cloth then wiped over with a dry cloth.
Self-cleaning
The self-cleaning feature cleans inside the plate, removing impurities. We recommend using it every 10-15 days.
Directions:
-Fill the reservoir up to the maximum level indicated and set the steam selector to "0"
-Set the thermostat knob to the maximum temperature and wait for the light to turn off.
-Pull the plug out of the socket and hold the iron horizontally over the sink.
-Hold the cleanout button setting until all the boiling water, steam, impurities come out.
-When the soleplate has cooled down, you can clean it with a damp cloth.
Using the iron
Advice for good ironing
We recommend using the lowest temperatures with fabrics that have unusual finishes (sequins, embroidery, flush, etc.).
If the fabric is mixed (e.g. 40% cotton 60% synthetics), set the thermostat to the temperature of the fibre requiring the lower temperature.
If you do not know the composition of the fabric, determine the suitable temperature by testing on a hidden corner of the garment. Start with a low temperature and increase it gradually until it reaches the ideal temperature.
Never iron areas with traces of perspiration or other marks: the heat of the plate fixes the stains on the fabric, making them irremovable.
The size is more effective if you use a dry iron at a moderate temperature: excess heat scorches it with the risk of forming a yellow mark.
To avoid marking silk, woolen or synthetic garments shiny, iron them inside out.
To avoid marking velvet garments shiny, iron in one direction (following the fibre) and do not press down on the iron.
The heavier the washing machine is loaded, the more garments come out creased. This also happens when the spin drying revolutions are very high.
Many fabrics are easier to iron if they are not completely dry. For example, silk should always be ironed damp.
Säkerhetsinstruktioner
- Copyright
- Statement
- A NOTE ABOUT RECYCLING
- ANGÄENDE ÅTERVINNING
- Product components
- Using the iron
- Anti-calc system
- Please note:
- Anti-drip system
- General instructions
- Preparations
- Steam ironing
- Selecting the steam
- Dry ironing
- Spray Function
- Cleaning
- Self-cleaning
- Directions:
- Advice for good ironing
- Säkerhetsinstruktioner
Brand : Andersson
Model : SMI 2.1
Category : Iron