
DX-LCD37-09 - Television Dynex - Free user manual and instructions
Find the device manual for free DX-LCD37-09 Dynex in PDF.


| Product Type | 37-inch LCD TV |
| Model | DX-LCD37-09 |
| Brand | Dynex |
| Display Size | 37 inches (diagonal) |
| Dimensions (with stand) | 28.1 × 37.5 × 11.5 inches (713 × 950 × 290 mm) |
| Dimensions (without stand) | 26.5 × 37.5 × 5.0 inches (672.5 × 950 × 126.5 mm) |
| Weight | 45.5 lbs (20.6 kg) |
| Power Consumption (max) | 220 W |
| Power Requirements | 120 V AC ± 10%, 60 Hz ± 0.5% |
| Video Inputs | 2x HDMI, 2x Component, 2x S-Video, 2x Composite, 1x PC (VGA) |
| Audio Inputs | RCA L/R for each video input, PC audio mini-jack |
| Audio Outputs | Digital Audio Coaxial, Analog Audio L/R |
| Tuner | ATSC / NTSC-M |
| Remote Control | Infrared, requires 2 AA batteries |
| Stand Included | Yes |
| Wall Mount Compatible | Yes (use rated mount) |
| Sleep Timer | 30, 60, 90, or 120 minutes |
| Closed Captioning | Analog and digital, customizable styles |
| Parental Controls | V-Chip with MPAA and TV ratings, password protected |
| Picture Freeze | Yes (FREEZE button) |
| Aspect Ratios | Normal, Zoom, Cinema, Wide (for 4:3/16:9); Normal, Wide, Dot-by-Dot (for PC) |
| Cleaning Instructions | Unplug, use soft damp cloth; no solvents or aerosols |
| Safety Warnings | Do not open, risk of shock; keep away from water/heat; use proper stand/wall mount |
| Warranty | 1-year limited warranty |
Frequently Asked Questions - DX-LCD37-09 Dynex
User questions about DX-LCD37-09 Dynex
0 question about this device. Answer the ones you know or ask your own.
Ask a new question about this device
Download the instructions for your Television in PDF format for free! Find your manual DX-LCD37-09 - Dynex and take your electronic device back in hand. On this page are published all the documents necessary for the use of your device. DX-LCD37-09 by Dynex.
USER MANUAL DX-LCD37-09 Dynex
Dynex DX-LCD37-09 37" LCD TV
Contents
Important safety instructions....4
TV components ....6
Front and side....6
Back....6
Remote control....7
Setting up your TV....8
Installing remote control batteries....8
Connecting an antenna or basic cable....8
Connecting a cable or satellite box....8
Connecting an HDMI device....9
Connecting a DVI device 9
Connecting a component video device 9
Connecting an S-Video device.... 10
Connecting a camcorder, game, or VCR....10
Connecting a digital audio device....10
Connecting an analog audio device ....11
Connecting a computer....11
Using your TV 11
Turning your TV on or off 11
Setting up for the first time 11
Opening the on-screen menu 12
Scanning for channels 12
Deleting channels from the channel list 13
Adding channels to the channel list....13
Selecting the on-screen menu language ....13
Changing channels 14
Adjusting the volume 14
Adjusting the picture.... 14
Adjusting the sound 14
Selecting the video input source.... 15
Selecting the audio mode.... 15
Displaying program information.... 15
Selecting the aspect ratio 15
Setting the sleep timer....16
Checking the antenna signal strength 16
Freezing the picture....17
Using digital closed captioning.... 17
Using analog closed captioning....17
Changing digital closed captioning styles....18
Setting parental controls ....19
Setting the MPAA Rating 20
Setting the TV Rating....20
Changing the password....21
Adjusting the computer image.... 21
Selecting the HDMI audio mode 22
Maintaining....22
Cleaning 22
Servicing....22
Checking the remote control signal....22
Troubleshooting 22
Specifications 25
Legal notices....25
One-year limited warranty....27
Español 29
CHILD SAFETY
It makes a difference how and where you use your flat panel display
As you enjoy your new product, keep these safety tips in mind
The issue
The home theater entertainment experience is a growing trend, and larger TVs are popular purchases. However, TVs are not always supported on the proper stands or installed according to the manufacturer's recommendations. We and the consumer electronics industry are committed to making home entertainment enjoyable and safe.
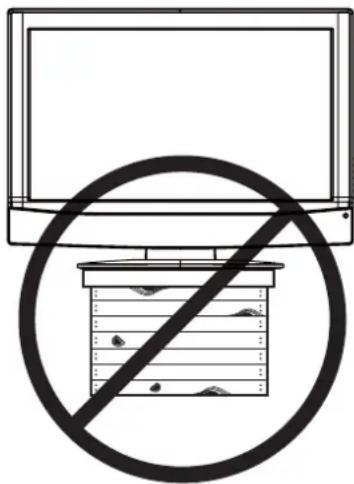
TVs that are inappropriately placed on dressers, bookcases, shelves, desks, speakers, chests, or carts may fall over and cause injury.
Tune into safety
- One size of TV stand does not fit all. Use only a TV stand rated for the weight of your TV.
- Carefully read and understand all enclosed instructions for proper use of this product.
- Don't let children to climb on or play with entertainment system furniture and TVs.
- Don't place TVs on furniture that can easily be used as steps, such as a chest of drawers.
- Remember that children can become excited while watching a program, especially on a “larger-than-life” TV. Make sure that you place or install the TV where it cannot be pushed, pulled over, or knocked down.
- Make sure that you route all cords and cables so that they cannot be pulled or grabbed by curious children.
Wall mounting
If you decide to wall mount your TV, always:
- One size of wall mount does not fit all. Use only a wall mount rated for the weight of your TV and that has been recommended by this TV manufacturer, listed in this manual, or otherwise listed by an independent laboratory (such as UL, CSA, or ETL) as suitable for your TV.
- Follow all instructions supplied by the TV and wall mount manufacturers.
- If you have any doubts about your ability to safely wall mount your TV, get help from a professional installer.
- Make sure that the wall where you are mounting the TV is appropriate. Some wall mounts are not designed to be mounted to walls backed with steel studs or cinder blocks. If you are unsure, ask a professional installer.
• TVs can be heavy. At least two people are required for safe wall mount installation.


Consumer Electronics Association
| CAUTIONRISK OF ELECTRIC SHOCKDO NOT OPEN |
Warning: To reduce the risk of electric shock, do not remove the cover or back. No user serviceable parts inside. Refer servicing to qualified service personnel.
Warning: To reduce the risk of fire or electric shock, do not expose your TV to rain or moisture.
Warning: To prevent electric shock, match the wide blade on the power cord plug to the wide slot on an electric outlet. If the plug does not fit, consult a licensed electrician to replace the obsolete outlet. Do not modify the power cord plug, or you will defeat this safety feature.

This symbol indicates that dangerous voltage constituting a risk of electric shock is present within your TV. This label is located on the back of your TV.
This symbol indicates that there are important operating and maintenance instructions in the literature accompanying your TV.
Warning: Your TV contains a fluorescent lamp containing a small amount of mercury. Disposal of these materials may be regulated for environmental reasons. For disposal or recycling information, contact your local authorities or the Electronic Industries Alliance at www.eia.org.
Important safety instructions
Read instructions
Read all of the safety and operating instructions before you use your TV.
Retain instructions
Retain safety and operating instructions for future reference.
Follow warnings and instructions
Follow all warnings on your TV and in the operating instructions. Follow all operating and use instructions.
Water and moisture
Do not use your TV near water. For example, do not use it near a bath tub, wash bowl, kitchen sink, or laundry tub, in a wet basement, or near a swimming pool.
Cleaning
Unplug your TV before cleaning. Do not use liquid or aerosol cleaners. Use only a damp cloth to clean the exterior of your TV.
Note: If your TV requires uninterrupted service for some specific reason, such as the possibility of the loss of an authorization code for a CATV converter, ignore the instruction to unplug your TV before cleaning.
Ventilation
Slots and openings in the cabinet and the back or bottom are provided for ventilation, reliable operation, and protection from overheating. These openings must not be blocked or covered. Do not block the openings by placing your TV on a bed, sofa, rug, or other similar surface. Do not place your TV near or over a radiator or heat register. Do not place your TV in a built-in installation, such as a bookcase or rack, unless you provide correct ventilation or follow the manufacturer's instructions.
Heat
Make sure that your TV is located away from heat sources such as radiators, heat registers, stoves, or other products (including amplifiers) that produce heat.
Grounding or polarization
Do not defeat the safety purpose of the polarized or grounding-type plug. A polarized plug has two blades with one wider than the other. A grounding type plug has two blades and a grounding prong. The wide blade or grounding prong are provided for your safety. If the plug does not fit, contact an electrician to replace the obsolete outlet.
Power cord protection
Route power cords so that they are not likely to be walked on or pinched by items placed on or against them. Pay particular attention to cords at plugs, convenience receptacles, and the point where they exit from your TV.
Attachments
Do not use attachments not recommended by Dynex because they may cause hazards.
Stand
Do not place your TV on an unstable cart, stand, tripod, bracket, or table. Your TV may fall, causing serious personal injury and serious damage to your TV. Use only with a cart, stand, tripod, bracket, or table recommended by the manufacturer, or sold with your TV. If you mount your TV to the wall, follow the manual instructions and use a mounting accessory recommendation manufacturer. Your TV and cart combination should be care. Quick stops, excessive force, and uneven surfaces TV and cart combination to overturn.

Servicing
Do not attempt to service your TV yourself because opening or removing covers may expose you to dangerous voltage or other hazards. Refer all servicing to qualified service personnel.
Overloading
Do not overload power outlets and extension cords because this can result in a risk of fire or electric shock.
Object and liquid entry
Never push objects of any kind into your TV through openings because objects may touch dangerous voltage points or short out parts that could result in a fire or electric shock. Never spill liquid of any kind on your TV.
Damage requiring service
Unplug this TV from the power outlet and refer servicing to qualified service personnel under the following conditions:
- When the power supply cord or plug is damaged or frayed.
- If liquid has been spilled or objects have fallen into your TV.
- If your TV has been exposed to rain or water.
- If your TV does not operate normally by following the operating instructions. Adjust only those controls that are covered by the operating instructions because incorrect adjustment of other controls may result in damage and will often require extensive work by a qualified technician to restore your TV to its normal operation.
- If your TV has been dropped or damaged in any way.
- When your TV exhibits a distinct change in performance.
Replacement parts
When replacement parts are required, make sure that the service technician uses replacement parts specified by the manufacturer that have the same characteristics as the original part. Unauthorized substitutions may result in fire, electric shock, personal injury, or other hazards.
Safety check
After completing any service or repair to this TV, ask the service technician to perform routine safety checks to determine that your TV is in correct operating condition.
Power source
Operate your TV only from the type of power source indicated on the marking label. If you are not sure of the type of power supplied to your home, consult your TV dealer or local power company.
Lightning
For added protection for your TV's receiver during a lightning storm, or when it is left unattended and unused for long periods of time, unplug it from the power outlet and disconnect the antenna or cable system. This helps prevent damage to your TV from lightning and power line surges.
Screen protection
Your TV's screen is made of glass. Do not drop your TV or hit the glass screen. If the screen breaks, be careful of broken glass.
Non-active pixels
The LCD panel contains almost 3 million thin film transistors, which provide exceptionally sharp video quality. Occasionally, a few nonactive pixels may appear on the screen as a fixed blue, green, or red point. These non-active pixels do not adversely affect the performance of your TV, and are not considered defects.
Power lines
An outside antenna system should not be located in the vicinity of overhead power lines or other electric light of power circuits, or where it can fall into such power lines or circuits.
When installing an outside antenna system, extreme care should be taken to keep from touching such power lines or circuits as contact with them might be fatal.
Outdoor antenna grounding
If an outside antenna or cable system is connected to your TV, make sure that the antenna or cable system is grounded to provide some protection against voltage surges and built-up static charges. Article 810 of the National Electrical Code, ANSI/NFPA No. 70, provides information with respect to correct grounding of the mast and supporting structure, grounding of the lead-in wire to an antenna discharge unit, size of grounding conductors, location of the antenna-discharge unit, connection to grounding electrodes, and requirements for the grounding electrode.
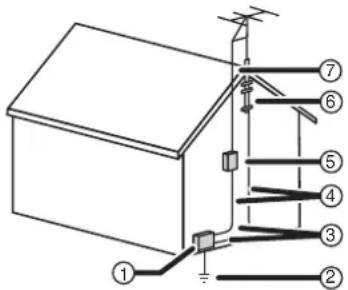
| 1 Electric service equipment | |||||
| 2 Power service grounding electrode system | |||||
| 3 | G | r | o | u | n d |
| 4 Grounding conductors | |||||
| 5 Antenna discharge unit | |||||
| 6 | G | r | o | u | n d |
| 7 Antenna lead-in wire | |||||
Note to CATV system installer
This reminder is provided to call the CATV system installer's attention to Article 820-40 of the NEC that provides guidelines for correct grounding and in particular, specifies that the cable ground must be connected to the grounding system of the building as close to the point of cable entry as practical.
TV components
Accessories
- Remote control
- AA batteries (2)
- User guide
Note: Cables are not supplied. You can purchase cables at most electronics stores.
Front and side

| # Component Description | ||
| 1 | R e m sensor | Receives signals from the remote c control. Do not block. |
| 2 POWER | Press to turn your TV on or off. | |
| 3 INPUT | Press to select the video input source.When the on-screen menu is open, press to confirm selections. | |
| 4 | CHANNEL ▲ | Press to tune to the next higher channel in the channel list. For information about creating the channel list, see “Scanning for channels” on page 12.When the on-screen menu is open, press to move up. |
| 5 | CHANNEL ▼ | Press to tune to the next lower channel in the channel list. For information about creating the channel list, see “Scanning for channels” on page 12.When the on-screen menu is open, press to move down. |
| 6 | VOLUME △ | Press to increase the volume.When the on-screen menu is open, press to move right . |
| 7 | VOLUME ▽ | Press to decrease the volume.When the on-screen menu is open, press to move left. |
| 8 MENU | Press to open the on-screen menu. | |
Back

| # | J | a | c | k | D | es |
| 1 PC-IN | Connect a computer with a VGA cable to this jack. | |||||
| 2 HDMI 2 | IN | Connect an HDMI device to this jack. | ||||
| 3 HDMI 1 | IN | Connect an HDMI or DVI device to this jack. To connect an DVI device, you need to connect an HDMI-DVI cable, and connect an audio cable to the AUDIO IN L/R jacks. | ||||
| 4 AUDIO | IN L/R | If you connect a DVI device to the HDMI 1 IN jack, connect the DVI device's audio out jacks to these jacks. | ||||
| 5 AUDIO | OUT L/R | Connect an analog audio device to these jacks with an RCA cable. | ||||
| 6 DIGITAL | AUDIO OUT (COAXIAL) | Connect a digital audio device to this jack. | ||||
| 7 ANT. IN | Connect an antenna or cable TV to this jack. | |||||
| 8 Power cord | Plug into a power outlet. | |||||

| # | J a c | k D e |
| 1 PC-IN AUDIO Connect the computer audio jack to this jack. | ||
| 2 AUDIO (for VIDEO1) Connect the audio for an analog device to these jacks. | ||
| 3 VIDEO1 Connect an analog video device to this jack. The analog video cable does not carry audio. You need to connect an audio cable to theAUDIOjacks when using an analog video device. | ||
| 4 S-VIDEO (VIDEO1) Connect an S-Video device to this jack. The S-Video cable does not carry audio. You need to connect an audio cable to theAUDIOjacks when using an S-Video device. | ||
| 5 COMPONENT1/COMPONENT2 | Connect a component video device to theCOMPONENT1orCOMPONENT2jacks and theAUDIOjacks. You can connect two component devices. The component video cable does not carry audio. You need to connect an audio cable to the AUDIO jacks when using a component video device. | |
| 6 AUDIO (for VIDEO2) Connect the audio for an analog device to these jacks. | ||
| 7 VIDEO2 Connect an analog video device to this jack. The analog video cable does not carry audio. You need to connect an audio cable to theAUDIOjacks when using an analog video device. | ||
| 8 S-VIDEO (VIDEO2) Connect an S-Video device to this jack. The S-Video cable does not carry audio. You need to connect an audio cable to theAUDIOjacks when using an S-Video device. | ||
Remote control

| # Button | Description | |
| 1 POWER | Press to turn your TV on or off. | |
| 2 Numbers | Press to enter a channel number. If you want to select a digital sub-channel, press — to select theo sub-channel. | |
| s | c r i | |
| 3 | — | Press the number buttons to select a main digital channel, then press this button to select a digital sub-channel. |
| 4 MENU | Press to open the on-screen menu. | |
| 5 | ▲ ▼ ◀ ▶ | Press to navigate in the on-screen menu. |
| 6 ENTER | Press to confirm option settings in the on-screen menu. | |
| 7 BACK | Press to return to a previous menu in the on-screen menu. | |
| 8 RECALL | Press to go to the previous channel. | |
| 9 | VOL.▲ / VOL.▼ | Press to increase or decrease the volume. |
| 10 | MUTE | Press to mute the sound. Press again to restore the sound. |
| 11 | INPUT | Press to select the video input source. |
| 12 | SLEEP | Press to set the sleep timer. |
| 13 | MTS/SAP | In digital TV mode, press to select the audio language, if more than one language is available.In analog TV mode, press to select the audio mode. |
| 14 | FREEZE Press to still (freeze) the picture. Press any button except POWER to return to normal viewing. | |
| 15 | ZOOM | Press to select the aspect ratio. |
| 16 | DISPLAY | For digital or analog TV channels, press to display the channel information, signal type, and TV setting (such as the audio setting, aspect ratio, program rating, and closed caption setting). For an external device, press to display the input mode, signal type, and TV setting. |
| # | B u t | t o n |
| 17 | CH ▲ CH ▼ | Press to go to the next or previous channel in the channel list, or to select the external input mode. When you press one of these buttons repeatedly, you cycle between:Analog TV channels in the channel listDigital TV channels in the channel listV i de o 1V i de o 2Component1Component2H D M I 1H D M I 2PC |
Setting up your TV Installing remote control batteries
To install remote control batteries:
1 Open the battery compartment.
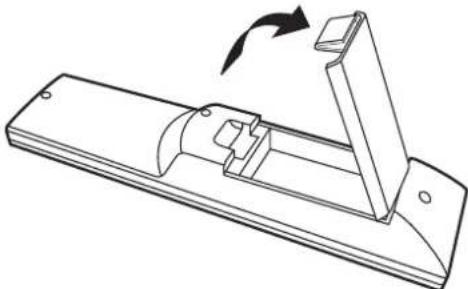
2 Insert two AA batteries into the battery compartment. Make sure that the + and - symbols on the batteries match the + and - symbols in the battery compartment.

3 Close the battery compartment.
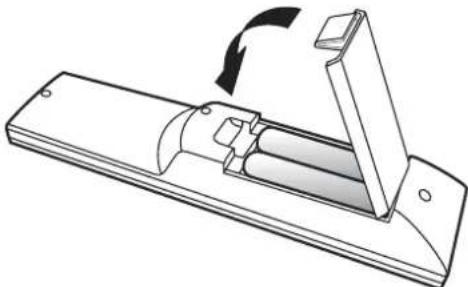
Notes:
Make sure that you match the + and - symbols on the batteries with the symbols in the battery compartment.
Do not mix different types of batteries or old and new batteries.
If you do not intend to use the remote control for a extended period of time, remove the batteries to prevent leakage.
Do not try to recharge batteries non-rechargeable batteries. They may overheat and rupture.
Connecting an antenna or basic cable
D e s c r i p t i To connect an antenna or basic cable (no cable box):
- Connect one end of a 75 ohm coaxial cable to the antenna or basic cable wall jack, then connect the other end of the cable to the ANT. IN jack on the back of your TV.

Notes:
Always unplug the coaxial cable when you move your TV. If you use an antenna to receive analog TV, the antenna should also work for digital TV (DTV). If you want to switch between antenna and cable, install an antenna selector. If you need help connecting cable TV, contact your cable TV provider.
Connecting a cable or satellite box
Note: Installation methods may vary depending on the type of cable or satellite box. Contact your cable or satellite provider for more information.
To connect a cable or satellite box:
1 Connect a 75 ohm cable to cable or satellite TV wall jack, then connect the other end to the Antenna IN jack on the cable or satellite TV box.
![graph TD A["Cable TV"] --> B["Cable or satellite box"] B --> C["RF OUTANT. IN"] C --> D["Coaxial cable"] D --> E["Coaxial cable"] E --> F["Satellite"]](/content/2026/05/863310/images/cdd63d2fb132e3dc2a3cfbe5f4498c9f833db6c9cff07e4196f0e59ecc587798.jpg)
2 Connect a 75 ohm coaxial cable to the RF OUT jack on the cable or satellite TV box, then connect the other end to the ANT. IN jack on the back of your TV.
Connecting an HDMI device
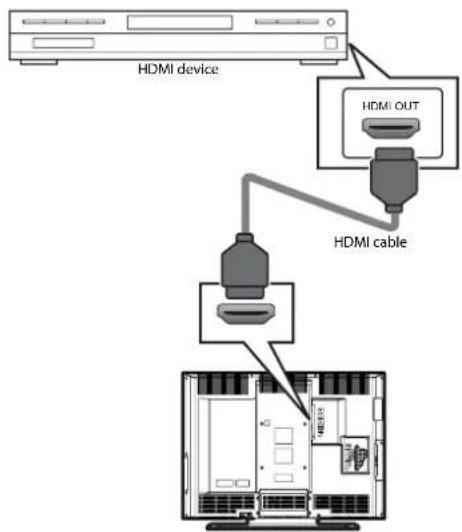
You can connect two HDMI devices.
To connect an HDMI device:
- Connect one end of an HDMI cable to the HDMI OUT jack on the HDMI device, then connect the other end of the cable to the HDMI 1 INPUT or HDMI 2 INPUT jack on the back of your TV.
Connecting a DVI device
To connect a DVI device, you need an HDMI-to-DVI conversion cable.
To connect a DVI device:
1 Connect the DVI end of the HDMI-to-DVD conversion cable to the DVI OUT jack on the DVI device, then connect the HDMI end of the cable to the HDMI 1 IN jack on the back of your TV.
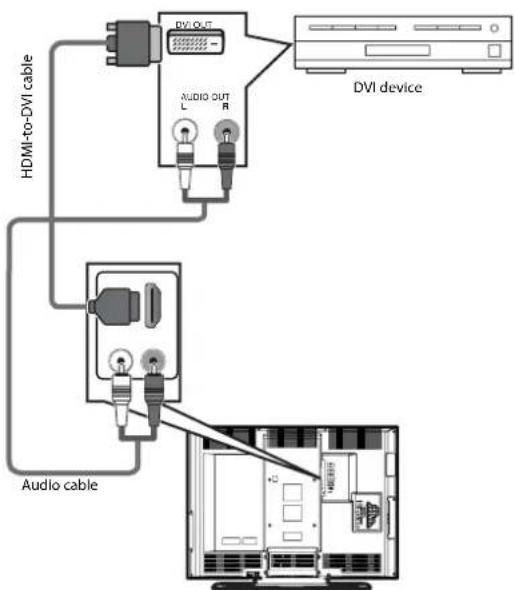
2 Connect an audio cable to the AUDIO OUT jacks on the DVI device, then connect the other end of the cable to the AUDIO IN jacks next to the HDMI 1 IN jack on the back of your TV.
Notes:
Your TV accepts 480i, 480p, 720p, and 1080i video signals. Your TV cannot display 480i video that is not EIA/CEA-861/861B-compliant.
You must use the HDMI 1 IN jack to connect a DVI device because a DVI device requires an audio connection. The AUDIO IN jacks only work for the HDMI 1 IN jack.
Connecting a component video device
You can connect two component video devices.
To connect a component video device:
1 Connect a component video cable to the COMPONENT VIDEO OUT (Y, Pb, and Pr) jacks on the component device, then connect the other end of the cable to the COMPONENT 1 or COMPONENT 2 jacks on the back of your TV.

2 Connect an RCA audio cable to the AUDIO L and R jacks on the component video device, then connect the other end of the cable to the AUDIO L and R jacks on the back of your TV. Make sure that you connect the audio cable to the audio jacks associated with the component jacks you connected the component video cable to.
Note: Your TV accepts 480i, 480p, 720p, and 1080i video signals.
Connecting an S-Video device
You can connect two S-Video devices.
To connect an S-Video device:
1 Connect one end of an S-Video cable to the S-VIDEO OUT jack on the S-Video device, then connect the other end of the cable to the S-VIDEO (VIDEO 1) or S-VIDEO (VIDEO 2) jack on the back of your TV.

2 Connect one end of an audio cable to the AUDIO OUT jacks on the S-Video device, then connect the other end of the cable to the AUDIO L and R jacks that are near the S-Video jack you connected the S-Video cable to.
Note: If you connect an S-Video device to the S-VIDEO (VIDEO1) jack and a video device to the VIDEO1 jack, the S-Video device has priority. If you connect an S-Video device to the S-VIDEO (VIDEO2) jack and a video device to the VIDEO2 jack, the S-Video device has priority.
Connecting a camcorder, game, or VCR
To connect a camcorder, game, or VCR:
1 Connect one end of a video cable to the VIDEO OUT jack on the camcorder, game, or VCR, then connect the other end to the VIDEO1 or VIDEO2 jack on the back of your TV.
![graph TD A["GameCamcorder VCR"] --> B["Audio OUT L"] A --> C["Audio OUT R"] A --> D["Video OUT"] B --> E["Audio cable Video cable"] C --> E D --> E E --> F["2C-1K AUDIO"] E --> G["SYTAYE T-1 Y AUDIO ALDC"] E --> H["SYTAYE T-2 Y AUDIO ALDC"] F --> I["Computer"]](/content/2026/05/863310/images/faaff45e4c916f57c99022978f8691f36719a6138ed035f0f279009b4a727608.jpg)
2 Connect one end of an audio cable to the AUDIO OUT jacks on the camcorder, camera, or VCR, then the other end of the cable to AUDIO jacks on the back of your TV. Make sure that you connect the audio cable to the audio jacks associated with the video jack you connected the video cable to.
Connecting a digital audio device
To connect a digital audio device:
- Connect one end of a digital audio coaxial cable to the DIGITAL AUDIO IN jack on the audio device, then connect the other end of the cable to DIGITAL AUDIO OUT jack on the back of your TV.
![graph TD A["Digital audio device"] --> B["Coaxial inductor"] B --> C["Digital Audio OUT jack"] C --> D["Output"]](/content/2026/05/863310/images/dc65e976e2e2af6cabe25bf03b9f649c92df23c5df128377d5517615234c90a5.jpg)
Connecting an analog audio device
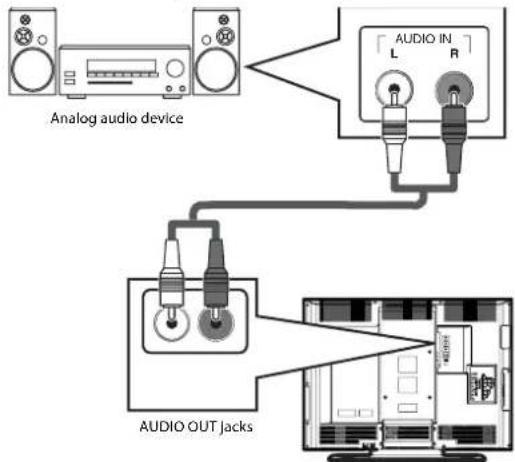
To connect an analog audio device:
- Connect one end of an audio cable to the AUDIO IN L and R jacks on the audio device, then connect the other end of the cable to the AUDIO OUT jacks on the back of your TV.
Connecting a computer
Note: Make sure that the VGA cable has a ferrite core.
To connect a computer:
1 Connect one end of a VGA cable to the VGA jack on the computer, then connect the other end of the cable to the PC-IN jack on the back of your TV.
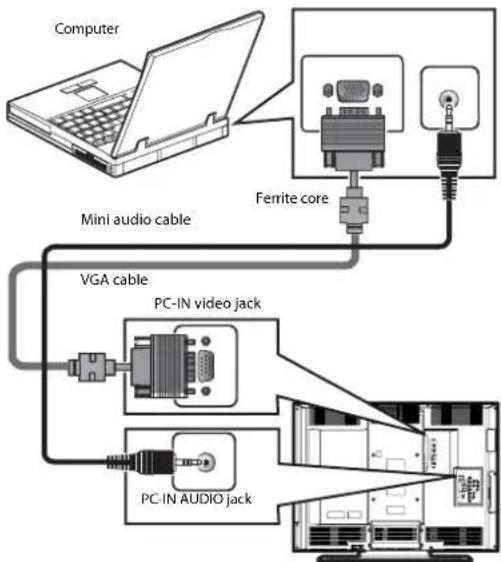
2 Connect one end of a mini-plug audio cable to the AUDIO LINE OUT jack on the computer, then connect the other end of the cable to the PC-IN AUDIO jack on the back of your TV.
Using your TV
Turning your TV on or off
To turn your TV on or off:
- Press POWER.
Warning: When you press POWER to turn off your TV, your TV goes into Standby mode. It is still receiving electrical power. To completely disconnect power, unplug the power cord.
Note: When your TV does not receive a signal and you do not press any buttons for 15 minutes, your TV goes into Standby mode.
Setting up for the first time
The first time you turn on your TV, a quick setup program starts that lets you select a language for the on-screen menu, select the TV signal source, and scan for available channels.
To set up your TV for the first time:
1 Make sure that your TV is connected to an antenna, cable TV, or satellite TV.
2 Press POWER. You may have to wait a few seconds for your TV to initialize. After your TV turns on, the Initial Setup screen opens.
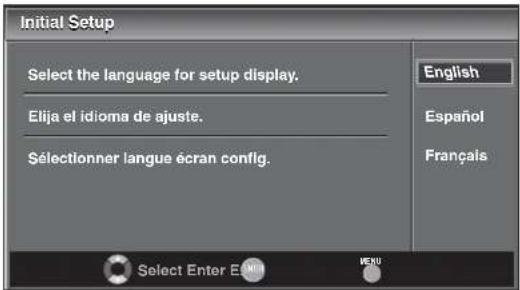
3 Press ▲ or ▼ to select English, Español, or Français, then press ENTER. The following screen opens.

4 Press ▲ or ▼ to select Air (antenna) or Cable (cable or satellite TV), then press ENTER. The following screen opens, and your TV starts scanning for channels. Your TV stores the channel information in the channel list.

When the scan is complete, the lowest channel in the channel list is displayed.
Notes:
The initial setup program only runs once for Air or Cable. If you change the TV signal source, you need to re-scan for channels. For more information, see "Scanning for channels" on page 12.
If you press POWER or MENU while your TV is scanning for channels, scanning will stop.
Opening the on-screen menu
To open the on-screen menu:
1 Press MENU. The on-screen menu opens.

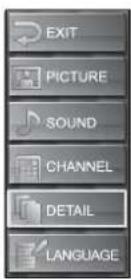
2 Press ▲ or ▼ to select a menu, then press ENTER. You can select:
- EXIT—Closes the on-screen menu.
- PICTURE—Lets you adjust the picture quality. For more information, see "Adjusting the picture" on page 14.
- SOUND—Lets you adjust the sound quality. For more information, see "Adjusting the sound" on page 14.
- CHANNEL—Lets you scan for channels and remove unwanted channels. For more information, see "Scanning for channels" on page 12 and "Deleting channels from the channel list" on page 13.
-
DETAIL—Lets you change closed captioning styles, set parental controls, adjust the computer video image, and select the audio input for connected HDMI devices. For more information, see:
-
"Changing digital closed captioning styles" on page 18
- "Setting parental controls" on page 19
- "Adjusting the computer image" on page 21
- "Selecting the HDMI audio mode" on page 22
- LANGUAGE—Lets you change the language for the on-screen menu. For more information, see "Selecting the on-screen menu language" on page 13.
Scanning for channels
The first time you turned on your TV, your TV scanned for channels. You only need to re-scan for channels if:
- You change the TV signal source. For example, you change from Air to Cable.
- You move your TV to a different viewing area.
• Additional channels have become available since the initial scan. - You want to restore DTV channels you have deleted.
Your TV stores the scanned channel information in the channel list. When you press CH ▲ or CH ▼, your TV tunes to the next or previous channel in the channel list, and skips channels that do not have a signal.
To scan for channels:
1 Press MENU. The on-screen menu opens.

2 Press ▲ or ▼ to select CHANNEL, then press ENTER.

3 Press ▲ or ▼ to select Autoscan, then press ENTER.
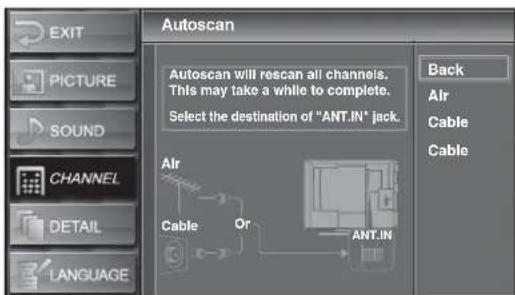
4 Press ▲ or ▼ to select Air (antenna) or Cable (cable or satellite TV). Your TV scans for channels. When the scan is complete, the lowest channel in the channel list is displayed.

Notes:
If you connect cable TV without a cable box, you may need to contact your cable TV provider for help.
If you press POWER or MENU during the scan, the scan will be canceled.
For digital channels, if you unplug the power cord without turning off your TV first, the channel list information may be lost.
Deleting channels from the channel list
If the channel list includes channels you do not want, you can delete the channels from the list. When you press CH ▲ or CH ▼, your TV skips the deleted channels. You can still tune to a deleted analog channel by pressing the number buttons for the channel.
To delete channels from the channel list:
1 Press MENU. The on-screen menu opens.

2 Press ▲ or ▼ to select CHANNEL, then press ENTER.

3 Press ▲ or ▼ to select CHANNEL LIST, then press ENTER.

4 Press on to select the channel you want to delete, then press ENTER. The channel number is grayed out and the channel is deleted from the channel list.
5 Press MENU to close the menu.
Notes:
If you want to add a deleted channel back to the channel list, press ▲ or ▼ to select the channel, then press ENTER.
When you delete a main digital channel, its sub-channels are also deleted. Digital channels are indicated by DTV next to the channel number. Unmarked channels are analog.
Adding channels to the channel list
When your TV scans for channels, it looks for channels with good signals. If a channel has a poor signal, your TV skips that channel. You can add a skipped channel to the channel list.
Note: This feature only works for analog channels. You cannot add digital channels to the channel list. To add digital channels, you must scan for channels.
To add channels to the channel list:
1 Press MENU. The on-screen menu opens.

2 Press ▲ or ▼ to select CHANNEL, then press ENTER.

3 Press ▲ or ▼ to select Manual Register, then press ENTER.

4 Press the number button for the channel you want to add, then press ENTER. Registered to the Channel List is displayed.
5 Press MENU to close the menu.
Note: If external input (Video1, Video2, Component1, Component2, HDMI1, HDMI2, or PC) is used, you cannot add the channel and Unavailable appears.
Selecting the on-screen menu language
To select the on-screen menu language:
1 Press MENU. The on-screen menu opens.

2 Press ▲ or ▼ to select LANGUAGE, then press ENTER.
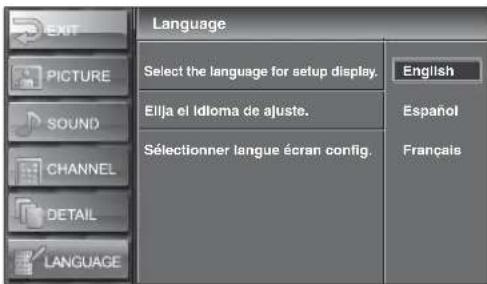
3 Press ▲ or ▼ to select English, Español, or Français, then press ENTER.
4 Press MENU to close the menu.
Changing channels
To change channels:
- Press CH ▲ or CH ▼ to select a channel in the channel list.
- Press the number buttons for the channel you want, then press ENTER or wait a few seconds.
- Press RECALL to go to the previous channel.
• To select a digital sub-channel, press the number button for the main channel, press —, then press the number button for the sub-channel.
Most digital TV channels have more than one channel. The main channel carries the signal for the main TV program. The sub-channels carry signals for additional or alternate programming, such as a radio or news broadcasts.
For example, if the main channel number is 8, the sub-channel number might be 8-1, 8-2, or 8-3.
Note: No Signal appears when the sub-channel program ends.
Adjusting the volume
To adjust the volume:
- Press VOL ▲ or VOL ▼ to increase or decrease the volume. The Volume bar appears at the bottom of the screen.

Adjusting the picture
To adjust the picture:
1 Press MENU. The on-screen menu opens.

2 Press ▲ or ▼ to select PICTURE, then press ENTER.
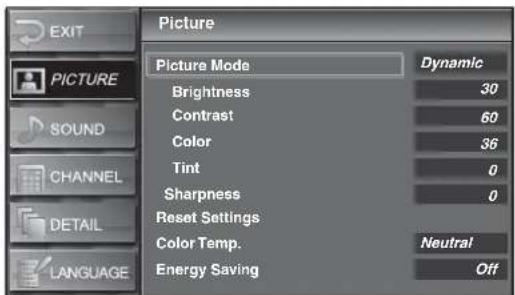
3 Press or to select the setting you want to adjust, then press ENTER. You can select:
- Picture Mode—Press ▲ or ▼ to select Standard, Dynamic, Movie, or News, then press ENTER.
- Brightness—Press or to decrease or increase the brightness.
- Contrast—Press or to decrease or increase the contrast.
• Color—Press or to adjust the color.
• Tint—Press or to adjust the tint. - Sharpness—Press or to decrease or increase the sharpness.
- Reset Settings—Press ENTER to reset the picture settings to the factory default.
• Color Temp.—Press ▲ or ▼ to select Cool, Neutral, or Warm, then press ENTER. - Energy Saving—Press ◀ or ▶ to decrease or increase the brightness of the backlight.
4 Press MENU to close the menu.
Adjusting the sound
To adjust the sound:
1 Press MENU. The on-screen menu opens.

2 Press ▲ or ▼ to select SOUND, then press ENTER.

3 Press or to select the setting you want to adjust, then press ENTER. You can select:
- Treble—Press or to adjust the treble.
-
Bass-Press or to adjust the bass.
-
Surround-Press ▲ or ▼ to select On or Off.
- Reset Settings—Press ENTER to reset the sound settings to the factory default.
4 Press MENU to close the menu.
Selecting the video input source
To select the video input source:
- Press INPUT or CH ▲ repeatedly to select the video input source. You can select:
• TV or DTV channel - Video1—Selects the video or S-Video device connected to the VIDEO1 jacks.
- Video2—Selects the video or S-Video device connected to the VIDEO2 jacks.
- Component1—Selects the component device connected to the COMPONENT1 jacks.
- Component2—Selects the component device connected to the COMPONENT2 jacks.
- HDMI1—Selects the HDMI or DVI device connected to the HDMI1 jack.
- HDMI2—Selects the HDMI device connected to the HDMI2 jack.
• PC—Selects the computer connected to the PC-IN jack.
Selecting the audio mode
To select the digital audio mode:
- Press MTS/SAP repeatedly to select the audio language. The languages you can select depend on the available languages for the program you are watching.
To select the analog audio mode:
- Press MTS/SAP repeatedly to select the audio mode. Depending on the modes available for the program you are watching, you can select STEREO, MONO, or SAP (second audio program).
Note: Pressing MTS/SAP does not control the audio from an external device.
Displaying program information
To display digital channel information:
- Press DISPLAY. The following information appears.

| 1 | P | r | o | g | r | a |
| 2 Broadcast station. | ||||||
| 3 Channel number. | ||||||
| 4 Audio language. | ||||||
| 5 Effective scanning lines and scan mode, program format, and aspect ratio. | ||||||
| 6 CC is closed captioning if turned on. | ||||||
| 7 Program rating. | ||||||
| 8 Program guide information (four-line limit). If the guide information is longer than four lines, press ▲ or ▶ scroll the information. If no program information is available,No description provided appears. | ||||||
- Press DISPLAY or BACK to close the display.
To display analog channel information:
- Press DISPLAY. The following information appears:

This information includes the channel number, audio mode, type of resolution, aspect ratio, CC (if closed captioning is turned on), and program rating.
- Press DISPLAY or BACK to close the display.
To display external device information:
- Press DISPLAY. The following information appears:

This information includes the video input source, type of resolution, program rating, and CC (if closed captioning is turned on).
Selecting the aspect ratio
You can select from four aspect ratios for TV channels and three aspect ratios for a computer.
To select the display mode:
- Press ZOOM repeatedly to select the aspect ratio you want.
For a 4:3 video signal
![graph TD A["Normal"] --> B["Zoom"] B --> C["Cinema"] C --> D["Wide"]](/content/2026/05/863310/images/377da82e75ee71811dd38df610d49143b43a25535076d77b5e10a86f84638bc7.jpg)
- Normal—Displays the picture at its original size. Black bars appears on the sides of the picture.
- Zoom—Enlarges the center of the picture. The top and bottom of the picture are cropped.
- Wide — Stretches the picture horizontally to fill the screen.
Cinema—Stretches the picture to fill the 16:9 screen horizontally, then enlarges the picture until it fills the entire screen without changing the aspect ratio. The outer part of the picture is cropped.
For a 16:9 video signal
![graph TD A["Normal Zoom"] --> B["Cinema Wide"] B --> C["Downward arrow"] C --> D["Cinema Wide"]](/content/2026/05/863310/images/aaf442537036cf70a82a7549aad19b49a9fa4dad72777c7db89e4b406d4d55b9.jpg)
- Normal—Squeezes the picture horizontally to be displayed at 4:3. Black bars appear on the sides of the picture.
- Zoom—Enlarges the center of the picture. The outer part of the picture is cropped.
- Wide—Displays the picture at its original size.
- Cinema—Displays the picture at its maximum size without changing its aspect ratio. The outer part of the picture is cropped.
For a computer image
![graph TD A["Normal Wide"] --> B["Dot-by-Dot"] B --> C["Dot by Dot"]](/content/2026/05/863310/images/7ade3cdca59e5640b83999b51a078ede268d4a51ce25a558e7fff73f32e1bc8f.jpg)
- Normal—Stretches the image proportionally. Black bars appears on the sides of the image. Availability of this option depends on the aspect ratio of the input signal.
- Wide—Stretches the image to fill the screen.
- Dot-by-Dot—Displays the image in its original size.
Setting the sleep timer
To set the sleep timer:
- Press SLEEP repeatedly to select the amount of time you want your TV to wait before it turns itself off. You can select 30min, 60min, 90min, or 120min.
- To turn off the timer before it expires, press SLEEP repeatedly until Sleep Off appears.
Note: If you unplug the power cord or a power failure occurs, the sleep timer is canceled.
Checking the antenna signal strength
To check the antenna signal strength:
1 Press MENU. The on-screen menu opens.

2 Press ▲ or ▼ to select CHANNEL, then press ENTER.

3 Press ▲ or ▼ to select Antenna, then press ENTER.
4 Press the number buttons or CH ▲ or CH ▼ to select the channel you want to check the signal strength for. A screen opens that shows the signal strength.

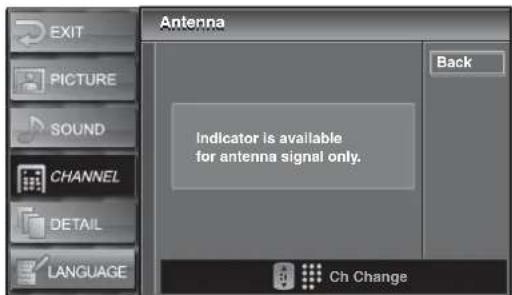
If the video input source is not TV, the following screen opens. You cannot check the signal strength when the video input source is an external device.
5 Press MENU to close the menu.
Freezing the picture
To freeze the picture:
- Press FREEZE. The picture freezes on the screen, but the sound continues to play. Press any button except POWER to return to normal viewing.
Notes:
If your TV does not detect a signal or the signal is protected, the picture freezes and the sound is muted.
After the picture is frozen for five minutes, your TV returns to normal viewing to protect the screen.
Using digital closed captioning
To use digital closed captioning:
1 Press MENU. The on-screen menu opens.
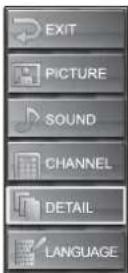
2 Press ▲ or ▼ to select DETAIL, then press ENTER.

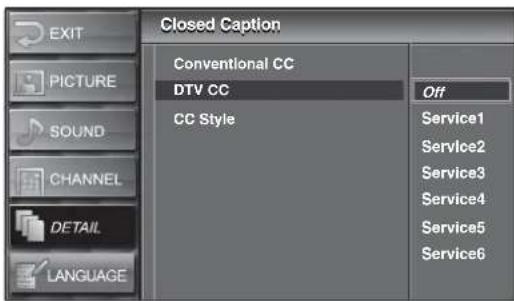
3 Press ▲ or ▼ to select DTV CC, then press ENTER.

4 Press or to select a closed captioning mode, then press ENTER. You can select Off or Service 1 through Service 6. The normal mode is Service 1. The available modes depend on the modes broadcast with the program.
5 Press MENU to close the menu.
Using analog closed captioning
To use analog closed captioning:
1 Press MENU. The on-screen menu opens.
2 Press ▲ or ▼ to select DETAIL, then press ENTER.

3 Press ▲ or ▼ to select Closed Caption, then press ENTER.

4 Press ▲ or ▼ to select Conventional CC, then press ENTER.

5 Press on to select a closed captioning mode, then press ENTER. You can select:
- Off—Turns off closed captioning.
- CC1 through CC4—Displays text in a small area so it does not obstruct the picture. CC1 normally displays the text for the audio in the same language as the audio. CC3 normally displays the text for the audio in a second language. CC2 and CC4 are rarely used and usually display information provided by the broadcaster like news or weather reports.
- Text1 through Text4—Displays text in a large black box that may obstruct the picture. Text1 normally displays the text for the audio in the same language as the audio. Text3 normally displays the text for the audio in a second language. Text2 and Text4 are rarely used and usually display information provided by the broadcaster like news or weather reports.
6 Press MENU to close the menu.
Notes:
To display closed captioning on your TV, the broadcast signal must contain the closed captioning data.
Not all TV programs and commercials have closed captioning or all types of the closed captioning.
Captions and texts may not exactly match the TV voice.
Changing channels may delay closed captioning for a few seconds.
Adjusting the volume or muting the sound may delay closed captioning for a few seconds.
Abbreviations, symbols, and other grammatical shortcuts may be used in order to keep pace with the on-screen action. This is not a problem with your TV.
The caption or text characters will not be displayed while the on-screen menu is open.
If a black box appears on the TV screen, closed captioning is set to the Text mode. To clear the box, select CC1, CC2, CC3, CC4, or Off.
If your TV receives poor quality television signals, captioning may contain errors, or there might be no captioning at all. Some possible causes of poor quality signals are automobile ignition noise, electric motor noise, weak signal reception, or multiplex signal reception (ghosts or screen flutter).
Your TV retains the closed captioning setting if the power fails.
Closed captioning is not displayed when you are using an HDMI connection.
When your TV receives a special effects playback signal (such as Search, Slow, or Freeze) from a VCR's video output channel (3 or 4), your TV may not display the correct captioning or text.
Changing digital closed captioning styles
To change digital closed captioning styles:
1 Press MENU. The on-screen menu opens.

2 Press ▲ or ▼ to select DETAIL, then press ENTER.
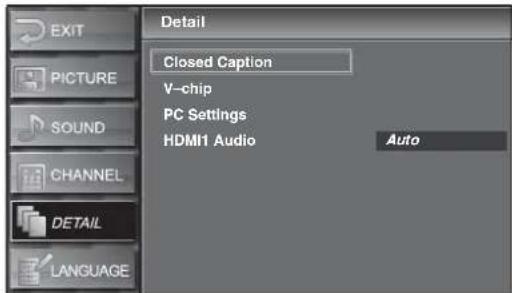
3 Press ▲ or ▼ to select Closed Caption, then press ENTER.

4 Press ▲ or ▼ to select CC Style, then press ENTER.

5 Press ▲ or ▼ to select User Setting, then press ENTER.

6 Press ▲ or ▼ to select On, then press ENTER.

7 Press ▲ or ▼ to select a style, then press ENTER.
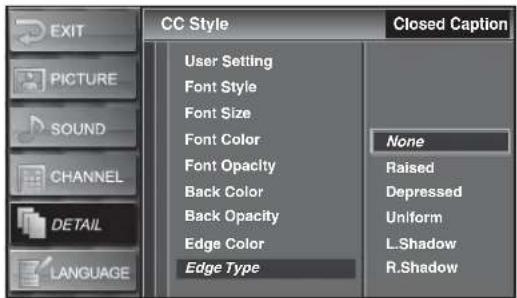
8 Press ▲ or ▼ to select change the style, then press ENTER. You can change the following styles:
Font Style

Font Size

Font Color

Font Opacity
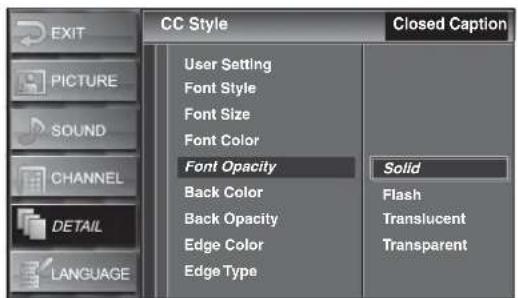
Back Color (background color)

Back Opacity
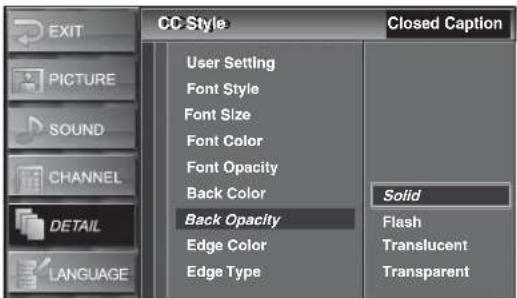
Edge Color

Edge Type
9 Press MENU to close the menu.
Setting parental controls
To set parental controls:
1 Press MENU. The on-screen menu opens.
2 Press ▲ or ▼ to select DETAIL, then press ENTER.

3 Press ▲ or ▼ to select V-chip, then press ENTER.

4 Press the number buttons to enter the four-digit password. If you have not set a password, enter 0000.

5 Press or to select a parental control option, then press ENTER. You can select:
- MPAA Rating—For more information, see "Setting the MPAA Rating" on page 20.
- TV Rating—For more information, see "Setting the TV Rating" on page 20.
- Downloadable Rating—Lets you use rating information that is automatically downloaded for digital stations. This is a new rating system, and not all digital channels use this rating system.
- Clear Downloadable Rating—Lets you clear downloaded rating information.
- New Password—For more information, see "Changing the password" on page 21.
Setting the MPAA Rating
Many movies have ratings based set by the Motion Picture Association of America (MPAA). You can block movies based on these ratings.
To set the movie rating:
1 Press ▲ or ▼ to select MPAA Rating, then press ENTER.

2 Press or to select the rating you want to block, then press ENTER. To unblock the rating press ENTER. The rating you selected and all higher ratings will be blocked. When a rating is blocked, a lock icon appears next to the rating.
You can select:
• X—Mature audiences only.
- NC-17—No one under 17.
- R—Children under 17 should be supervised by a parent or adult guardian.
• PG-13—Unsuitable for children under 13.
• PG—Parental guidance suggested.
• G—General audiences.
- NR—Not rated.
3 Press MENU to close the menu.
Setting the TV Rating
Many TV programs have ratings set by broadcasters. You can blick TV programs based on these ratings.
To set the TV rating:
1 Press ▲ or ▼ to select TV Rating, then press ENTER.

2 Press ▲or▼to select the rating you want to block, then press ENTER. To unblock the rating, press ENTER. You can select:
• TV-MA—Mature audiences only.
• TV-14—Not suitable for children under 14.
• TV-PG—Parental guidance suggested.
• TV-G—General audiences.
• TV-Y7—Not suitable for children under 7.
• TV-Y—Suitable for all children.
3 If you selected TV-MA, TV-14, TV-PG, or TV-Y7, press ▲▼◀ or ▶to select the sub-rating you want to block, then press ENTER. To unblock the rating press ENTER. The rating you selected and all higher ratings will be blocked. When a rating is blocked, a lock icon appears under to the rating.
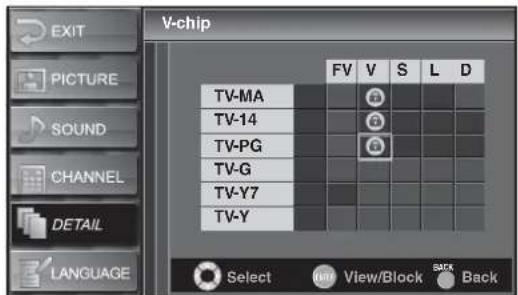
You can select:
• FV—Fantasy violence. For TV-Y7.
• V—Violence. For TV-PG, TV-14, and TV-MA.
• S—Sexual situations. For TV-PG, TV-14, and TV-MA.
• L—Coarse language. For TV-PG, TV-14, and TV-MA.
• D—Suggestive dialog. For TV-PG, and TV-14.
Note: You cannot block a sub-rating unless the main rating is blocked.
4 Press MENU to close the menu.
Notes:
When you block a rating, the higher ratings are blocked automatically. The lower ratings are still available for viewing.
When you unblock the highest rating, all ratings are unblocked automatically.
Different programs use different ratings. To block all inappropriate programming, set parental controls for MPAA Rating, TV Rating, and Downloadable Rating.
If power fails, your TV retains the V-chip setting except for the password. The password is reset to 0000.
Changing the password
To change the password:
1 Press MENU. The on-screen menu opens.

2 Press ▲ or ▼ to select DETAIL, then press ENTER.

3 Press ▲ or ▼ to select V-chip, then press ENTER.

4 Press the number buttons to enter the four-digit password. If you have not set a password, enter 0000. If you have forgotten the password, close the menu, turn off your TV, and unplug the power cord for 10 seconds. The default password (0000) is restored.

5 Press ▲ or ▼ to select New Password, then press ENTER.

6 Press the number buttons to enter the new password, then enter the new password again to confirm.
7 Press MENU to close the menu.
Adjusting the computer image
To adjust the computer image:
1 Press MENU. The on-screen menu opens.

2 Press ▲ or ▼ to select DETAIL, then press ENTER.

3 Press ▲ or ▼ to select PC Settings, then press ENTER.

4 Press on to select the setting you want to adjust, then press ENTER. You can select:
- Auto Adjustment—Press ENTER. Your TV automatically adjusts horizontal position, vertical position, clock, and phase. If you do not get the results you want, you may need to manually adjust the other settings.
- Horizontal Position—Press or to move the image left or right.
- Vertical Position—Press or to move the image down or up.
- Clock—Press or to stabilize the image. For best results, adjust the Phase setting before you adjust the Clock setting.
- Phase—Press or to improve image clarity.
5 Press MENU to close the menu.
Selecting the HDMI audio mode
You can select the HDMI audio mode for the device connected to the HDMI 1 IN jack only.
To select the HDMI audio mode:
1 Press MENU. The on-screen menu opens.

2 Press ▲ or ▼ to select DETAIL, then press ENTER.

3 Press ▲ or ▼ to select HDMI1 Audio, then press ENTER.
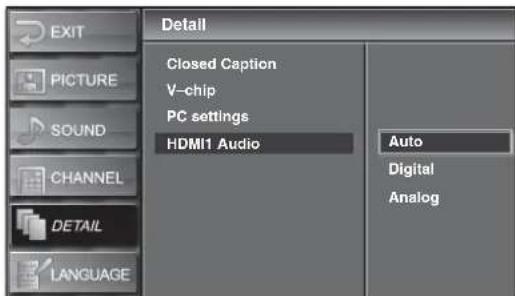
4 Press ▲ or ▼ to select an HDMI1 audio mode, then press ENTER. You can select:
- Auto—If you have connected a digital device to the HDMI 1 IN jack and an analog device to the related AUDIO IN jacks, gives the digital audio device priority.
- Digital—Selects the digital device connected to the HDMI 1 IN jack.
- Analog—Selects the analog device connected to the AUDIO IN jacks related the HDMI 1 IN jack.
5 Press MENU to close the menu.
Maintaining
Cleaning
- Before cleaning the screen, unplug your TV from the power outlet.
- Wipe the front panel and other exterior surfaces of your TV with a soft cloth immersed in lukewarm water, then wrung dry.
- Never use a solvent or alcohol. Do not spray insecticide liquid near your TV. Such chemicals may cause damage and discoloration to the exposed surfaces.
Servicing
Do not try to repair your TV yourself. There are no user serviceable parts inside. Turn off your TV, unplug the power cord, then contact an authorized service center.
Checking the remote control signal
If the remote control is not working correctly, you can use an AM radio or digital camera (including a cellular phone with built-in camera) to see if the remote control is sending an infrared signal.
To check the signal with an AM radio:
1 Tune the AM radio to a non-broadcasting frequency.
2 Point the remote control towards the radio, then push any button and listen. If the sound from the radio flutters, the remote control is working.
To check the signal with a digital camera:
1 Point a digital camera towards the remote control.
2 Push any button on the remote control and look at the camera's LCD viewfinder. If the infrared light appears on the LCD, the remote control is working.
Troubleshooting
| Problem | Solution |
| No power. | Make sure that the power cord is plugged in. |
| If a power failure occurs, unplug the power cord for 30 minutes to let your TV reset itself. | |
| No picture or sound. | Make sure that your TV is turned on. |
| Make sure that the power outlet is supplying power. | |
| Make sure that the antenna or cable TV is connected correctly and securely. | |
| If you are using an outside antenna, check the condition of the wiring and connections. | |
| Try another channel. The problem might be limited to the broadcasting station. | |
| Turn off your TV, wait for about one minute, then turn it on again. | |
| Problem Solution | |
| No color. Make sure that the | antenna or cableTV is connected correctly and securely. |
| If you are using an outside antenna, check the condition of the wiring and connections. | |
| Try another channel. The problem might be limited to the broadcasting station. | |
| Adjust theColoroption in the on-screen menu. For more information, see “Adjusting the picture” on page 14. | |
| Sound good, picture poor. Make sure that the antenna or cable TV is connected correctly and securely. | |
| Problem Solution | ||
| Ghosts in picture. Make sure | that the antenna or cable TV is connected correctly and securely. | |
| If you are using an outside antenna, check the condition of the wiring and connections. | ||
| Electrical interference from nearby appliances may affect picture quality. Turn off the appliances or move your TV. | ||
| Try another channel. The problem might be limited to the broadcasting station. | ||
| Bars on TV screen. If you are | using an outside antenna, check the condition of the wiring and connections. | |
| Electrical interference from nearby appliances may affect picture quality. Turn off the appliances or move your TV. | ||
| Picture rolls vertically. If you are using an outside antenna, check the condition of the wiring and connections. | ||
| Electrical interference from nearby appliances may affect picture quality. Turn off the appliances or move your TV. | ||
| Try another channel. The problem might be limited to the broadcasting station. | ||
| Different color marks on TV screen. | Move the unit away from nearby electric appliances. Turn off the power and wait 30 minutes before turning it back on. | |
| Try another channel. The problem might be limited to the broadcasting station. | ||
| Picture has a few bright or dark dots | A few bright or dark dots on an LCD screen is normal. It does not affect the operation of this TV. | |
| Poor reception on some channels. | Make sure that the antenna or cable TV is connected correctly and securely. | |
| If you are using an outside antenna, check the condition of the wiring and connections. | ||
| Electrical interference from nearby appliances may affect picture quality. Turn off the appliances or move your TV. | ||
| Try another channel. The problem might be limited to the broadcasting station. | ||
| Picture good, sound poor. Try another channel. The problem might be limited to the broadcasting station. | ||
| No reception of digital signals. | Make sure the auto channel scan has been completed.The auto channel scan must be completed when you set up your TV for the first time or move it to a location where previously unavailable channels are broadcast. | |
| The selected channel may not be broadcasting. | ||
| When the auto channel scan is interrupted and not completed, some channels will not be received. Make sure the auto channel scan has been completed. | ||
| The entered channel number changes automatically. | Many digital channels have alternate channel numbers. Your TV changes the numbers automatically to the ones signifying the broadcasting station. These are the numbers used for analog broadcasts. | |
| Problem Solution | |
| Remote control does not work. | If you are using an outside antenna, check the condition of the wiring and connections. |
| Check the remote control batteries. | |
| Make sure that there is no obstacle between the remote control sensor on your TV and the remote control. | |
| Test the signal output. If the signal is good, then there may be infrared sensor trouble.When there is an infrared-equipped device such as a computer is near your TV, the device may interrupt the remote control signal. Move the infrared-equipped device away from your TV, change the angle of the infrared sensor, or turn off the infrared communication function. | |
| Aim the remote control directly at the remote control sensor on the front of your TV. | |
| Reduce the distance between the remote control and your TV. | |
| Make sure that the batteries are inserted correctly. The + and - symbols on the batteries must match the + and - symbols inside the battery compartment. | |
| Misspelled captions are displayed. | Closed captioning production companies may broadcast programs without correcting the misspelling in a live broadcast. |
| Captions are not entirely displayed, or captions appear after the dialog. | Captions that are delayed a few seconds behind the actual dialog are common for live broadcasts. Most captioning production companies can display dialog at a maximum of 220 words per minute. If a dialog exceeds that rate, selective editing is used to ensure that the captions remain up to date with the current dialog. |
| Captions are displayed as a white box or no caption is displayed in a closed caption-supported program. | Interference from buildings or weather conditions may cause captioning to be incomplete. |
| Broadcasting stations may shorten the programs to insert commercials. The closed caption decoder cannot read the information of shortened programs. | |
| No caption is displayed when playing the videotape containing captions. | The videotape may be illegally copied, or the caption signal might not have been read during copying. |
| Black box is displayed in the TV screen. | The text mode is selected for caption. Select CC1, CC2, CC3, CC4, or Off. |
Specifications
Specifications are subject to change without notice.
| TV format | ATSC / NTSC-M TV standard |
| Closed caption system | §15.122/FCC (digital CC)§15.119/FCC (analog CC) |
| Channel coverage (ATSC/NTSC) | Terrestrial VHF: 2~13UHF: 14~69CATV: 2~13, A~W, W+1~W+94 (analog W+1~W+84), A-5~A-1, 5A |
| Tuning system | Channel frequency synthesized tuning system |
| Channel access | Direct access keyboard, programmable scan, and up/down |
| Sound output | 10W, 8Ω × 2 |
| Antenna input | VHF/UHF/CATV75Ω unbalanced (F-type) |
| S-Video input | Mini DIN 4-pin jack × 2Y: 1Vp-p (75Ω)C: 286mVp-p (75Ω) |
| Video input | RCA jack × 21Vp-p (75Ω) |
| Audio input | RCA jack (L/R) × 10500mV rms |
| Component video input | RCA jack × 6Y: 1Vp-p (75Ω)Pb: 700mVp-p (75Ω)Pr: 700mVp-p (75Ω) |
| HDMI input | HDMI 19-pin × 2 |
| PC input | D-Sub 15-pin × 1 (RGB)Mini jack ø3.5mm × 1 (audio) |
| Coaxial digital audio output | RCA jack × 1500mVp-p (75Ω) |
| Analog audio output | RCA jack × 2 |
| Remote control | Digital encoded infrared light system |
| Operating temperature | 41°F to 104°F (5°C to 40°C) |
| Power requirements | 120 V AC ± 10%, 60 Hz ± 0.5% |
| Power consumption (maximum) | 220 W |
| LCD | 37 inches wide XGA panel |
| Dimensions H × W × D | Without stand:26.5 × 37.5 × 5.0 inches(672.5 × 950 × 126.5 mm)With stand:28.1 × 37.5 × 11.5 inches(713 × 950 × 290 mm) |
| Weight | 45.5 lbs. (20.6 kg) |
Legal notices
FCC Part 15
This device complies with Part 15 of the FCC Rules. Operation of this product is subject to the following two conditions: (1) this device may not cause harmful interference, and (2) this device must accept any interference received, including interference that may cause undesired operation.
This equipment has been tested and found to comply within the limits for a class B digital device, pursuant to Part 15 of the FCC Rules. These limits are designed to provide reasonable protection against harmful interference in a residential installation. This equipment generates, uses, and can radiate radio frequency energy and, if not installed and used in accordance with the instructions, may cause harmful interference to radio communications. However, there is no guarantee that interference will not occur in a particular installation. If this equipment does cause harmful interference to radio or television reception, which can be determined by turning the equipment off and on, the user is encouraged to try to correct the interference by one or more of the following measures:
- Reorient or relocate the receiving antenna.
- Increase the separation between the equipment and receiver.
- Connect the equipment into an outlet on a circuit different from that to which the receiver is connected.
- Consult the dealer or an experienced technician for help.
FCC warning
Changes or modifications not expressly approved by the party responsible for compliance with the FCC Rules could void the user's authority to operate this equipment.
Copyrights
Dolby Laboratories
This product incorporates copyright protection technology that is protected by method claims of certain US patents and other intellectual property rights owned by Macrovision Corporation and other rights owners. Use of this copyright protection technology must be authorized by Macrovision Corporation, and is intended for home and other limited viewing uses only unless otherwise authorized by Macrovision Corporation. Reverse engineering or disassembly is prohibited. Manufactured under license from Dolby Laboratories. Dolby and the symbol are registered trademarks of DOLBY LABORATORIES. All rights reserved.

HDMI™
Your TV incorporates HDMI™ technology. HDMI, the HDMI Logo and High-Definition Multimedia Interface are trademarks or registered trademarks of HDMI Licensing LLC.

Energy Star
Products that have earned ENERGY STAR ® are designed to protect the environment through superior energy efficiency. Your TV is Energy Star compliant.

HDTV
The "HD TV" Logo is a trademark of EICTA.

Notices
Specifications and features are subject to change without notice or obligation.
For service and support call (800) 305-2204.
One-year limited warranty
Dynex Products ("Dynex") warrants to you, the original purchaser of this new DX-LCD37-09 ("Product"), that the Product shall be free of defects in the original manufacture of the material or workmanship for a period of one (1) year from the date of your purchase of the Product ("Warranty Period"). This Product must be purchased from an authorized dealer of Dynex brand Products and packaged with this warranty statement. This warranty does not cover refurbished product. If you notify Dynex during the Warranty Period of a defect covered by this warranty that requires service, terms of this warranty apply.
How long does the coverage last?
The Warranty Period lasts for one year (365 days) from the date you purchased the Product. The purchase date is printed on the receipt you received with the Product.
What does this warranty cover?
During the Warranty Period, if the original manufacture of the material or workmanship of the Product is determined to be defective by an authorized Dynex repair center or store personnel, Dynex will (at its sole option): (1) repair the Product with new or rebuilt parts; or (2) replace the Product at no charge with new or rebuilt comparable products or parts. Products and parts replaced under this warranty become the property of Dynex and are not returned to you. If service of products and parts are required after the Warranty Period expires, you must pay all labor and parts charges. This warranty lasts as long as you own your Dynex Product during the Warranty Period. Warranty coverage terminates if you sell or otherwise transfer the Product.
How to obtain warranty service?
If you purchased the Product at a retail store location, take your original receipt and the Product to the store you purchased it from. Make sure that you place the Product in its original packaging or packaging that provides the same amount of protection as the original packaging. If you purchased the Product from an online web site, mail your original receipt and the Product to the address listed on the web site. Make sure that you put the Product in its original packaging or packaging that provides the same amount of protection as the original packaging.
To obtain in-home warranty service for a television with a screen 25 inches or larger, call 1-888-BESTBUY. Call agents will diagnose and correct the issue over the phone or will have an Dynex-approved repair person dispatched to your home.
Where is the warranty valid?
This warranty is valid only to the original purchaser of the Product in the United States and Canada.
What does the warranty not cover?
This warranty does not cover:
- Customer instruction
- Installation
- Setup adjustments
- Cosmetic damage
- Damage due to acts of God, such as lightning strikes
- Accident
- Misuse
- Abuse
- Negligence
• Commercial use - Modification of any part of the Product
- Plasma display panel damaged by static (non-moving) images applied for lengthy periods (burn-in).
This warranty also does not cover:
• Damage due to incorrect operation or maintenance
- Connection to an incorrect voltage supply
- Attempted repair by anyone other than a facility authorized by Dynex to service the Product
- Products sold as is or with all faults
- Consumables, such as fuses or batteries
- Products where the factory applied serial number has been altered or removed REPAIR REPLACEMENT AS PROVIDED UNDER THIS WARRANTY IS YOUR EXCLUSIVE REMEDY. DYNEX SHALL NOT BE LIABLE FOR ANY INCIDENTAL OR CONSEQUENTIAL DAMAGES FOR THE BREACH OF ANY EXPRESS OR IMPLIED WARRANTY ON THIS PRODUCT, INCLUDING, BUT NOT LIMITED TO, LOST DATA, LOSS OF USE OF YOUR PRODUCT, LOST BUSINESS OR LOST PROFITS. DYNEX PRODUCTS MAKES NO OTHER EXPRESS WARRANTIES WITH RESPECT TO THE PRODUCT, ALL EXPRESS AND IMPLIED WARRANTIES FOR THE PRODUCT, INCLUDING, BUT NOT LIMITED TO, ANY IMPLIED WARRANTIES OF AND CONDITIONS OF MERCHANTABILITY AND FITNESS FOR A PARTICULAR PURPOSE, ARE LIMITED IN DURATION TO THE WARRANTY PERIOD SET FORTH ABOVE AND NO WARRANTIES, WHETHER EXPRESS OR IMPLIED, WILL APPLY AFTER THE WARRANTY PERIOD. SOME STATES, PROVINCES AND JURISDICTIONS DO NOT ALLOW LIMITATIONS ON HOW LONG AN IMPLIED WARRANTY LASTS, SO THE ABOVE LIMITATION MAY NOT APPLY TO YOU. THIS WARRANTY GIVES YOU SPECIFIC LEGAL RIGHTS, AND YOU MAY ALSO HAVE OTHER RIGHTS, WHICH VARY FROM STATE TO STATE OR PROVINCE TO PROVINCE.
Contact Dynex:
For customer service please call 1-800-305-2204
www.dynexproducts.com
Distributed by Best Buy Purchasing, LLC
7601 Penn Avenue South, Richfield, Minnesota, U.S.A. 55423-3645
© 2008 Best Buy Enterprise Services, Inc.
All rights reserved. DYNEX is a trademark of Best Buy Enterprise Services, Inc. Registered in some countries. All other products and brand names are trademarks of their respective owners.
Dynex DX-LCD37-09 Televisor con pantalla LCD de 37"
Contenido
Montaje en pared
Notas:
Notas:
Notas:
Dynex, 7601 Penn Avenue South, Richfield, Minnesota, E.U.A. 55423-3645
Distributed by Best Buy Purchasing, LLC
7601 Penn Ave. South, Richfield, MN 55423 U.S.A.
© 2008 Best Buy Enterprise Services, Inc. All rights reserved.
DYNEX is a trademark of Best Buy Enterprise Services, Inc. Registered in some countries. All other products and brand names are trademarks of their respective owners.
Distribuido por Best Buy Purchasing, LLC
7601 Penn Ave. South, Richfield, MN 55423 U.S.A.
© 2008 Best Buy Enterprise Services, Inc. Todos los derechos reservados.
- DYNEX DX-LCD37-09 37" LCD TV
- CONTENTS
- CHILD SAFETY
- IT MAKES A DIFFERENCE HOW AND WHERE YOU USE YOUR FLAT PANEL DISPLAY
- AS YOU ENJOY YOUR NEW PRODUCT, KEEP THESE SAFETY TIPS IN MIND
- THE ISSUE
- TUNE INTO SAFETY
- WALL MOUNTING
- IMPORTANT SAFETY INSTRUCTIONS
- READ INSTRUCTIONS
- RETAIN INSTRUCTIONS
- FOLLOW WARNINGS AND INSTRUCTIONS
- WATER AND MOISTURE
- CLEANING
- VENTILATION
- HEAT
- GROUNDING OR POLARIZATION
- POWER CORD PROTECTION
- ATTACHMENTS
- STAND
- SERVICING
- OVERLOADING
- OBJECT AND LIQUID ENTRY
- DAMAGE REQUIRING SERVICE
- REPLACEMENT PARTS
- SAFETY CHECK
- POWER SOURCE
- LIGHTNING
- SCREEN PROTECTION
- NON-ACTIVE PIXELS
- POWER LINES
- OUTDOOR ANTENNA GROUNDING
- NOTE TO CATV SYSTEM INSTALLER
- TV COMPONENTS
- ACCESSORIES
- SETTING UP YOUR TV INSTALLING REMOTE CONTROL BATTERIES
- TO INSTALL REMOTE CONTROL BATTERIES
- NOTES
- CONNECTING AN ANTENNA OR BASIC CABLE
- CONNECTING A CABLE OR SATELLITE BOX
- TO CONNECT A CABLE OR SATELLITE BOX
- CONNECTING AN HDMI DEVICE
- TO CONNECT AN HDMI DEVICE
- CONNECTING A DVI DEVICE
- TO CONNECT A DVI DEVICE
- CONNECTING A COMPONENT VIDEO DEVICE
- TO CONNECT A COMPONENT VIDEO DEVICE
- CONNECTING AN S-VIDEO DEVICE
- TO CONNECT AN S-VIDEO DEVICE
- CONNECTING A CAMCORDER, GAME, OR VCR
- TO CONNECT A CAMCORDER, GAME, OR VCR
- CONNECTING A DIGITAL AUDIO DEVICE
- TO CONNECT A DIGITAL AUDIO DEVICE
- CONNECTING AN ANALOG AUDIO DEVICE
- TO CONNECT AN ANALOG AUDIO DEVICE
- CONNECTING A COMPUTER
- TO CONNECT A COMPUTER
- USING YOUR TV
- TURNING YOUR TV ON OR OFF
- TO TURN YOUR TV ON OR OFF
- SETTING UP FOR THE FIRST TIME
- TO SET UP YOUR TV FOR THE FIRST TIME
- OPENING THE ON-SCREEN MENU
- TO OPEN THE ON-SCREEN MENU
- SCANNING FOR CHANNELS
- TO SCAN FOR CHANNELS
- DELETING CHANNELS FROM THE CHANNEL LIST
- TO DELETE CHANNELS FROM THE CHANNEL LIST
- ADDING CHANNELS TO THE CHANNEL LIST
- TO ADD CHANNELS TO THE CHANNEL LIST
- SELECTING THE ON-SCREEN MENU LANGUAGE
- TO SELECT THE ON-SCREEN MENU LANGUAGE
- CHANGING CHANNELS
- TO CHANGE CHANNELS
- ADJUSTING THE VOLUME
- TO ADJUST THE VOLUME
- ADJUSTING THE PICTURE
- TO ADJUST THE PICTURE
- ADJUSTING THE SOUND
- TO ADJUST THE SOUND
- SELECTING THE VIDEO INPUT SOURCE
- TO SELECT THE VIDEO INPUT SOURCE
- SELECTING THE AUDIO MODE
- TO SELECT THE DIGITAL AUDIO MODE
- TO SELECT THE ANALOG AUDIO MODE
- DISPLAYING PROGRAM INFORMATION
- TO DISPLAY DIGITAL CHANNEL INFORMATION
- TO DISPLAY ANALOG CHANNEL INFORMATION
- TO DISPLAY EXTERNAL DEVICE INFORMATION
- SELECTING THE ASPECT RATIO
- TO SELECT THE DISPLAY MODE
- SETTING THE SLEEP TIMER
- TO SET THE SLEEP TIMER
- CHECKING THE ANTENNA SIGNAL STRENGTH
- TO CHECK THE ANTENNA SIGNAL STRENGTH
- FREEZING THE PICTURE
- TO FREEZE THE PICTURE
- USING DIGITAL CLOSED CAPTIONING
- TO USE DIGITAL CLOSED CAPTIONING
- USING ANALOG CLOSED CAPTIONING
- TO USE ANALOG CLOSED CAPTIONING
- CHANGING DIGITAL CLOSED CAPTIONING STYLES
- TO CHANGE DIGITAL CLOSED CAPTIONING STYLES
- FONT STYLE
- SETTING PARENTAL CONTROLS
- SETTING THE MPAA RATING
- TO SET THE MOVIE RATING
- SETTING THE TV RATING
- TO SET THE TV RATING
- CHANGING THE PASSWORD
- TO CHANGE THE PASSWORD
- ADJUSTING THE COMPUTER IMAGE
- TO ADJUST THE COMPUTER IMAGE
- SELECTING THE HDMI AUDIO MODE
- TO SELECT THE HDMI AUDIO MODE
- MAINTAINING
- CHECKING THE REMOTE CONTROL SIGNAL
- TO CHECK THE SIGNAL WITH AN AM RADIO
- TO CHECK THE SIGNAL WITH A DIGITAL CAMERA
- TROUBLESHOOTING
- SPECIFICATIONS
- LEGAL NOTICES
- FCC PART 15
- FCC WARNING
- COPYRIGHTS
- DOLBY LABORATORIES
- HDMI™
- ENERGY STAR
- HDTV
- NOTICES
- ONE-YEAR LIMITED WARRANTY
- HOW LONG DOES THE COVERAGE LAST
- WHAT DOES THIS WARRANTY COVER
- HOW TO OBTAIN WARRANTY SERVICE
- WHERE IS THE WARRANTY VALID
- WHAT DOES THE WARRANTY NOT COVER
- DYNEX DX-LCD37-09 TELEVISOR CON PANTALLA LCD DE 37
- CONTENIDO
- MONTAJE EN PARED
- NOTAS
Brand : Dynex
Model : DX-LCD37-09
Category : Television