12230007 - Citrus juicers Exido - Free user manual and instructions
Find the device manual for free 12230007 Exido in PDF.


| Product Type | Electric masticating juicer |
| Model | 12230007 |
| Brand | Exido |
| Power Supply | 230V ~ 50Hz |
| Power Consumption | Approximately 150-200 W |
| Plug Type | BS 1363 13A (UK) with fuse |
| Main Features | Auger system, reverse function, safety lock, dual spouts for juice and pulp |
| Capacity | Juice container approx. 600 ml, pulp container approx. 800 ml |
| Materials | Plastic body, stainless steel strainer |
| Dimensions (approx.) | Height: 35 cm, Width: 20 cm, Depth: 25 cm |
| Weight (approx.) | 3.5 kg |
| Cord Length | 1.2 m |
| Dishwasher Safe Parts | Bowl, strainer holder, strainer, auger, hopper, pulp container, juice container, tamper (except motor unit) |
| Safety Features | Operates only when correctly assembled; automatic stop when hopper is removed; reverse for clearing jams |
| Maintenance | Clean immediately after use; motor unit only with damp cloth; other parts in warm soapy water or dishwasher |
| Warranty | Standard 2-year warranty, terms apply |
| Intended Use | Domestic only; for fresh fruits and vegetables |
Frequently Asked Questions - 12230007 Exido
User questions about 12230007 Exido
0 question about this device. Answer the ones you know or ask your own.
Ask a new question about this device
Download the instructions for your Citrus juicers in PDF format for free! Find your manual 12230007 - Exido and take your electronic device back in hand. On this page are published all the documents necessary for the use of your device. 12230007 by Exido.
USER MANUAL 12230007 Exido
OVERSIGT OVER APPARATETS DELE
natural_image
Exterior view of a modern kitchen juicer with labeled parts (6), (7), and (8), showing no text or symbols on the device itself.natural_image
Exterior view of a modern kitchen brush unit with labeled parts (6), (7), and (8), showing internal components without any text or symbols.F∅R APPARATET TAS I BRUK F∅RSTE GANG
To get the best out of your new juicer, please read this user guide carefully before using it for the first time.
Take particular note of the safety precautions. We also recommend that you keep the instructions for future reference.
GENERAL SAFETY INSTRUCTIONS
- The appliance is not to be used by persons with reduced sensitivity, physical or mental disabilities or persons who are unable to use the appliance, unless supervised or instructed by a person responsible for their safety.
- Keep the appliance under constant supervision while in use. Keep an eye on any children in the vicinity of the appliance when it is in use. The appliance is not a toy.
- Incorrect use of this appliance may cause personal injury and damage the appliance.
- Use for its intended purpose only. The manufacturer is not responsible for any injury or damage resulting from incorrect use or handling (see also Guarantee Terms).
- For domestic use only. Not for outdoor or commercial use.
- Remove all packaging and transport materials from the inside and outside of the appliance.
- Check that the appliance has no visible damage and that no parts are missing.
- Do not use with other cords than that supplied.
-
Check that it is not possible to pull or trip over the cord or any extension cord.
-
Turn off the appliance and remove the plug from the socket before cleaning, or when the appliance is not in use.
- Avoid pulling the cord when removing the plug from the socket. Instead, hold the plug.
- Keep the cord and appliance away from heat sources, hot objects and naked flames.
- Ensure that the cord is fully extended.
- The cord must not be twisted or wound around the appliance.
- Check regularly that neither the cord nor plug is damaged and do not use if there is any damage, or if it has been dropped on the floor, dropped in water or damaged in any other way.
- If the appliance, cord or plug has been damaged, have the appliance inspected and if necessary repaired by an authorised repairer.
- Connect to 230 V, 50 Hz only. The guarantee is not valid if the appliance is connected to incorrect voltage.
- Never try to repair the appliance yourself. Please contact the store where you bought the appliance for repairs under guarantee.
- Unauthorised repairs or modifications will invalidate the guarantee.
SPECIAL SAFETY INSTRUCTIONS
- The appliance may only be switched on once all parts are correctly fitted.
- NEVER use your fingers, kitchen utensils or similar to push ingredients down the hopper! Use the accompanying tamper.
- Never try to squeeze frozen fruit or vegetables!
- NEVER stick fingers or other objects into the spout for juice or fruit pulp.
- NEVER touch the moving parts of the appliance until it has come to a complete stop.
- Please note that the auger may still rotate for a while after you switch the appliance off.
- Never use the appliance if the strainer mesh is broken! This may cause personal injury.
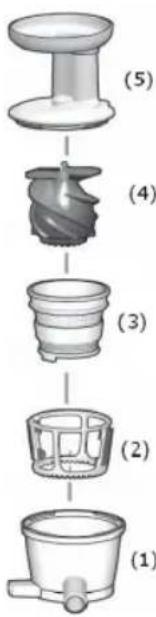
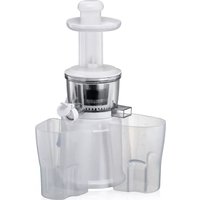
KEY TO MAIN COMPONENTS
- Bowl
- Strainer holder
- Strainer
- Auger
- Hopper
- Pulp container
- Juice container
- Tamper
natural_image
Exterior view of a modern kitchen juicer with labeled parts (6), (7), and (8), showing no text or symbols on the device itself.PRIOR TO FIRST USE
- Remove all packaging and transport materials from the inside and outside of the appliance.
- Check that the appliance has no visible damage and that no parts are missing.
- Clean all parts that come into contact with food before using the appliance for the first time (or after prolonged storage). See “Cleaning”.
USING THE APPLIANCE
Assembly before use:
- Place the motor section on a flat surface, e.g. a kitchen counter, and make sure it is standing firmly.
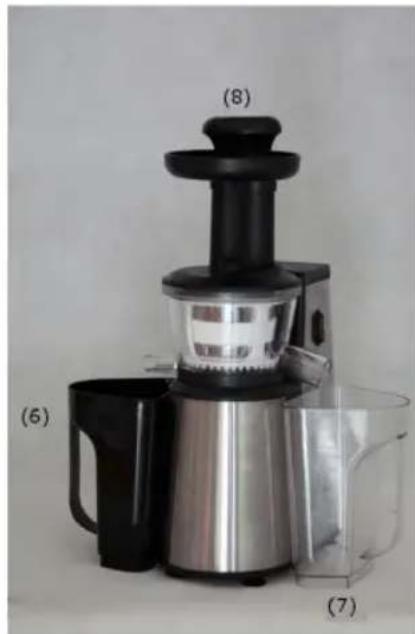
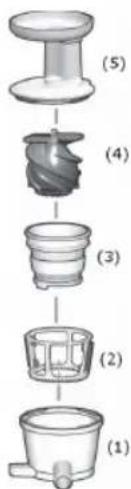
- Place the bowl (1) on the motor unit and turn it so that they lock together. Place the pulp container (6) under the flat spout and place the juice container (7) under the round spout.
- Place the strainer holder (2) in the bowl. It can only be fitted in one position. Place the strainer (3) in the strainer holder.
- Put the auger (4) into the strainer.
- Place the hopper (5) on the bowl so that the arrows on the lid and the bowl line up with each other. Turn the hopper slightly towards the symbol of the closed padlock, so the parts are locked together.
- Slide the tamper (8) down the chute. The tamper can only be fitted one way.
If the parts are not correctly assembled, the juicer will not operate. This is a safety feature.
Preparing fruits and vegetables
• Always wash fruits and vegetables thoroughly before juicing.
- It is not necessary to remove small seeds, pits or thin peels before using the appliance.
- Cut the fruit into small pieces so that they can get through the hopper.
- Fruits with thick peels such as oranges and lemons must be peeled before juicing. It is particularly important to remove all the peel (including the pith), as even small amounts of peel can impart an unpleasant taste to the juice.
- It is also necessary to remove large stones such as plum and apricot stones before juicing to avoid damaging the appliance.
Juicing
- Switch on the appliance by switching the on/off button to "ON".
- Feed the selected fruit and/or vegetables into the appliance through the hopper a little at a time, pushing them down using the tamper.
- Make sure that you turn the tamper so that the groove in the tamper fits into the hopper properly.
- Long vegetables such as carrots should be fed into the hopper pointy end first.
- Press the fruits and/or vegetables gently with the hopper. Too much presser reduces the amount of juice extracted and can damage the appliance.
-
Stop the appliance before removing the tamper to add more fruit/vegetables in order to avoid splashes.
-
The juice runs out through the round spout, while the fruit pulp comes out through the flat spout.
- If the appliance struggles to process the fruit or vegetable pieces or becomes blocked, you can run the auger backwards by pressing the on/off button to the REVERSE position and holding it in temporarily.
- Turn off the appliance by pushing the on/off button to the O position when you have finished using it.
- Take the appliance apart. First remove the tamper and then the hopper, the auger, the strainer, the strainer holder and finally the bowl. If the hopper is difficult to remove, you can press the on/off button to the REVERSE position a few times to loosen it.
TIP
- Only use fresh fruits and vegetables.
- Good candidates for juicing include pineapple, apples, cucumbers, celery, carrots, spinach, melons, tomatoes and most citrus fruits.
- The various varieties of apple yield juice with different flavours and consistency. Experiment with different combinations to find your own favourite.
- Leafy green vegetables such as cabbage and spinach can also be juiced. Roll the leaves into cylinders of an appropriate size before feeding them into the hopper.
-
Fruits such as bananas, mangoes, papayas and avocados are not suitable for juicing, as the result is often mashed fruit instead of juice.
-
All types of juice should be consumed right after juicing, as fresh juice quickly looses important nutrients as well as taste when exposed to the oxygen in the air.
- Pure apple juice turns brown quickly when exposed to air. To prevent discoloration, serve apple juice immediately after juicing or add a little lemon juice.
- Remember that fruit pulp need not be thrown away. It can often be used as filling in carrot cakes, vegetable lasagne, muffins etc.
CLEANING
- The appliance must be cleaned immediately after use so fruit pulp and juice does not get stuck in the parts of the appliance.
- Always switch off at the wall socket and unplug it before cleaning the appliance.
- Clean the motor unit using a damp cloth and, if necessary, a little detergent. Never use abrasive cleaning agents or solvents. The motor section must not be submerged in any form of liquid.
- All parts other than the motor unit must be cleaned in warm water with a little washing-up liquid or in dishwasher. Remove the rubber plug from the inner end of the flat spout to rinse out the fruit pulp. Replace the rubber plug.
- Dry the parts thoroughly before they are replaced and before storing the appliance.
FOR UNITED KINGDOM ONLY
Plug wiring:
This product is fitted with a BS 1363 13-amp plug. If you have to replace the fuse, only those that are ASTA or BSI approved to BS1362 and with a rated current of 13 amps should be used. If there is a fuse cover fitted, this cover must be refitted after changing the fuse. If the fuse cover is lost or damaged, the plug must not be used. You must also check if the socket outlets in your home fit with the plug of the appliance. If the socket outlet in your home does not fit with the plug, the plug must be removed and disposed of safely as insertion of the plug into the socket is likely to cause electric hazard. A replacement plug should be wired according to following description.
Important
This appliance must be earthed. The wires in the cord set are coloured thus:
BLUE- Neutral, Brown-Live, Green& Yellow-earth (For detachable plug only)
As the colours of the wires in the mains lead of this appliance may not correspond with the coloured markings identifying the terminals in your plug, proceed as follows:
The wire that is coloured Green& Yellow must be connected to the terminal in the plug that is marked with the letter E or by the earth symbol,or coloured green & yellow.
The wire that is coloured blue must be connected to the terminal that is marked with the letter N or coloured black.
The wire that is couloured brown must be connected to the terminal that is marked with the letter L or coloured red.
INFORMATION ON DISPOSAL AND RECYCLING OF THIS PRODUCT
Please note that this Adexi product is marked with this symbol: ✗
This means that this product must not be disposed of along with ordinary household waste, as electrical and electronic waste must be disposed of separately.
In accordance with the WEEE directive, every member state must ensure correct collection, recovery, handling and recycling of electrical and electronic waste. Private households in the EU can take used equipment to special recycling stations free of charge. In some member states you can in certain cases return used equipment to the retailer from whom you purchased it, if you are purchasing new equipment. Contact your retailer, distributor or the municipal authorities for further information on what to do with electrical and electronic waste.
WARRANTY TERMS
The warranty does not apply:
- if the above instructions have not been followed
- if the appliance has been interfered with
- if the appliance has been mishandled, subjected to rough treatment, or has suffered any other form of damage
- if the appliance is faulty due to faults in the electricity supply.
Due to the constant development of our products in terms of function and design, we reserve the right to make changes to the product without prior warning.
FREQUENTLY ASKED QUESTIONS
If you have any questions regarding the use of the appliance and cannot find the answer in this user guide, please try our website at www.adexi.eu.
Go to the “Consumer Services” menu and click on “Frequently Asked Questions” to view the most frequently asked questions.
You can also see contact details on our website if you need to contact us for technical questions, repairs, accessories or spare parts.
IMPORTER
Adexi Group
www.adexi.eu
We cannot be held responsible for any printing errors
DE
EINLEITUNG
natural_image
Exterior view of a modern kitchen brush unit with labeled parts (6), (7), and (8) (no text or symbols on the device itself)VOR DEM ERSTMALIGEN GEBRAUCH
- OVERSIGT OVER APPARATETS DELE
- F∅R APPARATET TAS I BRUK F∅RSTE GANG
- GENERAL SAFETY INSTRUCTIONS
- SPECIAL SAFETY INSTRUCTIONS
- KEY TO MAIN COMPONENTS
- PRIOR TO FIRST USE
- USING THE APPLIANCE
- Assembly before use:
- Preparing fruits and vegetables
- Juicing
- TIP
- CLEANING
- FOR UNITED KINGDOM ONLY
- Important
- BLUE- Neutral, Brown-Live, Green& Yellow-earth (For detachable plug only)
- INFORMATION ON DISPOSAL AND RECYCLING OF THIS PRODUCT
- WARRANTY TERMS
- FREQUENTLY ASKED QUESTIONS
- IMPORTER
- DE
- EINLEITUNG
- VOR DEM ERSTMALIGEN GEBRAUCH
Brand : Exido
Model : 12230007
Category : Citrus juicers