
S351X-5 - Cooker SMEG - Free user manual and instructions
Find the device manual for free S351X-5 SMEG in PDF.


| Type of product | Freestanding cooker |
| Energy source | Gas hob (natural gas or LPG), electric oven |
| Dimensions (HxWxD) | 85 x 90 x 60 cm |
| Weight | 70 kg |
| Power supply for oven | 220-240 V, 50/60 Hz, 16 A |
| Oven capacity | 65 liters |
| Oven functions | Convection, grill, static, defrost |
| Hob burners | 4 gas burners (auxiliary, semi-rapid, rapid, triple ring) |
| Burner power | From 1.0 kW to 3.5 kW |
| Ignition | Automatic electronic ignition |
| Safety devices | Flame failure device on all burners, oven door safety switch |
| Child lock | Electronic control lock |
| Oven cleaning | Enamel interior, easy-clean |
| Spare parts availability | Through Smeg authorized service centers |
| Reparability index | 8.5/10 |
| Warranty | 2 years (EU) |
Frequently Asked Questions - S351X-5 SMEG
User questions about S351X-5 SMEG
0 question about this device. Answer the ones you know or ask your own.
Ask a new question about this device
Download the instructions for your Cooker in PDF format for free! Find your manual S351X-5 - SMEG and take your electronic device back in hand. On this page are published all the documents necessary for the use of your device. S351X-5 by SMEG.
USER MANUAL S351X-5 SMEG
INSTRUCTIONS FOR THE INSTALLER: these are intended for the qualified technician who must install the appliance, set it functioning and carry out an inspection test.
INSTRUCTIONS FOR THE USER: these contain user advice, description of the controls and the correct procedures for cleaning and maintenance of the appliance.
1. INSTRUCTIONS FOR SAFE AND PROPER USE

THIS MANUAL IS AN INTEGRAL PART OF THE APPLIANCE AND THEREFORE MUST BE KEPT IN ITS ENTIRETY AND IN AN ACCESSIBLE PLACE FOR THE WHOLE WORKING LIFE OF THE OVEN. WE ADVISE CAREFUL READING OF THIS MANUAL AND ALL THE INSTRUCTIONS THEREIN BEFORE USING THE OVEN. INSTALLATION MUST BE CARRIED OUT BY QUALIFIED PERSONNEL IN ACCORDANCE WITH THE REGULATIONS IN FORCE. THIS APPLIANCE IS INTENDED FOR DOMESTIC USES AND CONFORMS TO CURRENT REGULATIONS IN FORCE. THE APPLIANCE HAS BEEN BUILT TO CARRY OUT THE FOLLOWING FUNCTIONS: COOKING AND HEATING-UP OF FOOD. ALL OTHER USES ARE CONSIDERED IMPROPER.
THE MANUFACTURER DECLINES ALL RESPONSIBILITY FOR IMPROPER USE.

DO NOT LEAVE THE PACKING IN THE HOME ENVIRONMENT. SEPARATE THE VARIOUS WASTE MATERIALS AND TAKE THEM TO THE NEAREST SPECIAL GARBAGE COLLECTION CENTRE.

IT IS OBLIGATORY FOR THE ELECTRICAL SYSTEM TO BE EARTHED ACCORDING TO THE METHODS REQUIRED BY SAFETY RULES.

WHEN LINKING UP TO MAINS BY PLUG AND SOCKET, MAKE SURE THAT BOTH ARE COMPATIBLE AND CONNECT BY MEANS OF A POWER CABLE COMPLYING WITH APPLICABLE REGULATIONS. THE SOCKET MUST BE ACCESSIBLE AFTER THE APPLIANCE HAS BEEN BUILT IN.
NEVER ATTEMPT TO REPAIR THE APPLIANCE.
Introduction

ALWAYS CHECK THAT THE CONTROL KNOBS ARE IN THE "ZERO" (OFF) POSITION WHEN YOU FINISH USING THE OVEN.

NEVER PUT INFLAMMABLE OBJECTS IN THE OVEN: THEY COULD BE ACCIDENTALLY CATCH LIGHT AND CAUSE FIRES.

DURING USE THE APPLIANCE BECOMES VERY HOT. TAKE CARE NOT TO TOUCH THE HEATING ELEMENTS INSIDE THE OVEN.
THE I.D. PLATE WITH TECHNICAL DATA, REGISTRATION NUMBER AND BRAND NAME IS POSITIONED VISIBLY ON THE OVEN DOOR FRAME. THE PLATE MUST NOT BE REMOVED.
THE OVEN IS DESIGNED FOR USE BY ADULTS. DO NOT ALLOW CHILDREN TO GO NEAR OR PLAY WITH IT.

This appliance is marked according to the European Directive 2002/96/EC on Waste Electrical and Electronic Equipment (WEEE).
This guideline is the framework for a European-wide validity of return and recycling of waste electrical and electronic equipment.
Before the appliance is put into operation, all labels and protective films applied inside or outside must be removed.

The manufacturer declines all responsibility for damage to persons or things caused by non-observance of the above guidelines or by interference with any part of the appliance or by the use of non-original spares.
2. INSTALLATION
2.1 Electrical connection

Check that the mains voltage and power cable ratings are as per the information provided on the label attached to the oven door frame.
This label must never be removed.

It is obligatory for the electrical system to be earthed according to the methods required by safety rules.

If a plug and socket connection is being used, make sure that the plug and socket are compatible. Avoid use of adapters and shunts as these could cause overheating and risk of burns.

If a fixed connection is being used, fit cable with an omnipolar circuit breaker with a contact opening gap equal to or greater than 3 mm in an easily accessible position near to the oven.

For operation on 220-240V ~: use an H05RR-F / H05V2V2-F type three-core cable (3 x 1.5 mm²).
The cable end to be connected to the appliance must be provided with a ground wire (yellow-green) at least 20 mm longer.

2.1.1 Ovens with hob controls
In the ovens with hob controls, the power cable is not supplied. Use a H05RR-F or H05RN-F rubber-sheathed cable, making sure that it does not come into contact with any external metal parts of the oven when routing.
Remove the rear cover by loosening the relevant screws to gain access to the terminal strip. If necessary, change the jumper configuration as shown in the diagram, then connect the wires, making sure that the earth wire is at least 20 mm longer than the others. Secure the power cable to the oven by means of an appropriate fitting.


For operation on 220-240V ~: use an H05RR-F / H05V2V2-F type three-core cable (3 x 4 mm²).
For operation on 380-415V2N~: use an H05RR-F / H05V2V2-F type four-core cable (4 x 2.5 mm²).
For operation on 380-415V3N~: use an H05RR-F / H05V2V2-F type five-core cable (5 x 1.5 mm²).
The cable end to be connected to the appliance must be provided with an earth wire (yellow-green) at least 20 mm longer.


The manufacturer declines all responsibility for damage to persons or things caused by non-observance of the above guidelines or by interference with any part of the appliance.
2.2 Installing the oven
The oven is designed for installation into any piece of furniture as long as it is heat-resistant. Proceed according to the dimensions shown in Figures 1, 2 and 3. For installing under a work top, follow the dimensions given in Figure 3. For installing under a work top beneath a hob with controls connected to the oven, ensure a minimum clearance from any side walls of at least 110 mm as shown in Figure 1.
For installing in a column, follow the dimensions given in Figure 2, allowing for a clearance of 80 to 90 mm at the top and sides of the column. Tighten the four screws (ref. A) inside the frame to secure (Fig. 1).
For installing beneath a separate hob, allow for a rear and bottom clearance as shown in Figure 1 (ref. B). See relevant instructions for fitting and securing the hob.


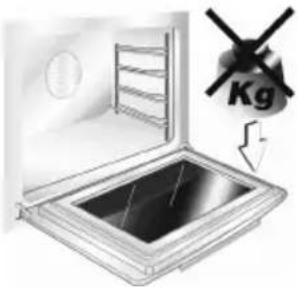
Never use the oven door to lever the oven into place when fitting.
Avoid exerting too much pressure on the oven door when open.
2.3 Connecting the hob to the oven
Once installed, the hob must be connected to the oven. Install the oven allowing enough room for the following operations to take place.
- Connect the earth wire (yellow-green) of the hob to the earth terminal A of the oven (see figure).
- Fit the hob connectors into the appropriate sockets in the top cover of the oven. Make sure that the colours and symbols of the connectors match those of the oven sockets.
- If the hob is equipped with a connector for the residual heat indicator, this must be fitted into the free socket on the right hand side.
The oven can now be fully mounted into the cabinet; make sure that the power cable is properly routed and does not come into contact with parts which may become hot during operation.

3. DESCRIPTION OF CONTROLS
3.1 Front control panel
All the oven controls are grouped together on the front panel.
STATIC MODEL
5-FUNCTION MODEL

6- FUNCTION MODEL


7- FUNCTION MODEL

8- FUNCTION MODEL
STATIC MODEL + HOB CONTROLS

5-FUNCTION MODEL + HOB CONTROLS
6-FUNCTION MODEL + HOB CONTROLS

FUNCTION CONTROL KNOB (static oven)
Cooking temperature is selected by turning the knob clockwise to the desired setting, between 50° and 240 - 250°C (depending on models).

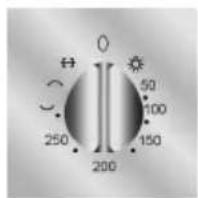
This knob allows selection of either the bottom (_) or top (grill) (_) heating element. A further symbol ↔ at end of knob rotation permits to turn on the spit motor and the top grill heating element.
THERMOSTAT KNOB (multifunction oven)
Cooking temperature is selected by turning the knob clockwise to the desired setting, between 50° and 240 - 250°C (depending on models).
Maximum temperature in models with front glass panel is 260°C.

THERMOSTAT INDICATOR LIGHT
When this light comes on, the oven is heating up. When this light goes out, the preset heating temperature has been reached. When the light flashes, the temperature inside the oven is steady.

FUNCTION CONTROL KNOB
Rotate the knob in either direction to select desired function from the following:


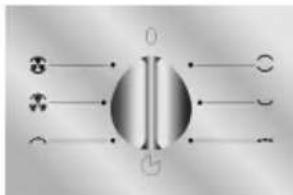


NO FUNCTION SET

OVEN LIGHT

UPPER AND LOWER HEATING ELEMENT

LOWER HEATING ELEMENT

HALF GRILL ELEMENT

FULL GRILL ELEMENT

GRILL ELEMENT + VENTILATION

FULL GRILL ELEMENT + VENTILATION

UPPER AND LOWER HEATING ELEMENT + VENTILATION UPPER AND LOWER HEATING ELEMENT + VENTILATED HEATING ELEMENT VENTILATED HEATING ELEMENT


DEFROSTING
MINUTE COUNTER KNOB
Turn the knob clockwise to the desired time. Time is expressed in minutes (maximum 55 minutes).

Adjustment is continuous so that intermediate times between markings can also be set. Alarm activation at end of pre-set time does not turn off the oven (no end of cooking).
TIMER KNOB
Lets you choose manual cooking or the timer with automatic turn-off of the oven when done.

For manual control of cooking time, turn the knob anticlockwise to the symbol 🎨
Instructions for the user
To set cooking time turn the knob clockwise. The numbers from 5 to 90 correspond to minutes. Adjustment is progressive and intermediate positions between the numbers shown may be used.
At the end of programmed cooking, an audible alarm sounds which goes off automatically after 4-5 seconds.
HOB TOP CONTROL KNOB
Used to control the temperature on the hob. Rotate clockwise to set to desired value (2 to 12).

HOB CONTROL KNOB WITH DUAL ZONES
Used to select heating zone in plates with dual heating zones.


Rotating the knob clockwise from between 2 to 12 heats the inner zone within the small diameter.
Setting knob to Ⓞ or Ⓞ and releasing it (knob returns to 12) causes both zones to be heated. To adjust heat intensity, turn the knob anticlockwise to the desired value.
To return to heating inside the inner zone only, set knob first to 0 and then to any value between 2 and 12 as desired.
IMPORTANT
(in models with flush controls only)
To access to the control knobs simply press them and they will spring out into the operating position (fig. A).
They must remain out in this position while the oven is in operation to prevent them from overheating. To return them to the retracted position, simply press down until the catch engages.
To open the oven door, press the handle and it will spring out into the operating position (fig. B). It must remain in this position while the oven is in operation to prevent it from overheating.
A
B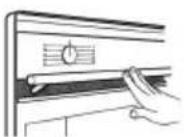
4. USE OF THE OVEN
4.1 Warnings and general advice
Before using the oven for the first time, pre-heat it to maximum temperature (250°C) long enough to burn off any manufacturing oily residues which could give the food a bad taste.

During cooking, do not cover the bottom of the oven with aluminium or tin foil and do not place pans or oven trays on it as this may damage the enamel coating. If you wish to use greaseproof paper, place it so that it will not interfere with the hot air circulation inside the oven.

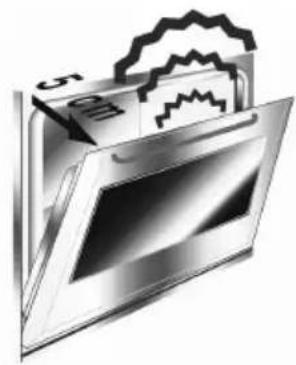
To prevent any steam in the oven creating problems, open the door in two stages: half open (5 cm approx.) for 4-5 seconds and then fully open. To access food, always leave the door open as short a time as possible to prevent the temperature in the oven from falling and ruining the food.
4.2 Cooling system (certain models only)
The oven is equipped with a cooling system which automatically comes on when the oven is turned on.
Fan operation causes a normal flow of air which exits at the bottom part of the oven front which may continue for a brief period of time even after the oven has been turned off.

4.3 Oven light
To turn on the oven light in models with static oven, rotate the temperature knob clockwise to the first setting aligned with the lamp symbol (☀️). The light will remain on throughout the entire cooking operation.
In the multifunction models, the inside oven light may be turned on by simultaneously rotating the function selector knob and the timer knob. When the oven is not working, the light comes on by simply opening the door.
5. AVAILABLE ACCESSORIES
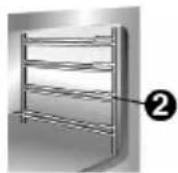
The oven features 4 support positions for shelves and pans of different height.


Some models do not feature all accessories.
Chrome shelf: useful for holding cooking vessels.
Grill mesh: for placing above grill pan to allow juices to drip into pan below.
Roasting/Grill pan: to be used for roasting or grilling.
Enamel tray: for baking cakes, pizza and oven desserts.
Rotisserie/Spit frame (in models with static oven only): to be inserted in the oven guides before fitting the spit.
Rotisserie/Spit (in models with static oven only): suitable for cooking whole chickens, sausages and any other food requiring even cooking on all surfaces.
Roof liner/Grill guard: removing this simplifies cleaning procedures inside the oven.
Chromium-plated handle for removing hot shelves and pans from the oven. Be sure to wear oven gloves when in use.


Accessories available on request
Original accessories may be ordered from any Authorised Service Centre.

Instructions for the user


6. COOKING HINTS
In fan-assisted mode preheating should be carried out at 30/40°C above the cooking temperature. This considerably shortens cooking times and reduces power consumption, as well as giving better cooking results.

Keep the oven door closed during cooking
6.1 Traditional cooking (multifunction models)

FUNCTION SWITCH

THERMOSTAT SWITCH
50 ÷ 250 °C
This traditional cooking method, in which heat comes from above and below, is suitable for cooking food on a single level. You have to preheat the oven until the set temperature is reached. Place the food in the oven only after the thermostat indicator light has turned off. Very fatty meats may be put in when the oven is still cold. Put frozen meat in immediately, without waiting for it to thaw. The only precaution you need to take is to set the temperature about 20°C lower and cooking time about 1/4 longer than you would for fresh meat.
6.2 Fan cooking (multifunction models)

FUNCTION SWITCH

THERMOSTAT SWITCH
5 0 ÷ 2 5 0 °C

This system is suitable for cooking on several levels, including different types of food (fish, meat etc.), without the tastes and smells mingling. Air circulation in the oven ensures a uniform distribution of heat.

Multiple cooking is possible as long as the cooking temperature of the different foods is the same.
6.3 Grill cooking

FUNCTION SWITCH

THERMOSTAT SWITCH


Permits rapid browning of foods. You are advised to place the pan in the highest position. When cooking small items for a short time the pan should be in the highest position. For larger items requiring longer cooking times, the pan should be lowered to avoid food being burned on top before being thoroughly cooked.

Grill function must be used only with the door closed.
Keep the oven door closed during grilling. Grilling with the door open could permanently damage the oven and affect safety of operation.
6.4 Fan grilling (multifunction models)

FUNCTION SWITCH

THERMOSTAT SWITCH
200

Ensures uniform heat distribution with greater heat penetration into the food. Food will be lightly browned on the outside and remain soft inside. Keep the oven door closed during cooking. Heating up time must not exceed 60 minutes.

Keep the oven door closed during grilling. Grilling with the door open could permanently damage the oven and affect safety of operation.
6.5 Delicate cooking (in some models only)
 | |
| FUNCTION SWITCH |  |
| THERMOSTAT SWITCH | 50 ÷ 250°C |

Ideal for pastries and cakes with a liquid surface and little sugar and moist desserts in moulds. Excellent results can also be achieved in completing cooking at the base and with dishes requiring heat in the lower area in particular. The pan is best inserted in the lowest position.
6.6 Defrosting (multifunction models)
 | |
| FUNCTION SWITCH |  |
| THERMOSTAT SWITCH IN POSITION | 0 |

The flow of air produced by the fan ensures quicker defrosting. The air circulating inside the oven is at room temperature.

The advantage of defrosting at room temperature is that it does not alter the taste and appearance of the food.
6.7 Spit roasting (models with static oven)

THERMOSTAT SWITCH


Prepare the food on the spit rod and block fork screws A. Insert the frame B in the third level from the bottom. Remove handle D and position the spit rod with the handle holder E in the guide on frame B. Completely fit frame B until the tip of the spit rod fits into hole C on the back wall of the oven. Place an oven dish F on the bottom guide and pour in a little water to prevent smoke from forming.

It is normal for the thermostat light to flash during cooking. This indicates the temperature inside the oven is regular.

6.8 Recommended cooking table
Cooking times, especially meat, vary according to the thickness and quality of the food and to consumer taste.
TRADITIONAL COOKING
| SHELF(1 IS LOWEST) | TEMPERATUREPOSITION(°C) | TIMEIN MINUTES (*) | |
| FIRST COURSES | |||
| LASAGNE | 2 - 3 | 210 - 230 | 30 |
| OVEN-BAKED PASTA | 2 - 3 | 210 - 230 | 40 |
| MEAT | |||
| ROAST VEAL | 2 | 170 - 200 | 30 - 40 / KG. |
| ROAST BEEF | 2 | 210 - 240 | 30 - 40 / KG. |
| ROAST PORK | 2 | 170 - 200 | 30 - 40 / KG. |
| CHICKEN | 2 | 170 - 200 | 45 - 60 |
| DUCK | 2 | 170 - 200 | 45 - 60 |
| GOOSE - TURKEY | 2 | 140 - 170 | 45 - 60 |
| RABBIT | 2 | 170 - 200 | 50 - 60 |
| LEG OF LAMB | 2 | 170 - 200 | 40 - 50 |
| FISH 1 - 2 170 - 200 ACCORDING TO | |||
| SIZE | |||
| PIZZA 1 - 2 210 - 240 40 - 45 | |||
| DESSERTS | |||
| SHORT PASTRY | 1 - 2 | 170 - 200 | 15 - 20 |
| CIAMBELLA | 1 - 2 | 165 | 35 - 45 |
| BRIOCHES | 1 - 2 | 170 - 200 | 40 - 45 |
| FRUIT CAKE | 1 - 2 | 170 - 200 | 20 - 30 |
| PARADISE CAKE | 1 - 2 | 170 | 60 |
| APPLE CAKE | 1 - 2 | 190 | 60 |
| RICE CAKE | 1 - 2 | 180 | 60 |
(*) = WITH PREHEATED OVEN
GRILLING
| SHELF(1 IS LOWEST) | TIME INPOSUNITS | ||
| FIRST SIDE SECOND SIDE | |||
| PORK CHOPS | 4 | 7 - 9 | 5 - 7 |
| FILLET OF PORK | 3 | 9 - 11 | 5 - 9 |
| FILLET OF BEEF | 3 | 9 - 11 | 9 - 11 |
| LIVER | 4 | 2 - 3 | 2 - 3 |
| VEAL ESCALOPES | 4 | 7 - 9 | 5 - 7 |
| HALF CHICKEN | 3 | 9 - 14 | 9 - 11 |
| SAUSAGES | 4 | 7 - 9 | 5 - 6 |
| MEAT-BALLS | 4 | 7 - 9 | 5 - 6 |
| FISH FILLETS | 4 | 5 - 6 | 3 - 4 |
| TOAST | 4 | 2 - 4 | 2 - 3 |
FAN COOKING


| SHELF(1 IS LOWEST) | TEMPERATURE(°C) | POSITIONTIMEIN MINUTES | |
| FIRST COURSES | |||
| LASAGNE | 2 | 190 - 210 | 20 - 25 |
| OVEN-BAKED PASTA | 2 | 190 - 210 | 25 - 30 |
| CREOLE RICE | 2 | 190 - 220 | 20 - 25 |
| MEAT | |||
| ROAST VEAL | 2 | 150 - 170 | 65 - 90 |
| ROAST PORK | 2 | 150 - 160 | 70 - 100 |
| ROASTED BEEF | 2 | 160 - 170 | 65 - 90 |
| FILLET OF BEEF | 2 | 160 - 180 | 35 - 45 |
| ROAST LAMB | 2 | 130 - 150 | 100 - 130 |
| ROAST BEEF | 2 | 170 - 180 | 40 - 45 |
| ROAST CHICKEN | 2 | 170 | 70 - 90 |
| ROAST DUCK | 2 | 160 - 170 | 100 - 160 |
| ROAST TURKEY | 2 | 150 - 160 | 160 - 240 |
| ROAST RABBIT | 2 | 150 - 160 | 80 - 100 |
| ROAST HARE | 2 | 160 - 170 | 30 - 50 |
| ROAST PIGEON | 2 | 140 - 170 | 15 - 25 |
| FISH 2 - 3 150 - 170 ACCORDING | |||
| TO SIZE | |||
| PIZZA | 2 - 3 | 210 - 240 | 30 - 50 |
| BREAD | 2 - 3 | 190 - 210 | 40 |
| TOAST | 1 - 2 | 220 - 240 | 7 |
| DESSERTS | |||
| CIAMBELLA | 2 - 3 | 150 - 170 | 35 - 45 |
| FRUIT CAKE | 2 - 3 | 170 - 190 | 40 - 50 |
| BRIOCHES | 2 - 3 | 160 - 170 | 40 - 60 |
| SHORT PASTRY | 2 - 3 | 170 - 180 | 20 |
| RICE CAKE | 2 - 3 | 170 | 60 |
| APPLE CAKE | 2 - 3 | 180 | 60 |
| PARADISE CAKE | 2 - 3 | 160 | 60 |
7. CLEANING AND MAINTENANCE

NEVER USE A STEAM JET TO CLEAN THE APPLIANCE.

Before carrying out any maintenance, switch off the power supply to the machine.
7.1 Cleaning stainless steel
To keep stainless steel in good condition it should be cleaned regularly after use. Let it cool first.
7.1.1 Ordinary Daily Cleaning
To clean and preserve the stainless steel surfaces, always use only specific products that do not contain abrasives or chlorine-based acids.
How to use: pour the product on a damp cloth and wipe the surface, rinse thoroughly and dry with a soft cloth or leather.
7.1.2 Food stains or residues
Do not use metallic sponges or sharp scrapers: they will damage the surface.
Use normal non-abrasive products for steel, and a wooden or plastic tool if necessary.
Rinse thoroughly and dry with a soft cloth or leather.
Do not allow residues of sugary foods (such as jam) to set inside the oven. If left to set for too long, they might damage the enamel lining of the oven.

7.2 Cleaning of the oven (without self-cleaning panels)
For best oven upkeep, clean regularly after having allowed it to cool. Take out all removable parts.

Instructions for the user
- Clean the oven grill and side guides with hot water and non-abrasive detergent. Rinse and dry.
- The oven should be operated at the maximum temperature for about 15/20 minutes after using specific products, to eliminate the residues deposited inside the oven.
- For easier cleaning, the door can be removed (see P. 8.2)
7.3 Self-cleaning liners (only on some models)
The oven is equipped with continuous self-cleaning enamelled liners.
These liners make the oven easier to clean and ensure its efficiency over time.
7.3.1 Using the self-cleaning liners
Periodically, to prevent food residues and unpleasant smells from accumulating inside the oven, the appliance should be operated empty at temperatures of not less than 200°C for a time varying from 30 to 60 minutes, in order to allow the self-cleaning liners to oxidise the residues present; when the oven has cooled, these will then be removed with a damp sponge.
7.3.2 Looking after the self-cleaning liners
The liners should not be cleaned with abrasive creams or ordinary detergents. Use a damp sponge only, so as not to damage the special characteristics of the enamel which coats the liners.
7.3.3 Assembling the self-cleaning liners
- Remove all accessories from the oven; Remove the side supports (fig.1);
- Extract the side liners "F" and "G" (fig. 2);
- Remove the back panel "A" after undoing the threaded ring-nut "C" (fig. 2).
- Incorrect installation of the rear panel can lead to uneven cooking.


7.4 Door glass
The door glass should always be kept clean. Use absorbent kitchen paper to clean. In case of tough spots, clean with a damp sponge using regular detergent.
8. ADDITIONAL MAINTENANCE
The oven may require additional maintenance or replacement of parts subject to wear such as seals, bulbs, and so on. The following instructions describe how to carry out these minor maintenance operations.
Before any intervention, disconnect the power supply.
8.1 Replacement of light bulb
Remove the bulb protector A by turning anticlockwise and change bulb B (in the 8-function model with front glass panel change the halogen bulb C) with a similar one. Re-fit the bulb protector A.


Only use oven bulbs (T 300°C).
8.2 Removing the door
Raise levers on each hinge A to lock the hinges before attempting to remove the door. Hold the door on both sides with both hands near hinges B. Lift up the door forming an angle of about 45° and remove. To refit, slide the hinges A into slots in oven frame. Locate the grooves (figure C) over frame of oven in hinge cut out, lower the door and release the locking levers (figure B).

8.3 Oven door seal
To permit thorough cleaning of the oven, the seal may be removed. Before removing the seal, take off the door as described above. Once the door has been taken off, lift the tabs at the corners as shown in the figure.
After cleaning, refit the seal with the longer side horizontal and insert the tabs into the appropriate holes starting from the top ones.

- INSTRUCTIONS FOR SAFE AND PROPER USE
- INTRODUCTION
- INSTALLATION
- ELECTRICAL CONNECTION
- OVENS WITH HOB CONTROLS
- INSTALLING THE OVEN
- CONNECTING THE HOB TO THE OVEN
- DESCRIPTION OF CONTROLS
- FRONT CONTROL PANEL
- FUNCTION CONTROL KNOB (STATIC OVEN)
- THERMOSTAT KNOB (MULTIFUNCTION OVEN)
- THERMOSTAT INDICATOR LIGHT
- FUNCTION CONTROL KNOB
- MINUTE COUNTER KNOB
- TIMER KNOB
- INSTRUCTIONS FOR THE USER
- HOB TOP CONTROL KNOB
- HOB CONTROL KNOB WITH DUAL ZONES
- IMPORTANT
- (IN MODELS WITH FLUSH CONTROLS ONLY)
- USE OF THE OVEN
- WARNINGS AND GENERAL ADVICE
- COOLING SYSTEM (CERTAIN MODELS ONLY)
- OVEN LIGHT
- AVAILABLE ACCESSORIES
- ACCESSORIES AVAILABLE ON REQUEST
- COOKING HINTS
- TRADITIONAL COOKING (MULTIFUNCTION MODELS)
- FUNCTION SWITCH
- THERMOSTAT SWITCH
- FAN COOKING (MULTIFUNCTION MODELS)
- GRILL COOKING
- FAN GRILLING (MULTIFUNCTION MODELS)
- DELICATE COOKING (IN SOME MODELS ONLY)
- DEFROSTING (MULTIFUNCTION MODELS)
- SPIT ROASTING (MODELS WITH STATIC OVEN)
- RECOMMENDED COOKING TABLE
- CLEANING AND MAINTENANCE
- CLEANING STAINLESS STEEL
- ORDINARY DAILY CLEANING
- FOOD STAINS OR RESIDUES
- CLEANING OF THE OVEN (WITHOUT SELF-CLEANING PANELS)
- SELF-CLEANING LINERS (ONLY ON SOME MODELS)
- USING THE SELF-CLEANING LINERS
- LOOKING AFTER THE SELF-CLEANING LINERS
- ASSEMBLING THE SELF-CLEANING LINERS
- DOOR GLASS
- ADDITIONAL MAINTENANCE
- REPLACEMENT OF LIGHT BULB
- REMOVING THE DOOR
- OVEN DOOR SEAL
Brand : SMEG
Model : S351X-5
Category : Cooker