
Fatmax BC8S - Battery charger STANLEY - Free user manual and instructions
Find the device manual for free Fatmax BC8S STANLEY in PDF.

| Product Type | Battery Charger |
| Brand | Stanley |
| Model | Fatmax BC8S |
| Input Voltage | 120 VAC, 60 Hz |
| Input Current | 1.8 A |
| Output Voltage | 12 VDC |
| Output Current | 2 A or 8 A (selectable) |
| Charging Modes | Motorcycle Mode and Vehicle Mode |
| LED Indicators | Power (green), Charging (yellow), Charged (green), Reverse Polarity (red), Motorcycle Mode (green), Vehicle Mode (green) |
| Mode Selection | Push button to toggle between Motorcycle and Vehicle modes |
| Battery Compatibility | 12V lead-acid batteries only (not for dry-cell batteries) |
| Charging Connectors | Battery clamps, terminal rings, and 12V DC accessory plug |
| AC Plug Type | Polarized 120V plug |
| Float Charge Mode | Automatic maintenance charging when battery is full |
| Reverse Polarity Protection | Red LED warning and automatic shutdown |
| Safety Features | Spark-proof design, overload protection, GFCI recommended |
| Fuse Rating (DC accessory plug) | 10 A |
| Operating Environment | Indoor, dry location; not for rain or wet areas |
| Compliance | FCC Part 15 Class B |
| Warranty | One-year limited warranty |
| Dimensions (approx.) | Not specified in manual, typical charger size |
| Weight (approx.) | Not specified in manual, typical charger weight |
| Storage | Clean, dry, cool place; coils cords loosely |
Frequently Asked Questions - Fatmax BC8S STANLEY
User questions about Fatmax BC8S STANLEY
0 question about this device. Answer the ones you know or ask your own.
Ask a new question about this device
Download the instructions for your Battery charger in PDF format for free! Find your manual Fatmax BC8S - STANLEY and take your electronic device back in hand. On this page are published all the documents necessary for the use of your device. Fatmax BC8S by STANLEY.
USER MANUAL Fatmax BC8S STANLEY
natural_image
Black and white photo of a Stanley ETAMAX 8 AMP charger with visible wiring and terminal connectors (no readable text beyond branding)English page 3
Español pagina 10
SAVE THIS INSTRUCTION MANUAL FOR FUTURE REFERENCE. CONSERVE ESTE MANUAL PARA FUTURAS CONSULTAS.
© 2014 Baccus Global LLC
Boca Raton, FL 33432
(877) 571-2391


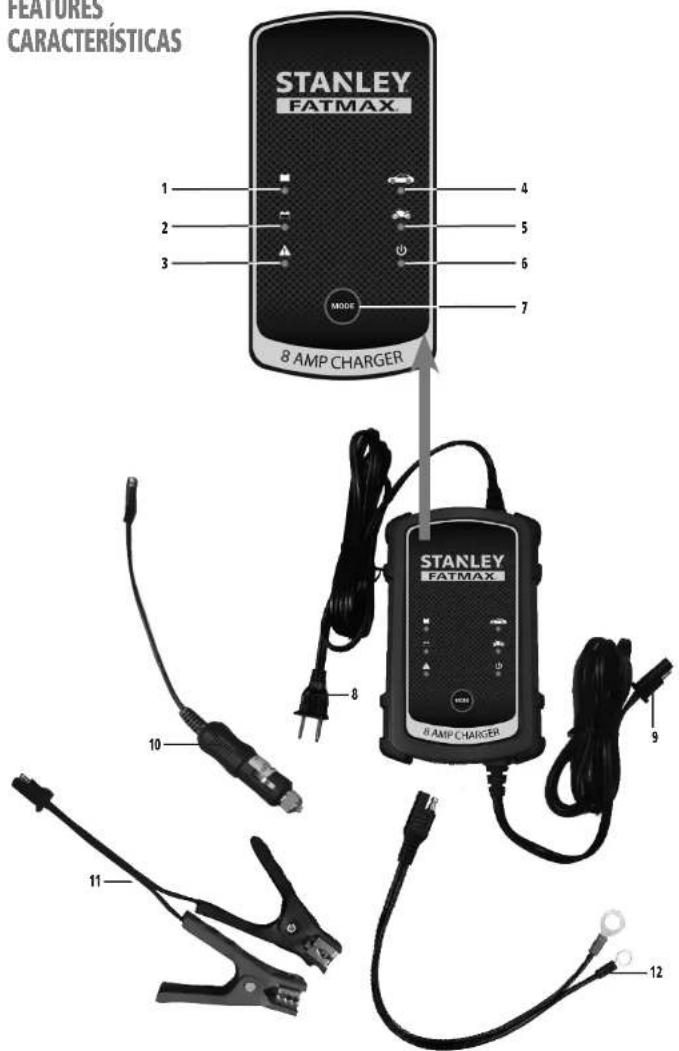
FEATURES
CARACTERÍSTICAS
text_image
FEATURES CARACTERÍSTICAS STANLEY FATMAX 1 2 3 MODE 4 5 6 7 8 AMP CHARGER STANLEY FATMAX 8 AMP CHARGER 9 10 11 122
BC8S BC8A10 ManualENSP 061714.indd 2-3 6/17/2014 6:13:05 PM

FEATURES
-
Charged LED
-
Charging LED
-
Reverse polarity LED
-
Vehicle mode LED
-
Motorcycle mode LED
-
Power LED
-
Mode selector button for selecting either motorcycle mode or vehicle mode
-
120 volt AC plug
-
Double barrel charger connector (connects to clamps, terminal rings or DC accessory plug)
-
DC accessory plug
-
Battery clamps
-
Battery terminal rings
CARACTERÍSTICAS
This device complies with part 15 of the FCC rules. Operation is subject to the following two conditions: (1) this device may not cause harmful interference, and (2) this device must accept any interference received, including interference that may cause undesired operation.
This equipment has been tested and found to comply with the limits for a Class B digital device, pursuant to part 15 of the FCC Rules. These limits are designed to provide reasonable protection against harmful interference in a residential installation. This equipment generates, uses and can radiate radio frequency energy and, if not installed and used in accordance with the instructions, may cause harmful interference to radio communications. However, there is no guarantee that interference will not occur in a particular installation. If equipment does cause harmful interference to radio or television reception, which can be determined by turning the equipment off and on, the user is encouraged to try to correct the interference by one or more of the following measures:
• Reorient or relocate the receiving antenna.
- Increase the separation between equipment and receiver.
- Connect the equipment into an outlet on a circuit different from that to which the receiver is connected.
- Consult the dealer or an experienced radio/TV technician for help.
Changes or modifications not approved by the party responsible for compliance could void user's authority to operate the equipment.
DANGER: Indicates an imminently hazardous situation which, if not avoided, will result in death or serious injury.
WARNING: Indicates a potentially hazardous situation which, if not avoided, could result in death or serious injury.
CAUTION: Indicates a potentially hazardous situation which, if not avoided, may result in minor or moderate injury.
CAUTION: Used without the safety alert symbol indicates potentially hazardous situation which, if not avoided, may result in property damage.
RISK OF UNSAFE OPERATION. When using tools or equipment, basic safety precautions should always be followed to reduce the risk of personal injury. Improper operation, maintenance or modification of tools or equipment could result in serious injury and property damage. There are certain applications for which tools and equipment are designed. Manufacturer strongly recommends that this product NOT be modified and/or used for any application other than for which it was designed. Read and understand all warnings and operating instructions before using any tool or equipment.
IMPORTANT SAFETY INSTRUCTIONS
WARNING: This product or its power cord contains lead, a chemical known to the State of California to cause cancer and birth defect or other reproductive harm. Wash hands after handling.
READ ALL INSTRUCTIONS
WARNING: Read all instructions before operating the battery charger. Failure to follow all instructions listed below may result in electric shock, fire and/or serious injury.
GENERAL SAFETY WARNINGS AND INSTRUCTIONS
- Avoid dangerous environments. Don't use the battery charger in clamp or wet locations. Do not use the battery charger in the rain. - Keep children away. Keep away from children. This is not a toy!
- Store indoors. When not in use, battery chargers should be stored indoors in dry, and high or locked-up places – out of reach of children.
- Check for damaged parts. Any part that is damaged should be properly repaired or replaced by manufacturer unless otherwise indicated elsewhere in this instruction manual before further use.
- Unplug the battery charger when not in use.
SPECIFIC SAFETY INSTRUCTIONS FOR POWER CORDS
- Don't abuse cord. Never carry appliance by cord or yank it to disconnect from receptacle. Keep cord from heat, oil, and sharp edges. Pull plug rather than cord when unplugging the unit.
- Ground Fault Circuit Interrupter (GFCI) protection should be provided on the circuits or outlets to be used. Receptacles are available having built in GFCI protection and may be used for this measure of safety.
Extension Cords
- An extension cord should not be used unless absolutely necessary. Use of an improper extension cord could result in a risk of fire and electric shock, and will void warranty.
- If an extension cord must be used, make sure your extension cord is in good condition. When using an extension cord, be sure to use one heavy enough to carry the current your product will draw. An undersized cord will cause a drop in line voltage resulting in loss of power and overheating. The following table shows the correct size to use depending on cord length and nameplate ampere rating. If in doubt, use the next heavier gauge. The smaller the gauge number, the heavier the cord.
| Recommended Minimum AWG Size for Extension Cords for Battery Chargers | |||||
| AC Input Rating American Wire Gage (AWG) Size of Cord | |||||
| Amperes Length of Cord, feet (m) | |||||
| Equal to or But less greater than | 25 (7.6) than | 50 (15.2) | 100 (30.5) | 150 (45.6) | |
| 0 | 2 | 18 | 18 | 18 | 16 |
| 2 | 3 | 18 | 18 | 16 | 14 |
| 3 | 4 | 18 | 18 | 16 | 14 |
| 4 | 5 | 18 | 18 | 14 | 12 |
| 5 | 6 | 18 | 16 | 14 | 12 |
| 6 | 8 | 18 | 16 | 12 | 10 |
| 8 | 10 | 18 | 14 | 12 | 10 |
| 10 | 12 | 16 | 14 | 10 | 8 |
| 12 | 14 | 16 | 12 | 10 | 8 |
| 14 | 16 | 16 | 12 | 10 | 8 |
| 16 | 18 | 14 | 12 | 8 | 8 |
| 18 | 20 | 14 | 12 | 8 | 6 |
54

- Power Cord Safety: This appliance has a polarized plug (one blade is wider than the other) as a safety feature. This plug will fit into a polarized outlet only one way. If the plug does not fit fully into the outlet, reverse the plug. If it still does not fit, contact a qualified electrician. Do not attempt to defeat this safety feature.
SPECIFIC SAFETY INSTRUCTIONS FOR BATTERY CHARGERS
• This unit was designed for household use only.
- Use of accessories and attachments: The use of any accessory or attachment not recommended by manufacturer for use with this battery charger could be hazardous.
- Stay alert. Use common sense. Do not operate this equipment when you are tired or impaired.
- Do not operate the battery charger near flammable liquids or in gaseous or explosive atmospheres. Motors may spark, and the sparks might ignite fumes.
WARNING: TO REDUCE THE RISK OF ELECTRIC SHOCK: Never immerse the battery charger in water or any other liquid, or use when wet.
WARNING: BURST HAZARD: Do not use the unit for charging dry-cell batteries that are commonly used with home appliances. These batteries may burst and cause injury to persons and damage property. Use the unit for charging/boosting a LEAD-ACID battery only. It is not intended to supply power to a low-voltage electrical system other than in a starter-motor application.
WARNING: RISK OF EXPLOSIVE GASES:
- Working in the vicinity of a lead acid battery is dangerous. Batteries generate explosive gases during normal battery operation. For this reason, it is of the utmost importance that each time before using the battery maintainer you read this manual and follow instructions exactly.
• To reduce the risk of battery explosion, follow these instructions and those published by the battery manufacturer and manufacturer of any equipment you intend to use in the vicinity of the battery. Review cautionary markings on these products and on the engine.
- This equipment employs parts (switches, relays, etc.) that produce arcs or sparks. Therefore, if used in a garage or enclosed area, the unit MUST be placed not less than 18 inches above the floor.
- THIS UNIT IS NOT FOR USE BY CHILDREN AND SHOULD ONLY BE OPERATED BY ADULTS.
WARNING: TO REDUCE THE RISK OF FIRE:
- Do not operate near flammable materials, fumes or gases.
- Do not expose to extreme heat or flames.
- If the vehicle accessory outlet fuse opens (blows) when plugging in this battery charger, do not use this battery charger with this vehicle accessory outlet.
- Do not repeatedly replace the fuse
- Do not replace the vehicle accessory outlet fuse with one of a higher amperage rating.
- Never attempt to patch the fuse with tin foil or wire.
• Any of these actions may cause serious electrical damage and/or a fire.
CAUTION: TO REDUCE THE RISK OF INJURY OR PROPERTY DAMAGE:
- This charger is not designed for use with every make, manufacture or model of engine. Use only with 12 volt systems.
- NEVER ATTEMPT CHARGE A FROZEN BATTERY.
- Do not charge the battery while the engine is operating
- Stay clear of fan blades, belts, pulleys, and other parts that can cause injury to persons.
- When working with lead acid batteries, always make sure immediate assistance is available in case of accident or emergency.
• Always have protective eyewear when using this product: contact with battery acid may cause blindness and/or severe burns. Be aware of first aid procedures in case of accidental contact with battery acid.
- Have plenty of fresh water and soap nearby in case battery acid contacts skin.
- If battery acid contacts skin or clothing, wash immediately with soap and water for at least 10 minutes and get medical attention immediately.
- Never smoke or allow a spark or flame in vicinity of vehicle battery, engine or battery charger.
- Remove personal metal items such as rings, bracelets, necklaces and watches when working with a lead acid battery. A lead acid battery can produce a short circuit current high enough to weld a ring, or similar metal object, to skin causing a severe burn.
- Never allow battery acid to come in contact with this unit.
- Do not operate this unit in a closed area or restrict ventilation in any way.
• Always turn the battery charger off by unplugging it when not in use
- Do not open the battery charger. There are no user-serviceable parts inside. Opening the battery charger will void manufacturer's warranty.
- Operate battery charger only as described in this Instruction Manual.
- Check battery charger and components periodically for wear and tear. Return to manufacturer for replacement of worn or defective parts immediately.
Connection Precautions
- Connect and disconnect terminal rings, output clamps or DC accessory plug only after removing AC cord from electric outlet.
- Never allow terminal rings or clamps to touch each other.
- Attach clamps only as indicated in "Charging Using the Supplied Battery Clamps."
FIRST AID
- Skin: If battery acid comes in contact with skin, rinse immediately with water, then wash thoroughly with soap and water. If redness, pain, or irritation occurs, seek immediate medical attention.
- Eyes: If battery acid comes in contact with eyes, flush eyes immediately, for a minimum of 15 minutes and seek immediate medical attention.
- Read and Understand This Instruction Manual Before Using This Unit.
SAVE THESE INSTRUCTIONS
WARNING: TO REDUCE THE RISK OF INJURY OR PROPERTY DAMAGE: Follow these instructions and those published by the manufacturer of any engine you intend to use with this battery charger. Review cautionary markings on the battery charger and engine. INTRODUCTION
Congratulations on purchasing your new Stanley® Fatmax® 8 Amp Battery Charger. Read this Instruction Manual and follow the instructions carefully before using your new battery charger.
PREPARING TO CHARGE
-
Remove battery completely from boat/airplane or any confined area before charging.
-
If it is necessary to remove battery from vehicle to charge, or to clean terminals, always remove grounded terminal from battery first. Make sure all accessories in the vehicle are off, so as not to cause an arc.
-
Clean battery terminals, taking care to avoid getting corrosive material in eyes.
-
Add distilled water in each cell until battery acid reaches level specified by battery manufacturer. This helps purge excessive gas from cells. Do not overfill. For a battery without cell caps (maintenance free), carefully follow manufacturer's charging instructions.
-
Study all battery manufacturer's specific precautions, such as removing or not removing cell caps while charging, and recommended rates of charge.
CHARGER LOCATION
- Locate charger as far away from battery as cables permit.
- Never place charger directly above battery being charged; gases from battery will corrode and damage charger.
- Never allow battery acid to drip on charger.
- Never operate charger in a closed-in area or restrict ventilation in any way.
• Marine batteries must be removed and charged on shore. - Do not set a battery on top of charger.
GUIDE TO CONTROLS AND INDICATORS
| Charged LED: Lights green to indicate the battery is fully charged. The unit automatically goes into Float Charge mode. | |
| Charging LED: Lights yellow to indicate there is a good connection to the battery and the battery is charging. | |
| Reverse polarity LED: Lights red to indicate a reverse polarity connection is detected. | |
| Mode Selector Button: Button for selecting either Motorcycle Mode or Vehicle Mode. | |
| Power LED: Lights green to indicate the unit is properly plugged into a functional 120 volt AC outlet. | |
| Motorcycle Mode LED: Lights green when Motorcycle Mode is selected (suitable for most small vehicles, such as motorcycles). | |
| Vehicle Mode LED: Lights green when Vehicle Mode is selected (suitable for general automotive vehicles). |
76

OPERATING INSTRUCTIONS
IMPORTANT: ALWAYS disconnect the AC power cord from the AC power outlet before connecting (or disconnecting) the charger to (or from) the battery.
Charging Using the Supplied Battery Clamps
WARNING: A spark near the battery may cause an explosion. To reduce the risk of a spark near the battery, position AC and DC cords away from hood, door, or moving engine parts. Never charge the battery while the engine is operating. 1. Unplug the charger's AC power cord from the AC power outlet.
- Disconnect the Battery Clamps, Terminal Rings or DC Accessory Plug from the battery charger's Double Barrel Charger Connector.
- Check polarity of battery posts. Positive (POS, P, +) battery post usually has larger diameter than negative (NEG, N, -) post.
- Determine which post of battery is grounded (connected) to the chassis. If negative post is grounded to chassis (as in most vehicles), see 5. If positive post is grounded to the chassis, see 6.
- For negative-grounded vehicle, connect positive (red) clamp from battery charger to positive (POS, P, +) ungrounded post of battery. Connect negative (black) clamp to vehicle chassis or engine block away from battery. Do not connect clip to carburetor, fuel lines, or sheet-metal body parts. Connect to heavy gauge metal part of the frame or engine block.
- For positive-grounded vehicle, connect negative (black) clamp from battery charger to negative (NEG, N, -) ungrounded post of battery. Connect positive (red) clamp to vehicle chassis or engine block away from battery. Do-not connect clip to carburetor, fuel lines or sheet-metal body parts. Connect to a heavy gauge metal part of the frame or engine block.
- Insert the double barrel tip of the battery clamp cable into the double barrel tip of the double barrel charger connector (male-to-female and female-to-male) and position it as far away from the battery as possible.
- Insert the AC plug of the battery charger into a (powered) standard North American 120 volt 60Hz outlet. The Power LED will light green to indicate the unit is in standby mode and ready to use.
Note: If the Power LED does not come on, check connection with the AC outlet. Make sure the AC outlet is functional. - When the charger is properly connected, choose the following operation mode for the battery to be charged by pressing the Mode Selector Button.
- Motorcycle Mode, suitable for most small vehicles like motorcycles.
• Vehicle Mode, for most automobiles.
The corresponding mode LED (Motorcycle Mode or Vehicle Mode) will light green. The charging process will start automatically after a few seconds and the Charging LED (which light yellow to indicate the unit is in charging mode.
Notes: If the damps are incorrectly connected with regard to polarity, the Reverse Polarity/Fault LED (O) will light. Unplug the charger, then remove the damps. Reconnect the clamps properly.
If the Charging LED did not come on, check the connection to the battery. If the damps are properly connected, the battery may be in fault
condition. Manufacturer suggests to have the battery tested by a qualified battery service technician.
- When the battery is fully charged, the charger will automatically go into Float Charge Mode and the Charged LED (■) will light. In this mode, the charger monitors the battery voltage and charges as necessary to assure the battery maintains full capacity. The charger remains in Float Charge Mode as long as the charger is connected to the battery and is plugged into a functioning AC outlet.
When disconnecting charger, disconnect AC cord, remove clamp from vehicle chassis, and then remove clamp from battery terminal. Connecting and Charging the Battery with the Terminal Rings
CONNECTING THE CHARGER WITH TERMINAL RINGS
The charger's output leads have crimped, color-coded terminal rings (RED-POSITIVE and BLACK-NEGATIVE). These rings connect directly to the corresponding connectors on the battery posts.
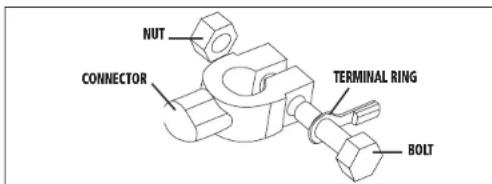
text_image
NUT CONNECTOR TERMINAL RING BOLT- Remove the nuts from the bolts of the battery post's connectors.
- Position the RED terminal on the bolt of the POSITIVE battery post connector.
- Position the BLACK terminal on the NEGATIVE post connector; then replace the nuts.
IMPORTANT: If there is any problem connecting the output leads, check with a reputable auto supply store or contact the Customer Service Department toll-free at 1-877-571-2391 for assistance in finding an appropriate connection device for your particular application.


CHARGING WITH THE TERMINAL RINGS
-
Disconnect AC power cord from AC power outlet
-
Disconnect the Battery Clamps, Terminal Rings or DC Accessory Plug from the battery charger's Double Barrel Charger Connector.
-
With the terminals rings properly connected to the battery posts, connect the terminal ring connector with the unit's Double Barrel Charger Connector (male-to-female and female-to-male) and position it as far away from the battery as possible.
-
Insert the AC plug of the battery charger into a (powered) standard North American 120 volt 60Hz outlet. The Power LED will light green to indicate the unit is in standby mode and ready to use.
Note: If the Power LED does not come on, check connection with the AC outlet. Make sure the AC outlet is functional.
- When the charger is properly connected, choose the following operation mode for the battery to be charged by pressing the Mode Selector Button.
- Motorcycle Mode, suitable for most small vehicles like motorcycles.
• Vehicle Mode, for most automobiles.
The corresponding mode LED (Motorcycle Mode or Vehicle Mode) will light green. The charging process will start automatically after a few seconds and the Charging LED (Will light yellow to indicate the unit is in charging mode.
Notes: If the terminal rings are incorrectly connected with regard to polarity, the Reverse Polarity Fault LED (NO) will light. Unplug the charger; then remove the terminal rings. Reconnect the terminal rings properly. If the Charging LED did not come on, check the connection to the battery. If the terminal rings are properly connected, the battery may be in fault condition. Manufacturer suggests to have the battery tested by a qualified battery service technician.
- When the battery is fully charged, the charger will automatically go into Float Charge Mode and the Charged LED (■) will light. In this mode, the charger monitors the battery voltage and charges as necessary to assure the battery maintains full capacity. The charger remains in Float Charge Mode as long as the charger is connected to the battery and the charger is plugged into a functioning AC outlet.
When disconnecting charger, disconnect AC cord, remove the terminal rings from battery posts.
Charging Using the DC Accessory Plug
WARNING: NEVER connect this unit to a positive grounded vehicle using the 12 Volt DC Accessory Plug.
-
Disconnect AC power cord from AC power outlet
-
Disconnect the Battery Clamps, Terminal Rings or DC Accessory Plug from the battery charger's Double Barrel Charger Connector.
-
Insert the double barrel tip of the 12 Volt DC Accessory Plug cable into the double barrel tip of the Double Barrel Charger Connector (male-to-female and female-to-male).
-
Insert the grooved tip of the 12 volt DC accessory plug into the vehicle's 12 volt DC accessory outlet.
-
Insert the AC plug of the battery charger into a (powered) standard North American 120 volt 60Hz outlet. The Power LED will light green to indicate the unit is in standby mode and ready to use.
Note: If the Power LED does not come on, check connection with the AC outlet. Make sure the AC outlet is functional.
- When the charger is properly connected, choose the following operation mode for the battery to be charged by pressing the Mode Selector Button.
- Motorcycle Mode, suitable for most small vehicles like motorcycles.
• Vehicle Mode, for most automobiles.
The corresponding mode LED (Motorcycle Mode or Vehicle Mode) will light green. The charging process will start automatically after a few seconds and the Charging LED (Will light yellow to indicate the unit is in charging mode.
Notes: If the Charging LED did not come on, check the connection to the vehicle's DC accessory outlet. Rotate the adapter slightly to make sure there is good contact. If it is properly connected, the battery may be in fault condition. Manufacturer suggests to have the battery tested by a qualified battery service technician.
Some vehicles require that the ignition be turned to the ACC (accessory) position to activate the DC accessory outlet. If your vehicle ignition is required to be turned to the ACC position, be sure all the vehicle accessories (i.e. heater, fan, radio, TV, lights... etc) are turned off. If not turned off, the charger might not be able to charge the battery.
- When the battery is fully charged, the charger will automatically go into Float Charge Mode and the Charged LED (■) will light. In this mode, the charger monitors the battery voltage and charges as necessary to assure the battery maintains full capacity. The charger remains in Float Charge Mode as long as the charger's 12 Volt DC Accessory Plug is connected to the vehicle's 12 volt DC accessory outlet and the unit is plugged into a functioning AC outlet.
When disconnecting charger, disconnect AC cord, and then remove the 12 volt DC accessory plug from the vehicle accessory outlet.
TROUBLESHOOTING
Unit Not Charging
- Check that the charger is properly connected to a live 120 volt AC outlet.
- If the battery to be charged has fallen below 2 volts, the battery cannot be recharged with this unit.
CARE AND MAINTENANCE
Storage
- Store the unit in a clean, dry, cool place when not in use.
- Clean the unit casing and cords (as necessary) with a dry (or slightly damp) cloth. Ensure that unit is completely disconnected from battery and power source before cleaning.
8
- To maintain the operating condition and maximize the life of the charger cords, always coil them loosely for storage. Do not wrap them around the unit or crimp them with a tight band.
Fuse Replacement (DC Accessory Plug)
-
Remove plug from accessory outlet. Remove the grooved cap by turning counter clockwise and lifting off.
-
Remove center pin and spring. Remove fuse.
-
Replace fuse with same type and size fuse (10 amp).
-
Replace center pin and spring inside plug
-
Replace gold cap by turning clockwise.
ACCESSORIES
Recommended accessories for use with this unit may be available from the manufacturer. If you need assistance regarding accessories, please contact the manufacturer at 1-877-571-2391.
WARNING: The use of any accessory not recommended for use with this appliance could be hazardous.
SERVICE INFORMATION
Whether you need technical advice, repair, or genuine factory replacement parts, contact the manufacturer at 1-877-571-2391.
ONE-YEAR LIMITED WARRANTY
The manufacturer warrants this product against defects in materials and workmanship for a period of ONE (1) YEAR from the date of retail purchase by the original end-user purchaser ("Warranty Period").
If there is a defect and a valid claim is received within the Warranty Period, the defective product can be replaced or repaired in the following ways: (1) Return the product to the manufacturer for repair or replacement at manufacturer's option. Proof of purchase may be required by manufacturer. (2) Return the product to the retailer where product was purchased for an exchange (provided that the store is a participating retailer). Returns to retailer should be made within the time period of the retailer's return policy for exchanges only (usually 30 to 90 days after the sale). Proof of purchase may be required. Please check with the retailer for their specific return policy regarding returns that are beyond the time set for exchanges.
This warranty does not apply to accessories, bulbs, fuses and batteries; defects resulting from normal wear and tear, accidents; damages sustained during shipping; alterations; unauthorized use or repair; neglect, misuse, abuse; and failure to follow instructions for care and maintenance for the product.
This warranty gives you, the original retail purchaser, specific legal rights and you may have other rights which vary from state to state or province to province. This product is not intended for commercial use.
Please complete the Product Registration Card and return within 30 days from purchase of the product to: Baccus Global LLC, 595 S.
Federal Highway, Suite 210, Boca Raton, FL 33432. Baccus Global LLC, toll-free number: (877) 571-2391.
SPECIFICATIONS
Input: 120VAC, 60Hz, 1.8A
Output: 12VDC, 2A, 8A
Imported by Baccus Global LLC, 595 S. Federal Highway, Suite 210, Boca Raton, FL 33432 • (877) 571-2391
RD061714
9