
SWADS-ALARMS - Alarm system SWANN - Free user manual and instructions
Find the device manual for free SWADS-ALARMS SWANN in PDF.


| Product Type | Wireless Home Security Alarm System |
| Brand | Swann |
| Model | SWADS-ALARMS |
| Dimensions (Control Panel) | Approx. 12 x 8 x 3 cm |
| Weight (Control Panel) | Approx. 200 g |
| Power Supply | AC 100-240V, 50/60Hz with backup battery |
| Backup Battery Type | Rechargeable NiMH 3.6V 600mAh |
| Wireless Frequency | 868/915 MHz |
| Number of Zones | Up to 8 |
| Sensor Range | Up to 150 meters open field |
| Siren Output | 105 dB |
| Keypad | Wireless remote keypad with arm/disarm functions |
| Compatible Sensors | Door/window contacts, PIR motion detector, smoke detector |
| Main Functions | Arm/disarm, instant alarm, entry delay, panic button, low battery indicator |
| Maintenance | Test sensors monthly; replace batteries as needed; clean control panel with dry cloth |
| Safety Features | Tamper protection, communication supervision, overload protection |
| Spare Parts | Replacement remotes, sensors, backup battery available from Swann |
| Repairability | User-replaceable batteries and sensors; control panel repair by qualified technician |
| Operating Environment | Indoor use, temperature 0°C to 40°C |
Frequently Asked Questions - SWADS-ALARMS SWANN
User questions about SWADS-ALARMS SWANN
0 question about this device. Answer the ones you know or ask your own.
Ask a new question about this device
Download the instructions for your Alarm system in PDF format for free! Find your manual SWADS-ALARMS - SWANN and take your electronic device back in hand. On this page are published all the documents necessary for the use of your device. SWADS-ALARMS by SWANN.
USER MANUAL SWADS-ALARMS SWANN
Home Doorway Alert Kit
EN
Instruction Manual
About this Manual
The content in this manual is for information purposes only and is subject to change without notice. While every effort is made to ensure that this manual is accurate and complete at the time of printing, no liability is assumed for any errors and omissions that may have occurred. As we’re constantly making improvements to our products, firmware, software and user manuals, we reserve the right to change the information without prior notice. For the latest version of this user manual, please visit: www.swann.com
FCC Statement
This equipment has been tested and found to comply with the limits for Class B digital device, pursuant to part 15 of the FCC Rules. These limits are designed to provide reasonable protection against harmful interference in a residential installation. This equipment generates, uses and can radiate radio frequency energy and, if not installed and used in accordance with the instructions, may cause harmful interference to radio or television reception, which can be determined by turning the equipment off and on, the user is encouraged to try to correct the interference by one or more of the following measures:
- Reorient or relocate the receiving antenna
- Increase the separation between the equipment and the receiver
- Connect the equipment into an outlet on a circuit different from that to which the receiver is connected
- Consult the dealer or an experienced radio/TV technician for help
This device complies with part 15 of the FCC Rules. Operation is subject to the following two conditions: (1) This device may not cause harmful interference, and (2) This device must accept any interference received, including interference that may cause undesired operation.
FCC Caution: Any changes or modifications not expressly approved by the party responsible for compliance could void the user's authority to operate this equipment.
Important Safety Instructions
When fitting the screws into the wall, make sure you are not inserting them anywhere near electrical wires, including wires that may be behind the wall. If you are unsure at all, please get a professional to check first and install the screws for you.
Battery Safety Information
Replace batteries at the same time. Do not mix new and old batteries or battery types (for example, alkaline and lithium batteries). Keep batteries out of reach of children. Dispose of used batteries promptly in accordance with local regulations.
Limited Warranty Terms & Conditions
Swann Communications warrants this product against defects in workmanship and material for a period of one (1) year from it's original purchase date. You must present your receipt as proof of date of purchase for warranty validation. Any unit which proves defective during the stated period will be repaired without charge for parts or labour or replaced at the sole discretion of Swann. The end user is responsible for all freight charges incurred to send the product to Swann's repair centres. The end user is responsible for all shipping costs incurred when shipping from and to any country other than the country of origin.
The warranty does not cover any incidental, accidental or consequential damages arising from the use of or the inability to use this product. Any costs associated with the fitting or removal of this product by a tradesman or other person or any other costs associated with its use are the responsibility of the end user. This warranty applies to the original purchaser of the product only and is not transferable to any third party. Unauthorized end user or third party modifications to any component or evidence of misuse or abuse of the device will render all warranties void.
By law some countries do not allow limitations on certain exclusions in this warranty. Where applicable by local laws, regulations and legal rights will take precedence.
For Australia: Our goods come with guarantees which cannot be excluded under Australian Consumer Law. You are entitled to a replacement or refund for a major failure and for compensation for any other reasonably foreseeable loss or damage. You are also entitled to have the goods repaired or replaced if the goods fail to be of acceptable quality and the failure does not amount to major failure.
AT A GLANCE
Thank you for choosing the Home Doorway Alert kit from Swann. It's the ideal system for front & back door security without the hassle of wiring.
How does it work?
Basically, there are two parts to the Wireless Entry Alert Plus system.
- The Indoor Alarm Receiver works as an alarm buzzer. It monitors for signals coming from the Alert Sensors, and sounds an alert in response to that signal. It also features a series of LED indicators on the front of the unit so you can visually tell where an alert is coming from. The Indoor Alarm Receiver can be either mounted to a fixed location or completely free standing.
- The Alert Sensors enables you to monitor for movement in two zones or areas of your property. Each Alert Sensor contains a miniature radio transmitter, which sends a signal to the Indoor Alarm Receiver whenever movement is detected. The Alert Sensors can be deployed outdoors (it's weatherproof!), for example, near the entry to your driveway and garage, or place them indoors at entry/exit points in your home or business.

Need more coverage and protection for your property?
Simply purchase extra Alert Sensors and add them to your system. The Indoor Alarm Receiver has 3 separate sensor channels, each with its own distinct alarm sound, capable of providing continuous monitoring of multiple sensor devices.
Getting to know your Indoor Alarm Receiver
![graph TD A["Doorbell LED*"] --> B["Central Bell Icon"] C["Channel 1 LED"] --> B D["Channel 2 LED"] --> B E["Channel 3 LED"] --> B B --> F["Swann"]](/content/2026/05/862783/images/631d036db0e5bae63f5f872c1ba09724b86fc4f88b6217e5842147f90c9fe40d.jpg)
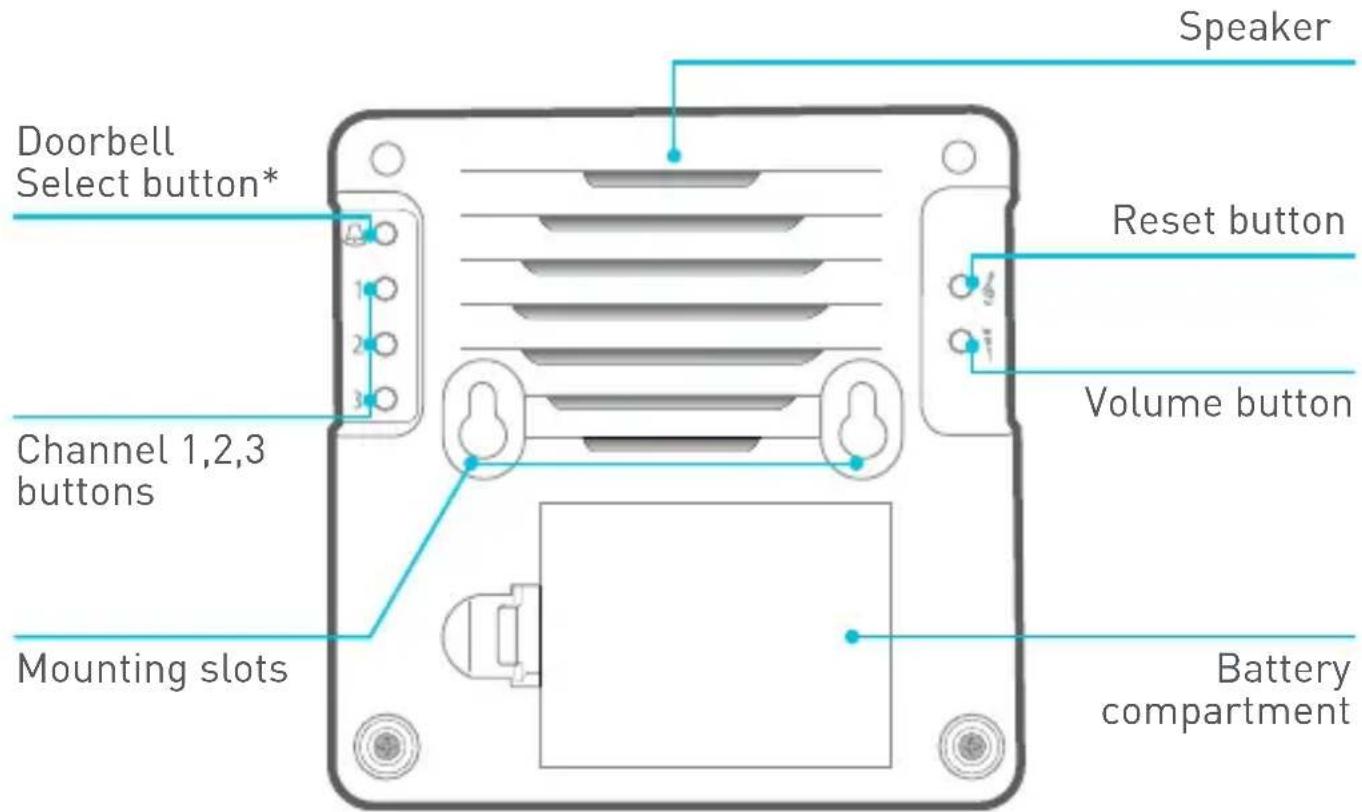
By default, your Alert Sensors are assigned to channel 1 and 2 respectively. Each channel is capable of supporting up to 15 sensor devices. Features denoted with * require separate purchase of an add-on Doorbell.
Getting to know your Alert Sensor
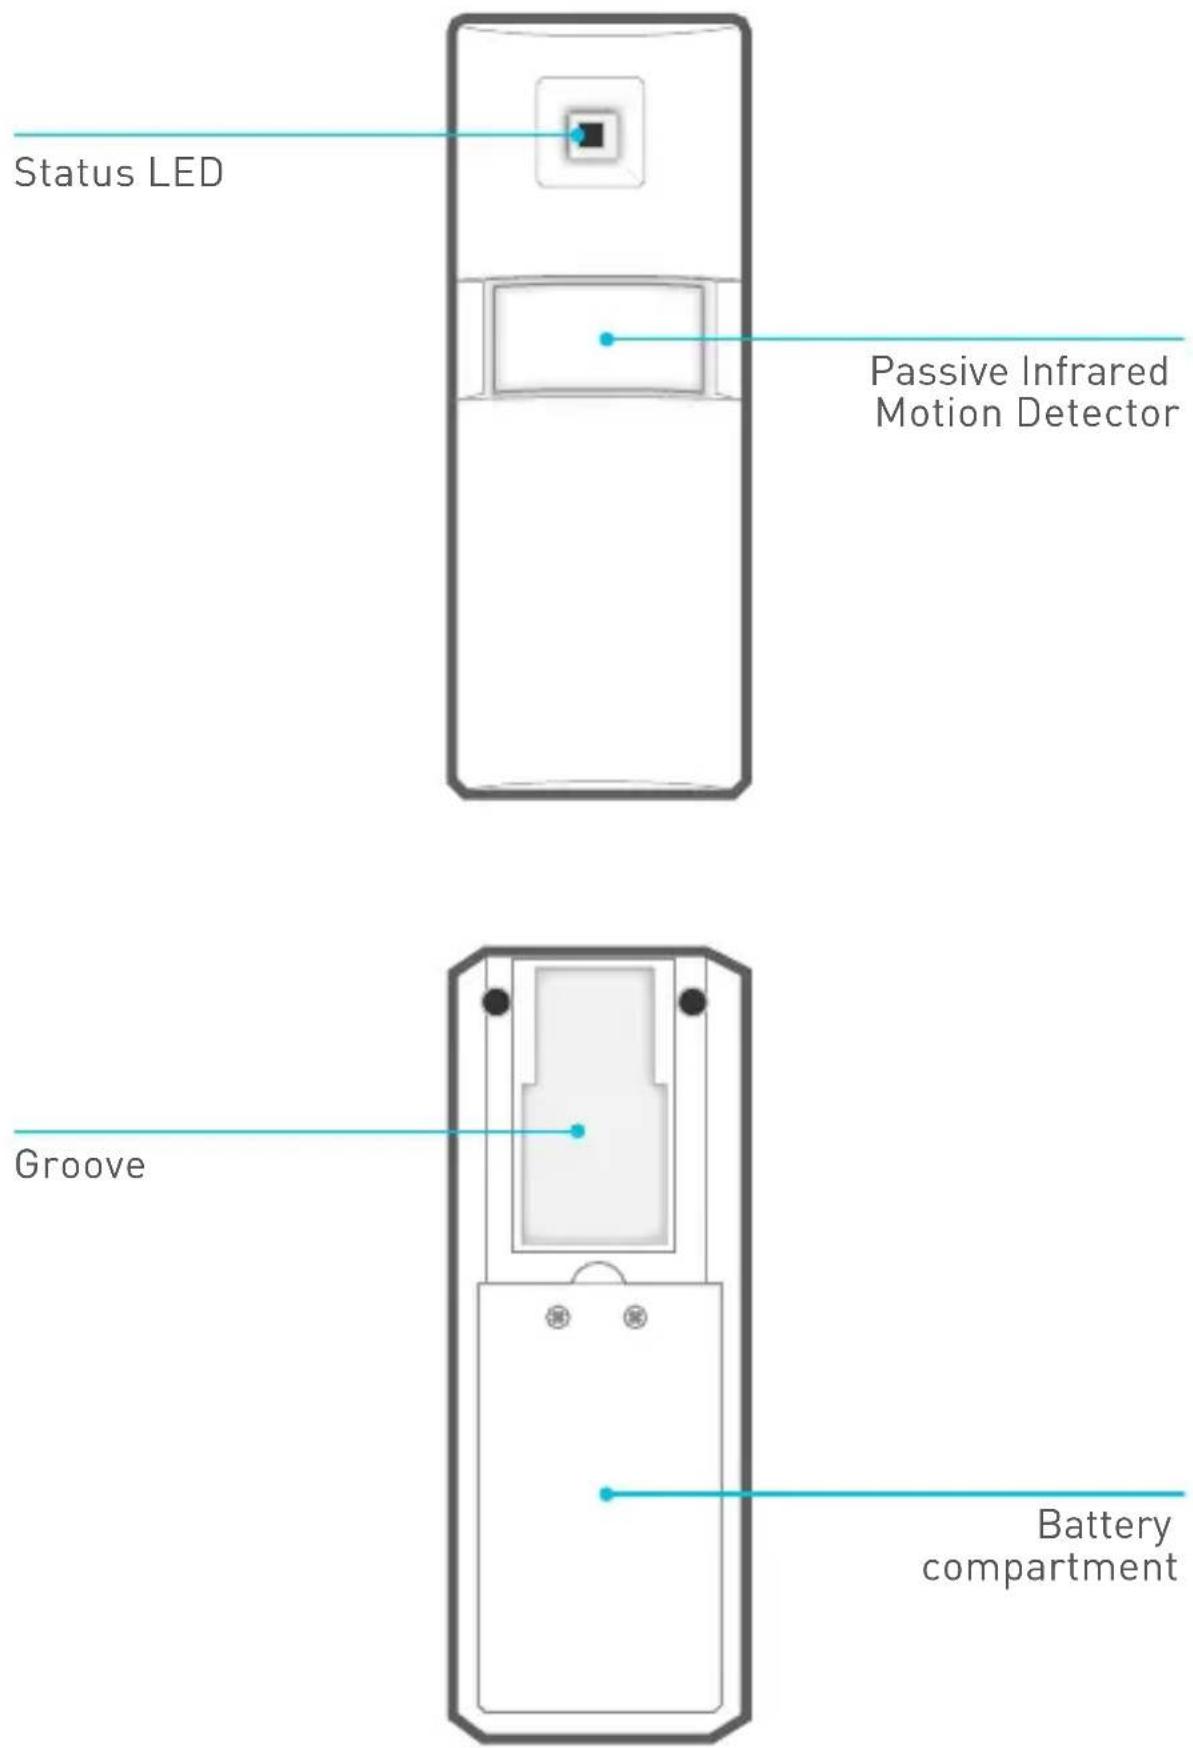
SETTING UP
Indoor Alarm Receiver
Installing batteries
The Indoor Alarm Receiver requires 3 x AA batteries (not included) to operate. To install batteries:
- Push the release tab and lift off battery compartment cover.
- Insert 3 new "AA" alkaline batteries, matching the polarity markings (+ and -) inside the battery compartment.
- Put the battery compartment cover back on by pressing down until the release tab clicks into place.
Placement
There is no requirement to mount the Indoor Alarm Receiver. As it is also completely freestanding, you may find it more convenient to place it on a shelf or table. One of the benefits of a battery operated wireless receiver is that if you have a large house, you can take the receiver with you. No more missing visitors because you were all the way at the back of the house or by the pool!
If you would like to mount the receiver, we've included all the gear (template, screws and wall plugs) you'll need to hang it on the wall. See the supplied template for instructions on mounting the Indoor Alarm Receiver.
Alert Sensor
Installing batteries
Each Alert Sensor requires 3 x AAA batteries (not included) to operate. To install batteries:
- Use a small Phillips screwdriver to remove the screws from the battery compartment cover, and then lift up the cover.
- Insert 3 new "AAA" alkaline batteries, matching the polarity markings (+ and -) inside the battery compartment.
- Screw the battery compartment cover back into place.
Placement guide
The range of the wireless transmission for the Wireless Entry Alert Plus system is dependent on local environment (i.e., obstructions, weather, signal interferences, etc) and can be up to approximately 60 meters (around 196 feet) – take this into consideration when selecting positions for the Alert Sensors and make sure you test if the location is in range of the Indoor Alarm Receiver before fitting in place.
The Alert Sensor, under typical conditions, is designed to detect people and vehicles moving within an area of approximately 6 meters (around 20 feet) at a 100° angle from the sensor.

For best coverage and to maximize detection, place the sensor approximately 2m/6ft off the ground, pointing on a slightly downwards angle.
Tips

Ideally, the Alert Sensor should only see the entry/exit point (e.g., your front entrance), and the only moving objects in front of the sensor should be the cars or people you want to detect (i.e., no obstructions in the field of view).

Avoid placing the Alert Sensor in an area where it will face direct or reflected sunlight, or where the environmental temperature may change suddenly (for example, near heat or cold producing devices such as heaters, air conditioners, or lamps).

Any moving heat source can trigger the Alert Sensor. For example, a moving shadow on a sunny day may trigger the Alert Sensor, or the sun coming out from behind clouds. False triggers should be rare, but will occasionally occur.

Wandering small animals (such as a cat or similar) can, under some circumstances, trigger the Alert Sensor. Therefore, we suggest that the Alert Sensor is not suited to areas where pets are routinely kept.
Mounting your Alert Sensor
- Attach the mounting bracket for the Alert Sensor to a wall using the supplied screws. You may need to use wall plugs depending on the surface.
- Fit the tab on the mounting bracket into the groove on the back of the Alert Sensor. Slide the Alert Sensor down until it locks into place.
- Adjust the angle of the Alert Sensor accordingly.
OPERATING BASICS
Adjusting the alarm volume
You can change the loudness of the Indoor Alarm Receiver using the Volume button on the back of the receiver.
Three volume levels are available: High, Medium and Low.
Silent mode
Like some peace and quiet for a period of time? You can put the alarm triggered by your Alert Sensor on “silent”. Simply press the Channel button that corresponds with the Alert Sensor that you want the alarm muted. The Indoor Alarm Receiver beeps twice, confirming the alarm has been turned off.

If the Alert Sensor detects movement while the alarm is muted, you will still be visually alerted by the corresponding Channel LED indicator blinking on the Indoor Alarm Receiver.

To unmute the alarm, press the corresponding Channel button again. You will hear a single confirmation beep from the Indoor Alarm Receiver.
Low battery warning
Your devices will notify you when batteries are running low on power.
• Install new batteries immediately for the Indoor Alarm Receiver when all 4 LED indicators start blinking at the same time.
• Install new batteries immediately for the Alert Sensor when the status LED starts blinking continuously.
Re-pairing your sensors / Changing channels
The Alert Sensors and Indoor Alarm Receiver in your kit have been factory paired so all you have to do is put batteries in and they are ready to use. If for some reason pairing is lost or you just want sensors paired to another channel for a different alarm (each channel has a distinct sound), here's how to do it:
- Place your sensors faced down to avoid triggering them.
- Press and hold the Reset button on the back of the Indoor Alarm Receiver until all the LED indicators light up. This resets the receiver. Any sensors that you have will need to be assigned to a channel again. Sensors can only be paired one at a time following steps 3 and 4 below.
- Decide which channel (1, 2 or 3) you want the sensor to be assigned to, then press and hold the desired Channel button on the back of the Indoor Alarm Receiver until the LED indicator for that channel lights up.
- Within 10 seconds, trigger the sensor by lifting it up. The Indoor Alarm Receiver sounds the channel alarm and flashes the channel LED to confirm successful pairing.
Troubleshooting
Problem: I keep getting false alarms!
Solution:
- The Alert Sensor uses passive infrared to detect changes in temperature so check that there are no shifting heat sources in view of the sensor. This includes the obvious things, such as moving pets or people, but also things such as a moving shadow on a hot day. Sometimes reflected infrared heat from the sun is enough to trigger the sensor.
- If you're using the system in an environment with a high level of radio 'noise' (that is, somewhere with multiple wireless devices in use) then these interfering signals might be interpreted as the system as alarm signals.
Helpdesk / Technical Support Details
Swann Technical Support
All Countries E-mail: tech@swann.com
Telephone Helpdesk
USA 1800 627 2799
USA Parts & Warranty 1800 627 2799
(M-F, 9am-5pm US PT)
AUSTRALIA 1800 788 210
NEW ZEALAND 0800 479 266
UK 0808 168 9031


- HOME DOORWAY ALERT KIT
- ABOUT THIS MANUAL
- FCC STATEMENT
- IMPORTANT SAFETY INSTRUCTIONS
- BATTERY SAFETY INFORMATION
- LIMITED WARRANTY TERMS & CONDITIONS
- AT A GLANCE
- HOW DOES IT WORK
- SETTING UP
- INDOOR ALARM RECEIVER
- INSTALLING BATTERIES
- PLACEMENT
- ALERT SENSOR
- PLACEMENT GUIDE
- TIPS
- MOUNTING YOUR ALERT SENSOR
- OPERATING BASICS
- ADJUSTING THE ALARM VOLUME
- SILENT MODE
- LOW BATTERY WARNING
- RE-PAIRING YOUR SENSORS / CHANGING CHANNELS
- TROUBLESHOOTING
- SOLUTION
- HELPDESK / TECHNICAL SUPPORT DETAILS
- SWANN TECHNICAL SUPPORT
- TELEPHONE HELPDESK
Brand : SWANN
Model : SWADS-ALARMS
Category : Alarm system