
AH-2348 - Hi-Fi System MAJESTIC - Free user manual and instructions
Find the device manual for free AH-2348 MAJESTIC in PDF.


| Product Type | Hi-Fi Micro System |
| Brand | Majestic |
| Model | AH-2348 |
| Color | Black |
| Power Supply | 220-240V AC, 50Hz |
| Output Power | 2 x 25W (Max) |
| Disc Types Supported | CD-DA, CD-R, CD-RW, MP3 CD |
| Audio Inputs | USB (up to 32GB), AUX-In (3.5mm) |
| Radio Frequency | FM 87.5-108.0 MHz |
| Bluetooth | Yes (Pairing name: AH 2348HP BT, Password: 0000) |
| Remote Control | Included (Battery operated) |
| Display | LED screen |
| Dimensions (Approx.) | 200 x 250 x 300 mm (Main unit) |
| Weight (Approx.) | 3.0 kg (Main unit) |
| Sound Control | Treble/Bass adjustment, EQ presets (Rock, Classic, Pop, Live, Dance, Off) |
| Playback Features | Program (20 tracks), Random, Repeat (One/All), Fast Forward/Reverse |
| Additional Features | ID3 tag display, RDS radio, Mono/Stereo selection, Headphone output, USB charging |
| Safety Class | Class II (Double insulated) |
| Accessories Included | Remote control, FM antenna, User manual |
| Cleaning Instructions | Use a soft, dry cloth; do not use liquids or solvents |
Frequently Asked Questions - AH-2348 MAJESTIC
User questions about AH-2348 MAJESTIC
0 question about this device. Answer the ones you know or ask your own.
Ask a new question about this device
Download the instructions for your Hi-Fi System in PDF format for free! Find your manual AH-2348 - MAJESTIC and take your electronic device back in hand. On this page are published all the documents necessary for the use of your device. AH-2348 by MAJESTIC.
USER MANUAL AH-2348 MAJESTIC
AH 2348HP BT/MP3/USB
MICRO SISTEMA HI-FI LETTORE CD/MP3 PORTATILE FUNZIONE BLUETOOTH RADIO FM STEREO INGRESSI USB & AUX-IN

CE

MAJESTIC
CD/MP3 MICRO SYSTEM BLUETOOTH® FUNCTION FM STEREO RADIO USB & AUX-IN
AH 2348HP BT MP3/USB


User Manual
CONTENT
WARNING....14
PANELS....15
REMOTE CONTROL....16
BASIC OPERATION....17
TROUBLE SHOOTING....20
SPECIFICATION
Disc type CD-DA
Audio input USB, Aux in
Power supply 220V-240V, AC\~50Hz
Max power 2x25W
Frequency 87.5-108.0 MHz
Operating conditions Temperature : 5°C\~35°C
Installation : on a flat horizontal surface
- Read these Instructions - All the safety and operating instructions should be read before this product is operated.
- Keep these Instructions - The safety and operating instructions should be retained for future reference.
- Heed all Warnings-All warnings on the appliance and in the operating instructions should be adhered to.
- Follow all instructions - All operating and use instructions should be followed.
- Do not use this apparatus near water- The appliance should not be used near water or moisture - for example, in a wet basement or near a swimming pool, and the like.
- Do not block any of the ventilation openings. Install in accordance with the instructions.
- Do not install near any heat sources such as radiators, heat Registers, stoves, or other apparatus (including amplifiers) that produce heat.
- Protect the power cord from being walked on or pinched particularly at plugs, convenience receptacles, and the point where they exit from the apparatus.
- Only use attachments/accessories specified by the manufacturer.
- Unplug the apparatus during lightning storms or unused for long periods of time.
- Refer all serving to qualified service personnel. Servicing is required when the apparatus has been damaged in any way, such as liquid has spilled.
- Please keep the unit in a good ventilation environment.
- To reduce the risk of electric shock, do not perform any servicing other than that contained in the operating instructions unless you are qualified to do so.
- This equipment is a Class II or double insulated electrical appliance. It has been designed in such a way that it does not require a safety connection to electrical earth.
- -This lightning flash with arrowhead symbol within an equilateral triangle is intended to alert the user to the presence of non-insulated dangerous voltage within the product's enclosure thufficiency magnitude to constitute a risk of electric shock.
-To reduce the risk of electric shock, do not remove cover (or back) as there are no user-serviceable parts inside. Refer servicing to qualified personnel.
-The exclamation point within an equilateral triangle is intended to alert the user to the presence of important operating and maintenance in the literature accompanying the appliance.
- Invisible laser radiation when open and interlocks defeated.
Avoid exposure to beam of laser.
- The batteries in remote control shall not be exposed or excessive heat such as fire.
- The apparatus shall not be exposed to dripping or slashing and that no objects filled with liquids, such as vases, shall be placed on the apparatus.
- To reduce the risk of fire or electric shock, do not expose this apparatus to rain or moisture.

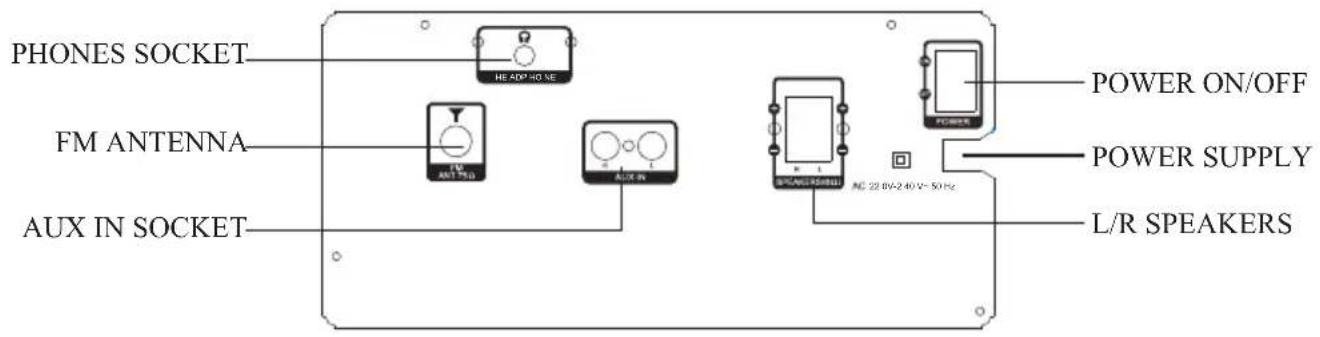

CONNECTIONS
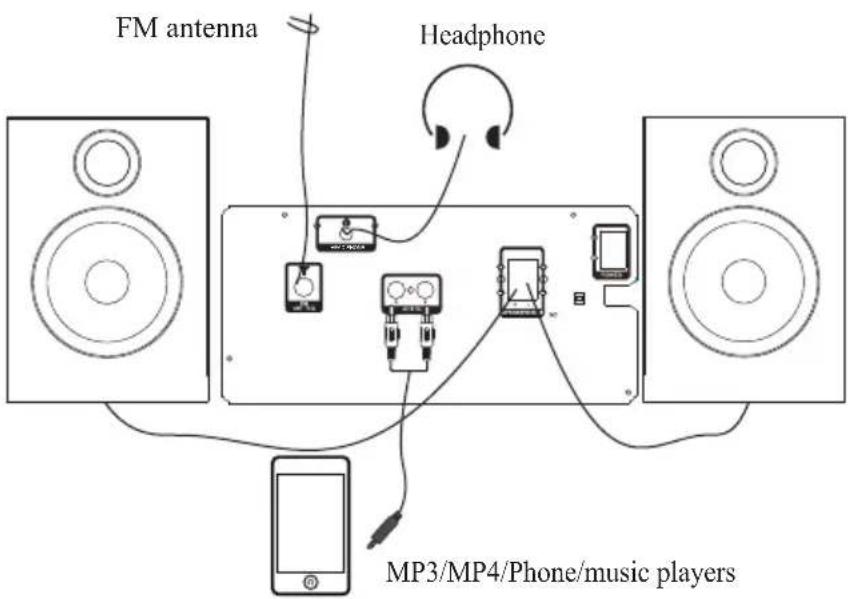
CAUTION: if the product is in Standby mode, in case of power failure, when the power returns, the unit will automatically turn on. If the unit is not in use for long time, it is suggested to turn the unit off, using the Pwer button on the unit back side and take out the power cable.
Preparation
- Before the unit is turned on, please check if all the connections are right and safely made. Insert the plug in the corresponding power socket.
- Press the STANDBY button to turn on the unit, or turn to the standby mode.
- Press the EJECT/OPEN/CLOSE ▲ button to move the disc cover out. Put the disc on the disc holder and press the button again. The player will start loading the disc and playing the disc automatically.
Select modes
Press the CD, USB, FM, AUX/BT buttons to enter the related mode.
Number buttons
Use the Number buttons to select tracks/stations/frequency.
Volume setting
Press the VOLUME+/- buttons to adjust the volume.
Previous and next
Press the ◀◀ or ▶▶ button to go to the previous or next song.
Fast Forward and Reward
While playing a disc, press the ◀◀ or ▶▶ button to fast forward or fast reward the track.
Play/pause
Press the ▶II button to pause the playback, press the button again to resume.
Stop
Press the ■ button to stop playback, press the▶■ button to restart.
Treble/Bass
Press the TREBLE or BASS button, then press the VOLUME+/- to adjust the effect of bass or treble.
EQ
Press the EQ button to select the sound fields: Rock, Classic, Pop, Live, Dance and off.
Random
Press the RANDOM button to play tracks in a random order. Press again to cancel.
Repeat
Press REPEAT button to select repeat mode: repeat one, or repeat all.
Program
This function makes tracks of CD be played in a programmed order.
(The unit can program 20 tracks in all.)
- Press the STOP button to stop playing, then press PROGRAM button, it displays: P 01-00
- Input the number of songs which you want to play first, e.g. input 04, the fourth song will be played as the first song.
- When you finish entering the first order, press the NUMBER buttons to continue to input the other order you want to program.
- When you finish all progress, press the PLAY /▶II button to save, and it will start playing the tracks by the programmed order.
- To cancel programmed playing, press the STOP button twice.
RADIO OPERATION
- Press the FM button to enter the FM mode.
- Press the MO/ST button to turn stereo on or off, if there is no strong stereo signal, you can not turn stereo on.
- If the unit detects the RDS signal, press the RDS button will display the station information if it's provided.
- Press the SEARCH button to search stations from low to high frequency automatically.
Station tuning
- Briefly press the TUNE+/- buttons to adjust the frequency in increment of 0.05MHz.
- Press and hold the TUNE+/- buttons to skip to the next or previous available frequency with sufficient reception.
Selecting stations
- Press the CH+/- buttons to skip to next or previous stations.
- Press the NUMBER buttons directly to select wanted stations.
E.g. To listen to the 28th station, press 2, then press 8.
- Press the F button, then press the NUMBER buttons to select the frequency.
E.g. To listen to the 99.80MHz, press the F button, then press 9 9 8 0.
Save Stations
To save the 88.90MHz in the 15th station:
Press the NUMBER buttons to enter 15th station; press the F button and input 8 8 9 0; at last press the SAVE button.
-
Press the AUX/BT button to enter the Bluetooth mode. The display flashes quickly.
-
Enable the Bluetooth function on your phone within 10 meters.
-
Select the name "AH 2348HP BT" from the search list,
-
Some device may ask you to input the password "0000" for pairing.
-
If pairing is successful, the display flashes steadily. You can select/play the music from your phone.
-
To disconnect the current device, turn off the Bluetooth function of your device and unpair with your speaker. The follow the STEPS 1-5 to pair with a new device.
NOTE: The unit can only connect with one device at a time and please make the pairing operation if the device is out of 10 meters range.
AUX IN OPERATION
-
Use the 3.5mm RCA cable to connect the external audio player with AUX IN socket.
-
Press the AUX/BT button to enter the AUDIO mode.
-
Control playback on the external device. Adjust the volume by the unit.
USB OPERATION
-
Insert the USB stick to the USB port.
-
Press the USB button to enter the USB mode.
-
The unit detects the inserted USB device and start playing when it's finished reading.
NOTE:
-
Depending on the amount of data and media speed, it may take longer time for the unit to read the USB device. This is not a malfunction.
-
Even when the files are in supported format (MP3), some may not play or display depending on the compatibility.
-
Some Mp3 files may contain information of the tracks such as singer, album, etc. Press the ID3 button to check the information.
-
The USB supports the USB data capacity of 32GB.
-
The USB port charges the inserted USB device.
NOTE: It is not guaranteed the compatibility with all the USB flash drive in commerce.
For your convenience, we have listed some methods to solve common problems you may encounter when you use the system. If the problem occurs repeatedly, contact the nearest maintenance center.
| Problem Possible cause | Solution | |
| Power supply does not work | Power plug is not fully inserted into the power socket | Fully insert the power plug into the power socket |
| Remote control does not work | The batteries have been used up | Replace them with new ones |
| The remote control is not aimed at the remote control sensor | Please aim the remote control correctly; in line with the remote sensor | |
| Play is unavailable | No disc inserted | Insert a disc |
| Disc incorrectly inserted | Reinsert the disc with the picture upward | |
| Disc is not compatible with this device | Only use discs that are compatible with this device | |
| No sound from speakers | Audio wire is not connected correctly | Connect the audio wire correctly |
| Incorrectly connected to computer | Connect the computer correctly by referring to the illustration | |
| Discontinuous sound | Disc is not clean | Replace with a clean disc or use a soft cloth to clean the disc |
| Disc scratched | Replace with a new one |

- MICRO SISTEMA HI-FI LETTORE CD/MP3 PORTATILE FUNZIONE BLUETOOTH RADIO FM STEREO INGRESSI USB & AUX-IN
- MAJESTIC
- CD/MP3 MICRO SYSTEM BLUETOOTH® FUNCTION FM STEREO RADIO USB & AUX-IN
- CONTENT
- SPECIFICATION
- PREPARATION
- SELECT MODES
- NUMBER BUTTONS
- VOLUME SETTING
- PREVIOUS AND NEXT
- FAST FORWARD AND REWARD
- PLAY/PAUSE
- STOP
- TREBLE/BASS
- EQ
- RANDOM
- REPEAT
- PROGRAM
- RADIO OPERATION
- STATION TUNING
- SELECTING STATIONS
- SAVE STATIONS
- AUX IN OPERATION
- USB OPERATION
- NOTE
Brand : MAJESTIC
Model : AH-2348
Category : Hi-Fi System