
AH-2349 HP - Hi-Fi System MAJESTIC - Free user manual and instructions
Find the device manual for free AH-2349 HP MAJESTIC in PDF.


| Product Type | Bluetooth Micro Hi-Fi System with CD, USB, FM Radio |
| Model | AH-2349 HP |
| Brand | Majestic |
| Power Supply | AC 220-240V ~ 50/60Hz |
| Power Consumption | 35W |
| Max Output Power | 100W x 2 |
| RMS Output Power | 50W x 2 |
| Speaker Impedance | 4Ω each |
| Unit Dimensions (W x H x D) | 25.0 x 13.5 x 26.8 cm |
| Unit Weight | 2.40 kg |
| Speaker Dimensions (each, W x H x D) | 16.5 x 26.0 x 23.0 cm |
| Speaker Weight (each) | 2.80 kg |
| FM Tuning Range | 87.5 - 108 MHz |
| Bluetooth Version | 4.0 |
| Bluetooth Range | Approx. 8 m |
| NFC | Yes, passive tag at 13.56 MHz |
| Supported Disc Formats | CD, CD-R/RW, MP3, WMA |
| USB Playback | MP3, WMA (max 16GB) |
| Preset Radio Stations | 20 FM |
| Remote Control Range | 6 m |
| ECO / Auto Standby | Yes, after 15 min inactivity |
| Clock / Timer | Manual & RDS auto-set, daily timer & sleep timer |
| Audio Inputs | AUX IN (RCA & 3.5mm), AUDIO IN |
| Included Accessories | 2 speakers, remote control, power cord, audio cable, MP3 link cable, FM antenna, speaker cables, manual |
Frequently Asked Questions - AH-2349 HP MAJESTIC
User questions about AH-2349 HP MAJESTIC
0 question about this device. Answer the ones you know or ask your own.
Ask a new question about this device
Download the instructions for your Hi-Fi System in PDF format for free! Find your manual AH-2349 HP - MAJESTIC and take your electronic device back in hand. On this page are published all the documents necessary for the use of your device. AH-2349 HP by MAJESTIC.
USER MANUAL AH-2349 HP MAJESTIC
MICRO SISTEMA HI-FI BLUETOOTH MANUALE D'ISTRUZIONI
BLUETOOTH MICRO HI-FI SYSTEM INSTRUCTION MANUAL
AH 2349HP BT/MP3/USB

FUNZIONI TASTI....3

Installation of Battery 25
Speakers Connections 26
Connect power cable....26
ECO-Power/Standby Features....26
Power-saving automatic standby 27
Setting the Clock 27
Sound Quality....28
Adjusting the Volume 28
Mute sound 28
Presetting Equalizer....28
Controlling the Loudness 28
Adjusting the Bass 28
Adjusting the Treble 28
Adjust brightness of display panel....28
FM Radio....29
Tuning in a Station 29
Presetting Stations....29
To change the FM Reception Mode 29
RDS (Radio Data System) Reception 30
CD Operation....31
CD Playing 31
To Skip Search and Play 31
To Search....31
Text Display During Playback 31
Programme Play 31
Playing Repeatedly (CD)....32
Press the (RANDOM)....32
MP3/WMA Disc Playing....32
Playing Repeatedly (MP3 disc).... 33
Press the (RANDOM)....33
Using the USB 33
USB Storage Device Data Protection 34
Playing from a Bluetooth device....34
About NFC 35
Setting the Daily on Timer 36
Set sleep timer....36
Connecting Auxiliary Equipment....37
Specifications 38
Troubleshooting 39
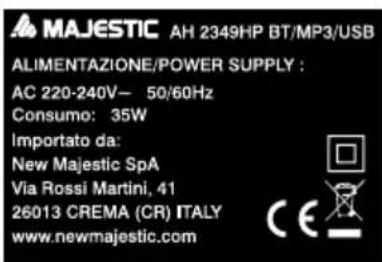
The marking information is located at the bottom of apparatus.


- Source Select Knob
- AUDIO IN Input Terminals
- Disc Tray
- Display Panel
- Open/Close Button ( ▲)
- Volume Control Knob - Adjustment time
- Remote Sensor
- Headphone Terminal
- Standby Button ( ⏻)
- Play/Pause Button (▶ III)
-
Tuned station
-
Previous Button (◀◀)
- Preset Down Switch
- Next Button (▶▶▶)
- Preset Up Switch
- Bass Button
- Treble Button
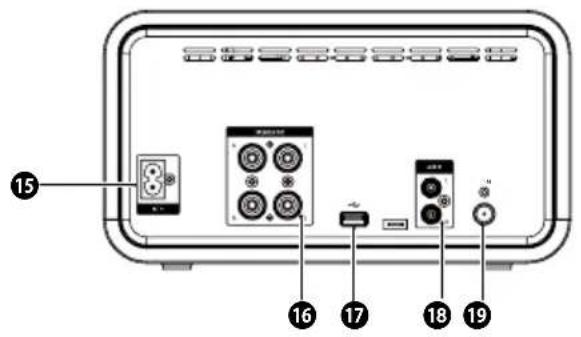
- AC Power Cable
- Speaker Output Terminals (L&R)
- USB socket
- AUX Input Terminals (L&R)
- FM Antenna
Unpacking
- The Unit 1
- Speaker Box 2
- Remote Control 1
- Power cord 1
- Audio Cable 1
- MP3 Link Cable 1
- FM Antenna 1
- Speaker Cable 2
- Instruction Manual 1
![graph TD A["1"] --> B["+"] B --> C["O"] C --> D["PROG"] D --> E["SOURCE"] E --> F["VOLI+"] F --> G["VOLIUTE"] G --> H["II/PAIRING"] H --> I["RANDOM"] I --> J["INFO"] J --> K["LOUDNESS"] K --> L["TIMER/SLEEP"] L --> M["22"] M --> N["23"] style A fill:#f9f,stroke:#333 style N fill:#f9f,stroke:#333](/content/2026/05/830217/images/028b9eb97f42c1a2f07ecce74a6acb8e59910ece7f15e0157c28a7d7d71d40c5.jpg)
- Standby Button ⏻
- Previous Button
- Program Button Memory Button
- Mute Button
- Play/Pause Button ▶ II Pairing Button
- Repeat Button Stereo/Mono Button
- INTRO Button
- P-EQ Button
- Super Bass Button
- Clock Button
- Preset Up Button ^
- Confirm button
- Next Button >1 Preset Up Button
- Preset Down Button √
- Volume Up Button (VOL +)
- Volume Down Button (VOL -)
- Source Button
- ■ Button
- Random Button
- Information Button
- Loudness Button
- Timer Button Sleep Button
- Dim Button
Installation of Battery
The first use of remote control, remote control to activate the battery piece remove protection!

Replace remote control battery
- Unscrew the screws back on the remote control.

- Open the battery compartment and remove the battery.
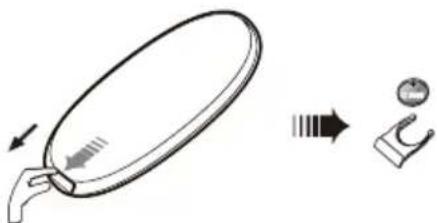
- In accordance with the instructions, with the correct polarity (+ / -) into a CR2025 battery and close the battery compartment.

- Tighten the screws back on the remote control.

Attention:
* Please keep the battery away from the high temperature environment, the sun or the sun.Fire environment. Do not throw the battery in the fire.Explosion hazard!
* If you plan for a long time without using the remote, Please take out the battery.
Remote Control Operation Range

Speakers Connections
Connect the speaker cables in the ends on the unit back side.

Connect the white cords into the screw connection (- black) and the red wire into the screw connection (+ red).
Connect power cable

Will be attached to the power cord and the machine on the back of the AC power outlet and the wall on the AC power outlet connection, and then you can use this machine!
Warning:
please do not use this machine when you go out or for a long time. Unplug the power cord from the power outlet.
ECO-Power/Standby Features
Powering ON/OFF
When you insert the AC Power cable into a wall outlet, the unit will be in standby mode.
- Press ⏻ button, the machine will switch to the last selected source.
- Press ⏻ button, again to switch to POWER ECO.
ECO Power
The clock will not be displayed. Press the CLOCK button to display the clock on the VFD.
*Normal ECO power mode
Note:
If the unit is idle for more than 15 minutes in normal mode, it will automatically switch to ECO-Power mode.
Power-saving automatic standby
As a power-saving feature, the system will automatically switch to Standby mode if you do not press any buttons within 15 minutes after playback is stopped (except for the Bluetooth is connected.)
Setting the Clock
Setting the Clock Manually
- Set the unit in standby mode.
- Press and hold the CLOCK button, the VFD will display CLOCK SET and CLOCK 24 begins to blink.
- Press the VOL+/- button on the remote control on the front panel of unit to select 12/24 mode (time format), the hour digits begin to blink, press the Clock button to confirm.
- Press the VOL+/- button on the remote control or on the front panel of unit to set the hour, press the Clock button to confirm.
- Set the minute with the VOL+/- button on the remote control or on the front panel of unit
- Press the Clock button, the built-in clock starts operating.
Note:
- If the clock setting is idle for more than 90 seconds, the clock setting mode will be cancelled.
- If a power failure occurs or the unit is disconnected from the mains socket, the clock setting will be lost.
Setting the Clock Automatically
When the RDS station displays the time, press and hold the "INFO" button on the remote control, and the clock will automatically synchronise time with the RDS station.
Display the Clock
In ECO power mode, press the Clock button.
Adjusting the Volume
To increase or decrease the volume, rotate the - VOLUME + control on the unit or press the VOL +/- buttons on the remote control.
Mute sound
During paly, press MUTE button to mute or restore sound.
Presetting Equalizer
You can adjust the sound reproduced simply by choosing from 5 preset equalizers. Press the EQ button repeatedly to scroll through the following options:
This unit has a loudness function, which can automatically increase the bass sound effect at low volume. It can also increase the bass sound effect at high volume, but it will be relatively less when it is at high volume. Press the loudness button (LOUDNESS) on the remote control to obtain the loudness function, the “◀” will be shown on the display, press this button again will disappear.
Adjusting the Bass
Press the BASS button on the unit to adjust the intensity of the bass output sound.
Adjusting the Treble
Press the Treble button on the unit to adjust the intensity of the Treble output sound.
Adjust brightness of display panel
Press DIM button repeatedly to select different brightness levels.
Caution: Before listening to the radio, please check that the FM antenna is correctly connected and adjusted for length and direction.
Tuning in a Station
- Repeatedly rotate the SOURCE button on the front of unit TUNER is displayed on the display screen, or press the SOURCE button on the remote control.
- Tune in a station using one of the following methods.
- Auto Tuning
If you press and hold the PROG button on the remote control, display will show "AUTO" and the auto tuning would start.
- Manual Tuning
Repeatedly press the ◀◀/▶▶I buttons on the front panel of unit or press the ◀<buttons on the remote control change the frequency until you find the station you want.
♦ Preset Tuning (Available only after the stations are preset)
Repeatedly press the ◄◀▶▶I buttons on the remote control or press the ✗ buttons on the front panel of unit to select the desired preset number. Its band and frequency are displayed on the Display panel.
Presetting Stations
You can manually preset up 20 FM stations.
Tune in the desired station:
- Press the PROG button on the remote control, the preset number will be displayed.
- Press the ↗ buttons on the remote control or press the ◀◀/▶▶I buttons on the front panel of unit to select the preset number.
- Press the PROG button again to store the station. The display will return to the broadcast frequency display.
- Repeat above steps 1 to 3 for each station you want to store in memory with a preset number.
Note: If the system is unplugged or if a power failure occurs, the preset stations will not be erased after stored.
To change the FM Reception Mode
Press the Repeat button to select the Stereo or Mono channel to receive the best FM reception mode.
RDS (Radio Data System) Reception
Every time you press the INFO button on the remote control, the display will cycle through the following display modes: Station Name, Frequency, Programme Type, Radio Text, Date / Clock.
The information is displayed on the lower segment of the display.
Station Name
When an RDS station is received, the name of that station will be displayed.
Programme Type
Programme type identification signal. (Example: News, Rock, Classical music.)
Date / Clock
The RDS CLOCK system may not properly operate in areas where RDS CLOCK service is not available. Once RDS CLOCK service is available, the RDS CLOCK system will commence operation.
Radio Text
This displays an RDS station description.
Frequency
This shows the frequency of the current station, e.g. 89.80 MHz.
![graph TD A["Station Name"] --> B["Programme Type"] B --> C["Date / Clock"] C --> D["Radio Text"] D --> E["Frequency"]](/content/2026/05/830217/images/4506f9f83631f62a10fe38497cf6968be58fe8787a4f3b9e73d243f5ef77e395.jpg)
CD Playing
- Repeatedly rotate the SOURCE button on the front panel of the unit or press the SOURCE button on the remote control and select DISC. "DISC" will be shown on the display.
- Press the ▲ button on the unit to open the disc door and place the disc on the disc tray (with the printed side up).
- Press the ▶■ button to close the disc door, the unit will read the disc and play it automatically.
Note: If in stop mode, please press the ▶■ button to start playing the disc. - Press the ▶■ button to pause the playing, press again to continue play.
- Press the ■ button on the remote control to stop the disc playing.
To Skip Search and Play
- Press the I<button once or more to skip previous one or more tracks on the disc.
- Press the >button once or more to skip forward one or more tracks on the disc.
To Search
Press and hold the
Text Display During Playback
Press the INFO button to select display information during play.
Programme Play
You can programme up to 20 tracks to play in any desired order.
- Insert a disc and press the ■ button when it starts playing.
- Press the PROG button, "001 P--01" will be displayed on the display.
- Press the I K buttons on the remote control to select the desired track number.
- Press the PROG button to confirm the track number to be stored.
- Repeat steps 3-4 to select and store all desired tracks.
- Press the ▶■ button to start programme play.
- Press the ■ button once to stop the programme play. Press the ■ button twice to clear the programme.
Playing Repeatedly (CD)
ONE, ALL repeat play can be set by pressing the REPEAT button.
- First press : To repeat the same track, "REP" will be displayed on the display.
- Second press : To repeat playing all tracks on a disc, "REP ALL" will be displayed on the display.
- Third Press : Returns to the normal playback state.
Press the (RANDOM)
- First Press : To play tracks randomly, "SHUF ON" will be displayed on the display.
- Second Press : To cancel the repeat playing, "SHUF OFF" will be disappeared on the display.
MP3/WMA Disc Playing
Note:
MP3/WMA music playback from a CD maybe be affected due to the type and format of the disc or condition of the recording. If you are having trouble playing a certain disc, it is recommended to use the USB input instead for best MP3/WMA playback.
- Rotate the SOURCE button on the unit or press the CD button on the remote control. "DISC" will be shown on the display.
- Press the ▲ button to open the disc door and place the MP3/WMA disc on the disc tray.
- Press the Display button on the remote control, ID3 information (song title and artist) will be displayed or "NO ID3" if there is no ID3 information.
- When playing MP3/WMA discs, the current album and track will be displayed.
- Press the I<>I buttons to select the previous/next track. When pressing the ^/√ buttons for a few seconds, it will search backward or search forward.
- Press the ∧ or ∨ button on the remote control to select the next/previous folder, and play the first track of this folder. If the playing has ended, press the Album Up button or Album Down button on the remote control to select the next/previous album. Then choose the track with the button or button.
- Press the▶■button to start playing the disc.
- Press the ■ button to stop playback.
Playing Repeatedly (MP3 disc)
ONE, ALB and ALL repeat play can be set by pressing the REPEAT button.
- First press : To repeat the same track, "REP" will be displayed on the display.
- Second press : To repeat playing folder, "REP ALB" will be displayed on the display.
- Third press : To repeat playing all tracks on a disc, the words "REP ALL" will be displayed on the display.
- Fourth Press : To return to the normal playback state.
Press the (RANDOM)
- First Press : To play tracks randomly, "SHUF ON" will be displayed on the display.
-SecondPress: Tocanceltherepeatplaying, "SHUFOFF" will bed disappeared on the display.
Using the USB
By connecting an USB mass storage device to this unit, you can enjoy the device's stored music through the unit.
- Insert USB plug into the back panel of the unit.

- Press the SOURCE button on remote control or rotate the SOURCE button on the main unit to select the USB function. "USB" will be shown on the display.
- The device's stored music will be played automatically.
- When you store more than one folder in the USB flash, use the ^ button or √ button on the remote control to select the next/previous folder. Then choose the trackwith the 1< or >1 buttons to play the folder.
- The player support the USB music file format of MP3, WMA only.
USB Storage Device Data Protection
- Always insert the USB device in the correct direction. Failure to do so may result in damage to the USB device and the unit.
- Do not remove the USB device while it is being accessed.
- Electrical interference and electrostatic discharges may cause the USB device to malfunction and suffer damage, resulting in data loss. It is strongly recommended that any important data is backed up on a PC to protect against corruption, data loss or device malfunction.
Note: USB connection is not compatible with all hard drive models, the maximum capacity support 16G.
Playing from a Bluetooth device
With this unit, you can listen to audio files from a player via Bluetooth if the connection is available.
Pairing bluetooth-enabled devices
To connect your Bluetooth device to the unit, you need to pair the device to the unit. Pairing needs only to be done once.
Note:
* The operational range between this unit and a Bluetooth device is approximately 10 metres.
* Before you connect a Bluetooth device to this unit, familiarise yourself with the Bluetooth capabilities of the device.
* Compatibility with all Bluetooth devices is not guaranteed.
* Any obstacle between this unit and a Bluetooth device can reduce the operational range.
* Keep this unit away from any other electronic device that may cause interference.
-
Press the SOURCE button on the remote control or rotate the SOURCE on the unit. BT will appear on display.
-
Turn on the Bluetooth function on your device.
-
Search for other Bluetooth devices with your device.
-
Select "AH 2349HP BT/MP3/USB" in the pairing list.
-
Enter default password "0000" if necessary. (After the BT pairing, it will stop flashing).
-
Press and hold the PAIR button more than 2 seconds to clear pairing history.
Note:
- The device will be disconnected if it is moved beyond the operation range.
- If you want to reconnect the device to the unit, place it within the operational range.
Listening to music from a Bluetooth device
If the connected Bluetooth device supports Advanced Audio Distribution Profile (A2DP), you can listen to the music stored on the device through the unit.
- Pair the device with the unit.
- Start playing music via device.
About NFC
Near Field Communication (NFC) makes connecting and sharing easy and fun. Devices and accessories that support NFC can be connected wirelessly when you touch them together.
With NFC, you can:
* Share your own music between two compatible devices that support NFC.
* Connect to compatible Bluetooth accessories that support NFC, such as smart phone or wireless loudspeaker.
The NFC area is on the front of the main unit.
Connect to a Bluetooth accessories using NFC
- Activate NFC on your device.
- Tap your device on the NFC area of the main unit.
- Operate your device directly for playback features.
Disconnecting the accessory
- Turn off the function on your device.
You can use the setting timer to make the unit automatically turn on at a certain time everyday from standby. When the setting timer is on, The clock must be correctly set for the timer to operate correctly.
- In clock mode, press and hold the TIMER/SLEEP button until [TIMER SET] (set timer) scrolls on the display.
- Then the source is displayed, e.g. DISC.
- Press the SOURCE button or VOL+/- button to select a source.
- Press the TIMER/SLEEP button, the hour indicator will blink.
- Set the hour with the VOL+/- button.
- Press the TIMER/SLEEP button, the minute indicator will blink.
- Set the minute with the VOL+/- button.
- Press the TIMER/SLEEP button, the volume indicator will blink.
- Adjust volume with the VOL+/- button.
Caution: If disc/USB source is selected and the audio cannot be played, TUNER is automatically activated.
Set sleep timer
This unit can switch to clock mode automatically after a set period of time.
- When the unit is turned on, press the TIMER/SLEEP button repeatedly to select a preset period(in minutes).

- To deactivate the sleep timer, press the TIMER/SLEEP button repeatedly until [OFF] (sleep off) is displayed.
Connecting Auxiliary Equipment
Connect the RCA cable or the 3.5mm jack-jack cable on the rear of the unit to the line output terminals on the auxiliary equipment as illustrated below.

Playing music from an external audio source.
- Ensure that the external audio source is connected to the device.
- Press the SOURCE button to select the audio input through the AUX IN / AUDIO IN.
- In case there are some problems, just start the playback from the external unit (see the instruction manual of your device).
Power Requirements : 220-240V\~, 50/60Hz
FM Tuning Range : 87.5\~108 MHz
Power Consumption : 35W
AUX input sensitivity : ≤ 1000mV
Max. Output Power : 100W x 2
Output Power in RMS : 50W x 2
Unit Dimensions : 25.0(L) x 13.5(H) x 26.8(D) cm
Unit Wdight : 2.40 Kg
Speaker Specification
Impedance : 4Ω
Dimensions : 16.5(L) x 26.0(H) x 23.0(D) cm each
Weight : 2.80 Kg each
Bluetooth
Communication system : Bluetooth Standard version 4.0
Hardware version : V01A
Software version : 120201
Frequency range : 2402 - 2480 MHz
Maximum power transmitted : 4dBm
Maximum communication range : approx. 8m
Compatible Bluetooth profiles : Advanced Audio Distribution Profile (A2DP)
NFC
Frequency operation : 13.56 MHz
Communication technique : NFC passive tag
Remote Control
Distance : 6m
Angle : ±30°
Note:
* Only used elevation 2000 meters below the regional security.
* Only for safe use in non tropical climates. When used in tropical climates, there may be a safety hazard.
If you are having a problem with your unit, check this list for a possible solution before calling for service.
If you cannot solve the problem from the hints given here, or the unit has been physically damaged, call a qualified person, such as your dealer, for service.
| Symptom Possible Cause Action | ||
| No sound is heard Connections are incorrect, or loose Check all connections and make corrections | ||
| Poor radio reception The Antenna is disconnectedThe Antenna is not properly extended and positionedReconnect the Antenna securely and reposition it to the best reception position | ||
| The disc skips The disc is dirty or scratched Clean or replace the disc | ||
| The disc does not play The disc is upside downThe disc is dirtyPut the disc in with the label side upRemove disc from player, wipe with a clean cloth and re-insert. | ||
| Unable to operate the remote controlThe path between the remote control and the sensor on the unit is blockedThe batteries have lost their chargeRemote the obstructionReplace the batteries | ||
| Operations are disabledThe built-in microprocessor has malfunctioned due to external electrical interferenceUnplug the unit then plug it back in | ||
| The Bluetooth device cannot playThe audio quality is poor after connection.The Bluetooth reception is poorMove the device closer to the unit or remove any obstacle between the device and the unit | ||
| The Bluetooth cannot connect with the unitThe device does not support the profiles required for the unit.The Bluetooth function of the device is not enabled.The unit is not in the pairing mode.The unit is already connected with another Bluetooth-enabled device.Refer to the user manual of the device for how to enable the functionDisconnect that device or all other connected devices and then try again. | ||
* There are no restrictions of use.
INFORMAZIONE AGLI UTENTI DI APPARECCHIATURE DOMESTICHE


- UNPACKING
- INSTALLATION OF BATTERY
- REPLACE REMOTE CONTROL BATTERY
- ATTENTION
- REMOTE CONTROL OPERATION RANGE
- SPEAKERS CONNECTIONS
- CONNECT POWER CABLE
- WARNING
- ECO-POWER/STANDBY FEATURES
- POWERING ON/OFF
- ECO POWER
- POWER-SAVING AUTOMATIC STANDBY
- SETTING THE CLOCK
- SETTING THE CLOCK MANUALLY
- NOTE
- SETTING THE CLOCK AUTOMATICALLY
- DISPLAY THE CLOCK
- ADJUSTING THE VOLUME
- MUTE SOUND
- PRESETTING EQUALIZER
- ADJUSTING THE BASS
- ADJUSTING THE TREBLE
- ADJUST BRIGHTNESS OF DISPLAY PANEL
- TUNING IN A STATION
- AUTO TUNING
- MANUAL TUNING
- ♦ PRESET TUNING (AVAILABLE ONLY AFTER THE STATIONS ARE PRESET)
- PRESETTING STATIONS
- TO CHANGE THE FM RECEPTION MODE
- RDS (RADIO DATA SYSTEM) RECEPTION
- STATION NAME
- PROGRAMME TYPE
- DATE / CLOCK
- RADIO TEXT
- FREQUENCY
- CD PLAYING
- TO SKIP SEARCH AND PLAY
- TO SEARCH
- TEXT DISPLAY DURING PLAYBACK
- PROGRAMME PLAY
- PLAYING REPEATEDLY (CD)
- PRESS THE (RANDOM)
- MP3/WMA DISC PLAYING
- PLAYING REPEATEDLY (MP3 DISC)
- USING THE USB
- USB STORAGE DEVICE DATA PROTECTION
- PLAYING FROM A BLUETOOTH DEVICE
- PAIRING BLUETOOTH-ENABLED DEVICES
- LISTENING TO MUSIC FROM A BLUETOOTH DEVICE
- ABOUT NFC
- WITH NFC, YOU CAN
- CONNECT TO A BLUETOOTH ACCESSORIES USING NFC
- DISCONNECTING THE ACCESSORY
- SET SLEEP TIMER
- CONNECTING AUXILIARY EQUIPMENT
- SPEAKER SPECIFICATION
- BLUETOOTH
- NFC
- REMOTE CONTROL
- INFORMAZIONE AGLI UTENTI DI APPARECCHIATURE DOMESTICHE
Brand : MAJESTIC
Model : AH-2349 HP
Category : Hi-Fi System