
LA CAFETIERE - Coffee maker MAGIMIX - Free user manual and instructions
Find the device manual for free LA CAFETIERE MAGIMIX in PDF.
| Product type | Drip coffee maker |
| Brand | MAGIMIX |
| Model | LA CAFETIERE |
| Maximum capacity | 10 cups (1.2 L) |
| Carafe material | Double-wall stainless steel (thermal model) or glass (hot plate model) |
| Timer function | Yes (on programmable models) |
| Auto shut-off | Yes (15 min for thermal, 2 h for glass after start) |
| Flavor selector | For 1 to 5 cups (longer brew time) |
| Anti-drip system | Yes (allows removing carafe during brewing) |
| Water filter | Removable, available as replacement (ref. 19 465) |
| Coffee filter type | Paper 1x4 or size 4 |
| Measuring scoop included | Yes (1 level scoop = 7 g, 1 heaped scoop = 1 large cup) |
| Voltage | 220-240 V, 50/60 Hz |
| Power consumption | Approx. 690 W (deduced from 3 A fuse) |
| Dimensions (L x W x H) | Approx. 30 x 20 x 35 cm (estimate) |
| Weight | Approx. 2 kg (estimate) |
| Maintenance | Clean exterior with a damp cloth; glass carafe dishwasher safe, thermal carafe hand wash |
| Descaling | Every 8-10 months with a special product (do not use vinegar) |
| Safety instructions | Unplug before cleaning; do not immerse; do not open lid during brewing |
| Spare parts available | Magimix water filters, paper filters, replacement carafe |
Frequently Asked Questions - LA CAFETIERE MAGIMIX
User questions about LA CAFETIERE MAGIMIX
0 question about this device. Answer the ones you know or ask your own.
Ask a new question about this device
Download the instructions for your Coffee maker in PDF format for free! Find your manual LA CAFETIERE - MAGIMIX and take your electronic device back in hand. On this page are published all the documents necessary for the use of your device. LA CAFETIERE by MAGIMIX.
USER MANUAL LA CAFETIERE MAGIMIX
Instructions for use
Congratulations! You have just acquired a Magimix appliance and we would like to thank you for choosing our brand. We hope that its use will give you entire satisfaction.

Before you use your Magimix coffeemaker for the first time, make sure you read through these instructions carefully and keep them in a safe place.
The secrets of brewing good coffee
5 key factors :

The freshness of your ground coffee.
To ensure none of the freshness of your ground coffee is lost, avoid all unnecessary exposure to air. After opening the packet, close it as tightly as possible, squeezing all the air out, and place it in an airtight container in the refrigerator.

Water quality.
A cup of coffee is more than 98% water! Your coffeemaker is fitted with a water filter to remove the taste of chlorine from tap water. To improve the life expectancy of your appliance, use water with a low mineral content (soft water).

The ground coffee / water ratio.
The optimum ratio varies between 50g and 75g of coffee per litre, i.e. if you use the measuring spoon supplied with your appliance :
Normal coffee : 1 level spoonful per cup
- Strong coffee : 1 heaped spoonful per cup

Water temperature.
The water passing through your ground coffee must be simmering, but never boiling. Your coffeemaker's thermostat guarantees that it is at the optimum temperature for brewing coffee.

Steeping time.
If you only wish to brew enough for 1-5 cups, the ground coffee must be allowed to steep for longer, so that it releases all its flavour. This is why your appliance is equipped with an aroma selector, so that you always obtain the same quality of coffee, whatever the quantity.
Tips :
As far as possible, please avoid reheating your coffee! The best way of keeping your coffee hot over a long period is to use a thermos coffee pot.
| CONTENTS | Pages |
| Description | 32 |
| Before you use your appliance for the first time | 33 |
| How to make filter coffee? | 33 |
| - Preparing the machine | 33 |
| - Making a small amount of coffee | 34 |
| - Manual/automatic switch-off | 34 |
| - Water filter | 35 |
| Programmable version | 36 |
| - Adjusting the clock | 36 |
| - Setting the timer | 36 |
| Thermos version | 37 |
| Aftercare | 38 |
| - Cleaning | 38 |
| - Descaling | 38 |
| Troubleshooting? | 39 |
| Electrical instructions | 39 |
| Recipes | 40 |
| - Alcohol-free recipes for hot coffee | 40 |
| - Alcohol-free recipes for cold coffee | 41 |
| - Recipes for coffee laced with spirits | 42 |
| △ Safety instructions | 43 |
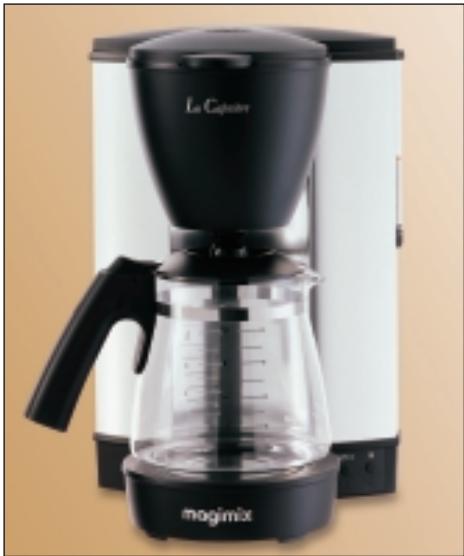
Description
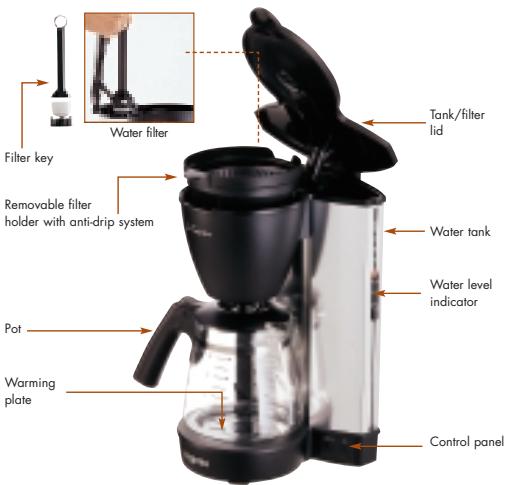
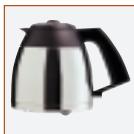
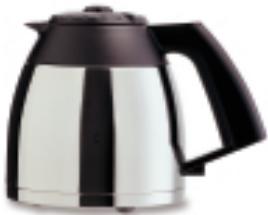
Double-insulated stainless-steel walls
Supplied with 1 measuring spoon (1 level spoonful = 7 g)
Before you use your appliance for the first time
Before you use your appliance for the first time. (for operating instructions, see "Preparing the machine")
- Then rinse the pot and filter holder.
How to make filter coffee
Preparing the machine
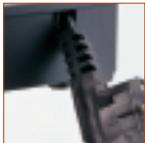
Unwind the power cord to the length you require.
- Plug your machine into an earthed socket.

- Fill the tank with fresh water using the pot
Do not fill above the maximum capacity ("MAX" mark on the water level indicator).
NB:10 cups = 1.2 litres.
NB: Do not forget that ground coffee absorbs water, so the quantity of coffee you obtain will always be smaller than the amount of water you put in the tank.

- Check that the filter holder is properly slotted into place.
- Put a paper filter (1 × 4 or n^.4) in the filter holder.
- Spoon the ground coffee in the filter using the measuring spoon : - 1 level spoonful = 1 small cup. - 1 heaped spoonful = 1 large cup.
NB: These quantities are given as a rough guide – you will soon decide what suits you best.
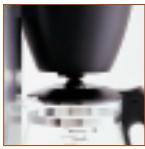
- Close the lid and put the pot in place.
NB: Your coffeemaker is fitted with an anti-drip system which means you can remove the pot and pour yourself a cup while the coffee is still brewing.
If the pot is incorrectly positioned, or if its lid is missing, the filter holder may overflow.
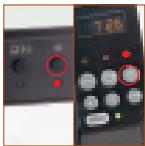
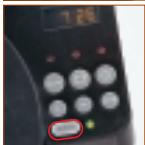
- Switch on your appliance by pressing the ① button. The red indicator light will come on and the water will start to flow within a few seconds.
Never open the lid while the coffee is brewing.
Making a small amount of coffee
Your appliance is equipped with an aroma selector to allow you to enjoy the same quality of coffee whatever the quantity you brew.
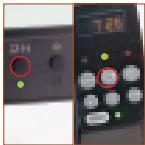
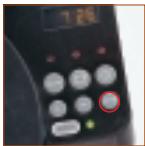
- Press the 1-5 cup button. The green indicator light will come on.
- Then press the ① on/off button. The red indicator light will then come on.
The ground coffee will steep for longer so that it releases all its flavour.
NB: A small amount of coffee starts to cool down rapidly when it comes into contact with the pot, which is why we recommend that you rinse the latter with hot water before brewing your coffee.
NB: To cancel this function, simply press the 1-5 cup button again.
Manual/automatic switch-off
-
Manual switch-off: press the ① button.
Automatic switch-off: to save energy and for safely reasons, your coffeemaker is equipped with an automatic switch-off. -
Model with thermos pot : switched off 15 min. after being switched on.
- Model with glass pot : switched off 2 hours after being switched on.
Always leave your appliance to cool down for approx. 5 minutes before opening the lid.
Your coffeemaker's water filter removes most of the chlorine and other impurities contained in tap water.
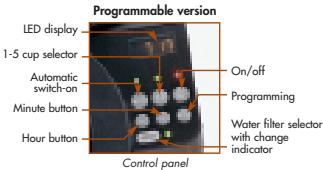
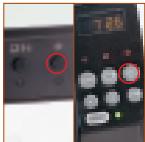
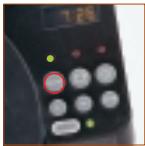
NB: If you are using bottled water, there is no need to use the filter. In this case, if you have a programmable model, press the filter button to switch off the filter change indicator.
Fitting the filter
- Remove the filter key from the tank.

- Insert the water filter into the key.
- Place the filter in the tank, checking that it is correctly positioned in the compartment intended for this purpose
Each time you fit a fresh filter :
- fill the water tank for 4 cups and wait approx. 3 min.
- press the ① button and wait for the water to flow into the pot.
Changing the filter
When?
- Model without programming : when you have used it 60 times.
- Model with programming : when the filter light flashes (after 6 weeks of use or when you have used your coffeemaker more than 60 times).
If the machine is left unplugged for more than 10 sec., the indicator is reinitialized.
How?
- Replace the filter as described in the paragraph "Fitting the filter".
- Programmable version : press the filter button for a few seconds until the indicator stops flashing.
NB: You can obtain Magimix filters (ref. 19 465) from your retailer or directly from Magimix, using the order form enclosed with your appliance.
Programmable version
Adjusting the clock
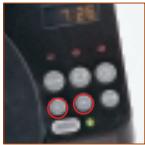
- Press the (h) hour button and release when the correct hour is displayed.
- Press the (m) minute button and release when the correct time is displayed.
NB : The display will flash until you adjust the clock.
Setting the timer
- Press the (prog) button.
- Then immediately press the (h) button then the (m) button as described above, to set or adjust the timer for the automatic switch-on. After a few seconds, the screen will display the actual time again.
NB: to check the timer programming, press the (prog) button.
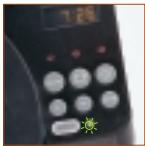
- After you have prepared your coffeemaker (water + ground coffee), press the "auto" button. The indicator light will come on. NB: Make sure the pot is correctly positioned.
- At the programmed time, the coffeemaker will automatically switch itself on. The red power indicator light will come on and the green "auto" light will go out.
NB: to cancel the automatic switch-on function, press the "auto" button again: the "auto" indicator light will go out.
If the machine is left unplugged for more than 10 sec., you will have to reprogramme it.
Thermos version

Before brewing your coffee, we recommend that you rinse your thermos pot out with hot water for optimum results.
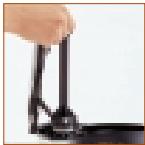
- Close the lid, screwing it in a clockwise direction as far as it will go.
Do not screw the lid too far. The spout must always be correctly positioned with the lid closed, otherwise the anti-drip system will not work properly and the filter holder will overflow.
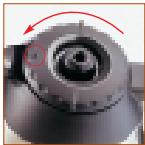
- To pour the coffee, turn the lid until the dot on the lid is facing the spout. Tighten the lid again immediately afterwards, to keep in the heat.
Immediately after it has been brewed, the temperature of the coffee in the pot will be between 80 and 84^ though this may vary according to the initial temperature of the pot. After 2 hours, the temperature will still be between 74 and 79^ .
NB: the number of times the lid is opened and the quantity of coffee left inside can affect this temperature.
Aftercare
Always unplug your appliance before embarking on any kind of maintenance task.
Never use alcohol, solvents or aggressive cleaning products.
Cleaning
- The appliance housing : from time to time, clean the external surfaces of the appliance with a damp cloth.
- The coffee pot : always empty it and clean it with a mild washing-up liquid after use.
The thermos coffe pot : never immerse it completely in hot water. Clean the outside with a soft cloth. Clean the inside with a little water and washing-up liquid using a soft brush, then rinse. Always rinse the lid under the top after use.
Never put the thermos pot in the dishwasher.
Dscaling
Your coffee machine is equipped with a stainless-steel heating element, which reduces the formation of limescale. However, it is important to descale your appliance every 8 or 10 months - or more often if you notice that the coffee is taking longer to brew.
Dscaling method :
We recommend you use a descending product specially formulated for coffee machines.
Never use vinegar.
Remove the water filter while your are descending.
- Fill the tank with fresh water up to the maximum level, then pour in the liquid descaler according to the manufacturer's instructions.
- Plug in your appliance and place the pot under the empty filter holder (no paper filter or ground coffee).
- Press the ① button to switch your appliance on.
- Once the water tank is empty, switch off your appliance by pressing the ① button.
- Wait for approx. 10 minutes to allow the coffeemaker to cool, then rinse the circuits through with the equivalent of two full pots of fresh water.
Troubleshooting
| Problems | Possible causes | Solutions |
| The coffee takes a longer time to brew | • The appliance is clogged with limescale | • Descale (cf. p.38) |
| • The coffee is too finely-ground | • Try a coarser grind | |
| The coffee drips onto the warming plate when the pot is removed | • The anti-drip system is not working properly | • Rinse the filter holder under the top and check that it is working properly |
| The coffee does not flow into the pot/the filter holder overflows | • The anti-drip system is preventing the coffee from going into the pot | • Check that the pot is correctly positioned, with its lid on properly • Check the positioning of the filter holder |
| • There is too much ground coffee | • Put less ground coffee in the filter holder | |
| Your coffee has an unpleasant taste | • You did not rinse out the appliance properly after descaling it | • Rinse out your appliance 2 or 3 times (cf. p.38) |
If you cannot determine the cause of the problem, contact your retailer or our customer care department, which will give you the address of a Magimix-approved after-sales service
You must never dismantle your appliance yourself.
Electrical instructions
WARNING: Always replace the fuse cover of the fitted plug, never use the plug with the fuse cover omitted. If a replacement fuse cover is required, ensure it is the same as the one visible on the pin face of the plug (i.e. RED or ORANGE).
Fuse covers are available from: BBS Ltd
Po Box 110
Farnham Surrey GU10 4PL
Phone:01252727755
Use a 3A fuse approved by ASTA to BS1362, marked thus

WARNING: a plug with a bared flexible cord is hazardous if engaged in a live socket. If the fitted plug has been cut from the power supply cord, it should be destroyed and replaced with a three
pin plug in accordance with the following code: BLUE : neutral
BROWN : live
GREEN/YELLOW : earth
The wire which is coloured BLUE must be connected to the terminal in the plug which is marked with the letter "N" or coloured BLUE or BLACK.
The wire which is coloured BROWN must be connected to the terminal in the plug which is marked with the letter "L" or coloured BROWN or RED which is connected to the fuse.
The wire which is coloured GREEN/YELLOW should be connected to the terminal marked with the letter "E", or by the earth symbol or coloured GREEN or GREEN/YELLOW.


- The secrets of brewing good coffee
- Description
- Before you use your appliance for the first time
- How to make filter coffee
- Preparing the machine
- Making a small amount of coffee
- Manual/automatic switch-off
- Fitting the filter
- Changing the filter
- If the machine is left unplugged for more than 10 sec., the indicator is reinitialized.
- Programmable version
- Adjusting the clock
- Setting the timer
- Thermos version
- Aftercare
- Cleaning
- Dscaling
- Dscaling method :
- Troubleshooting
- Electrical instructions
Brand : MAGIMIX
Model : LA CAFETIERE
Category : Coffee maker