16510054 - Air conditioner Melissa - Free user manual and instructions
Find the device manual for free 16510054 Melissa in PDF.


| Product Type | Tower Fan |
| Brand | Melissa |
| Model | 16510054 |
| Power Supply | 230 V ~ 50 Hz |
| Speed Settings | 3 (Low, Medium, High) |
| Operating Modes | Normal, Natural Breeze, Sleep |
| Timer | Up to 7.5 hours (combination of 0.5, 1, 2, 4 hours) |
| Oscillation Angle | 75° |
| Control | Control panel on unit + Remote control |
| Remote Control Battery | 1 x CR2025 (button cell) |
| Base Assembly Required | Yes |
| Cleaning Instructions | Wipe with damp cloth, do not immerse |
| Safety Features | Overheat protection? Not specified; use on flat surface, keep away from water |
| Storage | Dismantle base, store in dry place |
| Warranty | Standard guarantee terms apply (see manual) |
| Indoor Use Only | Yes |
| Power Cord Length | Not specified |
| Dimensions | Not specified |
| Weight | Not specified |
| Spare Parts Availability | Contact Adexi Group via website |
Frequently Asked Questions - 16510054 Melissa
User questions about 16510054 Melissa
0 question about this device. Answer the ones you know or ask your own.
Ask a new question about this device
Download the instructions for your Air conditioner in PDF format for free! Find your manual 16510054 - Melissa and take your electronic device back in hand. On this page are published all the documents necessary for the use of your device. 16510054 by Melissa.
USER MANUAL 16510054 Melissa
natural_image
White vertical electric fan tower with grid and control panel (no visible text or symbols)671-145
UK Tower fan with base and remote control.....26
OVERSIGT OVER APPARATETS DELE
Fjernbetjening
a. Knappen "POWER" (tænd/sluk)
b. Knappen "SPEED" (hastighed)
c. Knappen "MODE" (tilstand)
d. Knappen "TIMER"
e. Knappen "OSC" (drejefunktion)
p. Batteriholder (ikke synlig på billedet)

natural_image
Close-up of hands holding a white mechanical component with arrows pointing to features (no visible text or symbols)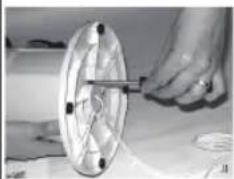
natural_image
Close-up of a hand using a tool to spread a circular object with a pointer (no visible text or symbols)o "1/2H" (1/2 time) (i)
o "1H" (1 time) (j)
o "2H" (2 timer) (k)
o "4H" (4 timer) (l)
Timerindstillingerne kan kombineres, f.eks. 4H+1H+ 12 H - dvs. 5 12 time. Den maksimale indstilling er således 7 12 time.
natural_image
Close-up of hands assembling a white plastic component with arrows indicating assembly direction (no text or symbols visible)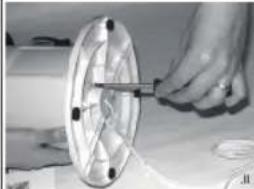
natural_image
Close-up of hands using a tool to adjust or install a mechanical component (no visible text or symbols)natural_image
Close-up of hands assembling a circular mechanical component with arrows indicating assembly direction (no text or symbols visible)
natural_image
Close-up of hands operating a mechanical device with wires and components (no visible text or symbols)o "1/2H" (1/2 time) (i)
o "1H" (1 time) (j)
o "2H" (2 timer) (k)
o "4H" (4 timer) (l)
Timerinnstillingene kan kombineres, for eksempel 4H+1H+12H=512 time. Maks. innstilling er 712 time.
natural_image
Close-up of hands assembling a white circular mechanical component with mounting holes and arrows indicating features (no text or symbols visible)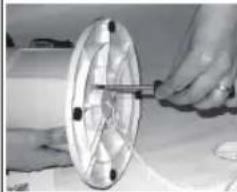
natural_image
Close-up of hands operating a mechanical component with a spool and wires (no visible text or symbols)LAITTEEN KÄYTTÖ
To get the best out of your new appliance, please read this user guide carefully before using it for the first time. Take particular note of the safety precautions. We also recommend that you keep the instructions for future reference, so that you can remind yourself of the functions of your appliance.
SAFETY MEASURES
General
- Incorrect use of this appliance may cause personal injury and damage.
- Use for the intended purpose only. The manufacturer is not responsible for any injury or damage resulting from incorrect use or handling (see also Guarantee Terms).
- For domestic use only. Not for outdoor or commercial use.
- For connection to 230 V, 50 Hz only.
- Do not immerse the appliance, cord or plug in water and make sure no water enters the appliance.
- Never touch the appliance, cord or plug with wet or damp hands.
- Do not expose the appliance to direct sunlight, high temperatures, humidity, dust or corrosive substances.
- Never leave the appliance unattended when it is switched on.
- Never leave unattended when in use, and keep an eye on children in the vicinity of the appliance when it is being used. The appliance is not a toy.
- The appliance is not to be used by persons with reduced sensitivity, physical or mental disabilities or persons who are unable to use the appliance, unless supervised or instructed by a person responsible for their safety.
- The appliance should be stored out of the reach of children when not in use.
Use
- Place the appliance on its base on a level, flat and dry surface. The appliance is not to be mounted onto a wall, ceiling or similar.
- Place the appliance at a safe distance from any curtains to prevent them from being sucked into the appliance.
- Do not place the appliance anywhere where there is a risk of it falling into water, such as near a bath.
- Do not cover or hang things on the appliance.
- Do not use the appliance until it has been assembled.
- Never use the appliance if protective screens are missing or defective.
- Never try to open the cabinet yourself and never force objects into it.
- Never use the appliance near flammable gasses or liquids, or in a damp environment.
- Do not use the appliance together with speed regulating devices.
- Avoid subjecting the remote control to heavy impact.
Cord and plug
- Keep the cord and appliance away from heat sources, hot objects and naked flames.
- Check that it is not possible to pull or trip over the cord of the appliance.
- Turn off the appliance and remove the plug from the socket before moving, cleaning or when the appliance is not in use. Avoid pulling the cord when removing the plug from the socket. Instead, hold the plug.
- Ensure that the cord is fully extended.
- The cord must not be twisted or wound around the appliance.
- Check regularly that neither cord nor plug is damaged and do not use if they are, or if the appliance has been dropped or damaged in any other way.
- If either the appliance, cord or plug has been damaged, have the appliance inspected and if necessary repaired by an authorised repairer. Never try to repair the appliance yourself. Please contact the store where you bought the appliance for repairs under the guarantee. Unauthorised repairs or modifications to the appliance will invalidate the guarantee.
Battery
- Check that the plus and minus poles are aligned correctly to avoid damage to the remote control.
- Remove the battery from the remote control if the appliance is not to be used for a prolonged period.
KEY TO THE MAIN COMPONENTS OF THE APPLIANCE
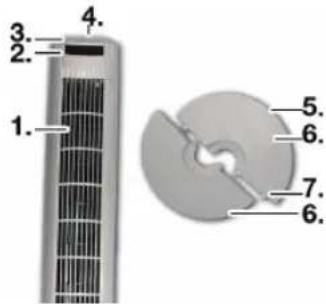
- Vent slats
- Display
- Control panel with buttons
- Storage compartment for the remote control (not visible in the picture)
- Groove for cord
- Base (2 halves)
- Collector rings (4)
Remote control
a. "POWER" (on/off) button
b. "SPEED" button
c. "MODE" button
d. "TIMER" button
e. "OSC" button (turning function)
p. Battery holder (not visible)

Buttons on the control panel

a. "POWER" (on/off) button
b. "SPEED" button
c. "MODE" button
d. "TIMER" button
e. "OSC" button (turning function)
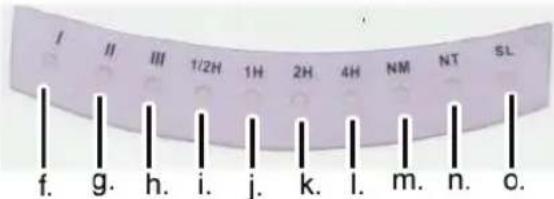
Indicators on the display
- Remove all packaging and transport material from the appliance.
- Check that the appliance has no visible damage and that no parts are missing.
- Clean the appliance before using it (see the section "Cleaning" below).
-
Assemble the appliance before use following the instructions below.
-
Place the appliance on its side.
- Place the cord between the two halves of the base (6) and assemble the base by inserting the round dowels on one half into the collector rings (7) on the other half. Ensure the two halves are perfectly level and that the cord moves freely through the hole at the centre of the base.
- Pass the cord through the groove (5) at the edge of the base and secure it by pushing it underneath the two holders (see picture I.).
- Place the base against the bottom of the appliance so the holes in the base align with the holes in the appliance. Join the two parts together using the 4 screws (see picture II.).
- Stand the appliance on its base. The appliance is now ready for use.

natural_image
Close-up of hands assembling a mechanical component with arrows indicating assembly direction (no visible text or symbols)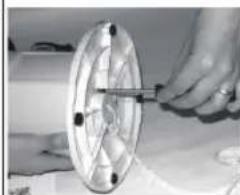
natural_image
Close-up of hands using a tool to adjust or inspect a circular mechanical component (no visible text or symbols)Placing battery in the remote control
- Turn the remote control so that the back is facing upwards.
- Remove the battery holder (p) by pressing the pin on the left side down and pulling the holder out.
- Insert 1 x battery type CR2025 (button cell battery) with plus pole facing upwards in the battery holder (see diagram on back of remote control).
-
Push the battery holder back into place in the remote control.
-
If the appliance does not respond or responds slowly when activating the remote control, it could be because the battery needs replacing.
- Always remove the battery from the remote control if the appliance is not to be used for a prolonged period.
USING THE APPLIANCE
Activate the appliance using the buttons at the control panel (3) or the remote control.
- Connect the appliance.
- Turn the appliance so the vent slats (1) point in the desired direction.
-
Switch the appliance on by pressing the "POWER" button (a). The appliance starts at the speed and mode that was used last time the appliance was switched off.
-
Press the "SPEED" button (b) repeatedly to shift between the three speeds. A green indicator in the display (2) shows the selected speed:
o "l": Low speed (f)
o "II": Medium speed (g)
o "III": High speed (h)
- The "MODE" button (c) allows you to choose between three different modes. A green indicator in the display shows the selected mode:
o "NM" (normal mode) (m): The appliance runs at a constant speed.
o “NT”: (neutral mode) (n): The appliance delivers an effect similar to a natural breeze.
o “SL”: (sleep mode) (o): The appliance runs at reduced speed which is more comfortable for sleeping.
-
Press the "OSC" button (e) to make the appliance turn slowly from side to side to an angle of 75^ in order to better distribute the effect throughout the room. Press the "OSC" button again to switch off the turning function. The appliance stops in the position it is in when the button is pressed.
-
Use the "TIMER" button (d) to set the appliance to run for a pre-selected period, after which it automatically switches off. Press the "TIMER" button a number of times to set the required period; one or more green indicators on the display show the selected setting: o "½H" (½ hour) (i) o "1H" (1 hour) (j) o "2H" (2 hours) (k) o "4H" (4 hours) (l)
The timer settings can be combined, for example 4H+1H+12H=512 hours. The maximum setting is 712 hours.
Return to manual mode by pressing the "TIMER" button a number of times, until all indicators for timer setting have been extinguished.
- Always turn the appliance off using the "POWER" button and unplug it when you are finished with it.
Using the remote control
- Point the remote control directly at the infrared receiver on the front of the appliance.
- Make sure that no other objects in the room block the signal from the remote control.
-
Check if there are other appliances in the room that use infrared signals, as they can cause interference.
-
Make sure that the distance between the remote control and the appliance is within the range of the signal.
- The remote control can be placed in the storage space (4) at the top of the appliance when not in use.
STORAGE
- Dismantle the base and store the appliance in its original packaging in a dry place when it is not in use. Ensure that no dust can penetrate the appliance, e.g. by wrapping it in a plastic bag or similar.
- Do not place heavy objects on top of the appliance.
- Always remove the batteries from the remote control if the appliance is not to be used for a prolonged period.
- The cord must not be twisted or wound around the appliance.
CLEANING
When cleaning the appliance, you should pay attention to the following:
- Remove the plug from the mains socket, and allow the appliance to cool down completely before cleaning it.
- Do not immerse the appliance in water and make sure no water enters the appliance.
- Clean the appliance by wiping it with a damp cloth. A little detergent can be added if the appliance is heavily soiled.
-
Do not use scouring pads, steel wool or any form of strong solvents or abrasive cleaning agents to clean the appliance, as they can damage the external surfaces of the appliance.
-
Alternatively, vacuum the appliance on the outside. Never attempt to open the appliance or insert items into the appliance.
- IMPORTANT! Allow to dry completely after cleaning. Do not use the appliance if it is damp.
FOR UNITED KINGDOM ONLY
Plug wiring:
This product is fitted with a BS 1363 13-amp plug. If you have to replace the fuse, only those that are ASTA or BSI approved to BS1362 and with a rated current of 13 amps should be used. If there is a fuse cover fitted, this cover must be refitted after changing the fuse. If the fuse cover is lost or damaged, the plug must not be used. You must also check if the socket outlets in your home fit with the plug of the appliance. If the socket outlet in your home does not fit with the plug, the plug must be removed and disposed of safely as insertion of the plug into the socket is likely to cause electric hazard.
As this product is a class II appliance, the pin of BS plug for earth connection is false.
INFORMATION ON DISPOSAL AND RECYCLING OF THIS PRODUCT
Please note that this Adexi product is
marked with this symbol:

This means that this product must not be disposed of along with ordinary household waste, as electrical and electronic waste must be disposed of separately.
According to the WEEE directive, every member state must ensure correct collection, recovery, handling and recycling of electrical and electronic waste. Private households in the EU can take used equipment to special recycling stations free of charge. In some member states you can in certain cases return used equipment to the retailer from whom you purchased it, if you are purchasing new equipment. Contact your retailer, distributor or the municipal authorities for further information on what to do with electrical and electronic waste.
GUARANTEE TERMS
The guarantee does not apply:
- if the above instructions have not been followed
- if the appliance has been interfered with
- if the appliance has been mishandled, subjected to rough treatment, or has suffered any other form of damage
- if the appliance is faulty due to faults in the electricity supply.
Due to the constant development of our products in terms of function and design, we reserve the right to make changes to the product without prior warning.
FREQUENTLY ASKED QUESTIONS
If you have any questions regarding the use of the appliance and cannot find the answer in this user guide, please try our website at www.adexi.eu.
Go to the “Consumer Services” menu and click on “Frequently Asked Questions” to view the most frequently asked questions.
You can also see contact details on our website if you need to contact us for technical questions, repairs, accessories or spare parts.
IMPORTER
Adexi Group
We cannot be held responsible for any printing errors.
DE
EINLEITUNG
natural_image
Close-up of hands assembling a mechanical component with arrows indicating assembly direction (no visible text or symbols)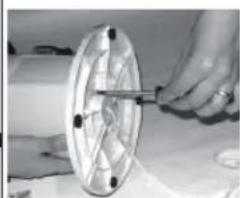
natural_image
Close-up of hands operating a wire spool with a measuring tool (no visible text or symbols)
- 671-145
- OVERSIGT OVER APPARATETS DELE
- Fjernbetjening
- LAITTEEN KÄYTTÖ
- SAFETY MEASURES
- General
- Use
- Cord and plug
- Battery
- KEY TO THE MAIN COMPONENTS OF THE APPLIANCE
- Remote control
- Buttons on the control panel
- Indicators on the display
- Placing battery in the remote control
- USING THE APPLIANCE
- Using the remote control
- STORAGE
- CLEANING
- FOR UNITED KINGDOM ONLY
- Plug wiring:
- INFORMATION ON DISPOSAL AND RECYCLING OF THIS PRODUCT
- GUARANTEE TERMS
- FREQUENTLY ASKED QUESTIONS
- IMPORTER
- DE
- EINLEITUNG
Brand : Melissa
Model : 16510054
Category : Air conditioner