
KH 2314 - Radio SILVERCREST - Free user manual and instructions
Find the device manual for free KH 2314 SILVERCREST in PDF.


| Product Type | DAB/FM Portable Radio |
| Brand | SilverCrest |
| Model | KH 2314 |
| Dimensions (L × W × H) | 241 × 106 × 158 mm |
| Weight | 1430 g approx. |
| Power Supply | AC 230 V ~ 50 Hz or 6 × 1.5 V (AA/LR6/Mignon) batteries |
| Power Consumption | 10 W (operating), 1.9 W (standby) |
| Output Power | 2 × 1.2 W RMS |
| Frequency Ranges | DAB (Band III): 174–240 MHz; FM (VHF): 87.5–108 MHz |
| Display | Digital LCD with backlight |
| Antenna | Telescopic antenna |
| Audio Output | Headphone jack (3.5 mm stereo) |
| Presets | 10 stations each for DAB and FM |
| Alarm | 2 alarms with snooze and sleep timer |
| Operating Temperature | +5 °C to +35 °C |
| Humidity | 5–90% (non-condensing) |
| Protection Class | II (double insulated) |
| Cleaning | Wipe with a slightly damp cloth; do not submerge |
| Safety | Do not expose to rain or moisture; keep away from children; remove batteries if not used for extended period |
| Warranty | 3 years from date of purchase |
| Importer | KOMPERNASS GMBH, BURGSTRASSE 21, 44867 BOCHUM, GERMANY |
Frequently Asked Questions - KH 2314 SILVERCREST
User questions about KH 2314 SILVERCREST
0 question about this device. Answer the ones you know or ask your own.
Ask a new question about this device
Download the instructions for your Radio in PDF format for free! Find your manual KH 2314 - SILVERCREST and take your electronic device back in hand. On this page are published all the documents necessary for the use of your device. KH 2314 by SILVERCREST.
USER MANUAL KH 2314 SILVERCREST
natural_image
Black and white portable radio with a digital display and antenna, no visible text or symbols on the device itself.GI DAB RADIO IE Operating instructions

CONTENT PAGE
Technical Data 2
Intended Use 2
Safety information 2
Items supplied 4
Legend 4
Commissioning 5
Battery operation....5
Mains power operation....5
Headphone connection....5
Telescopic antenna ....5
Switching the DAB-Radio on ....5
Adjusting Time and Date. 6
Operation 6
DAB-Mode....6
FM-Mode....7
Save / Recall Stations....7
Display information 8
Expanded adjustments in the DAB-Mode 9
Alarm Function 10
Setting the alarm time....10
Activating the alarm....10
Snooze Function....10
Sleep Function....11
Cleaning 11
Disposal 11
Importer 11
Warranty & Service 12
Read the operating instructions carefully before using the appliance for the first time and preserve this booklet for later reference. Pass the manual on to whomsoever might acquire the appliance at a later date.
Technical Data
This device complies with the fundamental requirements and other relevant prescripts of both the EMC Guidelines 2004/108/EC and the Guidelines for Low Voltage Devices 2006/95/EC.
Power supply: AC 230 V \~50 Hz
Power consumption: 10 Watt
Power consumption
Standby: 1.9 Watt
Output level: 2 x 1.2 Watt RMS
Operating temperature: +5 \~ +35°C
Humidity: 5 \~ 90 %
(No condensation)
Measurements
(L × W × H): 241 × 106 × 158 mm
Weight : 1430 g approx.
Protection class: II /

Batteries
6 x 1.5 V, Type AA/LR6/Mignon
(Batteries not supplied)
Frequency ranges radio:
DAB (BAND III): 174 - 240 MHz
VHF (FM): 87.5 - 108 MHz
The technical features of this device enable an adjustable frequency range of FM 87,5 - 108 MHz. In some countries, different national regulations may apply to the assigned radio frequency ranges. Please note that information received outside of the assigned radio frequency ranges may not be exploited, passed on to third parties or otherwise misused.
DAB (Digital Audio Broadcasting)
Digital Audio Broadcasting (DAB) is a digital transmission standard for terrestrial reception of radio programmes and is described in general as digital radio.
For DAB transmission several audio data torrents (transmission channels) are brought together into a so-called Ensemble resp. Multiplex or a block with a higher bit rate. The DAB Band III contains for example the blocks 5A to 13F.
Intended Use
This DAB Radio is intended exclusively for the reception of digital as well as FM radio stations.
This DAB radio is not intended for utilisation in commercial or industrial applications.
No warranty claims will be granted for damage resulting from improper use!
Safety information
- This device is not intended for use by individuals (including children) with restricted physical, physiological or intellectual abilities or deficiencies in experience and/or knowledge unless they are supervised by a person responsible for their safety or receive from this person instruction in how the device is to be used.
• Children should be supervised to ensure that they do not play with the device.
- To avoid unintentionally switching the device on, remove the power cable from the mains supply after use and before cleaning it.
- Check the device and all parts for visible damage. The safety concept can work only if the device is in a faultless condition.
- The power plug must always be easily accessible, so that the device can be quickly separated from the mains power supply in the event of an emergency.
⚠️ Risk of electrical shocks.
- Connect the device only to correctly installed and earthed mains sockets. Ensure that the rating of the local power supply tallies completely with the details given on the rating plate of the device.
- Arrange for defective power plugs and/or cables to be replaced at once by qualified technicians or our Customer Service Department.
- Arrange for Customer Services to repair or replace connecting cables and/or devices that are not functioning properly or have been damaged.

NEVER submerse the device in water. Wipe it only with a slightly damp cloth.
- Do not expose the device to rain and never use it in a humid or wet environment.
- Ensure that the power cable never becomes wet during operation.
- Do not open the housing or attempt to repair the device yourself. Should you do so, device safety can no longer be assured and the warranty will become void.
- Protect the device against drip and spray water. Do not place any water-filled vessels (e.g. flower vases) on or near the device.
Risk of fire!
- Do not use the device in the vicinity of hot surfaces.
- Do not place the device in locations exposed to direct sunlight.
If you do, it may overheat and become irreparably damaged.
- Do not leave the device unattended when in use.
- Never cover the ventilation slots of the device while it is being used.
- Do not place open fire sources, such as candles, on or near the device.
- When positioning the device, maintain a minimum distance of 15 cm to walls and of 1 mtr. to combustible materials, decorations or other installations.
⚠️ Injury hazard
- Keep children away from the connecting cable and the device. Children frequently underestimate the dangers of electrical devices.
- Provide for a safe location for the device.
- Do not operate the device if it has sustained a fall or is damaged. Arrange for the device to be checked and/or repaired by qualified technicians.
- Batteries/Cells are potentially fatal if swallowed. Store batteries out of the reach of children. If a battery is swallowed medical assistance must be sought IMMEDIATELY.
- Keep the plastic packaging well away from small children. There is a risk of suffocation.
(i) Note:
Some aggressive furniture finishes can have a destructive influence on the device's rubber pads. If necessary, place the device on a nonslip mat.
Thunderstorms!
Equipment connected to a power supply can be damaged during a thunderstorm.
You should therefore always remove the plug from the power socket when there is a thunderstorm.
⚠ Notice regarding electrical power surges (EFT / electrical fast transient) and electrostatic discharges:
In a case of malfunction due to an electrical fast transient (power surge) and/or electrostatic discharge, the device must be returned to default settings in order to re-establish normal operation. Possibly the power supply must be separated and then reconnected. The batteries (if present) must be removed and then reinserted.
⚠️ Notice regarding separation from mains-power
The STANDBY/ON switch for this device does NOT completely separate it from the mains power source. Additionally, the device consumes power when in standby-mode. To completely separate the device from mains power, the plug MUST be removed from the power socket.
⚠ Information regarding the handling of batteries
The device uses batteries. In regard to interaction with batteries, please observe the following:
Risk of explosion!
Do not throw batteries into a fire. Do not recharge the batteries.
- Never open batteries, never solder or weld batteries.
The risk of explosions and injuries exists!
- Regularly check the condition of the batteries. Leaking batteries can cause damage to the device.
- If you do not intend to use the device for an extended period, remove the batteries.
- If the batteries have leaked, to avoid the risk of injury through chemical burns put on a pair of protective gloves before removing the batteries.
- Clean the battery compartment and the battery contacts with a dry cloth.
Attention!
No liability/warranty claims will be considered for damage to the device caused by the effects of moisture, water penetration or overheating!
Items supplied
- DAB Radio KH 2314
- Power cord
- Operating manual
Legend
1 Handle
② Telescopic antenna
③ Display
4 Right loudspeaker
⑤ Multi adjuster VOLUME/SELECT
6 Button ALARM1
⑦ Button ALARM2
8 Button SLEEP
9 Button INFO
10 Button SNOOZE
11 Button STANDBY/ON
12 Button DAB/FM
13 Button AUTOTUNE
14 Save button PRESETS
15 Button JOG MODE/SELECT
16 Left loudspeaker
17 Headphone connection
18 Battery compartment
19 Power cable connection with power cable
Battery operation
The DAB Radio can also be operated with batteries.
- Open the cover of the battery compartment on the underside of the DAB Radio by sliding it downwards in the direction of the arrow.
- Insert six 1.5 V Type AA/LR6/Mignon batteries into the designated recesses. Pay heed to the polarity markings given in the battery compartment.
- Replace the battery compartment cover. The cover must audibly engage.
The use of rechargeable batteries is possible. However, these will not be recharged in the battery compartment.
(i) Note:
The DAB radio also consumes power when in Standby-Mode. Therefore, remove all batteries from the battery compartment if you are not intending to use the device for an extended period of time. Saved radio stations and alarm times are conserved for up to 10 minutes in the event of a mains power failure.
(i) Note:
To help preserve the batteries, in standby mode the display is not illuminated and the time is not displayed. With a new switch-on, it could happen that the time must be re-programmed.
Mains power operation
Connect the power cable to a mains power socket. When being supplied with energy via the power cable, the DAB Radio automatically switches over from battery operation to mains power operation.
Headphone connection
You can connect headphones with a 3.5 mm stereo jack plug to the DAB Radio. The headphone connection is located at the rear of the device. When you have connected the headphones, the loudspeakers are disconnected and you will only hear sound via the headphones.
- Insert the jack plug of the headphones into the headphone connection.

Important!
Listening to music with headphones for long periods and at high sound volume levels can lead to hearing damage!.
Telescopic antenna
- Extend the telescopic antenna completely. Afterwards, align it for the best reception.
Switching the DAB-Radio on
- Insert the plug into the mains power socket or insert batteries into the battery compartment. With mains power operation, WELCOME TO DIGITAL RADIO appears briefly in the display. The clock starts at 00:00:00.
- Press the button STANDBY/ON to switch the radio on. With the very first switch-on, Scan Services Full Scan appears in the display. Otherwise, the last selected mode of operation is switched back on.
The radio searches for available transmitters in the DAB mode. At the end of the search run the number of transmitters found is briefly displayed (X Services found). Thereafter, the first alphanumeric (beginning with 1 or A) transmitter found is shown in the display and, underneath, the transmitter group to which the transmitter is assigned.
- Should a transmitter not be found, 0 Services found appears in the display.
- If the signal is too weak, Signal N/A appears underneath the transmitter name.
- Press the button STANDBY/ON once again to switch the radio off.
In mains operation the time display and a light background illumination is retained. In battery operation the time display and background illumination are switched off.
Adjusting Time and Date.
The time and the date are transmitted automatically by the radio stations. Should the DAB Radio not receive any information, the time display starts at 00:00:00.
Operation
DAB-Mode
In DAB-Mode the radio receives digital radio transmissions. With the first switching on of the radio the scan mode Station Search starts automatically. Should a station already have been received, the radio starts with the last tuned station.
(i) Note:
Unlike an analog radio, with DAB several stations (an Ensemble or Multiplex) are bundled together to a station group and transmitted on one frequency. When the radio has found a station group, the name of the station and the station group are shown in the display.
Station Search (Auto-Tune)
You can choose between two different station search methods: Quick Scan and Full Scan.
Quick Scan searches only for the frequencies used in most countries. This function can be used to search for new stations and is quicker than the Full Scan search.
Full Scan examines all frequencies in the DAB III Band. When the station search is finished, the transmitter found first is shown in the display.
- To activate the Quick Scan, first briefly press the button AUTOTUNE. In the display appears Scan Services Quick Scan. Thereafter, the search advance is represented from 0 - 100% by a progress bar. At the end of the search run the number of transmitters found is briefly displayed (X Services found).
- To activate Full Scan, hold the button AUTOTUNE pressed down until Scan Services Full Scan is shown in the display. Thereafter, the search advance is represented from 0 - 100% by a progress bar. At the end of the search run the number of transmitters found is briefly displayed (X Services found).
Note:
If you wish to conclude the station search prematurely, turn the multi adjustor VOLUME/SELECT.
Accessing the station
- To call up a found transmitter, press the button JOG MODE/SELECT. In the display appears the indicator
- Turn the multi adjustor VOLUME/SELECT to the left or right to show the various stations, one after the other.
- When the sought after station name is indicated in the display, press the button JOG MODE/SELECT. In the display the indicator Tuning... appears briefly, after this the sender group is shown once again.
Manual Station Search
- Hold the button INFO pressed down until Manual Tune appears in the display.
- Press the button JOG MODE/SELECT.
3 Turn the multi adjustor VOLUME/SELECT slowly, and with pauses, to the left or right in order to switch through the various DAB channels for the sender groups (5A - 13F). When a sender group is found in a DAB channel, the name of the group is indicated in the lower display line. - To select a found sender group, press the button JOG MODE/SELECT. The first found sender of this sender group appears and, next to it, the transmitter number/the total number of available senders.
- Turn the multi adjustor VOLUME/SELECT slowly, and with pauses, to the left or right. In this way the saved senders in this sender group can be switched through.
- When you have selected a sender, press the button JOG MODE/SELECT. You then depart the manual station search.
(i) Note:
If you select a DAB channel on which no sender group is transmitted, the last adjusted sender will be reproduced.
Autoselect
If you have activated Autoselect, using the multi adjustor VOLUME/SELECT you can directly select a sender.
- Press the button JOG MODE/SELECT.
- Turn the multi adjustor VOLUME/SELECT until you have reached the desired sender.
Tuning... is indicated in the display for approx 2 seconds, afterwards the station is reproduced.
- When Autoselect is deactivated, you must confirm the desired sender, after selection with the multi adjustor VOLUME/SELECT, by pressing the button JOG MODE/SELECT. If you do not confirm the selection, the prior selected station will be displayed again after four seconds.
- To activate and deactivate Autoselect, hold the button JOG MODE/SELECT pressed down until Auto Enter ON resp. Auto Enter OFF is indicated in the display.
To call up an alternative sender
Some senders transmit additional programmes with further content. In these cases, an arrow symbol -> appears behind the sender name.
- Press the button JOG MODE/SELECT to switch over to an alternative sender. The alternative sender is located in the sequence directly behind the main sender.
When the alternative sender is no longer transmitting, the radio switches back to the main sender automatically.
FM-Mode
- Press the button DAB/FM to switch between the DAB and FM modes. In the display appears DAB -> FM or FM -> DAB.
Sender search (Autotune)
- Press the button AUTOTUNE. The radio starts the station search and halts as soon as the next higher station is found.
- Hold the button AUTOTUNE pressed down. The radio starts the station search and halts as soon as the next lower station is found.
Manual Station Search
- Press the button JOG MODE/SELECT.
- Turn the multi adjustor VOLUME/SELECT to fine tune the frequency.
Select Audio Mode
- Press and hold down the button JOG MODE/SELECT until Radio Mode: Auto appears in the display.
During the reception of a radio station transmitting in stereo, the sound is reproduced in stereo and Auto (Stereo) appears. During mono reception Auto (Mono) appears. - Once again, press and hold down the button JOG MODE/SELECT until Radio Mode: Mono appears in the display. The sound is now always reproduced in mono and Mono appears in the display. Use this adjustment to improve the reception of weak stereo transmissions.
Save / Recall Stations
Note:
If no further input is made within 10 seconds, the display indicates once again the previous mode of operation.
Saved radio stations are preserved for up to 10 minutes in the event of a mains power failure..
You can save up to ten stations in both the FM and DAB modes.
- Select either the DAB or the FM mode.
-
Select the radio stations to be saved, as described under either Station Search (Auto Tune) or Manual Station Search.
-
Hold the button PRESETS pressed down. In the display the indicator Preset appears and the number 1, for saved station position 1, blinks.
-
Turn the multi adjustor VOLUME/SELECT to select one of the station saving positions, from 1-10.
-
To save the sender to the selected saving position, briefly press the button PRESETS. The indicator Preset X Saved appears in the display. The station is now saved.
-
To call up a saved sender, briefly press the button PRESETS and then, using the multi adjustor VOLUME/SELECT, select the saved position. Loaded is indicated in the display for approx 2 seconds, afterwards the station is reproduced.
(i) Note:
If you recall a saving position in FM or DAB mode to which a station is not yet saved, PRESET 1/2/3/4 free is shown in the display.
Display information
Through repeated pressing of the button INFO you can call up various information details about the radio programme:
In the DAB mode:
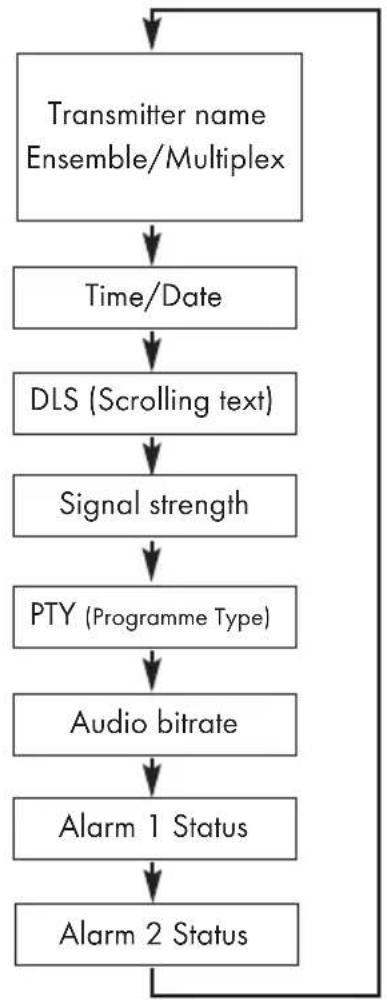
flowchart
graph TD
    A["Transmitter name\nEnsemble/Multiplex"] --> B["Time/Date"]
    B --> C["DLS (Scrolling text)"]
    C --> D["Signal strength"]
    D --> E["PTY (Programme Type)"]
    E --> F["Audio bitrate"]
    F --> G["Alarm 1 Status"]
    G --> H["Alarm 2 Status"]
In the FM mode:

flowchart
graph TD
    A["Frequency"] --> B["Alarm 1 Status"]
    B --> C["Alarm 2 Status"]
    C --> A
Ensemble/Multiplex
Under the sender name the name of the sender group is also shown. If additional information about station group is available, this is displayed with a > after the name of the station group.
Time/Date
The time and date are automatically corrected through the RDS Signal. If this information is not being transmitted,
DLS (Dynamic Label Segment)
DLS is an information service running in the display. Generally, this contains detailed information about the programme resp. the title/performer of a piece of music.
Signal strength
Signal strength is shown in the display with a bar: The longer the bar, the higher the signal strength.
Programme Type
Here, details of the type of current programme are shown. If this information is not available,
Audio bitrate
Indicated is the bitrate in which the digital radio signal is being transmitted.
Alarm 1 Status
The following is displayed: Alarm activated (ON) or deactivated (OFF), alarm tone and alarm time.
Alarm 2 Status
The following is displayed: Alarm activated (ON) or deactivated (OFF), alarm tone and alarm time.
Frequency
The frequency of the current station is shown.
Expanded adjustments in the DAB-Mode
(i) Note:
If no further input is made within 5 seconds, the display indicates once again the previous mode of operation.
- Hold the button INFO pressed down until Manual Tune appears in the display.
- Now press the button INFO repeatedly to display the following information entries:
System reset
- Press the button JOG MODE/SELECT to reset all of the settings in the DAB radio. This may be necessary, for example, if the radio is to be operated at a different location or in another country.
The indicator "System Reset...", appears briefly in the display, afterwards the DAB radio is returned to default settings.
(i) Note:
After the resetting of the adjustments from the DAB mode, the indicator Press PRESETS for Default appears, afterwards the sender search starts automatically.
After the resetting of the adjustments from the FM mode, the frequency 87,5 MHz is reproduced.
(i) Note:
When resetting the adjustments, all saved radio stations are erased!
Firmware version
Here, the software version in the DAB radio is indicated.
Alarm Function
You can programme in two alarm times, and then be woken by either the DAB radio, FM radio or one of two different alarm signals.
(i) Note:
In mains operation the functions alarm, snooze and sleep are available without restriction.
In battery operation only the sleep function is available without restriction. An alarm can of course be programmed with a switched on radio, however, it does not switch itself on from the standby mode.
Setting the alarm time
(i) Note:
If no further input is made within 10 seconds, the display indicates once again the previous mode of operation.
- Press and hold the buttons ALARM1 or ALARM2 to programme the respective alarm. In the display the indicators Alarm 1 Time Set resp. Alarm 2 Time Set and the alarm time appear. The minute figures blink.
- Turn the multi adjustor VOLUME/SELECT to programme in the minutes. Press the button JOG MODE/SELECT. The hour figures blink.
- Turn the multi adjustor VOLUME/SELECT to programme in the hours. Press the button JOG MODE/SELECT.
- Turn the multi adjustor VOLUME/SELECT to choose between the alarm signals BEEP TONE1 or BEEP TONE2. Press the button JOG MODE/SELECT.
- Turn the multi adjustor VOLUME/SELECT to programme in a saved position 1-10 (DAB-Preset) for the DAB mode. Press the button JOG MODE/SELECT.
-
Turn the multi adjustor VOLUME/SELECT to programme in a saved position 1-10 (FM-Preset) for the FM mode. Press the button JOG MODE/SELECT.
-
Turn the multi adjustor VOLUME/SELECT to programme in a sound volume (Volume Level) from 1-20. Press the button JOG MODE/SELECT.
The alarm time is now programmed. To activate the alarm, read the next section.
Activating the alarm
- Repeatedly press the button ALARM1 resp. ALARM2 to adjust the appropriate alarm as follows:
ON BEEP Alarm activated by alarm signal
ON DAB Alarm activated in the DAB mode
ON FM Alarm activated in the FM mode
OFF Alarm switched off
(i) Note:
For an alarm call in the DAB mode a sender MUST be programmed in at the selected save location. If a sender is not saved there, then the alarm switches itself on with a signal tone.
(i) Note:
When the alarm is activated, a quadrat appears in the upper left corner of the display.
- With the device switched on, repeatedly press the button INFO until the indicator Alarm 1 Status or Alarm 2 Status appears, to display the alarm adjustments.
With an activated alarm, at the adjusted alarm time the signal tone resp. the radio sounds for one hour.
- Terminate the alarm by pressing the button STANDBY/ON, or deactivating the alarm by pressing the appropriate button ALARM1 resp. ALARM2.
Snooze Function
With the snooze function you can extend the alarm time in 5 minute steps.
- Press the button SNOOZE when the alarm sounds. In the display the time and Z is indicated.
The alarm stops and sounds again after 5 minutes. After one hour the alarm switches itself off.
Sleep Function
With the sleep function, the radio switches itself off after a pre-programmed time.
- Repeatedly press the button SLEEP to programme in a switch-off time after 90 - 60 - 30 - or 10 minutes.
- After 2 seconds the display shows, behind the time, S9/S8/S7/S6/S3/S1, dependant on the adjustment, instead of the seconds.
In battery operation, after expiration of the programmed period the time and a light background illumination is retained. With a manual switch off the background illumination and the time are stopped.
- To deactivate the programmed sleep function, briefly press the button SLEEP. In the display Sleep OFF is blended in briefly.
Cleaning

Warning!
Moisture permeating into the device creates the risk of electric shock!
Additionally, the device could become irreparably damaged!
Clean the housing of the radio only with a slightly moist cloth and a mild detergent. Ensure that moisture cannot permeate into the device during cleaning!
Disposal

Do not dispose of the appliance in your normal domestic waste. This product is subject to the European guideline 2002/96/EC.
Dispose of the appliance through an approved disposal centre or at your community waste facility.
Observe the currently applicable regulations.
In case of doubt, please contact your waste disposal centre.
Battery disposal!
Batteries may not be disposed of with normal domestic waste. All consumers are statutorily obliged to dispose of batteries at the collection point in their community/district or with the original supplier. The purpose of this obligation is to ensure that batteries can be disposed of in an environmentally friendly manner. Only dispose of batteries when they are fully discharged.

Dispose of all packaging materials in an environmentally friendly manner.
Importer
KOMPERNASS GMBH
BURGSTRASSE 21
44867 BOCHUM, GERMANY
www.kompernass.com
Warranty & Service
You receive a 3-year warranty on this device from the date of purchase. If, in spite of our high quality standards, you have reason to complain about this device, please contact our service hotline.
If it is not possible to deal with your complaint by phone, they will provide
- a processing number (RMA number) and
- an address where you can send your product for repairs under the warranty.
If you send the device please enclose a copy of the proof of purchase (till receipt). The device must be packaged securely for transport and the RMA number must be directly visible. Shipments without an RMA number can not be processed.
Note:
The warranty applies to material or manufacturing faults.
The warranty does not apply to
• parts subject to wear and tear
- damage to breakable parts such as switches and rechargeable batteries.
The product is only designed for private and not commercial use. Improper handling and usage not in accordance with the intended purpose, use of force and any interventions that are not carried out by our authorised service centre will render the warranty null and void.
This warranty does not affect your legal rights.
SilverCrest
Warranty
DAB Radio KH 2314
In order to ensure a cost free repair procedure please get in touch via the service hotline. Ensure you have your sales slip handy.
Sender, please write clearly:
Last name
First name
Street
Postcode/City
Country
Telephone
Date/Signature
GB DES Ltd
Tel.: 0870/787-6177
Fax: 0870/787-6168
e-mail: support.uk@kompernass.com
IE Irish Connection
Tel: 00353 (0) 87 99 62 077
Fax: 00353 18398056
e-mail: support.ie@kompernass.com
www.mysilvercrest.de
Description of fault:
INDHOLDSFORTEGNELSE SIDE
Tekniske data 16
DAB (Digital Audio Broadcasting)
DLS (Dynamic Label Segment)


- CONTENT PAGE
- Technical Data 2
- Intended Use 2
- Safety information 2
- Items supplied 4
- Legend 4
- Commissioning 5
- Operation 6
- Alarm Function 10
- Cleaning 11
- Disposal 11
- Importer 11
- Warranty & Service 12
- Technical Data
- Batteries
- Frequency ranges radio:
- DAB (Digital Audio Broadcasting)
- Intended Use
- Safety information
- ⚠️ Risk of electrical shocks.
- Risk of fire!
- ⚠️ Injury hazard
- Note:
- Thunderstorms!
- ⚠ Notice regarding electrical power surges (EFT / electrical fast transient) and electrostatic discharges:
- ⚠️ Notice regarding separation from mains-power
- ⚠ Information regarding the handling of batteries
- Risk of explosion!
- Attention!
- Items supplied
- Legend
- Battery operation
- Mains power operation
- Headphone connection
- Important!
- Telescopic antenna
- Switching the DAB-Radio on
- Adjusting Time and Date.
- Operation
- DAB-Mode
- Station Search (Auto-Tune)
- Note:
- Accessing the station
- Manual Station Search
- Autoselect
- To call up an alternative sender
- FM-Mode
- Sender search (Autotune)
- Select Audio Mode
- Save / Recall Stations
- Display information
- Ensemble/Multiplex
- Time/Date
- DLS (Dynamic Label Segment)
- Signal strength
- Programme Type
- Audio bitrate
- Alarm 1 Status
- Alarm 2 Status
- Frequency
- Expanded adjustments in the DAB-Mode
- System reset
- Firmware version
- Alarm Function
- Setting the alarm time
- Activating the alarm
- Snooze Function
- Sleep Function
- Cleaning
- Warning!
- Disposal
- Battery disposal!
- Importer
- Warranty & Service
- SilverCrest
- Warranty
- DAB Radio KH 2314
- INDHOLDSFORTEGNELSE SIDE
- Tekniske data 16
Brand : SILVERCREST
Model : KH 2314
Category : Radio