
Joy Plus - Mobile Phone OLYMPIA - Free user manual and instructions
Find the device manual for free Joy Plus OLYMPIA in PDF.


| Type | Mobile Phone |
| Brand | Olympia |
| Model | Joy Plus |
| Dimensions | 165 x 76 x 8.5 mm |
| Weight | 180 g |
| Display | 6.5 inch IPS LCD |
| Resolution | 720 x 1600 pixels |
| Processor | Quad-core 1.6 GHz |
| RAM | 2 GB |
| Internal Storage | 16 GB |
| Battery | 3000 mAh, removable |
| Operating System | Android 10 (Go edition) |
| Rear Camera | 8 MP |
| Front Camera | 5 MP |
| Connectivity | 4G, Wi-Fi 802.11 b/g/n, Bluetooth 4.2 |
| SIM | Dual SIM (Nano-SIM) |
| Memory Card Slot | microSD, up to 32 GB |
| Ports | micro USB, 3.5 mm headphone jack |
| Sensors | Accelerometer, proximity |
| Safety | Keep away from water and heat; use only approved charger |
| Maintenance | Clean with dry, soft cloth; remove battery if not in use for long periods |
| Spare Parts | Contact manufacturer or authorized service center |
| User Manual | Available for download in PDF format |
Frequently Asked Questions - Joy Plus OLYMPIA
User questions about Joy Plus OLYMPIA
0 question about this device. Answer the ones you know or ask your own.
Ask a new question about this device
Download the instructions for your Mobile Phone in PDF format for free! Find your manual Joy Plus - OLYMPIA and take your electronic device back in hand. On this page are published all the documents necessary for the use of your device. Joy Plus by OLYMPIA.
USER MANUAL Joy Plus OLYMPIA
Observe Safety Instructions 9
Tips Concerning the Battery ....12
Intended Use 13
Checking the Package Contents 13
Mobile Phone in Detail 14
Keys and Operating Elements 14
Rear View and Side View 16
Putting the Mobile Phone into Operation 18
Inserting the SIM Cards 19
Inserting the MicroSD Memory Card 20
Inserting the Battery 21
Charging the Battery 22
Charging the Battery, Charging Adapter ....23
Charging the Battery, Charging Cradle .....24
Switching the Mobile Phone On and Off 25
Start Screen.... 26
Other Icons on the Start Screen....28
Using the Mobile Phone 29
Navigating in the Menu 29
Display Texts 29
Using the Function Keys 30
Making Calls 33
Taking, Ending and Rejecting Calls 33
Mobile Phone Menu 34
Overview of the Most Important Menus 35
Menu Options Available During a Call 36
Call Lists 38
Options for the Call Lists 38
Call Settings 42
Phone Book 46
Phone Book Settings 49
Speed Dialling ....50
Text Messages.... 52
Writing Text Messages ....53
Viewing Text Messages....53
Replying to Text Messages ....54
Calling the Sender of a Text Messages ....54
Forwarding Text Messages....55
Deleting Text Messages ....56
Saving Phone Numbers in the Phone Book .....56
Saving a Text Message as a Draft .....57
Settings for Text Messages ....58
Settings 60
Phone Settings 61
Setting the Time and Date ....61
Setting the Language ....61
More Phone Settings ....62
Security Settings 65
Switching the PIN Request On/Off ....65
Changing the PIN 66
Switching the Phone Lock On/Off 67
Changing the Phone Lock Password ....67
Setting Up the Automatic Key Lock 68
Dual SIM Settings 69
Network Settings 70
Bluetooth 71
Switching Bluetooth On/Off 71
Visibility 71
Connecting Devices Via Bluetooth 72
Changing Device Names 72
Emergency Call Function (SOS Key) 73
Switching the Emergency Call Function On/Off . . . . . . . . . . . . . . . . . . . . . . . . . . . . . . . . . . . . . . . . . . . . . . . . . 73
Setting Up a Call Chain 74
Emergency Call Function Settings ....74
Low Battery Power Alert 78
Switching the Charge Remind On/Off 78
Settings for Low Battery Power Alert 78
Automatic Handsfree Function 80
Restoring the Default Factory Settings 81
Organiser 82
Calendar 82
Alarm Clock 84
Camera 86
Radio 89
File Manager 93
User Profiles 94
Activating the User Profile. 95
Adapting the User Profile .....95
Caller Picture Dialling 98
Transferring Photos from Computer 99
Adding Contacts to Picture Selection....99
Adding a Picture to the Caller Picture Contacts . . . . . . . . . . . . . . . . . . . . . . . . . . . . . . . . . . . . . . . . . . . . . . . . . . . 99
Dialling Via the Caller Picture Menu ....100
Other Settings....100
Additional Functions 102
Key Lock....102
Torch....102
Other Important Information 103
Technical Data 103
Declaration of Conformity 104
Guarantee 104
Care Instructions 105
Disposal 105
Frequently Asked Questions (FAQ) 106
For Your Safety
The information on the following pages will help to ensure you can use the mobile phone safely.

Read the operating manual carefully and pay attention to the information when using your mobile phone. Keep the operating manual handy for future reference.

Pay attention to this symbol. Texts which are highlighted by this symbol provide helpful information on handling the mobile phone.

This symbol indicates warnings regarding certain situations which could lead to personal injuries or damage to the mobile phone.
Observe Safety Instructions
Pay attention to the following safety instructions to protect yourself from any possible personal injury.

WARNING!
Risk of electric shock! Never attempt to open and repair the device or accessories yourself. Never touch bare contacts with metallic objects. Never plug-in or unplug the charging adapter when your hands are wet.
WARNING!

Risk of suffocation! Risk to health through packaging material and protective foil! Keep packaging material and protective foil out of reach of children. Small children can swallow small parts.

WARNING!
Risk of suffocation! Risk to health through batteries! Keep batteries out of reach of children. Do not swallow batteries. If a battery has been swallowed, contact medical assistance immediately.

WARNING!
Prevent life-threatening interference to heart pacemakers! Maintain a safety distance of at least 15 cm! Never carry the mobile phone in a breast pocket when switched on. Always hold the mobile phone to the ear furthest away from the pacemaker during calls. Switch the mobile phone off immediately if you notice or suspect any adverse effects.

CAUTION!
The ringing tone is issued via the loudspeaker. Take an incoming call first and then hold the mobile phone to your ear. This prevents any possible hearing damage.

CAUTION!
Risk of explosion through improper replacement or removal of the lithium-ion battery! Only replace the lithium-ion battery by a type approved by the manufacturer.

CAUTION!
Do not use the phone in prohibited areas! Prohibited areas could include hospitals, petrol stations, aeroplanes, etc. Please observe local regulations!

CAUTION!
Reduce exposure to radio waves! Use an appropriate headset in the case of longer calls. Do not keep the mobile phone near your head.

CAUTION!
With regard to emergencies, do not rely on the mobile phone alone! For technical reasons, it is not possible to guarantee a reliable connection in every situation.
Avoid the risk of property damage to your device and observe the information!

IMPORTANT!
Protect the device from moisture, dust, liquids, chemicals, vapours, heat and direct sunlight. The phone is not waterproof; therefore, keep it dry.

IMPORTANT!
Only use original accessories. Only connect accessories approved by the manufacturer.

IMPORTANT!
Repairs to this device may only be completed by qualified service personnel.

IMPORTANT!
When using mobile communication equipment, interference can cause disturbances.

IMPORTANT!
Telephoning while driving is only permitted when the applicable legal regulations are observed.
Tips Concerning the Battery
The following tips and information help to ensure the mobile phone battery works properly.
■ Only use batteries and power adapters approved by the manufacturer, otherwise the batteries could be damaged.
- Do not short circuit the battery. Always leave the battery in the mobile phone to avoid accidentally short circuiting the battery contacts.
- Keep the battery contacts clean and free of dirt.
The battery can be charged/discharged hundreds of times but its service life is limited. Replace the battery when the battery power has decreased noticeably.
- To prevent unnecessary power consumption via the power adapter plug, disconnect the power adapter plug from the power socket when the battery is not being charged.
■ The battery only reaches its full capacity after several full charging process.
Intended Use
The mobile phone is designed for telephoning when connected to a mobile phone network. Any other use is considered unintended use. Unauthorised modification or reconstruction is not permitted. Under no circumstances open the mobile phone or try and complete any repair work yourself.
Checking the Package Contents
Before starting up the mobile phone, check the package contents. The following are enclosed with the mobile phone supplied:
■ JOY Plus mobile phone
■ USB connection cable
- Charging unit
- Charging adapter
Lithium-ion battery
■ Quick reference manual
Mobile Phone in Detail
Familiarise yourself with the elements on the mobile phone before actually starting to use the mobile phone.
Keys and Operating Elements
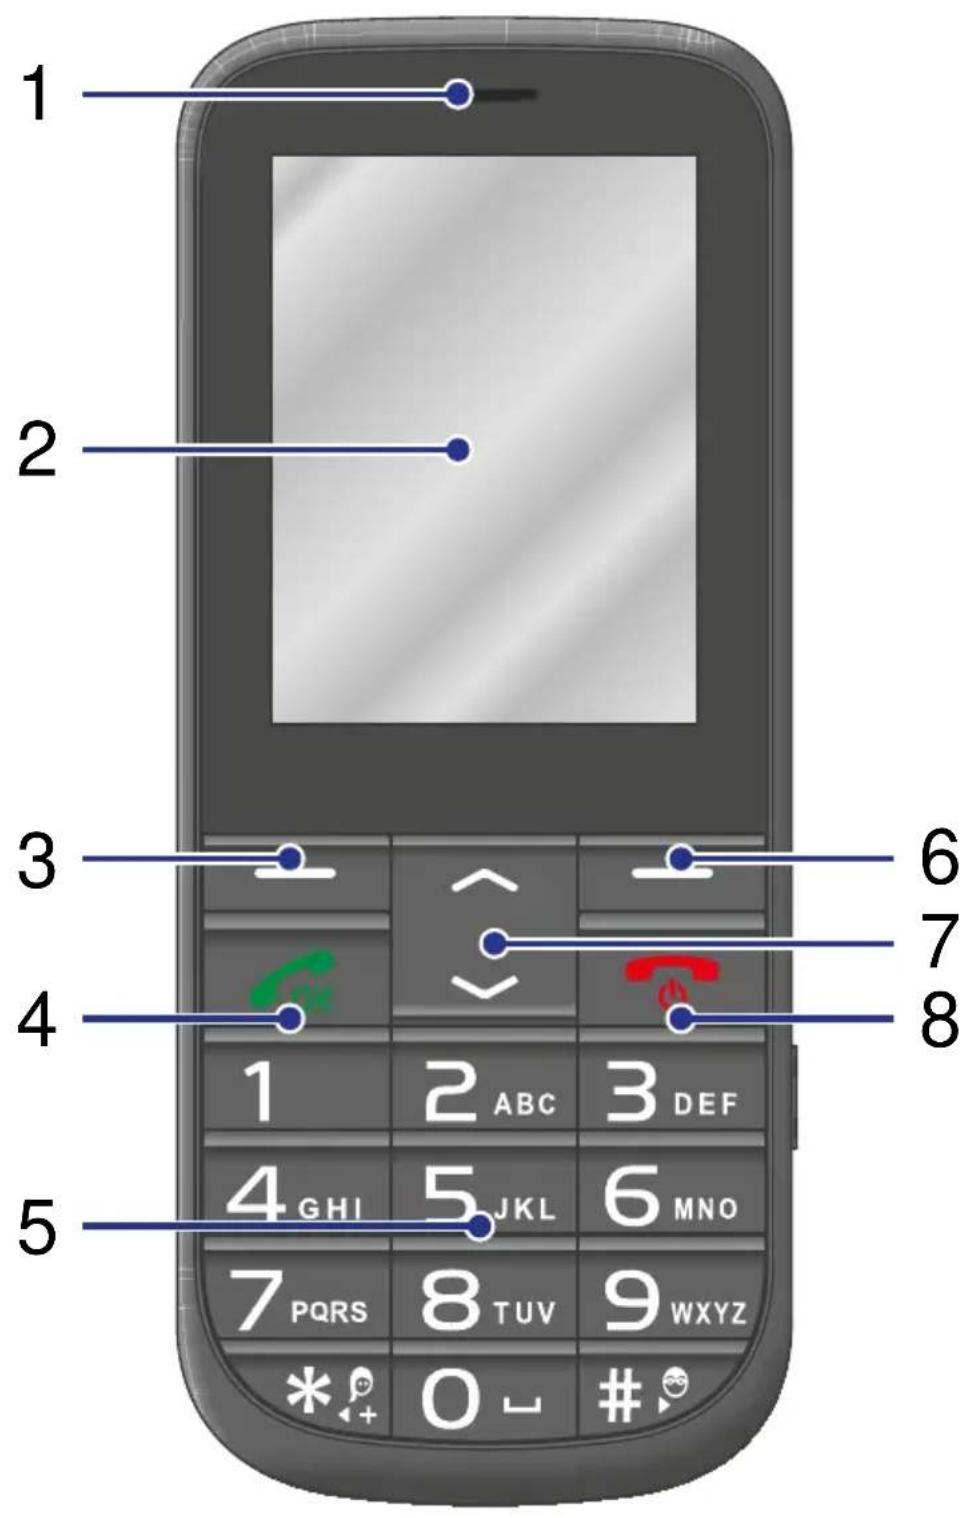
The following diagrams illustrate the keys and operating elements which you can use to exploit the functional scope of the mobile phone to the full.
1 Microphone
2 Display
3 Softkey, left
4 Call key
5 Keypad
6 Softkey, right
7 Navigation keys
8 On-hook key

The position numbers in the table relate to the annotations on the illustration on Page 15.
Rear View and Side View
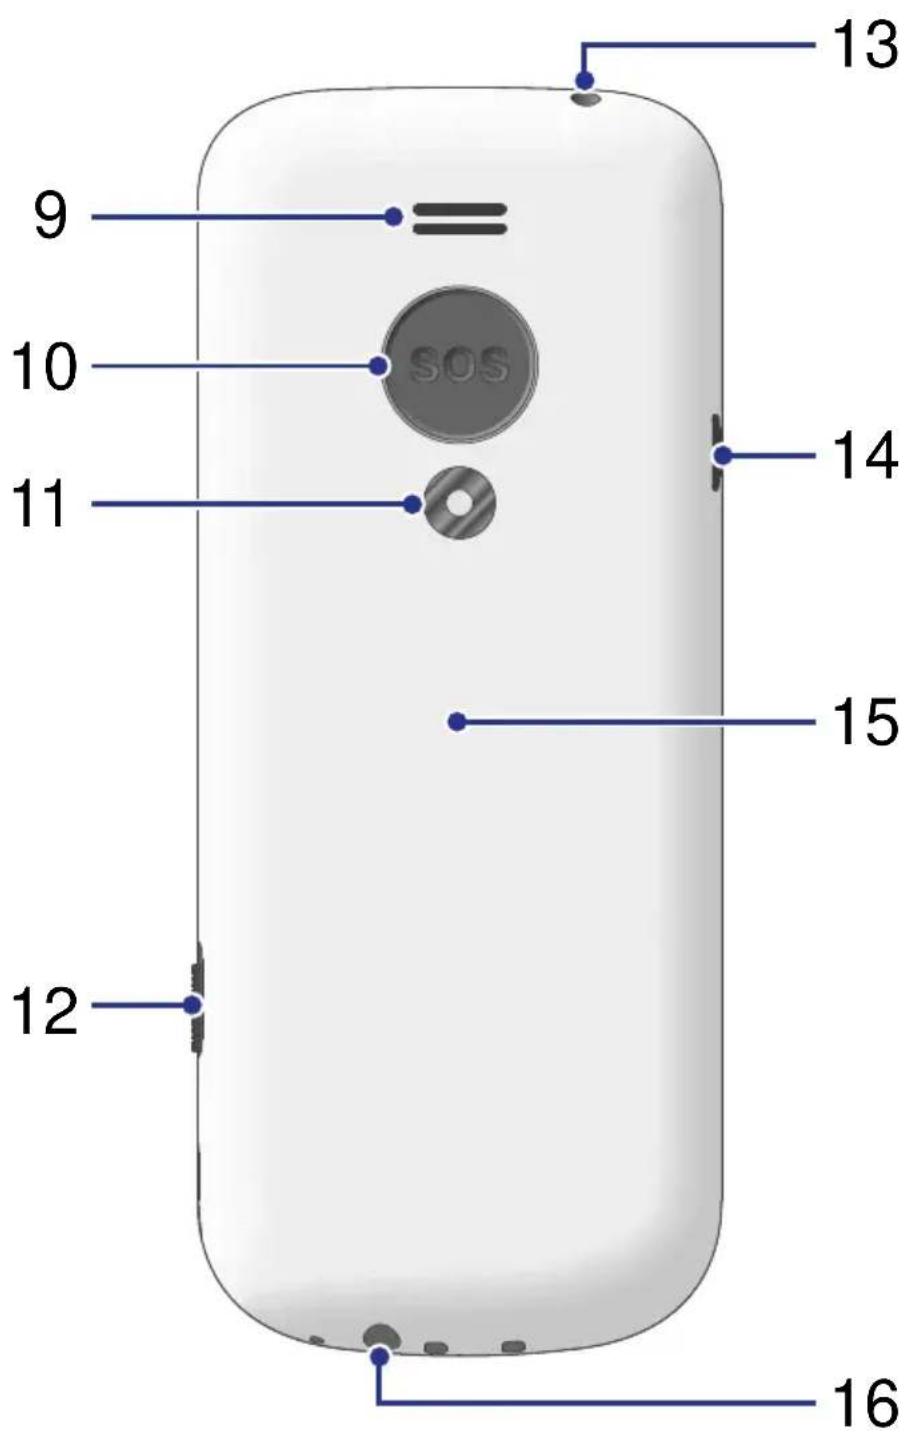
More elements are available on the sides, rear and underside of the mobile phone which provide different functions to operate the mobile phone.
9 Loudspeaker (play music and handsfree function)
10 Emergency call key (SOS)
11 Camera
12 Torch switch
13 Torch lamp (LED)
14 MicroUSB connection port
15 Battery compartment cover
16 Headphone connection port

The position numbers in the table relate to the annotations on the illustration on Page 17.
Putting the Mobile Phone into Operation
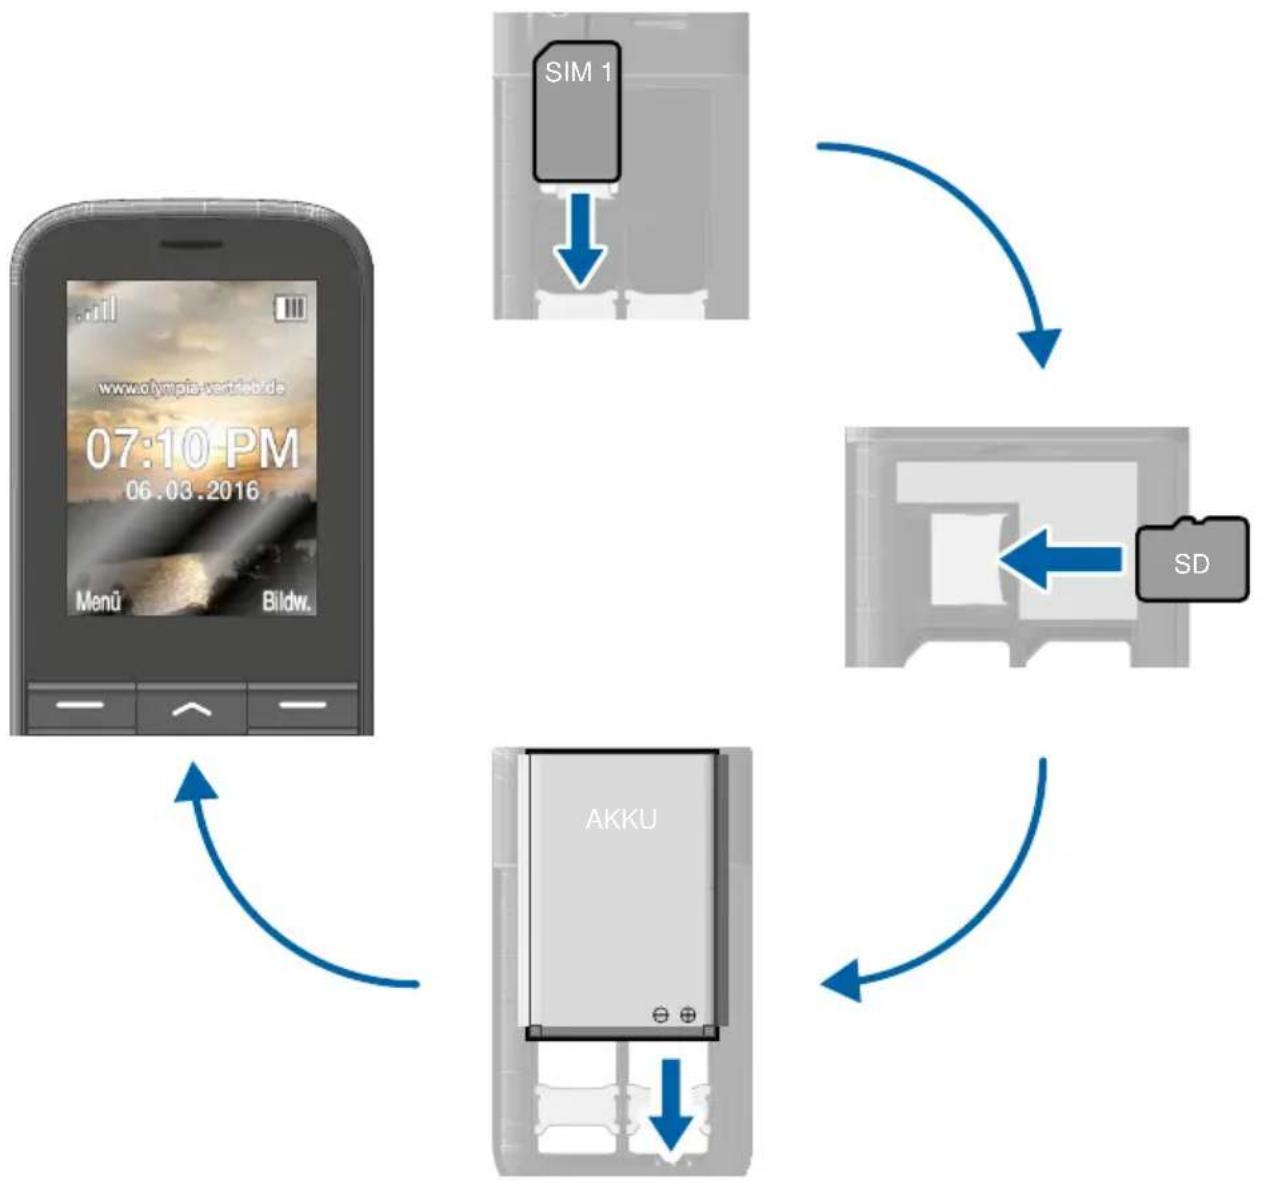
This chapter provides information on how to put your mobile phone into operation. The phone is ready for use after just a few steps.

Before you start, please read the information in Section Observe Safety Instructions on page 9.
flowchart
graph TD
    A["Mobile Phone: www.olympie-vertrieb.de 07:10 PM 06.03.2016"] --> B["SIM 1"]
    B --> C["SD"]
    C --> D["AKKU"]
    D --> A
Inserting the SIM Cards
Before you can start to use the mobile phone, you must insert one or more SIM cards (not included in the equipment supplied) in the phone.
At certain points of this operating manual, reference is made to SIM1. Since this device supports the use of two SIM cards (dual SIM), the settings are also applicable for SIM2 at the specified points.
The emergency call (SOS) function of the phone is completed by the SIM1 card. Therefore, the emergency call (SOS) function can only be used when a SIM1 card is inserted.
Before inserting one or more SIM cards in your mobile phone, please observe the information in Section Dual SIM Settings on page 69.
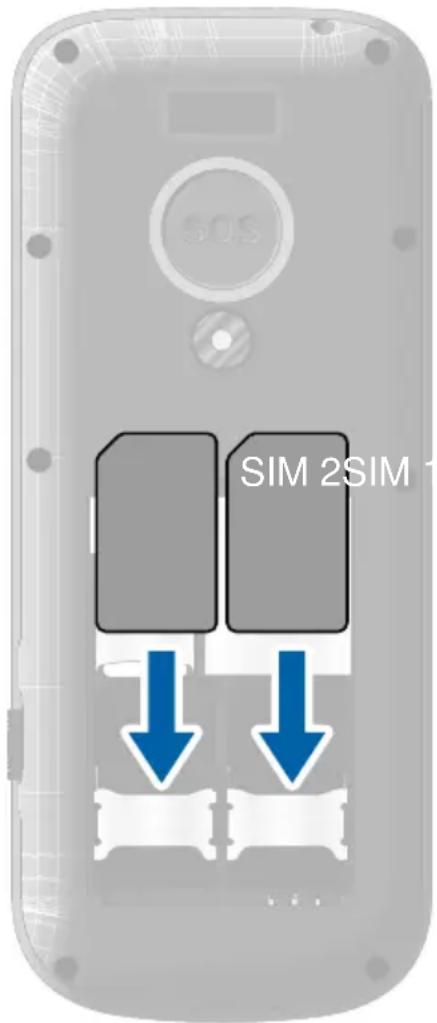
The battery compartment contains a useful diagram which indicates how to position and align the SIM card correctly in the compartment.
1 Remove the battery compartment cover. Use the notch on the underside of the mobile phone.
2 Insert the SIM cards as illustrated.
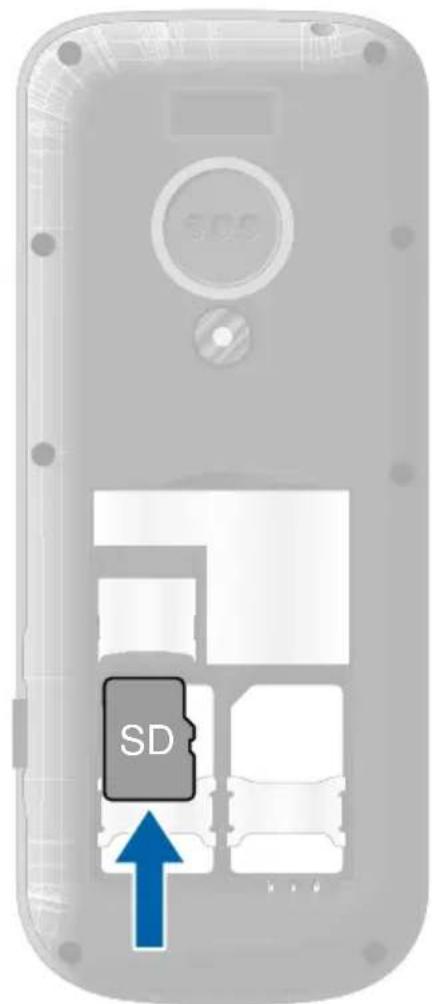
Inserting the MicroSD Memory Card
A microSD memory card (not included in the equipment supplied) can be inserted, as an option, in the mobile phone. This increases the quantity of data which can be stored on the mobile phone.
1 Slide the microSD memory card with the contacts facing down in the open compartment as illustrated.

The shape of the compartment ensures the battery cannot be inserted incorrectly.
Inserting the Battery
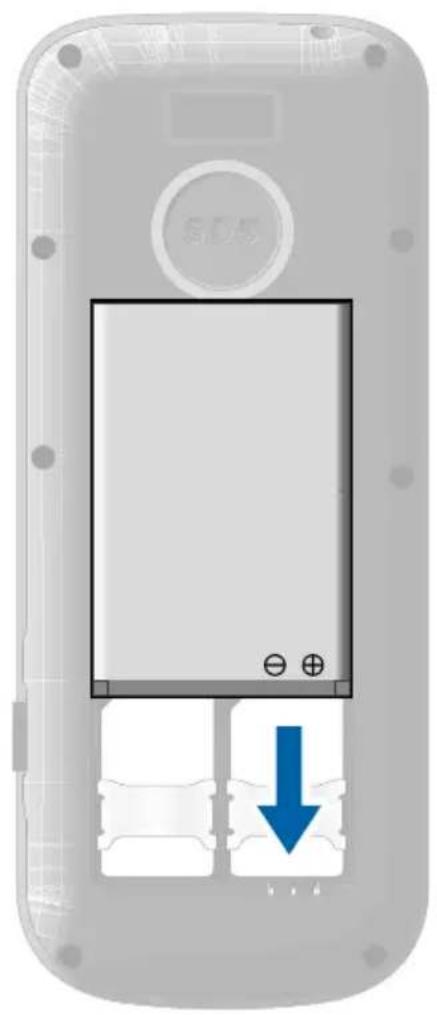
Before you can use the mobile phone, you must insert the battery in the mobile phone.
1 Insert the battery as illustrated.

The shape of the compartment ensures the battery cannot be inserted incorrectly.
2 Replace the battery compartment cover. The battery compartment cover latches audibly into place.
Charging the Battery
When charging the battery for the first time, it should be charged for at least four hours. Some batteries only reach their full capacity after several complete charge/discharge cycles. If the battery is fully discharged, it may take some time for the charging process to be indicated.
Before starting to charge the battery, check that it has been installed properly.

IMPORTANT! Do not remove the battery while the battery is being charged. This could damage the mobile phone.
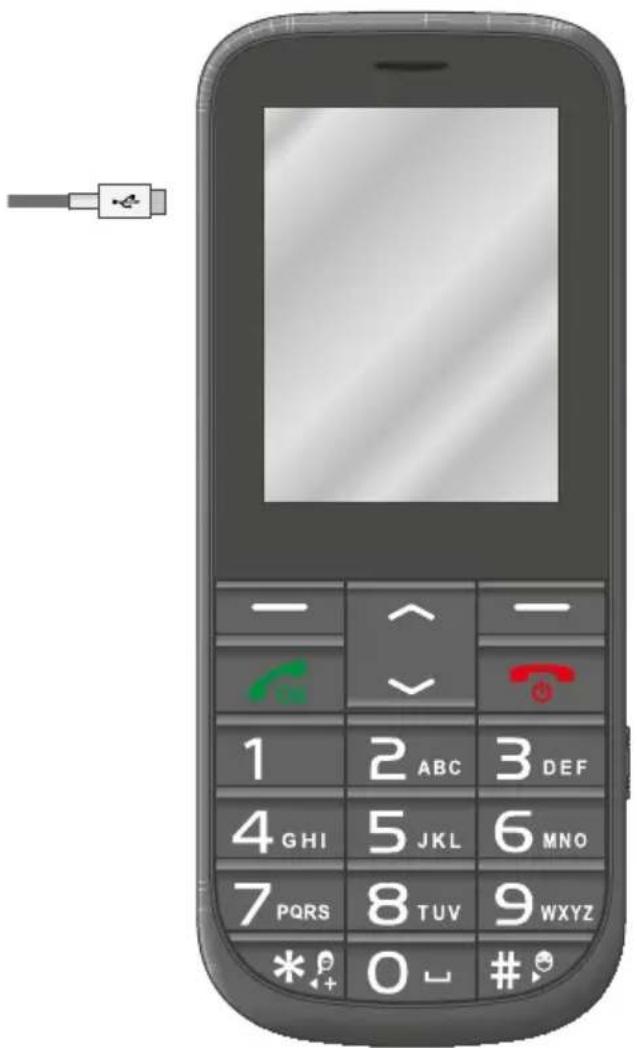
Charging the Battery, Charging Adapter
1 Connect the power plug to a properly installed power socket.
2 Connect the microUSB plug to the microUSB connection port on the mobile phone. Ensure that the microUSB plug is correctly aligned to the microUSB connection port when connecting it.

The charging process is indicated in the display by means of a charging battery icon.
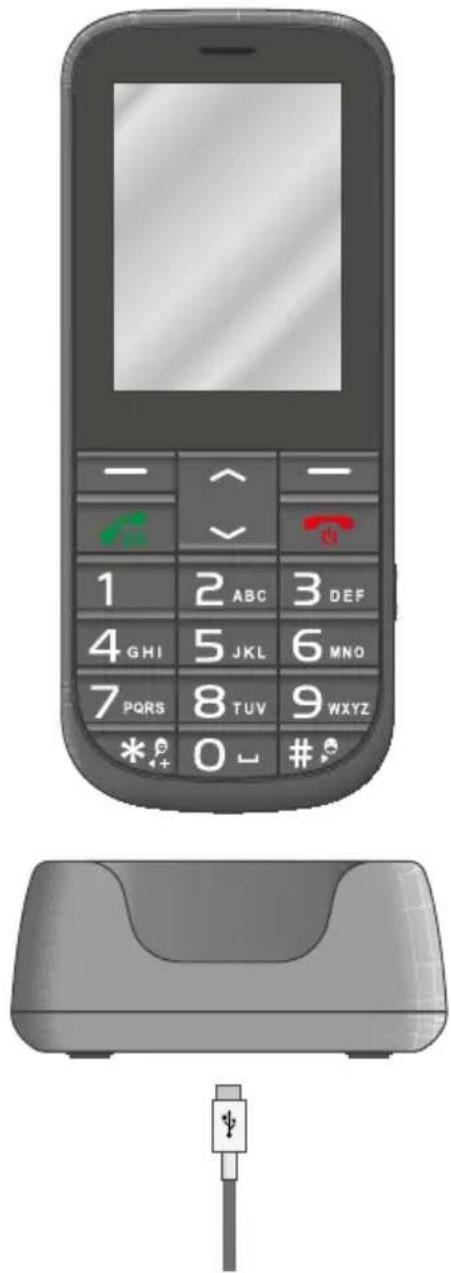
Charging the Battery, Charging Cradle
1 Connect the power plug to a properly installed power socket.
2 Connect the microUSB plug to the USB connection port on the rear side of the charging cradle.
3 Place the mobile phone in the charging cradle as illustrated.

The charging process is indicated in the display by means of a charging battery icon.
Switching the Mobile Phone On and Off
1 Press and hold the On-hook key for three seconds.
Some SIM cards will require you to enter a PIN code. Follow the instructions on the screen.
2 An animated graphic appears at first and then the start screen appears.
3 As soon as the name of your network operator appears in the middle of the display, your mobile phone has connected to the network and is ready for use.
1 2 3
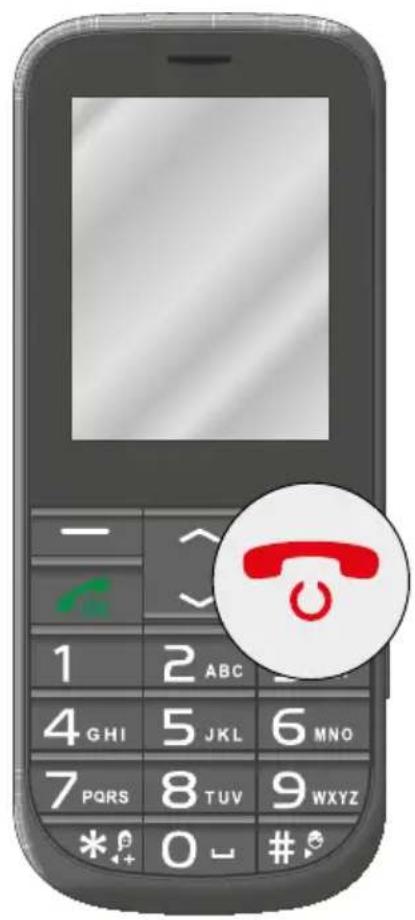
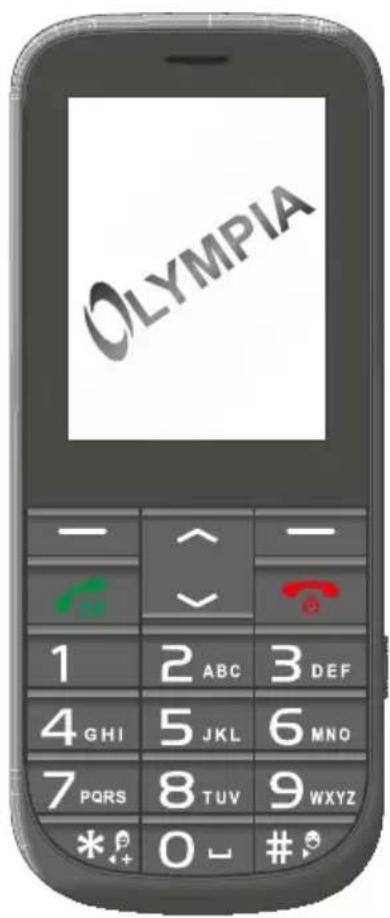
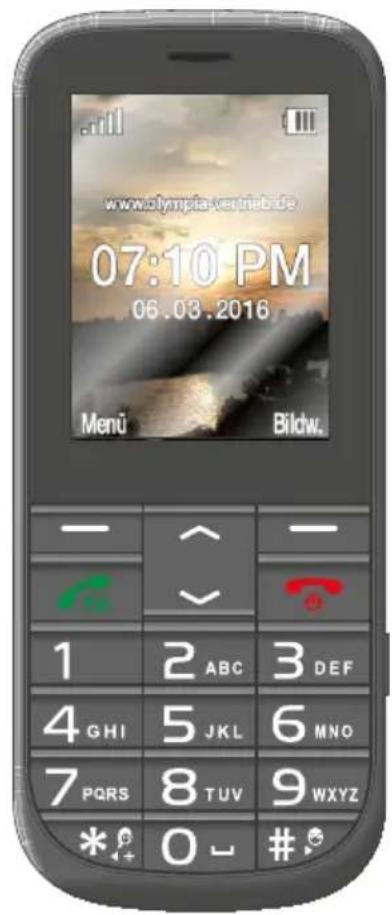
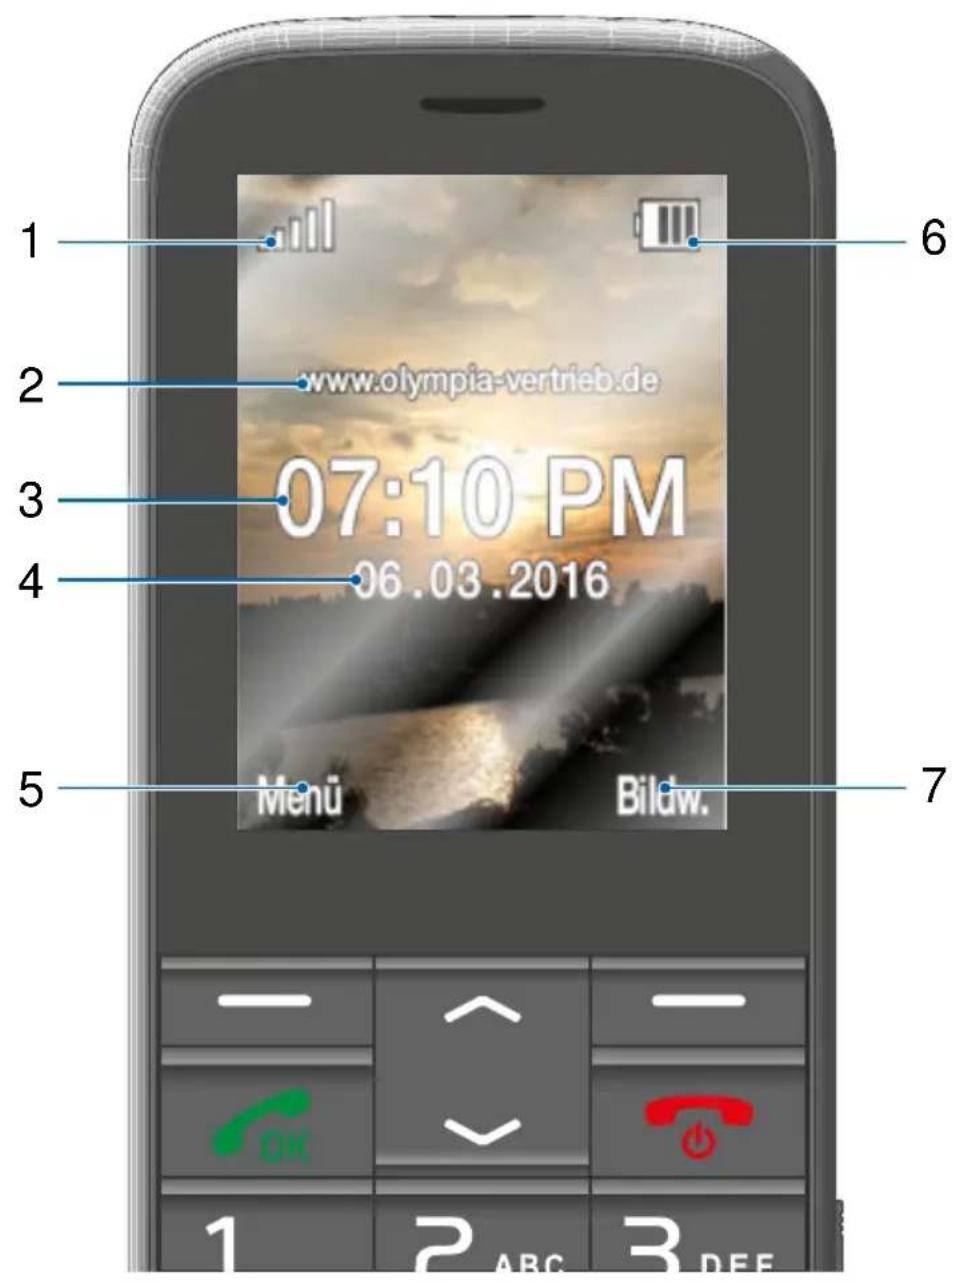
The start screen is the standard display which appears when the mobile phone is switched on. The start screen contains various useful indicators.
Press any key in order to switch on the start screen on the mobile phone display. Depending on the settings defined, it may be necessary to deactivate the key lock. Further information is provided in Section Key Lock on page 102.
1 Network availability
2 Network operator
3 Time
4 Date
5 Display text ☐Menu - changes according to the context
6 Battery charge
7 Display text Caller picture - changes according to the context

The position numbers in the table relate to the annotations on the illustration on Page 27.
Other Icons on the Start Screen
Apart from the icons permanently on the start screen, other icons appear at the top edge of the start screen according to the current settings. A selection of the most frequent icons appears below.

The Bluetooth function is activated.

The mobile phone rings and vibrates when calls or texts are received.

The mobile phone is muted.

The key lock function is switched on.

A text which has not yet been read is in your inbox.
Using the Mobile Phone
Navigating in the Menu
Use the following keys to navigate through the menus provided by the mobile phone.
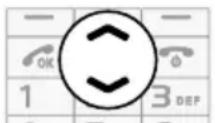
Navigate up and down in the menu.
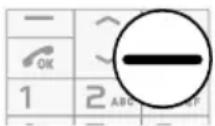
Open submenus and confirm entries.
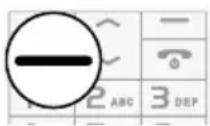
Navigate one menu level back or discard all your entries and settings.
Display Texts
All the most important functions are explained below with the aid of texts, illustrations and examples. You will find display texts illustrated in many sections of this operating manual. These display texts correspond to the texts which appear in the screen of your mobile phone. If several display texts are illustrated in succession, use the navigation keys and softkeys in succession to navigate to the display texts.
Using the Function Keys
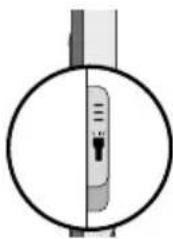
The operating elements on the sides or rear of the phone are assigned the following functions:
natural_image
Simple line drawing of a device inside a circle, no text or symbols presentSwitch the torch on or off.
Trigger an emergency call to the stored phone numbers.
Entering Phone Numbers and Letters
If you want to enter phone numbers or digits or delete entries, use the digit keys or softkeys provided o the mobile phone keyboard.
Multi-tap
When the mobile phone is initially supplied, Multitap_de (German) is set. You can change the input method (e.g. to UPPER CASE, lower case or digits 123) by pressing the Hash key as often as necessary.
If you want to enter text in multi-tap mode, press the key containing the letter/character you want the corresponding number of times. The letters/characters assigned to a key are imprinted on the respective key.
Pressing the 4 KEY, for example, enables you to enter the digit 4 as well as the letters G, H and I. If you want the first letter in the group, press the key once. If the second character is required, press it twice, and so on.
To enter two characters assigned to the same key, press the key the respective number of times to enter the first character. Wait until the cursor skips to the next position and then enter the letter.

You can change and save your preferred input method in the
Settings → Phone → Pref. input method menu.
Punctuation and Special Characters
Press the Star key when you are in Edit mode.
All the punctuation marks and special characters available are displayed. Use the navigation keys to move to the required character and press the left-hand softkey to accept it.
Repeatedly pressing the 1 key in Edit mode scrolls through a list of frequently used punctuation and special characters.
Other Entries and Functions
Press the 0 key to enter a space.
Press the right-hand softkey to delete characters.
Press and hold the right-hand softkey for 2 seconds to delete all the characters.
Making Calls
When you want to make a call, proceed as follows:
Enter the required phone number using the digit keys and then press the Call key.
Taking, Ending and Rejecting Calls
When you want to take, end or reject calls, use the following keys:
Take an incoming call.
End a call in progress.
Reject an incoming call.
Mobile Phone Menu
The main mobile phone menu is divided into topically organised groups (submenus).
The following descriptions always assume that the starting point for the operation is the mobile phone's start screen.
The higher level menus - such as Phonebook, Settings and Profiles - are on the start screen of the mobile phone. Press the navigation keys to view all the higher level menus. Use the navigation keys and softkeys to navigate through the entire menu provided on the mobile phone.
Overview of the Most Important Menus
| Call center | Call center | |
| Call settings | ||
| Phonebook | Phonebook | |
| Phonebook settings | ||
| Speed dial | ||
| Messaging | Write message | |
| Inbox | ||
| SMS settings | ||
| Settings | Phone | Time and date |
| Language | ||
| Security settings | ||
| Change PIN | ||
| Change barring password | ||
| Dual SIM settings | ||
| Bluetooth | ||
| Restore default | ||
| Emergency settings | ||
| Charge remind | ||
| Organizer | Calendar | |
| Alarm | ||
| Tasks | ||
| Multimedia | Camera | |
| FM radio | ||
| File manager | ||
| Profiles | General | |
| Silent | ||
| Caller picture | Add | |
Menu Options Available During a Call
Volume During a Call
You can alter the volume of a caller while a call is in progress by pressing the navigation keys.
Handsfree Function
You can select whether to hear the caller via the loudspeaker.
1 Select H-Free while a call is in progress. The caller can then be heard over the loudspeaker.
2 Select H-Held to switch off the caller via the loudspeaker.
Muting the Microphone
You can switch the microphone off while the call is in progress. Muting the phone means that the call continues to be connected, you can still hear the caller but the caller can no longer hear you.
1 Select Silent while a call is in progress. The microphone is muted, the caller can no longer hear you.
2 Select Unmute. The muting function is deactivated and the caller is able to hear you again.
Putting a Call on Hold
You can select whether to put the call in progress on hold. Putting a call on hold basically means keeping the caller connected but having no direct communication. The caller is put on hold enabling you to call someone else. The first caller cannot hear this call.
1 Navigate to Hold while a call is in progress. The caller is put on hold.
2 Navigate to Retrieve in order to resume the call.
Conference Facility
You can set-up a conference call, meaning communicating with at least two other parties at the same time.
1 While a call is in progress, navigate to Phonebook and dial the phone number of the third contact.
2 Press the Call key. The number of the contact selected is dialled. The call with the first caller is put on hold.
3 Select Conference. The conference call is set-up and you can now talk to both parties (or more).
4 Press the On-hook key to end the conference.
Alternatively, select End single call if you only want to end the call with one of the contacts involved in the conference.
Call Lists
You can open the Call List menu to view the last numbers you have dialled as well as the calls taken and calls missed in separate call lists.
If one of the phone numbers received matches an entry in the phone book, the associated name appears.
Options for the Call Lists
The following descriptions for the call list options apply to calls missed, calls received and phone numbers dialled. Navigation and use is the same in all the submenus.
Making a call
You can call an entry from the call lists.
1 Press the left-hand softkey to open the main menu.
2 Navigate to Call center → Call center.
3 Select the required call list.
4 Select the required entry.
5 Press the Call key. The entry selected is dialled.
View
This option provides more detailed information (e.g. time and date of the call and number of calls) regarding the entry selected.
1 Press the left-hand softkey to open the main menu.
2 Navigate to Call center → Call center.
3 Select the required call list.
4 Select the required entry.
5 Select Options → View. An overview of more detailed information on the selected entry is displayed.
Writing text messages
You can write and send a text message to the selected entry.
1 Press the left-hand softkey to open the main menu.
2 Navigate to Call center → Call center.
3 Select the required call list.
4 Select the required entry.
5 Select Send message.
6 Enter your text.
7 Select Send to.
8 Select the required contact. Alternatively, enter the required phone number manually.
9 Select Send. The text message is sent.
Save in phone book
You can store entries in the call list in your phone book.
1 Press the left-hand softkey to open the main menu.
2 Navigate to Call center → Call center.
3 Select the required call list.
4 Select the required entry.
5 Select Save to Phonebook.
6 Select a memory location for the phone book entry.
7 Enter a name for the phone book contact.
8 Select Save. The setting is saved.
Deleting entries
You can delete an entry from the call lists.
1 Press the left-hand softkey to open the main menu.
2 Navigate to Call center → Call center.
3 Select the required call list.
4 Select the required entry.
5 Select Clear and confirm the prompt. The contact is deleted.
Alternatively, you can delete all the call lists in one operation. Navigate to Call center → Delete call logs. Confirm the prompt.
Call Settings
You can define various settings in order to specify certain telephone reactions and features for your mobile phone.
Transmitting your own caller ID
You can define whether your own phone number is transmitted to the call partner, not transmitted or the setting should be defined by your mobile phone provider.
1 Press the left-hand softkey to open the main menu.
2 Navigate to Call center → Call settings → SIM 1 call settings → Caller ID.
3 Select the required setting. The setting is saved.
Call waiting
You can define whether a new, incoming call should be indicated by means of the call waiting signal while a call is already in progress.
1 Press the left-hand softkey to open the main menu.
2 Navigate to Call center → Call settings → SIM 1 call settings → Call waiting → Activate or Deactivate.
This service may need to be enabled by your mobile phone provider. You can check whether the service is available in Query status.
Call divert
Define whether and in what situations incoming calls to the mobile phone should be diverted to another, specified phone number.
1 Press the left-hand softkey to open the main menu.
2 Navigate to Call center → Call settings → SIM 1 call settings → Call divert.
3 Select the required call divert setting.
4 Select Activate To new number and enter the phone number to which the calls should be diverted. Alternatively, select Activate → From phonebook and select a contact from the phone book.
5 Select Options Save. The setting is saved.
If necessary, deactivate all the call diversions you have set-up. Navigate to Call settings → Call divert → Cancel all diverts.
Auto redial
You can define whether your mobile phone should automatically try and redial a number previously dialled but which was engaged or could not be reached at the time as soon as the mobile detects the line to the person called is no longer busy.
1 Press the left-hand softkey to open the main menu.
2 Navigate to Call center → Call settings → Advanced settings → Auto redial.
3 Select the required setting.
4 Select Select. The setting is saved.
Call time reminder
You can define whether an acoustic signal should be issued to remind you of the call time which has elapsed until that moment while a call is in progress. You can define a single period or a repeated interval for the acoustic signal.
1 Press the left-hand softkey to open the main menu.
2 Navigate to Call center → Call settings → Advanced settings → Call time reminder.
3 Define whether you want to be reminded of the call time elapsed by a single acoustic signal (once) or a repeated acoustic signal (periodic). You can also define when or at what intervals the acoustic signal should be issued.
4 Select Select. The setting is saved.
Answer mode
You can define the way and means by which you take phone calls.
1 Press the left-hand softkey to open the main menu.
2 Navigate to Call center → Call settings → Advanced settings → Answer mode.
3 Select the required setting.
4 Select Select. The setting is saved.
Phone Book
The phone book in the phone can store up to 300 contacts. In most cases, it is also possible to store further contacts on the SIM card.
When the mobile phone memory or SIM card is full, the corresponding message appears in the display. Before new entries can be stored, old contacts must be deleted or a new memory location selected.
The contacts are arranged in alphabetical order.
Adding a contact
Save your contacts in the phone book in order to be able to access important phone numbers quickly.
1 Press the left-hand softkey to open the main menu.
2 Navigate to Phonebook → Add new contact and confirm it with Select.
3 Select the storage location for the new contact.
4 Enter the name and phone number.
5 Select Save. The new contact is saved.
You can also assign a speed dialling number or picture to the contacts saved. Further information is provided in Section Speed Dialling on page 50 or Caller Picture Dialling on page 98.
Calling a contact
You can call contacts stored in the phone book as follows:
1 Press the left-hand softkey to open the main menu.
2 Navigate to [Phonebook] and select a contact.
To skip directly to an entry, use the keypad to enter the first letters of the name stored. It may be necessary to press a key several times. To enter a name starting with the letter "L", press the key three times.
3 Press the Call key. The phone number is dialled.
Deleting a contact
You can delete a contact from the phone book as follows:
1 Press the left-hand softkey to open the main menu.
2 Navigate to [Phonebook].
3 Select the required contact.
4 Select Clear and confirm the prompt. The contact is deleted.
Editing a contact
You can edit a contact stored in the phone book.
1 Press the left-hand softkey to open the main menu.
2 Navigate to Phonebook.
3 Select the required contact.
4 Select Edit.
5 Edit the contact details.
6 Select Save. The modifications are saved.
Phone Book Settings
Advanced settings can be defined in the phone book settings. You can define, for example, where new phone book entries should be stored.
Preferred storage
You can define your preferred storage location for phone book entries. Depending on the setting defined, phone book entries are saved on the SIM card or in the mobile phone memory without any further confirmation requests.
1 Press the left-hand softkey to open the main menu.
2 Navigate to Phonebook → Phonebook settings → Preferred storage.
3 Select the storage location and confirm it with Select.
Memory status
Information appears regarding the number of contacts stored and storage locations available:
1 Press the left-hand softkey to open the main menu.
2 Navigate to Phonebook → Phonebook settings → Memory status.
The storage locations still available are displayed.
Speed Dialling
You can set-up speed dialling for up to eight phone book entries. If you want to be able to dial certain phone numbers even more quickly, you can assign the respective phone book entries to digit keys 2 to 9.
Activating speed dialling
Firstly, the speed dialling function must be switched on. You can only assign speed dialling numbers to contacts who are already stored in the phone book.
1 Press the left-hand softkey to open the main menu.
2 Navigate to Phonebook → Phonebook settings → Speed dial → Status.
3 Select On. The Speed dial function is switched on.
Adding contacts for speed dialling
Firstly, the speed dialling function must be switched on. You can only assign speed dialling numbers to contacts who are already stored in the phone book.
1 Press the left-hand softkey to open the main menu.
2 Navigate to Phonebook → Phonebook settings → Speed dial → Set numbers.
3 Select an empty memory location and confirm it with Edit. The memory locations displayed correspond to the digit keys on the mobile phone.
4 Select a contact from the phone book and confirm it with Select.
Calling contacts using the speed dialling function
You can use the speed dialling function from the start screen.
1 Press and hold one of the keys 2 to 9 for three seconds. The phone number saved as a speed dial number is dialled.
Text Messages
Navigate to the Messaging menu in order to write, receive, view, reply to, forward and delete text messages (occasionally referred to to as SMS) received and sent as well as to create drafts and define other settings using the mobile phone.
The following descriptions relate to the Inbox, Drafts, Outbox and Sent messages submenus. Navigation and use is the same in all the submenus.
A standard message normally contains maximally 160 characters.
Sending a text message with more than 160 characters could result in additional costs, depending on the terms of your SIM card.
It is possible that not all functions described are supported by every mobile service provider. Therefore, please contact your local mobile service provider for details.
Writing Text Messages
Use the function to write short text messages:
1 Press the left-hand softkey to open the main menu.
2 Navigate to Messaging → Write message.
3 Enter your text.
4 Select Send to.
5 Select Add from Phonebook and then the required phone book contact. Alternatively, enter the required phone number manually.
6 Select Send. The text message is sent.
Viewing Text Messages
Open any text message in order to view the full content of the message.
1 Press the left-hand softkey to open the main menu.
2 Navigate to Messaging → Inbox.
3 Select the required text message.
4 Select View. The text message is opened.
Replying to Text Messages
If you want to reply to the sender of a text message received, proceed as follows.
1 Press the left-hand softkey to open the main menu.
2 Navigate to Messaging → Inbox.
3 Select the required text message.
4 Select Reply.
5 Enter your text.
6 Select Send to.
7 Select the sender of the text message received.
8 Select Send. The text message is sent.
Calling the Sender of a Text Messages
If you want to call the sender of a text message received, proceed as follows.
1 Press the left-hand softkey to open the main menu.
2 Navigate to Messaging → Inbox.
3 Select the required text message.
4 Select Call sender. The sender of the message received is called.
Forwarding Text Messages
If you want to forward a text message, proceed as follows.
1 Press the left-hand softkey to open the main menu.
2 Navigate to Messaging → Inbox.
3 Select the required text message.
4 Select Forward.
5 Edit the selected text message, if necessary.
6 Select Send to.
7 Select Add from Phonebook and then the required phone book contact. Alternatively, enter the required phone number manually.
8 Select Send. The text message is sent.
Deleting Text Messages
If you want to delete a text message, proceed as follows.
1 Press the left-hand softkey to open the main menu.
2 Navigate to Messaging → Inbox.
3 Select the required text message.
4 Select Clear and confirm the prompt. The text message is deleted
Saving Phone Numbers in the Phone Book
If you want to save a phone number, from which you have received a text message, in your phone book, proceed as follows.
1 Press the left-hand softkey to open the main menu.
2 Navigate to Messaging → Inbox.
3 Select the required text message.
4 Select Save to Phonebook.
5 Select the storage location and enter a name.
6 Select Save. The phone number from which a text message was received is stored as a phone book entry.
Saving a Text Message as a Draft
Write a text which you want to save as a draft.
1 Press the left-hand softkey to open the main menu.
2 Navigate to Messaging → Write message.
3 Enter your text.
4 Select Save. The text message is saved as a draft.
Settings for Text Messages
You can use this menu to define further settings such as the preferred storage location for your text messages or the receipt of delivery reports for the text messages you have sent.
Preferred storage
This defines whether the text messages are stored on the mobile phone or SIM card.
1 Press the left-hand softkey to open the main menu.
2 Navigate to Messaging → SMS settings → Preferred storage.
3 Change the storage location with the Star or Hash key.
Delivery reports
You can define whether you want to receive a delivery (transmission) report for text messages sent.
1 Press the left-hand softkey to open the main menu.
2 Navigate to Messaging → SMS settings → Sent messages.
3 Change the status with the Star or Hash key.
When the default setting is set, the text messages sent are saved.
Memory status
You can check how much memory space is available for your text messages.
1 Press the left-hand softkey to open the main menu.
2 Navigate to Messaging → SMS settings → Memory status.
The memory capacity of the SIM card and mobile phone is displayed.
Settings
The Settings menu is used to adapt the basic settings of the mobile phone, such as time, language, call settings, phone settings, network and security settings, to your own needs.
In addition, the Settings menu also contains the emergency call (SOS key) function, low battery charge alert and dual-SIM settings, for example.
Phone Settings
Setting the Time and Date
Set the time and date before using the mobile phone for the first time.
1 Press the left-hand softkey to open the main menu.
2 Navigate to Settings → Phone → Time and date.
3 Enter the current time and date using the keypad.
4 Select Save. The setting is saved.
Adapt the settings for the time zone as well as the time and date format according to your needs.
Setting the Language
The mobile phone can be operated in four different languages (German, English, French and Italian).
1 Press the left-hand softkey to open the main menu.
2 Navigate to Settings → Phone → Language.
3 Select the required setting.
4 Select Select. The mobile phone can now be used in the language selected.
More Phone Settings
Preferred input method
You can define the method by which you enter text. This setting affects all the operating modes in which text can be entered (creating phone book contacts, writing text messages, etc.).
1 Press the left-hand softkey to open the main menu.
2 Navigate to Settings → Phone → Pref. input method.
3 Select the required setting.
4 Select Select. The setting is saved and affects all the relevant menus.
Displaying the date and time
Define whether the time and date should be displayed on the start screen of the mobile phone.
1 Press the left-hand softkey to open the main menu.
2 Navigate to Settings → Phone → Display → Time and date.
3 Select On. The time and date are now permanently displayed on the start screen.
Setting the back-lighting
You can define how bright the back-lighting of the screen display should be and how long it should be active.
1 Press the left-hand softkey to open the main menu.
2 Navigate to Settings → Phone → Misc. settings → LCD backlight.
3 Select the required settings. Change the settings using the Star or Hash key.
4 Select Select. The setting is saved.
Switching on/off automatically
The mobile phone can be switched on or off automatically at a time you define.
1 Press the left-hand softkey to open the main menu.
2 Navigate to Settings → Phone → Sched. power on/off → Scheduled power on or Scheduled power off.
3 Select a time.
4 Enter the time at which the mobile phone should be switched on or off and change the status using the Star or Hash key.
5 Select Save. The settings are saved and your mobile will be switched on or off at the time defined.
Setting the background image (wallpaper)
You can select a picture which should appear on the start screen.
1 Press the left-hand softkey to open the main menu.
2 Navigate to Settings → Phone → Display → Wallpaper.
3 Navigate to the storage location of the wallpaper (background image).
4 You can select from a total of eight wallpapers stored.
5 Select Select. The setting is saved.
The wallpaper selected appears permanently on the start screen.
If you insert a microSD memory card in the mobile phone and have stored a suitable picture on it, you can also use the picture as the wallpaper for the phone.
Security Settings
You can define your own individual PIN and phone lock password. You can deactivate the request for your PIN from the SIM card if so required. The risk here is, should you lose your mobile phone, the data stored on it could be misused by third-parties and subsequent costs could be charged to you.
When you change your PIN or phone lock password, we urgently recommend that you note down the new PIN or phone lock password and keep it where it cannot be accessed by third-parties.
Switching the PIN Request On/Off
1 Press the left-hand softkey to open the main menu.
2 Navigate to Settings → Security settings → SIM 1 security → PIN lock.
3 Enter the PIN. The standard PIN is contained with the documents provided with the SIM card. The setting is saved. The PIN request is switched on or off.
Changing the PIN
You can change the preset PIN to a number combination which you can easily remember. We recommend that you choose your PIN so that it is not possible for unauthorised persons to determine the number combination simply by trial and error with easy combinations (such as 1-2-3-4 or 0-0-0-0).
1 Press the left-hand softkey to open the main menu.
2 Navigate to Settings → Security settings → SIM 1 security → Change PIN.
3 Enter your PIN. The standard PIN is contained with the documents provided with the SIM card.
4 Enter the new PIN.
5 Enter the new PIN again.
6 Confirm the prompt. The setting is saved.
The PIN is stored on the SIM card. If you give your SIM card to someone else or insert it in another mobile phone, the newly entered PIN is valid.
If you forget your PIN, you can reset the SIM card to its default settings after entering the PUK. More detailed information on this is available from your mobile phone provider.
Switching the Phone Lock On/Off
1 Press the left-hand softkey to open the main menu.
2 Navigate to Settings → Security settings → Phone security → Phone lock.
3 Enter the phone lock password. The setting is saved.
In its default setting, the phone lock password is 1234.
The phone lock is also active when there is no SIM card inserted in the mobile phone.
Changing the Phone Lock Password
1 Press the left-hand softkey to open the main menu.
2 Navigate to Settings → Security settings → Phone security → Change password.
3 Enter the phone lock password.
4 Enter the new phone lock password.
5 Enter the new phone lock password again. The setting is saved.
Setting Up the Automatic Key Lock
You can define that the mobile phone key lock is automatically activated after a specific period of time. This helps prevent access to your mobile phone by authorised persons and minimises the risk of activating functions inadvertently.
1 Navigate to Settings → Security settings → Phone security → Screen auto lock.
2 Select the required time period.
3 Select Select. The mobile phone switches the automatic key lock on after the set period of time has elapsed.
If you want to switch the Screen auto lock function off, select the Off option instead of a period of time.
Dual SIM Settings
The Dual SIM function can be used, for example, to keep private and business calls separate without the need to use a second mobile phone. In addition, you can use two different, specifically chosen mobile phone rates if, for example, you are frequently abroad.
You must insert two SIM cards in the mobile phone in order to use this function. Otherwise, SIM1 is automatically activated.
You can define whether the mobile phone should access one or both SIM cards inserted.
1 Press the left-hand softkey to open the main menu.
2 Navigate to Settings → Dual SIM settings.
3 Select the required settings.
If you select Only SIM 1 open or Only SIM 2 open, all the operations will only be activated from the SIM card selected.
If you select Dual SIM settings, you are prompted to enter the SIM card to be used to execute certain functions (such as making calls, writing text messages or saving phone book contacts).
Network Settings
The mobile phone searches for and automatically selects the mobile network assigned to the SIM card or mobile phone provider (network operator).
The presettings in this menu are set-up by the SIM card or network operator. We recommend that you do not alter the settings in this menu.
Bluetooth
The Bluetooth function, a standard for wireless data transfer, can be used to exchange data with other Bluetooth-capable devices free of charge.
Switching Bluetooth On/Off
1 Press the left-hand softkey to open the main menu.
2 Navigate to Settings → Bluetooth → Status.
3 Select On or Off. The Bluetooth function is switched on or off, respectively.
Visibility
You can define whether your mobile phone should be visible for other Bluetooth-capable devices in the environment.
1 Press the left-hand softkey to open the main menu.
2 Navigate to Settings → Bluetooth → Visibility.
3 Select On or Off. The mobile phone is visible or not visible for other Bluetooth-capable devices.
Connecting Devices Via Bluetooth
Search for other Bluetooth-capable devices in your environment with which you want to connect your mobile phone.
1 Press the left-hand softkey to open the main menu.
2 Navigate to Settings → Bluetooth → My device → Search new device.
3 Follow the instructions on the screen. Your mobile phone is connected to the device selected.
Changing Device Names
You can assign your mobile phone a name via which it can be identified and located under other Bluetooth-capable devices. The default setting for the mobile phone is the name "BT Device".
1 Press the left-hand softkey to open the main menu.
2 Navigate to Settings → Bluetooth → My name.
The name of the mobile phone is limited to 18 characters.
3 Enter a name for the mobile phone.
4 Select Save. The setting is saved.
Emergency Call Function (SOS Key)

CAUTION!
The acoustic alarm signal is very loud and can cause hearing damage if sounded close to the ear. Hold the mobile phone away from your ear if you press the SOS key.
The SOS key activates an emergency call function. Press and hold the SOS key for approx. three seconds to trigger an emergency call. An acoustic alarm signal is sounded and the emergency text is sent to the phone numbers stored for the purpose. After that, the respective phone numbers stored are dialled in succession in Handsfree mode. You can assign up to four phone numbers to the SOS key.
Inform all the people who are to be entered in the list to receive the emergency call in advance before actually storing the list of emergency numbers.
Switching the Emergency Call Function On/Off
Before using the favourite keys, the function must be activated.
1 Press the left-hand softkey to open the main menu.
2 Navigate to Settings → Emergency settings → Status.
3 Select On or Off. The emergency call function is activated or deactivated.
Setting Up a Call Chain
You must define whether the emergency call numbers should be called once or repeatedly.
1 Press the left-hand softkey to open the main menu.
2 Navigate to Settings → Emergency settings → SOS Chain.
3 Select On or Off. The call chain is activated or deactivated.
If the telephone chain function is activated, all the phone numbers stored are dialled in succession in 3 complete cycles. This ensures that the emergency call function is not interrupted by answering machines or mailboxes.
Emergency Call Function Settings
Defining the list of emergency call numbers
You can store up to five phone numbers which can be contacted in an emergency by pressing the SOS key, on the rear of the mobile phone, to which an emergency call and emergency text message are sent.
Do not assign any official emergency call service numbers. A false alarm can lead to considerable costs which could be charged to you.
1 Press the left-hand softkey to open the main menu.
2 Navigate to Settings → Emergency settings → Number List.
3 Select a storage location which is empty.
4 Enter the necessary phone number.
5 Select Select. The phone number stored will receive a phone call and an alert text message after triggering an alert call by pressing the SOS key on the rear of the mobile phone.
Defining a text messages for the emergency call
Enter a text from which it is clearly evident to the recipient that you are in an emergency situation and require help.
1 Press the left-hand softkey to open the main menu.
2 Navigate to Settings → Emergency settings → Content.
When in its default setting, the text for the emergency text message is
SOS Help! The content of the emergency text messages is limited to 160 characters.
3 Edit the emergency text message.
4 Select Select. The emergency text message you save is sent to the emergency phone numbers after triggering an emergency call by pressing the SOS key on the rear of the mobile phone.
Selecting the SIM card for the emergency call function
Are there two SIM cards inserted in your mobile phone? In this case, it is possible to select the SIM card from which the emergency call function should be issued.
1 Press the left-hand softkey to open the main menu.
2 Navigate to Settings → Emergency settings → Select SIM.
3 Select the SIM card and confirm it with Select. The emergency call (SOS) function will then be triggered by the SIM card selected.
Defining a female contact person
You can define a phone number which you can call by pressing and holding the Star key. There is a symbolic female face on the Star key for this purpose.
The function works similarly to speed dialling. Further information is provided in Section Speed Dialling on page 50.
1 Press the left-hand softkey to open the main menu.
2 Navigate to Settings → Emergency settings → Female Number.
3 Enter a phone number and confirm it with Select. Press and hold the Star key on the start screen to dial the phone number stored.
Defining a male contact person
You can define a phone number which you can call by pressing and holding the Hash key. There is a symbolic male face on the Hash key for this purpose.
The function works similarly to speed dialling. Further information is provided in Section Speed Dialling on page 50.
1 Press the left-hand softkey to open the main menu.
2 Navigate to Settings → Emergency settings → Male Number.
3 Enter a phone number and confirm it with Select. Press and hold the Hash key on the start screen to dial the phone number stored.
Low Battery Power Alert
The alert function in the case of low battery power can be used to initiate the dispatch of a text message to any phone numbers informing you that the battery in your mobile phone is almost empty and must be recharged.
Switching the Charge Remind On/Off
Switch the function on or off.
1 Press the left-hand softkey to open the main menu.
2 Navigate to Settings → Charge remind → Status.
3 Select On or Off. The charge remind function is activated or deactivated.
Settings for Low Battery Power Alert
List of phone numbers
Set-up a list not exceeding five phone numbers to which the text message should be sent.
1 Press the left-hand softkey to open the main menu.
2 Navigate to Settings → Charge remind → Number List.
3 Select a storage location which is empty.
4 Enter the necessary phone number.
5 Select Select. The phone number stored will receive a phone call and an alert text message after triggering an alert call by pressing the SOS key on the rear of the mobile phone.
Text Message for Low Battery Power Alert
Define the content of the text message which should be sent when the battery in the mobile phone is almost empty and must be recharged.
1 Press the left-hand softkey to open the main menu.
2 Navigate to Settings → Charge remind → Content.
The default content of the text message is Charge battery! The content of the text messages in this case is limited to 159 characters.
3 Edit the selected text message.
4 Select Save. The text message which you have stored is sent to all the phone numbers entered in the Charge remind → Number List menu option as soon as the mobile phone battery is almost empty.
Automatic Handsfree Function
You can activate this function in the menu if you want to take all calls via the mobile phone loudspeaker automatically.

CAUTION! Exposure to the receiver earpiece at full volume for a long period could cause ear damage. Do not hold the mobile phone directly on the ear when listening to calls via the loudspeaker.
1 Press the left-hand softkey to open the main menu.
2 Navigate to Settings → Hand free setting.
3 Select On or Off. The function is activated or deactivated.
You can also switch the function on and off during a call. Further information is available in Section Menu Options Available During a Call on page 36.
Restoring the Default Factory Settings
You should reset the phone settings to their default factory settings before transferring the device to third parties, e.g. for repair or sale.
Make a copy of your personal data on your SIM card or microSD memory card prior to initiating a reset to the factory settings.
1 Press the left-hand softkey to open the main menu.
2 Navigate to Settings → Restore default.
3 Enter the phone lock password.
In its default setting, the phone lock password is 1234.
4 Confirm the prompt. The mobile phone is reset to its factory settings.
Organiser
You can arrange the most important tasks in the organiser provided on the mobile phone. The mobile phone can be used to enter tasks of which you want to be reminded, as an alarm clock or a calendar.
Calendar
The calendar provides an overview of the days, weeks and months of the year.
1 Press the left-hand softkey to open the main menu.
2 Navigate to Organizer → Calendar. An overview of the current month with the weekdays appears.
3 Use the Star or Hash key to navigate horizontally and the navigation keys to navigate vertically.
Jump to date
You can skip directly to a date in the future or past as necessary. This may be useful, for example, if you want to know on which weekday a birthday, marriage or other important events fall in the following year.
1 Press the left-hand softkey to open the main menu.
2 Navigate to Organizer → Calendar → Jump to date.
3 Enter the required date via the keyboard and confirm it with Select. The date entered appears on a coloured background in the month view.
Views
You can switch between a week and a month overview.
1 Press the left-hand softkey to open the main menu.
2 Navigate to Organizer → Calendar → Go to weekly view. The current calendar week is displayed.
Alarm Clock
You can use the mobile phone as an alarm clock.
Switching the alarm clock on
1 Press the left-hand softkey to open the main menu.
2 Navigate to Organizer → Alarm.
You can set up to five different alarms.
3 Select the required alarm and confirm it by selecting Edit.
4 Set the alarm with the Star or Hash On key.
You can define more settings to adapt the alarm clock to your needs.
Setting the time
Set the time at which the alarm should ring.
1 Enter the wake-up time.
Setting the ringing tone
You can define the tone with which you want to be woken.
1 Select Alarm tone → Select.
2 You can select one of the 20 different ringing tones available.
Setting the date
You can define whether and how often the alarm clock rings (once, daily or on certaindays).
1 Select Repeat.
2 Select the required entry and confirm it by selecting Save.
Define other settings to the weekdays according to the selection or set the days on which the alarm should wake you.
Camera
Use the camera to take photos at any time and any place.
Observe local regulations and respect other peoples' rights of privacy.
1 Press the left-hand softkey to open the main menu.
2 Navigate to Multimedia → Camera.
The subject in front of the camera lens appears on the mobile phone screen.
3 Press the 5 digit key. The camera integrated in the mobile phone stores the photo.
You can adjust the quality of the photos taken, activate various effects on the camera, change the white balance and define a variety of other settings.
Some settings assume an in-depth knowledge of photography. Test the most convenient way of presenting photos for yourself.
Preferred storage
In order to use the camera on the mobile phone and save the photos taken, a microSD memory card must be inserted in the mobile phone and set-up as the storage location for the photos.
1 Select Options → Storage.
2 Select Memory card and confirm with Select. The photos taken are then stored on the microSD memory card installed.
Image viewer
1 Select Options → Photos.
2 Select Options → View.
You can select Options → Browse style to view your photos on the full screen and display other information on them. You can also change the presentation of the collection of photos, define photos as background images, transfer them via Bluetooth, rename, delete or sort them.
Resetting the camera
You can reset the camera settings to their default factory settings.
1 Navigate to Options → Restore default.
2 Confirm the prompt. The camera settings are restored to their default factory values.
Use
You can also use the mobile phone as a radio and camera when underway.
Image settings
Define the settings for image size and image quality.
1 Select Options → Image settings. Adjust and define the settings as required.
Camera settings
Define the settings for shutter time, exposure value, contrast, self-timer and serial exposure.
1 Select Options → Camera settings. Adjust and define the settings as required.
Radio
The mobile phone is equipped with an integrated radio with which you can receive radio stations in the FM frequency range.
The radio only works when the headphone is connected. The headphone serves as the antenna.
1 Connect the headphones (not contained in the scope of delivery) to the head-phone connection port on your mobile phone.
2 Press the left-hand softkey to open the main menu.
3 Navigate to Multimedia → FM radio.
Searching for and storing radio stations manually
Enter the transmission frequency manually to access a radio station directly.
1 Press the left-hand softkey to open the main menu.
2 Navigate to Multimedia → FM radio → Options → Manual input.
3 Enter the transmission frequency of the radio station.
4 Select Save. You will hear the manually entered radio station.
Save your radio stations in the channel list.
1 Press the left-hand softkey to open the main menu.
2 Navigate to Multimedia → FM radio → Options → Channel list.
3 Select a memory location which is empty.
4 Select Edit.
5 Enter the name of a channel and the transmission frequency of the channel.
6 Select Save. The radio station is saved in the channel list.
Searching for and storing radio stations automatically
The mobile phone can search for all the locally available radio stations over the entire frequency band automatically and save those found in the channel list.
1 Press the left-hand softkey to open the main menu.
2 Navigate to Multimedia → FM radio → Options → Auto search.
3 Confirm the prompt. All the locally available radio stations are saved in the channel list.
4 Change the channel names in the channel list, if necessary.
Volume control
You can increase or reduce the volume of the radio station being played to various levels.
1 Press the Star or Hash key. The volume is raised or lowered.
A change in the volume level affects the volume being played on both the loudspeaker and the headset.

CAUTION! Exposure to the receiver earpiece at full volume for a long period could cause ear damage. Do not hold the mobile phone directly on the ear when listening to the radio via the loudspeaker.
More settings for the radio
Make any necessary adjustments to the background playback of the radio and the telephone loudspeaker.
Background playback
Define whether the radio should remain on in the background (meaning that the radio continues to be played although the FM radio menu is no longer selected and the mobile phone has been closed).
1 Press the left-hand softkey to open the main menu.
2 Navigate to Multimedia → FM radio → Options → Settings → Background play. Change the status with the Star or Hash key.
3 Select Save. The setting is saved.
Loudspeaker
You can set the radio up so that it can be played via the telephone loudspeaker as well as the headset.
1 Press the left-hand softkey to open the main menu.
2 Navigate to Multimedia → FM radio → Options → Settings → Loudspeaker.
Change the status with the Star or Hash key.

CAUTION! Exposure to the receiver earpiece at full volume for a long period could cause ear damage. Do not hold the mobile phone directly on the ear when listening to the radio via the loudspeaker.
3 Select Save. The setting is saved.
The radio only works when the headphone is connected. The headset must also be connected in order to play the radio via the mobile phone loudspeaker.
File Manager
The file manager enables you to manage the memory of the mobile phone and memory of a microSD card if inserted.
1 Press the left-hand softkey to open the main menu.
2 Navigate to File manager.
3 You can manage the files according to your needs.
User Profiles
A user profile compiles diverse settings, such as ringing tone, ringing volume, vibration alert, text message tones, volume, switching on/off tones and other acoustic signals, together in a personalised menu.
You have the option of choosing a preinstalled user profile and/or adapting it to suit your own needs.
We recommend that you use the General user profile if you want to complete personal adjustments.
Activating the User Profile
1 Press the left-hand softkey to open the main menu.
2 Navigate to Profiles.
3 Select the user profile required.
4 Select Options → Activate. The user profile selected is activated.
Adapting the User Profile
Adapt your user profile according to your needs. You can customise all user profiles. However, we recommend entering your personalised settings in the General user profile.
1 Navigate to Profiles.
2 Select the user profile required.
3 Select Options → Customize.
Setting the type of alert signal
You can define what type of alert signal you require from the mobile phone in the event of incoming calls and text messages.
1 Navigate to Alert type.
2 Select Options → Change.
3 Select the required setting and confirm it with Select.
Setting the ringing type
You can define whether the mobile phone should issue a single acoustic signal (single signal), a slowly increasingly loud signal (ascending) or if the set signal tone should be played repeatedly (repeat).
1 Navigate to Ring type.
2 Select Options → Change.
3 Select the required setting and confirm it with Select.
Setting the ringing tones
You can select your favourites from the different ringing tones available.
1 Navigate to Ringtone.
2 Select Options → Change.
3 Select the required setting and confirm it with Select.
Adjusting the volume
Adapt the volume of the incoming calls.
1 Navigate to Ringtone volume.
2 Select Options → Change.
3 Select the required setting and confirm it with Select.
Other Settings
Adapt the other settings for the various tones available in this menu (such as Message volume, Power on and Power off or System alert).
Caller Picture Dialling
Assign pictures to your favourite contacts. These pictures are displayed in the picture menu. On selecting a picture, the phone number of the contact assigned to the picture is dialled.
You can transfer your own pictures from a computer to the mobile phone or the memory card and set them up for picture dialling. To ensure optimal display quality of the pictures, only use photos with a resolution of 58 x 68 pixels. Otherwise, pictures could be blurred or not shown at all. Only pictures in ".jpeg" format can be displayed.
Use the practical image converter at www.olympia-vertrieb.de when you want to simply cut your pictures to the appropriate size.
Transferring Photos from Computer
1 Connect the mobile phone to a computer using the USB cable.
2 Select Mass storage.
3 Transfer the pictures required to the mobile phone.
Adding Contacts to Picture Selection
1 Press the right-hand softkey to open the Caller picture menu.
2 Press and hold the key of a storage location not yet assigned. An unused storage location can be recognised by the fact that the image appears as a grey silhouette.
3 Select Add.
4 Select the required phone book entry and confirm the prompt. The phone book entry is saved as a picture dialling contact.
Adding a Picture to the Caller Picture Contacts
You can use pictures which you have transferred from your computer onto the mobile phone for the caller picture contacts.
1 Press the right-hand softkey to open the Caller picture menu.
2 Press and hold the key to which the required caller picture contact is assigned.
3 Select Edit → Caller picture.
4 Select the required picture. The picture is added to the picture dialling contact selected and can be viewed in the Caller picture menu.
Dialling Via the Caller Picture Menu
You can call the phone book entry by selecting the corresponding picture. You can then see the person to be called on the screen before actually making the call.
1 Press the right-hand softkey to open the Caller picture menu.
2 Press the key assigned to the required picture dialling contact. The selected caller picture contact is dialled.
Other Settings
Sending text messages to caller picture contacts
1 Press the right-hand softkey to open the Caller picture menu.
2 Press and hold the key to which the required caller picture contact is assigned.
3 Select Send message.
4 Enter your text.
5 Select Send to.
6 Select the caller picture contact displayed.
7 Select Send. The text message is sent.
Editing a picture dialling contact
1 Press the right-hand softkey to open the Caller picture menu.
2 Press and hold the key to which the required caller picture contact is assigned.
3 Select Edit. Edit the name, number and picture of the selected caller picture contact.
4 Confirm with Select. The settings are saved.
Deleting a caller picture contact
1 Press the right-hand softkey to open the Caller picture menu.
2 Press and hold the key to which the required caller picture contact is assigned.
3 Select Clear. The caller picture contact is deleted.
Additional Functions
Key Lock
The key lock function is intended to prevent other functions being activated inadvertently. You can only activate the key lock when the start screen is on the mobile phone display.
1 Press and hold the navigation key up until the corresponding message appears on the display indicating that the keys on the mobile phone are locked against use.
2 Press and hold the navigation key up again to deactivate the mobile phone key lock.
Calls can be received and taken on the phone as normal even when the key lock is activated. Incoming calls and text messages are indicated by the respective ringing tone set and calls can be taken by pressing the Call key.
Torch
You can use the mobile phone as a torch. An LED is provided at the top of the mobile phone which can be switched on.
1 Slide the torch switch on the side of the mobile phone upwards. The LED on the top of the mobile phone lights up.
2 Slide the torch switch on the side of the mobile phone down. The LED on the top of the mobile phone goes out.
Other Important Information
Technical Data
Frequency Quad band
GSM 850, 900, 1800, 1900 MHz
Dimensions 104 x 53 x 18 [mm]
Weight 91 g incl. battery
Power supply Input: 100 - 240 V, 50 - 60 Hz, 400 mA
Output: 5 V, 500 mA
Battery 3.7 V, 600 mAh
Charging time Approx. 2 hours until fully charged
Standby Up to 120 hours
Max. talk time Up to 4 hours
Display 2.4" LCD with back-lighting
Permissible ambient -10 °C to 40 °C at
conditions 30% to 75% rel. humidity
Subject to change without notice!
Declaration of Conformity
CE Olympia Business Systems Vertriebs GmbH, Zum Kraftwerk 1, 45527 Hattingen hereby declares that this device fulfils the basic requirements and other relevant provisions stipulated in Directive 1999/5/EC.
The CE mark on the device confirms its conformity.
The Declaration of Conformity for this product, as well as other information, is available online at www.olympia-vertrieb.de.
Guarantee
Dear Customer,
we are pleased that you have chosen this equipment.
In the case of a defect, please return the device together with the receipt and original packing material to the point-of-sale.
Care Instructions
Clean the housing surfaces with a soft, fluff-free cloth. Do not use any solvents or cleaning agents.
Disposal
In order to dispose of your device, take it to a collection point provided by your local public waste authorities (e.g. recycling centre). According to laws on the disposal of electronic and electrical devices, owners are obliged to dispose of old electronic and electrical devices in a separate waste container.

The symbol indicates that the device must not be disposed of in normal domestic waste! Risks to health and the environment from batteries! Never open, damage or swallow batteries or allow them to pollute the environment. Batteries may contain toxic, ecologically hazardous
heavy metals. You are legally obliged to dispose of batteries and power packs at a battery retailer or in the corresponding containers provided at collection points by local public waste authorities. Disposal is free of charge. The symbol indicates that the batteries must not be disposed of in normal domestic waste and that they must be brought to collection points provided by local public waste authorities.

Packaging materials must be disposed of according to local regulations.
Frequently Asked Questions (FAQ)
In the event of a problem, use the information on the following pages first to try and identify it and implement the solutions proposed.
The mobile phone cannot be switched on.
There is no battery inserted or the battery is not sufficiently charged. Insert or charge the battery, whichever is necessary. Further information is provided in Section Putting the Mobile Phone into Operation on page 18.
When the battery charge drops below a minimum status, the mobile phone switches off automatically. Charge the battery in the mobile phone.
When I press the SOS key, the mobile phone's emergency call function does not react.
Create emergency call contacts in the Emergency Call Function (SOS Key) on page 73 and save the phone numbers which must be called by phone or notified by a text message in the event of an emergency.
The emergency call function of the mobile phone is completed by SIM card 1. Lay the SIM card in the compartment labelled SIM1.
A message, indicating the keys are locked against use, appears in the display.
The key lock function is activated; switch the key lock off. Further information is provided in Section Key Lock on page 102.
Neither the signal strength nor my mobile phone network are displayed on the start screen.
There is no network connection. Your mobile phone could be in a location without any network coverage. Move to a different location or contact your mobile phone provider (network operator).
Check that the SIM card is inserted correctly. Further information is provided in Section on page 18.
If you use the Dual SIM function offered by the mobile phone, the network availability and name of each mobile phone network used are displayed. Some mobile phone networks offer better coverage than others in different areas.
The keypad does not function or only reacts very slowly to my input.
The operating speed of the display is reduced in the case of low temperatures, for example. Use the mobile phone within the ambient conditions specified in the Technical Data. Further information is provided in Section Technical Data on page 103.
Restart your mobile phone, if necessary. Further information is provided in Section Switching the Mobile Phone On and Off on page 25.
In the case of some functions, a message appears indicating it cannot be executed.
Some services only function when you have enabled or activated the service. Please contact your mobile service provider for details.
The display of my mobile phone has "frozen" and the mobile phone does not react when keys are pressed.
Your mobile phone can occasionally crash. Remove the battery, wait 30 seconds, replace the battery in the phone and start it up again. Further information is provided in Section Switching the Mobile Phone On and Off on page 25.
The battery cannot be charged or is empty within a short time.
Charge the mobile phone for at least 2 hours. Please note that the battery only reaches its full capacity after several full charging processes.
If the problem continues, the battery may be defective and need to be changed. Please contact our service department regarding this.
My mobile phone does not ring, either for incoming calls or incoming text messages.
Check the user profile which is currently active. Adapt the ringing behaviour in the active user profile of the mobile phone to your needs. Further information is provided in Section User Profiles on page 94.
The camera on my mobile phone works but I cannot save any pictures.
Expand the memory of the mobile phone by inserting a microSD memory card. You can purchase a microSD memory card from specialist retailers. Further information is provided in Sections Camera on page 86 and Inserting the MicroSD Memory Card on page 20.
I want to execute a function. A message in the mobile phone display requests that I enter the phone lock password.
The default setting for the mobile phone's phone lock password is
1-1-2-2. Switch the prompt for the phone lock password on and off in the Settings
→ Security settings → Phone security → Phone lock menu.
If the solutions proposed above do not lead to the mobile phone working as I want, what should I do?
Refer to the FAQs in the Internet under www.olympia-vertrieb.de or contact our Service department.
Subject to change without prior notice.
Art. No. 2205 / Version 2016.07

- Mobile Phone in Detail 14
- Putting the Mobile Phone into Operation 18
- Using the Mobile Phone 29
- Mobile Phone Menu 34
- Settings 60
- Phone Settings 61
- Security Settings 65
- Dual SIM Settings 69
- Network Settings 70
- Bluetooth 71
- Emergency Call Function (SOS Key) 73
- Low Battery Power Alert 78
- Automatic Handsfree Function 80
- Restoring the Default Factory Settings 81
- Organiser 82
- Camera 86
- Radio 89
- File Manager 93
- User Profiles 94
- Caller Picture Dialling 98
- Additional Functions 102
- Other Important Information 103
- For Your Safety
- Observe Safety Instructions
- WARNING!
- CAUTION!
- IMPORTANT!
- Tips Concerning the Battery
- Intended Use
- Checking the Package Contents
- Mobile Phone in Detail
- Keys and Operating Elements
- Rear View and Side View
- Putting the Mobile Phone into Operation
- Inserting the SIM Cards
- Inserting the MicroSD Memory Card
- Inserting the Battery
- Charging the Battery
- Charging the Battery, Charging Adapter
- Charging the Battery, Charging Cradle
- Switching the Mobile Phone On and Off
- Other Icons on the Start Screen
- Using the Mobile Phone
- Navigating in the Menu
- Display Texts
- Using the Function Keys
- Entering Phone Numbers and Letters
- Multi-tap
- Punctuation and Special Characters
- Other Entries and Functions
- Making Calls
- Taking, Ending and Rejecting Calls
- Mobile Phone Menu
- Overview of the Most Important Menus
- Menu Options Available During a Call
- Volume During a Call
- Handsfree Function
- Muting the Microphone
- Putting a Call on Hold
- Conference Facility
- Call Lists
- Options for the Call Lists
- Making a call
- View
- Writing text messages
- Save in phone book
- Deleting entries
- Call Settings
- Transmitting your own caller ID
- Call waiting
- Call divert
- Auto redial
- Call time reminder
- Answer mode
- Phone Book
- Adding a contact
- Calling a contact
- Deleting a contact
- Editing a contact
- Phone Book Settings
- Preferred storage
- Memory status
- Speed Dialling
- Activating speed dialling
- Adding contacts for speed dialling
- Calling contacts using the speed dialling function
- Text Messages
- Viewing Text Messages
- Replying to Text Messages
- Calling the Sender of a Text Messages
- Forwarding Text Messages
- Deleting Text Messages
- Saving Phone Numbers in the Phone Book
- Saving a Text Message as a Draft
- Settings for Text Messages
- Delivery reports
- Settings
- Phone Settings
- Setting the Time and Date
- Setting the Language
- More Phone Settings
- Preferred input method
- Displaying the date and time
- Setting the back-lighting
- Switching on/off automatically
- Setting the background image (wallpaper)
- Security Settings
- Switching the PIN Request On/Off
- Changing the PIN
- Switching the Phone Lock On/Off
- Changing the Phone Lock Password
- Setting Up the Automatic Key Lock
- Dual SIM Settings
- Network Settings
- Bluetooth
- Switching Bluetooth On/Off
- Visibility
- Connecting Devices Via Bluetooth
- Changing Device Names
- Emergency Call Function (SOS Key)
- Switching the Emergency Call Function On/Off
- Setting Up a Call Chain
- Emergency Call Function Settings
- Defining the list of emergency call numbers
- Defining a text messages for the emergency call
- Selecting the SIM card for the emergency call function
- Defining a female contact person
- Defining a male contact person
- Low Battery Power Alert
- Switching the Charge Remind On/Off
- Settings for Low Battery Power Alert
- List of phone numbers
- Text Message for Low Battery Power Alert
- Automatic Handsfree Function
- Restoring the Default Factory Settings
- Organiser
- Calendar
- Jump to date
- Views
- Alarm Clock
- Switching the alarm clock on
- Setting the time
- Setting the ringing tone
- Setting the date
- Camera
- Image viewer
- Resetting the camera
- Use
- Image settings
- Camera settings
- Radio
- Searching for and storing radio stations manually
- Searching for and storing radio stations automatically
- Volume control
- More settings for the radio
- Background playback
- Loudspeaker
- File Manager
- User Profiles
- Activating the User Profile
- Adapting the User Profile
- Setting the type of alert signal
- Setting the ringing type
- Setting the ringing tones
- Adjusting the volume
- Other Settings
- Caller Picture Dialling
- Transferring Photos from Computer
- Adding Contacts to Picture Selection
- Adding a Picture to the Caller Picture Contacts
- Dialling Via the Caller Picture Menu
- Sending text messages to caller picture contacts
- Editing a picture dialling contact
- Deleting a caller picture contact
- Additional Functions
- Key Lock
- Torch
- Other Important Information
- Technical Data
- Declaration of Conformity
- Guarantee
- Care Instructions
- Disposal
- Frequently Asked Questions (FAQ)
- The mobile phone cannot be switched on.
- When I press the SOS key, the mobile phone's emergency call function does not react.
- The battery cannot be charged or is empty within a short time.
- My mobile phone does not ring, either for incoming calls or incoming text messages.
- The camera on my mobile phone works but I cannot save any pictures.
- I want to execute a function. A message in the mobile phone display requests that I enter the phone lock password.
Brand : OLYMPIA
Model : Joy Plus
Category : Mobile Phone