
TOUCH - Mobile Phone OLYMPIA - Free user manual and instructions
Find the device manual for free TOUCH OLYMPIA in PDF.

| Product type | Mobile phone |
| Brand | OLYMPIA |
| Model | TOUCH (Style Plus) |
| Frequency bands | GSM 850 / 900 / 1800 / 1900 MHz (Quadband) |
| Display | 2.4 inch LCD screen with backlight |
| Dual SIM | Yes, up to 2 SIM cards (Mini-SIM format) |
| Expandable memory | microSD card up to 8 GB |
| Camera | Built-in (requires microSD card) |
| FM radio | Yes (requires headphones) |
| Bluetooth | Yes, for wireless connection of accessories |
| Flashlight | Built-in LED with switch |
| SOS button | Emergency call function with alarm and SMS sending |
| Battery | Lithium-ion 3.7 V, 800 mAh |
| Standby time | Up to 120 hours |
| Talk time | Up to 4 hours |
| Charging time | Approximately 2 hours |
| Power supply | Mains adapter (input 100-240 V, 50/60 Hz, 0.3 A; output 5 V, 500 mA) or microUSB cable to PC |
| Dimensions | Approximately 97 x 50 x 17 mm |
| Weight | Approximately 90 g (with battery) |
| Connectors | microUSB (charging/data), 3.5 mm headphone jack |
| Operating temperature | -10 °C to 40 °C, humidity 30% to 75% |
| Cleaning | Soft, lint-free cloth; no solvents or detergents |
| Warranty | 24 months (keep the receipt) |
| Maintenance | Protect from moisture, dust, liquids, chemicals, heat, and direct sunlight. |
| Repairability | Do not open or repair yourself; contact customer service |
Frequently Asked Questions - TOUCH OLYMPIA
User questions about TOUCH OLYMPIA
0 question about this device. Answer the ones you know or ask your own.
Ask a new question about this device
Download the instructions for your Mobile Phone in PDF format for free! Find your manual TOUCH - OLYMPIA and take your electronic device back in hand. On this page are published all the documents necessary for the use of your device. TOUCH by OLYMPIA.
USER MANUAL TOUCH OLYMPIA
natural_image
Front view of a smartphone with a small display and a black arrow pointing to it (no text or symbols visible)
natural_image
Illustration of a handheld electronic device with a cable and connector (no text or symbols)natural_image
Illustration of a device with a cable and connector (no text or symbols visible)text_image
Icon showing a phone with 'OK' signal and a power button symbol, likely indicating status or notification.text_image
Icon showing a phone with 'OK' signal and a power button symbol, likely indicating an OK function or notification.text_image
Control panel icon with directional arrow and function labels including OK, OFF, and power symbolstext_image
Icon showing a green 'OK' button next to a gray interface with a black horizontal line and a magnified circle highlighting the zero.natural_image
Icon showing a minus sign over a phone with a red 'OK' button (no text or symbols)text_image
Icon showing a phone with 'OK' signal and a circular button labeled 'Power' symboltext_image
Icon showing a phone with 'OK' signal and a power button, likely indicating status or notification.text_image
Icon showing a green 'OK' signal next to a gray device with white lines and a black horizontal bar, alongside a magnified circle.natural_image
Simple line drawing of a flashlight inside a circle (no text or symbols)natural_image
Pure mechanical component diagram without any text, numbers, or symbolsnatural_image
Simple circular diagram with two concentric circles and a central vertical line, no text or symbols present.natural_image
Symbol of a trash bin with crossed lines and a blank bottom bar (no text or labels)Safety Instructions ....32
General View 36
First Steps 38
Package Contents....38
Operating the Mobile Phone....45
SOS Key (Emergency Call Function).....52
Technical Properties 55
Disposal ....56
Guarantee....57
Care Instructions....57
Declaration of Conformity .....58
Safety Instructions
Avoid any personal injury by paying attention to the following information!

WARNING! Risk of electric shock! Never attempt to open and repair the mobile phone or accessories yourself. Never touch bare contacts with metallic objects. Never plug-in or unplug the charging adapter when your hands are wet.

WARNING! Risk of suffocation! Keep out of reach of children! Keep packaging materials and protective foils as well as batteries out of reach of children. Keep the mobile phone and any accessories out of reach of children. Small children can swallow small parts or batteries. If a battery is swallowed, contact medical assistance immediately.

CAUTION! Risk of explosion through improper replacement or removal of the battery! Only replace the battery by a type approved by the manufacturer and dispose of the battery according to the applicable laws.

CAUTION! Do not remove the battery while the mobile phone is being charged. This could damage the phone. Disconnect the charging cable from the mobile phone before changing or removing the battery.

CAUTION! Risk of injury to the retina. The LED for the torch is very bright and could cause damage to eyes. Never look directly into the LED torch beam when the torch is switched on.

CAUTION! Reduce exposure to radio waves! Use an appropriate headset in the case of longer calls. Do not keep the mobile phone near your head.

CAUTION! The ringing tone is issued via the loudspeaker.
Take an incoming call first and then hold the mobile phone to your ear. This prevents any possible hearing damage.

IMPORTANT! Do not use the phone in prohibited areas! Prohibited areas could include hospitals, petrol stations, aeroplanes, etc. Please observe local regulations!

IMPORTANT! With regard to emergencies, do not rely on the mobile phone alone! For technical reasons, it is not possible to guarantee a reliable connection in every situation.

IMPORTANT! Protect the device from moisture, dust, liquids, chemicals, vapours, heat and direct sunlight. The phone is not waterproof; therefore, keep it dry.

IMPORTANT! Only use original accessories. Only connect accessories approved by the manufacturer. Telephoning while driving is only permitted when the applicable legal regulations are observed.
Intended Use
This mobile phone is designed for use within a mobile phone network. Any other use is considered unintended use. Unauthorised modification or reconstruction is not permitted. Under no circumstances open the device or complete any repair work yourself.
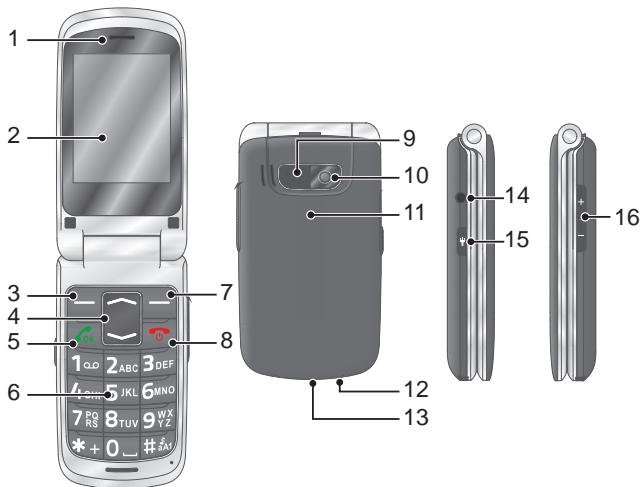
General View
The following illustration shows details of the mobile phone. Familiarise yourself with all the operating elements before starting to use the mobile phone.
1 Loudspeaker 9 SOS key (emergency call function)
2 Display 10 Camera
3 Softkey, left 11 Battery compartment cover
4 Navigation key 12 Torch lamp (LED)
5 Call key 13 MicroUSB connection port
6 Keypad 14 Headphone connection port
7 Softkey, right 15 Torch switch
8 On-hook key 16 Volume buttons
text_image
1 2 3 4 5 6 7 8 9 10 11 12 13 14 15 16 17 18 19 20 21 22 23 24 25 26 27 28 29 30 31 32 33 34 35 36 37 38 39 40 41 42 43 44 45 46 47 48 49 50 51 52 53 54 55 56 57 58 59 60 61 62 63 64 65 66 67 68 69 70 71 72 73 74 75 76 77 78 79 80First Steps

Read the instruction manual carefully and proceed as described. This will enable you to use all the functions to your full satisfaction.
Package Contents
Before starting up the mobile phone, check the package contents. If anything is missing or damaged, please contact our Service department.
| Style Plus mobile phone | Charging cradle |
| Battery | USB connection cable |
| Charging adapter | Quick reference manual |
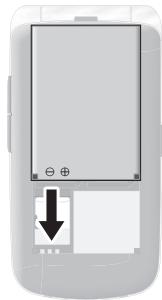
Inserting the SIM Card
Before you can start to use the mobile phone, you must insert your SIM card (not included in the equipment supplied) in the phone. Only use SIM cards of the size illustrated (mini SIM). Micro or nano cards which have already been broken out can cause contact problems or malfunctions. If you want to use a micro or nano SIM card, you will need an appropriate adapter.
natural_image
Close-up of a smartphone's front panel showing a battery with a black arrow pointing to its side panel (no text or symbols visible)1 Remove the battery compartment cover.
Use the recess at the bottom of the battery compartment cover.
2 Insert the SIM card in the slot labelled SIM 1.
Ensure the SIM card is aligned correctly.
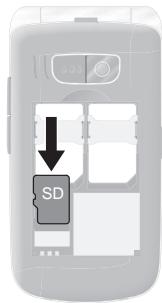
Inserting the MicroSD Memory Card
If you want to increase the memory capacity of the mobile phone, you can insert a microSD memory card (not included in the equipment supplied) with a memory of up to 8 GB in the mobile phone. A microSD memory card is necessary, for instance, when you want to use the camera.
1 Lay the microSD memory card with the contacts facing down in the compartment, as illustrated. Ensure the microSD memory card is aligned correctly.
text_image
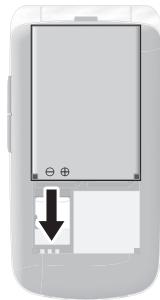
SDInserting the Battery
Before you can use the mobile phone, you must insert the battery supplied in the mobile phone.
1 Insert the battery as illustrated. Pay attention the battery is aligned correctly.
2 Replace the battery compartment cover. The battery compartment cover latches audibly into place.
natural_image
Front view of a smartphone with a small display and a black arrow pointing to it (no text or symbols visible)
CAUTION! Do not remove the battery
while the mobile phone is being charged. Disconnect the charging cable from the mobile phone before changing or removing the battery.
Charging the Battery
1 Connect the power adapter plug on the charging adapter to a properly installed power socket.
2 Connect the microUSB plug to the microUSB connection port on the mobile phone. The microUSB plug is protected against reverse polarity.

CAUTION! Do not remove the battery while the mobile phone is being charged. Disconnect the charging cable from the mobile phone before changing or removing the battery.
3 When the phone battery is fully charged, disconnect the connection to the power supply. This reduces power consumption.
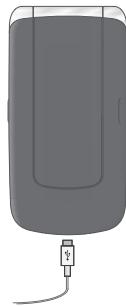
natural_image
Illustration of a handheld electronic device with a cable and connector (no text or symbols)Charging the Battery, Charging Cradle
1 Connect the power adapter plug on the charging adapter to a properly installed power socket.
2 Connect the microUSB plug to the microUSB connection port on the charging cradle. The microUSB plug is protected against reverse polarity.
3 Place the mobile phone in the charging cradle.

CAUTION! Do not remove the battery while the mobile phone is being charged. Disconnect the charging cable from the mobile phone before changing or removing the battery.
4 When the phone battery is fully charged, disconnect the connection to the power supply. This reduces power consumption.
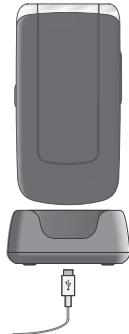
natural_image
Illustration of a device with a plug inserted into a housing (no text or symbols visible)Switching On the Mobile Phone
Press the On-hook key for 3 seconds. The mobile phone is switched on. The start screen appears in the display after a short time.

text_image
Icon showing a phone with 'OK' and a power button symbol, likely indicating status or notification.Switching Off the Mobile Phone
Press the On-hook key for 3 seconds. The mobile phone is switched off. The display goes out.

text_image
Icon showing a phone with 'OK' signal and a power button symbol, likely indicating status or notification.When the mobile phone is switched off, you cannot use the emergency call function (via the SOS key on the mobile phone).
Operating the Mobile Phone
Use the following keys to navigate through the menus provided by the mobile phone. Some keys are assigned two functions depending on the menu. Further information is available online in the detailed operating manual at www.olympia-vertrieb.de

text_image
Control panel interface with bidirectional arrow icon and OK/OK/OK buttonsNavigate up or down in the menu. When the start screen is displayed: Open the phone book or start the camera.

text_image
Icon showing a green 'OK' button next to a gray device with white lines and a black horizontal line, alongside a magnified circle.Discard the settings or navigate one menu level back. On the start screen: Open the Caller Picture menu.

natural_image
Gray rectangular object with a white circular overlay and a black horizontal line, next to a stylized road or vehicle (no text or symbols visible)Open a submenu or confirm your entries.
When you want to take, end or reject calls, use the following keys:

text_image
OKTake an incoming call or begin a conversation.

text_image
Icon showing a phone with 'OK' and a circular button labeled 'Power' indicating function or operation.End a call in progress.

text_image
Icon showing a phone with 'OK' signal and a circular button labeled 'Power' symbolReject an incoming call.
When you want to enter phone numbers and digits or delete entries, use the following keys:

text_image
OKDelete entries.

text_image
2ABC GHI 5JKL 6 RQ 8TUVEnter digits and letters.
The operating elements on the sides or rear of the phone are assigned the following functions:

text_image
SOSTrigger an emergency call to the stored phone numbers.

natural_image
Pure electrical circuit lines without any symbolsSwitch the torch integrated in the phone on and off.

natural_image
Pure mechanical component diagram without any text, numbers, or symbolsCharge the mobile phone battery or establish a connection to a computer.

natural_image
Simple circular diagram with a central vertical line and two concentric circles, no text or symbols present.Connect the head- phones, e.g. to listen to the radio or use the phone while driving a car.
Overview of the Most Important Functions
Framed texts are provided in the following operating steps. These frames indicate texts which can appear in the display of the mobile phone.
Setting the Language
1 Press the left-hand softkey to open the main menu.
2 Navigate to the Settings Phone settings Language menu option.
3 Select the required language.
Setting the Time and Date
1 Press the left-hand softkey to open the main menu.
2 Navigate to the Settings Phone settings Time and date Set time/date menu option.
3 Enter the current time and date.
4 Select Save to activate the setting.
Adding a Contact to the Phone Book
You can store up to 300 contacts in the phone book.
1 Press the left-hand softkey to open the main menu.
2 Navigate to the Phonebook Add new contact Select menu option.
3 Select a storage location (To SIM or To phone).
4 Enter the name and phone number.
5 Press the left-hand softkey and select Save.
Dialling Contacts from the Phone Book
1 Press the left-hand softkey to open the main menu.
2 Navigate to the Phonebook menu option.
3 Select the required contact.
4 Press the Call key. The number is dialled.
Dialling Caller Picture Contacts
You can assign a picture to each of your eight favourite contacts.
These pictures are displayed in the Caller Picture menu. On selecting a picture, the phone number of the contact assigned to the picture is dialled. Further information is available online in the detailed operating manual at www.olympia-vertrieb.de.
Adding Contacts to the Caller Picture Menu
1 Press the right-hand softkey to open the Caller Picture menu.
2 Select the entry you require and confirm it by answering the prompt with Yes.
3 Select a contact from the phone book and confirm your settings by selecting OK.
Dialling Via the Caller Picture Menu
1 Press the right-hand softkey to open the Caller Picture menu.
2 Select the required picture contact.
3 Press the left-hand softkey and select Call.
Adding a Picture to the Caller Picture Contacts
When you want to assign a picture to a contact, you can either use the camera integrated in the mobile phone or transfer a picture stored on your computer to the mobile phone. In this case, you need a microSD memory card.
1 Press the right-hand softkey to open the Caller Picture menu.
2 Select the required picture contact.
3 Press the left-hand softkey and select Set picture.
4 Use the File Manager to assign a picture or take a photo with the camera integrated in the mobile phone.
5 Press the left-hand softkey and confirm your settings by selecting OK.
SOS Key (Emergency Call Function)
You can initiate an emergency call by using the SOS key on the rear of the mobile phone. An alarm signal is issued first of all. Then the SOS text message is sent to the phone numbers saved for this purpose. After that, the respective phone numbers stored are dialled in succession in Handsfree mode. You can store up to 5 phone numbers which can be assigned to the emergency call function. Further information on the SOS function is available online in the detailed operating manual at www.olympia-vertrieb.de.
Activating the Emergency Call Function
1 Press the left-hand softkey to open the main menu.
2 Navigate to the Settings SOS settings Switch menu option.
3 Press the left-hand softkey and select Activate.
Adding a Phone Number to the SOS Function
1 Press the left-hand softkey to open the main menu.
2 Navigate to the Settings SOS settings Switch menu option.

Do not assign any official emergency call service numbers. A false alarm can lead to considerable costs which could be charged to you.
3 Select a free storage location and enter the required phone number or select a contact from the phone book.
4 Press the left-hand softkey and confirm your settings by selecting OK.
Bluetooth
The Bluetooth function, a standard for data transfer via wireless communication systems, can be used to connect a compatible headphone to the mobile phone without the need for any cables.
Activating Bluetooth
Switch the Bluetooth function on when you want to connect compatible devices to your mobile phone.
1 Press the left-hand softkey to open the main menu.
2 Navigate to the Settings Bluetooth Power menu option.
3 Press the left-hand softkey and switch the Bluetooth function On.
Further information on the Bluetooth function is available online in the detailed operating manual at www.olympia-vertrieb.de
Technical Properties
| Frequency band | GSM 850 / 900 / 1800 / 1900 MHz quad band |
| Power supply | Input: 100 - 240 V, 50 - 60 Hz, 0.3 A,Output: 5 V, 500 mA |
| Battery | 3.7 V, 800 mAh, up to 120 h standby, up to 4 h talk time, max. charging time approx. 2 h |
| Display | 2.4" LCD with back-lighting |
| Dimensions | Approx. 97 x 50 x 17 mm |
| Weight | Approx. 90 g incl. battery |
| Ambient conditions | -10 °C to 40 °C at 30% to 75% humidity |
| Connections | MicroUSB, 3.5 mm jack socket |
| Dual SIM | Yes, max. 2 SIM cards |
| Extras | Radio, camera, Bluetooth |
Disposal

natural_image
Symbol of a trash bin with crossed lines and a blank bottom bar (no text or labels)In order to dispose of your device, take it to a collection point provided by your local public waste authorities (e.g. recycling centre). According to laws on the disposal of electronic and electrical devices, owners are obliged to dispose of old electronic and electrical devices in a separate waste container. The symbol indicates that the device must not be disposed of in normal domestic waste! Risk to health and the environment through batteries! Never open, damage or swallow batteries or allow them to pollute the environment. Batteries may contain toxic, ecologically hazardous heavy metals. You are legally obliged to dispose of batteries and power packs at a battery retailer or in the corresponding containers provided at collection points by local public waste authorities. Disposal is free of charge.

Packaging materials must be disposed of according to local regulations.
Guarantee
Dear Customer,
we are pleased that you have chosen this equipment.
In the case of a defect, please return the device together with the receipt and original packing material to the point-of-sale.
Care Instructions
Clean the housing surfaces with a soft, fluff-free cloth. Do not use any solvents or cleaning agents.
Declaration of Conformity
Olympia Business Systems Vertriebs GmbH, Zum Kraftwerk 1, 45527 Hattingen hereby declares that this device in fulfils the basic requirements and other relevant provisions stipulated in the Directive 1999/5/EC.
CE The CE mark on the devices confirm their conformity. The Declaration of Conformity for this product is available at www.olympia-vertrieb.de