
NeoTouch P300 - Mobile Phone ACER - Free user manual and instructions
Find the device manual for free NeoTouch P300 ACER in PDF.


| Product Type | Smartphone |
| Brand | Acer |
| Model | NeoTouch P300 |
| Operating System | Windows Mobile 6.5 Professional |
| Processor | Qualcomm MSM7225, 528 MHz |
| Memory | 512 MB ROM, 256 MB RAM |
| Display | 3.2-inch TFT LCD touchscreen, 400 x 240 pixels, 65K colors |
| Camera | 3.2 MP autofocus |
| Connectivity | Bluetooth 2.0+EDR, Wi-Fi 802.11 b/g, GSM/UMTS/HSDPA/EDGE/GPRS |
| Dimensions | 110 x 55 x 15.1 mm |
| Weight | 130.6 g (with battery and stylus) |
| Battery | Rechargeable 970 mAh Lithium Polymer (replaceable) |
| Input Methods | QWERTY keyboard, onscreen keyboard, stylus |
| Storage Expansion | microSD card slot (SDHC compatible) |
| GPS | Built-in GPS with AGPS support |
| Multimedia | Audio: WMA, MP3, WAV, AAC, AMR; Video: 3GP, MPEG-4, WMV, H.263, H.264 |
| Battery Charging | Via micro USB (AC adapter included); first charge: 8 hours |
| Maintenance | Clean with soft damp cloth; avoid liquids and extreme temperatures |
| Safety | SAR (head): 0.435 W/kg, SAR (body): 0.697 W/kg (FCC); EU SAR limit: 2.0 W/kg |
| Spare Parts / Repairability | Battery and stylus replaceable; consult Acer support for other parts |
| Additional Features | FM radio, Acer Sync, Spinlets, streaming media |
Frequently Asked Questions - NeoTouch P300 ACER
User questions about NeoTouch P300 ACER
0 question about this device. Answer the ones you know or ask your own.
Ask a new question about this device
Download the instructions for your Mobile Phone in PDF format for free! Find your manual NeoTouch P300 - ACER and take your electronic device back in hand. On this page are published all the documents necessary for the use of your device. NeoTouch P300 by ACER.
USER MANUAL NeoTouch P300 ACER
Acer P300 User Guide
© 2010 All Rights Reserved
Acer P300 Smartphone User Guide
First issue: 01/2010
Acer P300 Smartphone
Model number: ____
Serial number: ____
Date of purchase: ____
Place of purchase: ____
End User Licence Agreement
IMPORTANT-READ CAREFULLY: THIS END USER LICENSE AGREEMENT ("AGREEMENT") IS A LEGAL AGREEMENT BETWEEN YOU (EITHER AN INDIVIDUAL OR A SINGLE ENTITY), AND ACER INC. INCLUDING ITS SUBSIDIARIES ("ACER") FOR THE SOFTWARE (WHETHER PROVIDED BY ACER OR BY ACER'S LICENSORS OR SUPPLIERS) THAT ACCOMPANIES THIS AGREEMENT, INCLUDING ANY ASSOCIATED MEDIA, PRINTED MATERIALS AND RELATED USER ELECTRONIC DOCUMENTATION WHICH MAY BE BRANDED "ACER" ("SOFTWARE"). AGREEMENTS RELATING TO ANY OTHER PRODUCT OR TOPIC ARE NEITHER INTENDED NOR SHOULD THEY BE IMPLIED. BY INSTALLING THE ACCOMPANYING SOFTWARE OR ANY PORTION THEREOF, YOU AGREE TO BE BOUND BY THE TERMS AND CONDITIONS OF THIS AGREEMENT. IF YOU DO NOT AGREE TO ALL OF THE TERMS AND CONDITIONS OF THIS AGREEMENT, DO NOT CONTINUE THE INSTALLATION PROCESS AND IMMEDIATELY DELETE ALL INSTALLED FILES, IF ANY, OF THE ACCOMPANYING SOFTWARE FROM YOUR PHONE.
IF YOU DO NOT HAVE A VALIDLY-LICENSED COPY OF THE APPLICABLE SOFTWARE, YOU ARE NOT AUTHORIZED TO INSTALL, COPY OR OTHERWISE USE THE SOFTWARE, AND HAVE NO RIGHTS UNDER THIS AGREEMENT.
The Software is protected by U.S. and international copyright laws and conventions as well as other intellectual property laws and treaties. The Software is licensed, not sold.
GRANT OF LICENSE
Acer grants to you the following non-exclusive and non-transferable rights with respect to the Software. Under this Agreement, you may:
- Install and use the Software only on a single designated phone. A separate license is required for each phone on which the Software will be used;
- Make one copy of the Software solely for backup or archival purposes;
- Make one hardcopy of any electronic documents included in the Software, provided that you receive the documents electronically.
RESTRICTIONS
You may NOT:
- Use or copy the Software except as provided in this Agreement;
- Rent or lease the Software to any third party;
- Modify, adapt, or translate the Software in whole or in part;
- Reverse engineer, decompile, or disassemble the Software or create derivative works based upon the Software;
- Merge the Software with any other program or modify the Software, except for your personal use; and
- Sublicense or otherwise make the Software available to third parties, except that you may, after prior written notification to Acer, transfer the Software as a whole to a third party so long as you do not retain any copies of the Software and such third party accepts the terms of this Agreement.
-
Transfer your rights under this Agreement to any third parties.
-
Export the Software in contravention of applicable export laws and regulations, or (i) sell, export, re-export, transfer, divert, disclose technical data, or dispose of, any Software to any prohibited person, entity, or destination including, without limitation, Cuba, Iran, North Korea, Sudan and Syria; or (ii) use any Software for any use prohibited by the laws or regulations of the United States.
SUPPORT SERVICES
Acer is not obligated to provide technical or other support for the Software.
ACER LIVE UPDATE
Certain of the software contains elements that enable the use of the Acer Live Update service, which allows for updates for such software to be automatically downloaded and installed on your phone. By installing the software, you hereby agree and consent that Acer (or its licensors) may automatically check the version of such software that you are using on your phone and may provide upgrades to such software that may be automatically downloaded on to your phone.
OWNERSHIP AND COPYRIGHT
Title, ownership rights and intellectual property rights in and to the Software and all copies thereof shall remain with Acer or Acer's licensors or suppliers (as applicable). You do not have or shall not gain any proprietary interest in the Software (including any modifications or copies made by or for you) or any related intellectual property rights. Title and related rights in the content accessed through the Software is the property of the applicable content owner and may be protected by applicable law. This license gives you no rights to such contents. You hereby agree
- Not to remove any copyright or other proprietary notices from the Software;
- To reproduce all such notices on any authorized copies you make; and
- To use best efforts to prevent any unauthorized copying of the Software.
TRADEMARKS
This Agreement does not grant to you any rights in connection with any trademarks or service marks of Acer or of Acer's licensors or suppliers.
DISCLAIMER OF WARRANTIES
TO THE MAXIMUM EXTENT PERMITTED BY APPLICABLE LAW, ACER, ITS SUPPLIERS, AND ITS LICENSORS, PROVIDE THE SOFTWARE "AS IS" AND WITH ALL FAULTS, AND HEREBY DISCLAIM ALL OTHER WARRANTIES AND CONDITIONS, EITHER EXPRESS, IMPLIED OR STATUTORY, INCLUDING, BUT NOT LIMITED TO, ANY IMPLIED WARRANTIES, DUTIES OR CONDITIONS OF MERCHANTABILITY, OF FITNESS FOR A PARTICULAR PURPOSE, OF ACCURACY OR COMPLETENESS OF RESPONSES, OF RESULTS, OF WORKMANLIKE EFFORT, OF LACK OF VIRUSES, AND OF LACK OF NEGLIGENCE, ALL WITH REGARD TO THE SOFTWARE AND THE PROVISION OF OR FAILURE TO PROVIDE SUPPORT SERVICES. ALSO, THERE IS NO WARRANTY OR CONDITION OF TITLE, QUIET ENJOYMENT, QUIET POSSESSION, CORRESPONDENCE TO DESCRIPTION OR NON-INFRINGEMENT WITH REGARD TO THE SOFTWARE.
EXCLUSION OF INCIDENTAL, CONSEQUENTIAL AND CERTAIN OTHER DAMAGES
TO THE MAXIMUM EXTENT PERMITTED BY APPLICABLE LAW, IN NO EVENT SHALL ACER, ACER'S SUPPLIERS, OR ACER'S LICENSORS, BE LIABLE FOR ANY SPECIAL, INCIDENTAL, INDIRECT, PUNITIVE, OR CONSEQUENTIAL DAMAGES WHATSOEVER (INCLUDING, BUT NOT LIMITED TO, DAMAGES FOR LOSS OF PROFITS OR CONFIDENTIAL OR OTHER INFORMATION, FOR BUSINESS INTERRUPTION, FOR PERSONAL INJURY, FOR LOSS OF PRIVACY, FOR FAILURE TO MEET ANY DUTY INCLUDING OF GOOD FAITH OR OF REASONABLE CARE, FOR NEGLIGENCE, AND FOR ANY OTHER PECUNIARY OR OTHER LOSS WHATSOEVER) ARISING OUT OF OR IN ANY WAY RELATED TO THE USE OF OR INABILITY TO USE THE SOFTWARE, THE PROVISION OF OR FAILURE TO PROVIDE SUPPORT SERVICES, OR OTHERWISE UNDER OR IN CONNECTION WITH ANY PROVISION OF THIS AGREEMENT, EVEN IN THE EVENT OF THE FAULT, TORT (INCLUDING NEGLIGENCE), STRICT LIABILITY, BREACH OF CONTRACT OR BREACH OF WARRANTY OF ACER OR ITS SUPPLIERS OR LICENSORS, AND EVEN IF ACER AND ITS SUPPLIERS AND LICENSORS HAVE BEEN ADVISED OF THE POSSIBILITY OF SUCH DAMAGES.
LIMITATION OF LIABILITY AND REMEDIES
NOTWITHSTANDING ANY DAMAGES THAT YOU MIGHT INCUR FOR ANY REASON WHATSOEVER (INCLUDING, WITHOUT LIMITATION, ALL DAMAGES REFERENCED ABOVE AND ALL DIRECT OR GENERAL DAMAGES), THE ENTIRE LIABILITY OF ACER, ITS SUPPLIERS, AND ITS LICENSORS, UNDER ANY PROVISION OF THIS AGREEMENT, AND YOUR EXCLUSIVE REMEDY FOR ALL OF THE FOREGOING, SHALL BE LIMITED TO THE AGGREGATE AMOUNT PAID BY YOU FOR THE SOFTWARE. THE FOREGOING LIMITATIONS, EXCLUSIONS AND DISCLAIMERS (INCLUDING DISCLAIMER OF WARRANTIES AND EXCLUSION OF INCIDENTAL, CONSEQUENTIAL AND CERTAIN OTHER DAMAGES ABOVE) SHALL APPLY TO THE MAXIMUM EXTENT PERMITTED BY APPLICABLE LAW, EVEN IF ANY REMEDY FAILS ITS ESSENTIAL PURPOSE; PROVIDED, HOWEVER, THAT BECAUSE SOME JURISDICTIONS DO NOT ALLOW THE EXCLUSION OR LIMITATION OR LIABILITY FOR CONSEQUENTIAL OR INCIDENTAL DAMAGES, THE ABOVE LIMITATION MAY NOT APPLY TO YOU.
TERMINATION
Without prejudice to any other rights, Acer may immediately terminate this Agreement without notice if you fail to comply with any terms and conditions of this Agreement.
In such event, you must:
- Cease all use of the Software;
- Destroy or return to Acer the original and all copies of the Software; and
- Delete the Software from all phones on which it was resident.
All disclaimers of warranties and limitation of liability set forth in this Agreement shall survive termination of this Agreement.
GENERAL
This Agreement represents the complete agreement between you and Acer relating to this license for the Software and supersedes all prior agreements, communications, proposals and representations between the parties and prevails over any conflicting or additional terms of any quote, order, acknowledgement or similar communication.
This Agreement may only be modified by a written document signed by both parties.
If any provision of this Agreement is held by a court of competent jurisdiction to be contrary to law that provision will be enforced to the maximum extent permissible and the remaining provisions of this Agreement will remain in full force and effect.
ADDITIONAL PROVISIONS APPLICABLE TO THIRD PARTY SOFTWARE AND SERVICES
Software provided hereunder by Acer's licensors or suppliers ("Third Party Software") is made available to you for your personal, non-commercial use only. You may not use the Third Party Software in any manner that could damage, disable, overburden, or impair the services provided by Acer's licensors or suppliers hereunder ("Third Party Services"). Furthermore, you may not use the Third Party Software in any manner that could interfere with any other party's use and enjoyment of the Third Party Services, or the services and products of Acer's licensors' or suppliers' third party licensors. Your use of the Third Party Software and Third Party Services is also subject to additional terms and conditions and policies which can be accessed through our global website.
Privacy policy
During registration you will be asked to submit some information to Acer. Please refer to Acer's privacy policy at www.acer.com or your local Acer website.
Table of Contents
End User Licence Agreement
Getting to know your smartphone
Features and functions 7
Other sources of help 8
Product registration 9
Chapter 1: Setting Up
Unpacking your smartphone 10
Getting to know your smartphone 11
Installing or removing the battery 13
Installing a SIM or microSD Card 14
Chapter 2: Using Your Smartphone
Turning on for the first time 16
Chapter 3: Making Calls
Before making a call 18
Making a call 18
The onscreen number pad 19
The voice call screen 21
Onscreen call options 21
Chapter 4: Input Devices
The stylus 25
The onscreen keyboard 25
The QWERTY keyboard 26
Chapter 5: Messaging
The messaging screen 27
Text (SMS) messages 28
MMS messages 29
E-mail 32
Chapter 6: Using the Camera
Camera icons and indicators 33
Taking a photo 34
Shooting a video 35
Photo and video options 35
Chapter 7: Advanced Settings
Putting your smartphone in flight mode ..... 37
Comm. Manager 38
Adjusting connection settings 38
Phone settings 41
Managing your phonebook 43
Connecting to a PC and installing software ..... 46
Acer Sync 47
Other functions 51
Multimedia playback 53
Satellite Data Update 58
Personalizing your smartphone 59
Updating your smartphone 64
Setting a schedule 65
Resetting your smartphone 65
Chapter 8: Accessories and Tips
Using the headset 67
Using a Bluetooth headset 67
Using your smartphone as a modem 68
Inserting a microSD Card 70
Appendix
FAQ, troubleshooting and error messages ..... 71
Specifications 73
Warnings and precautions 75
Emergency calls 81
Disposal and recycling information 82
Taking care of your smartphone 83
Safety regulations 84
Getting to know your smartphone
Features and functions
Your new smartphone is a multi-functional tool packed with intuitive features and powerful applications that make organizing your information and synchronizing it with your personal activities an easy, efficient task. Your smartphone lets you:
- Access your email while on the move.
- Make voice calls when connected to a 3G/EDGE/GPRS/GSM/HSDPA/UMTS network.
- Connect wirelessly to your local cellular network to access the Internet and other network features.
- Exchange information between devices that have Bluetooth capabilities.
- Easily manage your contacts and social networking interaction.
- Read PDF files on your smartphone.
Product features
• Qualcomm MSM 7225 528 MHz processor
• 512 MB of ROM, 256 MB of RAM
- 3.2" 400 x 240-pixel TFT LCD touchscreen
- microSD Card slot with SDHC support
- High-density, rechargeable 970 mAh Lithium Polymer battery (replaceable)
• Windows Mobile 6.5 Professional
- Easy-to-use Acer features: Phonebook, Phone Dialer with Favorites and Call History, Social Networking, Notification Manager, and Preferences.
Other sources of help
To help you use your smartphone, we have designed a set of guides:
For information on: Refer to:
Programs on your smartphone and additional programs that can be installed on your smartphone
This User Guide. Included on the smartphone Companion CD, it provides online reference for using your smartphone.
Up-to-date information regarding your smartphone
www.acer.com/
Service enquiries www.acer.com/support/
Accessing the help menus
Your smartphone features detailed help menus to aid you in making connections and using the embedded applications.
1.

Help to access the Help menu.
- Choose the topic from the list and click View.
Product registration
When using your product for the first time, it is recommended that you immediately register it. This will give you access to some useful benefits, such as:
- Faster service from our trained representatives.
• Membership in the Acer community: receive promotions and participate in customer surveys - The latest news from Acer.
Hurry and register, as other advantages await you!
How to register
To register your Acer product, visit our website at registration.acer.com. Choose your country and follow the simple instructions.
You can also click 📄 > Registration to register using your smartphone.
After we receive your product registration, we will send you a confirmation email with important data that you should keep in a safe place.
Chapter 1: Setting Up
Unpacking your smartphone
Your smartphone comes packed in a protective box. Carefully unpack the box and remove the contents. If any of the following items is missing or damaged, contact your dealer immediately:
- Acer P300 Smartphone
- Stylus
- Battery
- Quick Guide
- Companion CD
- USB c a b l e
- AC adapter
- Headset
- Screen protective film
Getting to know your smartphone Views

No. Item Description
| 1 Power button Press to turn the screen on/off or enter sleep mode; press and hold for more than three seconds to turn the smartphone off. | |
| 2 microSD Card slot / micro USB connector | Slot for microSD card; connect to a USB cable/charger. |
| 3 Fn / Shift indicators Indicate the Fn / Shift status. | |
| 4 Keyboard QWERTY keyboard. | |
| 5 Send / hold key Open the phone dialer; place current call on hold. | |
| 6 Stylus Use to enter information or select items on the touch screen. | |
| 7 3.5 mm headset jack Connect to headset. | |
| 8 Phone speaker | Suitable for normal phone use. |
| No. | Item | Description |
| 9 Volume control Increase or decrease the ringer/system volume; mute the smartphone. | ||
| 10 Touchscreen 400 x 240 pixel screen to display data, phone content and enter information. | ||
| 11 Camera button Activate the camera or take a picture. | ||
| 12 End / back key Press to end a call. | ||
| 13 Start key Press to open the Applications menu. | ||
| 14 Strap holes / speaker Holds phone danglers; emits audio from your smartphone | ||
| 15 Camera A 3.2-megapixel camera for taking high-resolution images. | ||
LED indicators
| Indicator State Description | ||
| Solid white for all LEDs | Device is fully charged. | |
| Slow flashing for left and right LEDs | Device is charging. | |
| Ascending / descending flash (center LED) | Device is in sleep mode, with new event (missed call, new message, voicemail etc.) | |
| Solid-Flash-Solid Device is fully charged, with new event (missed call, new message, voicemail etc.) | ||
| Slow flashing for all LEDs | Device is charging, with new event (missed call, new message, voicemail etc.) | |
Installing or removing the battery
Your smartphone uses a replaceable battery to provide power. It is packed separately from your smartphone and needs to be inserted and charged before you can use the smartphone.
Installing the battery
Gently apply pressure and slide the battery cover down then lift it away from the smartphone.

natural_image
3D illustration of a rectangular electronic device with a black lightning bolt on top (no text or symbols)Place the battery into the battery compartment, lining up the battery connectors with those at the top of the compartment.

natural_image
Illustration of a smartphone with an arrow pointing to the top screen (no text or symbols present)Insert the tabs on the inside of the battery cover into the slots in your smartphone. Carefully slide the cover up until it clicks into place.

natural_image
3D illustration of a smartphone with a black arrow pointing to the front panel (no text or symbols)
CAUTION: RISK OF EXPLOSION IF BATTERY IS REPLACED BY AN INCORRECT TYPE.
DISPOSE OF USED BATTERIES ACCORDING TO THE INSTRUCTIONS.
Charging the battery
For initial use, you need to charge your smartphone for eight hours. After that you can charge it each day to recharge the battery to full capacity.
Connect the AC adapter cord to the micro USB connector on your smartphone.
Removing the battery
Open the battery compartment as shown in Installing the battery on page 13. Lift the battery out of the compartment using the tab on the top of the battery.
Replace the battery cover as described above.

natural_image
Diagram of a smartphone showing the internal circuit board and an arrow indicating a component (no text or symbols present)Installing a SIM or microSD Card
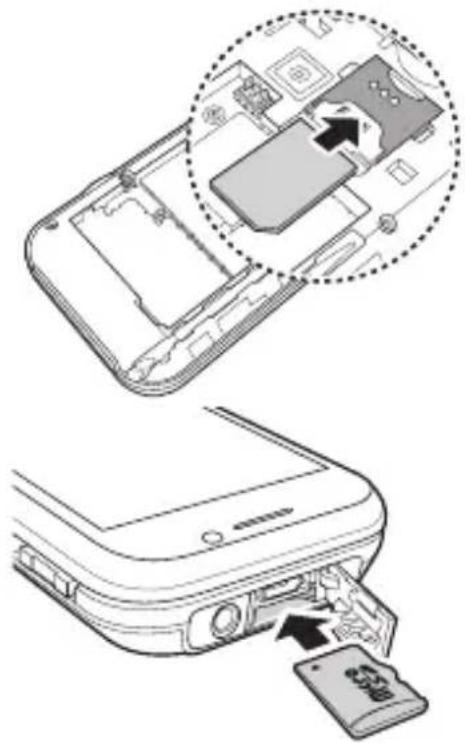
To take full advantage of your smartphone's telephony capabilities, you must install a SIM card. The SIM card holder is located at the top of the battery bay.
Additionally, you may wish to increase your smartphone's storage by inserting a microSD Card into the slot provided. This is located above the micro USB connector on the outside of the phone.
-
Turn off the smartphone by pressing and holding the power button.
-
Open the cover and remove the battery as described in Removing the battery.
-
Insert the SIM card as shown.
-
Insert the microSD Card as shown.
-
Replace the battery cover.
natural_image
Diagram showing a smartphone's internal components and a close-up of its internal card slot (no text or symbols present)
Note: Ensure that the microSD Card is inserted all the way into the card slot.
SIM card lock
Your smartphone may come with a SIM card lock, i.e., you will only be able to use the SIM card provided by your network operator.
To cancel the SIM lock, contact your network provider.
Chapter 2: Using Your Smartphone
Turning on for the first time
To turn on your smartphone for the first time, press and hold the power button until the system bootup screen appears. Follow the setup screens to set up your phone.
Entering your PIN
When you install a SIM card for the first time, you may need to enter a PIN.

Important: Depending on your settings, you may be required to enter your PIN each time you switch on the phone function.
If the PIN you enter is incorrect, a warning message appears.
Activating a new SIM card
If you are using your SIM card for the first time, it may require activation. Contact your network operator for details on how to do this.
The Today screen
After rebooting, your smartphone will display the Today screen. This screen gives you quick, icon-based access to many of the frequently-used features of your smartphone.
The first time you start your smartphone, you will see shortcuts on the screen.

Connecting to your PC and synchronizing data
You can synchronize the data on your smartphone with the data on your PC using the supplied USB sync cable and the Windows Sync Center or ActiveSync.
Refer to Connecting to a PC and installing software on page 46 for more details on connecting and synchronizing.
Chapter 3: Making Calls
This chapter shows you how to make phone calls, and the various options available to you during your call.
Before making a call
Check that the phone function is on before you make a call; you can activate the phone from the Comm. Manager (refer to Comm. Manager on page 38).
-
To access the Comm. Manager, tap >Comm. Manager.
-
Tap the phone connection icon so it displays ON.

Making a call
-
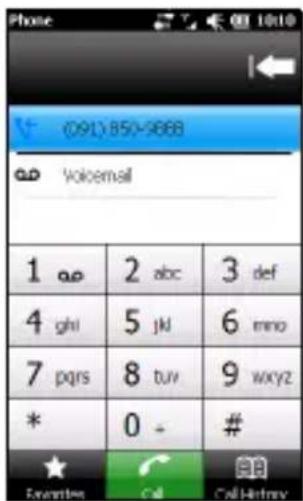
From the Today screen, press the Call button to open the onscreen number pad.
-
Enter the number you wish to dial.
-
Press the Call button or to make the call.
-
To end the call, press the End button.


Note: The phone function needs to be enabled before the call can be connected.
The onscreen number pad
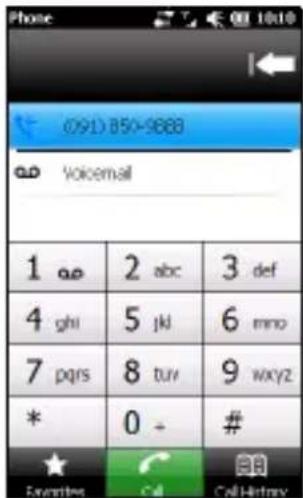
The onscreen number pad allows you to enter numbers to dial.
To access the onscreen number pad:
- Press the Call button, or
-
Tap Phone from the Today screen, or
-
Tap


Making a call to one of your contacts
-
Your contacts will be displayed above the onscreen number pad.
-
Tap a contact to pull up their detailed information.
-
Tap Call ( ) to call the displayed contact.
Dialing a number from Call History
Your Call History is also displayed above the onscreen number pad and displays recent received, dialed and missed calls.
Tap a number to view the call details. To redial any number in
the call history, select the number and tap
Missed calls will be displayed in the telephone icon on the
Today screen using the 📄 icon.

Dialing from other applications
You can dial numbers quickly and easily even when using other applications.
- Press the Call button to open the phone dialer.
- Make your call.
- When you have finished your call, tap the End key.
Dialing an international number
When dialing international numbers, there is no need to enter the international direct dialing prefix ('00' etc.) before the country code. Simply tap and hold +0 on the onscreen number pad until + appears onscreen.

Warning: International call rates can vary greatly depending on the country you are calling and your network provider. We suggest you check all call rates with your network provider, to avoid excessive phone bills. If you are using your smartphone abroad, international roaming charges will apply. Consult your network provider for roaming rates specific to the country you are visiting before you leave.
The voice call screen
Once you have dialed your number the voice call screen appears, where several options are available.

| Item Description | |
| Open Favorites or Call History. | |
| Mute the call. | |
| Put the current call on hold. | |
| Add a note. | |
| Enter the Phonebook. | |
| Turn the speaker on. | |
| Display the keypad. | |

Note: Certain options are only available during a call. These menu items are grayed out when not in a call.
Onscreen call options
Answering a call
Press to answer a call.
Rejecting a call
Press the End key or Reject to reject a call.
Ending a call
To end a call, press the End key.
Putting a call on hold
To put a call on hold, tap Hold ( ) on the voice call screen. Tap again to resume the call.
Swapping between calls
When you receive a second call while already on a call, the number of the second caller will appear.
- Tap Swap () to answer the incoming call. The first call will be put on hold.
- Tap Swap (S) to switch between calls.
Conference calls
If you have a call on hold and another on line, you can combine all calls to create a conference call.
- Tap Merge Call (). All calls are combined.
- Tap the End key to disconnect.
Using the speakerphone
The speakerphone function allows you to make calls without having to hold your smartphone. This handsfree function is especially useful for multitasking.
To activate the speakerphone, tap Speaker On (播放) on the
voice call screen. Tap Speaker Off ( ) to disable the speakerphone.
Adding notes
You can write or type notes during a call to record important information and view it at a later date.
- Tap Note ( ) in the voice call screen.
- Use the keyboard to enter letters and characters or the stylus to write handwritten notes.
- Tap OK when you have finished to save the note.
To view the notes at a later date, tap > Notes. Tap the note you want to open and view.
Muting a call
To switch the microphone off during a call, tap Mute ( musical) on the voice call screen T. Tap Unmute ( musical) to switch the microphone back on.
Saving a dialed number to contacts
You can save a number you have dialed to your contacts for future use.
- Select the number from the Call History list and tap Save to contacts.
- Select to save it in the SIM or Phone.
- Enter the contact's information and tap Save.
Redialing a missed call
When you have a missed call, the icon appears at the Today screen.
- Tap Phone to display the missed call details.
- Select the call from the list and tap .
Call History
View recent calls by accessing Call History: Open the onscreen number pad, then tap Call History ( ).
Call History Menu options
There are various options available in the Call History Menu.
- Tap (◀, ▶) to organize the call history view. For example, tap (◀, ▶) to cycle through All, Missed, Dialed, and Received calls.
Chapter 4: Input Devices
This section will take you through the various input methods available to you on your smartphone.
The stylus
The stylus is used to select items and enter information. Carefully remove the stylus from its holder to use.
Tap: Touch the screen once with the stylus to open items and select options.
Drag: Hold the stylus on the screen and drag across the screen to select text and images. Drag on a scroll bar to scroll up and down the screen.
Tap and hold: Tap and hold the stylus on an item to see a list of actions available for that item. On the pop-up menu that appears, tap the action you want to perform.
The stylus is also used for handwritten input.
The onscreen keyboard
You can activate an onscreen keyboard in certain applications when entering data.
Tap the keyboard icon at the bottom of the screen to display the keyboard. Tap again to hide the keyboard.
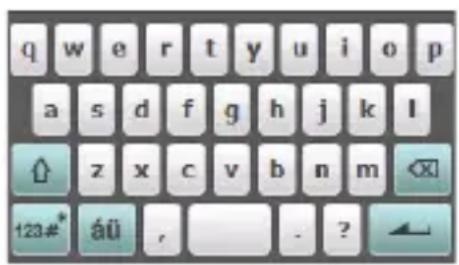
Tap the arrow next to the keyboard symbol to select different input options.
Mode Description
Easy Keyboard Displays a standard keyboard with larger keys for easier use. Tap to enter letters, numbers and use function keys.
Keyboard Displays a compact keyboard.
The QWERTY keyboard

No. Item Description
1 Caps Enables typing in upper case.
| Press once (abc mode) | Type the next character in upper case. |
| Press twice (abc mode) | Switch to ABC mode. |
| Press once (ABC mode) | Switch to abc mode. |
2 Fn Enables typing the numbers / symbols indicated in the upper right-hand corner of each key.
| Press once (abc mode) | Type a number or symbol for the next character. |
| Press twice (abc mode) | Switch to numbers and symbols mode. |
| Press once (123 mode) | Switch to the previous character mode. |
3 Sym Opens the symbols table.
4 E-mail / sms Fn off: Compose an email / Fn on: Create an sms
5 @ / .com Fn off: @ / Fn on: .com
6 OK Functions the same as the onscreen OK key.
7 Navigation keys 4-way navigation keys to move the cursor.
8 Enter key Moves the cursor to the next line.
9 Delete key Deletes the character to the left of the cursor.
Chapter 5: Messaging
This chapter shows you how to set up and use the SMS, MMS and email functions of your smartphone.
The messaging screen
All SMS, MMS and email messages are accessed via the messaging screen.
To access the messaging screen, tap
Text ( ). Then tap the drop-down menu in the top left corner of the messaging screen to view the folder list.
All email accounts, SMS and MMS folders are displayed here. Tap on the plus sign next to each folder to view the sub folder list. Each folder features the following subfolders:
- Deleted Items: Displays all messages you have selected to delete.
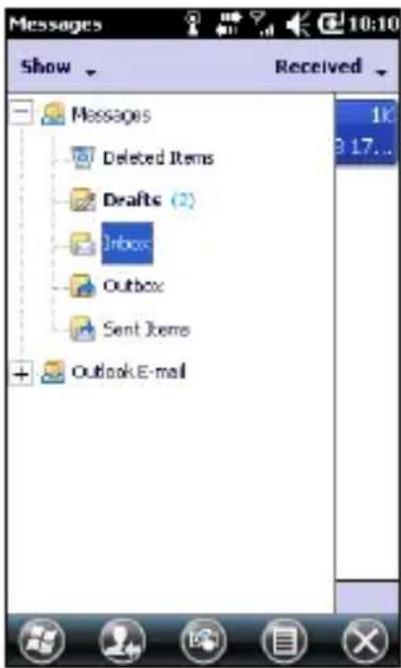

Note: To completely erase messages, you will need to delete them
from the Deleted Items folders as well. Tap >Tools>Empty Deleted Items to accomplish this.
- Drafts: Displays all draft messages.
- Inbox: Displays all received messages.
- Outbox: Displays messages waiting to be sent.
- Sent Items: Displays all sent messages.
Tap a subfolder to open it. Tap Inbox to return to the main
messaging screen. Tap for a list of options appropriate to the selected folder.
Managing your folders
You can select synchronization, download and other settings for certain folders. To manage your folders, tap Menu, or tap and hold on the folder name to open a menu of action items.
Text (SMS) messages
You can use your smartphone to exchange text messages with other mobile phones. Each text message can contain up to 160 characters.
Creating and sending text messages
- Tap Text (

-
Tap > New. Choose Text Message. The message composition window appears.
-
Select a recipient; enter your message then tap

Replying to text messages
When a new text message arrives a message icon appears at the top of the screen and a notification message is displayed.
-
Tap Text () to view your inbox.
-
Tap a message to open it.
-
Enter your text message on the space below and tap

Sorting text messages
You can sort your text messages by message type, sender, received messages and message subject.
Tap the Sort by drop-down menu in the top-right of the messaging screen, and select an option from the list.
MMS messages
MMS messages are similar to text messages but also allow you to attach multimedia files such as pictures, audio or video clips. Each MMS message can be up to 300 kB in size.
Setting up MMS messaging
Before you can send MMS messages, you have to set up a connection and profile. Ask your network provider for the information required to complete the setup procedure.
- Tap > Settings > Connections > Connections.
- You can choose to Add a new modem connection either in MY ISP or My Work Network section.
- The Make New Connection screen appears.
- Enter a name for the connection.
- Select Cellular Line (GPRS) from the Select a modem list and tap Next.
- Enter the access point name provided by your network provider.
- Enter your user name, password and domain.
- Tap Finish to save and complete setup.
Setting up MMS profiles
You can select and configure several MMS messaging profiles for different networks and environments.
-
Tap Text () from the Today screen. Select Inbox from the drop-down menu in the top left corner of the messaging screen.
-
Tap > MMS Settings > MMS Profiles tab.
- Tap a profile from the list. Tap Edit to view the selected profile settings.
- Tap each field to adjust its setting. These fields should be automatically configured by your network provider. If so, we recommend you leave them as they are.
- Tap Done once you have finished editing the profile.
- Tap Select to select the profile from the list and tap OK.

Note: For further information on options available to you when editing or creating MMS profiles, refer to the Help menus.
Creating MMS messages
- Tap Text ( ). Then tap > New > Multimedia Message and the message composition window appears.
- Enter the recipient (along with other recipients in the Cc and Bcc fields if necessary) and subject of the MMS.
- To attach a picture or video clip, tap Insert Picture/Video
( ) and select the file you want to attach.
- To attach an audio file, tap Insert Audio and select the file you want to attach. The audio file will be displayed in the message.
- To insert text, tap Insert Text and enter your message. All attachments and text will now be displayed in the message window.
- Tap Send.
Replying to MMS messages
When a new MMS message arrives, a message icon appears at the top of the screen and a notification message is displayed.
- Tap Text (

-
Tap a message to open it.
-
Tap 📋 > Reply to reply to the message. The message window will appear.
-
Follow the steps described in Creating MMS messages to compose your reply.
-
Tap Send.
Sorting MMS messages
You can sort your MMS messages by message type, sender, received messages and message subject.
Tap the Sort by drop-down menu in the top-right of the messaging screen, and select an option from the list.

Note: For further information on options available to you when creating, replying to and sorting SMS and MMS messages, refer to the Help menus.
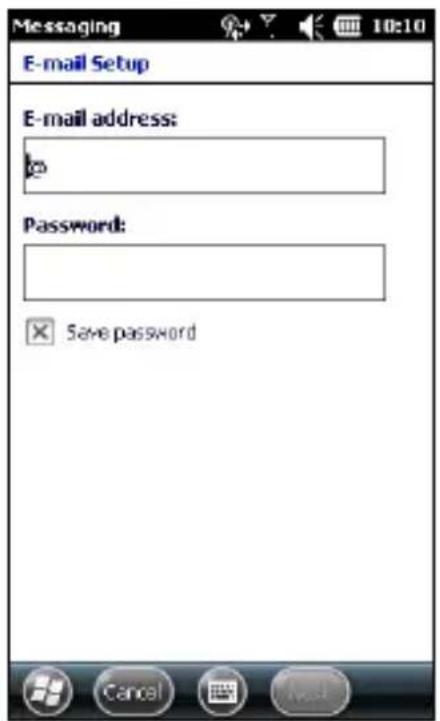
Your smartphone uses Outlook Mobile to manage email accounts. Tap E-mail from the Today screen or

E-mail to access the account Tap Setup E-mail to set up your account.
Enter your email address and password to set up the account. Select if you want to save your password or not.
When you've finished entering the information, tap Next. Your smartphone has pre-set definitions for a variety of popular ISPs and will recommend settings if your email address is recognized. Otherwise your smartphone will try to connect to the Internet to find the settings.

Chapter 6: Using the Camera
Your smartphone features a 3.2-megapixel digital camera mounted on the rear. This section will take you through all the steps in taking photos and videos with your smartphone.
To activate the camera, press and hold the camera button.
Camera icons and indicators

natural_image
Close-up of a yellow flower with blurred background under blue sky, no visible text or symbolsIcon Description

Open the album to view thumbnails of stored pictures and videos.
Icon Description

Adjust the camera or video settings.
Camera:
- Scene - disable, low light, nightshot, back light, outdoor, anti-shake
- Resolution
• Quality - White Balance
- Effect
• ISO
• GPS - Review
- Self timer
- Storage
Video:
- Resolution
• Quality
- Audio
- Review

Tap to switch between camera and video modes.
Displays the storage type being used and approximately how many photos you can still take.

Adjust the image resolution.
Taking a photo
- Frame your subject and steady your smartphone.
- Adjust any settings you require, such as brightness and scene mode. Zoom in or out by adjusting the onscreen (+/-) slider.
- Press the camera button halfway down to focus on your subject.
- Press the key the rest of the way down to take the picture.
Shooting a video
- Frame your subject and steady your smartphone.
- Press the camera button down fully to begin recording.
- Press the camera button down fully to stop recording.
Supported formats
The following file formats are supported:
Type Formats
Image JPEG
Video MPEG4
Saving photos and videos to a microSD Card
Tap > File Explorer > My Documents > My Pictures (or My Videos). Tap and hold on the file you want to save to your microSD Card, select Copy or Cut from the pop-up menu.
Navigate to your microSD Card in File Explorer, tap and hold in the folder you want to save the image/video to, and select Paste from the pop-up menu.
Photo and video options
After you have taken your photo or video, it is automatically saved.

Note: The default locations for saving photos and videos are My Documents/My Pictures and My Documents/My Videos respectively.
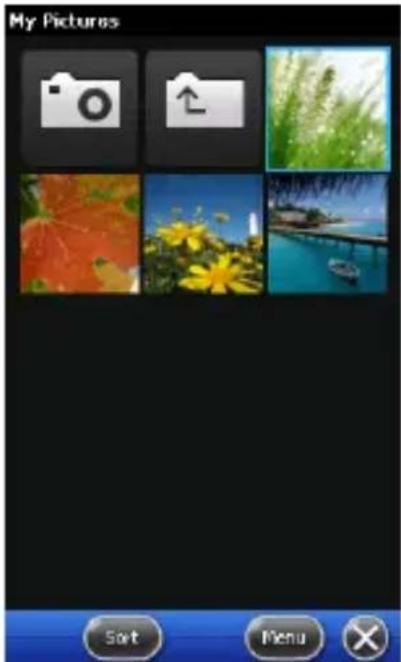
Tap the Album icon and select a photo to view. Tap the photo to display the option icons.
From this interface, you can start a slideshow with all the pictures in the folder, send the current picture to a contact as an MMS or email message, view the picture's information, delete the picture or return to the thumbnail view.
You can also zoom into the picture or zoom out and navigate to the previous or following file.
Editing photos and videos
You can crop or rotate your saved photos.
- Tap > Multimedia > Album.
- All your photos and videos are displayed as thumbnails. Select a photo to edit.
- Tap Menu to view the list of editing options.
Chapter 7: Advanced Settings
Putting your smartphone in flight mode
You can enter flight mode to turn off telephone, Bluetooth and WLAN functions and use your smartphone as a handheld device during a flight. Check with your airline to make sure this is permitted onboard.
Some airlines may provide wireless Internet services on board that can be accessed via the WLAN feature. Check prior to your departure whether this service is available on your flight.
Switch your smartphone off during takeoff and landing as it may interfere with aircraft electronic systems.
Entering flight mode
- Access the Comm. Manager (refer to Comm. Manager on page 38).
- Tap Flight Mode ON to turn off all phone, Bluetooth and WLAN functions.

Comm. Manager
Your smartphone features phone, Bluetooth and WLAN functions. This section will explain how to activate and set basic phone, Bluetooth and wireless network (WLAN) connection settings through the Comm. Manager screen.

Tip: Tap and hold the name of any communication type to open its associated Settings page.
Using the Comm. Manager
To access the Comm. Manager:
- Tap the communication icons at the top of the screen, or
- Tap >Comm.Manager, or
- Tap > Settings > Connections > Comm. Manager.
- Tap > Preferences > Connections.
Activating or deactivating connections
You can choose to activate one or all connections from the Comm. Manager window.
Each connection icon will be highlighted when turned on.
Adjusting connection settings
This section will show you how to adjust detailed settings for your phone, data and Bluetooth connections.
Phone connections
Once you have inserted a SIM card, your smartphone will automatically detect your network provider.
For all phone settings, tap > Settings > Personal > Phone. Here you can adjust ringtone, security, services, network and CB (Cell Broadcast) settings.
Selecting a network
You can set the smartphone to detect your network automatically or set it manually.
Detecting a network automatically
- Tap > Settings > Personal > Phone > Network tab.
- Select Automatic from the Network Selection list.
- Tap Find Network. Your network will be automatically detected.
Selecting a network manually
- Tap > Settings > Personal > Phone > Network tab.
- Select Manual from the Network Selection list. A list of available networks will appear.
- Select a network from the list and tap OK.
When your current network is unavailable, tap Select to select another network to use.

Note: Contact your service provider should you have any problems obtaining voice mail and the text message service center numbers.
Adjusting Bluetooth settings
You can use Bluetooth to exchange information between your smartphone and other mobile devices.
Bluetooth connections
For all Bluetooth settings, tap > Settings > Bluetooth. Here you can adjust Bluetooth profiles, status, accessibility, and services settings. You can also view version information.

Creating new Bluetooth connections
The simplest way to set up and configure a new Bluetooth connection is through the Bluetooth Manager.
- Tap > Settings > Bluetooth. You will be asked to turn on Bluetooth, then tap Settings > Add a device.
- Your smartphone will search for devices in range.
- Select the device you want to connect to.
- Tap Select and follow all onscreen instructions to set up the connection.
Adjusting Bluetooth settings
- Tap > Settings > Bluetooth > Settings.
- Select whether to enable or disable the Bluetooth function and whether the device should be discoverable or not.
- Tap Done to confirm and save.
- You can also define a Name for your smartphone. Tap

Settings > System > About > Device ID.
Phone settings
Many phone settings are automatically configured by your smartphone when you insert a SIM card. The device will communicate with your service provider and automatically obtain all necessary settings, such as network name, voice mail and text message center numbers.
You can, however, view and modify these settings yourself if necessary, through the Phone Settings screen.
Tap

Settings > Personal > Phone.
Configuring caller options
You can configure certain caller options to keep control over your incoming and outgoing calls.
Bar outgoing or incoming calls using call barring; choose who to display your identity to with caller ID; specify a number to which calls can be forwarded if you are unavailable using call forwarding; choose to be notified if an incoming call is waiting using call waiting.
Setting up caller ID
- Tap > Settings > Personal > Phone > Services tab.
- Select Caller ID from the list and tap Get Settings.
- Select who to provide your caller ID to.
- Tap OK to confirm and save.
Setting up call forwarding
- Tap > Settings > Personal > Phone > Services tab.
-
Select Call Forwarding from the list and tap Get Settings.
-
Specify whether to forward all calls or only under certain conditions. Tap the checkboxes to select the option you require and enter number(s) to forward calls to.
-
Tap OK to confirm and save.
Setting up call waiting
- Tap > Settings > Personal > Phone > Services tab.
- Select Call Waiting from the list and tap Get Settings.
- Select whether to be notified or not when a call is waiting.
- Tap OK to confirm and save.
Setting up voice mail and text messages
- Tap > Settings > Personal > Phone > Services tab.
- Select Voice Mail and Text Messages from the list and tap Get Settings.
- Enter the text messages service center and voice mail numbers.
- Tap OK to confirm and save.
Setting up fixed dialing
- Tap > Settings > Personal > Phone > Services tab.
- Select Fixed Dialing from the list and tap Get Settings.
- Select whether to enable fixed dialing and enter the necessary number patterns.
- Tap OK to confirm and save.

Note: Refer to the Help menus for more detailed information on adjusting phone settings.
Choosing a ringtone
A profile contains settings for alert notification, device volume, ring type and tone.
- Tap > Settings > Personal > Phone > Sounds.
- Select your preferred ringtone.
- Tap OK to confirm and save.
Configuring End button functions
You can shut down your smartphone, end current program, launch Task Manager, launch Comm. Manager or lock device and suspend when you press the End button.
- Tap > Preferences > End Key.
- Set the function you want to perform.
- Tap OK to confirm and save.
Managing your phonebook
Your smartphone features an address book that allows you to save contacts to either the internal memory or onto your SIM card.
Adding a contact
- Enter the telephone number on the phone screen.
- The phone will recognize a new number. Select Save to Contacts.
- Select whether this is a SIM Contact or Phone Contact.
- Enter the required information.
- Tap Save.
You can choose to save contacts directly to your SIM card. This is useful if you use your SIM card with multiple phones and you always need your address book at hand.

Note: You can only enter a contact name, telephone number and email when creating a new SIM contact. If more information is required, create a regular phone contact.
Editing a contact
1.

Contacts.
-
Select and open the contact you want to edit.
-
Tap

- Edit the contact information and tap OK.
Copying contact information
You can copy contact information to/from the Contacts list from/to the SIM card. You may copy individual contacts, multiple contacts or all contacts.
- To copy all contacts, tap the box alongside Name: Tap and hold any contact and select Copy to Contact/SIM.
- To copy multiple contacts, tap the box alongside each contact: Tap and hold any contact and select Copy to Contact/SIM.
- To copy a single contact, tap and hold any contact, and select Copy to Contact/SIM.
Copying a contact from internal memory to the SIM card

Note: Copying a contact from internal memory to your SIM will only copy the contact's name and phone number. Names longer than 14 characters will be truncated.
1.

Contacts.
- Select the contact you want.
- Tap > Copy contact to SIM.
Copying a contact from the SIM card to internal memory
1.

Contacts.
- Select the contact you want.
- Tap > Copy contact to Phone.
Deleting contacts
To free up space on either the internal memory or on your SIM card, you can delete contacts from your address book.
1.

Contacts.
- Select the contact you want to delete.
- Tap > Delete.
- Tap Yes to permanently delete the contact.
Assigning a ringtone and picture to specific contacts
You can assign a specific ringtone and picture to a particular Phone contact so they are easily identifiable when they call.
- Tap > Contacts.
- Select the contact you want to edit by using the up and down navigation buttons.
- Tap > Edit.
- Tap the picture of the contact to open My Pictures. Tap the desired picture to assign a picture to the contact.
- Tap Ringtone and select a ringtone from the list.
Connecting to a PC and installing software
You can use Microsoft ActiveSync (on Windows XP) or the Windows Mobile Device Center (on Windows Vista or Windows 7) to synchronize the information on your computer with the information on your smartphone, comparing and updating data on both locations. This serves as backup data in case something happens to your smartphone.
Connecting to a PC
The packaged micro USB sync cable enables you to synchronize the information on your smartphone with the data on your computer using Windows Mobile Device Center, Windows Sync Center or ActiveSync (depending on your operating system and installation).
Plug the micro USB connector into your smartphone, then connect the USB connector into an available USB port on your computer.
After a short delay, your smartphone should be recognized and the program to synchronize your smartphone files will open. Please check the help files for the program installed on your computer for more information.
Configuring USB to PC settings
You can enable advanced networking to enhance your USB to PC connection, should you be experiencing any problems synchronizing your data with ActiveSync.
- Tap > Settings > Connections > USB to PC.
- Check the Enable advanced network functionality checkbox to enable.
- Tap OK to confirm and save.
Acer Sync
Acer Sync helps you synchronize PIM data (contacts and calendars) on your device with the Google services and Microsoft Outlook. The photos and videos on your device can also be uploaded to Picasa and Youtube through Acer Sync.
Make sure that you have installed Acer Sync on your computer. You can easily synchronize PIM services (Google and Microsoft Outlook) after you have set up your account and preference.
Acer Sync also provides a regular synchronization feature, which automatically synchronizes according to your settings.

Note: You may only add a single Google account to Acer Sync. If you have multiple Google accounts and desire to synchronize data from these accounts, you will need to remove the existing account and replace it with another account.
Adding a Google account
To add a Google account:
1.

Acer Sync.
-
Tap Next.
-
Enter your Google email and password.
-
Check Save password.

Note: If you choose not to save your password, regular synchronization will be disabled.
Synchronizing data
Choose the data type you want to synchronize with the Google servers.
Data type Description
Contacts / Calendar
Synchronize the PIM data on your device with Google Contacts and Google Calendar. If Acer Sync detects duplicate items, it will help merge the PIM data during the first synchronization.
Data type Description
Photo Upload photos on your device to your Picasa album.
Video Upload videos on your device to your Youtube account. This function is only available if your Youtube ID is associated with your Google account. If you don't have a Youtube account, you will need to register for one.

Note: You have to choose at least one data type.
Preference settings
Settings Description
Album Name The location where your photos will be uploaded to on Picasa. If the album doesn't exist on Picasa, Acer Sync will create it automatically.
Album Privacy Defines who may view the album.
Photo Upload Folder / Video Upload Folder The locations of photos and videos on your device. You can use the folder browser to select the correct folders.
Settings Description
Contact / Calendar Conflict Settings Defines the rule Acer Sync will follow when a duplicate is found during synchronization. This may happen when data was modified on the local (device) side and the server (Google) side since the last synchronization.
Synchronize Interval Defines the schedule for regular synchronization. Regular synchronization will take place automatically regardless of whether you launch the application or not. Choose Manual to disable automatic synchronization.
Synchronizing and managing your account
From the sync profile, you can view the synchronization status, start synchronization and manage your Google account.
- Tap Sync to launch synchronization.
- Tap Menu > Edit Profile to edit the data of your account and modify your preferences.
- Tap Menu > Delete Profile to remove the account you are using right now.
- Tap View My Picasa to launch Internet Explorer and open your public Picasa album.
- Tap View My Youtube to launch Internet Explorer and open your Youtube page. This item is disabled until you upload your first video.
- Tap About to view the copyright and version information of Acer Sync.
- Tap Exit or OK to close Acer Sync.
In the sync profile main window, you can view the account name, last synchronization time, device connection method and the status for each data type. It will update automatically so you can monitor the synchronization.

Note: If your device has less than 20 percent power remaining, you will need to confirm the synchronization. If you decide to synchronize, the device may shut down at anytime during synchronization and data will be lost.

Note: Video uploading will fail if you haven't associated your Youtube ID with your Google account.
Other functions
Managing your calendar
You can set appointments and event reminders with the calendar feature.
Setting a new appointment
1.

Calendar.
- Tap > New Appointment.
- Enter appointment information and reminder frequency.
- Tap OK to confirm and save.
To edit an appointment, tap the date and tap the entry to open the edit page.
Creating tasks
Tasks can be set to remind you of specific things you must do and the completion deadlines.
Creating a new task
-
Tap > Tasks.
-
Tap > New Task.
- Enter all task information, start and due dates and how often to be reminded.
- Tap OK to confirm and save.
To edit a task, tap the entry and then tap to open the task entry screen.

Note: For more information on other options available in the calendar and task screens, refer to the Help menus.
Browsing the Internet
In order to browse the Internet with your smartphone, you must be connected to a 3G network or to a computer with an Internet connection via ActiveSync.
Tap Favorites in the Today screen and tap Internet Explorer to open the browser.
To adjust your browser settings, tap > > Tools.
Starting Windows Live
-
Tap > Windows Live.
-
Sign in with your email address and password and your contacts list appears.
Multimedia playback
Your smartphone comes supplied with a variety of programs that you can use to enjoy multimedia content.
Using Windows Media Player
You can use Windows Media Player to play videos you have taken with your smartphone as well as other media files, such as MP3 music files.
Tap the Windows Media player icon on the Today screen. The media player will search for all supported media files on your smartphone. Tap the Play icon to start playback immediately.
The following formats are supported:
Type Formats
Audio WMA, MP3
Video WAV, 3GP, AVI, MPEG4
Playing video or audio files
1.


File Explorer.
- Locate the file to playback, and tap once to play it in Windows Media Player.
Spinlets
Spinlets gives you access to your favorite music, movie and television content. Get your favorite music, photos and videos from your mobile phone and share your favorite Spinlets on social networks, websites and more.

Note: Some content may not be available in some countries.
Launching Spinlets
To launch the Spinlets application, tap

Spinlets.
Browsing Spinlets gallery
You can sort or search your media content by albums or genres.
Browsing albums
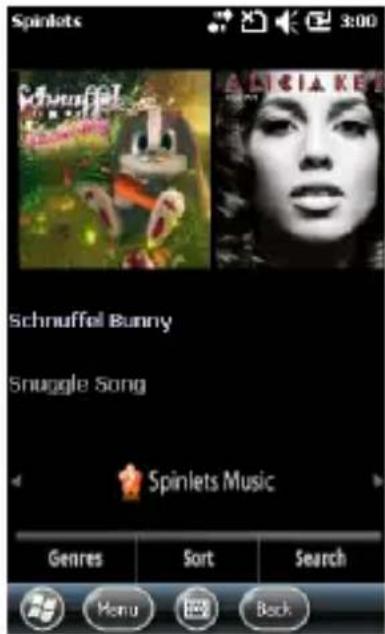
Once Spinlets is opened, you will see a display of featured albums. Browse this display by sliding your finger horizontally (left or right) and select an album by tapping it.
Browsing genres
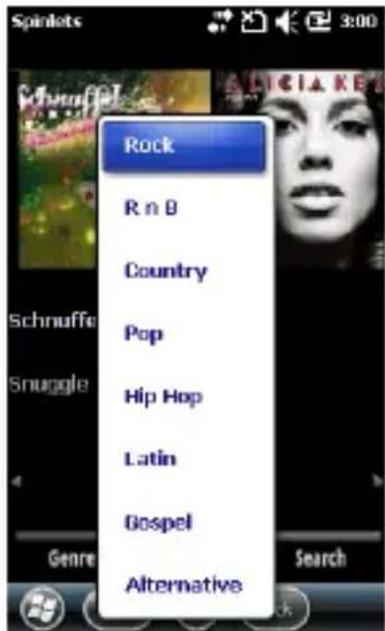
To browse the Gallery by genre, tap the Genres button on the bottom left corner of the screen. You will see a new screen with a list of different genres. Tap on the genre you wish to view.
Sort
To sort through Spinlets by Name, Ratings or Newest content, select the Sort button at the bottom of the screen.
Search
To search the Gallery for a specific name, select the Search button at the bottom right corner of the screen. Type the name of an artist in the search box and find potential matches.
Exploring Spinlets widgets
When you select an album, you will see a Spinlet.
To play the featured song, select the red Play button.
To play selected songs, select the Music tab and choose which songs you would like to play.
To view artist photos, select the Photos tab.

Sharing your Spinlets
You can share your favorite Spinlets in two ways.
To post the Spinlet you are currently viewing to your social networks, blogs, or other websites, tap Share It at the top right corner of the Spinlet. Select Post it and tap the icon of the social network site or blog you want to post the widget to. Log in to your social network account or blog page and follow the steps.
Another way you can share Spinlets is through email. Tap Share It at the top right corner of the Spinlet, select Send it and enter your name and your friend's email address.


Note: Spinlets, and Spinlet are trademarks or registered trademarks of Fuhu, Inc. in the U.S. and/or other countries.
Streaming Media

Note: This application may not be available in your region or for your language.
Steaming Media allows you to view streamed video off the Internet directly on your smartphone.
If you try to open an audio or movie video that is not supported by Microsoft Windows Media Player, for example RTSP or HTTP, the system will automatically switch to Streaming Media.
Alternatively, tap > Streaming
Media to manually launch the player. You can enter the address of the content you wish to access in the address bar.

natural_image
Person mid-air during a jump against a clear blue sky, captured in a mobile app interface (no text or symbols on the image itself)Tap anywhere on the playback window to display the content full-screen. Tap the screen again to return to the normal display mode.
Satellite Data Update

Important: Satellite Data Update is not supported in the USA.
Tap

Settings > Utilities > Satellite.
You may need to log into your provider's server to download instant satellite data and enable the GPS function.

Note: All the following connections allow your smartphone to download the latest GPS data. If there is more than one connection available, the system will automatically select the best connection, in the following order: Sync connection to PC; GPRS (not supported when roaming).
The system will update GPS data automatically based on a schedule.
Check the Auto update checkbox.
Set the date and time.
You will see the expiration date of the GPS data. On the due date, a warning message will appear to remind you.
Alternatively, tap Download to update the GPS data manually.

Important: You may be charged additional fees when connecting over GPRS.
Personalizing your smartphone
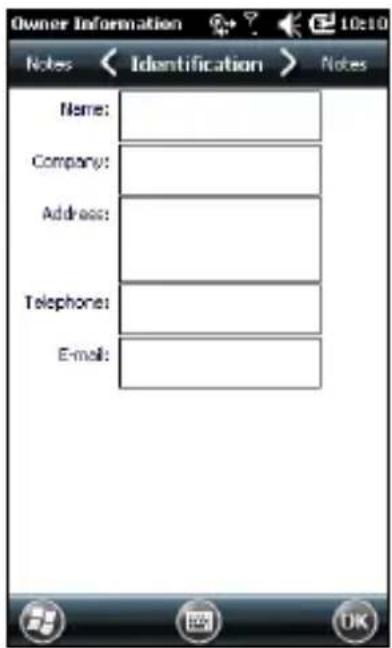
You can enter your personal information to easily identify your smartphone. This is especially useful if it should ever be lost or stolen. To enter owner
information, tap > Settings > Personal > Owner Information.
Enter your name along with any other information you want to store.
Tap the Notes tab to add any additional notes.
Tap OK to confirm and save.
Naming your smartphone
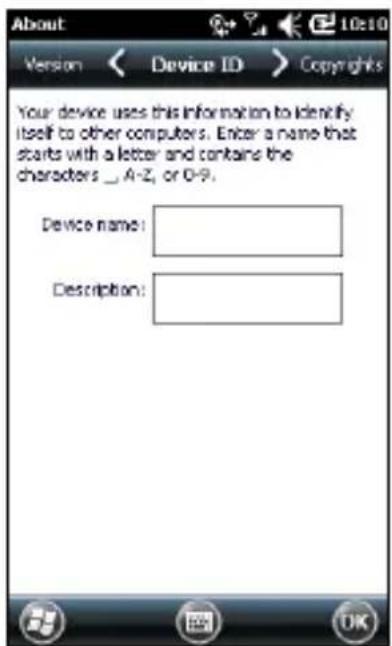
Your smartphone uses a name to identify itself when connected to other
computers. To specify a name, tap > Settings > System > About > Device ID tab.
Enter a name for your device. Add a description if necessary.
Tap OK to confirm and save.
Adjusting the volume
To adjust the volume, tap at the top of the screen. The volume control appears.
- Use the right slider to adjust the ring volume.
- Use the left slider to adjust system volume.
- Use the icons at the top of the screen to turn all sounds on, set to vibrate only or mute all sounds.
- If you adjust the volume during a call, the speaker volume will be adjusted.

Note: You can also adjust the volume or mute the smartphone using the volume button at the side of the phone.
Configuring sounds and notifications
You can specify sounds to play for certain events or when certain actions are performed.
- Tap > Settings > Personal > Sounds & Notifications > Sounds tab.
- Select to enable sounds for events or programs. You can also specify to enable sounds when tapping the screen or pressing buttons.
- Tap the Notifications tab.
- Select an event from the list and the notification options for that event are displayed.
- Adjust the settings.
- Repeat steps 4 and 5 to adjust notification options for other events.
- Tap OK to confirm and save.
Configuring backlight settings
You can specify the appearance and conditions under which the screen backlight will be on or off.
- Tap > Settings > System > Backlight > Battery Power tab.
- Select the timing for the backlight to turn on and off when your smartphone is running on battery power.
- Tap the External Power tab. Select the timing of the backlight to turn on or off when your smartphone is running on external power.
- Tap the Backlight Level tab. Adjust the backlight brightness level and automatic level selection options.
- Tap OK to confirm and save.

Tip: Backlight settings greatly affect battery life. Configure these settings carefully to ensure that you get the most out of your battery.
Managing system certificates
System certificates are used to positively identify your smartphone to other systems.
Tap > Settings > System > Certificates to view all certificates.
Setting the date and time
To set the date and time:
- Tap > Settings > Clock & Alarms > Time, or tap the digital clock in the Today screen.
- Select your time zone from the drop-down menu. Set the time by tapping the up and down arrows. Select the date from the drop-down calendar.
Tap OK when you have finished.
Setting alarms

- Tap > Settings > Clock & Alarms > Alarm, or
- Tap the checkbox to activate an alarm.
- Tap Description and enter a name for the alarm.
- Select the day and time for the alarm.
- Tap OK to confirm and save.
Configuring regional settings
You can adjust regional settings for number, currency, date and time formats to match those used in your country.
- Tap > Settings > System > Regional Settings.
- Tap the Region, Number, Currency, Date and Time tabs to view information for your region. Adjust any if necessary.
- Tap OK to confirm and save.
Viewing power status
- Tap > Settings > System > Backlight.
- Click the power link located at the bottom of the screen, and select the Battery tab.
Power saving options
- Tap > Settings > System > Backlight.
- Click the power link located at the bottom of the screen, and select the Advance tab.
- Select the interval after which your smartphone will turn off if not in use. You can specify two intervals: one for when on battery power, and one for when on external power.
Removing programs
You can remove programs you have installed on your smartphone to free up extra storage memory.

Note: You can only remove programs you have installed, you cannot remove programs installed during manufacture.
- Tap > Settings > System > Remove Programs.
- Tap the program you want to remove from the list.
- Tap Remove and the program will be uninstalled.
Configuring screen options
You can change orientation, align the screen, enable ClearType and adjust text size to make viewing your smartphone as comfortable as possible.

- Tap > Settings > System > Screen > General tab.
- Select screen orientation and tap Align Screen if you need to re-align the screen.
- Tap the ClearType tab. Select to enable ClearType.
- Tap the Text Size tab. Move the slider to adjust text size.
- Tap OK to confirm and save.
Updating your smartphone
You may use the Notification Manager to check for updates to your smartphone's software.

1.
Notification Manager.
- Tap Check now to see if an update is available.

Important: You may be charged additional fees when connecting over GPRS.
If updates are available, brief information about each update will be displayed. Tap an update to see download options. Some updates may be downloaded directly to your smartphone, others must be run from a computer.
Tap Generate URL to create a download link. You may then transfer this link to your PC in order to download and run the update. See Connecting to a PC on page 47.
The link may be found in the My Documents folder. Tap > File Explorer > Notification. You may transfer this shortcut to your computer and use your computer's Internet connection to download the update. Install this update correctly by following the instructions provided with the files.
Setting a schedule
It is also possible to set schedule to check for updates.
-
Tap > Notification Manager.
-
Tap Menu, then Settings.
- Enable the scheduled notification update and set either a daily or weekly check.
- Tap OK to confirm and save.
Resetting your smartphone
You may have to perform a reset if your smartphone fails to respond when buttons are pressed or the screen is tapped.

Note: Before performing a reset, ensure that your smartphone is not locked. Press any key or tap the screen to see if the phone responds.
Reset
A reset will clear the RAM of your smartphone. It is similar to turning a computer off and then turning it back on.

Important: To reduce risking damage to your smartphone, only use the supplied stylus to reset the device.
Clean boot

Warning! You should only perform a clean boot when all other reset options have failed to restore your smartphone to an operational state.
A clean boot will restore your smartphone to the factory settings.

Warning! This will erase all your personal information, any contacts stored on your phone and any programs you installed.
If your screen is responding to stylus input: Go to > Default Settings. Read the warning information and enter the security code in the empty textbox. Tap OK to proceed.
If your screen is not responding to stylus input: press the Power button and Start key at the same time. When you see the clean boot screen, press the camera button to proceed.
Chapter 8: Accessories and Tips
This chapter shows you how to use accessories with your smartphone, as well as provide useful tips for when you are using your smartphone.
Using the headset
Your smartphone comes packaged with a headset with built-in microphone for handsfree use when making calls.
To use the headset, plug it into the 3.5mm jack.
When the headset is plugged in, all audio is routed to the headset, and the speakers are turned off.
- To answer an incoming call, press the button on the microphone.
- Adjust the volume using the volume up/down button on the smartphone.
- End the call by pressing the button again.
Using a Bluetooth headset
Your smartphone's Bluetooth functions make it fully compatible with all Bluetooth headsets. This allows you to use the unit handsfree when making calls, without the inconvenience of wires.
To set up your Bluetooth headset
- Turn on Bluetooth using the Comm. Manager (please see Comm. Manager on page 38).
-
Connect to the headset as described in Creating new Bluetooth connections on page 40.
-
Tap the icon for your Bluetooth headset.
- Enter your headset passkey and tap OK or press the OK button.
- Tap Finish to complete setup.
When you want to answer an incoming call, press the "answer" button on your Bluetooth headset. Press the End key to end the call.

Tip: As well as being essential for handsfree operation when driving, you can also use your Bluetooth headset when at home or in the office, to avoid carrying your smartphone around with you at all times. In ideal conditions, Bluetooth range is up to 10 meters, or 30 feet.
Using your smartphone as a modem
When connected to your PC, your smartphone can function as a modem via GPRS or UMTS.
You can also use a USB connection or the Bluetooth function of your smartphone to connect to your PC or laptop and act as a modem.
To set up an ISP connection on your PC or laptop.
- Click Start > Settings > Control Panel.
- Click Network Connections > Create a new connection.
- Click Next to begin the New Connection Wizard.
- Select Connect to the Internet and click Next.
- Select Set up my connection manually and click Next.
- Select Connect using a dial-up modem and click Next.
-
Enter the name of your ISP (Internet Service Provider) and click Next.
-
Enter your ISP's phone number. The number must begin with '*99#'. Click Next.
- Select one option from the Connection Availability screen and click Next.
- Enter your username and password and click Next.
- Click Finish to complete the setup.
You can now establish a Bluetooth connection between your PC and your smartphone. When you attempt to access the Internet on your PC, your smartphone will dial the ISP number specified to establish a connection.

Important: Some providers and countries do not allow the use of a smartphone as a modem over HSDPA. Please check with your provider before attempting to do so.
Using a USB connection
-
Close ActiveSync if it is running. This helps Internet sharing to function properly.
-
Tap > Internet Sharing.
- Select USB from the PC connection drop-down menu.
- Select your network connection type from the network connection drop-down menu.
- Tap Connect.
Your smartphone will now act as a modem.
Using a Bluetooth connection
You can also use Bluetooth to link your PC to your smartphone to connect to the Internet. Ensure that Bluetooth is enabled from the Comm. Manager (refer to Comm. Manager on page 38), and that other devices can discover your smartphone. To do this, open the Comm. Manager, tap and
hold Bluetooth to open the settings page. From the options listed, change your device's visibility status to Discoverable.
Ensure that your computer's Bluetooth adapter is switched on.
- Click Add a device, then follow the steps of the Add Bluetooth Device Wizard.
- Double click on your smartphone device name.
- Type the password when requested.
- Your smartphone will ask to allow pairing, and for the Passkey. Enter the same code you entered above and tap OK.
- Windows will automatically connect to your smartphone and detect what services are available.
Inserting a microSD Card
Your smartphone features a memory expansion slot that accepts a microSD Card to expand memory and storage capacity.
Please refer to Installing a SIM or microSD Card on page 14 for proper instructions on installing a microSD Card.
FAQ, troubleshooting and error messages
This section lists frequently asked questions that may arise during the use of your smartphone, and gives easy answers and solutions to these questions.
| Aspect Question Answer | ||
| Audio Why is sound coming from the device? | there no | If the headset is plugged into the device, the speaker is automatically shut off. Disconnect the headset.Check that the device volume setting is not muted. Tap thecommunication icons at the top of the screen.Check that the volume control is not at its lowest setting. |
| Multimedia files | Why can’t I view my picture files? | You may be trying to view an image that is not supported. Refer to Multimedia on page 73 for more information. |
| Why can’t I view my video files? | You may be trying to view a video that is not supported. Refer to Multimedia on page 73 for more information. | |
| Why can’t I play my music files? | You may be trying to play a file that is not supported. Refer to Multimedia on page 73 for more information. | |
| System information and performance | How do I check the OS version of my device? | Tap  > Settings > System > System Information to check the OS version and other hardware and software information. > Settings > System > System Information to check the OS version and other hardware and software information. |
| Aspect Question Answer | |
| Power I couldn’t turn on the device. | The battery power may be depleted. Recharge the device. Refer to Charging the battery on page 14 for more information. |
| Heat The phone heats up when charging or making long duration calls. | It is normal for the phone to heat up when charging. When charging is complete, it will return to its normal temperature.It is also normal for the phone to heat up during long periods of use, such as a during a phone conversation or watching a video.All Acer phones are factory tested before release. |
Error messages
Error message Description
| Connection canceled Operation canceled by the user. | |
| Service unavailable —please try again later | The network is not stable, or server has not responded. Try again later. |
| Connection unavailable —please check your network settings | No path to the destination is available.Please check the settings in  Settings > Connections.If your Smartphone is connected to your PC via USB, check both the PC's network settings and ActiveSync settings (when connected via USB, GPRS/3G is not used).Note: Try using Internet Explorer to connect to a website to verify your network connection. Settings > Connections.If your Smartphone is connected to your PC via USB, check both the PC's network settings and ActiveSync settings (when connected via USB, GPRS/3G is not used).Note: Try using Internet Explorer to connect to a website to verify your network connection. |
Specifications
Performance
• Qualcomm MSM 7225, 528 MHz
- System memory:
• 256 MB of SDRAM
• 512 MB of Flash ROM
- Microsoft Windows Mobile 6.5 Professional Edition
Display
• 3.2" TFT LCD touchscreen
- 400 x 240 resolution
- 65K color support
- Microsoft ClearType technology for clearer, crisper font display
Multimedia
• CD-quality stereo output
• Mono speaker 0.5 W (max)
- Omni-directional microphone
- Formats supported
Type Formats
| Audio playback WMA, MP3, WAV, AAC, AMR |
| Ringtone AAC, AMR, MID, MP3, WMA, WAV, 3GP, AWB |
| Video recording 3GP |
| Video playback 3GP, MPEG-4, WMV, H.263, H.264 |
USB connector
- Micro USB connector
- USB Client
• DC power-in (5 V, 1 A)
Connectivity
- Bluetooth 2.0+EDR
- IEEE Wi-Fi 802.11 b/g WLAN
• GSM 850 / 900 / 1800 / 1900 - UMTS 2100
• HSDPA / HSUPA / EDGE / GPRS
Camera
• 3.2 megapixel auto-focus
Expansion
- microSD memory card support
- SDHC support
GPS
- Built-in GPS
- Supports AGPS
Battery
- High density, rechargeable 970 mAh Lithium Polymer battery (changeable)

Note: Length of battery operation will depend on power consumption which is based on system resource use. For example, constantly using the backlight or using power-demanding applications will shorten battery life between charges.
Size and weight
- Dimensions: 110 (h) x 55 (w) x 15.1 (t) mm
- Weight: 130.6 g (including battery and stylus)
Warnings and precautions
- Do not use this product near water.
- Do not place this product on an unstable cart, stand or table. If the product falls, it could be seriously damaged.
- Slots and openings are provided for ventilation to ensure reliable operation of the product and to protect it from overheating. These openings must not be blocked or covered. The openings should never be blocked by placing the product on a bed, sofa, rug or other similar surface. This product should never be placed near or over a radiator or heat register, or in a built-in installation unless proper ventilation is provided.
- Never push objects of any kind into this product through cabinet slots as they may touch dangerous voltage points or short-out parts that could result in a fire or electric shock. Never spill liquid of any kind onto or into the product.
- To avoid damage of internal components and to prevent battery leakage, do not place the product on a vibrating surface.
- Never use this product when engaging in sporting activities, exercising, or in any vibrating environment which may cause a short circuit or damage, and even a risk of explosion from the battery pack.
CAUTION when listening to music
To protect your hearing, follow these instructions.
- Increase the volume gradually until you can hear clearly and comfortably.
- Do not increase the volume level after your ears have adjusted.
- Do not listen to music at high volumes for extended periods.
- Do not increase the volume to block out noisy surroundings.
- Decrease the volume if you can't hear people speaking near you.
Battery information
This product uses a Lithium Polymer battery. Do not use it in a humid, wet and/or corrosive environment. Do not put, store or leave your product in or near a heat source, in a high temperature location, in strong direct sunlight, in a microwave oven or in a pressurized container, and do not expose it to temperatures over 60 °C (140 °F). Failure to follow these guidelines may cause the battery to leak acid, become hot, explode or ignite and cause injury and/or damage. Do not pierce, open or disassemble the battery. If the battery leaks and you come into contact with the leaked fluids, rinse thoroughly with water and seek medical attention immediately. For safety reasons, and to prolong the lifetime of the battery, charging will not occur at low (below 0 °C/32 °F) or high (over 45 °C/113 °F) temperatures.
The full performance of a new battery is achieved only after two or three complete charge and discharge cycles. The battery can be charged and discharged hundreds of times, but it will eventually wear out. When the talk and standby times are noticeably shorter than normal, buy a new battery. Use
only Acer approved batteries, and recharge your battery only with Acer approved chargers designated for this device.
Unplug the charger from the electrical plug and the device when not in use. Do not leave a fully charged battery connected to the AC adapter, since overcharging may shorten its lifetime. If left unused, a fully charged battery will lose its charge over time. If the battery is completely discharged, it may take a few minutes before the charging indicator appears on the display or before any calls can be made.
Use the battery only for its intended purpose. Never use any charger or battery that is damaged.
Do not short-circuit the battery. Accidental short-circuiting can occur when a metallic object such as a coin, clip, or pen causes direct connection of the positive (+) and negative (-) terminals of the battery. (These look like metal strips on the battery.) This might happen, for example, when you carry a spare battery in your pocket or purse. Short-circuiting the terminals may damage the battery or the connecting object.
Leaving the battery in hot or cold places, such as in a closed car in summer or winter conditions, will reduce the capacity and lifetime of the battery. Always try to keep the battery between 15 °C and 25 °C (59 °F and 77 °F). A device with a hot or cold battery may not work temporarily, even when the battery is fully charged. Battery performance is particularly limited in temperatures well below freezing.
Do not dispose of batteries in a fire as they may explode. Batteries may also explode if damaged. Dispose of batteries according to local regulations. Please recycle when possible. Do not dispose as household waste.
Replacing the battery pack
Your smartphone uses lithium batteries. Replace the battery with the same type as that which came bundled with your
product. Use of another battery may present a risk of fire or explosion.

Warning! Batteries may explode if not handled properly. Do not disassemble or dispose of them in fire. Keep them away from children. Follow local regulations when disposing of used batteries.
Additional safety information
Your device and its enhancements may contain small parts. Keep them out of the reach of small children.
Operating environment

Warning! For safety reasons, turn off all wireless or radio transmitting devices when using your smartphone under the following conditions. These devices may include, but are not limited to: wireless LAN (WLAN), Bluetooth and/or 3G.
Remember to follow any special regulations in force in any area, and always switch off your device when its use is prohibited or when it may cause interference or danger. Use the device only in its normal operating positions. To successfully transmit data files or messages, this device requires a good quality connection to the network. In some cases, transmission of data files or messages may be delayed until such a connection is available. Ensure that the above separation distance instructions are followed until the transmission is completed. Parts of the device are magnetic. Metallic materials may be attracted to the device, and persons with hearing aids should not hold the device to the ear with the hearing aid. Do not place credit cards or other magnetic storage media near the device, because information stored on them may be erased.
Medical devices
Operation of any radio transmitting equipment, including wireless phones, may interfere with the functionality of inadequately protected medical devices. Consult a physician or the manufacturer of the medical device to determine if they are adequately shielded from external RF energy or if you have any questions. Switch off your device in health care facilities when any regulations posted in these areas instruct you to do so. Hospitals or health care facilities may be using equipment that could be sensitive to external RF transmissions.
Pacemakers. Pacemaker manufacturers recommend that a minimum separation of 15.3 cm (6") be maintained between wireless devices and a pacemaker to avoid potential interference with the pacemaker. These recommendations are consistent with the independent research by and recommendations of Wireless Technology Research. Persons with pacemakers should do the following:
- Always keep the device more than 15.3 cm (6") from the pacemaker.
- Not carry the device near your pacemaker when the device is switched on. If you suspect interference, switch off your device, and move it.
Hearing aids. Some digital wireless devices may interfere with some hearing aids. If interference occurs, consult your service provider.
Vehicles
RF signals may affect improperly installed or inadequately shielded electronic systems in motor vehicles such as electronic fuel injection systems, electronic antiskid (antilock) braking systems, electronic speed control systems, and air bag systems. For more information, check with the manufacturer, or its representative, of your vehicle or any equipment that has been
added. Only qualified personnel should service the device, or install the device in a vehicle. Faulty installation or service may be dangerous and may invalidate any warranty that may apply to the device. Check regularly that all wireless equipment in your vehicle is mounted and operating properly. Do not store or carry flammable liquids, gases, or explosive materials in the same compartment as the device, its parts, or enhancements. For vehicles equipped with an air bag, remember that air bags inflate with great force. Do not place objects, including installed or portable wireless equipment in the area over the air bag or in the air bag deployment area. If in-vehicle wireless equipment is improperly installed, and the air bag inflates, serious injury could result. Using your device while flying in aircraft is prohibited. Switch off your device before boarding an aircraft. The use of wireless teledevices in an aircraft may be dangerous to the operation of the aircraft, disrupt the wireless telephone network, and may be illegal.
Potentially explosive environments
Switch off your device when in any area with a potentially explosive atmosphere and obey all signs and instructions. Potentially explosive atmospheres include areas where you would normally be advised to turn off your vehicle engine. Sparks in such areas could cause an explosion or fire resulting in bodily injury or even death. Switch off the device at refueling points such as near gas pumps at service stations. Observe restrictions on the use of radio equipment in fuel depots, storage, and distribution areas; chemical plants; or where blasting operations are in progress. Areas with a potentially explosive atmospheres are often, but not always, clearly marked. They include below deck on boats, chemical transfer or storage facilities, vehicles using liquefied petroleum gas (such as propane or butane), and areas where the air contains chemicals or particles such as grain, dust or metal powders.
Follow any restrictions. Do not use the device where blasting is in progress.
Emergency calls
Important: Wireless phones, including this device, operate using radio signals, wireless networks, landline networks, and user-programmed functions. Because of this, connections in all conditions cannot be guaranteed. You should never rely solely on any wireless device for essential communications like medical emergencies.
To make an emergency call:
- If the device is not on, switch it on. Check for adequate signal strength. Some networks may require that a valid SIM card is properly inserted in the device.
- Press the End button as many times as needed to clear the display and ready the device for calls.
- Enter the official emergency number for your present location. Emergency numbers vary by location.
- Press the Call button.
If certain features are in use, you may first need to turn those features off before you can make an emergency call. Consult this guide or your service provider for more information.
When making an emergency call, give all the necessary information as accurately as possible. Your wireless device may be the only means of communication at the scene of an accident. Do not end the call until given permission to do so.
Disposal and recycling information
Do not throw this electronic device into the trash when discarding.
To minimize pollution and ensure utmost protection of the global environment, please recycle. For more information on the Waste from Electrical and Electronics Equipment (WEEE) regulations, visit www.acer-group.com/public/Sustainability/sustainability01.htm

Mercury advisory
For projectors or electronic products containing an LCD/CRT monitor or display:
Lamp(s) inside this product contain mercury and must be recycled or disposed of according to local, state or federal laws. For more information, contact the Electronic Industries Alliance at www.eiae.org. For lamp-specific disposal information, check www.lamprecycle.org.

Taking care of your smartphone
- DO take care not to scratch the screen of your smartphone. Keep the screen clean. When working with your smartphone, use the supplied stylus or plastic-tipped pens intended for use with touch-sensitive screens. Never use an actual pen or pencil or other sharp object on the screen surface.
- DO NOT expose your smartphone to rain or moisture. Do not let water enter the circuitry through the front panel buttons or expansion slots. In general, treat your smartphone as you would a mobile phone or other small electronic device.
- DO be careful not to drop your smartphone or subject it to any strong impact. Do not place your smartphone in your back pocket.
- DO NOT expose your smartphone to extreme temperatures. For example, do not leave your smartphone on the dashboard of a car on a hot day or when temperatures are below freezing point. Also, keep it away from heaters and other sources of heat.
- DO NOT use or store your smartphone in any location that is dusty, damp or wet.
- DO use a soft, damp cloth to clean your smartphone. If the surface of the screen becomes soiled, clean it with a soft cloth moistened with diluted window-cleaning solution.
- DO NOT press down on the screen with force, otherwise you may crack the screen.
Safety regulations
RoHS compliance
This product is in compliance with Directive 2002/95/EC of the European Parliament and of the Council of 27 January 2003, on the restriction of the use of certain hazardous substances in electrical and electronic equipment (RoHS) and its amendments.
LCD pixel statement
The LCD unit is produced with high-precision manufacturing techniques. Nevertheless, some pixels may occasionally misfire or appear as black or red dots. This has no effect on the recorded image and does not constitute a malfunction.
Radio device regulatory notice

Note: Regulatory information below is for models with wireless LAN and/or Bluetooth only.
General
This product complies with the radio frequency and safety standards of any country or region in which it has been approved for wireless use. Depending on configuration, this product may or may not contain wireless radio devices (such as wireless LAN and/or Bluetooth modules). Information below is for products with such devices.
Preventing hearing loss

Caution: Permanent hearing loss may occur if earphones or headphones are used at high volume for prolonged periods of time.
This device has been tested to comply with the Sound Pressure Level requirement laid down in the applicable EN 50332-1 and/or EN 50332-2 standards.

Note: For France, mobile headphones or earphones for this device have been tested to comply with the Sound Pressure requirement laid done in the applicable NF EN 50332-1:2000 and/or NF EN 50332-2:2003 standards as required by French Article L. 5232-1.
Wireless operation channels for different domains
N. America 2.412-2.462 GHz Ch01 through Ch11
Japan 2.412-2.484 GHz Ch01 through Ch14
Europe ETSI 2.412-2.472 GHz Ch01 through Ch13
France: Restricted wireless frequency bands
Some areas of France have a restricted frequency band. The worst case maximum authorized power indoors are:
- 10 mW for the entire 2.4 GHz band (2400 MHz - 2483.5 MHz)
- 100 mW for frequencies between 2446.5 MHz and 2483.5 MHz

Note: Channels 10 through 13 inclusive operate in the band 2446.6 MHz to 2483.5 MHz.
There are few possibilities for outdoor use: On private property or on the private property of public persons, use is subject to a preliminary authorization procedure by the Ministry of Defense, with maximum authorized power of 100 mW in the 2446.5 - 2483.5 MHz band. Use outdoors on public property is not permitted.
In the departments listed below, for the entire 2.4 GHz band:
• Maximum authorized power indoors is 100 mW
• Maximum authorized power outdoors is 10 mW
Departments in which the use of the 2400 - 2483.5 MHz band is permitted with an EIRP of less than 100 mW indoors and less than 10 mW outdoors:
| 01 Ain Orientales | 36 Indre | 67 Bas Rhin |
| 02 Aisne | 37 Indre et Loire | 68 Haut Rhin |
| 03 Allier | 41 Loir et Cher | 70 Haute Saone |
| 05 Hautes Alpes | 45 Loret | 71 Saone et Loire |
| 08 Ardennes | 50 Manche | 75 Paris |
| 09 Ariege | 55 Meuse | 82 Tarn et Garonne |
| 11 Aude | 58 Nievre | 84 Vaucluse |
| 12 Aveyron | 59 Nord | 88 Vosges |
| 16 Charente | 60 Oise | 89 Yonne |
| 24 Dordogne | 61 Orne | 90 Territoire de Belfort |
| 25 Doubs | 63 Puy Du Dome | 94 Val de Marne |
| 26 Drome | 64 Pyrenees Atlantique | |
| 32 Gers | 66 Pyrenees |
This requirement is likely to change over time, allowing you to use your wireless LAN card in more areas within France. Please check with ART (www.art-telecom.fr) for the latest information.

Note: Your WLAN card transmitts less than 100 mW, but more than 10 mW.
List of National Codes
This equipment may be operated in the following countries:
| Country | ISO 3166(2 letter code) | Country | ISO 3166(2 letter code) |
| Austria | AT | Malta | MT |
| Belgium | BE | Netherlands | NT |
| Cyprus | CY | Poland | PL |
| Czech Republic | CZ | Portugal | PT |
| Denmark | DK | Slovakia | SK |
| Estonia | EE | Slovenia | SL |
| Finland | FI | Spain | ES |
| France | FR | Sweden | SE |
| Germany | DE | United Kingdom | GB |
| Greece | GR | Iceland | IS |
| Hungary | HU | Liechtenstein | LI |
| Ireland | IE | Norway | NO |
| Italy | IT | Switzerland | CH |
| Latvia | LV | Bulgaria | BG |
| Lithuania | LT | Romania | RO |
| Luxembourg | LU | Turkey | TR |
FCC regulation
This mobile phone complies with part 15 of the FCC Rules. Operation is subject to the following two conditions: (1) This device may not cause harmful interference, and (2) this device must accept any interference received, including interference that may cause undesired operation.
This mobile phone has been tested and found to comply with the limits for a Class B digital device, pursuant to Part 15 of the FCC Rules. These limits are designed to provide reasonable protection against harmful interference in a residential installation. This equipment generates, uses and can radiated
radio frequency energy and, if not installed and used in accordance with the instructions, may cause harmful interference to radio communications. However, there is no guarantee that interference will not occur in a particular installation If this equipment does cause harmful interference to radio or television reception, which can be determined by turning the equipment off and on, the user is encouraged to try to correct the interference by one or more of the following measures:
- Reorient or relocate the receiving antenna.
- Increase the separation between the equipment and receiver.
- Connect the equipment into an outlet on a circuit different from that to which the receiver is connected.
- Consult the dealer or an experienced radio/TV technician for help.
Changes or modifications not expressly approved by the party responsible for compliance could void the user's authority to operate the equipment.
The equipment complies with FCC RF exposure limits set forth for an uncontrolled environment.
The antenna(s) used for this transmitter must not be co-located or operating in conjunction with any other antenna or transmitter.
RF Exposure Information (SAR)
SAR data table
FCC_US model
Head (W/kg) Body (W/kg)
0.435 0.697
FCC ID
FCC ID_US model
BOOEU
For body worn operation, this phone has been tested and meets the FCC RF exposure guidelines for use with an accessory that contains no metal and the positions the handset a minimum of 1.5 cm from the body. Use of other accessories may not ensure compliance with FCC RF exposure guidelines. If you do not use a body-worn accessory and are not holding the phone at the ear, position the handset a minimum of 1.5 cm from your body when the phone is switched on.
Certificate Information (SAR)
This device meets the EU requirements (1999/519/EC) on the limitation of exposure of the general public to electromagnetic fields by way of health protection.
The limits are part of extensive recommendations for the protection of the general public. These recommendations have been developed and checked by independent scientific organizations through regular and thorough evaluations of scientific studies. To guarantee the safety of all persons, regardless of age and health, the limits include a significant safety buffer.
Before radio devices can be put in circulation, their agreement with European laws or limits must be confirmed; only then may the CE symbol be applied.
The unit of measurement for the European Council's recommended limit for mobile telephones is the "Specific Absorption Rate" (SAR). This SAR limit is 2.0 W/kg, averaged over 10 g of body tissue. It meets the requirements of the International Commission on Non-Ionizing Radiation Protection (ICNIRP) and was included in the European Standard EN 50360 for mobile radio devices. The SAR regulation for mobile telephones is in line with European Standard EN 62209-1. The maximum SAR value is calculated at the highest output level in all frequency bands of the mobile telephone. During use, the actual SAR level is usually much lower than the maximum value, because the mobile telephone works in different output levels. It only transmits with as much output as is required to reach the network. In general the following applies: The closer you are to a base station, the lower the transmission output of your mobile telephone. The tested SAR of this device is as follows:
CE NCC
Head (W/kg 10g)
Body (W/kg 10g)
Head (W/kg 10g)
Body (W/kg 10g)
0.435 0.697 0.522 NA
NCC warning
警語
Lithium-ion battery warning


Declaration of Conformity
We, Acer Incorporated,
of 8F., No. 88, Sec. 1, Hsin Tai Wu Rd. Hsichih Taipei Hsien 221, Taiwan
Declare under sole responsibility that the product:
M o d e l : P 3 0 0
Description: Smart HandHeld
To which this declaration relates, is in conformity with the following standards and/or other normative documents:
●EN 301 511 V9.0.2
●EN 300 328 V1.7.1
●EN 301 908-1/-2 V3.2.1
●EN 300 440-1 V1.4.1/ EN300 440-2 V1.2.1
●EN 301 489-1 V1.8.1/-3 V1.4.1/-7 V1.3.1/-17 V1.3.2/-24 V.1.4.1
●EN 55022:2006/A1:2007 Class B; EN 55024:1998/A1:2001/A2:2003
●EN 60950-1:2006+A11:2009
●EN 50332-1:2000/-2:2003
●EN 50360:2001/ EN 62209-1:2006/ EN62311:2008/ OET65C
We hereby declare that the above named product is in conformance to all the essential requirements of the R&TTE Directive (99/5/EC) issued by the Commission of the European Community.
The conformity assessment procedure referred to in Article 10 and detailed in Annex [IV] of directive 1999/5/EC has been followed related to Articles
● R&TTE Article 3.1 (a) Health and Safety
● R&TTE Article 3.1 (b) EMC
● R&TTE Article 3.2 Spectrum Usage
with the involvement of the following Notified Body:
CETECOM, Untertuerkheimer Str. 6 – 10 66117 Saarbruecken
Identification mark: 0682 (Notified Body) CE
The technical documentation relevant to the above equipment will be held at:
Acer Incorporated
8F., No. 88, Sec. 1, Hsin Tai Wu Rd. Hsichih Taipei Hsien 221, Taiwan
Authorized Person:

Name: Harriot S.L. Lee
A
acer sync
adding a Google account 48
managing your account .. 50
settings 49
synchronizing 48
applications 17
history 17
B
backlight settings 61
battery
charging 14
information 74
Bluetooth
connections 40
headset 67
C
calendar 51
call forwarding 41
call history 19
dialing 19
options 24
call waiting 42
caller ID 41
calls
answering 21
ending 22
from other applications .. 20
onscreen options 21
putting on hold 22
swapping between ..... 22
camera
icons and indicators ...... 33
information 74
shooting a video 35
supported formats ...... 35
taking a photo 34
connecting to a PC 47
connectivity 74
contacts
adding and editing ...... 43
making calls 19
D
display 73
E
e-mail 32
end button 43
error messages 71
exploring 56
F
FAQs 71
features 7
fixed dialing 42
flight mode 37
G
GPRS 68
H
help
menus 8
sources 8
|
international numbers ..... 20
L
LED indicators 12
M
MMS messages 29
N
naming 59
navigation buttons ...... 25
network selecting 39
0
onscreen keyboard 25
onscreen number pad ...... 19
P
performance 73
personalizing 59
phone connections .... 39
settings 41
photos and videos editing 36
Q
QWERTY keyboard 26
R
ringtones 43
S
safety regulations 75
screen options 64
SD card 70
information 74
software removing 63
sounds and notifications .... 60
speakerphone 22
specifications 73
spinlets browsing 54
launching 54
sharing 56
streaming media 57
stylus 25
system certificates ...... 61
T
tasks 51
troubleshooting 71
turning on 16
U
unpacking 10, 16
USB connector 74
V
views 11
voice calls the voice call screen ..... 21
voice mail 42
volume adjusting 60
W
Windows Media Player ..... 53


- Acer P300 User Guide
- End User Licence Agreement
- GRANT OF LICENSE
- RESTRICTIONS
- SUPPORT SERVICES
- ACER LIVE UPDATE
- OWNERSHIP AND COPYRIGHT
- TRADEMARKS
- DISCLAIMER OF WARRANTIES
- EXCLUSION OF INCIDENTAL, CONSEQUENTIAL AND CERTAIN OTHER DAMAGES
- LIMITATION OF LIABILITY AND REMEDIES
- TERMINATION
- GENERAL
- ADDITIONAL PROVISIONS APPLICABLE TO THIRD PARTY SOFTWARE AND SERVICES
- Privacy policy
- Table of Contents
- Getting to know your smartphone
- Chapter 1: Setting Up
- Chapter 2: Using Your Smartphone
- Chapter 3: Making Calls
- Chapter 4: Input Devices
- Chapter 5: Messaging
- Chapter 6: Using the Camera
- Chapter 7: Advanced Settings
- Chapter 8: Accessories and Tips
- Appendix
- Features and functions
- Product features
- Other sources of help
- For information on: Refer to:
- Accessing the help menus
- Product registration
- How to register
- Unpacking your smartphone
- Getting to know your smartphone Views
- Installing or removing the battery
- Installing the battery
- Charging the battery
- Removing the battery
- Installing a SIM or microSD Card
- SIM card lock
- Turning on for the first time
- Entering your PIN
- Activating a new SIM card
- The Today screen
- Connecting to your PC and synchronizing data
- Before making a call
- Making a call
- The onscreen number pad
- Making a call to one of your contacts
- Dialing a number from Call History
- Dialing from other applications
- Dialing an international number
- The voice call screen
- Onscreen call options
- Answering a call
- Rejecting a call
- Ending a call
- Putting a call on hold
- Swapping between calls
- Conference calls
- Using the speakerphone
- Adding notes
- Muting a call
- Saving a dialed number to contacts
- Redialing a missed call
- Call History
- Call History Menu options
- The stylus
- The onscreen keyboard
- Mode Description
- The QWERTY keyboard
- No. Item Description
- The messaging screen
- Managing your folders
- Text (SMS) messages
- Creating and sending text messages
- Replying to text messages
- Sorting text messages
- MMS messages
- Setting up MMS messaging
- Setting up MMS profiles
- Creating MMS messages
- Replying to MMS messages
- Sorting MMS messages
- Camera icons and indicators
- Icon Description
- Camera:
- Video:
- Taking a photo
- Shooting a video
- Supported formats
- Type Formats
- Saving photos and videos to a microSD Card
- Photo and video options
- Editing photos and videos
- Putting your smartphone in flight mode
- Entering flight mode
- Comm. Manager
- Using the Comm. Manager
- Activating or deactivating connections
- Adjusting connection settings
- Phone connections
- Selecting a network
- Detecting a network automatically
- Selecting a network manually
- Adjusting Bluetooth settings
- Bluetooth connections
- Creating new Bluetooth connections
- Phone settings
- Configuring caller options
- Setting up caller ID
- Setting up call forwarding
- Setting up call waiting
- Setting up voice mail and text messages
- Setting up fixed dialing
- Choosing a ringtone
- Configuring End button functions
- Managing your phonebook
- Adding a contact
- Editing a contact
- Copying contact information
- Copying a contact from internal memory to the SIM card
- Copying a contact from the SIM card to internal memory
- Deleting contacts
- Assigning a ringtone and picture to specific contacts
- Connecting to a PC and installing software
- Connecting to a PC
- Configuring USB to PC settings
- Acer Sync
- Adding a Google account
- Synchronizing data
- Data type Description
- Preference settings
- Settings Description
- Synchronizing and managing your account
- Other functions
- Managing your calendar
- Setting a new appointment
- Creating tasks
- Creating a new task
- Browsing the Internet
- Starting Windows Live
- Multimedia playback
- Using Windows Media Player
- Playing video or audio files
- Spinlets
- Launching Spinlets
- Browsing Spinlets gallery
- Browsing albums
- Browsing genres
- Sort
- Search
- Exploring Spinlets widgets
- Sharing your Spinlets
- Streaming Media
- Satellite Data Update
- Tap
- Personalizing your smartphone
- Naming your smartphone
- Adjusting the volume
- Configuring sounds and notifications
- Configuring backlight settings
- Managing system certificates
- Setting the date and time
- Setting alarms
- Configuring regional settings
- Viewing power status
- Power saving options
- Removing programs
- Configuring screen options
- Updating your smartphone
- Setting a schedule
- Resetting your smartphone
- Reset
- Clean boot
- Using the headset
- Using a Bluetooth headset
- To set up your Bluetooth headset
- Using your smartphone as a modem
- Using a USB connection
- Using a Bluetooth connection
- Inserting a microSD Card
- FAQ, troubleshooting and error messages
- Error messages
- Specifications
- Performance
- Display
- Multimedia
- USB connector
- Connectivity
- Camera
- Expansion
- GPS
- Battery
- Size and weight
- Warnings and precautions
- CAUTION when listening to music
- Battery information
- Replacing the battery pack
- Additional safety information
- Operating environment
- Medical devices
- Vehicles
- Potentially explosive environments
- Emergency calls
- Disposal and recycling information
- Mercury advisory
- Taking care of your smartphone
- Safety regulations
- RoHS compliance
- LCD pixel statement
- Radio device regulatory notice
- Preventing hearing loss
- Wireless operation channels for different domains
- France: Restricted wireless frequency bands
- List of National Codes
- FCC regulation
- RF Exposure Information (SAR)
- FCC ID
- Certificate Information (SAR)
- CE NCC
- NCC warning
- 警語
- Lithium-ion battery warning
- Declaration of Conformity
- A
- B
- C
- D
- E
- F
- G
- H
- |
- L
- M
- N
- 0
- P
- Q
- R
- S
- T
- U
- V
- W
Brand : ACER
Model : NeoTouch P300
Category : Mobile Phone