
DX900 - Mobile Phone ACER - Free user manual and instructions
Find the device manual for free DX900 ACER in PDF.

| Product Type | Smartphone |
| Brand | Acer |
| Model | DX900 |
| Dimensions | 106 x 59 x 15 mm (4.17 x 2.32 x 0.59 in) |
| Weight | 150 g (5.29 oz) |
| Operating System | Windows Mobile 6.1 Professional |
| Processor | Samsung S3C6410 533 MHz |
| Display | 2.8 inches, 240 x 320 pixels, TFT resistive touchscreen |
| Memory | 128 MB RAM, 256 MB ROM; microSD slot up to 8 GB |
| Camera | 2 MP rear, no front camera |
| Connectivity | Wi-Fi 802.11 b/g, Bluetooth 2.0, GPS (A-GPS support), mini-USB 2.0 |
| Battery | Removable Li-Ion 1530 mAh; stand-by up to 200 h, talk time up to 5 h |
| Dual SIM | Yes, dual SIM (2G/2.5G standby) |
| Radio | FM radio |
| Cleaning Instructions | Wipe with a dry soft cloth; avoid liquids and harsh chemicals |
| Safety Warnings | Do not expose to water or extreme temperatures; use only original charger |
| Spare Parts | Battery, stylus, USB cable, charger, microSD card |
| Repairability | User‑replaceable battery; other repairs by qualified technician |
| General Information | Released in 2008; supports GSM quad‑band 850/900/1800/1900 |
Frequently Asked Questions - DX900 ACER
User questions about DX900 ACER
0 question about this device. Answer the ones you know or ask your own.
Ask a new question about this device
Download the instructions for your Mobile Phone in PDF format for free! Find your manual DX900 - ACER and take your electronic device back in hand. On this page are published all the documents necessary for the use of your device. DX900 by ACER.
USER MANUAL DX900 ACER
Please Read Before Proceeding Please Read Before Proceeding
- Avoid heavily pressing on the touch screen.
- Avoid heavily pressing on the touch screen with the stylus or your fingers.
- This product is not charged when shipped from the factory. When you use this product the first time, we recommend that you install the battery as illustrated and fully charge it for about 8 hours before use.
- Do not remove the battery while charging.
- Before installing the SIM card, launch Communication Manager, the maplication Manager
the button. When the color of the icon turns orange , thisindicates that the wireless connection of the Pocket PC is disabled
- When aboard an aircraft, at a medical facility, or at the gas pump where wireless communication devices are prohibited, please launch the Communication Manager and then to the Minnesota. When the color of the icon turns orange the Flight Mode is activated and the wireless connection of the Pocket PC is disabled.
- In case the Pocket PC is damaged, send it back to the dealer for repair. Do not attempt to disassemble the Pocket PC on your own; otherwise the warranty will be void.
Where to Find Information
For information on: FSee this source: See this source: See this source
| Programs on your Pocket PC | This User's Guide and Pocket PC Help. To view HelpHelp |
| Additional programs that can be installed on the Pocket PC | The Pocket PC Getting Started CD. |
| Connecting to and synchronizing with a desktop computer | Check the user's guide that comes with this product or look for the online help relevant to synchronization tools on the desktop PC or the Pocket PC. |
| Up-to-date information on your Pocket PC | http://www.microsoft.com/windowsmobile/ |
Note Note
This document lists the functions, specifications, and illustrations for reference only. The actual purchased product should be taken as the standard. Supported features for this product is subject to version differences. We reserve the right to make modifications to the features and contents contained in the instruction manual and the product.
Trademarks and Copyright
Copyright ^© 2008 Acer Incorporated. All Rights Reserved.
Trademarks and trade names mentioned in this document are those of their respective owners.
The Bluetooth ^® word mark and logos are owned by the Bluetooth SIG, Inc. and any use of such marks by Acer Incorporated is under license. Other trademarks and trade names are those of their respective owners.
Contents
1 Getting Started Getting Started 1-1
PACKAGE CONTENT 1-1
EXTERNAL VIEWS 1-2
HARDWARE HOTKEY FUNCTIONS 1-4
SIM CARD(S) 1-6
Installing the SIM Card(s) 1-6
Removing the SIM Card(s).... 1-7
BATTERY 1-8
Installing the Battery 1-8
Removing the Battery.... 1-9
CHARGING POWER AND POWER SUPPLY 1-10
GETTING STARTED 1-12
POWER ON AND OFF.... 1-13
Sleep Mode.... 1-14
Turn on the Screen 1-15
Restarting the Pocket PC.... 1-16
2 Using the Pocket PC Using the Pocket PC 2-1
START 2-1
Screen....2-1
Today Screen 2-3
Programs 2-7
System Application Programs 2-9
SPB MOBILE SHELL 2-12
Starting Spb Mobile Shell 2-12
Using Spb Mobile Shell 2-14
Configuring Spb Mobile Shell.... 2-18
COMMUNICATION MANAGER 2-19
Switching a Connection On / Off 2-20
Managing Dual SIM Cards on a Single Device 2-21
Flight Mode 2-22
ENTER INFORMATION ON YOUR POCKET PC 2-23
Enter Text Using the Input Panel 2-24
Write on the Screen 2-28
Draw on the Screen 2-30
Record a Message.... 2-31
Voice Commander 2-33
3 Voice Command and Satellite Navigation Voice Command and Satellite Navigation
NAVIGATION DEVICE INSTALLATION 3-1
GPS NAVIGATION SOFTWARE INSTALLATION 3-2
CONDITIONS FOR USING GPS CAR NAVIGATION 3-2
SATELLITE DATA UPDATE (NOT SUPPORTED IN USA) 3-4
LOCATION SMS 3-7
GPS VIEWER 3-9
4 Using the Phone the Phone 4-1
ADJUSTING THE PHONE VOLUME.... 4-4
PHONE FUNCTIONS 4-5
Turning on Your Phone(s) 4-5
Making a Call 4-6
Answering / Ignoring a Call.... 4-11
Ending a Call 4-12
Video Call 4-13
CUSTOMIZING YOUR PHONE 4-16
PHONE APPLICATION PROGRAMS 4-17
SIM Manager 4-17
SIM Tool Kit 4-19
SMS Sender 4-20
Speed Dial.... 4-21
5 Customize Your Pocket PC Customize Your Pocket PC 5-1
ADJUSTING SETTINGS....5-1
NOTIFICATIONS 5-2
POWER PREFERENCE SETTINGS 5-3
BACKLIGHT 5-4
LIGHTSENSOR....5-5
GRAVITY SENSOR 5-6
MICROPHONE 5-7
ADJUST VOLUME 5-8
MEMORY OPTIMIZATION 5-9
SCENARIOS....5-10
FIND AND ORGANIZE INFORMATION 5-11
NAVIGATION BAR AND COMMAND BAR 5-12
POP-UP MENUS 5-13
REDEFINE HOTKEYS 5-14
6 Synchronization Synchronization 6-1
WINDOWS VISTA PART 6-1
WINDOWS XP/2000/98 PART 6-3
INSTALLING AND USING ACTIVES YNC 6-4
FAQ About Synchronization 6-6
USB SYNCHRONIZATION 6-7
SYNCHRONIZATION TOOL ON POCKET PC 6-10
SYNCHRONIZING USING BLUETOOTH 6-11
7 Connections Connections 7-1
CONNECTING TO THE INTERNET.... 7-1
Connection Wizard 7-1
Setting the GPRS Connection.... 7-3
Starting GPRS Connection.... 7-5
Disconnecting GPRS....7-7
USING BLUETOOTH 7-8
Setup the Bluetooth Connection.... 7-9
INTERNET SHARING....7-13
CSD TYPE....7-14
CONNECTING WITH A PERSONAL COMPUTER 7-15
WIRELESS LAN TRANSMISSION 7-15
8 Using Wireless LAN iLess LAN 8-1
CONNECTING TO WIRELESS LAN 8-2
CONFIGURE YOUR WIRELESS NETWORK 8-3
WLAN Setup Scenarios.... 8-3
Configure Your Wireless Network (Normal Setup).... 8-4
Configure Your Wireless Network (Proxy Setup).... 8-7
9 E-mails and Messages mails and Messages 9-1
MESSAGE ACCOUNTS 9-1
TEXT MESSAGES....9-3
Reading Received Text Messages 9-3
Creating a Text Message.... 9-5
MULTIMEDIA MESSAGES 9-7
Reading MMS Messages 9-7
Creating an MMS Message 9-8
E-MAILS....9-9
Synchronizing E-mail Messages.... 9-10
Connecting Directly to the Mail Server 9-11
E-mail Server Setup 9-12
Sending / Receiving E-mails 9-14
Direct Push Technology Alert 9-16
WINDOWS LIVE ^TM MESSENGER 9-18
Setting Up....9-19
Working with Contacts....9-20
Chatting with Contacts.... 9-21
Multimedia Multimedia
10-1
USING CAMERA 10-1
Pocket PC Exterior and Camera.... 10-1
How to Use the Camera?...... 10-3
Common Tools for Camera.... 10-7
Common Tools for Camcorder.... 10-10
Advanced Setup for Camera or Camcorder.... 10-12
ALBUM....10-15
Preview Album Information.... 10-15
Slideshow Settings 10-17
NAMECARD MANAGER.... 10-18
Digitize New Name Cards 10-18
Name Cards Management 10-21
Companion Programs Companion Programs
11-1
CALENDAR: SCHEDULING APPOINTMENTS AND MEETINGS.... 11-2
Create an Appointment 11-3
Use the Summary Screen 11-4
Create Meeting Requests 11-4
Schedule a Meeting 11-5
CONTACTS 11-6
Finding a Contact 11-6
Managing Your Contacts 11-7
Creating a Contact 11-8
Using the Summary Screen 11-9
TASKS: KEEPING A TO DO LIST 11-10
Create a Task.... 11-11
Use the Summary Screen 11-12
NOTES: CAPTURING THOUGHTS AND IDEAS 11-13
Create a Note 11-14
WORD MOBILE 11-15
EXCEL MOBILE 11-18
Tips for Working in Excel Mobile 11-20
POWERPOINT MOBILE 11-21
WINDOWS MEDIA PLAYER.... 11-22
STREAMING PLAYER 11-24
INTERNET EXPLORER 11-25
Using Internet Explorer.... 11-25
The Mobile Favorites Folder.... 11-27
Favorite Links 11-28
Synchronize Mobile Favorites 11-28
12 Maintaining the Pocket PC Maintaining the Pocket PC 12-1
BACKUP UTILITY.... 12-1
Storage Space.... 12-1
Backup Files 12-2
Advanced Settings Options 12-3
Restore Files 12-5
ADDING OR REMOVING PROGRAMS.... 12-7
Add Programs Using Synchronization Tools.... 12-7
Add a Program Directly from the Internet 12-8
Add a Program to the Start Menu.... 12-9
Remove Programs 12-10
MANAGE MEMORY 12-11
View Memory Status.... 12-11
Find Available Memory.... 12-12
SYSTEM INFORMATION.... 12-15
13 Voice Commander Voice Commander 13-1
STARTING VOICE COMMANDER 13-2
VOICE COMMAND FORMAT 13-3
VOICE COMMANDER SETTINGS.... 13-5
Contacts Settings Page 13-5
Application Settings Page.... 13-8
Music Settings Page 13-10
Digit Training Page.... 13-12
Digit Settings Page.... 13-14
Advanced Settings Page.... 13-15
FAQ....13-16
14 Specifications Specifications 14-1
15 Regulation Notice and Safety Declaration Regulation Notice and Safety Declaration
SAR INFORMATION 15-1
HEALTH AND SAFETY INFORMATION.... 15-2
REGULATORY NOTICES.... 15-6
WEEE NOTICES 15-9
16 FAQ FAQ 16-1
17 Index 17-1

1 Getting Started

Package Content
Pocket PC, stylus, battery, Getting Started CD, Quick Start Guide, AC adapter, USB cable, headset, leather case.

① Pocket PC
②Stylus
③ Battery
④ Getting Started CD
⑤ Quick Start Guide
⑥USB Cable
⑦ AC Adapter
External Views
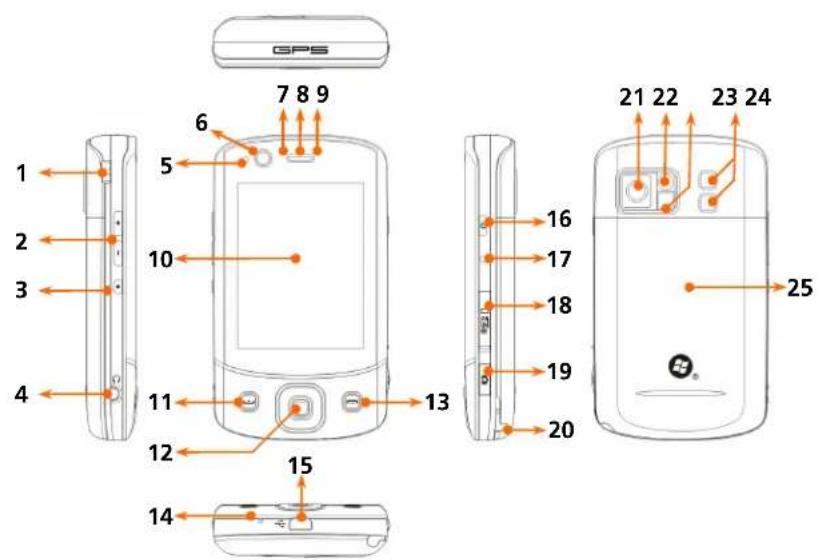
| 1. Strap holder 2 | 2. Volume control key |
| 3. Record key / Voice Commander hot key | 4. Headset connector |
| 5. Light sensor 6 | 6. Video conference camera |
| 7. Bluetooth / WLAN / GPS LED indicator | 8. Phone Receiver |
| 9. Charging / Mobile Phone LED indicator | 10. Display, Touch screen |
11. SEND S E N D O T O N  | 12. Navigation pad |
13. END E N D O T O N  | 14. Microphone |
| 15. Mini USB connector 16 | 16. POWER POWER |
| 17. RESET reset | 18 | 18. MicroSD slot |
| 19. Camera hot key or Camcorder | 20. Styler holder | |
| 21. Camera lens | 22 | 22. Preview mirror |
| 23. Flashlight LED | 24 | 24. Speaker |
| 25. Back cover, battery is inside | ||
Hardware Hotkey Functions
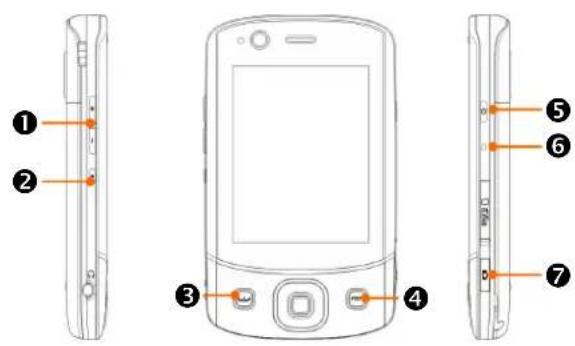
Long PressLong Pre
Short Press Short Press Hardware Button Hardware Button (Press and hold for a few ( (Press once and release)(Press once and release) seconds and release)sec

Adjust volume --

Record
/ Voice Commander
Notes

Phone / dial / redial / answer
Telephone hold

- Hang up during call
- Disconnect during GPRS connection
-
Skip to Today screen while in other programs
-
Turns off the phone function
- Turns on the phone function

Turn on/off screen, enter the Sleep mode
Enter Power off mode of the Pocket PC
| Short Press Short PressHardware Button(Press once and release) | Long Press Long Press (Press and hold for a few ( seconds and release)sec | |
| 5 + 6 ● 6 | POWER POWER + RESET RESET--button = Cold boot | |
| 6 ● | RESET RESET | -- |
| 7 ● | Camera or Camera Shutter | -- |
SIM Card(s)
Your device is designed for operating two SIM cards simultaneously, so you can receive and make calls on either number. Both the SIM card slots are capable of carrying GSM SIM cards. The slot on the right is dedicated for GPRS/3G compatible SIM card. To make video calls or send an MMS message, please make sure your GPRS/3G SIM card has been installed in SIM card slot correctly.
Installing the SIM Card(s)
- Before installing or removing the SIM card, make sure all the wireless connections are disabled. Launch Communication Manager, Manager the button to turn it orange.
- Press the POWERPOWER to turn off the screen.
- Disconnect the USB cable or AC adapter if either of them is connected to your Pocket PC. The removal of SIM card or battery while the Pocket PC is connected with a USB cable or AC adapter may damage your device.
- Turn over your Pocket PC and remove the back cover.
- With the missing corner facing out of the slot and the metallic contact facing down, slide the SIM card into the slot.

Removing the SIM Card(s)
- Disconnect the USB cable or AC adapter if either of them is connected to your Pocket PC.
- If the battery is installed, turn off the device and remove the battery.
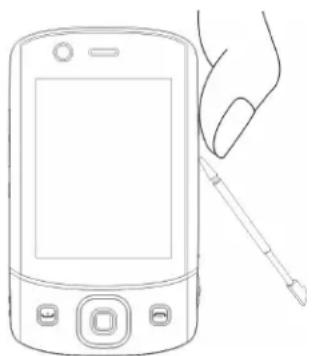
- With a small amount of pressure, plug your stylus tip a bit into the hole on the top of SIM slot, use it to hook the SIM card edge until it loosens from the SIM card holder.
- Use your finger to slightly slide the SIM card out of the card slot.

natural_image
Two-step diagram showing a hand inserting a screwdriver into a device casing (no text or symbols present)Battery
Using the Pocket PC for the First Timesing the Pocket PC for the First Time. If you are opening this product for the first time, the main battery and the Pocket PC are packed separately inside the product package.
Installing the Battery
- Turn over the Pocket PC and remove the back cover.
- Place the battery in the back of Pocket PC. Make sure that the golden contacts are aligned to the battery box.
- Gently insert the battery until it clicks.
- Replace the back cover.

flowchart
graph TD
    A["Hand gestures"] --> B["Device state ①"]
    B --> C["Device state ②"]
    C --> D["Device state ③"]
Removing the Battery
- If the phone, GPRS or wireless LAN connection function is already activated, deactivate it first and then replace the battery.
- Disconnect the USB cable or AC adapter if either of them is connected to your Pocket PC. The removal of SIM card or battery while the Pocket PC is connected with a USB cable or AC adapter may damage your device.
- Turn over your Pocket PC and remove the back cover.
- Remove the battery.
Charging Power and Power Supply
①Connect the AC adapter plug to any household power outlet.
②Connect the other plug from the AC adapter to the USB port. The Pocket PC starts to charge automatically.
③If you need to connect Pocket PC and desktop computer, you could connect the USB cable to the USB port. And then connect the other end of the USB cable to the USB port on the desktop computer. Your Pocket PC will also charge at the same time.
But don't remove the battery while charging. Once you remove the battery, Pocket PC will not work.

- It will take about 8 hours to fully charge the battery after the first time you open the package. Subsequent charging will only take about 3 hours. After charging, you can disconnect the AC adapter and carry the Pocket PC around portably. To maintain smooth operation, charge the power regularly.
- View the battery icon: on the upper right corner to check the power usage condition.
- The LED indicator on the top of the Pocket PC will indicate the various functions that are currently in use.
| LED LED indicators | Behavior / MeaningBehavior / Mea |
| Red | ●Red always light: Device is charging.●Red sparkling once every 4 seconds: Warning of battery low level, missed calls or unread messages.●Red sparkling continuously: Battery level very low. |
| Green | ●Green always light: Battery charging is full.●Green sparkling once every 4 seconds: GSM is connecting on line. |
| Blue | ●Blue sparkling once every 4 seconds: Bluetooth enabled. |
| Amber | Amber sparkling once every 4 seconds: WLAN enabled. |
| White | White sparkling once every 4 seconds: GPS enabled. |
Getting Started
Getting Started@beddes you with basic concepts and shortcuts to certain primary features and settings.
Tap > Programs Pro Getting Started Getting Started

1 Tap a subject to view how to get started.
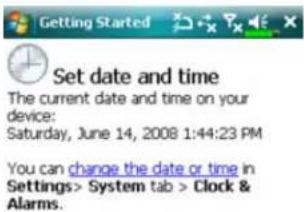
2 Tap hyperlink to execute the specified command.
3 Tap BackButton to the Getting Started Geating Started

Power On and Off

Power Down

User unsaved data will be lost if press Yes to continue.
Yes
No
-
Press and hold the POWER POWER button on the Pocket PC and then tap Yes/Yesturn off the Pocket PC. All functions will be disabled; this is not the same as entering Sleep mode.
-
To turn on, simply press the POWER POWERonce.
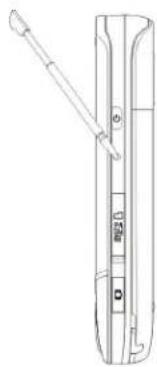
Using the Stylus to Touch the Screen to Touch the Screen
- Your Pocket PC is designed for graphics-based operation. Generally speaking, we usually “use the stylus to perform basic actions such as tap, drag, and tap and hold” on the touch screen. Other actions such as reset and cold boot will require the use of the stylus tip.
- Pull the stylus to full-length to make it easier to tap the screen during operation. When kept completely in the stylus holder, the stylus length shortens.
- Avoid heavily pressing on the touch screen with the stylus or your fingers.
Sleep Mode
-
Press the POWER BOMER of the Pocket PC to enter the Sleep mode. At this time, the screen is turned off and all peripheral devices enter the power-saving mode. But if the phone is turned on, it is still in the call waiting mode.
-
To turn on the screen later, just press the POWER BOMMER

- Tap >SettingsSetSystem tab > PowerPowd then the Advanced Advanced the device to turn off automatically after waiting for a certain time period.
Turn on the Screen
This product is designed with a power-saving feature. If the screen is turned off, press the POWER POWER of the Pocket PC to turn it on.

If the screen is too dark and you cannot see clearly, set the proper brightness level for the backlight.
Tap > SettingsSetSystem System
BacklightBacklightLevelLevel
Restarting the Pocket PC
Appropriate situation: If the Pocket PC is unable to maintain normal operation, has no response, or if the screen is frozen.
For your consideration, factoring into your safety and convenience, please refer to the following instructions in order:
| ResetReset | Press the RESETRESET on of Pocket PC with the tip of the stylus. |
| Default SettingsDefa proceduresprocedure | If the touch screen is functional, please tap > ProgramsProilitiesUDefault SettingsDefault Settings |
| Clean BootClean Bo | Press and hold both POWER BOWERand RESETRESET button for a while, then release them simultaneously. Wait for a few seconds until the screen wakes up displaying the model name, firmware version and firmware build date of your device, instantly press and hold Continue pressing and release it when you see an inquiry box shown on the screen. |
ResetReset
Reset method: Press the RESETRESET of Pocket PC with the tip of the stylus.
natural_image
Technical line drawing of a mechanical component with no visible text or symbols- Appropriate situation: If the Pocket PC is unable to maintain normal operation, has no response, or if the screen is frozen.
Result: In a moment, when Pocket PC automatically completes the system startup process, the last display will be the Today screen. This will retain the Microsoft Windows, factory pre-installed applications, and user's input data, newly installed programs, and user custom settings.
Default SettingsDefault Settings
Tap ➤ Programs Productities Util Default Settings & Settings


-
If this application is inadvertently accessed, please select the ✗ to the upper right of the screen to exit, the system will not be affected.
-
If you are certain that you wish to perform this action, please select the data input block on the right, and enter the authorized code in the block to the left. Then tap OK.
-
Appropriate situation: If the Pocket PC is unable to maintain normal operation, but the touch screen is functional. Please refer to the instructions in this section to troubleshoot.
Result: This will retain only the Microsoft Windows, and factory pre-installed applications. Other settings such as user's input data, newly installed programs, and user custom settings will all be cleared.
CleanBoot Boot
Cold boot method:
Press and hold both POWER BOWDERand RESETRESET for a while, then release them simultaneously. Wait for a few seconds until the screen wakes up displaying the model name, firmware version and firmware build date of your device, instantly press and hold
natural_image
Line drawing of a handheld mobile phone with a hand holding the screen (no text or symbols)- Appropriate situation: If a previous reset has already been attempted and the Pocket PC is still unable to maintain normal operations, has no response, or if the screen is frozen.
-
Before executing the preceding "Cold boot method", please carefully consider the following instructions and then decide on the cold boot method.
-
After a cold boot is performed, if no buttons are pressed, when Pocket PC automatically completes the system startup process, the last display will be the Today Today. This is identical to the reset result.
-
If a previous reset has already been attempted but the Pocket PC is still unable to maintain normal operation, consider the following solution:
-
Press and hold both POWER POWERand RESETRESET for a while, then release them simultaneously.
②Wait for a few seconds until the screen wakes up displaying the model name, firmware version and firmware build date of your device, instantly press and hold
③ Continue pressing and release it when you see this message shown on the screen.
![•Press all data and bind default 1 5 Yes [press CAMERA button] D](/content/2026/05/1038173/images/33bed2c552a32517be5d57f461da0383c321fd5064be025b6271579f3bd874fc.jpg)
The operation "Erase all data and load default? Erase all data and load default? stored on your device and restore it back to factory default settings.
- If you press 📷 on seeing the line "Yes" (pre CAMERA button) Yes [press CAMERA button] bottom of screen, all the data you stored, programs you installed and customized settings you made on this device will all be cleared. Follow the onscreen instructions to complete the resetting after the device reboots.
- Without your confirmation of this operation as pressing the device will cancel this procedure after a few seconds idle.
Caution
- After performing a cold boot, the system will retain Microsoft Windows and pre-installed programs. If you answer "Yes" to the question displayed after a cold boot, other items such as the user's input data, newly installed programs and user settings will be lost.
2.There are two ways to retain your data, loaded default and registry:
① Perform a Reset.
② Performing a Cold Boot, and answer "No" when the above question displays.
2 Using the Pocket PC

Start
Screen
Tap >SetSettings System System ScreenScreen
The first time you use or cold boot the pocket PC, the system will ask you to align the screen. Kindly continue to tap the center of each cross (*) that appears and follow the screen instructions to complete the operation. If you feel that the position is not quite accurate while tapping on the screen, you follow the help for this section to align the screen again.
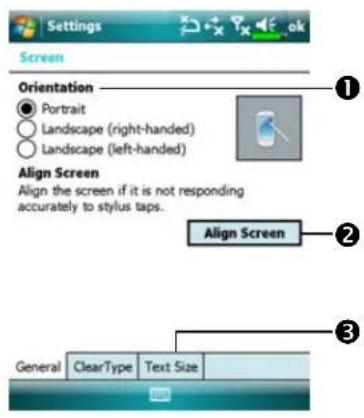
① Orientation:
Portrait (default) Portrait (default)
Landscape (right-handed/ble/riged)
Landscape (left-handed/ble/refed)
② Tap the Align ScreenAligntoScreen calibrate the screen. When Align Screen appears, use the stylus to tap the center of the cross (+) until the next cross appears, then follow the screen instructions to complete the operation. Finally, tap ok to exit.
③Text Size tab: For selecting the desired text size.
The following steps will bring you into the touch screen calibration mode. These steps provide a faster and more efficacious way to enter the touch screen calibration mode. And they also provide a method of getting into ScreenScreen program for when the touch screen dislocation is so severe that you completely cannot select or do anything using the stylus.
- Simultaneously press on the bottom-left of the Pocket PC and the execution button in the center of the navigation pad.
- Release these two buttons at the same time, and you will enter the calibration screen.
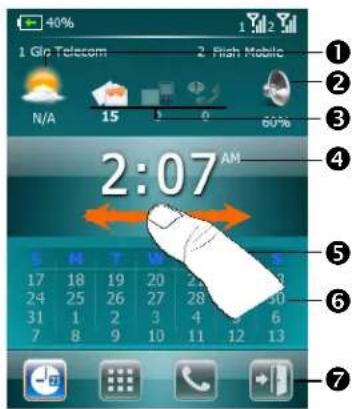
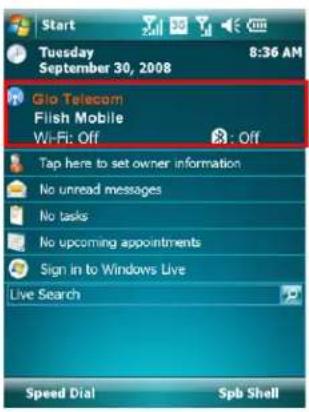
Today Screen
When you turn on your Pocket PC for the first time each day (or after 4 hours of inactivity), you will see the Today screen. You can also display it by tapping
TodayTodaythe Today screen, you can see at a glance the important information for the day.
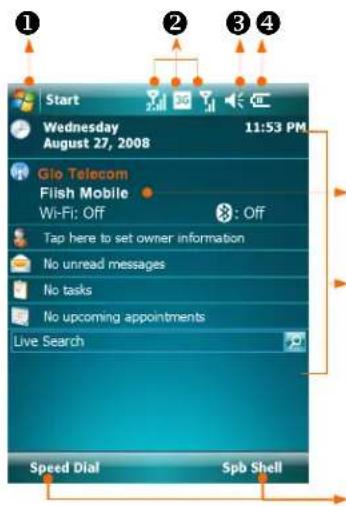
① StartStap to switch to a program.
②Connection status icons, tap to view the connection details.
③Speaker icon. For adjusting volume.
⑤ ④ Current battery status.
⑤ Communication Manager
⑥ Displays your dual phones staus. When the name of service provider appears in orange, this phone is currently selected as the primary phone number when you make a call.
⑦ Today Today. Displays important information for the day. Tap on any item to enter its relevant setup screen.
⑦ Tap to quick link to Speed DialSpSpSpMobile ShellMobile Shell
The following table lists the icons that you may see on the Navigation Bar. Kindly refer to the "Meaning" column for explanation or tap on the icon to access the instant message.
| IconIcon | MeaningMeaning(Located on the Navigation Bar at the top of the screen)(Lo |
| Speaker is on | |
| Ringer off | |
| Pending alarm | |
| Battery charging | |
| Battery level | |
| Low battery | |
| Battery power is very low | |
| Battery is fully charged | |
| New instant message | |
| New e-mail or text message (SMS) | |
| New MMS mail | |
| If there is not enough space on the screen to display all notification icons, tap this icon to view all icons. | |
| Active connection to computer | |
| Synchronizing | |
| Sync error | |
| PowerPoint slide show | |
| IconIcon | MeaningMeaning |
| (Located on the Navigation Bar at the top of the screen)(Lo | |
| Missing SIM1sid | |
| Missing SIM2sid | |
| Phone1phoned off. | |
| Phone2phoned off. | |
| Phone1phoned on. Signal strength. | |
| Phone2phoned on. Signal strength. | |
| Phone1phesedt yet detected signal | |
| Phone2phesedt yet detected signal | |
| No service. Phone1phesedt yet connected to a network. | |
| No service. Phone2phesedt yet connected to a network. | |
| Phone1phesedhing for signal. | |
| Phone2phesedhing for signal. | |
| Phone Voice call in progress | |
| Data call in progress | |
| Calls are forwarded | |
| Call on hold | |
| Missed call | |
| Roaming | |
| Bluetooth | |
| Wireless Active | |
| Wireless Data Calling | |
| Wireless in use |
Iconcon
MeaningMeaning
(Located on the Navigation Bar at the top of the screen)(L

GPRS not in use

GPRS available

GPRS connected

Synchronizing over GPRS in use

EDGE available

EDGE connected

Synchronizing over EDGE in use

3G network available

3G connected

Synchronizing over 3G in use

3.5 G network available

3.5 G connected

Synchronizing over 3.5 G in use
G E r3Ges H: the availability of various data connection services
provided by SIM card you installed in SIM1. They are shown according to your monthly plans, telecom service provider, and network distribution conditions or effective system coverage area. To make modifications to your monthly plans, please contact your telecom service provider.
Programs
You can switch from one program to another by selecting it from the

menu. (You can customize which programs you see on this menu. For information, see "Adjusting Settings" section.) To access some programs, you'll need to tap ➤ ProgramsProgram then the program name.
| IconIcon | Programs | Description | Description |
| Games Group Bubble Breaker, Solitaire | |||
| GPS Group | GPS Viewer, Location SMS, Satellite Data Update | ||
| Multimedia Group Album, Camera, Namecard Manager | |||
| Office Mobile Group | Excel Mobile, OneNote Mobile, PowerPoint Mobile, Word Mobile | ||
| Phone Group | Scenarios, SIM Manager, SMS Sender, Speed Dial | ||
| Utilities Group | Application Recovery, Backup Utility, Default Settings, Memory Optimization | ||
| Voice Commander Group | Voice Commander, Voice Commander Settings | ||
| ActiveSync | Synchronize information between your Pocket PC and computer. | ||
| Calendar | Keep track of your appointments and create meeting requests. | ||
| Contacts Keep track of your friends and colleagues. | |||
| Notes | Create handwritten or typed notes, drawings, and recordings. | ||
| Tasks | Keep track of your tasks. | ||
| Messaging Send and receive e-mail messages. | |||
| [32DH] | Internet Explorer | Browse Web and WAP sites, and download new programs and files from the Internet. | |
| [340H] | Windows Live MSN related programs. | ||
 | Messenger | Send and receive instant messages with your MSN contacts. | |
| [8ATZ] | Calculator | Performs basic calculations. | |
| [630D] | Pictures & Videos | Take, view, and edit pictures. | |
| [VSX1] | Windows Media | Plays movies or sound files. | |
 | Streaming Player | Playback video or audio files from RTSP, HTTP etc. | |
| [92WC] | Internet Sharing | Simulate Pocket PC as a modem for the PC to surf the Internet. | |
 | Search Quickly find the information you need. | ||
| [DWCB] | File Explorer Manages files or folders. | ||
 | Communication Manager | Manage wireless connections and related functions. | |
You can also switch to some programs by pressing a program button. Your Pocket PC has one or more program buttons located on the front or side of the Pocket PC. The icons on the buttons identify the programs they switch to. For more information, refer to "Redefine Hot Keys" section.
System Application Programs
Tap

SettSettingsSePersonalPersonal
ProgramPDescription
DescriptionDescription
Buttons Set the hot key for Pocket PC hardware button.
Input Set the details about the input method.
Lock Set the access rights and password of Pocket PC.
Menus Set the items displaying on the Start menu.

Owner Information Input owner information.
Phone Set the details about the phone.
Phone2 Set the details about the phone2.
Sounds & Notifications Set the volume and notification method.
Today Set the look of Today screen and display information.
Tap > SettSettings SystemSystem
| Program Description | Description Description | |
| About Display the important information about the Pocket PC. | ||
| Backlight Set the details about the backlight and brightness. | ||
| Certificates For network identification to prevent unauthorized access. | ||
| Clock & Alarms Set the time and alarms. | ||
| Gravity Sensor Settings | The built-in gravity sensor is able to recognize how your hand manipulate this device and change the screen orientation accordingly. | |
| Memory View the memory usage, and the list of running programs, etc. | ||
| Microphone Set the microphone volume. | ||
| Power View the power usage condition, whether or not to power off after a waiting period. | ||
| Regional Settings | Set the region and information display formats such as date, time, etc. | |
| Remove Programs | Remove programs that are no longer used. | |
| Screen | Aligning the screen is helpful in determining the touch accuracy. You can select the portrait or landscape orientation. | |
| System Information | View the system information. | |
Tap

ettSettingStarConnectionsConnections
ProgramDescription
DescriptionDescription
Beam Set if receiving end will accept beam data automatically or not.
Bluetooth Establish the connection between the Pocket PC and other Bluetooth capable devices.
Comm. Manager Manage the connections of your device.
Connection Wizard Select the appropriate country and carrier name.
Connections Set the network connection.
CSD Type Set Pocket PC to simulate a modem and access the Internet through the built-in GSM device.
Domain Enroll Enroll your device in company's domain, in order to connect it to the System Center Mobile Device Manager.
USB to PC Change the type of USB connection.
Spb Mobile Shell
Spb Mobile Shell has easy to use functions and tools to keep your Pocket PC organized for quick access. The program consists of the main window panels (Now Screen, Spb Menu, Speed-Dial, Quick D panel (smart taskbar gestures), Spb Contacts (smart contact search), Task Manager, color based themes, and improved usability for device locking.
Starting Spb Mobile Shell
• On the Today screen, tap Spb Shell should quick link to Spb Mobile Shell.
- Taskbar Smart Gestures: Tap-and-hold in the middle of the taskbar to launch Spb Mobile ShellSpb Mobile Shell
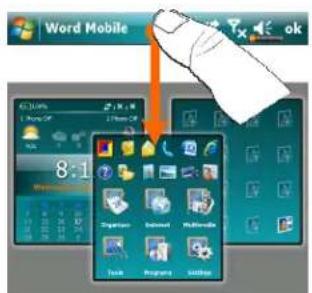

- The taskbar smart gestures allow you to launch Spb Mobile ShellSpb Mobile Shell from any application you are in.
①Tap-and-hold in the middle of the taskbar while moving your finger in a downwards gesture.
②Select one of the panels and release when the gray popups window appears.
③If you release your finger outside the gray area then the highlight disappears and the panels launching is canceled.

- To return to the Today screen or the last active application, the following methods are available.
①Slide your finger in a downwards gesture.
②Tap
Using Spb Mobile Shell
- Now ScreenNameScreenNow Now ScreenScreenyou a quick and easy way to check your device status.
①Tap to select a city or open the weather details panel where you can update forecast or access the weather options.
② Tap to adjust the phone profiles on your Pocket PC.
③ Three icons for e-mail, SMS, Voice mail, and missed calls. For example, when you receive an e-mail you will see the e-mail icon highlighted with the number of new e-mails you have in your inbox. You can open your Inbox to read new e-mails with just a tap, or with a few key presses.
④ Displays your current time and date. Tap to open the time screen for more details.
⑤ Use the left/right gesture to switch between the main window panels.
⑥The calendar displays the days that correspond to the selected month and year settings.
⑦ Tap soft keys to switch between the main window panels. Tap to quit.


- Spb MenuSpbMenuSpb Menu consists of two parts, smart launcher at the top (12 shortcuts) and six large phone style menu items below.
①Tap to quick link.
②The six large menu items not only show you what you have already on your Pocket PC but it also adds very useful tools under some categories.
③Use the left/right gesture to switch between the main window panels.
④Tap soft keys to switch between the main window panels. Tap

⑤Tap and hold on any of the 12 items and Pin your favorite items or select Manage Pinned Manage Pinned customize the smart launcher.

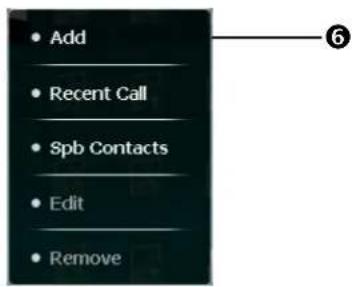
- Speed DialSpeed Dial allows you to add up to sixteen photo contacts of your choice. You can also add a shortcut to the Spb Contacts Spb Contacts
① Add your favorite contacts to the Speed DialSpareel Diapplies only to entries stored in Contacts(Contacts Pocket PC).
②Tap the photo, name, or number of the contact whom you want to call.
③Use the left/right gesture to switch between the main window panels.
④Tap to link to Spb Contacts.Spb Contacts
⑤Tap soft keys to switch between the main window panels. Tap

to quit.
⑥Tap and hold to open the context menu.

On the Speed Dial Speed, Dial the photo, name, or number of the contact whom you want to call. The contact panel of your selected contact is then displayed.
①Select one of the phone numbers that you want to dial or send a text message.
② Tap OpenOpenview the contact full details card.
On the Speed Dial Speed, Diap
The Spb ContactsSpbContacts then displayed. When you start entering a phone number or contact name, Spb ContactsSpbContacts automatically search and sort the contact entries that match the sequence you have entered. You can then select the desired number or contact from the filtered list to dial.

Configuring Spb Mobile Shell
- On the Spb Menu panel, tap SettingsSetting > Spb Mobile ShellSpb Mobile Shell
Tap >SetSettingsSystem SystemSpb Mobile Shell Spb Mobile Shell

Configure...
- Now ScreenNow Customize options on your Now ScreenNow Screen display. Show the Now Screen when device wakes up: Enable this option to show the Now Screencreen each time you wake your device from te standby mode.
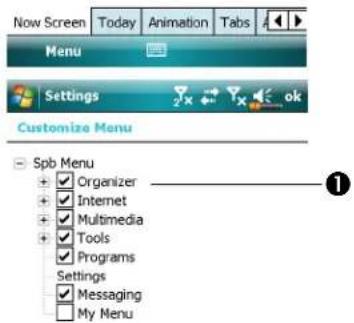

- Advanced ApproCustomize Spb Spb Menu and Now ScreenNowScreen options.
- On the menu of Advanced tab, tap Menu to open the customization dialog of the six large menu items of the Spb Menu panel.
①Spb Menu tree.
②Provides the relevant menu.
You can Move Up, Move Down, Edit, Remove, Add and open the Menu Option for any of the Spb Spb Menu tree items.
Communication Manager
CommGoration Manager Manager you to manage the wireless connections of the Pocket PC including Phone1Phone2Phone3both, WiFi and data connection.
You can access Communication Manager by these methods Manager
• On the Today screen, tap.
- On the Today screen, tap the connection status icons on navigation bar, when the message window appears, tap Comm. Manager.
- Tap \~ProgramsProComm. ManagerComm. Manager

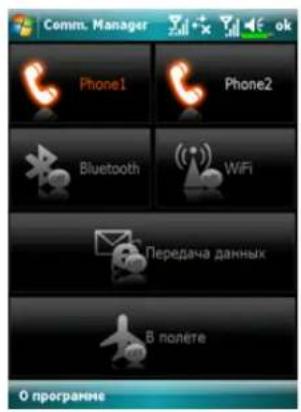
Switching a Connection On / Off
On Communication Manager Manager single tap on these buttons to activate or disable each individual functions.
- The icon indicates that the associated function is currently in the off state. For example, tap when it becomes, the GPRS connection is available.
- Tapping these buttons will turn the icons orange, indicating that these functions are newly activated.
- To turn off these functions, simply tap on the buttons once again.
Note Note
You can enable Data ConnectionDaily ConnectionBG/GPRS SIM card in SIM1(3G) SIM1(3G) slot and Phone1 Phoneactivated.
Managing Dual SIM Cards on a Single Device
You can have two numbers activated simultaneously on this device as if carrying two cell phones. Every time you call out or send a message, you may choose the network at the most economical rate while receiving with the other number freely.
In Communication Manager, Man Phene1 PhD Phone2 Phone2 activate the SIM card you have installed in the corresponding slot.
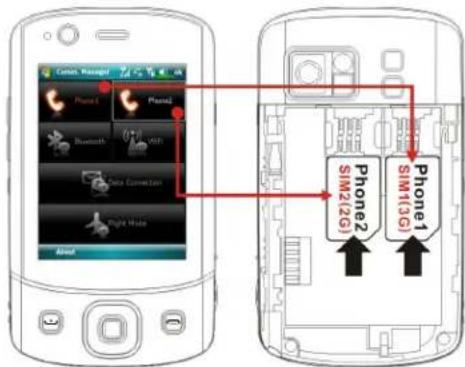
SIM1(3G)1 card slot (3G) data slot for SIM cards enabling data services over cellular network. To use video call, web-browsing, MMS or E-mail services, please install a 3G/GPRS compatible SIM card in this slot, and activate Phone1Phone1
SIM2(2G)card slot (2G) card only the GSM services like voice call, text messaging and emergency number (in most countries) that your SIM card supports. To start using it, install any 2G SIM (a 3G SIM card may do) in this slot and activate Phone2Phone2

③ 1 Phone1Phone1
Connection status of SIM stored in SIM1(3G)Silot1(3G)
② As the SIM is successfully activated, the telephone receiver symbol will turn from dim grey to glowing orange, and you may receive incoming calls and messages on this number
③ Phone2Phone2
Connection status of SIM stored in (SIM2)2G (Sdt12)2G
④ When the text "Phone1"/"Phone2""Phone1"/"Phone2" is in orange, it indicates this number is currently selected to send outgoing calls when you press
Flight Mode
You can enter Flight Mode in which all the wireless connections are disabled if your are to save down battery power or in occasions where wireless connections are prohibited like on a flight, at a medical facility, or at a gas pump.
Launch the Communication Manager Michael tap the Pocton. When the color of the icon turns orange the Flight Mode is activated and the wireless connections of the Pocket PC are all disabled.
Enter Information on Your Pocket PC
You have several options for entering new information:
- Use the input panel to enter typed text, either by using the soft keyboard or other input method.
- Write directly on the screen.
- Draw pictures on the screen.
- Speak into your Pocket PC microphone to record a message.
- Use synchronization tools to synchronize or copy information from your desktop computer to your Pocket PC. For more information, see Help on your desktop computer.
Enter Text Using the Input Panel
Use the input panel to enter information in any program on your Pocket PC. You can either type using the soft keyboard or write using Letter Recognizer Letter Recognizer Block Recognizer Block Transcribe that is there because, the characters appear as typed text on the screen.
To show or hide the input panel, tap the Input Panel button. Tap the arrow next to the Input Panel button to see your choices.

① Select an input method.
②Tap to see your choices.
③ Input Panel button.

When you use the input panel, your Pocket PC anticipates the word you are typing or writing and displays it above the input panel. When you tap the displayed word, it is inserted into your text at the insertion point. The more you use your Pocket PC, the more words it learns to anticipate.

① Tap here if this is the right word.
![meeting meet meets meet 123 1 2 3 4 5 6 7 8 9 0 - = Tab q w e r t y u i o p [ ] CAP a s d f g h j k l ;' Shift z x c v b n m , . / ← Csl a0 \ View Menu](/content/2026/05/1038173/images/25ca9296a2c2e8e4cd77bab595037e1a902cb55acd66e7ed1ac30d888b45afbd.jpg)
Note Note
To change word suggestion options, such as the number of words suggested at
one time, tap → SettingsSetPersonalPersonInput InWord CompletionWord Completion
Type with the Soft KeyboardType with the Soft Keyboard
1 Tap the arrow next to the Input Panel button and then KeyboardKeyboard
2 On the soft keyboard that is displayed, tap the keys with your stylus.
Use Letter RecognizerLetter Recognizer
With Letter Recognizer you can write letters using the stylus just as you would on paper.
1 Tap the arrow next to the Input Panel button and then Letter RecognizeRegnizer
2 Write a letter in the box.
When you write a letter, it is converted to typed text that appears on the screen.
For specific instructions on using Letter Recognizer, with Letter RecognizerLapter, Recognizer tap the question mark next to the writing area.
Use Block Recognizerlock Recognizer
With Block Recognizer you can input character strokes using the stylus that are similar to those used on other Pocket PCs.
- Tap the arrow next to the Input Panel button and then Block RecognizerBlock Recognizer
- Write a letter in the box.
When you write a letter, it is converted to typed text that appears on the screen.
For specific instructions on using Block RecognizerBlock RecognizerBpck,Recognizer tap the question mark next to the writing area.
Use TranscriberTranscriber
With TranscriberTranscriber write anywhere on the screen using the stylus just as you would on paper. Unlike Letter RecognizerLatteBlodoRecognizerByouk Recognizer write a sentence or more of information. Then, pause and let TranscriberTranscriber change the written characters to typed characters.
- Tap the arrow next to the Input Panel button and then TranscriberTranscriber
- Write anywhere on the screen.
For specific instructions on using TranscriberTwitscTranscriberTopescrtbthe question mark in the lower right hand corner of the screen.
Select Typed TextSelect Typed Text
If you want to edit or format typed text, you must select it first. Drag the stylus across the text you want to select. You can cut, copy, and paste text by tapping and holding the selected words and then tapping an editing command on the pop-up menu, or by tapping the command on the MenuMenu.
Write on the Screen
In any program that accepts writing, such as the NotesNotegram, and in the NotesNotein Calendar, Colorantots, CondaFasks, Tasks can use your stylus to write directly on the screen. Write the way you do on paper. You can edit and format what you've written and convert the information to text at a later time.
Write on the ScreenWrite on the Screen
Tap Menu med then check DrawDraw switch to writing mode. This action displays lines on the screen to help you write.

① Tap MenuMed then check DrawDraw Use your stylus like a pen now.
Note Note
Some programs that accept writing may not have the Draw Direction. See the documentation for that program to find out how to switch to writing mode.
Select WritingSelect Writing
If you want to edit or format writing, you must select it first.
- Tap and hold the stylus next to the text you want to select until the insertion point appears.
- Without lifting, drag the stylus across the text you want to select.
If you accidentally write on the screen, tap MenuMan Undolandtry again. You can also select text by tapping MenuMed then DrawDradeselect it and then dragging the stylus across the screen.
You can cut, copy, and paste written text in the same way you work with typed text: tap and hold the selected words and then tap an editing command on the pop-up menu, or tap the command on the MenuMenu.
Draw on the Screen
You can draw on the screen in the same way that you write on the screen. The difference between writing and drawing on the screen is how you select items and how they can be edited. For example, selected drawings can be resized, while writing cannot.
Create a DrawingCreate a Drawing
Cross three ruled lines on your first stroke. A drawing box appears. Subsequent strokes in or touching the drawing box become part of the drawing. Drawings that do not cross three ruled lines will be treated as writing.
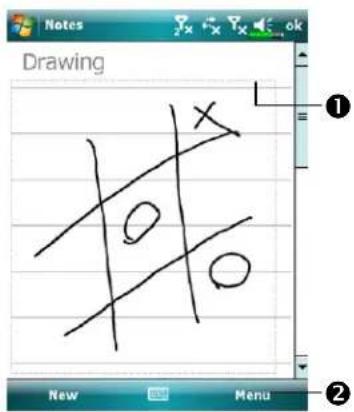
①The drawing box indicates the boundaries of the drawing.
② Tap MenuMledu then check DrawDraw
Note Note
You may want to change the zoom level so that you can more easily work on or view your drawing. Tap MenuZoomZouhthen a zoom level.
Select a DrawingSelect a Drawing
If you want to edit or format a drawing, you must select it first. Tap and hold the stylus on the drawing until the selection handle appears. To select multiple drawings, tapping Menuled then DrawDooleselect it and then drag to select the drawings you want.
You can cut, copy, and paste selected drawings by tapping and holding the selected drawing and then tapping an editing command on the pop-up menu, or by tapping the command on the MenuMenu. To resize a drawing, make sure the DrawDrawtion is not selected, and drag a selection handle.
Record a Message
In any program where you can write or draw on the screen, you can also quickly capture thoughts, reminders, and phone numbers by recording a message. In Calendar Tasks Tasks Contacts Contacts can include a recording in the Notes Notes Refer to "Voice Recording Format" section.
In the Notes program, you can either create a stand-alone recording or include a recording in a written note. If you want to include the recording in a note, open the note first. In the Inbox program, you can add a recording to an e-mail message.
Create a RecordingCreate a Recording
- Hold your Pocket PC's microphone near your mouth or other source of sound.
- Press and hold the Record Radioware button on your Pocket PC until you hear a beep.
3 While holding down the RECORD RECORD make your recording.
4 To stop recording, release the RECORD RECORD Two beeps will sound. The new recording appears in the note list or as an embedded icon.
Note Note
You can also make a recording by tapping the RECORDRECORD on the Recording toolbar. To play a recording, tap it in the list or tap its icon in the note.
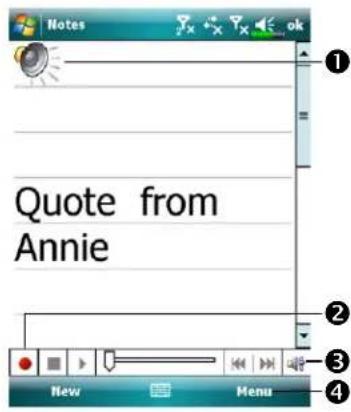
① Indicates an embedded recording.
②Tap to begin recording.
③Recording toolbar.
④ Tap Menuled then check View View Recording Toolbar Recording Toolbar
Voice Commander
By default, the system sets the button on the side of the Pocket PC as the "Voice Commander Button Commander this button to launch the Voice Voice Commander Commander on how to use this function, please refer to the Voice Commander section.

3 Voice Command
and Satellite Navigation

Navigation Device Installation

① Pocket PC
② Car Charger (* optional): when Pocket PC is low on power, recharge by connecting one end to the car cigarette lighter/12 volt power outlet and the other end to the socket on base of Pocket PC.
Attention: The GPS signal receiver is built into the Pocket PC. If car windscreen has heat reflective metallic film, or Pocket PC is obstructed by objects, then the receptivity of the GPS will be adversely affected.
GPS Navigation Software Installation
Please follow your car navigation system operating manual's instructions on software installation in order to use the navigation function.
Conditions for Using GPS Car Navigation
By using this system you are agreeing to the following conditions:
- When using this device, please use with matching car mounts. Affix device securely to the car mount. Please be aware that installation in the areas depicted below is forbidden and is strictly prohibited.
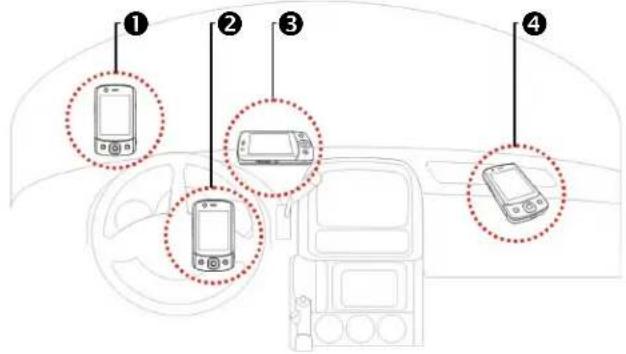
①Do not place where it will obstruct driver vision
②Do not place over air bag
③Do not place where it can not be securely attached
④Do not place in path of activated air bag
- Please set navigation destination before driving. Do not operate this system while driving.
- Please use this system with care. If any harm results from careless use of this system, the responsibility for safe driving resides with the driver.
- GPS positioning is limited by weather and usage location (tall buildings, tunnels, underpasses, trees, bridges). Most GPS do not work indoors, nor can GPS signals penetrate buildings, car sun shades and heat reflective film with metallic content. Please install GPS outdoors with clear line of sight. Beneath the windscreen at the front of the car is a common choice, and the windscreen should be free of heat reflective film.
- The GPS system is built and operated by the U.S. Department of Defense which is also responsible for its maintenance and calibration. Any changes made by them may affect the operation and accuracy of the GPS system.
- Wireless devices (mobile phones, speed radar detectors) will all interfere with the satellite signal and cause unreliable signal reception.
- The GPS position fix is provided only for the driver's reference and should not affect actual driver behavior.
- The electronic map data provided in the navigation system is for normal reference only and not intended for high precision applications. The user should determine their exact location based on actual road conditions.
- The route provided by the navigation system, the audio cues and intersection data are derived from recommended optimal route calculated using the electronic map data. This is provided for the driver's reference only, the driver should decide their chosen route according to actual road conditions.
- When not in use, please do not leave the device inside the car. If exposed directly to sunlight, the battery may overheat and cause damage to this device. This may endanger the vehicle as well.
Satellite Data Update (Not supported in USA)
Tap ➕ Programs ProGPS GPSatellite Data UpdateSatellite Data Update
Login to the provider's server to download instant satellite data and enable the GPS function. Note: either of the following connections allows your Pocket PC to download the latest GPS data. If there is more than one connection available, the system will automatically select the best connection, in the following order:
- Synchronization connection: Connect your Pocket PC to a PC (Desktop or Notebook). Please note that your PC must be online.
- Wireless LAN connection.
- GPRS connection: Roaming mode cannot update GPS data automatically. If necessary, change to manual mode.

●The system will update GPS data automatically based on a schedule. Follow these steps:
① Check the AutoUpdateUpdate checkbox.
② Set the date.
③ Set the time.
4 The text shows the expiration date of the GPS data. On the due date, the system will pop up a warning message. Refer to the following instruction about the Today Today.
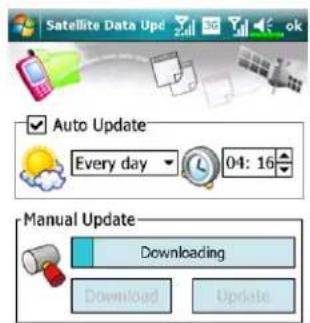
Expire Date:
Tap the DownloadDownload
update the GPS data manually.
The figure on the left shows how to download using the synchronization connection.
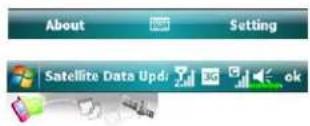
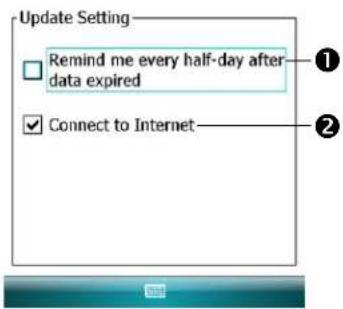
Tap the SettingSetting in the
Satellite Data Update Date screen to open the dialog in the left figure.
① Check the expiration checkbox to activate the reminder function on the due date.
②The default value is checked. The system will automatically update the data when online.
Costs will be incurred when connecting over the GPRS, so consider carefully before activating this function.
After setting your Pocket PC to the following connection mode and activating the automatic update and Internet connection functions, the system will automatically download the latest GPS information periodically.
- Synchronization connection. Make sure that your Pocket PC is connected to the PC, and that the PC is online.
- Wireless LAN connection.
- GPRS connection.

When the GPS data has expired, the relevant message displays on the top of the screen.
①The icon reminds you that your GPS data has expired.
② Tap the Notification Notification open the message window.
③Tap to close the message window.
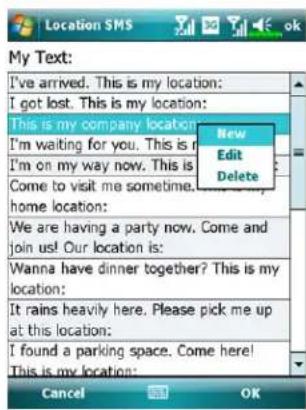
Location SMS
Tap ➕ Programs ProGPS GPS Location SMS Location SMS
You can utilize the GPS function offered by your Pocket PC, to send the matching location automatically found by this program and the necessary message to your contacts. This could be helpful in preventing kidnapping, reporting disastrous situations, calling for help in emergencies or locating an individual. In addition, we have formulated many SMS templates based on different situations for your convenience.
![Location SMS To: < 123456 Location: < Happy building | I've arrived. This is my location: My location is X E 121:34'42.66" Y N 25:4'23.80" 123 1 2 3 4 5 6 7 8 9 0 - - Tab q w e r t y u i o p [ ] CAP a s d f g h j k l ; Shift z x c v b n m , . / + Ct áu \ Send About ① ② ③ ④ ⑤ ⑥](/content/2026/05/1038173/images/fd8cb3d7f039ea7aead735e400a28c8726979cfe60c40cf5185378c99345b555.jpg)
- It is better to execute this program at a location with clear signal.
①Tap to open the Contactsstreten, if set up in advance, you can choose contacts directly.
②You can directly enter mobile phone number in the To area. If there is more than one recipient, please use “;” to separate recipients.
③ You can directly enter your message in this area, such as landmarks, features or street names.
④ Automatically searches for GPS information.
⑤ Tap to allow you to select, add, edit, or delete your most used messages.
⑥ Tap to allow you to send SMS messages and report your location.

-
Select in the main screen, once in the screen shown on the left, tap on any message and tap OK button to select.
-
Further, by pressing and holding anywhere on the screen, together with the pop-up menu, you can add, edit or delete your most used messages.
-
The content of the message that your recipient views looks similar to what is shown on the left. Actual messages differ depending on the recipient's device.
GPS Viewer
Tap

Programs ProGPS GPS Viewer GPS Viewer
You may use this Pocket PC to automatically search the GPS coordinates of your location and check if the GPS functions work properly.

- Run this program in a location with good signal reception.
①Greenwich Mean Time (GMT): After connecting to a satellite and obtaining the GMT, it will be displayed on the screen. Tap to set the satellite time as the system time.
②Report GPS tracking information.
③Tap to change the unit.
④Switch to Satellite mode.

- Tap SatelliteSatelwitch to Satellite mode.
①Red: Satellite detected (In View).
Blue: Satellite data detected (Data Valid).
Green: Tracking completed (Tracker).
②Signal strength: The larger the figures, the stronger the signal.
③Satellite ID: The IDs expressed in numbers in this field correspond to the IDs on the earth image above.
④Switch to Compass mode.
4 Using the Phone

The Phone feature on the Pocket PC allows you to perform the following tasks:
• Capability of carrying dual SIM cards.
• 3.5 G video telephony.
• Make and receive calls.
- Quickly make calls or listen to voice mail without entering phone numbers using Contacts, Speed Dial, Speed Call Log Call Log
- Check the Call Log called who has called, whom you have called, add a new number to Contacts. Contactless notes taken while you were on a call.
- Receive calls and easily take notes during the call.
- Send SMS messages.
- Customize how your phone rings.
To switch to the Phone function, press or tap > PhonePhone

the lower part of the Pocket PC
Cautions Cautions
- To avoid distraction and affecting driving safety, never use your Pocket PC while driving an automobile or any other moving vehicle.
- Make sure that the SIM card is properly installed in your Pocket PC and the Phone is already turned on before you use the functions described in this section.
- When aboard an aircraft, at a medical facility, or at the gas pump where wireless communication devices are prohibited, please launch the
Communication Manager and then tap the

ton. When the color of
Using the Phone
the icon turns orange the Flight Mode is activated and the wireless connection of the Pocket PC is disabled.
- The Phone function relies on the Pocket PC main battery for power. Maintain the main battery power level to assure call quality and the normal operation.

① Microphone
② Earphone
③ Phone Receiver
④ Phone Speaker (Bottom of Pocket PC)
Precautions!Precautions!
- Avoid wearing earphones at high volume for extended periods of time.
- Avoid wearing earphones while driving, cycling or in other situations where quick reactions are required.
Combination
MethodMethod
Answer or Answe Adjust Earphone
OperationOperation
nd a CallEnd a Call VolumeVoluri
Hold the
Pocket PC
manually for calls
Hold the Pocket
PC and position
the receiver close to your ear and the speaker close to your lips.
Press


on the lower part of the Pocket PC.
While answering a
call, push the volume control key on the side of the Pocket PC to test the earphone volume.
Install the
external headset
Place the
earphone in your ear and position the microphone to your lips.
Use the line control
function. Press the button on the headset to answer or end the call. Except the Bluetooth headset, when the phone is ringing, hold down the button to reject the incoming call.
--
Adjusting the Phone Volume

Tap 📁 on the top and adjust all programs' sound functions under ⏻ Adjust the phone sound volume under ⏱.
- When there is no call, you can push the volume control key on the side of the Pocket PC or use the stylus to tap the speaker icon
Tap and then to adjust the ring volume of the incoming call.
-
Push the volume control key on the side of the Pocket PC or tap and then to adjust the phone volume. You can only do this during a call.
-
Vibration mode: The speaker icon 📁 in the top changes to

- Mute mode: The speaker icon 📋 in the top changes to .

Adjust the proper volumedjust the proper volume
- If earphones are used with the Pocket PC to make calls, set the volume according to actual personal needs.
- If earphones are not used with the Pocket PC and not held close to the ear for calls but similar to hands-free operation, it is recommended to set the sound volume for the top two levels.
- For holding the Pocket PC close to the ear directly for calls, it is recommended that you set the volume to the lower four levels. It is recommended not to use the top two levels because the volume is high and may affect your hearing.
Turn on or turn off the speakerphone Turn on or turn off the speakerphone
- Enable the speakerphone: While answering a call, tap Speaker on Speaker.com
- Disable the speakerphone: Tap Speaker off Speaker off.
Phone Functions
Turning on Your Phone(s)
Before using phone functions, please install you SIM card(s) and turn the phone(s) on.
- On the Today screen, tap or , when the message window appears, tap Comm. ManagerComm. Manager
- Or tap to launch Communication Manager Communication Manager
- In Communication Manager Comthendate your desire, and follow the onscreen instructions to activate it. You may be requested to enter a preset t PIN (Personal Identification Number) which is usually a four-digit code. If PIN is entered incorrectly three times, your SIM will be blocked, please obtain the PUK (Personal Unblocking Key) from your service provider to unblock the SIM.

- As the icon 70 appears at the top of the Today screen, you can start using the phone functions.
Using the Phone
Making a Call
On the Today screen, tap


To make a call, use the screen keypad to enter the phone number and tap

to place the call on Phone1Phone2 to place the call on Phone2 Phone2Phone2

①Phone1Phone1
Service provider name
②Phone2Phone2
Service provider name
③ Contacts display area Contacts display area List of people you lately contacted with.
④ Hide Keyblandkaryb
Tap to expand the contacts display area, and tap it again to restore the keyboard
⑤ Backspace Backspace
If you enter a wrong digit, tap to clear it; you can tap and hold to clear the whole number.
⑥Phone2 Call button
⑦Phone1 Call button
⑧Menu
Tap to enter more phone functions
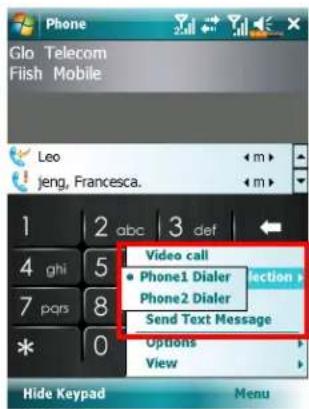
Selecting the primary phone line
By activating two SIM numbers on your device, you can make calls via either number.
If one of the SIM numbers is used more frequently, you can assign it as the primarily-used number through Phone Dialer Selection. Hence, when a call is made by your pressing or launching a dialing action from any application, this call will automatically be made via the pre-selected number.
On the Today screen, tap


Selection, and choose a Phone as the selected primary number.
Note Note
If only one SIM number on your device is activated, this number will be the primary number when you make calls, and Phone Dialer Selection Phones Dialer Selection enabled.
Making a call on either number Making a call on either number
You can always select your desired number to make a single call at will. If selected, the service provider name of this number will turn orange on the Today screen. Next time you place a call by directly pressing in certain applications such as Contacts, Call, Email, Story, Speed, Dial, Spe, Messaging, Messaging, and Messaging will be made on this selected number.
On the Today screen, press to enter Phone screen.
On Phone screen, after entering a telephone number or choosing a contact, you can make a call on either number by:
- Tapping 📞 at the call on Phone1Phone1Phone2 on Phone2Phone2
Or
- Pre-assigning one of your two numbers as the primary number to make outgoing calls:
Tap Menu Phone Dialer Selection Pro the Dialer Selection line, then you'll only have to press to make a call on this selected number.
Note Note
If you tap Talk1 without Talk2, stating the corresponding SIM beforehand, you will be asked to complete the activation process in order to make this call.
Making a phone call from ContactsMaking a phone call from Contacts
You can quickly locate stored phone numbers in ContactsContactake calls. If you dial out by pressing 📋 or taping Call on the screen, this call will be made using the current selected number. You can always tap Menu > Phone Dialer Selection to change the current selected number.
On the Today screen, tap > ContactsContacts
Find the contact you want to call, and press You can tap Menu > Phone Dialer SelectionPhone Dialer Selection selected number.
- If this contact has more than one number, tap and hold on the contact, and choose the number to call.

Making a call from Call HistoryMaking a call from Call History
On the Phone screen, tap Call History Call History
- To sort out call entries by different methods, tap MenuMeduhen FilterRiderst the categories.
- Find the number you wish to call, tap Call Calpress to call using the current selected number. You can tap Menu Mail phone Dialer Selection Phone Dialer Selection change the current selected number.

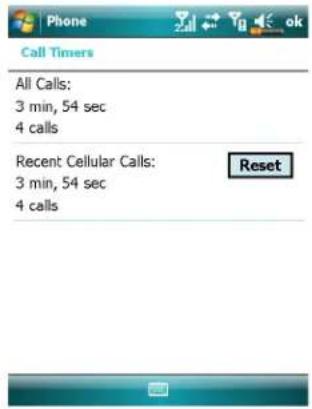
Using the Phone
- To view the number of calls, call time and manage call records, tap Menu and then Call TimersCall Timer

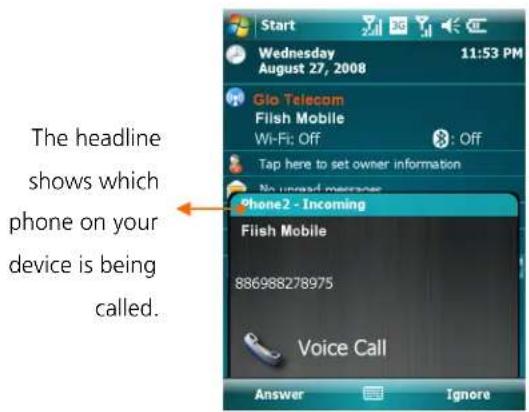
Answering / Ignoring a Call
Upon receiving an incoming call, a window will pop up.
- To answer this call, tap Answer Anpress

- To ignore this call, tap IgnoreIgnore
During the call, you can tap buttons on screen to execute several functions

Note Note
If a call enters one SIM number while the other SIM number is already on a call, a pop-up window will inform you of the new incoming call, tap Answer Answer answer it, which will hang up the previous call in the meantime; or tap Ignore Ignore hang up the new incoming call.
Ending a Call
During a connected call, you can tap Endfordpress to hang up. As a screen of Last Call detail shows, you can tap Talk1TalkTalk2Talk2dial to this contact.

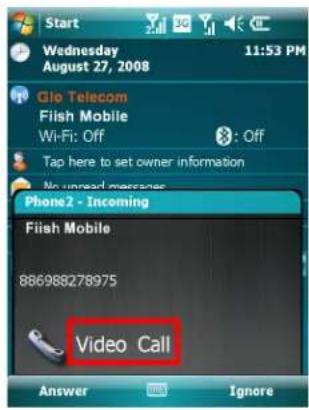
Video Call
Video Call enables you to see a real-time, two-way video of the other party during a call.
To establish an instant video call with your device, make sure:
- You are using a 3G SIM card in the coverage of network.
- The other party is equipped with a compatible device and service system.
Making a video calla video cal
- On Phone screen, Select your contact and tap Menu MVideo CallVideo Call

-
After dialing out, you will have to wait for a few seconds until video images of both parties are shown on your screen. If this video call fails to get connected, a window will pop up asking to redial or make a voice call.
-
As the video call is set up successfully, you may access several options during this call:

① Carrier name and talk time
② Incoming / Outgoing call number
③ Return to voice call keypad
④ Video screen of your contact
⑤ Video screen of yourself
⑥ Video call control panel:

Stop sending your video
Switch to front/rear camera lens

Video brightness
Mute / Unmute microphone
Chang the layout of both party's screen
End the video call
- To end the call, simply tap

ne Video Call main menu.
ReceivRegieyideo call a video call
Upon receiving a video call, a window pops up to notify you that this is an incoming video call. If you tap Answer, answered device will start sending your image to your recipient, tap to stop showing the other party your image during the call.
Note Note
-
Please insert your 3G SIM card in SIM1 slot and activate Phone1 before making or receiving a video call.
-
If the video call dial out is unsuccessful, it is possible to switch to normal voice calls.
-
G E 3G H represent the availability of various data connection services provided by SIM card you installed in SIM1 slot. They are shown according to your monthly plans, telecom service provider, and network distribution conditions or effective system coverage area. To make modifications to your monthly plans, please contact your telecom service provider.
Customizing Your Phone
You can enter the PhonePhone2Pledings page from SettingsSettings PersonalPersonthe Today screen to modify the relevant service settings. Note that the setup values you can change here depend on the services provided by your telephone company. If you choose the phone that is not currently activated, you will have to activate it before entering the settings page.
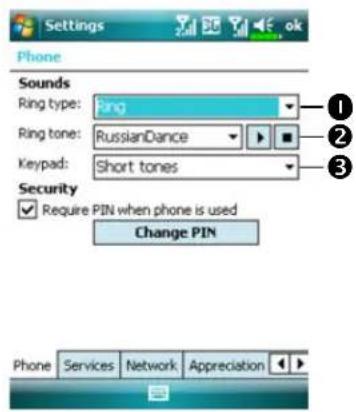
① You can set the ring type as ring, vibration or mute.
② If you want to use a customized ring tone file, use the synchronization program on your desktop computer to copy the .wav ring tone file to the /Windows/Rings folder on the Pocket PC. You can then select this ring tone from the Ring tone list.
③ Set the key sound for dialing.
④ You can set a PIN (Personal Identity Number) to block unauthorized access to your phone. Your first PIN is provided by your phone service provider.
Phone Application Programs
CautionCaution
Before you can use the functions described in the PhoneGroup. Make sure that the SIM card is properly installed in your Pocket PC and the Phone is already turned on.
If your Pocket PC does not include this function, it means it is not supported and you can skip this chapter.
SIM Manager
You can use SIM Manager & Manager contact entries stored on your SIM cards, edit and copy contacts from SIM cards to your device, or vice versa.
Tap

ProgramsProPhonePhSIM ManagerSIM Manager

① Tap and hold to open a list to choose between SIM1 and SIM2SIM2
② Check the box to select all contact.
③Contact entry Tap and hold to bring up a menu of contact options.
④ Tap to switch among various display modes.
Change Display ModeChange Display Mode
You can change the display mode of SIM Manager to Standard3SIM1 and SIM1 Contacts, SIM2SIMContacts and Outlook Contacts Contacts
When switching to SIM1SIM2SIM2SIM2 full screen display for SIM card phonebook or Contacts will be as shown as per the illustration below. This will enable the phonebook contacts to be easier to read and more precise management can be conveniently performed.

Copy Phonebook Information Copy Phonebook Information
You can copy contact entry from SIM1, SIM2, or your device to one another.
- Check the □ in front of a phonebook entry to select it.
- On highlighted area, tap and hold to bring up a menu.
- Tap Copy to SIM1/SIM2 for Copy to ContactCopy to Contact
NoteNote
If you copy an entry comprising multiple numbers to a SIM card, only one number will be copied to the target storage place under the contact name.
SIM Tool Kit
Tap ➞ ProgramsProSjmaTKUIS(5HIVKTdol Kit).
This screen will list only the service menu offered by SIM1SWith you installed in SIM1Silot1

This screen is for reference only. The actual screen is based on the service items provided by your telecom company.
① Tap any service item.
② Select Selection: Launch service item. Follow the screen or voice instructions.

SMS Sender
Tap

ProProgramsProPhanePhSMS SSMDefender
SMS Sender is a shortcut for you to directly start editing a new text message and send it out.
To send a text message, on message composing screen:
- Enter the recipient's number in To field, or tap MenuMAdd Recipient Add Recipient select a person from Contacts
- Enter the content of your message in text field.
- Tap SendSend
- On Send via screen, choose the SIM number that you'll use to send this message.
![From: (Short Messaging) To: 0987275405 Size: 45/160 Hilfiger, I miss you so much! Give me a call. 123 1 2 3 4 5 6 7 8 9 0 - - Tab q w e r t y u i o p [ ] CAP a s d f g h j k l ; ' Shift z x c v b n m , . / + Cd óu ' \ Send Menu Messages Sim1 SIM2 Send Via Select Cancel](/content/2026/05/1038173/images/79c1aeea37421c3f5da9199ef4e521cf9242c9e25c6b42b4bcba1ff831e027e1.jpg)
Speed Dial
Tap ➕ ProgramsProphanePhSpeed DialSpeed Dial
Hot Key Switch Hot Key Switch
① Tap the box according to the functions provided by the system.
② Tap to switch between these functions: Frequency Dial Frequency Dial Index Dial Index Dial
③ ToolsToction: Provides the relevant menu. For example, select SettingsSet the interface as Frequency DialForendexDiallex Di Select Sound on/off Soused the/off sound for tapping the screen.
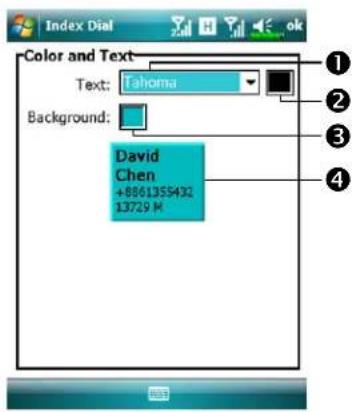
Tap Tools and then Color and Color and Text to enter the Setting screen shown on the left. You can set the text font, text color and button background color according to your personal preferences.
①Font
②Text color
③ Button background
4 Preview area
Frequently Dialed Screen Frequently Dialed Screen

Frequency Dial screen
① Tap any phone entry box to speed dial. You will make a call on the number currently selected by your device. To select the other number, press to enter Phone screen, tap Menu/MPhone Phone Dialer Selection Dialer Selection
② Tap and hold the box, then select appropriate command from the pop-up menu.
③Sort according to the number of calls in descending order. The upper left corner has the most number of calls while the lower right corner has the least number.
4: Tap to view the previous or next page.
⑤ Tap to switch to the Frequency Frequency Dial Screen as shown on the left.
Note Note
To make a video call from Speed DialSpeedInstall your 3G SIM card in SIM1SIM1 slot and activate Phone1Phone1
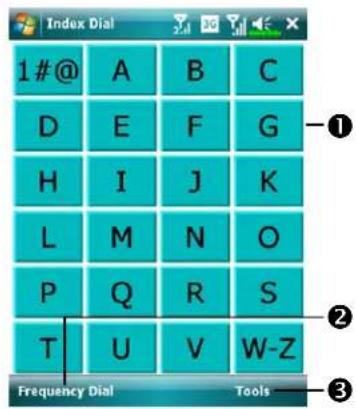
Index DialIndex Dial

Index Dial screen
① Switch to the Index Dial screen as shown on the left.
② Tap on any letters. The content displayed are the data created in Contacts. Contact did not create any data in Contacts, the screen is blank.
①The letter "F" appears on the upper left side of the screen (see left). This indicates that this page contains all address data that starts with "F". The English Address Book is arranged alphabetically using the First Name.
② Tap any box to speed dial.
③←→: Tap to view the previous or next page.
5 Customize Your Pocket PC

You can adjust the Pocket PC settings according to your personal preferences and install other programs.
Adjusting Settings
To see available options, tap Settings Se Personal Per System Systelocated at the bottom of the screen. The following utilities allow you to adjust the settings based on your personal work style.
• Clock & AlarmsClock&ngalms time or to set alarms
- MenusMenu customize what appears on the menu, and to enable a pop-up menu from the New button
• Owner Information, Owner information contact information
- LockLooklimit access to your Pocket PC
• PowerPowermaximize battery life
- Today, today, customize the look and the information that is displayed on the Today screen
Notifications
Your Pocket PC reminds you in a variety of ways when you have something to do. For example, if you've set up an appointment in CalendarCalars with a due date in Tasks Taskan alarm in Clock & Alarmsck & Abe notified in any of the following ways:
• A message box appears on the screen.
• A sound, which you can specify, is played.
• A light flashes on your Pocket PC.
• The Pocket PC vibrates.
To choose reminder types and sounds for your Pocket PC, tap and then SettingsSettthsPersonalReisptap Sounds & Notifications SThe deep Nstifications choose here apply throughout the Pocket PC.
Power Preference Settings
Tap

ettSettingsSystemSystemPowerPower
View the power usage condition or perform the relevant power management settings.

① Power icon
② Check this item, so that when you accidentally press the hardware buttons on the Pocket PC, the Pocket PC will not exit the sleep mode. This will prevent unnecessary power consumption if a button is being pressed accidentally and not being discovered in time.
③ Checking this item displays the power icon on the upper right side of the screen.
4 Advanced Advanced Seed the Pocket PC to turn off automatically after a period of inactivity.
Backlight
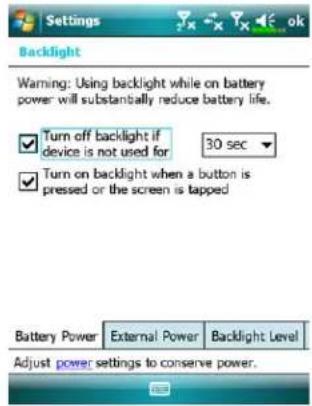
Tap > SettSettingsSetSystemSystem
BacklightBacklight
- Battery PowerBat External PowerExternal Power tab: Set the relevant backlight functions.
- Backlight Level Backlight Adjusted backlight level.
Light Sensor
The unique light sensor within your Pocket PC enhances the accuracy of onscreen view and decreases your eyestrain while saving on more battery life. Based on the ambient light intensity the sensor detected, it will adjust backlight brightness dynamically. The lighter the environment is, the more illumination the device outputs to brighten the screen; in a dusky place like a tunnel, the device dims the screen a bit to reduce power consumption.
Tap → SettingsSetSystemSystemBacklightBacklightBacklight
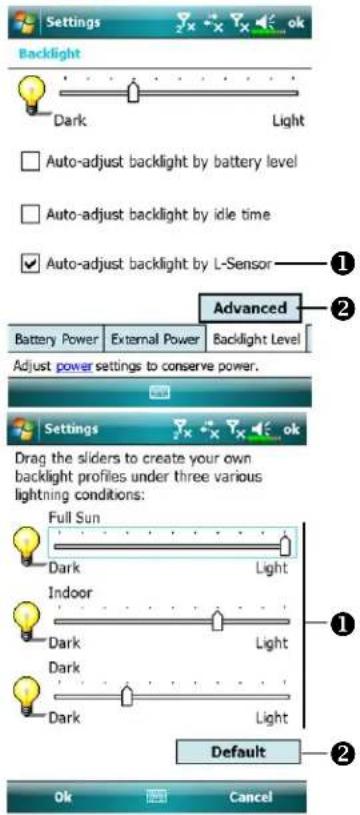
① Check "AutoAdjust backlight by adjust backlight by light sensor" that activate the light sensor.
② Tap to set your own backlight profiles.
Drag the slider under each of the three light conditions to set your own profile. Tap OK to save your settings.
② Tap to restore default settings.
Gravity Sensor
The gravity sensor in your Pocket PC is able to recognize its own orientation manipulated by your hand, and would so change the screen orientation accordingly. For example, if you position the device vertically and then turn it into a horizontal orientation, the screen mode will then change from portrait to landscape automatically.
Tap → SettingsSetSystemSystemGravity SensorGravity Sensor
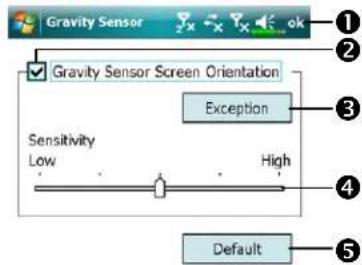
①Tap olc save settings.
②Check "Gravity Sensor Screen Gravity Sensor Screen Orientation Orientation Gravity Sensor.
③ Tap to check applications in which gravity sensor will disable itself.
④ Drag the slider to adjust the sensitivity.
⑤ Restore to default system settings.

Microphone
Profile Microphone Microphone Microphone Cause Cause
| * Voice Voice Turn the volume down and Commander Cofind the proper volume setting voice control for better recognition of system. | Surrounding interference recorded when volume up. |
| Speech recording | Turn the volume up. More distance from the lecturer more interference recorded. |
* Used for the version built in "Voice Commanded Voice Commande
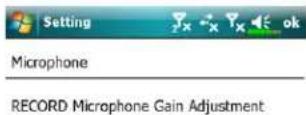


Note
This document lists the functions, specifications, and illustrations for reference only. The actual purchased product should be taken as the standard.
Customize Your Pocket PC 5-7
Adjust Volume
Push the volume control key on the side of the Pocket PC. Or use the stylus to tap the ▶on on the top of the screen to adjust all program sound functions under □: Adjust the incoming call's volume under .
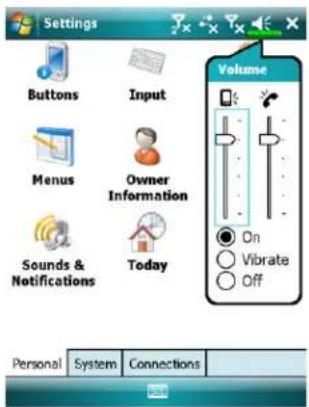
-
Adjust volume: When set to On, use the stylus to tap and drag the slider up and down to adjust the volume. You can also push or on the side of the Pocket PC.
-
Vibrate: Under ☐ VibrateVibrate, the sound function of all programs will be replaced by vibration, including incoming call rings. The 📄on on the top changes to 📋
-
Mute: Under ☐ Off mode, the sound function of all programs will be turned off, including incoming call rings. The 📄on on the top changes to 📋
Memory Optimization
Tap ➕ Programs Probilates UtilMemory Optimization Memory Optimization
Memory Optimization optimization optimize the memory using in your Pocket PC.

- Enable the auto-restart option and select the timer.
Your Pocket PC will automatically restart. - Select the least memory.
Your Pocket PC will restart when the memory is less than your settings.
Scenarios
Tap > Programs> Phone> ScenariosScenarios

① Select an applicable mode.
② Details Section: Set the relevant options for this mode, such as volume, backlight, etc.
Tap DetailsDettation to enter the screen shown on the left. And then tap SettingsSettings to set the relevant options for this mode, such as volume, backlight, etc.
Find and Organize Information
The SearchSearchre on your Pocket PC helps you quickly locate information.
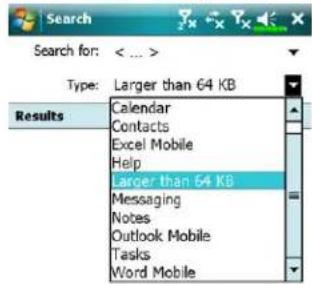
- Tap > ProgramsProSearchSearch
Input the text you want to find and then select the data type. Tap on SearchSeastart the search.
- To find information that occupies a larger space, select Larger than Larger than 64 KB64KTypeType

Actually, you can use File ExplorerFile Explorer for files and place these files into folders systematically. Just tap ProgramsProfileExplorerFile Explorer

①Tap to change folders.
②Select the sort order for the list.
③Tap the folder name to open folder.
④Tap Menu and then New Folder to create a new folder.
Note
You can move files in File ExplorerFile ExplorerGrand holding the item you want to move, and then tapping Cut or Copy and Paste on the pop-up menu.
Navigation Bar and Command Bar
The navigation bar is located at the top of the screen. It displays the active program and current time, and allows you to switch to programs and close screens.
Use the command bar at the bottom of the screen to perform tasks in programs. The command bar includes menu names, buttons, and the Input Panel button. To create a new item in the current program, tap NewNewsee the name of a button, tap and hold the stylus on the button. Drag the stylus off the button so that the command is not carried out.

① Tap to change volume or mute the Pocket PC.
②Tap to select a program.
③Tap to quickly select a program you have recently used.
④ Tap to see additional programs.
⑤Tap to customize the Pocket PC.
⑥MenuMention.
⑦ Input panel button.
⑧ New Newton.
Pop-up menus
With pop-up menus, you can quickly choose an action for an item. For example, you can use the pop-up menu in the contact list to quickly delete a contact, make a copy of a contact, or send an e-mail message to a contact. The actions in the pop-up menus vary from program to program. To access a pop-up menu, tap and hold the stylus on the item name that you want to perform the action on. When the menu appears, lift the stylus, and tap the action you want to perform. Or tap anywhere outside the menu to close the menu without performing an action.

① Tap and hold to display the pop-up menu.
② Lift the stylus and tap the action you want.
③ Tap outside the menu to close it without performing an action.
Redefine Hot Keys
Tap

ettSettingsSePersonalPearsonButtonsButtons
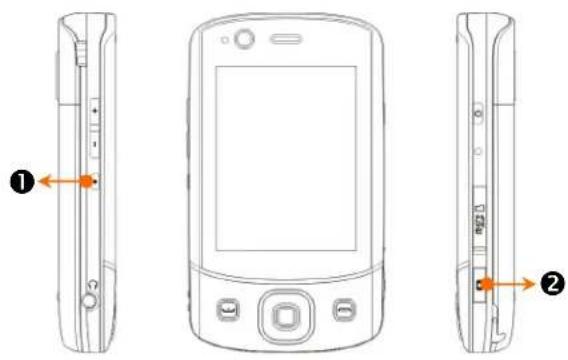
① Button 1
② Button 2
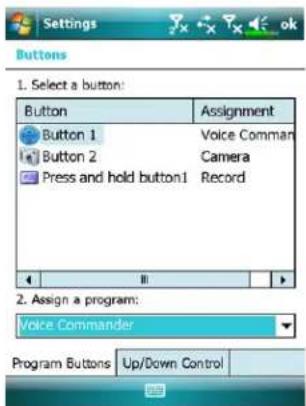
These hot keys can be redefined as launch keys for frequently used programs.

and

exclusive
phone functions so they cannot be redefined.
6 Synchronization

Windows Vista Part
A PC with Windows Vista™ operating system can be used to enable connection and synchronize with your Pocket PC. The Windows Mobile® Device Center application can be used to manage your Pocket PC, and can provide Pocket PC access to other resources through the connected PC. The online services and application access can also keep the Pocket PC up-to-date with the connected PC. For example, if you make a modification to the Pocket PC, then this modification will be automatically applied to the appropriate information on the computer during the next synchronization, and vice versa. This way, the latest data can be ensured to be available no matter which computer is being accessed.
Important Installation Notice Important Installation Notice
Before you install Windows Mobile ^® Device Center, make sure that the USB cable on the Pocket PC is not connected to the personal computer. Connect the USB cable only after Windows Mobile ^® Device Center is installed.
-
Software installation: You could use the Getting Started CD to install Windows Mobile® Device Center on the personal computer.
-
Hardware installation: The USB cable is a plug-and-play device. Use the USB cable to connect your Pocket PC to your personal computer.
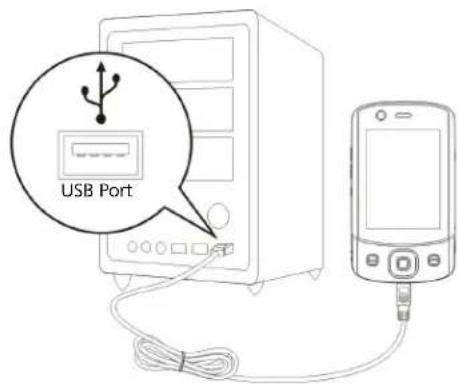
- Using Windows Mobile ^® Device Center
① After installation is complete, the Setup Wizard helps you customize your synchronization settings.
②Once you use the USB cable to connect the two devices properly, the Set Up a Partnership screen appears on the personal computer. Set it up according to your requirements. The green icon 📋 appears on the status bar of your personal computer to indicate that it is Connected.
Windows XP/2000/98 Part
A PC with Windows XP/2000/98 operating system can be used to enable connection and synchronize with your Pocket PC. Using Microsoft® ActiveSync®, you can synchronize the information on your desktop computer with the information on your device. Synchronization compares the data on your device with your desktop computer and updates both computers with the most recent information. For example:
- Keep Pocket Outlook data up-to-date by synchronizing your Pocket PC with Microsoft Outlook data on your desktop computer.
- Synchronize Microsoft Word and Microsoft Excel files between your Pocket PC and desktop computer. Your files are automatically converted to the correct format.
Note Note
By default, ActiveSync does not automatically synchronize all types of information. Use ActiveSync options to turn synchronization on and off for specific information type.
With ActiveSync, you can also:
- Back up and restore your Pocket PC data.
- Copy (rather than synchronize) files between your device and desktop computer.
- Control when synchronization occurs by selecting a synchronization mode. For example, you can synchronize continually while connected to your desktop computer or only when you choose the synchronize command.
- Select which information types are synchronized and control how much data is synchronized. For example, you can choose how many weeks of past appointments you want synchronized.
Synchronization
Installing and Using ActiveSync
Important Installation Notice Important Installation Notice
Before you install ActiveSync, make sure that the USB cable on the Pocket PC is not connected to the personal computer. Connect the USB cable only after ActiveSync is installed.
- Installing ActiveSync: You could use the Getting Started CD to install Microsoft ActiveSync version 4.5 or above on the personal computer. ActiveSync is already installed on your Pocket PC.
- Hardware installation: The USB cable is a plug-and-play device. Use the USB cable to connect your Pocket PC to your personal computer.

3. Using ActiveSync
①After installation is complete, the ActiveSync Setup Wizard helps you customize your synchronization settings.
②Once you use the USB cable to connect the two devices properly, the Set Up a Partnership screen appears on the personal computer. Set it up according to your requirements. The green icon 📋 appears on the status bar of your personal computer to indicate that it is Connected.
③Click Explore Exp the Microsoft ActiveSync on the personal computer to access files in the Pocket PC. Just like using a personal computer, manage the files in the two devices.
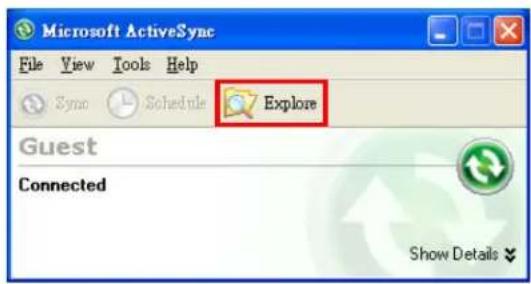
FAQ About Synchronization
Tap → SettingsSetConnections ConnectUSB to PCUSB to PC
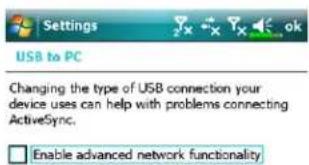

- Factory setting defaults to checking the box.
- If you have followed the above installation and operation procedures and find that the connection between your Pocket PC and desktop PC still cannot be established, please uncheck the box shown on the left.
USB Synchronization
Before you start to synchronize, use the Pocket PC Getting Started CD to install synchronization tools on your personal computer. For more information on how to install, please refer to the Pocket PC Getting Started CD or online help. Synchronization tool is already installed on your Pocket PC.
ActiveSync synchronization settings: ActiveSync synchronization settings:
- After installation is complete, the Setup Wizard will continue to guide you. Adjust the specifications according to your actual needs.
- Use the USB cable to connect the two devices properly and the Set Up a Partnership screen appears on the personal computer. Set it up according to your requirements.

① Click OK.
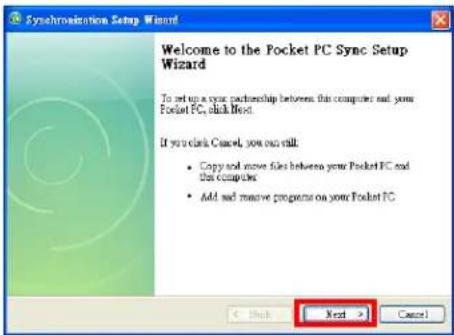
②Click NextNext

③Check the items you want to synchronize.
④ Click NextNext

⑤ Click FinishFinish
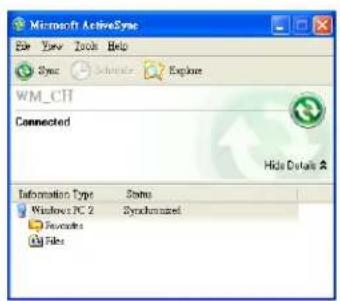
⑥ After installation is complete, the ActiveSync Setup Wizard helps you connect your Pocket PC to your desktop computer, set up a partnership so you can synchronize information between your Pocket PC and your desktop computer, and customize your synchronization settings. Your first synchronization process will automatically begin when you finish using the wizard.
⑦The green icon 📋 appears on the status bar of the personal computer to indicate that it is Connected.
After your first synchronization, take a look at Calendar, Clientouts, ComdaTasks Tasks your Pocket PC. You'll notice that information you've stored in Microsoft Outlook on your desktop computer has been copied to your device, and you didn't have to type a word. Disconnect your Pocket PC from your computer and you're ready to go!
Synchronization Tool on Pocket PC
Once you have set up ActiveSyncActiveSync completed the first synchronization process, you can initiate synchronization from your Pocket PC. To switch to ActiveSyncActiveSyncPocket PC, tap ProgramsProActiveSyncActiveSync
For more information on how to use ActiveSyncActiveSyncpersonal computer, run ActiveSyncActiveSyncto the ActiveSyncActiveSync help. To learn more about the Pocket PC ActiveSyncActiveSync ActiveSyncActiveSync HelpHelpHelp refer to the HelpHelpmore information.
After the synchronization is completed, tap Calendar, Cadenitaets, CandaTasks Tasks the Pocket PC to view if the information saved in Microsoft Outlook on the personal computer is already copied to the Pocket PC.
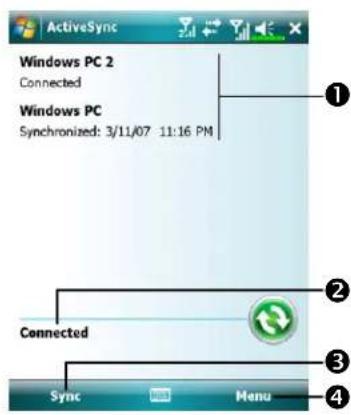
On the Pocket PC site: Tap

ProgramsProActiveSyncActiveSync
① View synchronization status.
② View connection status.
③ Tap to connect and synchronize.
④ Tap to synchronize via Bluetooth or change synchronization settings.
Synchronizing using Bluetooth
Without using the USB cable to connect the two devices, you can still synchronize using Bluetooth. The greatest advantage is that you don't have to plug in and detach from the USB cable so often. This is especially useful for managing several Pocket PCs. For details on Bluetooth devices, refer to "Using Bluetooth" section.
7 Connections
Connecting to the Internet
This section teaches you how to use GPRS wireless network connection. GPRS wireless networking is a convenient function for working at home or while traveling. You can use the Pocket PC to browse websites and read or send E-mails, SMS or MSN messages.
To start using GPRS service, please:
- Contact your service provider for the data plan and apply for it.
- Install the SIM card with the GPRS plan in SIM1Sllt1
- Activate Phone1Phone1
Note Note
SIM2 SIM12 allows only the voice services such as phone call and SMS provided by the SIM card you install in it; for use of data transmission service such as GPRS, 3G or EDGE, please insert the compatible SIM card in SIM1 SIM1
Connection Wizard
Generally, you will only need to install the SIM card to your Pocket PC to simultaneously use the mobile phone functions. The system will automatically add the connection items for this SIM card. To verify: Tap

ettlSettingsSettings
Connections(Console ConnectionsGo/ Marriage existing connections, Manage existing connections show the newly added network name.
If the system is unable to successfully add the connection to your SIM card, it is possible to use Connection WizardConnection Wizard
Connections
Tap → SettSettingsSetConnections Connection WizardConnection Wizard

-
Select the country name from the list.
-
Select the carrier name from the list.
-
According to actual requirements, select the carrier name, and then tap AddAddton or EditEditton. Or use the NewNewton to add the new network connection.
-
Search Search: Detect the currently available telecommunication service. If it is found, use the AddAddton to add the highlighted selection. If it is not found, the "New network New network screen will be shown; please manually setup the network.
-
Recovery Recovery Restore to the original setup value.
-
Tap 3 Settings Settings Connections:FaboneConnections,Connections and then "Manage existing connections," the list will show the newly added network name.
Setting the GPRS Connection
To connect to the Internet or use MMS service, please make sure you have installed SIM card in SIM1Slot1and activated Phone1Phone1
Tap → SettingsSetConnections ConnectionGoTaskStats
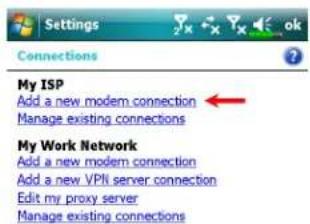
- As shown in the screen on the left tap "Add a new modem Add a new modem connection"

- Enter the "Make New Connection" screen as shown in the screen on the left.
①Input a new connection name for convenience in making connections in the future.
②Select "Cellular Line (GPRS)."
③Lastly tap Next.

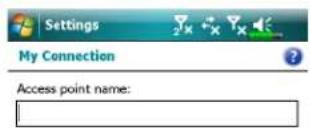
-
Input the Access Point Name provided by your service provider and tap NextNext
-
Input your personal information such as account number, and tap FinishFinish
![123 1 2 3 4 5 6 7 8 9 0 - - Tab q w e r t y u i o p [ ] CAP a s d f g h j k l :' Shift z x c v b n m , / Ct áú ` \ Back Next](/content/2026/05/1038173/images/2b55336e7628a587772bc6751a6e6bc27b7ac8eaa479d2f6d1f92efbe4e1e85b.jpg)
Starting GPRS Connection
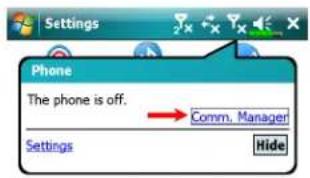
- Turn on Phone: Tap or icon at the top of the screen and tap "CommComm ManagerManagerand input your PIN to enable GSM. The Icon will change to while the icon changes to .H

-
Tap ☐ the Communication Management Manager becomes the GPRS (Data) connection is available.
-
Tap , then tap SettingsSetting to Connections. You are ready to connect GPRS.
G E 3G H represent the availability of various data connection services provided by SIM card you installed in SIM1 slot. They are shown according to your monthly plans, telecom service provider, and network distribution conditions or effective system coverage area. To make modifications to your monthly plans, please contact your telecom service provider.

-
Connect GPRS: Select "Manage existing connections" in Connections Connections hold on the newly created connection name, and then select ConnectConnect enable GPRS connection.
-
Input your account information in the Logon Network screen and tap to login to the network.
-
After the connection is established, the
icon will change to
- Now you can use the appropriate program to access the Internet, receive or send E-mails, etc.
Disconnecting GPRS

- Disconnect GPRS: Tap and the message window appears. Tap DisconnectDisconnect
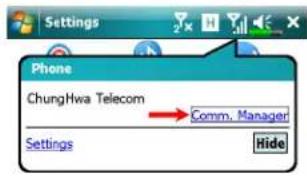
- Turn off Phone: Tap and then "CommC Manager. Manager, disable GSM.
Using Bluetooth
Bluetooth is a short-distance wireless communication technology with an effective range under 10 meters (30 feet). When the Bluetooth power is turned on, the indicator will blink blue.

Bluetooth capable devices such as the PC, Pocket PC, Bluetooth headset etc. can be connected to this product for the convenience of data sharing.
Setup the Bluetooth Connection
On the Communication Manager, Screen adaptation Manager button, then release to enter the Bluetooth Bhantogen.
Tap → SettingsSetConnections ConnectBluetooth Bluetooth
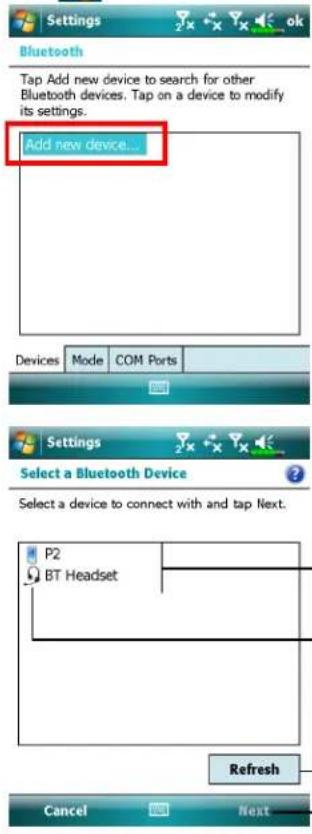
Tap Bluetooth Bandwidth Devices Devices
-
Select "Add new device Add the device system will begin to search for nearby Bluetooth devices.
-
The search results will be similar to the screen to the left. Select the device to connect with the list.
① All Bluetooth devices found nearby the system.
②This icon indicates a Bluetooth headset.
③ Refreshed lesson: Search again to look for additional Bluetooth devices to connect with.
④ Select any device to connect with, and then tap NextNextfollow the onscreen instructions.
Note Note
Pair for Bluetooth headset: When the system asks for the password, please refer to the instructions provided with your purchased Bluetooth headset.
Pair for PC or Pocket PC: When the system asks for the password, please make sure that the identical password is entered to both devices.

- Your Pocket PC connected with these devices will be able to transfer data, receive calls on a Bluetooth headset, and other applications.
① Successfully connected devices will be shown as on the screen to the left.
② Tap and hold a device, for example the Bluetooth headset, then select Set Hands free to be able to use the Bluetooth headset to receive calls.
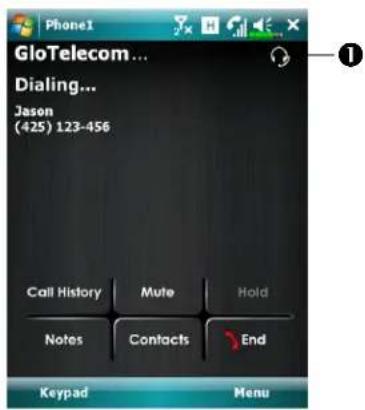

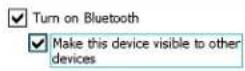
To connect to a device, click on the Devices tab below.

- The screen to the left is during a call.
①PhonePooren during a call will show a headset icon in the upper right corner, the Bluetooth headset will be used to communicate with the callee.
Tap BluetoothBluModeMable
-
Configure the Bluetooth related options for your Pocket PC.
-
Tap > SettingsSetPersonaPersona tab > Owner InformationOwner Information Enter the name that you wish to show in the Name field. At the same time, other Bluetooth capable devices can recognize your Pocket PC by this name.
① Checkmarking the "Make this device visible to other devices Make this device visible to other devices will enable all Bluetooth capable devices within the 10 m (30ft) effective range to detect your Pocket PC, and transmit data with the proper authentication.
②If the "Make this device visible to other devices Make this device visible to other devices selected, your Pocket PC can send data to other devices but other devices will not be able to detect your Pocket PC.
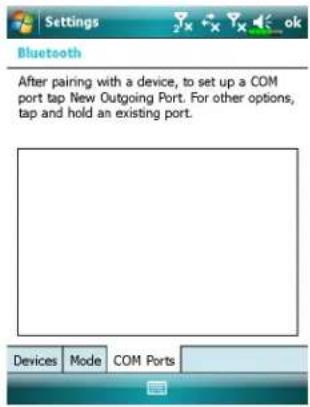
Tap BluetoothBluetooth COM COM PortsPlatts
- Follow the onscreen instructions to register the connected Bluetooth device as an effective COM port.
Internet Sharing
Tap > ProgramsProgram Internet Sharing
This function provides a simulated modem function for the Pocket PC to connect to the PC. The built-in Bluetooth paring or USB port can be connected with the PC and provide Internet access on the PC.
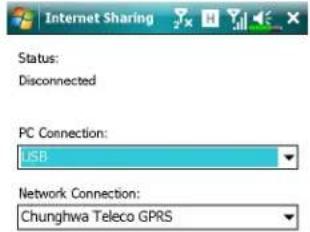

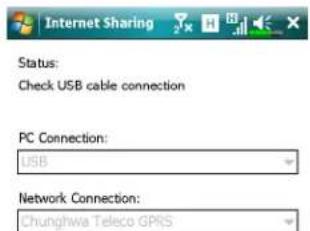

-
The USB connection is used as an example.
-
Complete the connection setup between the Pocket PC and PC. The network connection and configuration can be attained from your telecom service provider.
-
Tap ConnectCard wait for the system to complete the connection.
-
This screen is only for reference as the actual connection method will depend on the Bluetooth paring or USB port; the connection configurations can be referenced from your telecom service provider. The fees will be decided by the service provider.
CSD Type
Tap → SettSettingsConnectionsFabneCSDTypeCSD Type
You must first apply for Circuit-Switched Data (CSD) service from your telecom company before you can use this function. In short, this function is similar to the modem dial-up in a personal computer. By simulating the Pocket PC as a modem and connecting through the built-in GSM device, you can use the Pocket PC to access the web.
To start using this function, please install the CSD service-enabled SIM card in SIM1Slot1and activate Phone1Phone1
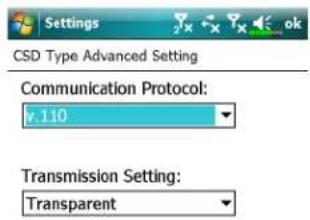

This figure is for reference only.
The parameters shown in the screen will be based on the settings provided by your telecom company. The charge rate is regulated by your telecom company.
Connecting with a Personal Computer
For more information, refer to "Synchronization" section.
Wireless LAN Transmission
On the Today screen, tap 📄 to launch Communications Manager Communication Manager information, refer to "Using Wireless LAN" section.

Connections 7-15
8 Using Wireless LAN

This section teaches you how to use the Pocket PC's built-in wireless LAN function to connect to the Internet. It is convenient for you to browse websites and send/receive E-mails through wireless networks at certain locations where wireless networking services are provided.
When you purchase credits for connecting to the Internet through a wireless LAN, you will be given the following information: an IP address, DNS name server address, Proxy server, port, and network key, etc. You need this information to setup and activate your connection. In some cases, you may need additional information to use a company's wireless connection, please confirm with the network administrator in your company.
If this is your first time using the wireless LAN function, firstly you should refer to the following "Configure Your Wireless Network" section for instructions for the necessary configuration settings. After you have completed the one-time configuration process, you only need to select the 📄 in the
Communication Manager Communication Management connections.
Connecting to Wireless LAN
On the Today screen, tap to launch Comm. ManagerComm. Manager
Tap ➕ ProgramsPrograms. ManagerComm. Manager

This icon will show up on your screen whenever your Pocket PC has detected a usable wireless network and has connected to that network, indicating that your Pocket PC has successfully connected to the network hotspot (Access Point). The LED indicator on the Pocket PC will blink amber.
② Tap to connect or disconnect to your wireless network, a off means that this function has been disabled.
③ Tap and hold this button, then release to enter the configuration screen.
When the screen shown on the left appears, please choose a wireless network that you can use, and then tap OK button. Then, select WorkWork tap ConnectContact The first time you use the wireless LAN function, your system will ask you to set the above mentioned settings, after that, your system will continually use the settings from your most recent successful connection.
![Multiple Networks Detected Select a network to connect to: ○ vlan [Unsecured] ○ B-MIS [Security-enabled] ● TTN [Security-enabled] Show all networks OK Menu](/content/2026/05/1038173/images/c5d0b8507672e8357cf898a3907abb1ff1ad6279762e4a5caff4abc1c1994964.jpg)
![New Network Detected "TTN [Security-enabled]" network connects me to: ○ The Internet (or work via a VPN) ● Work Settings Connect Menu](/content/2026/05/1038173/images/fa536017688541f4fdebe83361ee79709a3773bde476b7b71d05228351d98c3e.jpg)
Configure Your Wireless Network
WLAN Setup Scenarios
LocationLocationSelect NetworksSPExPNetConnectionProxy Connection Network key or Net Access PointAcc
Home

Settingsettings
Connections Connections
ConnectionsGoAdvancedAdvanced Not required to
tab, Select NetworksSelect NetworkProxy
button, and then select My
Work Network from
"Programs that
automatically connect to
the Internet should connect
using:" menu
Office
Refer to the above and set
as My Work Network

Settings >
Refer to the above
Connections connections set the items for
ConnectionsConnectionNetwork key
Tasks tab, select
"Edit my proxy
server," and then
check the Internet
items to enable the
entry bar about
Proxy
Café
Refer to the above and set
as My Work Network
or
restaurant
- Close Proxy
connection
- Not required to
WLAN select
different Access
Point
Configure Your Wireless Network (Normal Setup)
You will need a correct IP address; DNS name server address, Proxy server, and connection port number to setup your connection. If you have purchased a wireless Internet service account, then the service desk at the location where you will be connecting will provide you with this information, or, you should obtain this information from the network administrator of your company.
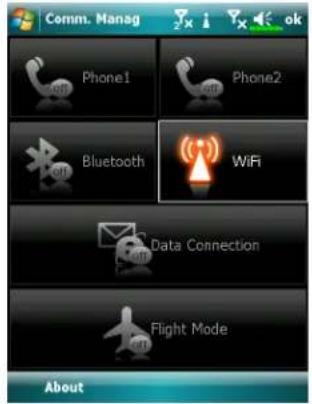
When your Pocket PC is unable to automatically detect or connect to a usable wireless network, please try to configure the network manually. Please refer to this section's settings instructions.
- Select the 📄 in the Communication Manager/Communication Manager menu, a 📋icon will display on the navigation bar.

- Then tap >SetSettingsSettings ConnectionsTabnConnectionsConnections Advanced tabAdvancedTabdisplays shown on the left.
- Select the Select NetworksSelect Networks button.


- As shown on the left, make sure that My Work Network is a network for both items, and finally tap ok to save and exit.
My Work Network MyWork Network connection method. As this option is from a choice of two, the next time you need to use the GPRS connection, you will have to refer to the above listed steps, select My ISPN or the first item.
- At the Communication Management Manage screen, tap and hold, and then release the button to enter the setup screen.
- Select name of a currently available network to enter the WLAN authorization setup screen.

- Set accordingly to the rules and information provided by the hotspot location.
①AuthenticationAsElectOperation
②Data EncryptionDseEncryption enable the entry bar about Network key
③Network keyNetwork key
④KeyKindex index
- Tap and hold on the name of the network connection that you can currently use, then select ConnectWhenthe ?eon appears on the top of the screen, your wireless network has been successfully connected.
Configure Your Wireless Network (Proxy Setup)
To successfully configure your network, you will need the following information: a correct IP address, DNS name server address, Proxy server, and connection port number, etc. Please obtain the above listed information from your company's network administrator. If your company's networking environment doesn't need Proxy server settings, please close the proxy connection.
Tap

ettingsettingsSetConnectionsFaboneConnectionsGoTracksTracks
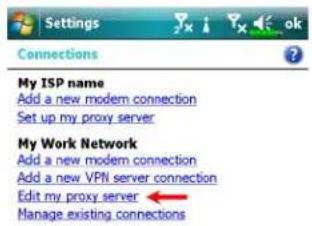
When your Pocket PC fails to automatically detect or connect to a usable wireless network, please try using the manual method to configure your network settings. Please refer to the settings information in this section.
![Tasks Advanced Settings My Work Network ✓ This network connects to the Internet ✓ This network uses a proxy server to connect to the Internet Proxy server: XXX.XXX.XXX.XXX Advanced... General Modem VPN Proxy Settings 123 1 2 3 4 5 6 7 8 9 0 = * Tab q w e r t r y u i o p [ ] CAP a s d f g h j k l : * Shift z x c v b n m , / Ctrl äü ' \](/content/2026/05/1038173/images/8482fef59da6a53a7e9387b42e1ff6cc287477004b37129b2b2553a47c182007.jpg)
- Select "Setup my proxy server Setup my proxy server" Edit my proxy server Edit my proxy server on the left.
- In the Proxy Setting, a Section, make sure that the following items have been checked:
①This network connects to the Internet
②This network uses a proxy server to connect to the Internet
The above is applicable to an office environment that requires a Proxy setup.
For others that close the proxy connection, please do not check the box named "This network connects to the Internet" "This network connects to the Internet" following procedures.
- Enter the name into the "Proxy serverPrfieldserver
- Select the Advanced Advanced and enter the advanced settings screen.
![My Work Network Tap a proxy type to change its settings. Type Server HTTP XXXXXX.XXX.XXX.0 WAP 10.1.1.1:0 Secure WAP Socks XXX.XXX.XXX.XXX.1080 123 1 2 3 4 5 6 7 8 9 0 = - Tab q w e r t y u i o p [ ] CAP a s d f g h j k l ; * Shift z x c v b n m , . / Cd ju \ ↓ ↑ -](/content/2026/05/1038173/images/fd12498ffbfdbe85d9dc6b47868b2ca88eec422f800d4d5ad578ab6883d487c4.jpg)
- You can modify the settings by tapping the HTTP type.

- Enter the number into the "PortPort field. Finally, tap ok to save and exit.

![123 1 2 3 4 5 6 7 8 9 0 - = Tab q w e r t y u i o p [ ] CAP a s d f g h j k l ; ' Shift z x c v b n m , . / CtI áu ` \ ↓ ↑ ← →](/content/2026/05/1038173/images/ff106e8ac33144686899766f8263fbf65a3bcb151ddca166992df5d354d8181a.jpg)
9 E-mails and Messages

Message Accounts
Messaging Messaging you can manage all message types including SMS (Short Messaging Service), MMS (Multimedia Messaging Service) and E-mail accounts. To use these services, please connect your device to a network connection.
Tap Messaging Messaging
On account picker screen, select the messaging service you want to use.
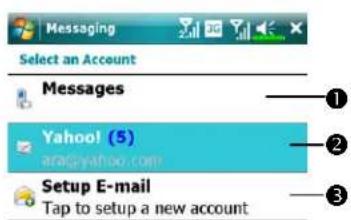
① Tap to enter MessagesMessages
② Tap to enter an E-mail accounts ou have established.
③ Tap to setup a new E-mail account
④ Change the account settings. Or delete a message.

Note Note
• To use MMSM and SE-mail lease:
-
Apply wireless service from your service provider
-
Activate this SIM in SIM1 Slot1
-
Go to SettingsSetConnectionsTabneConnectionsForsee this network settings.
-
On the Today screen, tap and turn on Data Connection by tapping connection

- SIM2Silot2allows only the SMS service provided by the SIM card you install in it; if you want to send MMS message or E-mail via a certain number, please insert the SIM of that number in SIM1Silot1
Text Messages
Reading Received Text Messages
Tap > MessagingMeGrayMessagingMessageMap MessagesMessages
- To read received messages, tap, and select the sub folder ▼Indoklumber MessageMessage

- In Inbox, I you can tap and hold a message to open a list of actions; you may Delete Reply Reply Forward This message. To sort the messages by sender or received time, tap MenuMeToolsToSort By Sort Then choose the sort method.
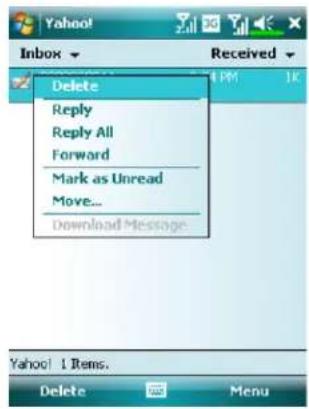

Creating a Text Message
- On Messaging Messaging Messages Message New Text Message Text Message

- In To: filed, enter the number of recipient or tap Menu Add Recipients Recipients select a contact. If there is more than one contact, use a semi-colon (;) to separate them.
- In Text Field, enter your message. You can tap Menu My Text My Text canned messages.
- Tap Send.
- Select the SIM number you will use to send this message.
Note ote
If the SIM card you select is not activated, a notice "Send failed Send failpup.

Multimedia Messages
Reading MMS Messages
Tap > Messaging Messages Messages
In Inbox|tapxon a single MMS message to view it.
- Use the playback controls: PlayPlay, PauseRay ResumeReview the message.

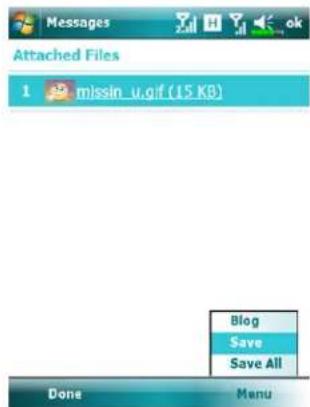
• To save the objects attached to this MMS message:
- Tap Menu > View Objects,
- On object list, tap Menu > Save or Save AllSave All
Note
- If you reply to an MMS message from Inbox, this reply message will be sent as an MMS message via SIM1 number.
- If you want to send MMS message or E-mail via a certain number, please always activate the SIM of that number in SIM1 slot.
- To modify MMS settings such as Receiving Options or Sending Options, in Inbox\rtapMenu\MMS Settings. In these settings you may select to request / send a delivery report, set the size or delivery time of a message.
Emails and Messages
Creating an MMS Message
On Messaging Messaging Messages Made New Media Marketing Message Select an MMS template to compose a new MMS message. Or tap the envelop icon to open your own blank message.
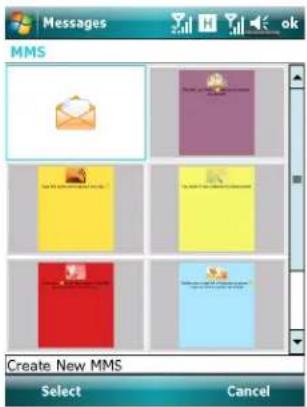

On an MMS composing screen, you may tap:
• BccBccC to field to add recipients.
- SubjectSibjeto enter the message title.
- MenuInsert to insert a file.
- MenuMeSlides to edit the slide content and settings.
- MenuMePreview to preview your MMS message.
- Send to send out this MMS message.
Note
- You may also send an MMS message from Camera, Album, Pictures & Videos, File Explorer and Notes.
- SIM2 slot allows only the SMS service provided by the SIM card you install in it; if you want to send an MMS message or E-mail via a certain number, please activate the SIM of that number in SIM1 slot.
E-mails
This section explains the basic preparations and processing principles. If you have any questions, refer to online help about Pocket PC or synchronization.
Use Messaging Messaging and receive E-mails messages in either of these ways:
- Send and receive e-mail messages by connecting directly to an e-mail server through an Internet service provider (ISP) or a network.
- Synchronize e-mail messages with Microsoft Exchange or Microsoft Outlook on your desktop computer.
Note Note
Inbox synchronization does not support synchronization with Microsoft Outlook Express.
Synchronizing E-mail Messages
If you want to synchronize e-mails with company or home usage, please refer to this section. E-mail messages can be synchronized as part of the general synchronization process. You will need to enable Inbox synchronization in synchronization tools. For information on enabling Inbox synchronization, see Help on the desktop computer.
During synchronization: During synchronization:
- Refer to "Connecting to the Internet" section. Select the partnership you want to establish under "Set Out a Partnership" a partnership start to synchronize data. If you choose not to synchronize data, you can manually copy or move E-mails between the Pocket PC and a personal computer.
- E-mail messages in the "Outbox October" on your Pocket PC are transferred to Exchange or Outlook, and then sent from those programs.
- Exchange or Outlook E-mail is supported.
- Mails in the Pocket PC Inbox folder will be transmitted to the personal computer and then sent out via Microsoft Outlook or Microsoft Exchange.
- If you delete mail in the Pocket PC, this mail will also be deleted from the personal computer the next time the two devices perform synchronization.
- SMS messages are not synchronized.
Connecting Directly to the Mail Server
For single-machine use, not combining office and home E-mails, please refer to "E-mail Server Setup" section.
You will receive messages directly from the mail server. This is irrelevant to personal computer use. You can work online or offline. When working online, you read and respond to messages while connected to the e-mail server. Messages are sent as soon as you tap SendSwitch which saves space on your Pocket PC.
When working offline, once you've downloaded new message headers or partial messages, you can disconnect from the e-mail server and then decide which messages to download completely. The next time you connect, Inbox downloads the complete messages you've marked for retrieval and sends the messages you've composed.
Based on your preference, you can program the Pocket PC to receive mail for the last few days, receive subjects only or the entire mail, or just receive mail with file attachments smaller than a specified size. If you want to receive more or less mail, tap MenuMade then Options Option just the E-mail account settings according to your needs.
E-mail Server Setup
Refer to this section if you are preparing for single-machine use and not combining office and home E-mails. If you already have an E-mail account from your ISP or company network, you can use Messaging Message and receive mails and messages. To establish a new Messaging Message over on your Pocket PC, refer to the following sections.
- Obtain the following information from your ISP or company's network administrator for convenience in setting up the E-mail service.
① E-mail address, account name and password
② POP3 or IMAP4 server name for internal mail
③ SMTP server name for sending mail

- Setup a new E-mail account:
Tap Messaging Setup E-mailmail

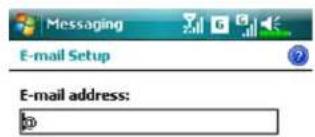
- Follow the instructions on the screens to setup the E-mail account.
![Password: ✓ Save password 123 1 2 3 4 5 6 7 8 9 0 - = Tab q w e r t y u i o p [ ] CAP a s d f g h j k l ; * Shift z x c v b n m , . / Clt äü * \ ↓ ↑ + → Cancel Next](/content/2026/05/1038173/images/aa40093dd0c20c0405ff996f422890ab86f8521c63987c980ac1c5354361e153.jpg)
-
Refer to "Connecting to the Internet" section or "Using Wireless LAN" section to connect the Pocket PC to the Internet and you can start sending and receiving E-mails and SMS messages.
-
Connecting to the E-mail server:
①Tap MenuMeGo ToGanTothen check the new E-mails account you setup.
②Tap Menu/Meduthen Send/ReceiveSend/Receive
Note Note
Tap MenuMeToolsToOptionsOptionchange the E-mail account.
Sending / Receiving E-mails
Sending E-mailings
Tap Menuled then NewNewcompose a message and then tap SendSend it.
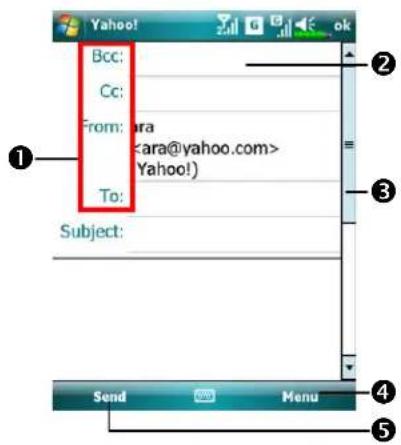

① Tap To, Cc or BccBocopen the ContactsContactAs long as you have set up ContactsContactand, you can just tap to select.
② Tap the data area to input the E-mail adress, mobile phone number and subject directly. If there is more than one contact, use a semi-colon (;) to separate the addressees.
③ Use the scroll bar to view the header.
④ Menu button: Provides frequently-used functions for writing mail such as request return receipt, attach files to E-mail, select canned messages, edit canned messages or cancel mail.
⑤ Send button: Send your messages.
ReadRegiagd replyjngiEmailsmails
Receive new mails by tapping MenuMed then Send/ReceiveSend/Receive the InboxInbox folder and tap to open.
Chang@gipreference settingsference sett
① Set the Inbox Synchronization option in synchronization tools.
②Tap > Messaging > Menu > Options, and then the Accounts, Message
tabs on the Pocket PC to set the appropriate options.
Direct Push Technology Alert
The Direct Push Technology alert function will enable you as a corporate user to never miss another e-mail, using the Pocket PC for the best business service. Through the synchronization feature, your Pocket PC can instantly and automatically receive important e-mails from Microsoft Exchange Server.
Direct Push Technology Alert SettingsDirect Push Technology Alert Settings
The following description will explain how to setup the synchronization program on the Pocket PC end, and to directly synchronize the Pocket PC with Exchange Server. This way, your device under GPRS or wireless network connections will be able to receive in-coming e-mail alerts, and be able to instantly read the messages.
A reminder that if you selected the connection method to be wireless network, for power saving purposes when the Pocket PC enters sleep mode the connection will be broken. During this time you will not be able to receive instant e-mail. However, you will only need to press the POWER BOMER to automatically complete the connection to the wireless network.

1. Tap

Programs Programs
ActiveSyncActMehyMeConfigure Configure Server.
If the Exchange Server
synchronization has not been setup before, please select Add Add Server SourceServer Source
①Tap to connect and synchronize.
②Tap to modify the synchronization settings.
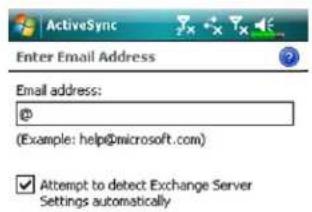
- Obtain the e-mail, server address, user name, network etc. from the company network administrator to successfully setup the server data.
![123 1 2 3 4 5 6 7 8 9 0 Tab q w e r t y u i o p [ ] CAP a s d f g h j k l ; Shift z x c v b n m / Ctrl Sa `\ Cancel Next ActiveSync Schedule Sync during Peak times: As items arrive Off-peak times: As items arrive Use above settings when roaming Send/receive when I click Send](/content/2026/05/1038173/images/d97b70d8839bc435c0b3bc968f863721ae322a03d223a5c1972c094842dc65ca.jpg)
- Tap Menu and then ScheduleSchedule The Peak times and Off-peak times provide a As items arriveAs items arrive option, this is the direct push technology alert function.
![123 1 2 3 4 5 6 7 8 9 0 - = Tab q w e r t y u i o p [ ] CAP a s d f g h j k l ;' Shift z x c v b n m , . / Ct d a' \ ↓ ↑ ← →](/content/2026/05/1038173/images/4c80826147741b6ccbd7083eefc77630e9f5784b26efb7e2ae1e87663d6169c6.jpg)
Windows Live™ Messenger
To switch to Windows Live™ Messenger, Programs Pr Messenger Messenger Windows Live™ Messenger on your Pocket PC is an instant messaging program that lets you:
• See who is online.
- Send and receive instant messages.
- Have instant message conversations with groups of contacts.
For more information on using Windows Live™ Messenger, tap HelpHelpHelp To use Windows Live™ Messenger, you must have a Microsoft Passport™ account or a Microsoft Exchange e-mail account. You must have a Passport to use Windows Live™ Messenger Service. If you have a Hotmail® or MSN account, you already have a Passport. Once you have obtained either a Microsoft Passport or a Microsoft Exchange account, you are ready to set up your account.
Note Note
Sign up for a Microsoft Passport account at http://www.passport.com. Get a free Microsoft Hotmail e-mail address at http://www.hotmail.com.
Setting Up
The first time you use: Tap
ProgramProgress Messenger
On the Today screen, tap Messenger Messenger the Windows Live™ Windows Live™ Messenger Messenger.
Before you can connect, you must enter Passport or Exchange account information.

- Choose MessengerMesser

ProgramProgram
- Tap Sign inSign in


Emails and Messages
Working with Contacts
If you already use Windows Live™ Messenger on your desktop computer, your contacts will show up on your Pocket PC without being added again.
The Windows Live™ Messenger window shows all of your messenger contacts at a glance, divided into Online and Offline categories, or sorted by groups. From this view, while connected, you can chat, send an e-mail, block the contact from chatting with you, or delete contacts from your list using the pop-up menu.

① Tap a contact to start a chat.
② Provides the relevant menu.
For example, select AddNew new contact to locate a new MSN contact. Or select Sign outSignout from Windows Live™ Messenger.

Notes Notes
To see others online without being seen, tap MenuChange statusChadghestatus select Appear OfflineAppear Offline
If you block a contact, you will appear offline but will remain on the blocked contact's list. To unblock a contact, tap Menu/Contact Options, optobitsen Unblock/contact.contact
Chatting with Contacts
Tap a contact name to open a chat window.
![Windows Live Chat with Arbl You're chatting with Arbl Jason: Arbl: March 123 1 2 3 4 5 6 7 8 9 0 - = Tab q w e r t y u i o p [ ] CAP a s d f g h j k l ; Shift z x c v b n m . / + Ctrl äü .\ Send Menu ① ② ③ ④ ⑤](/content/2026/05/1038173/images/bfe884d8c070bd85042c93fb69fda82506cf30bc2bef405871f0d340eb5791c3.jpg)
①View full chat.
② Enter your message in the text entry area, and tap SendSend
③ Return to the contacts list, and select a contact to chat with.
④ The contact you are chatting with.
⑤ Provides the relevant menu.
For example, to invite another contact to a multi-user chat, select OptionsOptichen Add participantAandpartidthecontact you want to invite.
10 Multimedia

Using Camera
Pocket PC Exterior and Camera

- MicroSD card slot 2.
- Camera hotkey, camera shutter, camcorder button
- Activate or disable the flash or spotlight
- Quit CameraCamera
- Digital zoom 6.
- Switch to other camera or camcorder modes
- Select the storage location 8.
- Select front or rear camera lens
- Select the environment lighting 10.
- Camera lens
- Self portrait mirror 12.
- Flash or spotlight
How to Use the Camera?
Notes Notes
For example, to take a self-portrait, face the light source and avoid dark surroundings or your back to the light source for better results
Press the 📄 button on the Pocket PC.
Tap → Pr ProgramsogMultimediaMuCameraCamera
ActionActions
Scenery or Portrait (Default)
InstructionsInstructions
-
Point the screen of the Pocket PC toward you.
-
Press half the key to activate auto focus. When you hear beeps and the focus frame becomes green from red, press the same key to take a picture.
-
If the screenshot is good, press the camera shutter ☐ on the side of the Pocket PC to take the picture.

natural_image
Scenic garden scene with a boat on a calm river surrounded by rocks and greenery (no visible text or symbols)ActionActions
InstructionsInstructions
Scenery or Portrait (Default)
- If you are in the camera mode from the guidance wizard, pressing the camera shutter will link you to the applications. For more information about the provided tools, please refer to the later descriptions.

natural_image
Scenic view of a tour boat on a turquoise river surrounded by lush greenery and rocks, with no visible text or symbols.- Tap ← to continue with the next shot.
Self Portrait 1.
- First tap along the bottom of the screen. When the icon changes to front camera lens will be used.


natural_image
Portrait photo of a man in formal attire (no visible text or symbols)- Or flip the Pocket PC over and face the "self portrait mirror" beside the camera lens toward yourself.
- If the screenshot is good, press the camera shutter take the picture.
VideoVidestructions
InstructionsInstructions
Video 1.
- Switch to the video mode.
- Face the Pocket PC toward you.
- If the screenshot is good, press the camcorder key on the side of the Pocket PC to begin filming.

natural_image
Hotel scene with palm trees and a pond, no visible text or symbols- During filming, you will see a red dot and flashing numbers of time lapsed at the upper left of the screen.

VideoVidestructions
InstructionsInstructions
Video 5.
- Press the camcorder key 📂 again to stop filming. If you are in the video mode from the guidance wizard, stopping filming will link you to the applications. For more information about the provided tools, please refer to the later descriptions.

natural_image
Scenic view of a resort with palm trees and a pond, no visible text or symbols- Tap continue with the next video segment.
IconToolbar Description Toolbar DescriptionToolbar Descripti
| Continue to shoot or film | |
| Delete the current camera or camcorder | |
| Link to MMS Message at Messaging Messaging | |
| Link to Album | |
| When using camera mode, play or pause the video. | |
| When using “Continuous Shot” mode, go to the previous or next picture. |
Common Tools for Camera
The CameraCamera used to take pictures or videos. This chapter will introduce the common tools for camera and icons on the screen. The previous chapter introduces hardware hotkeys on the Pocket PC that can also control some of the tool icons shown on the screen.

- Switch to other camera or camcorder modes
2.Remaining shots - Timer for "self-timer"
- Display or hide the date
5.Activate or disable the flash - Select the resolution, higher resolutions lead to larger picture files
- Auto focus frame
- Quit CameraCamera
- Digital zoom
10.1 Display or hide detailed information - Link to Album for browsing and managing files
12.10pen the camera setup screen
13.1 Select the storage location
14.1 Select the special effect
15.1 Select front or rear camera lens
16.1 Select the environment lighting
Camera ModesCamera Modes
Tap ◀ or ▶ in ◀ b ○ n to ▶ ch to other camera modes.
Camera Mode C Descript Mode
DescriptionDescript

natural_image
Scenic view of a tour boat on a pond surrounded by lush greenery and rocks (no visible text or symbols)
Normal camera mode.
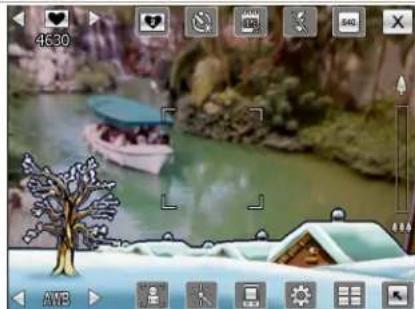
natural_image
Winter landscape scene with a boat on a river, snow-covered ground, and trees (no visible text or symbols)
Camera mode with picture frame.
Tap ☐ select
picture frame or background.

natural_image
Scenic river view with a small boat on calm water, surrounded by greenery and rocks (no visible text or symbols)
Camera mode with GPS information.
becomes to white
icon after the GPS position is fixed.
Camera Mode Description Mode
DescriptionDescrip

natural_image
Scenic river view with a small boat carrying passengers, surrounded by greenery and rocks (no visible text or symbols)
"Continuous ShootShiodus
camera mode.
Tap to select the number of shots.
Common Tools for Camcorder
The CameraCamera used to take pictures or videos. This chapter will introduce the common tools for camcorder and icons on the screen. The previous chapter introduces hardware hotkeys on the Pocket PC that can also control some of the tool icons shown on the screen.

- Switch to other camera or camcorder modes
- Record status: When the recording begins, you will see a red dot.
- Activate or disable the audio
- Activate or disable the spotlight
- Select the resolution, higher resolutions lead to larger video files
- Quit CameraCamera
- Digital zoom
- Display or hide detailed information
- Link to Album Adb browsing and managing files
10.10pen the camcorder setup screen
11.1 Select the storage location
12.1 Select the special effect
13.1 Select front or rear camera lens
14.1 Select the environment lighting
Camcorder Modes Camcorder Modes
Tap or in to other camcorder modes.
Camcorder ModeDescriptionMode DescriptionDescript
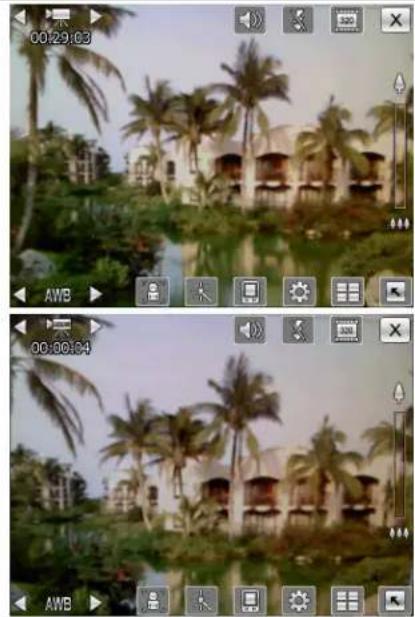
natural_image
Two-panel photo collage showing palm trees and a resort building in a tropical setting, captured with video player interface overlays (no readable text or symbols)
Normal camcorder mode.

MMS camcorder mode.
Advanced Setup for Camera or Camcorder

Tap the 📄onscreen to open the advanced setup screen for the CameraCamera
① Tap to show the corresponding options for the function.
② Options. Flick to scroll I up or down to see the options if the number of items exceeds a screen displaying.
③Tap ▲ or ▼ to switch to the previous page or next page.
④ Tap to select camera or camcorder setup screen.
⑤ Tap to save the settings.
CameraCamcorderCamcorder DescriptionsDescriptions


Select the resolution, higher resolutions lead to larger files.


Select the environment lighting (white balance).


Adjust for fluorescent light frequency.

--
Activate "selfstilhertlmer specific length of time can be set for "selfstilhertlmer


Activate or disable the flash or spotlight.
--

Activate or disable the audio.

-- Display or hide the date.


Select effects.
--

Select quality.

-- Select file format.
--

Select file format; videos in the 3GP format can be played back on the PC.


Select storage location.
Important Hints Important Hints
- When the "--" is shown, this indicates that the function is not supported under this mode.
- When the camera lens is set to face the front, for example when you want to have a self portrait, the picture frame function will not be available.
- Functions and options for various camera modes will be referred to the actual onscreen display, and will not be listed here in full.
Album
Tap > ProgramsProMultimediaMuAlbumAlbum
You can use AlbumAbmanage and view multimedia information such as pictures, music, and videos.
Preview Album Information

① Display the folder name you are browsing.
②Select the sort order for the list.
③Preview thumbnails, which are arranged in the sort order you set. Tap a thumbnail to see a picture at full screen. Tap a thumbnail to play music or video file.
4 Link to CameraCamera
Tap to move to the upper directory. Then select the folder you want to browse.
⑤ Flick to scroll up or down the list if the height of current page exceeds the screen.
⑥ Select other types or start the slide show.
⑦ Provides the relevant menu.
For example, select CutCopyPasteParsDeleteRename the selected file. Select Slideshow SettingsSettingthe details.
Multimedia

natural_image
Close-up of green leafy plants with blue arrows pointing to a white paper clip (no text or symbols visible)
Tap a thumbnail to see the picture at full screen.
① Flick to scroll left or right to browse the previous or next picture.
②If you enable the "Gravity Sensor Screen Orientation," you can turn your Pocket PC sideways to view the picture in landscape orientation.
③Tap on 📄 tap on the screen to display the pop-up menu.
Tap on the screen to display the pop-up menu.
① Start the slide show. Tap anywhere on the screen to stop the slide show.
② Link to MMS Message Stage can send the picture as an attachment.
③ Link to Messaging Messaging send the picture as an attachment.
④ View information about this picture.
⑤ Delete this picture.
⑥ Quit the browsing screen.
⑦Browse the previous or next picture.
⑧ Tap to zoom in or out.
⑨ Tap outside the pop-up menu to abort it.

Tap to zoom in a picture.
① In the zoom-in mode, the smaller frame shown left is part of the picture what you see on the screen.
②Flick to scroll left, right, up or down to view the part of picture exceeding the screen.
③ Tap outside the pop-up menu to abort it.
④ Browse the previous or next picture.
⑤ Tap to zoom in or out.
Slideshow Settings
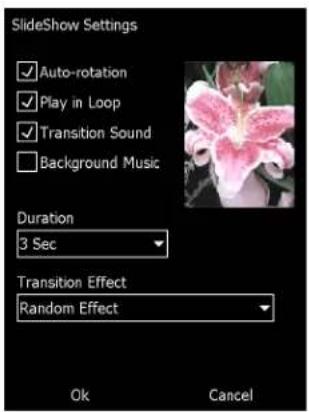
Tap AlbumAllMenuMeSlideshowSlideshow SettingsSettings
Namecard Manager

ProgramsProdMultimediaMuNamedard ManagerNamecard Manager
Provides full name cards management for scanning paper name cards into a digital format. The contacts database from Pocket PC can also be integrated into a unified contacts book.
Digitize New Name Cards

-
Tap RecognizeRecognize
-
Tip: Before taking a picture, please take the following pointers to improve recognition quality.
①If the original name card is a landscape design, it is recommended that you rotate the Pocket PC before taking the picture.
②Keep the Pocket PC's camera lens at a distance of 10\~12cm.
③Fill the four corners of the screen marked by red indicators with the name card.
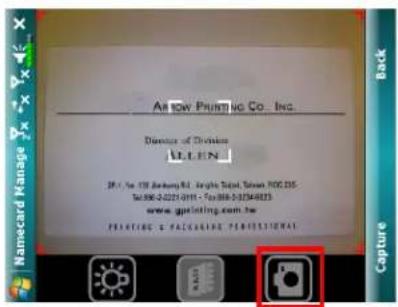
- Take pictures
Prepare a name card and adjust the position. Press the shutter 📄 the side of the Pocket PC to take the shot.
You can directly select on the screen to take a picture.


- Name card recognition
①Select LanguageLanguage the appropriate language for this name card.
②Select 📄 Identify identify recognize the contents on the name card.
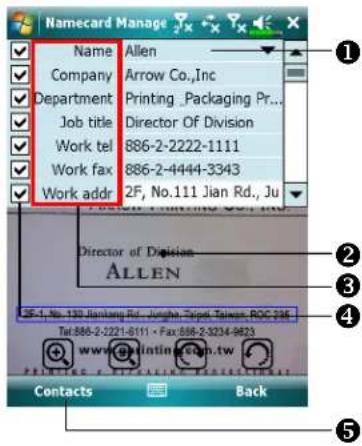
- Modify the name card's contents and confirm
①Select the contents field to make modifications.
②When selecting the contents field, the name card source will be shown for verification. Double tap on the name card area to zoom to the max viewing.
③Select the field name to modify and adjust the error recognitions.
④ Choose whether to keep this data entry.
⑤Add this name card to the contacts database on the Pocket PC. Go back to Contacts to view the new entry.
IconidMeaning
MeaningMeaning

Enable or disable the flashlight.

Select storage path

Take a picture. Identical to the 📄 utter at side of a Pocket PC. If the result is not satisfactory, retake the picture.

Increase or decrease zoom.

Rotate left or right.

Identify name card.
Name Cards Management

- Tap ManageManage

- Main screen for name card management
Only recognized name cards will be shown here.
①Enter the quick search page. Tap a letter and the results for name cards created in Namecard Namecard Manager Will age shown.
② Delete the entered text to the left.
③Search criteria for name card. All matching name cards for "Name, Work, or Tel" will be shown on the screen. To search for all name cards, please leave the field blank.
④ Name card index display area, select an entry to expand its contents.
⑤ Display area for the original name card.
⑥ Provides the relevant menu.
NewNCreate a new digital name card.
Import/Supported format includes BMP, JPG, and PNG. An existing name card image file can be imported and then processed.
EditModify the name card information.
Delete Delete the selected name card.
⑦ Return to the previous page.
| A | B | C | D |
| E | F | G | H |
| I | J | K | L |
| M | N | O | P |
| Q | R | S | T |
| U | V | W | X |
| Y | Z |
3. Quick search screen
After selecting a letter, the name cards created in Namecard Namecard ManagerMailbagerhown. The matching name or company entries will be shown on the name cards management list.
11 Companion Programs

Microsoft® Pocket Outlook includes Calendar, Contacts, Tasks, Messaging Messaging NotesNotes can use these programs individually or together. For example, e-mail addresses stored in Contacts connected to address e-mail messages in Messaging Messaging
Using synchronization tools, you can synchronize information in Microsoft Outlook or Microsoft Exchange on your desktop computer with your Pocket PC. You can also synchronize this information directly with a Microsoft Exchange server. Each time you synchronize, synchronization tools compare the changes you made on your Pocket PC and desktop computer or server and updates both computers with the latest information. For information on using synchronization tools, see Help on the desktop computer.
You can switch to any of these programs by tapping them on the menu.
Calendar: Scheduling Appointments and Meetings
Use Calendar (Calendar) schedule appointments, including meetings and other events. You can check your appointments in one of several views (Agenda, Day, Week, Month, and Year) and easily switch views by using the View menu.
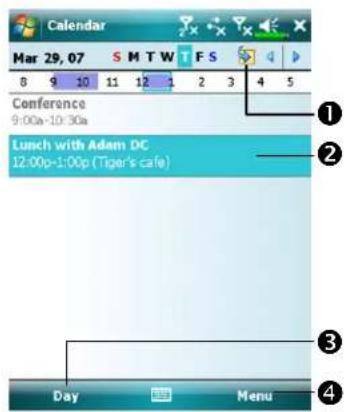
①Tap to go to today.
② Tap to display or edit the appointment details.
③ ViewViremu.
④ Tap MenuMed then New New Appointment Appointment new appointment.
Notes Notes
You can customize the Calendar display, such as changing the first day of the week, by tapping MenuMToolsToOptionsOptions
Create an Appointment
![Calendar Subject: Location: Starts: 3/29/07 12:00 PM Ends: 3/29/07 1:00 PM All Day: No Occurs: Once Reminder: Remind me 15 minute(s) Categories: No categories Appointment Notes 123 1 2 3 4 5 6 7 8 9 0 - - Tab q w e r t y u i o p [ ] CAP a s d f g h j k l : . Shift z x c v b n m , / Ct d u \ Menu](/content/2026/05/1038173/images/426502f3bdc747c94495c85a3886b8b92ee3b81ea717b02d6123535c8bfce824.jpg)
①Tap to return to the calendar (the appointment is saved automatically).
② Tap to choose from predefined text.
③ Tap to choose from previously entered locations.
④ Tap to select a time.
⑤ Tap to select a date.
⑥ Notes is a good place for maps and directions.
- If you are in Day or Week view, tap the desired date and time for the appointment.
- Tap MenuMed then New AppointmentNew Appointment
- Using the input panel, enter a description and a location. Tap first to select the field.
- If needed, tap the date and time to change them.
- Enter other desired information. You will need to hide the input panel to see all available fields.
- To add notes, tap the Notes Notes You can enter text, draw, or create a recording. For more information on creating notes, see "Notes: Capturing Thoughts and Ideas" section.
- When finished, tap of return to the calendar.
Notes Notes
If you select Remind meReraimdappointment, your Pocket PC will remind you according to the options set in SettingsSetPersonalPairs or Sounds & Sounds & NotificationsNotifications
Use the Summary Screen
When you tap an appointment in Calendar, calendar screen is displayed. To change the appointment, tap EditEdit

① View appointment details.
②View.
③ Tap MenuMedu then EditEdit change appointment.

Create Meeting Requests
You can use Calendar to set up meetings with users of Outlook or Pocket Outlook. The meeting request will be created automatically and sent either when you synchronize Inbox or when you connect to your e-mail server. Indicate how you want meeting requests sent by tapping Menu > Tools > Options.
Schedule a Meeting
- Create an appointment.
- In the appointment details, hide the input panel, and then tap AttendeesAttendees
- From the list of e-mail addresses you've entered in Contacts, select the meeting attendees.
The meeting notice is created automatically and placed in the Outbox folder.
For more information on sending and receiving meeting requests, see Calendar Calendar Help and Messaging Messaging the Pocket PC.
Contacts
Contacts maintain a list of your friends and colleagues, in which you can easily manage or find their information on this device.
To enter Contacts screen, tap

ConContactsContacts

① Contact entry stored on SIM1Stand.
② Contact entry stored on SIM2S1M2.
③ Contact entry stored as Outlook Contact on your device.
④ Tap to create a new contact.
⑤ Tap and enter part of a name to quickly find it in the list.
⑥ Tap to display the contact details; tap and hold to display a pop-up menu of actions.
⑦ Tap to bring up relevant options for Contacts screen.
Finding a Contact
Contact list shows altogether contacts on your SIM card, SIM2 SIM2 and device. To find a contact, try the following methods:
- On the contact list, enter a contact name in the box under the navigation bar; to show all contacts again, clear the text in the box.
- In the contact list, tap MenuAFilterFalter then select the type of contact that you want displayed.
• To show all contacts again, select All ContactsAll Contacts
• To view a contact not assigned to a category, select No CategoriesNo Categories
- To look for SIM2.SIM2acts, check SIM2.SIM2tacts to sort out the contacts stored on SIM2.SIM2
-
To view the names of companies your contacts work for, in the contact list, tap MenuView By Vie Company The number of contacts that work for that company will be displayed to the right of the company name.
-
Tap > ProgramsProSearch, enter the contact name, select Contacts for the type, and then tap Search.
Managing Your Contacts
On Contacts list, tap MenuMore actions:

- To edit a chosen contact, select Edit to modify the contact information.
- To duplicate a contact entry to your device or SIM phonebook, select Copy Copy Contact >To SIM / To SIM2 or To Contacts.
- To share contact with other devices, select Send Contact >Beam to send this entry via Bluetooth, or Messages to send it via text-messaging.
- To switch your current selected phone, tap Menu4Phone Dialer Selection > and then choose between Phone1 one1 Phone2.
Creating a Contact
![123 1 2 3 4 5 6 7 8 9 0 - = * Tab q w e r t y u i o p [ ] CAP a s d f g h j k l ; ' Shift z x c v b n m , . / Ct áu ` \ Select Cancel](/content/2026/05/1038173/images/d218edacaca9cd5fc779737a4af99e0b110898af0b862ddf68af422b6d47904f.jpg)
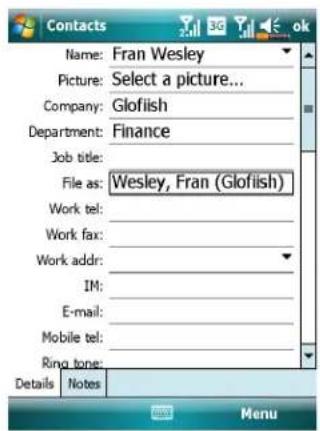
- On Contacts screen, tap New, and then select a contact type.
- To create a contact on your device, select Outlook ContactOutlookContact can manage this contact even if the SIM card is absent.
-
To create a contact on either SIM1SIM1 SIM2SIM2, select SIM Contact on SIM2SIM2 ContactTomanage your contact entries, you can also go to
Programs > Phone > SIM Manager. -
Use the input panel to enter a name and other contact information. You will need to scroll down to see all available fields.
-
To assign the contact to a category, scroll to and tap Categories and select a category from the list. In the contact list, you can display contacts by category.
-
To add notes, tap the Notes tab. You can enter text, draw, or create a recording. For more information on creating notes, see "Notes: Capturing Thoughts and Ideas" section.
-
When editing is finished, tap ok to return to the contact list.
Using the Summary Screen
When you tap a contact in the contact list, a summary screen is displayed.

①View contact details. All of the available contact information is listed, you can tap and use easily.
②Provides the relevant menu.
For example, select EditEdit
change the contact information.
Or select Save to SIM or Save to Save to
Contacts to duplicate to Contacts
or SIM phonebook.
③Tap to view notes.
Tasks: Keeping a To Do List
Use Tasks Task keep track of what you have to do.
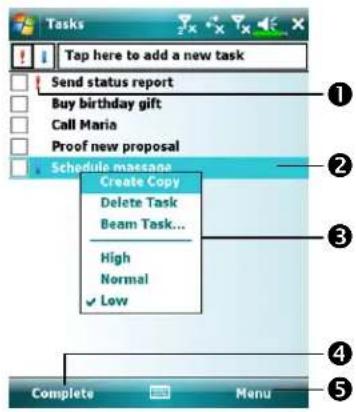
① Indicates high priority.
②Tap to display or edit the task details.
③ Tap and hold to display a pop-up menu of actions.
④ Tap to change the status.
⑤ Provides the relevant menu.
For example, tap FilterFilter select the category of tasks you want displayed in the list. Tap Sort BySort By to select the sort order of the list. Or tap OptionOptochange the way information is displayed in the list.
Create a Task
- Tap MenuMedu then New TaskNew Task
- Using the input panel, enter a description.
- You can enter a start date and due date or enter other information by first tapping the field. If the input panel is open, you will need to hide it to see all available fields.
- To assign the task to a category, tap Categories and gelies a category from the list. In the task list, you can display tasks by category.
-
To add notes, tap the Notes tab. You can enter text, draw, or create a recording. For more information on creating notes, see "Notes: Capturing Thoughts and Ideas" section.
-
When finished, tap to return to the task list.
![Tasks Subject: Priority: Normal Status: Not Completed Starts: None Due: None Occurs: Once Reminder: None Categories: No categories Task Notes: 123 1 2 3 4 5 6 7 8 9 0 - - Tab q w e r t y u i o p [ ] CAP a s d f g h j k l ; - Shift z x c v b n m , . / Ctrl 60 ' \ Menu](/content/2026/05/1038173/images/cf10ce5fa8a4832e51e365e481d965fee7b34c9204341e46dc6065042b8d74aa.jpg)
①Tap to return to the task list (the task is saved automatically).
②Tap to choose from predefined subjects.
③Notes is a good place for maps and drawings.
Notes Notes
To quickly create a task with only a subject, check Show Tasks entry by tasks that Options menu. Then, tap "Tap here to add a new task" and enter your task information.
Use the Summary Screen
When you tap a task in the task list, a summary screen is displayed. To change the task, tap EditEdit
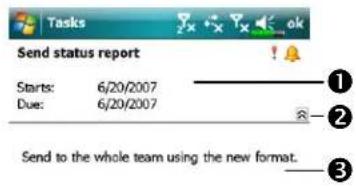
①View task details.
② Tap to show and hide additional summary information.
③View notes.
④ Tap to change task.

Notes: Capturing Thoughts and Ideas
Quickly capture thoughts, reminders, ideas, drawings, and phone numbers with NotesNotes can create a written note or a recording. You can also include a recording in a note. If a note is open when you create the recording, it will be included in the note as an icon. If the note list is displayed, it will be created as a stand-alone recording.

① Tap to change the sort order of the list.
② Tap to open a note or play a recording.
③ Tap and hold to display a pop-up menu of actions.
④ Tap to record.
⑤ Provides the relevant menu.
For example, check View View
Recording Toolbar Recording Toolbar
Recording toolbar.
⑥ Tap to create a new item.
Create a Note
- Tap NewNew
- Create your note by writing, drawing, typing, and recording. For more information about using the input panel, writing and drawing on the screen, and creating recordings, see "Enter Information on Your Pocket PC."
![Team meeting notes: . Adam will send current status to core team. . Julie will get the revenue numbers. . Tanner is back from the conference and reports that the product was a big hit! 123 1 2 3 4 5 6 7 8 9 0 - = Tab q w e r t y u i o p [ ] CAP a s d f g h j k l ; Shift z x c v b n m . / Cd aü \ ↓ ↑ → New * Menu](/content/2026/05/1038173/images/06d086204b8af592a8d57591b9db19b1630117f8b8ff087d24771a83cc6ddd05.jpg)
① Tap to return to the note list (the note is saved automatically).
② Tap to show or hide the input panel.
③ Provides the relevant menu.
For example, check View View
Recording Toolbar Recadding Toolbar
recording to the note; or check
Draw Drawwrite on the screen.
Word Mobile
Word Mobile works with Microsoft Word on your desktop computer to give you easy access to copies of your documents. You can create new documents on your Pocket PC, or you can copy documents from your desktop computer to your Pocket PC. Synchronize documents between your desktop computer and your Pocket PC so that you have the most up-to-date content in both locations.
Use Word Mobile to create documents, such as letters, meeting minutes, and trip reports. To create a new file, tap ▶ Office Mobile Word Mobile & New Mobile A blank document appears. Or, if you've selected a template for new documents in the Options dialog box, that template appears with appropriate text and formatting already provided. You can open only one document at a time; when you open a second document, you'll be asked to save the first. You can save a document you create or edit in a variety of formats, including Word Document, Document Template, Rich Text Format, and Plain Text.
Word Mobile contains a list of the files stored on your Pocket PC. Tap a file in the list to open it. To delete, make copies of, and send files, tap and hold a file in the list. Then, select the appropriate action on the pop-up menu.
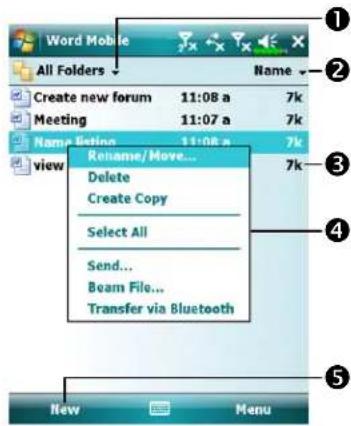
① Select the type of folder you want displayed in the list.
② Tap to change the sort order of the list.
③ Tap to open a document.
④ Tap and hold an item to see a pop-up menu of actions.
⑤ Tap to create a new document.
Notes Notes
You can change the zoom magnification by tapping ViewView then ZoomZobem select the percentage you want. Select a higher percentage to enter text and a lower one to see more of your document.
If you're opening a Word document created on a desktop computer, check Wrap to WindowWrap the ViewNow so that you can see the entire document.
Using the input panel, enter typed text into the document. For more information on entering typed text, see "Enter Information on Your Pocket PC."
To format existing text and to edit text, first select the text. You can select text as you do in a Word document, using your stylus instead of the mouse to drag through the text you want to select. You can search a document to find text by tapping MenuEditand then Find/ReplaceFind/Replace
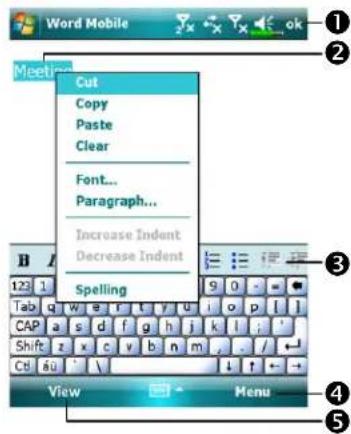
① Tap to return to the document list (changes are saved automatically).
② Tap and hold to see a pop-up menu of actions.
③Tap to format text.
④ Provides the relevant menu.
For example, select FormatFormat change formatting options.
⑤ Tap View and then check Toolbar Toolbar to show the toolbar.
Excel Mobile
Excel Mobile works with Microsoft Excel on your desktop computer to give you easy access to copies of your workbooks. You can create new workbooks on your Pocket PC, or you can copy workbooks from your desktop computer to your Pocket PC. Synchronize workbooks between your desktop computer and your Pocket PC so that you have the most up-to-date content in both locations.
Use Excel Mobile to create workbooks, such as expense reports and mileage logs. To create a new file, tap OfficeMobileOfficeMobileExNewMobile blank workbook appears. Or, if you've selected a template for new workbooks in the OptionsDialog box, that template appears with appropriate text and formatting already provided. You can open only one workbook at a time; when you open a second workbook, you'll be asked to save the first.
Excel Mobile contains a list of the files stored on your Pocket PC. Tap a file in the list to open it. To delete, make copies of, and send files, tap and hold a file in the list. Then select the appropriate action from the pop-up menu.
Excel Mobile provides fundamental spreadsheet tools, such as formulas, functions, sorting, and filtering. To display the toolbar, tap View\and\then check ToolbarToolbar
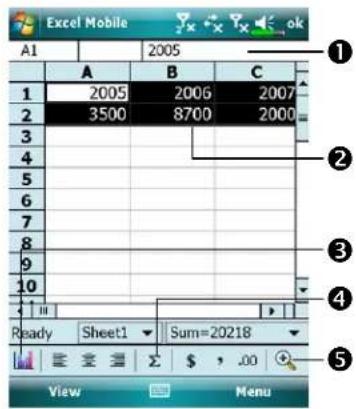
①Cell contents appear here as you enter them.
② Select cell contents for the resource of chart.
③Insert ChartlsettoChart
④ AutoSum AutoSum
⑤ZoomZuction
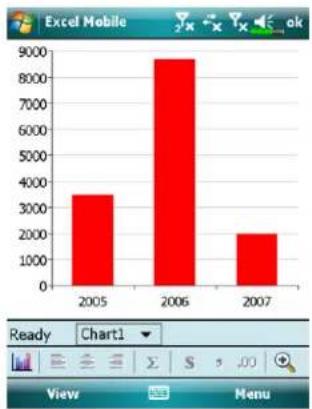
bar
| Year | Value | |---|---| | 2005 | 3600 | | 2006 | 8700 | | 2007 | 2100 |Tap Format ChartFormMan Chart modify the relevant information, such as titles, scale, type and series.
Tips for Working in Excel Mobile
For more information on using Excel Mobile, tap HelpHelpNote the following when working in large worksheets in Excel Mobile:
- View in full-screen mode to see as much of your worksheet as possible. Tap View and then check Full ScreenFull Section full-screen mode, tap View and then Full ScreenRoller.
- Show and hide window elements. Tap View/Show show then tap the elements you want to show or hide.
- Freeze panes on a worksheet. First select the cell where you want to freeze panes. Tap View and then Freeze Panes Freeze Panes want to freeze the top and leftmost panes in a worksheet to keep row and column labels visible as you scroll through a sheet.
- Split panes to view different areas of a large worksheet. Tap View and then SplitS then drag the split bar to where you want it. To remove the split, tap View and then Remove SplitRemove Split
Show and hide rows and columns. To hide a row or column, select a cell in the row or column you want to hide. Then tap MenuFormatFohenaRowRowColumnCanthen HideHideshow a hidden row or column, tap MenuMenuFormatFohenaRow or ColumnCanthen Unhide.
PowerPoint Mobile
View PowerPoint slides created in PowerPoint 97 and above versions on your desktop computer. The supported formats include .ppt and .pps files.

① Select the type of folder you want displayed in the list.
②Tap to change the sort order of the list.
③ Tap to open a file, and play the slides.
④ Tap to open the file you played last time.
⑤ Provides the relevant menu.

Tap ▲ on the lower left corner to open the menu. Tap End Show End Show
Windows Media Player
Use Microsoft Windows Media Player for Pocket PC to play digital audio and video files that are stored on your Pocket PC or on a network. To switch to
Windows Media Player for Pocket PC, tap

ProgramsProWindows MediaMedia

① Use full-screen to view video.
② Display website. Find music or video to be played from website.
③ Return to the start of the current file or previous file.
④Tap to play or pause.
⑤Tap to skip to the next song.
⑥Tap to adjust volume.
⑦ Audio/mute
⑧ Indicates the progress of the current track.
To enter the screen shown on the left, tap MenuMedthen LibraryLibrary
① Select Library.
②Tap and hold the file or folder to be played, then tap PlayPlayQueue Up.
③ MenuMatton: Tap Open FileOpen File play files that do not belong to the current library. Tap Update Update LibraryLibrapdate the file list.
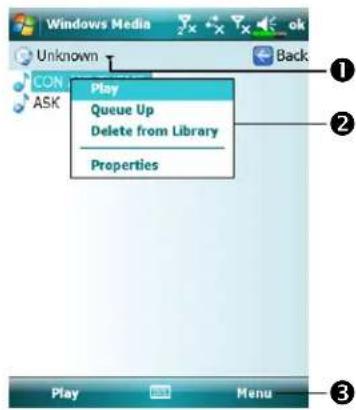
Use Microsoft Windows Media Player on your desktop computer to copy digital audio and video files to your Pocket PC.
For more information about using Windows Media Player for Pocket PC, tap

HelpHelp
Streaming Player
Tap

ProPrograms Streaming PlayerPlayer
Some audio and movie files that cannot be played back from Microsoft Windows Media Player, for example RTSP, HTTP... types of files, will be automatically switched to Streaming Players by the same player

① Automatically launch the Streaming Player StreamPlayer when using Internet Explorer Internet Explorer run media files not supported by Windows Media Webflow to Media the website address and media file name.
②View the video. Tapping in this area during playback will enable full-screen video content. Tapping the screen again will return to the normal display mode.
③ Indicates the current position in the track.
④ Adjust volume level.
⑤ Provides the relevant menu.
⑥ Mute or enable sound.
⑦ Stop.
⑧Play or pause.
Internet Explorer
Using Internet Explorer
Use Microsoft® Internet Explorer Mobile to view Web or WAP pages in either of these ways:
- During synchronization with your desktop computer, download your favorite links and mobile favorites that are stored in the Mobile Favorites subfolder in Internet Explorer on the desktop computer.
- Connect to an Internet service provider (ISP) or network and browse the Web. To do this, you'll need to create the connection first, as described in "Connect to the Internet".
When connected to an ISP or network, you can also download files and programs from the Internet or intranet.
To switch to Pocket Internet Explorer, tap

nt Internet Explorerernet Explorer
Browse the InternetBrowse the Internet
Refer to "Connecting to the Internet" section to connect the Pocket PC to the Internet and start browsing websites.
- Tap > Internet Explorer Explorer
- Input the site address into the address bar at the top of the screen and connect to this site.
- Use the scroll bar at the right side or bottom of the screen, or press the up or down button on the Pocket PC to view the contents of the entire website.
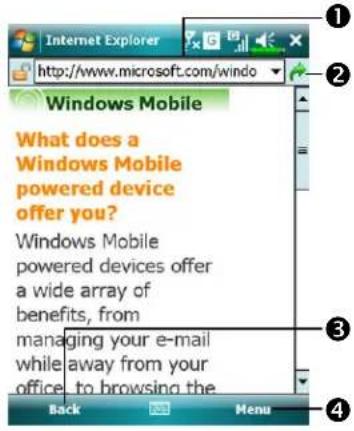
① Input address here
②Tap to launch
③BackBackton
4 Provides the relevant menu, such as Favorites Additives FavoritesAdd to Favorites HomeHomeRefreshRefresh
Aside from keying in the address directly, you can also connect to websites using the following methods.
Tap the Favorites Favdore, and then tap the favorite you want to view.
- In the address bar, tap the arrow ▼ to choose from previously entered addresses.
Notes Notes
To add a favorite link while using the Pocket PC, go to the page you want to add, tap and hold on the page, and tap Add to Favorites.
View Mobile Favorites and Channels saved channels

①Tap the favorite you want to
view.
② Tap to add or delete a folder or favorite link.

- Tap the Favorites Favouto to display your list of favorites.
- Tap the page you want to view.
You'll see the page that was downloaded the last time you synchronized with your desktop computer. If the page is not on your Pocket PC, the favorite will be dimmed. You will need to synchronize with your desktop computer again to download the page to your Pocket PC, or connect to the Internet to view the page.
The Mobile Favorites Folder
Only items stored in the Mobile Favorites subfolder in the Favorites folder in Internet Explorer on your desktop computer will be synchronized with your Pocket PC. This folder was created automatically when you installed synchronization tools.
Favorite Links
During synchronization, the list of favorite links in the Mobile Favorites folder on your desktop computer is synchronized with Pocket Internet Explorer on your Pocket PC. Both computers are updated with changes made to either list each time you synchronize. Unless you mark the favorite link as a mobile favorite, only the link will be downloaded to your Pocket PC, and you will need to connect to your ISP or network to view the content. For more information on synchronization, see Help on the desktop computer.
Synchronize Mobile Favorites
If you are using Microsoft Internet Explorer 5.0 or later on your desktop computer, you can download mobile favorites to your Pocket PC. Synchronizing mobile favorites downloads Web content to your Pocket PC so that you can view pages while you are disconnected from your ISP and desktop computer.
Use the Internet Explorer plug-in installed with synchronization tools to create mobile favorites quickly.
Create a Mobile Favorite Create a Mobile Favorite
- In Internet Explorer on your desktop computer, click ToolsToadsthen Create Create Mobile FavoriteMobile Favorite
- To change the link name, enter a new name in the NameName
- Optionally, in UpdateUpdate a desired update schedule.
-
Click OK. Internet Explorer downloads the latest version of the page to your desktop computer.
-
Synchronize your Pocket PC and desktop computer. Mobile favorites that are stored in the Mobile Favorites folder in Internet Explorer are downloaded to your Pocket PC.
Notes Notes
If you did not specify an update schedule in step 3, you will need to manually download content to keep the information updated on your desktop computer and Pocket PC. Before synchronizing with your Pocket PC, in Internet Explorer on your desktop computer, click ToolsTardsthen SynchronizeSyouwillize the last time content was downloaded to the desktop computer, and you can manually download content if needed.
You can add a button to the Internet Explorer toolbar for creating mobile favorites. In Internet Explorer on your desktop computer, click View/ToolbarsToolbars and then Customize customize
Save Pocket PC MemorySave Pocket PC Memory
Mobile favorites take up storage memory on your Pocket PC. To minimize the amount of memory used:
- In the settings for the Favorites information type in synchronization tools options, turn off pictures and sounds, or stop some mobile favorites from being downloaded to the Pocket PC. For more information, see Help.
- Limit the number of downloaded linked pages. In Internet Explorer on the desktop computer, right-click the mobile favorite you want to change and then PropertiesPropertyDownload tab, specify 0 or 1 for the number of linked pages you want to download.
12 Maintaining the Pocket PC

Backup Utility
Tap ➕ ProgramsPro UtilitiesUtil Backup UtilityBackup Utility
Backup UtilityBacked to Back up or restore files saved in the Pocket PC. You can back up personal data such as Calendar, Clientants, Tasks, Personal profilePersonal profileNetwork settings, Messaging Messages and SMS), etc.
Storage Space
When making backups, you can choose the following storage spaces:
- My Documents: Data saved here may disappear when you perform a cold boot. It is recommended that you use this area only as temporary storage.
- External storage card.
Backup Files
Wizard Mode Wizard Mode
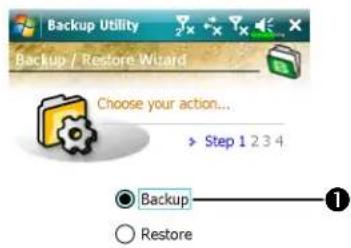
①Tap BackupBackup
② Tap NextNext on and the Wizard will guide through the steps that follow.
③ StandardS avoid to the Standard mode.
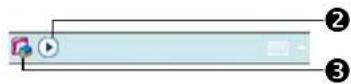
Standard Mode Standard Mode
Backup your personal data to a storage space.

Tap the BackupBackup
① Tap to check the items for backup.
② Tap to select the storage space from the list.
③Tap Backup Backup to start the backup.
4 Advanced Advanced Enter the Advanced settings screen.
Advanced Settings Options
Under the Backup Files screen, tap settings screen as shown below.
Advanced Advanced to enter the Advanced

Check the options as required.
① If you check this option, the Wizard will guide you through the steps to complete the operation the next time you open Backup Utility Backup Utility
② CancelGarten
③ OK button
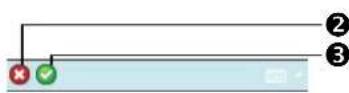
- If you checked "Auto backup Auto backup filesfiletap to enter the screen shown on the left.
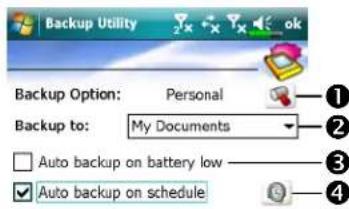
① Select the backup option.
②Select the site to backup to.
③ Pocket PC performs auto backup when the battery power is low.
④ To backup regularly, tap to select "Auto Backup on Auto Backup on schedules schedule


- If you checked "Auto backup on Auto backup on schedules,"chapuleto enter the screen shown on the left.
① Backup frequency.
② Tap the date button on the right of "Starting" starting the starting date.
③Tap the time button on the right of "Starting Starting the starting time.
4 If you have selected "Weekly/Weekly tap the function button on the right of "EveryEverset the day of the week to backup.
- If you selected "Manage old Manage old backup files", "backup file" enter the screen shown on the left.
① Tap the arrowhead to set the number of files.
②Tap the files to be retained.
Restore Files
Caution! Caution!
- When restoring files, the system will delete all current data in the Pocket PC and replace it with the backup files.
- To make sure that files can be restored successfully, do not use the Pocket PC while performing restore.
- Restore cannot be stopped once it is started. Think carefully before proceeding.
- After restore completed, your Pocket PC will reboot.
Wizard Mode Wizard Mode

①Tap RestoreRestore
② Tap NextNext on and the Wizard will guide through the steps that follow.
StandardSawidendo to the Standard mode.
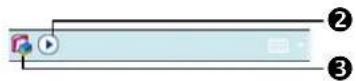
Standard Mode Standard Mode
Restore the backup personal data from a storage space.

① Select "Latest" below "Restore Restore From From" or select from the list.
② Tap backup file name from the list under "File NameFile Name
③ Tap ■ResRestoreRestore to start restoring.
Adding or Removing Programs
Programs added to your Pocket PC at the factory are stored in ROM (read-only memory). You cannot remove this software, and you'll never accidentally lose ROM contents. All other programs and data files added to your Pocket PC after factory installation are stored in RAM (random access memory).
You can install any program created for your Pocket PC, as long as your Pocket PC has enough memory. The most popular place to find software for your Pocket PC is on the Pocket PC Web site (http://www.microsoft.com/windowsmobile/pocketpc/).
Add Programs Using Synchronization Tools
You'll need to install the appropriate software for your Pocket PC on your desktop computer before installing it on your Pocket PC.
- Determine your Pocket PC and processor type so that you know which version of the software to install. Tap SettingsSettge SystemSystetap AboutAbout In the VersionVersionmake a note of the information in ProcessorProcessor
- Download the program to your desktop computer (or insert the CD or disk that contains the program into your desktop computer). You may see a single *.zip, *.exe, or *.zip file, a Setup.exe file, or several versions of files for different Pocket PC types and processors. Be sure to select the program designed for the Pocket PC and your Pocket PC processor type.
- Read any installation instructions, Read Me files, or documentation that comes with the program. Many programs provide special installation instructions.
-
Connect your Pocket PC and desktop computer.
-
Double-click the *.exe file.
If the file is an installer, the installation wizard will begin. Follow the directions on the screen. Once the software has been installed on your desktop computer, the installer will automatically transfer the software to your Pocket PC.
②If the file is not an installer, you will see an error message stating that the program is valid but it is designed for a different type of computer. You will need to move this file to your Pocket PC. If you cannot find any installation instructions for the program in the Read Me file or documentation, use synchronization tools Explore Exploray the program file to the Program Files folder on your Pocket PC. For more information on copying files using synchronization tools, see Help.
Once installation is complete, tap to switch to it.

ProgramsProgram then the program icon
Add a Program Directly from the Internet
- Determine your Pocket PC and processor type so that you know which version of the software to install. Tap SettingsSetthe SystemSystenap AboutAbout In the VersionVersionmake a note of the information in ProcessorProcessor
- Download the program to your Pocket PC straight from the Internet using Pocket Internet Explorer. You may see a single *.zip, *.exe or *.zip file, a Setup.exe file, or several versions of files for different Pocket PC types and processors. Be sure to select the program designed for the Pocket PC and your Pocket PC processor type.
- Read any installation instructions, Read Me files, or documentation that comes with the program. Many programs provide special installation instructions.
- Tap the file, such as a *.zip or *.exe file. The installation wizard will begin. Follow the directions on the screen.
Add a Program to the Start Menu
Tap

SettSettingsSePersonalstab> MenusMenus
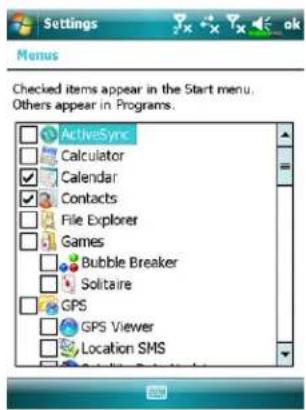
Check the box for the program.
If you do not see the program listed, you can either use File Explorer File Explorer Pocket PC to move the program to the Start Menu folder, or use synchronization tools on the desktop computer to create a shortcut to the program and place the shortcut in the Start Menu folder.
- Using File Explorer on the Pocket PC: Tap > ProgramsProfile ExplorerFile Explorer and locate the program (tap the folder list, labeled My DocumentsMy Documents default, and then My DeviceMy Device list of all folders on the Pocket PC). Tap and hold the program and tap CutOut the pop-up menu. Open the Start MenuFolder located in the WindowsWindow, tap and hold a blank area of the window, and tap PastePast the pop-up menu. The program will now appear on the menu.
- Using synchronization tools on the desktop computer: Use the Explorer in synchronization tools to explore your Pocket PC files and locate the program. Right-click the program and then click Create Shortcut CLAote Shortcut the shortcut to the Start Menu StadeMenthe Windows Window The shortcut now appears on the menu. For more information, see Help.
Remove Programs
Tap

SettingsSetthe SystemSystem Remove ProgramsPrograms
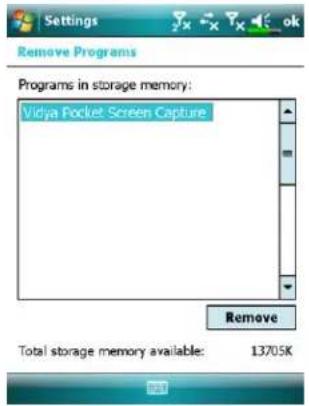
- Tap a program name from the list under "Programs in storage Programs in storage memory/mem highlight it and then tap RemoveRemove
If the program does not appear in the list of installed programs, use File Explorer File Explorer on your Pocket PC to locate the program, tap and hold the program, and then tap DeleteDelete pop-up menu.
Manage Memory
View Memory Status
Tap

SettingsSetSystemSystemMemoryMemory

Tap the MainMain
①The status of Storage and Program memory.
② Find: Quick link to the SearchSearch program.
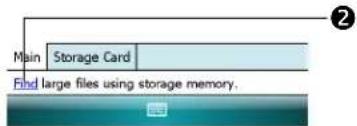

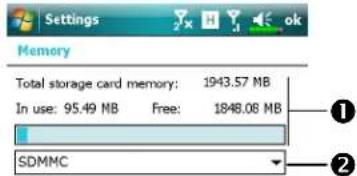
C Tap the Storage Card Storage Card
① Current storage card memory status.
② Tap to select the built-in or external storage card.
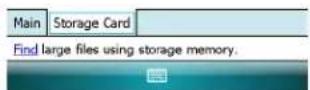
Find Available Memory
Under certain circumstances such as insufficient memory, the Pocket PC cannot allocate memory automatically. Try to solve this problem through the following methods:
Tap

ProgramsProSearchSearch
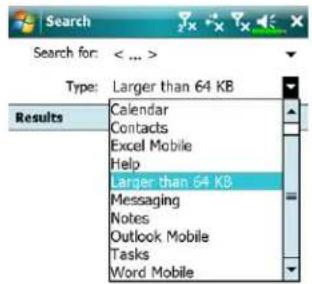
-
To find files occupying larger amounts of memory, select "Larger than 64 KB" after the 64 KB tap SearchSearch
-
Then use File Explorer.

-
Tap Programs Profile File Explorer Explore File Explorer FiltoExplorer move the files you want to keep to external storage cards. Tap and hold the items to be moved, then tap Cut Copy copy the pop-up menu. Move to the storage card and then tap PastePaste
-
Use File ExplorerFile Explorer files that you no longer need.
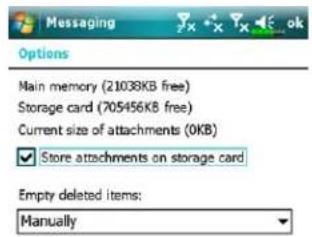
Tap Messaging Marketing Tools To Options Storage Storage
- Check "Store attachments on Store attachments on storage card" storage card attached files from E-mails automatically in the storage card in future.
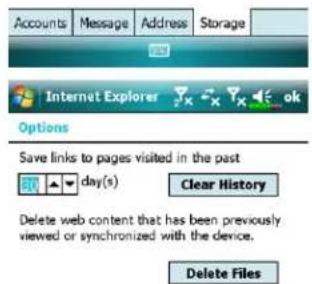
Tap InterInterExplorlerInternet Explorer MenuMethodsToOptionsOptMemoryMemory tab
Tap Clear History@clearDeleteFilesDelete Files to delete records of websites that you have browsed.

Tap ➤ Programs ProNotes Word Mobile Excel Mobile McMenu McOptions Options

- Enter the NotesNibedist screen.
- Tap MenuMed then OptionsOptions

- Tap the "Save to Salvention button and select SDMMC from the list. This indicates that you are using your external storage card. Hereafter, new files will be automatically saved to this storage card.
Follow the same operation procedure for NotesNoWord Word MobileMobileExcel MobileExcel Mobile

In addition, you can use the Rename/Move or Save As function provided by the program above to move or save files to the storage card.
System Information
Tap → SettingsSetSystemSystemInformationSystem Information
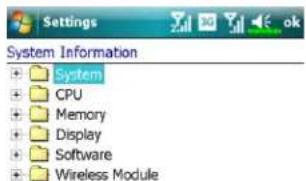
Tap⊕ or □ to display or hide the system information.
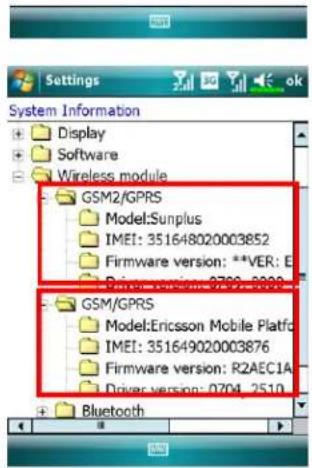
To find detailed information of your SIM cards, tap +infront of "Wireless module" wireless and data category, and tap the SIM card you desire to look at. If you have installed two SIM cards in the slots, both IMEI numbers of the SIM cards will be shown here.
13 Voice Commander

Tap ➤ Programs ProVoice Commander Voice Commander
Voice Commander voice command voice recognition application software in the Pocket PC. Voice Commander allows the user order use their own voice to dial and control functions. Voice Commander has the following features:
- Fully voice-controlled system that allows the user to complete operations (such as dialing phone or running applications) quickly without using hands.
- Uses Speaker-Independent (SI) recognition technology that allows the user to use the Pocket PC immediately without having to train or pre-record for the system.
- Provides a Conversational UI for guiding beginners to issue voice commands through the conversational method. The user can then use commands easily without any practice.
- Provides the Voice tag and "digit model adaptation" function so that the user can customize personal settings and further increase recognition and convenience in usage.
The Voice Commander voice command with this product does not need personal training or recording. You can use voice control to operate this Pocket PC immediately. Try calling out "Solitaire Solitaire." Press the Voice Commander Voice Commander button on the side of the Pocket PC and when the system prompts you to "Say Say Command, Just sayd', Start Solitaire Start Solitaire Solitaire screen will appear.
Starting Voice Commander
Here are two methods for running Voice CommanderVoice Commander
- Tap > Programs > Voice Commander> Voice Commander Voice Commander
- Voice Commander Voice The system sets the button on the Pocket PC as the exclusive "Voice Commander" button. Just press this key to run Voice Voice
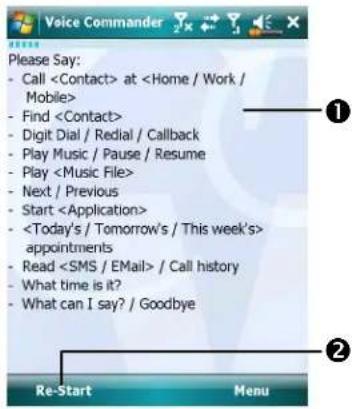
① Show the format of voice command.
②Re-StartStatton: Restart Voice Voice CommanderCommander
③ MenuMention:
SettingsSettingsVoice CommanderVoice Commander
Help: About Voice CommanderVoice Commander
Exit: Exit Voice CommanderVoice Commander
Tap > Settings >
Personal tab >
Buttons to redefine
the Voice CommanderVoice Commander hot key or other hardware buttons.

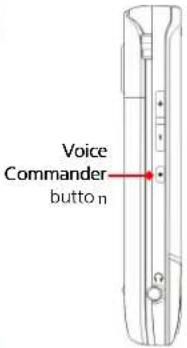
Voice Command Format
Press the Voice Commander Voitte to Comrthen Bccket PC and enter the Voice Voice Commander Goreenander
• Voice Name dialing
Usage: Call
Example 1: Call Jennifer Lopez
Example 2: Call Jennifer Lopez at mobile
• Voice Show Contact
Usage: Show
Example 1: Show Eric Clapton
Example 2: Show Eric Clapton at work
• Voice Digit Dial
Usage: Digit Dial
Example: Digit Dial
(System: What number)
29109088
• Voice Show Appointment
Usage: Today's/Tomorrow's/
This week's Appointment
Goodbye
Usage: Goodbye
- Start Application
Usage: Start
Example: Start Calendar
• Voice Play Music File
Usage: Play
Example 1: Play The Moment
Example 2: Play SHE album
Example 3: Play Music
Tips
- All the names in Contacts will automatically become recognizable contacts in the "Voice dialing" syntax. However, if the number of contacts exceeds 1000 entries, the system will not recognize the excessive entries. To add these entries to Voice Commander for recognition, tap MenuA Settings run Voice Commander Settings voice Commander setting contacts manually for voice recognition.
- If your volume is too low or if your surroundings are so noisy that the system cannot recognize your voice, the system will prompt you "Please say again." Adjust the distance between yourself and your Pocket PC or reduce the noise and try again.
-
If the user has a heavy accent that may cause poor voice recognition, use any of the following methods to train the personal digital adapted model in order to increase recognition:
-
Tap Menu Setting Setting Training Digit Training
- Tap Voice Commander Settings\oDigitTraining\BagSetTrapsing
- You can also tap Voice Commander Vo Meio Meianderend Voice Commander.
- If you open another program while using Voice Commander\andetCommander the Voice Commander screen, Voice Commander will terminate automatically.
Voice Commander Settings
There are two ways to run Voice Commander SettingsVoice Commander Settings
Tap Programs ProVoice Commander Voice Commander Settings Commander Set Tap Menu Settings Setting Voice Commander Voice Commander
Voice Commander Settings allow the commander personalize the Voice Voice Commander Settings and remove contacts or applications within the recognition range, record voice tags or play commands to prompt the user on how to say the correct command.
Contacts Settings Page
Tap Voice Commander Settings voids from the Contacts tag. The setting page will list all the names and their status (whether or not it is selected, with or without voice tag) in Contacts.
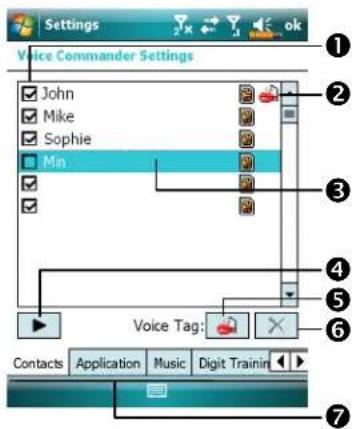
① Check box function If a contact is checked, it can be identified normally. If unchecked, this indicates that it is not within the recognizable range. Please create a voice tag.
② Lips icon: Voice tag is built.
③Tap a contact name to highlight it for using with buttons.
PlayPlayButton: Play the recorded voice tag for this contact and hear how it is pronounced.
5 BuildBuildon: Record the voice tag for this contact again.
During the recording, tap Cancel ButtonTcancel recording.
6 DeleteDelete: Delete the voice tag for this contact.
7 Contacts: Cabs Sets the voice commands for Contacts: Contacts Application AppSato the voice commands for applications. Digit Training Digit Seating the voice command for digital dialing. Advanced Settings Advanced SetLength and sensitivity for digital dialing.
For example, record Alex Cooper in Contacts Gas Street Heart.
- Tap Alex Cooper.
- Tap BuildButton.
- When you hear a beep, say the words "Sweet Heart" that you want to record.
- When you hear a second beep, say "Sweet Heart" again.
- After recording twice, the system will play the voice you just recorded to indicate that you have created a voice tag.
- At this time, a Lips icon 📋 appears to the right of your contact, Alex Cooper, to indicate that there is a voice tag created for this name. This is helpful in identifying which contacts already have voice tags.
- To create another voice tag, tap BuildBuildon and repeat the steps above.
- Tap Delete deletion to remove the voice tag. The system will then restore the default voice for Alex Cooper.
Tips ips
- You can choose which Contacts are to be added to the recognizable range of the Voice Commander. By default, the system automatically adds all names within the recognizable range.
- If the number of Contacts Expects 1000 entries, the system will not recognize the excessive entries. To add these contacts to Voice Commander Voice Commander for recognition, manually check the check boxes in front of the contact entries.
Application Settings Page
Tap Voice Commander Settings Vo Application Applications Settings page will list the applications and settings installed by the Pocket PC on and then Programs (Together or not it is selected, with or without voice tag).
You can choose which applications are to be added to the recognizable range of the Voice Commander/BicycleDefault System automatically adds all applications as recognizable targets in the < Application > syntax in "Voice open application." No matter when you install a new application, the system updates immediately and adds the new application within the recognizable range. This helps you save time spent in finding applications.
![Settings Voice Commander Settings [Internet] [Lock Device] [My Menu] [Organizer] [Spb Contacts] [Spb Shell] [Task Manager] [Tools] ActiveSync Album Voice Tag: Contacts Application Music Digit Trainin](/content/2026/05/1038173/images/6ddc6e3a5b7b03095f2457ac0b33372f364ae987652a418d75344a29be9b5fed.jpg)
① Check box function If the application is checked, it can be identified normally. If unchecked, this indicates that it is not within the recognizable range. If the check box is gray and cannot be checked, this indicates that the item is unrecognizable. Build a voice tag to add a gray item into the recognizable range.
② Lips icon: Voice tag is built.
③ Tapped application name is highlighted and can be used with functions.
PlayButton: Play the recorded voice tag for this application and hear how it is pronounced.
During the recording, tap
BuildButton: Record the voice tag for this application again.
Cancel ButtonButton to cancel recording.
⑥ ✗ DeleteDeletten: If there is a Lips icon, the voice tag for this application can be deleted and restored to the default system voice.
Application example: You want to record Windows Live™ Messengers as "Chat room."
- Tap Windows Live™ Messengers.
- Tap BuildBuildon.
- When you hear a beep, say the words "Chat room" that you want to record.
- When you hear a second beep, say "Chat room" again.
- After recording twice, the system will play the voice you just recorded to indicate that you have created a voice tag.
- At this time, a Lips icon appears to the right of Windows Live™ Messengers to indicate that there is a voice tag created for this application name. This is helpful in identifying which applications already have voice tags.
- To create another voice tag, tap BuildBuildon and repeat the steps above.
- Tap DeleteButton to remove the voice tag. The system will then restore the default voice for Windows Live™ Messengers.
Music Settings Page
Tap Voice Commander Settings\voidet\kcnm the MusicWaltighe settings page will list the music files and configuration status of the specify folder in your Pocket PC or on your storage card.
If you add a new music file, the system will update in real-time, automatically adding the file to your recognizable range, saving you the time of searching for your music files.
The system will automatically activate music files stored in the following folders:
- All folders on your storage card.
- The My Documents\My Documents Pocket PC, or any folder that is inside the My Documents\My Documents
- If you want to transfer the files to your Pocket PC via the synchronization tools, then you must put the files in either the Play listsPlayer for the MusicMusic folder.

① Check box function
If the music file name is checked, it can be identified normally. If unchecked, this indicates that it is not within the recognizable range.
If the check box is gray and cannot be checked, this indicates that the item is unrecognizable. Build a voice tag to add a gray item into the recognizable range.
② Lips icon: Voice tag is built.
③ Tapped music file name is highlighted and can be used with ▶ × functions.
PlayButton: Play the recorded voice tag for this music file name and hear how it is pronounced. During the recording, tap
BuildButton: Record the voice tag for this music file name again. Tap Cancel button bottom recording.
⑥ Delete Delten: If there is a Lips icon, the voice tag for this music file name can be deleted and restored to the default system voice.
Digit Training Page
Tap Voice Commander Settings\Voidet\Conthe Digit Training Digit Training function trains a set of personal voice model to increase accuracy in recognition for users with heavier accents.
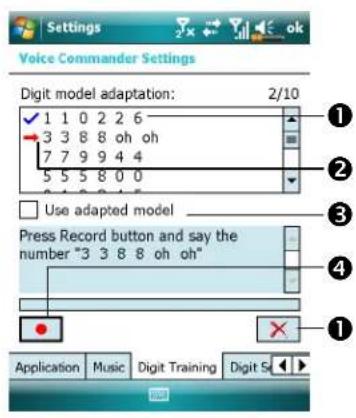
① √: Voice tag is built.
②→: Current digit to be recorded.
③ Check "Use adapted model" use adapted model use the model tailor made for you with better recognition ability.
4 RecordButton: Start recording the assigned digit.
5 Remove All Remove Delete all voice tags.
There are 10 sets of built-in 6-digit numbers that you have to recite. The steps are as follows:
- Tap RecordButton. When you hear a beep, start reciting the displayed numbers.
- After reciting, the system plays the numbers you just recited so that you can check if it is correct.
- If correct, please tap Yes and the system prompts you to continue reciting the next set of numbers for recording.
- If it is necessary to recite these numbers again, tap No and then recite again.
- If you are not satisfied with the sound recorded before, tap ☒ Remove AllRemove All button and the system will delete all recorded sounds. Please record again.
- After recording 10 sets of numbers, the system will tell you that the voice model is already built.
Tips Tips
- As long as you have completed recording, then you can check "Use Use adapted model" adapted the personal model tailored made for you. It is recommended that you recite all 10 sets of numbers so the adaptation effect is more obvious. If you do not want to use the adapted model, then just uncheck "Use adapted model" adapted mode
- If you have trained 10 sets of number as 1 set of voice model, the system will show that all numbers are already recorded when you run this function. If some of the numbers are not yet recorded, the system returns to where it stopped the last time to let you continue with the unfinished portion.
- You can also tap Remove All Reimove and the system will delete the last voice model trained and let you train a new model
Digit Settings Page
The digit setting is for voice recognition. The "Length of phone number" set forth of phone number specifies the maximum number of digits that can be entered as the phone number. These settings will improve recognition accuracy.
- There are three fields in this screen, you can set different lengths in the three fields respectively. The system default settings are 3, 7, and 10, this means that in Digital Dial your system will recognize telephone numbers of 3, 7, and 10 digits in length.
- If you check No constraint, the system will not constrain the length of the telephone number that you input, any length of from 1 to 18 digits will be accepted.

Advanced Settings Page


① Sensitivity by: When you use this setting, the voice recognition system is not as strict while performing voice recognition tasks, in other words, under this setting the system will respond to your voice most of the time and you won't have many non-responsive situations. You should set the system to SensitiveSensitive when in continually noisy environments, for example when on a train or in a factory, etc.
Normal Normal Noth default setting and is best for the average environment.
AccurateAccurate the AccurateActing the system is more strict when performing voice pattern matching. Recognition errors are less likely to occur when you set the system to AccurateAccurate
FAQ
Question: I want to make a call to my friend Andy Miller, but I'm tired of reading manuals. What do I need to know if I just want to make phone calls?
Answer: Make sure you have Andy Miller's name and phone number in the contact database. Press the Voice Commander Voito Co. and say "Call Andy Miller." The system will guide you through it.
Question: I added a new contact but it is not recognized.
Answer:
- The system only recognizes English words and characters or digits. Any symbols or marks will be ignored. However you can still make a voice tag for these items.
- When the number of contacts exceeds 1,000 entries, the system will not recognize the excessive entries, until activated manually by the user.
- To have a look at the status of the contact's voice command attributes, please go to the Contacts Gettagtpage in Voice Commander Settings Voice Commander Settings
Question: I recorded a voice tag for my friend last month, but I forgot what I recorded. Do I need to redo the recording?
Answer: No! Just tap Voice Commander Settings, the Contacts tab, select the contact, and then tap Play button.
Question: I performed digit training today, but I found that the accuracy is worse than before, what do I do now?
Answer: You can retry the digit training again in a "quiet" place. And if it still doesn't help, disable the adapted model and use the default one. To disable the adapted model, tap Voice Commander Settings, the Digit Digital Settings TrainingMap, and then uncheck "Use adapted model." "Us" is adapted model.
Remove All button to Remove the model. It will save you some memory this way.
Question: I accidentally activated Voice CommanderVoice Comirabodeit?
Answer: Say "Goodbye."
14 Specifications

ItemItDescription
DescriptionDescription
Operating system Windows Mobile® 6.1 Professional
Processor Samsung SC3 6400, 533MHz
Memory 256MB ROM, 128 MB RAM
Display 2.8" VGA, 65,536 colors TFT-LCD touch window(640 x 480)
Communication
■ 3.5G HSDPA / UMTS (2100/1900/850 MHz) Quad-Band GSM: 850/900/1800/1900 MHz EDGE class 10/GPRS class 10 2.75G GSM/GPRS Tri-Band(900/1800/1900)
■ Wireless LAN 802.11b/g
■ Bluetooth 2.0 class 2 + EDR
GPS Embedded Chip, SiRF Star III
Camera ■ 3.2M pixels auto-macro with flashlight, up to 2048 x 1536 resolution
■ 0.3M pixels fixed-focus Camera for conference call usage
Light Sensor Sensing the brightness of environment to adjust panel luminance
Gravity Sensor Gravity Sensor for user friendly operation
Expansion slot MicroSD
Interface (Audio) Built-in microphone and speaker, external stereo headsets jack
Interface (Data) Mini USB 2.0 Sync
Design and specifications are subject to change without notice.
| Item/Description | DescriptionDescription | |
| Interface/Audio Built-in microphone and speakerExternal stereo headset jack | ||
| Interface/Data USB Sync | ||
| Power supply Battery: 1530 mAh Li-Ion Polymer, rechargeable, replaceableAC Adapter: 100~240 VAC/50~60 Hz, 5V/1A DC | ||
| Environmental temperature | Daily operation: 0°C ~ 40°C; storage: -10°C ~ 50°C | |
| Environmental humidity | 45% ~ 85% | |
| Dimensions 106 x 60.5 x 17 mm147g (including battery) | ||
| Optional accessories | Battery, Car charger, Car mount, TV-out cable | |
15 Regulation Notice
and Safety Declaration

SAR Information
Your device contains a radio transmitter and receiver, and it is designed, manufactured and tested not to exceed the radio frequency exposure limitations recommended by international guidelines.
The maximum SAR values for DX900 are:
• 0.831 W/kg @10g (GSM 900)
• 0.373 W/kg @10g (GSM1800)
• 0.492 W/kg @10g (WCDMA 2100)
• 0.044 W/kg @10g (WiFi)
Health and Safety Information
Electrical and Battery Safety Electrical and Battery Safety
- Please use ONLY accessories approved by the manufacturer. Any battery, AC adapter or cable of which authenticity is not verified by authorized service point or dealer (even if similar to original product in appearance or specifications) should not be used with your Pocket PC. The warranty of your Pocket PC DOES NOT apply to damage caused by use with non-manufacturer approved products.
- Follow the specifications of the battery manufacturer: Avoid charging the battery when the environmental temperature is higher than 45°C. Do not store or use the battery when the environmental temperature is higher than 50°C. Otherwise, battery expansion or leakage may occur.
- Do not attempt to disassemble, pound, pierce or damage the battery to avoid causing injury, danger or risk.
Application Environment Safety Environment Safety
- Do not directly expose the Pocket PC to any of the following environments: rapid changes of temperature, high temperature (such as direct exposure to sunlight or stoves), extremely low temperature, high pressure, areas with electrostatic discharge interference or dusty and humid places. Do not soak or wet the Pocket PC with water or any other liquid.
- Do not place the Pocket PC near electrical appliances (such as TVs, computers, scanners, disc players, faxes, hair dryers, etc.) that may generate electrostatic discharge interference.
-
Never drop the Pocket PC nor subject it to strong impact.
-
Do not use ordinary pen or any object with a sharp tip to tap the Pocket PC cover or screen (LCD panel) to avoid damaging and scratching the surfaces.
- Do not use corrosive or volatile liquids to wipe the Pocket PC. If necessary, use a soft cloth or tissue to wipe the Pocket PC.
Warranty Security Warranty Security
- In case the Pocket PC is damaged, kindly return it to your place of purchase. Do not attempt to disassemble this device on your own as this may void the warranty.
- If any hazards result from the failure of the user to comply with usage rules, we will not be held responsible for any resulting warranty claims.
Data SecurityData Security
- This company is not responsible for any data loss or damage to the Pocket PC due to improper use. Record important data in your notebook separately or use the USB accessories that come with this product to save important data to your computer or storage card.
Privacy Restrictions Privacy Restrictions
- Some countries require full disclosure of recorded telephone conversations, and stipulate that you must inform the person with whom you are speaking that the conversation is being recorded. Always obey the relevant laws and regulations of your country when using the rewording feature of your Pocket PC Phone.
IMPORTANT SAFETY PRECAUTIONS IMPORTANT SAFETY PRECAUTIONS
- When using this product, the safety precautions below must be taken to offset possible legal liabilities and damages.
Regulation Notice and Safety Declaration
Safety in airports, medical facilities, and inflammable environments
When aboard an aircraft, at a medical facility, or at the gas pump where wireless communication devices are prohibited, please launch the
Communication Manager and the M-poton. When the color of the icon turns orange, the Flight Mode is activated and the wireless connection of the Pocket PC is disabled.
Safety In Aircrafts Safety In Aircrafts
Due to the possible interference caused by this product to an aircraft's navigation system and its communications network, using this product on board an airplane is against the law in most country.
Interference With Medical Equipment Functions Interference With Medical Equipment Functions This product may cause medical equipment to malfunction. The use of this device is forbidden in most hospitals and medical clinics.
Environment Restrictions Environment Restrictions
Do not use this product in gas or refueling stations. The use of this product is also prohibited in fuel storehouse, chemical plants, and locations containing explosives.
Safety For Environments Safety For Environments
Do not use this product in gas station, fuel depots, chemical plants or where blasting operations are in progress, or in potentially explosive atmospheres such as fueling areas, below deck on boats, fuel or chemical transfer or storage facilities, and areas where the air contains chemicals or particles, such as grain, dust, or Mattel powders. Please be aware that Sparks in such areas could cause an explosion or fire resulting in badly injury or even death.
Explosive Atmosphere Atmos
When in any area with a potentially explosive atmosphere or where flammable materials exist, the product should be turned off and user should obey all signs and instructions. Sparks in such areas could cause an explosion or resulting in bally injury or even death. Users are advised not to use the equipment at refueling points such as service or gas stations. Users are reminded of the need to observe restrictions on the use of radio equipment in fuel depots, chemical plants or where blasting operations are in progress. Areas with a potentially explosive atmosphere are often, but not always, clearly marked. These include fueling areas, below desk on boats, fuel or chemical transfer or storage facilities, and areas where the air contains chemicals or particles, such as grain, dust, or metal powders.
Nonionizing Radiation Nonionizing Radiation
This product should be operated in the suggested normal condition only to ensure the radioactive performance and safety of the interference. As with other mobile radio transmitting equipments, user are advised that for satisfactory operation of the equipment and for the safety of personnel, it is recommended that no part of the human body be allowed to come too close to the antenna during operation of the equipment.
Road Safety Road Safety
Vehicle drivers in motion are not permitted to use telephone service with handheld devices, except in case of emergency. In some countries, using hand-free devices as an alternative is allowed.
Regulatory Notices
Agency identification numbers Agency identification numbers
For regulatory identification purposes, your product is assigned a model number of DX900.
To ensure continued reliable and safe operation of your Pocket PC, use only the accessories listed in this document.
This product is intended to be charged only from an approved battery charger (rated 5V DC, 1A).
European Union Declaration of Conformity European Union Declaration of Conformity The CE marking indicated that the product to which it is affixed complies with all the applicable Directives of the European Parliament and Council of the European Union, in particular the Radio & Telecommunications Terminal Equipment (R&TTE) Directive, 1999/5/EC.
Your product conforms to the following European Norms: Your product conforms to the following European Norms:
- EN 60950-1:2001 (IEC 60950-1 (Modified)) – Information technology equipment – Safety – Part 1: General requirement.
-
ETSI EN 301 511 V9.0.2(2003-03) – Mobile communications (GSM); Harmonized standard for mobile stations in the GSM 900 and DCS 1800 bands covering essential requirements under article 3.2 of the R&TTE directive (1999/5/EC).
-
ETSI EN 300 328 V1.7.1 – Electromagnetic compatibility and Radio spectrum Matters (ERM); Wide-band transmission systems; Data transmission equipment operating in the 2.4 GHz band and using spread spectrum modulation techniques; Harmonized EN covering essential requirements under article 3.2 of the R&TTE directive.
- ETSI EN 301 489-1 V1.6.1 - Electromagnetic compatibility and Radio spectrum Matters (ERM); ElectroMagnetic Compatibility (EMC) standard for radio equipment and services; Part 1: Common technical requirements.
- ETSI EN 301 489-7 V1.3.1 - Electromagnetic compatibility and Radio spectrum Matters (ERM); ElectroMagnetic Compatibility (EMC) for radio equipment and services; Part 7: Specific conditions for mobile and portable radio and ancillary equipment of digital cellular radio telecommunications systems (GSM and DCS).
- ETSI EN 301 489-17 V1.2.1 - Electromagnetic compatibility and Radio spectrum Matters (ERM); ElectroMagnetic Compatibility (EMC) for radio equipment and services; Part 17: Specific conditions for 2.4 GHz wideband transmission systems and 5 GHz high performance RLAN equipment.
- EN 55013:2001 – Sound and television broadcast receivers and associated equipment – Radio disturbance characteristics.
- EN 55020:2002 – Sound and television broadcast receivers and associated equipment – Immunity characteristics.
- EN 50371:2002 – Generic standard to demonstrate the compliance of low power electronic and electrical apparatus with the basic restrictions related to human exposure to electromagnetic fields (10 MHz \~ 300 GHz) – General public.
- EN 50360 – 2001 – Product standard to demonstrate the compliance of mobile phones with the basic restrictions related to human exposure to electromagnetic fields (300 MHz \~ 3 GHz).
WEEE Notices
The Directive on Waste Electrical and Electronic Equipment (WEEE), which entered into force as European law on 13th February 2003, resulted in a major change in the treatment of electrical equipment at end-of-life. The purpose of this Directive is, as a first priority, the prevention of WEEE, and in addition, to promote the reuse, recycling and other forms of recovery of such wastes of as to reduce disposal.
The WEEE logo (shown left) on the product or on its box indicates that this product must not be disposed of or dumped with your general household waste. You are liable to dispose of all your electronic or electrical waste equipment by transferring it to a specified collection point for recycling of such hazardous waste. Isolated collection and proper recovery of your electronic and electrical wastes equipment at the time of disposal will allow us to help conserve natural resources. Moreover, proper recycling of the electronic and electrical waste equipment will ensure safety of human health and the environment.
For more information about electronic and electrical waste equipment disposal, recovery, and collection points, please contact your local city center, town or country council, household waste disposal service, shop from where you purchased the equipment or manufacturer of the equipment.
16 FAQ

- What features does the Pocket PC have?
Answer:
① Capability of carrying dual SIM cards.
② Built-in 802.11b/g wireless networking module.
③ The latest Windows Mobile ^® 6.1 Professional operating system, with all its settings stored on a Flash ROM. You won't have to worry about losing your data even if the Pocket PC runs completely out of power. The extra-large Flash memory space is capable of storing a large amount of personal data and application programs.
- How do I configure the wireless network? And how do I connect to the Internet?
Answer: Communication Manager/Coherence in Managing your Bluetooth devices, GSM mobile devices, and your wireless networks.
When you purchase credit points for connection to the Internet via a wireless connection, you will be given an IP address, DNS name server address, Proxy server, connection port number, and network key information, you will need this information to successfully connect to the Internet. Sometimes corporate networks may need additional information, please contact your company's network administrator for details. If you are using your wireless network for the first time, please refer to the "Configure your Wireless Network" section and set the necessary configurations.
②In general, you can activate the wireless connection by tapping the 📄 in Communication Manager C when your Pocket PC and Rg detects and connects to a available wireless network, a 📌 on will appear on the top of your screen, this means that your Pocket PC has successfully connected with a network hotspot (Access Point). At this time, the indicator on the upper left of your pocket PC will flash amber.
FAQ 16-1
- My Pocket PC cannot boot. What should I do about it?
Answer:
①Make sure the Pocket PC battery you use still has enough power.
②Plug your Pocket PC into the charger, and make sure the red charging indicator lights up. Press the POWER button POWER button
- My Pocket PC has a screen freeze or the system does not respond. What should I do about it?
Answer:
①You may reset your Pocket PC. It means to re-start the whole system to release unnecessary resources so that the system can return to normal.
②If you have reset your Pocket PC but it still cannot operate normally, then you need to carry out a cold boot to solve this problem.
To Carry out a cold boot:rry out a cold boot:
Press and hold both POWER BOWDERand RESET RESET in for a while, then release them simultaneously. Wait for a few seconds until the screen wakes up displaying the model name, firmware version and firmware build date of your device, instantly press and hold Continue pressing and release it when you see an inquiry box shown on the screen.
If you answer "Yes" to the question if displays after a cold book (Erase all data and load default?) The programs installed by yourself, self-made settings, and self-made data (e.g., "Contacts" and "Calendar") will disappear. And return to their default settings.
As a result, we suggest you copy your data to the storage card. Data stored in the storage card will not vanish because of a cold boot. Or you can synchronize the data on your Pocket PC with your desktop computer.
- Why doesn't my Pocket PC make any sound?
Answer:
①Tap the speaker icon on the top right of the screen, then select the volume control options, or adjust the volume of the incoming call sound.
②Alternatively, you may use the volume control key to control the volume.
- Why does my Pocket PC screen automatically become dark?
Answer: Tap > SettingsSetSystem> > BacklightBackBatterypowerBatterypower ExternalpowerExterYdpowerfind that if you use battery power, the backlight automatically shuts down after 30 seconds by default; the external power shuts down after 1 minute by default. If you think these times are too short, you may extend them as needed.
- When I want to open a program or file, a warning message "Not enough Not enough memory/prop-by-up. What should I do about it?
Answer: Because your Pocket PC's memory is shared by storage memory and program memory, the following methods are available. You may choose the one that works best for you.
①Remove the programs you installed or that are not frequently used to release program memory space.
②Delete data that is not used frequently or unnecessary to release storage memory space.
-
The characters on the screen are too small to read. How can I enlarge them? Answer: Tap → SettingsSetSystem System Screen S-Text size Text Size may adjust the text size as you wish. Also, you may select the landscape orientation in the General Gamescreen. Try and change them so that you can read more smoothly.
-
The contact point of my stylus is not quite precise. What should I do about it? Answer: Align the screen in place, and the touch screen can respond to the operation of your stylus more precisely. The following two ways will bring you into the touch screen calibration mode.
①Tap Settings System System Screen >Align Screen /BigScreen ②Simultaneously press on the bottom-left of the Pocket PC and the execution button in the center of the navigation pad.
- The hardware buttons of my Pocket PC doesn't make any response or calls a wrong program. What should I do about it?
Answer: Tap > Settings > Personal tab > ButtonsB checks each button for correct setup.
- My Pocket PC's Activesync cannot be executed or make a connection. What should I do about it?
Answer:
①Make sure you have installed Activesync version 4.5 or above. The companion CD contains the software. If you have lost the CD, you may download it from the Microsoft Website.
②Make sure the charger as well as the USB cable provided along with the product are already connected up to your PC end.
③Make sure you are not executing another program that uses the same serial port you selected for operation during installation.
4 If your Activesync is still not working, remove and delete the old version of Activesync software at the PC end and install it once again.
12.1 My PC uses Windows Vista™ operating system, how will it handle the Pocket PC connection?
Answer:
①Please make sure that the Windows Mobile ^® Device Center included in the companion CD is installed.
②Make sure that the included USB cable is properly connected to the PC port.
- My PC currently has Microsoft Outlook installed; will it work with the Pocket PC?
Answer: Refer to the download link which you can see in the companion CD. If your current Microsoft Outlook version is older than that, uninstall the older version, then install the Microsoft Outlook limited trial version. When the trial period is over, contact with Microsoft for more information on purchasing the retail version.
FAQ 16-5
17 Index

3
3.5 G video telephony · 4-1
A
About · 2-10
AC Adapter · 1-1
Accounts · 9-1
ActiveSync · 2-7, 6-10
ActiveSync Setup Wizard · 6-7
Adding or Removing Programs · 12-7
Adjust volume · 5-8
Adjust Volume · 5-8
Adjusting Settings · 5-1
Adjusting the Phone Volume · 4-4
Align Screen · 2-1
Answering a call · 4-11
B
Back cover · 1-3
Backlight · 1-15, 2-10, 5-4
Backup Files · 12-2
Backup Utility · 12-1
Battery · 1-1, 1-8, 1-11
Beam · 2-11
Block Recognizer · 2-26
Bluetooth · 2-11, 7-8, 7-9
Browse the Internet · 11-27
Bubble Breaker · 2-7
Built-in camera lens · 1-3
Buttons · 2-9, 5-14
C
Calculator · 2-8
Calendar · 2-7, 11-2
Call History · 4-9
Camcorder · 1-3
Camera · 10-1, 10-3, 14-1
Camera button · 10-3
Camera hot key · 1-3
Certificates · 2-10
Charging · 1-10
Chatting with Contacts · 9-21
Circuit-Switched Data (CSD) · 7-14
Clean Boot · 1-16, 1-19
Clock & Alarms · 2-10
Command Bar · 5-12
Communication · 14-1
Communication Manager · 2-19
Connect GPRS · 7-6
Connection · 3-4
Connection Wizard · 2-11, 7-2
Connections · 2-11, 7-1
Contacts · 2-7, 11-6
Create a Note · 11-14
Index 17-1
Create a Task · 11-11
Create an Appointment · 11-3
Creating a contact · 11-8
Creating a text message · 9-5
Creating an MMS Message · 9-8
CSD Type · 2-11, 7-14
D
Default Settings · 1-16, 1-18
Dimensions · 14-2
Direct Push Technology · 9-16
Disconnect GPRS · 7-7
Display · 1-2, 14-1
Drag · 1-14
Draw on the Screen · 2-30
Dual SIM · 2-21
E
Earphone · 4-2
E-mail · 9-12
E-mails · 9-9
End button · 1-2
End Button · 4-3
Ending a call · 4-12
Enter Information · 2-23
Excel Mobile · 11-18
Expansion slot · 14-1
F
Favorites · 11-28
File Explorer · 2-8, 5-11, 12-12
17-2
Find Information · 5-11
Finding a contact · 11-6
Flashlight LED · 1-3
Flight mode · 2-22
Fully charge the battery · 1-11
G
Getting Started CD · 1-1, 6-2, 6-4
GPRS Connection · 7-3
GPS · 3-2, 14-1
GPS Viewer · 2-7, 3-9
H
Hardware installation, ActiveSync · 6-4
Hardware installation, WMDC · 6-2
Headset connector · 1-2
/
Input · 2-9
Input Panel button · 2-24
Install the external headset · 4-3
Installing ActiveSync · 6-4
Installing the SIM Card · 1-6
Interface/Audio · 14-2
Interface/Data · 14-2
Internet Explorer · 2-8, 11-26, 11-27
Internet Sharing · 2-8, 7-13
L
LED indicator · 1-11
Letter Recognizer · 2-26
Light Sensor · 5-5
Location SMS · 2-7, 3-7
Lock · 2-9
M
Making a call · 4-6
Memory · 2-10, 12-11, 14-1
Menus · 2-9, 12-9
Messaging · 2-7, 9-1
Messenger · 2-8, 9-18
Microphone · 2-10, 4-2, 5-7
MicroSD slot · 1-3
Microsoft® ActiveSync® · 6-3
Microsoft® Internet Explorer Mobile · 11-26
Microsoft® Pocket Outlook · 11-1
Mini USB connector · 1-2
MMS · 9-7
Mute · 5-8
Mute mode · 4-4
N
Name Cards Management · 10-21
Namecard Manager · 10-18
Navigation Bar · 2-4, 5-12
Navigation button · 1-2
Notes · 2-7, 11-13
Notifications · 5-2
0
Operating system · 14-1
Organize Information · 5-11
Owner Information · 2-9
P
Phone · 2-9, 4-1
Phone Receiver · 1-2, 4-2
Phone Speaker · 1-2, 4-2
Phone1 · 2-21, 2-22
Phone2 · 2-21, 2-22
Pictures & Videos · 2-8
Pocket PC · 1-1
Pop-up menus · 5-13
Power · 1-14, 2-10, 5-3
Power Button · 1-2, 1-13, 1-14, 1-15
Power supply · 14-2
Regional Settings · 2-10
Remove Programs · 2-10, 12-10
Reset · 1-16, 1-17
Reset button · 1-3
Reset Button · 1-17
Restore Files · 12-5
s
Satellite Data Update · 2-7, 3-4
Index 17-3
Satellite Navigation · 3-1
Scenarios · 5-10
Screen · 2-1, 2-10
Search · 2-8, 5-11, 12-12
Select a Drawing · 2-31
Select Writing · 2-29
Send button · 1-2
Send Button · 4-3
SIM card · 1-6
SIM Manager · 4-17
SIM Tool Kit · 4-19
SIM1 · 2-21
SIM2·2-21
Sleep mode · 1-14
SMS · 9-3
SMS Sender · 4-20
Soft Keyboard · 2-26
Software installation, WMDC · 6-2
Solitaire · 2-7
Sounds & Notifications · 2-9
Spb Mobile Shell · 2-12
Speaker · 1-3, 2-3
Speed Dial · 4-21
Start · 2-3
Start a chat · 9-20
Start Menu · 12-9
Storage Space · 12-1
Streaming Player · 11-24
Stylus · 1-1
Stylus holder · 1-3
Synchronizing E-mail · 9-10
System Information · 2-10, 12-15
T
Tap · 1-14
Tap and hold · 1-14
Tasks · 2-7, 11-10
Text Message · 9-3
Today · 2-9
Today screen · 2-3
Touch screen · 1-2
Touch the screen · 1-14
Transcriber · 2-27
Turn off Phone · 7-7
Turn on Phone · 7-5
U
USB Cable · 1-1
USB Synchronization · 6-7
USB to PC · 2-11, 6-6
Using the stylus · 1-14
v
Vibrate · 5-8
Vibration mode · 4-4
Video Call · 4-13
Video conference camera · 1-2
Voice Command Format · 13-3
Voice Commander · 2-7, 2-33, 13-1,
13-2
Voice Commander Button · 2-33
Voice Commander hot key · 13-2
Voice Commander Settings · 2-7, 13-5
Volume control key · 1-2
W
Windows Live · 2-8
Windows Live™ Messenger · 9-18
Windows Media · 2-8, 11-22
Windows Media Player · 11-22
Windows Mobile ^® Device Center · 6-1
Wireless LAN · 7-15, 8-1
Word Mobile · 11-15
Write on the Screen · 2-28
First Version: January 2009
Current Version: January 2009, Version 1
Number: 20081218


- Where to Find Information
- Note Note
- Trademarks and Copyright
- Contents
- Getting Started Getting Started 1-1
- Using the Pocket PC Using the Pocket PC 2-1
- Customize Your Pocket PC Customize Your Pocket PC 5-1
- Synchronization Synchronization 6-1
- Connections Connections 7-1
- Using Wireless LAN iLess LAN 8-1
- E-mails and Messages mails and Messages 9-1
- Multimedia Multimedia
- 10-1
- Companion Programs Companion Programs
- 11-1
- Maintaining the Pocket PC Maintaining the Pocket PC 12-1
- Voice Commander Voice Commander 13-1
- Getting Started
- Package Content
- Record
- / Voice Commander
- Notes
- SIM Card(s)
- Installing the SIM Card(s)
- Removing the SIM Card(s)
- Battery
- Installing the Battery
- Removing the Battery
- Charging Power and Power Supply
- Getting Started
- Power On and Off
- Power Down
- Using the Stylus to Touch the Screen to Touch the Screen
- Sleep Mode
- Turn on the Screen
- Restarting the Pocket PC
- ResetReset
- Default SettingsDefault Settings
- CleanBoot Boot
- Caution
- Using the Pocket PC
- Start
- Screen
- Today Screen
- Iconcon
- MeaningMeaning
- (Located on the Navigation Bar at the top of the screen)(L
- Programs
- System Application Programs
- ProgramPDescription
- DescriptionDescription
- ProgramDescription
- Spb Mobile Shell
- Starting Spb Mobile Shell
- Using Spb Mobile Shell
- Configuring Spb Mobile Shell
- Communication Manager
- Switching a Connection On / Off
- Managing Dual SIM Cards on a Single Device
- Flight Mode
- Enter Information on Your Pocket PC
- Enter Text Using the Input Panel
- Type with the Soft KeyboardType with the Soft Keyboard
- Use Letter RecognizerLetter Recognizer
- Use Block Recognizerlock Recognizer
- Use TranscriberTranscriber
- Select Typed TextSelect Typed Text
- Write on the Screen
- Select WritingSelect Writing
- Draw on the Screen
- Create a DrawingCreate a Drawing
- Select a DrawingSelect a Drawing
- Record a Message
- Create a RecordingCreate a Recording
- Voice Commander
- Voice Command
- and Satellite Navigation
- GPS Navigation Software Installation
- Conditions for Using GPS Car Navigation
- Satellite Data Update (Not supported in USA)
- Location SMS
- GPS Viewer
- Using the Phone
- Cautions Cautions
- Precautions!Precautions!
- Combination
- MethodMethod
- Answer or Answe Adjust Earphone
- OperationOperation
- nd a CallEnd a Call VolumeVoluri
- Adjusting the Phone Volume
- Adjust the proper volumedjust the proper volume
- Phone Functions
- Turning on Your Phone(s)
- Making a Call
- Selecting the primary phone line
- Making a call on either number Making a call on either number
- Answering / Ignoring a Call
- Ending a Call
- Video Call
- Making a video calla video cal
- ReceivRegieyideo call a video call
- Customizing Your Phone
- Phone Application Programs
- CautionCaution
- SIM Manager
- Change Display ModeChange Display Mode
- Copy Phonebook Information Copy Phonebook Information
- NoteNote
- SIM Tool Kit
- SMS Sender
- Speed Dial
- Frequently Dialed Screen Frequently Dialed Screen
- Customize Your Pocket PC
- Adjusting Settings
- Notifications
- Power Preference Settings
- Backlight
- Light Sensor
- Tap → SettingsSetSystemSystemBacklightBacklightBacklight
- Gravity Sensor
- Microphone
- Profile Microphone Microphone Microphone Cause Cause
- Note
- Adjust Volume
- Memory Optimization
- Scenarios
- Find and Organize Information
- Navigation Bar and Command Bar
- Pop-up menus
- Redefine Hot Keys
- Synchronization
- Windows Vista Part
- Windows XP/2000/98 Part
- Installing and Using ActiveSync
- Important Installation Notice Important Installation Notice
- Using ActiveSync
- FAQ About Synchronization
- USB Synchronization
- Synchronization Tool on Pocket PC
- Synchronizing using Bluetooth
- Connections
- Connecting to the Internet
- Connection Wizard
- Tap → SettSettingsSetConnections Connection WizardConnection Wizard
- Setting the GPRS Connection
- Starting GPRS Connection
- Disconnecting GPRS
- Using Bluetooth
- Setup the Bluetooth Connection
- Internet Sharing
- CSD Type
- Connecting with a Personal Computer
- Wireless LAN Transmission
- Using Wireless LAN
- Connecting to Wireless LAN
- Configure Your Wireless Network
- WLAN Setup Scenarios
- LocationLocationSelect NetworksSPExPNetConnectionProxy Connection Network key or Net Access PointAcc
- Configure Your Wireless Network (Normal Setup)
- Configure Your Wireless Network (Proxy Setup)
- Tap
- ettingsettingsSetConnectionsFaboneConnectionsGoTracksTracks
- E-mails and Messages
- Message Accounts
- Text Messages
- Reading Received Text Messages
- Creating a Text Message
- Note ote
- Multimedia Messages
- Reading MMS Messages
- Creating an MMS Message
- E-mails
- Synchronizing E-mail Messages
- Connecting Directly to the Mail Server
- E-mail Server Setup
- Sending / Receiving E-mails
- Sending E-mailings
- Direct Push Technology Alert
- Direct Push Technology Alert SettingsDirect Push Technology Alert Settings
- Tap
- Windows Live™ Messenger
- Setting Up
- Working with Contacts
- Notes Notes
- Chatting with Contacts
- Multimedia
- Using Camera
- Pocket PC Exterior and Camera
- How to Use the Camera?
- ActionActions
- InstructionsInstructions
- VideoVidestructions
- Common Tools for Camera
- Common Tools for Camcorder
- CameraCamcorderCamcorder DescriptionsDescriptions
- Important Hints Important Hints
- Album
- Preview Album Information
- Slideshow Settings
- Namecard Manager
- Digitize New Name Cards
- IconidMeaning
- Name Cards Management
- Quick search screen
- Companion Programs
- Calendar: Scheduling Appointments and Meetings
- Create an Appointment
- Use the Summary Screen
- Create Meeting Requests
- Schedule a Meeting
- Contacts
- Finding a Contact
- Managing Your Contacts
- Creating a Contact
- Using the Summary Screen
- Tasks: Keeping a To Do List
- Create a Task
- Notes: Capturing Thoughts and Ideas
- Create a Note
- Word Mobile
- Excel Mobile
- Tips for Working in Excel Mobile
- PowerPoint Mobile
- Windows Media Player
- Streaming Player
- Internet Explorer
- Using Internet Explorer
- Browse the InternetBrowse the Internet
- View Mobile Favorites and Channels saved channels
- The Mobile Favorites Folder
- Favorite Links
- Synchronize Mobile Favorites
- Create a Mobile Favorite Create a Mobile Favorite
- Save Pocket PC MemorySave Pocket PC Memory
- Maintaining the Pocket PC
- Backup Utility
- Storage Space
- Backup Files
- Standard Mode Standard Mode
- Advanced Settings Options
- Restore Files
- Caution! Caution!
- Wizard Mode Wizard Mode
- Adding or Removing Programs
- Add Programs Using Synchronization Tools
- Add a Program Directly from the Internet
- Add a Program to the Start Menu
- Remove Programs
- Manage Memory
- View Memory Status
- Find Available Memory
- Tap ➤ Programs ProNotes Word Mobile Excel Mobile McMenu McOptions Options
- System Information
- Voice Commander
- Starting Voice Commander
- Voice Command Format
- Tips
- Voice Commander Settings
- Contacts Settings Page
- Tips ips
- Application Settings Page
- Music Settings Page
- ① Check box function
- Digit Training Page
- Tips Tips
- Digit Settings Page
- Advanced Settings Page
- FAQ
- Specifications
- ItemItDescription
- Regulation Notice
- and Safety Declaration
- SAR Information
- Health and Safety Information
- Electrical and Battery Safety Electrical and Battery Safety
- Application Environment Safety Environment Safety
- Warranty Security Warranty Security
- Data SecurityData Security
- Privacy Restrictions Privacy Restrictions
- IMPORTANT SAFETY PRECAUTIONS IMPORTANT SAFETY PRECAUTIONS
- Explosive Atmosphere Atmos
- Nonionizing Radiation Nonionizing Radiation
- Road Safety Road Safety
- Regulatory Notices
- WEEE Notices
- FAQ
- Index
- 3
- A
- B
- C
- D
- E
- F
- G
- H
- /
- L
- M
- N
- 0
- P
- s
- T
- U
- v
- W
Brand : ACER
Model : DX900
Category : Mobile Phone