
HD Stick 620 T2 - Digital decoder MEGASAT - Free user manual and instructions
Find the device manual for free HD Stick 620 T2 MEGASAT in PDF.


| Product Type | Digital TV Stick Decoder |
| Brand | Megasat |
| Model | HD Stick 620 T2 |
| Standards | DVB-T2, DVB-T |
| Video Decoding | MPEG-4 AVC/H.264, MPEG-2, H.265/HEVC |
| Max Resolution | 1080p (Full HD) |
| Audio Decoding | MPEG-1 Layer 1/2, Dolby Digital Plus |
| Interface | USB 2.0 (Mini) |
| Antenna Input | IEC Female (RF Coaxial) |
| Power Supply | 5V DC via USB (standard port) |
| Power Consumption | < 2.5 W |
| Dimensions (L x W x H) | 90 x 30 x 12 mm |
| Weight | 35 g |
| Operating Temperature | 0°C to 40°C |
| Signal Sensitivity | < -80 dBm (DVB-T2) |
| Recording Function | Time Shift & Recording to USB Storage (FAT32) |
| Electronic Program Guide (EPG) | Yes (for up to 7 days) |
| Parental Control | Yes (PIN protectable) |
| Remote Control | Included (IR) |
| USB Port | 1 x USB 2.0 for recording/playback |
| Compatible OS | Windows, Linux, Android (with appropriate software) |
| Warranty | 2 years (varies by region) |
Frequently Asked Questions - HD Stick 620 T2 MEGASAT
User questions about HD Stick 620 T2 MEGASAT
0 question about this device. Answer the ones you know or ask your own.
Ask a new question about this device
Download the instructions for your Digital decoder in PDF format for free! Find your manual HD Stick 620 T2 - MEGASAT and take your electronic device back in hand. On this page are published all the documents necessary for the use of your device. HD Stick 620 T2 by MEGASAT.
USER MANUAL HD Stick 620 T2 MEGASAT
natural_image
Black MEGASAT HDI 580x 12G-17A device with ports and connectors (no readable text beyond branding)HD Stick 620 T2
Bedienungsanleitung
natural_image
Black and white image of a MEGASAT TV displaying Earth from space, with no visible text or symbols on the screen or background.Hinweis:
natural_image
Black Megacat HD 5800/625 12 audio device with HDMI port and external connectors (no visible text or symbols on body)HD Stick 620 T2
User manual
Safety instructions 03
1. Reference
1.1 Genareal Features....04
1.2 Delivery....04
2. Names and key assignment
2.1 Front view 05
2.2 Rear view 05
2.3 Remote control....06
3. Connecting the set-top box
3.1 Connecting the set-top box....07
4. Main menu
4.1 Initial Installation....08
4.2 Installation 09
4.3 Channel 10
4.4 Preferences....12
4.5 Multimedia menu 13
4.6 Settings....14
4.7 AV (Audio/Video) 16
4.8 Mediacenter....17
5. Troubleshooting 18
6. Specifications....19
Safety instructions
Please read the manual thoroughly before operating the equipment. In case of incorrect or improper handling, the warranty becomes void.
Power supply: Before start please check the correct operation voltage of the power point. The operating voltage of this device is AC 100-240 V, 0.5 A / DC 12 V, 1A.
Overload: Do not overload a wall outlet, extension cord or adapter, neither use damaged power cord or touch it with wet hand as this may result in electric shock.
Liquid: The device shall not be exposed to dripping or splashing water, and that no objects filled with liquids, such as base, shall be placed on the apparatus.
Ventilation: Keep the slots on top of the receiver uncover to allow sufficient airflow to the unit. Do not expose the receiver to direct light or do not place it near a heater or in humid conditions. Do no stack other electronic equipments on top of the receiver.
Risk of suffocation: Do not let children play with films or other packaging components, there is a risk of suffocation.
Cleaning: Plug out the receiver from the wall outlet before cleaning. Clean the receiver by a soft cloth or mild solution of washing-up liquid (no solvents).
Uncover: Do not remove the cover, to reduce the risk of electric shock. Contact qualified and licensed service personnel to repair the receiver, or contact your dealer.
1. Reference
1.1 Genareal Features
• DVB-T / DVB-T2 compliant (MPEG-II / MPEG-IV / H.264 / H.265 / HEVC)
• PAL / NTSC conversion
- Variable aspect ratio (4: 3, 16: 9) with Pan Vector or Letter Box
• Output resolution: 576p & 576i, 720p, 1080i & 1080p
- Improve HDMI with Upscalefunction
- Scart (can be angled)
- Infrared sensor
- Favorite lists
- Parental Control feature
- Screen Display with full color resolution
- Teletext and subtitle support (OSD)
- 7 days EPG (Electronic Program Guide) for On-Screen Program Information
- Multilingual menu
- Multichannel sorting
• USB 2.0 port (media playback)
1.2 Delivery
• Megasat HD Stick 620 T2
- Remote Control
- Batteries
- Infrared sensor
• 2x Velcro adhesive tape
- USB to Mini USB adapter
• 230/12 Volt power supply
• 12 volt vehicle power cable
- User manual
2. Names and key assignment
2.1 Front view
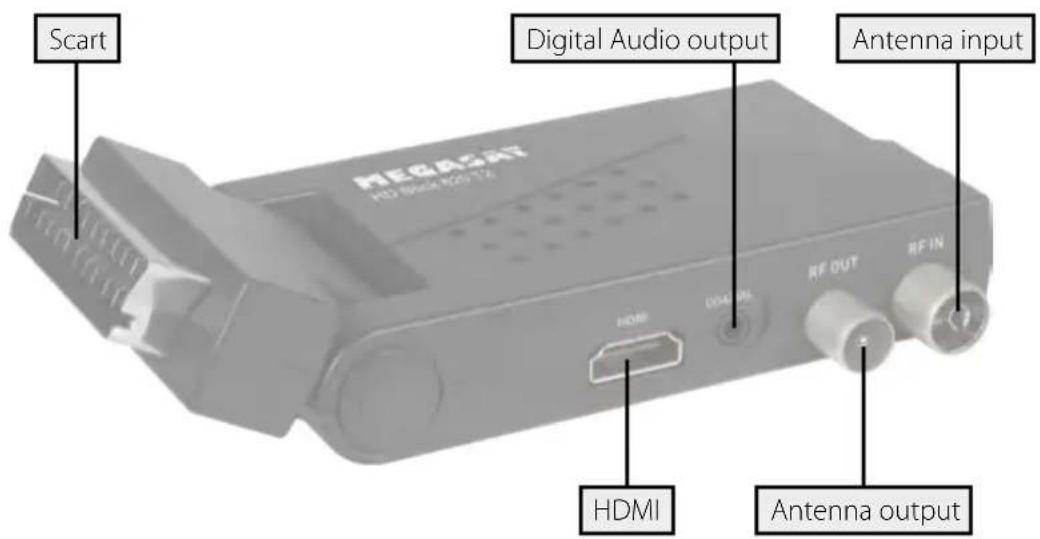
2.2 Rear view
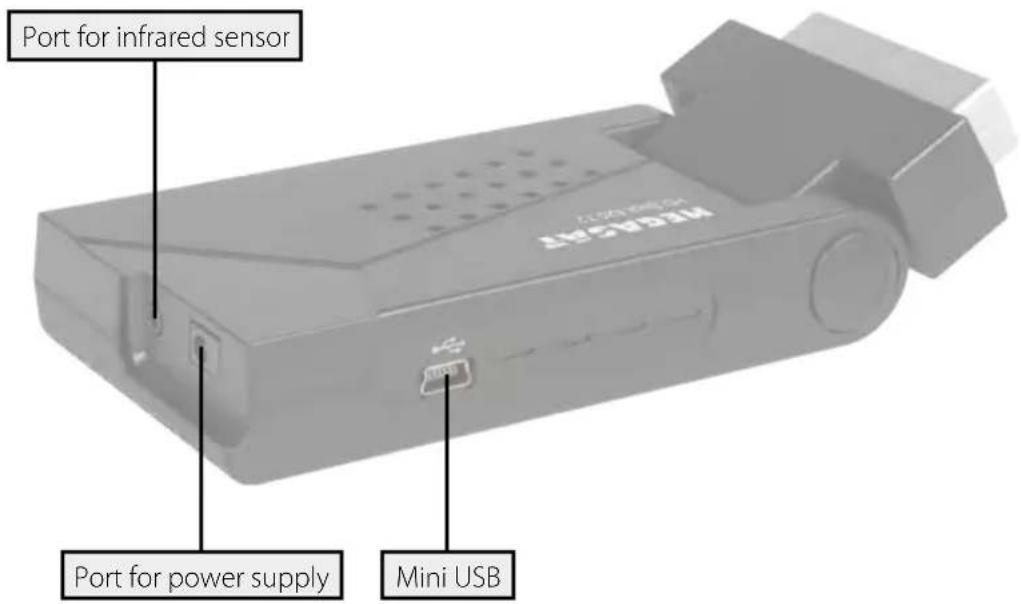
2. Names and key assignment
2.3 Remote control
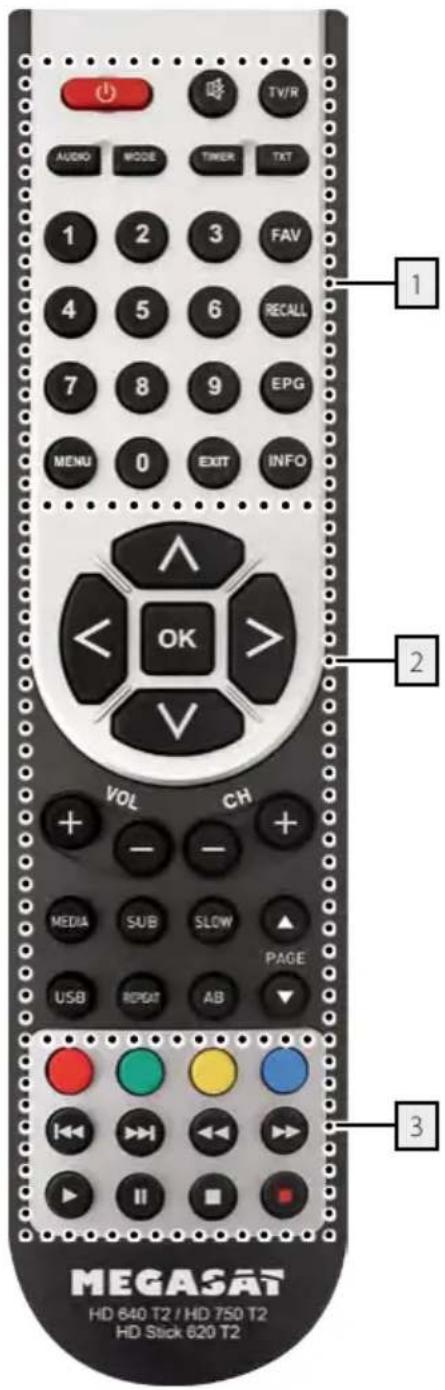
Zone 1
POWER Turn on/off the unit (Standby)
MUTE Muting the sound
TV/R Switches between TV and radio reception
AUDIO Select or change the audio track
MODE Change the TV resolution
TIMER Timer setting
TXT Displays the teletext of the respective program
Nummernblock (0\~9) Program Change / Enter numbers
FAV Displays the Favorites list (if favorites available)
RECALL Switches between the last and current program
EPG Displays the EPG (Electronic Program Guide)
INFO Displays information of the current program
MENU To access the main menu
EXIT Exits the current menu step by step
Zone 2
▲▼ Switches TV/radio programs (up/down)
◀ ▶ Adjust the volume
OK Confirm the current selection / Open the program list
VOL +/- Adjust the volume
CH +/- Switches TV/radio programs (up/down)
MEDIA Open the USB Media menu
SUB Displaying subtitles (if available)
SLOW Go forward slightly in video playback
USB Display menus of the USB if a USB device is connected
REPEAT Repeats the current playback
AB Repeats playback of A to B
PAGE ▲/▼ Scroll page by page
Zone 3
RED Function button
GREEN Function button
YELLOW Function button
BLUE Function button
|◀◀ / ▶▶▶ | Chapter forward / backward
◀◀ / ▶▶ Fast forward / reverse
▶ Start
||Pause
■ Stop
- Record (optional)
3. Connecting the set-top box
3.1 Connecting the set-top box
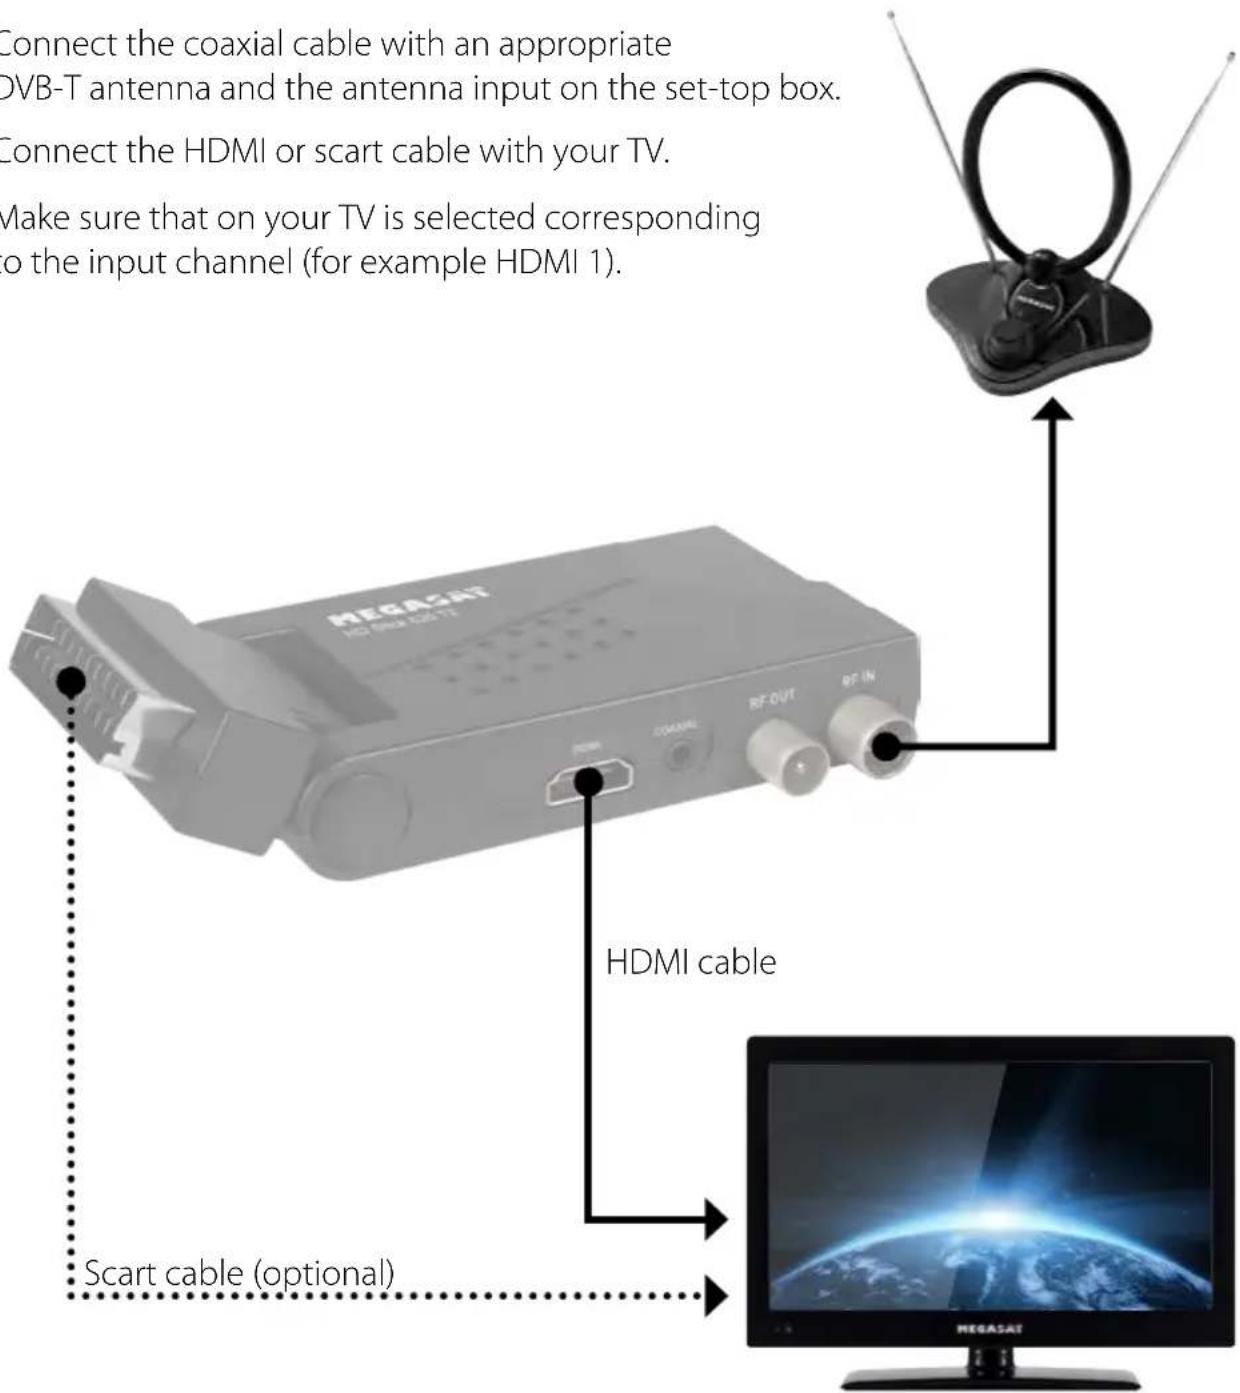
- Connect the coaxial cable with an appropriate DVB-T antenna and the antenna input on the set-top box.
- Connect the HDMI or scart cable with your TV.
- Make sure that on your TV is selected corresponding to the input channel (for example HDMI 1).
Note:
We recommend the connection via an HDMI cable. HDMI as opposed to Scart a digital, lossless image is transferred to the TV.
4. Main menu
After connecting all the necessary components and the set-top box starts, the window appears with the initial installation.
Use the ▲▼ buttons to select a point. Press the OK button to make the appropriate settings.
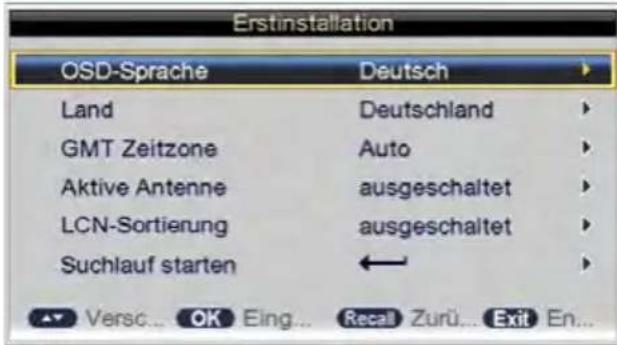
Menu language Select the menu language
Country Please choose the country in which you are located
Time zone Select the appropriate time zone for your country
Aktiv antenna Select ON if you are using an active DVB-T antenna without own power supply. For passive antennas this function is switched off.
LCN Select ON to activate the automatic channel sorting (not available in each region)
Start search Starts the automatic channel search
After you pressed Search, the Auto Search menu appears. The founded channels are automatically inserted into the program list.
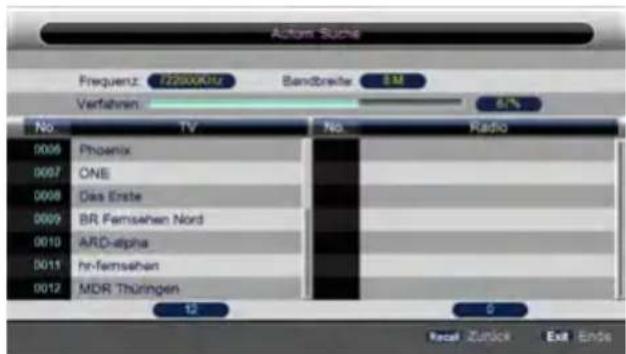
The basic navigation in the menu is made with the ▲▼ buttons (up / down), or with the ◀▶ buttons (right / left). To enter a menu item, press the OK button. To exit a menu item, press RECALL. Press EXIT to exit the whole menu.
The main menu consists of 6 submenus:
- Installation
- Channel
- Preferences
- Settings
- AV (Audio/Video)
- Mediacenter
4.1 Installation
Auto Search
Starts the automatic channel search
Manual Search
Here you can manually search for channels. Enter the channel number, the frequency and the bandwidth of the desired program. Then select "Start Search". Note: at the bottom of the current signal strength and quality is displayed.
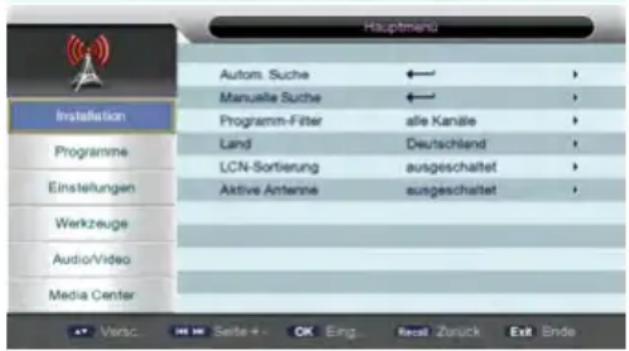
Choose whether all channels (incl. encrypted) or only free to air (FTA) should be found.
Country
Here you can select the country where you are located
LCN
Select ON to activate the automatic channel sorting (not available in each region)
Aktiv antenna
Select ON if you are using an active DVB-T antenna without your own power supply. For passive antennas this function is switched off.
4. Main menu
4.2 Channel
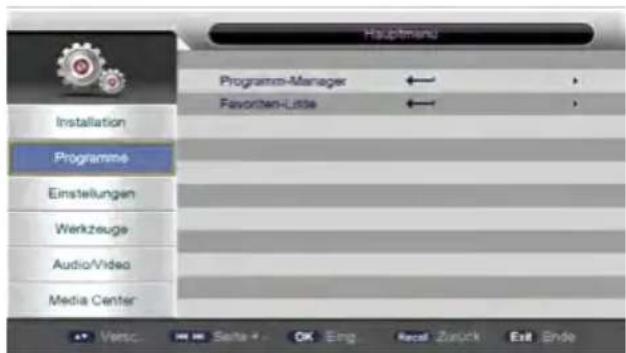
Channel Manager
In this menu you can lock, delete, skip, or rename channels.
Move
Use the arrow keys to select the channel you want to move. Press OK to highlight (the channel is now flashing yellow). Use the arrow buttons to move the channel to the desired position. Confirm with OK to complete the process. Repeat the steps with all other channels you want to move.
Lock
Select a channel and then press the RED button to lock the channel. You will be prompted to enter a password (Default:
0000). Then the channel is locked in the channel list (the one with the red tick in the padlock icon column). In order to unlock it, the password is required.
Delete
Select a channel and press the GREEN button to delete the channel. The channel will be marked with a green check mark in the X column. Once you leave the Channel Manager menu with EXIT you will be asked if you really want to delete the marked channels. Select YES to delete or NO to cancel.
Skip
Select a channel and press the YELLOW button to skip the channel when scrolling through the channel list. The channel is marked with a yellow tick.
Rename
Select a channel and press the BLUE button to rename the channel. Then another window will appears to change the channel name. Pay attention to the symbols on the bottom of the screen to input the channel name (eg. yellow for clear, blue for confirmation, ...)
4. Main menu
Favorite list
In this menu you can allocate channels to different favorite groups. You can create max 4 favorite groups.
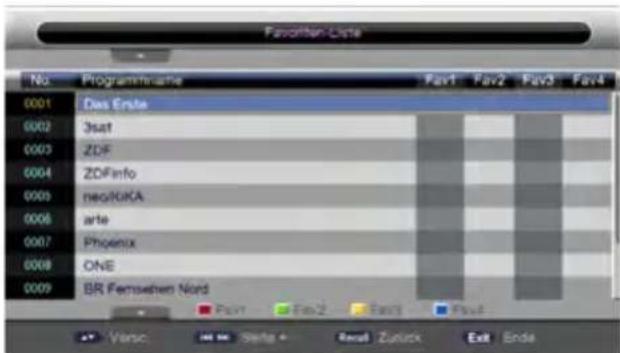
Select a channel with the navigation keys. Then press the RED button to save the channel in favorite group 1. The mark you acknowledge a tick in the appropriate column of the favorite group. Repeat the process with all channels that are to be stored in group 1.1 Do you want to store other channels in favorite group 2, 3 or 4, press the corresponding colored button.
To access the individual favorite groups press OK during the normal TV mode. Subsequently, the channel list (all channels) opens. Now use the ◀▶ keys to select the favorite group. In each group that you have created channels are now displayed.
4. Main menu
4.3 Preference
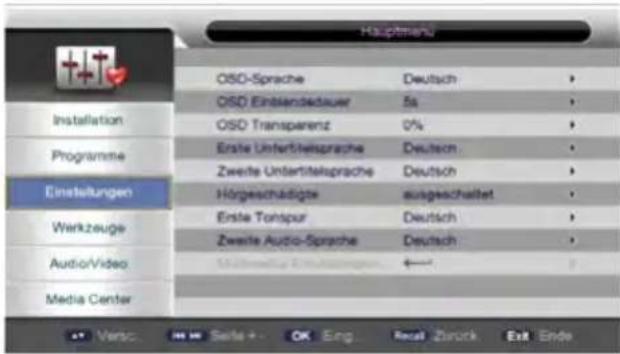
In this menu you can make various settings on the set-top box.
OSD Language
Select the menu language the set-top box.
OSD Time
Select the duration of the information display that appears when you switch.
OSD Transparency
Set the transparency of the menus.
First preferred subtitle language
Select the first language of the subtitles channel (if available).
Second preferred subtitle language
Select the second language of the subtitles channel (if available).
Hard of hearing
When you turn on this option a speaker tells the events of the consignment (this function is not always available and depending on the TV station or broadcast)
First Preferred Audio Language
Select the first audio language of the channel (if available).
Second Preferred Audio Language
Select the second audio language of the channel (if available)
Multimedia
To access this menu, first press the MEDIA button on remote control. Then you can return to the main menu to open the Multimedia menu.
In this menu you can make settings for the playback of multimedia files.
MP4 Subtitle Language
Set the repeat for movie playback. Choose between ON (individually), OFF (No) or folder (repeat the complete directory).
Repeat music
Set the repeat for music playback. Choose between ON (individually), OFF (No) or folder (repeat the complete directory).
Repeat photo
Set the repeat for photo playback. Choose between ON (individually), OFF (No) or folder (repeat the complete directory).
BGMusic
Choose ON or OFF.
Slideshow time
Choose the time to the next image in a slideshow
Effect
Select a transition effect between photos in a slide show.
4. Main menu
4.4 Setting
Program name: The channel name and channel number
Start timer: Enter the start time of the desired program.
End time: no function
Duration: no function
Mode: When should the timer take place? Choose between once, daily, weekly or monthly.
Typ: Select the type of the timer. Should the receiver only switch on at the selected time, witch to the channel or switch to standby mode?
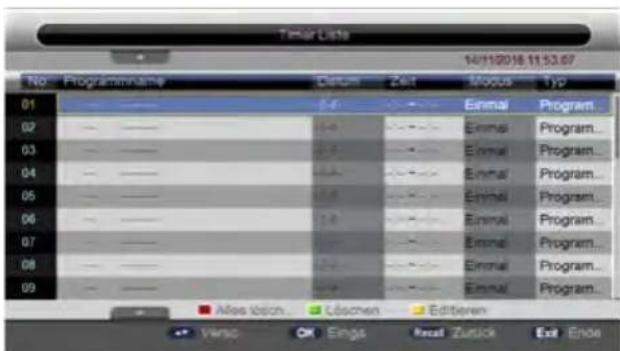
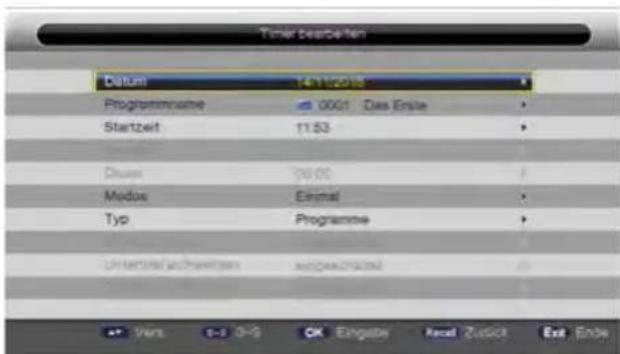
Once you have made your selections, click OK. The programming is now displayed in the main list. To change the settings, select the program and press OK or the YELLOW button.
4. Main menu
Parental Lock
In this menu you can set up a parental control. When activated channels are blocked, where the set age limit is exceeded.
Default password: 0000
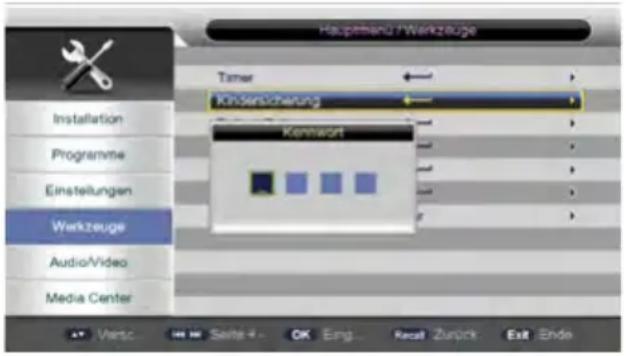
Safeguarding: Activate or deactivate the Parental Lock
Age limit: Enter the age limit. Choose between 0-18 years.
(The age limit is not offered by each channel)
Change password: Change the default password. First enter the current password, then the new password. Repeat at the end the new password
Date / Time
Set the current date and time. The settings can only be changed if the GMT deviation is not set to AUTO. In general, the Auto GMT sufficient deviation.
Factory setting
If you choose this option, you are prompted to enter a password (Default: 0000). Subsequently, the receiver is placed in the work condition. ATTENTION: All channels and settings deleted irrevocably!
Software update
Choose this option if a new firmware is available for this set-top box. Copy the new firmware to a USB stick and plug it into the USB slot on the front panel of the set-top box. Select USB Upgrade to enter the USB mode. Now select the new firmware and confirm with OK. The update process will start. Do not turn off the set-top box during this time and do not disconnect it from the mains. The set-top box will automatically turn off and then starts with the initial installation.
Version
Displays current information about the set-top box.
Auto Standby
Select the time after the set-top box automatically switches to standby mode if no operation on the device or on the remote control is carried out. Choose between 1, 2, 3 hours or disable this option.
4. Main menu
4.5 Audio/Video
Contrast
Set the desired contrast of the screen display (default: 12)
Brightness
Set the desired brightness of the screen display (default: 12)
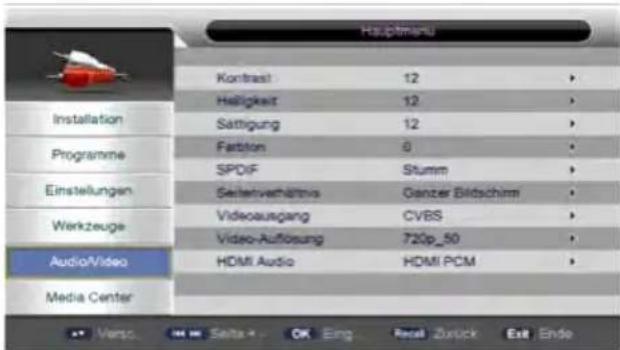
Set the audio output of the coaxial audio output. Disabled, Bitstream or PCM for connection to a digital surround sound system
Aspect ratio
Set the aspect ratio of the TV. Choose between 4:3 PS, 16:9, Full screen or 4:3 LB
Video output
Choose between CVBS or RGB
Video resolution
Select the video resolution. This depends on your TV. Inquire which max. resolution of the TV can play. Alternatively, select automatic detection.
HDMI Audio
Select the audio output through the HDMI connection (RAW, disabled or PCM).
4.6 Media Center
In this menu, you can play media files (movies, music and photos). Make sure that media files are located on a USB device and the USB flash drive or external hard drive is plugged into the set-top box.
Use the ◀▶ buttons on the top of the screen which files you want to play. Choose between movies, music or photos. Then confirm with OK.
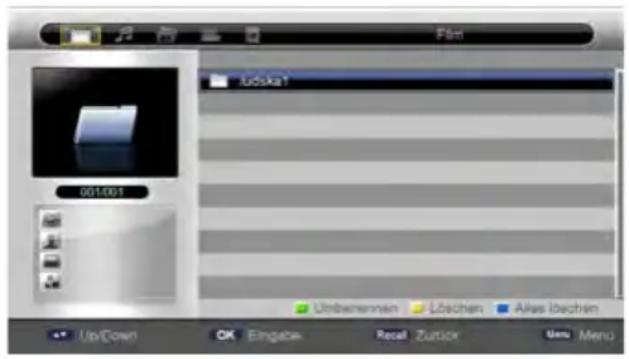
If several partitions are on the USB media, you can select it in the table. A standard USB medium has only one partition (/udska1). Confirm this partition with OK to access the media files.
Movies
Use the ▲▼ buttons to select a movie. At the left of the screen you will see information about the file (size, date, ...). To start playback, press OK. Use the buttons on the remote to stop playback, to fast forward or back, or to pause. Press RECALL to return to the Media list.
Music
Use the ▲▼ buttons to select a music file. At the left of the screen you will see information about the file (size, date, ...). To start playback, press OK. Use the buttons on the remote to stop playback, to fast forward or back, or to pause. Press RECALL to return to the Media list.
Photo
Use the ▲▼ buttons to select a photo. At the left of the screen you will see information about the file (size, date, ...). To start playback, press OK. Pay attention to the settings (Slideshow) in the photo playback, that you set in "Preferences > Multimedia".
5. Troubleshooting
You might meet abnormal working of this set-top box with various reasons. Check the following which may help you.
| Problem Possible causes What to do | ||
| The LED on the infrared sensor does not light up. | The power cable or the infrared sensor is not connected. | Check that the cables are connected correctly. |
| Bad or jerky image. The antenna is not connected properly or not properly configured in the menu. | Make sure that the antenna is connected properly. Check the antenna settings menu. | |
| No auto-start screen when starting the set-top box. | The set-top box is connected via HDMI, but the TV is not in the correct HDMI mode. | Switch the TV to the correct HDMI mode (eg HDMI 1). |
| The remote control is not working. | The batteries are empty or the remote control does not point to the infrared sensor | Change the batteries (both). Aim the remote control at the STB. Check that nothing blocks the front panel. Check if LED indicator on the front panel is showing the time, press the power button to switch off standby mode. |
| You have forgotten your password. | The default password is: 0000. Contact the dealer or Service Provider. They will help you set it up again. | |
| The set-top box will now be operated in another room, but there is no picture and sound. | Possibly is the terrestrial reception poor in this room. | Perform a new channel search. Alternatively, the DVB-T antenna must be positioned at another location with more receiving. |
6. Specifications
| Tuner & Demodulator | |
| RF input 1x IEC-TYPE, IEC169-2, female | |
| RF output 1x IEC-TYPE, IEC169-2, male (loop-through) | |
| Frequency range 174 MHz ~ 230 MHz (VHF) / 470 MHz ~ 862 MHz (UHF) | |
| Signal level -15 ~ -70 dBm | |
| Decoder | |
| Video Decoder H.265/HEVC HD resolution decoding,MPEG-2 MP@HL, AVC/H.264 HP @L4.1MPEG-4 ASP SUPPORTED | |
| Audio Decoder MPEG-1/2/PCM/AAC | ICE958 SPDIF/Dobly D+/Dobly D |
| Ratio 4:3/16:9 | |
| Video output HDMI, SCART | |
| Modulation QPSK / 16QAM / 64QAM / 256QAM | |
| Audio decoding MPEG / MusiCam Layer & II | |
| Audio mode | Single channel / Dual channel / Joint stereo / Stereo |
| Sampling | 32, 44.1 und 48 KHz |
| Connections | |
| Tuner | 1x antenna input / 1x antenna output |
| Data port | 1x Mini USB |
| Scart | 1x to TV |
| Audio/Video | 1x 3,5 mm output |
| HDMI | 1x HDMI outbut |
| Infrared sensor | 1x output |
| Power supply | 1x input |
| Power supply | |
| Power supply | AC 100-240 V, 0,5 A / DC 12 V, 1A |
| Power consumption | max. 6 W (in use) / < 0,5 W (standby) |
| Other | |
| Dimensions | 137 x 60 x 21 mm |
| Weight | 95 g |
Note:
Weight and dimensions are not absolutely exact values .
Technical details can be changed at any time without prior notice.
Declaration of Conformity
Hereby declare the company Megasat Werke GmbH that the following devices is in compliance with the essential requirements and other relevant provisions of Directive Council 2014/30/EU and 2014/35/EU:
The Declaration of Conformity for these products is located the company:
Megasat Werke GmbH
Industriestraße 4a
D-97618 Niederlauer
Notes

- Bedienungsanleitung
- Hinweis:
- User manual
- Reference
- Names and key assignment
- Connecting the set-top box
- Main menu
- Troubleshooting 18
- Specifications....19
- Safety instructions
- Genareal Features
- Delivery
- Front view
- Rear view
- Remote control
- Zone 1
- Zone 2
- Zone 3
- Connecting the set-top box
- Note:
- Installation
- Auto Search
- Manual Search
- Country
- LCN
- Aktiv antenna
- Channel
- Channel Manager
- Move
- Lock
- Delete
- Skip
- Rename
- Favorite list
- Preference
- OSD Language
- OSD Time
- OSD Transparency
- First preferred subtitle language
- Second preferred subtitle language
- Hard of hearing
- First Preferred Audio Language
- Second Preferred Audio Language
- Multimedia
- MP4 Subtitle Language
- Repeat music
- Repeat photo
- BGMusic
- Slideshow time
- Effect
- Setting
- Parental Lock
- Date / Time
- Factory setting
- Software update
- Version
- Auto Standby
- Audio/Video
- Contrast
- Brightness
- Aspect ratio
- Video output
- Video resolution
- HDMI Audio
- Media Center
- Movies
- Music
- Photo
- Troubleshooting
- Specifications
- Declaration of Conformity
- Notes
Brand : MEGASAT
Model : HD Stick 620 T2
Category : Digital decoder