
HD8603 - Coffee maker Caffitaly - Free user manual and instructions
Find the device manual for free HD8603 Caffitaly in PDF.


| Product type | Capsule coffee machine |
| Brand | Caffitaly (by Saeco/Philips) |
| Model | HD8603 (Bravista Latte+) |
| Capsule system | Caffitaly branded capsules only |
| Beverages | Espresso, Lungo, Black coffee, Cafe latte, Frothed milk, Latte macchiato |
| Milk carafe | Integrated carafe with frothing system (capacity: MIN/MAX marks) |
| Adjustable coffee quantity | Yes, per beverage type (30 ml – 300 ml for espresso/lungo, up to 250 ml for black coffee) |
| Cup size adjustment | Adjustable drip tray and dispensing spout positions |
| Automatic shut-off | After 9 minutes of inactivity |
| Descaling indicator | Orange service indicator light; recommended descaling with Saeco solution (CA6700) |
| Water tank capacity | Approx. 1 liter (fill to MAX mark) |
| Power | Approx. 1500 W (typical for similar machines) |
| Dimensions (H x W x D) | Approx. 30 x 20 x 40 cm (estimated) |
| Weight | Approx. 5 kg (estimated) |
| Safety features | EMF compliant, non-slip feet, child safety lock (capsule compartment), auto shut-off |
| Warranty | 2 years (additional to statutory rights) |
Frequently Asked Questions - HD8603 Caffitaly
User questions about HD8603 Caffitaly
0 question about this device. Answer the ones you know or ask your own.
Ask a new question about this device
Download the instructions for your Coffee maker in PDF format for free! Find your manual HD8603 - Caffitaly and take your electronic device back in hand. On this page are published all the documents necessary for the use of your device. HD8603 by Caffitaly.
USER MANUAL HD8603 Caffitaly
natural_image
Exterior view of a Saeco coffee machine with a glass of coffee and a milk cup, no visible text or symbols on the device itself.BRAVISTA
Latte +
Crafted by

Saeco

natural_image
Abstract line icon showing a grid pattern with an arrow pointing to the open book (no text or symbols)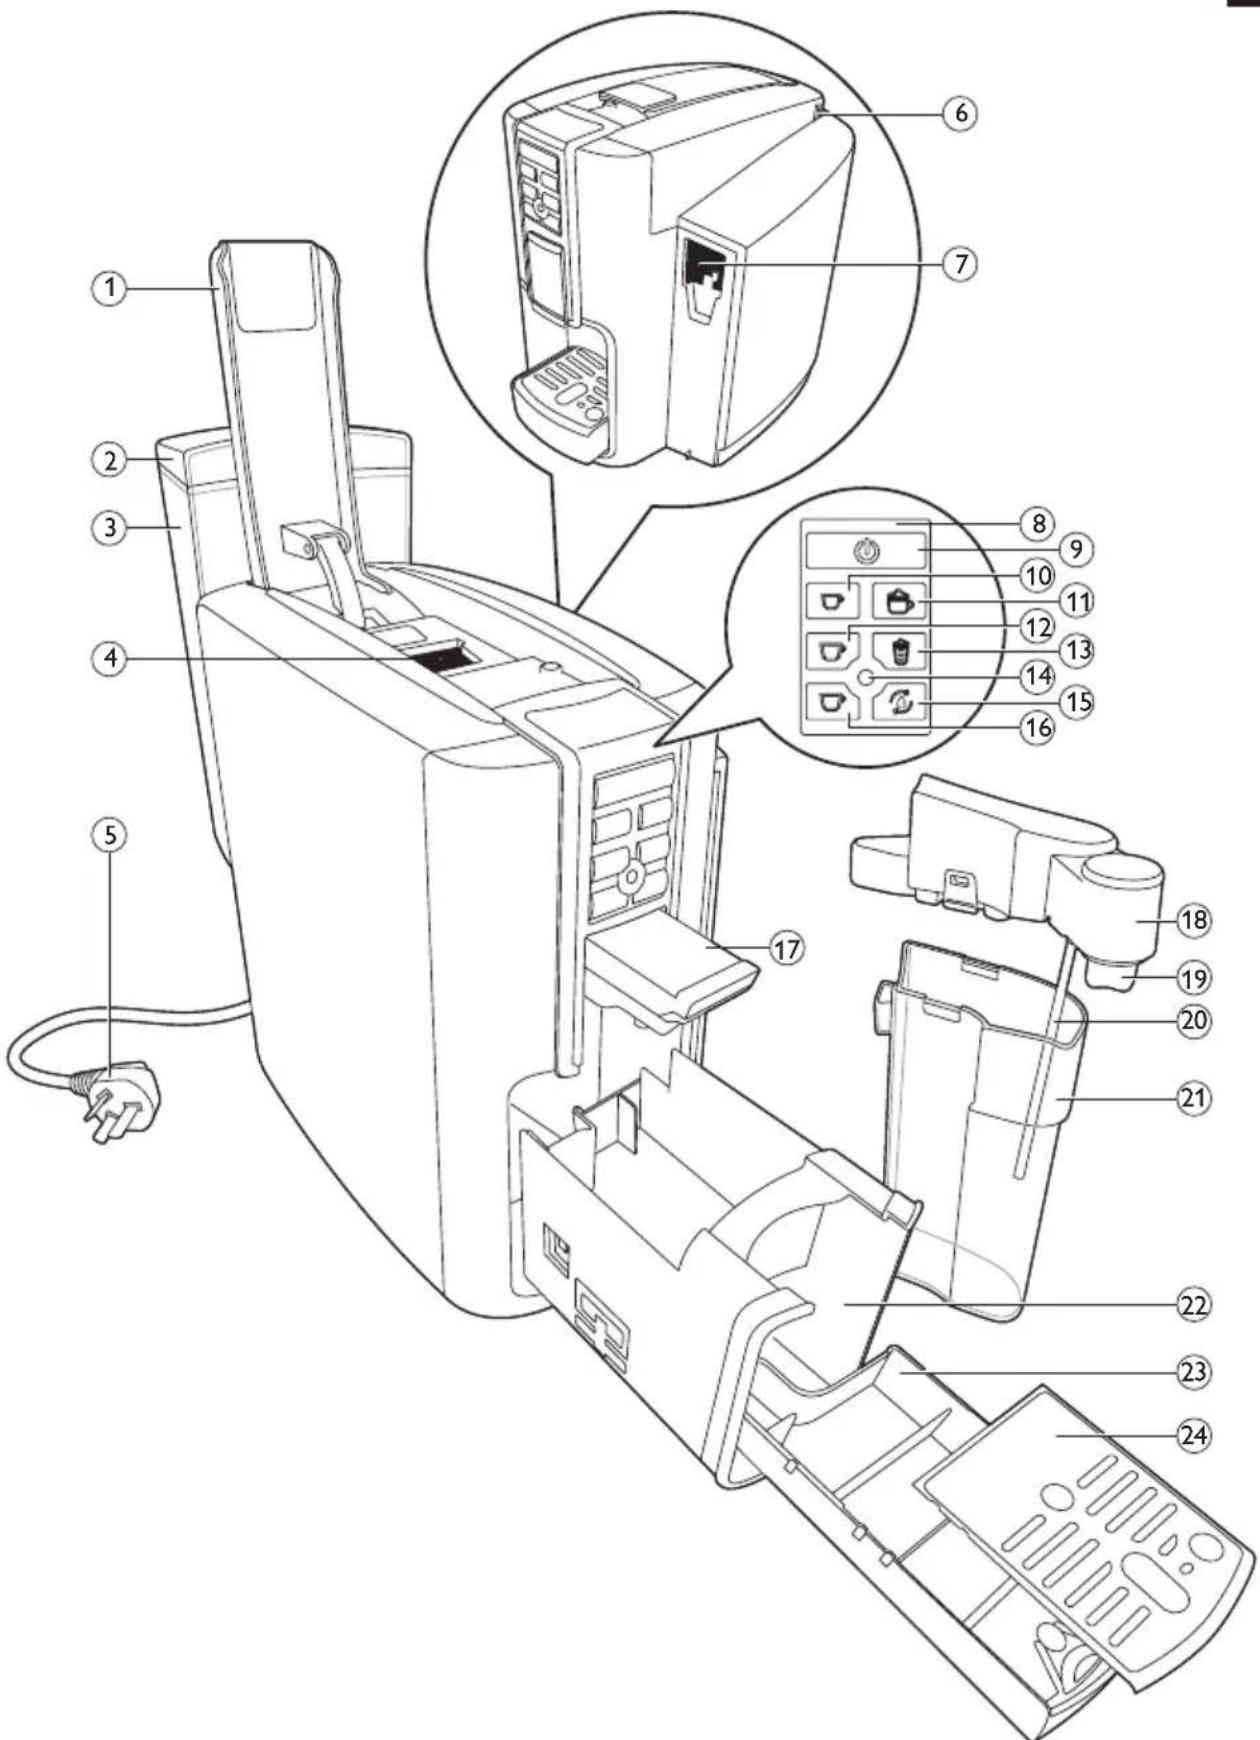
ENGLISH 6
Table of contents
Introduction 6
General description 7
Important 7
Electromagnetic fields (EMF) 9
Before first use 9
Installing the machine 9
Preparing for use 9
Filling the water tank 9
Using the machine for the first time 10
Using the machine 11
Adjusting the drip tray and dispensing spout positions 11
Capsules 11
Brewing coffee 11
Adjusting the coffee quantity 13
Resetting the coffee and resetting the coffee quantities 13
Milk carafe 13
Café latte, frothed milk, latte macchiato 15
Frothed milk 16
Adjusting the amount of frothed milk 17
Latte macchiato 17
Rinsing the milk circuit 18
Cleaning and maintenance 18
Drip tray and used capsule drawer 18
Daily cleaning of the water tank 20
Weekly cleaning of the coffee circuit (priming) 20
Weekly cleaning of the milk carafe 20
Descaling the machine 23
Descaling procedure 24
Meaning of light signals 25
Accessories 26
Environment 26
Troubleshooting 26
Warranty 28
Introduction
Congratulations on buying the Bravista Latte+ coffee capsule machine!
This user manual applies to HD8603. The machine is suitable for preparing espresso, lungo and black coffee using the Caffitaly branded capsules.
You can use the milk carafe for brewing café latte, frothed milk and other milk specialties. The machine can be used with a variety of cup sizes to dispense your different coffee varieties. In this user manual you find all the information you need to install, use and maintain your machine
General description (Fig. 1)
1 Capsule compartment opening lever
2 Water tank lid
3 Water tank
4 Capsule compartment
5 Mains cord
6 Steam outlets
7 Milk carafe attachment point
8 Control panel
9 On/off button (green)
10 Espresso button (white)
11 Café latte button (white)
12 Lungo button (yellow)
13 Frothed milk button (white)
14 Service indicator light (orange)
15 Rinse milk circuit button (orange)
16 Black coffee button (blue)
17 Coffee dispensing spout
18 Milk carafe lid
19 Milk dispensing spout
20 Milk tube
21 Milk container
22 Used capsule drawer
23 Waste water drawer
24 Cup tray
Important
Read and follow the safety instructions carefully and only use the machine as described in this user manual to avoid accidental injury or damage due to improper use of the machine. Keep this user manual for future reference.
Danger
- Never immerse the machine in water or any other liquid.
Warning
- Check if the voltage indicated on the machine corresponds to the local mains voltage before you connect the machine.
- Connect the machine to an earthed wall socket.
- This machine can be used by children aged from 8 years and above and by persons with reduced physical, sensory or mental capabilities or lack of experience and knowledge if they have been given supervision or instruction concerning use of the appliance in a safe way and if they understand the hazards involved.
- Cleaning and maintenance shall not be made by children unless they are older than 8 and supervised.
- Children should be supervised to ensure that they do not play with the machine.
- Keep the machine and its cord out of the reach of children aged less than 8 years.
- Do not pour liquids on the mains cord connector.
- Do not use the machine if the plug, the mains cord or the machine itself is damaged.
- Do not touch hot surfaces. The surface of the heating element is subject to residual heat after use.
- Do not lift the machine by the lever that opens the capsule compartment. To move the machine, hold it by the outer housing.
- Never let the machine operate unattended.
- The machine is equipped with non-slip feet. Work surfaces often have varnished or plastic finishes and are treated with a variety of substances. Some of these products may contain substances that react adversely with the rubber feet and soften them.
- Remove the plug from the wall socket if the machine malfunctions, if you are not going to use the machine for a long time and before you clean the machine.
- Pull at the plug, not at the mains cord. Do not touch the plug with wet hands.
- If the mains cord is damaged, you must have it replaced by Saeco, a service centre authorised by Saeco or similarly qualified persons in order to avoid a hazard.
- Always return the machine to a service centre authorised by Saeco for examination or repair. Do not attempt to repair the appliance yourself, otherwise your guarantee becomes invalid.
- Never insert your fingers into the capsule compartment.
Caution
- Always put the machine on a flat and stable surface. Keep it in an upright position (also during transport).
- Do not place the machine on a hotplate or directly next to a hot oven, heater or similar source of heat.
- Only use the original Caffitaly branded capsules. Neither use capsules from other manufactures, nor damaged or misshapen capsules. Never fill capsules or the machine with ground coffee or instant coffee, as this will damage the machine. In these cases, any necessary repairs due to damage are not covered by the guarantee.
- Descale the machine regularly.
- If you do not clean and descale the machine, you run the risk that the machine stops working and that your guarantee becomes invalid.
- Never fill the water tank with warm, hot or sparkling water, as this may cause damage to the water tank and the machine.
- Do not use aggressive cleaning agents, solvents or chemicals to clean the machine.
- Do not keep the machine at temperatures below 0^ C. Water left in the heating system may freeze and cause damage.
- This machine is intended for normal household use only. It is not intended for use in environments such as staff kitchens, shops, offices, farms or other work environments. Nor is it intended to be used by clients in hotels, motels, bed and breakfasts and other residential environments.
- Always use fresh water when you use the machine. Empty the water tank if you are not going to use the machine for a long time.
- Always make sure that the drip tray and the used capsule drawer are inserted when you use the machine.
Electromagnetic fields (EMF)
This machine complies with all applicable standards and regulations regarding exposure to electromagnetic fields.
Before first use
Installing the machine
natural_image
Illustration of a plug inserted into an electrical outlet with three socket holes (no text or symbols)1 Remove all packaging material from the machine.
2 Place the machine on a table or worktop away from the tap, the sink and heat sources.
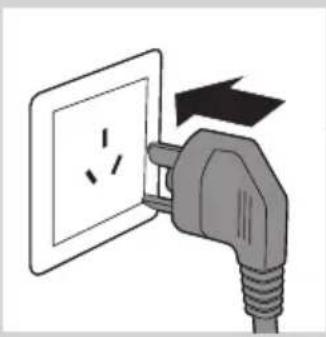
3 Put the plug in the wall socket.
Preparing for use
Filling the water tank
natural_image
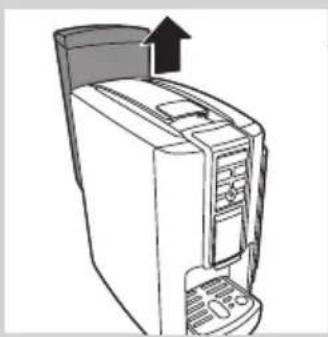
Line drawing of a computer tower with an upward arrow indicating motion (no text or symbols)1 Remove the water tank from the machine.

natural_image
Diagram of a mechanical device with a lid and arrow indicating upward motion (no text or symbols)2 Remove the lid from the water tank. Rinse the water tank under the tap.

3 Fill the water tank with cold tap water up to the MAX indication.
4 Place the lid back onto the water tank.
5 Place the water tank back onto the machine.

natural_image
Line drawing of a coffee maker with a cup on the front (no text or symbols)
natural_image
Line drawing of a coffee machine with a cup and a power button icon (no text or symbols)
Using the machine for the first time
When you use the machine for the first time or if you have not used it for 2 weeks or longer, perform the following steps:
1 Place a cup under the coffee dispensing spout and lift the dispensing spout up in the horizontal position. Do not insert a capsule, but make sure that the lever is closed.
2 Press the on/off button.
The on/off button flashes green slowly to indicate the machine is heating up. When the on/off button lights up green continuously, it is ready to perform the next step.
The orange service indicator light flashes to indicate that no water has been pumped into the system yet.
3 Press the yellow lungo button. Water flows from the coffee dispensing spout.
Note: The machine stops brewing automatically once it has dispensed the preset coffee cup volume.
Note: If the cup is full before the machine stops dispensing, you can stop the brewing process by pressing the yellow lungo button again.
Note: When the internal circuit is empty, the machine produces a humming sound. When the machine dispenses water is, it produces less loud humming sounds. This is normal.
4 Empty the cup and place it back under the coffee dispensing spout.
5 Repeat steps 3-5 until the water tank is empty.
Note: The orange service indicator light flashes to indicate that the water tank is empty.
6 Fill the water tank up to the MAX indication.
Note: The orange service indicator light stops flashing when you brew another beverage.
7 Empty the drip tray and waste water drawer. See chapter ‘Cleaning and maintenance’, section ‘Emptying the used capsule drawer and waste water drawer’.
The machine is now ready for use.
Using the machine
Adjusting the drip tray and dispensing spout positions
The machine can be used with a variety of cup sizes to dispense your different coffee varieties.
You can adjust the position of the drip tray and the dispensing spout to create various dispensing positions.

natural_image
Line drawing of a coffee machine with a cup and side panel (no text or symbols)1 For a cup of espresso, slide the drip tray in the middle position and leave the coffee dispensing spout in the vertical position.

natural_image
Illustration of a coffee machine with a cup and directional arrows indicating flow or movement (no text or symbols)2 For a black coffee or café latte, pull the drip tray to the outer position and pull the coffee dispensing spout up in the horizontal position.
natural_image
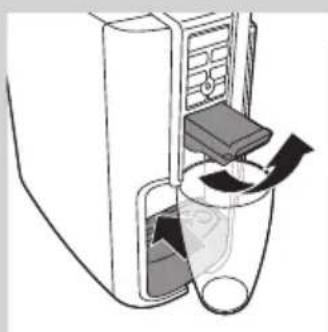
Diagram of a device with a container and a tray, showing internal components (no text or symbols)3 For a glass frothed milk and latte macchiato or for recipes which require a large cup, push the drip tray into the machine and pull the coffee dispensing spout up in the horizontal position.
Capsules
Only Caffitaly branded capsules are compatible with the Caffitaly system. Any other capsules will damage the machine and void the manufacturer warranty.
Brewing coffee
natural_image
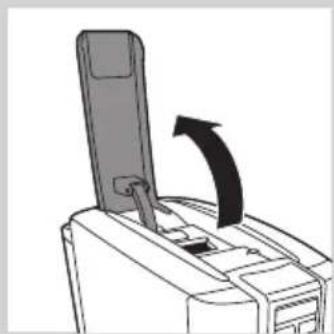
Diagram of a printer's clasp mechanism with an arrow indicating rotation (no text or symbols present)1 Press the on/off button.
The on/off button flashes green to indicate the machine is heating up.
2 Place a cup under the coffee dispensing spout (see section 'Adjusting the drip tray and dispensing spout positions').
Note: Choose a cup that suits the type of coffee you want to brew.
3 Lift the capsule compartment opening lever.

natural_image
Line drawing of a mechanical device with a knob and lever mechanism (no text or symbols)
natural_image
Line drawing of a toaster with a black arrow indicating compression or cooling process (no text or symbols)4 Insert a capsule.
5 Push the lever downwards to close the capsule compartment.
Note: If the compartment opening lever does not close easily, check if the capsule is inserted correctly and if the used capsule drawer is not full.
6 Press the desired coffee button:
Note: For an optimal taste of black coffee, rinse the internal circuit before and after you brew a black coffee. See chapter 'Cleaning and maintenance', section 'Weekly cleaning of the coffee circuit (priming)'.
7 The machine stops brewing automatically once it has dispensed the preset coffee volume. To stop the brewing process, you can press the same button again.
Note: The machine brews at a certain speed and produces humming sounds during brewing. These speeds and sounds differ for the different coffee varieties, This is normal.
8 Lift the capsule compartment lever. The empty capsule falls into the used capsule drawer automatically.
Note: The machine switches off automatically after 9 minutes of inactivity. Press the on/off button to switch the machine back on.
Note: After every coffee that the machine brews, a small amount of water flows into the waste water drawer. Empty the waste water drawer regularly.
Note: If the machine stops earlier during the brewing process and the orange service indicator light flashes slowly, the internal circuit of the machine is empty. Fill the water tank with water, do not insert a new capsule and press the button of selected coffee variety again to continue brewing. When the cup contains the desired amount of coffee, press the same button again to stop the brewing process.
Never insert your fingers or any other objects into the capsule compartment. Single-dose capsules brew a single coffee. Do not use capsules more than once. When you prepare an espresso or lungo, the machine performs a pre-brewing cycle. There is an audible pause in the brewing process between the pre-brewing and brewing cycles.
Adjusting the coffee quantity
Each capsule contains the optimal amount of ground coffee (8 grams) for one cup of espresso or lungo with an optimal flavour. You can adjust the amount of brewed coffee according to your taste and the size of your cup, mug or glass.
Each coffee variety button brews a preset amount of coffee.
Espresso: approx. 40ml
▶Lungo: approx. 125ml
▶Black coffee: approx. 125ml
Note: This quantity can be reprogrammed according to your taste for each type of coffee. The minimum quantity that can be set is approximately 30ml and the maximum quantity that can be set is approximately 300ml for an espresso and lungo. For a black coffee is the maximum quantity that can be set approximately 250ml. For optimal extraction for an espresso capsule, a maximum pour length of 60 ml is recommended.
To reprogram the quantity of espresso, lungo or black coffee:
1 Choose a cup that suits the type of coffee you want to brew. If necessary, adjust the position of the drip tray and/or the coffee dispensing spout.
2 Place a cup under the coffee dispensing spout.
3 Insert a capsule.
4 Press and hold the button of the desired coffee variety for 3 seconds until it starts to flash at brief intervals. The machine starts brewing coffee.
5 Press the same button again when the cup contains the desired amount of coffee.
Note: The selected coffee button has now been reprogrammed. The machine will dispense the reprogrammed amount of coffee every time you press this button.
Resetting the coffee quantities
To reset the coffee quantities to their factory settings:
1 Switch off the machine.
2 Press the on/off button (green) and the blue black coffee button for 5 seconds.
▶All buttons flash twice
Milk carafe
The machine has a milk carafe for brewing café latte, frothed milk and latte macchiato.
Filling the milk carafe
Clean the milk carafe before you use it. Follow steps 1 to 7 in section 'Weekly cleaning of the milk carafe'.
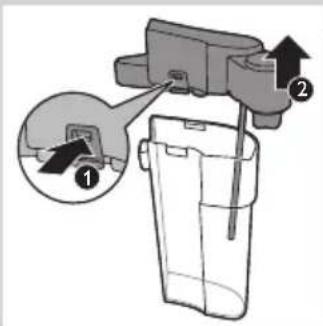
1 Remove the milk carafe lid.
natural_image
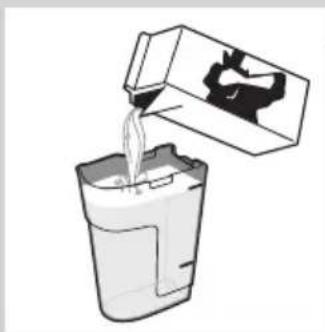
Illustration of a container pouring liquid into a container with a lid (no text or symbols)2 Fill the milk carafe with milk to a level between the MIN and MAX indications.

natural_image
Mechanical component diagram showing internal assembly with arrows indicating motion (no text or symbols)3 Put the lid on the milk carafe properly.
Inserting and removing the milk carafe
Note: Do not hold the milk carafe by the lid. The lid can come off the milk carafe.
To place or to remove the assembled milk carafe, perform the following steps:

natural_image
Diagram of a mechanical device with a handle and outlet, showing no text or symbols1 Lift the milk carafe slightly above the machine and place it in the machine.

natural_image
Illustration of a hand inserting a device into a control panel (no text or symbols visible)2 Attach the milk carafe to the machine by pushing it down gently until it clicks into place.

3 To remove the milk carafe, lift it and pull it carefully away from the machine.
Café latte, frothed milk, latte macchiato
Be careful: before milk is dispensed, small jets of hot water may come out of the machine. Do not select coffee varieties that contain milk if the milk carafe is not in place.
Note: Always put the milk carafe with the remaining milk in the refrigerator.
Café latte
1 For a café latte, insert an espresso capsule. See section 'Brewing coffee'.
2 Fill the milk carafe with milk to a level between the MIN and MAX indications. Put the lid on the milk carafe and place the milk carafe in the machine.
3 Adjust the position of the drip tray and/or the coffee dispensing spout.
4 Place a mug below the coffee and milk dispensing spout.
5 Press the white café latte button.
The café latte button flashes white to indicate that the machine is warming up.
6 After the machine has warmed up, the machine dispenses frothed milk directly into the cup. The machine stops brewing automatically once it has dispensed the preset milk volume. To stop the brewing process, you can press the white café latte button again.
7 The machine automatically dispenses the espresso coffee directly into the cup, after dispensing the milk. The machine stops brewing automatically once it has dispensed the preset coffee volume. To stop the brewing process, you can press the white café latte button again.
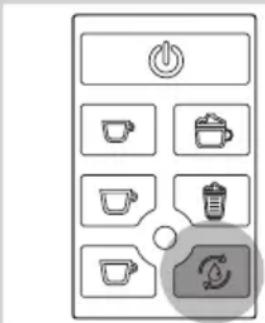
When the machine has finished brewing the café latte, the orange rinse milk circuit button lights up to indicate that the milk circuit must be rinsed. See section 'Rinsing the milk circuit'.
Adjusting the amount of café latte
You can adjust the amount of café latte brewed according to your taste and the size of your cup. Follow the steps:


1 Insert an espresso capsule.
2 Fill the milk carafe with milk to a level between the MIN and MAX indications. Put the lid on the milk carafe and place the carafe in the machine.
3 Press and hold the white café latte button for 3 seconds until it starts to flash at brief intervals. Then release the button.
The machine dispenses milk froth.
4 Press the white café latte button again when the cup contains the desired amount of milk. The machine has saved the desired amount of milk and starts to brew the espresso.
5 Press the white café latte again when the cup contains the desired amount of espresso coffee. The machine has saved the desired amount of espresso.
Note: The café latte button has been reprogrammed. The machine will dispense the reprogrammed amount of milk and coffee every time you press the café latte button.
The minimum quantity of espresso that can be set is approx. 30ml.
The maximum quantity of espresso that can be set is approx. 300ml.
The minimum quantity of milk that can be set is approx. 50ml.
The maximum quantity of milk that can be set is approx. 300ml.
The preset quantities for café latte are approx. 90ml milk and approx. 40ml espresso.
To reset beverages to their factory settings, see section 'Restoring quantities to factory settings'.
Frothed milk
Note: To prepare frothed milk, it is not necessary to insert a coffee capsule.
1 Fill the milk carafe with milk to a level between the MIN and MAX indications. Put the lid on the milk carafe and place the carafe in the machine.
2 Adjust the position of the drip tray and/or the coffee dispensing spout.
3 Place a glass under the milk dispensing spout.
Note: Do not insert a coffee capsule into the capsule compartment.
4 Press the frothed milk button.
The frothed milk button flashes white to indicate the machine is warming up.
5 After the machine has warmed up, the machine dispenses the frothed milk directly into the glass. The machine stops dispensing the frothed milk once it has dispensed the preset volume. You can interrupt the dispensing process by pressing the white frothed milk button again.
When the machine stops dispensing the frothed milk, the orange rinse milk circuit button lights up to indicate the milk circuit must be rinsed. See section 'Rinsing the milk circuit'.
Adjusting the amount of frothed milk
You can adjust the amount of frothed milk prepared according to your preference and the size of your glass.
1 Fill the milk carafe with milk to a level between the MIN and MAX indications. Put the lid on the milk carafe and place the carafe in the machine.
2 Place a glass under the milk dispensing spout.
3 Press and hold the white frothed milk button for 3 seconds until it starts to flash at brief intervals. Then release the button.
The machine dispenses milk froth.
4 Press the white frothed milk button again when the cup contains the desired amount of milk froth.
Note: The frothed milk button has been reprogrammed. The machine will dispense the reprogrammed amount of milk every time you press the frothed milk button.
The minimum quantity of milk that can be set is approx. 50ml. The maximum quantity of milk that can be set is approx. 300ml. Preset quantities of frothed milk is approx. 110ml.
Latte macchiato
For a latte macchiato it is recommended to use approx. 130ml frothed milk and 40ml espresso. If necessary, you can preset the quantity of milk. See section ‘Adjusting the amount of frothed milk’.
1 Fill the milk carafe with milk to a level between the MIN and MAX indications. Put the lid on the milk carafe and place the carafe in the machine.
2 Adjust the position of the drip tray and/or the coffee dispensing spout.
3 Place a glass under the coffee and milk dispensing spout.
Note: Do not insert a coffee capsule into the capsule compartment.
4 Press the frothed milk button.
The frothed milk button flashes to indicate the machine is warming up.
5 After the machine has warmed up, the machine dispenses the frothed milk directly into the glass. The machine stops dispensing the frothed milk once it has dispensed the preset volume. To stop the dispensing process, you can press the frothed milk button again.
Note: Make sure there is enough space in the glass left for the coffee, when dispensing the milk.
6 Lift the capsule compartment opening lever.
7 Insert an espresso capsule.
8 Lower the lever to close the capsule compartment.
9 Press the white espresso button for an espresso.
10 The machine stops brewing automatically once it has dispensed the preset volume. To stop the brewing process, you can press the espresso button again.
11 Lift the lever to remove the used capsule.
Rinsing the milk circuit
Rinse the milk circuit right after use, to ensure optimal hygiene.
Note: The rinse button lights up as a reminder and it remains lit until the circuit has been rinsed or the machine has been switched off.
To rinse the milk circuit, perform the following steps:
1 Make sure the milk carafe is in the machine.
2 Place a glass under the milk dispensing spout.
3 Press the rinse button.
The machine dispenses a quantity of water sufficient to rinse the milk circuit. When the dispensing stops, remove the glass.
Note: Always put the milk carafe with the remaining milk in the refrigerator.
Rinsing the milk circuit helps to maintain optimal hygiene and performance of the machine, but only in combination with the cleaning procedures described in chapter ‘Cleaning and maintenance’.
Note: When preparing milk/caffe latte, steam may come out of the steam outlets. This is normal.
Cleaning and maintenance
Regular cleaning and descaling prolongs the lifetime of your machine and ensures optimum coffee taste and milk froth quality.
Do not immerse the machine in water or any other liquid.
Never use scouring pads, abrasive cleaning agents or aggressive liquids to clean the machine.
Always unplug the machine and let it cool down before you clean it.
Do not put the removable parts in the dishwasher, except for the cup tray, the grill and the internal parts of the frothing system (see section 'Weekly cleaning of the milk carafe) these parts are dishwasher safe.
Use a soft, damp cloth to clean the machine.
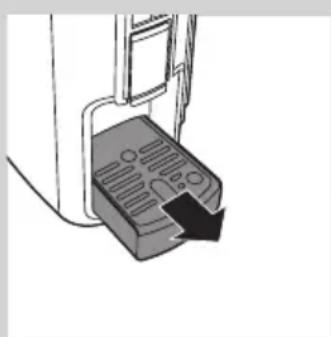
Drip tray and used capsule drawer
natural_image
Diagram of a device with a black arrow pointing to a button or port (no text or symbols present)Clean the used capsule and waste water drawer after each 8-10 cups of coffee that the machine has brewed.
Check periodically if the used capsule drawer and waste water drawer are not full to avoid damage and malfunctioning of the machine.
1 Pull the drip tray out off the machine.
natural_image
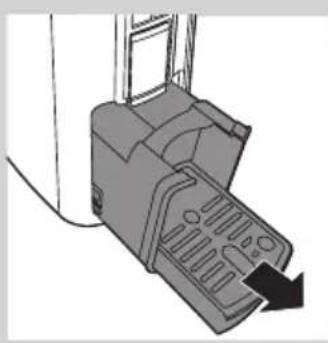
Mechanical device with a black arrow pointing to a component (no visible text or symbols)2 Remove the used capsule drawer by pulling out the drip tray as far as it goes.

3 Push the sliding lock on the left side of the used capsule drawer upwards and pull the drip tray out of the used capsule drawer.
4 Empty the drip tray.
5 Empty the used capsule drawer.
6 Rinse all parts under warm tap water. Dry all parts with a soft cloth.

natural_image
Line drawing of a hand inserting a device into a computer tower (no text or symbols)7 Wipe the inner compartment with a damp cloth and then with a dry cloth.

natural_image
3D diagram of a mechanical device with a black arrow pointing to a component (no text or symbols)8 Reinsert the used capsule drawer.

natural_image
Illustration of a device with an arrow pointing to a button, showing a magnified view of the button (no text or symbols present)9 Reinsert the drip tray. Make sure you push the drip tray all the way into the machine and make sure it aligns with the outer edge of the machine.

natural_image
Diagram of a printer with a black X mark indicating cancellation or disassembly (no text or symbols present)Always insert the used capsule drawer before you insert the drip tray. Do not push both parts into the machine at once.
Daily cleaning of the water tank

natural_image
Diagram of a faucet with a showerhead and water outlet, no text or symbols present- Rinse the water tank under the tap every day. This prevents scale and other particles from clogging the filter at the bottom of the water tank.
Weekly cleaning of the coffee circuit (priming)
Clean the coffee circuit every week to ensure an optimum quality and taste of your coffee.
1 Place a cup under the coffee dispensing spout. See chapter 'Using the machine', section 'Adjusting the drip tray and dispensing spout positions'.
2 Lift the capsule compartment lever. The empty capsule falls into the used capsule drawer automatically. Do not insert a new capsule.
3 Close the lever.
4 Press the yellow lungo button.
5 Let the machine dispense a cup of water. Empty the cup afterwards. The machine is now ready for use.
Weekly cleaning of the milk carafe
Clean the milk carafe every week if you use it regularly. Clean the milk carafe after preparing a beverage with milk in addition to the rinsing cycle.
1 Remove the milk carafe lid and rinse the lid and the milk carafe with lukewarm tap water.
2 Fill the milk carafe up to the MAX level with fresh, cold tap water and place the lid back on the carafe.
3 Place the milk carafe into the machine and place a container under the milk dispensing spout.
4 Switch on the machine.
5 Press the frothed milk button. Wait until the dispensing stops.

natural_image
Mechanical component diagram showing a bolt and shaft assembly with a downward arrow indicating force or direction (no text or symbols)6 Press the white rinse button. Wait until the dispensing stops.
7 Empty the milk container and remove the milk carafe.
8 Remove the lid and empty the milk carafe.
You can now clean the components of the milk frothing system. Perform the following steps:
9 Remove the tube attached to the milk carafe lid by pulling it out.
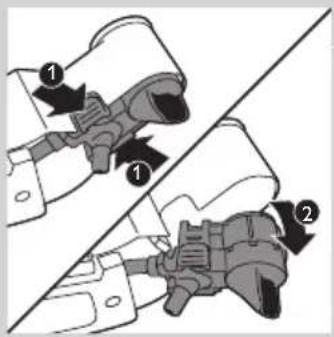
10 Push on the sides of the milk dispensing spout (1) and remove it from the lid by pulling it outwards(2).

natural_image
Diagram of a mechanical assembly with a valve and directional arrow (no text or symbols)11 Pull the milk dispensing spout off the fitting.
natural_image
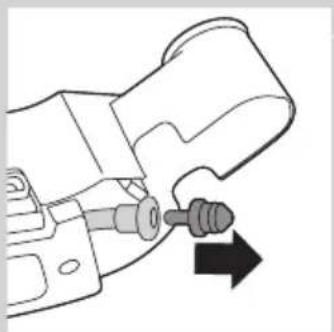
Mechanical component diagram showing a pin inserted into a housing with an arrow indicating direction (no text or symbols)12 Pull the fitting off the rubber tube.

natural_image
Line drawing of a kitchen sink with a faucet and showerhead (no text or symbols)13 Wash the carafe lid with lukewarm tap water.
Note: Do not place the milk carafe lid in the dishwasher to prevent it from discolouring.
ENGLISH22
natural_image
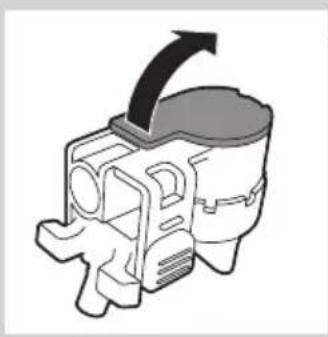
Mechanical component diagram showing a rotating arrow and housing (no text or symbols)
natural_image
Technical illustration of a mechanical component with an upward arrow indicating motion (no text or symbols)
natural_image
Mechanical assembly diagram showing a motor and valve assembly (no text or labels)
natural_image
Diagram of a mechanical component with an arrow indicating rotation or assembly (no text or symbols present)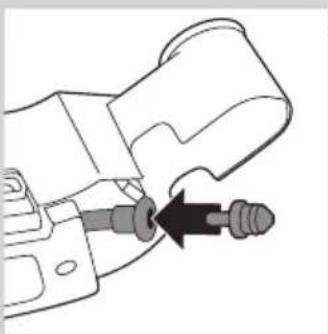
natural_image
Mechanical component diagram showing a valve or connector with an arrow indicating direction (no text or symbols present)14 Open the lid of the milk dispensing spout.
15 Remove the lower part of the milk dispensing spout from the upper part.
16 Clean all the components in lukewarm water with a mild washing-up liquid. Rinse all components with tap water and dry them completely. The internal parts of the frothing system are dishwasher-safe.
After cleaning the components, you can reassemble them by following the same procedure, but in reverse order.
Assembly procedure of the milk carafe
1 Push the bottom part of the milk dispensing spout into the upper part until you hear a click.
2 Close the lid of the milk dispensing spout.
3 Push the fitting onto the rubber tube.

natural_image
Illustration of a hand pouring liquid into a mechanical component (no text or symbols)4 Push the milk dispensing spout onto the fitting.

natural_image
Illustration of a hand using a tool to adjust or install a mechanical component, with an inset showing a close-up of the tool (no text or symbols present)5 Push the milk dispensing spout back into the lid until it clicks into place.

natural_image
Mechanical component diagram showing a lever and shaft assembly (no text or symbols)6 Insert the tube into the opening in the milk dispensing spout.
Descaling the machine
Scale builds up inside the machine during use. It is essential to descale the machine when the service indicator light illuminates continuously.
Only use the Saeco descaling solution to descale the machine.
The Saeco descaling solution is designed to ensure optimal performance of the machine. You can buy the Saeco descaling solution (CA6700) online at
www.philips.com
Note: The use of other descaling products may cause damage to the machine and leave residues in the water.
Never drink the water with descaling mixture that you pour into the water tank or any water with residues that comes out of the machine during the descaling procedure.
Descaling procedure
The descaling procedure lasts approximately 30 minutes and consists of a descaling and a rinsing cycle.
Note: Do not interrupt the descaling or rinsing cycle and do not switch off the machine. During the descaling cycle, the descaling solution will be dispensed from the coffee and milk dispensing spouts in intervals. During the rinsing cycle with fresh water, the water comes out of the coffee dispensing spout continuously.
1 Switch off the machine.
2 Fill the milk carafe with fresh water up to the MIN level. Place the carafe back onto the machine.
3 Make sure that there is no capsule in the capsule compartment and that the capsule compartment opening lever is in the closed position.
4 Remove and empty the water tank, drip tray, waste water drawer and used capsule drawer.
5 Pour the entire bottle of Saeco descaling solution 250ml into the water tank.
6 Add water to the descaling solution in the water tank up to the MAX indication.
7 Place the water tank back onto the machine.
8 Remove the metal cup tray from the drip tray and push the drip tray all the way into the machine.
9 Pull the dispensing spout upwards.
10 Place a bowl with a minimum capacity of 1 litre under the coffee dispensing spout.
11 Press the on/off button (green) and the café latte button (white) simultaneously for 3 seconds until the orange service indicator light and the white espresso button light lights up continuously.

natural_image
Line drawing of a kitchen appliance with a bowl and side shelf (no text or symbols)
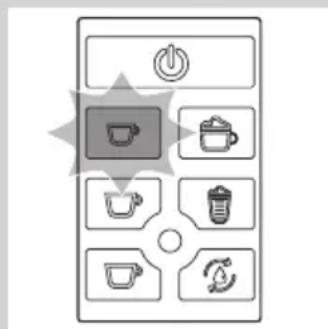
12 Press the white espresso button to start the descaling cycle.
The machine dispenses the entire descaling solution at regular intervals through the coffee and milk dispensing spouts. The espresso button flashes white during the entire descaling cycle.

13 The orange service indicator light flashes and the white café latte button lights up continuously when all the descaling solution has been dispensed at the end of the descaling cycle.
14 Empty the bowl and drip tray and place the bowl and drip tray back.
15 Remove the water tank and rinse it under the tap, then fill it up to the MAX level with fresh water. Place the water tank back onto the machine.
16 Press the café latte button to start the rinsing cycle.
The machine dispenses all the water from the water tank at regular intervals through the coffee dispensing spout. The café latte button flashes white during the entire descaling cycle.
17 When the rinsing cycle has finished, all lights flash 5 times and the machine switches off.
18 Remove and empty the bowl and drip tray.
19 Place the metal cup tray back and slide the drip tray back into the machine.
20 Rinse the milk carafe and water tank under the tap. Fill the water tank up to the MAX level and place it back onto the machine.
Note: If after the rinsing cycle the orange service indicator light continues to flash and the yellow lungo button lights up continuously, repeat steps 15-20 once more and make sure the water tank is filled up to the MAX indication.
Note: If you switch off the machine during the descaling or rinsing cycle by unplugging the mains cord, you need to finish the descaling procedure before you can brew coffee. Plug the mains cord back in. Press the on/off button (green) to switch on the machine. If the espresso button lights up white continuously, continue the descaling cycle by pressing the white espresso button and follow steps 12-20. When the white café latte button lights up continuously, continue the rinsing cycle by pressing the white café latte button and follow steps 15-20.
The machine is now ready for use.
Meaning of light signals

- The on/off button flashes slowly. The machine is warming up.
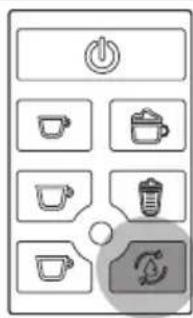
- The rinse milk circuit button light lights up continuously. You have to perform a milk carafe rinsing cycle. Follow the instructions in chapter 'Using the machine', section 'Rinsing the milk circuit'.

- The service indicator light lights up continuously. You have to descale the machine. Follow the instructions in chapter 'Descaling the machine'.

- The service indicator light flashes slowly. Fill the water tank with fresh water up to the MAX indication, make sure there is no capsule in the machine. Press the desired coffee button. The internal circuit is now filled with water and the service indicator light goes out.
- All lights flash simultaneously. Contact our Consumer Care Centre on 1300 363 391 in Australia or 0800 658 224 in New Zealand.
Accessories
To purchase accessories for this machine please visit www.philips.com. If your having difficulties to obtain accessories for your machine, please contact our Consumer Care Centre on 1300 363 391 in Australia or 0800 658 224 in New Zealand.
Environment
Do not throw away the product with the normal household waste at the end of its life, but hand it in at an official collection point for recycling. By doing this, you help to preserve the environment.
Troubleshooting
This chapter summarises the most common problems you could encounter with the appliance. If you are unable to solve the problem with the information below, visit www.philips.com/support or contact our Consumer Care Centre on 1300 363 391 in Australia or 0800 658 224 in New Zealand.
Problem Possible cause Solution
| The machine does not switch on. | The machine is not connected to the mains. | Put the mains plug in an earthed wall socket. |
| Contact the Consumer Care Centre. | ||
| The machine needs a long time to warm up. | The machine is clogged with scale. | Descale the machine (see chapter ‘Descaling the machine’) |
| The pump makes a lot of noise. | There is not enough water in the water tank. | Fill the water tank with fresh tap water up to the MAX indication. |
| Water tank is not placed correctly. | Place the water tank correctly and push it downwards. | |
| I cannot close the capsule compartment lever completely. | The used capsule drawer is full. | Empty the used capsule drawer and insert the capsule again. |
| The capsule is not inserted correctly. | Insert the capsule again and check if it is inserted correctly. | |
| The capsule is stuck. Open and close the lever a few times with moderate force to remove the capsule. | ||
| The lever does not open completely. | The used capsule drawer is full. | Empty the used capsule drawer. |
| The machine does not dispense coffee or only dispenses drops of coffee. | There is not enough water in the water tank. | Fill the water tank with fresh tap water up to the MAX indication. Press the button of selected coffee variety again to continue brewing. When the cup is full, press the same button again to stop the brewing process. |
| Scale has built up inside the machine. | Descale the machine (see chapter ‘Descaling the machine’). | |
Problem Possible cause Solution
| The machine suddenly stops brewing coffee. | There is not enough water in the water tank. | Fill the water tank with fresh tap water up to the MAX indication. |
| Coffee grounds end up in the cup of coffee. | A small amount of ground coffee will always end up on the bottom of the cup. | This is normal. |
| The milk is not frothed properly. | You are using a type of milk that is not suitable for frothing. | Use fresh milk with at least 1.5% fat. |
| The milk is too hot. Use milk at fridge temperature. | ||
| The milk carafe is dirty or has not been placed correctly. | Clean the carafe and place it correctly. | |
| The machine does not dispense milk. | The components of the carafe are not assembled correctly. | Assemble the components of the milk carafe correctly. |
| Why do I find water in the waste water drawer? | The used capsule drawer and waste water drawer catch the residual water released after brewing coffee. | This is normal. |
| Brewing takes more time than before. | Descale the machine (see chapter ‘Descaling the machine’). | |
| After the rinsing cycle the orange service indicator light continues to flash and the white café latte button lights up continuously. | The internal circuit has not been rinsed sufficiently. | Repeat steps 15-20 in chapter ‘Descaling the machine’, section ‘Descaling procedure’ once more. Make sure the water tank is filled up to the MAX indication. |
Warranty
IMPORTANT:
Please keep this warranty card together with your proof of purchase for use when claiming.
AUSTRALIA
Philips Consumer Lifestyle
Consumer Care: 1300 363 391
Website: www.philips.com/support
NEW ZEALAND
Philips Consumer Lifestyle
Consumer Care: 0800 658 224
Website: www.philips.com/support
In this warranty:
We or us means Philips Electronics Australia Limited ACN 008 445 743 or Philips New Zealand Limited (Company Number 1723), and our contact details are set out at the end of this warranty;
You means the purchaser or the original end-user of the Goods;
Supplier means the authorised distributor or retailer of the Goods that sold you the Goods in Australia or New Zealand; and
Goods means the product or equipment which was accompanied by this warranty and purchased in Australia or New Zealand.
If you require assistance with the operation of the product, its features or specifications please call the Philips Consumer Care Centre on 1300 363 391 in Australia or 0800 658 224 in New Zealand.
Australia: Our Goods come with guarantees that cannot be excluded under the Australian Consumer Law. You are entitled to a replacement or refund for a major failure and for compensation for any other reasonably foreseeable loss or damage. You are also entitled to have the Goods repaired or replaced if the goods fail to be of acceptable quality and the failure does not amount to a major failure. This is not a complete statement of your legal rights as a consumer.
New Zealand: Our Goods come with guarantees that cannot be excluded under the Consumer Guarantees Act 1993.
This guarantee applies in addition to the conditions and guarantees implied by that legislation.
Additional Warranty:
In addition to the rights and remedies that you have under the Australian Consumer Law, Consumer Guarantees Act of New Zealand or any other applicable law, we provide the following warranty against defects:
-
If, during the first 2 years from their date of purchase from the Supplier (Warranty Period), the Goods prove defective by reason of improper workmanship or materials and none of your statutory rights or remedies apply, we will repair or replace the Goods without charge.
-
We do not have to repair or replace the Goods under this Additional Warranty if the Goods have been used for a commercial purpose; misused, improperly or inappropriately installed, operated or repaired; abused; damaged; or not maintained in accordance with the manufacturer's instructions.
-
Even when we do not have to repair or replace the Goods, we may decide to do so anyway. In some cases, we may decide to substitute the Goods with a similar alternative product of our choosing. All such decisions are at our absolute discretion.
-
All such repaired, replaced or substituted Goods continue to receive the benefit of this Additional Warranty for the time remaining on the original Warranty Period.
-
This Additional Warranty is limited to repair, replacement or substitution only. As far as the law permits, we will not be liable for any loss or damage caused to property or persons arising from any cause whatsoever.
-
In order to claim under this Additional Warranty you must telephone us on 1300 363 391 in Australia or 0800 658 224 in New Zealand within the Warranty Period. You will be asked for details of the Goods, a description of the defect and your personal details. Upon accepting your claim, we shall assist you with either returning the Goods to the Supplier for replacement or to the most convenient Philips Authorised Service Centre for your Goods to be repaired. In some case we may require that you return to the Goods to us (at the address below) for repair, replacement or substitution.
* All returned Goods must be accompanied by satisfactory proof of purchase which clearly indicates the name and address of the Supplier, the date and place of purchase and identifies product. It is best to provide a legible and unmodified receipt or sales invoice.
* You must bear any expense for return of the Goods or otherwise associated with making your claim under this Additional Warranty.
- This warranty is only valid and enforceable in Australia and New Zealand.
Contact us or the place of purchase for further details.
Philips Electronics Australia Limited Philips New Zealand Limited Level 1, 65 Epping Rd, Level 2, 1 Nugent St, North Ryde, SYDNEY NSW 2113 Grafton, AUCKLAND, 1023 Consumer Care: 1300 363 391 Consumer Care: 0800 658 224 E-mail: pceinfo.australia@philips.com Email: pceinfo.australia@philips.com Website: www.philips.com/support Website: www.philips.com/support


- BRAVISTA
- Latte +
- Table of contents
- Introduction
- General description (Fig. 1)
- Important
- Danger
- Warning
- Caution
- Electromagnetic fields (EMF)
- Before first use
- Installing the machine
- Preparing for use
- Filling the water tank
- Using the machine for the first time
- Using the machine
- Adjusting the drip tray and dispensing spout positions
- Capsules
- Brewing coffee
- Adjusting the coffee quantity
- Resetting the coffee quantities
- Milk carafe
- Filling the milk carafe
- Inserting and removing the milk carafe
- Café latte, frothed milk, latte macchiato
- Café latte
- When the machine has finished brewing the café latte, the orange rinse milk circuit button lights up to indicate that the milk circuit must be rinsed. See section 'Rinsing the milk circuit'.
- Adjusting the amount of café latte
- Frothed milk
- Adjusting the amount of frothed milk
- Latte macchiato
- Rinsing the milk circuit
- Cleaning and maintenance
- Drip tray and used capsule drawer
- Daily cleaning of the water tank
- Weekly cleaning of the coffee circuit (priming)
- Weekly cleaning of the milk carafe
- ENGLISH22
- Assembly procedure of the milk carafe
- Descaling the machine
- www.philips.com
- Descaling procedure
- Meaning of light signals
- Accessories
- Environment
- Troubleshooting
- Warranty
- IMPORTANT:
- AUSTRALIA
- NEW ZEALAND
- Additional Warranty:
Brand : Caffitaly
Model : HD8603
Category : Coffee maker