
FS 4316-90 N - Freezer GRAM - Free user manual and instructions
Find the device manual for free FS 4316-90 N GRAM in PDF.

| Product Type | Freezer |
| Brand | Gram |
| Model | FS 4316-90 N |
| Energy Efficiency Class | A (estimated) |
| Annual Energy Consumption | Approximately 200-250 kWh (estimated) |
| Total Net Capacity | Approximately 230-250 L (estimated) |
| Freezing Capacity | Up to 10-15 kg per 24 hours (estimated) |
| Noise Level | Approximately 40-45 dB (estimated) |
| Climate Class | SN-T (subnormal to tropical) (estimated) |
| Dimensions (H x W x D) | Approximately 185 x 60 x 65 cm (estimated) |
| Weight | Approximately 60-70 kg (estimated) |
| Power Supply | 220-240 V, 50 Hz |
| Refrigerant | R600a (flammable) |
| Temperature Control | Adjustable thermostat with 4 settings and MAX |
| Fast Freeze Function | Yes (MAX setting) |
| Automatic Defrost | Full automatic defrost |
| Door Reversibility | Yes (user reversible) |
| Adjustable Legs | Yes (front legs) |
| Ice Pack Included | Yes |
| Interior Light | Not specified (likely LED) |
| Maintenance | Clean with lukewarm water and bicarbonate of soda; unplug before cleaning |
| Safety Features | Child safety (supervision advised); anti-tip stability by adjusting legs |
| Spare Parts Availability | Contact Gram service for replacements |
| Warranty | Standard manufacturer warranty; consult Gram service |
Frequently Asked Questions - FS 4316-90 N GRAM
User questions about FS 4316-90 N GRAM
0 question about this device. Answer the ones you know or ask your own.
Ask a new question about this device
Download the instructions for your Freezer in PDF format for free! Find your manual FS 4316-90 N - GRAM and take your electronic device back in hand. On this page are published all the documents necessary for the use of your device. FS 4316-90 N by GRAM.
USER MANUAL FS 4316-90 N GRAM
natural_image
Diagram showing a device with a lightning bolt and cable, no text or symbols presentnatural_image
Diagram showing a rectangular structure with upward and downward arrows indicating rotational or directional movement, no text or symbols present.Alarm for åben dør
natural_image
Diagram showing a device with a lightning bolt and cable, no text or symbols presentnatural_image
Diagram showing a rectangular structure with upward and downward arrows indicating rotational or directional motion, no text or symbols present.natural_image
Diagram showing a device with a lightning bolt and cable, no text or symbols presentnatural_image
Diagram showing a rectangular structure with upward and downward arrows, surrounded by curved arrows indicating motion or force directions (no text or symbols)Byte av dörran
flowchart
graph TD
    A["Opening Door"] --> B["Clamping Clip"]
    B --> C["Sliding Pin"]
    C --> D["Opening Door with Clamping Clip"]
    D --> E["Slending Bag"]
    E --> F["Opening Door with Clamping Clip"]
    F --> G["Slending Ring"]
    G --> H["Opening Door with Clamping Clip"]
    H --> I["Slending Ring with Clamping Clip"]
    I --> J["Opening Door with Clamping Clip"]
    J --> K["Slending Ring with Clamping Clip"]
    K --> L["Opening Door with Clamping Clip"]
    L --> M["Slending Ring with Clamping Clip"]
    M --> N["Opening Door with Clamping Clip"]
    N --> O["Slending Ring with Clamping Clip"]
    O --> P["Opening Door with Clamping Clip"]
    P --> Q["Slending Ring with Clamping Clip"]
    Q --> R["Opening Door with Clamping Clip"]
    R --> S["Slending Ring with Clamping Clip"]
    S --> T["Opening Door with Clamping Clip"]
    T --> U["Slending Ring with Clamping Clip"]
    U --> V["Opening Door with Clamping Clip"]
    V --> W["Slending Ring with Clamping Clip"]
    W --> X["Opening Door with Clamping Clip"]
    X --> Y["Slending Ring with Clamping Clip"]
4 Förberedelse
natural_image
Diagram showing a device with a lightning bolt and cable, no text or symbols presentnatural_image
Diagram showing directional arrows and curved arrows around a rectangular structure (no text or symbols)Your product has been produced in modern plants and checked under the most meticulous quality control and we hope that your product, will provide you with an effective service.
We recommend you to carefully read the entire user guide before using your product and to keep the user guide at hand for future references.
This user guide
- Will help you to use your appliance in a fast and safe way.
- Read the user guide before installing and operating your product.
- Follow the instructions, especially those for safety.
- Keep the user guide in an easily accessible place as you may need it later.
- Besides, read also the other documents provided with your product.
Please note that this user guide may be valid for other models as well.
Symbols and their descriptions
This user guide contains the following symbols:
i Important information or useful tips.
⚠ Warning against dangerous conditions for life and property.
⚠ Warning against electric voltage.
1 Your freezer 4
2 Important Safety Warnings 5
Intended use ....5
General safety 5
Compliance with WEEE Directive and
Disposing of the Waste Product: .....8
Compliance with RoHS Directive: .....9
Package information 9
HC Warning 9
Energy-saving precautions .....9
3 Installation 10
Points to be considered when re-transporting your freezer ....10
Before operating your freezer .....10
Before starting to use your freezer check the following: 10
Disposing of the packaging .....11
Disposing of your old freezer .....11
Dispose of your old freezer without harming the environment. .....11
Placing and Installation .....11
Adjusting the legs 12
Ice Pack 12
Icematic and ice storage container ..12
Changing the door opening direction 13
4 Preparation 14
5 Using your freezer 15
Setting the operating temperature ...15
Fast freeze 16
6 Maintenance and cleaning 17
Protection of plastic surfaces .....17
7 Recommended solutions for the problems 18
1 Your freezer
- Control Panel
- MegaBox (Fast-Freeze compartment)
- Drawers
- Adjustable front legs
2 Important Safety Warnings
Please read through the following information. If this information is not followed, personal injury or material damage may occur and all warranty and reliability commitments will become invalid.
Intended use
- This product is designed for domestic use.
- It should not be used outdoors. It is not appropriate to use it outdoor even if the place is covered with a roof.
General safety
- When you want to dispose of the product, we recommend you to consult the authorized service in order to get information on disposal and available facilities.
- Consult GRAM service for all your questions and problems related to the refrigerator.
- Vapor and vaporized cleaning materials should never be used in connection with the cleaning and defrosting of your refrigerator. In such cases, the vapor might get in contact with the electrical parts and cause short circuit or electric shock.
- Never use the equipment from your refrigerator such as the door as a support or a step.
- Do not use electrical devices inside the freezer.
- Do not damage the cooling circuit, where the refrigerant is circulating, with drilling or cutting tools. The refrigerant that might blow out when the gas channels of the evaporator, pipe extensions or surface coatings are punctured may cause skin irritations and eye injuries.
- Do not cover or block the ventilation holes on your refrigerator with any material.
- Repairs of the electrical appliances must only be made by qualified people. Repairs performed by unqualified people may cause a risk for the user.
- In case of any failure, maintenance or repair, disconnect your refrigerator's mains supply by either turning off the relevant fuse or by unplugging your appliance.
- Do not pull the cable when pulling out the plug.
- Flammable items or products that contain flammable gases (e.g. spray) as well as explosive materials must never be kept in the appliance.
-
Do not use mechanical devices or other means to accelerate the defrosting proces, other than the ones recommended by the manufacturer.
-
Do not operate a damaged freezer. Consult GRAM service if you have any doubts.
- Electrical safety of your will only be covered by the guarantee be covered by the guarantee if the earth system in your house complies with standards.
- Exposing the product to rain, snow, sun and wind is dangerous with respect to electrical safety.
- Contact the GRAM service when there is a power cable damage and etc. so that it will not create a danger for you.
- Never plug the freezer into the outlet during installation or a, risk of death or serious injury may occur.
- This freezer is only only designed for storing food. It should not be used for any other purposes.
- The label that describes the technical specification of the product is located
on the inner left side of the freezer.
- Do not connect the freezer to electronic energy saving systems which turn off the electricity as they may damage the product.
- If the power supply is disconnected in manually controlled freezers please wait for at least 5 minutes before reconnecting the power.
- This user guide should be passed to the next owner of the freezer if the ownership changes.
- When moving the freezer make sure that you do not damage the power cord. In order to prevent fire the power cord must not be twisted. Heavy objects should not be placed on the power cord. When the freezer is plugged into the socket do not touch the power outlet with wet hands.
natural_image
Diagram showing a device with a lightning bolt and cable, no text or symbols present- Do not connect the freezers if the electric outlet is loose.
- Do not splash water directly on the outer or inner parts of the freezer due to safety.
- Do not spray inflammable materials such as propane gas etc near the freezer due to the risk of fire and explosion.
- Do not place objects filled with water on top of the freezer as it may result in electric shock or fire.
- Do not overload the freezer with excess food. The excess food may fall out when the door is opened resulting in injuring you or damaging the freezer. Do not place objects on top of the refrigerator as the objects may fall out when
opening or closing the freezer door.
- If the freezer will not be operated for an extended period of time it should be unplugged. A problem in the electrical cable insulation may result in fire.
- The tip of the electric plug should be cleaned regularly otherwise it may cause fire.
- The freezer may move when the adjustable feet are not positioned firmly on the floor. By using the adjustable feet you can ensure that the freezer is positioned firmly on the floor.
- Do not pull the freezer by the door handle when moving the product as it may disconnect the handle from the refrigerator.
- If you want to place two products side by side, we recommend you to buy a decoration kit, which includes a mat to be placed on the
side of the product. A decoration part is placed between the products to hide the gap between the products.
Child safety
- Children should be supervised to ensure that they do not play with the appliance
Compliance with WEEE Directive and Disposing of the Waste Product:
This product complies with EU WEEE
Directive (2012/19/EU). This product bears a
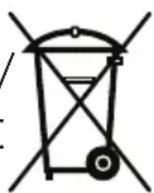
classification symbol for waste electrical and electronic equipment (WEEE).This product has been manufactured with high quality parts and materials which can be reused and are suitable for recycling. Do not dispose of the waste product with normal domestic and other wastes at the end of its service life. Take it to the
collection center for the recycling of electrical and electronic equipment. Please consult your local authorities to learn about these collection centers.
Compliance with RoHS Directive:
The product you have purchased complies with EU RoHS Directive (2011/65/EU). It does not contain harmful and prohibited materials specified in the Directive.
Package information
Packaging materials of the product are manufactured from recyclable materials in accordance with our National Environment Regulations. Do not dispose of the packaging materials together with the domestic or other wastes. Take them to the packaging material collection points designated by the local authorities.
HC Warning
- This product is equipped with a cooling system that contains R600a:
This gas is flammable. Therefore, pay attention not to damage the cooling system and piping during usage and transportation. In the event of damage, keep your product away from potential fire sources that can cause the product to catch a fire and ventilate the room in which the unit is placed.
Energy-saving precautions
- Do not leave the door of your freezer open for a long time.
- Do not overload your freezer so that the air circulation inside of it is not prevented.
- Do not install your freezer under direct sunlight or near heat emitting appliances such as ovens, dishwashers or radiators.
- Pay attention to keep your food in closed containers.
3 Installation
⚠️ Please remember that the manufacturer shall not be held liable if the information given in the user guide is not observed.
Points to be considered when re-transporting your freezer
- Your freezer must be emptied and cleaned prior to any transportation.
- Shelves, accessories, etc. have to be fastened securely by adhesive tape against any jolt before packaging the freezer.
- The packaging must be tied with thick tapes and strong ropes and the rules of transportation printed on the package must be followed.
Please do not forget...
That recycled material is an indispensable source for the nature and for our national resources. If you would like to contribute to the recycling of the packaging materials, you can get further information from the environmental bodies or local authorities.
Before operating your freezer
Before starting to use your freezer check the following:
-
The interior of the freezer has to be dry and it is possible for the air to circulate freely at the back of the appliance.
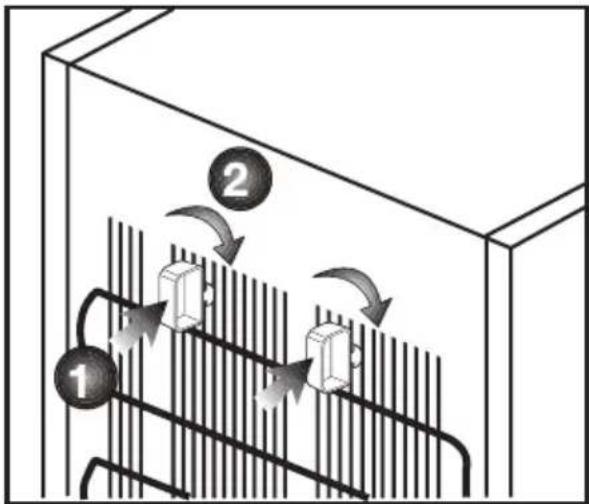
-
You can install the 2 spacers as illustrated in the figure. The spacers will provide the required distance between your freezer and the wall in order to allow the air to circulate. (The illustrated figure is only an example and does not match exactly with your product.)
- Clean the interior of the freezer as recommended in the "Maintenance and cleaning" section.
- Plug the freezer into the outlet.
- You will hear a noise as the compressor starts up. The liquid and gases sealed within the refrigeration system may also give rise to noise, even if the compressor is not running and this is quite normal.
- The front edges of the freezer may feel warm. This is normal. These areas are designed to be warm to avoid condensation.
Electric connection
Connect your product to a grounded socket which is being protected by a fuse with the appropriate capacity. Important:
- The connection must be in accordance with the national regulations.
- The power cable plug must be easily accessible after installation.
- Extension cords and sockets with several plugs must not be used for connection.
A damaged power cable must be replaced by an authorised electrician.
Disposing of the packaging
The packaging may be dangerous for children. Keep it out of the reach of children or dispose of it by classifying it in accordance with the waste instructions. Do not dispose of it together with the normal household waste.
The packaging from your freezer is made from recyclable materials.
Disposing of your old freezer
Dispose of your old freezer without harming the environment.
- You may consult your authorised retailer or the recycling depot in your municipality about the disposal of your freezer.
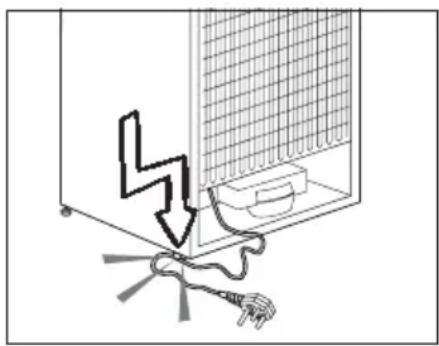
Before disposing of your freezer, cut out the electric plug and, if there are any locks on the door, make them inoperable in order to protect children from any danger.
Placing and Installation
- There must be appropriate air ventilation around your freezer in order to achieve an efficient operation.
- Place your freezer on a level floor to prevent jolts.
- Do not keep your freezer in ambient temperatures under 10^ C.
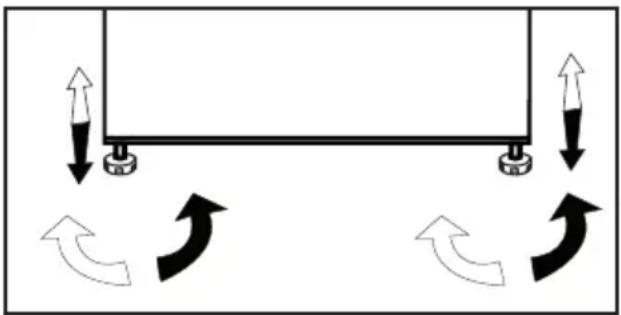
Adjusting the legs
If your freezer is unbalanced you can balance the freezer by turning the front legs as shown in the illustration below. The corner where the leg is placed is lowered when you turn the leg in the direction of the black arrow and raised when you turn the leg in the opposite direction. Getting help from someone to slightly lift the freezer will facilitate this process.
natural_image
Diagram showing a rectangular structure with upward and downward arrows indicating rotational or directional motion, no text or symbols present.Ice Pack
Ice substitute pack decelerates thawing of stored frozen food in case of blackout or malfunction. Placing the pack directly on top of the food will enable the longest storing period.
Ice substitute pack can also be used to keep food temporarily cold, e.g. in a cooler bag.
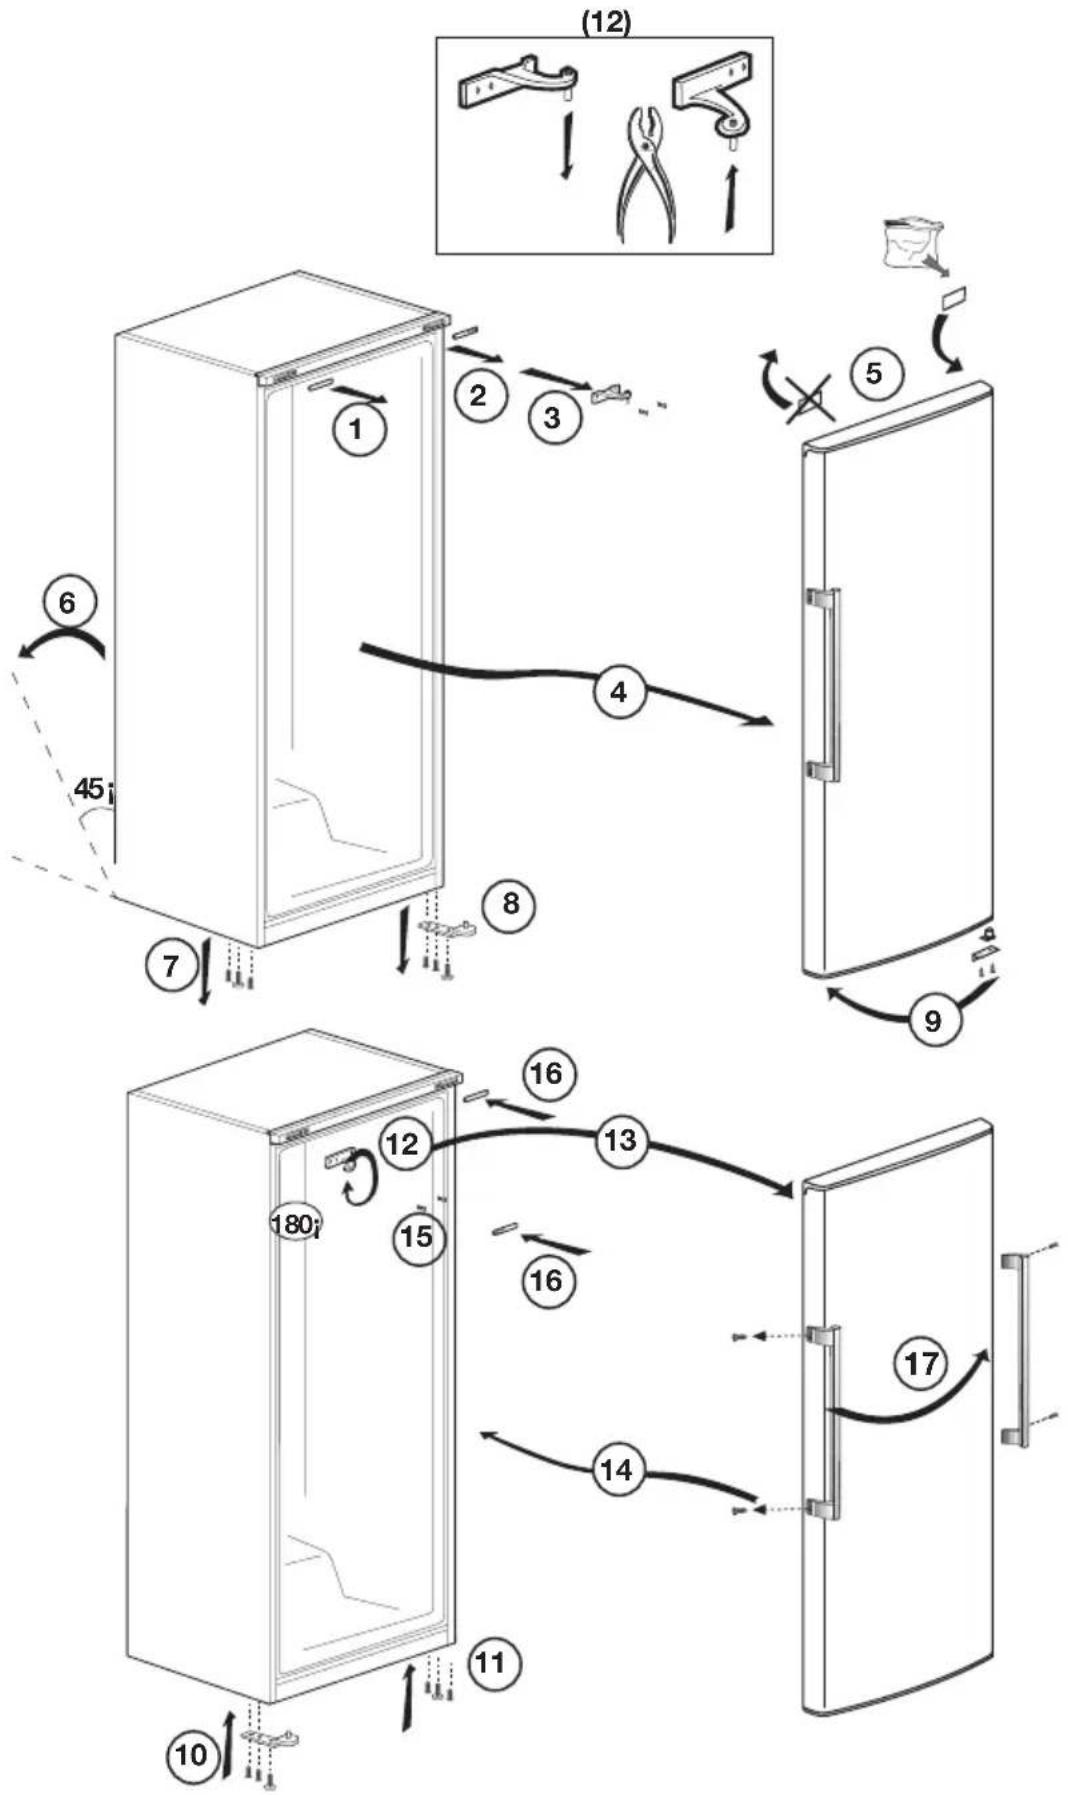
Changing the door opening direction
Proceed in numerical order.
flowchart
graph TD
    A["Opening Door"] --> B["Clamping"]
    B --> C["Sliding"]
    C --> D["Opening Back"]
    D --> E["Clamping"]
    E --> F["Sliding"]
    F --> G["Opening Back"]
    style A fill:#f9f,stroke:#333
    style D fill:#f9f,stroke:#333
    style E fill:#f9f,stroke:#333
    style G fill:#f9f,stroke:#333
4 Preparation
- Your refrigerator should be installed at least 30 cm away from heat sources such as hobs, ovens, central heater and stoves and at least 5 cm away from electrical ovens and should not be located under direct sunlight.
- The ambient temperature of the room where you install your refrigerator should at least be 10^ C. Operating your refrigerator under cooler conditions than this is not recommended with regard to its efficiency.
- Please make sure that the interior of your refrigerator is cleaned thoroughly.
- If you want to place two products side by side, we recommend you to buy a decoration kit which includes a mat to be placed on the side of the product. A decoration part is placed between the products to hide the gap between the products.
- When you operate your refrigerator for the first time, please observe the following instructions during the initial six hour.
- The door should not be opened frequently.
- It must be operated empty without any food in it.
- Do not unplug your refrigerator. If a power failure occurs out of your control, please see the warnings in the “Recommended solutions for the problems” section.
- Original packaging and foam materials should be kept for future transportations or moving.
- This appliance is designed to operate at temperatures specified in the table below is equipped with Advanced Electronic Temperature Control System [AETCS] which ensures that at the advised setting [4 - four on the knob] the frozen food in the freezer will not defrost even if the ambient temperature falls as low as -15 °C. When first installed the product MUST NOT be placed in low ambient temperatures because the freezer will not reduce to it's standard operating temperature. Once it has reached its steady operating state it can be re-located. So you may then install your appliance in a garage or an unheated room without having to worry about frozen food in the freezer being spoilt. However at low ambient temperatures mentioned above, fridge contents are likely to freeze, so check and consume food in the fridge accordingly. When the ambient temperature returns to normal, you may change the knob setting to suit your needs.
- If the ambient temperature is below 0°C, the food in the fridge compartment will freeze. So, we recommend you don't use the fridge compartment in such low ambient conditions. You can continue using the freezer compartment as usual.
5 Using your freezer
Setting the operating temperature


The operating temperature is regulated by the temperature control.
1 = Lowest cooling setting
(Warmest setting)
MAX. = Highest cooling setting
(Coldest setting))
Please choose the setting which is consistent with the desired temperature.
The interior temperature also depends on ambient temperature, the frequency with which the door is opened and the amount of foods kept inside.
Frequently opening the door causes the interior temperature to rise.
For this reason, it is recommended to close the door as soon as possible after use.
The normal storage temperature of your appliance should be -18 °C (0 °F). Lower temperatures can be obtained by adjusting the thermostat control towards the position MAX.
We recommend checking the temperature with a thermometer to ensure that the storage compartments are kept to the desired temperature. Remember to read off the thermometer immediately as the temperature on the thermometer will rise very rapidly after you remove it from the freezer.
⚠ Attention
Do not exceed the freezing capacity of your appliance in 24 hours. See the rating label.
In order to maintain the quality of the food, the freezing must take effect as quickly as possible. In this way, the freezing capacity will not be exceeded, and the temperature inside the freezer will not rise.
Attention
Always keep the already deep-frozen food separated from freshly placed food.
If you find the freezer door difficult to open just after you have closed it, don't worry. This is due to the pressure difference which will equalize and allow the door to open normally after a few minutes.
You will hear a vacuum sound just after closing the door. This is quite normal.
Fast freeze
If large amounts of fresh food are going to be frozen, adjust the thermostat control to the MAX. position. 24 hours before putting the fresh food in the fast freeze compartment.
It is strongly recommended to keep the thermostat control at the MAX. position for at least 24 hours to freeze the maximum amount of fresh food stated as the freezing capacity. Take special care not to mix frozen and fresh food.
Defrosting the appliance
The appliance defrosts automatically.
6 Maintenance and cleaning
⚠️ Never use gasoline, benzene or similar substances for cleaning purposes.
⚠️ We recommend that you unplug the freezer before cleaning.
- Never use any sharp abrasive instrument, soap, household cleaner, detergent and wax polish for cleaning.
- Use lukewarm water to clean the cabinet of your freezer and wipe it dry.
- Use a damp cloth wrung out in a solution of one teaspoon of bicarbonate of soda to one pint of water to clean the interior and wipe it dry.
- If your freezer is not going to be used for a long period of time, unplug the power cable, remove all food, clean it and leave the door ajar.
- Check door seals regularly to ensure they are clean and free from food particles.
⚠️ To remove door racks, remove all the contents and then simply push the door rack upwards from the base.
⚠️Never use cleaning agents or water that contain chlorine to clean the outer surfaces and chromium coated parts of the product. Chlorine causes corrosion on such metal surfaces.
Protection of plastic surfaces
- Do not put liquid oils or oil-cooked meals in your freezer in unsealed containers as they may damage the plastic surfaces of your freezer. In case of spilling or smearing oil on the plastic surfaces, clean and rinse the relevant part of the surface at once with warm water.
7 Recommended solutions for the problems
Please review this list before calling the GRAM service. It might save you time and money. This list includes frequent complaints that have not occurred from defective workmanship or material usage. Some of the features described here may not exist in your product.
The freezer does not operate.
- Is the freezer properly plugged in? Insert the plug to the wall socket.
- Is the fuse of the socket or the main fuse blown out? Check the fuse.
Condensation on the side wall of the freezer compartment
- Very cold ambient conditions. Frequently opening and closing the door. Highly humid ambient conditions. Leaving the door ajar. Switching the thermostat control to a colder degree.
- Decreasing the time the door is left open or using it less frequently.
- Wipe the condensation using a dry cloth and check if it persists.
The compressor is not running
- In case of an electrical cut the freezer cannot start up right away as the compressor has to balance the refrigerant pressure in the cooling system of the freezer. The alignment of the refrigerant pressure will lead to a postponement of the start by 6 minutes. Please contact GRAM service if the refrigerator does not start up at the end of this period.
- The freezer is in the defrost cycle. This is normal for a full-automatically defrosting freezer. The defrostning cycle occurs periodically.
- Your freezer is not plugged into the socket. Make sure that the plug fits properly into the socket.
- Are the temperature adjustments made in the correct way?
• The power might be cut off.
The freezer is running frequently or for a long time.
- Your new product may be wider than the previous appliance. This is quite normal. Large freezer operate for a longer period of time.
- The ambient room temperature may be high. This is quite normal.
- The freezer might have been plugged in recently or might have been loaded with food. Cooling down of the freezer completely may last for a couple of hours longer.
- Large amounts of hot food might have been put in the freezer recently. Hot food causes longer running of the freezer until it reaches the safe storage temperature.
- The door might have been opened frequently or left ajar for a long time. The warm air that has entered into the freezer causes the freezer to run for longer periods of time. Open the door less frequently.
- The freezer is adjusted to a very low temperature. Adjust the freezer temperature to a warmer degree and wait until the temperature is reached.
- The door seal of the freezer may be soiled, worn out, broken or not placed properly. Clean or replace the seal. Damaged/broken seal causes the freezer to run for a longer period of time in order to maintain the current temperature.
The temperature in the freezer is very high.
- The freezer temperature might have been adjusted to a very high degree. Change the temperature of the freezer until the freezer temperature reaches a sufficient level.
- The door might have been opened frequently or left ajar for a long time; open it less frequently.
- The door might have been left ajar; close the door completely.
- A large amount of hot food might have been put in the freezer recently. Wait until the freezer reaches the desired temperature.
- The freezer might have been plugged in recently. Cooling down of the freezer completely takes time.
| The operation noise increases when the freezer is running. |
| · The operating performance of the freezer may change due to the changes in the ambient temperature. It is normal and not a fault. |
| Vibrations or noise. |
| · The floor is not level or it is weak. The freezer rocks when moved slowly. Make sure that the floor is strong enough to carry the freezer, and that the floor is level.· The noise may be caused by the items placed on the freezer. Items on top of the freezer should be removed. |
| There are noises coming from the freezer like liquid spilling or spraying. |
| · Liquid and gas flows happen in accordance with the operating principles of your freezer. It is normal and not a fault. |
| There is a noise like wind blowing. |
| · Fans are used in order to cool the freezer. It is normal and not a fault. |
| Condensation on the inner walls of the freezer. |
| · Hot and humid weather increases icing and condensation. It is normal and not a fault.· The door might have been left ajar; make sure that the door is closed fully.· The door might have been opened frequently or left ajar for a long time; open them less frequently. |
| Humidity occurs on the outside of the freezer. |
| · There might be humidity in the air; this is quite normal in humid weather. When the humidity is less, condensation will disappear. |
| The door is not closing. |
| · Food packaging may prevent the door from closing. Replace the packaging that are obstructing the door.· The freezer is not completely upright on the floor and rocking when slightly moved. Adjust the legs.· The floor is not level or strong. Make sure that the floor is level and capable of carrying the freezer. |
natural_image
Diagram showing a device with a lightning bolt and cable, no text or symbols presentnatural_image
Pure electrical circuit lines without any symbolsnatural_image
Diagram showing a rectangular structure with upward and downward arrows indicating rotational or directional motion, no text or symbols present.flowchart
graph TD
    A["Step 1: Lifting to refrigerator"] --> B["Step 2: Clamping with clips"]
    B --> C["Step 3: Clamping with clips"]
    C --> D["Step 4: Clamping with clips"]
    D --> E["Step 5: Clamping with clips"]
    E --> F["Step 6: Clamping with clips"]
    F --> G["Step 7: Clamping with clips"]
    G --> H["Step 8: Clamping with clips"]
    H --> I["Step 9: Clamping with clips"]
    I --> J["Step 10: Clamping with clips"]
    J --> K["Step 11: Clamping with clips"]
    K --> L["Step 12: Clamping with clips"]
    L --> M["Step 13: Clamping with clips"]
    M --> N["Step 14: Clamping with clips"]
    N --> O["Step 15: Clamping with clips"]
    O --> P["Step 16: Clamping with clips"]
    P --> Q["Step 17: Clamping with clips"]
    Q --> R["Step 18: Clamping with clips"]
    R --> S["Step 19: Clamping with clips"]
    S --> T["Step 20: Clamping with clips"]
    T --> U["Step 21: Clamping with clips"]
    U --> V["Step 22: Clamping with clips"]
    V --> W["Step 23: Clamping with clips"]
    W --> X["Step 24: Clamping with clips"]
    X --> Y["Step 25: Clamping with clips"]
    Y --> Z["Step 26: Clamping with clips"]
    Z --> AA["Step 27: Clamping with clips"]
    AA --> AB["Step 28: Clamping with clips"]
    AB --> AC["Step 29: Clamping with clips"]
    AC --> AD["Step 30: Clamping with clips"]
    AD --> AE["Step 31: Clamping with clips"]
    AE --> AF["Step 32: Clamping with clips"]
    AF --> AG["Step 33: Clamping with clips"]
    AG --> AH["Step 34: Clamping with clips"]
    AH --> AI["Step 35: Clamping with clips"]
    AI --> AJ["Step 36: Clamping with clips"]
    AJ --> AK["Step 37: Clamping with clips"]
    AK --> AL["Step 38: Clamping with clips"]
    AL --> AM["Step 39: Clamping with clips"]
    AM --> AN["Step 40: Clamping with clips"]
    AN --> AO["Step 41: Clamping with clips"]
    AO --> AP["Step 42: Clamping with clips"]
    AP --> AQ["Step 43: Clamping with clips"]
    AQ --> AR["Step 44: Clamping with clips"]
    AR --> AS["Step 45: Clamping with clips"]
    AS --> AT["Step 46: Clamping with clips"]
    AT --> AU["Step 47: Clamping with clips"]
    AU --> AV["Step 48: Clamping with clips"]
    AV --> AW["Step 49: Clamping with clips"]
    AW --> AX["Step 50: Clamping with clips"]
    AX --> AY["Step 51: Clamping with clips"]
    AY --> AZ["Step 52: Clamping with clips"]
    AZ --> BA["Step 53: Clamping with clips"]
    BA --> BB["Step 54: Clamping with clips"]
    BB --> BC["Step 55: Clamping with clips"]
    BC --> BD["Step 56: Clamping with clips"]
    BD --> BE["Step 57: Clamping with clips"]
    BE --> BF["Step 58: Clamping with clips"]
    BF --> BG["Step 59: Clamping with clips"]
    BG --> BH["Step 60: Clamping with clips"]
    BH --> BI["Step 61: Clamping with clips"]
    BI --> BJ["Step 62: Clamping with clips"]
    BJ --> BK["Step 63: Clamping with clips"]
    BK --> BL["Step 64: Clamping with clips"]
    BL --> BM["Step 65: Clamping with clips"]
    BM --> BN["Step 66: Clamping with clips"]
    BN --> BO["Step 67: Clamping with clips"]
    BO --> BP["Step 68: Clamping with clips"]
    BP --> BQ["Step 69: Clamping with clips"]
    BQ --> BR["Step 70: Clamping with clips"]
    BR --> BS["Step 71: Clamping with clips"]
    BS --> BT["Step 72: Clamping with clips"]
    BT --> BU["Step 73: Clamping with clips"]
    BU --> BV["Step 74: Clamping with clips"]
    BV --> BW["Step 75: Clamping with clips"]
    BW --> BX["Step 76: Clamping with clips"]
    BX --> BY["Step 77: Clamping with clips"]
    BY --> BZ["Step 78: Clamping with clips"]