
630 T - Digital decoder MEGASAT - Free user manual and instructions
Find the device manual for free 630 T MEGASAT in PDF.


| Product Type | Digital Decoder |
| Brand | Megasat |
| Model | 630 T |
| Dimensions (approx.) | 150 x 100 x 30 mm |
| Weight (approx.) | 200 g |
| Power Supply | 5 V DC, 1 A via external adapter |
| Tuner Type | DVB-T/T2 |
| Video Decoding | MPEG-2, MPEG-4, H.264, H.265 (HEVC) |
| Max Resolution | 1080p Full HD |
| Output Interfaces | HDMI, RCA (composite), Coaxial S/PDIF |
| USB Port | USB 2.0 for media playback and recording |
| Main Functions | Digital TV reception, Electronic Program Guide (EPG), time shifting, USB recording, media player |
| Maintenance | Wipe with a dry cloth; avoid liquids and abrasive cleaners |
| Safety | Operate in well-ventilated area; do not cover vents; use only supplied power adapter |
| Spare Parts and Repairability | Power adapter available separately; no user-serviceable parts inside |
| General Information | Compatible with DVB-T/T2 broadcast; supports multiple audio languages and subtitles |
Frequently Asked Questions - 630 T MEGASAT
User questions about 630 T MEGASAT
0 question about this device. Answer the ones you know or ask your own.
Ask a new question about this device
Download the instructions for your Digital decoder in PDF format for free! Find your manual 630 T - MEGASAT and take your electronic device back in hand. On this page are published all the documents necessary for the use of your device. 630 T by MEGASAT.
USER MANUAL 630 T MEGASAT
B
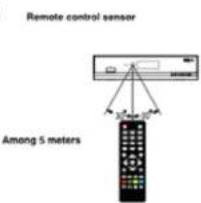
Remote control sensor
Vorbereitung
1.4 Software Upgrade
Safety Instructions 03
Precautions 04
Delivery 04
Front panel....05
Rear panel 05
Remote Control....06
Start 07-09
Batteries 07 Pavada catarial varies 07
Proposition 99
Connection antenna, VCR and TV set 03
infection of a cell, VET and TV excitation
Advanced Operation 09-13
Menu Operation....09
- Digital TV....89
- Movie 12
- Music 12
Photo 17
- Game 12
- Disk Manager....13
- Partition-Format 13
Appendix....13-16
Maintenance 13
lerminology 13
Specifications 14
Troubleshooting....15
Declaration of Conformity 16
This S18 has been designed and manufactured to satisfy the international safety standards. Please read the following safety precautions carefully before operating this receiver.
Main Supply:
Before operating, please check the units operating voltage is 100\~240V AC 50/60Hz.
Overload:
Do not overload a wall outlet, extension cord or adapter, neither use damaged power cord or touch it with wet hand as this may result in electric shock.
Liquid:
The receiver shall not be exposed to dripping or splashing water, and that no objects filled with liquids, such as base, shall be placed on the apparatus.
Ventilation:
Keep the slots on too of the receiver uncover to allow sufficient airflow to the unit. Do not put the receiver on soft furnishings or carpets. Do not expose the receiver to direct light or do not place it near a heater or in humid conditions. Do not stack other electronic equipments on top of the receiver.
Cleaning:
Plug out the receiver from the wall outlet before cleaning. Clean the receiver by a soft cloth or mild solution of washing-up liquid (no solvents).
Connection:
Disconnect the receiver from the mains when you connect it to satellite LNB or disconnect it from LNB. Failure would possibly cause damage to the LNB.
Location:
Put the receiver indoor in order to avoid lightning, raining or sunlight.
Uncover:
Do not remove the cover, to reduce the risk of electric shock. Contact qualified and licensed service personnel to repair the receiver, or contact your dealer.
Megasat Werke GmbH | Industriestraße 4a | D-97618 Niederlauer | www.megasat.tv | info@megasat.tv
Precautions Fr
This SIB has been designed and manufactured to satisfy the international safety standards. Please read the following safety precautions carefully before operating this receiver.
Main Supply:
Before operating, please check the units operating voltage is 100-240V AC 50/60Hz.
Overload:
Do not overload a wall outlet, extension cord or adapter, neither use damaged power cord or touch it with wet hand as this may result in electric shock.
Liquid:
The receiver shall no be exposed to dripping or splashing water, and that no objects filled with liquids, such as base, shall be placed on the apparatus.
Ventilation:
Keep the slots on top of the receiver uncover to allow sufficient airflow to the unit. Do not put the receiver on soft furnishings or carpets. Do not expose the receiver to direct light or do not place it near a heater or in humic conditions. Do not stack other electronic equipments on top of the receiver.
Cleaning:
Plug out the receiver from the wall outlet before cleaning. Clean the receiver by a soft cloth or mild solution of washing up liquid (no solvents).
Connection:
Disconnect the receiver from the mains when you connect it to satellite LNB or disconnect it from LNB. Failure would possibly cause damage to the LNG.
Location:
Put the receiver in case in order to avoid lightening, raining or sunlight.
Uncover:
Do not remove the cover, to reduce the risk of electric shock. Contact qualified and licensed service personnel to repair the receiver, or contact your dealer.
Delivery
Unpack the unit and check to make sure that all of the following accessories are included in the packaging.
- 1x Receiver
• 1x Female control - 1x User manual
• 7x Batteries (AAA)
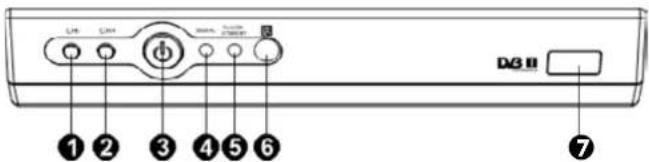
- CH-Button
- CH + Button
- Power/Standby Button
- Signal Indicator
- Power/Standby Indicator
- IR Receiver Window
- USB Port
Rear panel
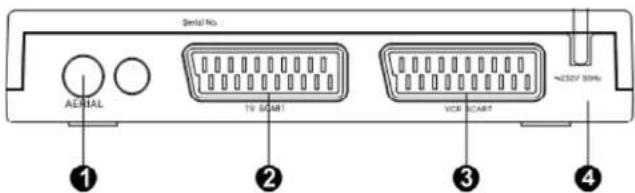
- Aerial IN
- TV SCART Socket
- VCR SCART Socket
- AC IN
Remote control
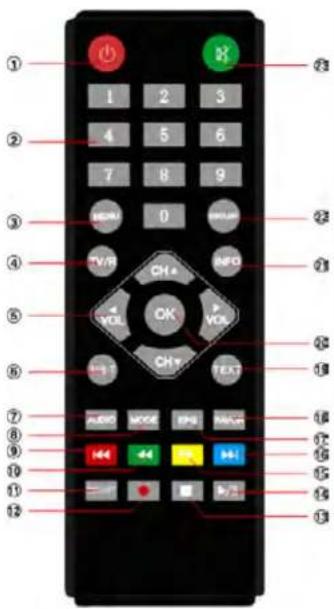
| No. | Name Descriptions | |
| 15 | AN OBY | Switch your device on from standby mode. |
| 2 | Numeric Buttons | Select channel or programming parameters. |
| 3 | MENJ Enter in mail | I menu. |
| 4 | TVR | Switch between TV and Radio programs. |
| 5 | Navigation Buttons | Move cursor. |
| 6 | LB-T Subtitle setup | |
| 7 | AUDIO Audio Setup | |
| 8 | MODE Audio channel's setup. | |
| 9 | Back← previous. | |
| 10 | backward. | |
| 11* | TIMESHIFT | Start Time Shift |
| 12* | REC | Switch to PVR mode. |
| 13 | STOP | Stop playing. |
| 14 | PLAY/ PAUSE | Start watching. Make a pause. |
| 15 | Forward. | |
| 16 | to next. | |
| 17 | EPG | Display the Electronic Program Guide. |
| 18 | FAVOR | Switch to favorite channels. |
| 19 | TEXT | Display information bar of current service. |
| 20 | OK | Display channel list on screen. Confirm selection. |
| 21 | INFO | Display information bar of current service. |
| 22 | EXIT | Ext from current menu. |
| 23 | MUTE | Enable or disable the audio. |
^x no function
Batteries
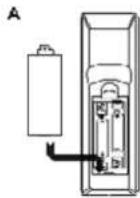
Install the batteries and make sure the positive (+) and negative (-) polarities match as shown in Figure A.
Service life of batteries
- The batteries normally last for about one year despite that it depends on how often and in what way the remote control is operated.
- Replace the batteries if the remote control fails to work even when it is operated near the DVD-S receiver.
• Use 2 pieces of 7 (AAA/UM-4) batteries.
Note:
- Do not use rechargeable (Ni Cd) batteries.
Do not attempt to recharge, short circuit, disassemble, heat the batteries or dispose of in fire. - Do not drop or step on the remote control unit or subject it to shocks. Otherwise the parts of the remote control unit may get damaged and lead malfunction.
• Do not use the new and old batteries together. - Please remove the batteries if the remote control is not going to be used for a long period of time. Otherwise, it may cause electrolyte leakage and lead malfunction, even fire accidents. Carefully wipe the electrolyte out of the remote control compartment and replace with new batteries. If any electrolyte happens to touch your skin, wash it off thoroughly with clean water immediately.
Remote control range
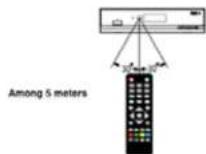
- Point the remote control to the IR receiver window. The remote control shall be effective within a distance of about 5 meters and an angle of about 60 degrees as shown in Figure 8.
• The effective range may vary slightly with the brightness of the room.
Note
- Do not shine bright light to the remote control sensor.
- The remote control unit may not work if there are obstacles between the remote control and the sensor.
- Do not recommend this remote control using for other products.
B
Preparation
- All equipments must be connected according to this user manual.
- Switch of this product and other equipments before connecting
- Read the User Manual carefully before connecting other equipments
• Plug the Audio and Video cable correctly - When connecting this product with TV set, only one kind of video output format will be accepted. Please choose a corresponding video output mode for the product, otherwise the image will be distorted.
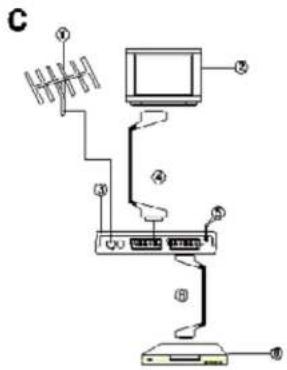
Connecting antenna, VCR and TV-set
- Antenna (No. included)
- TV Set (Not included)
- DVB-T Receiver
- TV SCART cable for connecting TV set and
DVB-T receiver (Not included) - ACIN
- VCR SCART cable for connecting IV set and
DVB-T Receiver (Not included) - VCR (Not included)
Fast Installation
- Connect this unit and other apparatus according to "BASIC CONNECTIONS". Plug the power cord, press [STANDBY] button (no need for first connection) to start.
- Plug the power cord and press [STANDBY] button to start.
- Press [MENU] button to setup. Press ▲ ★ ] button to select "Tools" and load factory default. Default password is "0000".
- Select "Installation" by press |CH/CH| button and press |VOP▶ button to setup. Password: 0000.
- Select "Satellite List" to choose satellite. Press [EXIT] button to exit after setup.
- Select: "Antenna Setup" and press [VOL] to setup. Select "I NB Freq" to setup High Frequency and other parameters. Press [EXIT] button to exit after setup.
- Select "Single/Multi Satellite" and press [VOL] to setup. After setup, press [VOL] to start auto search.
Menu Operation
Press MFNU button to browse the Main Menu which includes 7 sub-menus are listed below:
• Digital TV
- Move
• Music
- Photo
• Games
- Disk Manager
- Partition-Format
Press [CH ▶A] button to select menu item, press OK button to browse its submenu. Press [EXIT] button to return to the previous menu.
No.c:
-
The four navigation buttons (▲/▼/▲/▲), OK and EXIT button have same functions in all levels menus.
-
Some buttons have different functions in different menus. Please find out according to the screen.
-
Programmable buttons (which with color) functionality depends on the menu that is active at press moment. Please find out according to the screen.
1. Digital TV
Move cursor to "Digital TV" and press [OK] button to enter in its submenu. There are 6 options which are listed below.
- Channel Manager
- Installation
- Configuration
- Software Upgrade
- Factory Default
- Version
1.1 Channel Manager
Move cursor to "Channel Manager" and press OK! button to enter in its submenu. Use [CHA] buttons to select item, [VOL] buttons to change parameters, [EXT] button to quit from current interface.
Channel Organizer
"Service No.", "Channel Name" and four editing functions such like: "Favor", "Move", "Lock" and "Delete" will be displayed on the top of screen. Area name, Frequency and bandwidth will be displayed on the bottom of screen.
- Press [RED] button to set chosen program in favorite list. A favorite icon will be displayed.
- Press [YELLOW] button to move program's position. Select channel first and press [Yellow] button to display move icon, use [CHA/▼] buttons to move cursor and press [OK] button to confirm movement.
- Press [BLUE] button to lock chosen program. Password will be required. Press [OK] button to confirm after password has been set.
- Press [GREEN] button to delete chosen program. Select channel first and press [Green] button to display delete icon. Press [EXIT] button to quit from current setup interface. A window will be displayed to confirm deletion. Choose "Yes" to delete.
- Press [VOL] ▶ button to rename chosen program. Use numeric button to input.
- Press [IV/RADIO] button to switch between IV and Radio. Press [FRWD] and [HFWD] button to quick browse programs.
Channel Sorting
- First Option
All programs sort by region. The default status is "All Area". All programs will be displayed on the screen, England, Germany, France, etc are available.
- Second Option
All programs sort by "All", "FTA" or "Scramble". The default status is "All". All programs will be sorted in "All" mode. All free programs will be sorted in "FTA" mode (Free to Air). Programs will be listed by Random.
- Third Option
All programs sort by "All", "Z to A" or "A to Z". The default status is "All". Programs will be listed according to name from / to A or A to / in "/ to A" (or A to /) mode.
- Channel Grouping
"S. No." , "Channel Name", "FAV" and "Group" will be displayed in this menu. There are 8 groups which will be listed on the right of screen. They are: None/ News/ Science/ Sports/ Movie/ Kids/ Music/ Fashion. Use [CH-4] buttons to select channel, press numeric buttons "2 8" to sort channels in different groups. Corresponding icon will be displayed, press [EXIT] button to quit, a window will be displayed to confirm operation, choose "Yes" to confirm operation. Press numeric button "O" to cancel sort.
• Edi Channels
*S. No.*, "Channe Name", "Audio PID", "Video PID" and "PCR PID" will be listed in this menu. ADD: Press [RHD] button to add another channel. Please choose proper parameter of Area Name, Carrier, Channel Name, Audio PID, Video PID, PCR PID.
ED.T. Press [YELLOW] button to edit Channe Name, Audio PID, Video PID and PCR PID. Press [VOL ◀▶] buttons to change parameters, use numeric buttons '0-9' to input, press [Yellow] button to delete input, [Green] button to make a space, press [Red] button to transfer to capitalization, press [Blue] button to transfer to small letters.
- Delete All
Delete all stored TV and Radio programs. Password will be need for this operation.
1.2 Installation
Move cursor to "Installation" and press OKJ button to enter in its submenu.
- Auto Search
Move cursor to "Auto Search" and press [OK] button to start auto search. A progress information bar will be displayed at the bottom of screen. Once TV or Radio program has been found, it will be listed automatically in TV and Radio windows.
- Manual Search
Use [VOL ◀/▶] buttons to choose channel name and press [OK] button to start search.
- Area Search
Set up "Start Frequency", "End Frequency" and "Bandwidth", use numeric buttons "0-9" to input and press [OK] button to start search. Press [FXI] button to quit.
1.3 Configuration
Move cursor to "Configuration" and press (OK) button to enter in its submenu. Use [CHA▼] buttons to select item, 'VOL◄/►] buttons to change parameters, (OK) button to confirm and [EXIT] button to quit.
OSD
- OSD theme: 5 different, colors for option.
• Time on OSD: ON/OFF
• OSD Timeout: 1-6 Second
• OSD Trans: 0%/10%/20%/30%/40%/50%/60%
• OSD Language: English, French and Deutsch, etc.
• 1st Audio Language: English, French and Deutsch, etc.
• 2nd Audio language: English, French and Deutsch, etc.
TV
• Display Mode: Auto/PAL/NTSC
• Aspect Ratio: Auto/431 B/43FS/16:9
• Video Output: CVBS
- Brightness: 0%–100%
- Contrast: 0%-100%
• HUE: 6\~16
- Saturation: 0-12
System Setup
• EQ Setup: Standard/Classic/Rock/Jazz/POP
• Surround: OFF/Concert/Church/Passive/Live
• Active Antenna: OFF/ON
- JPEG Effect: OFF/ON
- LCN:OFF/ON
• Area: England/France/Germany, etc.
• Auto Standby: ON/OFF
Time
-imer Mode: Auto/Manual
- Date: Activated in "Manual" mode. Press [VOL▶] to enter in its setup interface. Use [VOL◀/▶] buttons to skip days, [CHA/▼] buttons to skip weeks, [Red] button to skip to next month, [Yellow] button to skip to previous month, [Green] button to skip to next year and [Blue] button to skip to last year.
- Time: Activated in "Manual" mode. Press [VOL▶] to enter in its setup interface. Use navigations button to
input.
• GMT Offset: Auto/12:00\~112:00
- Summer Time: ON/OFF. Activated in "Manual" mode.
Wakeup Timer
- Timer No: 18
-imer Mode: Off/Once/Daily/Weekly/Yearly
- Wakeup Mode: OF-/Message/Channe/ON/Fecorde
- Wakeup Channel: Use navigation buttons to select channel to be woken up
- Wakeup Date: Use [VOL ▲/▶] buttons to skip days, [CH▲/▼] buttons to skip weeks, [Red] button to skip to next month, [Yellow] button to skip to previous month, [Green] button to skip to next year and [Blue] button to skip to last year;
- On Time. Set up an alarm. Use [VOL ◀/▶] buttons and numeric buttons to input time.
- Duration: Set up an alarm. Use [VCI ◀/▶] buttons and numeric buttons to set up length of the alarm.
- Default Partition
Note:
Press [EPG] button to browse EPG information, press [Green] button to enter in Weekly mode, [Yellow] button to enter in Extended mode and [Blue] button to enter in Wakeup Timer mode.
- Parental lock (Use numeric buttons to input, old password and new password.)
• Channel Upgrade: OK/OFF
1.4 Software Upgrade
- Insert USB device.
- Press [MI-NJ] button to enter in setup interface, move cursor to "Digital IV" and press [OK] button.
- Select "Software Upgrade" and press [OK] button to enter in its interface.
- Select upgrade files and press [OK] button to confirm to load.
• System will upgrade automatically - After upgrade, the device will switch to standby mode automatically in default state.
1.5 Factory Default
Move cursor to "Factory Default" and press OK! button to load factory default. The default password is "00000". This step must be done at first use.
1.6 Version
Move cursor to "Version" and press [OK] button to display HW, SAW, Date and Time information of this device.
2. Movie
Connect USB device to the receiver, use [CH▲/▼] buttons to select "Movie", press [OK] button to enter in its interface. Find movie files and press [OK] button to start watching. Please refer to remote control for detail operations. Press [EXIT] button to stop playing and back to previous menu.
3. Music
Connect USB device to the receiver, use [CH▲▼] buttons to select "Music", press [OK] button to enter in its interface. Find audio files and press [OK] button to start playing. Please refer to remote control for detail operations. Press [EXIT] button to stop playing and back to previous menu.
4. Photo
Connect USB device to the receiver, use [CH▲/▼] buttons to select "Photo", press [OK] button to enter in its interface. Find photo files and press [OK] button to start watching. Please refer to remote control for detail operations. Press EXIT button to stop watching and back to previous menu.
All photos can be rotate in 4 angles.
- VOI ►: Rotate to left for 90°
- VOI ← Rotate to right, for 90°
- CH▲: 180° horizontal rotation
- CH▼: 180° vertical rotation
5. Game
Move cursor to "Game" and press [OK] button to enter in its interface. There are 3 submenus which are listed below. Press [INFO] button to browse the operation guide.
- Box Man
• L. etis
• I it Rat
6. Disk Manager
Move cursor to "Disk Manager" and press [OK] button to enter in its interface. Press [GREEN] button to switch between Play/Delete One/Delete All/Bename functions. Choose mode first and operate according to:
- Play: Press [OK] button to enter in current file.
- Delete One: Press [OK] button to delete current file.
- Delete All Press [OK] button to delete all files
- Rename: Press [OK] button to rename current file
7. Partition-Format
Move cursor to "Parition Format" and press [OK] button to enter in its interface.
Note: All data will be erased after this action, make sure everything has back up before formatting.
Maintenance
- Unplug the power cord before maintenance.
- Keep the product surface clean. Please use a piece of soft cloth to clean the outer. If it's dirty.
• Do not use any chemical products like Alcohol or dilution to clean the product. - Refer all servicing to a qualified service agent.
Terminology
| Name Descriptions | |
| DVB The aborcvlation of Digital Video Broadcasting. | |
| DVB-1 One type of DVB modes (1=terrestrial). | |
| MPEG The aborcvlation of Motion Picture Experts Group. | |
| MPEG-2 The MPEG-2 standards are mainly used in digital IV signals. | |
| Subtitles The words appear at the bottom of the screen. They are usually recorded on DVD discs and have 32 languages at most. | |
| FEC FEC stands for Forward Error Correction, used to correct signal transmission errors between antennas and the receiver. | |
| PIC The PIC code (?packed: centifcation) is the identification number of audio and video signals in the digital data flow/stream of DVB MPEG-2 signals. It is used to transmit audio and video signals to a specific address. |
Specifications
| Items Features | ||
| High Frequency Tuner | Input Frequency Range 174 - 23 | 0,470 --- 862MHz (VHFR/UHF) |
| Bandwidth 7 or 8 M I z | ||
| Input Signal Level -75 -- -20 dBm | ||
| RF Input Connector IEC169-2, Female | ||
| Input impedance 75Ω | ||
| Demodulation Mode | Waveform CO-HDM (Code Orthogonal Frequency Division Multi-plexing) | |
| Demodulation QAM16, QAM6/1 | ||
| Transmission Mode 2K, 8K | ||
| Guard interval 1/4, 1/8, 1/16, 1/32 | ||
| Code rate 1/2, 2/3, 3/4, 5/6, 7/8 | ||
| Video Audio Decoding | Video decoding ISO/IEC13818-2 | MPEG2 (MP@ML) Compatible |
| Video resolution | PA: 770x576/ NISC, 770X480 | |
| Video input code rate | 15Mbit/s Max. | |
| Teletext | Support DVB-ETS3004/2 | |
| Audio decoding | ISO 11172-3 | |
| Audio Track | Stereo, Monophony (Left, Right) | |
| Audio Sample rate | 32, 44.1, 48K Iz | |
| USB | USB Port | US32.0 |
| Format | MPDG/MP3/WMA/JPEG | |
| Supported | SD/MMC/MS Card | |
| Power | Voltage Range | ~165-76/V, 50Hz |
| Rated Voltage 230V,50Hz | ||
| Rated Consumption | 5 W | |
| Standby Consumption | ≤ 0.5 W | |
| Work Environment | Temperature | 0° ~ 40° |
| Humidity | < 90% | |
| Dimensions | Weight | -0.5 kg (brutto) 0.3 kg (inetto) |
| Size | 180(W) x 113(D) x 34(l b mm | |
Troubleshooting
You might meet abnormal working of this STB with various reasons. Check the following which may help you.
| Problem | Possible causes | What to do |
| LED on the front panel fail to light up/is not lit. | Main supply cable is not connected. | Check if the main supply cable is plugged into the power socket. |
| No picture or sound. | Satellite dish is not aiming to satellite accurately. No signal or weak signal. The LNB is faulty. The cable is faulty. | Adjust the dish. Check the signal strength indicator in one of the channels search submenus. Check the cable connections, LNB and other equipment connected to LNB & receiver, or adjust dish. Replace the LNB. Replace the cable. |
| Bad picture/blocking error | Satellite dish is not aiming to the satellite accurately. Signal too strong. Satellite dish is too small. LNB noise factor too high. The LNB is faulty. | Adjust the dish. Connect an attenuator to LNB input. Change to a larger dish. Change LNB with lower noise factor. Replace the LNB. |
| No startup menu on screen after turning on STB for the first time. | The system is connected by SCART cable and the TV is not in AW/ DXT mode. | Switch the TV to the appropriate AV input. |
| The remote control is not working. | Battery exhausted. Remote control is not aimed correctly STB is in standby mode. | Change the batteries (both). Aim the remote control at the STB. Check that nothing blocks the front panel. Check if IHD indicator on the front panel is showing the time, press the power button to switch off standby mode. |
| You have forgotten your password. | Contact the dealer or Service Provider. They will help you set it up again. | |
| Poor picture quality or Less channels in scanning. | Low LNB power or signal loss in cable. | Change the LNB power to 14W/13W in Antenna setup menu. |
Declaration of Conformity
This conforms to the following directives / standards is confirmed:
• Electromagnetic Compatibility Directive 2004/108/FG
-EN 55013:2001+A1:2003+A2:2006
-EN 55020:2007
EN 61000 3 2:2006 + A'2009 + A2:2009
- EN 61000-3-3:2008
• Low Voltage Directive 2006/95/EG
FV 50065:7007+A1:7005+A11:7008
Notes
Status: v1.0 March 2013

- Vorbereitung
- Software Upgrade
- Safety Instructions 03
- Main Supply:
- Overload:
- Liquid:
- Ventilation:
- Cleaning:
- Connection:
- Location:
- Uncover:
- Precautions Fr
- Delivery
- Remote control
- Batteries
- Remote control range
- Preparation
- Connecting antenna, VCR and TV-set
- Fast Installation
- Menu Operation
- Digital TV
- Channel Manager
- Channel Organizer
- Channel Sorting
- Installation
- Configuration
- OSD
- TV
- System Setup
- Time
- Wakeup Timer
- Note:
- Factory Default
- Version
- Movie
- Music
- Photo
- Game
- Disk Manager
- Partition-Format
- Maintenance
- Terminology
- Declaration of Conformity
- Notes
Brand : MEGASAT
Model : 630 T
Category : Digital decoder