
MagicInfo VideoWall Author - Logiciel photo/vidéo SAMSUNG - Free user manual and instructions
Find the device manual for free MagicInfo VideoWall Author SAMSUNG in PDF.

| Product Type | Video Wall Authoring and Management Software |
| Supported Content | Video, image (bmp, jpeg, gif, png, tif), streaming (IP Camera, PC Screen) |
| Main Functions | Content authoring, schedule publishing, instant publish, urgent message, scene editor, remote device control |
| Maximum Monitors | Up to 250 video wall monitors per Console |
| System Requirements - CPU | Intel Pentium 4 1.8 GHz or higher; Dual Core or higher for LivePlayer |
| System Requirements - RAM | 2 GB or higher |
| System Requirements - Disk | 51 GB or higher |
| System Requirements - OS | Windows 7, Windows 2000 SP4+, Windows 2003 SP1+, Windows XP SP2+ |
| Network Requirements | 1 Gbit network recommended; all devices on same local network |
| Supported Layouts | Regular matrix and irregular video wall configurations |
| Key Feature - Scene Editor | Live editing of currently playing content on video wall monitors |
| Key Feature - Scheduling | Instant publish and scheduled publish with repeat options (daily, weekly, monthly) |
| Key Feature - Urgent Message | Playback of synchronized urgent message on all monitors |
| Remote Management | Remote access, job scheduling, device control (on/off, reboot, file copy, etc.) |
| Supported IP Cameras | Samsung IP cameras only (models: SNC-B2315, SNC-B5395, etc.) |
| License | License registration required; 60-day trial without license; unregistered limited to 4 monitors |
| Language Support | Multiple languages selectable in settings |
| Components | MagicInfo VideoWall Console, Client, LivePlayer, Author |
Frequently Asked Questions - MagicInfo VideoWall Author SAMSUNG
User questions about MagicInfo VideoWall Author SAMSUNG
0 question about this device. Answer the ones you know or ask your own.
Ask a new question about this device
Download the instructions for your Logiciel photo/vidéo in PDF format for free! Find your manual MagicInfo VideoWall Author - SAMSUNG and take your electronic device back in hand. On this page are published all the documents necessary for the use of your device. MagicInfo VideoWall Author by SAMSUNG.
USER MANUAL MagicInfo VideoWall Author SAMSUNG
VideoWall is an application which publishes video wall content created in the authoring tool MagicInfo VideoWall Author or general content (images, movies, etc.) through VideoWall Console, and plays the published content on video wall monitors.
Contents
Before usin01 g
Understanding This Manual ....3
Menu Command 3
Software Titles 3
Main Functions of VideoWall ....4
System Requirements 5
Program Restrictions 5
VideoWall Consol02 e
Installation and Uninstallation 6
Installing the Program 6
Uninstalling the Program 7
License Registration 8
Using VideoWall Console 9
Logging on to VideoWall Console 10
Screen Composition 11
Top Menus 11
Administration Menu 11
Device Information 12
Log Information 12
Message Information 12
Schedule Information 12
Content Management 13
Content Registration 14
Publishing Content 15
Deleting Content 15
Recycle Bin....16
Managing a Schedule 17
Registering a Schedule 18
Instant Publish 18
Schedule Publish 21
Viewing a Schedule 24
Week 24
Month 28
List 29
Message Schedule 30
Preview 30
Position 31
Align 31
Device 33
Device....34
General 34
System 38
Display 41
Network....43
Job Schedule 45
Register 46
Cancel 50
Delete....51
Log 52
Delete....52
Export 53
Settings 54
General Settings 55
Magic Info Server Settings ....55
Basic setting ....57
User Settings 58
Add 59
Change 60
Delete....61
Scene Editor 62
Screen Composition 63
Using Scene Editor 64
Add 64
Delete....66
Apply 66
VideoWall Clien03 t
Program Installation 67
Program Uninstallation 68
Using VideoWall Client 69
Icons and Components 69
Video Wall Agent Composition ....70
RDC Composition 70
Setting VideoWall Client 71
LOGIN 71
Configuration - Administrator Screen 71
Default 72
Network....72
Play 73
Admin 74
Options 76
04LivePlayer
Program Installation 77
Program Uninstallation ....78
UsingLivePlayer 79
IP Camera 79
IP Camera Information ....79
Streaming Information 80
Settings 80
Adding and Deleting an IP Camera 81
PC Screen 82
Screen Information 82
PC Screen Information 83
Sending and Configuring the PC Screen 83
Understanding This Manual
This manual provides product information in easy-to-understanding instructions as follows.
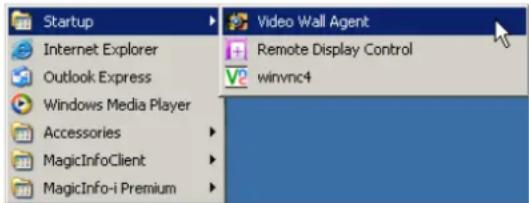
Menu Command
Menu commands are described as follows. : Select Startup - Video Wall Agent.
- This means that you must select the Video Wall Agent on the Startup tab.
Software Titles
In this manual, the following application names are used to provide product information.
MagicInfo VideoWall refers to VideoWall, MagicInfo VideoWall Console refers to VideoWall Console, MagicInfo VideoWall Client refers to VideoWall Client, MagicInfo VideoWall LivePlayer refers to LivePlayer, MagicInfo VideoWall Author refers to VideoWall Author and MagicInfo-i Premium Edition Server refers to Server.
Main Functions of VideoWall
VideoWall is an Application which publishes video wall content created in the authoring tool MagicInfo VideoWall Author or general content (images, movies, etc.) through VideoWall Console and plays the published content on video wall monitors.
Irregular video wall Feature
- Content playback on non-formal irregular video wall monitors as well as on regular matrix video wall monitors
Scene-by-Scene Content Playback
- Scene-by-scene content playback through creation of video wall content
Content Playback using Various Layouts
Playback of one content item using various layouts through creation of video wall content
Instant Publishing
Convenient schedule publishing with the Instant Publish feature ·
Urgent Message Feature
- Playback of a synchronized urgent message on all the video wall monitors
Scene Editor Feature
Live editing of the currently playing content on video wall monitors.
IP Camera and PC Screen Features
- Playback of images from IP Camera or PC Screen on video wall monitors using LivePlayer
RDC and Job Schedule Features
- All the monitors that form a video wall can be managed and controlled through RDC and Job Schedule functions
Working with MagicInfo-i Premium Edition Server
- The videowall comprises the VideoWall Console and VideoWall Client, and controls video wall monitors by connecting to Server
Tips
Up to 250 video wall monitors can be connected to a single VideoWall Console.
Supported Content -
Video : The proper codec to play a video must be installed on the VideoWall Console and VideoWall Client.
Image : bmp, jpeg, gif, png, tif file formats are supported.
Streaming Data : IP Camera(supported for Samsung products only) / PC Screen
System Requirements
Hardware
CPU : Intel Pentium 4 1.8GHz or higher Dual Core or higher for LivePlayer
RAM: 2GB (or higher)
DISK : 51GB (or higher)
Software
IE 6.0 or higher, DirectX, .Net Framework 2.0
System
Windows Platform
Windows 7
Service Pack 4 or greater for Windows 2000
Service Pack 1 or greater for Windows 2003
Service Pack 2 or greater for Windows XP
Network
1Gbit network is recommended
Program Restrictions
- A schedule with Mapping information different from the existing schedule cannot be added.
For a schedule that will be published instantly, details other than its content, such as the time, date and cycle, cannot be modified.
Changing a schedule using UI in the VideoWall Console is only possible in weekly viewing mode.
Message publishing and Scene Editor functions are only enabled in regular video wall monitors.
IP Camera / PC Screen can only be edited when the Port and LivePlayer IP are set correctly.
The PC where VideoWall Console is installed and the video wall monitors where -VideoWall Client is installed must be on the same local network.
A content item cannot be registered or published if the VideoWall Console and Server are connected or a connection is being attempted.
- Other files cannot be published if the VWL file is not registered and published to the VideoWall Console. Register and publish the VWL file to the VideoWall Console before you publish Video or Image files.
MagicInfo VideoWall
VideoWall Console
02
Installation and Uninstallation
Installing the Program
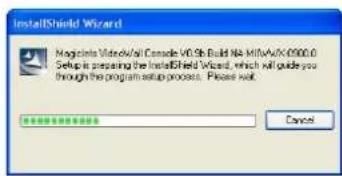
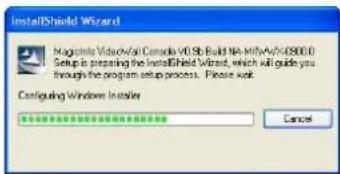
Run the installation file to display the installation screen.
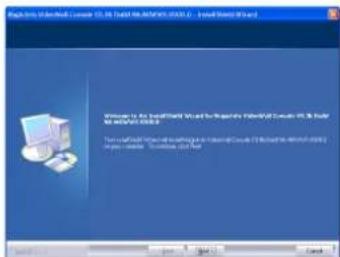
This is the first screen of the installation wizard. Click Next to continue the installation or click Cancel to exit the installation.
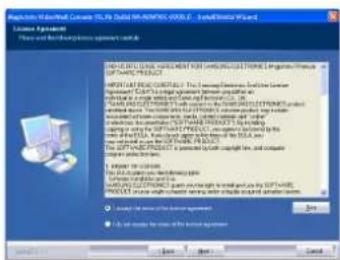
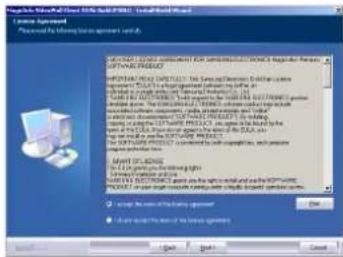
Check the "I accept the terms of the license agreement." field and click Next.
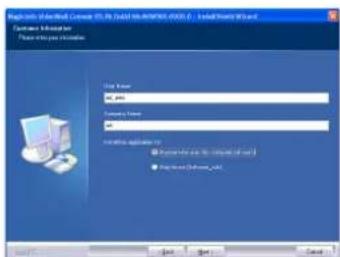
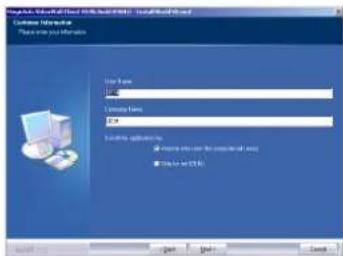
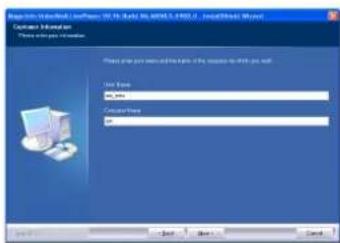
This screen allows you to enter in user information. Enter a user name and company name, pick a user to install the program, and click Next.
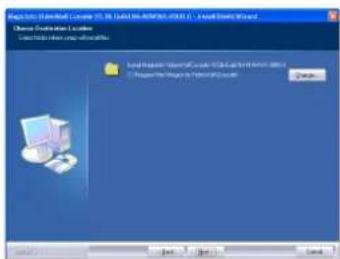
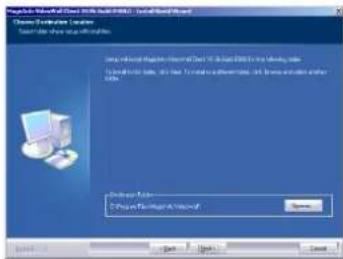
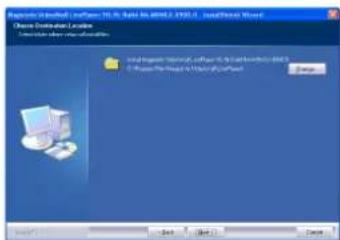
This screen allows you to select a destination folder to install the program.
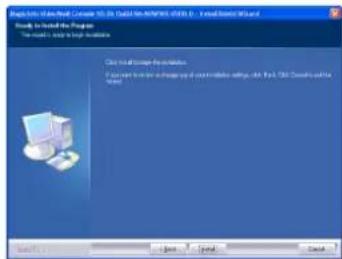
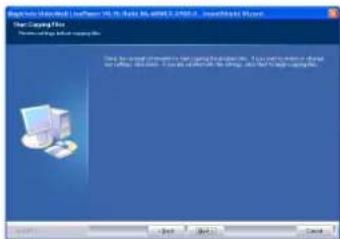
This is the confirmation screen displayed before the installation begins.
Click Back to change or review the installation settings you have made or click Cancel to end the installation wizard.
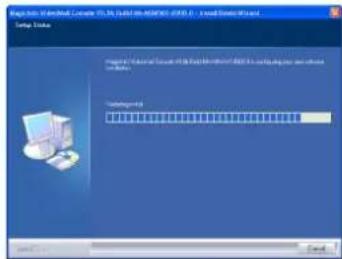
Click Install to start the installation.
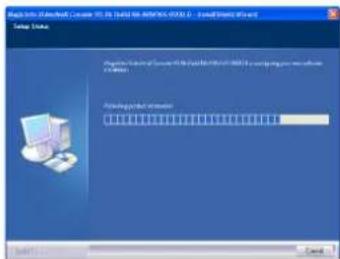
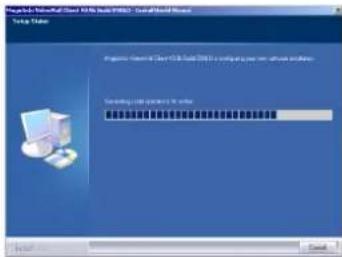
MagicInfo VideoWall Console is being installed in the folder you selected.
Click Cancel to cancel the installation.
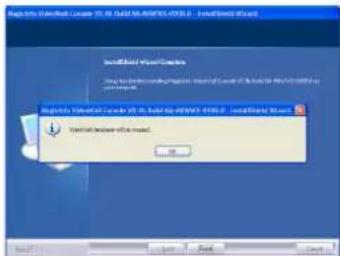
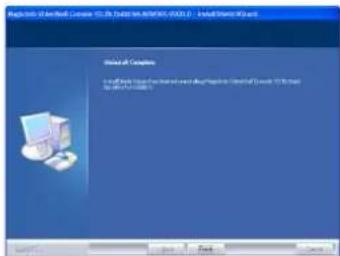
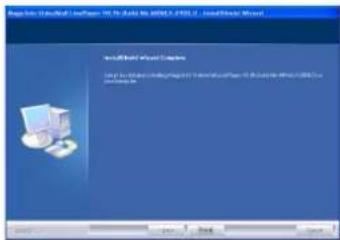
This screen is displayed when the VideoWall Console has been installed successfully.
A new database has been configured.
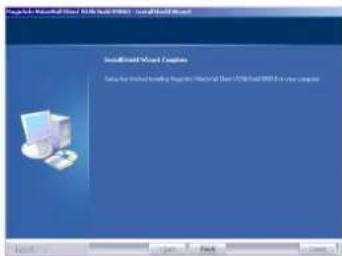
Click OK and Finish to complete the installation.
This is the screen where an icon is created on the desktop after the installation is completed successfully.
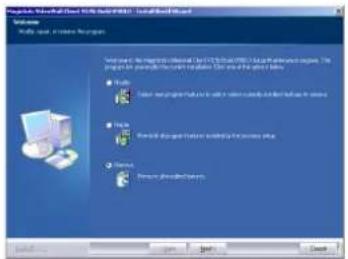
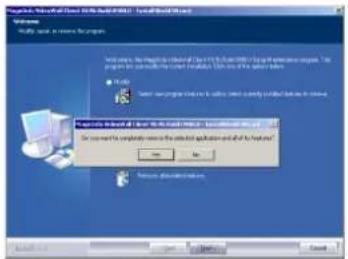
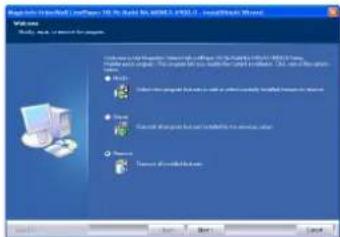
Uninstalling the Program
Select Control Panel - Add or Remove Programs
- Uninstall VideoWall Console to display the window to start the uninstall process.
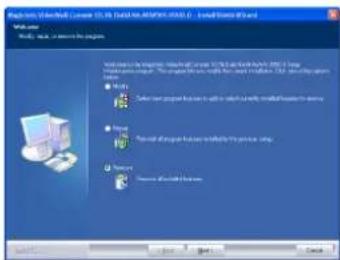
You can start the uninstall process as well as modify and recover. Select Remove and click Next to continue the uninstall process.
![About to the Project - Create 3D - This is a project that will create a new project in the following: [ ] [ ] [ ] [ ] [ ] [ ] [ ] [ ] [ ] [ ] [ ] [ ] [ ] [ ] [ ] [ ] [ ] [ ] [ ] [ ] [ ] [ ] [ ] [ ] [ ] [ ] [ ] [ ] [ ] [ ] [ ] [ ] [ ] [ ] [ ] [ ] [ ] [ ] [ ] [ ] [ ] [ ] [ ] [ ] [ ] [ ] [ ] [ ] [ ] [ ] [ ] [ ] [ ] [ ] [ ] [ ] [ ] [ ] [ ] [ ] [ ] [ ] [ ] [ ] [ ] [ ] [ ] [ ] [ ] ( ) ( ) ( ) ( ) ( ) ( ) ( ) ( ) ( ) ( ) ( ) ( ) ( ) ( ) ( ) ( ) ( ) ( ) ( ) ( ) ( ) ( ) ( ) ( ) ( ) ( ) ( ) ( ) ( ) ( ) ( ) ( ) ( ) ( ) About to the Project - Create 3D - This is a project that will create a new project in the following: 1. To build a new project in the project, it is not running through the project. 2. To build a new project in the project, it is not running through the project. 3. To build a new project in the project, it is not running through the project. 4. To build a new project in the project, it is not running through the project. 5. To build a new project in the project, it is not running through the project. 6. To build a new project in the project, it is not running through the project. 7. To build a new project in the project, it is not running through the project. 8. To build a new project in the project, it is not running through the project. 9. To build a new project in the project, it is not running through the project. 10. To build a new project in the project, it is not running through the project. 11. To build a new project in the project, it is not running through the project. 12. To build a new project in the project, it is not running through the project. 13. To build a new project in the project, it is not running through the project. 14. To build a new project in the project, it is not running through the project. 15. To build a new project in the project, it is not running through the project. 16. To build a new project in the project, it is not running through the project. 17. To build a new project in the project, it is not running through the project. 18. To build a new project in the project, it is not running through the project. 19. To build a new project in the project, it is not running through the project. 20. To build a new project in the project, it is not running through the project. 21. To build a new project in the project, it is not running through the project. 22. To build a new project in the project, it is not running through the project. 23. To build a new project in the project, it is not running through the project. 24. To build a new project in the project, it is not running through the project. 25. To build a new project in the project, it is not running through the project. 26. To build a new project in the project, it is not running through the project. 27. To build a new project in the project, it is not running through the project. 28. To build a new project in the project, it is not running through the project. 29. To build a new project in the project, it is not running through the project. 30. To build a new project in the project, it is not running through the project. 31. To build a new project in the project, it is not running through the project. 32. To build a new project in the project, it is not running through the project. 33. To build a new project in the project, it is not running through the project. 34. To build a new project in the project, it is not running through the project. 35. To build a new project in the project, it is not running through the project. 36. To build a new project in the project, it is not running through the project. 37. To build a new project in the project, it is not running through the project. 38. To build a new project in the project, it is not running through the project. 39. To build a new project in the project, it is not running through the project. 40. To build a new project in the project, it is not running through the project. 41. To build a new project in the project, it is not running through the project. 42. To build a new project in the project, it is not running through the project. 43. To build a new project in the project, it is not running through the project. 44. To build a new project in the project, it is not running through the project. 45. To build a new project in the project, it is not running through the project. 46. To build a new project in the project, it is not running through the project. 47. To build a new project in the project, it is not running through the project. 48. To build a new project in the project, it is not running through the project. 49. To build a new project in the project, it is not running through the project. 50. To build a new project in the project, it is not running through the project. 51. To build a new project in the project, it is not running through the project. 52. To build a new project in the project, it is not running through the project. 53. To build a new project in the project, it is not running through the project. 54. To build a new project in the project, it is not running through the project. 55. To build a new project in the project, it is not running through the project. 56. To build a new project in the project, it is not running through the project. 57. To build a new project in the project, it is not running through the project. 58. To build a new project in the project, it is not running through the project. 59. To build a new project in the project, it is not running through the project. 60. To build a new project in the project, it is not running through the project. 61. To build a new project in the project, it is not running through the project. 62. To build a new project in the project, it is not running through the project. 63. To build a new project in the project, it is not running through the object 64. To build a new process with an operation 65. To build a new process with an operation 66. To build a new process with an operation 67. To build a new process with an operation 68. To build a new process with an operation 69. To build a new process with an operation 70. To build a new process with an operation 71. To build a new process with an operation 72. To build a new process with an operation 73. To build a new process with an operation 74. To build a new process with an operation 75. To build a new process with an operation 76. To build a new process with an operation 77. To build a new process with an operation 78. To build a new process with an operation 79. To build a new process with an operation 80. To build a new process with an operation 81. To build a new process with an operation 82. To build a new process with an operation 83. To build a new process with an operation 84. To build a new process with an operation 85. To build a new process with an operation 86. To build a new process with an operation 87. To build a new process with an operation 88. To build a new process with an operation 89. To build a new process with an operation 90. To build a new process with an operation 91. To build a new process with an operation 92. To build a new process with an operation 93. To build a new process with an operation 94. To build a new process with an operation 95. To build a new process with an operation 96. To build a new process with an operation 97. To build a new process with an operation 98. To build a new process with an operation 99. To build a new process with an operation 100. To build a new process with an operation](/content/2026/05/858866/images/0e0305c1720ed0ed21a0adf55dd80aa816cf15ca16a440cdb318d27d4d8f50a2.jpg)
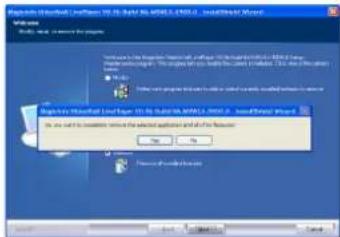
Confirm that you want to completely remove the program. Click Yes to start the program uninstall process.
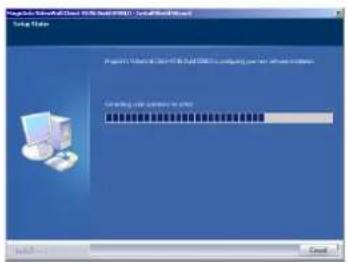
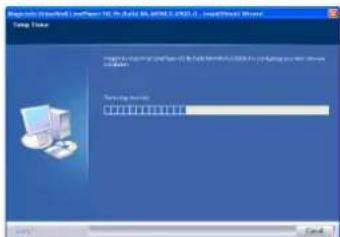
The uninstall process has started.
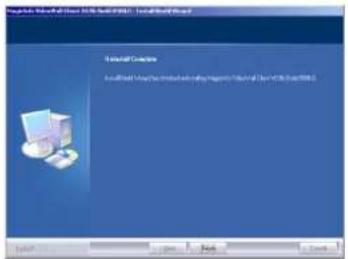
Click Finish to complete the uninstall process.
License Registration
A product license must be registered before running MagicInfo VideoWall Console. The period of use is restricted to 60 days if a product license is not registered.
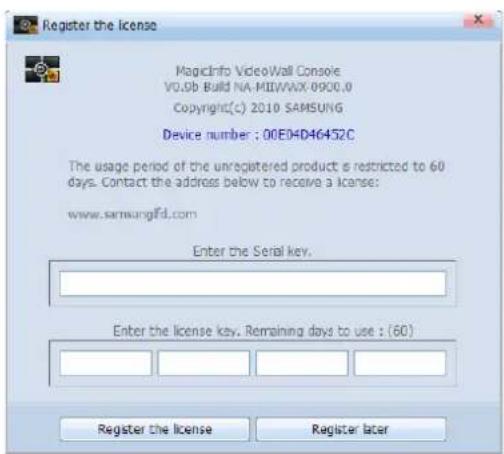
Caution
Without registering a license, you can register only up to four video wall monitors to the VideoWall Console.
Using VideoWall Console
![Video Wall Console Device info DEM-Y0QE7QRRF9G [VM000] Schedule Add/Modify Schedule Count: 1 1 Month 17 18 19 20 21 22 23 2 4 6 8 10 12 14 16 18 20 22 24 Log Go to Log [0013FB12080B (OEM-Y0QE7QRF9G)] Event: 1/15/2010 6:02:31 PM Status Connected [0012FB12080B (OEM-Y0QE7QRF9G)] Event: 1/13/2010 1:33:12 PM Status Disconnected [0012FB12080B (OEM-Y0QE7QRF9G)] Event: 1/13/2010 1:39:15 PM Status Connected Message Go to Msg](/content/2026/05/858866/images/615934263e77642a1f298d8e40dc24e93fd218bb94933821cc0bf2c8dc1d6421.jpg)
The function of VideoWall Console is to publish video wall content created in the authoring tool VideoWall Author or general content (images, movies, etc.) to the VideoWall Client.
It also has the remote management function similar to Server which schedules content to publish, and remotely manages and controls the status of VideoWall Client where content is published.
Logging on to VideoWall Console
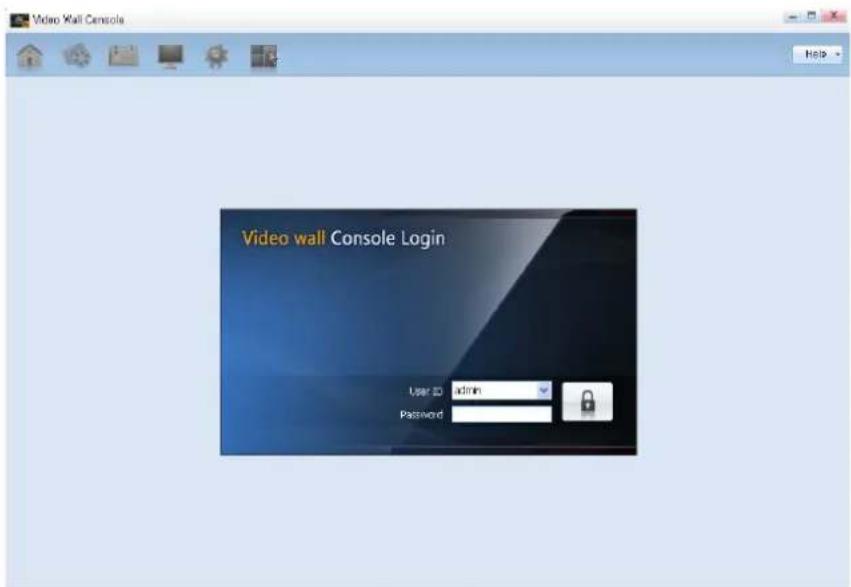
MagicInfo VideoWall comprises VideoWall Console, VideoWall Client and LivePlayer.
The VideoWall Console is a program similar to Server which plays, controls and manages video wall content or general media (images, movies) that will be played on the video wall monitors.
After installing VideoWall Console, double-click on the Console icon on the desktop to open the log-in page.
Enter your User ID and Password, and click 🔒 to move to the main page. (A user with no ID and password can only use the VideoWall Console if the administrator adds the user in the User Settings.)
Tips
Login -
The default administrator ID and password after the initial installation are
For security purposes, change the password on the User Settings page.
Screen Composition
![Video Wall Console Device Info. OEM-Y0Q57QFRXG [1/4/2010] Schedule Add/Modify Schedule Count: 1 1 Month 17 18 19 20 21 22 23 2 4 6 9 12 14 16 18 20 22 24 Log Go to Log [0012FB12089B (OEM-Y0Q57QFRXG)] Event 1/15/2010 6:02:31 PM Status Connected [0012FB12089B (OEM-Y0Q57QFRXG)] Event 1/13/2010 1:33:12 PM Status Disconnected [0012FB12089B (OEM-Y0Q57QFRXG)] Event 1/13/2010 1:30:15 PM Status Connected Message Go to Ping](/content/2026/05/858866/images/adc76d727bc7698a76975fa634f368fa722ffd3a3e8151a32a830c347c826c26.jpg)
Top Menus
| Move to the main page.View the Device, Log, Message and Schedule settings. | |
| Register and manage content. | |
| Create, publish and manage scheduled files using content registered to the VideoWall Console. | |
| View information about a device. You can also instruct a device to run a job Schedule and view its log information. | |
| Manage the MagicInfo Server and basic settings, and manage, view, modify or add users. | |
| Run Scene Editor. |
Administration Menu
| admin | Indicates a user with an administrator ID. |
| Logout | Logout from your application. |
| Help | View the version and help information about VideoWall Console. |
| Help | View help information about VideoWall Console. |
| About | View the version of VideoWall Console. |
Device Information
![Device Info. OEM-YOCETCFRP9G [VM000]](/content/2026/05/858866/images/6f213ae9c61d8d3ef2b549be6ae6b4cf01d445ac01090cefd39fbb8333616c2a.jpg)
Information about the device that will be instructed to play content or a schedule is displayed.
Log Information
![[0012FB12080B (OEMY0/E7Q/FFR3G)] Event 1/15/2010 6:02:31 PM Status Connected [0012FB12080B (OEMY0/E7Q/FFR3G)] Event 1/13/2010 1:33:12 PM Status Disconnected [0012FB12080B (OEMY0/E7Q/FFR3G)] Event 1/13/2010 1:30:15 PM Status Connected](/content/2026/05/858866/images/b21dcaae49fc76ac601b4a06fc5543f119d62ebdb7b38cc37dfd1cbb4b866cd4.jpg)
Log information is displayed.
Press the button on the upper right corner to directly move to the log settings page.
Message Information
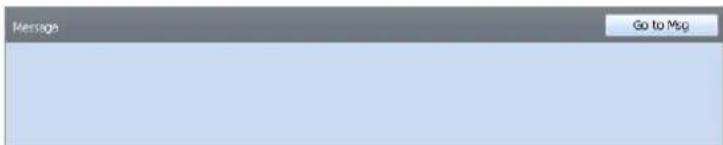
A currently running message on the video wall monitors is displayed. Press the button on the upper right corner to directly move to the message settings page.
Schedule Information
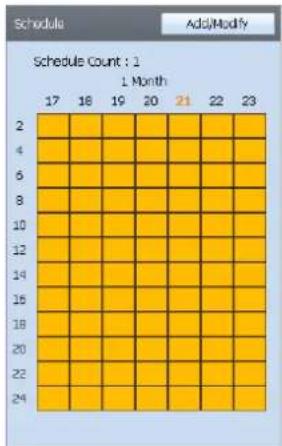
Information about created schedules can be viewed.
Press the button on the upper right corner to directly move to the schedule settings page.
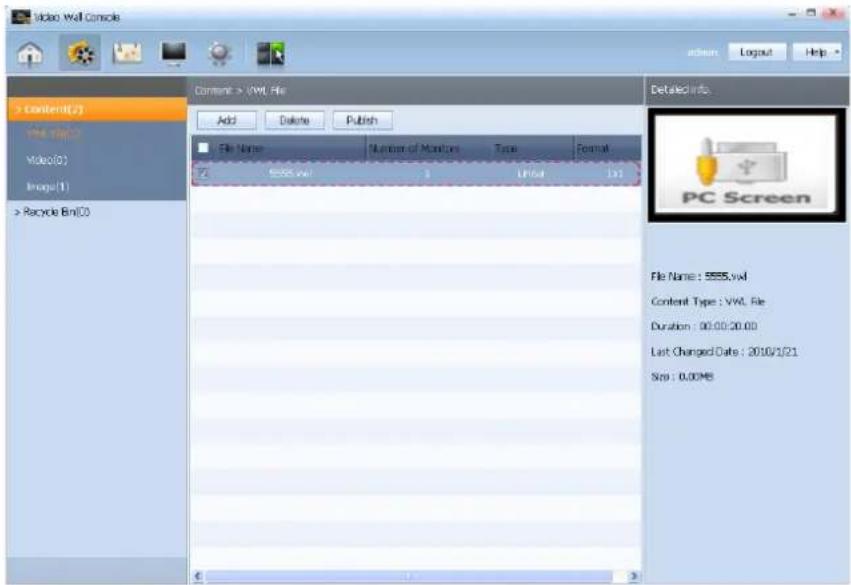
Content Management
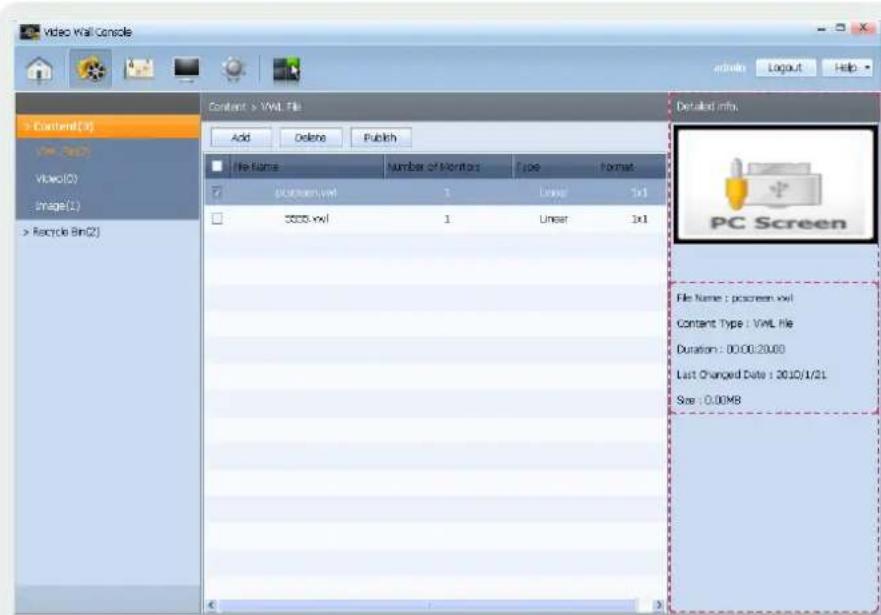
In the Content tab, video wall content, video or image files can be registered, modified or removed, and the registered files can be published.
Detailed information about registered content can be viewed in the Detailed info. section on the upper right corner.
Content Registration
Select a content type you want.
Click the button to load the file uploader window, and select a file you want.
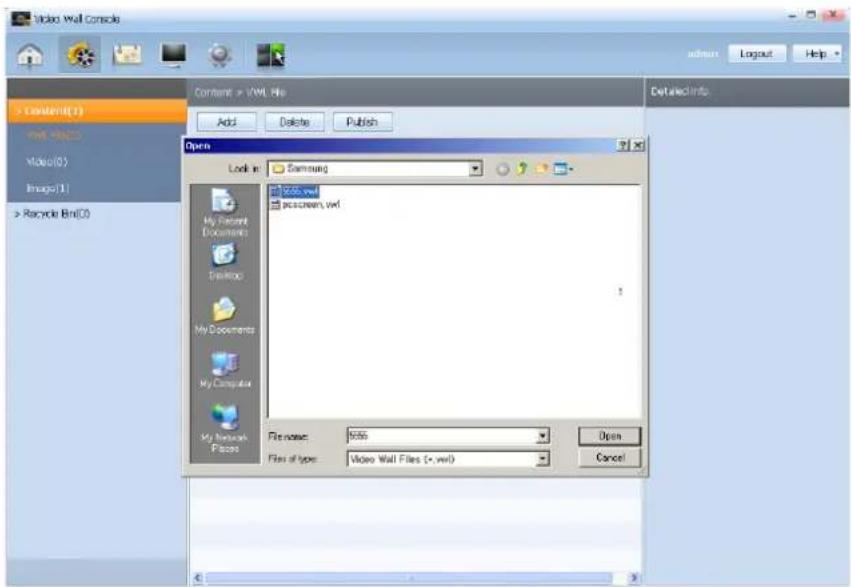
You can see that the content has been registered successfully.
Tips
How To View Content -
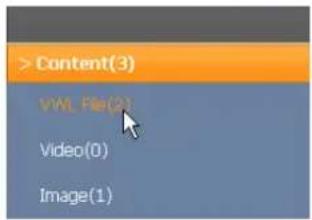
If video or image files along with video wall content files are registered, the registered content items can be viewed in two ways.
Select the Video or Image tab in the Content tab and click the arrow on the ≡ button on the upper right corner.
The following two viewing modes are displayed.
| View the registered content in list format. | |
| View the registered content in thumbnail format. |
Publishing Content
Select the content you want to publish and click the button.
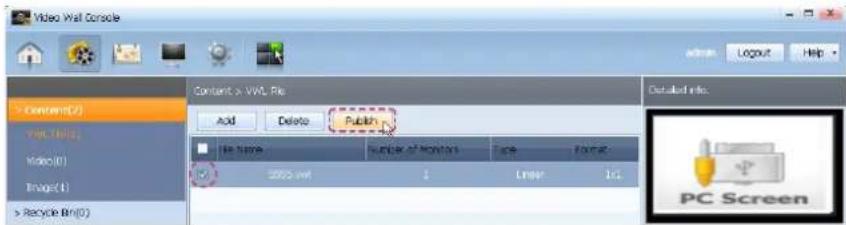
From the displayed schedule settings page, you can instantly publish the selected content.
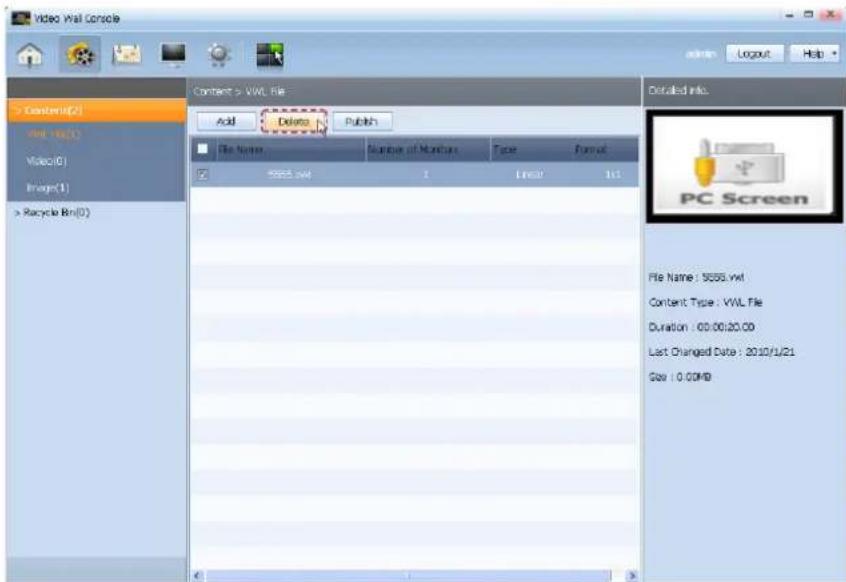
Deleting Content
Select the content you want to delete and click the button.
Tips
Publishing Content -
For details on publishing content, refer to the "Registering a Schedule" section herein.
If you check the checkbox on the top menu bar, the registered content items are all selected.
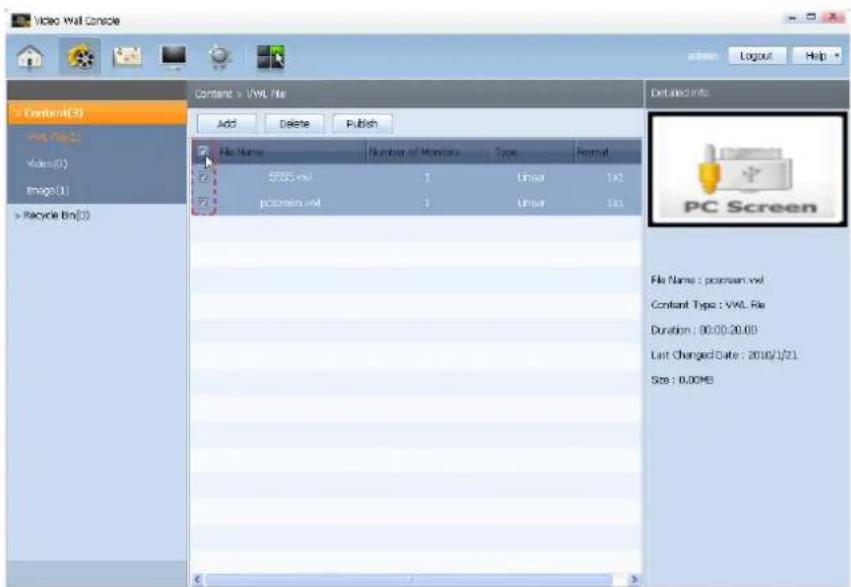
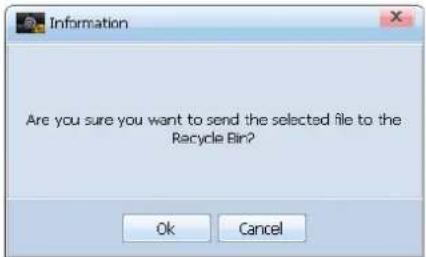
Confirm that they are the content items you want to delete and click . OK They will be deleted and moved to Recycle Bin.
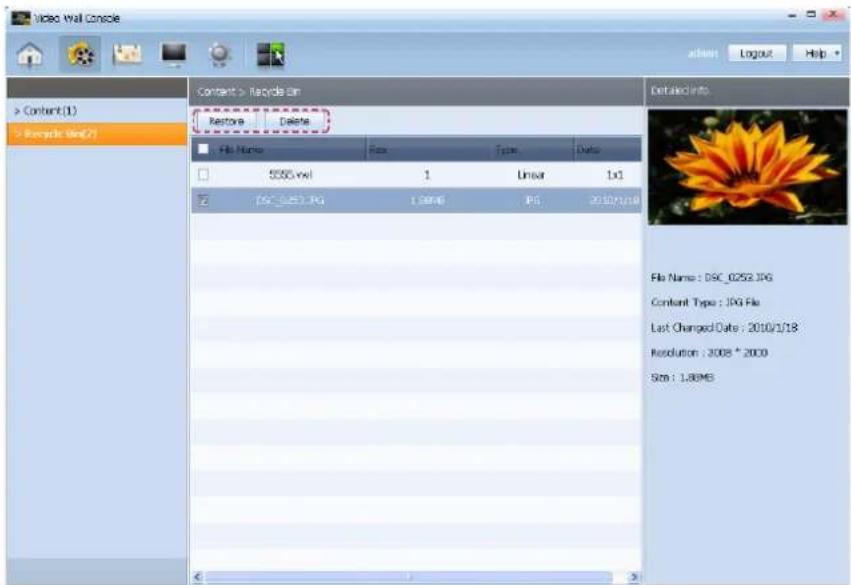
Recycle Bin
Click the or stop button to restore or permanently delete the deleted content respectively.
Caution
Deleting Content Permanently
Content deleted permanently from Recycle Bin cannot be restored.
Managing a Schedule
In the Schedule tab, schedules can be viewed, registered, published or managed. Schedule is the most direct item used by the VideoWall Console to instruct VideoWall Client to run content.
The Schedule tab comprises two settings items: Schedule settings to create a schedule to publish content and Message settings to register an urgent message. The Schedule settings can be viewed in the Week, Month or List format.
Registering a Schedule
There are two ways to register a schedule (Instant Publish and Schedule Publish).
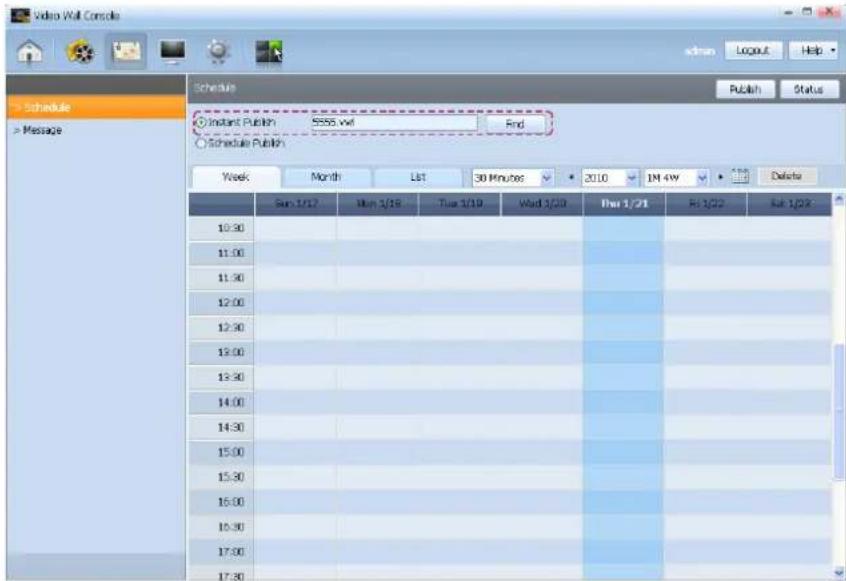
Instant Publish
If you select Instant Publish, content selected on the content management page or content selected by the button will be published instantly and played continuously until it is replaced by another schedule.
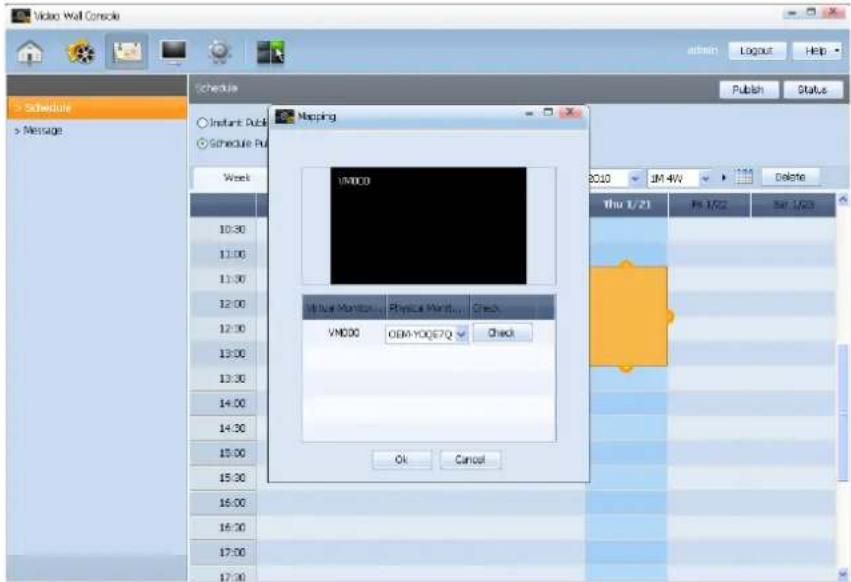
Select a file and click the button to display the Mapping window, which is the window for 1:1 mapping between virtual monitors specified in the VideoWall Author and actual video wall monitors.
When the Check process is completed, click the button.
| Tips | |
| Mapping - | |
| 1 Virtual Monitor Name | View the name of virtual monitors specified in the VideoWall Author.(e.g. 2x2 video wall monitors are described as VM000, VM001, VM002 and VM003.) |
| 2 Physical Monitor Name | View the name of a monitor. Click the arrow in the combo box to view the name of each monitor.(e.g. OEM-FOPKHI1S10GI) |
| 3 Check | View the actual location of a monitor corresponding to the Physical Monitor Name.If you select a monitor name in the Physical Monitor Name combo box and click the Check button, the monitor name is displayed on the screen of the corresponding video wall monitor. |
The screen below shows a schedule that is allotted.
Click the button to view the status of the schedule that is being uploaded from VideoWall Console to the video wall monitors.
![Download Status FileServer Stop Log Schedule List [2010-01-21 ~] [00:00 ~ 23:59] 5555.vwl Device Name Status Detailed info. OEM-Y0QE7QFRF9G 100%](/content/2026/05/858866/images/2e153b26fcd85acdbbe489e2110d5390d09c896fd8f64e12015ba410083dd99d.jpg)
When the FileServer is inactive, the Start button is enabled, and when active, the Stop button is enabled.
To stop the operation of the FileServer, click . Stop To view log files for the FileServer, click . Log
Tips
If you place your mouse cursor over the area where a schedule is allotted, the name and time of the published content will appear.
Status
| 1 Schedule List | View the name of and date and time for the content to be played on the video wall monitors.When multiple schedules are published, press the arrow in the combo box to select a schedule you want. |
| 2 Device Name | View the name of a video wall monitor. |
| 3 Status | View the status of a schedule that is being uploaded from VideoWall Console to the video wall monitors as a percentage. |
| 4 Detailed info. | Shows details of a schedule being uploaded. |
In the Download Status window, the computer-shaped icon shows the status of the FileServer. (The grey monitor indicates the FileServer is inactive while the blue monitor indicates the FileServer is active.)
The red (or green) circle indicates the file transmission status of the FileServer. (The circle turns green if a file is being transmitted and turns red if no file is being transmitted.)
Deleting a Schedule
Click on the area where a schedule is allotted and click the button on the upper right corner.
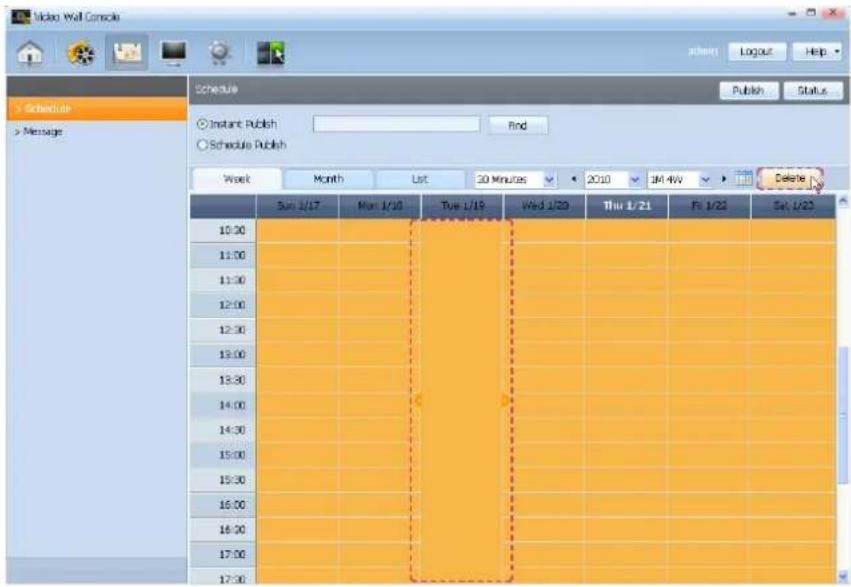
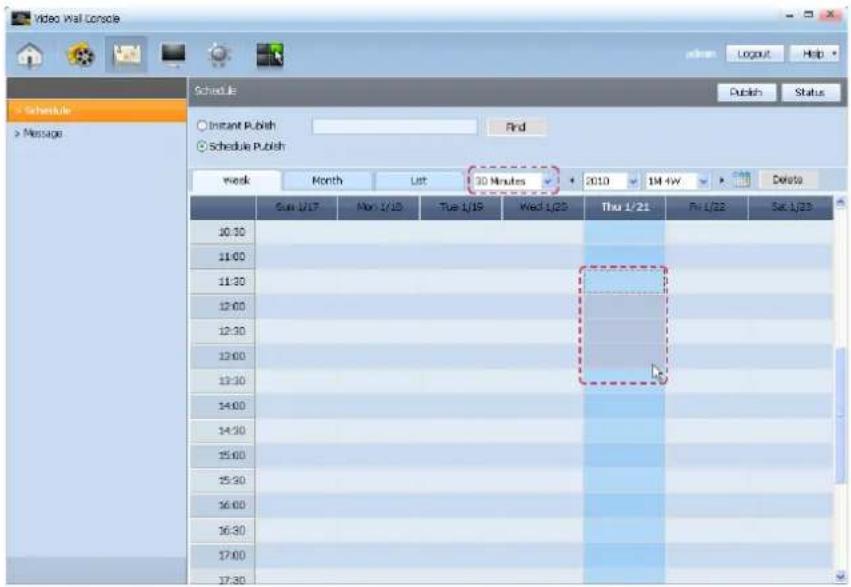
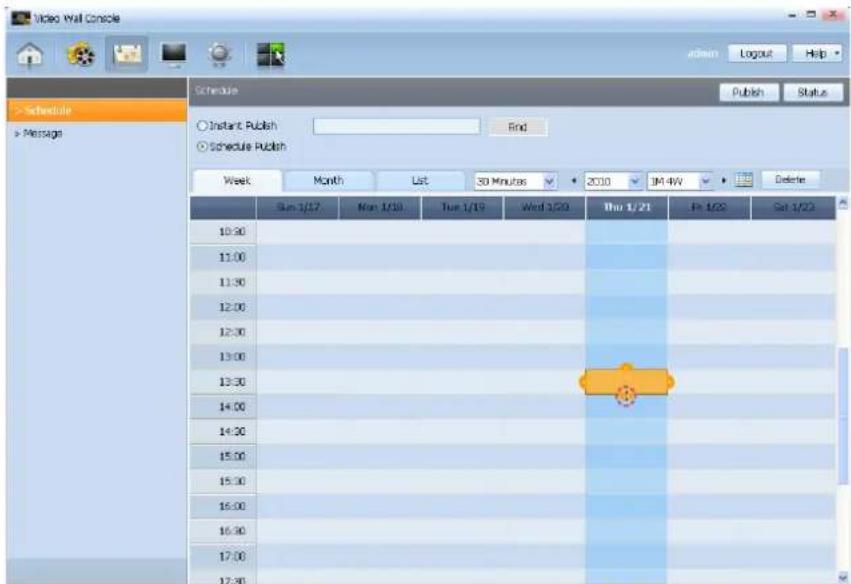
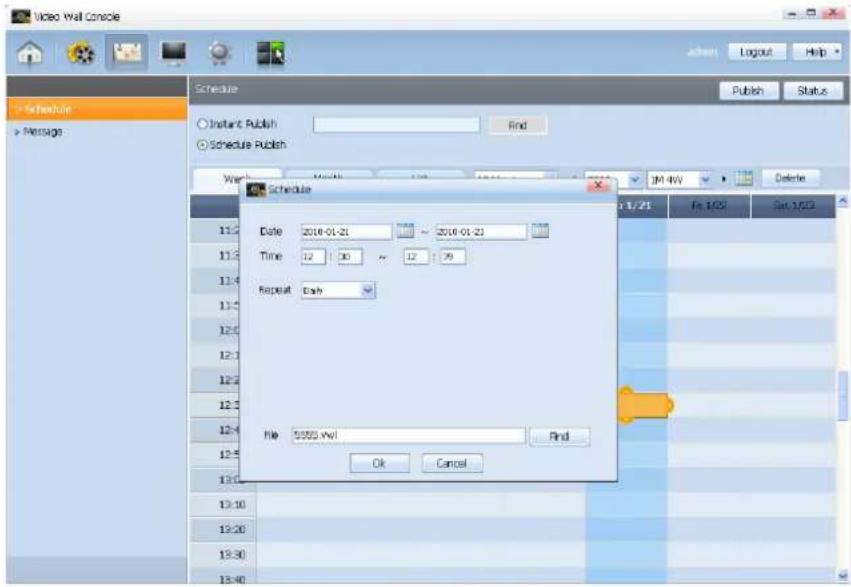
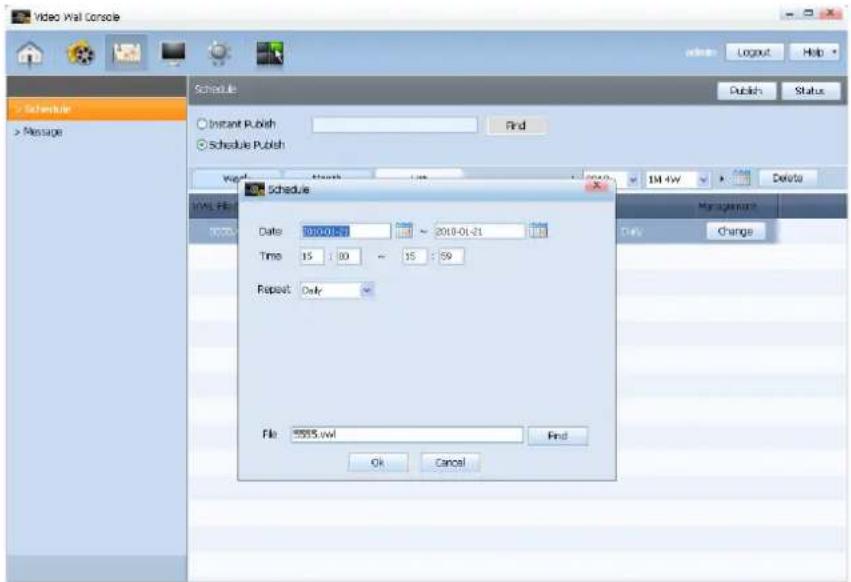
Schedule Publish
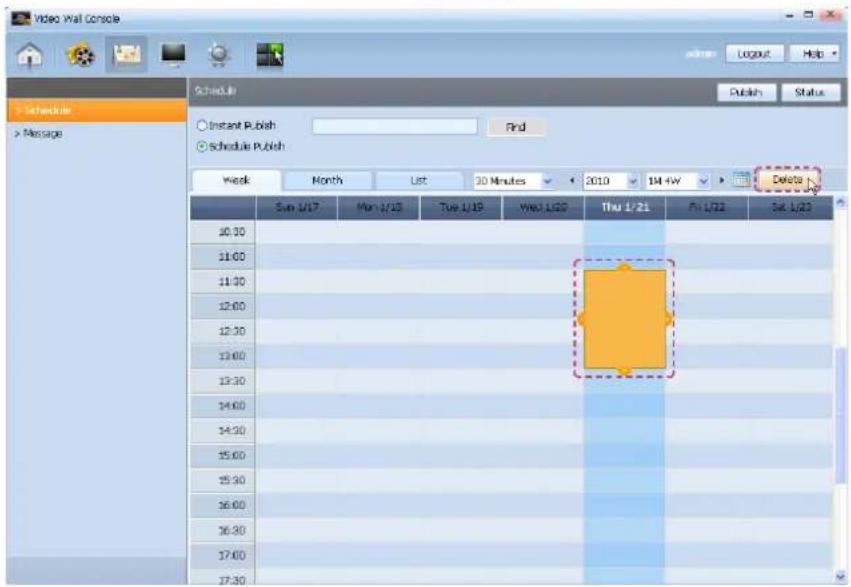
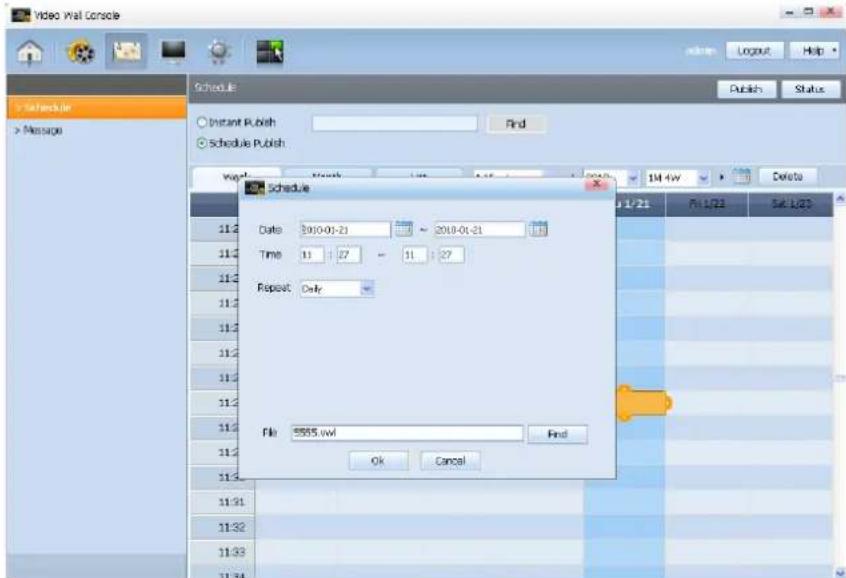
If you select Schedule Publish, you can register a schedule to a date and time slot of your choice.
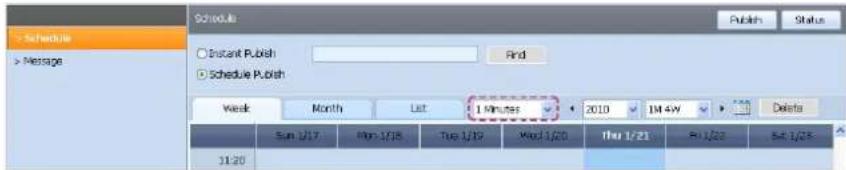
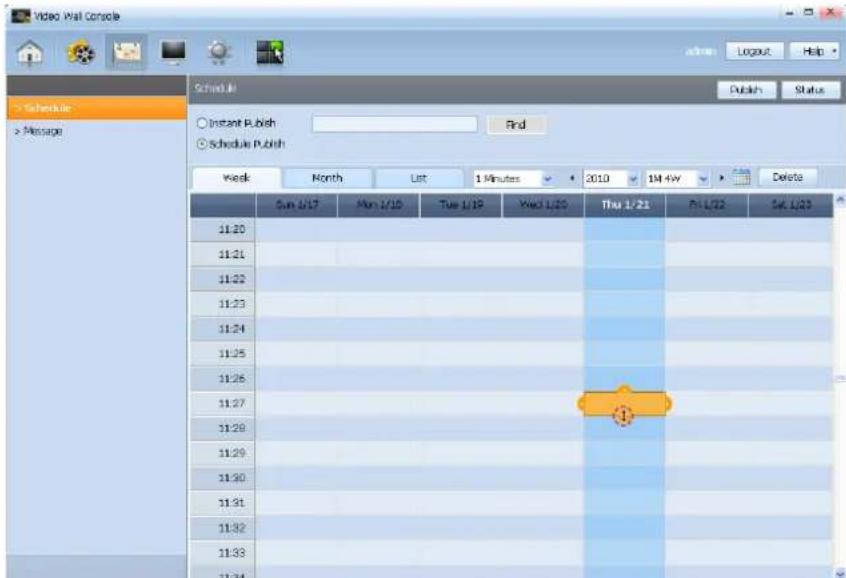
Select Schedule Publish, specify the date and time you want to schedule, and click or drag a time slot.
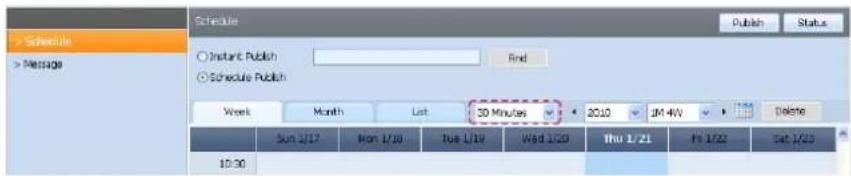
A schedule can be registered in 30 Minutes increments by default. To register a schedule more precisely, select time intervals in the combo box. (1 Minutes, 10 Minutes, 30 Minutes, 1 Hour(s)).
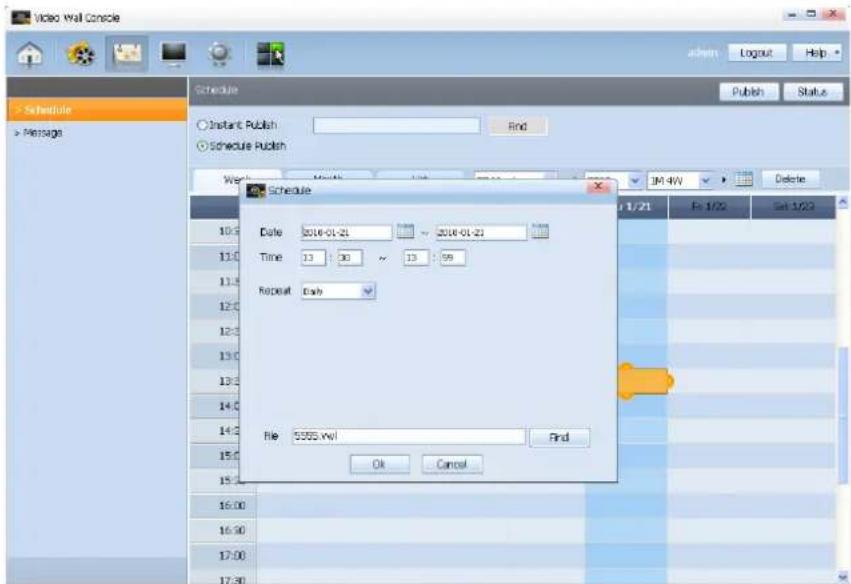
The settings page for registering a schedule is displayed.
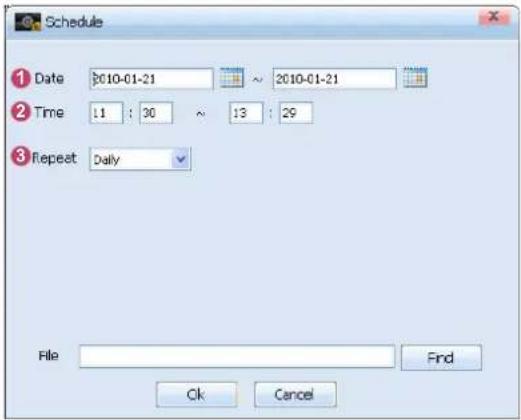
Click the button to select content, and click the button. OK
| Tips | |
| Registering a Schedule - | |
| 1 Date | Specify the date. |
| 2 Time | Specify the time. |
| 3 Repeat | Select to repeat a schedule.(Daily, Weekly, Monthly) |
| Daily Repeat a schedule at a specifiedtime on a specified date. | |
| Weekly Repeat a schedule on aspecified day every week. | |
| Monthly Repeat a schedule on aspecified date every month. | |
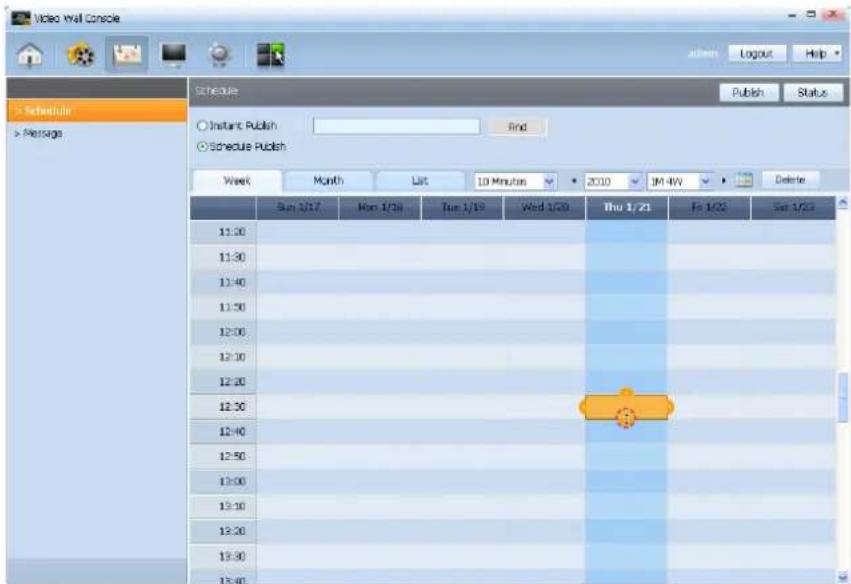
The screen below shows a schedule that is allotted.
If you click on a scheduled area, small arrows are created on each side of the clicked rectangular area. Drag these arrows to increase or decrease the time specified for the schedule.
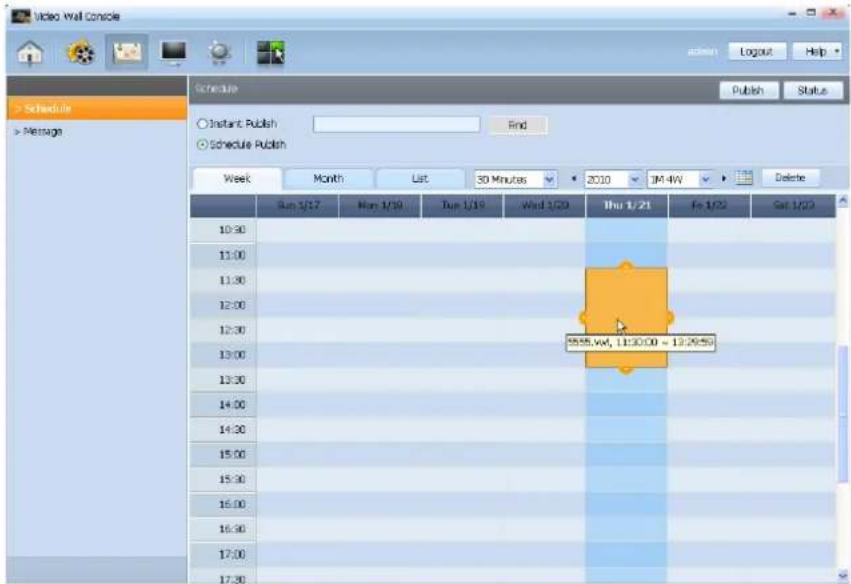
Click the button. On the displayed Mapping window, perform 1:1 mapping between the specified virtual monitors and physical video wall monitors.
Caution
Changing a Schedule
To change the time of a schedule using the arrows, the corresponding time slot must contain only one schedule.
(e.g. Viewing at 30 Minutes intervals
If schedules named A and B are allotted for 01:00\~01:10 and 01:20\~01:30 respectively, this means that the two schedules A and B are allotted to the same time slot (01:00\~01:30) and thus the arrows will not be created even if the scheduled time slot is clicked.)
Click the button to view the status of the schedule that is being uploaded from VideoWall Console to the video wall monitors.
![Video Wall Console Schedule List [2019-01-21 ~ [(11:09 - 13:25) 6888...xell] Device Name Status Detailed info. OB4-10Q87QPRP06 100%](/content/2026/05/858866/images/067db88eec1e127ff31fb0bbd0587b8e457a8e5ca5f0d1c93069235a2ce4ce83.jpg)
Deleting a Schedule
Click on a scheduled area and click the button on the upper right corner.
Tips
Status
In the Download Status window, the computer-shaped icon shows the status of the FileServer. (The grey monitor indicates the FileServer is inactive while the blue monitor indicates the FileServer is active.)
The red (or green) circle indicates the file transmission status of the FileServer. (The circle turns green if a file is being transmitted and turns red if no file is being transmitted.)
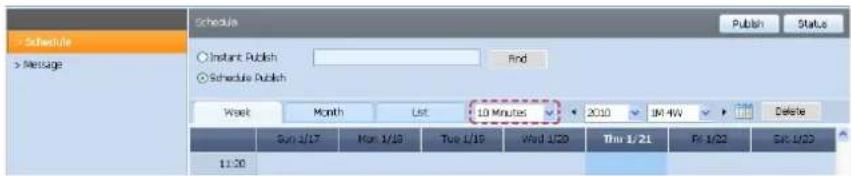
Viewing a Schedule
A schedule can be set and viewed by Week, Month or List.
Week
Viewing at 30 Minutes intervals
This is the default time interval setting by which seven-day schedules can be set in 30 Minutes increments and viewed at the specified intervals.
Double-click on a scheduled area to display the schedule settings window and change the allotted schedule.
Click on a scheduled area to create small arrows on the sides of the rectangular area. Drag these arrows to increase or decrease the time specified for the schedule.
Caution
Changing a Schedule
To change the time of a schedule using the arrows, the corresponding time slot must contain only one schedule.
(e.g. Viewing at 30 Minutes intervals
If schedules named A and B are allotted for 01:00\~01:10 and 01:20\~01:30 respectively, this means that the two schedules A and B are allotted to the same time slot (01:00\~01:30) and thus the arrows will not be created even if the scheduled time slot is clicked.)
Viewing at 1 Minutes intervals
Seven-day schedules can be set in one minute increments and viewed at the specified intervals.
Double-click on a scheduled area to display the schedule settings window and change the allotted schedule.
Click on a scheduled area to create small arrows on the sides of the rectangular area.
Drag these arrows to increase or decrease the time specified for the schedule.
Caution
Changing a Schedule
To change the time of a schedule using the arrows, the corresponding time slot must contain only one schedule.
(e.g. Viewing a schedule set in 1 Minutes increments at 30 Minutes intervals,
If schedules named A and B are allotted for 01:00\~01:05 and 01:05\~01:07 respectively, this means that the two schedules A and B are allotted to the same time slot (01:00\~01:30) and thus the arrows will not be created even if the scheduled time slot is clicked.)
Viewing at 10 Minutes intervals
Seven-day schedules can be set in 10 minutes increments and viewed at the specified intervals.
Double-click on a scheduled area to display the schedule settings window and change the allotted schedule.
Click on a scheduled area to create small arrows on the sides of the rectangular area. Drag these arrows to increase or decrease the time specified for the schedule.
Caution
Changing a Schedule
To change the time of a schedule using the arrows, the corresponding time slot must contain only one schedule.
(e.g. Viewing a schedule set in 10 Minutes increments at 30-Minutes intervals,
If schedules named A and B are allotted for 01:00\~01:10 and 01:10\~01:20 respectively, this means that the two schedules A and B are allotted to the same time slot (01:00\~01:30) and thus the arrows will not be created even if the scheduled time slot is clicked.)
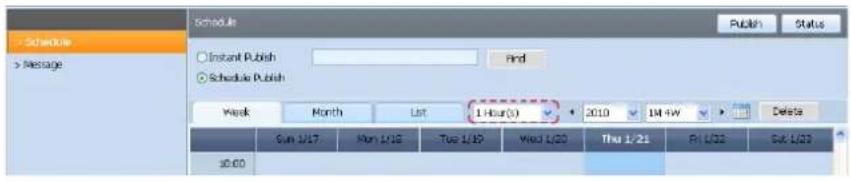
Viewing at 1 Hour(s) intervals
Seven-day schedules can be set in one hour increments and viewed at the specified intervals.
Double-click on a scheduled area to display the schedule settings window and change the allotted schedule.
Click on a scheduled area to create small arrows on the sides of the rectangular area.
Drag these arrows to increase or decrease the time specified for the schedule.
Caution
Changing a Schedule
To change the time of a schedule using the arrows, the corresponding time slot must contain only one schedule.
(e.g. Viewing a schedule set in 30 Minutes increments at one-Hours intervals,
If schedules named A and B are allotted for 01:00\~01:30 and 01:30\~02:00 respectively, this means that the two schedules A and B are allotted to the same time slot (01:00\~02:00) and thus the arrows will not be created even if the scheduled time slot is clicked.)
Month
Monthly schedules can be viewed. Days with schedules are marked in yellow.
Double-click on a scheduled area to display the schedule settings window and change the schedule settings.
Caution
Changing a Schedule
A scheduled area where more than one schedule is allotted does not display the schedule settings window even if it is double-clicked.
Changing a schedule using UI in the VideoWall Console is only possible in weekly viewing mode.
List
Registered schedules can be viewed in the form of a list.
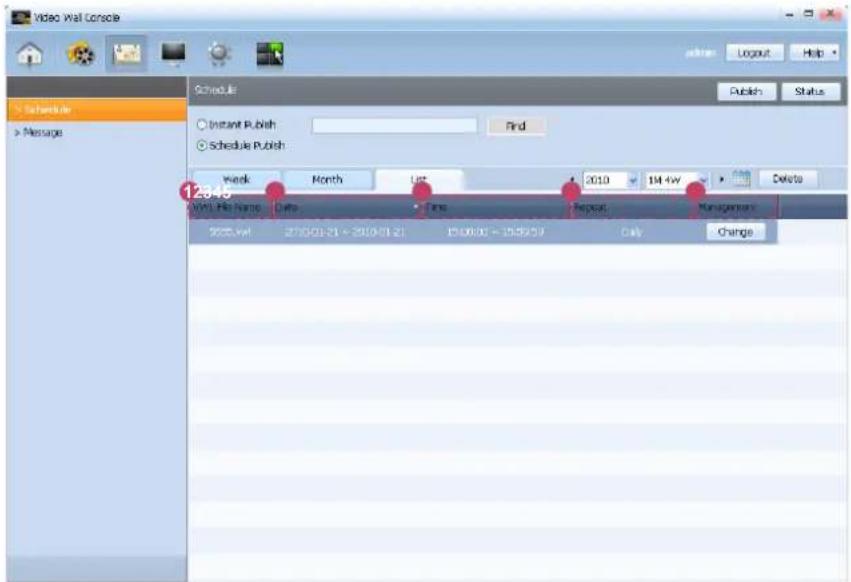
Press the button in the window to make changes.
⑤ Management tab to display the schedule settings
If you choose a date, time and repeat cycle and click the button, the schedule is updated according to the changes made.
| Tips | |
| 1 VWL File Name | View the file name. |
| 2 Date | View the date a schedule is allotted. |
| 3 Time | View the time a schedule is allotted. |
| 4 Repeat | Select to repeat a schedule. (Daily, Weekly, Monthly) |
| 5 Management | Click the Change button to change details of a schedule. |
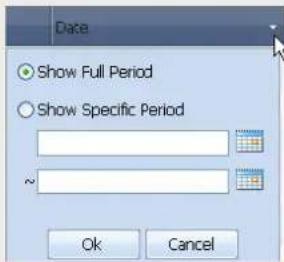
Setting the View Period
The search time period can be selected by clicking the arrow next to the ② Date tab.
(Show Full Period or Show Specific Period)
Message Schedule
A message schedule can be created, viewed and published.
You cannot set a message schedule unless the VideoWall Console and video wall device are connected.
First, select a message schedule.
Below is the main page for the message settings.
On this page, the content of a message schedule can be written and related settings, such as font, scroll, location and alignment, can be changed.
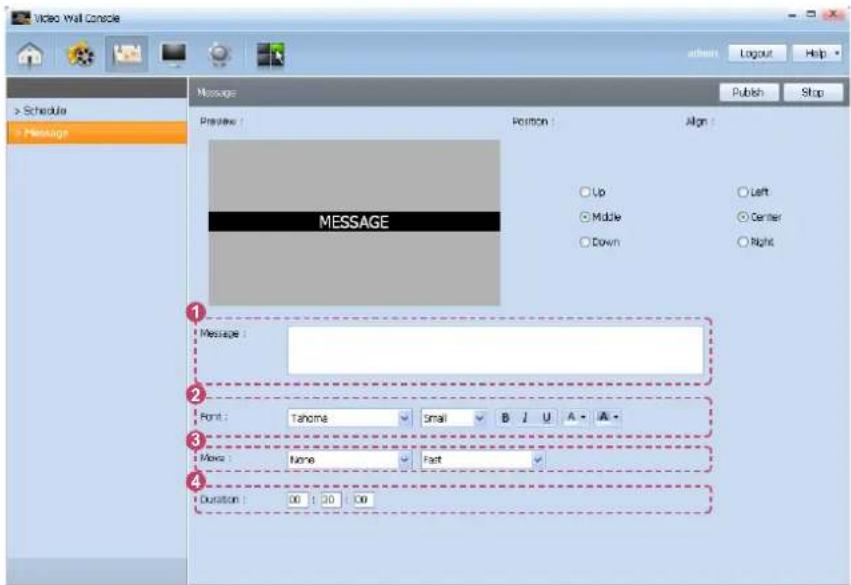
Preview

The screen containing the configured Position and Align settings for a message can be previewed.
| Tips | |
| 1 Message | Enter content of a message to publish. |
| 2 Font | Define the font face, size and color of text and background color of a message. |
| 3 Move | Define the movement direction and speed of a message. |
| 4 Duration | Define the time at which a published message will be displayed using the order: hour, minute, second. |
Caution
Previewing a message
Details of a message cannot be previewed.
(Locked to display MESSAGE only.)
Position
Select the position (
e.g.) When

e.g.) When
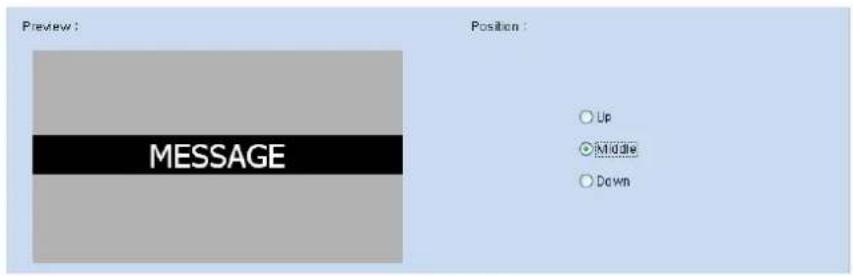
e.g.) When
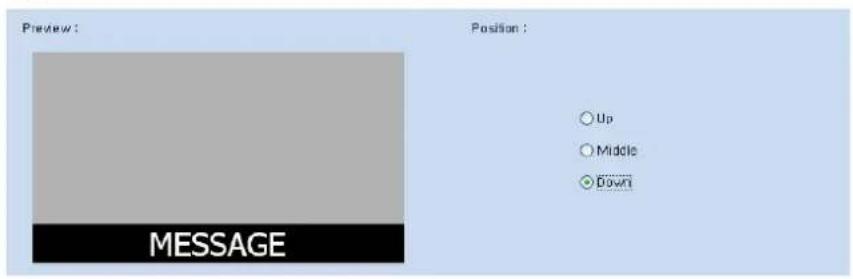
As shown in the images above, the position of a message can be set to
Align
Select the alignment (
e.g.) When
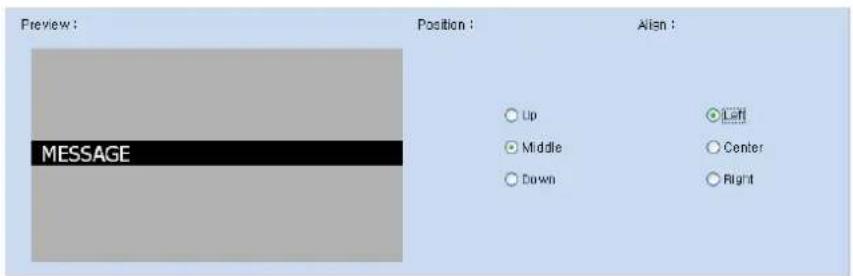
e.g.) When
e.g.) When
As shown in the images above, the alignment of a message can be set to
After the position and alignment settings for a message are completed, click the publish button to publish the message to the video wall monitors.
If you want to stop playback of a published message before it ends, click the button.
Device
In Device, detailed settings for the video wall monitors, including basic on/off functions, remote access settings, name of monitor and network addresses, can be changed.
In Job Schedule, you can assign instructions to monitors to perform a task at a specific time.
In Log, you can view or delete your log files.
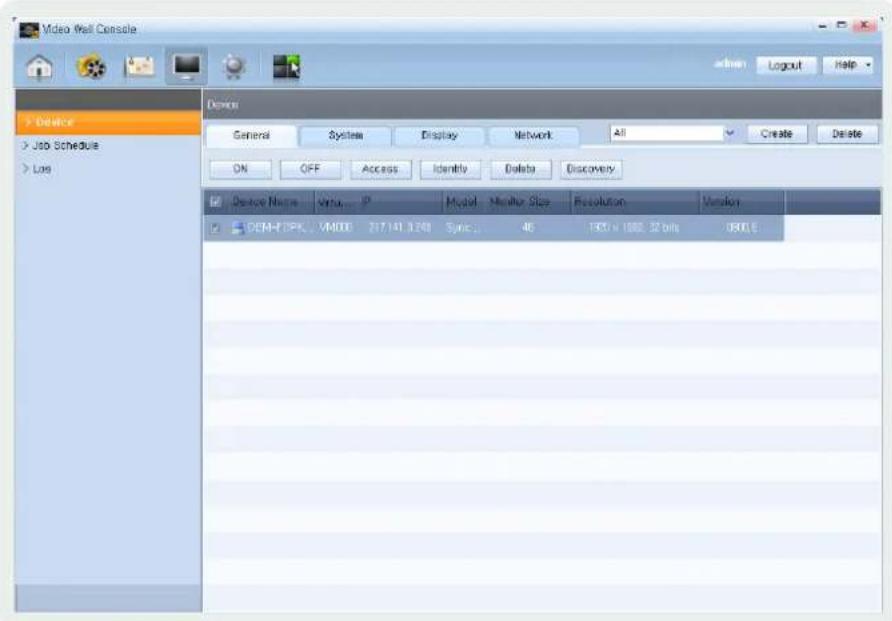
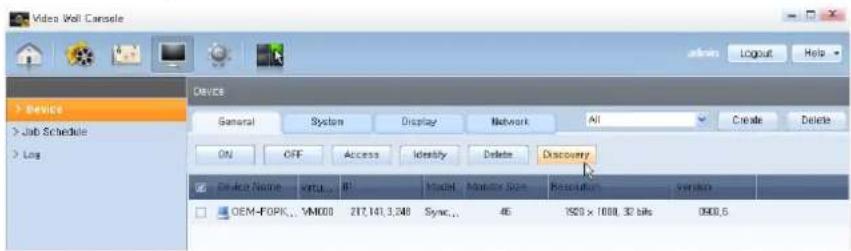
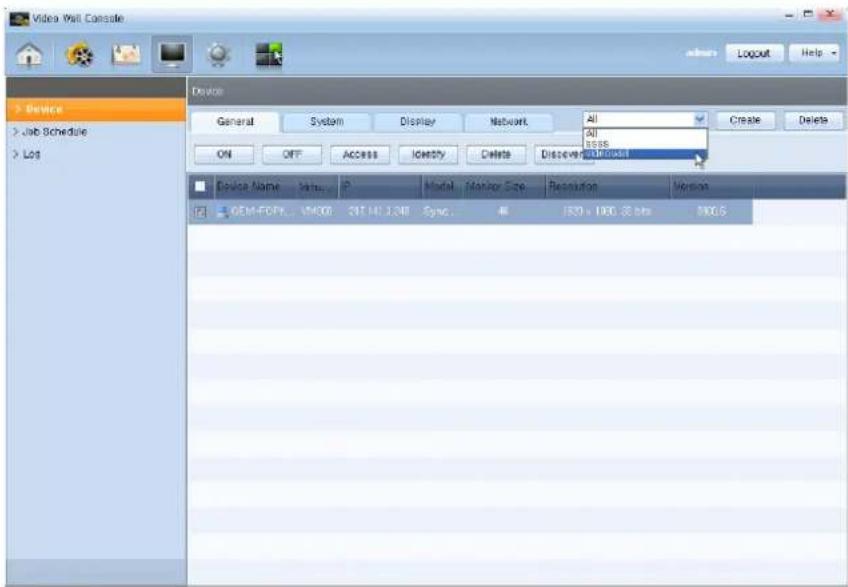
Device
You can view all the video wall monitors connected to the VideoWall Console. You can also view detailed information for both active and inactive monitors of the video wall, and remotely access and control the monitors.
General
Product information of the video wall monitors connected to the VideoWall Console can be viewed.
Various functions can be performed on a particular monitor using the ON, OFF, Access, Identify, Delete and Discovery buttons at the top.
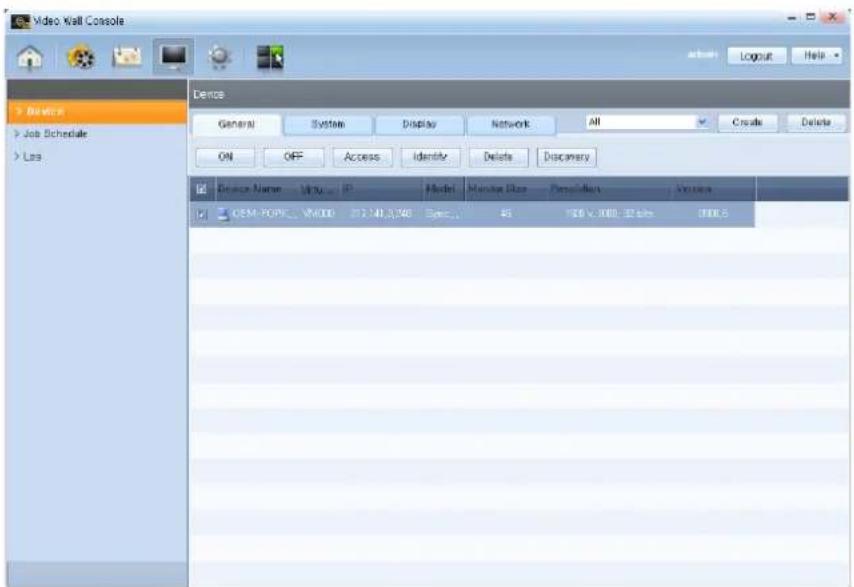
| Device Name | View the name of a monitor. |
| Virtual Monitor Name | View the name of a virtual monitor defined in the authoring tool. |
| IP | View the IP address of a monitor. |
| Model | View the model name of a monitor. |
| Monitor Size | View the size of a monitor. |
| Resolution | View the resolution of a monitor. |
| Version | View the version of a monitor. |
ON
Select a monitor and click the button to connect the monitor to the VideoWall Console.
OFF
Select a connected monitor and click the button to disconnect the monitor from the VideoWall Console.
Tips
Select All
Select the checkbox on the top menu bar to select all the monitors that are registered.

ON, OFF -
A small computer icon can be found before the name of a monitor.
The status of connection between a monitor and the VideoWall Console is indicated by the change in the status of this icon.
| The video wall monitor is connected to the VideoWall Console. | |
| The video wall monitor is not connected to the VideoWall Console. |
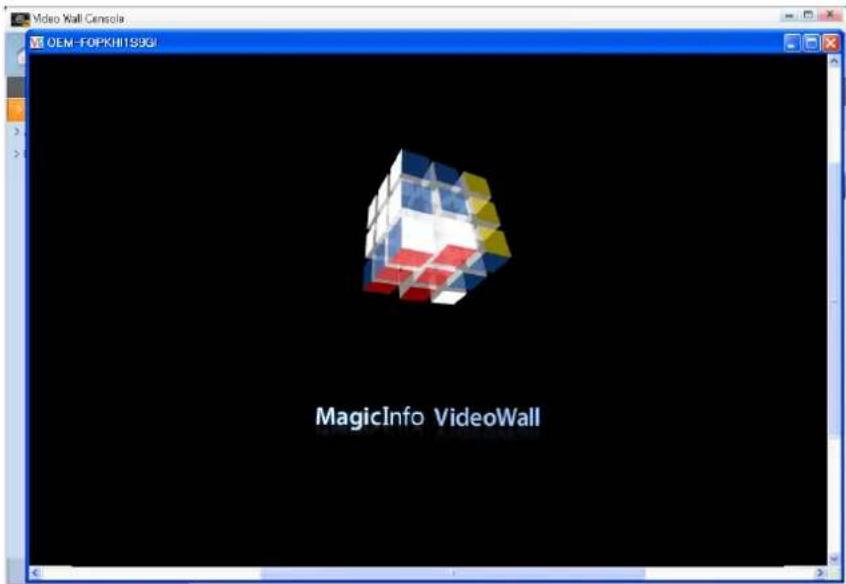
Access
The monitors connected to the VideoWall Console can be controlled remotely.
Select a monitor for remote access and click the button.
The remote access screen will appear and the content being played on the selected monitor will be displayed.
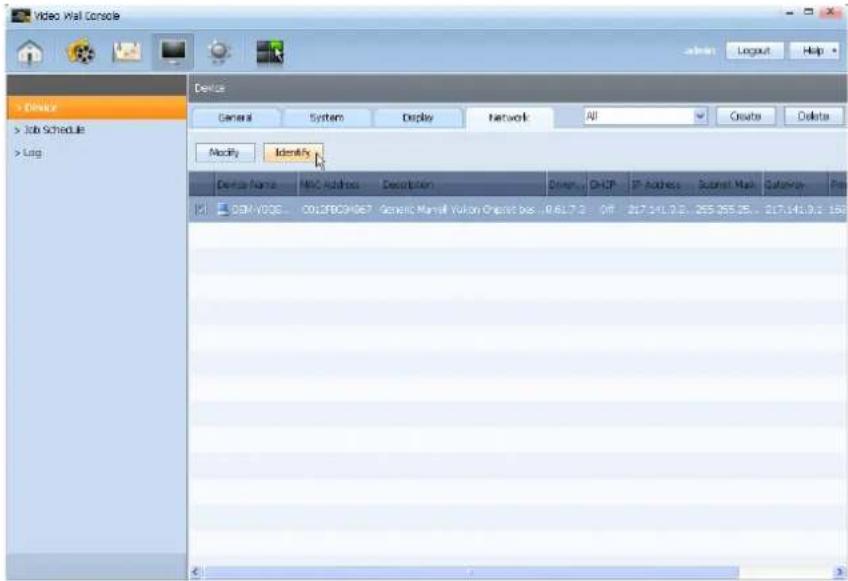
Identify
The name and actual location of a monitor can be viewed.
If you select a monitor and click the , the monitor name is displayed on the screen of the corresponding video wall monitor.
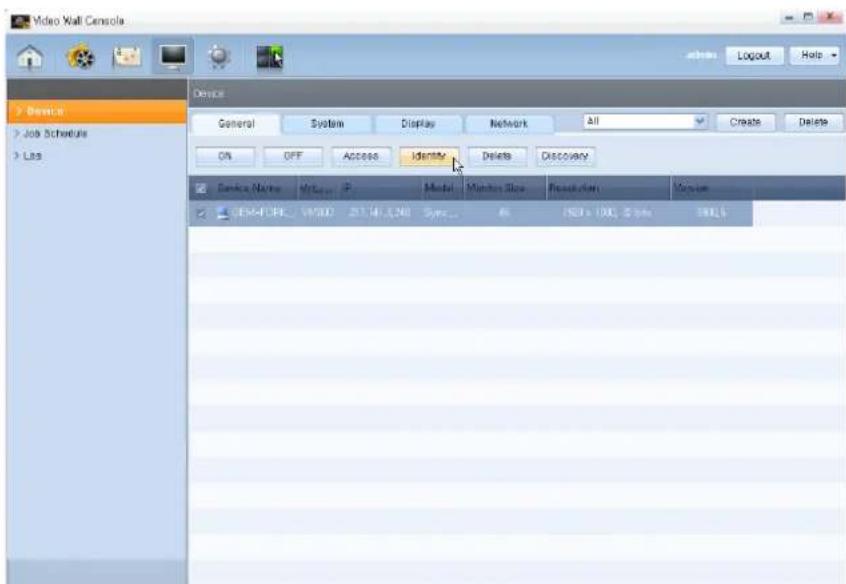
In the above image, the monitor name is
Delete
Delete a monitor from the search list.
If you select a monitor and click the button, the corresponding video wall monitor is deleted from the search list.

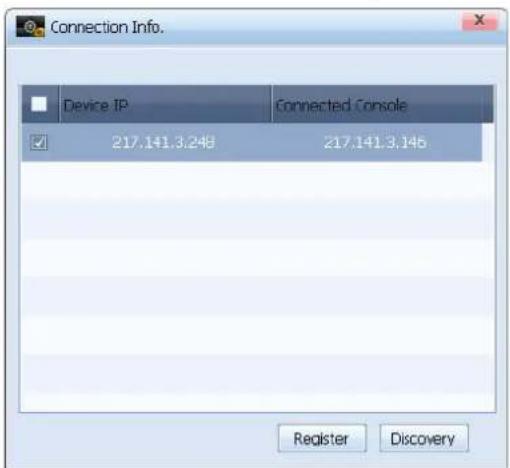
Discovery
If you press the \$i video wall monitors connected to the same network will be searched and registered.
You can select a device you want to register from the list of video wall devices displayed in the Connection Info. window or check the checkbox at the top to register all devices.
After you select a video wall device, click the button.
Tips
Discovery Function
If the Discovery function is executed, VideoWall Clients currently running on the local network connect automatically.
If the PC where VideoWall Console is installed has more than one network card, use the network card selection function in the Settings tab to connect to the video wall monitors.
Creating a Group
In VideoWall Console, a group of monitors can be created.
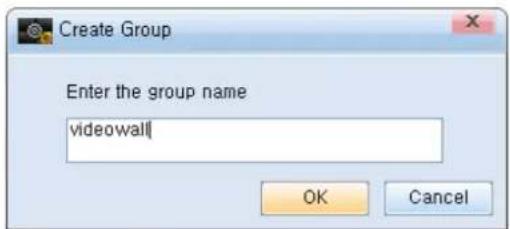
Select monitors to create a group and press at the top to display the group creation window.
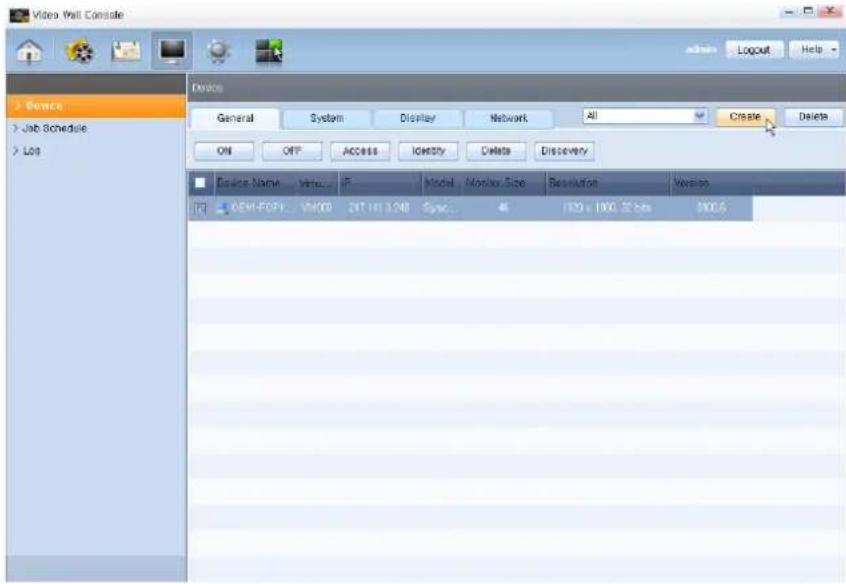
Enter a group name and press . OK
If you select a group in the combo box at the top, only the monitors that belong to the selected group can be viewed.
Tips
If you do not create a group or select All in the combo box, all the monitors connected to the VideoWall Console can be viewed.
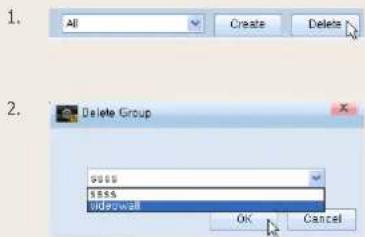
Deleting a Group
If you press the Delete button next to the combo box at the top and select a group to delete, the group is deleted from the combo box.
System
System information of monitors connected to the VideoWall Console can be viewed.
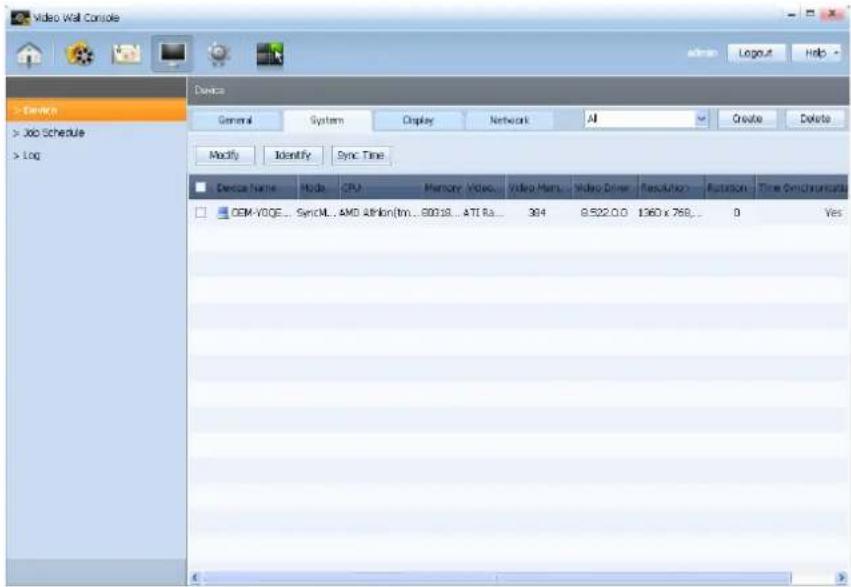
| Device Name | View the name of a monitor. |
| Model Name | View the model name of a monitor. |
| CPU | View the type of CPU on a monitor. |
| Memory | View the memory size of a monitor. |
| Video Adapter | View the details of a graphics card connected to a monitor. |
| Video Memory | View the memory size of a graphics card connected to a monitor. |
| Video Driver | View the video driver installed on a monitor. |
| Resolution | View the resolution of a monitor. |
| Rotation | View the rotation angle of a monitor. |
| Time Synchronization | View if the time on a monitor is synchronized with the VideoWall Console. |
| Yes | The time on a monitor is synchronized with the VideoWall Console. |
| No | The time on a monitor is not synchronized with the VideoWall Console. |
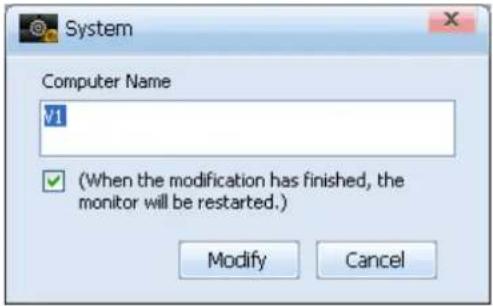
Modify
If you select a monitor and press the button, the monitor can be renamed.
Check the
Identify
The name and actual location of a monitor can be viewed.
If you select a monitor and click the ,the monitor name is displayed on the screen of the corresponding video wall monitor.

In the above image, the monitor name is
Tips
Renaming a Computer
It is recommended a computer is given a name that can easily be identified by the user in order to publish and manage schedules conveniently.
Sync Time
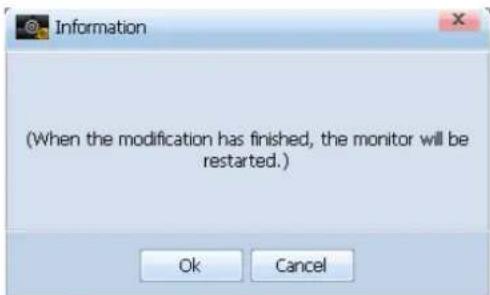
If you select a monitor and press the button, the time on the monitor is synchronized with the VideoWall Console.
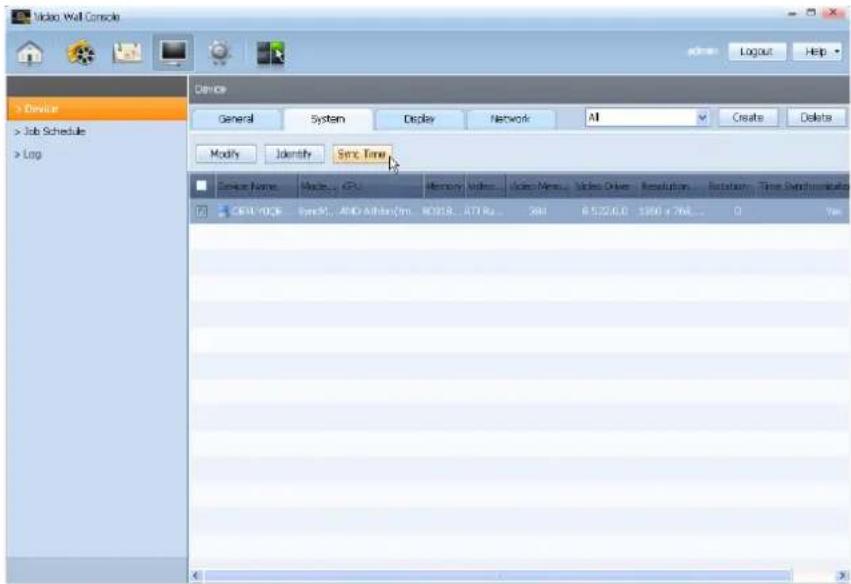
For time synchronization update, the monitor will restart automatically.
Click the button.
Tips
Synchronizing the Time
Check if the Time Synchronization item in the list is set to
If it is not
Display
You can view preset settings for monitors connected to the VideoWall Console, such as display brightness, volume, channel and mute.
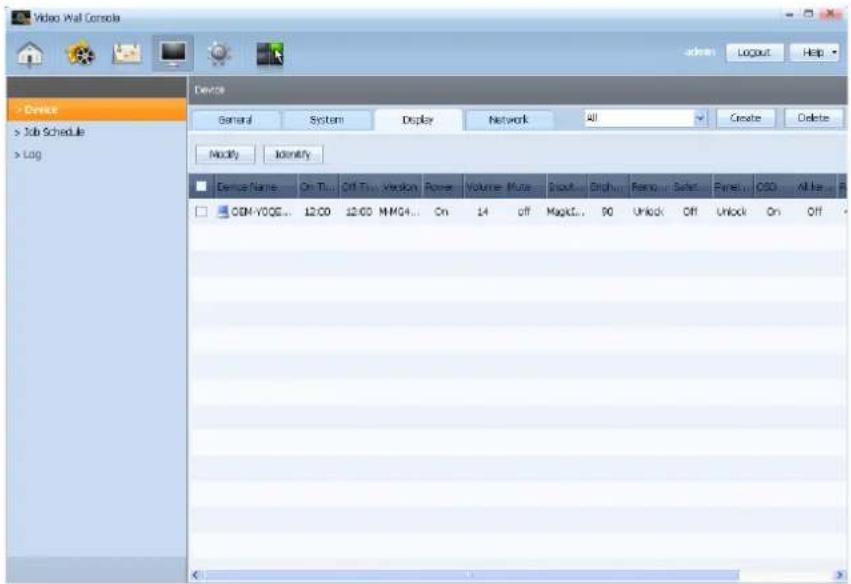
| Device Name | View the name of a monitor. |
| On Time | View the time when a monitor was initially connected. |
| Off Time | View the time when a monitor was disconnected. |
| Version | View the display version of a monitor. |
| Power | View the power status of a monitor. |
| Volume | View the volume setting of a monitor. |
| Mute | View the mute setting of a monitor. |
| Input Source | View the playback source being displayed on a monitor. |
| Brightness | View the screen brightness setting of a monitor. |
| Remote Control | View the remote control setting for a monitor. (Lock/Unlock) |
| Safety Lock | View whether a safety lock is set for a monitor. |
| Panel Lock | View the panel lock setting for a monitor. (Lock/Unlock) |
| OSD | View the On/Off setting for OSD on a monitor. |
| All Keys Lock | View whether All Key Lock is set for a monitor. |
| Panel On Time | View the duration for which a monitor remained turned on. |
| Temperature | View the temperature of a monitor. |
| Panel | View the panel status of a monitor. |
Modify
If you select a monitor and press, 'you can make changes to preset settings, such as display brightness, volume, channel and mute, and send the changed settings to the monitor.
![Display CEM-3285QW7951 Select All Deselect All Command Type Comma_Data Time 0x01 5 On Time 0x02 6 Off Time 0x03 6 Power 0x11 1 Volume 0x12 1 Muto 0x13 1 Input Source 0x14 1 Picture Size 0x15 1 Direct Channel 0x17 8 Contrast 0x21 1 Brightness 0x25 1 Sharpness 0x26 1 Color 0x27 1 Tint 0x28 1 Red Gain 0x29 1 Green Gain 0x24 1 Blue Gain 0x28 1 Treble 0x2C 1 Base 0x29 1 Balance 0x2E 1 Counter 0x2F 1 Command Data Description Command Type [CommandType] Data Count [DataCount] Send Cancel](/content/2026/05/858866/images/306b74fef916a4fa139e7db628ff208a4b19690cca9b4ea1bf74f12a435702aa.jpg)
After all the detailed settings are completed, press to send the settings to the corresponding monitor.
Identify
The name and actual location of a monitor can be viewed.
If you select a monitor and click the , the monitor name is displayed on the screen of the corresponding video wall monitor.
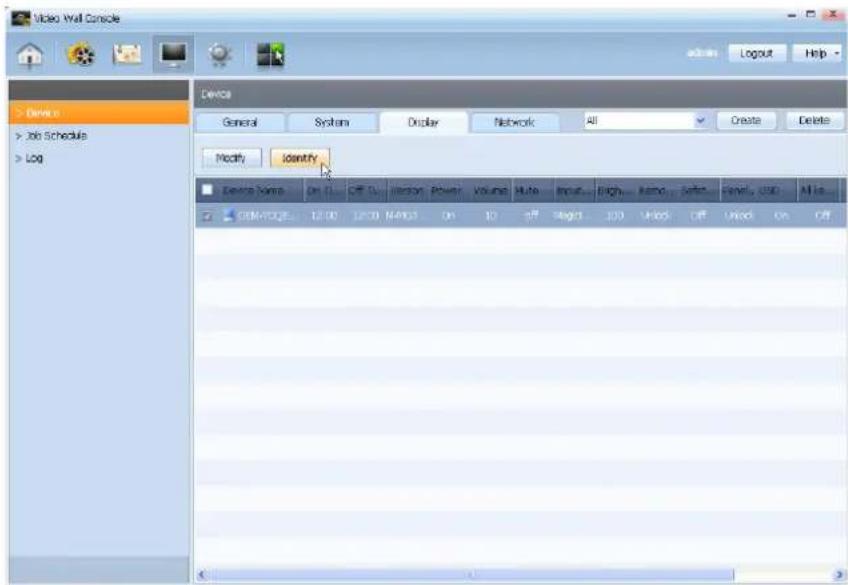
Tips
| 1 Monitor Name | View the name of a monitor. |
| 2 Select All | Select all the devices on the list. |
| Deselect All Deselect all the devices on the list. | |
| 3 Command Type | View a Command that will be issued to the video wall monitors. |
| 4 Command | Send a user-issued Command as codes to the video wall monitors. |
| 5 Data Count | View the number of sub-commands contained in an issued Command. |
| 6 Description | View a description of a Command to be issued. |
Caution
Modify
If the Modify function is disabled in the Display tab, go to
Network
Network information of monitors connected to the VideoWall Console can be viewed.
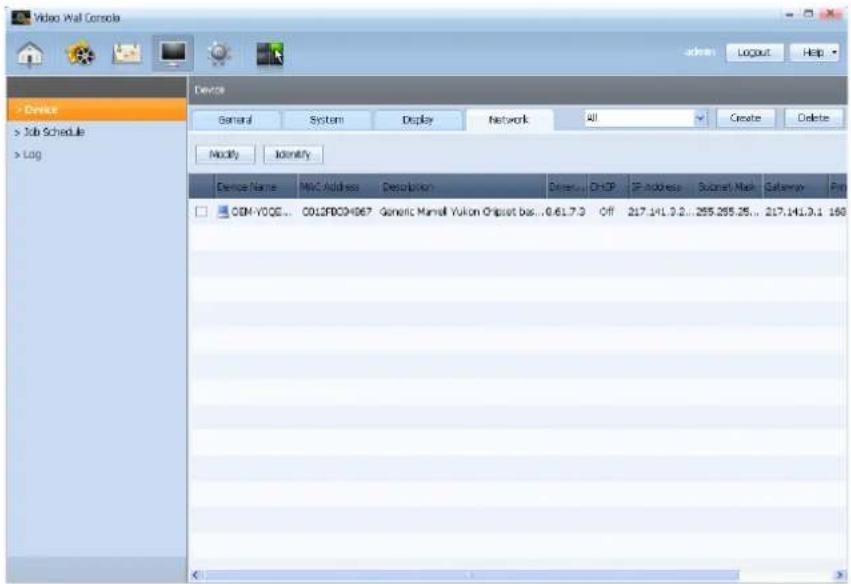
| Device Name | View the name of a monitor. |
| MAC Address | View the MAC address of a monitor. |
| Description | View the network card information for a monitor. |
| Driver Version | View the network driver version for a monitor. |
| DHCP | View the DHCP status of a monitor. |
| IP Address | View the IP address of a monitor. |
| Subnet Mask | View the subnet address of a monitor. |
| Gateway | View the gateway address of a monitor. |
| Primary DNS | View the primary DNS server address of a monitor. |
| Secondary DNS | View the secondary DNS server address of a monitor. |
Modify
Select a monitor and press the button.
The option to obtain an IP address automatically or to use a user-defined address can be selected. In this window, you can define detailed settings such as IP Address, Subnet Mask and Default Gateway.
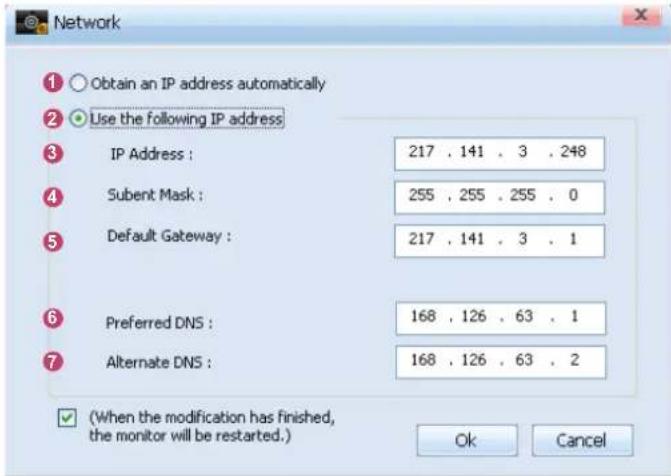
After completing the network setup, check the
Identify
The name and actual location of a monitor can be viewed. If you select a monitor and click the ,the monitor name is displayed on the screen of the corresponding video wall monitor.
Tips
| 1 Obtain an IP address automatically | Select this mode to obtain an IP address automatically. |
| 2 Use the following IP address | Select this mode to use a user-defined IP address. |
| 3 IP Address | Set the IP address for a monitor. |
| 4 Subnet Mask | Set the subnet address for a monitor. |
| 5 Default Gateway | Set the gateway address for a monitor. |
| 6 Preferred DNS | Set the primary DNS server address for a monitor. |
| 7 Alternate DNS | Set the secondary DNS server address for a monitor. |
Changing the IP -
It is recommended that a static IP is used for ease of setting up a connection between VideoWall Console and VideoWall Client.
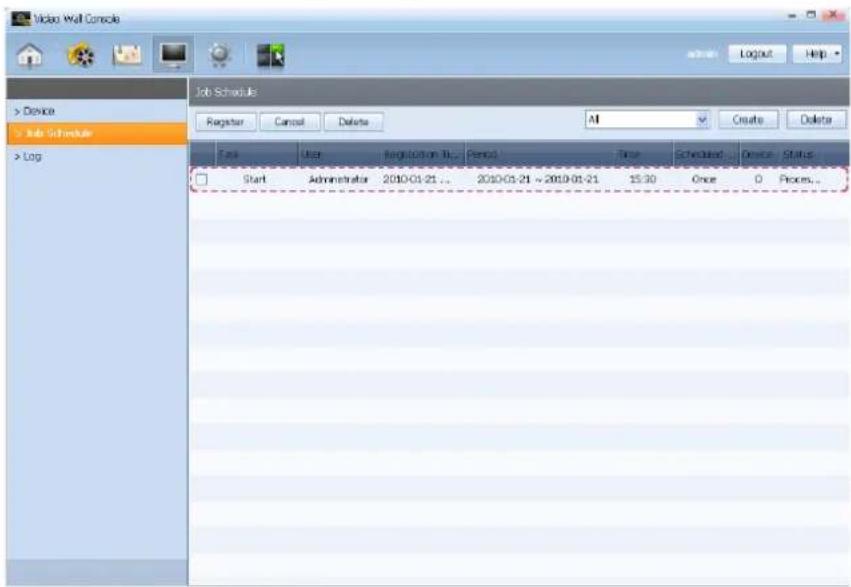
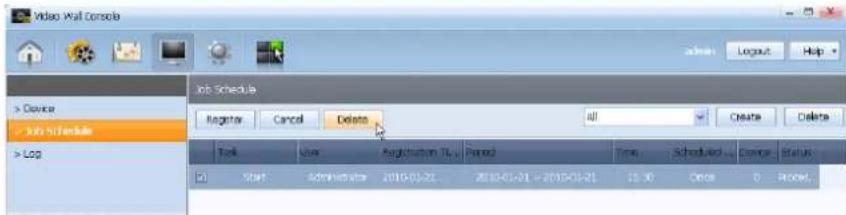
Job Schedule
You can assign instructions to monitors connected to the VideoWall Console to perform a Job Schedule, or edit, cancel or delete a job schedule, by week or time slots.
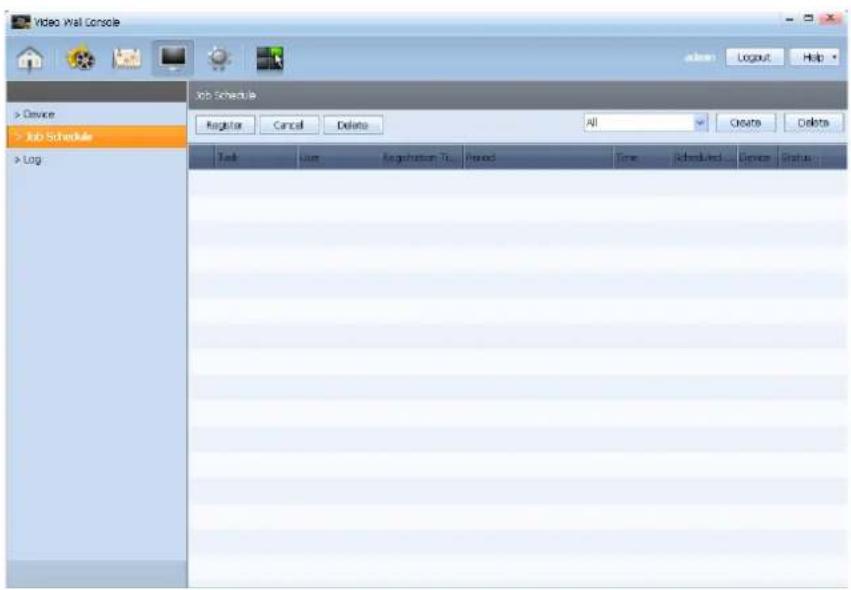
| Task | View content of a task assigned to the monitors. |
| User | View the name of a user that assigned instructions to a monitor to perform a task. |
| Registration Time | View the time when a task was initially assigned to the monitors. |
| Period | View the length of time for a job schedule to run on a monitor. |
| Time | View the time when a job schedule is run on the monitors. |
| Scheduled Time | View the frequency of a job schedule running on the monitors for a specified period of time. |
| Device | View the number of monitors that were assigned to perform a task. |
| Status | View the processing status of a job schedule sent to the monitors. |
Register
You can remotely instruct the monitors connected to the VideoWall Console to perform a task.
Press the button at the top.
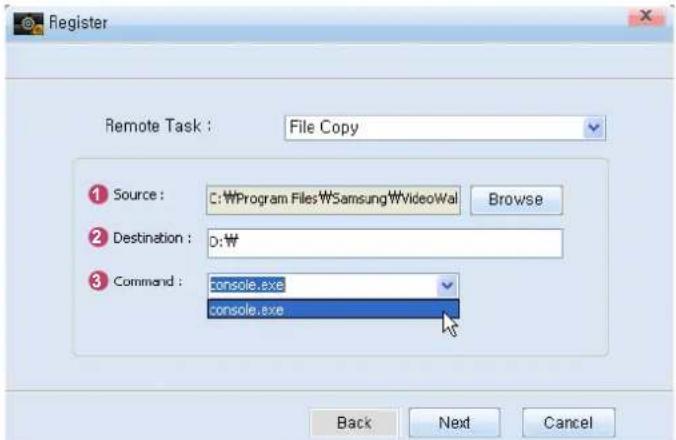
The Remote Task comprising a total of 7 tasks (File Copy, Delete File, Run Command, System Control, Kill Process, Service Control, Close Window) can be found.
File Copy
File Copy issues a command to copy a user-specified file to the monitors.
Delete File
Delete File issues a command to delete a user-specified folder or file from the monitors.
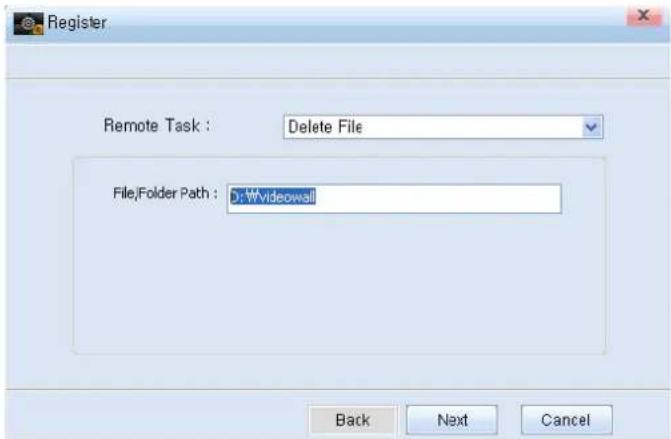
Enter the path of the file or folder you want to delete from the monitors.
If you enter D:\videowall, for example, the videowall folder in the D drive on the monitors will be deleted.
| Tips | |
| 1 Source | PressBrowseand specify the file location to select a file that will be copied to the monitors. |
| 2 Destination | Enter a destination directory where a file will be copied on the monitors. |
| 3 Command | Issue a Command to run an executable file with the extension like .exe immediately after the file is copied to the monitors. |
Run Command
Run Command issues the command the user wants to run on the monitors.
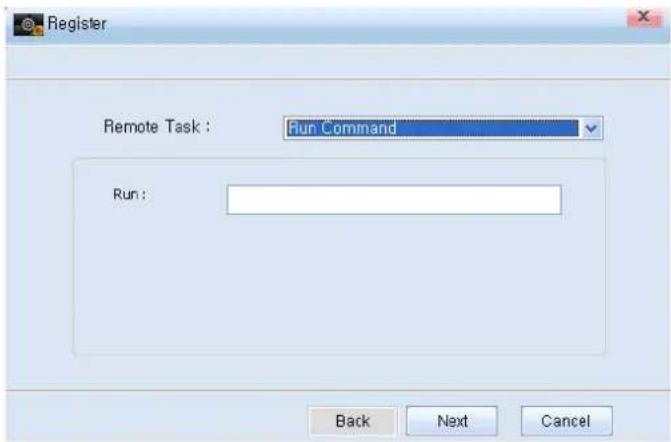
Enter the command you want to run in the Run field.
System Control
System Control issues a command on the power status of the monitors.
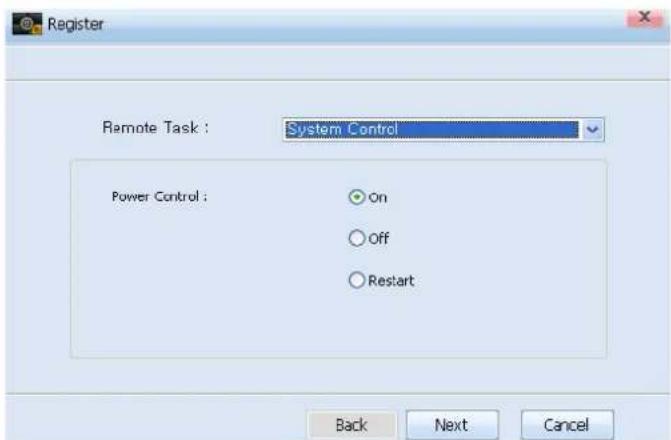
In the Power Control options, select On, Off or Restart for the monitors.
Kill Process
Kill Process issues a command to end a currently running process.
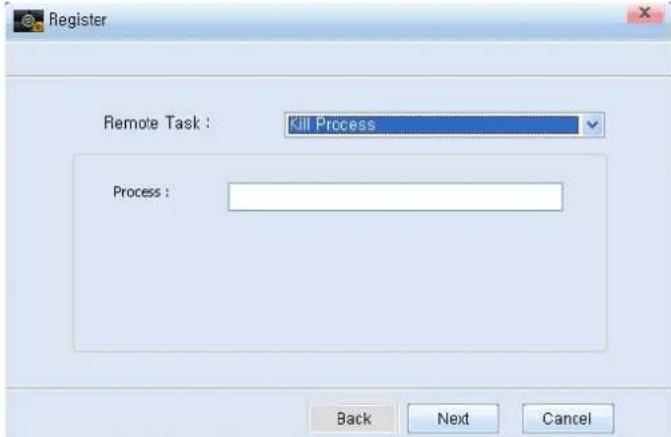
Enter the process running on the monitors in the Process field.
Service Control
Service Control issues a command on the status of services to the monitors.
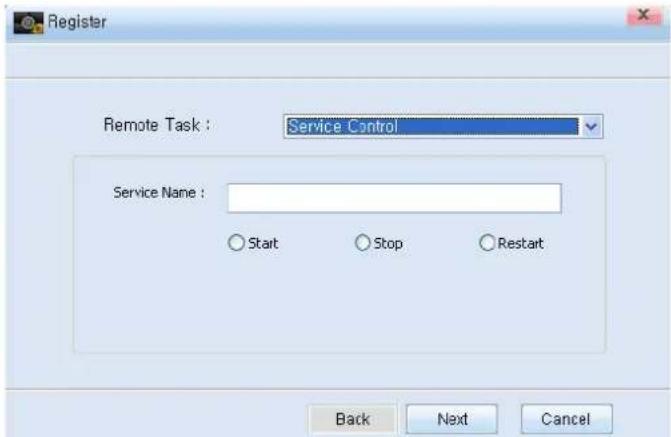
Enter the name of service you want to instruct the monitors to perform. You can instruct to Start, Stop or Restart the service using the options below the Service Name field.
Close Window
Close Window issues a command to close a user-selected window on the monitors.
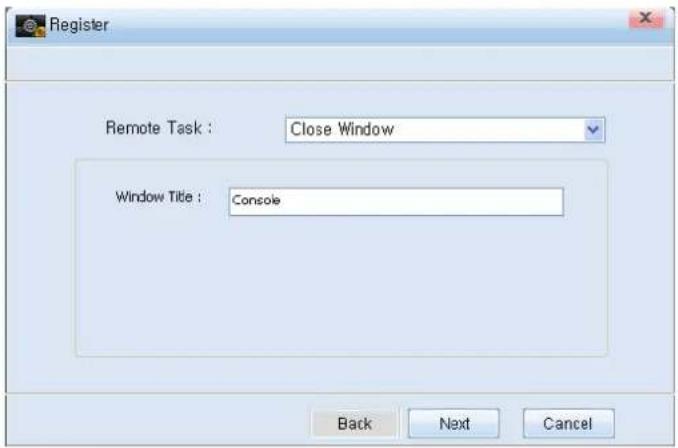
Enter the name of the window you want to close in the Window Title field.
Define the Remote Task you need and its detailed settings, and press the Next button. The window where you can specify the period, date and time to run the command will be displayed.
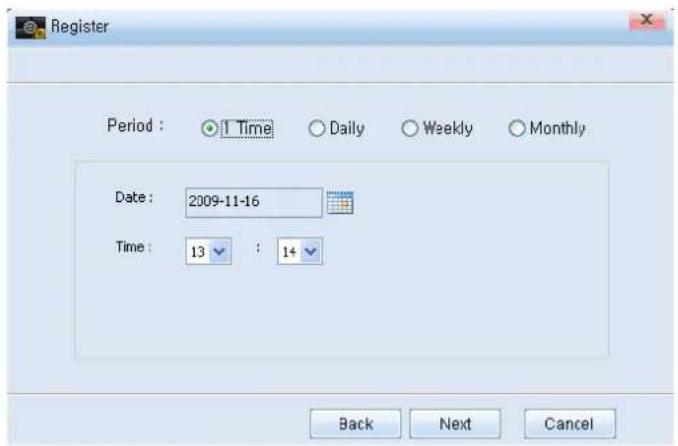
After you define the period, date and time to run a task, press the button and select monitors to assign instructions to perform the task.
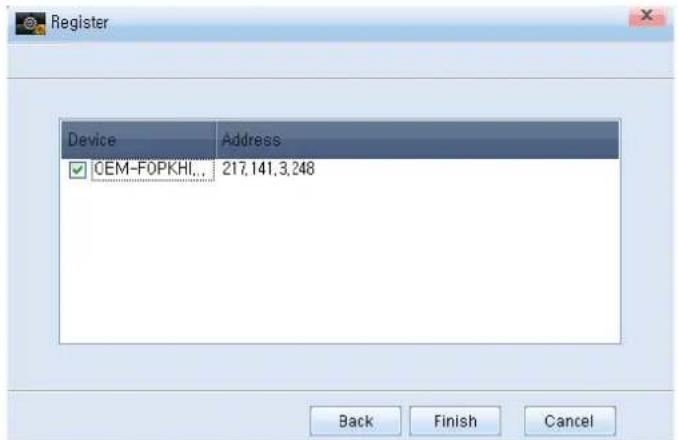
Press the button to finish the process to change settings.
Press the button to return to the previous stage.
Press the button to cancel the changes to settings.
Below is a screenshot showing an assigned Job Schedule.
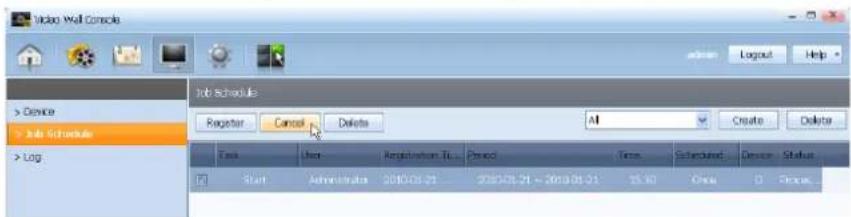
Cancel
An assigned Job Schedule can be canceled.
Select the Job Schedule you want to cancel and press .Cancel
The window asking if you want to cancel the selected schedule is displayed.
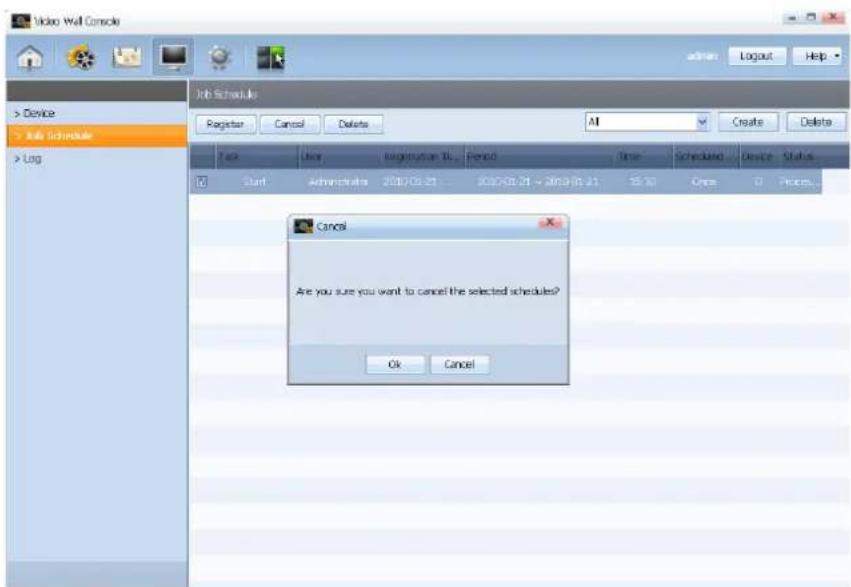
Click to cancel the selected schedule.
Tips
Editing a Job Schedule
Double-click a schedule to display the Edit window where the schedule can be modified.
Delete
An assigned Job Schedule can be deleted.
Select the Job Schedule you want to delete and press . Delete
The window asking if you want to delete the selected schedule is displayed.
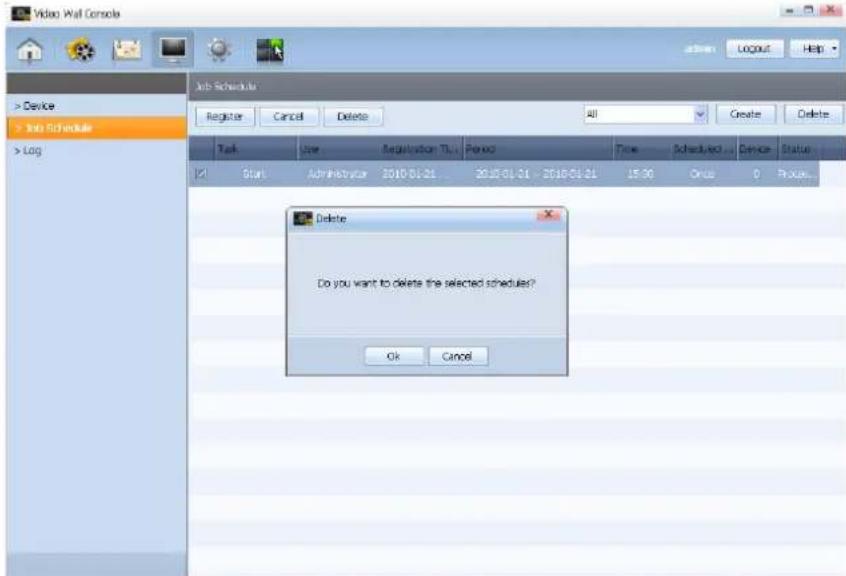
Click to delete the selected schedule.
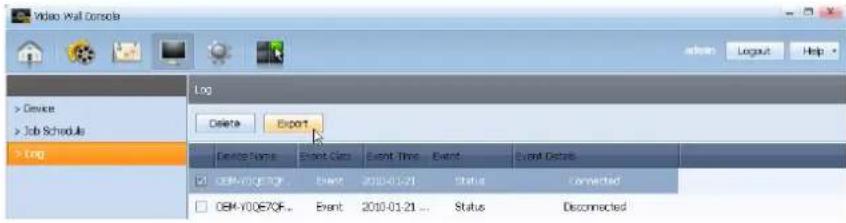
Log shows a history of events or tasks assigned to the monitors by date and time. Select a Log, and delete or convert it into an Excel file and export.
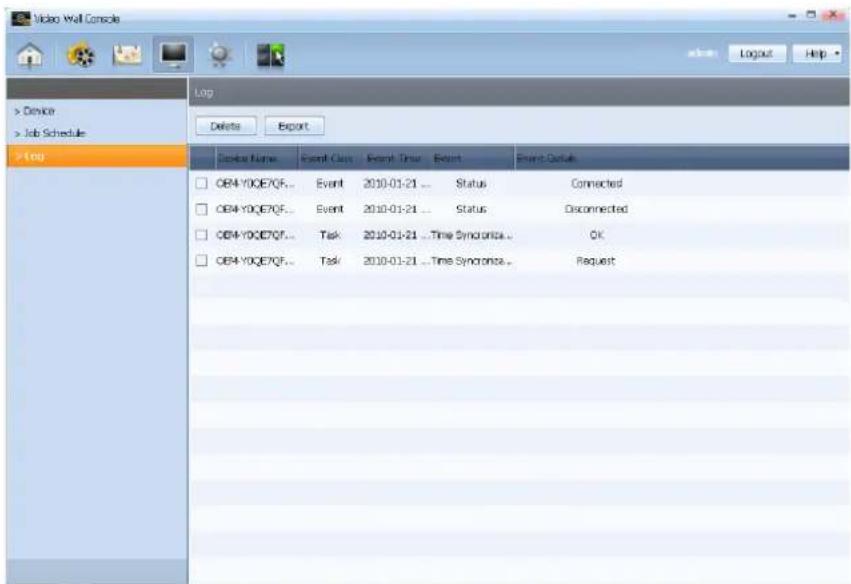
| Device Name | View the name of a monitor. |
| Event Class | Classify events assigned to a monitor. |
| Event Time | View the time when an event was assigned to a monitor. |
| Event | View the name of an event assigned to a monitor. |
| Event Details | View details of an event assigned to a monitor. |
Delete
A selected Log can be deleted.
Select the Log you want to delete and press .Delete
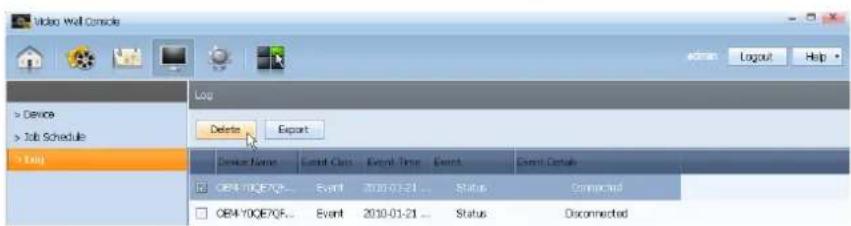
The selected Log is deleted.
Export
A Log can be converted into an Excel file and exported.
Press the button.
If the window asking for a destination path to save is displayed, specify the file location and name, and save.
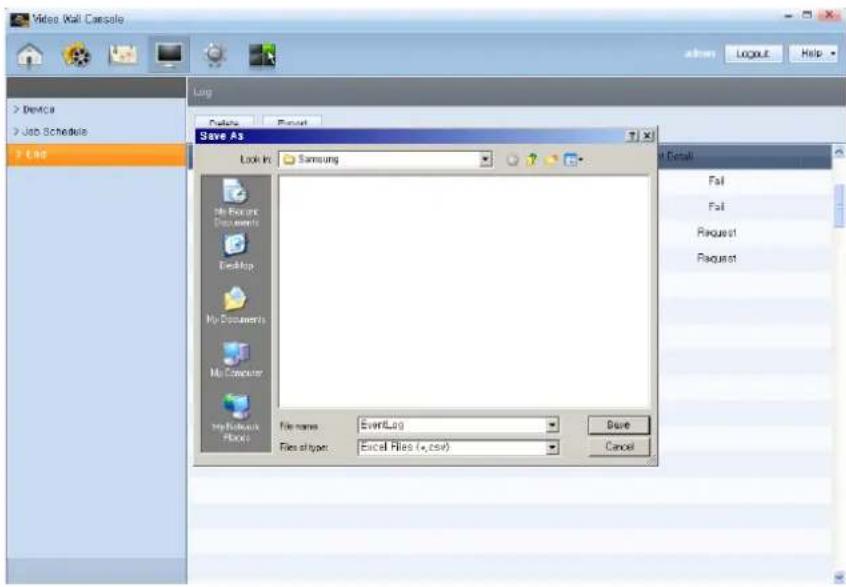
Below is a Log list saved as an Excel file.
| A1 | Device Name | ||||||
| A | B | C | D | E | F | G | |
| 1 | Device Na | Event Clas | Event Tim | Event | Event Detail | ||
| 2 | OEM-FOP | Schedule | 2009-11-0 | Update | New schedule deploy | ||
| 3 | OEM-FOP | Schedule | 2009-11-0 | Update | New schedule deploy | ||
| 4 | OEM-FOP | Schedule | 2009-11-0 | Update | New schedule deploy | ||
| 5 | OEM-FOP | Schedule | 2009-11-0 | Update | New schedule deploy | ||
| 6 | OEM-FOP | Schedule | 2009-11-0 | Update | New schedule deploy | ||
| 7 | OEM-FOP | Schedule | 2009-11-0 | Update | New schedule deploy | ||
| 8 | OEM-FOP | Schedule | 2009-11-0 | Update | New schedule deploy | ||
| 9 | OEM-FOP | Schedule | 2009-11-0 | Update | New schedule deploy | ||
| 10 | OEM-FOP | Schedule | 2009-11-0 | Update | New schedule deploy | ||
| 11 | OEM-FOP | Schedule | 2009-11-0 | Update | New schedule deploy | ||
| 12 | OEM-FOP | Schedule | 2009-11-0 | Update | New schedule deploy | ||
| 13 | OEM-FOP | Schedule | 2009-11-0 | Update | New schedule deploy | ||
Settings
Settings comprises General Settings and User Settings.
In General Settings, basic settings for VideoWall Console, such as Server, language and network card, can be defined.
In User Settings, a user other than the Administrator can be added, modified or deleted.
Caution
Users other than Administrators are not permitted to access Settings. (The Settings icon is disabled for general users.)
General Settings
In General Settings, you can configure the connection of the VideoWall Console and Server and basic settings for the VideoWall Console.
Magic Info Server Settings
Define the settings of Server.
Check that Server IP and Port are configured correctly in Detail and click connect the Server and VideoWall Console.
Detail
Click to configure detailed settings for the Server.
| Tips | |
| Magic Info Server Settings - | |
| 1Server IP | Set the IP address of the Server. |
| 2Port | Set the port of the Server. |
Connecting to Magic Info Server
The status of the connection between the Server and VideoWall Console is indicated by the status of the icon as follows:
| The Server is connected to VideoWall Console. | |
| The Server is not connected to VideoWall Console. |

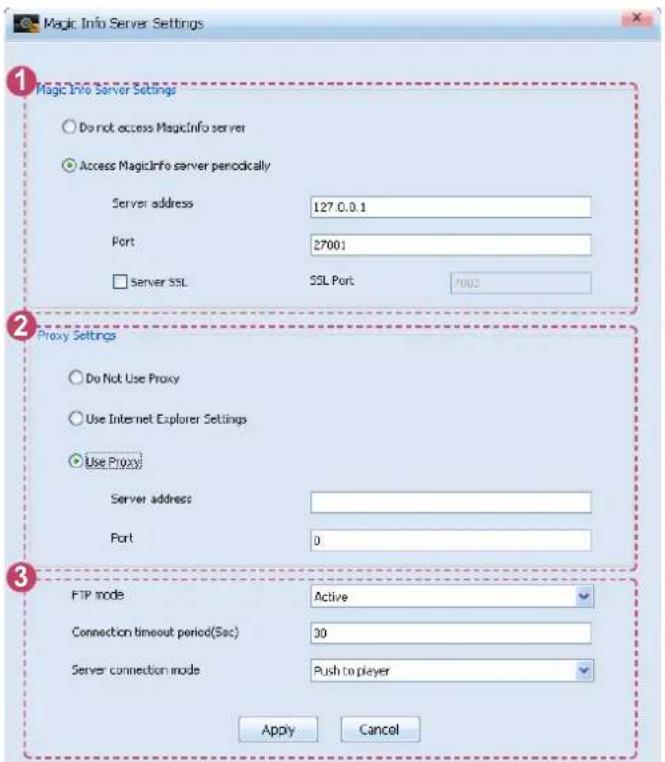
1 Magic Info Server Settings
| Do not access MagicInfo server | Select this mode if you do not intend to access the Server. |
| Access MagicInfo server periodically | Select this mode to access the Server periodically. |
| Server address | Set the IP of the Server to download.(e.g. 192.168.2.100) |
| Port | Set the web server port to download content. |
| Server SSL | Select this option if you intend to enable packet security encryption when transmitting data between Server and VideoWall Client.If Server SSL is selected, the SSL Port field is activated and a port number can be entered. |
② Proxy Settings
| Do Not Use Proxy | Select this mode if you do not intend to use proxy server settings. |
| Use Internet Explorer Settings | Select this mode to apply the proxy setting used in Internet Explorer. |
| Use Proxy | Select this mode to directly enter a proxy server address. |
| Server address | Enter the IP of the proxy server. |
| Port | Enter the port of the proxy server. |
3 TCP
| FTP mode | Define the FTP Mode to download data from Server. |
| Active | Select this mode if there is no firewall in place between VideoWall Console and Server. |
| Passive | Select this mode if there is a firewall in place between VideoWall Console and Server. |
| Connection timeout period(Sec) | Set the maximum time VideoWall Console can spend in attempting to connect to Server to download or upload a file. |
| Server connection mode | Set the connection mode between Server and VideoWall Console. |
| Pull from server | Select this mode if there is a firewall in place between VideoWall Console and Server.Some time can be required to refresh the data in VideoWall Console as data is transmitted according to the polling period specified in Server. |
| Push to player | Select this mode if there is no firewall in place between VideoWall Console and Server. |
Tips
Proxy
A proxy server performs the role of transmitting data between VideoWall Console and VideoWall Client.
For security, data must be transmitted between VideoWall Console and VideoWall Client through a proxy server.
TCP -
TCP is the acronym for Transmission Control Protocol, which is a communication protocol used on computer networks.
Basic setting
Basic settings for VideoWall Console can be defined.
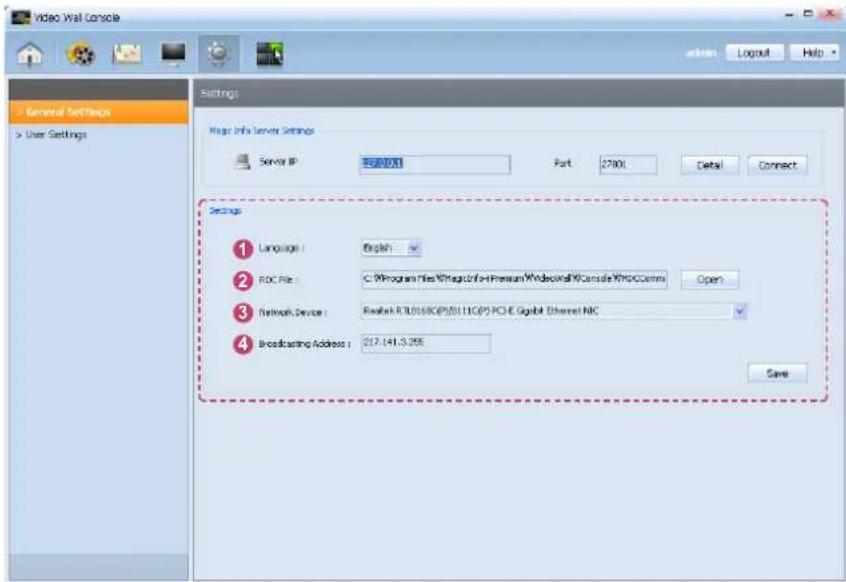
After all the detailed settings are completed, press . Save
The user-defined settings are applied to the VideoWall Console.
| Tips | |
| 1Language | Select a language to use in VideoWall Console. |
| 2RDC File | Specify the path to the RDC file by clicking the open button. |
| 3Network Device | Select a network card for data transmission. |
| 4Broadcasting Address | Shows the broadcast address configured automatically for the network card. |
Caution
Changing the Language -
Select a new language, save the change and restart the VideoWall Console. If the VideoWall Console is not restarted, the change will not be applied.
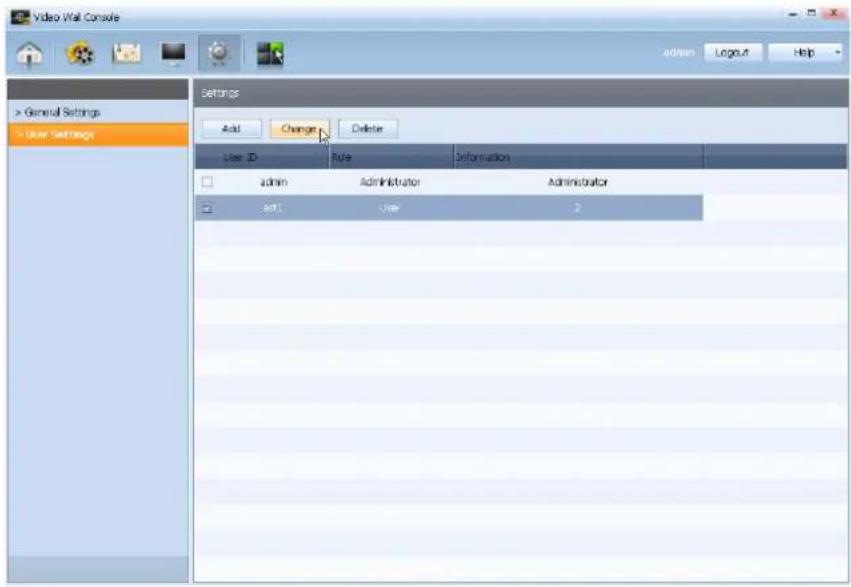
User Settings
In User Settings, a user other than the Administrator can be added, modified or deleted.
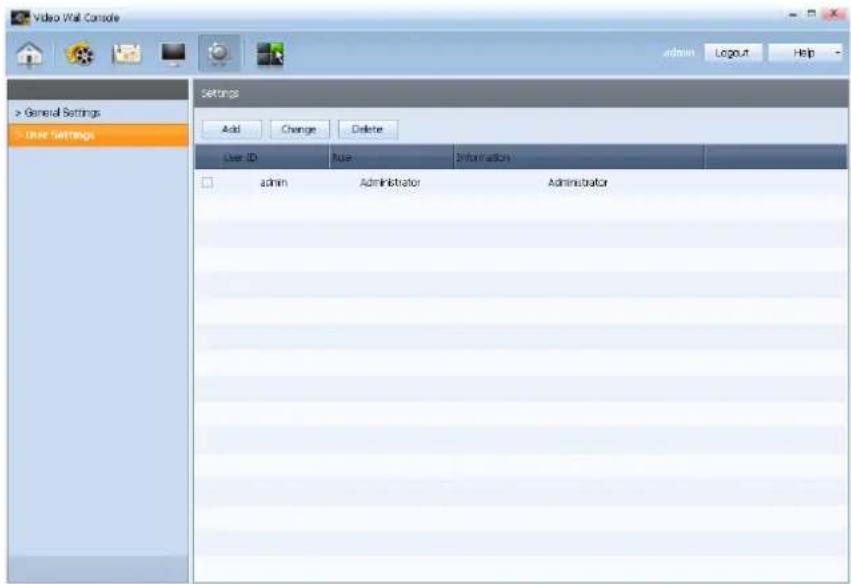
| User ID | View the ID of a user. |
| Role | View the role of a user.(Administrator or general user) |
| Information | View user information. |
Add
Add a user other than the Administrator.
Click the button.
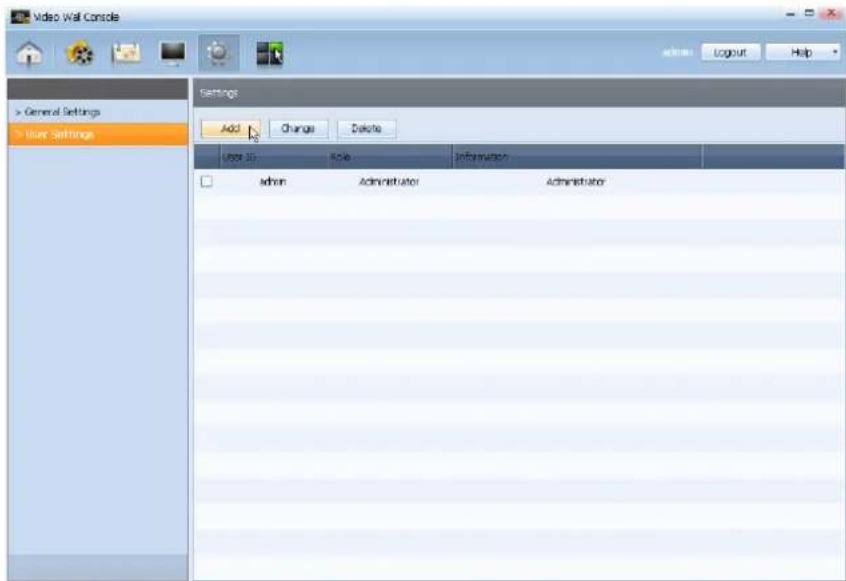
The window where you can add a user is displayed.
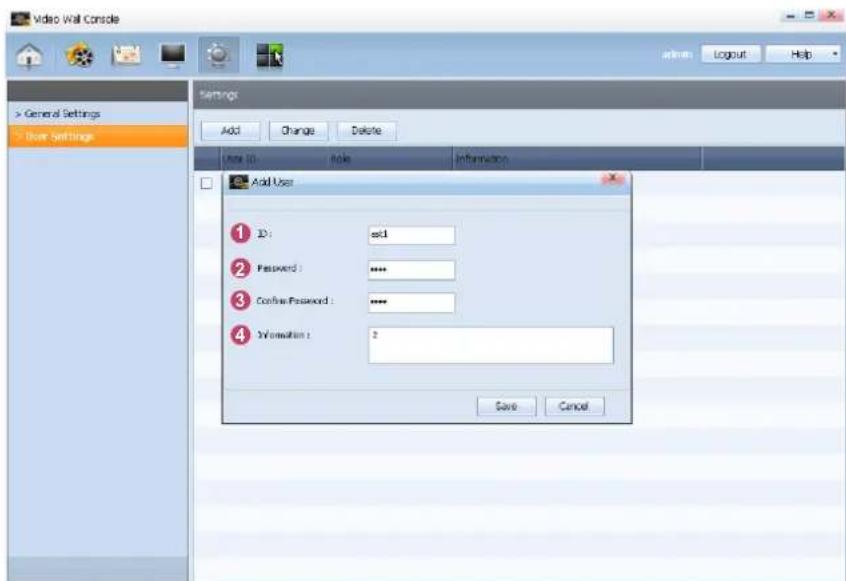
When the settings are completed, click . Save
| Tips | |
| 1 ID | Enter the ID of the user to be added. |
| 2 Password | Enter the Password of the user to be added. |
| 3 Confirm Password | Confirm the password again. |
| 4 Information | Enter in information of the user to be added. |
Change
The password and information of a user can be changed.
Select the user whose settings you want to change and click Change
The window where you can change the password and information is displayed.
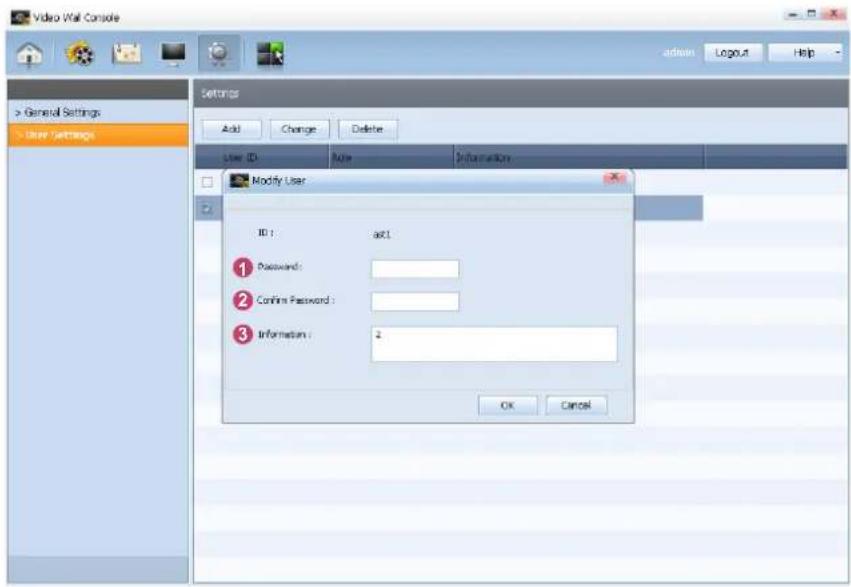
When the settings are completed, click OK
| Tips | |
| 1 Password | Enter the current password of the user whose password you want to change. |
| 2 Confirm Password | Confirm the new password again. |
| 3 Information | Enter in information of the user whose information you want to change. |
Delete
A user ID can be deleted.
Select a user ID and click the button.
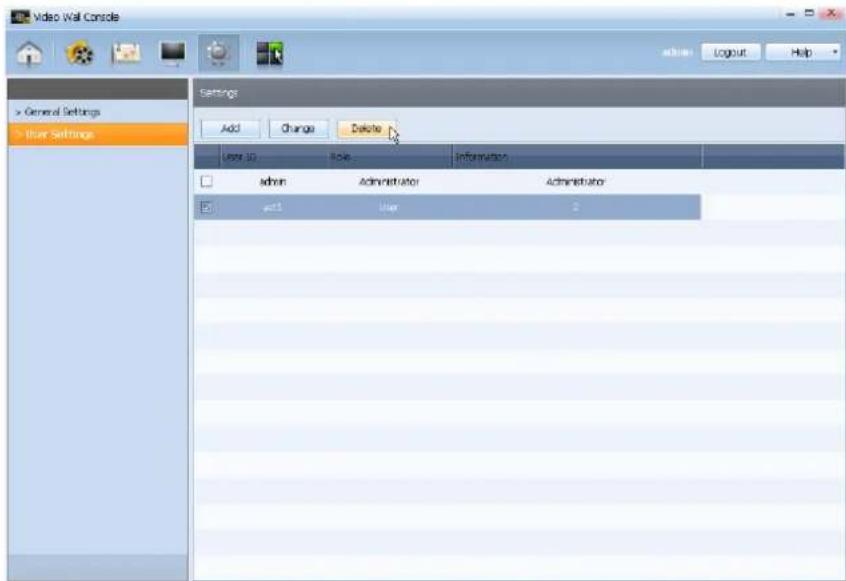
The window asking if you want to delete the selected user ID is displayed.
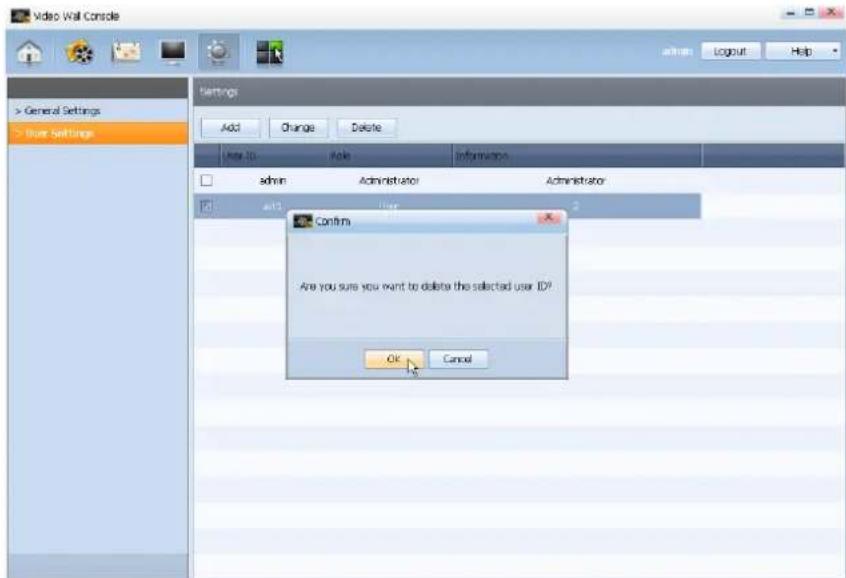
Click the button.
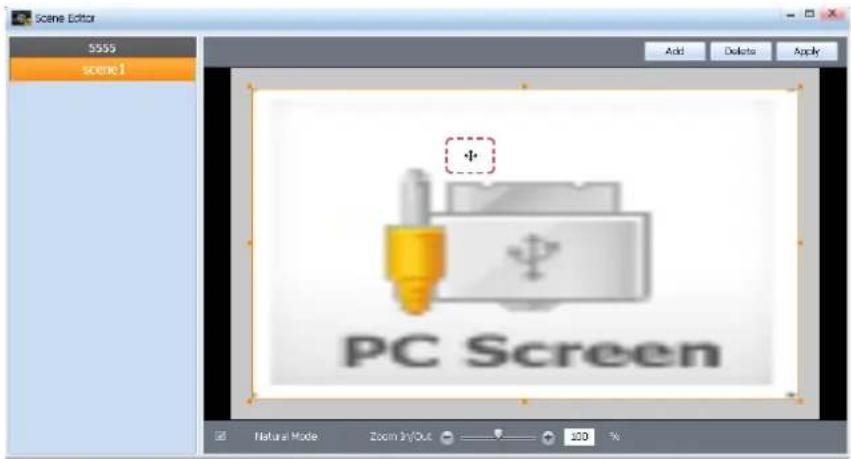
Scene Editor
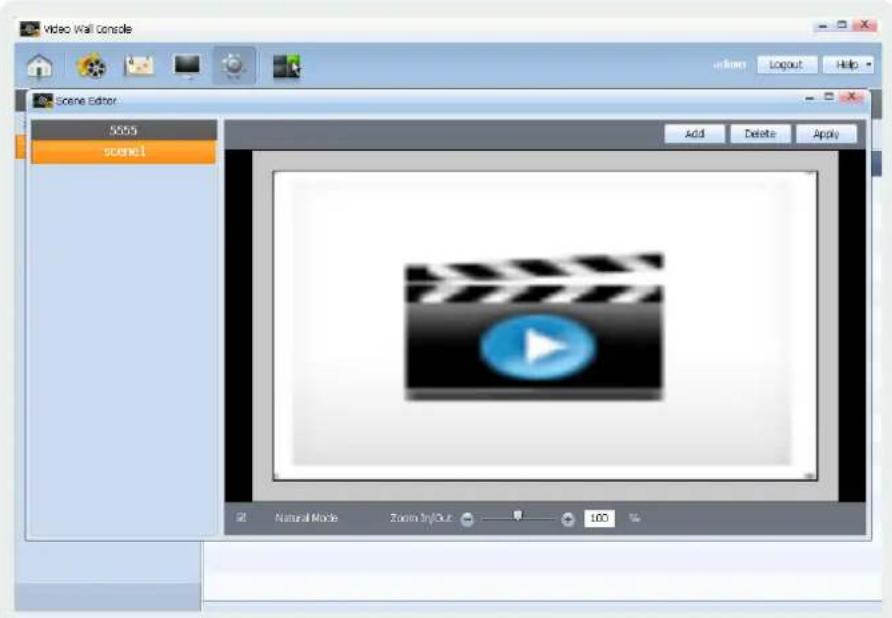
Press the top to display the Scene Editor window.
In Scene Editor, you can enlarge, reduce or configure the display mode for the page being scheduled on the video wall monitor.
In addition, you can add or delete a scene you want to play in the list on the left and apply a scene edited using the editing window to a video wall monitor.
Caution
Scene Editor -
If there is no schedule being played on the video wall monitors, Scene Editor will not be run.
Add -
To add a Video or Image as a scene, the corresponding Video or Image file must be registered in the Content tab.
Screen Composition
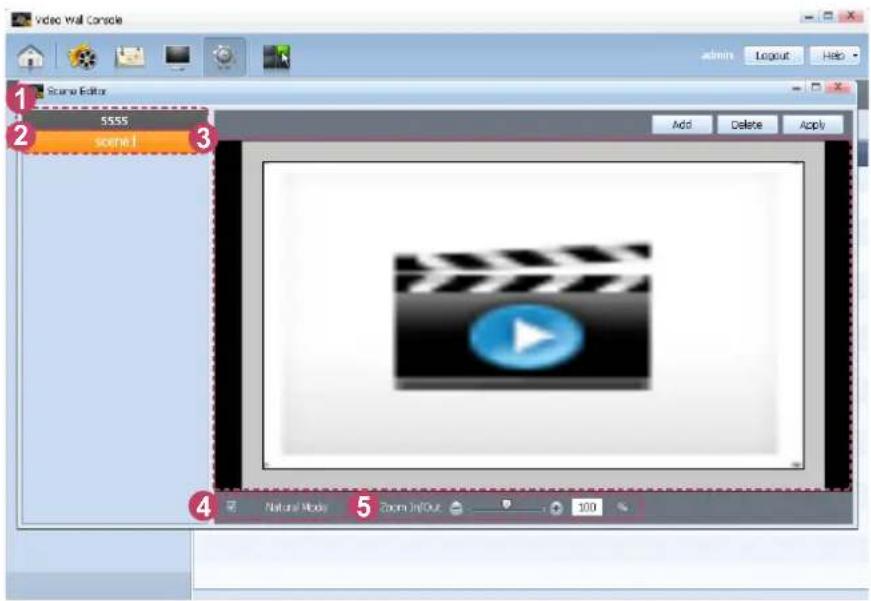
1 View the name of the content file currently being played on the video wall monitors.
2 Select a scene you want to edit in the Scene Editor.
3 You can view the scene selected in step 2 in playback mode. Right-click on the scene that is playing to view its playback order and properties.
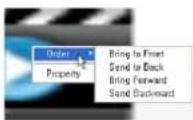
When you right-click on a scene that is playing
4 Select a viewing mode. If Natural Mode is selected, the screen is displayed with the surrounding frame. If Natural Mode is not selected, the screen is displayed in full screen mode. If you double-click on a scene during playback in full screen mode, the frame disappears.
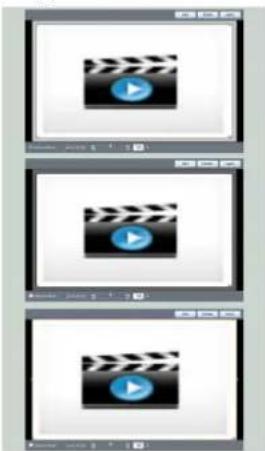
natural_image
Three identical video player icons displayed in separate panels, each with a film clapperboard icon (no text or symbols)When Natural Mode is selected
When Natural Mode is not selected
Full screen mode with no frame
5 Zoom In/Out on a displayed scene that is playing.
Tips
Changing the playback order of - scenes
When scenes with various properties are added, the option to change the order of the scenes is available.
To change the order of scenes, right-click on a playing scene and place your mouse cursor over the Order tab.
The following four options are displayed.
| Bring to Front Bring the selected scene to the front. |
| Send to Back Send the selected scene to the back. |
| Bring Forward Bring the selected scene one layer forward. |
| Send Backward Send the selected scene one layer backward. |
Viewing scene properties
To view properties of a scene, right-click the scene in playback mode and click the Property tab.
Properties of each scene can be viewed in the displayed Property window.
Add
If you want to add a scene to play, press the button to select the file to play. Press the button to display the window where you can add a scene.
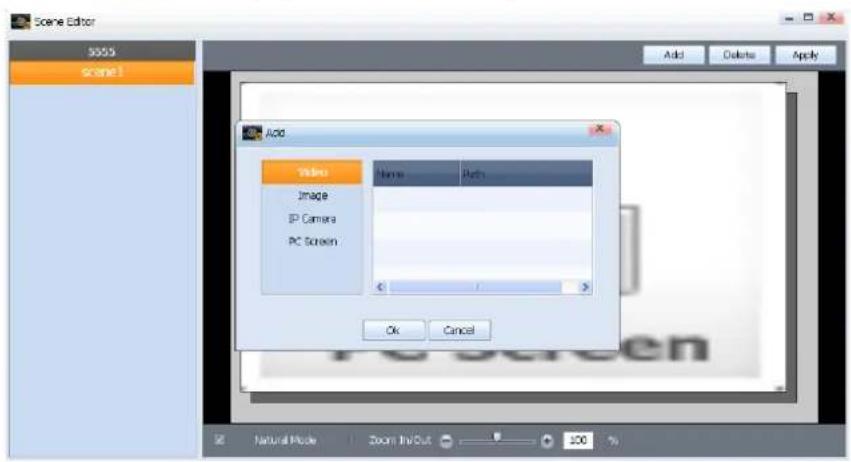
Video
Select a Video file to be played on the scene that will be added.
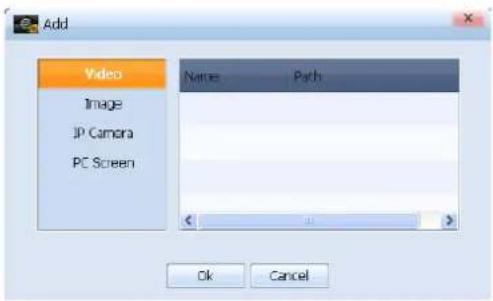
| Name | View the name of a Video file. |
| Path | View the path of a Video file. |
Image
Select a Image file to be played on the scene that will be added.
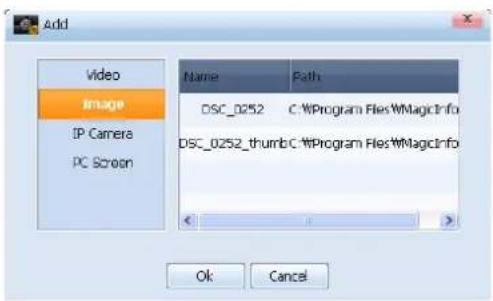
| Name | View the name of a Image file. |
| Path | View the path of a Image file. |
Caution
Add
Only the Video or Image files registered in the Content tab can be selected.
IP Camera
Input from an IP Camera can be received and displayed on the video wall monitors. The IP Camera is connected to a video wall monitor via the LivePlayer.
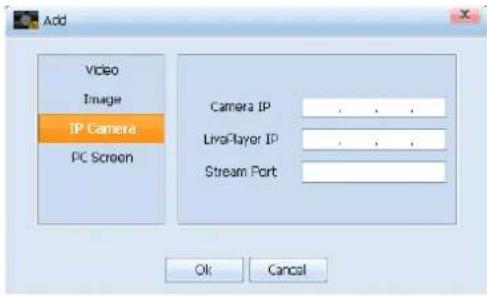
| Camera IP | Enter the IP address of the IP Camera connected to the LivePlayer. |
| LivePlayer IP | Enter the IP address of the LivePlayer. |
| Stream Port | Enter the port where the LivePlayer will be connected. |
PC Screen
Pictures from PC are displayed on the video wall displays. PC Screen can be connected to a video wall display via the LivePlayer.

| LivePlayer IP | Enter the IP address of the LivePlayer. |
| Stream Port | Enter the port where the LivePlayer will be connected. |
Select a file and press OK to add a scene to play or press Cancel to cancel the scene addition.
Caution
Stream Port
The Stream Port number must be identical to the Stream Port that is set on the LivePlayer.
A Port number between 1024 and 65535 is valid only.
Delete
A playing scene being controlled or edited on the Scene Editor can be deleted. Click the scene you want to delete in the editing window.
Press the button to delete the selected scene.

Apply
A scene that was controlled or edited on the Scene Editor is applied to the video wall monitors.
Select a scene and press the button.
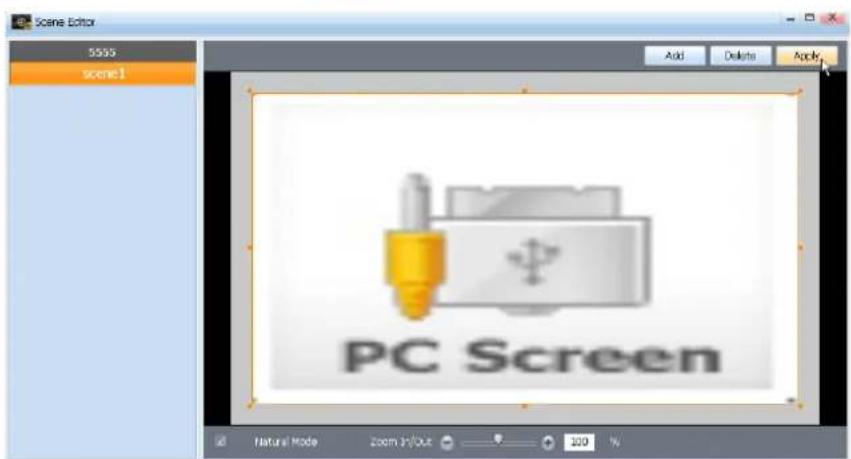
The applied scene will be played on the video wall monitors for its original duration from the time the scene was initially applied.
Tips
Moving Between Scenes
When VideoWall Client displays a VWL file that contains many scenes, the user can choose to move from one scene to another when required.
Select a scene number from the Scene list on the left side. The current scene will be replaced by the selected one. If you click Apply, VideoWall Client will be launched for the replaced scene.
MagicInfo VideoWall
VideoWall Client
03
Program Installation
VideoWall Client runs automatically after installation. Accordingly, if software that runs automatically on the monitor is already installed, a conflict may occur. Before installing the VideoWall Client, be sure to remove any software that runs automatically upon boot-up similarly to the MagicInfo-i Premium Edition Client.

This is the first page of the installation wizard. Click Next to continue the installation or click Cancel to exit the installation. You must remove any older versions that are installed before you continue with the installation.
This is the confirmation screen displayed before the installation begins. Click Back to change or review the installation settings you have made or click Cancel to end the installation wizard. Click Install to start the installation.
Check the "I accept the terms of the license agreement." field and click Next.
MagicInfo VideoWall Client is being installed in the folder you selected. Click Cancel to cancel the installation.
This screen allows you to enter in user information. Enter a user name and company name, pick a user to install the program, and click Next.
This is the screen displayed after MagicInfo VideoWall Client is installed in the folder you selected. Click Finish to complete the installation.
This screen allows you to select a destination folder to install the program. Click Next to install in the folder shown at the bottom. To install the program in a different folder, click Browse, select another folder location, and then click Next.
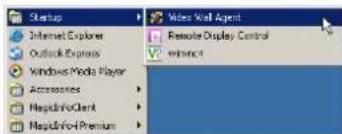
After the installation is completed, the Video Wall Agent tab will be created on the Startup tab.
Program Uninstallation
Run Control Panel - Add or Remove Programs - Uninstall MagicInfo VideoWall Client to display the uninstall window.
You can start the uninstall process as well as modify and repair. Select Remove and click Next to continue the uninstall process.
The uninstall process will not be performed properly if VideoWall Client is running. Close the program that is currently running and click Yes.
The uninstall process has started.
Click Finish to complete the uninstall process.
Using VideoWall Client
VideoWall Client is an application which publishes video wall content created in the authoring tool MagicInfo VideoWall Author or other multimedia content (images, movies, sounds, etc.) from the VideoWall Console and plays the published content.
Icons and Components
VideoWall Client comprises four applications.
Video Wall Agent (vwagent.exe)
Video Wall Ticker (vwticker.exe)
Video Wall Player (viwall.exe)
RDC (RemoteDisplay.exe)
Video Wall Agent, the main module of VideoWall Client, issues a command to play a specified playlist repeatedly for a specified time. It communicates with the VideoWall Console to download a schedule and content and instructs the Video Wall Player to play scheduled content items.
You can set and control the items related to the VideoWall Client using the setup tabs for each component.
If the Video Wall Agent is turned off, the VideoWall Client is exited.
Video Wall Ticker is a module which displays a message the user intends to communicate via the VideoWall Client.
Video Wall Player is a module that plays content created in VideoWall Author or general media content (movies, images, etc.) on the screen when the VideoWall Client is run.
RDC, the acronym for Remote Display Control, is a remote access feature which allows the VideoWall Client status information to be managed and controlled remotely from the VideoWall Console.
After installing the program, if you click
Tips
Default content is played if content for playback is not specified or when playback has finished.

indicates that VNC is currently running.
VNC
VNC is the acronym for Virtual Network Computing and allows display settings to be viewed even on an extensive network. VNC servers manage and control the status of clients through VNC.
Video Wall Agent Composition
Right-click the Video Wall Agent icon to display the menu tab.
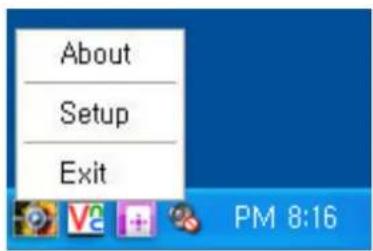
| About | View the version of the VideoWall Client. |
| Setup | Customize the settings for VideoWall Client to your preferences. |
| Exit | Exit the VideoWall Client. |
RDC Composition
Double-click the RDC icon or right-click with your mouse to select the menu tab -
Port and Local IP Settings
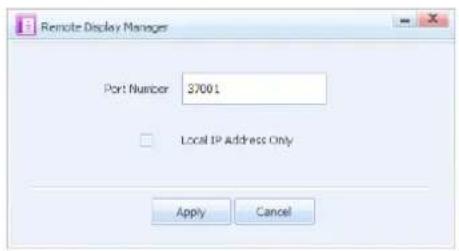
| Port Number | Enter the port number of a video wall monitor where RDC is installed. |
| Local IP Address Only | Select this option if you intend to use only a local IP address. |
After the settings are completed, press to apply the settings.
Tips
Port and Local IP Settings
If the port number is changed, the monitor cannot be controlled remotely from the VideoWall Console.
Using an IP other than a Local IP can increase security risks.
Setting VideoWall Client
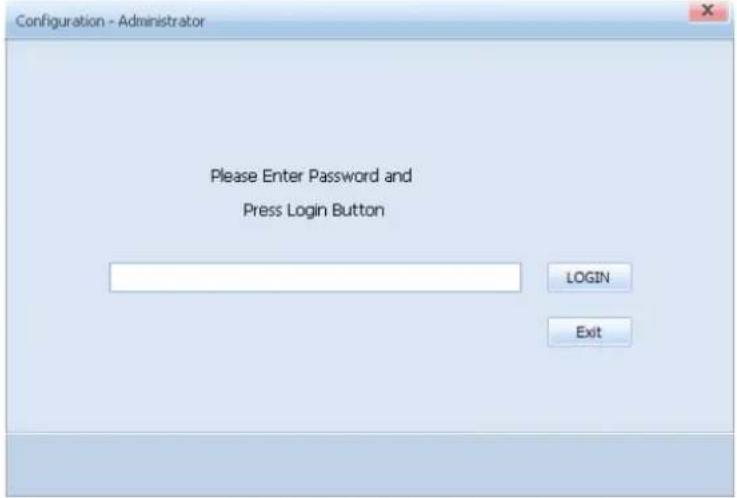
Right-click the Video Wall Agent icon on the Windows taskbar and select the Setup tab to display the following settings page.
LOGIN
In order to access the settings page, you must login.
Enter the password and click .Logn
Login is not required if
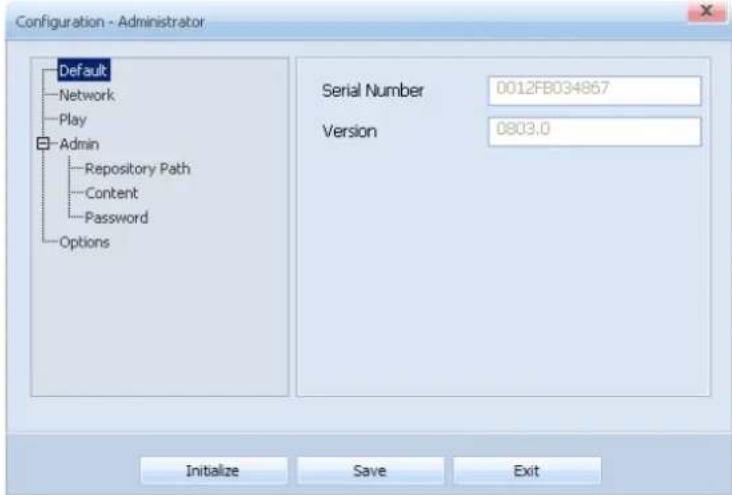
Configuration - Administrator Screen
After logging in, the Configuration - Administrator screen is displayed. This page has a total of five tabs (Default, Network, Play, Admin, Options).
Tips
Password Setting
The password after the initial installation is '000000.'
After Making Changes to Settings
After making changes to settings for each tab, click Save at the bottom to save the changes made.
If you click the Initialize button, all properties are reset to the default VideoWall Client values.
Click Exit to exit the Settings screen.
Default
This page shows the default settings for VideoWall Client.
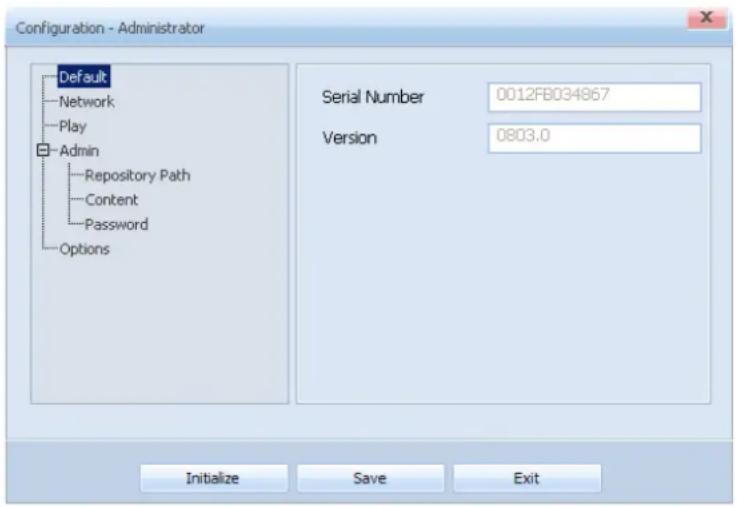
| Serial Number | Shows a number that identifies devices in the VideoWall Console by using the Mac address of network cards. |
| Version | View the Version of the installed VideoWall Client. |
Network
The Network Card of a video wall monitor can be set.
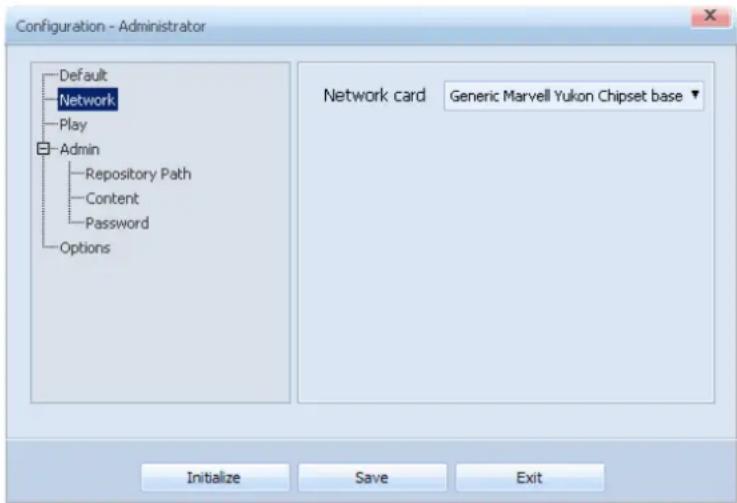
A Network card used to transmit data between VideoWall Console and VideoWall Client can be selected.
Play
Settings required to Play content can be defined.
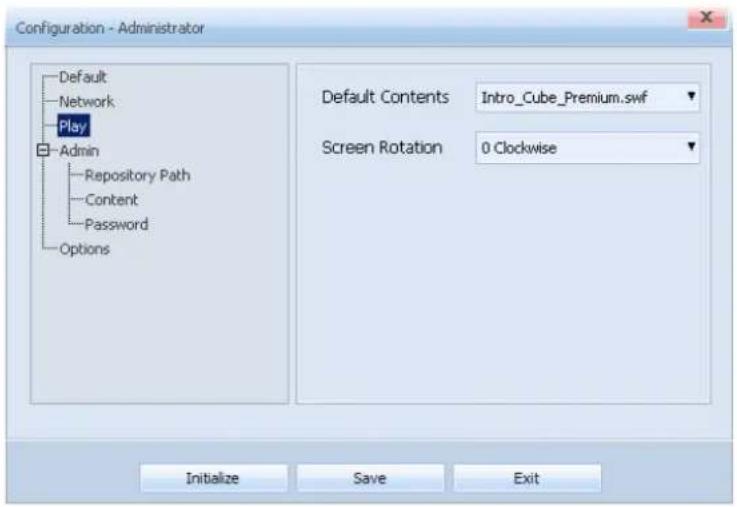
| Default content | Content to be played by default when a schedule is not run in the VideoWall Client can be defined.(Movies or Flash content are recommended as Default content.) |
| Screen rotation | Change the display direction. |
| 0 Clockwise | View the playback screen in the original direction without rotation. |
| 270 Clockwise | Rotate the screen by 270 degrees clockwise. |
Caution
Screen rotation
The Screen rotation function only works if a Samsung LFD and a ATI graphics card are used.
Admin
You can set the paths to the management and repository folders and define detailed settings for the management folder. You can also set the password for login.
Repository path
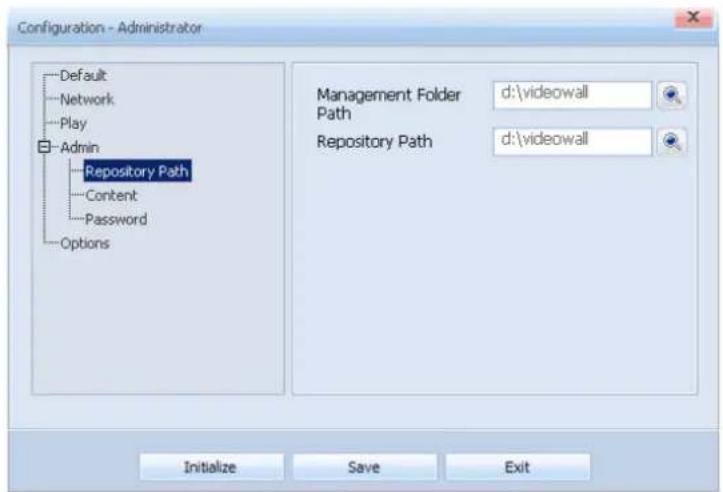
| Management Folder path | Click thebutton to specify the path to the management folder. |
| Repository path | Clickto specify the folder location where a schedule and content downloaded from the VideoWall Console will be saved. |
Content
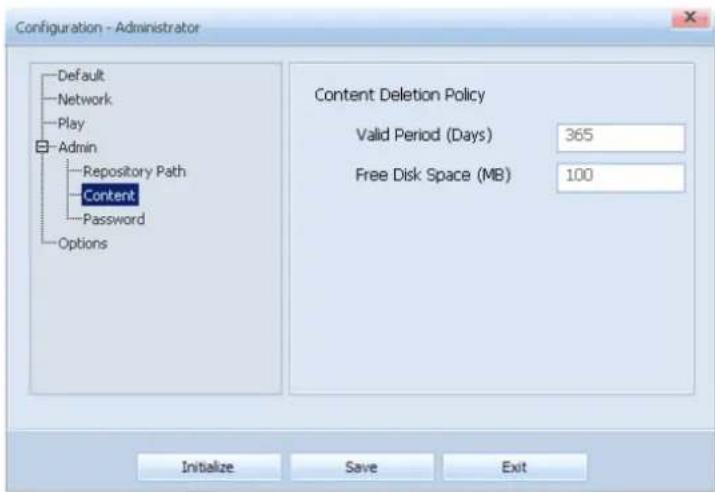
| Content Deletion Policy | Set the period for deletion of content saved on your computer and the size of surplus space in the <Contents> folder. |
| Valid Period(Days) | Content is automatically deleted when a specified period of time (days) is exceeded. |
| Free Disk Space (MB) | Content is automatically deleted when the surplus space in the <Contents> folder exceeds the specified limit. |
Tips
Management and repository folders
The management and repository folder locations are defined as D: \videowall by default.
The
Files containing lists of settings are placed in the management folder.
You can change the folder path to a preferred location.
The
Content transmitted from the VideoWall Console is saved to the
Password
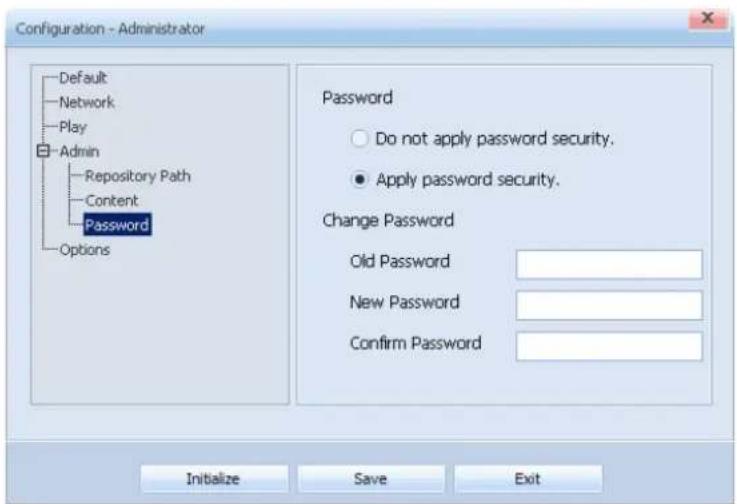
| Do not apply password security | Select this mode if you do not intend to use a password for login. If this mode is selected, the login process is skipped when accessing the Configuration - Administrator page. |
| Apply password security | Select this mode to use a Password for login. |
| Old password | Enter the current Password. |
| New password | Enter a new Password. |
| Confirm password | Enter the new Password again. |
Caution
Password Setting -
The
After changing the mode from
Leave the Old Password field empty if
Options
This page provides the option whether to show or hide Windows system messages when the Video Wall Player is in playback mode.
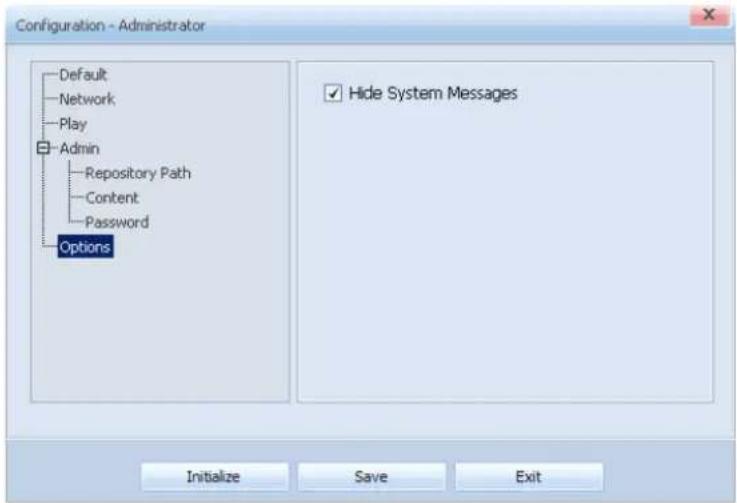
If
Tips
After Making Changes to Settings After making changes to settings for each tab, click Save at the bottom to save the changes made.
If you click the Initialize button, all properties are reset to the default VideoWall Client values.
Click Exit to exit the Settings screen.
MagicInfo VideoWall
LivePlayer
04
Program Installation
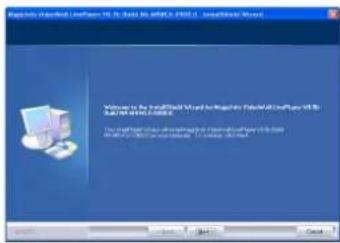
This is the first screen of the installation wizard. Click Next to continue the installation or click Cancel to exit the installation.
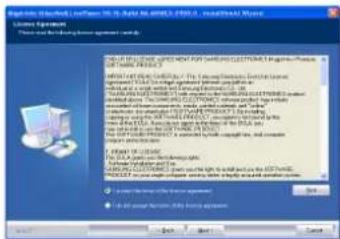
Check the "I accept the terms of the license agreement." field and click Next.
This screen allows you to enter in user information. Enter a user name and company name and click Next.
This screen allows you to select a destination folder to install the program.
This is the confirmation screen displayed before the installation begins.
Click Back to change or review the installation settings you have made or click Cancel to end the installation wizard.
Click Next to start the installation.

MagicInfo VideoWall LivePlayer is being installed in the folder you selected.
Click Cancel to cancel the installation.
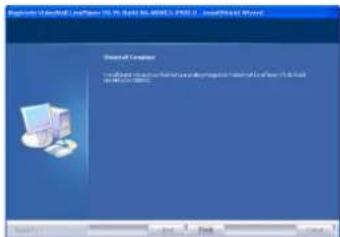
This is the screen displayed after MagicInfo VideoWall LivePlayer is installed. Click Finish to complete the installation.
This is the screen where an icon is created on the desktop after the installation is completed successfully.
Program Uninstallation
Run Control Panel - Add or Remove Programs - Uninstall MagicInfo VideoWall LivePlayer to display the uninstall window. You can start the uninstall process as well as modify and repair. Select Remove and click Next to continue the uninstall process.
The uninstall process will not be performed properly ifLivePlayeris running. Close the program that is currently running and click Yes.
The uninstall process has started.
Click Finish to complete the uninstall process.
UsingLivePlayer
LivePlayer is an application which transmits the picture from the screen of the user's PC where LivePlayer is installed to the video wall devices. It also forwards images from an IP Camera to the video wall devices.
IP Camera
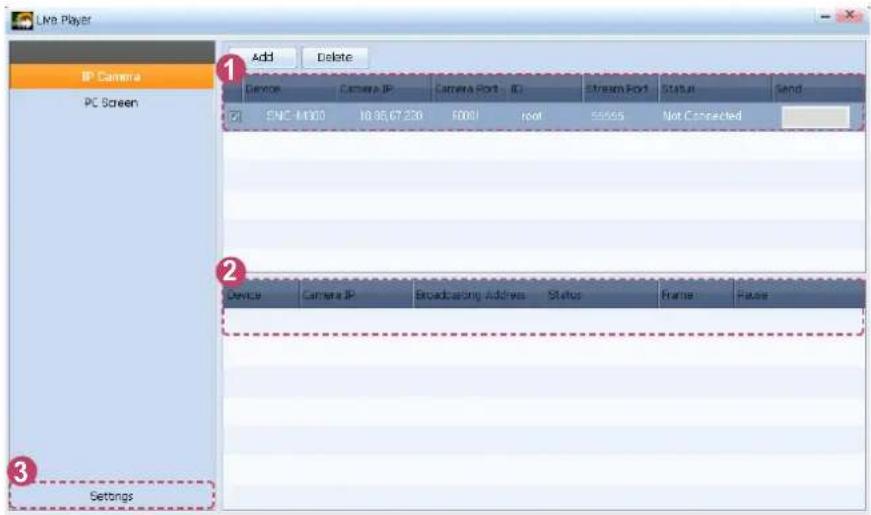
1 IP Camera Information
| Device | View the model name of an IP Camera. |
| Camera IP | View the IP address of an IP Camera. |
| Camera Port | View the Port used for streaming on the IP Camera. |
| ID | View the ID of an IP Camera. |
| Stream Port | View the port number of an IP Camera connected to the LivePlayer specified by the VideoWall Author. |
| Status | View the status of the connection between the IP Camera and LivePlayer. |
| Send | If the connection to the IP Camera is correct, press the Send button to start streaming. |
Tips
IP Camera
The IP Camera, which is used over a network, must have an IP to be operable.
Only a Samsung IP Camera can connect to LivePlayer.
For details on setting an IP Camera, please read the manual that came with the IP Camera.
*Supported Models :
SNC-B2315, SNC-B5395, SNC-B2331, SNC-B5368, SNC-C7478, SNC-C7225, SNC-C6225, SNC-B2335, SNC-B5399, SNC-C7478C, SNC-M300
② Streaming Information
| Device | View the model name of the IP Camera whose screen is currently being transmitted. |
| Camera IP | View the IP address of an IP Camera. |
| Broadcasting Address | View the broadcasting address. |
| Status | View the stream status. |
| Frame | View the number of data frames transmitted to the video wall monitors. |
| Pause | Press Pause to stop streaming visual data from the IP Camera. |
3 Settings
Set up a network for LivePlayer.
Click on Settings on the bottom left corner to display the Settings window.
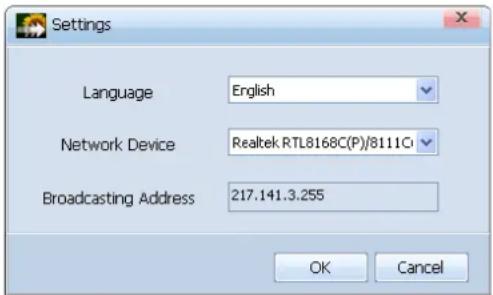
| Language | Select the language to use on the LivePlayer. |
| Network Device | Set the network card used to transmit data between a LivePlayer and the video wall monitors. |
| Broadcasting Address | View the broadcasting address. |
When the settings are completed, press . OK
Tips
IP Camera
The IP Camera, which is used over a network, must have an IP to be operable.
Network Setting
If the PC where LivePlayer is installed has more than one network card, you can select one of them to be used for streaming.
Adding and Deleting an IP Camera
Add
An IP Camera can be added.
Press to display the settings window where you can add an IP Camera.
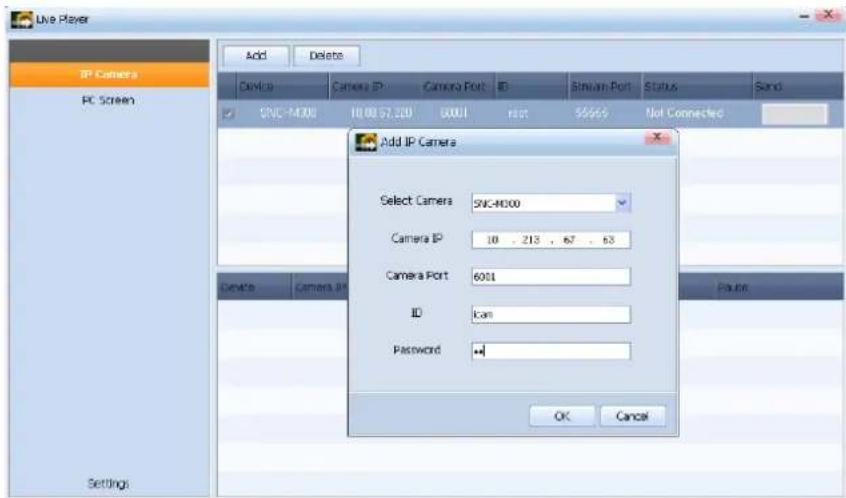
| Select Camera | Select an IP Camera model. |
| Camera IP | Enter the IP address of an IP Camera. |
| Camera Port | Enter the port number of an IP Camera. |
| ID | Enter the ID of an IP Camera. |
| Password | Enter the password of an IP Camera. |
When the settings are completed, press . OK
Delete
An IP Camera can be deleted.
Select an IP Camera to delete and press . Delete
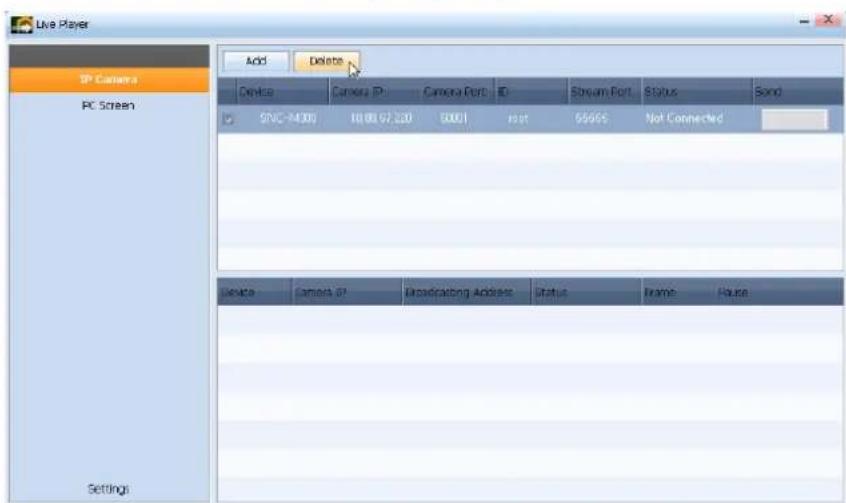
Tips
IP Camera
Only a Samsung IP Camera can connect to LivePlayer.
For details on setting an IP Camera, please read the manual that came with the IP Camera.
*Supported Models :
SNC-B2315, SNC-B5395, SNC-B2331, SNC-B5368, SNC-C7478, SNC-C7225, SNC-C6225, SNC-B2335, SNC-B5399, SNC-C7478C, SNC-M300
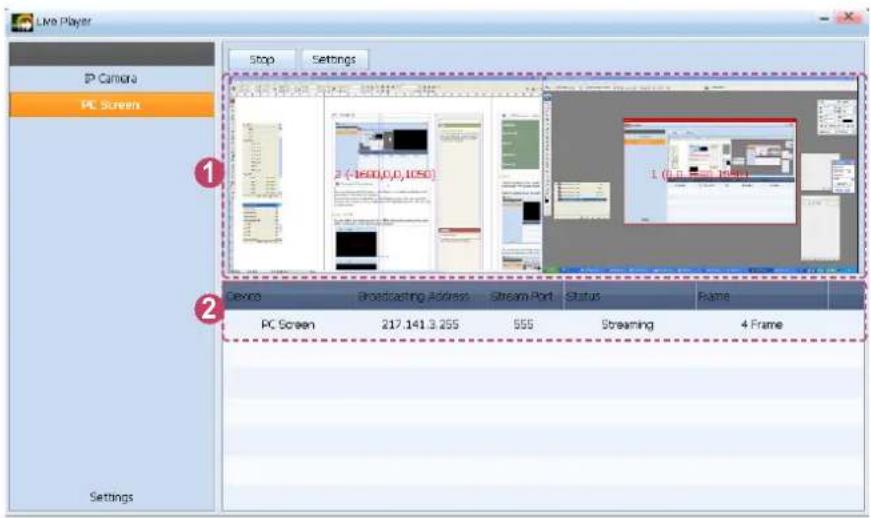
① Screen Information
The screen from a user's PC where LivePlayer is installed is displayed and transmitted to the video wall monitors.
Two monitor screens are displayed on both display screens if the user uses dual monitors. One monitor screen is displayed on the left display screen if the user uses a single monitor.
Screen On/Off
You can switch each display screen On or Off by clicking the number in the center of the screen when a data transmission is stopped.
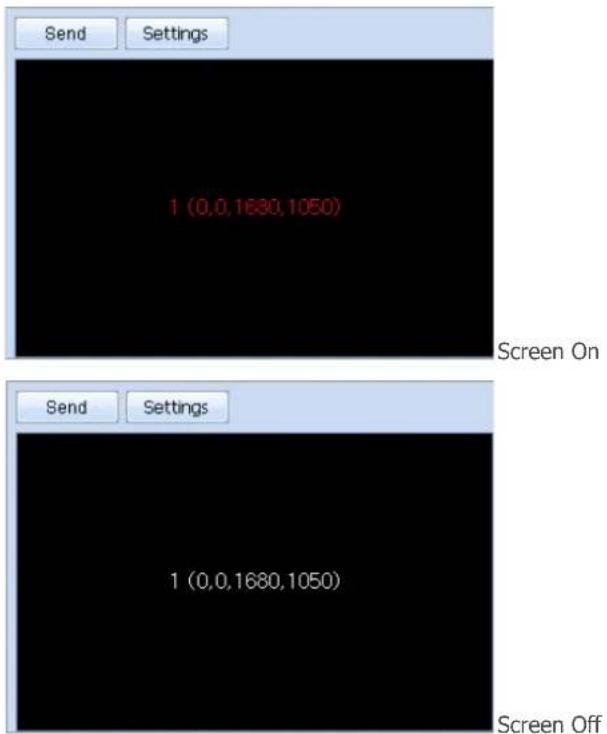
If the display screen is switched off, the monitor screen will not be displayed even if the button is pressed.
Tips
Monitor Information
The number displayed at the center of the black area displays information (number, resolution) of the monitor connected to the PC where LivePlayer is installed.
Caution
Screen On/Off
The display screen can only be switched On or Off when a data transmission is stopped.
② PC Screen Information
| Device | View the name of a monitor. |
| Broadcasting Address | View the broadcasting address. |
| Stream Port | View the port number of a PC Screen connected to the LivePlayer specified by the VideoWall Author. |
| Status | View the stream status. |
| Frame | View the number of data frames transmitted to the video wall monitors. |
Sending and Configuring the PC Screen
Send
Send the picture from a user's PC being displayed on the LivePlayer screen under PC Screen mode to the video wall monitors.
While the display screen is turned on, press the button.
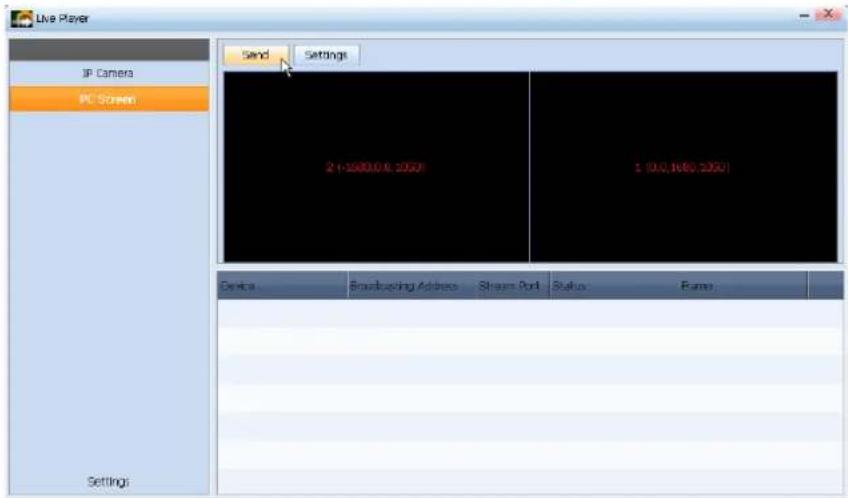
The PC Screen is being transmitted to the video wall monitors.
During a transmission, the button switches to the button.

To stop the transmission, press the button.
Settings
Change settings for PC Screen.
Press the button when there is no data transmission.
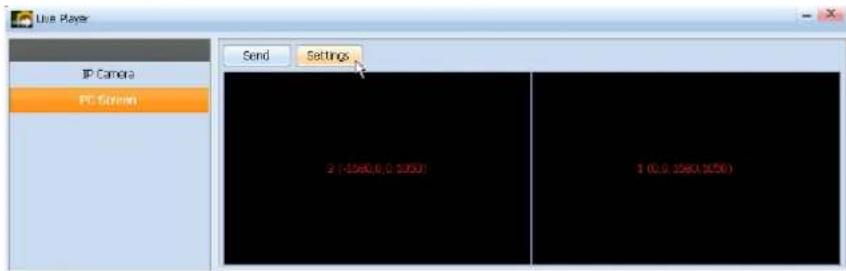
The PC Screen Settings window is displayed.
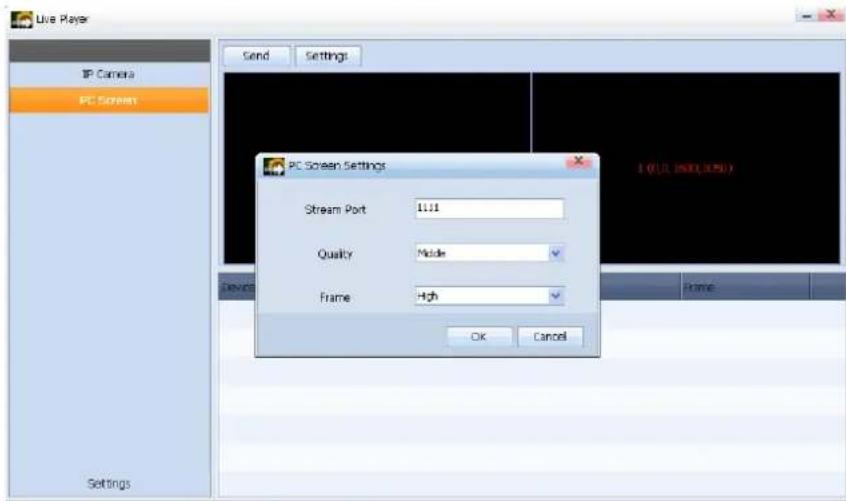
| Stream Port | Set the Port to transmit the PC Screen. |
| Quality | Select the picture quality to transmit image data.(High, Middle, Low) |
| Frame | Select the frame to transmit image data.(High, Middle, Low) |
Press to complete the settings and press at the top.
The pictures on the PC Screen are transmitted with the changed settings to the video wall monitors.
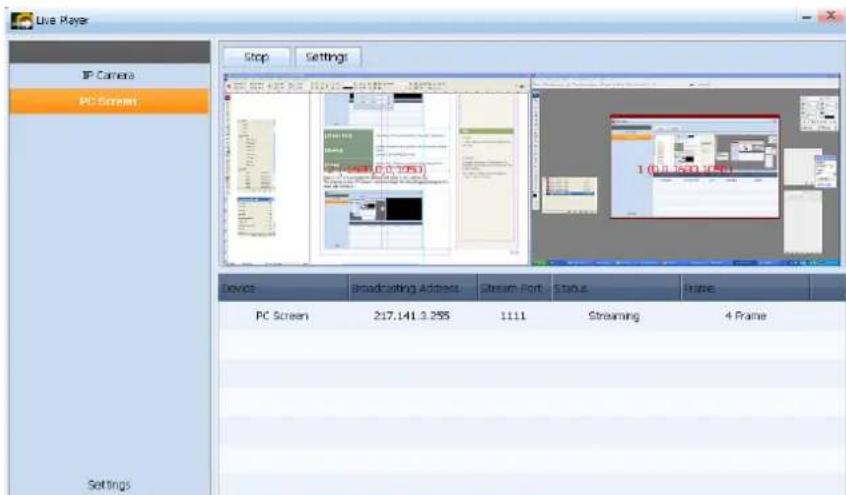
Tips
Port -
A Port number between 1024 and 65535 is valid only.
Frame
To increase the number of data frames to be transmitted to the video wall monitors, lower the picture quality.
If the number of data frames increases, the CPU usage increases.

- Contents
- Before usin01 g
- VideoWall Consol02 e
- VideoWall Clien03 t
- 04LivePlayer
- Understanding This Manual
- Menu Command
- Software Titles
- Main Functions of VideoWall
- Irregular video wall Feature
- Scene-by-Scene Content Playback
- Content Playback using Various Layouts
- Instant Publishing
- Urgent Message Feature
- Scene Editor Feature
- IP Camera and PC Screen Features
- RDC and Job Schedule Features
- Working with MagicInfo-i Premium Edition Server
- Tips
- Supported Content -
- System Requirements
- Hardware
- Software
- System
- Network
- Program Restrictions
- MagicInfo VideoWall
- VideoWall Console
- 02
- Installation and Uninstallation
- Installing the Program
- Uninstalling the Program
- License Registration
- Caution
- Using VideoWall Console
- Logging on to VideoWall Console
- Login -
- Screen Composition
- Top Menus
- Administration Menu
- Device Information
- Log Information
- Message Information
- Schedule Information
- Content Management
- Content Registration
- How To View Content -
- Publishing Content
- Deleting Content
- Publishing Content -
- Recycle Bin
- Deleting Content Permanently
- Managing a Schedule
- Registering a Schedule
- Instant Publish
- Deleting a Schedule
- Schedule Publish
- Changing a Schedule
- Status
- Viewing a Schedule
- Week
- Viewing at 30 Minutes intervals
- Viewing at 1 Minutes intervals
- Viewing at 10 Minutes intervals
- Viewing at 1 Hour(s) intervals
- Month
- List
- Setting the View Period
- Message Schedule
- Preview
- Previewing a message
- Position
- Align
- Device
- General
- ON
- OFF
- Select All
- ON, OFF -
- Access
- Identify
- Delete
- Discovery
- Discovery Function
- Creating a Group
- Deleting a Group
- Modify
- Renaming a Computer
- Sync Time
- Synchronizing the Time
- Display
- Changing the IP -
- Job Schedule
- Register
- File Copy
- Delete File
- Run Command
- System Control
- Kill Process
- Service Control
- Close Window
- Cancel
- Editing a Job Schedule
- Export
- Settings
- General Settings
- Magic Info Server Settings
- Detail
- Connecting to Magic Info Server
- Proxy
- TCP -
- Basic setting
- Changing the Language -
- User Settings
- Add
- Change
- Scene Editor
- Scene Editor -
- Add -
- Changing the playback order of - scenes
- Viewing scene properties
- Video
- Image
- IP Camera
- PC Screen
- Stream Port
- Apply
- Moving Between Scenes
- VideoWall Client
- 03
- Program Installation
- Program Uninstallation
- Using VideoWall Client
- Icons and Components
- VNC
- Video Wall Agent Composition
- RDC Composition
- Port and Local IP Settings
- Setting VideoWall Client
- LOGIN
- Configuration - Administrator Screen
- Password Setting
- After Making Changes to Settings
- Default
- Play
- Screen rotation
- Admin
- Password
- Password Setting -
- Options
- LivePlayer
- 04
- UsingLivePlayer
- ② Streaming Information
- Settings
- Adding and Deleting an IP Camera
- ① Screen Information
- Screen On/Off
- Monitor Information
- ② PC Screen Information
- Sending and Configuring the PC Screen
- Send
Brand : SAMSUNG
Model : MagicInfo VideoWall Author
Category : Logiciel photo/vidéo