
UP-CX1 - Printer SONY - Free user manual and instructions
Find the device manual for free UP-CX1 SONY in PDF.


| Product Type | Digital Photo Printer |
| Printing Method | Dye sublimation thermal transfer |
| Resolution | 11.8 dot/mm (300 dpi) |
| Gradations | 256 levels (8 bits) each for yellow, magenta and cyan |
| Print Sizes | 89 × 126 mm (3.5 × 5 in.), 101 × 152 mm (4 × 6 in.), 126 × 178 mm (5 × 7 in.), 101 × 203 mm (4 × 8 in.) |
| Printing Time | Approx. 13 to 21 seconds depending on print size |
| Connectivity | Hi-Speed USB (USB 2.0) |
| Power Requirements | 100 to 240 V AC, 50/60 Hz, 3.0 to 1.3 A max. |
| Dimensions (W x H x D) | Approx. 275 × 262 × 380 mm (10 7/8 × 10 3/8 × 14 15/16 in.) excluding projections |
| Weight | Approx. 10.5 kg (23 lb 2 oz) printer only |
| Operating Temperature | 5 to 35 °C |
| Operating Humidity | 20 to 80% |
| Paper Tray Capacity | About 100 sheets (varies with environment and images) |
| Input Connector | AC IN (power), USB function port |
| Supplied Accessories | Paper Tray, Paper Tray Adaptor, Paper Holder, Paper Core, Adaptors (left/right), Cleaning Cartridge, Ferrite Core, CD-ROM, Software License Agreement, Before Using This Printer |
| Optional Accessories | Self-Laminating Color Printing Packs (2UPC-C13, C14, C15, C48PF), Paper Holder UPA-CPH1 |
| Print Media | Designated print packs with paper roll and ribbon cartridge set |
| Safety Features | Must be earthed; no power switch; use approved power cord with earthing contacts |
| Maintenance | Cleaning inside using supplied cleaning cartridge and sheet; clean roller with alcohol; cabinet with mild detergent; rinse cooling fan filter |
| Repairability | Consult qualified service personnel; thermal head and other internal parts should only be serviced by authorized technicians |
Frequently Asked Questions - UP-CX1 SONY
User questions about UP-CX1 SONY
0 question about this device. Answer the ones you know or ask your own.
Ask a new question about this device
Download the instructions for your Printer in PDF format for free! Find your manual UP-CX1 - SONY and take your electronic device back in hand. On this page are published all the documents necessary for the use of your device. UP-CX1 by SONY.
USER MANUAL UP-CX1 SONY
Digital Photo Printer
Operating Instructions
Before operating the unit, please read this manual thoroughly and retain it for future reference.
UP-CX1
English
Owner's Record
The model and serial numbers are located at the rear. Record these number in the space provided below. Refer to these numbers whenever you call upon your Sony dealer regarding this product.
Model No.
Serial No. ____
WARNING
To reduce the risk of fire or electric shock, do not expose this apparatus to rain or moisture.
To avoid electrical shock, do not open the cabinet. Refer servicing to qualified personnel only.
THIS APPARATUS MUST BE EARTHED.
This unit has no power switch.
When installing the unit, incorporate a readily accessible disconnect device in the fixed wiring, or connect the power cord to an easily accessible socket-outlet near the unit. If a fault should occur during operation of the unit, operate the disconnect device to switch the power supply off, or disconnect the power cord.
For the customers in the U.S.A.
This equipment has been tested and found to comply with the limits for a Class B digital device, pursuant to Part 15 of the FCC Rules. These limits are designed to provide reasonable protection against harmful interference in a residential installation. This equipment generates, uses, and can radiate radio frequency energy and, if not installed and used in accordance with the instructions, may cause harmful interference to radio communications. However, there is no guarantee that interference will not occur in a particular installation. If this equipment does cause harmful interference to radio or television reception, which can be determined by turning the equipment off and on, the user is encouraged to try to correct the interference by one or more of the following measures:
- Reorient or relocate the receiving antenna.
- Increase the separation between the equipment and receiver.
- Connect the equipment into an outlet on a circuit different from that to which the receiver is connected.
- Consult the dealer or an experienced radio/TV technician for help.
You are cautioned that any changes or modifications not expressly approved in this manual could void your authority to operate this equipment.
All interface cables used to connect peripherals must be shielded in order to comply with the limits for a digital device pursuant to Subpart B of Part 15 of FCC Rules.
If you have any questions about this product, you may call; Sony Customer Information Service Center 1-800-222-7669 or http://www.sony.com/
Declaration of Conformity
Trade Name : SONY
Model : UP-CX1
Responsible Party : Sony Electronics Inc.
Address : 16530 Via Esprillo, San Diego, CA 92127 U.S.A.
Telephone Number:858-942-2230
This device complies with part 15 of the FCC Rules. Operation is subject to the following two conditions: (1) this device may not cause harmful interference, and (2) this device must accept any interference received, including interference that may cause undesired operation.
Warning on power connection
Use a proper power cord for your local power supply.
- Use the approved Power Cord (3-core mains lead) / Appliance Connector / Plug with earthing-contacts that conforms to the safety regulations of each country if applicable.
- Use the Power Cord (3-core mains lead) / Appliance Connector / Plug conforming to the proper ratings (Voltage, Ampere).
If you have questions on the use of the above Power Cord / Appliance Connector / Plug, please consult a qualified service personnel.
Table of Contents
Introduction
Features ....4
Basic Application Example ...... 4
Controls and Functions ....4
Front....4
Rear....5
Preparation
Supplied Accessories ......6
Connection to a Computer ....7
Installing the Printer Driver.... 7
Connections 7
Operation
Loading Paper Roll and Ribbon
Cartridge....8
Handling the paper roll and ribbon cartridge....8
Attaching adaptors to paper holder...... 9
Loading the paper roll and ribbon cartridge.... 10
Removing the paper roll and ribbon cartridge.... 12
Attaching the Paper Tray 13
Printing from the Computer ....15
Miscellaneous
Precautions....16
Cleaning.... 17
Ribbon Cartridge and Paper......19
Specifications....19
Printing Trouble....20
Troubleshooting 21
Introduction
Features
The UP-CX1 Digital Photo Printer is a dye sublimation thermal transfer printer providing high quality, high resolution (330 dpi), and high speed printing of computer image data on four sizes of paper in full color (256 gradations process and 16.7 million colors).
Basic Application Example
Computer: provides image data for printing and printer control signals

natural_image
Line drawing of a desktop computer connected to a printer (no text or symbols present)UP-CX1 Digital Photo Printer
Controls and Functions
Front

① (ON/STANDBY) indicator
Lights when the printer is turned on.
② (PRINT) indicator
Lit: Printing is in progress.
Flashing: Receiving print data from the computer.
③ CLEANING indicator
Lit: Cleaning is in progress.
Flashing: Cleaning cartridge is inserted, and the printer is awaiting operation.
④ ALARM indicator (page 20)
Lit (red): The printer is malfunctioning. Consult a Sony service representative.
Lit (orange): A paper jam has occurred, or the ribbon cartridge has severed.
⑤ indicator (page 20)
Lit: Lights in the following cases.
• The paper roll or ribbon cartridge has run out.
• The paper roll or ribbon cartridge is not inserted.
- The paper roll and ribbon cartridge sizes do not match.
Flashing: When the paper roll or ribbon cartridge run out while printing is in progress, the indicator begins flashing after you replace them. Press the RESET button after replacement, and the indicator turns off.
⑥ON/STANDBY button
Press this button to turn on power to the unit. Press it again to enter the standby mode.
To restart the unit from standby mode, wait at least 5 seconds in standby mode, and then press the ON/STANDBY button.
⑦ CLEANING button (page 17)
Press this button to perform cleaning.
⑧RESET button
When the paper roll or ribbon cartridge run out while printing is in progress or an error occurs, press this button to resume printing after the problem has been resolved.
⑨Eject slot
The printed photo emerges from this slot.
⑩Paper tray (page 13)
Printed photos are collected in this tray.
⑪ Paper eject stopper (page 14)
When using the print pack 2UPC-C13, this stopper should be raised.
12Front door (page 9)
Open this door to change the paper roll.
Front door open

natural_image
Line drawing of a printer internal structure with labeled parts A and B (no text or symbols beyond labels)A Paper holder (page 9)
The paper roll is inserted here.
The white areas between printouts are cut off and collected in the top portion of the paper holder.
③Paper holder release button (page 9)
Press this button to remove the paper holder.
Open this door for replacing the ribbon cartridge.
Side door open

natural_image
Line drawing of a device casing with internal components and labeled point A (no text or symbols beyond label)A Ribbon cartridge access opening (page 11) Mount the ribbon cartridge here.
Rear

①USB port (device) (page 7)
Use a commercially available USB cable to connect the unit to a computer.
Operation is not guaranteed when connected by a USB hub.
②\~ AC IN (Power Source) Connector (page 7)
Connect the power cord here.
③ Air vent
Features a built-in filter for the thermal head cooling fan.
Preparation
Supplied Accessories
Make certain you have received the following accessories:
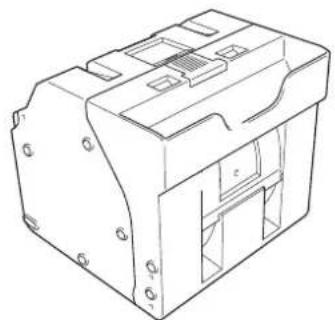
Paper Holder
natural_image
Technical line drawing of a mechanical component with mounting holes and internal channels (no text or symbols)The paper holder is stored in the printer. Be sure to remove the paper holder from the inside of the printer before turning the power on.
These accessories are stored in the paper holder.
Paper Core (1)

Adaptor (left,1) Adaptor (right,1)


Paper Tray (1)

Paper Tray Adaptor (1)
Cleaning Cartridge (1) ^*
Ferrite Core (1)
CD-ROM (1)
Software License Agreement (1)
Before Using This Printer (1)
*) For information on use, refer to the operating instructions supplied with the cleaning cartridge.
Notes
- When taking the unit out of the carton box, be careful not to hurt your back.
- The packaging materials are needed when transporting the unit, so we suggest you keep them.
- Before transporting the unit, remove the ribbon cartridge and paper roll from the unit.
- Before transporting the unit, also remove any paper remnants from the paper holder. The paper remnants may slip into the inner parts of the unit and result in damage if not removed.
Connection to a Computer
After connecting a USB connecting cable (not supplied) to the printer and the computer, connect the power cord. For details about the printer connection, refer to the manuals for the computer or other peripheral devices.
Installing the Printer Driver
Before connecting the printer to the computer, install the printer driver provided with the printer. For detailed instructions on how to install the printer driver, refer to the Readme.txt file and the install manual contained on the CD-ROM disc supplied.
Connections
Notes
- Follow the connection procedures described in the computer manual.
• Make sure that the interface cable is connected securely at both ends. - The printer driver software provided with the printer is not suitable for using the printer connected to a network.
• Operation of the printer is not guaranteed for connection to a USB hub. - Before connecting the unit using a USB cable (not supplied), attach a supplied ferrite core to the end of the cable to be connected to the printer for noise prevention.

Attaching a ferrite core to a USB cable
Before connecting a USB cable (not supplied) to the printer, you should attach a supplied ferrite core to its cable for noise prevention. To conform to radiation standards, attach the supplied ferrite core to the USB cable of your device as described below.
1 Release two stoppers on the ferrite core to open it.
2 Slip the USB cable through the ferrite core and position it at the base of the USB connector to the printer.
3 Close the ferrite core until you hear a click.

Note
When the ferrite core cannot be secure because the USB cable is thin, secure it using a tape.
Operation
Loading Paper Roll and Ribbon Cartridge
When using the printer for the first time, you must first load a paper roll and ribbon cartridge. When using the 2UPC-C14 or 2UPC-C48PF, adaptors must be installed in the paper holder, as described in the section "Attaching adaptors to paper holder" on page 9. For information on how to remove a spent paper roll and ribbon cartridge, see the section "Removing the paper roll and ribbon cartridge" on page 12.
Notes
• Always use a designated print pack.
• Always replace the paper roll and ribbon cartridge together as a set.
Handling the paper roll and ribbon cartridge
Notes
- The print pack contains two ribbon cartridges and two paper rolls. Be sure to use the ribbon cartridge and paper roll in the same carton as a set. (See “Ribbon Cartridge and Paper” on page 19.)
- The number of sheets that can be printed depends on the print pack type. The table below lists the image count for one ribbon cartridge and paper roll set.
| Print pack | 2UPC-C13 | 2UPC-C14 | 2UPC-C15 | 2UPC-C48PF |
| Number of sheets | 300 (sheets) | 200 (sheets) | 172 (sheets) | 150 (sheets) |
| Print size | 89 × 126 mm ± 2 mm (3.5 × 5 in. ± 3/32 in.) | 101 ×152 mm ± 2 mm (4 × 6 in. ± 3/32 in.) | 126 × 178 mm ± 2 mm (5 × 7 in. ± 3/32 in.) | 101 × 203 mm ± 2 mm (4 × 8 in. ± 3/32 in.) |
- Do not replace the ribbon cartridge and paper roll before they are used up. Otherwise the above number of sheets may not be achieved.
- Place the paper roll vertically. If you place the paper roll horizontally, the paper roll may roll around and fall. This may cause an injury.

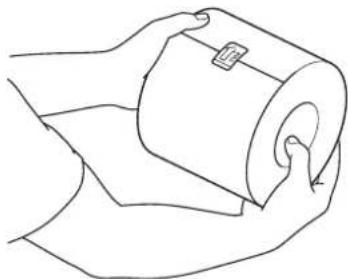
- Hold the paper roll with both hands so that you do not drop it, because it is heavy. Dropping may result in an injury.
natural_image
Line drawing of a person holding a rolled-up cylindrical object with a knob, no text or symbols presentHold the paper roll with both hands.
- If inserting the paper core into the paper roll is difficult when loading the paper roll, squeeze the roll from both sides to restore its shape.

natural_image
Illustration of two hands holding a cylindrical object with a small inset symbol, no text or labels presentSqueeze from both sides.
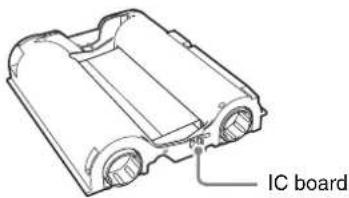
- An IC board is incorporated in the ribbon cartridge. Do not touch the terminal of the IC board with anything, including your fingers or metallic objects. Also, do not strike, bend, or drop the IC board.
Attaching adaptors to paper holder
Paper roll widths vary according to the print pack. When using the print pack 2UPC-C14 or 2UPC-C48PF, attach an adaptor to the paper holder to compensate for the width difference.
1 Open the front door.

natural_image
Line drawing of a printer with paper roll and directional arrows indicating motion (no text or symbols)2 Press the paper holder release button and pull the paper holder out.

natural_image
Line drawing of a printer internal structure with no visible text or symbols3 Press the latch on top of the paper holder and open the holder.

natural_image
Line drawing of hands assembling or adjusting a mechanical component (no text or symbols visible)4 Adjust the width of the paper holder.
When using the print pack 2UPC-C14 or 2UPC-C48PF
Attach adaptors to both ends of the paper holder.

natural_image
Technical line drawing of a mechanical housing component with internal cavities and mounting holes (no text or symbols)Memo
Make sure the color of the label on the upper part of the adaptors matches the color of the label on the paper holder.
Note
Insert the adaptors firmly and completely into the paper holder.
When using the print pack 2UPC-C13 or 2UPC-C15
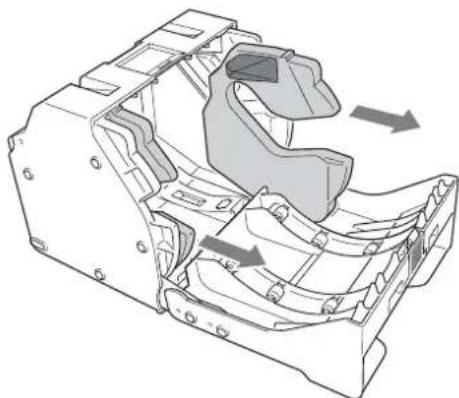
Remove the adaptors from the paper holder.
natural_image
Technical line drawing of a mechanical housing component with internal cavities and mounting holes (no text or symbols)Note
Store the adaptors in a safe place so as not to lose them.

Loading the paper roll and ribbon cartridge
Loading the paper roll
1 Insert the paper core into the paper roll.
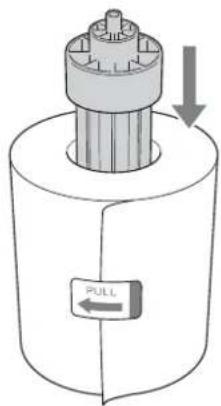
Notes
- If the edges of the paper roll are uneven, make sure to even them out before installing the paper roll. Otherwise a malfunction may occur.
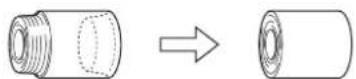
- If the paper is wound loosely around the core, make sure to wind it tightly before installing the paper roll. Otherwise a malfunction may occur.

natural_image
Diagram showing a cylindrical mechanical component before and after transformation, with no text or symbols present.- Do not grasp the paper too tightly or strike it against a hard object, because the paper may tear or crease, effecting the print quality.
2 Open the front door.

natural_image
Line drawing of a printer with two arrows indicating flow or movement (no text or symbols)3 Press the paper holder release button and pull the paper holder out.

natural_image
Line drawing of a printer holder with internal components and an arrow indicating left motion (no text or symbols)4 Press the latch on top of the paper holder and open the holder.
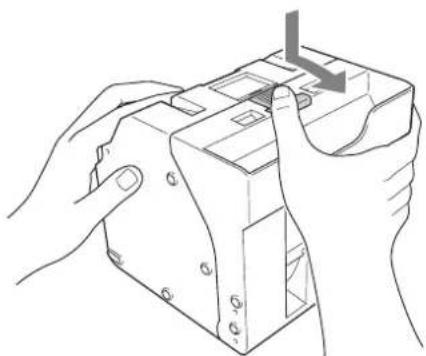
natural_image
Line drawing of hands installing or adjusting a mechanical component (no text or symbols present)5 Insert the paper roll into the paper holder.
The arrow on the label in the center of the paper roll must point inwards.

natural_image
Illustration of hands installing or adjusting a mechanical component with a tool (no text or symbols visible)Note
When installing the paper roll, make sure the paper holder is completely open. Otherwise a malfunction may occur.

6 Remove the label in the center of the paper roll.
Notes
- Make sure to fully remove all labels from the paper roll. If labels remain inside the printer, operation problems may occur.
• After inserting the paper roll, do not touch the printing surface (the inner surface of the rolled paper). Fingerprints, sweat, creases etc. can lead to reduced print quality. - Insert the paper roll firmly and completely into the paper holder.
7 Close the paper holder.

natural_image
Line drawing of hands installing or adjusting a device component (no text or symbols visible)Note
When closing the paper holder, take care that the leading edge of the paper roll does not stick out of the paper feed opening.

natural_image
Cross-shaped diagram of a printer with paper and door, no text or symbols present8 Return the paper holder into the unit.
Insert the paper holder until you hear a sharp click.
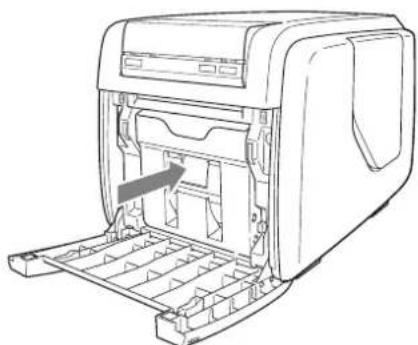
natural_image
Line drawing of a printer holder with internal compartments and a paper feed tray (no text or symbols)9 Close the front door.

natural_image
Line drawing of a printer internal structure with no visible text or symbolsLoading the ribbon cartridge
1 Open the side door.

natural_image
Line drawing of a mechanical device with an arrow indicating direction (no text or symbols)2 Insert the ribbon cartridge completely.

natural_image
Technical line drawing of a mechanical device with an arrow indicating direction (no text or symbols present)Notes
- If it is difficult to insert the ribbon cartridge, remove it and try inserting it again. Reduce the ribbon slack by turning the cartridge spool in the direction of the arrow only if the ribbon cartridge cannot be inserted due to slack in the ribbon.


- Do not rewind the ribbon cartridge for reuse in printing. Printing will not be performed properly, and it may cause a malfunction to occur.
- Do not try to replace the ribbon cartridge while printing is in progress.
- Immediately after printing, the thermal head inside the unit will be hot. When loading a cartridge, do not insert your hand into the ribbon cartridge access opening, to prevent the risk of burns.
3 Close the side door.

natural_image
Line drawing of a mechanical device with an arrow indicating rotation or movement (no text or symbols)Notes on storage
- Avoid placing where subject to:
– high temperatures
– high humidity or dust
- direct sunlight
• After opening the bag, use the ribbon cartridge and the paper as soon as possible.
- When storing after partial use, put the ribbon and the paper back in their bags.
Notes
- There is extra paper on the paper roll. When the ribbon cartridge is finished, remove the remainder of the paper roll and install a new ribbon cartridge and paper roll.
- Make sure to use a matching paper roll and ribbon cartridge set. Using an unmatched combination will not only prevent you from obtaining normal print results but may cause a paper jam or a malfunction.
- Do not touch the printing surface of the paper roll or the ink on the ribbon cartridge. Fingerprints and other pollutants can lead to reduced print quality.
Removing the paper roll and ribbon cartridge
Removing the paper roll
1 Open the front door.

natural_image
Line drawing of a portable electronic device with two arrows indicating flow or movement (no text or symbols)2 Press the paper holder release button and pull the paper holder out.
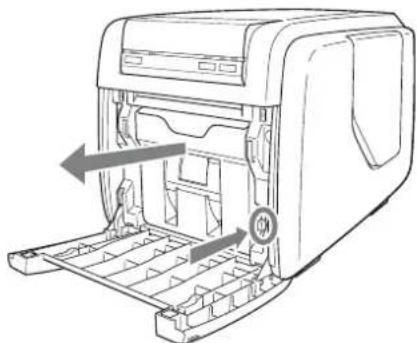
natural_image
Line drawing of a printer's front panel with internal structure and directional arrows indicating movement (no text or symbols)3 Remove any paper remnants from the paper holder.
4 Press the latch on top of the paper holder and open the holder.

natural_image
Line drawing of hands assembling a device into a housing (no text or symbols)5 Remove the paper roll.

natural_image
Line drawing of hands assembling a mechanical component with a tool (no text or symbols)6 Pull out the paper core from the paper roll.
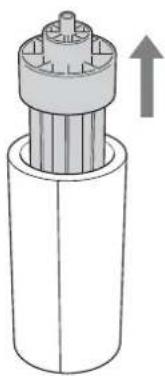
natural_image
Cross-sectional diagram of a mechanical component with an upward arrow indicating motion (no text or symbols)Note
You will need to reuse the paper core. Be careful not to misplace it.
Removing the ribbon cartridge
1 Open the side door.
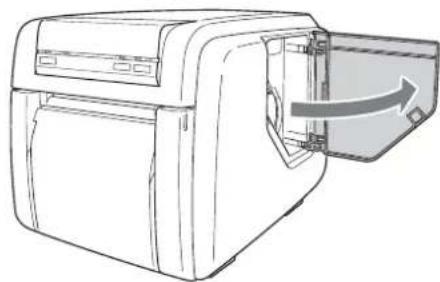
natural_image
Line drawing of a mechanical device with an arrow indicating direction (no text or symbols)2 Pull back the latch on the ribbon cartridge to release the lock, and then grasp the ribbon cartridge and remove it.

natural_image
Technical line drawing of a mechanical device with an arrow indicating direction (no text or symbols present)Memo
If the ink ribbon breaks, you can reconnect it with a piece of tape and use the remaining ribbon.
Note
Immediately after printing, the thermal head inside the unit will be hot. When removing a cartridge, do not insert your hand into the ribbon cartridge access opening, to prevent the risk of burns.
3 Close the side door.

natural_image
Line drawing of a mechanical device with an open lid and internal components (no text or symbols)Attaching the Paper Tray
Attach the supplied paper tray.

natural_image
Line drawing of a printer with a plastic cover emerging from its side panel (no text or symbols)
When using the print pack 2UPC-C14 or 2UPC-C15

natural_image
Line drawing of a printer with paper feed and paper holder (no text or symbols)About 100 sheets of printouts can be left on this paper tray. However, the number of printouts which can be accumulated on the paper tray changes according to the environment condition where the printer is used or the printed image. Remove the printed sheets accumulated on the paper tray as soon as possible.
When using the printing pack 2UPC-C13

natural_image
Line drawing of a printer with a paper feed into the cover (no text or symbols)Raise the eject paper stopper.
About 100 sheets of printouts can be left on this paper tray. However, the number of printouts which can be accumulated on the paper tray changes according to the environment condition where the printer is used or the printed image. Remove the printed sheets accumulated on the paper tray as soon as possible.
When using the print pack 2UPC-C48PF

natural_image
Line drawing of a printer with a paper clip inserted into the base (no text or symbols)Attach the paper tray adaptor.
The number of printouts which can be accumulated on the paper tray changes according to the environment condition where the printer is used or the printed image. Remove the printed sheets accumulated on the paper tray as soon as possible.
Note
Do not touch the printouts until they have been ejected from the printer. If a printout gets stuck in the eject slot, remove it from the slot immediately.
To remove the paper tray
Grasp the bottom of the paper tray, lift it up while keeping it horizontal, and pull it out.
Printing from the Computer
Before starting to print
- Confirm that the printer and computer are connected (page 7).
- Confirm that the paper roll and the ribbon cartridge are correctly installed (page 10).
- Confirm that compatible ribbon cartridge and printing paper are installed (page 8).
Note
Do not look into the paper output slot during printing. The sharp edge of the printout may poke your eye or face. This may cause loss of sight. Also, do not insert a foreign object in the paper output slot. The cutter may be damaged or broken and a piece of the cutter can cut you.
Printing
1 Turn on the printer and computer.

The ON/STANDBY) indicator lights after a few seconds.
Note
After turning the printer off, wait at least 5 seconds before turning it on again.
2 Make sure that the indicator is not lit.
If the indicator is lit, the size of the paper roll and ribbon cartridge may not be the same, or the paper roll or ribbon cartridge may not be loaded correctly. Reload them if necessary.
3 Send the print data from the computer to the printer, and begin printing.
For details, refer to the operating instructions for the printer driver.
①The PRINT) indicator flashes while the image data is being sent.
②A command to begin printing is sent form the computer, and printing begins. The (PRINT) indicator remains lit while printing is in progress.
③The printed images are ejected from the eject slot after printing. The print time depends on the size of the image and the type of paper roll and ribbon cartridge used. The (PRINT) indicator turns off after printing is complete.
Notes
- Do not disconnect the USB cable while data transmission or printing is in progress.
- Wait at least 5 seconds after disconnecting the USB cable before reconnecting it.
- The number of prints that can be stored in the paper tray varies greatly depending on the usage environment and the images printed. Be sure to remove printed images quickly. When using the 2UPC-C13 printing pack, be sure to raise the paper eject stopper.
If the printer does not print
The ALARM or indicator lights when an error occurs and the printer is unable to print. For details on errors and how to deal with them, see “Printing Trouble” on page 20.
Notes on storing your printouts
- Avoid exposure to direct sunlight, or conditions of high temperature and high humidity, which could cause the colors to fade.
- Avoid applying tape to a printout, and avoid contact with plastic objects such as erasers and desk mats.
- Do not allow alcohol or other volatile organic solvents to come into contact with the printouts.
Miscellaneous
Precautions
Safety
- Operate the printer using the power source specified in "Specifications" on page 19.
- Be careful not to damage the power cord by placing or dropping heavy objects on it; it is dangerous to use the unit with a damaged power cord.
- If you do not intend to use the unit for a long time, disconnect the power cord.
- Unplug the power cord by grasping the plug, not the cord itself.
- Do not disassemble the unit. There is a danger of electric shock from the internal parts.
- Be careful not to spill water or other liquids on the unit, or to allow combustible or metallic material to enter the cabinet. If used with foreign matter in the cabinet, the unit is liable to fail, or present a risk of fire or electric shock.
- If the unit malfunctions or if a foreign body falls into the cabinet, disconnect the power immediately and consult your Sony service facility or your Sony dealer.
- To store a half-used printing pack, replace it in its original packing and reseal the package. If possible, keep the sealed printing pack in a cool, dark location. To subsequently use the printing pack, place it, in its sealed package, in a warm room for several hours. Doing so prevents condensation from forming when the printing pack is removed from its package.
Installation
- Install the unit on a level surface. Do not install the unit on a slant or on its side. Doing so could damage the unit.
-
Do not jar or drop the unit.
-
Do not install the unit in any location that is subject to:
- instability
– excessive dust - extremely high or low temperatures
- vibration
– high humidity
direct sunlight
- Do not block the ventilation holes on the unit. Doing so could result in damage.

On transporting the printer
Before transporting the unit, remove the ribbon cartridge and paper roll from the unit, and be sure to remove any paper remnants from the paper holder. Not doing so may cause malfunction. It is recommended that you store the ribbon cartridge and paper roll in the package they came in after you remove them.
On condensation
- If the printer is subjected to wide and sudden changes in temperature, such as when it is moved from a cold room to a warm room or when it is left in a room with a heater that tends to produce quantities of moisture,
condensation may form inside the printer. In such cases the printer will probably not work properly, and may even develop a fault if you persist in using it. If moisture condensation forms, turn off the power and leave the printer standing for at least one hour. - If the printing pack is subjected to wide and sudden changes in temperature, condensation may form on the ribbon cartridge or paper inside. This will cause the printer to malfunction. Also if the printing pack is used in this state, spots are likely to appear on the printout.
Cleaning
Cleaning the inside of the printer
If stripes, scratches, or other marks begin to appear on prints, cleaning the inside of the printer may solve the problem. Cleaning the inside of the printer is especially effective in removing white stripes and scratches like those shown in the figure.
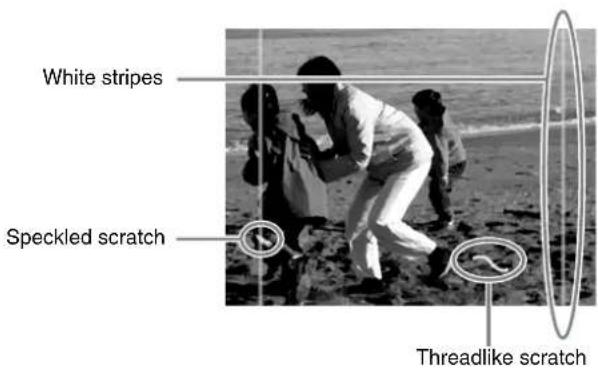
White stripes tend to appear when using the 2UPC-C13 or 2UPC-C15 printing pack after printing a large quantity of prints with the 2UPC-C14 or 2UPC-C48PF. Accumulation of dust on the thermal head can also cause white stripes and scratches to appear. When this occurs, use the cleaning cartridge supplied with the printer and the cleaning sheet supplied with the printing pack to clean the inside of the printer. The cleaning cartridge can be used repeatedly.
1 Look at the indicator to confirm that the paper holder is installed.
The indicator is lit when the paper holder is installed.
2 Remove the paper tray.
3 Open the side door, and remove the ribbon cartridge.
4 Insert the cleaning cartridge all the way.
The CLEANING indicator begins flashing.
5 Press the CLEANING button on the front panel of the printer.
The CLEANING indicator remains lit, and some paper is ejected from the printer.
The CLEANING indicator begins flashing again after the paper is ejected.
6 Remove the protective paper from the back side of the cleaning sheet (the side without an illustration).
Be careful not to confuse the back and front sides of the cleaning sheet.

natural_image
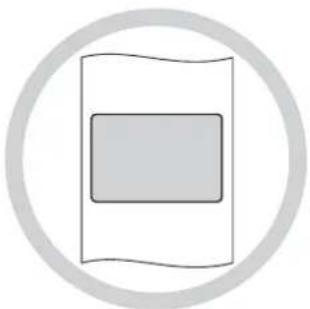
Diagram of a device with directional arrows indicating motion or movement (no text or symbols)7 Determine by the width of the print paper the orientation to affix the cleaning sheet, and affix the cleaning sheet evenly and squarely onto the ejected paper as illustrated.

natural_image
Diagram of a car interior showing a door panel with arrows pointing to a storage tray (no text or symbols)When using the 2UPC-C14 or 2UPC-C48PF printing pack, orient the cleaning sheet lengthwise rather than crosswise.
Firmly affix the entire cleaning sheet so that the corners do not peel up and the center is not raised. If the corners of the cleaning sheet peel up, cleaning may not be performed properly.
8 Remove the protective paper from the front side of the cleaning sheet.

natural_image
Diagram of a door opening with a tray and arrow indicating direction (no text or symbols)
9 The adhesive surface of the cleaning sheet is exposed now, so check again to make sure that none of the corners have peeled up.
natural_image
Simple diagram with a rectangle inside a wavy rectangle, enclosed in a circular border (no text or symbols)10 Press the CLEANING button again.
The CLEANING indicator remains lit, and cleaning begins. The print paper is fed in and out of the eject slot, removing any dust or other particles inside the printer in the process.
When cleaning is complete, the print paper is cut multiple times, and the CLEANING indicator begins flashing again.
Make sure that the entire cleaning sheet has been ejected. If there are any portions of the cleaning sheet remaining in the printer, remove the paper holder, and cut off the remains.

natural_image
Technical line drawing of a mechanical device with scissors cutting through it (no text or symbols)11 Remove the cleaning cartridge, and replace the ribbon cartridge.
Notes
- A small amount of paper is necessary to perform cleaning. If the remaining amount of paper is too low, an error may occur. In such a case, replace the paper roll and perform cleaning again.
- Paper used during cleaning is cut automatically.
When the printer roller becomes dirty
When the printer roller becomes dirty, use a soft cloth moistened with cleaning alcohol to gently wipe the roller while turning it.
Note
When cleaning the printer roller, always put the printer into standby mode with the ON/STANDBY button, and disconnect the power cord.

natural_image
Line drawing of a mechanical device with internal components and a circular button labeled '无' (no text or symbols)
natural_image
Technical line drawing of a mechanical housing or enclosure with internal components and mounting holes (no text or symbols)When the cabinet becomes dirty
If the cabinet is extremely dirty, soak a clean cloth in water, or a solution of water and a neutral detergent, wring out the cloth, and then wipe the surface of the cabinet. Next, wipe clean with a clean, dry cloth.
To avoid damaging the surfaces of the unit, never use thinner, benzene, alcohol, or any other type of organic solvent to clean the unit.
When the filter for the cooling fan becomes dirty
When the filter for the thermal head cooling fan has become considerably dirty, remove it and rinse off the dirt with water. Do not scrub the filter mesh with a brush or other cleaning tool.
Ribbon Cartridge and Paper
Each printing pack contains two sets of the ribbon cartridge and paper roll combination.
Be sure to use the ribbon cartridge and the paper roll in the carton as a set.
2UPC-C13 series Self-Laminating Color Printing Pack
Contains color ribbon cartridge and paper.
Ribbon cartridge for printing: 2 rolls
3.5 × 5 inches print paper: 2 rolls
2UPC-C14 series Self-Laminating Color Printing Pack
Contains color ribbon cartridge and paper.
Ribbon cartridge for printing: 2 rolls
4 × 6 inches print paper: 2 rolls
2UPC-C15 series Self-Laminating Color Printing Pack
Contains color ribbon cartridge and paper.
Ribbon cartridge for printing: 2 rolls
5 × 7 inches print paper: 2 rolls
2UPC-C48PF Self-Laminating Color Printing Pack
Contains color ribbon cartridge and paper.
Ribbon cartridge for printing: 2 rolls
4 × 8 inches print paper: 2 rolls
Printing capacity
Each printing pack contains two sets of the ribbon cartridge and paper combination. One set of the ribbon cartridge and paper allows you to print the following number of sheets.
| Print pack | 2UPC-C13 | 2UPC-C14 | 2UPC-C15 | 2UPC-C48PF |
| Number of sheets | 300 (sheets) | 200 (sheets) | 172 (sheets) | 150 (sheets) |
| Print size | 89 × 126 mm ± 2 mm(3.5 × 5 in. ± 3/32 in.) | 101 ×152 mm ± 2 mm(4 × 6 in. ± 3/32 in.) | 126 × 178 mm ± 2 mm(5 × 7 in. ± 3/32 in.) | 101 × 203 mm ± 2 mm(4 × 8 in. ± 3/32 in.) |
Notes
- However the number of sheets that can be printed may not be guaranteed if you replace the ribbon cartridge and paper before the ribbon cartridge and paper run out.
• Always use a designated print pack.
Specifications
Power requirements
100 to 240 V AC, 50/60 Hz
Input current 3.0 to 1.3 A max.
Operating temperature range
5 to 35°C
Operating humidity range
20 to 80%
External dimensions
Approx. 275 × 262 × 380 mm (WHD)
(10^7/8× 10^3/8× 14^15/_16in.)
(excluding the maximum projecting parts)
Mass Approx. 10.5 kg (23 lb 2 oz) (printer
only)
Printing method Dye sublimation thermal transfer
Resolution 11.8 dot/mm (300 dpi)
Gradations 256 levels (8 bits) each for yellow, magenta and cyan
Picture size 2UPC-C13: 89 × 126 ~mm ± 2 ~mm
(3.5 × 5 in. ± 3/32 in.)
2UPC-C14: 101 × 152 mm ± 2 mm
(4 × 6 in. ± 3/32 in.)
2UPC-C15: 126 × 178 mm ± 2 mm
(5 × 7 in. ± 3/32 in.)
2UPC-C48PF: 101 × 203 mm ± 2 mm
(4 × 8 in. ± 3/32 in.)
Image data transferred
2UPC-C13: 1,100 × 1,536 dots
2UPC-C14: 1,248 × 1,848 dots
2UPC-C15: 1,536 × 2,148 dots
2UPC-C48PF: 1,248 × 2,448 dots
(The top and bottom and right and left portions will not be printed by about 2 mm)
Printing time 2UPC-C13: Approx. 13 sec.
2UPC-C14: Approx. 16 sec.
2UPC-C15: Approx. 17 sec.
2UPC-C48PF: Approx. 21 sec.
Input connector AC IN (for power)
USB function port
Hi-Speed USB (USB2.0)
Accessories supplied
Paper Tray (1)
Paper Tray Adaptor (1)
Paper Holder (1)
Paper Core (1)
Adaptor (left, 1)
Adaptor (right, 1)
Cleaning Cartridge (1)
Ferrite Core (1)
CD-ROM (1)
Software License Agreement (1)
Before Using This Printer (1)
Optional accessories
Self-Laminating Color Printing Pack
2UPC-C13 series
2UPC-C14 series
2UPC-C15 series
2UPC-C48PF
Paper Holder UPA-CPH1
Design and specifications are subject to change without notice.
Printing Trouble
When an error occurs and printing is disabled, the type of error is conveyed by the state of the indicators. Resolve the problem as shown below.
| Indicator Meaning/Solution | |
| ALARM indicator lit (Red) | The printer is malfunctioning.→Consult a Sony service representative. |
| ALARM indicator lit (Orange) | The print paper is not feeding correctly.→Load the paper roll properly (page 10).There may be a crease in the print paper.→Check for creases, and cut off any creased portions before loading the paper roll back into place (page 10).The ink ribbon may be severed.→Tape together the severed portion of the ink ribbon.The ribbon cartridge has run out.→Replace the ribbon cartridge and paper roll as a set (page 10).The ribbon cartridge may not be loaded properly.→Load the ribbon cartridge properly (page 11). |
| indicator lit | The paper roll has run out.→Replace the paper roll and ribbon cartridge as a set (page 10).The ribbon cartridge has run out.→When the ink ribbon is reeled entirely to one side of the cartridge, the cartridge has run out. Replace the ribbon cartridge and paper roll as a set (page 10).There is no paper loaded.→Load a paper roll into the unit (page 10).There is no ribbon cartridge loaded.→Load a ribbon cartridge into the unit (page 11).The print paper and ribbon cartridge do not match.→Only load paper rolls and ribbon cartridges that came together in the same printing pack (page 8). |
Troubleshooting
Before sending the unit out for servicing, check the items listed below. If you still cannot solve the problem, contact your Sony Authorized Dealer.
| Symptom Cause/Remedy | |
| Cannot load paper roll. | Are you trying to load 2UPC-C13, C15 while adaptors are mounted in the paper holder?→Remove the adaptors and then load the paper roll (page 9). |
| Paper roll was loaded, but cannot print. | Paper roll may not have been loaded correctly.→Ensure that paper roll is loaded correctly (page 10). |
| Ribbon cartridge was loaded, but cannot print. | Ribbon may not have been loaded correctly.→Ensure that ribbon is loaded correctly (page 11). |
| The (PRINT) indicator is lit, but the printer does not print. | When the inside of the printer heats up, the printer may be unable to print temporarily.→Wait for printing to start again automatically. |
| Ribbon cartridge has run out, but there is still some paper left. | This is not a defect. Some spare paper will be left over.→Remove the leftover paper and load a new ribbon cartridge and paper roll (page 10). |
| Power does not switch on. | The power cord may not be connected.→Make sure that the power cord is connected (page 7).The ON/STANDBY button may not have been pressed correctly.→Make sure that the ON/STANDBY button has been fully depressed. |
| The unit does not switch to standby. | The unit may still be doing processing.→Wait a few moments for the unit to stop processing.An abnormal condition may have caused the unit to stop responding.→Disconnect the power cord from the power outlet. Then reconnect the power cord, and press the ON/STANDBY button. |
| White stripes and speckled or threadlike scratches appear in the printed images. | The thermal head or feed roller may be dirty.→Clean the inside of the printer (page 17). |


- Digital Photo Printer
- Operating Instructions
- English
- Owner's Record
- WARNING
- For the customers in the U.S.A.
- Declaration of Conformity
- Warning on power connection
- Table of Contents
- Introduction
- Preparation
- Operation
- Miscellaneous
- Features
- Basic Application Example
- Controls and Functions
- Front
- ⑥ON/STANDBY button
- ⑦ CLEANING button (page 17)
- ⑧RESET button
- ⑨Eject slot
- ⑩Paper tray (page 13)
- ⑪ Paper eject stopper (page 14)
- 12Front door (page 9)
- Front door open
- A Paper holder (page 9)
- ③Paper holder release button (page 9)
- Side door open
- Rear
- ①USB port (device) (page 7)
- ②\~ AC IN (Power Source) Connector (page 7)
- ③ Air vent
- Supplied Accessories
- Notes
- Connection to a Computer
- Installing the Printer Driver
- Connections
- Attaching a ferrite core to a USB cable
- Note
- Loading Paper Roll and Ribbon Cartridge
- Handling the paper roll and ribbon cartridge
- Attaching adaptors to paper holder
- When using the print pack 2UPC-C14 or 2UPC-C48PF
- Memo
- When using the print pack 2UPC-C13 or 2UPC-C15
- Loading the paper roll and ribbon cartridge
- Loading the paper roll
- Loading the ribbon cartridge
- Notes on storage
- Removing the paper roll and ribbon cartridge
- Removing the paper roll
- Removing the ribbon cartridge
- Attaching the Paper Tray
- To remove the paper tray
- Printing from the Computer
- Before starting to print
- Printing
- If the printer does not print
- Notes on storing your printouts
- Precautions
- Safety
- Installation
- On transporting the printer
- On condensation
- Cleaning
- Cleaning the inside of the printer
- When the printer roller becomes dirty
- When the cabinet becomes dirty
- When the filter for the cooling fan becomes dirty
- Ribbon Cartridge and Paper
- 2UPC-C13 series Self-Laminating Color Printing Pack
- 2UPC-C14 series Self-Laminating Color Printing Pack
- 2UPC-C15 series Self-Laminating Color Printing Pack
- 2UPC-C48PF Self-Laminating Color Printing Pack
- Printing capacity
- Specifications
- Optional accessories
- Printing Trouble
- Troubleshooting
Brand : SONY
Model : UP-CX1
Category : Printer