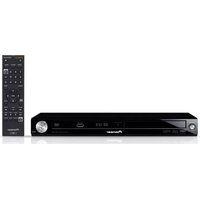
DV-120-K - DVD player PIONEER - Free user manual and instructions
Find the device manual for free DV-120-K PIONEER in PDF.


| Product Type | DVD Player |
| Brand | Pioneer |
| Model | DV-120-K |
| Dimensions (W x H x D) | 360 mm x 42 mm x 202 mm |
| Weight | 1.3 kg |
| Power Requirements | AC 220 V to 240 V, 50/60 Hz |
| Power Consumption | 11 W (operating), 0.6 W (standby) |
| Playable Discs | DVD-Video, DVD-R/-RW/-R DL, DVD+R/+RW/+R DL, Video CD, Super VCD, Audio CD, CD-R/-RW |
| Playable File Formats | DivX (.divx/.avi), JPEG (.jpg/.jpeg), MP3 (.mp3), WMA (.wma) |
| Video Outputs | Composite video (RCA), Component video (Y Cb/Pb Cr/Pr), SCART (AV connector) |
| Audio Outputs | Analog stereo (RCA), Coaxial digital audio |
| USB Port | 1 x USB (front) for playback and CD-to-USB recording |
| Region Code | 2 (DVD-Video) |
| Audio Features | Sound Retriever, Equalizer (Rock/Pop/Live/Dance/Techno/Classic/Soft), Virtual Surround, Audio DRC, Dialog enhancement |
| Video Adjustments | Sharpness, Brightness, Contrast, Gamma, Hue, Chroma Level |
| Playback Functions | Program Play, Repeat, Random, A-B Repeat, Search Mode |
| Special Functions | CD-to-USB recording (MP3), KURO LINK (not on DV-120-K), Parental Lock, Auto Power Off |
| Remote Control | Included with battery (AA x2) |
| Operating Temperature | +5 °C to +35 °C |
| Operating Humidity | 5% to 85% (no condensation) |
| Accessories | Remote control, audio/video cable, power cord, batteries, warranty card, operating instructions |
Frequently Asked Questions - DV-120-K PIONEER
User questions about DV-120-K PIONEER
0 question about this device. Answer the ones you know or ask your own.
Ask a new question about this device
Download the instructions for your DVD player in PDF format for free! Find your manual DV-120-K - PIONEER and take your electronic device back in hand. On this page are published all the documents necessary for the use of your device. DV-120-K by PIONEER.
USER MANUAL DV-120-K PIONEER
Discover the benefits of registering your product online at http://www.pioneer.co.uk (or http://www.pioneer.eu).
Thank you for buying this Pioneer product.
Please read through these operating instructions so you will know how to operate your model properly.
After you have finished reading the instructions, put them away in a safe place for future reference.
IMPORTANT

The lightning flash with arrowhead symbol, within an equilateral triangle, is intended to alert the user to the presence of uninsulated "dangerous voltage" within the product's enclosure that may be of sufficient magnitude to constitute a risk of electric shock to persons.
CAUTION
RISK OF ELECTRIC SHOCK DO NOT OPEN
CAUTION:
TO PREVENT THE RISK OF ELECTRIC SHOCK, DO NOT REMOVE COVER (OR BACK). NO USER-SERVICEABLE PARTS INSIDE. REFER SERVICING TO QUALIFIED SERVICE PERSONNEL.

The exclamation point within an equilateral triangle is intended to alert the user to the presence of important operating and maintenance (servicing) instructions in the literature accompanying the appliance.
D3-4-2-1-1_A1_En
CAUTION
This product is a class 1 laser product, but this product contains a laser diode higher than Class 1. To ensure continued safety, do not remove any covers or attempt to gain access to the inside of the product. Refer all servicing to qualified personnel.
CLASS 1 LASER PRODUCT
D3-4-2-1-8* C En
WARNING
This equipment is not waterproof. To prevent a fire or shock hazard, do not place any container filled with liquid near this equipment (such as a vase or flower pot) or expose it to dripping, splashing, rain or moisture. D3-4-2-1-3_B_En
VENTILATION CAUTION
When installing this unit, make sure to leave space around the unit for ventilation to improve heat radiation (at least 10 cm at top, 10 cm at rear, and 10 cm at each side).
WARNING
Slots and openings in the cabinet are provided for ventilation to ensure reliable operation of the product, and to protect it from overheating. To prevent fire hazard, the openings should never be blocked or covered with items (such as newspapers, table-cloths, curtains) or by operating the equipment on thick carpet or a bed. D3-4-2-1-7b_A_En
WARNING
Before plugging in for the first time, read the following section carefully.
The voltage of the available power supply differs according to country or region. Be sure that the power supply voltage of the area where this unit will be used meets the required voltage (e.g., 230 V or 120 V) written on the rear panel. D3-4-2-1-4_A_En
WARNING
To prevent a fire hazard, do not place any naked flame sources (such as a lighted candle) on the equipment. D3-4-2-1-7a_A_En
Operating Environment
Operating environment temperature and humidity: +5 °C to +35 °C (+41 °F to +95 °F); less than 85 %RH (cooling vents not blocked)
Do not install this unit in a poorly ventilated area, or in locations exposed to high humidity or direct sunlight (or strong artificial light)
D3-4-2-1-7c*_A1_En
If the AC plug of this unit does not match the AC outlet you want to use, the plug must be removed and appropriate one fitted. Replacement and mounting of an AC plug on the power supply cord of this unit should be performed only by qualified service personnel. If connected to an AC outlet, the cut-off plug can cause severe electrical shock. Make sure it is properly disposed of after removal. The equipment should be disconnected by removing the mains plug from the wall socket when left unused for a long period of time (for example, when on vacation). D3-4-2-2-1a_A_En
CAUTION
The Ⓧ STANDBY/ON switch on this unit will not completely shut off all power from the AC outlet. Since the power cord serves as the main disconnect device for the unit, you will need to unplug it from the AC outlet to shut down all power. Therefore, make sure the unit has been installed so that the power cord can be easily unplugged from the AC outlet in case of an accident. To avoid fire hazard, the power cord should also be unplugged from the AC outlet when left unused for a long period of time (for example, when on vacation). D3-4-2-2-2a_A_En
This product is for general household purposes. Any failure due to use for other than household purposes (such as long-term use for business purposes in a restaurant or use in a car or ship) and which requires repair will be charged for even during the warranty period. K041_En
POWER-CORD CAUTION
Handle the power cord by the plug. Do not pull out the plug by tugging the cord and never touch the power cord when your hands are wet as this could cause a short circuit or electric shock. Do not place the unit, a piece of furniture, etc., on the power cord, or pinch the cord. Never make a knot in the cord or tie it with other cords. The power cords should be routed such that they are not likely to be stepped on. A damaged power cord can cause a fire or give you an electrical shock. Check the power cord once in a while. When you find it damaged, ask your nearest PIONEER authorized service center or your dealer for a replacement. S002* En
Information for users on collection and disposal of old equipment and used batteries
(Symbol for equipment)

(Symbol examples) for batteries
These symbols on the products, packaging, and/or accompanying documents mean that used electrical and electronic products and batteries should not be mixed with general household waste.
For proper treatment, recovery and recycling of old products and used batteries, please take them to applicable collection points in accordance with your national legislation.
By disposing of these products and batteries correctly, you will help to save valuable resources and prevent any potential negative effects on human health and the environment which could otherwise arise from inappropriate waste handling.
For more information about collection and recycling of old products and batteries, please contact your local municipality, your waste disposal service or the point of sale where you purchased the items.
These symbols are only valid in the European Union.
For countries outside the European Union:
If you wish to discard these items, please contact your local authorities or dealer and ask for the correct method of disposal.
K058a_A1_En
01 Before you start
What's in the box 5
Loading the batteries in the remote control 5
02 Connections
Connecting using an audio/video cable ....6
Connecting using a SCART AV cable 6
Connecting using an HDMI cable (DV-220V-K only) ......6
03 Part Names and Functions
Remote control 8
04 Playback
Playing discs or files....10
Example of display on main unit display window....11
Playing files stored on USB devices 12
Recording audio CD tracks on USB devices .....12
Playing in the desired order (Programmed Play)......13
05 Changing the settings
Audio Settings parameters ....14
Video Adjust parameters 14
Initial Settings parameters 14
06 Playable discs and files
Playable discs....16
playable files 17
07 Additional information
Troubleshooting 18
Language Code Table and Country/Area Code
Table 22
Setting the TV system 23
Cautions on use 23
Handling discs 24
Specifications 25
Before you start
What's in the box
- Remote Control
• Audio/ video cable - Power cable
• AA batteries (R6) x 2 - Warranty card
- Operating instructions (this document)
Loading the batteries in the remote control
- Open the rear lid and insert the batteries as shown on the diagram below.

natural_image
Mechanical assembly diagram showing a lever mechanism with magnified inset (no text or symbols)To close the rear lid, line up the catch with the groove and slide in the direction of the arrow ( ).

Notes
- Do not use any batteries other than the ones specified. Also, do not use a new battery together with an old one.
- When loading the batteries into the remote control, set them in the proper direction, as indicated by the polarity marks (⊕ and ⊖).
- Do not heat batteries, disassemble them, or throw them into flames or water.
- Batteries may have different voltages, even if they are the same size and shape. Do not use different types of batteries together.
- To prevent leakage of battery fluid, remove the batteries if you do not plan to use the remote control for a long period of time (1 month or more). If the fluid should leak, wipe it carefully off the inside of the case, then insert new batteries. If a battery should leak and the fluid should get on your skin, flush it off with large quantities of water.
- When disposing of used batteries, please comply with governmental regulations or environmental public institution's rules that apply in your country/area.
- WARNING
Do not use or store batteries in direct sunlight or other excessively hot place, such as inside a car or near a heater. This can cause batteries to leak, overheat, explode or catch fire. It can also reduce the life or performance of batteries.
Connections
- Be sure to turn off the power and unplug the power cord from the power outlet whenever making or changing connections.
- Connect the power cord after all the connections between devices have been completed.
Connecting using an audio/video cable
Player's rear panel (DV-220V-K)

Connecting using a SCART AV cable
- The video signal to be output can be selected (AV Connector Out on page 15).
- Analog audio signals are also output from the SCART AV connector.
Player's rear panel (DV-220V-K)

Connecting using an HDMI cable (DV-220V-K only)
By using an HDMI cable, digital signals can be transferred to an HDMI-compatible TV on a single cable with no loss of picture or sound quality. After connecting, make the player's resolution and HDMI color settings according to the HDMI-compatible TV. Also refer to the HDMI-compatible TV's operating instructions.

- HDMI, the HDMI Logo and High-Definition Multimedia Interface are trademarks or registered trademarks of HDMI Licensing, LLC.

Notes
- This player's interface is designed based on the High-Definition Multimedia Interface specification.
- When an HDMI-compatible device is connected, the resolution is displayed on the front panel display.
- The resolution of the video signals output from the player's HDMI OUT terminal is changed manually. Change the HDMI Resolution setting (page 15). Settings for two units can be stored in the memory.
- This player is designed for connection to HDMI-compatible devices. It may not operate properly if connected to DVI devices.
Connecting to a TV
Player's rear panel (DV-220V-K)

Connecting to an AV receiver or amplifier
Player's rear panel (DV-220V-K)

flowchart
graph TD
    A["CONECTOR (SRS) TV/RJ/Host"] --> B["HDMI cable (commercially available)"]
    B --> C["To HDMI input terminal"]
    C --> D["AV receiver or amplifier HDMI cable (commercially available)"]
    D --> E["From HDMI output terminal"]
    E --> F["To HDMI input terminal"]
    G["TV"] --> H["Match the direction of the plug to the terminal and insert straight"]
Audio signals that can be output from the player's HDMI OUT terminal
• 44.1 kHz to 96 kHz, 16-bit/20-bit/24-bit 2-channel linear PCM audio (including 2-channel downmixing)
• Dolby Digital 5.1-channel audio
• DTS 5.1-channel audio
- MPEG audio

- Manufactured under license from Dolby Laboratories. Dolby and the double-D symbol are trademarks of Dolby Laboratories.
- Manufactured under license under U.S. Patent #: 5,451,942 & other U.S. and worldwide patents issued & pending. DTS and DTS Digital Out are registered trademarks and the DTS logos and Symbol are trademarks of DTS, Inc. © 1996-2008 DTS, Inc. All Rights Reserved.
Connecting using commercially available cables
- The player can be connected to a TV, etc., using commercially available component video cables.
- The player can be connected to an AV amplifier, etc., using commercially available digital audio cables.
Part Names and Functions
Remote control
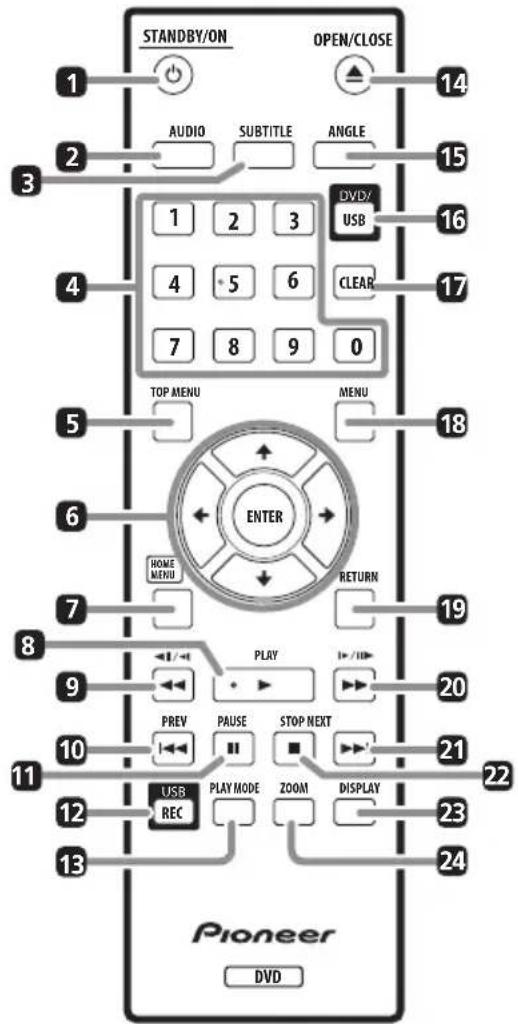
1 STANDBY/ON
Press to turn the power on and off.
2 AUDIO
For discs or files including multiple audio streams/channels, the audio stream/channel can be switched during playback.
3 SUBTITLE
On DVD-Video or DivX discs containing subtitles in multiple languages, the subtitle can be switched during playback.
4 Number buttons (0 to 9)
Use these to specify and play the title, chapter, track or file you want to view/listen to. Also use them to select items on menu screens, etc.
5 TOP MENU
Press to display the top menu of the DVD-Video.
6 ↑/↓/←/→
Use these to select items, change settings and move the cursor.
ENTER
Use this to implement the selected item or enter a setting that you have changed.
7 HOME MENU
Press to display/hide the Home Menu.
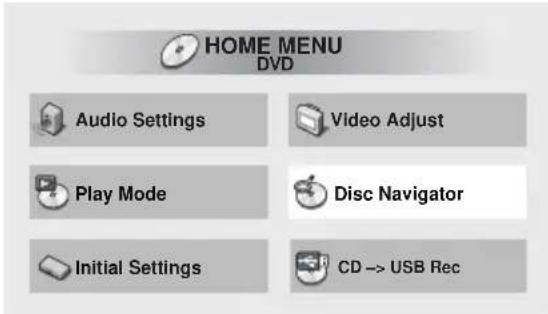
• Audio Settings (page 14)
• Video Adjust (page 14)
• Play Mode (PLAY MODE on page 8)
• Disc Navigator (MENU on page 9)
• Initial Settings (page 14)
• CD -> USB Rec (page 12)
8 ▶ PLAY
Press to start playback.
9
- Press during playback to fast-reverse.
- Press in the pause mode to move backward frame-by-frame.
- Press and hold in while in the pause mode for slow play in the reverse direction.
10 PREV
Press to return to the beginning of the currently playing title, chapter, track or file. Press twice to move back to the beginning of the previous title, chapter, track or file.
11 II PAUSE
Press to stop playback temporarily. Press again to resume.
12 USB REC (page 12)
Press to display the CD -> USB Rec.
13 PLAY MODE
Press to display/hide the Play Mode screen.

- A-B Repeat
The specified section within a single title or track is played repeatedly.
- Repeat
Plays titles, chapters, tracks or files repeatedly.
- Random
Plays titles, chapters or tracks in random order.
• Program (page 13)
Plays titles, chapters, tracks or files in the order in which you program them.
- Search Mode
Plays the specified number or time within the title, chapter, track or file.
The Play Mode function may not work for some discs or files.
14 ▲ OPEN/CLOSE
Open the disc tray and load the disc.
15 ANGLE
On DVD-Video discs containing multiple angles, the angle can be switched during playback.
16 DVD/USB (page 12)
Press to switch between the DVD and USB modes.
17 CLEAR
Press to clear the selected item. Use this for example if you input the wrong number.
18 MENU
- Press to display the menu screen or Disc Navigator.
- Select and play the title, chapter, track or file from the Disc Navigator.
Ex.: DVD video Disc Navigator

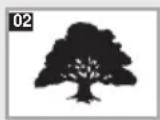


Disc Navigator: Title 01-49:
19 RETURN
Press to return to the previous screen.
20 ▶/▶/||▶
- Press during playback to fast-forward.
- Press in the pause mode to move forward frame-by-frame.
- Press and hold in while in the pause mode for slow play in the forward direction.
21 ▶▶▶I NEXT
Press during playback to skips ahead to the beginning of the next title, chapter, track or file.
22 ■ STOP
When ■ STOP is pressed during playback, the point at which playback was stopped is stored in the memory. When ▶ PLAY is pressed, playback resumes from the point at which it was stopped.
23 DISPLAY
The elapsed time, amount remaining, etc., is displayed.
24 ZOOM
Zooming on the image
Playback
Playing discs or files

- Before starting, turn the TV's power on and switch the TV's input.
- The player's screen display language can be changed (OSD Language on page 15).
Example of display on main unit display window
When the power is turned on (ON)

When the power is turned off (OFF)

When the disc tray is opened (OPEN)

When the disc tray is closed (CLOSE)

When the disc is being loaded (LOAD)

When the title menu or menu is displayed (TITLE)

When the GUI is displayed or operated (GUI)

When in the USB mode (USB)

When the disc is stopped (STOP)
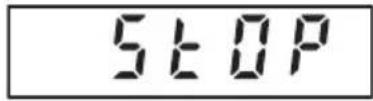
When no disc is loaded

Playing files stored on USB devices
- The player may not recognize the USB device, may not play files or may not supply power to the USB device. For details, see When a USB device is connected on page 19.
- Pioneer does not support that all files recorded on all USB devices will play or that power will be supplied to the USB device. Also note that Pioneer will accept no responsibility whatsoever for loss of files on USB devices caused by connection to this player.
1 Turn the power on.
Press ⏻ STANDBY/ON.
2 Switching the input to the USB mode.
Press DVD/USB.
USb is displayed on the front panel display.
3 Connecting USB devices.
The Disc Navigator appears automatically.
Player's front panel (DV-220V-K)

4 Starts playback.
Use ↑/↓/←/→ to select the file, then press ENTER.
- Turn the power off before removing the USB device.
- The input will remain in the USB mode the next time the power is turned on. To return to the DVD mode, press DVD/USB (or press ▲ OPEN/CLOSE to open the disc tray).
Recording audio CD tracks on USB devices
- The tracks of audio CDs loaded in the player can be recorded on a USB device connected to the USB port.
- It may not be possible to record tracks of audio CDs on a USB device. For details, see When a USB device is connected on page 19.
Recording all the tracks
1 Load the audio CD.
- If playback starts automatically, press ■ STOP to stop playback.
2 Display the CD -> USB Rec screen.
Press USB REC.

3 Start recording.
Use ↑/↓/←/→ to select Start, then press ENTER.
Selecting the track(s) to be recorded
1 Load the audio CD.
- If playback starts automatically, press ■ STOP to stop playback.
2 Display the Home Menu.
Press HOME MENU.
3 Select CD -> USB Rec.
Use ↑/↓/←/→ to select, then press ENTER.

4 Select Select Track → Individual → the track(s) you want to record.
Use ↑/↓/←/→ to select.
- Individual: Select 1 track at a time.
- Select All: Select all the tracks.
- All Clear: Deselect all the tracks.
5 Select Bitrate (transfer rate).
Use ↑/↓/←/→ to select, then press ENTER.
• Select 128kbps, 192kbps or 320kbps.
6 Start recording.
Use ↑/↓/←/→ to select Start, then press ENTER.

Notes
- The audio signals are converted into MP3 format for output.
- CD -> USB Rec can only be selected when the audio CD is stopped.
- When recording is completed, a folder named "PIONEER" is automatically created on the USB device. The recorded tracks are stored in this folder.
Playing in the desired order (Programmed Play)
DVD-Video Video CD CD(R/RW) DivX® WMA
MP3
1 Display the Play Mode screen.
Press PLAY MODE.
2 Select Program.
Use ↑/↓ to select, then press ENTER or →.
3 Select Create/Edit.
Use ↑/↓ to select, then press ENTER.
- The Create/ Edit screen differs according to the disc or file.
4 Select the title, chapter, track or file to be played.
Use ↑/↓/ ←/→ to select, then press ENTER.
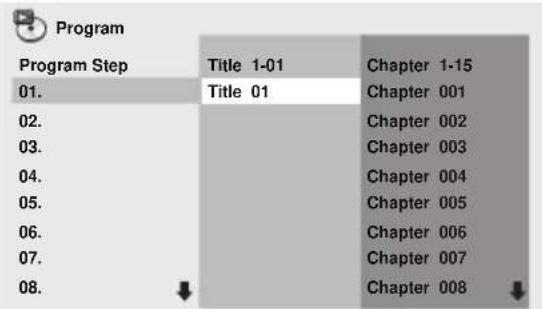
- To add to a program, first select the place in the program (the program step), next select the title, chapter or track, then press ENTER (files are added at the end of program).
- Press RETURN to return to the previous screen. If you return to the previous screen when inputting it, the settings you have programmed are cleared.
• To delete a step, highlight it and press CLEAR.
5 Starts playback.
Press ▶ PLAY.
- To play a program that has already been set, select Playback Start from the program screen, then press ENTER.
- To resume normal playback, select Playback Stop from the program screen, then press ENTER. The program remains in the memory.
- To cancel the entire program, select Program Delete from the program screen, then press ENTER.

Notes
- Programs can be played repeatedly. Select Program Repeat from Repeat on the play mode screen during programmed playback.
- Programs cannot be played in random order (random play is not possible during programmed play).
Changing the settings
The factory default settings are indicated in italic.
Audio Settings parameters
| Parameters (settings) | |
| Sound Retriever(High/Low/Off) | The sound of a WMA or MP3 file is played with high sound quality. This is only valid for files with the extension ".wma" or ".mp3".The effect depends on the file. Try different settings, and choose the one providing the good effect. |
| Equalizer(Off/Rock/Pop/Live/Dance/ Techno/Classic/ Soft) | Select according to the genre of music to be listened to. |
| Virtual Surround(On/Off) | A surround sound field with a sense of presence can be created with two speakers.When set to On, linear PCM audio signals of 96 kHz or greater are converted to 48 kHz. |
| Audio DRC(High/Medium/ Low/Off) | This makes loud sounds weaker and weak sounds louder. Change the setting for example when watching movies late at night.This setting only affects Dolby Digital sound.The effect depends on the volume of the connected TV, AV receiver or amplifier, speakers, etc. Try different settings, and choose the one providing the strongest effect. |
| Dialog(High/Medium/ Low/Off) | Change this setting if the sound of dialogs is low and the dialogs are hard to hear. |
About Sound Retriever function
- When audio data is removed during the compression process, sound quality often degrades. The Sound Retriever function automatically enhances compressed audio and restores CD quality sound.
Video Adjust parameters
| Parameters (settings) | |
| Sharpness(Fine/Standard/Soft) | Adjusts the picture's sharpness. |
| Brightness(-20 to +20) | Adjusts the picture's brightness. |
| Contrast(-16 to +16) | Adjusts the ratio of the brightness of the brightest and darkest portions of the picture. |
| Gamma(-3 to +3) | Adjusts the look of the dark portions of the picture. |
| Parameters (settings) | |
| Hue(green 9 to red 9) | Adjusts the balance between green and red. |
| Chroma Level(-9 to +9) | Adjusts the density of the colors. This setting is effective for sources with many colors, such as cartoons. |
Brightness, Contrast, Gamma, Hue and Chroma Level are set to 0 upon purchase.
Initial Settings parameters
- The player's detailed settings can be changed here.
- Initial Settings cannot be selected during playback. Stop the disc first.
DV-220V-K

Initial Settings
Digital Audio Out
Video Output
Language
Display
Options
HDMI Out ▶ Auto
Digital Out ▶ On
Dolby Digital Out ▶ Dolby Digital
DTS Out ▶ DTS
96kHz PCM Out ▶ 96kHz > 48kHz
MPEG Out ▶ MPEG > PCM
Digital Audio Out settings
| Options settings | Settings |
| HDMI Out (DV-220V-K only) | Select the audio signals to be output from the HDMI OUT terminal (LPCM (2CH)/Auto/Off) according to the connected HDMI-compatible device. |
| Digital Out | Select whether to output digital audio signals (On) from the COAXIAL DIGITAL AUDIO OUT terminals or not (Off). |
| Dolby Digital Out | Select whether to output Dolby Digital audio signals (Dolby Digital) or to convert Dolby Digital audio signals into linear PCM signals (Dolby Digital > PCM) for output, according to the connected AV amplifier, etc. |
| DTS Out | Select whether to output DTS audio signals (DTS) or not (Off), according to the connected AV amplifier, etc. |
| 96 kHz PCM Out | Select whether to output 96 kHz audio signals (96kHz) or to convert 96 kHz audio signals into linear PCM signals (96kHz > 48kHz) for output, according to the connected AV amplifier, etc. |
| MPEG Out | Select whether to output MPEG audio signals (MPEG) or to convert MPEG audio signals into linear PCM signals (MPEG > PCM) for output, according to the connected AV amplifier, etc. |
Video Output settings
| Options settings | Settings |
| TV Screen | · Change the picture's display format (4:3 (Letter Box)/4:3 (Pan & Scan)/16:9 (Wide)/16:9 (Compressed)), according to the connected TV.· 16:9 (Compressed) can only be set on the DV-220V-K. |
| Component Out | Change the output format of the video signals output from the COMPONENT VIDEO OUT terminals (Progressive/Interlace). |
| AV Connector Out | Change the video signal output from the AV connector (VideoRGB), according to the connected TV. |
| HDMI Resolution (DV-220V-K only) | Change the resolution of the video signals output from the HDMI OUT terminals (720x480i/720x576i/720x480p/720x576p/1280x720p/1920x1080i/1920x1080p). |
| HDMI Color (DV-220V-K only) | Change the video signals output from the HDMI OUT terminal (Full range RGB/RGB/ Component). |
Language settings
| Options settings | Settings |
| Audio Language | Change the language when listening to the sound of DVD-Video discs (English/available languages/Other Language). |
| Subtitle Language | Change the language of the subtitles displayed for DVD-Video discs (English/available languages/Other Language). |
| DVD Menu Lang. | Change the language used for the menu displays of DVD-Video discs (w/Subtitle Lang./available languages/Other Language). |
| Subtitle Display | Select whether to display subtitles (On) or not (Off). |
Display settings
| Options settings | Settings |
| OSD Language | Change the language of the operation messages (Play, Stop, etc.) displayed on the TV screen (English/available languages). |
| Angle Indicator | Select whether to display the angle mark on the TV screen (On) or not (Off). |
| On Screen Display | Select whether to display operation messages (Play, Stop, etc.) on the TV screen (On) or not (Off). |
Options settings
| Options settings | Settings |
| KURO LINK (DV-220V-K only) | Select whether to operate the player using the remote control of the AV component connected using an HDMI cable ( On ) or not (Off). |
| Parental Lock | Restrict DVD-Video viewing (Password/Level Change/Country Code). |
| DivX VOD | Display the registration code required for playing DivX VOD files (Activate/Deactivate). |
| Auto Power Off | Select whether to turn the power off automatically ( On ) or not (Off). When set to On , the power automatically turns off if no operation is performed for 30 minutes or more while in the stop mode. |
Setting the Component Out and HDMI Resolution settings back to their defaults
1 Turn the player's power off.
Press ⏻ STANDBY/ON.
2 Press ⏻ STANDBY/ON while pressing ◀◀.
Use the buttons on the player's front panel. The power turns on.
Restoring all the settings to the defaults
1 Turn the player's power off.
Press ⏻ STANDBY/ON.
2 Press ⏻ STANDBY/ON while pressing ■.
Use the buttons on the player's front panel.
playable discs and files
playable discs
 | • Commercially available DVD-Video discs• DVD-R/ -RW/-R DL and DVD+R/+RW/+R DL discs recorded in the Video mode and finalized |
 | DVD-R/-RW/-R DL discs recorded in the VR mode |
 | Video CDs (including Super VCDs) |
 | • Commercially available audio CDs• CD-R/ -RW/-ROM discs containing music recorded in the CD-DA format |
 | JPEG files recorded on DVD-R/-RW/-R DL discs, CD-R/-RW/-ROM discs or USB devices |
 | DivX video files recorded on DVD-R/-RW/-R DL discs, CD-R/-RW/-ROM discs or USB devices |
 | WMA files recorded on DVD-R/-RW/-R DL discs, CD-R/-RW/-ROM discs or USB devices |
 | MP3 files recorded on DVD-R/-RW/-R DL discs, CD-R/-RW/-ROM discs or USB devices |
| Fujicolor CD | |
| KODAK Picture CD | |
- is a trademark of DVD Format/Logo Licensing Corporation.
• is a trademark of FUJIFILM Corporation.
• RW COMPATIBLE
This label indicates playback compatibility with DVD-RW discs recorded in VR format (Video Recording format). However, for discs recorded with a record-only-once encrypted program, playback can only be achieved using a CPRM compatible device.

Notes
- This player does not support multisession discs or multiborder recording.
- Multisession/ multiborder recording is a method in which data is recorded on a single disc in two or more sessions/borders. A “session” or “border” is one recording unit, consisting of a complete set of data from lead-in to lead-out.
Discs that cannot be played
- DVD-Audio discs
- DVD-RAM discs
- SACDs
- CD-G
- Blu-ray discs
- HD DVDs
• Discs that have not been finalized
• Discs recorded with packet writing
About region numbers
DVD player and DVD-Video discs are assigned region numbers according to the region in which they are sold. This player's region number(s) is (are) as shown below.
- DVD-Video: 2
Discs not including these numbers cannot be played. Discs playable on this player are as shown below.
• DVDs: 2 (including 2) and ALL
Regarding copy protected CDs
This player is designed to conform to the specifications of the audio CD format. This player does not support the playback or function of discs that do not conform to these specifications.
About playing DualDiscs
- A DualDisc is a new two-sided disc, one side of which contains DVD content — video, audio, etc. — while the other side contains non-DVD content such as digital audio material.
- The DVD side of a DualDisc can be played on this player (excluding any DVD-Audio content).
- The non-DVD, audio side of the disc is not compatible with this player.
- It is possible that when loading or ejecting a DualDisc, the opposite side to that being played will be scratched. Scratched discs may not be playable.
- For more detailed information on the DualDisc specification, please refer to the disc manufacturer or disc retailer.
Playing discs created on computers or BD/DVD recorders
- It may not be possible to play discs recorded using a computer due to the application settings or computer's environment settings. Record discs in a format playable on this player. For details, contact the dealer.
- It may not be possible to play discs recorded using a computer or a BD/DVD recorder, if burn quality is not good due to characteristics of the disc, scratches, dirt on the disc, dirt on the recorder's lens, etc.
playable files
- Only discs recorded in ISO9660 Level 1, Level 2 and Joliet can be played.
- Files protected by DRM (Digital Rights Management) cannot be played.
- Files other than the ones below (WMV, MPEG4-AAC, etc.) are not guaranteed to play.
Supported video file formats
DivX
- DivX is a media technology created by DivX, Inc. DivX media files contain image data.
- DivX files may also include such advanced playback functions as menu screens and selection of multiple subtitle languages/audio tracks.
- Plays DivX ® video, including premium content
- DivX ® is a registered trademark of DivX, Inc., and is used under license.
Displaying external subtitle files
- The font sets listed below are available for external subtitle files. You can see the proper font set on-screen by setting the Subtitle Language on page 15 to match the subtitle file.
- This player supports the following language groups:
| Group 1 | Afrikaans (af), Basque (eu), Catalan (ca), Danish (da), Dutch (nl), English (en), Faroese (fo), Finnish (fi), French (fr), German (de), Icelandic (is), Irish (ga), Italian (it), Norwegian (no), Portuguese (pt), Rhaeto-Romanic (rm), Scottish (gd), Spanish (es), Swedish (sv) |
| Group 2 | Albanian (sq), Croatian (hr), Czech (cs), Hungarian (hu), Polish (pl), Romanian (ro), Slovak (sk), Slovenian (sl) |
| Group 3 | Bulgarian (bg), Byelorussian (be), Macedonian (mk), Russian (ru), Serbian (sr), Ukrainian (uk) |
| Group 4 Hebrew (iw), Yiddish (ji) | |
| Group 5 Turkish (tr) | |
- Some external subtitle files may be displayed incorrectly or not at all.
- For external subtitle files the following subtitle format filename extensions are supported (please note that these files are not shown within the disc navigation menu): .srt, .sub, .ssa, .smi
- The filename of the movie file has to be repeated at the beginning of the filename for the external subtitle file.
- The number of external subtitle files which can be switched for the same movie file is limited to a maximum of 10.
Supported image file formats
JPEG
• Resolution: Up to 3 072 x 2 048 pixels
• This player supports baseline JPEG.
• This player supports Exif Ver.2.2.
- This player does not support progressive JPEG.
Supported audio file formats
- This player does not support VBR (Variable Bit Rate).
- This player does not support lossless encoding.
Windows Media™ Audio (WMA)
• Sampling frequencies: 32 kHz, 44.1 kHz and 48 kHz
- Bit rate: Up to 192 kbps
- This player supports files encoded using Windows Media Player Ver. 7/7.1, Windows Media Player for Windows XP and Windows Media Player 9 Series.
- Windows Media is either a registered trademark or trademark of Microsoft Corporation in the United States and/or other countries.
- This product includes technology owned by Microsoft Corporation and cannot be used or distributed without a license from Microsoft Licensing, Inc.
MPEG-1 Audio Layer 3 (MP3)
• Sampling frequencies: 32 kHz, 44.1 kHz and 48 kHz
playable file extensions
Video files
.divx .avi
- Files not containing DivX video signals cannot be played, even if they have the extension “.avi”.
Image files
.jpg .jpeg
Audio files
.wma .mp3
Additional information
Troubleshooting
- Incorrect operation is often mistaken for trouble or malfunction. If you think that there is something wrong with this component, check the points below. Sometimes the trouble may lie in another component. Inspect the other components and electrical appliances being used. If the trouble cannot be rectified after checking the items below, ask your nearest Pioneer authorized service center or your dealer to carry out repair work.
- The player may not operate properly due to static electricity or other external influences. In such cases, normal operation may be restored by unplugging the power cord then plugging it back in.
General problems
| Problem Check Remedy | ||
| Settings you have made have been cleared. | Was the power cord unplugged forcibly while the player's power was on? | Be sure to press ◊ STANDBY/ON on the player's front panel or press ◊ STANDBY/ON on the remote control and wait for the OFF indicator on the front panel display to turn off before unplugging the power cord. |
| Difference in volume between DVDs and CDs. | This is not a problem with the player. The volume may sound different due to differences in how the signals are recorded on the disc. | |
| Player cannot be operated with the remote control. | Are you operating from far away? Operate from within a distance of 7 meters from the remote control sensor. | |
| Is the remote control sensor exposed to direct sunlight or strong artificial light from a fluorescent bulb, etc.? | The remote control signals may not be received properly if the remote control sensor is exposed to direct sunlight or strong artificial light from a fluorescent bulb, etc. | |
| Are the batteries dead? Replace the batteries (page 5). | ||
| Disc cannot be played or disc tray opens automatically. | Is the disc scratched? Scratched discs may not play. | |
| Is the disc dirty? Wipe the dirt off the disc (page 24). | ||
| Is the disc properly set in the disc tray? Set the disc with the printed side facing up. | ||
| Set the disc within the groove in the disc tray. | ||
| Does the disc have the right region number? | Discs with the region number “2 (including 2)” and “ALL” can be played on this player. | |
| Is the player placed in a humid location? | There could be condensation inside. Wait a while for the condensation to evaporate. Do not place the player near an air-conditioner, etc. (page 24). | |
| The player's power turns off automatically. | Is Auto Power Off set to On? | If Auto Power Off is set to On, the player's power turns off automatically if no operation is performed for over 30 minutes (page 15). |
| Power turns on or off automatically. | Is KURO LINK set to On? | The player's power may turn on together with the power of the TV connected to the HDMI OUT terminal. If you do not want the player's power to turn on when the TV's power is turned on, set KURO LINK to Off (page 15). |
| Input of connected TV and AV system switches automatically. | Is KURO LINK set to On? | The input of the TV, AV system (AV receiver or amplifier, etc.) and HD AV Converter connected to the HDMI OUT terminal may automatically switch to the player when playback starts on the player or the menu screen (Home Menu, etc.) is displayed. If you do not want the inputs of the connected TV, AV system (AV receiver or amplifier, etc.) and HD AV Converter to switch automatically, set KURO LINK to Off (page 15). |
| Picture is stretched, or aspect ratio cannot be switched. | Is the aspect ratio properly set on the connected TV? | Refer to the TV's operating instructions and set the TV's aspect ratio properly. |
| Is TV Screen properly set? | Set TV Screen properly (page 15). | |
Problem Check Remedy
| During playback, picture is disturbed or dark. | This is not a problem with the player. This player supports Macrovision copy protection. With some TVs, the picture may not display properly when playing discs including copy prevention signals. This is not a malfunction. | |
| Are the player and TV connected via a video deck? | When the player and TV are connected via a video deck, the player's analog copy protect function may cause the picture being played on the video deck not to display properly. Connect the player and TV directly. | |
| Is the TV system properly set? | The factory default setting is AUTO. If the picture is distorted, switch the TV system to the one used in your country or region (NTSC or PAL) (page 23). | |
| Digital audio signals are not output from the COAXIAL DIGITAL AUDIO OUT terminals. | Is Digital Out set to On? | When connected to the COAXIAL DIGITAL AUDIO OUT terminals, set Digital Out to On (page 14). |
| 96 kHz/88.2 kHz digital audio signals are not output from the COAXIAL DIGITAL AUDIO OUT terminals. | Is 96 kHz PCM Out set to 96kHz? | Set 96 kHz PCM Out to 96kHz >48kHz. |
| Are you playing a copyright-protected disc? | The 96 kHz/88.2 kHz digital audio signals of copyright-protected discs cannot be output. | |
| Folder or file names are not recognized. | Have you exceeded the maximum number of folder or file names the player can recognize? | Up to 299 folders can be recognized on one disc. Up to 648 files can be recognized within one folder. Depending on the folder structure, however, the player may not be able to recognized certain folders or files. |
| Time is required to play JPEG files. Are you playing large files? Some time may be required to display large files. | ||
| Black bars are displayed when playing JPEG files. | Are you playing files with different aspect ratios? | Black bars may be displayed along the top and bottom or sides when JPEG files with different aspect ratios are played. |
When a USB device is connected
Problem Check Remedy
| USB device is not recognized. Is the USB device properly connected? Connect the device securely (all the way in). | ||
| Is the USB device connected via a USB hub? | This player does not support USB hubs. Connect the USB device directly. | |
| This player only supports USB mass storage class devices. | ||
| This player supports portable flash memory and digital audio playback devices. | ||
| Only the FAT16 and FAT32 file systems are supported. Other file systems (exFAT, NTFS, etc.) are not supported. | ||
| This is not a problem with the player. Turn the power off then back on. | ||
| This is not a problem with the player. Some USB devices may not be recognized properly. | ||
| File cannot be played. Is the file copyright-protected (by DRM)? | Copyright-protected files cannot be played. | |
| This is not a problem with the player. Files stored on a computer cannot be played. | ||
| This is not a problem with the player. It may not be possible to play some files. | ||
| Folder or file names are not displayed or are not properly displayed. | Do the folder of file names contain more than 14 characters? | The maximum number of characters displayable for the folder and file names on the Disc Navigator is 14. |
| Folder or file names are not displayed in alphabetical order. | This is not a problem with the player. The order of the folder and file names displayed on the Disc Navigator depends on the order in which the folders or files were recorded on the USB device. | |
| Much time is required to recognized the USB device. | What is the USB device's capacity? Some time may be required to load the data when large capacity USB devices are connected (this could take several minutes). | |
| Problem Check Remedy | ||
| Power is not supplied to the USB device. | IsErrdisplayed on the front panel display? No power is supplied if the power consumption is too high. | Turn the power off then back on. |
| Turn the power off, then disconnect and reconnect the USB device. | ||
| PressDVD/USBto switch back to the DVD mode, then switch again to the USB mode. (When the input is switched back to the DVD mode,LOAdis displayed on the front panel display and the disc is recognized. When the input is switched back to USB,USbis displayed on the front panel display.) | ||
| If the USB device is equipped with an AC adapter, use the USB device with the AC adapter connected. | ||
| Audio CD tracks cannot be recorded on a USB device. | Is there enough free space on the USB device? | Recording is not possible if there is not enough free space left on the USB device. In this case,AvailableUSB space is lowis displayed. |
| Are there 300 or more folders on the USB device? | Recording is not possible if the USB device contains 300 or more folders. | |
| Are there already 99 PIONEER folders on the USB device? | Recording is not possible if there are already 99 PIONEER folders on the USB device. | |
When connected to an HDMI-compatible device
(DV-220V-K only)
| Problem Check Remedy | ||
| Picture is not displayed. | Is the resolution properly set? | Set HDMI Resolution properly for the connected device (page 15). |
| Restore HDMI Resolution to the default setting (720x480p/720x576p) (page 15). | ||
| Is the HDMI cable properly connected? | Connect the cable securely (all the way in). | |
| With some cables, 1 080p video signals will not be output. | ||
| Sound is not produced or is distorted. | Is HDMI Out properly set? | Set HDMI Out to LPCM (2CH) or Auto (page 14). |
| Multichannel audio signals are not output. | Is HDMI Out properly set? | Set HDMI Out to Auto (page 14). |
| Colors are not properly displayed on TV screen. | Is HDMI Color properly set? | Change the HDMI Color setting (page 15). |
Problem Check Remedy
| KURO LINK function does not work. Is the HDMI cable you are using a High Speed HDMITM cable? | Use a High Speed HDMITM cable. | |
| Is KURO LINK set to On on the player? | Set KURO LINK to On on the player (page 15). | |
| Does the connected device support the KURO LINK function? | The KURO LINK function does not work with devices of other brands, even if connected using an HDMI cable. | |
| The KURO LINK function will not work if devices that do not support the KURO LINK function or devices of other brands are connected between the KURO LINK-compatible device and the player. | ||
| Even when connected to a Pioneer product compatible with the KURO LINK function, some of the functions may not work. | ||
| Is KURO LINK set to On on the connected device? | Set “KURO LINK” on the connected component to “ON”. The KURO LINK function works when “KURO LINK” is set to “ON” for all the components connected to the HDMI OUT terminals. | |
| Are multiple players connected? The KURO LINK function may not work if three or more players, including this player, are connected by HDMI cable. | ||
| The message CEC200 appears. | Is the player’s power turned off? | When the Disc Navigator is selected using the Flat Screen TV’s remote controller, the message CEC200 is displayed if the player’s power is turned off. This is not a malfunction. You may continue using the player and Flat Screen TV as such. |
Language Code Table and Country/Area Code Table
Language Code Table
Language names (codes) and input codes
| Japanese (ja), 1001 | Bhutani (dz), 0426 | Kirghiz (ky), 1125 | Sinhalese (si), 1909 |
| English (en), 0514 | Esperanto (eo), 0515 | Latin (la), 1201 | Slovak (sk), 1911 |
| French (fr), 0618 | Estonian (et), 0520 | Lingala (ln), 1214 | Slovenian (sl), 1912 |
| German (de), 0405 | Basque (eu), 0521 | Laothian (lo), 1215 | Samoan (sm), 1913 |
| Italian (it), 0920 | Persian (fa), 0601 | Lithuanian (lt), 1220 | Shona (sn), 1914 |
| Spanish (es), 0519 | Finnish (fi), 0609 | Latvian (lv), 1222 | Somali (so), 1915 |
| Chinese (zh), 2608 | Fiji (fj), 0610 | Malagasy (mg), 1307 | Albanian (sq), 1917 |
| Dutch (nl), 1412 | Faroese (fo), 0615 | Maori (mi), 1309 | Serbian (sr), 1918 |
| Portuguese (pt), 1620 | Frisian (fy), 0625 | Macedonian (mk), 1311 | Siswati (ss), 1919 |
| Swedish (sv), 1922 | Irish (ga), 0701 | Malayalam (ml), 1312 | Sesotho (st), 1920 |
| Russian (ru), 1821 | Scots-Gaelic (gd), 0704 | Mongolian (mn), 1314 | Sundanese (su), 1921 |
| Korean (ko), 1115 | Galician (gl), 0712 | Moldavian (mo), 1315 | Swahili (sw), 1923 |
| Greek (el), 0512 | Guarani (gn), 0714 | Marathi (mr), 1318 | Tamil (ta), 2001 |
| Afar (aa), 0101 | Gujarati (gu), 0721 | Malay (ms), 1319 | Telugu (te), 2005 |
| Abkhazian (ab), 0102 | Hausa (ha), 0801 | Maltese (mt), 1320 | Tajik (tg), 2007 |
| Afrikaans (af), 0106 | Hindi (hi), 0809 | Burmese (my), 1325 | Thai (th), 2008 |
| Amharic (am), 0113 | Croatian (hr), 0818 | Nauru (na), 1401 | Tigrinya (ti), 2009 |
| Arabic (ar), 0118 | Hungarian (hu), 0821 | Nepali (ne), 1405 | Turkmen (tk), 2011 |
| Assamese (as), 0119 | Armenian (hy), 0825 | Norwegian (no), 1415 | Tagalog (tl), 2012 |
| Aymara (ay), 0125 | Interlingua (ia), 0901 | Occitan (oc), 1503 | Setswana (tn), 2014 |
| Azerbaijani (az), 0126 | Interlingue (ie), 0905 | Oromo (om), 1513 | Tonga (to), 2015 |
| Bashkir (ba), 0201 | Inupiak (ik), 0911 | Oriya (or), 1518 | Turkish (tr), 2018 |
| Byelorussian (be), 0205 | Indonesian (in), 0914 | Panjabi (pa), 1601 | Tsonga (ts), 2019 |
| Bulgarian (bg), 0207 | Icelandic (is), 0919 | Polish (pl), 1612 | Tatar (tt), 2020 |
| Bihari (bh), 0208 | Hebrew (iw), 0923 | Pashto, Pushto (ps), 1619 | Twi (tw), 2023 |
| Bislama (bi), 0209 | Yiddish (ji), 1009 | Quechua (qu), 1721 | Ukrainian (uk), 2111 |
| Bengali (bn), 0214 | Javanese (jw), 1023 | Rhaeto-Romance (rm), 1813 | Urdu (ur), 2118 |
| Tibetan (bo), 0215 | Georgian (ka), 1101 | Kirundi (rn), 1814 | Uzbek (uz), 2126 |
| Breton (br), 0218 | Kazakh (kk), 1111 | Romanian (ro), 1815 | Vietnamese (vi), 2209 |
| Catalan (ca), 0301 | Greenlandic (kl), 1112 | Kinyarwanda (rw), 1823 | Volapük (vo), 2215 |
| Corsican (co), 0315 | Cambodian (km), 1113 | Sanskrit (sa), 1901 | Wolof (wo), 2315 |
| Czech (cs), 0319 | Kannada (kn), 1114 | Sindhi (sd), 1904 | Xhosa (xh), 2408 |
| Welsh (cy), 0325 | Kashmiri (ks), 1119 | Sangho (sg), 1907 | Yoruba (yo), 2515 |
| Danish (da), 0401 | Kurdish (ku), 1121 | Serbo-Croatian (sh), 1908 | Zulu (zu), 2621 |
Country/Area Code Table
Country/Area name, Input codes and Country/Area code
| United States, 2119, us | Canada, 0301, ca | Chile, 0312, cl | Mexico, 1324, mx |
| Argentina, 0118, ar | Korea, Republic of, 1118, kr | Denmark, 0411, dk | Russian Federation, 1821, ru |
| United Kingdom, 0702, gb | Singapore, 1907, sg | Germany, 0405, de | Brazil, 0218, br |
| Italy, 0920, it | Switzerland, 0308, ch | Japan, 1016, jp | France, 0618, fr |
| India, 0914, in | Sweden, 1905, se | New Zealand, 1426, nz | Belgium, 0205, be |
| Indonesia, 0904, id | Spain, 0519, es | Norway, 1415, no | Portugal, 1620, pt |
| Australia, 0121, au | Thailand, 2008, th | Pakistan, 1611, pk | Hong Kong, 0811, hk |
| Austria, 0120, at | Taiwan, 2023, tw | Philippines, 1608, ph | Malaysia, 1325, my |
| Netherlands, 1412, nl | China, 0314, cn | Finland, 0609, fi |
Setting the TV system
- If the picture of the disc being played is distorted, switch the TV system to the one used in your country or region.
- When the TV system is switched, the types of discs that can be played are limited.
• The factory default setting is AUTO.
1 Turn the player's power off.
Press ⏻ STANDBY/ON.
2 Press ⏻ STANDBY/ON while pressing ▶▶I.
Use the buttons on the player's front panel.
The power turns on and the TV system switches as shown below.
- AUTO→NTSC
- NTSC→PAL
- PAL→AUTO
| Types of discs/files | Format | Player setting | ||
| NTSC PAL AUTO | ||||
| DVD-Video | NTSC NTSC | PAL NTSC | ||
| DVD VR | PAL NTSC PAL | PAL | ||
| Video CD | ||||
| DivX® | ||||
| CD(R/RW) | — | NTSC PAL | NTSC or PAL | |
| WMA | ||||
| MP3 | ||||
| JPEG | ||||
| no disc | ||||
Cautions on use
When moving the player
When moving the player, check first that there is no disc loaded and that the disc tray is closed. Then press ⏻ STANDBY/ON on the player (or ⏻ STANDBY/ON on the remote control), wait for the OFF indicator on the front panel display to turn off, then unplug the power cord. Moving the player with a disc inside it could result in damage.
Place of installation
- Choose a stable place near the TV or stereo system being used with the player.
- Do not place the player on top of a TV or color monitor. Also install it away from cassette decks and other devices easily affected by magnetic forces.
Avoid the following types of places:
- Places exposed to direct sunlight
• Humid or poorly ventilated places - Extremely hot places
- Places exposed to vibrations
- Places in which there is much dust or cigarette smoke
- Places exposed to soot, steam or heat (kitchens, etc.)
Do not place objects on the player.
Do not place any objects on top of the player.
Do not obstruct the ventilation holes.
Do not use the player on shaggy rugs, beds, sofas, etc., or wrapped in cloth, etc. Doing so will prevent the heat from dispersing, leading to damage.
Do not expose to heat.
Do not place the player on top of an amplifier or other component that generates heat. When placing it in a rack, to avoid the heat given off by the amplifier or other audio component, place it on a shelf below the amplifier.
Turn off the player's power when not using it.
Depending on signal conditions, striped patterns may appear on a TV screen and noise may enter the sound of radio broadcasts when the player's power is on. If this happens, turn the player's power off.
About condensation
If the player is moved suddenly from a cold place into a warm room (in winter, for example) or if the temperature in the room in which the player is installed rises suddenly due to a heater, etc., water droplets (condensation) may form inside (on operating parts and the lens). When condensation is present, the player will not operate properly and playback is not possible. Let the player stand at room temperature for 1 or 2 hours with the power turned on (the time depends on the extent of condensation). The water droplets will dissipate and playback will become possible. Condensation can also occur in the summer if the player is exposed to the direct wind from an air-conditioner. If this happens, move the player to a different place.
Cleaning the product
- Unplug the power cord from the power outlet when cleaning the player.
- Clean the player using a soft cloth. For tough dirt, apply some neutral detergent diluted in 5 to 6 parts water to a soft cloth, wring out thoroughly, wipe off the dirt, then wipe again with a soft, dry cloth.
- Alcohol, thinner, benzene, insecticides, etc., could cause the print or paint to peel off. Also, leaving rubber or vinyl products in contact with the player for long periods of time could mar the cabinet.
- When using chemical-impregnated wipes, etc., read the cautions included with the wipes carefully.
Caution for when the unit is installed in a rack with a glass door
Do not press ▲ OPEN/CLOSE on the remote control to open the disc tray while the glass door is closed. The door will hamper the movement of the disc tray, and the unit could be damaged.
Cleaning the lens
The player's lens should not become dirty in normal use, but if for some reason it should malfunction due to dust or dirt, consult your nearest Pioneer authorized service center. Although lens cleaners for players are commercially available, we advise against using them since some may damage the lens.
About copyrights
This product incorporates copyright protection technology that is protected by method claims of certain U.S. patents and other intellectual property rights owned by Macrovision Corporation and other rights owners. Use of this copyright protection technology must be authorized by Macrovision Corporation, and is intended for home and other limited viewing uses only unless otherwise authorized by Macrovision Corporation. Reverse engineering or disassembly is prohibited.
Handling discs
Storing
- Always place discs in their cases and store them vertically, avoiding hot, humid places, places exposed to direct sunlight and extremely cold places.
- Be sure to read the cautions included with the disc.
Cleaning discs
- Discs may not play if there are fingerprints or dust on them. In this case, use a cleaning cloth, etc., to gently wipe the disc from the inside towards the outside. Do not use dirty cleaning cloths.

natural_image
Illustration of hands cleaning a CD or DVD disc (no text or symbols visible)- Do not use benzene, thinner or other volatile chemicals. Also do not use record spray or antistatic agents.
- For tough dirt, apply some water to a soft cloth, wring out thoroughly, wipe off the dirt, then wipe off the moisture with a dry cloth.
- Do not use damaged (cracked or warped) discs.
- Do not let the signal surface of discs get scratched or dirty.
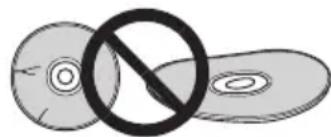
- Do not place two discs in the disc tray, one on top of the other.
- Do not attach pieces of paper or stickers to discs. Doing so could warp discs, making it impossible to play them. Also note that rental discs often have labels attached to them, and the label's glue may have oozed out. Check that there is no glue around the edges of such labels before using rented discs.

natural_image
Two overlapping circular shapes with a diagonal line and a circle, no text or symbols present.About specially shaped discs
Specially shaped discs (heart-shaped, hexagonal, etc.) cannot be played on this player. Do not attempt to play such discs, as they could damage the player.

About condensation on discs
Water droplets (condensation) may form on the surface of discs if they are moved from a cold place (particularly in winter) into a warm room. Discs may not play normally if there is condensation on them. Carefully wipe the water droplets off the surface of the disc before loading it.
Specifications
Power requirements ...... AC 220 V to 240 V, 50 Hz60 Hz
Power consumption 11 W
Power consumption (standby)
DV-220V-K 0.7 W
DV-120-K.... 0.6 W
Weight 1.3 kg
External dimensions
360 mm (W) x 42 mm (H) x 202 mm (D)
Tolerable operating temperature ....+5 °C to +35 °C
Tolerable operating humidity 5% to 85%
(no condensation)
AV Connector (21-pin connector assignment)
AV connector output .... 21-pin connector This connector provides the video and audio signals for connection to a compatible colour TV or monitor.
2018161412108642

natural_image
Pure electrical connector pinout diagram without any text or symbols19211715131197 5 3 1
PIN no.
1 ......Audio 2R out
3 Audio 1/L out
4 GND
7 ...... B out
8 ...... Status
11 G out
15....R out
17 GND
19 ......Video out
21 GND
Video output
Output level 1 Vp-p (75 Ω)
Output terminal ....RCA terminal
Component video output (Y, CB/PB , CR/PR )
Y output level 1 Vp-p (75 Ω)
CB/PB, CR/PR output level 0.7 Vp-p (75 Ω)
Output terminal ....RCA terminal
HDMI output (DV-220V-K only)
Output terminal 19-pin
Audio output (stereo L/R)
Audio output level 200 mVrms (1 kHz, -20 dB)
Output terminal ....RCA terminal
Frequency response 4 Hz to 44 kHz
S/N ratio 114 dB
Dynamic range 87 dB
Total harmonic distortion ....0.007 %
Wow and flutter......Below measurable limits
(±0.001 % W. PEAK)
Digital audio output
Coaxial digital output ...... RCA terminal
Additional information
USB port ......A type

Notes
- The specifications and design of this product are subject to change without notice.
- This product includes FontAvenue® fonts licensed by NEC Corporation. FontAvenue is a registered trademark of NEC Corporation.
Published by Pioneer Corporation.
Copyright © 2009 by Pioneer Corporation.
All rights reserved.
natural_image
Mechanical assembly diagram showing a lever mechanism with a close-up inset of the component (no text or symbols)natural_image
Illustration of hands cleaning a CD or DVD disc (no text or symbols)natural_image
Two overlapping circular shapes with a diagonal line and a circle, no text or symbols present.360 mm (L) × 42 mm (A) × 202 mm (P)
natural_image
Pure electrical connector pinout diagram without any text or symbols19211715131197 5 3 1
Piedino N°
1....Uscita audio 2/R
3. Uscita audio 1/L
4....TERRA
7....Uscita B
8.... Stato
11.....Uscita G
15....Uscita R
17......TERRA
19.... Uscita video
21......TERRA
Uscita video
Copyright © 2009 tutelati da Pioneer Corporation.
http://www.pioneer.co.uk
http://www.pioneer.it
http://www.pioneer.eu

J2M10921B SH 09/06
Published by Pioneer Corporation.
Copyright © 2009 Pioneer Corporation.
All rights reserved.
PIONEER CORPORATION
4-1, Meguro 1-Chome, Meguro-ku, Tokyo 153-8654, Japan
PIONEER ELECTRONICS (USA) INC.
P.O. BOX 1540, Long Beach, California 90801-1540, U.S.A. TEL: (800) 421-1404
PIONEER ELECTRONICS OF CANADA, INC.
300 Allstate Parkway, Markham, Ontario L3R 0P2, Canada TEL: 1-877-283-5901, 905-479-4411
PIONEER EUROPE NV
Haven 1087, Keetberglaan 1, B-9120 Melsele, Belgium TEL: 03/570.05.11
PIONEER ELECTRONICS ASIACENTRE PTE. LTD.
253 Alexandra Road, #04-01, Singapore 159936 TEL: 65-6472-7555
PIONEER ELECTRONICS AUSTRALIA PTY. LTD.
178-184 Boundary Road, Braeside, Victoria 3195, Australia, TEL: (03) 9586-6300
PIONEER ELECTRONICS DE MEXICO S.A. DE C.V.
Blvd.Manuel Avila Camacho 138 10 piso Col.Lomas de Chapultepec, Mexico,D.F. 11000 TEL: 55-9178-4270
K002_B_En
- IMPORTANT
- CAUTION
- RISK OF ELECTRIC SHOCK DO NOT OPEN
- CAUTION:
- CLASS 1 LASER PRODUCT
- WARNING
- VENTILATION CAUTION
- Operating Environment
- POWER-CORD CAUTION
- Information for users on collection and disposal of old equipment and used batteries
- Before you start
- Connections
- Part Names and Functions
- Playback
- Changing the settings
- Playable discs and files
- Additional information
- Before you start
- What's in the box
- Loading the batteries in the remote control
- Notes
- - WARNING
- Connections
- Connecting using an audio/video cable
- Connecting using a SCART AV cable
- Connecting using an HDMI cable (DV-220V-K only)
- Connecting to a TV
- Connecting to an AV receiver or amplifier
- Audio signals that can be output from the player's HDMI OUT terminal
- Connecting using commercially available cables
- Part Names and Functions
- Remote control
- ENTER
- ▲ OPEN/CLOSE
- ANGLE
- DVD/USB (page 12)
- CLEAR
- MENU
- RETURN
- ▶/▶/||▶
- ▶▶▶I NEXT
- ■ STOP
- DISPLAY
- ZOOM
- Playback
- Playing discs or files
- Example of display on main unit display window
- Playing files stored on USB devices
- Turn the power on.
- Switching the input to the USB mode.
- Connecting USB devices.
- Starts playback.
- Recording audio CD tracks on USB devices
- Recording all the tracks
- Load the audio CD.
- Display the CD -> USB Rec screen.
- Start recording.
- Selecting the track(s) to be recorded
- Display the Home Menu.
- Select CD -> USB Rec.
- Select Select Track → Individual → the track(s) you want to record.
- Select Bitrate (transfer rate).
- Start recording.
- Playing in the desired order (Programmed Play)
- Display the Play Mode screen.
- Select Program.
- Select Create/Edit.
- Select the title, chapter, track or file to be played.
- Starts playback.
- Changing the settings
- Audio Settings parameters
- About Sound Retriever function
- Video Adjust parameters
- Initial Settings parameters
- DV-220V-K
- Digital Audio Out settings
- Setting the Component Out and HDMI Resolution settings back to their defaults
- Restoring all the settings to the defaults
- playable discs and files
- playable discs
- Discs that cannot be played
- About region numbers
- Regarding copy protected CDs
- About playing DualDiscs
- Playing discs created on computers or BD/DVD recorders
- playable files
- Supported video file formats
- DivX
- Displaying external subtitle files
- Supported image file formats
- JPEG
- Supported audio file formats
- Windows Media™ Audio (WMA)
- MPEG-1 Audio Layer 3 (MP3)
- playable file extensions
- Video files
- Image files
- Audio files
- Additional information
- Troubleshooting
- When a USB device is connected
- When connected to an HDMI-compatible device
- Language Code Table and Country/Area Code Table
- Language Code Table
- Country/Area Code Table
- Setting the TV system
- Turn the player's power off.
- Press ⏻ STANDBY/ON while pressing ▶▶I.
- Cautions on use
- When moving the player
- Place of installation
- Avoid the following types of places:
- Do not place objects on the player.
- Do not obstruct the ventilation holes.
- Do not expose to heat.
- Turn off the player's power when not using it.
- About condensation
- Cleaning the product
- Caution for when the unit is installed in a rack with a glass door
- Cleaning the lens
- About copyrights
- Handling discs
- Storing
- Cleaning discs
- About specially shaped discs
- About condensation on discs
- Specifications
- AV Connector (21-pin connector assignment)
- Video output
- Component video output (Y, CB/PB , CR/PR )
- HDMI output (DV-220V-K only)
- Audio output (stereo L/R)
- Digital audio output
- Uscita video
- PIONEER CORPORATION
Brand : PIONEER
Model : DV-120-K
Category : DVD player