
TW635-3D - Projector OPTOMA - Free user manual and instructions
Find the device manual for free TW635-3D OPTOMA in PDF.


| Product Type | DLP Video Projector |
| Model | TW635-3D |
| Brand | Optoma |
| Display Technology | DLP |
| Resolution | WXGA (1280 x 800) |
| Brightness | 3000 ANSI Lumens |
| Contrast Ratio | 20000:1 |
| Aspect Ratio | 16:10 (Native), 4:3 & 16:9 Compatible |
| 3D Support | DLP Link & 3D Blu-ray Ready |
| Lens | Manual Zoom & Focus |
| Throw Ratio | 1.5 - 1.8:1 |
| Lamp Type | 240W UHP |
| Lamp Life | Up to 5000 Hours (Eco Mode) |
| Keystone Correction | ±40° Vertical |
| Connectivity | HDMI 1.4a, VGA, Composite, S-Video, Audio In/Out, RS-232, USB (Service) |
| Built-in Speaker | 2W Mono |
| Noise Level | 29 dB (Eco Mode) |
| Power Consumption | 260W (Normal), <0.5W Standby |
| Power Supply | AC 100-240V, 50/60Hz |
| Dimensions (W x D x H) | 11.8 x 8.5 x 4.3 in (30 x 21.6 x 10.9 cm) |
| Weight | 5.5 lbs (2.5 kg) |
| Operating Temperature | 41°F - 95°F (5°C - 35°C) |
| Safety Features | Auto Power Off, Thermal Overload Protection |
| Maintenance | Clean Air Filter Every 100 Hours, Lamp Replacement After 3000-5000 Hours |
| Spare Parts | Replacement Lamp (Model: BL-FP200A), Remote Control |
Frequently Asked Questions - TW635-3D OPTOMA
User questions about TW635-3D OPTOMA
0 question about this device. Answer the ones you know or ask your own.
Ask a new question about this device
Download the instructions for your Projector in PDF format for free! Find your manual TW635-3D - OPTOMA and take your electronic device back in hand. On this page are published all the documents necessary for the use of your device. TW635-3D by OPTOMA.
USER MANUAL TW635-3D OPTOMA
Table of Contents ......1
Usage Notice 2
Safety Information 2
Precautions 3
Eye Safety Warnings ....5
Product Features ....5
Introduction ......6
Package Overview 6
Product Overview 7
Main Unit 7
Control Panel 8
Input/Output Connections 9
Remote Control 10
Installation 11
Connecting the Projector ....11
Connect to Computer/Notebook ..... 11
Connect to Video Sources 12
Powering the projector On / Off .....13
Powering On the Projector 13
Powering Off the Projector 14
Warning Indicator 14
Adjusting the Projected Image .....15
Adjusting the Projector's Height .....15
Adjusting the Projector's Zoom /
Focus 16
Adjusting Projection Image Size ..... 16
User Controls ....18
Control Panel & Remote Control .....18
Control Panel 18
Remote Control 19
On-screen Display Menus .....24
How to operate 24
Menu Tree 25
IMAGE 27
IMAGE | Advanced 29
DISPLAY 31
DISPLAY|3D 34
SETUP 35
SETUP | Signal (RGB) 37
SETUP | Security 38
SETUP | Advanced 40
SETUP | Network 41
OPTIONS 46
OPTIONS | Advanced 47
OPTIONS | Lamp Settings 48
Network Application System
Introduction 49
How to use Web Administration ..... 49
How to use Multi-media Card Reader Application 56
How to use the Optoma Presenter System 59
Appendices 64
Troubleshooting 64
Replacing the lamp 69
Compatibility Modes ....71
Computer Compatibility 71
Video Compatibility 73
RS232 Commands and Protocol
Function List 74
RS232 Pin Assignments 74
RS232 Protocol Function List 75
Wall Mount Installation 79
Optoma Global Offices ....80
Regulation & Safety Notices ......82
Safety Information
 | The lightning flash with arrow head within an equilateral triangle is intended to alert the user to the presence of uninsulated “dangerous voltage” within the product’s enclosure that may be of sufficient magnitude to constitute a risk of electric shock to persons. |
 | The exclamation point within an equilateral triangle is intended to alert the user to the presence of important operating and maintenance (servicing) instructions in the literature accompanying the appliance. |
WARNING: TO REDUCE THE RISK OF FIRE OR ELECTRIC SHOCK, DO NOT EXPOSE THIS APPLIANCE TO RAIN OR MOISTURE. DANGEROUS HIGH VOLTAGES ARE PRESENT INSIDE THE ENCLOSURE. DO NOT OPEN THE CABINET. REFER SERVICING TO QUALIFIED PERSONNEL ONLY.
Class B emissions limits
This Class B digital apparatus meets all requirements of the Canadian Interference-Causing Equipment Regulations.
Important Safety Instruction
- Do not block any ventilation openings. To ensure reliable operation of the projector and to protect from over heating, it is recommended to install the projector in a location that does not block ventilation. As an example, do not place the projector on a crowded coffee table, sofa, bed, etc. Do not put the projector in an enclosure such as a book case or a cabinet that restricts air flow.
- Do not use the projector near water or moisture. To reduce the risk of fire and/or electric shock, do not expose the projector to rain or moisture.
- Do not install near heat sources such as radiators, heaters, stoves or any other apparatus such as amplifiers that emits heat.
- Clean only with dry cloth.
- Only use attachments/accessories specified by the manufacturer.
- Do not use the unit if it has been physically damaged or abused. Physical damage/abuse would be (but not limited to):
Unit has been dropped.
☐ Power supply cord or plug has been damaged.
☐ Liquid has been spilled on to the projector.
☐ Projector has been exposed to rain or moisture.
Something has fallen in the projector or something is loose inside. Do not attempt to service the unit yourself. Opening or removing covers may expose you to dangerous voltages or other hazards. Please call Optoma before you send the unit for repair.
-
Do not let objects or liquids enter the projector. They may touch dangerous voltage points and short out parts that could result in fire or electric shock.
-
See projector enclosure for safety related markings.
-
The unit should only be repaired by appropriate service personnel.
Precautions

Please follow all warnings, precautions and maintenance as recommended in this user's guide.
Warning- Do not look into the projector's lens when the lamp is on. The bright light may hurt and damage your eyes.
Warning- To reduce the risk of fire or electric shock, do not expose this projector to rain or moisture.
Warning- Please do not open or disassemble the projector as this may cause electric shock.
Warning- When replacing the lamp, please allow the unit to cool down. Follow instructions as described on pages 69-70.
Warning- This projector will detect the life of the lamp itself. Please be sure to change the lamp when it shows warning messages.
Warning- Reset the “Lamp Reset” function from the on-screen display “OPTIONS | Lamp Settings” menu after replacing the lamp module (refer to page 48).
Warning- When switching the projector off, please ensure the cooling cycle has been completed before disconnecting power. Allow 90 seconds for the projector to cool down.
Warning- Do not use lens cap when projector is in operation.
Warning- When the lamp is approaching the end of its lifetime, the message “Lamp Warning: Lamp life exceeded.” will show on the screen. Please contact your local reseller or service center to change the lamp as soon as possible.
Warning- Do not look into or point the laser pointer on your remote control into your or someone's eyes. Laser pointer can cause permanent damage to eyesight.

When the lamp reaches the end of its life, the projector will not turn back on until the lamp module has been replaced. To replace the lamp, follow the procedures listed under “Replacing the Lamp” section on pages 69-70.
Usage Notice
Do:
Turn off and unplug the power plug from the AC outlet before cleaning the product.
Use a soft dry cloth with mild detergent to clean the display housing.
Disconnect the power plug from AC outlet if the product is not being used for a long period of time.
Do not:
Block the slots and openings on the unit provided for ventilation.
Use abrasive cleaners, waxes or solvents to clean the unit.
Use under the following conditions:
- In extremely hot, cold or humid environments.
▶ Ensure that the ambient room temperature is within 5 - 40°C.
▶ Relative Humidity is 5 - 40°C, 80% (Max.), non-condensing.
- In areas susceptible to excessive dust and dirt.
- Near any appliance generating a strong magnetic field.
- In direct sunlight.
Eye Safety Warnings
natural_image
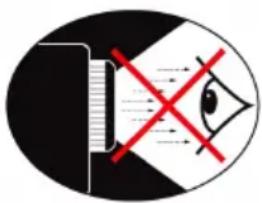
Symbolic illustration of a computer monitor with a red X mark and eye symbol inside, enclosed in an oval (no text or numbers)Avoid staring/facing directly into the projector beam at all times. Keep your back to the beam as much as possible.
When projector is used in a classroom, adequately supervise students when they are asked to point out something on the screen.
In order to minimize the lamp power, use room blinds to reduce ambient light levels.
Product Features

Monitor loop through only support in VGA1-In/YPbPr.
SVGA (800x600) Native resolution / XGA (1024x768) Native resolution / WXGA (1280x800) Native resolution
HD compatible – 720p and 1080p supported
VGA monitor loop through (works on standby mode > 0.5W)
BrilliantColor™ Technology
Security Bar and Kensington Lock
RS232 control
Rapid shutdown
Built-in speakers
Quick Resume and Eco+ mode
Network support
USB display
Network display
USB Reader
Package Overview
Unpack and inspect the box contents to ensure all parts listed below are in the box. If something is missing, please contact your nearest customer service center.
natural_image
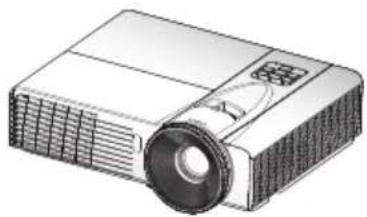
Illustration of a projector with a lens and ventilation slots (no text or symbols)Projector
natural_image
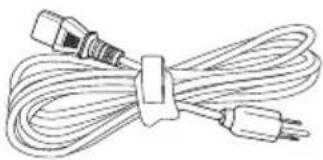
Line drawing of a cord with two connectors tied at the end (no text or symbols)Power Cord
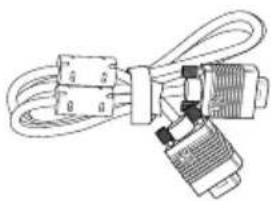
natural_image
Pure electrical connector diagram without any text, numbers, or symbolsVGA Cable
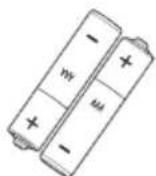
2 × AAA Batteries
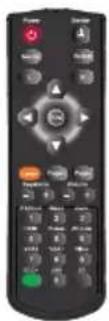
IR Remote Control

Due to different applications in each country, some regions may have different accessories.
Documentation :
User's Manual
Warranty Card
Quick Start Card
WEEE Card (for EMEA only)
Product Overview
Main Unit
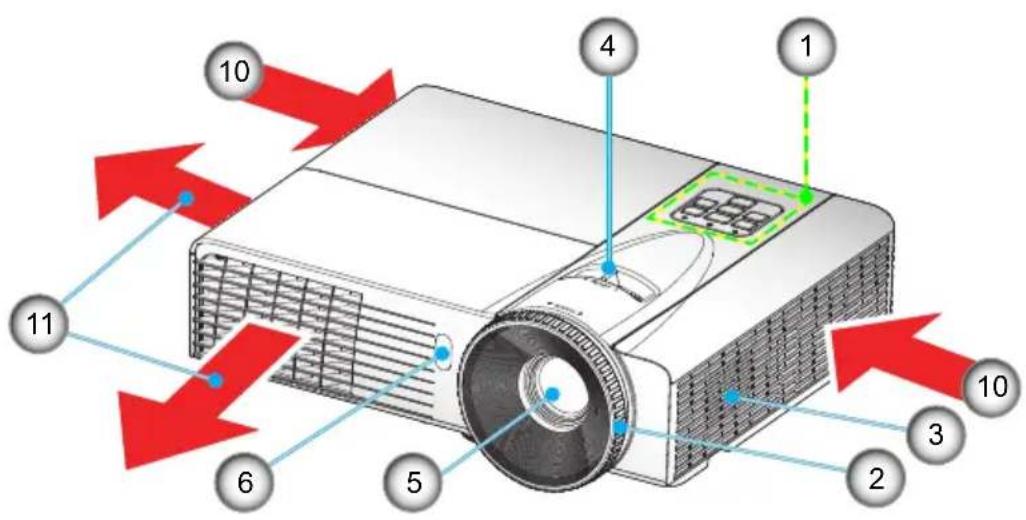

The interface is subject to model's specifications.
Do not block projector in/out air vents.
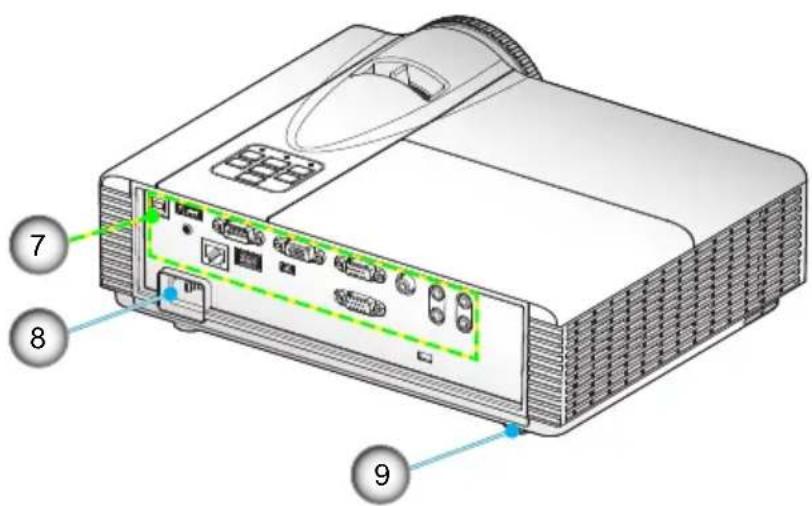
- Control Panel
- Focus Ring
- Speaker
- Zoom Ring
- Lens
-
IR Receiver
-
Input / Output Connections
- Power Socket
- Tilt-Adjustment Feet
- Ventilation (inlet)
- Ventilation (outlet)
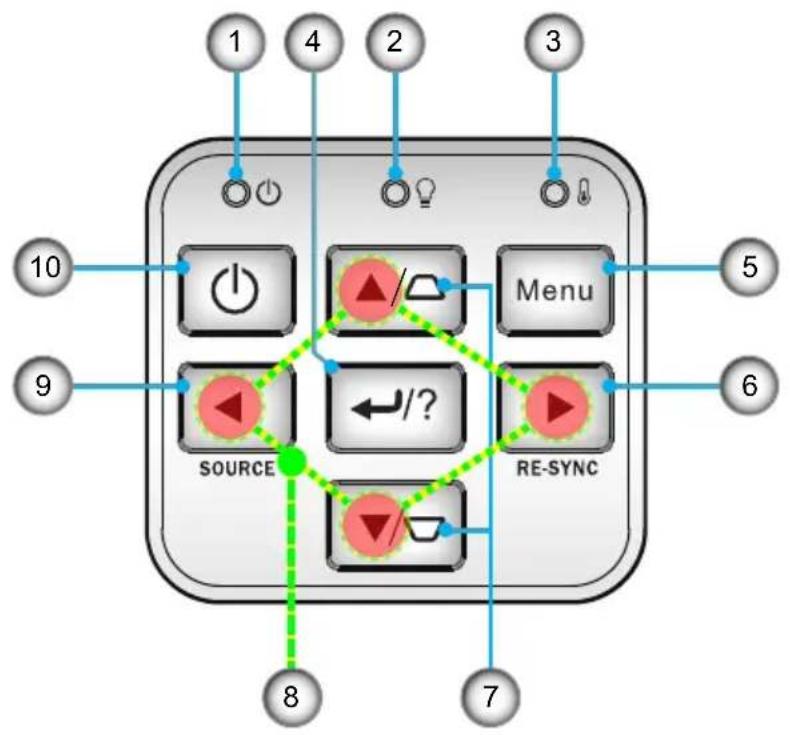
Control Panel
flowchart
graph TD
    A["Power"] --> B["Switch"]
    C["Lightbulb"] --> D["Menu"]
    E["Source"] --> F["Switch"]
    G["RE-SYNC"] --> H["Switch"]
    I["10"] --> J["Power"]
    K["9"] --> L["Switch"]
    M["5"] --> N["Menu"]
    O["6"] --> P["Switch"]
    Q["8"] --> R["Switch"]
    S["7"] --> T["Switch"]
- Power LED
- Lamp LED
- Temp LED
- Enter / Help
- Menu
- Re-Sync
- Keystone Correction
- Four Directional Select Keys
- Source
- Power/Standby button
Input/Output Connections
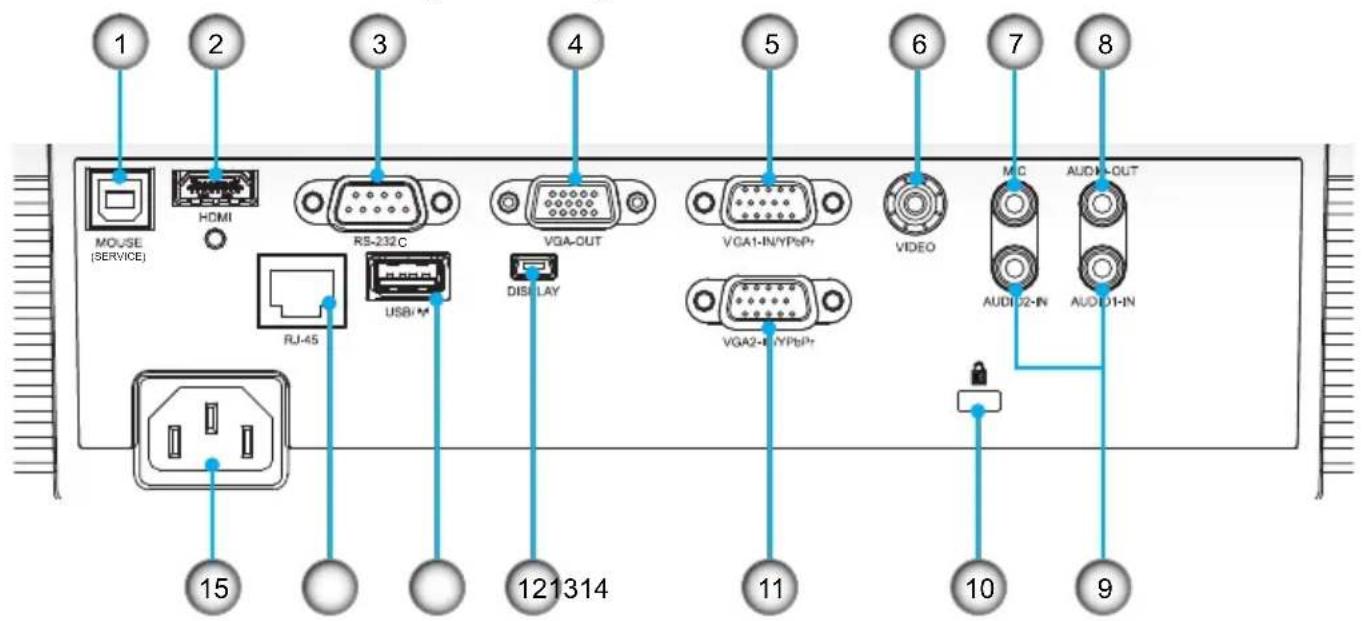

The interface is subject to model's specifications.
Mini WiFi USB dongle, USB thumb drive, keyboard/mouse, camera, etc are optional accessories.
- USB Connector (Connect to PC for Remote Mouse function)
- HDMI Connector
- RS-232 Connector (9-pin DIN Type)
- VGA-Out Connector (Monitor Loop-through Output)
- VGA1-In/YPbPr Connector (PC Analog Signal/Component Video Input/HDTV/YPbPr)
- Composite Video Input Connector
- 3.5mm Microphone Input
- Audio Output Connector (3.5mm Mini Jack)
- Audio Input connector (3.5mm mini jack)
- Kensington™ Lock Port
- VGA2-In/YPbPr Connector (PC Analog Signal/Component Video Input/HDTV/YPbPr)
- 5pin Mini-USB for Display
- USB for Mini WiFi Dongle & Thumb drive & Keyboard Mouse.
- RJ45
- Power Socket
Remote Control

The interface is subject to model's specifications.
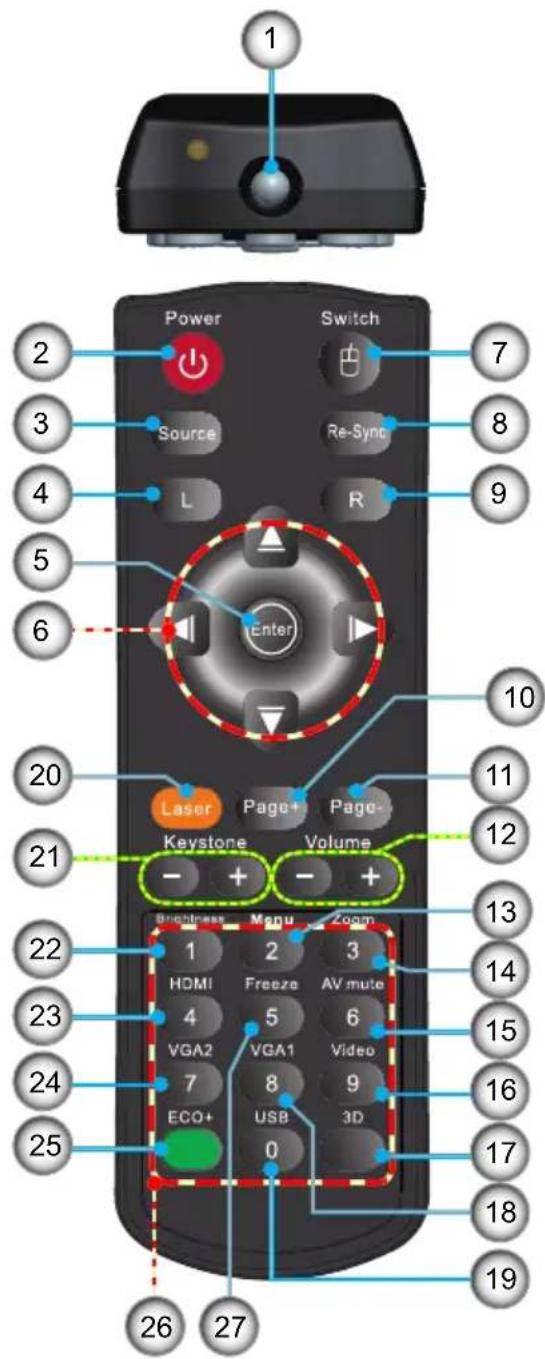
- LED Indicator
- Power On/Off
- Source
- Mouse Left Click
- Enter
- Four Directional Select Keys / Mouse control
- Switch (turn on/off mouse function)
- Re-Sync
- Mouse Right Click
- Page Up
- Page Down
- Volume +/-
- Menu
- Zoom
- AV mute
- Video
- 3D
- VGA1
- USB
- Laser Pointer
- Keystone +/-
- Brightness
- HDMI
- VGA2
- Eco ^+
- Numbered keypad (for password input)
- Freeze
Connecting the Projector Connect to Computer/Notebook

The interface is subject to model's specifications.

Due to the difference in applications for each country, some regions may have different accessories.
(*) Optional accessory
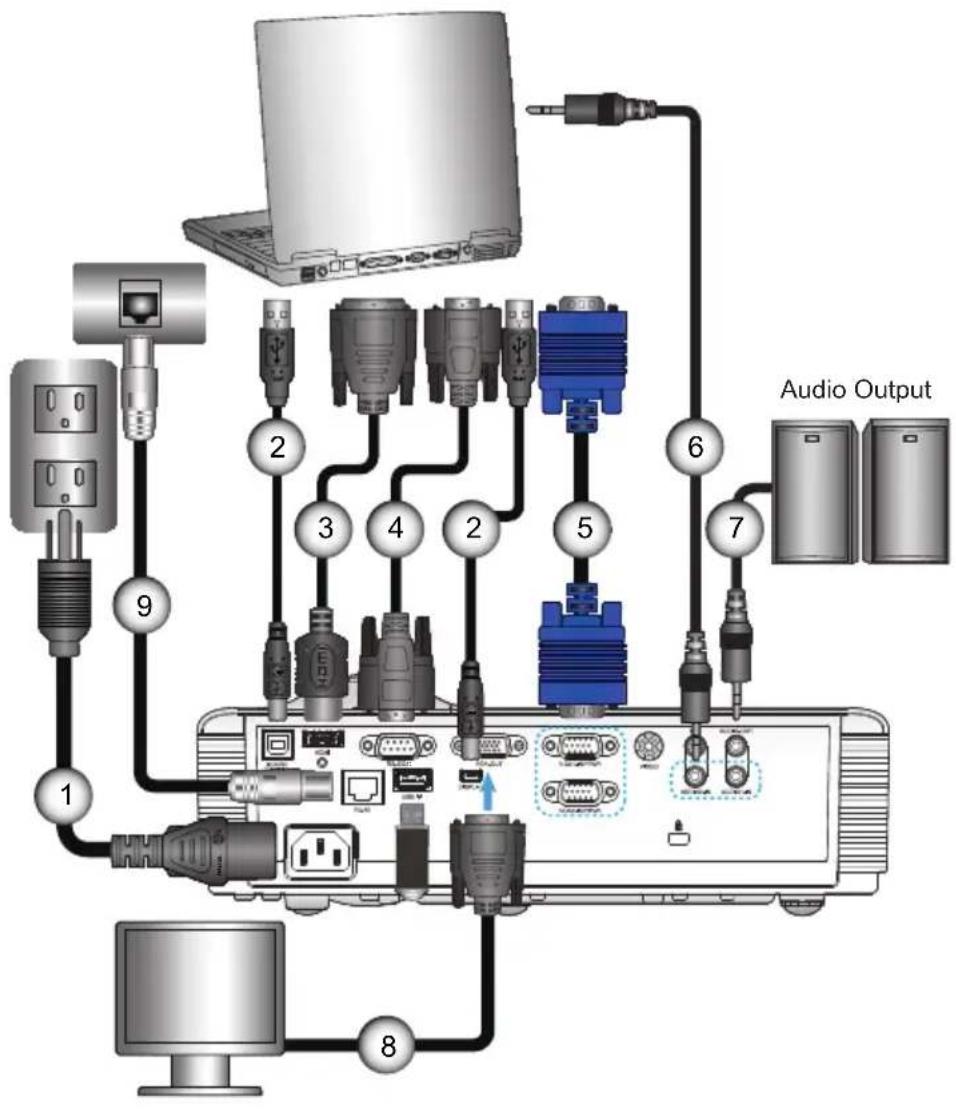
1Power Cord
2....*USB Cable
3. DVI/HDMI Cable
4....*RS232 Cable
5.....VGA Cable
6....*Audio Input Cable
7....*Audio Output Cable
8....*VGA Output Cable
9....*Network Cable
Connect to Video Sources
DVD Player, Set-top Box, HDTV receiver

The interface is subject to model's specifications.
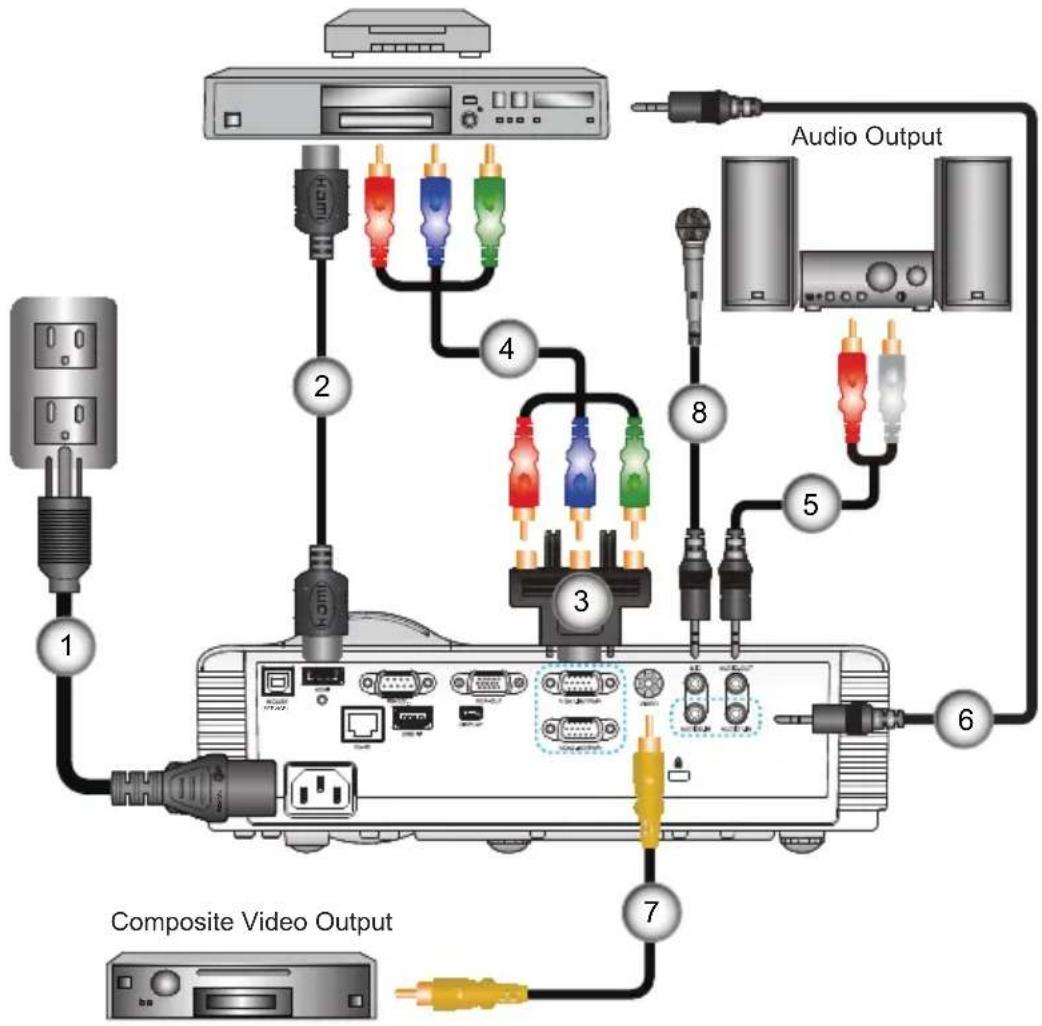

Due to the difference in applications for each country, some regions may have different accessories.
(*) Optional accessory
1Power Cord
2....*HDMI Cable
3....*15-Pin to 3 RCA Component/HDTV Adaptor
4....*3 RCA Component Cable
5. *Audio Cable Jack/RCA
6. *Audio Cable Jack/Jack
7....*Composite Video Cable
8....*Microphone Cable
Powering the projector On / Off
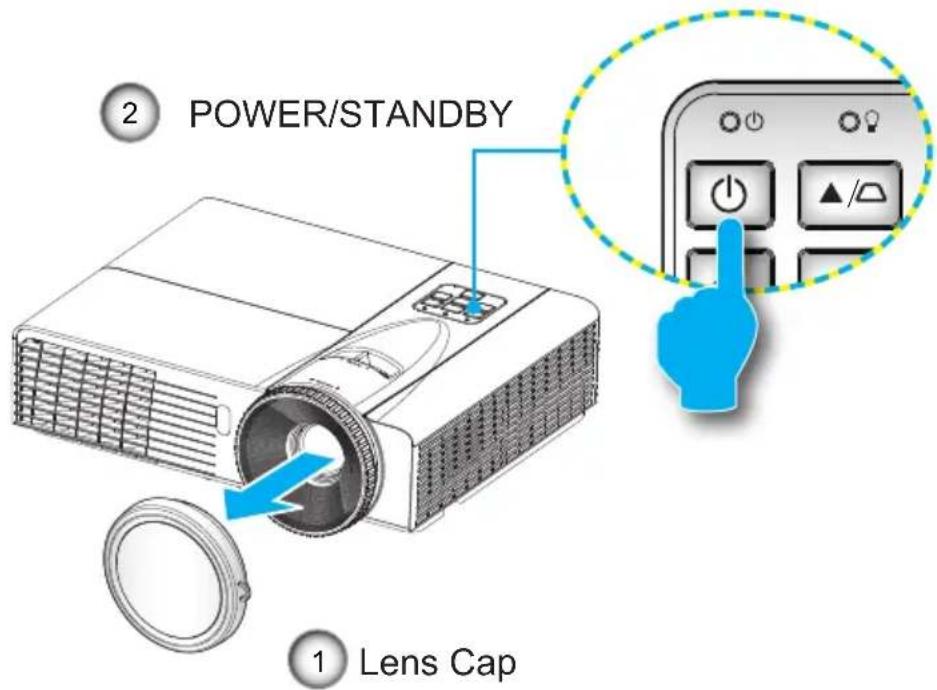
Powering On the Projector

When Power mode (Standby) is set to Eco (<0.5W), the VGA output and Audio pass-through will be deactivated when the projector is in standby.
- Remove the lens cap. 1
- Securely connect the power cord and signal cable. When connected, the POWER/STANDBY LED will turn Amber.
- Turn on the lamp by pressing "button either on the top of the projector or on the remote. The POWER/STANDBY LED will now turn Green. ②
The startup screen will display in approximately 10 seconds. The first time you use the projector, you will be asked to select the preferred language and power saving mode.
- Turn on and connect the source that you want to display on the screen (computer, notebook, video player, etc). The projector will detect the source automatically. If not, push menu button and go to "OPTIONS". Make sure that the "Source Lock" has been set to "Off".
If you connect multiple sources at the same time, press the "SOURCE" button on the control panel or direct source keys on the remote control to switch between inputs.

Turn on the projector first and then select the signal sources.
Powering Off the Projector
- Press the "button" on the remote control or
on the control panel to turn off the projector.
The following message will be displayed on the screen.
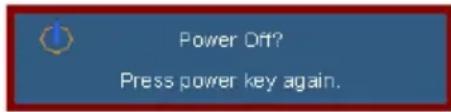
Press the “” button again to confirm otherwise the message will disappear after 15 seconds. When you press the "button for the second time, the fans will speed up to cool down the projector and will shut down in 10 seconds. During this time, the led will flash green.
- The cooling fans continue to operate for about 10 seconds for cooling cycle and the POWER/STANDBY LED will Flash Green. When the POWER/STANDBY LED lights solid Amber, the projector has entered standby mode.
If you wish to turn the projector back on, you must wait until the projector has completed the cooling cycle and has entered standby mode. Once in standby mode, simply press "button to restart the projector.
- Only disconnect the power cord when the projector is in standby mode (solid amber led).


Contact the nearest service center if the projector displays these symptom
See pages 80-81 for more information.
Warning Indicator
When the warning indicators (see below) come on, the projector will automatically shutdown:
“LAMP” LED indicator is lit red and if “POWER/STANDBY” indicator flashes amber.
“TEMP” LED indicator is lit red and if “POWER/STANDBY” indicator flashes amber. This indicates the projector has overheated. Under normal conditions, the projector can be switched back on.
“TEMP” LED indicator flashes red and if “POWER/STAND-BY” indicator flashes amber.
Unplug the power cord from the projector, wait for 30 seconds and try again. If the warning indicator light up again, please contact your nearest service center for assistance.
Adjusting the Projected Image
Adjusting the Projector's Height
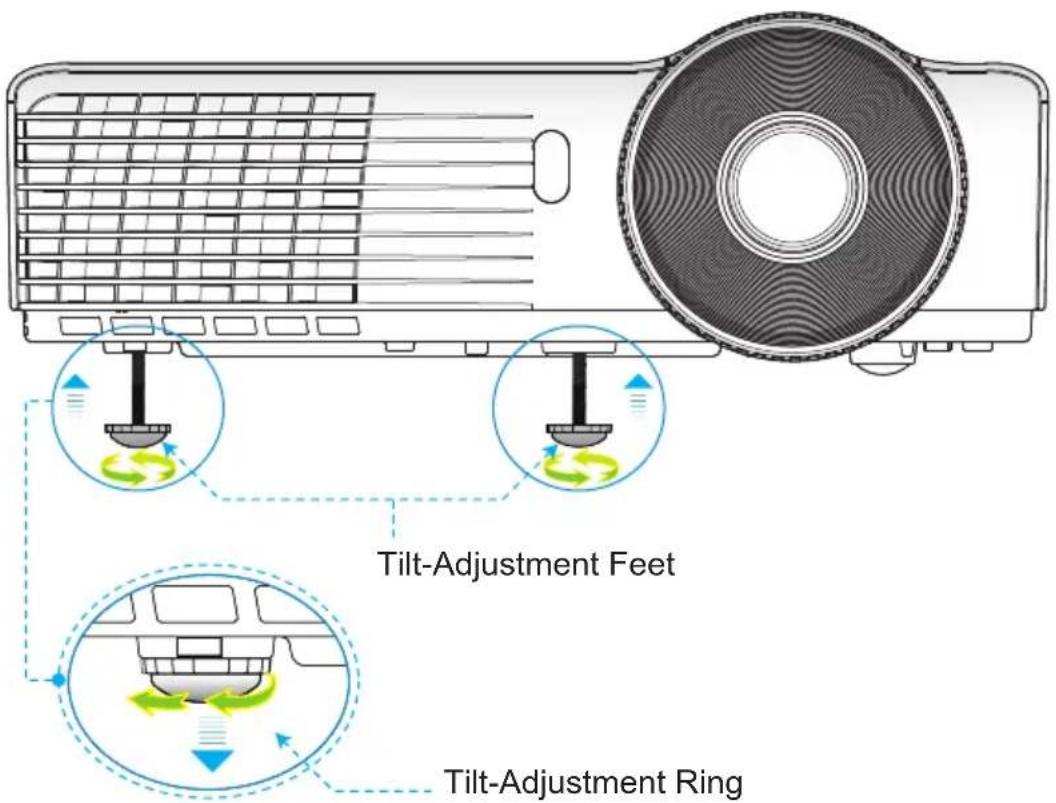
The projector is equipped with elevator feet for adjusting the image height.
- Locate the adjustable foot you wish to modify on the underside of the projector.
- Rotate the adjustable ring clockwise to raise the projector or counter clockwise to lower it. Repeat with the remaining feet as needed.
Adjusting the Projector's Zoom / Focus
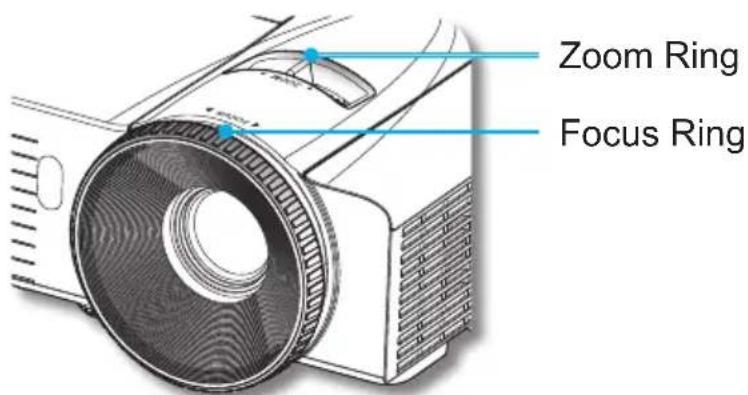
You may turn the zoom ring to zoom in or out. To focus the image, rotate the focus ring until the image is clear.
SVGA/XGA/WXGA series: The projector will focus at distances from 3.94 to 32.8 feet (1.2 to 10.0 meters).
Adjusting Projection Image Size
SVGA/XGA series: Projection Image Size from 30" to 307.0" (0.7 to 7.8 meters).
WXGA series: Projection Image Size from 36.3" to 362" (0.9 to 9.2 meters).
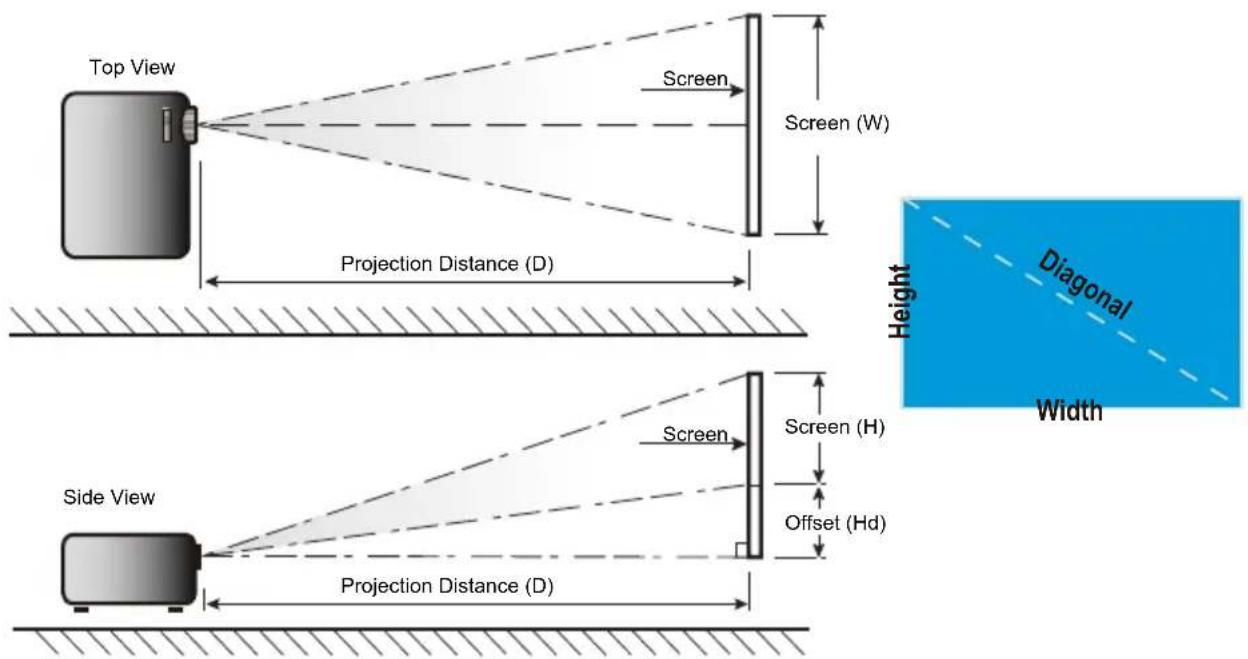
SVGA/XGA
| Diagonal length (inch) size of 4:3 Screen | Screen Size W x H Projection Distance (D) | Offset (Hd) | |||||||||
| (m) (inch) (m) (feet) | |||||||||||
| Width | Height | Width | Height | wide | tele | wide | tele | (m) | (inch) | ||
| 30.00 0.61 | 0.46 24.00 | 18.00 0.98 | 1.17 3.20 | 3.84 0.07 | 2.70 | ||||||
| 40.00 0.81 | 0.61 32.00 | 24.00 1.30 | 1.56 4.27 | 5.12 0.09 | 3.60 | ||||||
| 60.00 1.22 | 0.91 48.00 | 36.00 1.95 | 2.34 6.40 | 7.68 0.14 | 5.40 | ||||||
| 70.00 1.42 | 1.07 56.00 | 42.00 2.28 | 2.73 7.47 | 8.96 0.16 | 6.30 | ||||||
| 80.00 1.63 | 1.22 64.00 | 48.00 2.60 | 3.12 8.53 | 10.24 0.18 | 7.20 | ||||||
| 90.00 1.83 | 1.37 72.00 | 54.00 2.93 | 3.51 9.60 | 11.52 0.21 | 8.10 | ||||||
| 100.00 | 2.03 1.52 | 80.00 | 60.00 3.25 | 3.90 10.67 | 12.80 0.23 | 9.00 | |||||
| 120.00 | 2.44 1.83 | 96.00 | 72.00 3.90 | 4.68 12.80 | 15.36 0.27 | 10.80 | |||||
| 150.00 | 3.05 | 2.29 | 120.00 | 90.00 | 4.88 | 5.85 | 16.00 | 19.20 | 0.34 | 13.50 | |
| 180.00 | 3.66 | 2.74 | 144.00 | 108.00 | 5.85 | 7.02 | 19.20 | 23.04 | 0.41 | 16.20 | |
| 250.00 | 5.08 | 3.81 | 200.00 | 150.00 | 8.13 | 9.75 | 26.67 | 32.00 | 0.57 | 22.50 | |
| 307.00 | 6.24 | 4.68 | 245.60 | 184.20 | 9.98 | 11.98 | 32.75 | 39.30 | 0.70 | 27.63 | |
This table is for user's reference only.
WXGA
| Diagonal length (inch) size of 16:10 Screen | Screen Size W x H Projection Distance (D) | Offset (Hd) | |||||||||
| (m) (inch) (m) (feet) | |||||||||||
| Width | Height | Width | Height | wide | tele | wide | tele | (m) | (inch) | ||
| 36.30 0.78 | 0.49 30.78 | 19.24 1.00 | 1.20 3.28 | 3.94 | 0.06 2.39 | ||||||
| 40.00 0.86 | 0.54 33.92 | 21.20 1.10 | 1.32 3.62 | 4.34 | 0.07 2.63 | ||||||
| 60.00 1.29 | 0.81 50.88 | 31.80 1.65 | 1.99 5.43 | 6.51 | 0.10 3.94 | ||||||
| 70.00 1.51 | 0.94 59.36 | 37.10 1.93 | 2.32 6.33 | 7.6 | 0.12 4.60 | ||||||
| 80.00 1.72 | 1.08 67.84 | 42.40 2.21 | 2.65 7.24 | 8.68 | 0.13 5.26 | ||||||
| 90.00 1.94 | 1.21 76.32 | 47.70 2.48 | 2.98 8.14 | 9.77 | 0.15 5.91 | ||||||
| 100.00 | 2.15 1.35 | 84.80 | 53.00 2.76 | 3.31 | 9.05 | 10.85 0.17 | 6.57 | ||||
| 120.00 | 2.58 | 1.62 | 101.76 | 63.60 | 3.31 | 3.97 | 10.85 | 13.03 | 0.20 | 7.89 | |
| 150.00 | 3.23 | 2.02 | 127.20 | 79.50 | 4.14 | 4.96 | 13.57 | 16.28 | 0.25 | 9.86 | |
| 180.00 | 3.88 | 2.42 | 152.64 | 95.40 | 4.96 | 5.96 | 16.28 | 19.54 | 0.30 | 11.83 | |
| 250.00 | 5.38 | 3.37 | 212.00 | 132.50 | 6.89 | 8.27 | 22.61 | 27.14 | 0.42 | 16.43 | |
| 300.00 | 6.46 | 4.04 | 254.40 | 159.00 | 8.27 | 9.93 | 27.14 | 32.56 | 0.50 | 19.72 | |
| 362.00 | 7.80 | 4.87 | 306.98 | 191.86 | 9.98 | 11.98 | 32.74 | 39.29 | 0.60 | 23.79 | |
This table is for user's reference only.
Control Panel & Remote Control
Control Panel
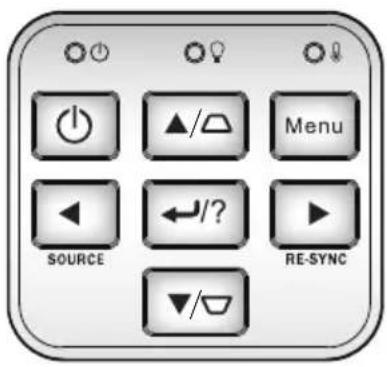
| Using the Control Panel | ||
| POWER |  | Refer to the “Power On/Off the Projector” section on pages 13-14. |
| RE-SYNC | Automatically synchronize the projector to the input source. | |
| Enter / Help |  | ← Confirm your item selection. ? Help Menu (only available when OSD menu is not shown). |
| SOURCE | Press “SOURCE” to select an input signal. | |
| Menu | Press “Menu” to launch the on-screen display (OSD) menu. To exit OSD, Press “Menu” again. | |
| Four Directional Select Keys | Use ▲ ▼  ect items or make adjustments to your selection. ect items or make adjustments to your selection. | |
| Keystone | Use □ to  ist image distortion caused by tilting the projector. (±40 degrees) ist image distortion caused by tilting the projector. (±40 degrees) | |
| Lamp LED Indicate the projector's lamp status. | ||
| Temp LED Indicate the projector's temperature status. | ||
| POWER/ STANDBY LED | ○ ⏻ | Indicate the projector's status. |
Remote Control
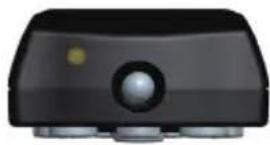
natural_image
Close-up of a black electronic device with a circular button and three metallic buttons (no visible text or symbols)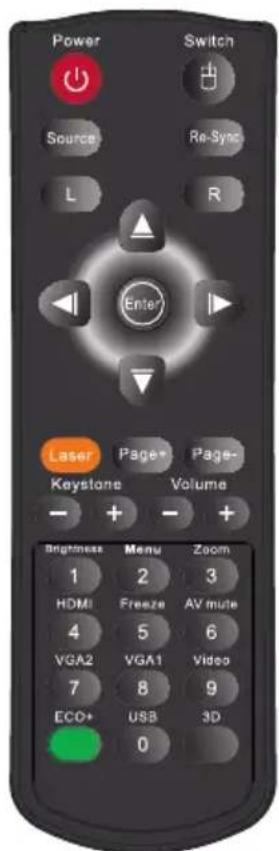
| Using the Remote Control | |
Power  | Refer to the “Power On/Off the Projector” section on pages 13-14. |
| L Button | Mouse left click. |
| R Button | Mouse right click. |
| Page + | Use this button to page up. |
| Page - | Use this button to page down. |
| Enter | Confirm your item selection. |
| Source | Press “Source” to select an input signal. |
| Re-SYNC | Automatically synchronizes the projector to the input source. |
| Four Directional Select Keys | Use ▲▼to select items or make adjustments to your selection. |
| PC/Mouse Control | Use ▲▼for emulation of USB mouse via USB when you press “Switch” button. |
| Keystone +/- | Adjust image distortion caused by tilting the projector. |
| Volume +/- | Adjust to increase / decrease the volume. |
| Brightness | Adjust the brightness of the image. |
| 3D | Press the “3D” to turn the 3D OSD menu on/off. |
| Menu | Press “Menu” to launch the on-screen display (OSD) menu. To exit OSD, press “Menu” again. |
| HDMI | Press “HDMI” to choose HDMI source. |
User Controls
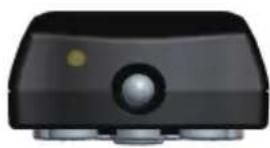
natural_image
Close-up of a black electronic device with a circular button and two side ports (no visible text or symbols)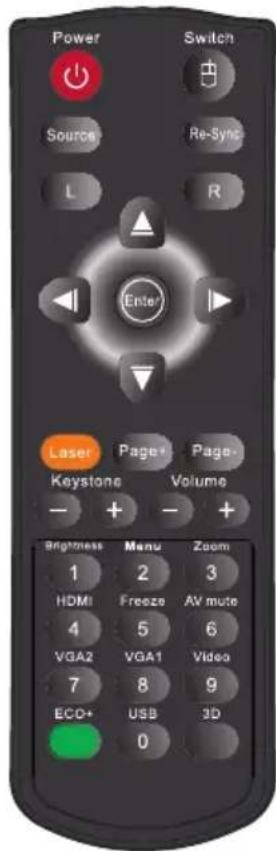

AV mute: Save up to 70% of the lamp power when AV mute is applied.
| Using the Remote Control | |
| Freeze | Press “Freeze” to pause the screen image. Press this button again to unlock. |
| AV mute | Momentarily turns off/on the audio and video. |
| VGA1 | Press “VGA1” to choose VGA1-In/YPbPr sources. |
| VGA2 | Press “VGA2” to choose VGA2-In/YPbPr sources. |
| Video | Press “Video” to choose Composite video source. |
| USB | Display the USB device. |
| Switch | USB mouse switch. Turns mouse function on/off. Press twice to turn on the mouse function. For the mouse function to work, USB cable must be connected between the projector and computer. |
| Zoom | Zoom in on an image. Press◀buttons to alter zoom. |
| Eco+ | When Eco+ mode is activated, the brightness level of the content is automatically detected to significantly reduced lamp power consumption (up to 30%) during periods of inactivity. |
Using the HELP button
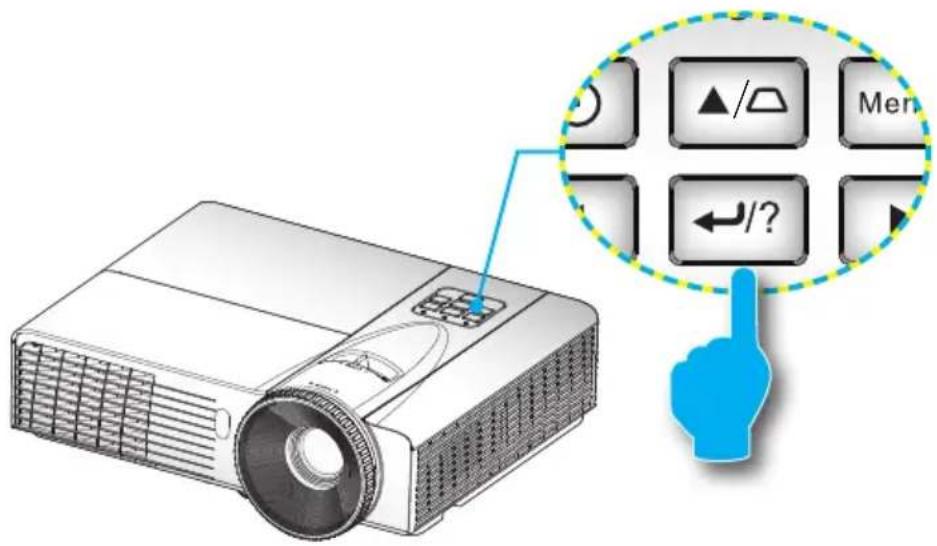
The HELP function ensures easy setup and operation.
Press the "√" button on the control panel to open the Help Menu.
User Controls

Please refer to the "Troubleshooting" section on pages 64-68 for more details.
▶ Help menu button functions only when no input source is detected.
![HELP ? No Image appears on-screen. UpDown Select Menu Exit No Image appears on-screen. Ensure all the cables and power connections are correctly and securely connected as described in the installation section of User's Manual. Ensure all the pins of connectors are not bent or broken. Ensure that the [AV MUTE] feature is not turned on. [NEXT] [Exit] UpDown Select Menu Exit No Image appears on-screen. If you are using a Notebook: 1. First, follow the steps above to adjust resolution of the computer. 2. Press the toggle output settings. Example: [Fn]+[F4] Acer → [Fn]+[F5] IBM/Lenovo → [Fn]+[F7] Asus → [Fn]+[F8] HP/Compaq → [Fn]+[F4] Dell → [Fn]+[F8] NEC → [Fn]+[F3] Gateway → [Fn]+[F4] Toshiba → [Fn]+[F5] Mac Apple : System Preference → Display → Arrangement → Mirror display [PREV] [Exit] UpDown Select Menu Exit](/content/2026/05/858643/images/4c1c94ffca4e1a77388c39974dd322ccac3bab54de02689a5b7b248ecb80cb92.jpg)
If input source is detected and help button is pressed, the following pages will appear to help diagnose any problems.
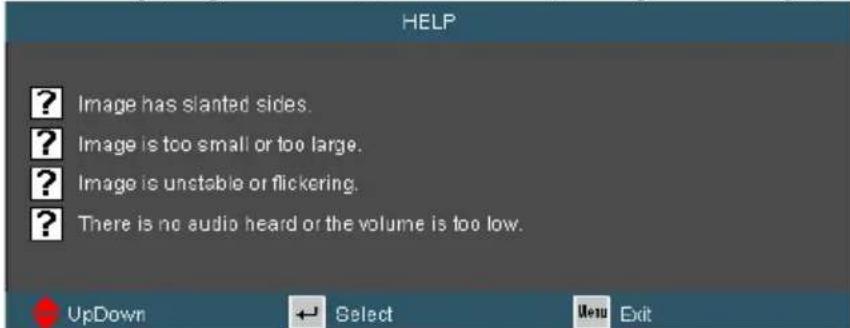
![Image has started sides. ► If possible, reposition the projector so that is centered on the screen and below the bottom of the screen. ► Press (KEYSTONE + / -) button until the sides are vertical on the remote control. [KEYSTONE + / -] ► [Exit]](/content/2026/05/858643/images/06bb625e8454fd61defa0505daec2d23db35de2552934440f19a7c6909a69f65.jpg)
![Image is too small or too large. ▶ Adjust the Zoom Ring on the top of projector. ▶ Move the projector closer to or further from the screen. ▶ Press [MENU] button on the remote control or projector panel, go to "DISPLAY | Format" and try the different settings. [DISPLAY | Format] ◀ [Exit] UpDown Select Men Exit](/content/2026/05/858643/images/b7207af97db5babdb734570a2b9224ac47968203a21e3fe24074a2fd4a231de9.jpg)
![There is no audio heard or the volume is too low. Is the volume setting at the minimum? Turn up the volume setting. Is the cable connected properly to the projector? Check the physical connection and ensure the cable is connected properly from the source to projector. [Volume] [Exit] UpDown Select New Exit](/content/2026/05/858643/images/09ff473483783c61ef1758b9b4d3189aaf24882cf132eb97db10c88ebdb414cb.jpg)
![Image is unstable or flickering. ► Use [Phase / Frequency] to correct it ► Change the monitor color setting on your computer. [Phase] [Frequency] [Exit] UpDown Select Mon Exit](/content/2026/05/858643/images/9238ebb240aa343e78a0791b443a0036720f3503a7aafa1d82774ca4f9c0e1c6.jpg)
On-screen Display Menus
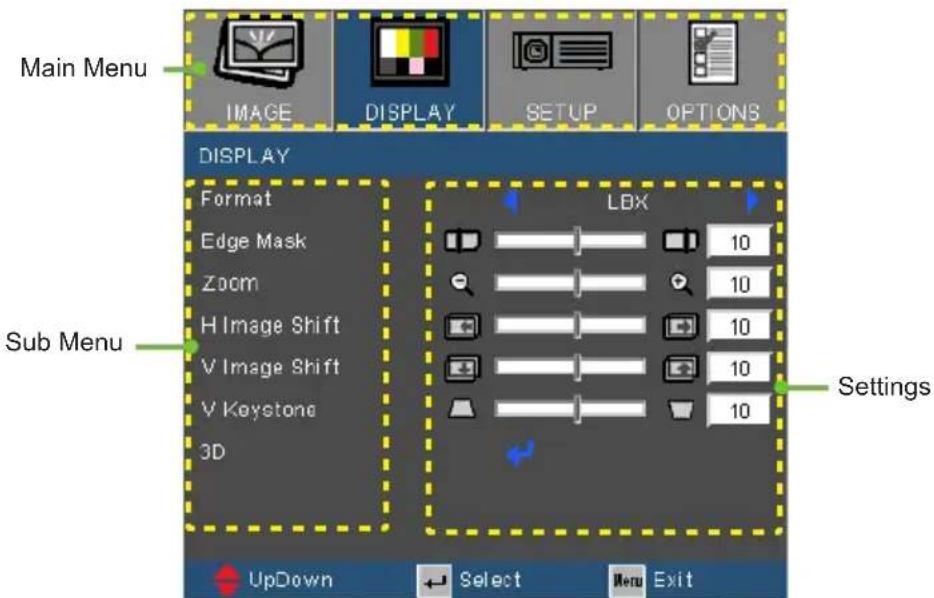
The Projector has multilingual On-screen Display menus that allow you to make image adjustments and change a variety of settings.
How to operate
- To open the OSD menu, press "Menu" on the Remote Control or Projector Keypad.
2 When OSD is displayed, use ◀▶ keys to select any item in the main menu. While making a selection on a particular page, press ▼ or "Enter" key to enter sub menu.
-
Use ▲▼ keys to select the desired item and adjust the settings using ◀▶ key.
-
Select the next item to be adjusted in the sub menu and adjust as described above.
-
Press "Enter" to confirm, and the screen will return to the main menu.
-
To exit, press "MENU" again. The OSD menu will close and the projector will automatically save the new settings.
Menu Tree
Main Menu Sub Menu Settings
| Image | Display Mode | Presentation / Bright / Movie / sRGB / Blackboard / Classroom / User / 3D | |
| Brightness -50~50 | |||
| Contrast -50~50 | |||
| Sharpness 1~15 | |||
| #1 Color -50~50 | |||
| #1 Tint -50~50 | |||
| Advanced Gamma Film / Video / Graphics / Standard | |||
| Format 4:3 / 16:9 or 16:10 / LBX / Native / AUTO | |||
| Edge Mask 0~10 | |||
| Zoom -5~25 (80%~200%) | |||
| H Image Shift -50~50 | |||
| V Image Shift -50~50 | |||
| V Keystone | -40~40 | ||
| Auto Keystone | On / Off | ||
| 3D 3D Mode | Off / DLP-Link / IR | ||
| #4 3D Sync. Invert | On / Off | ||
| Exit | |||
| Setup | Language | English / Deutsch / Français / Italiano / Español / Português / Svenska / Nederlands / Norsk/Dansk / Polski / Suomi / Русский / ελληνικά / Magyar / Čeština / فارسی / 繁體中文 / 筒体中文 / 日本語 / 한국어 / İnn / Türkçe / Việt / Bahasa Indonesia / Română | |
| Projection | |||
| Menu Location | |||
| #3 Screen Type | 16:10 / 16:9 | ||
| #5 Signal | Automatic | On / Off | |
| Phase (VGA) | 0~31 | ||
| Frequency (VGA) | -5~5 | ||
| H. Position (VGA) | -5~5 | ||
| V. Position (VGA) | -5~5 | ||
| Exit | |||
| Security | Security | On / Off | |
| Security Timer | Month / Day / Hour | ||
| Change Password | |||
| Exit | |||
Main Menu Sub Menu Settings
| Setup | Projector ID 0~99 | |
| Mute On / Off | ||
| Volume Audio 0~10 | ||
| Mic 0~10 | ||
| Exit | ||
| Audio Input Default / Audio1 / Audio2 | ||
| Advanced Logo Default / Neutral / User | ||
| Logo Capture | ||
| Closed Captioning Off / CC1 / CC2 | ||
| Exit | ||
| Network Network State | ||
| DHCP | ||
| IP Address | ||
| Subnet mask | ||
| Gateway | ||
| DNS | ||
| Apply Yes / No | ||
| Exit | ||
| Options | Source Lock On / Off | |
| High Altitude On / Off | ||
| Information Hide On / Off | ||
| Keypad Lock | On / Off | |
| Test Pattern | None / Grid / White Pattern | |
| Background Color | Black / Red / Blue / Green / White | |
| Advanced Direct Power On | On / Off | |
| Auto Power Off (min.) 0~180 | ||
| Sleep Timer (min.) 0~995 | ||
| Quick Resume On / Off | ||
| Power Mode (Standby) Active / Eco | ||
| Exit | ||
| Lamp Settings | Lamp Hours | |
| Lamp Reminder On / Off | ||
| Brightness Mode Bright / Eco / Eco+ | ||
| Lamp Reset Yes / No | ||
| Exit | ||
| Reset | ||

Please note that the on-screen display (OSD) menus vary according to the signal type selected and the projector model you are using.
(#1) "Color" and "Tint" are only supported in Video mode.
(#2) For XGA model only.
(#3) For WXGA model only. 16:9 or 16:10 depend on "Screen Type" setting.
(#4) "3D Sync Invert" is only available when 3D is enabled.
(#5) "Signal" is only supported in Analog VGA (RGB) signal.
(#6) For HDMI source device only.
IMAGE
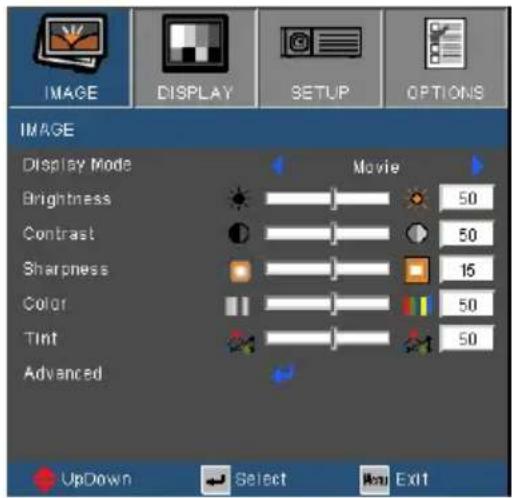
Display Mode
There are many factory presets optimized for various types of images.
Presentation: Good color and brightness from PC input.
Bright: Maximum brightness from PC input.
▶ Movie: For home theater.
sRGB: Standardised accurate color.
Blackboard: This mode should be selected to achieve optimum color settings when projecting onto a blackboard (green).
Classroom: This mode is recommended for projecting in a classroom.
User: User's settings.
3D: Recommend setting for 3D mode enabled. Any further adjustments by the user in 3D will be saved in this mode for further use.
Brightness
Adjust the brightness of the image.
Press the ◀o darken image.
▶ Press the ▶ to lighten the image.
Contrast
The contrast controls the degree of difference between the lightest and darkest parts of the picture.
Press the ◀ to decrease the contrast.
Press the ▶ to increase the contrast.

“Color” and “Tint” functions are only supported under Video mode.
Sharpness
Adjust the sharpness of the image.
Press the ◀ to decrease the sharpness.
Press the to increase the sharpness.
Color
Adjust a video image from black and white to fully saturated color.
Press the ◀ to decrease the amount of saturation in the image.
Press the ▶ to increase the amount of saturation in the image.
Tint
Adjust the color balance of red and green.
Press the ◀ to increase the amount of green in the image.
Press the ▶ to increase the amount of red in the image.
IMAGE | Advanced
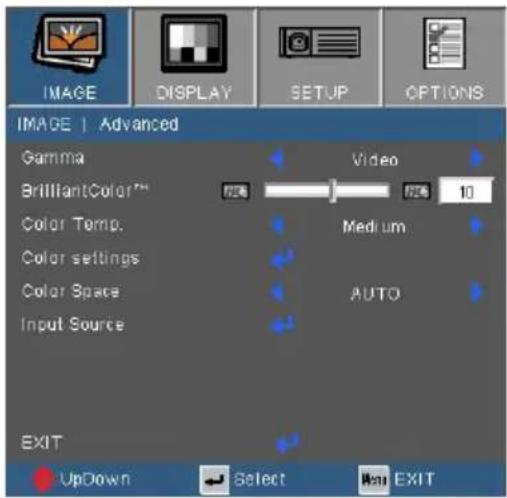
Gamma
This allows you to choose a degamma table that has been fine-tuned to bring out the best image quality for the input.
Film: for home theater.
▶ Video: for video or TV source.
▶ Graphics: for image source.
Standard: for PC or computer source.
BrilliantColor™
This adjustable item utilizes a new color-processing algorithm and system level enhancements to enable higher brightness while providing true, more vibrant colors in picture. The range is from "0" to "10". If you prefer a stronger enhanced image, adjust toward the maximum setting. For a smoother, more natural image, adjust toward the minimum setting.
Color Temp
If set to cold temperature, the image looks more blue. (cold image) If set to warm temperature, the image looks more red.
(warm image)
Color Settings
Press ← into the next menu as below and then use select item.

Red Gain/Green Gain/Blue Gain/Red Bias/Green Bias/Blue Bias/Cyan/Magenta/Yellow: Use ▶ to select Red, Green, Blue, Cyan, Magenta and Yellow Colors.
Reset: Choose "Yes" to return the factory default settings for color adjustments.
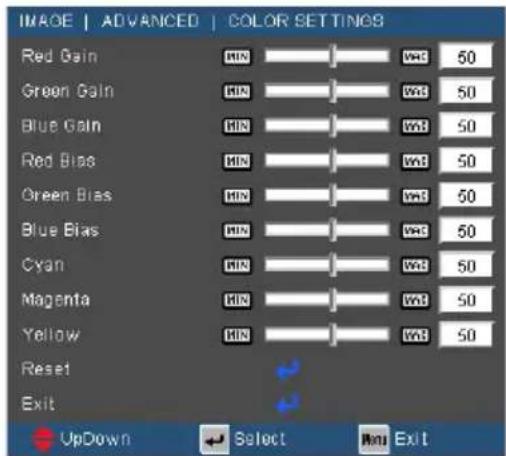

(*) For HDMI only.
Color Space
Select an appropriate color matrix type from AUTO, RGB, RGB(0-255) ^() , RGB(16-235) ^() or YUV.
Input Source
Use this option to enable / disable input sources. Press ▶to enter the sub menu and select which sources you require. Press "Enter" to finalize the selection. The projector will not search for inputs that are not selected.
DISPLAY
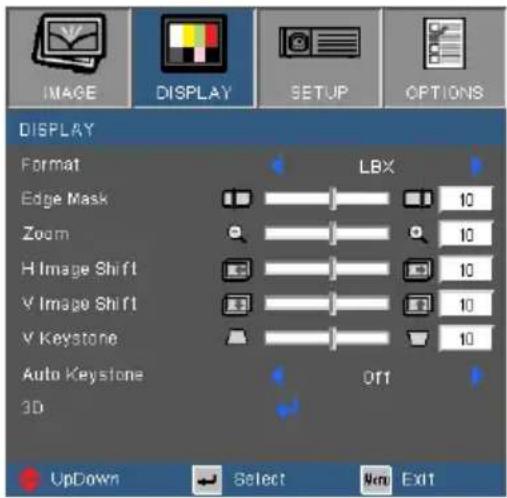
Format
Use this function to choose your desired aspect ratio.
SVGA/XGA
4:3: This format is for 4×3 input sources.
16:9-I: This format is for 16×9 input sources, like HDTV and DVD enhanced for Wide screen TV. (576i/p)
16:9-II: This format is for 16×9 input sources, like HDTV and DVD enhanced for Wide screen TV. (480i/p)
Native: This format displays the original image without any scaling.
▶ AUTO: Automatically selects the appropriate display format. When input is 4:3, the image is displayed as 4:3. When input is 16:9 above, the image is displayed as 16:9- I
| Aspect ratio (source detected) | Resize image | |
| SVGA model XGA | model | |
| 4:3 800 x 600 center 1024 x 768 center | ||
| 16:9-I 800 x 450 center 1024 x 576 center | ||
| 16:9-II 800 x 480 center 854 x 480 center | ||
| Native | No resize image, 1:1 mapping and centered. This format shows the original image without scaling. | |

16:9 or 16:10 depend on "Screen Type" setting.
WXGA
4:3: This format is for 4 × 3 input sources.
16:9: This format is for 16×9 input sources, like HDTV and DVD enhanced for Wide screen TV.
16:10: This format is for 16×10 input sources, like widescreen laptops.
LBX: This format is for non-16x9, letterbox source and for users who use external 16x9 lens to display 2.35:1 aspect ratio using full resolution.
Native: This format displays the original image without any scaling.
▶ AUTO: Automatically selects the appropriate display format.
| 16:10 Screen 480i/p 576i/p 1080i/p 720p PC | ||||
| 4:3 1066 x 800 center | ||||
| 16:10 1280 x 800 center | ||||
| LBX | 1280 x 960 center, then get the central 1280 x 800 image to display | |||
| Native | 1:1 mapping centered. | 1:1 map-ping (960 x 540) display 1280 x 800 | 1280 x 720 center | 1:1 mapping centered. |
| 16:9 Screen 480i/p 576i/p 1080i/p 720p PC | ||||
| 4:3 960 x | 720 center | |||
| 16:9 1280 | x 720 center | |||
| LBX | 1280 x 960 center, then get the central 1280 x 720 image to display | |||
| Native | 1:1 mapping centered. | 1:1 mapping (960 x 540) display 1280 x 720 | 1280 x 720 center | 1:1 mapping centered. |

Each I/O has different setting of "Edge mask".
“Edge mask” and “Zoom” can’t work at same time.
Edge Mask
Edge mask function removes the noise in a video image. Edge mask the image to remove video encoding noise on the edge of video source.
Zoom
Press the ◀ to reduce the size of an image.
Press the to magnify an image on the projection screen.
H Image Shift
Shift the projected image position horizontally.
V Image Shift
Shift the projected image position vertically.
V Keystone
Press the ◀ or ▶ to adjust image distortion vertically. If the image looks trapezoidal, this option can help make the image rectangular.
Auto Keystone
Automatically adjusts vertical image distortion.
DISPLAY | 3D
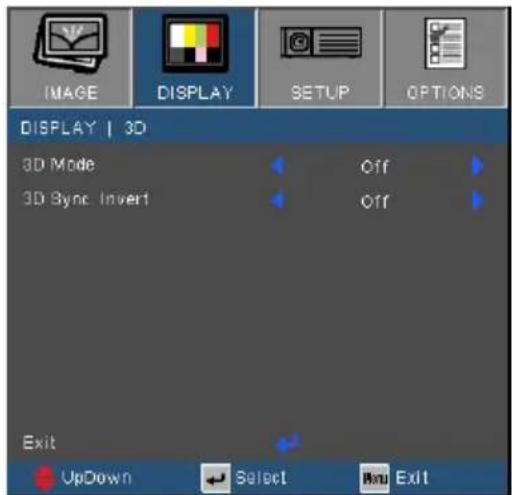

- “IR” options may vary according to model.
“3D Sync Invert” is only available when 3D is enabled and this mode 3D is for DLP link glass only.
Compatible 3D source, 3D content and active shutter glasses are required for 3D viewing.
3D Mode
Off: Select "Off" to turn 3D settings off for 3D images.
DLP Link: Select "DLP Link" to use optimized settings for DLP Link 3D images.
IR: Select "IR" to use optimized settings for IR-based 3D images.
3D Sync. Invert
Press the "On" to invert left and right frame contents.
Press the "Off" for default frame contents.
SETUP
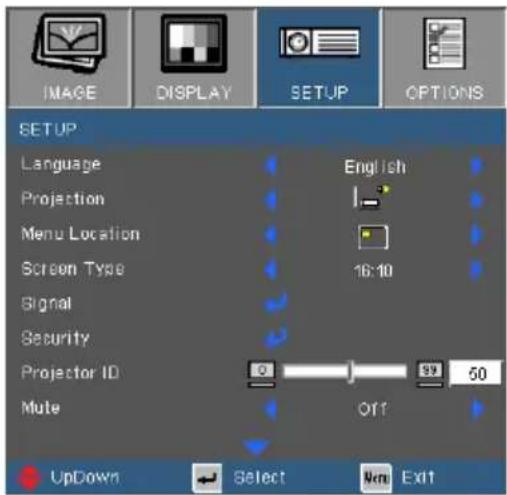

“SETUP” options may vary according to model.
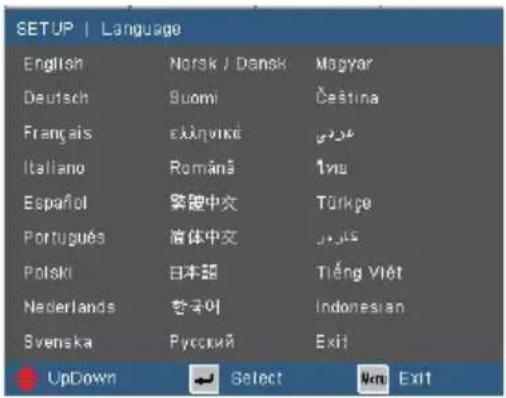
Language
Choose the multilingual OSD menu. Press ▶ or ▶ into the sub menu and then use the ▶ or ▶ key to select your preferred language. Press "Enter" to finalize the selection.
Projection

Rear-Desktop and Rear-Ceiling are to be used with a translucent screen.
Front-Desktop
This is the default selection. The image is projected straight on the screen.
Front-Ceiling
When selected, the image will turn upside down.
Rear-Desktop
When selected, the image will appear reversed.
Rear-Ceiling
When selected, the image will appear reversed in upside down position.
User Controls
Menu Location
Choose the menu location on the display screen.
Screen Type
Choose the screen type from 16:10 or 16:9.

"Screen Type" is for WXGA only.
Projector ID
ID definition can be set up by menu (range 0-99), and allow user control an individual projector by RS232. Refer to pages 74-78 for the complete list of RS232 commands.
Mute
Choose the "On" to turn mute on.
Choose the "Off" to turn mute off.
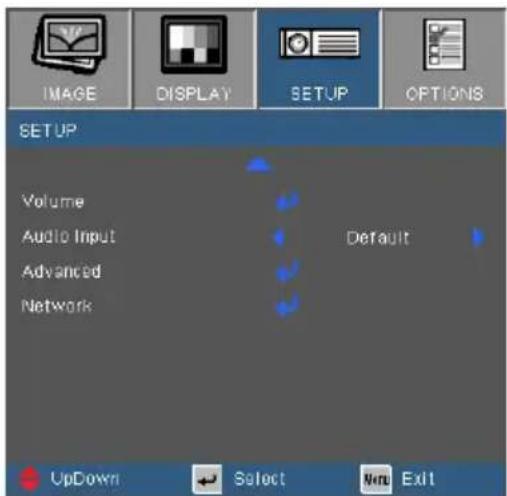
Volume
Adjust the volume from "Audio", "MIC" connector.
Press the ◀ to decrease the volume.
Press the to increase the volume.
Audio Input
The default audio settings are on the back panel of the projector. Use this option to reassign any of the Audio Inputs (1 or 2) to the current image source. Each Audio input can be assigned to more than one video source.
Audio 1: VGA 1 and VGA 2.
Audio 2: Video.
SETUP | Signal (RGB)

"Signal" is only supported in Analog VGA (RGB) signal.
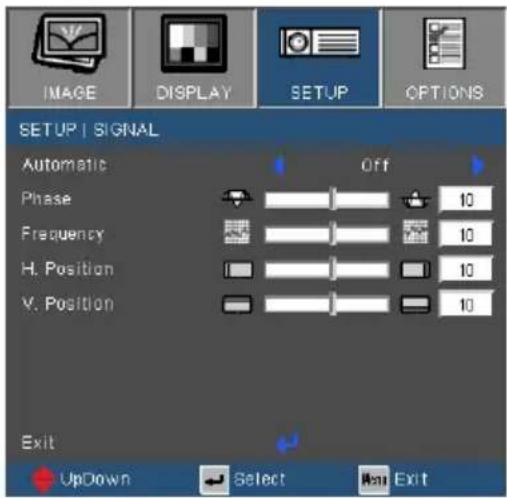
Automatic
Automatically selects the signal. If you use this function, the Phase, frequency items are grayed out, and if Signal is not automatic, the phase, frequency items will appear for user to manually tune and saved in settings after that for next time projector turns off and on again.
Phase
Synchronize the signal timing of the display with the graphic card. If the image appears to be unstable or flickers, use this function to correct it.
Frequency
Change the display data frequency to match the frequency of your computer's graphic card. Use this function only if the image appears to flicker vertically.
H. Position
Press the ◀ to move the image left.
Press the ▶ to move the image right.
V. Position
Press the ◀ to move the image down.
Press the ▶ to move the image up.
SETUP | Security
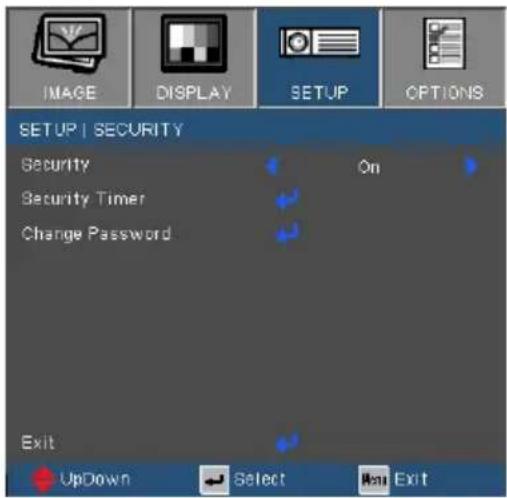
Security
On: Choose "On" to use security verification when the turning on the projector.
Off: Choose "Off" to be able to switch on the projector without password verification.

Password default value is "1234" (first time).
Security Timer
Use this function to set the how long (Month/Day/Hour) the projector can be used. Once this time has elapsed you will be requested to enter your password again.
Change Password
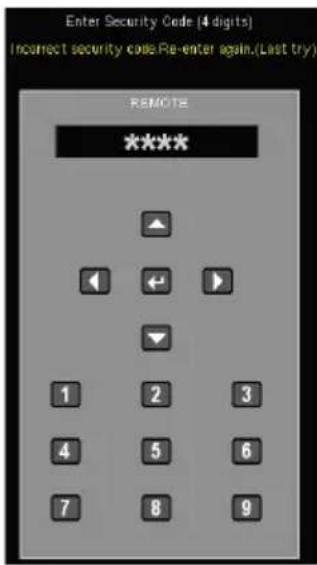
First time:
- Press "←" to set the password.
- The password has to be 4 digits.
- Use number button on the remote to enter your new password and then press "←key to confirm your password.
Change Password:
- Press "←" to input old password.
- Use number button to enter current password and then press "←" to confirm.
- Enter new password (4 digits in length) using the number buttons on the remote, then press “←” to confirm.
- Enter new password again and press "←" to confirm.
User Controls
If the incorrect password is entered 3 times, the projector will automatically shut down.
If you have forgotten your password, please contact your local office for support.
SETUP | Advanced
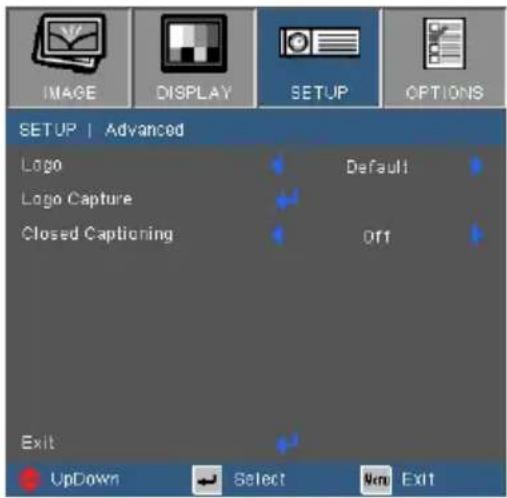
Logo
Use this function to set the desired startup screen. If changes are made they will take effect the next time the projector is powered on.
Default: The default startup screen.
Neutral: Logo is not displayed on startup screen.
User: Use stored picture from "Logo Capture" function.

For successful logo capture, please ensure that the on-screen image does not exceed the projector's native resolution. (XGA:1024x768 or WXGA:1280x800).
Logo Capture
Press to capture an image of the picture currently displayed on screen.
Closed Captioning
Use this function to set the desired startup screen. If changes are made they will take effect the next time the projector is powered on.
Off: select "off" to turn off the closed captioning feature.
CC1:CC1 language: American English.
CC2:CC2 language (depending on the TV channel of the user):Spanish, French, Portuguese, German, Danish.
SETUP | Network
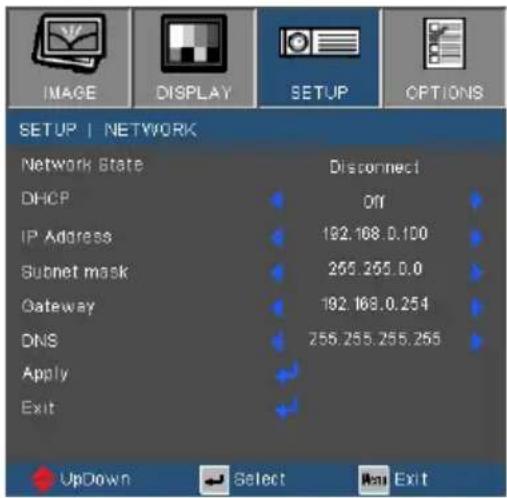
Network State
Display the network connection status.
DHCP
Use this function to select your desired startup screen. If you change the setting from one to another, when you exit the OSD menu, the new setting will take effect on next open.
On: Assign an IP address to the projector from an external DHCP server automatically.
Off: Assign an IP address manually.
IP Address
Select an IP address.
Subnet Mask
Select subnet mask number.
Gateway
Select the default gateway of the network connected to the projector.
DNS
Select DNS number.
Apply
Press “◀” and then choose “Yes” to apply the selection.
User Controls
How to use web browser to control your projector
- Turn on DHCP to allow the DHCP server to automatically assign an ip address or keep DHCP off to manually enter the network information
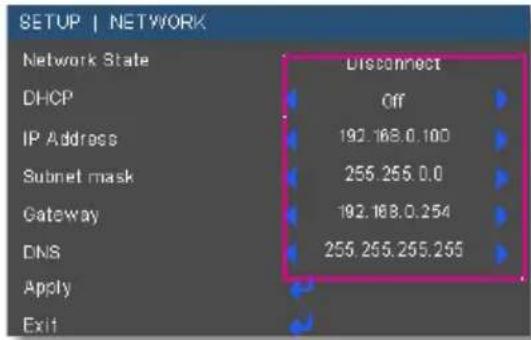
- Then choose apply and press "←" button to complete the configuration process.
- Open your web browser and type in the projector's ip address to access the Crestron control page.
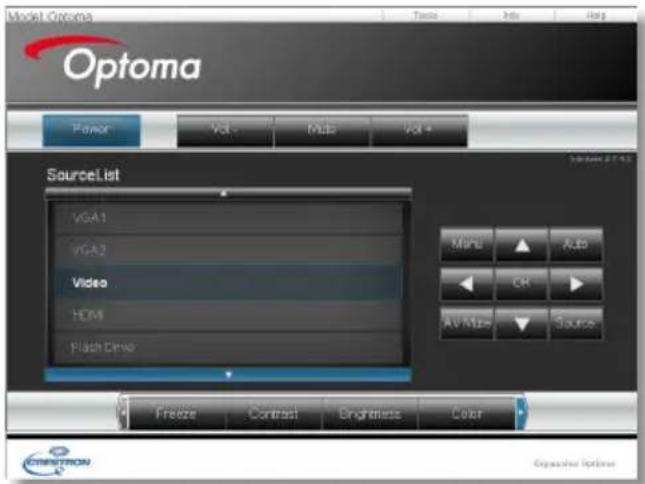
- BPlease see below for keyboard character keys space limitation.
| Category Item | Input-Length (characters) | |
| Crestron Control | IP Address 15 | |
| IP ID 2 | ||
| Port 5 | ||
| Projector | Projector Name 20 | |
| Location 9 | ||
| Assigned To 9 | ||
| Network Configuration | DHCP (Enabled) (N/A) | |
| IP Address 15 | ||
| Subnet Mask 15 | ||
| Default Gateway 15 | ||
| DNS Server 15 | ||
| User Password | Enabled (N/A) | |
| New Password | 15 | |
| Confirm | 15 | |
| Admin Password | Enabled (N/A) | |
| New Password | 15 | |
| Confirm | 15 | |
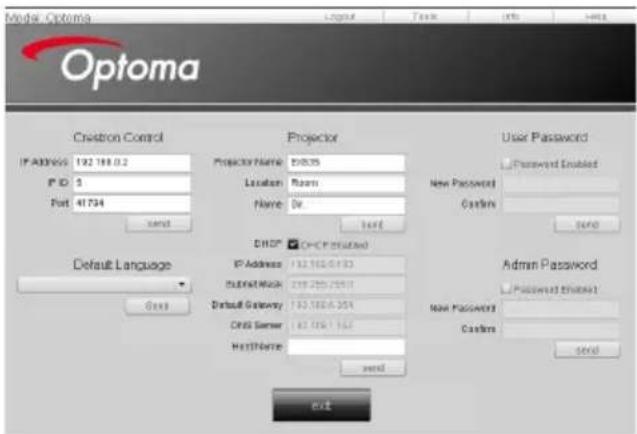
Below is an example on how to do a quick network setup
Step 1: Assign an ip address of 192.168.0.100 and subnet mask of 255.255.255.0.
IP Address
192.168.0.100
Step 2: Select apply and press enter to save the changes and then exit the menu.
Step 3: To open Network Connections, click Start, click Control Panel, click Network and Internet Connections, and then click Network Connections. Click the connection you want to configure, and then, under Network Tasks , click Change settings of this connection.
Step 4: On the General tab, under This connection uses the following items, click Internet Protocol (TCP/IP), and then click "Properties."
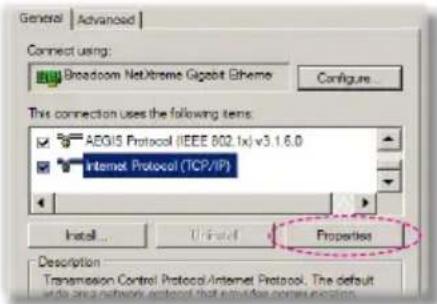
Step 5: Click Use the following IP address, and type in as below:
1) IP address: 192.168.0.101
2) Subnet mask: 255.255.255.0
3) Default gateway:192.168.0.254
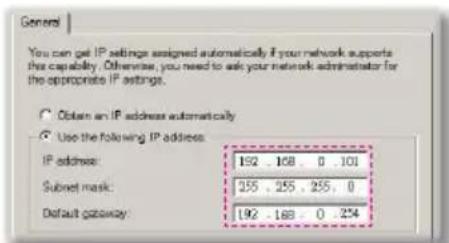
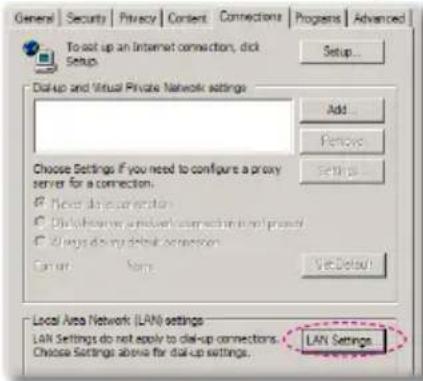
Step 6: To open Internet Options, click IE web browser, click Internet Options, click the Connections tab and click "LAN Settings..."
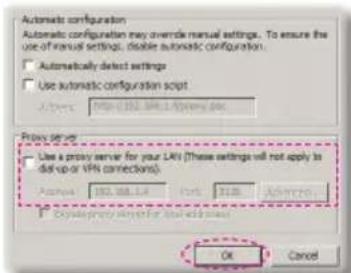
Step 7: The Local Area Network (LAN) Setting dialog box appears, In the Proxy Server area, cancel the Use a proxy server for your LAN check box., then click "OK" button twice.
Step 8: Connect a cat5 cross-over network cable between the projector and the computer.
Step 9: Open your IE and type in the IP address of 192.168.0.100 in the URL then press "Enter" key.
Crestron RoomView Control Tool
Crestron RoomView™ provides a central monitoring station for 250+ control systems on a single Ethernet network (more are possible, the number depends on the combination of IP ID and IP address). Crestron RoomView monitors each projector, including projector's online status, system power, lamp life, network setting and hardware faults, plus any custom attribute as defined by the Administrator. The Administrator can add, delete, or edit room information, contact information and events, which are logged automatically by the software for all users. (Operation UI as following image)
1. Main Screen

2. Edit Room

Crestron Room-View function support is dependent on models.
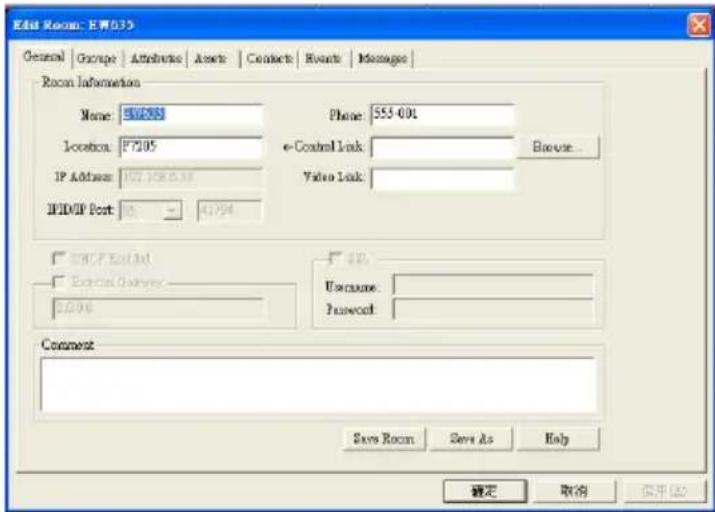
3. Edit Attribute
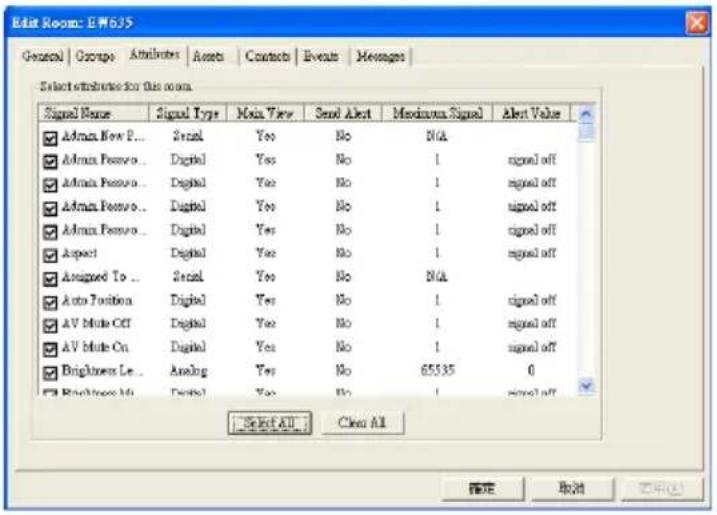
4. Edit Event
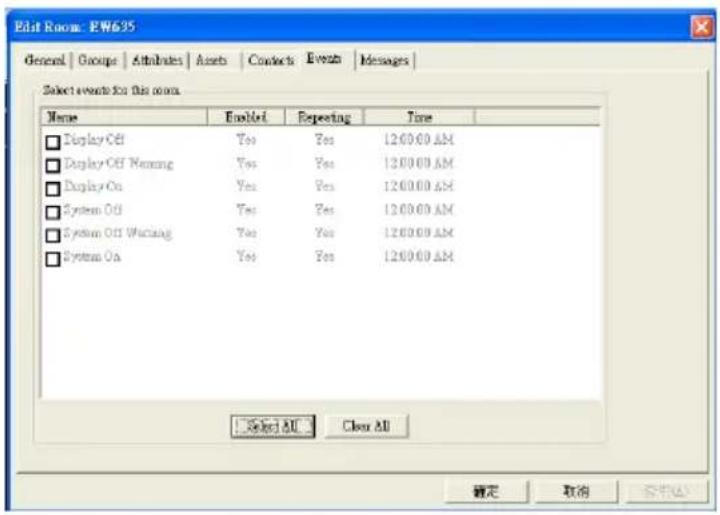
For more information, please visit
http://www.crestron.com & www.crestron.com/getroomview.
OPTIONS
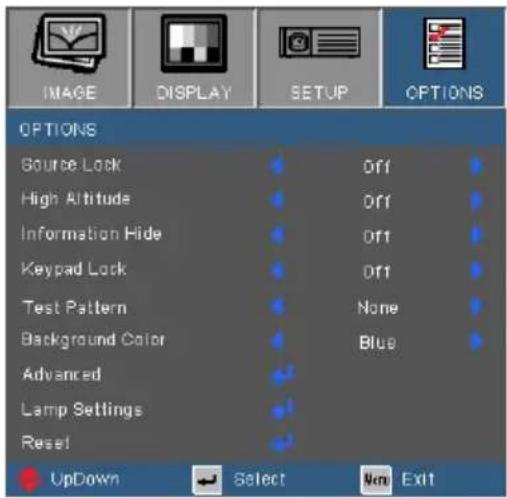
Source Lock
On: The projector will only search current input connection.
▶ Off: The projector will search for other signals if the current input signal is lost.
High Altitude
When "On" is selected, the fans will spin faster. This feature is useful in high altitude areas where the air is thin.
Information Hide
On: Choose "On" to hide the info message.
Off: Choose "Off" to show the "searching" message.

To turn off the keypad lock, press and hold "Enter" key on top of the projector for 5 seconds.
Keypad Lock
When the keypad lock function is "On", the control panel will be locked however, the projector can be operated by the remote control. By selecting "Off", you will be able to reuse the control panel.
Test Pattern
Display a test pattern. There are Grid, White pattern and None.
Background Color
Use this feature to display a "Black", "Red", "Blue", "Green" or "White", screen when no signal is available.
Reset
Choose "Yes" to return the display parameters on all menus to the factory default settings.
OPTIONS | Advanced
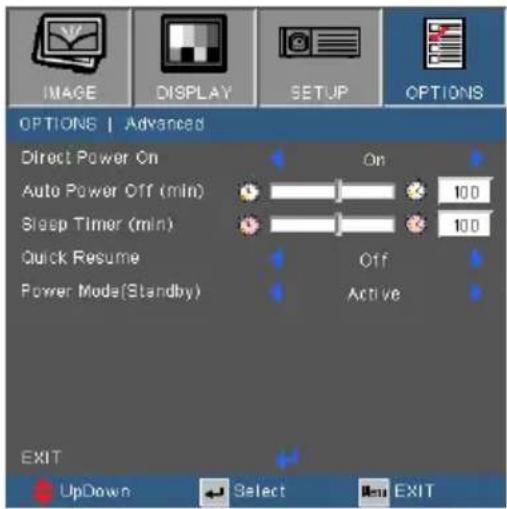
Direct Power On
Choose "On" to activate Direct Power mode. The projector will automatically power on when AC power is supplied, without pressing the "●key on the projector control panel or on the remote control.
Auto Power Off (min)
Sets the countdown timer interval. The countdown timer will start, when there is no signal being sent to the projector. The projector will automatically power off when the countdown has finished (in minutes).

When Power mode (Standby) is set to Eco (<0.5W), the VGA output and Audio pass-through will be deactivated when the projector is in standby.
Sleep Timer (min)
Sets the countdown timer interval. The countdown timer will start, with or without a signal being sent to the projector. The projector will automatically power off when the countdown has finished (in minutes).
Quick Resume
On: If the projector is accidentally turned off, this feature allows the projector to be instantly powered on again, if selected within a period of 100 seconds.
Off: The fan will start cooling the system immediately when user turns off the projector.
Power Mode (Standby)
Eco.: Choose "Eco." to save power dissipation further < 0.5W.
Active: Choose "Active" to return to normal standby and the VGA out port will be enabled.
OPTIONS | Lamp Settings
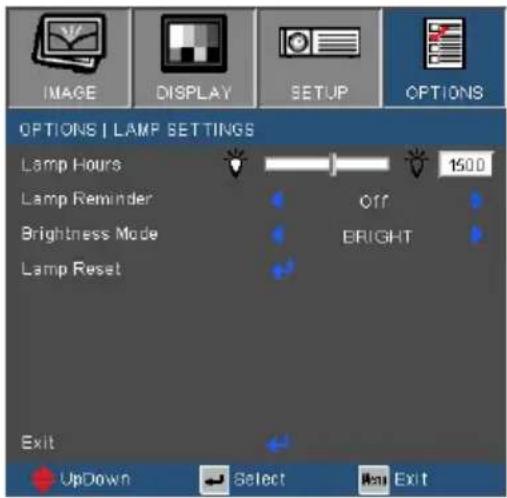
Lamp Hours
Display the projection time.
Lamp Reminder
Choose this function to show or to hide the warning message when the changing lamp message is displayed.
The message will appear 30 hours before suggested replacement of lamp.

When ambient temperature is over 40^ C in operating, the projector will switch to Eco automatically.
Brightness Mode
BRIGHT: Choose "BRIGHT" to increase the brightness.
Eco.: Choose "Eco." to dim the projector lamp which will lower power consumption and extend the lamp life.
Eco+: When Eco+ mode is activated, the brightness level of the content is automatically detected to significantly reduced lamp power consumption (up to 30%) during periods of inactivity.
Lamp Reset
Reset the lamp hour counter after replacing the lamp.
Network Application System Introduction
Network Application System includes the Network Display System, Web Administration System and Multi-media Card Reader Application which can bring the high performance in network projection. Base on network protocol, user can configure the projector remotely. It supports to connect the PC with Projector by USB, Ethernet, and Wireless. This project makes full use of the network capability. It allows the administrator to control all the projectors in one building by one PC. When some emergencies happen, the projector can send out alert information to administrator by email and web page. It can read more than one USB device directly and show all the images in it
This project consists of three software applications which make full use of the network and USB capability
• Web Administration
- Card Reader
- Optoma Presenter
How to use Web Administration
The Web Administration application allows user to configure the projector remotely via widely used TCP/IP protocol from anywhere in the building.
- Start the web browser, and enter the IP address of the projector in URL: http://IP-address, the log-in web page is displayed.
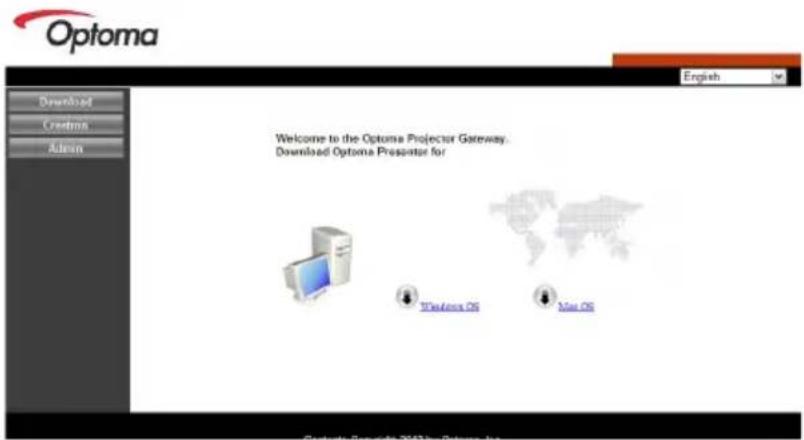
User Controls
2 There are 3 options in this page.
- Click "Download", it displays the interface to download the software of "Network Display".
- Click "Crestron", to enter the control page of Flash UI.
- Click "Admin", the log-in page shows up.
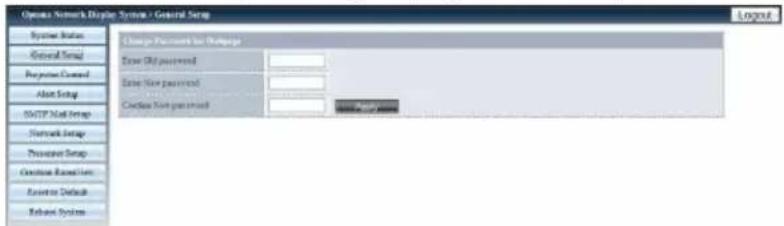
- Enter the password and click [Login] button, and then main page is displayed. The default password is "admin" when target system is brand new. The maximum password is 8 characters with any characters except "space".
System Status
This selection allows you to see current network and firmware status of the projector.
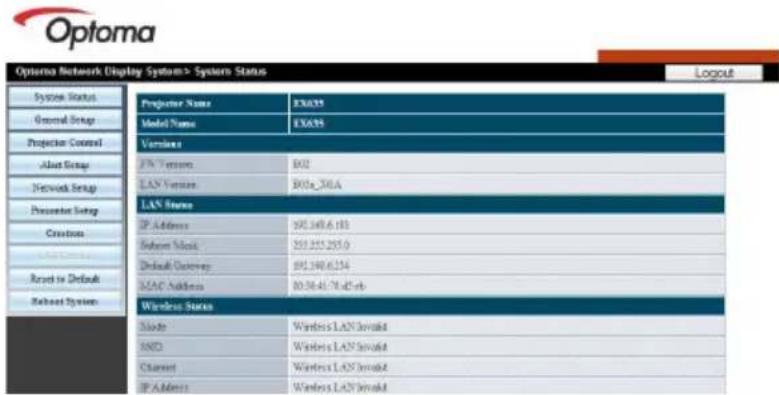
General Setup
Admin password can be changed here.
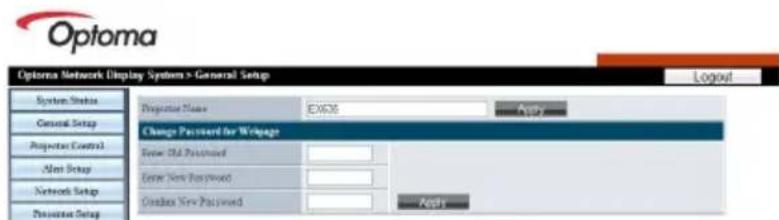
Projector Control
This selection gives you access to most of the settings available in the projector and the current configuration without having to be in the same room.
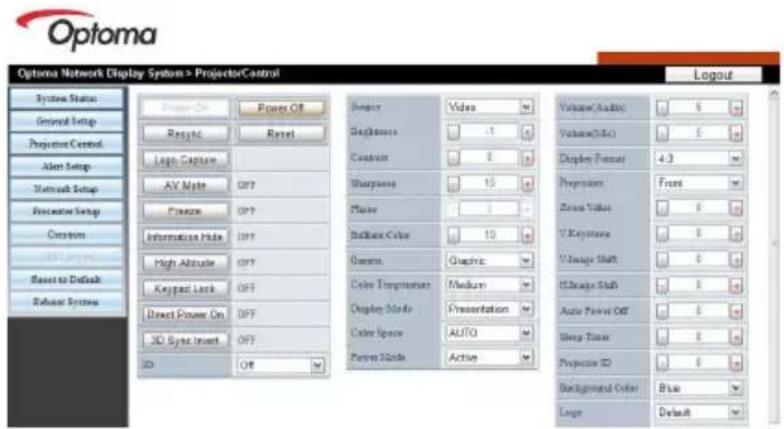
Alert Setup
- Alert Type: This selection allows the admin to receive alerts when the projector is at fault.
- SMTP setting and Email setting: This page is to set up the details of mail sending, ex. mail server IP address, user name, password and mail address of receivers. (Note: Multi-receivers are separated by semicolon.)
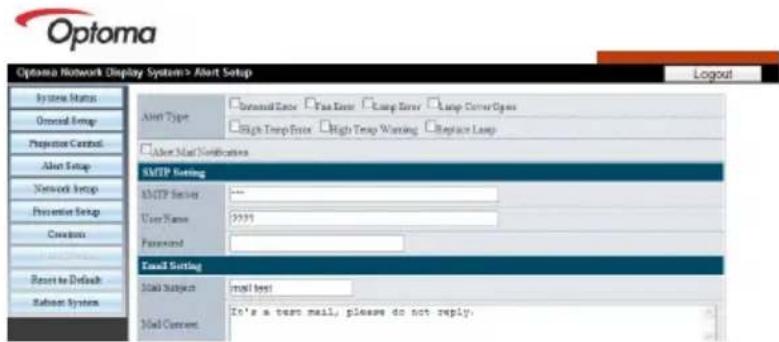
Network Setup
This page is for setting up and configuring the wireless usb dongle.
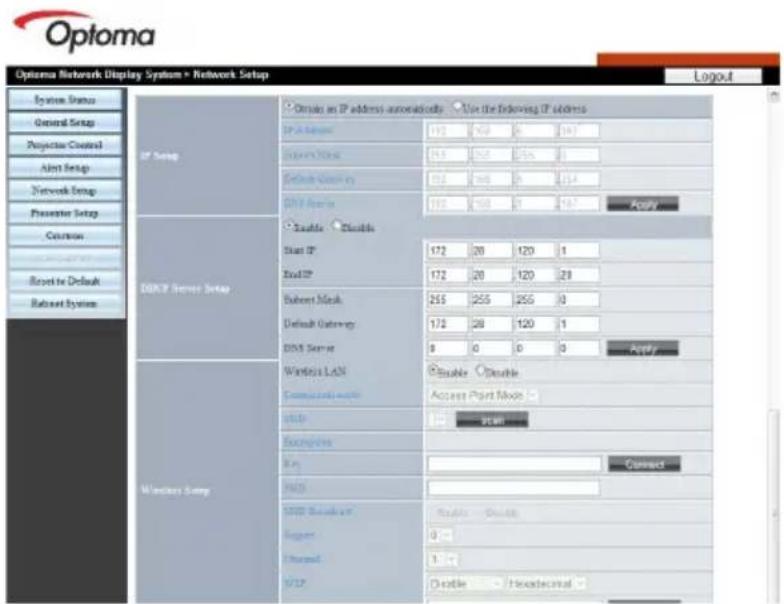
- IP Setup: Click "Obtain an IP address automatically" as auto mode; click "Use the following IP Address" as static mode, IP Address/Subnet Mask/Default Gateway/ DNS Server are required to be filled and then click "Apply" button.
- DHCP Server Setup: Enable/Disable, Start IP, End IP, Subnet Mask, Default Gateway, DNS server.
- Wireless Setup: This allows you to setup the projector as an access point or as a client that can be integrated to an existing network.
Presenter Setup
Admin password/User password is used to change the password for admin/user in target side.
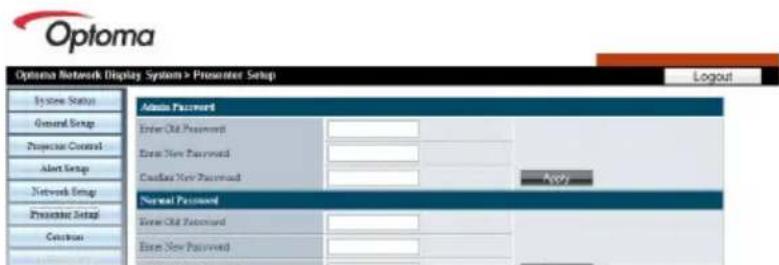
Click "Connection Control" to enter "Connection Status"
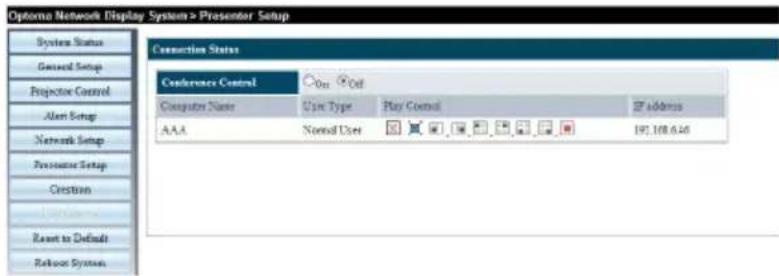
- Conference Control: Click "On" or "Off" to enable/disable conference control mode.
Click the following icons under "Play Control"
- Click to disconnect host PC.
- Click to switch session to background.
- Click to change display region.
Crestron RoomView
This is the control page of Flash UI.
Click "Power" to control power on/off of projector.
Click "Vol-, Mute, Vol+" to control volume.
In the SourceList, it includes all sources that the projector can process.
Click "Menu" to open menu; click "Source" to choose next source; click "Auto" to detect the source automatically; click "Blank" for AV mute function.
"Contrast, Brightness, Color, Sharpness, Zoom, Freeze" can be adjusted in the control panel below.
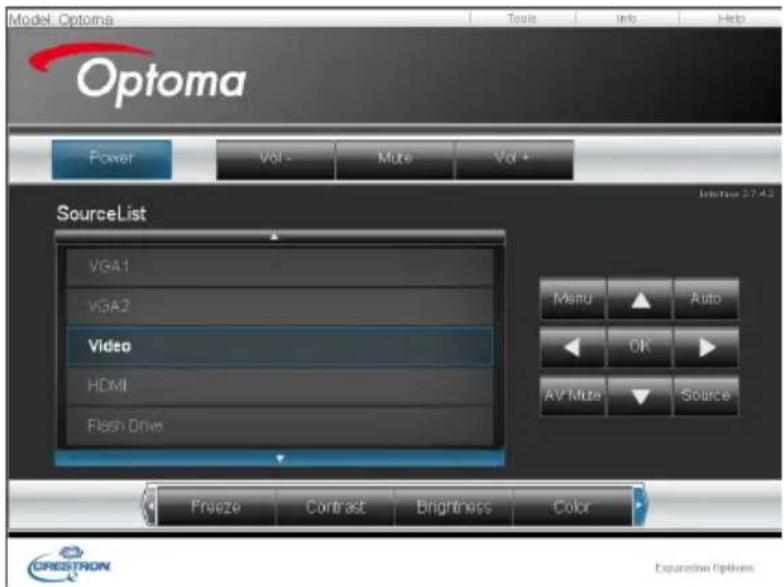
Click "Tools", the following items are included:
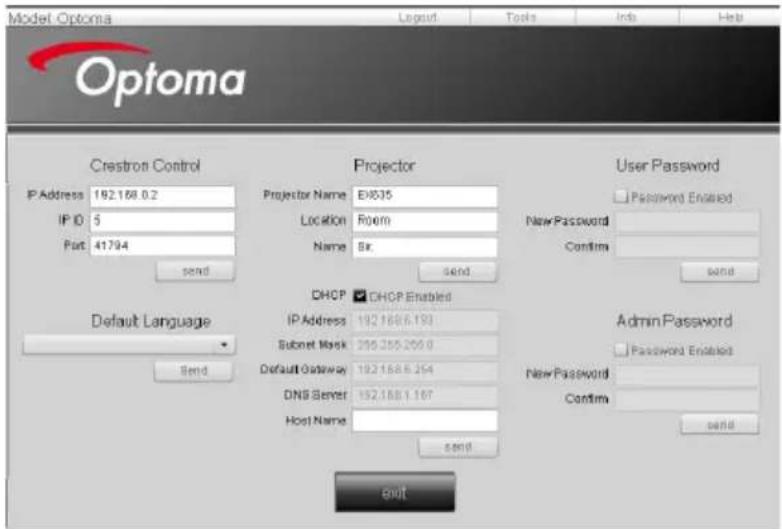
- Crestron Control: the basic network information of the control system device.
- Projector: the ID of each projector in a building for Administrator to control.
- User Password: change user's password.
- Default Language: set the default language.
- DHCP: enable/disable DHCP and the details of network card.
- Admin Password: change administrator's password.
After change each items, click "Send" button to make it effect.
Click "Info" to show information and status of this projector.
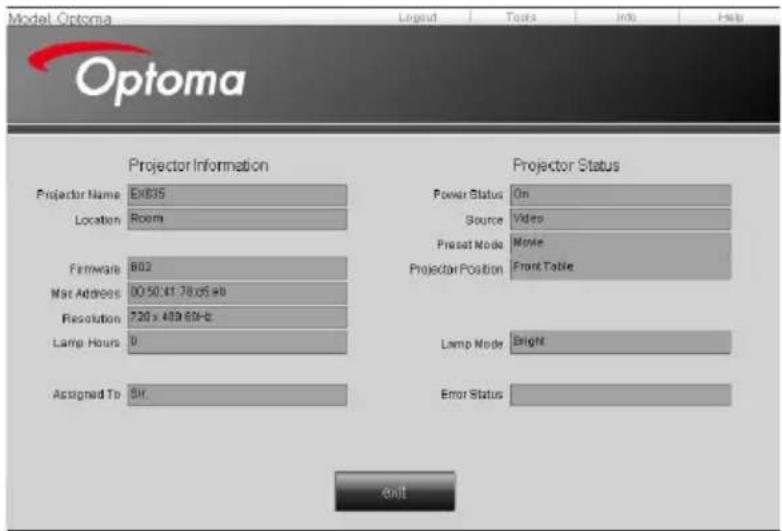
Click "Help" to inform administrator to do related protection or operation.
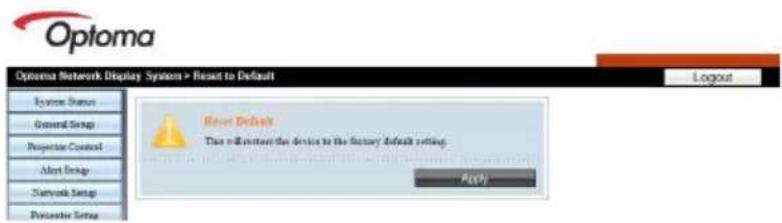
Reset to Default
Click "Apply" to reset system to the default settings.
Click "Flash Upgrade" to upgrade the Firmware from USB disk, which has been inserted in projector.
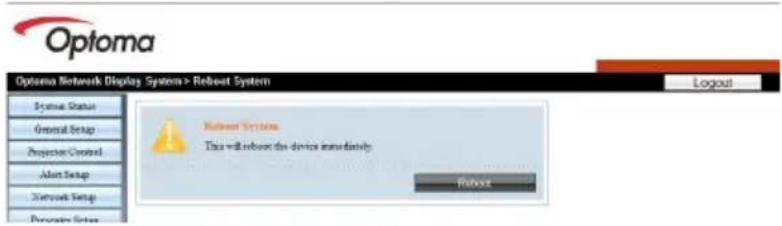
Reboot System
Click "Reboot" to reboot system.
How to use Multi-media Card Reader Application
The Card Reader application can display packaged images in a USB flash device.
- Plugging the USB device into USB port of projector, source of Flash Drive is detected, and then USB Flash Devices Detection Screen is displayed. It supports 3 USB devices at the same time.
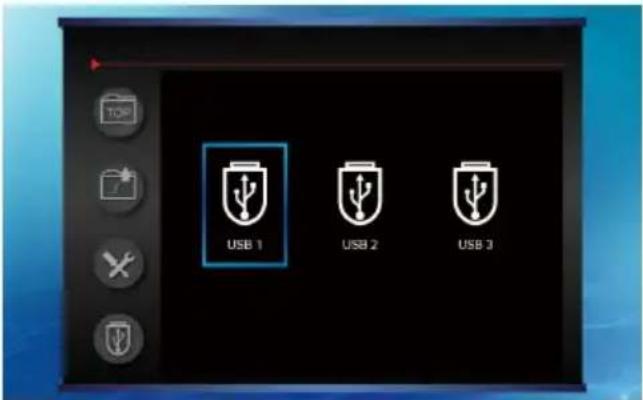
- Press "Enter" to enter Thumbnail mode, different photos in different folders can be chosen; If only one USB is plug-in, it will show thumbnail list directly. The following buttons are supported in the user interface:

If the file name is too long to show, it will show “...” on the last character beyond the limited length and cut out the spare string.
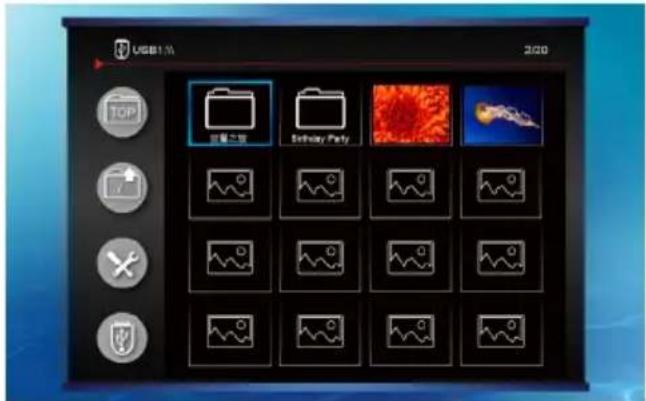
- Go to the top level of the selected USB.
- Go to previous level of folder.
- Setup function.
- Select another USB
User Controls
Press “Left” to back to the rightist at the same line; press “Right” to jump to next page; press “Up” to jump to previous page; press “Down” to jump to next page; press “Enter” into a picture, it will display picture auto fit to the screen by retaining original size ratio.
2-1. Setup Menu
When you highlight on and press "Enter" button, enter into Setup menu. The following buttons are supported in the user interface:
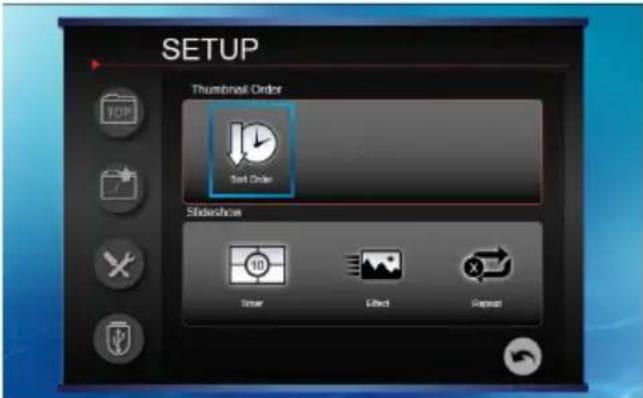
- Thumbnail Order: Enter the Thumbnail Display Mode.
- Slideshow: Enter the Slide Show Mode.
Timer: Use this function to set the slideshow interval.
Effect: Show the effect of Slideshow.
Repeat ON/OFF: Enable/Disable Slide Show Repeat Mode.
- Go back to thumbnail file browsing.
Press Up/Down/Left/Right key to choose different functions and press Enter key to make it effect.
2-2. Slideshow
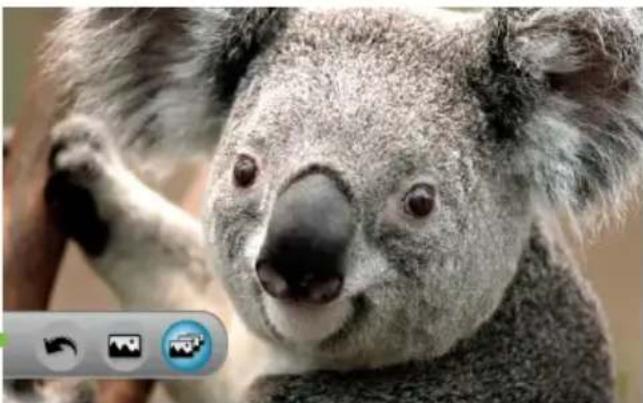
When you press "Enter" into a picture, it will display picture auto fit to the screen by retaining original size ratio. The following buttons are supported in the user interface:
natural_image
Close-up photo of a koala with visible eye and mouth, no text or symbols presentSlideshow Controls

When the image file is large, slide show time will be longer more than the general picture, such as BMP format. The max size of image file is as below:
- JPG:10000 x 10000;
- TIF, BMP, GIF and PNG: 1280 x 800
- Slideshow On.
Right /Left key: Show the next/previous photo and keep slideshow.
Enter key: Show the controls bar.
Menu key: Show the projector menu.
- Slideshow off.
Up /Down key: Rotate +90/-90 degree.
Right /Left key: Show the next/previous photo.
Enter key: Show the controls bar.
Menu key: Show the projector menu.
- Go back to thumbnail file browsing.
Press Left/Right key to choose different functions and press Enter key to make it effect.
2-3. PDF
When you press "Enter" into a PDF file, it will display PDF document as full mode. The following buttons are supported in the user interface:
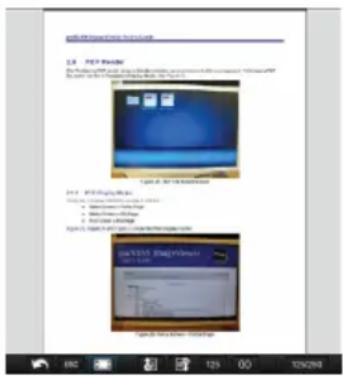
: Back to Thumbnail file browsing.
ESC Hidden setting bar.
Fit/Full switch.
▶ Set page to previous 5 pages.
▶ Set page to next 5 pages.
GO Directly jump to page that set in the previous column.
125/25C current/Total pages.
When the image cannot be displayed due to memory limitation or cannot support image format, the specific image is displayed on the center of the screen.
How to use the Optoma Presenter System
Optoma Presenter application allows a pc host to present from USB and via network connection (wired or wireless).

This projector is only compatible with Optoma's Mini WiFi USB Dongle. Please contact Optoma Service for details.
Mini WiFi USB dongle is optional accessory.
USB Display and Network Display support Window XP, Vista, Win7, Win7 (32/64bit), Mac OS 10.5, Mac OS 10.6.
Keyboard mouse function only supports Network Display source.
User must be administrator login.
Keyboard mouse function works at full screen or Left up screen or left screen.
Keyboard mouse function will not work when logged out or in lock, sleep, hibernate or standby modes.
1-1. Using Optoma Presenter via USB or Ethernet cable
Connect the usb cable to the projector. A USB device will be seen in "my computer".
- Select "Optoma Presenter", and then run "autorun.exe" to start USB display.
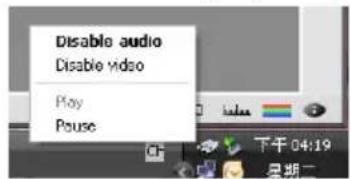
- Press the Autorun icon in the right-down region to pause or play the USB display.
1-2. Using Optoma Presenter via mini Wifi USB dongle
1-2-1. Insert mini Wifi USB dongle into projector's USB port.
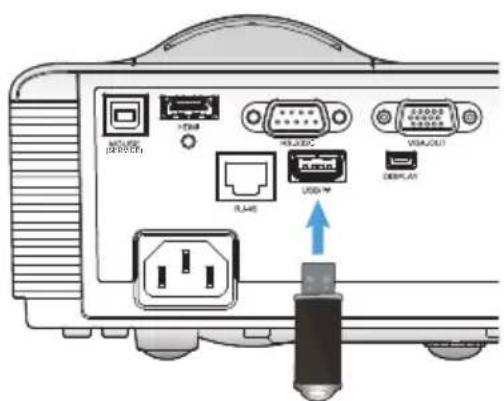
Mini WiFi USB Dongle (Optional Accessory)

Default SSID for wireless is Network Display.
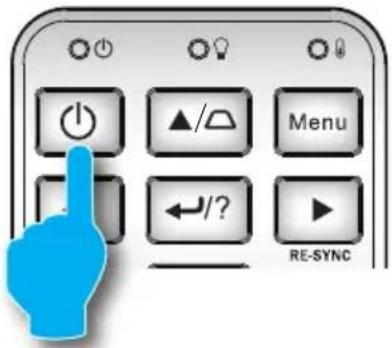
1-2-2. Power on projector.
1-2-3. Connect to Mini WiFi USB Dongle SSID "Network Display" from your PC device.
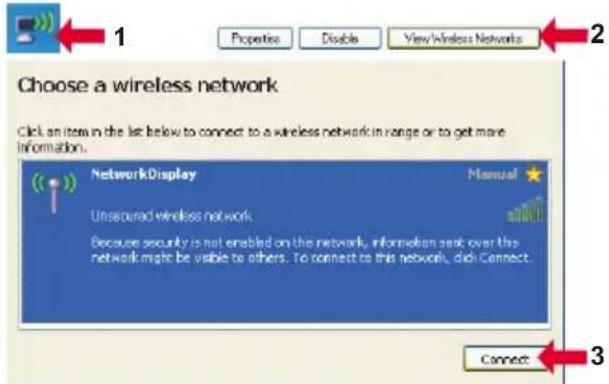
1-2-4. Download and Install Optoma Presenter Software.
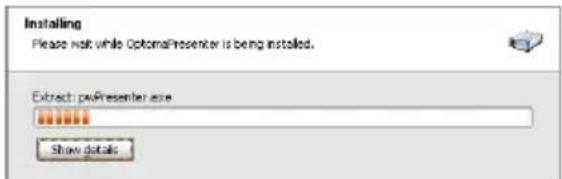
2. After installation in PC, double click the program of Optoma Presenter to enter main window.
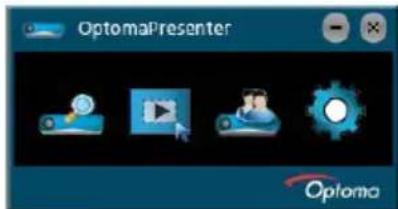
- Connect and search network display.
- Select display region.
- Manage all connected network displays.
- Configure Optoma Presenter.
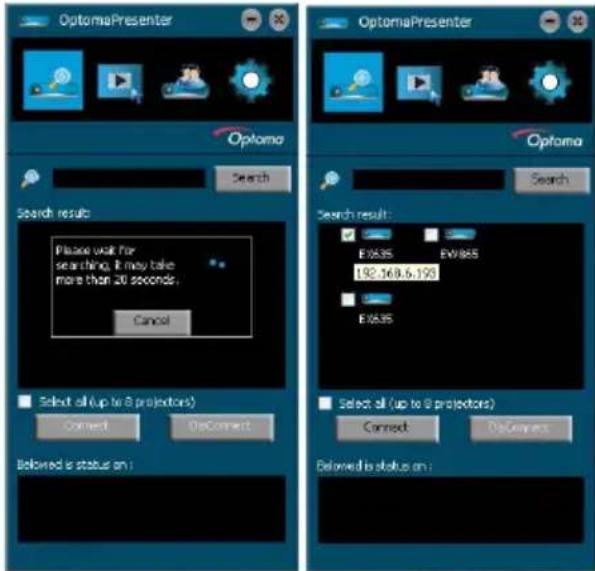
2-1. Click the button to enter Connect and Search Menu.
2-1-1. Enter IP address of projector, select the option "Directly", and then click "Connect" button to enter log-in interface; or Click "Search" button to search the projectors on network and select projectors to connect.
2-1-2. Input "User type" and "Password" in log-in interface.
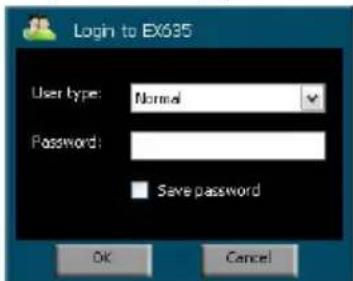
2-1-3. After log-in, Optoma Presenter will modify PC resolution to Network Application supported resolution.
2-2. Click the button to select the size of projection region, including Full screen and Alterable mode.
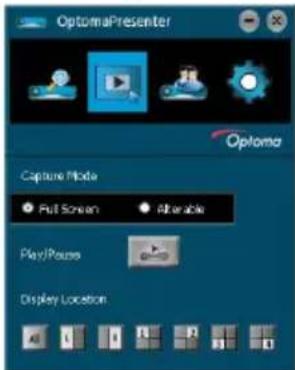
- Alterable size mode: The frame in ALTERABLE mode can be en-
User Controls
larged or downsized by dragging the eight small black squares scattered on eight edges of the frame.

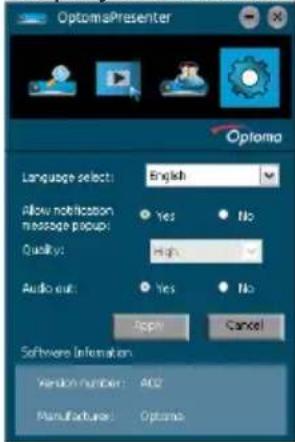
Audio transfer is supported in one on one connection between pc and computer. When audio out is enabled, video image quality setting will be greyed out.
To get the higher image quality, please set quality to high, and set audio out to "No".
2-3. Click the button to select the language, Audio out and display the software information.
2-4. Click the button to control all the users and all the projectors connected to the same projector.
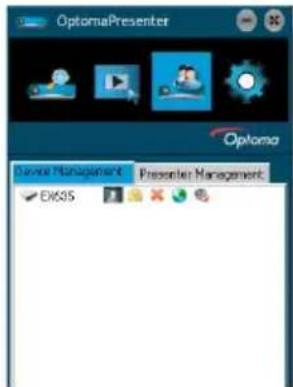
• Display range.
- Click to unlock and change the network display password. Only the Administrator has rights to make the changes.
- 📋: When normal user login, click this lock icon will result in no response.
• ✗ Disconnect with target network display.
- Connect the target network display via a webpage front end.
• :Turns on the audio.
• :Turns off the audio.
User of Admin type is able to view a menu page with a list of PCs connected to the target network display.

The quality of the image via network connection depends upon total bandwidth available in the network.
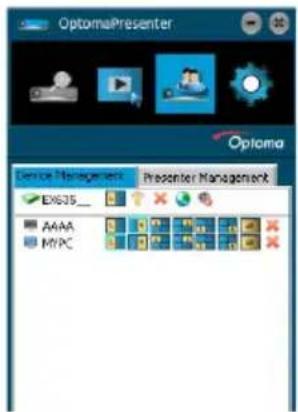
• For the other PCs.
- For the current PC.
• Options of display port in which
the highlight one is the current status, click on one of them to change the display port.
• ✗Disconnect the PC from a network display.
Troubleshooting
If you experience a problem with your projector, please refer to the following information. If a problem persists, please contact your local reseller or service center.
No image appears on-screen
▶ Ensure all the cables and power connections are correctly and securely connected as described in the “Installation” section.
▶ Ensure all the pins of connectors are not bent or broken.
▶ Check if the projection lamp has been securely installed. Please refer to the "Replacing the lamp" section.
Make sure you have removed the lens cap and the projector is switched on.
▶ Ensure that the "AV mute" feature is not turned on.
? Partial, scrolling or incorrectly displayed image
Press "Re-SYNC" on the remote.
If you are using a PC:
For Windows 95, 98, 2000, XP, Windows 7:
- Open the "My Computer" icon, the "Control Panel" folder, and then double click on the "Display" icon.
- Select the "Settings" tab.
- Verify that your display resolution setting is lower than or equal to UXGA (1600 × 1200).
- Click on the "Advanced Properties" button.
If the projector is still not projecting the whole image, you will also need to change the monitor display you are using. Refer to the following steps.
-
Verify the resolution setting is lower than or equal to UXGA (1600 × 1200).
-
Select the "Change" button under the "Monitor" tab.
-
Click on "Show all devices". Next, select "Standard monitor types" under the SP box; choose the resolution mode you need under the "Models" box.
- Verify that the resolution setting of the monitor display is lower than or equal to UXGA (1600 × 1200).
▶ If you are using a Notebook:
- First, follow the steps above to adjust resolution of the computer.
- Press the appropriate keys listed below for your notebook manufacturer to send signal out from notebook to projector. Example: [Fn]+[F4]
Acer [Fn]+[F5] IBM/Lenovo [Fn]+[F7] Asus [Fn]+[F8] HP/Compaq [Fn]+[F4] Dell [Fn]+[F8] NEC [Fn]+[F3] Gateway [Fn]+[F4] Toshiba [Fn]+[F5]
Mac Apple:
System Preference Display Arrangement Mirror display
If you experience difficulty changing resolutions or your monitor freezes, restart all equipment including the projector.
The screen of the Notebook or PowerBook computer is not displaying your presentation
If you are using a Notebook PC
Some Notebook PCs may deactivate their own screens when a second display device is in use. Each has a different way to be reactivated. Refer to your computer's manual for detailed information.
? Image is unstable or flickering
Use "Phase" to correct it. See page 37 for more information.
Change the monitor color setting on your computer.
? Image has vertical flickering bar
Use "Frequency" to make an adjustment. See page 37 for more information.
▶ Check and re-configure the display mode of your graphic card to make it compatible with the projector.
Appendices
? Image is out of focus
Make sure the lens cap is removed.
Adjust the Focus Ring on the projector lens.
Make sure the projection screen is between the required distance. See page 17.
The image is stretched when displaying 16:9 DVD title
When you play anamorphic DVD or 16:9 DVD, the projector will show the best image when the projector display mode is set to 16:9 in the OSD.
If you play 4:3 format DVD titles, please change the format to 4:3 in the projector OSD.
If the image is still stretched, you will also need to adjust the aspect ratio by referring to the following:
Please setup the display format as 16:9 (wide) aspect ratio type on your DVD player.
? Image is too small or too large
Move the projector closer to or further from the screen.
Press "Menu" button on the remote control or projector panel, go to "DISPLAY → Format" and try the different settings.
? Image has slanted sides
If possible, reposition the projector so that it is horizontally centered on the screen and below the bottom of the screen.
Press "Keystone +/-" button on the remote control or press "☐" on the projector panel, until the sides are vertical.
? Image is reversed
Select "SETUP → Projection" from the OSD and adjust the projection direction.
The projector stops responding to all controls
If possible, turn off the projector, then unplug the power cord and wait at least 60 seconds before reconnecting power.
Check that "Keypad Lock" is not activated by trying to control the projector with the remote control.
Lamp burns out or makes a popping sound
When the lamp reaches its end of life, it will burn out and may make a loud popping sound. If this happens, the projector will not turn on until the lamp module has been replaced. To replace the lamp, follow the procedures in the “Replacing the Lamp” section on pages 69-70.
? LED lighting message

Steady light
No light ○

| Message | POWER/STAND-BY LED | Temp-LED | Lamp-LED |
| (Green/Amber) (Red) (Red) | |||
| Standby State (Input power cord) | Amber | ○ | ○ |
| Power on (Warming) | Flashing Green | ○ | ○ |
| Lamp lighting Green | ○ | ○ | |
| Power off (Cooling) | Flashing Green | ○ | ○ |
| Quick Resume(100 secs) | Flashing Green | ○ | ○ |
| Error (Over Temp.) | Flashing Amber | ☀️ | ○ |
| Error (Fan fail) | Flashing Amber | Flashing | ○ |
| Error (Lamp fail) | Flashing Amber | ○ | ☀️ |
* POWER/STANDBY LED be ON when OSD appears, be OFF when OSD disappears.
On Screen Messages
Temperature warning:
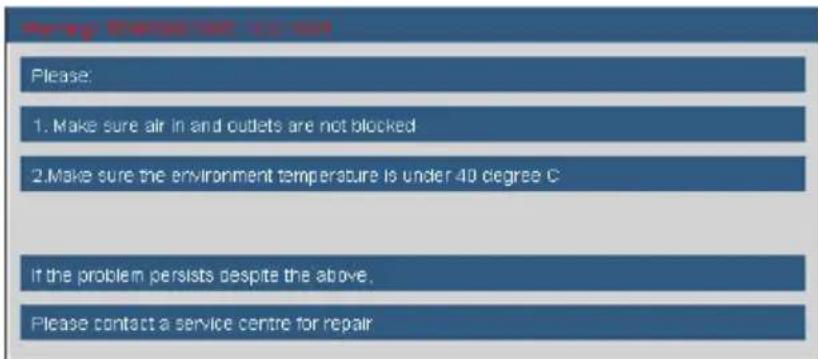
Fan failed:
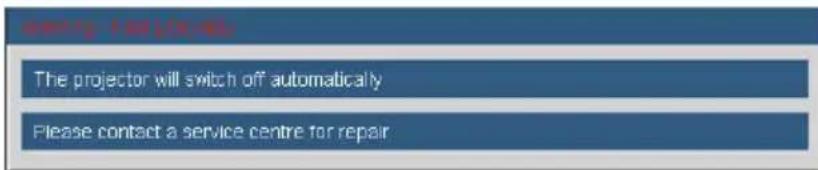
Lamp warning:

▶ Out of display range:
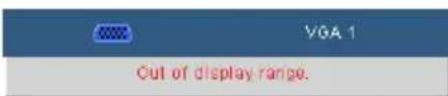
If the remote control does not work
▶ Check the operating angle of the remote control is within ±15^ both horizontally and vertically of one of the IR receivers on the projector.
Make sure there are not any obstructions between the remote control and the projector. Move to within 7 m ( ±0^ ) of the projector.
Make sure the batteries are inserted correctly.
Replace batteries if they are exhausted.
Replacing the lamp
The projector automatically detects the lamp life. When the lamp life is nearing the end of use, you will receive a warning message.

Lamp Warning
Lamp life exceeded.
When you see this message, please contact your local reseller or service center to change the lamp as soon as possible. Make sure the projector has been cooled down for at least 30 minutes before changing the lamp.


CAUTION!
HIGH PRESSURE LAMP MAY EXPLODE IF IMPROPERLY HANDED. REFER TO LAMP REPLACEMENT INSTRUCTIONS.
ATTENTION:
Warning: If ceiling mounted, please use caution when opening the lamp access panel. It is recommended to wear safety glasses if changing the bulb when ceiling mounted. "Caution must be used to prevent any loose parts from falling out of projector."
Warning: Lamp compartment may be hot! Allow it to cool down before changing the lamp!
Warning: To reduce the risk of personal injury, do not drop the lamp module or touch the lamp bulb. The bulb may shatter and cause injury if it is dropped.
Appendices

The screws on the lamp cover and the lamp cannot be removed.
The projector cannot be turned on if the lamp cover has not been placed back on the projector.
Do not touch the glass area of the lamp. Hand oil can cause the lamp to shatter. Use a dry cloth to clean the lamp module if it was accidentally touched.
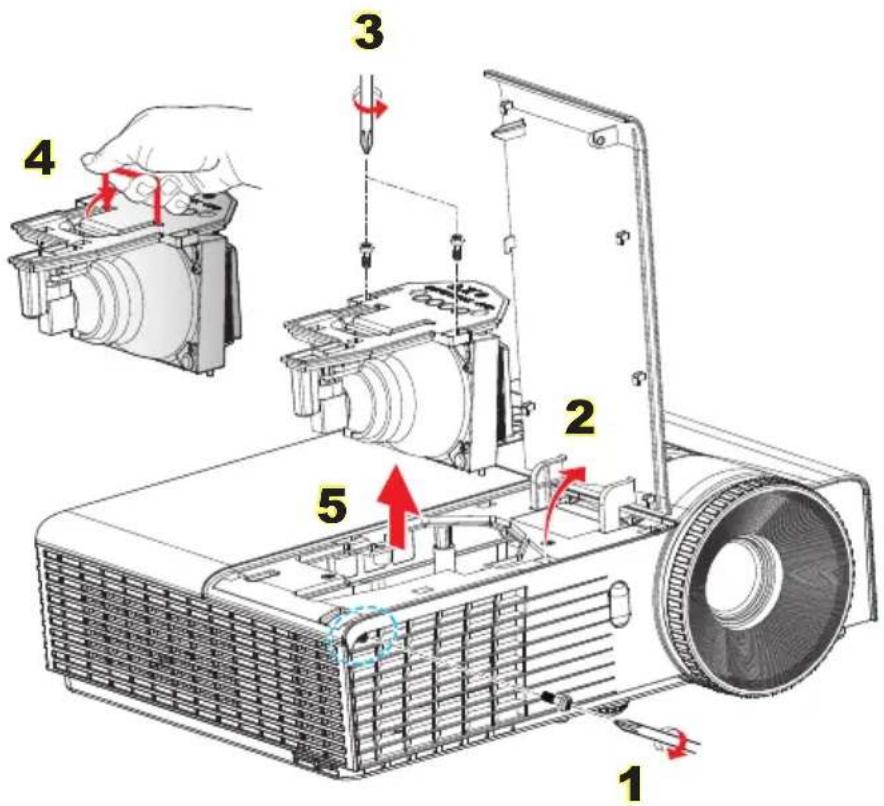
- Lamp Replacement Procedure:
- Switch off the power to the projector by pressing the ⬤ button.
- Allow the projector to cool down for at least 30 minutes.
- Disconnect the power cord.
- Unscrew the one screw on the cover. 1
- Lift up the cover. 2
- Unscrew the two screws on the lamp module. 3
- Lift up the lamp handle 4 and remove the lamp module slowly and carefully. 5
To replace the lamp module, reverse the previous steps. - Turn on the projector and use "Lamp Reset" after the lamp module is replaced.
Lamp Reset: (i) Press "Menu" → (ii) Select "OPTIONS" → (iii) Select "Lamp Settings" → (iv) Select "Lamp Reset" → (v) Select "Yes".
Compatibility Modes
Computer Compatibility

For widescreen resolution (WXGA), the compatibility support is dependent on Notebook/PC models.
120Hz input signals may be dependent on graphics cards support.
Please note that using resolutions other than native 800 x 1024 (SVGA), 1024 x 768 (XGA model), 1280 x 800 (WXGA model) may result in some loss of image clarity.
| Mode Resolution | Anglog/Digital | SVGA/XGA | WXGA | ||
| H-Sync (KHz) | V-Sync (Hz) | ||||
| VGA 640 × | 350 31.50 70 V | V | |||
| VGA 640 × | 350 37.90 85 V | V | |||
| VGA 720 × | 350 31.50 70 V | ||||
| VGA 640 × | 400 31.50 70 V | ||||
| VGA 640 × | 400 37.90 85 V | V | |||
| VGA 720 × | 400 31.50 70 V | V | |||
| VGA 720 × | 400 37.90 85 V | V | |||
| 720 × 576 - 50 V | |||||
| 720 × 576 - 60 V | |||||
| VGA 640 × | 480 31.50 60 V | V | |||
| VGA 640 × | 480 - 67 V V | ||||
| VGA 640 × | 480 37.90 72 V | V | |||
| VGA 640 × | 480 37.50 75 V | V | |||
| VGA 640 × | 480 43.30 85 V | ||||
| SVGA 800 × | 600 35.20 56 V | V | |||
| SVGA 800 × | 600 37.90 60 V | V | |||
| SVGA 800 × | 600 46.90 75 V | V | |||
| SVGA 800 × | 600 48.10 72 V | V | |||
| SVGA 800 × | 600 - 80 V | ||||
| SVGA 800 × | 600 53.70 85 V | ||||
| SVGA 800 × | 600 - 120 V | ||||
| 832 × 624 - 72 V | |||||
| 832 × 624 - 75 V V | |||||
| XGA 1024 × | 576 - 50 V | ||||
| XGA 1024 × | 576 - 60 V | ||||
| XGA 1024 × | 768 48.40 60 V V | ||||
| XGA 1024 × | 768 56.50 70 V V | ||||
| XGA 1024 × | 768 57.70 72 V | ||||
Appendices
| Mode Resolution | Anglog/Digital | SVGA/XGA | WXGA | ||
| H-Sync (KHz) | V-Sync (Hz) | ||||
| XGA 1024 | ×768 60.00 75 V | ||||
| XGA 1024 | ×768 68.70 85 V | ||||
| XGA 1024 | ×768 - 120 V | ||||
| 1152 × 864 - 60 V | |||||
| 1152 × 864 - 70 V | |||||
| 1152 × 864 - 75 V | |||||
| 1152 × 864 - 85 V | |||||
| 1152 × 870 - 75 V V | |||||
| HD720 1280 | ×720 - 50 V | ||||
| HD720 1280 | ×720 - 60 V | ||||
| HD720 1280 | ×720 - 75 V | ||||
| HD720 1280 | ×720 - 85 V | ||||
| HD720 1280 | ×720 - 120 V | ||||
| WXGA 1280 | ×768 47.40 60 V | ||||
| WXGA 1280 | ×768 - 70 V | ||||
| WXGA 1280 | ×768 - 75 V | ||||
| WXGA 1280 | ×768 - 85 V | ||||
| WXGA-800 | 1280 × 800 - 60 V | ||||
| SXGA | 1280 × 1024 | 64.00 60 V | |||
| SXGA | 1280 × 1024 | 80.00 75 V | |||
| SXGA | 1280 × 1024 | 91.10 85 V | |||
| 1366 × 768 | 60 - | V | |||
| 1400 × 900 | 60 | 55.935 | V | ||
| SXGA+ | 1400 × 1050 | - 60 V V | |||
| 1680 × 1050 | 60 - | V | |||
| UXGA | 1600 × 1200 | 75.00 60 V | |||
| HDTV 1920 | ×1080 | 33.80 30 V V | |||
| HDTV | 1920 × 1080 | 28.10 25 V | |||
| HDTV | 1920 × 1080i | - | 50/60 | V | V |
| HDTV | 1920 × 1080p | - | 24/25/30/50/60 | V | V |
| HDTV | 1280 × 720 45 | .00 60 V V | |||
| HDTV | 1280 × 720p | - | 50/60 | V | V |
| Mode | Resolution | Anglog/Digital | SVGA/XGA | WXGA | |
| H-Sync (KHz) | V-Sync (Hz) | ||||
| SDTV | 720 × 576 | 31.30 | 50 | V | |
| SDTV | 720 × 576i | - | 50 | V | V |
| SDTV | 720 × 576p - | 50 | VV | ||
| SDTV | 720 × 480 | 31.50 | 60 | V | |
| SDTV | 720 × 480i | - | 60 | V | V |
| SDTV | 720 × 480p - | 60 | VV | ||
Computer Compatibility
| Mode Resolution V-Sync (Hz) H-Sync (KHz) | |||
| MAC LC 13" 640 × 480 66.66 34.98 | |||
| MAC II 13" 640 × 480 66.68 35.00 | |||
| MAC 16" 832 × 624 74.55 49.73 | |||
| MAC 19" 1024 × 768 75 60.24 | |||
| MAC 1152 × 870 75.06 68.68 | |||
| MAC G4 640 × 480 60 31.35 | |||
| i MAC DV 1024 × 768 75 60.00 | |||
| i MAC DV 1152 × 870 75 68.49 | |||
Video Compatibility
| NTSC M/J, 3.58MHz, 4.43 MHz | |
| PAL | B, D, G, H, I, M, N (4.43 MHz) |
| SECAM | B, D, G, K, K1, L (4.25/4.4 MHz) |
| SDTV | 480i/p, 576i/p, |
| HDTV 720p@50Hz/60Hz, 1080i@50Hz/60Hz, 1080p@50Hz/60Hz | |
RS232 Commands and Protocol Function List
RS232 Pin Assignments

RS232 shell is grounded.
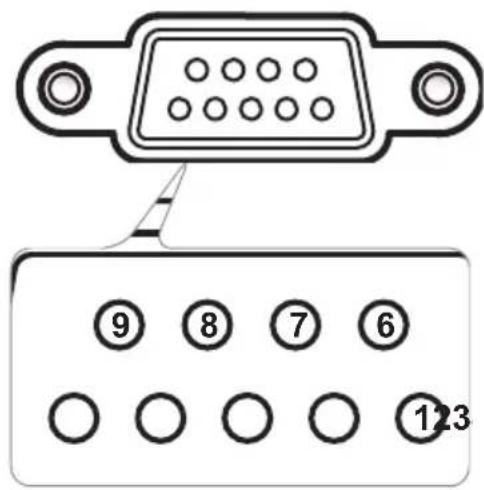
| Pin no. | Spec.(from projector side) |
| 1 N/A | |
| 2 RXD | |
| 3 TXD | |
| 4 N/A | |
| 5 GND | |
| 6 N/A | |
| 7 N/A | |
| 8 N/A | |
| 9 N/A |
RS232 Protocol Function List

- There is a
after all ASCII commands. - 0D is the HEX code for
in ASCII code.
Baud Rate : 9600
Data Bits: 8
Parity: None
Stop Bits: 1
Flow Control : None
UART16550 FIFO: Disable
Projector Return (Pass): P
Projector Return (Fail): F
XX=00-99, projector's ID,
XX=00 is for all projectors
Note: the \~XX must be set as \~00 when use on telnet command no matter what ID projector has.
eg: telnet with \~0004 1 can execute Freeze function but \~3804 1 can't.
SEND to projector (telnet supported)
| 232 ASCII Code | HEX Code | Function | Description |
| ~XX00 1 7E 30 30 30 30 20 31 0D Power ON | |||
| ~XX00 0 7E 30 30 30 30 20 30 0D Power OFF | (0/2 for backward compatible) | ||
| ~XX00 1 ~nnnn | 7E 30 30 30 30 20 31 20 a 0D | Power ON with Password | ~nnnn = ~0000 (a=7E 30 30 30 30)~9999 (a=7E 39 39 39 39) |
| ~XX01 1 7E 30 30 30 31 20 31 0D Resync | |||
| ~XX02 1 | 7E 30 30 30 32 20 31 0D | AV Mute | On |
| ~XX02 0 | 7E 30 30 30 32 20 30 0D | Off (0/2 for backward compatible) | |
| ~XX03 1 7E 30 30 30 33 20 31 0D Mute | On | ||
| ~XX03 0 7E 30 30 30 33 20 30 0D | Off (0/2 for backward compatible) | ||
| ~XX04 1 7E 30 30 30 34 20 31 0D Freeze | |||
| ~XX04 0 7E 30 30 30 34 20 30 0D Unfreeze | (0/2 for backward compatible) | ||
| ~XX05 1 7E 30 30 30 35 20 31 0D Zoom Plus | |||
| ~XX06 1 7E 30 30 30 36 20 31 0D Zoom Minus | |||
| ~XX12 1 7E 30 30 31 32 20 31 0D Direct Source Commands HDMI (for EW635) | |||
| ~XX12 5 7E 30 30 31 32 20 35 0D | VGA1 | ||
| ~XX12 6 | 7E 30 30 31 32 20 36 0D | VGA 2 | |
| ~XX12 8 7E 30 30 31 32 20 38 0D | VGA1 Component | ||
| ~XX12 10 7E 30 30 31 32 20 31 30 0D | Video | ||
| ~XX12 13 7E 30 30 31 32 20 31 33 0D | VGA 2 Component | ||
| ~XX12 17 7E 30 30 31 32 20 31 37 0D | Flash drive | ||
| ~XX12 18 7E 30 30 31 32 20 31 38 0D | Network Display | ||
| ~XX12 19 7E 30 30 31 32 20 31 39 0D | USB display | ||
| ~XX20 1 7E 30 30 32 30 20 31 0D Display Mode | Presentation | ||
| ~XX20 2 7E 30 30 32 30 20 32 0D | Bright | ||
| ~XX20 3 7E 30 30 32 30 20 33 0D | Movie | ||
| ~XX20 4 7E 30 30 32 30 20 34 0D | sRGB | ||
| ~XX20 5 7E 30 30 32 30 20 35 0D | User | ||
| ~XX20 7 7E 30 30 32 30 20 37 0D | Blackboard | ||
| ~XX20 8 7E 30 30 32 30 20 38 0D | Classroom | ||
| ~XX20 9 7E 30 30 32 30 20 39 0D | 3D | ||
| ~XX21 n | 7E 30 30 32 31 20 a 0D | Brightness | n = -50 (a=2D 35 30) ~ 50 (a=35 30) |
| ~XX22 n | 7E 30 30 32 32 20 a 0D | Contrast | n = -50 (a=2D 35 30) ~ 50 (a=35 30) |
| ~XX23 n | 7E 30 30 32 33 20 a 0D | Sharpness | n = 1 (a=31) ~ 15 (a=31 35) |
| ~XX24 n | 7E 30 30 32 34 20 a 0D | Color Settings | Red Gain |
| ~XX25 n | 7E 30 30 32 35 20 a 0D | Green Gain | |
| ~XX26 n | 7E 30 30 32 36 20 a 0D | Blue Gain | |
| ~XX27 n | 7E 30 30 32 37 20 a 0D | Red Bias | |
| ~XX28 n | 7E 30 30 32 38 20 a 0D | Green Bias | |
| ~XX29 n | 7E 30 30 32 39 20 a 0D | Blue Bias | |
| ~XX30 n | 7E 30 30 33 30 20 a 0D | Cyan | |
| ~XX31 n | 7E 30 30 33 31 20 a 0D | Yellow | |
| ~XX32 n | 7E 30 30 33 32 20 a 0D | Magcnta | |
| ~XX33 1 | 7E 30 30 33 33 20 31 0D | Reset | |
| ~XX34 n 7E 30 30 33 34 20 a 0D | BrilliantColor | TM | n = 0 (a=30) ~ 10 (a=31 30) |
| ~XX35 1 7E 30 30 33 35 20 31 0D Degamma | Film | ||
| ~XX35 2 7E 30 30 33 35 20 32 0D | Video | ||
| ~XX35 3 7E 30 30 33 35 20 33 0D | Graphics | ||
| ~XX35 4 7E 30 30 33 35 20 34 0D | Standard | ||
| ~XX36 1 7E 30 30 33 36 20 31 0D Color Temp. | Warm | ||
| ~XX36 2 7E 30 30 33 36 20 32 0D | Medium | ||
| ~XX36 3 7E 30 30 33 36 20 33 0D | Cold | ||
| ~XX37 1 7E 30 30 33 37 20 31 0D Color Space | Auto | ||
| ~XX37 2 7E 30 30 33 37 20 32 0D | RGB\ RGB(0-255) | ||
| ~XX37 3 7E 30 30 33 37 20 33 0D | YUV | ||
| ~XX37 4 7E 30 30 33 37 20 34 0D | RGB(16 - 235) | ||
Appendices
-XX45 n 7E 30 30 34 34 20 a 0D Color (Saturation) n = -50 (a=2D 35 30) \~ 50 (a=35 30) -XX44 n 7E 30 30 34 35 20 a 0D Tint n = -50 (a=2D 35 30) \~ 50 (a=35 30)
\~XX60 1 7E 30 30 36 30 20 31 0D Format 4:3 \~XX60 2 7E 30 30 36 30 20 32 0D 16:9-1 \~XX60 3 7E 30 30 36 30 20 33 0D 16:9-1/16:10(EW635) \~XX60 5 7E 30 30 36 30 20 35 0D LBX \~XX60 6 7E 30 30 36 30 20 36 0D Native \~XX60 7 7E 30 30 36 30 20 37 0D Auto
\~XX61 n 7E 30 30 36 31 20 a 0D Edge mask n = 0 (a=30) \~ 10 (a=31 30) \~XX62 n 7E 30 30 36 32 20 a 0D Zoom n = -5 (a=2D 35) \~ 25 (a=32 35) \~XX63 n 7E 30 30 36 33 20 a 0D H Image Shift n = -50 (a=2D 35 30) \~ 50 (a=35 30) \~XX64 n 7E 30 30 36 34 20 a 0D V Image Shift n = -50 (a=2D 35 30) \~ 50 (a=35 30) \~XX66 n 7E 30 30 36 36 20 a 0D V Keystone n = -40 (a=2D 34 30) \~ 40 (a=34 30) \~XX69 17E 30 30 36 39 20 31 0D Auto Keystone On \~XX69 07E 30 30 36 39 20 30 0D Auto Keystone Off \~XX230 3 7E 30 30 32 33 30 20 31 0D 3D Mode IR \~XX230 1 7E 30 30 32 33 30 20 31 0D 3D Mode DLP-Link \~XX230 0 7E 30 30 32 33 30 20 30 0D 3D Mode Off(0/2 for backward compatible) \~XX231 1 7E 30 30 32 33 31 20 31 0D 3D Sync Invert On \~XX231 0 7E 30 30 32 33 31 20 30 0D 3D Sync Invert Off(0/2 for backward compatible)
\~XX70 1 7E 30 30 37 30 20 31 0D Language English \~XX70 2 7E 30 30 37 30 20 32 0D German \~XX70 3 7E 30 30 37 30 20 33 0D French \~XX70 4 7E 30 30 37 30 20 34 0D Italian \~XX70 5 7E 30 30 37 30 20 35 0D Spanish \~XX70 6 7E 30 30 37 30 20 36 0D Portuguese \~XX70 7 7E 30 30 37 30 20 37 0D Polish \~XX70 8 7E 30 30 37 30 20 38 0D Dutch \~XX70 9 7E 30 30 37 30 20 39 0D Swedish \~XX70 10 7E 30 30 37 30 20 31 30 0D Norwegian/Danish \~XX70 11 7E 30 30 37 30 20 31 31 0D Finnish \~XX70 12 7E 30 30 37 30 20 31 32 0D Greek \~XX70 13 7E 30 30 37 30 20 31 33 0D Traditional Chinese \~XX70 14 7E 30 30 37 30 20 31 34 0D Simplified Chinese \~XX70 15 7E 30 30 37 30 20 31 35 0D Japanese \~XX70 16 7E 30 30 37 30 20 31 36 0D Korcan \~XX70 17 7E 30 30 37 30 20 31 37 0D Russian \~XX70 18 7E 30 30 37 30 20 31 38 0D Hungarian \~XX70 19 7E 30 30 37 30 20 31 39 0D Czechoslovak \~XX70 20 7E 30 30 37 30 20 32 30 D Arabic \~XX70 21 7E 30.30.37.30.20.32.31.0D Thai \~XX70.22 7E.30.30.37.30.20.32.32.0D Turkish \~XX70.23 7E.30.30.37.30.20.32.32.0D Farsi \~XX70.25 7E.30.30.37.30.20.32.35.0D Vietnamese \~XX70.26 7E.30.30.37.30.20.32.36.0D Indonesia \~XX70.27 7E.30.30.37.30.20.32.37.0D Romanian
\~XX71 1 7E 30 30 37 31 20 31 0D Projection Front-Desktop \~XX71 2 7E 30 30 37 31 20 32 0D Rear-Desktop \~XX71 3 7E 30 30 37 31 20 33 0D Front-Ceiling \~XX71 4 7E 30 30 37 31 20 34 0D Rear-Ceiling \~XX72 1 7E 30 30 37 32 20 31 0D Menu Location Top Left \~XX72 2 7E 30 30 37 32 20 32 0D Top Right \~XX72 3 7E 30 30 37 32 20 33 0D Centre \~XX72 4 7E 30 30 37 32 20 34 0D Bottom Left \~XX72 5 7E 30 30 37 32 20 35 0D Bottom Right
(EW635 only) \~XX90 1 7E 30 30 39 31 20 31 0D Screen Type 16:10 \~XX90 0 7E 30 30 39 31 20 30 0D 16:9 \~XX73 n 7E 30 30 37 33 20 a 0D Signal Frequency n = -5 (a=2D 35) \~ 5 (a=35) By signal \~XX91 n 7E 30 30 39 31 20 a 0D Automatic n = 0 disable; n = 1 enable \~XX74 n 7E 30 30 37 34 20 a 0D Phase n = 0 (a-30) \~ 31 (a=33 31) By signal \~XX75 n 7E 30 30 37 35 20 a 0D H. Position n = -5 (a=2D 35) \~ 5 (a=35) By timing \~XX76 n 7E 30 30 37 36 20 a 0D V. Position n = -5 (a=2D 35) \~ 5 (a=35) By timing \~XX77 n 7E 30 30 37 37 20 aabbcc 0D Security Security Timer Month/Day/Hour n = mm/dd/hh mm=00 (aa=30 30) \~ 12 (aa=31 32) dd=00 (bb=30 30) \~ 30 (bb=33 30) hh=00 (cc=30 30) \~ 24 (cc=32 34) \~XX78 1 7E 30 30 37 38 20 31 0D Security Settings Enable \~XX78 0 \~nnnn 7E 30 30 37 38 20 32 20 a 0D Disable (0/2 for backward compatible) \~nnnn = \~0000 (a=7E 30 30 30 30) \~9999 (a=7E 39 39 39
\~XX79 n 7E 30 30 37 39 20 a 0D Projector ID n = 00 (a = 30 30) \~ 99 (a = 39 39)
| ~XX80 1 7E 30 30 38 30 20 31 0D Mute On | ||
| ~XX80 0 7E 30 30 38 30 20 30 0D Off (0/2 for backward compatible) | ||
| ~XX81 n 7E 30 30 38 31 20 a 0D Volume (Audio) n = 0 (a=30) ~ 10 (a=31 30) | ||
| ~XX93 n 7E 30 30 39 33 20 a 0D Volume (Mic) n = 0 (a=30) ~ 10 (a=31 30) | ||
| ~XX89 0 7E 30 30 38 39 20 30 0D Audio Input Default | ||
| ~XX89 1 7E 30 30 38 39 20 31 0D Audio1 | ||
| ~XX89 3 7E 30 30 38 39 20 33 0D Audio2 | ||
| ~XX82 1 7E 30 30 38 32 20 31 0D Logo Default | ||
| ~XX82 2 7E 30 30 38 32 20 32 0D Uscr | ||
| ~XX82 3 7E 30 30 38 32 20 33 0D Neutral | ||
| ~XX83 1 7E 30 30 38 33 20 31 0D Logo Capture | ||
| ~XX88 0 7E 30 30 38 38 20 30 0D Closed Captioning Off | ||
| ~XX88 1 7E 30 30 38 38 20 31 0D cc1 | ||
| ~XX88 2 7E 30 30 38 38 20 32 0D cc2 |
| ~XX100 1 7E 30 30 31 30 30 20 31 0D Source Lock On | |
| ~XX100 0 7E 30 30 31 30 30 20 30 0D Off (0/2 for backward compatible) | |
| ~XX100 3 7E 30 30 31 30 30 20 33 0D Next Source | |
| ~XX101 1 7E 30 30 31 30 31 20 31 0D High Altitude | On |
| ~XX101 0 7E 30 30 31 30 31 20 30 0D Off (0/2 for backward compatible) | |
| ~XX102 1 7E 30 30 31 30 32 20 31 0D Information Hide | On |
| ~XX102 0 7E 30 30 31 30 32 20 30 0D Off (0/2 for backward compatible) | |
| ~XX103 1 7E 30 30 31 30 33 20 31 0D Keypad Lock | On |
| ~XX103 0 7E 30 30 31 30 33 20 30 0D Off (0/2 for backward compatible) | |
| ~XX195 0 7E 30 30 31 39 35 20 30 0D Test Pattern None | |
| ~XX195 1 7E 30 30 31 39 35 20 31 0D Grid | |
| ~XX195 2 7E 30 30 31 39 35 20 32 0D White Pattern | |
| ~XX104 1 | 7E 30 30 31 30 34 20 31 0D | Background Color | Blue |
| ~XX104 2 7E 30 30 31 30 34 20 32 0D | Black | ||
| ~XX104 3 7E 30 30 31 30 34 20 33 0D | Red | ||
| ~XX104 4 7E 30 30 31 30 34 20 34 0D | Green | ||
| ~XX104 5 7E 30 30 31 30 34 20 35 0D | White |
| ~XX105 1 | 7E 30 30 31 30 35 20 31 0D | Advanced | Direct Power On | On |
| ~XX105 0 7E 30 30 31 30 35 20 30 0D | Off (0/2 for backward compatible) | |||
| ~XX106 n | 7E 30 30 31 30 36 20 a 0D | Auto Power Off (min) | n = 0 (a=30) ~ 180 (a=31 38 30) | |
| ~XX107 n | 7E 30 30 31 30 37 20 a 0D | Sleep Timer (min) | n = 0 (a=30) ~ 995 (a=39 39 39) | |
| ~XX115 1 7E 30 30 31 31 35 20 31 0D Quick Resumc | On | |||
| ~XX115 0 | 7E 30 30 31 31 35 20 30 0D | Off (0/2 for backward compatible) | ||
| ~XX114 1 7E 30 30 31 31 34 20 31 0D Power Mode(Standby) | Eco.(<=0.5W) | |||
| ~XX114 0 7E 30 30 31 31 34 20 30 0D | Active (0/2 for backward compatible) | |||
| ~XX109 1 7E 30 30 31 30 39 20 31 0D Lamp Reminder On | ||
| ~XX109 0 7E 30 30 31 30 39 20 30 0D | Off (0/2 for backward compatible) | |
| ~XX110 1 7E 30 30 31 31 30 20 31 0D Brightness Mode | Bright | |
| ~XX110 2 7E 30 30 31 31 30 20 32 0D | Eco | |
| ~XX110 3 7E 30 30 31 31 30 20 33 0D | Eco+ | |
| ~XX111 1 7E 30 30 31 31 31 20 31 0D Lamp Reset | Yes | |
| ~XX111 0 7E 30 30 31 31 31 20 30 0D | No (0/2 for backward compatible) | |
| ~XX112 1 7E 30 30 31 31 32 20 31 0D Reset | Yes | ||
| ~XX99 1 7E 30 30 39 39 20 31 0D RS232 Alert Reset Reset System Alert | |||
| ~XX210 n | 7E 30 30 32 30 30 20 n 0D | Display message on the OSD | |
SEND to emulate Remote
| ~XX140 10 | 7E 30 30 31 34 30 20 31 30 0D | Up |
| ~XX140 11 | 7E 30 30 31 34 30 20 31 31 0D | Left |
| ~XX140 12 | 7E 30 30 31 34 30 20 31 32 0D | Enter (for projection MENU) |
| ~XX140 13 | 7E 30 30 31 34 30 20 31 33 0D | Right |
| ~XX140 14 | 7E 30 30 31 34 30 20 31 34 0D | Down |
| ~XX140 15 | 7E 30 30 31 34 30 20 31 35 0D | Keystone + |
| ~XX140 16 | 7E 30 30 31 34 30 20 31 36 0D | Keystone - |
| ~XX140 17 | 7E 30 30 31 34 30 20 31 37 0D | Volume - |
| ~XX140 18 | 7E 30 30 31 34 30 20 31 38 0D | Volume + |
| ~XX140 19 | 7E 30 30 31 34 30 20 31 39 0D | Brightness |
| ~XX140 20 | 7E 30 30 31 34 30 20 32 30 0D | Menu |
| ~XX140 21 | 7E 30 30 31 34 30 20 32 31 0D | Zoom |
SEND from projector automatically
232 ASCII Code IEX Code Function Projector Return Description
System status INFOOn n : 0/1/2/3/4/6/7/8 = Standby/Warming/Cooling/Out of Range/
Lamp fail/Fan Lock/Over Temperature/Lamp Hours Running Out/Cover Open
READ from projector (telnet supported)
232 ASCII Code HEX Code Function Projector Return Description
| ~XX121 1 7E 30 30 31 32 31 20 31 0D Input Source OKn n : 0/1/2/3/4/5/6/7 = None/VGA1/VGA2/Vidco/HDMI/ | |||||
| ~XX122 1 7E 30 30 31 32 32 20 31 0D Software Version OKdddd dddd: FW version | Flash drive/Network display/USB display | ||||
| ~XX123 1 7E 30 30 31 32 33 20 31 0D Display Modc OKn n : 0/1/2/3/4/5/7/8/9 = None/Presentation/Bright/Movic/sRGB/User/ | |||||
| ~XX124 1 7E 30 30 31 32 34 20 31 0D Power State | OKn n : 0/1 = Off/On | Blackboard/Classroom/3D | |||
| ~XX125 1 7E 30 30 31 32 35 20 31 0D Brightness | OKn | ||||
| ~XX126 1 7E 30 30 31 32 36 20 31 0D Contrast | OKn | ||||
| ~XX127 1 | 7E 30 30 31 32 37 20 31 0D | Aspect Ratio | OKn | (EW635) n: 0/1/2/3/4 = 4:3/16:9 or 16:10 */LBX/Native/AUTO (EX635) n: 0/1/2/3/4 = 4:3/16:9-1/16:9-II/ Native/AUTO * 16:9 or 16:10 depend on Screen Type setting | |
| ~XX128 1 7E 30 30 31 32 38 20 31 0D Color Temperature | OKn n : 0/1/2 = Warm/Medium/Cold | ||||
| ~XX129 1 | 7E 30 30 31 32 39 20 31 0D | Projection Mode | OKn | n : 0/1/2/3 = Front-Desktop/Rear-Desktop/Front-Ceiling/ Rear-Ceiling | |
| ~XX150 1 7E 30 30 31 35 30 20 31 0D Information | OKabbbbccdddde | ||||
| a : 0/1 = Off/On | |||||
| bbbb: LampHour | |||||
| cc: source 00/01/02/03/04/05/06/07 = None/VGA1/VGA2/Vidco/ HDMI/Flash Drive/Network display/USB display | |||||
| dddd: FW version | |||||
| c : Display mode 0/1/2/3/4/5/7/8/9 | |||||
| None/Presentation/Bright/Movie/sRGB/User/ Blackboard/Classroom/3D | |||||
| ~XX151 1 7E 30 30 31 35 31 20 31 0D Model name OKn n:1/2=EX635/EW635 | |||||
| ~XX108 1 7E 30 30 31 30 38 20 31 0D Lamp Hours OKbbb bbbb: LampHour | |||||
| ~XX108 2 | 7E 30 30 31 30 38 20 31 0D | Cumulative Lamp Hours | OKbbbb | bbbb: (5 digits) Total Lamp Hours | |
Wall Mount Installation
-
To prevent damage to your projector, please use the Optoma ceiling mount.
-
If you wish to use a third party ceiling mount kit, please ensure the screws used to attach a mount to the projector meet the following specifications:

Please note that damage resulting from incorrect installation will void the warranty.

Warning:
-
If you buy a ceiling mount from another company, please be sure to use the correct screw size. Screw size will vary depending on the thickness of the mounting plate.
-
Be sure to keep at least 10 cm gap between the ceiling and the bottom of the projector.
-
Avoid installing the projector near a heat source.
Screw type: M4*3
▶ Maximum screw length: 11mm
▶ Minimum screw length: 8mm
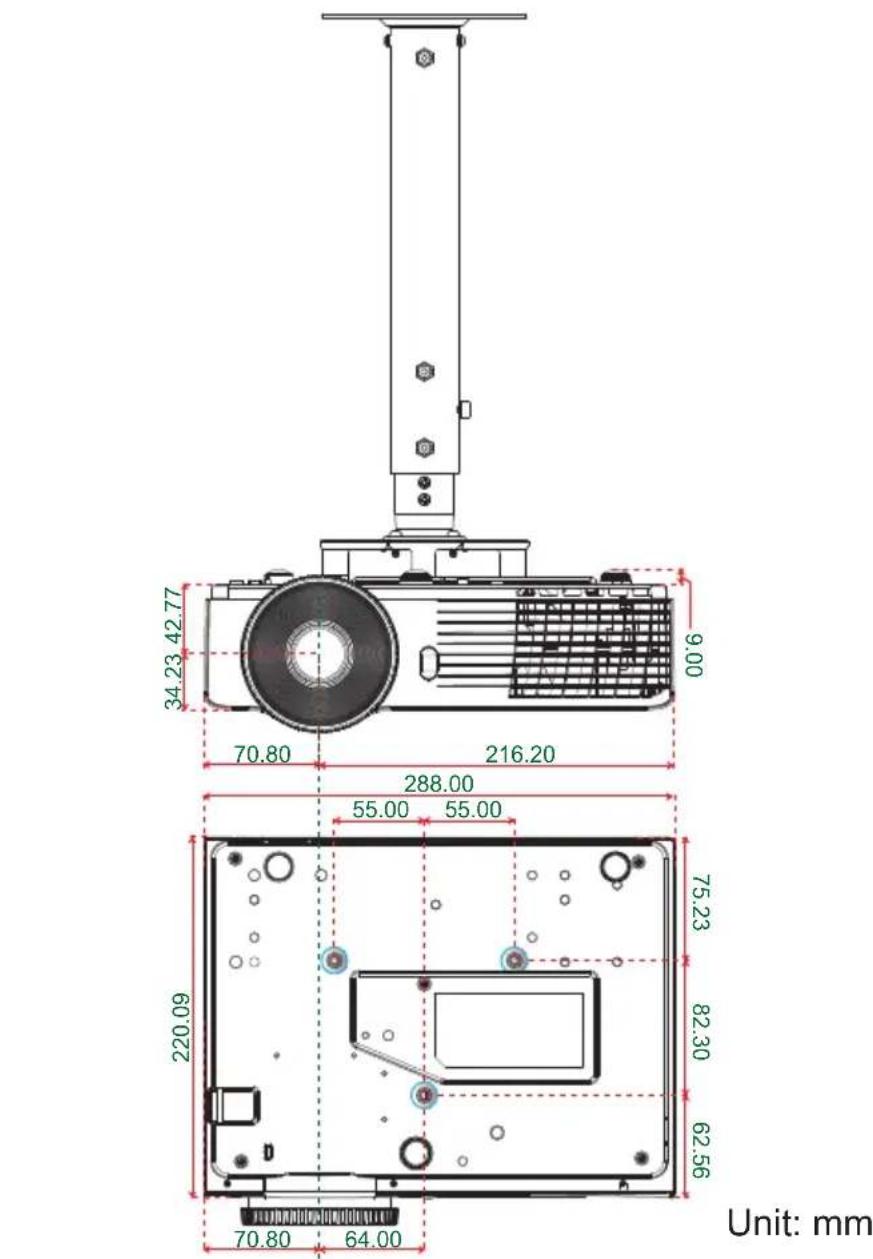
Optoma Global Offices
For service or support please contact your local office.
USA
3178 Laurelview Ct. 888-289-6786
Fremont, CA 94538, USA 510-897-8601
www.optomausa.com services@optoma.com
Canada
2420 Meadowpine Blvd., Suite #105 (888-289-6786)
Mississauga, ON, L5N 6S2, Canada 510-897-8601
www.optoma.ca services@optoma.com
Europe
42 Caxton Way, The Watford Business Park
Watford, Hertfordshire,
WD18 8QZ, UK +44 (0) 1923 691 800
www.optoma.eu +44 (0) 1923 691 888
Service Tel : +44 (0)1923 691865 service@tsc-europe.com
France
Germany info@optoma.de
Scandinavia
Lerpeveien 25
3040 Drammen
Norway
PO.BOX 9515
3038 Drammen
Norway
( +47 32 98 89 90
+47 32 98 89 99
info@optoma.no
Benelux BV
Randstad 22-123 +31 (0) 36 820 0253
1316 BW Almere +31 (0) 36 548 9052
The Netherlands www.optoma.nl
Latin America
3178 Laurelview Ct. 888-289-6786
Fremont, CA 94538, USA 510-897-8601
www.optomausa.com services@optoma.com
Korea
WOOMI TECH.CO.,LTD.
4F, Minu Bldg.33-14, Kangnam-Ku, +82+2+34430004
seoul,135-815, KOREA +82+2+34430005
Japan
東京都足立区綾瀬3-25-18
5F., No. 108, Minchiuan Rd. +886-2-2218-2360
Shindian City, +886-2-2218-2313
Taipei Taiwan 231, R.O.C. services@optoma.com.tw
www.optoma.com.tw asia.optoma.com
Hong Kong
Unit A, 27/F Dragon Centre,
79 Wing Hong Street,
Cheung Sha Wan,
Kowloon, Hong Kong
+852-2396-8968
+852-2370-1222
www.optoma.com.hk
China
5F, No. 1205, Kaixuan Rd.,
Changning District
Shanghai, 200052, China
+86-21-62947376
+86-21-62947375
www.optoma.com.cn
Regulation & Safety Notices
This appendix lists the general notices of your projector.
FCC notice
This device has been tested and found to comply with the limits for a Class B digital device pursuant to Part 15 of the FCC rules. These limits are designed to provide reasonable protection against harmful interference in a residential installation. This device generates, uses and can radiate radio frequency energy and, if not installed and used in accordance with the instructions, may cause harmful interference to radio communications.
However, there is no guarantee that interference will not occur in a particular installation. If this device does cause harmful interference to radio or television reception, which can be determined by turning the device off and on, the user is encouraged to try to correct the interference by one or more of the following measures:
- Reorient or relocate the receiving antenna.
- Increase the separation between the device and receiver.
- Connect the device into an outlet on a circuit different from that to which the receiver is connected.
- Consult the dealer or an experienced radio/television technician for help.
Notice: Shielded cables
All connections to other computing devices must be made using shielded cables to maintain compliance with FCC regulations.
Caution
Changes or modifications not expressly approved by the manufacturer could void the user's authority, which is granted by the Federal Communications Commission, to operate this projector.
Operation conditions
This device complies with Part 15 of the FCC Rules. Operation is subject to the following two conditions:
- This device may not cause harmful interference and
- This device must accept any interference received, including interference that may cause undesired operation.
Notice: Canadian users
This Class B digital apparatus complies with Canadian ICES-003.
Declaration of Conformity for EU countries
• EMC Directive 2004/108/EC (including amendments)
- Low Voltage Directive 2006/95/EC
• R & TTE Directive 1999/5/EC (if product has RF function)
Disposal instructions

Do not throw this electronic device into the trash when discarding. To minimize pollution and ensure utmost protection of the global environment, please recycle it.

- Table of Contents ......1
- Usage Notice 2
- Introduction ......6
- Installation 11
- User Controls ....18
- Network Application System
- Appendices 64
- Safety Information
- Class B emissions limits
- Important Safety Instruction
- Precautions
- Usage Notice
- Do:
- Do not:
- Eye Safety Warnings
- Product Features
- Package Overview
- Documentation :
- Product Overview
- Remote Control
- Connecting the Projector Connect to Computer/Notebook
- Connect to Video Sources
- Powering the projector On / Off
- Powering On the Projector
- Powering Off the Projector
- Warning Indicator
- Adjusting the Projected Image
- Adjusting the Projector's Height
- Adjusting the Projector's Zoom / Focus
- Adjusting Projection Image Size
- Control Panel & Remote Control
- Control Panel
- User Controls
- Using the HELP button
- On-screen Display Menus
- How to operate
- IMAGE
- Display Mode
- Brightness
- Contrast
- Sharpness
- Color
- Tint
- IMAGE | Advanced
- Gamma
- BrilliantColor™
- Color Temp
- Color Settings
- Color Space
- Input Source
- DISPLAY
- Format
- SVGA/XGA
- WXGA
- Edge Mask
- Zoom
- H Image Shift
- V Image Shift
- V Keystone
- Auto Keystone
- DISPLAY | 3D
- 3D Mode
- 3D Sync. Invert
- SETUP
- Language
- Projection
- Menu Location
- Screen Type
- Projector ID
- Mute
- Volume
- Audio Input
- SETUP | Signal (RGB)
- Automatic
- Phase
- Frequency
- Position
- Position
- SETUP | Security
- Security
- Security Timer
- Change Password
- SETUP | Advanced
- Logo
- Logo Capture
- Closed Captioning
- SETUP | Network
- Network State
- DHCP
- IP Address
- Subnet Mask
- Gateway
- DNS
- Apply
- How to use web browser to control your projector
- Below is an example on how to do a quick network setup
- Crestron RoomView Control Tool
- Main Screen
- Edit Room
- Edit Attribute
- Edit Event
- OPTIONS
- Source Lock
- High Altitude
- Information Hide
- Keypad Lock
- Test Pattern
- Background Color
- Reset
- OPTIONS | Advanced
- Direct Power On
- Auto Power Off (min)
- Sleep Timer (min)
- Quick Resume
- Power Mode (Standby)
- OPTIONS | Lamp Settings
- Lamp Hours
- Lamp Reminder
- Brightness Mode
- Lamp Reset
- Network Application System Introduction
- How to use Web Administration
- System Status
- General Setup
- Projector Control
- Alert Setup
- Network Setup
- Presenter Setup
- Crestron RoomView
- Reset to Default
- Reboot System
- How to use Multi-media Card Reader Application
- 2-1. Setup Menu
- 2-2. Slideshow
- - Slideshow On.
- - Slideshow off.
- - Go back to thumbnail file browsing.
- 2-3. PDF
- How to use the Optoma Presenter System
- 1-1. Using Optoma Presenter via USB or Ethernet cable
- 1-2. Using Optoma Presenter via mini Wifi USB dongle
- 1-2-2. Power on projector.
- 1-2-3. Connect to Mini WiFi USB Dongle SSID "Network Display" from your PC device.
- 1-2-4. Download and Install Optoma Presenter Software.
- After installation in PC, double click the program of Optoma Presenter to enter main window.
- Troubleshooting
- No image appears on-screen
- ? Partial, scrolling or incorrectly displayed image
- Appendices
- ? Image is out of focus
- The image is stretched when displaying 16:9 DVD title
- ? Image is too small or too large
- ? Image has slanted sides
- ? Image is reversed
- The projector stops responding to all controls
- Lamp burns out or makes a popping sound
- ? LED lighting message
- On Screen Messages
- If the remote control does not work
- Replacing the lamp
- CAUTION!
- - Lamp Replacement Procedure:
- Compatibility Modes
- RS232 Commands and Protocol Function List
- RS232 Protocol Function List
- SEND from projector automatically
- Wall Mount Installation
- Optoma Global Offices
- USA
- Canada
- Europe
- France
- Scandinavia
- Benelux BV
- Latin America
- Korea
- Japan
- Hong Kong
- China
- Regulation & Safety Notices
- FCC notice
- Notice: Shielded cables
- Caution
- Operation conditions
- Notice: Canadian users
- Declaration of Conformity for EU countries
- Disposal instructions
Brand : OPTOMA
Model : TW635-3D
Category : Projector