
KVP-101 - CD Player Omnitronic - Free user manual and instructions
Find the device manual for free KVP-101 Omnitronic in PDF.


| Product Type | Karaoke Audio/Video CD Player |
| Model | Omnitronic KVP-101 |
| Power Supply | 230 V AC, 50 Hz ~ |
| Power Consumption | 30 W |
| Dimensions (W x H x D) | 482 x 56 x 260 mm (19") |
| Weight | 4 kg |
| Supported Discs | CD, CD-R, CD-RW, DVD, Video-CD, MP3, JPEG, Kodak CD, WMA, DivX, HDCD |
| Video Outputs | Composite, S-Video, Component (Y, Pb/Cb, Pr/Cr) |
| Audio Outputs | RCA (Left/Right), Coaxial, Optical |
| Microphone Inputs | 2 x 6.35 mm jack (front) and 2 x XLR (rear) |
| Echo Control | Adjustable echo for microphone |
| Frequency Range | 4 - 20,000 Hz |
| S/N Ratio (Audio) | >92 dB |
| Audio Output Level | 2 Vp-p |
| Video Output Level | 1 Vp-p |
| TV Systems Supported | PAL, NTSC, MULTI |
| Remote Control | Included, battery operated (AAA) |
| Safety Class | Class II (protective insulation) |
| Operating Temperature | -5°C to +45°C |
| Relative Humidity | ≤50% at 45°C |
| Cleaning | Use a soft, lint-free, damp cloth; no solvents |
| Spare Parts | Use genuine parts only; service by authorized dealers |
| Protection Features | Auto power off when not in use; laser safety (Class 1) |
Frequently Asked Questions - KVP-101 Omnitronic
User questions about KVP-101 Omnitronic
0 question about this device. Answer the ones you know or ask your own.
Ask a new question about this device
Download the instructions for your CD Player in PDF format for free! Find your manual KVP-101 - Omnitronic and take your electronic device back in hand. On this page are published all the documents necessary for the use of your device. KVP-101 by Omnitronic.
USER MANUAL KVP-101 Omnitronic
Inhaltsverzeichnis
4.1 Features 18
4.2 Front panel 19
4.3 Rear panel....19
- INSTALLATION 20
5.1. Connection 20
5.2. Remote-control.... 21
- OPERATION 22
6.1 Setup 22
6.2 CD-tray 22
6.3 LC-display 22
6.4 Play/Pause 22
6.5 Selecting a track.... 22
6.6 End of operation.... 22
6.7 General Setup Menu 23
6.8 Speaker Setup Menu 23
6.9 Dolby Setup Menu.... 24
6.10 Preferences Setup Menu 24
6.11 Password Setup Menu 24
- PRECAUTIONS....25
- CLEANING AND MAINTENANCE 25
- TECHNICAL SPECIFICATIONS....26
This user manual is valid for the article number 11050210
6.10 Preferences Setup Menü
Keep this device away from rain and moisture! Unplug mains lead before opening the housing!
For your own safety, please read this user manual carefully before you initial start-up.
Every person involved with the installation, operation and maintenance of this device has to
- be qualified
- follow the instructions of this manual
- consider this manual to be part of the total product
- keep this manual for the entire service life of the product
- pass this manual on to every further owner or user of the product
- download the latest version of the user manual from the Internet
1. INTRODUCTION
Thank you for having chosen an OMNITRONIC KVP-101. If you follow the instructions given in this manual, we are sure that you will enjoy this device for a long period of time.
Unpack your KVP-101.
2. SAFETY INSTRUCTIONS
CAUTION!
Be careful with your operations. With a dangerous voltage you can suffer a dangerous electric shock when touching the wires!
This device has left our premises in absolutely perfect condition. In order to maintain this condition and to ensure a safe operation, it is absolutely necessary for the user to follow the safety instructions and warning notes written in this user manual.

Important:
Damages caused by the disregard of this user manual are not subject to warranty. The dealer will not accept liability for any resulting defects or problems.
English
If the device has been exposed to drastic temperature fluctuation (e.g. after transportation), do not switch it on immediately. The arising condensation water might damage your device. Leave the device switched off until it has reached room temperature.
Please make sure that there are no obvious transport damages. Should you notice any damages on the A/C connection cable or on the casing, do not take the device into operation and immediately consult your local dealer.
This device falls under protection-class II and features a protective insulation. The power plug must only be plugged into a suitable outlet. The voltage and frequency must exactly be the same as stated on the device. Wrong voltages or power outlets can lead to the destruction of the device and to mortal electrical shock.
Always plug in the power plug least. The power plug must always be inserted without force. Make sure that the plug is tightly connected with the outlet.
Never let the power-cord come into contact with other cables! Handle the power-cord and all connections with the mains with particular caution! Never touch them with wet hands, as this could lead to mortal electrical shock.
Never modify, bend, strain mechanically, put pressure on, pull or heat up the power cord. Never operate next to sources of heat or cold. Disregard can lead to power cord damages, fire or mortal electrical shock.
The cable insert or the female part in the device must never be strained. There must always be sufficient cable to the device. Otherwise, the cable may be damaged which may lead to mortal damage.
Make sure that the power-cord is never crimped or damaged by sharp edges. Check the device and the power-cord from time to time.
If extension cords are used, make sure that the core diameter is sufficient for the required power consumption of the device. All warnings concerning the power cords are also valid for possible extension cords.
Always disconnect from the mains, when the device is not in use or before cleaning it. Only handle the power-cord by the plug. Never pull out the plug by tugging the power-cord. Otherwise, the cable or plug can be damaged leading to mortal electrical shock. If the power plug or the power switch is not accessible, the device must be disconnected via the mains.
If the power plug or the device is dusty, the device must be taken out of operation, disconnected and then be cleaned with a dry cloth. Dust can reduce the insulation which may lead to mortal electrical shock. More severe dirt in and at the device should only be removed by a specialist.
There must never enter any liquid into power outlets, extension cords or any holes in the housing of the device. If you suppose that also a minimal amount of liquid may have entered the device, it must immediately be disconnected. This is also valid, if the device was exposed to high humidity. Also if the device is still running, the device must be checked by a specialist if the liquid has reduced any insulation. Reduced insulation can cause mortal electrical shock.
There must never be any objects entering into the device. This is especially valid for metal parts. If any metal parts like staples or coarse metal chips enter into the device, the device must be taken out of operation and disconnected immediately. Malfunction or short-circuits caused by metal parts may cause mortal injuries. Before the device is switched on all faders and volume controls have to be set to "0" or "min" position.
CAUTION: Turn the amplifier on last and off first!
Please note that damages caused by manual modifications on the device or unauthorized operation by unqualified persons are not subject to warranty. Keep away children and amateurs!
CAUTION: High volumes can cause hearing damage!
There are no serviceable parts inside the device. Maintenance and service operations are only to be carried out by authorized dealers.
3. OPERATING DETERMINATIONS
This device is a professional Audio/Video-player for playing CDs. This product is allowed to be operated with an alternating current of 230 V, 50 Hz and was designed for indoor use only.
Do not shake the device. Avoid brute force when installing or operating the device.
When choosing the installation-spot, please make sure that the device is not exposed to extreme heat, moisture or dust. There should not be any cables lying around. You endanger your own and the safety of others!
The ambient temperature must always be between -5^ C and +45^ C.
The relative humidity must not exceed 50 % with an ambient temperature of 45^ C.
This device must only be operated in an altitude between -20 and 2000 m over NN.
Batteries are hazardous waste which need to be disposed of appropriately. If the device is to be disposed, the batteries have to be removed first.
Make sure that the poles are correct when inserting the batteries.
Never let batteries lying around openly as there is the danger that these can be swallowed by children or domestic animals. Immediately consult a doctor when batteries are swallowed!
Leaking or damaged batteries can cause irritations when getting into contact with the skin. In this case use appropriate protective gloves.
Make sure that the batteries cannot be short-circuited, thrown into the fire and be charged. There is a danger of explosion.
Operate the device only after having familiarized with its functions. Do not permit operation by persons not qualified for operating the device. Most damages are the result of unprofessional operation!
Never use solvents or aggressive detergents in order to clean the device! Rather use a soft and damp cloth.
Please use the original packaging if the device is to be transported.
Never remove the serial barcode from the device as this would make the guarantee void.
If this device will be operated in any way different to the one described in this manual, the product may suffer damages and the guarantee becomes void. Furthermore, any other operation may lead to dangers like short-circuit, burns, electric shock, etc.
4. DESCRIPTION
4.1 Features
Karaoke audio/video-player
- For video-, MP3- and audio-CDs, CD-Rs, CD-RWs
- Reads HDC, MP3, JPG, Kodak CD, WMA and DivX-files
- Ideal for DJs for performing with videoclips
- 2 Karaoke microphone-inputs via jack on the frontpanel or XLR on the rearpanel
- Adjustable echo
- Outputs RCA, coaxial, S-Video, composite, optical
- 19"-dimensions
English
4.2 Front panel

- POWER SWITCH
Press this button to start operation.
- DISPLAY
LC-display for displaying the different modes and functions. Please refer to the explanations under 6.3 LC-display.
- OPEN/CLOSE BUTTON
Via the Open/Close-button, you can open and close the CD-tray. This button is disabled in play mode.
- PLAY/PAUSE-BUTTON
With the Play/Pause-button, you can start the playback and stop it again. Please refer to the explanations under 6.4 Play/Pause.
- STOP BUTTON
For stopping the playback
- PREVIOUS-BUTTON
Via the PREVIOUS-button, you can select the desired track.
- NEXT-BUTTON
Via the NEXT-button, you can select the desired track.
- DISC-TRAY
To enter the disc. Please refer to the explanations under 6.2 CD-tray.
-
ECHO-CONTROL
-
MIC1-SOCKET
You can connect microphones with jack.
- MIC LEVEL-CONTROL
With the Mic Level-control, you can adjust the mic volume.
- MIC2-SOCKET
You can connect microphones with jack.
- MIC LEVEL-CONTROL
With the Mic Level-control, you can adjust the mic volume.
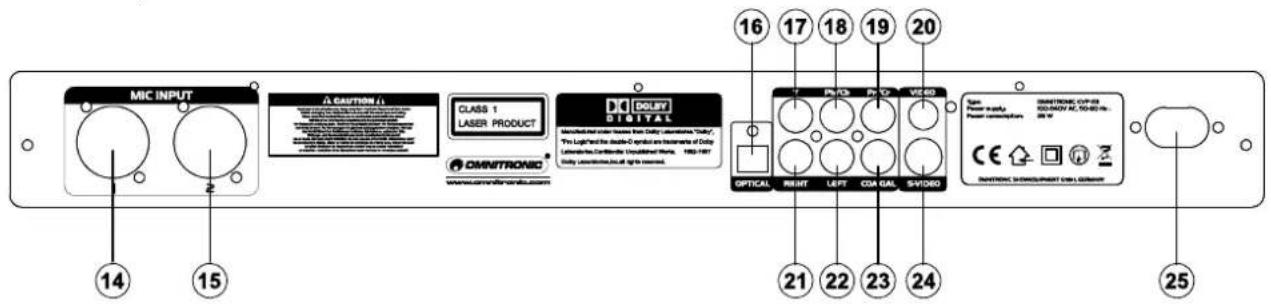
4.3 Rear panel
English
-
MIC1-SOCKET (XLR)
-
Pb/Cb-output
-
Coaxial-output
-
MIC2-SOCKET (XLR)
-
Pr/Cr-output
-
S-Video-output
-
Optical-output
-
Composite-output
-
AC CONNECTION
-
Y-output
-
Cinch L-output
Plug in the power supply cable here.
- Cinch R-output
5. INSTALLATION
(1) Install the audio/video-player on a plane surface or in your rack.
(2) Make sure that the inclination angle will not exceed 15°, as the CD cannot be read correctly otherwise.
(3) Remove the protection foil from the display.
(4) Please note that the LC-display can only be read from an angle of 45^ to the top and of 5^ to the bottom.
(5) Rack-installation: This audio/video-player is built for 19" racks (483 mm). The rack you use should be a Double-Door-Rack where you can open the front panel and the rear panel. The rack should be provided with a cooling fan. When mounting the audio/video-player into the rack, please make sure that there is enough space around the device so that the heated air can be passed on. Steady overheating will damage your device. You can fix the audio/video-player with four screws M6 in the rack. Be aware that fastening the device with four screws on the front panel is not enough. In order to ensure safety, additional fastening by using ground and side bars is necessary.
(6) CAUTION: Make sure that the audio/video-player is switched off (power-switch in outer position) before you connect it to the mains in order to avoid damages on your loudspeakers.
5.1. Connection
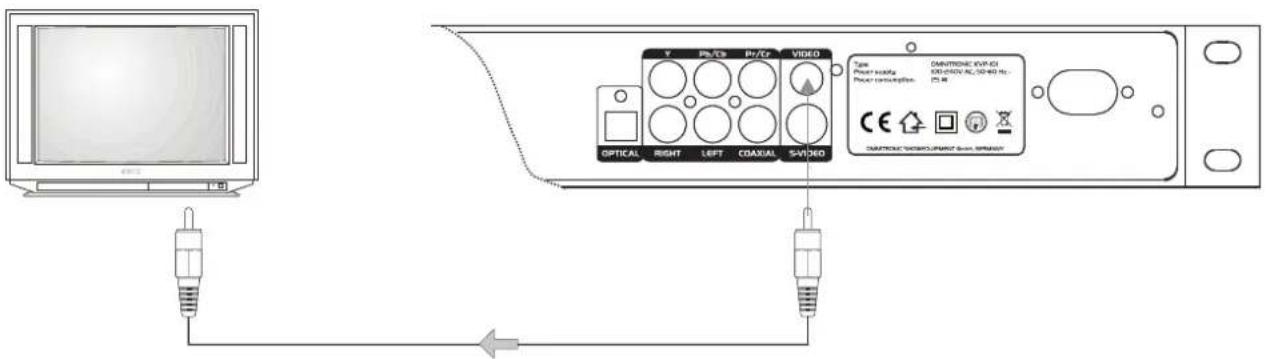
a) Connect your TV-set via an RCA-cable to the audio/video-player (VIDEO-socket).
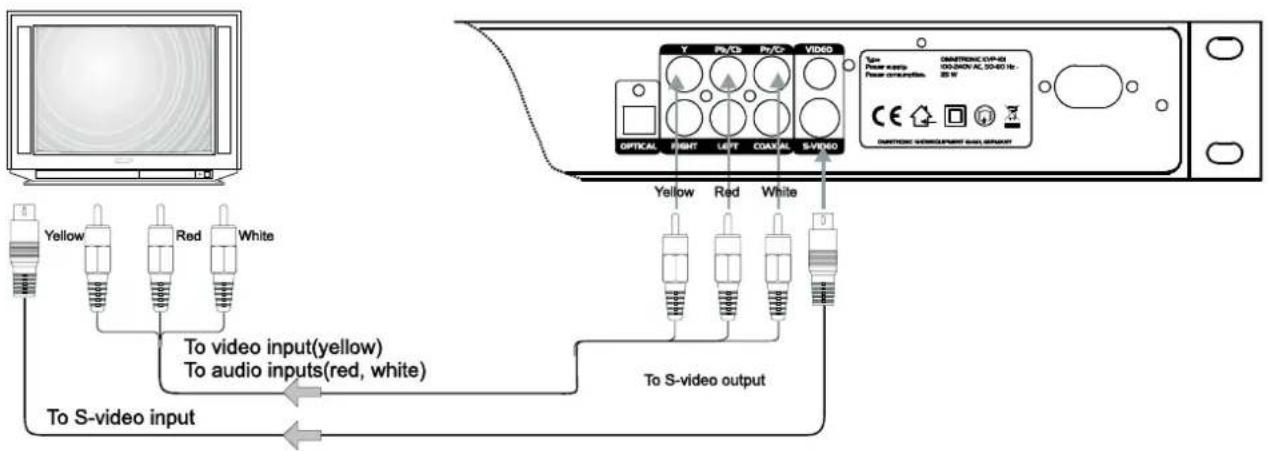
b) Connect your TV-set via an AV-RCA-cable (yellow, red, white) or via an S-video-cable to the audio/video-player.
English
c) Connect your audio system, active speaker or amplifier via the RCA-sockets Left/Right. Make sure that the right/left occupation (plug-colour red/white) is the same at both devices.
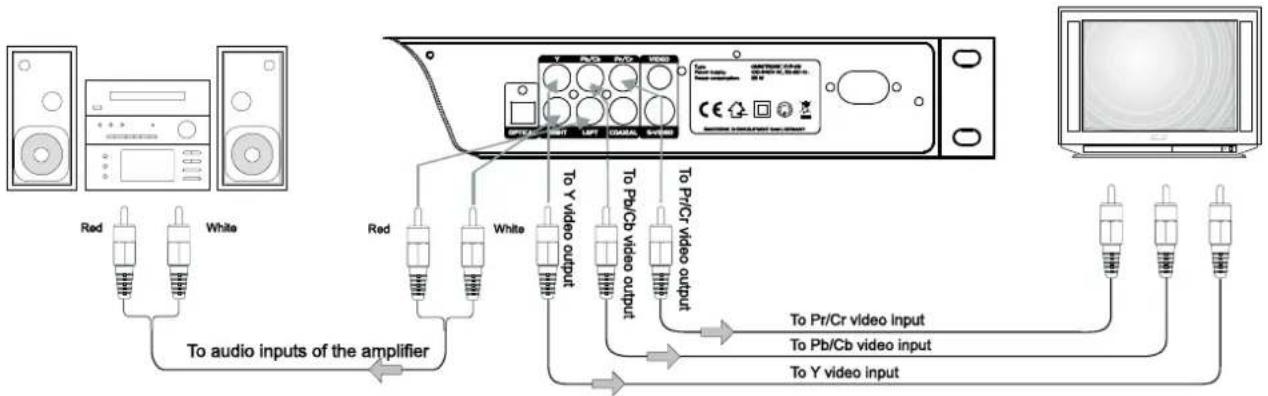
Select the appropriate input channel at your TV-set and the correct input of your audio system.
5.2. Remote-control
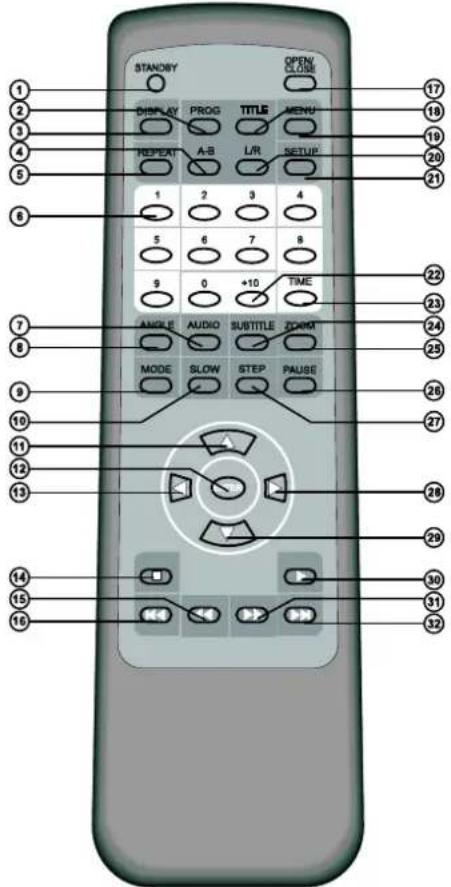
- STANDBY
- PROGRAM
- DISPLAY
- A-B
- REPEAT
- 0-9 DIGITS
- AUDIO
- ANCLE
- MODE
- SLOW
- SCROLL UP
- ENTER
- SCROLL LEFT
- STOP
- FAST REVERSE
- PREVIOUS
- OPEN/CLOSE
- TITLE
- MENU
20 I/R - SETUP
- +10
- TIME
- SUBTITLE
- ZOOM
- PAUSE
- STEP
- SCROLL LEFT
- SCROLL DOWN
- PLAY
- FAST FORWARD
- NEXT
Inserting/Replacing the batteries
Please refer to the explanations under Operating Determinations.
Open the battery cover on the bottom and remove it.
If replacing the batteries, remove the old batteries from the battery compartment. Only replace complete battery-sets.
Leaky or damaged batteries might cause cauterisation when in contact with the skin; therefore, use suitable protective gloves.
English
Insert the batteries and make sure that the poles are correct. Replace the battery cover and close it.
If the device will not be used for a longer period of time, remove the batteries in order to avoid battery leakage.
In order to have a long battery life, you should only use alcaline batteries.
Caution!
Danger of explosion when battery is replaced improperly.
Only replace by the same type or similar types recommended by the manufacturer.
Remove empty batteries in accordance with the instructions of the manufacturer.
BATTERY DISPOSAL NOTICE
Please dispose of old and used batteries properly.
Batteries are hazardous waste and should not be disposed of with regular domestic waste!
Please take old and used batteries to a collection center near you.
6. OPERATION
6.1 Setup
Switch the audio/video-player on via the Power-switch. If no CD is inserted, „NO DISC“ appears on the display.
6.2 CD-tray
(1) Press Open/Close-button in order to open the disc tray. The CD-tray opens and the display shows "OPEN". Insert your CD in the CD-tray. Make sure you only hold the CD with two fingers on the edge. Avoid touching the inside area of the CD.
(2) CAUTION: Do not close the tray by pushing it as this could harm the construction.
(3) Press the Open/Close-button again in order to close the tray.
You can find a list of available formats in Appendix.
6.3 LC-display
After inserting the CD, the player jumps to the first track and is in the Pause-mode.
6.4 Play/Pause
(1) The playback of the first track can be started by pressing the Play/Pause button.
(2) To interrupt playback, press the Play/Pause-button and the laser stops at the position where you stopped.
6.5 Selecting a track
You can select the desired track via the PREVIOUS/NEXT-buttons. In order to play a track from the beginning, press the PREVIOUS/NEXT-buttons until the desired track number is displayed. If you hold the respective Track-button, the audio/video-player will run through the track numbers until you let the button loose.
6.6 End of operation
Before you switch off the device, please make sure that no CD remains in the player. Also make sure that the CD-tray is completely closed before you switch off. If this is not the case, switch the device on again and close the tray with the Open/Close-button.
CAUTION: Do not close the tray by pushing it as this could harm the construction. Press the Open/Close-button again in order to close the tray.
English
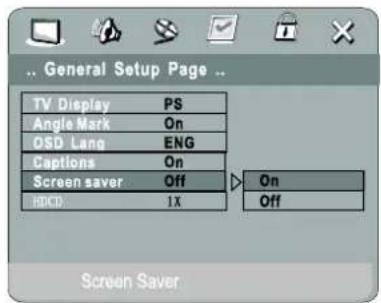
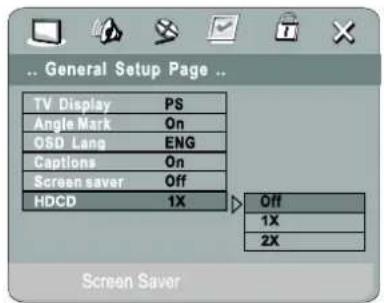
6.7 General Setup Menu
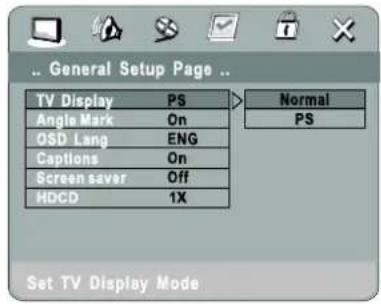
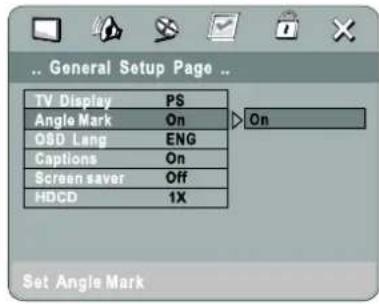
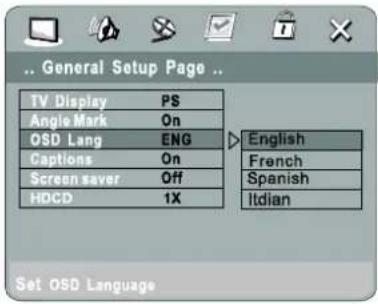
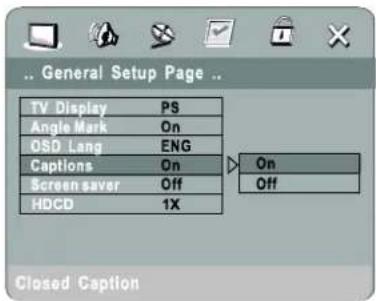
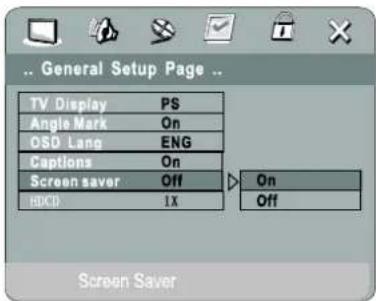
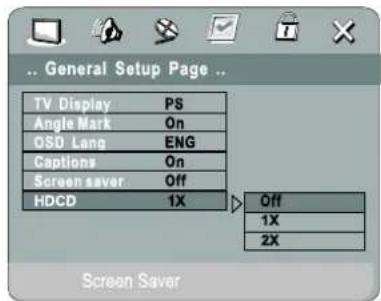
Overview Standard/Widescreen-format
| Film format\TV screen | 4:3 | 16:9 | ||
| Normal | Full view | Letterbox | Wide screen | |
4:3 |  | 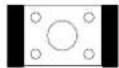 | ||
| 16:9 | ||||
Selecting the formats under TV Display.
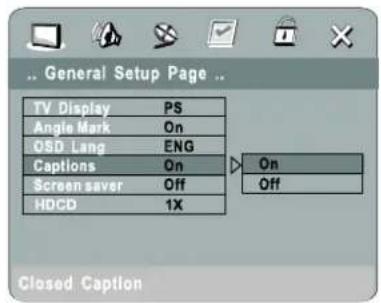
Angle Mark is an additional feature not available on all DVDs. If several camera angles are available, they can be selected via the Angle-button of the remote-control.
Under Captions additional text can be displayed if the DVD supports Feature Closed Caption (CC).
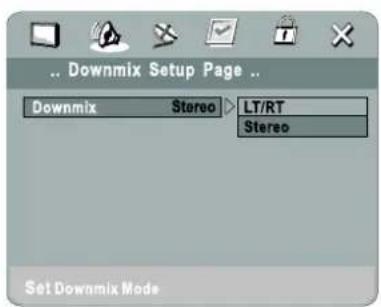
6.8 Speaker Setup Menu
English
Under Downmix you can adjust Dolby Pro Logic Format (LT/RT) or Stereo.
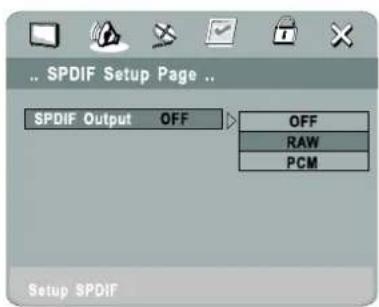
Under SPDFI Output you can adjust the optical output. OFF, RAW (non-modulated) PCM (Pulse Code Modulation).
6.9 Dolby Setup Menu
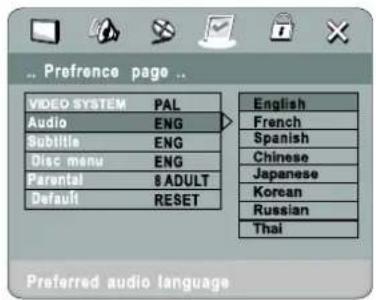
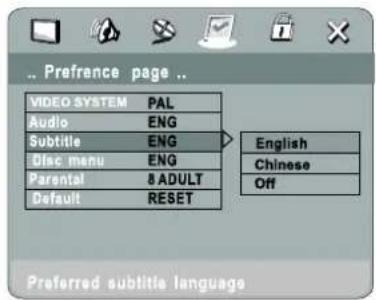
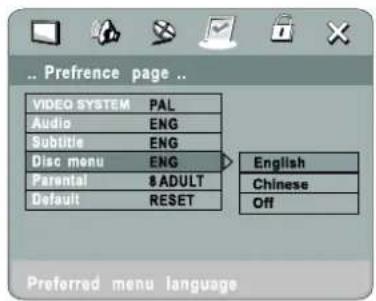
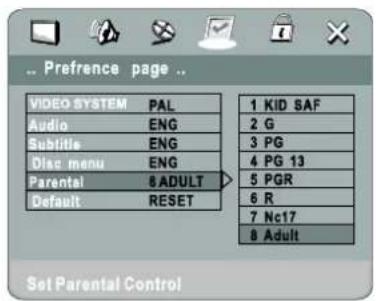
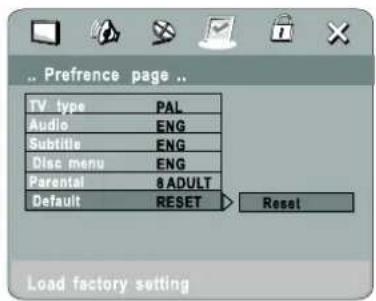
6.10 Preferences Setup Menu
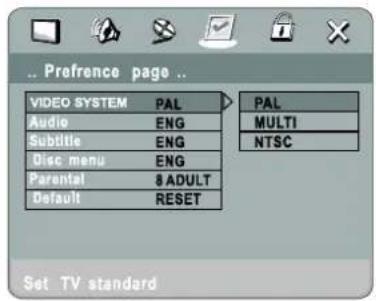
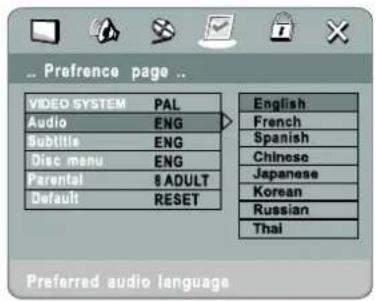
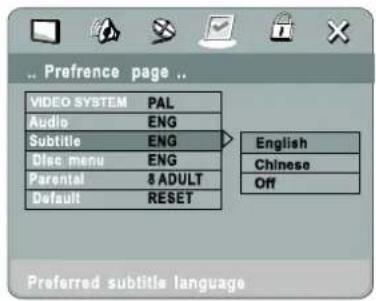
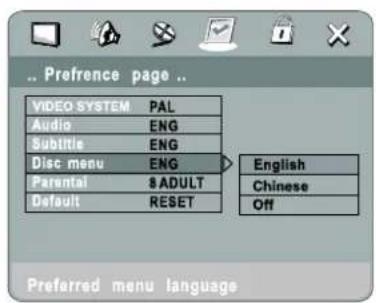
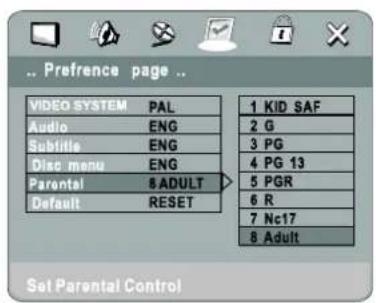
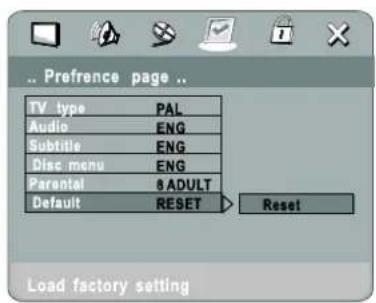
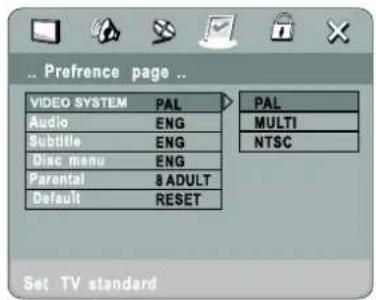
Under Video System you can select PAL (Europa), MULTI (universal) or NTSC (USA).
Under Parental Control you can adjust the level of child protection. 1 corresponds with very strict, 8 means without protection. The password mode must be set to OFF before changing any parameter.
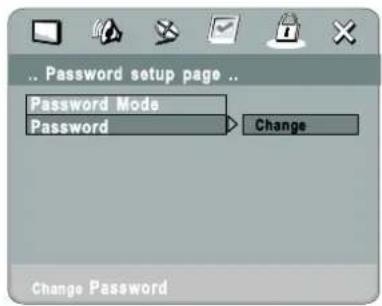
6.11 Password Setup Menu
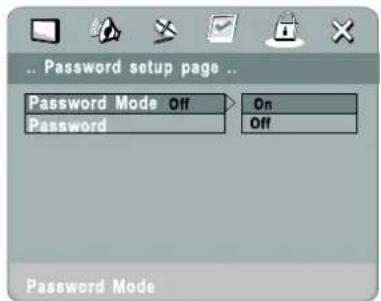
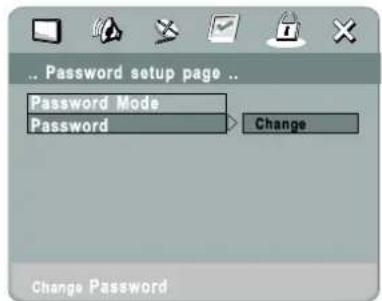
Here you can set the password protection to ON or OFF and change the password. The default password is 8888. If you forget the password, it cannot be reset.
7. PRECAUTIONS
This CD player cannot be compared to conventional Hifi CD players - even if they have almost the same appearance. This player is much more rugged in order to withstand the strenuous road use and consistent transports of mobile discotheques. We recommend to put the CD player on plastic foam or on rubber feet in order to avoid skipping, which is caused by vibrations of low frequencies. The same thing holds tDisque if the CD player is mounted in a rack an the rack is exposed to such frequencies.
Should you have further problems, please refer to the chart below.
Have the connections correctly been carried out?
Is your amplifier and your mixer properly adjusted?
Have you kept to all instructions given in this manual?
| SYMPTOMS POSSIBLE CAUSES $OLUTION | ||
| Device does not react when switching on. | Connection to mains disrupted. Check AC plug and AC connection. | |
| Player does not start operation | CD is badly positioned or dirty | Reposition CD with label atop or clean with a dry and soft cloth. |
| No sound Check the mixer and amplifier connections | Possibly exchange connections. | |
| Does not read properly. The device | is exposed to vibrations. | Place the device on a more stable stand, rack etc. |
| Pop noise Mixer or amplifier connections inappropriate | Check cable and jack quality | |
| No picture | Wrong connection.TV defective or not correctly adjusted. | Possibly exchange connections.Check tv on malfunction or re-adjust. |
8. CLEANING AND MAINTENANCE
DANGER TO LIFE!
Disconnect from mains before starting maintenance operation!
We recommend a frequent cleaning of the device. Please use a soft lint-free and moistened cloth. Never use alcohol or solvents!
There are no serviceable parts inside the device. Maintenance and service operations are only to be carried out by authorized dealers.
Should you need any spare parts, please use genuine parts.
If the power supply cable of this device becomes damaged, it has to be replaced by authorized dealers only in order to avoid hazards.
Should you have further questions, please contact your dealer.
9. TECHNICAL SPECIFICATIONS
| Power supply: 230 V AC, 50 Hz ~ | |
| Power consumption: 30 W | |
| Available disc: Standard CDs 8 and 12 cm | |
| Video signals: NTSC, PAL | |
| S/N-ratio audio: >92 dB | |
| Frequency range: 4 - 20,000 Hz | |
| Audio output: unbalanced via RCA | |
| Audio output level: 2 Vp-p | |
| Video output level: 1 Vp-p | |
| Dimensions: 482 x 56 x 260 mm | |
| 19"-dimensions | |
| Weight: 4 kg | |
| Accessory: | |
| EUROLITE VSD-104 video distributor 1in4 No. 8 | 1013010 |
| EUROLITE VSD-108 video distributor 1in8 No. 8 | 1013015 |
| EUROLITE AVS-402 video switch 4in2 No. 81013 | 101 |
| EUROLITE AVS-802, video switch 8in2 No. 8101 | 3102 |
| Cable AC-30 3.5mm jack plug stereo/2x RCA | No. 30225151 |
| Cable SA-15 Scart-cable/6x RCA, 1.5m | No. 30209920 |
| Cable CC-15 3x3 RCA-plugs, 1,5m, HighEnd | No. 30209390 |
| Cable CC-30 3x3 RCA-plugs, 3m, HighEnd | No. 30209395 |
| Cable CC-50 3x3 RCA-plugs, 5m, HighEnd | No. 30209398 |
| Akku-Battery Micro(AAA)1,2V 800mAh 1 P. | No. 13108000 |
| Akku-Battery Micro(AAA)1,2V 850mAh 1 P. | No. 13108001 |
| Akku-Battery Micro(AAA)1,2V 950mAh 1 P. | No. 13108004 |
| Battery Micro(AAA) 1.2V 1000mAh 4 pc | No. 13108005 |
| GP Powerbank MEGA charger for AA/AAA | No. 13108062 |
| GP Powerbank UNIVERSAL Charger | No. 13108064 |
| GP Powerbank EXPRESS charger for AA/AAA | No. 13108066 |
| GP Powerbank V800C charger for AA/AAA | No. 13108068 |
Please note: Every information is subject to change without prior notice. 18.09.2007 ©
APPENDIX
| DISC'S | MARKING | CONTENTS | DIMENSION |
| DVD AUDIO |  | Audio | 12cm |
| 8cm | |||
| DVD VIDEO |  | Audio +Video (moving picture) | 12cm |
| 8cm | |||
| Video-CD (VCD) |   | Audio +Video (moving picture) | 12cm |
| 8cm | |||
| AUDIO CD |  | Audio | 12cm |
| 8cm | |||
| HDCD |  | Audio | 12cm |
| 8cm | |||
| MP3 |  | Audio | 12cm |
| 8cm | |||
| JPEG |  | Video(picture) | 12cm |
| 8cm | |||
| KODAK CD |  | Video(picture) | 12cm |
| 8cm | |||
| CD-R |  | Audio or Video (moving picture) | 12cm |
| 8cm | |||
| CD-RW |  | Audio or Video (moving picture) | 12cm |
| 8cm | |||
| WMA |  | Audio | 12cm |
| 8cm | |||
| DivX |  | Audio +Video (moving picture) | 12cm |
| 8cm |
Comparison between DVDs and other discs:
| DVD | LD | SVCD | VCD | CD | ||||
| Encode method | Digital/MPEG II | Analog | Digital | Digital/ MPEG I | Digital | |||
| Capacity | Single-side single-layer 4.7G | Double-side single-layer 8.5G | Single-side double-layer 9.4G | Double-side double-layer 17G | 650MB | 650MB | 650MB | |
| Playing Time | 133 minutes | 242 minutes | 266 minutes | 484 minutes | Single-side 60 minutes double-side 120 minutes | 45 minutes | 74 minutes | 74 minutes |
| Disc diameter | 12cm/8cm | 30cm/20cm | 12cm | 12cm | 12cm/8cm | |||
| Horizontal resolution | More than 500 line | No more than 430 line | No more than 350 line | No more than 250 line | ||||
| Picture proportion | Multiple kinds | One kind | One kind | One kind | ||||
| Subtitle | 32 kinds | 16 kinds at most | 4 kinds | |||||
| Language | 8 kinds | 4 kinds at most | 4 kinds at most | 2 kinds | 2 kinds | |||
| Sound quality | 48KHz, 96KHz/ 6, 20, 24bit | 44.1KHz/ 16bit | 44.1KHz/ 16bit | 44.1KHz/ 16bit | 44.1KHz/ 16bit | |||
- Inhaltsverzeichnis
- Preferences Setup Menü
- INTRODUCTION
- SAFETY INSTRUCTIONS
- CAUTION!
- Important:
- English
- OPERATING DETERMINATIONS
- DESCRIPTION
- Features
- Karaoke audio/video-player
- Front panel
- Rear panel
- INSTALLATION
- Connection
- Remote-control
- Inserting/Replacing the batteries
- BATTERY DISPOSAL NOTICE
- OPERATION
- Setup
- CD-tray
- LC-display
- Play/Pause
- Selecting a track
- End of operation
- General Setup Menu
- Overview Standard/Widescreen-format
- Speaker Setup Menu
- Dolby Setup Menu
- Preferences Setup Menu
- Password Setup Menu
- PRECAUTIONS
- CLEANING AND MAINTENANCE
- DANGER TO LIFE!
- TECHNICAL SPECIFICATIONS
Brand : Omnitronic
Model : KVP-101
Category : CD Player