
UBox 4100 - Print Server Lantronix - Free user manual and instructions
Find the device manual for free UBox 4100 Lantronix in PDF.


| Type | USB Device Server / Print Server |
| Model | UBox 4100 |
| Part Numbers | UB4100001-01 (US), UB4100002-01 (EU), UB4100003-01 (UK) |
| USB Ports | 4 USB 2.0 Type A (full speed, 12 Mbps each) |
| Network Interface | 10/100 auto-sensing RJ45 Ethernet, half/full duplex |
| IP Addressing | Static, DHCP, or Zeroconfig |
| USB Device Support | Printers, multi-function printers, scanners, HID devices, mass storage (up to 8 logical devices per UBox via compound devices) |
| Speed | Low and full speed USB; throughput approx. 5-6 Mb/sec |
| Power Supply | External AC adapter (included); full 500 mA per USB port |
| LED Indicators | SYSTEM (1 green, 2 red), NETWORK (link/activity), USB per port (green) |
| Software | Lantronix UBox USB Device Server application for Windows XP/Vista (32-bit) |
| Connect Modes | Multi-User (shared, one-at-a-time) and Single-User (auto-connect) |
| Security | Configuration password, client access password, per-device password, optional encoded session |
| Maximum Users per UDP Port | 10 concurrent users |
| Maximum UBoxes per PC | 30 UBoxes (via multiple UDP ports); 8 visible in software tab at a time |
| Maximum USB Devices per PC | 50 USB devices (across multiple UDP ports) |
| Hub Support | One full-speed hub per port (max 1 level deep) |
| Firmware Update | Via software (automatic notification); requires reboot |
| Compliance | FCC Class B, CE, VCCI, AS/NZS, RoHS |
| Dimensions | Approx. 5.5 x 4.5 x 1.2 inches (140 x 114 x 30 mm) – estimated from similar models |
| Weight | Approx. 0.5 lbs (225 g) – estimated |
Frequently Asked Questions - UBox 4100 Lantronix
User questions about UBox 4100 Lantronix
0 question about this device. Answer the ones you know or ask your own.
Ask a new question about this device
Download the instructions for your Print Server in PDF format for free! Find your manual UBox 4100 - Lantronix and take your electronic device back in hand. On this page are published all the documents necessary for the use of your device. UBox 4100 by Lantronix.
USER MANUAL UBox 4100 Lantronix
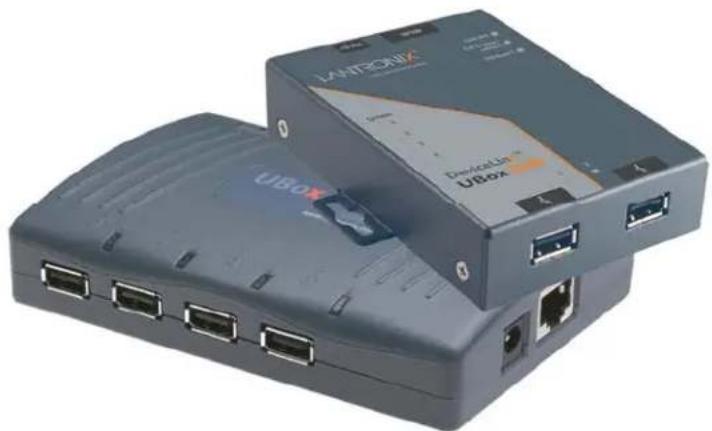
Models UBox 4100 and UBox 2100
natural_image
Two UBSX devices with Ethernet ports and USB interface (no visible text or symbols on the devices themselves)Trademark
UBox is a trademark of Lantronix. Other brand names are trademarks or registered trademarks of their respective holders.
Copyright
Copyright © 2005, 2007 Lantronix. All rights reserved. No part of the contents of this book may be transmitted or reproduced in any form or by any means without the written permission of Lantronix. The information contained herein is subject to change without notice. Printed in the United States of America.
Contacts
Lantronix Corporate Headquarters
15353 Barranca Parkway
Irvine, CA 92618, USA
Phone: 949-453-3990
Fax: 949-453-3995
Technical Support
Online: www.lantronix.com/support
Sales Offices
For a current list of our domestic and international sales offices, go to the Lantronix web site at www.lantronix.com
Revisions
Date Rev. Comments
| June 2005 | A |
| June 2007 | B Added UBox 2100. |
| Nov. 2007 | C Corrected PC requirements. |
| June 2008 | D Added RoHs notice; added Windows XP and Vista as operating system requirements |
Contents
Figures 5
1: Using This Guide 7
Purpose and Audience 7
Summary of Chapters 7
2: Introduction 8
Model and Part Numbers 8
USB Speeds and Throughput 8
Supported Devices 9
Compatible USB Devices 9
Connectivity to USB Devices 9
Connectivity to a Network 9
Connectivity to a PC 9
Hub Support 10
Requirements 10
What's Inside the Package 10
3: Installing the UBox 11
Installing the UBox Hardware 11
Step 1- Connect the UBox to Your Network ____ 11
Step 2 - Connect the UBox's Power Supply and Read the LEDs 11
Installing the UBox Software 13
Uninstalling the Lantronix UBox Software 15
4: Using USB Devices on the Network 16
Overview 16
Connecting Your USB Device 16
Step 1 - Connect a USB Device to the UBox ____ 16
Step 2 –Connect a Networked USB Device 18
Step 3 - Disconnect Your USB Device(s) ____ 19
Using Multiple UBoxes and USB Devices 20
Compound Devices 20
One UBox with Multiple Users 20
Multiple UBoxes and USB Devices 20
UBox Groups on Multiple UDP Ports 21
PC Connectivity to UBoxes and UBS Devices 21
Summary 21
Other Ways to Connect and Disconnect USB Devices 21
Using the UBox System Tray 22
Auto Connecting Printers 23
Using Forced Device Disconnect 25
Using Multi-and Single-User Connect Modes 26
Device Status 27
Separating Compound Devices 28
Types of USB Devices 28
Separating Compound Devices 28
5: Changing the UBox's Settings 29
Overview 29
Viewing UBox Settings 29
Editing Server Settings: Access Tab 31
Editing Server Settings: Network Tab 33
Editing Server Settings: USB Device Configuration Tab 36
Applying, Canceling, or Removing Server Settings 39
Restoring Default Settings 40
Updating the UBox's Firmware 40
Overriding Server Network Settings 42
Refreshing Data 43
6: Changing Local Software Settings 44
Updating Personal Communication Settings 44
Updating Server Access Settings 46
Viewing or Removing Device Passwords 47
Switching Between Sets of UBoxes 48
7: Troubleshooting 49
Before You Begin 49
Troubleshooting: Status Lights 49
Boot-Up 51
SYSTEM Status Light 1 51
SYSTEM Status Lights 2 and 3 51
USB Status Lights: 1-4 on the UBox 4100 and 1 & 2 on the UBox 2100 ____ 52
Troubleshooting: UDP Ports 53
Troubleshooting: Network Issues 54
Communication Between your PC and the UBox 54
Firewalls 55
Final Step 55
Resetting the UBox Hardware 55
Power-Cycling or Using the Reset Button 55
Rebooting the UBox into Safe Mode Using the Reset Button 56
Troubleshooting: USB Devices 57
Technical Support 57
8: Status Light Behavior 59
A: Configuring the Windows XP Firewall 63
Step 1 - Determine Which Version of Windows XP is Installed on Your Computer ____ 63
Step 2 – Access Your Firewall Software (Windows XP and XP Service Pack 1 Only) ____ 64
Step 3a - Add Settings to the Firewall to Allow Communication with the UBox ____ 66
Step 3b - Access and Configure Your Firewall Software (Windows XP Service Pack 2 Only) ____ 68
B: Compliance – UBox 4100 71
CE Mark Declaration of Conformity 71
Canada Digital Apparatus EMI Standard 71
VCCI 71
Australia/New Zealand 72
Disclaimer and Supplementary Information 72
C: Compliance – UBox 2100 74
Declaration of Conformity 74
Disclaimer and Supplementary Information 75
D: Lantronix Software License Agreement 77
E: Lantronix Warranty 79
Figures
Figure 2-1. Model UBox 2100 Part Numbers....8
Figure 2-2. Model UBox 4100 Part Numbers ....8
Figure 3-1. Ethernet and Power Connections ...... 11
Figure 3-2. UDS4100 SYSTEM LEDs....12
Figure 3-3. UDS2100 SYSTEM LEDs....12
Figure 3-4. USB Devices Tab....14
Figure 3-5. Servers Tab Displaying a UBox ....15
Figure 4-1. Connecting a USB Device to the UBox....16
Figure 4-2. USB Devices Tab Showing Attached Devices....17
Figure 4-3. Selected Device Displaying Device Details ....18
Figure 4-4. System Tray....22
Figure 4-5. System Tray Menu....22
Figure 4-6. Epson Printer Connected....23
Figure 4-7. Auto Connect Enabled 24
Figure 4-8. Disconnect Printer for Auto Connect....24
Figure 4-9. Forced Device Disconnect on the Advanced Menu....26
Figure 4-10. USB Device Status....27
Figure 5-1. Servers Tab....30
Figure 5-2. Edit Server Configuration – Access Tab....32
Figure 5-3. Network Tab....34
Figure 5-4. Edit Server Configuration – USB Device Configuration Tab....37
Figure 5-5. Device Configuration Window....38
Figure 5-6. Firmware Update Notification Window....40
Figure 5-7. Servers Tab....41
Figure 5-8. Update Server Firmware....41
Figure 5-9. Override Server Network Settings Window....42
Figure 6-1. Local Settings Tab 45
Figure 6-2. Edit Local Server Access Window ......46
Figure 7-1. Status Lights on UBox 4100 ....50
Figure 7-2. Status Lights on UBox 2100 ....50
Figure 7-3. Resetting the UBox 4100....56
Figure 7-4. Resetting the UBox 2100....56
Figure 8-1. Position of Status Lights on the UBox....59
Figure 8-2. UBox 2100 LEDs....60
Figure 8-3. UBox Status Lights—UBox is Booting UP 60
Figure 8-4. UBox Status Lights -- UBox is Running 62
Figure 8-5. IP Address on Servers Tab....64
Figure 8-6. Local Area Connection Properties – Advanced Tab....65
Figure 8-7. Advanced Settings Window 66
Figure 8-8. Service Settings – Adding a UDP ......66
Figure 8-9. Service Settings – Adding a TCP....67
Figure 8-10. Windows Firewall Window ......68
Figure 8-11. Exceptions Tab 69
Figure 8-12. Add a Port Window - UDP 69
Figure 8-13. Add a Port Window - TCP....70
1: Using This Guide
Purpose and Audience
The Lantronix UBox USB Device Server makes it possible to share USB devices such as printers, scanners, and storage drives over a Local Area Network. This guide provides the information needed to configure, use, and update the UBox 2100 and UBox 4100.
Summary of Chapters
The remaining chapters in this guide include:
| Chapter Description | |
| 2: Introduction | Describes the main features, the required hardware and software, and a list of items included with the unit. |
| 3: Installing the UBox | Provides instructions on installing the UBox hardware and software. |
| 4: Using USB Devices on the Network | Provides instructions for connecting to, using, and disconnecting from a USB device. |
| 5: Changing the UBox's Settings | Describes how to change the UBox's settings to meet your specific needs. |
| 6: Changing Local Software Settings | Describes how to change local settings such as the access password and TCP port. |
| 7: Troubleshooting | Explains how to interpret the status lights and to diagnose problems with UDP ports, your network, and USB devices. Includes Lantronix Technical Support contact information. |
| 8: Status Light Behavior | Describes the LED status lights and what they indicate. |
| A: Configuring the Windows XP Firewall | Provides instructions on how to configure Windows XP's built-in firewall for use with the Lantronix UBox device server. |
| B: Compliance – UBox 4100 | |
| C: Compliance – UBox 2100 | |
| D:Lantronix Software License Agreement | |
| E: Lantronix Warranty |
2: Introduction
The Lantronix UBox makes it possible to share, access, and control USB devices over a LAN. This User Guide deals with the UBox 2100, which supports two USB 2.0 devices and the UBox 4100, which supports four.
Model and Part Numbers
Lantronix offers the following part numbers for Model UBox 2100, which differ only in the power supply used.
Figure 2-1. Model UBox 2100 Part Numbers
| Part Number | Description |
| UB2100001-01 | 2-Port USB Device Server, US Domestic Power |
| UB2100002-01 | 2-Port USB Device Server, European Power |
| UB2100003-01 | 2-Port USB Device Server, UK Power |
Lantronix offers the following part numbers for Model UBox 4100, which differ only in the power supply used.
Figure 2-2. Model UBox 4100 Part Numbers
| Part Number | Description |
| UB4100001-01 | 4-Port USB Device Server, US Domestic Power |
| UB4100002-01 | 4-Port USB Device Server, European Power |
| UB4100003-01 | 4-Port USB Device Server, UK Power |
USB Speeds and Throughput
The UBox 4100 supports USB low speed and full speed, while the UBox 2100 supports low, full and high speed.
The UBox 4100 can sustain, depending on conditions, approximately 5-6 Mb/sec throughput. The UBox 2100 can sustain, depending on conditions and transaction types, approximately 12-15 Mb/sec.
Supported Devices
The UBox 4100 supports most low and full speed devices, including class and vendor specific devices. The UBox 4100 does not support high-speed isochronous devices; it supports isochronous devices for audio only.
In addition to these devices, the UBox 2100 supports most high-speed devices, as limited by the overall throughput. The UBox 2100 also supports full speed isochronous video. The UBox 2100 does not support High Speed Isochronous devices.
Compatible USB Devices
This release of UBox software supports USB printers, USB multi-function printers, USB scanners, USB HID devices, and USB hard drives and other mass storage devices. While other USB devices may work, this release does not officially support them. See the Lantronix web site for further compatibility details.
The UBox 4100 supports most low and full speed devices, including class and vendor specific devices. It supports isochronous devices for audio only. It does not support high-speed isochronous devices.
In addition to these devices, the UBox 2100 supports most high-speed devices, as limited by the overall throughput. The UBox 2100 also supports full speed isochronous video. See the Lantronix web site for further compatibility details.
Connectivity to USB Devices
The UBox USB Device Server provides the following connections to USB Devices:
◆ UBox 2100: 2 USB full-speed ports (12 Mbps)
◆ UBox 4100 : 4 USB full-speed ports (12 Mbps)
Full 500 mA power per port provided to each USB device
Connectivity to a Network
The UBox USB Device Server provides the following connections to your network:
◆ 10/100 auto sensing RJ45 Ethernet connector
◆ Half and full duplex support
IP addressing: Static/DHCP/Zeroconfig
Connectivity to a PC
The UBox firmware supports the connection of:
◆ Up to 50 USB devices per PC by means of multiple UDP ports.
◆ Up to 30 UBoxes per PC at the same time, by different UDP ports.
Hub Support
The UBox 4100 supports up to one full speed hub on each port, counting the hub inside a compound device. Hubs may be only one deep.
The UBox 2100 supports both full speed and high-speed hubs. In addition you can connect a compound device to a full speed or high-speed hub plugged into one of the UBox 2100 ports.
Requirements
Windows: Windows XP and Vista (32 bit)
What's Inside the Package
The Lantronix UBox package includes:
◆ Lantronix UBox USB Device Server
Power Supply
Quick Start Guide
◆ CD with software and User Guide
3: Installing the UBox
The UBox package has two components: the UBox hardware and the UBox software. Both have their own settings and configuration options.
This chapter includes the following topics:
Installing the UBox Hardware
Installing the UBox Software
◆ Uninstalling the UBox Device Server Software
Installing the UBox Hardware
Warning: Do not connect a USB device to the UBox until you have finished installing the software and hardware. Chapter 4: Using USB Devices on the Network walks you through the process of using your USB devices.
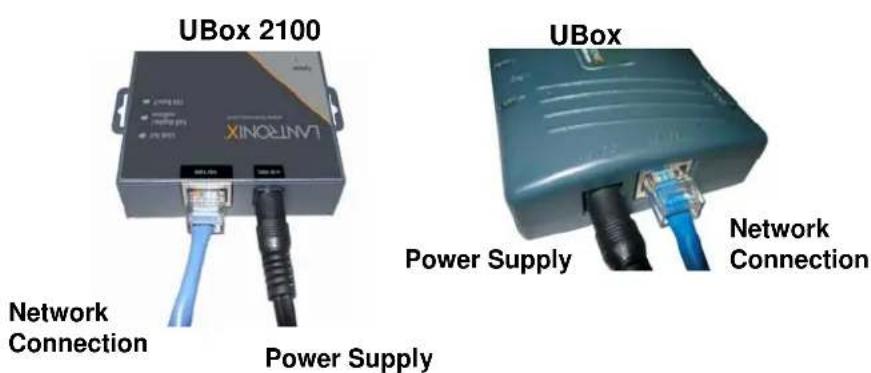
Step 1- Connect the UBox to Your Network
- Connect an Ethernet cable to the Ethernet port of the UBox.
- Connect the other end of the cable to your network.
If you do not have a network, you can connect the UBox directly to the Ethernet port on your computer using an Ethernet crossover cable.
Step 2 - Connect the UBox's Power Supply and Read the LEDs
- Connect the power supply (included in the box) to the UBox's power connector.
Figure 3-1. Ethernet and Power Connections
- Once the UBox has power, notice the following:
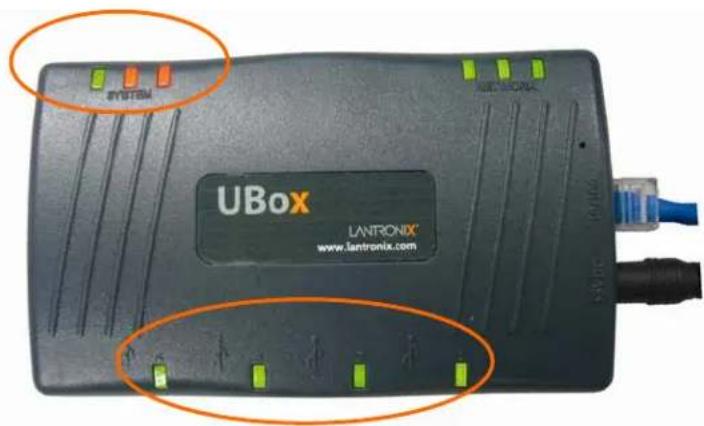
The UBox's status lights turn on and off. After a few seconds, the lights stop blinking.
If the UBox is responding properly, the green USB lights turn on and stay solid.
The first green SYSTEM light blinks on and off every few seconds. Ignore any other status lights for now.
Figure 3-2. UDS4100 SYSTEM LEDs
SYSTEM
USB
Note: The LEDs on the UBox can also indicate other statuses, such as IP configuration type and UBox status. For a detailed description of what the LED lights indicate, see 8: Status Light Behavior.
Figure 3-3. UDS2100 SYSTEM LEDs
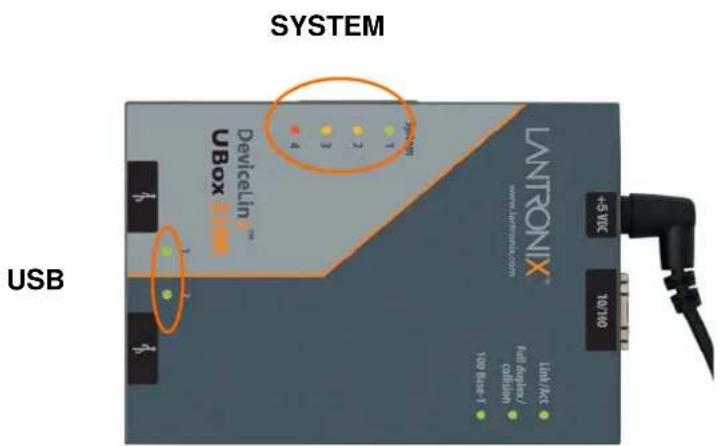
Both the UBox 2100 and UBox 4100 have the same three NETWORK status indicators. The UBox 4100 has three (one green and two red) "SYSTEM indicators, while the UBox 2100 has four (one green, two amber and one red). For both models, the green has the same meaning. The UBox 2100's two amber are equivalent to the UBox 4100's two red. The additional red indicator on the UBox 2100 indicates errors.
Troubleshooting
You may see red lights on the UBox 4100 or amber lights on the UBox 2100 at this point in the installation. This is normal until you install the UBox software on at least one computer.
If you do not see the USB lights turn on or do not have a blinking green SYSTEM light, please proceed to Troubleshooting: Status Lights on page 49.
The UBox hardware installation is now complete. Please proceed to the UBox software installation instructions.
Installing the UBox Software
The following instructions are for installing the UBox software for Windows operating systems.
To install the UBox Software:
- Insert the product CD into your CD drive. The CD should start automatically.
If the CD does not auto start, open My Computer, locate and then double-click Launch.exe. - Click the UBox Software Installation button to install the application.
- Follow the on-screen instructions.
Note: During or after the software installation, the Windows New Hardware Wizard may ask you to install software several times. Select Install the software automatically. If you see an additional prompt regarding logo testing, click Continue Anyway to proceed.
Once the Lantronix UBox Installer completes the installation, it automatically launches the Lantronix UBox application. The Lantronix UBox USB Device Server window opens with the USB Devices tab open. You will use this application to configure the UBox.
Note: The first time you launch the UBox software, you may be asked to update your UBox's firmware. If you get this message, please update your firmware using the on-screen instructions or see Updating the UBox's Firmware on page 40.
Figure 3-4. USB Devices Tab
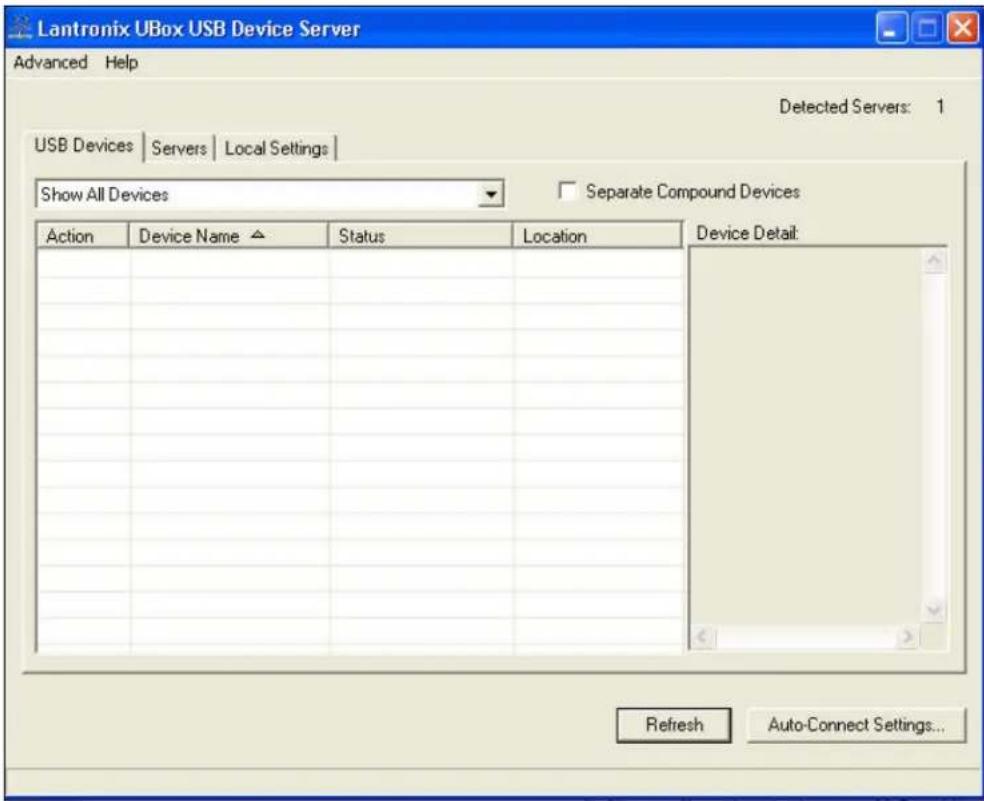
- To verify that the application sees the UBox Device Server, click the Servers tab.
Note: Initially, the UBox displays as Unnamed. During configuration, you can assign a name to it. (See page 31.)
Figure 3-5. Servers Tab Displaying a UBox
![Lantronix UBox USB Device Server Advanced Help Detected Servers: 1 USB Devices Servers Local Settings Server # Server Name Status 11ecc Unnamed OK Server Details: Name: Unnamed Serial No: 11ecc Firmware: 05-05-06 14:38 1.3b2 #317061 Connect Mode: Multi-User IP Address: 172.18.100.1 UDP: 10010 TCP: 10010 Discovery: Broadcast Password Required: No No. of Devices: 3 No. of Devices In Use: 0 Local Server Settings: Yes Exclusive Access: No Connected Clients 2 Edit Server Config... Connected Clients: [172.18.100.19] [172.18.15.2]](/content/2026/05/858501/images/b287cb20f7a5dfeacd2caf8c3a0deeb7c3c7ccb85dd74ee9c37421528c69babd.jpg)
Note: If the UBox does not display, and you have it in a static network, you can use the Override Server Network Settings option on the Advanced menu to configure the UBox. (See Overriding Server Network Settings on page 42.)
Uninstalling the Lantronix UBox Software
To uninstall the Lantronix UBox software:
- Click Start→Settings→Control Panel→Add or Remove Programs.
- Select Lantronix UBox USB Device Server and click the Change/Remove button.
- Follow the instructions on the screen to complete the uninstall process.
4: Using USB Devices on the Network
Overview
This chapter includes the following topics:
Connecting your USB device to the UBox's USB port.
Connecting to your networked USB device using the Lantronix UBox software:
- Using the Connect and Disconnect icons
- Using the Auto Connect feature for printers
Use your USB device by means of the Lantronix UBox.
Note: These instructions help you connect a USB device (e.g., a printer or scanner) to the UBox for the first time. We recommend that you only connect one USB device at a time. To connect additional devices, repeat these instructions for each device.
Connecting Your USB Device
Step 1 - Connect a USB Device to the UBox
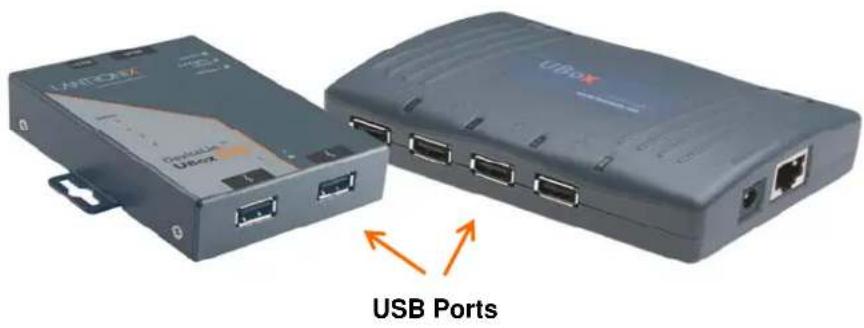
- Connect your USB device to any USB port on the Lantronix UBox.
Figure 4-1. Connecting a USB Device to the UBox
natural_image
Two USB ports connected via Ethernet, showing port labels and connection arrows (no text or symbols on devices)Each USB port has a green status LED light. These lights indicate whether the current software/firmware supports your USB device.
A solid green light indicates that the UBox supports your device.
A slowly blinking light indicates that the UBox does not currently support your USB device. Please contact Lantronix if a light is blinking slowly.
2. On the Start menu, click Programs→Lantronix UBox USB Device Server→UBox USB Device Server.
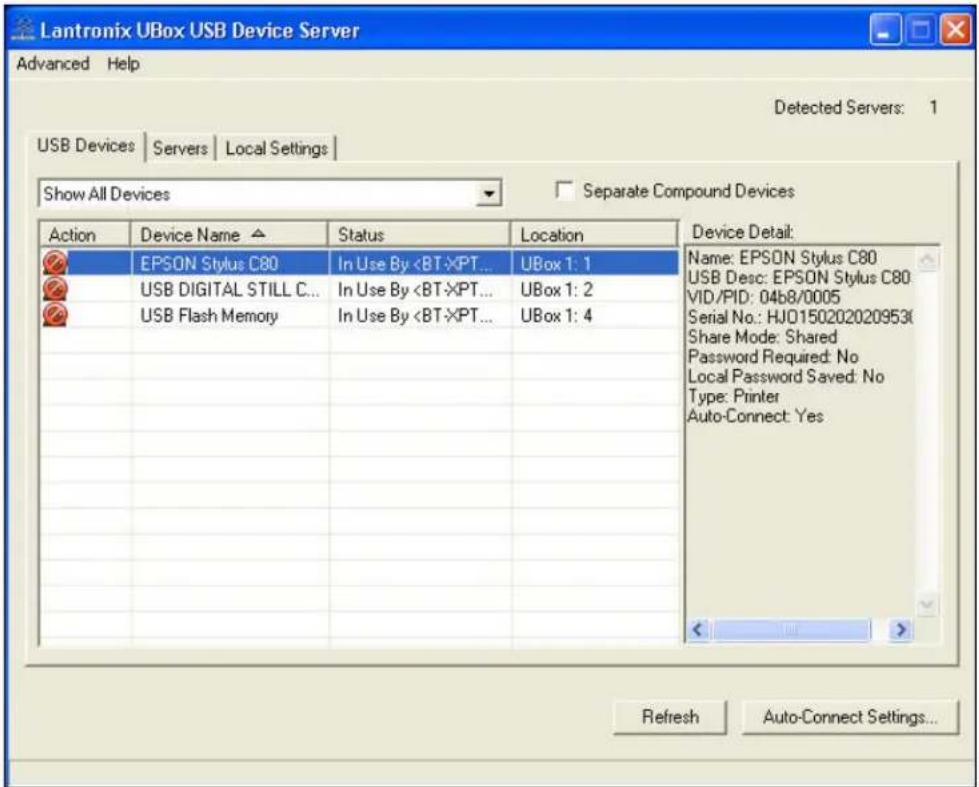
The Lantronix UBox USB Device Server window opens. The USB Devices tab displays a list of USB devices currently connected to each UBox on the network, the status of the software connection, and the location (UBox name and port) on the UBox to which it is attached.
In the example below, UBox 1: 4 means the device is attached to the fourth port of UBox 4100 1. Initially, your UBox location (name) displays as Unnamed.
Note: If you do not see your USB device, please proceed to Troubleshooting: USB Devices on page 57.
Figure 4-2. USB Devices Tab Showing Attached Devices
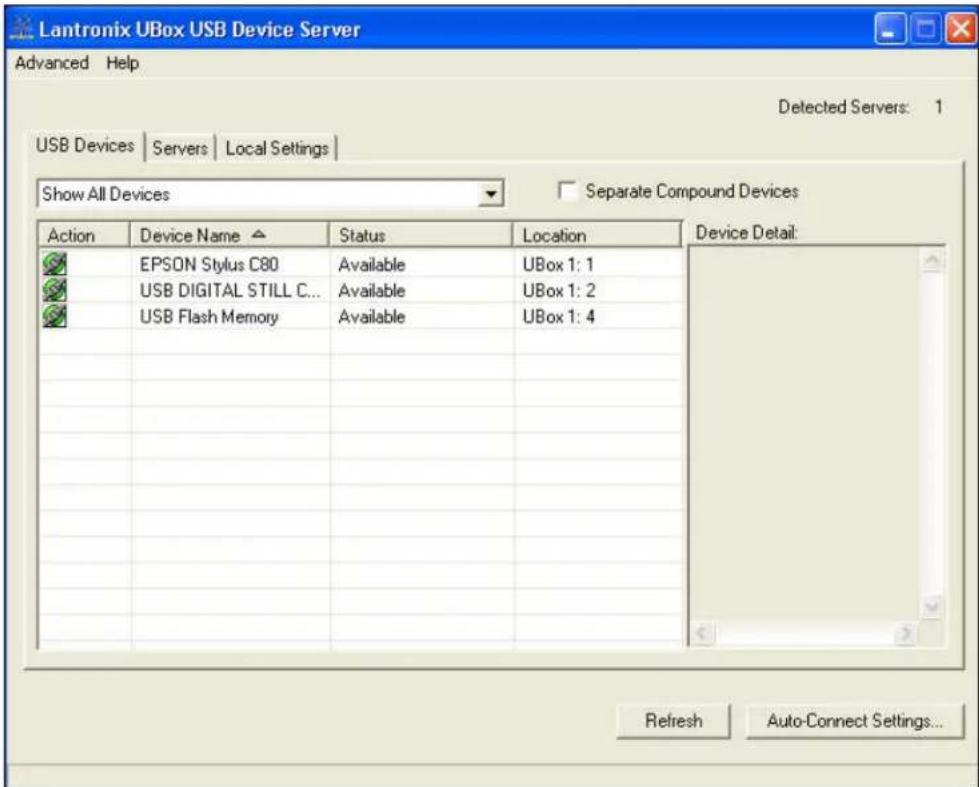
- Review the following information on the USB Devices tab.
| Action | The Connect/Disconnect icon connects and disconnects the USB device. The icon is green for Connect and red for Disconnect. |
| Device Name | Name programmed into your USB device by its manufacturer. This name may differ from the actual name and model number of your device. For example, if you have an HP Deskjet 882 printer, it may appear as HP Deskjet 880 or HP Printer. Some USB devices do not have names programmed into them. For unnamed USB devices, the USB device's programmed Vendor ID (VID) and Product ID (PID) display. If desired, you can rename your USB devices.(See6:Changing Local Software Settings.) |
| Status | Status of the USB device. The status changes as you start to use USB devices through the UBox. At the start, you see only theAvailablestatus (which means that the USB device is ready to be used by means of the UBox). (SeeUSB Device Status Details on page 27.) |
| Location | This column shows the UBox's name and the UBox's USB port number that your USB device is connected to. For example, the locationUBox 1:2means that the USB device is connected to USB port number 2 on the UBox called UBox 1. |
Step 2 – Connect a Networked USB Device
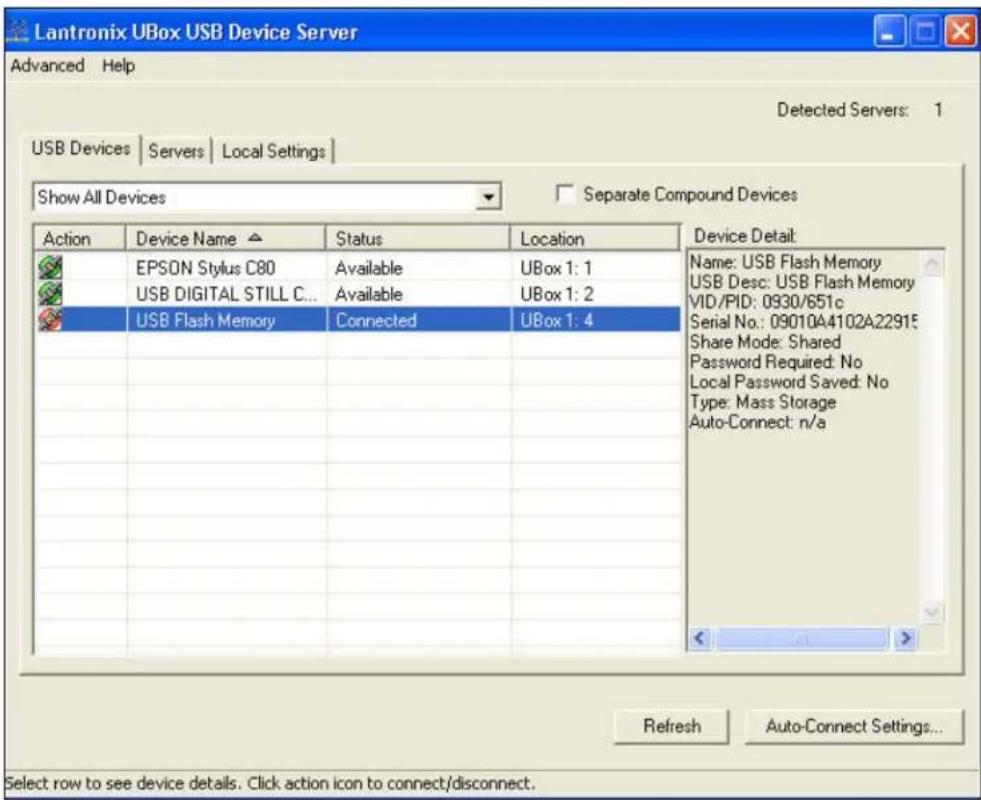
- Select the USB device under Device Name, and click the Connect icon in the Action column to the left of the device name. The status is now Connected. At this point, you can use it as if it were connected directly to your computer.
Figure 4-3. Selected Device Displaying Device Details
Note: The default configuration of the UBox is Multi-User Connect Mode. In this mode, all USB devices are shared in a one-at-a-time mode. If a device is in use by another user, that USB device's status displays as In Use By [ComputerName].
Before you can use the device, you must connect to it to gain exclusive access. When you are finished using the device, you must disconnect from it before others can use it.
When you select a USB device, information displays in the Device Details section of the window. Typically, this information includes:
| Name | Name for the USB device programmed into the device by the vendor. If you rename the device (see Editing Server Settings: USB Device Configuration Tab on page 36), the custom name displays as Name. |
| USB Desc | Description of the device programmed into the device by the vendor. Cannot be changed. |
| VID/PID | Vendor ID (VID) and Product ID (PID) programmed into the device by the vendor. |
| Serial No. | Serial number of the device programmed into the device by the vendor. |
| Share Mode | Indicates type of connection to the specific USB device:Shared: Allows multiple computers to connect to and disconnect from the USB device. Default.Dedicated: Dedicates the USB device to a specific computer. |
| Password Required | If Yes, the user must enter a password to view and update this USB device. |
| Local Password Saved | If Yes, the user must enter a password to access the USB device.Note: If the user chooses Remember Password when connecting to a password-protected USB device, the password is saved in the Local Settings tab. (See Viewing or Removing Device Passwords on page 47.) |
| Type | Type of device programmed into the device by the vendor. |
| Auto-Connect | If Yes, automatically connects to your computer when you have a print job queued and disconnects when the job is finished. |
- Repeat the procedure above for every USB device you want to use.
Step 3 - Disconnect Your USB Device(s)
When you have finished using your USB device, you must virtually disconnect it from your computer before it is available to everyone else on the network.
-
Open the Lantronix UBox application.
-
Select the USB device and click the Disconnect icon 📋. The status changes to Available.
Note: Some USB devices require additional action before you disconnect your USB device. For example, some USB devices require you to stop the USB device's software. If your USB device requires such action when the device is directly connected to your computer, please perform them before clicking the Disconnect icon in the Lantronix UBox software.
If you forget to disconnect a USB device, the USB device automatically disconnects if your computer goes to "sleep" or "hibernates," your computer is turned off, or you disconnect from your network.
In the worst case, where a USB device has been left in use and you cannot get the other computer to disconnect it, you can “forcibly disconnect” the device. While this action is not recommended, you can learn more about it in Using Forced Device Disconnect on page 25.
Using Multiple UBoxes and USB Devices
There are numerous ways to connect USB devices to one or more UBoxes.
Compound Devices
You can connect up to eight USB devices to one UBox. While the UBox 4100 only has four USB ports, and the UBox 2100 has two, each supports up to eight devices because of how compound USB devices work. Compound USB devices are devices that have multiple components connected to an embedded USB hub inside one USB device. A single PC supports connection of up to 50 USB devices.
For example, some compound devices have two components: a scanner and a printer. Other compound devices have three components: a printer, a card reader, and an HID device for buttons on the printer.
One UBox with Multiple Users
The UBox allows up to 10 users to connect to a single or to a set of UBoxes using the same UDP port. You can support more users by setting up additional UBoxes with different UDP port numbers.
Multiple UBoxes and USB Devices
You can view up to eight UBoxes in the Lantronix UBox software.
For example, if you are using all of the USB ports on eight UBox 4100 units, you can view up to 32 USB devices in the UBox software; however, you can only have 12 USB devices simultaneously connected to your computer.
To use a 13th USB device, disconnect one of your 12 USB devices using the Lantronix UBox software to free a location for the next USB device.
To have more than eight UBoxes, configure your next eight UBoxes to use a different UDP port (see 5: Changing the UBox's Settings). Once you have done this, use the Local Settings tab to switch between your first eight UBoxes and your next eight UBoxes (see 6: Changing Local Software Settings).
UBox Groups on Multiple UDP Ports
One PC can use groups of UBoxes attached to multiple UDP ports. For example, PC#1 could use 3 groups of UBoxes using 3 different UDP Ports, and PC#2 could use 2 of the three allowing PC#2 to share some but not all servers.
PC Connectivity to UBoxes and UBS Devices
The UBox firmware supports the connection of:
◆ Up to 50 USB devices per PC by means of multiple UDP ports.
◆ Up to 30 UBoxes per PC at the same time, by different UDP ports Summary
Summary
| USB Connections per UBox | 1 UBox can connect to up to 8 USB devices (assuming compound devices). |
| Users per UDP Port | 10 users can connect to a single or a set of UBoxes using the same UDP port. |
| USBs per User | 1 user can view up to 12 USB devices at a time. |
| PC UBox and USB Connections | 1 PC can connect to up to 30 UBoxes and 50 USB devices at a time |
Other Ways to Connect and Disconnect USB Devices
Using the USB Devices tab is only one method of connecting and disconnecting USB devices. You can use the following methods instead:
UBox System Tray: Use the UBox System Tray feature without opening the UBox software.
Auto Connect: For improved printer sharing, use the Auto Connect feature to automatically connect and disconnect printers.
Forced Device Disconnect: Forcibly disconnect a device that another user has left in use.
Single-User Device Connect: Use this mode to dedicate and automatically connect USB devices to only one computer.
Using the UBox System Tray
The UBox System Tray on the Windows taskbar contains icons that enable you to access the following functions quickly and easily:
- Access the UBox settings.
Configure Auto Connect.
Connect to and disconnect from USB devices on your UBox.
To use the system tray:
- Find the Lantronix UBox System Tray icon. The System Tray is in the lower right corner of your screen (next to the time).
Figure 4-4. System Tray

- Right-click the UBox application icon A menu displays.
Figure 4-5. System Tray Menu
| About Lantronix UBox |
| UBox SettingsAuto Connect Settings |
| Connect to devices |
| Exit |
- Select the desired function:
| About Lantronix UBox | Opens a window that displays the currently installed software version. |
| UBox Settings | Opens the Lantronix UBox application. |
| Auto Connect Settings | Opens the Auto Connect window to configure your printers for Auto Connect mode. |
| Connect to devices | Allows you to connect to available USB devices. To connect, select your device from the list. USB devices connected to your computer have a check mark next to them. USB Devices connected to other computers do not show. |
| Exit | Quits the Lantronix UBox System Tray and disables the Auto Connect feature. |
Auto Connecting Printers
This feature automatically connects and disconnects printers whenever you have a print job queued. This gives you a printing experience that is similar to using a print server.
The Auto Connect feature for printers actually connects just the printer component of a compound device regardless of what the separate compound devices is set to. This cuts down on the amount of connections needed before printing. (See Compound Devices on page 20.)
Auto Connect is only enabled in the Multi-User Connect Mode.
Before You Begin
Before you begin, please make sure that you have installed and connected your printer using the Lantronix UBox's USB Devices tab (see Connecting Your USB Device on page 16).
Figure 4-6. Epson Printer Connected
Using Your Printer with Auto Connect
Now that you have set up your printer by means of Auto Connect, you are ready to print. Just print your documents as you would normally. Depending on your printer, you may get a warning stating that your printer is disconnected. Ignore these, as the Auto Connect feature will connect the printer for you. Once the printer auto connects, your print job is sent to the printer (this may take a few seconds). When the printer has finished printing, Auto Connect disconnects your printer and makes it available to other users.Multiple Print Jobs from Multiple Users
If you have two users printing to the same printer, Auto Connect connects whichever computer reaches the UBox first. The second user's print job stays in the queue until the first user finishes printing. Once the first user's print job is finished, the first user is disconnected, the second user connects to the printer, and his print job automatically starts. Note: Auto Connect is enabled per computer. If you have multiple computers, enable Auto Connect on each computer.Using Forced Device Disconnect
The Forced Device Disconnect option enables you to disconnect a USB device left in use (connected) by another user. Warning: Do not disconnect a USB device while that device is in use (e.g., do not disconnect a scanner while it is scanning). If the device is still in use, you may damage your drive, lose data, or create a host of other problems. Only use Forced Device Disconnect if you are sure that the USB device is not in use. Please note that if a computer automatically “sleeps” (hibernates, power saves), USB devices connected to the sleeping computer are released and made available to other users. Turning off the connected computer also releases USB devices left in use.To use Forced Device Disconnect:
Note: If your UBox has an administrator password enabled, you must enter that password before you can disconnect the selected USB device. 1. On the USB Devices tab, select the UBox to disconnect. 2. From the Advanced menu, select Force Device Disconnect. Figure 4-9. Forced Device Disconnect on the Advanced Menu  3. In the Status column, the following may display:| Server # | Your UBox's MAC/Network address, found on the label on the bottom of the unit. |
| Server Name | Name of your UBox. You can modify this name by selecting the server and clicking the Edit Server Config button. |
| Status | Current state of your UBox's hardware and software. This column shows whether the UBox software has successfully communicated with your UBox hardware. The codes include:OK:The UBox software has successfully found the UBox hardware. You can now communicate with the selected UBox.Note:The UBox may have a Client Access Password or a Configuration Password that prevents users from accessing that specific server or changing the selected server's configuration.Old Firmware:The UBox hardware contains old firmware. This happens when your computer has newer software than the firmware on the UBox hardware. If you see this message, you must upgrade your UBox's firmware. Select your UBox in the Servers tab and click the Edit Server Config button. (See Updating the UBox's Firmware on page 40.)Temp. Defaults: The UBox hardware is in Temporary Default Settings Mode. This mode allows you to return the UBox to its factory settings temporarily for diagnostics. You can edit your previous settings while you are in this mode. (See Resetting the UBox Hardware on page 55.)Login Failed: Your computer could not connect to the selected UBox because the UBox has a password. Either your computer does not have a password set in the Server Access Settings field in the Local Settings tab or you entered an incorrect password.Attempting Discovery: The UBox software is attempting to locate UBox hardware on your network. This message temporarily displays when you first start your computer or when you reboot the UBox. If this message does not go away, see 7: Troubleshooting.Attempting to Connect: The UBox hardware is sending broadcast messages to your computer, but your computer cannot connect to the UBox hardware. If you have modified your UBox's settings, set the UBox to the Temporary Default Settings Mode and change your settings. If this message does not go away, see 7: Troubleshooting. |
Editing Server Settings: Access Tab
The Access tab contains settings that pertain to accessing the UBox hardware and how the UBox shares USB devices at the server level. These changes affect the selected UBox.To edit the UBox's Settings on the Access Tab:
1. To edit a specific UBox's setting, select the UBox from the list and click the Edit Server Config button. The Access tab on the Edit Server Configuration window opens. Figure 5-2. Edit Server Configuration – Access Tab Notes:
Firmware Upgrade:
After clicking the Edit Configuration button, a message may display informing you about new firmware. You can only update your UBox's settings after you have upgraded your firmware. The UBox's icon disappears while the new firmware is loading. The UBox icon reappears after your UBox has loaded the new firmware. See Updating the UBox's Firmware on page 40. Multiple Users: While multiple users can view the Server Configuration tab at any time, only one user at a time can change the UBox settings on the Edit Server Configuration window. If you are editing the UBox, other users receive a message stating that you are editing the UBox. Once you finish making changes and disconnect, other users can make changes on a one-user-at-a-time basis. 2. Update the following settings as desired:| Server Name | Name of the selected UBox. This name appears to anyone using the UBox application. |
| Connect Mode | From the drop-down menu, select how USB devices get connected to your client PCs:Multi-User (default): Allows multiple users to share a UBox, although they may only use a device on a one-at-a-time basis.Use this mode if you have more than one client computer connected to the UBox. Before using a USB device (e.g., a printer or scanner), you must click the Connect icon on the USB Devices tab.Single-User: Only one user can connect to the UBox at one time.Use this mode if there is only one client computer, or if only one client computer will be powered on at a time and connected to the UBox. In this mode all devices on the UBox are automatically connected to the client computer.Warning: Using this mode with multiple computers will cause unexpected results, as all of the computers will attempt to get exclusive access to the UBox. |
| RequiresConfigurationPassword | Selecting this checkbox forces a user to enter a password to configure the UBox.Once you set a password, users can see the UBox on the Devices and Server tabs; however they cannot edit any UBox settings without supplying the correct password. |
| ConfigurationPassword and Renter Password | Enter and then reenter the password a user must use to configure the UBox. The password is case sensitive. |
| Requires ClientAccess Password | Selecting this checkbox forces a user to enter a password to access the specific UBox. The password Is case sensitive. |
| Client AccessPassword and Reenter Password | If you selected the checkbox above, enter and then reenter the password a user must use to view the UBox. The password is case sensitive.To add the password to the local PC automatically, click Yes on the pop-up window that displays when you enter the password. |
Editing Server Settings: Network Tab
The Network tab contains network settings determining how the UBox communicates on your network. You can configure how the UBox obtains its IP address, what TCP/UDP port it uses to communicate (useful when dealing with firewalls), and the method that the UBox uses to "announce" its presence on your network (This method is known as the discovery mode.) 1. On the Edit Server Configuration window, click the Network tab. Figure 5-3. Network Tab  2. Update the following settings as desired:| IP Address Assignment | From the drop-down list, select one of the following methods of assigning an IP address:Using Defaults:The UBox tries to get an IP address via DHCP first. If it fails to obtain an IP address within 10 seconds, it assigns itself an IP address using Zeroconfig. This is the recommended setting for most users.Use DHCP:The UBox automatically obtains an address using DHCP server. Select this setting if youonlywantto use an IP address obtained using a DHCP server.Use Zeroconfig:In this mode, the UBox assigns itself an IP address using the Zeroconfig protocol. Zeroconfig is an alternative to DHCP that allows hosts to obtain an IP address automatically in smaller networks that may not have a DHCP server. Zeroconfig IP addresses are in the range 169.254.0.1 to 169.254.255.1. Use this setting if the UBox is in a network that only uses Zeroconfig IP addresses.Note:You can get more information about Zeroconfig (also called Zeroconf) athttp://www.zeroconf.org/Use Static IP:Use this mode if you want your UBox always to use the same network settings. Youmustenter the IP Address, Subnet Mask, and Gatewayfor the UBox to communicate with the network. |
| IP Address | The UBox must have a unique IP address on the network. Enter the IP address as xxx.xxx.xxx.xxx.Example:192.168.20.1Note:The system administrator provides the IP address, subnet mask, and gateway. |
| Subnet Mask | A subnet mask defines the number of bits taken from the IP address that are assigned for the host part. Enter the subnet mask as xxx.xxx.xxx.xxx.Example: 255.255.255.0 |
| Gateway | The gateway address, or router, allows communication to other LAN segments. The gateway address should be the IP address of the router connected to the same LAN segment as the unit. The gateway address must be within the local network. Enter the gateway as xxx.xxx.xxx.xxx.Example: 192.168.20.100.Note: If there is no gateway on the network, use the same IP address as the UBox or the IP address of your PC. |
| UDP Port and TCP Port | These fields allow you to specify which port numbers on which the UBox communicates. This communication happens between the UBox hardware and software. By default, these ports are set to 10010.UDP Port: Change this setting to change the UDP port number on which the UBox broadcasts. Other computers configured to use this UDP port number will be able to see this UBox. This setting is useful if you wish to limit the number of people connecting to a particular UBox or if you want to hide a UBox from other users on your network.If you change the UBox's UDP port number, you must tell the UBox software to “listen” to the new port. To do this, change the local UDP port number. (See Updating Server Access Settings on page 46.)TCP Port: Change this setting to change the TCP port that the UBox uses to transmit and receive USB data.If you change the UBox's TCP port number, you must tell the UBox software to “listen” to the new port. To do this, change the local TCP port number. (See Updating Server Access Settings on page 46.)Note: Most users will not need to change the UBox's UDP and TCP ports. However, certain firewalls may block traffic to the default UDP and TCP ports. In these instances, you can either change the port numbers or configure your firewall to allow connections using UBox's configured UDP and TCP ports. |
| Discovery Mode | Select the method the UBox should use to send its UDP data.Broadcast:By default, the UBox uses this method to send discover messages to UBox clients.Broadcast sends UDP messages to every Ethernet-connected device on your network. This is the best setting to use on small networks, home networks, and networks where you have computers with multiple network interfaces (for example, a computer with both wireless and wired connections).Multicast:Sends UDP messages using Multicast UDP.This method only sends discover messages to computers that listen to the same multicast address that the UBox uses.Multicast & Broadcast Uses both methods at the same time.Note:If you change the UBox’s multicast address, you must tell the UBox software to listen to the new address.You only need to change the multicast address if you are using Multicast or Multicast & Broadcast as your discovery method. (See Changing Local Software Settings on page 44.) |
| Multicast Address | The address on which the UBox will send discover messages. You can enter any multicast address a long as it is in the range of 224.0.0.0 to 239.255.255.255. Default is 239.255.176.42.Note:You would only change this if the default changes, for example, if you have a router that needs a different multicast address to properly route traffic across a LAN/WAN. |
Editing Server Settings: USB Device Configuration Tab
The USB Device Configuration tab on the Edit Server Configuration window shows USB devices that are connected to the UBox and configuration records for each device. On this tab, you make changes to USB devices connected to your UBox. You can configure: A USB device to require a password before you can access the device. A USB device to be dedicated to a certain computer so that the USB device is always connected to that computer. The name displayed for a particular USB device (useful if you have multiple USB devices that do not register a name, or if you have multiple identical USB devices). 1. On the Edit Server Configuration window, click the USB Device Configuration tab. Figure 5-4. Edit Server Configuration – USB Device Configuration Tab  2. Update the following settings as desired:| Server Serial No. | (View-only) Corresponds to the UBox's MAC/Network address (printed on the bottom of your UBox hardware). |
| Device Name | Name that is programmed into your USB device by its manufacturer. This name may different from the actual name and model number of your device. For example, if you have an HP Deskjet 882 printer, it may appear as HP Deskjet 880 or HP Printer. Some USB devices do not have names programmed into them. For unnamed USB devices, the USB device's programmed Vendor ID (VID) and Product ID (PID) display. |
| Location/Serial Number | The serial number of the USB device if it has one. If it does not have a serial number, the port (1-4) on the UBox to which the USB device is connected. |
| Cfg | Displays an asterisk if the device was configured using the USB Device Configuration window. |
| Status | Indicates whether the selected USB device is Attached, Detached, or has an Invalid Password (the password in this and the password saved on the Local Settings tab are different). (See 6: Changing Local Software Settings.) |
| USB Product Name | Name programmed into the USB device by the manufacturer. |
| Vendor ID (VID) | Vendor ID programmed into the USB device by the manufacturer. |
| Product ID (PID) | Product ID programmed into the USB device by the manufacturer. |
| USB Serial Number: | Serial number, if any, programmed into the USB device by the manufacturer. |
| Alternate Name | A name for the USB device other than the name programmed into it by the manufacturer.The alternate name applies to a specific UBox.◆ If you move a USB device to another UBox, reset the alternate name on the new UBox.◆ If your USB Device does not have a serial number, and you move the USB device to a different port, re-enter the alternate name. |
| Requires Password To Connect | Select the checkbox to share the specified USB device only with users who have the password to that USB device. When you first attempt to connect to a password-protected USB device, you are prompted to enter a password. You can then opt to store passwords locally in theLocal Settingstab so that you do not need to reenter the password every time you want to use that USB device.Because passwords apply to a specific UBox.◆ If you move a USB device to another UBox, reset that USB device's password on the new UBox.◆ If your USB Device does not have a serial number, and you move the USB device to a different port, select theRequires Password to Connectcheckboxagain. |
| Connection Password and Reenter Password | If you selected the checkbox above, enter and then reenter a password a user must use to view the USB device. |
| Share Mode | Select one of the following types of connection:Shared: Allows multiple computers to connect to and disconnect from the USB device. Default.Dedicated: Dedicates the USB device to a specific computer.Share modes apply to a specific UBox:◆ If you move a USB device to another UBox, reset that USB device's share mode on the new UBox.◆ If your USB Device does not have a serial number, and you move the USB device to a different port, reset the share mode. This is only necessary if the share mode is Dedicated. |
| Client Name | If you selected the Requires Password To Connect checkbox and the Share Mode of Dedicated, enter the name of the computer. (See the Local Settings tab for the name.) |
Applying, Canceling, or Removing Server Settings
1. Do one of the following: To save your changes, click the Apply button. The UBox hardware disconnects any users connected to it and restarts itself. Your UBox disappears temporarily from the UBox application while it restarts. Note: The Apply button is not available unless you make a change. To cancel the changes you made, click the Cancel button. The UBox does not restart. To delete the configuration, click the Remove button. The original information displays.Restoring Default Settings
Note: Restoring the UBox's default settings closes all device connections, possibly adversely affecting users connected to them. Please be sure that all devices attached to the UBox are not in use before continuing.To restore the UBox to factory settings:
1. On any of the Edit Server Configuration tabs (Access, Network, or USB Device Configuration), click the Restore Defaults button. Restoring to default settings also sets the UBox's UDP port to 10010 and the multicast address to 239.255.176.42. If you previously changed your UDP port or multicast address, remember to change the Lantronix UBox application's Local UDP Port to 10010 and multicast address to 239.255.176.42. You may not be able to see your UBox if you fail to do this. Firewall Users: If you have configured your firewall to allow access to the UBox, remember to check your firewall's setting. The UBox's IP address may have changed after restoring to default settings.Updating the UBox's Firmware
The UBox alerts you if the software and firmware do not match. Figure 5-6. Firmware Update Notification Window  You can update the firmware at any time using the Lantronix UBox application.To update the firmware:
1. On the Servers tab, select the UBox you want to update. Figure 5-7. Servers Tab  2. Click the Update Server Firmware button. An update confirmation window displays. Figure 5-8. Update Server Firmware  3. Click the Close button. Note: Always have the latest firmware installed on your UBox. We do not recommend using older firmware on your UBox with newer UBox software on your computer (or vice versa). Certain features, such as Auto Connect, may not work if your firmware is not compatible with the version of software that you have on your computer(s).Overriding Server Network Settings
You can override server network settings to configure a UBox that is in a static IP-based network. This makes it so that you do not have to change your local TCP settings, connect to the UBox using a direct Ethernet connection, or set up a DHCP address. Note: By default, the UBox gets a DHCP or Zeroconfig IP address. In some cases, this address is on a different subnet from the subnet your computer is on. If this is the case, the computer cannot see the UBox.To override network settings:
1. Select the UBox on the USB Devices, Servers, or Local Settings tab. 2. From the Advanced menu, select Override Server Network Settings. The Override Server Network Settings window opens. Figure 5-9. Override Server Network Settings Window  3. Enter the following information:| Server Serial Number | UBox's serial number. |
| IP Assignment Method | Select one of the following methods of assigning an IP address to the UBox:Automatic (default): The UBox tries to get an IP address using DHCP first. If it fails to obtain an IP address within 10 seconds, it assigns itself an IP address using Zeroconfig. This is the recommended setting for most users.Use DHCP: The UBox automatically obtains an address using DHCP server. Use this setting if you only want to use an IP address obtained via a DHCP server.Use Zeroconfig: In this mode, the UBox assigns itself an IP address using the Zeroconfig protocol. Zeroconfig IPaddresses are in the range 169.254.0.1 to 169.254.255.1.Use this setting if the UBox is in a network that only uses Zeroconfig IP addresses.Note:Zeroconfig (also called Zeroconf) is a networking protocol that allows computers to find each other automatically without the need for you to enter IP addresses, configure DNS servers, or set up DHCP.Computers using Zeroconfig can only communicate with each other when they are on the same Ethernet segment (all Zeroconfig computers are connected to the same Ethernet hub).You can get more information about ZeroConf at http://www.zeroconf.org/Use Static IP:Use this mode if you want your UBox always to use the same network settings. The UBox shows its current network configuration in theIP Address, Subnet Mask, andGatewayfields. You can only enter data in these fields if you selectUse Static IP. |
| IP Address | The UBox must have a unique IP address on the network.Enter the IP address as xxx.xxx.xxx.xxx.Example: 192.168.20.1Note:The system administrator provides the IP address, subnet mask, and gateway. |
| Subnet Mask | A subnet mask defines the number of bits taken from the IP address that are assigned for the host part. Enter the subnet mask as xxx.xxx.xxx.xxx.Example: 255.255.255.0 |
| Gateway | The gateway address, or router, allows communication to other LAN segments. The gateway address should be the IP address of the router connected to the same LAN segment as the unit. The gateway address must be within the local network. Enter the gateway as xxx.xxx.xxx.xxx.Example: 192.168.20.100.Note:If there is no gateway on the network, use the same IP address as the UBox or the IP address of your PC. |
Refreshing Data
You can refresh the USB Devices, Servers, and Local Settings tabs. This forces the UBox software to obtain the most recent status of the UBox hardware.To refresh the displayed information:
1. On the USB Devices, Servers, or Local Settings tab, click the Refresh button. The most current hardware information displays on each of the tabs.6: Changing Local Software Settings
To modify the settings for the UBox software, you use the Local Settings tab. These settings are kept on your computer. Note: The Servers tab is for modifying the settings for the UBox. These settings are stored on the UBox hardware. See 5: Changing the UBox's Settings. The Local Settings tab allows you to: - Change your client name (used to identify your computer to the UBox hardware and to other UBox users). - Change your UDP port number and multicast address (used to access the UBox). - Create and manage server access settings, allowing you to encode your communication with the UBox, connect to UBoxes outside of your subnet (active discovery), and enter server access passwords. View and delete saved passwords for password-protected USB devices.Updating Personal Communication Settings
To update your computer's settings:
1. Click the Local Settings tab. The tab displays information about your computer, the UBoxes on your network, and the devices attached to each UBox. Figure 6-1. Local Settings Tab  2. In the Personal Communications Settings area, update the following information as needed:| Client Name | Name of your computer that is broadcast to the UBox and to other users on the network. The default name is the computer name specified when your computer was first set up. You can enter a different name in this field. |
| UDP Port | This is the UDP port number that the UBox software uses to discover UBox hardware on your network. The default value is 10010. If your UBox hardware is set to broadcast on a different port number, you must change the UDP port number here to the same value. |
| Multicast Address | This is the multicast address that the UBox software uses to discover UBox hardware on your network. The default value is 239.255.176.42. If the UBox hardware is set to broadcast on a different address, you must change the address here to the same value. |
Updating Server Access Settings
The Server Access Settings area in the Local Settings tab is for connecting to a UBox that is either password protected or uses active discovery. For most users, Server Access Settings are blank.To update server access settings:
1. In the Server Access Settings area of the Local Settings tab, click the Add button. The Edit Local Server Access window opens. Figure 6-2. Edit Local Server Access Window  2. Update the following information as needed:| Server Serial Number | Serial number of the UBox to which you want to connect. This is the Network (MAC) address on the bottom of the unit. |
| Access Password (if required) | Enter the UBox's password. The password may have up to 31 characters (including spaces) and is case sensitive. |
| Encoded Session | Selecting this checkbox encodes your communication between the UBox hardware and your computer. You only need to enable this option in this window.Warning:Encoding the communication with your UBox affects overall performance of the UBox and the USB devices connected to it. |
| Active Discovery | If your UBox is outside of your network, for example, in another office, or if you need to access your UBox across a WAN, enableActive Discovery. Active discovery searches for UBoxes outside of your local network. It requires that you know the IP address, TCP port, and password (if one has been set up) of the UBox that you want to access. |
| IP Address | If you selectedActive Discovery, the IP Address field becomes available. Enter the UBox's IP address. |
| TCP Port | If you selectedActive Discovery, the TCP Port field becomes available. Enter the TCP port number. The default setting is 10010. |
| Server # | Serial number of the UBox to which you want to connect. |
| Server Name | Name of the UBox to which you want to connect. |
| Status | Status of the UBox to which you want to connect.Onlinedisplays if you have successfully connected to the UBox.Offline displays if the UBox is not detected. |
| Password | DisplaysYesorNodepending on whether a password was specified on the Edit Local Server Access window. |
| Active Discovery | DisplaysYesorNodepending on whetherActive Discoverywas enabled on the Edit Local Server Access window. |
Viewing or Removing Device Passwords
When you connect to a USB device that is password protected, you are asked if you want to save your password. If you save a password for a USB device, it displays in the Device Passwords area of the Local Settings tab.To view or remove USB device passwords:
1. In the Device Passwords area, verify the following (if you have saved a password previously):| Device Name | Name that is programmed into your USB device by its manufacturer. This name may different from the actual name and model number of your device. For example, if you have an HP Deskjet 882 printer, it may appear as HP Deskjet 880 or HP Printer. Some USB devices do not have any names programmed into them. For unnamed USB devices, the USB device's programmed Vendor ID (VID) and Product ID (PID) display. |
| Status | Status of the USB device: Attached or Detached to indicate whether the device is connected to or disconnected from the UBox. |
| Server # | Serial number on the label on the bottom of the UBox to which the USB device is connected. |
| Location | Port number on the UBox to which the USB device is connected. |
| Device Serial # | Serial number of the USB device, if programmed into it by the vendor. |
Switching Between Sets of UBoxes
The UBox software on your computer can only “see” eight UBoxes at a time. This is true even with Active Discovery, which can see UBoxes with different UDP port numbers. To use a ninth UBox, you have two options: Change both the local UDP port and the UBox UDP port to the same new port number so your computer can see the UBox. This forces the UBox software to see only the UBoxes on the new UDP port; it will not see UBoxes with a different UDP port. Remove UBoxes with Yes in the Active Discovery column in the Server Access Settings area of the Local Settings tab. This removes or prevents UBoxes that are on another network from showing up on this computer.7: Troubleshooting
Before You Begin
Please make sure that you already have: - Installed the latest version of the Lantronix UBox software. ◆ Connected your UBox hardware to your network. - Connected your computer to the same network as the UBox hardware. - Turned on the UBox (by connecting its power supply to an outlet). - Turned on your computer. - Connected a USB device (for example, a scanner) to the UBox hardware. - Installed your USB device's software on your computer. ◆ Had the UBox turned on for at least 15 seconds. If you have not done any of the above, please do so now and return to this chapter when you have finished. Note: You can find the latest version of the Lantronix UBox software at http://www.lantronix.com/. Please follow the instructions in this chapter in order as each section builds on the previous one. If you cannot proceed past a certain section, please contact Lantronix Technical Support.Troubleshooting: Status Lights
Look at the status lights on your Lantronix UBox hardware. These status lights will be in one of the following states: Off On (doesn't blink) - Blinking Steadily (blinks on/off every second) - Blinking Rapidly (blinks on/off rapidly) - Blinking Slowly (stays on for 3 seconds, and then blinks off/on and repeats) Both the UBox 2100 and UBox 4100 have three groups of status lights: SYSTEM, NETWORK, and USB device. Figure 7-1. Status Lights on UBox 4100 SYSTEM NETWORK  Figure 7-2. Status Lights on UBox 2100  Note: For a detailed description of every light and its status, please read 8: Status Light Behavior. While the UBox is booting up, different status lights turn on and off. Once the UBox is running, the status lights have new meanings that help troubleshoot the UBox.Boot-Up
The following table explains what the SYSTEM status lights mean during the boot-up process. UBox 4100: Has three (one green and two red) SYSTEM indicators UBox 2100:, Has four (one green, two amber and one red). The green has the same meaning on both units. The UBox 2100's two amber indicators are equivalent to the UBox 4100's red indicator. The additional red indicator on the UBox 2100 indicates error.SYSTEM Status Light 1
Look at the SYSTEM status light 1 (the green leftmost light under SYSTEM).| Status Condition Suggestions | ||
| Off | The UBox does not have power. | Check the UBox's power supply and its connection to an outlet. |
| On | If this light does not blink on/off within 6 seconds, the UBox has failed to boot up. | Please follow the instructions in Resetting the UBox Hardware on page 55. |
| Blinking Slowly | This is normal and indicates the UBox hardware is working. | Proceed to the next light. |
| Alternating On/Off with SYSTEM Lights 2 and 3 | If the SYSTEM 1 (green) light alternates on/off with either SYSTEM 2 or 3 (red), so that when SYSTEM 1 turns off, SYSTEM 2 or 3 turns on and vice versa, the UBox has encountered an error while loading its firmware. | Contact Technical Support. |
SYSTEM Status Lights 2 and 3
Look at the USB status lights 2 and 3. These two lights are red on the UBox 4100 and amber on the UBox 2100 under SYSTEM). Status 2 is the red/amber light in the middle, and Status 3 is the rightmost red/amber light). Note the status of each.| Status Condition Suggestions | ||
| SYSTEM 2 is On / SYSTEM 3 is On | The UBox has obtained an IP address using DHCP and does not show any users connected to it. | Verify the following:◆ The computer trying to communicate with the UBox is on the same DHCP Ethernet subnet or also received an IP address via DHCP.◆ The computer has the current UBox software installed.◆ The UBox software has the UDP port set correctly (default 10010).◆ The computer does not have a personal firewall activated. |
| SYSTEM 2 is On / SYSTEM 3 is Off | The UBox is configured to use a static IP and does not show any users connected to it. | Verify the following:◆ The computer trying to communicate with the UBox is on the same static IP Ethernet subnet.◆ The computer has the current UBox software installed.◆ The UBox software has the UDP port set correctly (default 10010).◆ The computer does not have a personal firewall activated. |
| SYSTEM 2 is Off / SYSTEM 3 is On | The UBox obtained an IP address using Zeroconfig and does not show any users connected to the UBox. | Verify the following:◆ The computer trying to communicate with the UBox is also on the Zeroconfig subnet.◆ The computer has the current UBox software installed.◆ The UBox software has the UDP port set correctly (default 10010).◆ The computer does not have a personal firewall activated. |
| Status 2 is Off / Status 3 is Off | This is normal and indicates that the UBox hardware is working. It has obtained an IP address and has detected users (client computers) connected to it. | |
USB Status Lights: 1-4 on the UBox 4100 and 1 & 2 on the UBox 2100
Locate the green light under USB that corresponds to the USB port to which your USB device (e.g., printer or scanner) is connected.| Status Condition Suggestions | ||
| Off | The UBox does not have power. | Check the UBox's power supply and its connection to an outlet. |
| Blinking | Blinking may indicate the UBox hardware does not support your USB device or is having problems communicating with the device.Blinking may indicate you have exceeded the number of USB devices per UBox. | Currently, the UBox does not support isochronous USB devices (e.g., webcams and USB speakers).If you have a USB device that is not isochronous, please check the Lantronix web site or contact Lantronix Technical Support.Note: While most USB devices work with the UBox, future software updates from Lantronix will support certain incompatible USB device. Please go to the Lantronix web site or contact Lantronix Technical Support for more information about compatible devices.One UBox supports up to eight USB devices. While many USB devices appear as one USB device, components of compound USB devices (a device with an embedded hub or a device that has multiple components tied together by an internal USB hub) count as one device each.For example, the Lexmark X1150 is a compound device that has two components (one for the scanner, one for the printer). The Canon i475D is a compound device that has three components (the printer, the card reader, and an HID device for buttons on the printer).If you connect four X1150 devices, you are still under the eight-device limit, and the USB lights do not blink. If you have three Canon i475Ds, you have nine USB devices and are over the limit. Therefore, the light blinks. |
| On | This is normal and indicates the UBox supports your USB device. | Proceed to the next light. |
Troubleshooting: UDP Ports
Make sure that your UBox software and hardware are communicating on the same UDP port. To verify this, open the Lantronix UBox application. Your UBox should display.  In the Lantronix UBox application, is your UBox listed?| Status Condition Suggestions | ||
| Is Not Listed | The UBox software cannot find the UBox hardware. | 1. Verify that the UBox software's local UDP port is set to match the UDP port used by the UBox hardware. The default is 10010.(See Updating Server Access Settings on page 46.2. If you do not know the UDP port that your UBox software is using, set the Local UDP Port to 10010.3. If this does not work, reset your UBox hardware (see page 55).4. If you still cannot see your UBox, proceed to Troubleshooting: Network Issues below. |
| Is Listed | This is normal and indicates that the UBox hardware is working. | |
Troubleshooting: Network Issues
Communication Between your PC and the UBox
If you have determined via the status LEDs that the UBox is communicating with a specific network, but network communication between the computer and the UBox is not established, you can ping the UBox from the PC trying to communicate with the UBox:To ping the UBox:
1. From the Windows Start menu, select Run, type cmd, and click OK. A command window opens. 2. At the prompt, type ping xxx.xxx.xxx.xxx (where xxx.xxx.xxx.xxx is the IP address of the UBox). If the UBox replies, the physical and logical (IP subnet) network communications are good. Proceed to step 4. 3. If you do not receive a reply from the ping, the problem is network related. Make sure: IP addresses of the PC and UBox are on different subnets ◆ Physical network connections of the PC and UBox are established: - Check network cable connections. - Verify that switches/hubs are powered up. - Verify that you have a network link light on the PC and UBox. Note: Some Ethernet hubs/switches may not properly route UDP and TCP traffic when connected to other hubs and switches. This is especially true when your UBox is using Zeroconfig to obtain an IP address. To avoid these issues, connect your UBox and your computer to the same Ethernet hub/switch. 4. If you can ping the UBox, but the UBox software cannot establish a connection, the UDP/TCP port is not correct or a firewall is blocking it. Temporarily disable the firewall and see if communication to the UBox is established. If so, configure the firewall to allow the UBox UDP/TCP ports to pass through. See Firewalls below. If not, the UDP/TCP ports between the UBox and UBox application on the PC do not match. See Troubleshooting: UDP Ports on page 53.Firewalls
A firewall helps keep your network safe by preventing hackers from getting inside your network and preventing you from sending private data to outside networks (e.g., the Internet). Firewalls are either hardware (a physical item on your network such as your DSL router) or software (resides on your computer, e.g., Windows XP's built-in firewall software). In most cases, these firewalls are configured to allow only basic Internet traffic (e.g., web, email, ftp) to come in and out of your network. Since the UBox is a new product, these firewalls usually do not know about Lantronix UBox network data and may prevent you from communicating with your UBox. If you are using a firewall, configure the firewall software to allow UDP traffic on port 10010 and to allow TCP/IP traffic on port 10010. The UBox uses both UDP and TCP/IP to communicate. Note: For step-by-step instructions on configuring the software firewall that is built into Windows XP, see A: Configuring the Windows XP Firewall.Final Step
If still have problems with your UBox, try resetting the UBox hardware and then repeating the troubleshooting process. For instructions on how to reset your UBox hardware, please proceed to Resetting the UBox Hardware belowResetting the UBox Hardware
Power-Cycling or Using the Reset Button
You can reset the UBox hardware at any time by two methods: by power cycling it or by using its reset button.To reset by power cycling:
1. Disconnect the UBox's power supply and wait 5 seconds. 2. Reconnect the power supply. The UBox resets.To reset using the reset button
1. Make sure that you have a straightened or unfolded paper clip (or a similar object without a sharp tip) and that your UBox is on. 2. Locate the reset hole on the top of your UBox. Figure 7-3. Resetting the UBox 4100  3. Using the paper clip, quickly press the reset button inside the hole. The UBox resets. Figure 7-4. Resetting the UBox 2100  Rebooting the UBox into Safe Mode Using the Reset Button If you have made an unwanted change to the UBox settings and can no longer access the UBox, you can boot it into a "safe mode." In this mode, the UBox reboots using default settings (e.g., multi-user connect mode or default IP mode) and allows you to view and edit the settings. To boot into safe mode: 1. Press and hold the reset button until the lights turn off (this takes 3 or more seconds). It takes approximately 15 seconds to complete the reset. 2. In the Lantronix UBox application, make sure that your Local UDP Port is 10010. 3. Once you have verified the port, check the Lantronix UBox application to see whether your UBox displays. 4. If it does not display, check the SYSTEM status LEDs to determine the UBox's network condition.Troubleshooting: USB Devices
To troubleshoot problems with USB Devices:
1. Open the Lantronix UBox application. You should see your USB device listed. Make sure Show All Devices displays in the list box below the tabs. 2. If your USB device does not display: a) Check the USB LED status. b) Connect the device directly to the PC to verify that the device is functioning. To troubleshoot issues with multiple users of a USB device:| If ... Suggestions | |
| You are sure that no one else is using your USB device, and the device still shows up asIn Use | Contact Lantronix Technical Support. |
| Your USB device displays and isConnected. | You should be able to use the USB device as you would normally.◆ If your USB device is a printer, you should be able to print by going to yourFilemenu and selectingPrint.◆ If your USB device is a scanner, you should be able to open the scanner software and use your scanner. |
| You are not able to use your device | Refer to your USB device’s troubleshooting instructions for what to do next.If you are still not able to use your USB device, please contact Lantronix Technical Support. |
Technical Support
If you are experiencing an error that is not described in this chapter, or if you are unable to fix the error, contact us as follows:Technical Support US
Check our online knowledge base or send a question to Technical Support at http://www.lantronix.com/support.Technical Support Europe, Middle East, Africa
Phone: +49 (0) 89 31787 817 Email: mailto:eu\_techsupp@lantronix.com or mailto:eu\_support@lantronix.com Firmware downloads, FAQs, and the most up-to-date documentation are available at: http://www.lantronix.com/support When you report a problem, please provide the following information: - Your name, and your company name, address, and phone number - Lantronix model number ◆ Software version ◆ Description of the problem Status of the unit when the problem occurred (please try to include information on user and network activity at the time of the problem)8: Status Light Behavior
The Lantronix UBox comes equipped with LED lights that report the status of the Lantronix hardware. Figure 8-1. Position of Status Lights on the UBox SYSTEM NETWORK  USB Figure 8-2. UBox 2100 LEDs  The meaning of these lights changes depending on whether the UBox is booting up (you have just turned on the UBox), or if it is running. The two tables on the following pages show all of the possible states of these LED lights and what they mean. If you are having problems with your UBox, please use this information in conjunction with the information in 7: Troubleshooting to diagnose the problem. Note: SYSTEM lights 2 and 3 on the UBox 4100 are red; they are amber on the UBox 2100. Figure 8-3. UBox Status Lights—UBox is Booting UP| Stage Status Troubleshooting | ||
| STAGE 1UBox Is BootingUp | When you first power on the USB UBox, the (red or amber) SYSTEM 3 light is ON while the UBox is booting. | If this light never goes off or the 4 (green) USB lights never come on, you may have a hardware failure. Please contact Lantronix Tech Support.If SYSTEM 1 (green) and SYSTEM 2 (red/amber) blink alternately, the UBox firmware has failed to update or load. Please contact Lantronix Tech Support. |
| STAGE 2Firmware Loading | The (green) USB 1-4 lights are turned ON as the firmware starts running. | If SYSTEM 2 and 3 never stop blinking, the UBox is not finding a valid Ethernet connection, or you have configured the UBox to use an invalid IP address. Please contact Lantronix Tech Support for further details. |
| STAGE 3Checking Ethernet Connection | SYSTEM 2 and SYSTEM 3 (both red/amber) start blinking while the UBox looks for an Ethernet signal (a physical Ethernet connection) and continue to blink until the UBox finds this signal. | |
| STAGE 4Finding IP Address | SYSTEM 2 and SYSTEM 3 (both red/amber) blink while the UBox tries to obtain an IP address. Once the UBox obtains its IP address, the UBox has finished booting and is now running. The status lights now have a new meaning. Please refer to Figure 8-4. UBox Status Lights -- UBox is Running.Notes:◆ If the UBox is configured to use a Static IP address, Stage 4 finishes immediately.◆ For DHCP only, it waits for the DHCP UBox.◆ For Zeroconfig only, it takes 1-2 seconds while it negotiates.◆ For Default, it waits for DHCP for 10 seconds before taking a Zeroconfig address (1-2 seconds). | If SYSTEM 2 and 3 never stop blinking, the UBox is not finding a valid Ethernet connection, or you have configured the UBox to use an invalid IP address. |
| Light Color Status | ||
| SYSTEM 1 | GreenUBox is working. | Slowing Blinking (on for 3 seconds then off/on):OFF or ON (does not blink):If the light is off, the UBox is not receiving power. If the light is on, the UBox has crashed and needs to be reset (see Resetting the UBox Hardware on page 55). |
| SYSTEM 2-3 | Red/AmberUBox is currently working as it detects users connecting to the UBox.SYSTEM 2=ON and SYSTEM 3=OFF:UBox is configured to use a static IP and does not detect any users connected to the UBox.SYSTEM 2=ON and SYSTEM 3=ON:UBox has obtained an IP address using DHCP and does not detect any users connected to the UBox.SYSTEM 2=OFF and SYSTEM 3=ON:UBox obtained an IP address using Zeroconfig and does not detect any users connected to the UBox. | |
| NETWORK 1 | Green ON/OFF:If the light is on, the UBox has detected a link speed of 100 Mbits. If the light is off and NETWORK 3 is on, the link speed is 10 Mbits. | |
| NETWORK 2 | Green ON/OFF:If the light is on, the UBox's Ethernet port is in full-duplex mode.If the light is off and NETWORK 3 is on, the Ethernet port is in half-duplex mode.Blinking:Packet collision has occurred. This is a normal and self-recovering occurrence with Ethernet. | |
| NETWORK 3 | GreenUBox has detected an Ethernet connection. This light blinks during data transmission.If the light is off, no Ethernet connection was detected. | ON or Blinking:UBox has detected an Ethernet connection. This light blinks during data transmission.If the light is off, no Ethernet connection was detected. |
| USB 1 - 4 | ON (does not blink):UBox is working. If a USB device is connected to the USB port, this light indicates that the USB UBox supports your USB device.Blinking (only appears when a USB device is connected):UBox hardware does not support your USB device, you have connected more than 8 USB devices (by using multiplecompoundUSB devices), or the UBox is having problems communicating with the device. Please check the UBox's USB device compatibility on the Lantronix web site or contact Lantronix Tech Support. | |
A: Configuring the Windows XP Firewall
The following instructions detail how to configure Window XP's built-in firewall for use with the Lantronix UBox. While these instructions are specific for this software, you can apply the basic idea of these instructions to configuring other firewalls. These instructions show you how to: ◆ Determine which version of Windows XP is installed on your computer. ◆ Access your firewall software. - Add settings to your firewall to allow communication with your Lantronix UBox. If you have multiple computers, please repeat these steps for every computer that will access the UBox.Step 1 - Determine Which Version of Windows XP is Installed on Your Computer
To determine Windows XP version:
1. On the Start menu, click Run. 2. In the Open field, type winver.exe and click OK. The About Windows window displays the version. 3. Do one of the following: If you have Windows XP with Service Pack 1 or Windows XP without any Service Packs installed, perform Step 2 and Step 3a. If you have Windows XP with Service Pack 2, perform Step 3b.Step 2 – Access Your Firewall Software (Windows XP and XP Service Pack 1 Only)
You need to know your UBox's UDP/TCP port numbers and IP address before configuring your firewall. If you already know this information, skip ahead to Step 3a - Add Settings to the Firewall to Allow Communication with the UBox on page 66.To obtain your UDP and TCP port numbers:
The Lantronix UBox defaults to using UDP port 10010 and TCP/IP port 10010. If you have not changed these settings, we will use these port numbers when we configure your firewall. If you have changed the UBox's UDP and/or TCP port numbers, use that number instead of 10010.To obtain your IP address:
To obtain your IP address: 1. Open the Lantronix UBox application. 2. Click the Servers tab and locate your UBox. 3. Select your UBox. Its IP Address displays in the Server Details area. Figure 8-5. IP Address on Servers Tab  Note: If the Edit Server Configuration Network tab is set to Automatic, DHCP or Zeroconfig, the UBox is obtaining an IP address dynamically. Dynamic addresses can change at any moment, making it harder for firewalls to keep track of. If you need to use a firewall, we suggest that you configure your UBox to use a static IP address. Also, if your firewall is currently on, you will not be able to see the UBox. Turn off the firewall to allow your computer to communicate temporarily with the UBox.To obtain the Advanced Settings window:
1. On the Start menu, click Settings→Network Settings. An icon for your network connection displays. (It is usually called Local Area Connection). 2. Right-click the icon. A submenu opens.  3. In the submenu, select Properties. The Local Area Connection Properties window opens. Figure 8-6. Local Area Connection Properties – Advanced Tab  4. Click the Advanced tab, and then click the Settings button. The Advanced Settings window opens Figure 8-7. Advanced Settings Window Step 3a - Add Settings to the Firewall to Allow Communication with the UBox
To add your UDP Port to the firewall: 1. In the Advanced Settings window, click the Add button. The Service Settings window opens. Figure 8-8. Service Settings – Adding a UDP  2. In the Description of Service field, enter something descriptive like "Lantronix UBox UDP." 3. In the IP address field, enter the IP address. 4. In both the External Port and Internal Port fields, enter the UDP port number. 5. Select UDP. 6. To save your changes, click OK. You have added support for the UBox's UDP port. Now add a setting for TCP. To add your TCP port to the firewall: Figure 8-9. Service Settings – Adding a TCP  1. Click the Advanced tab to return to the Advanced Settings window. 2. Click the Add button to create a new Service Settings window. 3. In the Description of Service field, enter something descriptive like "Lantronix USB TCP." 4. In the IP address field, enter the IP address. 5. In both the External Port and Internal Port fields, enter the TCP port number. 6. Select TCP. 7. To save your changes, click OK.To close the remaining windows:
1. Click the OK buttons on the remaining windows to finish up. Your firewall is now configured to allow access to the Lantronix UBox. If you have multiple computers, please repeat these steps for every computer that will access the UBox.Step 3b - Access and Configure Your Firewall Software (Windows XP Service Pack 2 Only)
To access your firewall software: 1. From the Start menu, click Control Panel. The Control Panel window opens. 2. Double-click Windows Firewall. The Windows Firewall window opens. (If you do not see Windows Firewall, click Switch to Classic View on the side panel.) Figure 8-10. Windows Firewall Window  3. Select On. 4. Click the Exceptions tab. Figure 8-11. Exceptions Tab To add your UDP port to the firewall:
1. On the Exceptions tab, click the Add Port button. The Add a Port window displays. Figure 8-12. Add a Port Window - UDP  2. In the Name field, enter something descriptive like "Lantronix UBox UDP." 3. In the Port number field, type 10010. 4. Select UDP. 5. Click OK.To add your TCP port to the firewall:
1. On the Exceptions tab, click the Add Port button. The Add a Port window displays. Figure 8-13. Add a Port Window - TCP  2. In the Name field, enter something descriptive like "Lantronix UBox TCP." 3. In the Port number field, type 10010. 4. Select TCP. 5. Click OK.To close the remaining windows:
1. Click the OK buttons on the remaining windows. Your firewall is now configured to allow access to the Lantronix UBox. If you have multiple computers, please repeat these steps for every computer that will access the UBox.B: Compliance – UBox 4100
CE Mark Declaration of Conformity
(According to EN 45014)Manufacturer's Name and Address
Lantronix 15353 Barranca Parkway Irvine, CA 92618 USA (949) 453-3990Declares that the product:
Product Name: UBox USB Device Server Model Numbers: UBox 4100 Conforms to the following Product Specifications: EN 55022: 1998 Class B EN 55024: 1998 following the provisions of the Electromagnetic Compatibility Directive.Canada Digital Apparatus EMI Standard
This Class B digital apparatus meets all the requirements of the Canadian Interference-Causing Equipment Regulations. Cet appareil numérique de la classe B respecte toutes les exigences du Reglement sur le material brouilleur du Canada.VCCI
Voluntary Control Council for Interference from Information Technology EquipmentClass B ITE
この装置は、情報処理装置等電波障害自主規制協議会(VCCI)の基準に基づくクラスB情報技術装置です。この装置は、家庭環境で使用することを目的としていますが、この装置がラジオやテレビジョン受信機に近接して使用されると、受信障害を引き起こすことがあります。 取扱説明書に従って正しい取り扱いをして下さい。Translation:
This is a Class B product based on the standard of the Voluntary Control Council for Interference from Information Technology Equipment (VCCI). If this is used near a radio or television receiver in a domestic environment, it may cause radio interference. Install and use the equipment according to the instruction manual.Australia/New Zealand
This device complies with AS/NZS 3548 Class B limits for the operation of Information Technology Equipment.Disclaimer and Supplementary Information
The Lantronix UBox USB Server, Model UBox 4100, complies with Part 15 of FCC Rules. Operation is subject to the following two conditions: (1) This device may not cause harmful interference, and (2) This device must accept any interference received, including interference that may cause undesired operation. Caution: Changes or modifications to the UBox USB Device Server not expressly approved by Lantronix could void the user's authority to operate this equipment. Note: This equipment has been tested and found to comply with the limits for a Class B digital device, pursuant to Part 15 of the FCC Rules. These limits are designed to provide reasonable protection against harmful interference in a residential installation. This equipment generates, uses, and can radiate radio frequency energy, and, if not installed and used in accordance with the instructions, may cause harmful interference to radio communications. However, there is no guarantee that interference will not occur in a particular installation. If this equipment does cause harmful interference to radio or television reception, which can be determined by turning the equipment off and on, the user is encouraged to try to correct the interference by one or more of the following measures: ◆ Reorient or relocate the receiving antenna. - Increase the separation between the equipment and receiver. Connect the equipment into an outlet on a circuit different from that to which the receiver is connected. Consult Lantronix or an experienced radio/TV technician for help.RoHS Notice
All Lantronix products in the following families are China RoHS-compliant and free of the following hazardous substances and elements: \- Lead (Pb) \- Mercury (Hg) • Polybrominated biphenyls (PBB) \- Cadmium (Cd) • Hexavalent Chromium (Cr (VI)) • Polybrominated diphenyl ethers (PBDE)| Product Family Name | Toxic or hazardous Substances and Elements | |||||
| Lead (Pb) | Mercury (Hg) | Cadmium (Cd) | Hexavalent Chromium (Cr (VI)) | Polybrominated biphenyls (PBB) | Polybrominated diphenyl ethers (PBDE) | |
| UDS1100 and 2100 0 0 0 | 0 0 0 | |||||
| EDS | 0 | 0 | 0 | 0 0 | ||
| MSS100 | 0 | 0 | 0 | 0 | 0 | 0 |
| IntelliBox | 0 | 0 | 0 | 0 | 0 | 0 |
| XPress DR & XPress-DR+ | 0 | 0 | 0 | 0 | 0 | 0 |
| SecureBox 1101 | 0 0 0 0 0 0 | |||||
| WiBox | 0 | 0 | 0 | 0 | 0 | 0 |
| UBox | 0 | 0 | 0 | 0 | 0 | 0 |
| MatchPort | 0 | 0 | 0 | 0 | 0 | 0 |
| SLC | 0 | 0 | 0 | 0 | 0 | 0 |
| XPort | 0 | 0 | 0 | 0 | 0 | 0 |
| WiPort | 0 | 0 | 0 | 0 | 0 | 0 |
| SLB | 0 | 0 | 0 | 0 | 0 | 0 |
| SLP | 0 | 0 | 0 | 0 | 0 | 0 |
| SCS | 0 | 0 | 0 | 0 0 | ||
| SLS | 0 | 0 | 0 | 0 | 0 | 0 |
| DSC | 0 | 0 | 0 | 0 | 0 | 0 |
Manufacturer's Contact
Director of Quality Assurance, Lantronix 15353 Barranca Parkway, Irvine, CA 92618 USA Tel: 949-453-3990 Fax: 949-453-3995C: Compliance – UBox 2100
Declaration of Conformity
Manufacturer's Name and Address
Lantronix 15353 Barranca Parkway Irvine, CA 92618 USA (949) 453-3990Declares that the product:
Product Name: UBox USB Device Server Model Numbers: UBox 2100 Conforms to the following standards or other normative documents:Radiated and Conducted Emissions
CFR Title 47 FCC Part 15, Subpart B and C Industry Canada ICES-003 Issue 4 2004 VCCI V-3/2007.04 AS/NZS CISPR 22: 2006 EN55022: 2006 EN61000-3-2: 2000 + A2: 2005 EN61000-3-3: 1995 + A1: 2001 + A2: 2005Immunity
EN55024: 1998 + A1: 2001 + A2: 2003Direct & Indirect ESD
EN61000-4-2: 1995RF Electromagnetic Field Immunity
EN61000-4-3: 2002Electrical Fast Transient/Burst Immunity
EN61000-4-4: 2004 Surge Immunity EN61000-4-5: 2006 RF Common Mode Conducted Susceptibility EN61000-4-6: 1996 Power Frequency Magnetic Field Immunity EN61000-4-8: 1994 Voltage Dips and Interrupts EN61000-4-11: 2004 Safety EN60950-1: 2001, Low Voltage Directive 2006/95/ECDisclaimer and Supplementary Information
United States
The Lantronix UBox USB Server, Model UBox 2100, complies with Part 15 of FCC Rules. Operation is subject to the following two conditions: (1) This device may not cause harmful interference, and (2) this device must accept any interference received, including interference that may cause undesired operation. Changes or modifications not expressly approved by the party responsible for compliance could void the user's authority to operate the equipment. Note: This equipment has been tested and found to comply with the limits for a Class A digital device, pursuant to part 15 of the FCC Rules. These limits are designed to provide reasonable protection against harmful interference when the equipment is operated in a commercial environment. This equipment generates, uses, and can radiate radio frequency energy and, if not installed and used in accordance with the instruction manual, may cause harmful interference to radio communications. Operation of this equipment in a residential area is likely to cause harmful interference in which case the user will be required to correct the interference at his own expense.Canada
This Class A digital apparatus complies with Canadian ICES-003. Cet appareil numérique de la classe A est conforme à la norme NMB-003 du Canada.RoHS Notice
All Lantronix products in the following families are China RoHS-compliant and free of the following hazardous substances and elements: \- Lead (Pb) \- Mercury (Hg) • Polybrominated biphenyls (PBB) \- Cadmium (Cd) • Hexavalent Chromium (Cr (VI)) • Polybrominated diphenyl ethers (PBDE)| Product Family Name | Toxic or hazardous Substances and Elements | |||||
| Lead (Pb) | Mercury (Hg) | Cadmium (Cd) | Hexavalent Chromium (Cr (VI)) | Polybrominated biphenyls (PBB) | Polybrominated diphenyl ethers (PBDE) | |
| UDS1100 and 2100 0 0 0 | 0 0 0 | |||||
| EDS | 0 | 0 | 0 | 0 0 | ||
| MSS100 | 0 | 0 | 0 | 0 | 0 | 0 |
| IntelliBox | 0 | 0 | 0 | 0 | 0 | 0 |
| XPress DR & XPress-DR+ | 0 | 0 | 0 | 0 | 0 | 0 |
| SecureBox 1101 | 0 0 0 0 0 0 | |||||
| WiBox | 0 | 0 | 0 | 0 | 0 | 0 |
| UBox | 0 | 0 | 0 | 0 | 0 | 0 |
| MatchPort | 0 | 0 | 0 | 0 | 0 | 0 |
| SLC | 0 | 0 | 0 | 0 | 0 | 0 |
| XPort | 0 | 0 | 0 | 0 | 0 | 0 |
| WiPort | 0 | 0 | 0 | 0 | 0 | 0 |
| SLB | 0 | 0 | 0 | 0 | 0 | 0 |
| SLP | 0 | 0 | 0 | 0 | 0 | 0 |
| SCS | 0 | 0 | 0 | 0 0 | ||
| SLS | 0 | 0 | 0 | 0 | 0 | 0 |
| DSC | 0 | 0 | 0 | 0 | 0 | 0 |
Manufacturer's Contact
Director of Quality Assurance, Lantronix 15353 Barranca Parkway, Irvine, CA 92618 USA Tel: 949-453-3990 Fax: 949-453-3995D: Lantronix Software License Agreement
This Agreement constitutes a legal agreement between you, the end user, and Lantronix regarding the Lantronix software accompanying this Agreement ('Software'). You should carefully read the following terms and conditions before installing this software. EITHER CLICKING ON THE ACKNOWLEDGMENT BUTTON BELOW OR INSTALLING THE SOFTWARE INDICATES YOUR ACCEPTANCE OF THESE TERMS AND CONDITIONS. 1. Ownership; Copy Restrictions. You are being granted a limited license to use the Software; you are not purchasing a copy of the Software. The copyright to the hardware and Software comprising this product is owned, patent pending and copyright by Lantronix. Lantronix retains title to the Software including copies, regardless of form or media, and to all copyrights therein. Except as otherwise expressly provided for in this Agreement, You may make one or more copies of the Software solely for archival or backup purposes. The Software and accompanying written materials are copyrighted. Except as expressly provided in this Agreement, any act of reproduction, distribution or development of derivative works of any portion of the Software is strictly prohibited by such laws and treaty provisions. Nothing in this Agreement constitutes a waiver of Lantronix's rights under any copyright law. 2. Grant of License. Lantronix grants to you the right to use this copy of the software ("Software") on one or more computers provided that the Software is only used with the Lantronix UBox 4100 or UBox 2100 hardware. 3. Transfer Restrictions. You may transfer the Software to another person only in connection with the transfer of the Lantronix UBox 4100 or UBox 2100 hardware, and only if: a) you delegate your duties under this Agreement to the transferee; and only if b) the transferee/other party accepts the terms and conditions of this Agreement. Upon such transfer, you must transfer all accompanying written materials, and either transfer or destroy all copies of the Software. You may not lease, rent, merge, reverse engineer, decompile or disassemble the Software or hardware. 4. Termination. This License Agreement is effective until terminated. This License Agreement will automatically terminate without notice from Lantronix if you fail to comply with any of the provisions of the License. You may voluntarily terminate this Agreement at any time. Upon termination, you agree to destroy or purge all copies of the Software and accompanying written materials in your possession. 5. LIMITED WARRANTY. As its only Warranty under this Agreement, Lantronix warrants the media on which the Software is provided to be free from defects in materials under normal use for a period of 90 days from the date of the purchase of the Lantronix UBox 4100 or UBox 2100 hardware. EXCEPT AS EXPRESSLY WARRANTED HEREIN, THE SOFTWARE IS PROVIDED "AS IS" WITHOUT WARRANTY OF ANY KIND, EITHER EXPRESS OR IMPLIED, INCLUDING BUT NOT LIMITED TO IMPLIED WARRANTIES OF MERCHANTABILITY AND FITNESS FOR A PARTICULAR PURPOSE. THE ENTIRE RISK AS TO THE QUALITY AND PERFORMANCE OF THE SOFTWARE IS WITH YOU. LANTRONIX DOES NOT WARRANT THAT THE FUNCTIONS CONTAINED IN THE SOFTWARE WILL MEET YOUR REQUIREMENTS OR THAT THE OPERATION OF THE SOFTWARE WILL BE UNINTERRUPTED OR ERROR FREE OR THAT SOFTWARE DEFECTS WILL BE CORRECTED. SOME STATES DO NOT ALLOW THE EXCLUSION OF IMPLIED WARRANTIES, SO THE ABOVE EXCLUSIONS MAY NOT APPLY TO YOU. THIS WARRANTY GIVES YOU SPECIFIC, LIMITED RIGHTS. YOU MANY HAVE OTHER RIGHTS, WHICH VARY FROM STATE TO STATE. 6. LIMITATION OF LIABILITY. Lantronix's entire liability and your sole remedy under this License Agreement is, at Lantronix's option, either: a) the return of payment as evidenced by a copy of your purchase receipt; or b) the replacement of the media not meeting Lantronix's Limited Warranty. IN NO EVENT WILL LANTRONIX OR ITS VENDORS BE LIABLE FOR ANY DIRECT, CONSEQUENTIAL OR INCIDENTAL DAMAGES (INCLUDING DAMAGES FOR LOSS OF BUSINESS PROFITS, INFORMATION, OR USE) EVEN IF LANTRONIX HAS BEEN ADVISED OF THE POSSIBILITY OF SUCH DAMAGES. SOME STATES DO NOT ALLOW THE EXCLUSION OR LIMITATION OF LIABILITY FOR CONSEQUENTIAL OR INCIDENTAL DAMAGES, SO THE ABOVE LIMITATION OR EXCLUSION MAY NOT APPLY TO YOU. 7. Governing Law. This Agreement is governed by the laws of the State of California.E: Lantronix Warranty
Lantronix warrants each Lantronix product to be free from defects in material and workmanship for a period of TWO YEARS after the date of shipment. During this period, if a customer is unable to resolve a product problem with Lantronix Technical Support, a Return Material Authorization (RMA) will be issued. Following receipt of an RMA number, the customer shall return the product to Lantronix, freight prepaid. Upon verification of warranty, Lantronix will -- at its option -- repair or replace the product and return it to the customer freight prepaid. If the product is not under warranty, the customer may have Lantronix repair the unit on a fee basis or return it. No services are handled at the customer's site under this warranty. This warranty is voided if the customer uses the product in an unauthorized or improper way, or in an environment for which it was not designed. Lantronix warrants the media containing its software product to be free from defects and warrants that the software will operate substantially according to Lantronix specifications for a period of 60 DAYS after the date of shipment. The customer will ship defective media to Lantronix. Lantronix will ship the replacement media to the customer. \* \* \* \* In no event will Lantronix be responsible to the user in contract, in tort (including negligence), strict liability or otherwise for any special, indirect, incidental or consequential damage or loss of equipment, plant or power system, cost of capital, loss of profits or revenues, cost of replacement power, additional expenses in the use of existing software, hardware, equipment or facilities, or claims against the user by its employees or customers resulting from the use of the information, recommendations, descriptions and safety notations supplied by Lantronix. Lantronix liability is limited (at its election) to: refund of buyer's purchase price for such affected products (without interest) repair or replacement of such products, provided that the buyer follows the above procedures. There are no understandings, agreements, representations or warranties, express or implied, including warranties of merchantability or fitness for a particular purpose, other than those specifically set out above or by any existing contract between the parties. Any such contract states the entire obligation of Lantronix. The contents of this document shall not become part of or modify any prior or existing agreement, commitment or relationship. For details on the Lantronix warranty replacement policy, go to our web site at http://www.lantronix.com/support/warranty/index.html
- Models UBox 4100 and UBox 2100
- Trademark
- Copyright
- Contacts
- Revisions
- Contents
- 1: Using This Guide 7
- 2: Introduction 8
- 3: Installing the UBox 11
- 4: Using USB Devices on the Network 16
- 5: Changing the UBox's Settings 29
- 6: Changing Local Software Settings 44
- 7: Troubleshooting 49
- 8: Status Light Behavior 59
- A: Configuring the Windows XP Firewall 63
- B: Compliance – UBox 4100 71
- C: Compliance – UBox 2100 74
- D: Lantronix Software License Agreement 77
- E: Lantronix Warranty 79
- Figures
- 1: Using This Guide
- Purpose and Audience
- Summary of Chapters
- 2: Introduction
- Model and Part Numbers
- USB Speeds and Throughput
- Supported Devices
- Compatible USB Devices
- Connectivity to USB Devices
- Connectivity to a Network
- Connectivity to a PC
- Hub Support
- Requirements
- What's Inside the Package
- 3: Installing the UBox
- Installing the UBox Hardware
- Step 1- Connect the UBox to Your Network
- Step 2 - Connect the UBox's Power Supply and Read the LEDs
- Troubleshooting
- Installing the UBox Software
- To install the UBox Software:
- Uninstalling the Lantronix UBox Software
- To uninstall the Lantronix UBox software:
- 4: Using USB Devices on the Network
- Overview
- Connecting Your USB Device
- Step 1 - Connect a USB Device to the UBox
- On the Start menu, click Programs→Lantronix UBox USB Device Server→UBox USB Device Server.
- Step 2 – Connect a Networked USB Device
- Step 3 - Disconnect Your USB Device(s)
- Using Multiple UBoxes and USB Devices
- Compound Devices
- One UBox with Multiple Users
- Multiple UBoxes and USB Devices
- UBox Groups on Multiple UDP Ports
- PC Connectivity to UBoxes and UBS Devices
- Other Ways to Connect and Disconnect USB Devices
- Using the UBox System Tray
- To use the system tray:
- Auto Connecting Printers
- Before You Begin
- To use the auto connect feature:
- Using Your Printer with Auto Connect
- Multiple Print Jobs from Multiple Users
- Using Forced Device Disconnect
- To use Forced Device Disconnect:
- Using Multi-and Single-User Connect Modes
- Device Status
- Separating Compound Devices
- Types of USB Devices
- To separate compound devices:
- 5: Changing the UBox's Settings
- Viewing UBox Settings
- To view current settings:
- Editing Server Settings: Access Tab
- To edit the UBox's Settings on the Access Tab:
- Notes:
- Firmware Upgrade:
- Editing Server Settings: Network Tab
- Editing Server Settings: USB Device Configuration Tab
- Applying, Canceling, or Removing Server Settings
- Restoring Default Settings
- To restore the UBox to factory settings:
- Updating the UBox's Firmware
- To update the firmware:
- Overriding Server Network Settings
- To override network settings:
- Refreshing Data
- To refresh the displayed information:
- 6: Changing Local Software Settings
- Updating Personal Communication Settings
- To update your computer's settings:
- Updating Server Access Settings
- To update server access settings:
- Viewing or Removing Device Passwords
- To view or remove USB device passwords:
- Switching Between Sets of UBoxes
- 7: Troubleshooting
- Troubleshooting: Status Lights
- Boot-Up
- SYSTEM Status Light 1
- SYSTEM Status Lights 2 and 3
- USB Status Lights: 1-4 on the UBox 4100 and 1 & 2 on the UBox 2100
- Troubleshooting: UDP Ports
- Troubleshooting: Network Issues
- Communication Between your PC and the UBox
- To ping the UBox:
- Firewalls
- Final Step
- Resetting the UBox Hardware
- Power-Cycling or Using the Reset Button
- To reset by power cycling:
- To reset using the reset button
- Troubleshooting: USB Devices
- To troubleshoot problems with USB Devices:
- Technical Support
- Technical Support US
- Technical Support Europe, Middle East, Africa
- 8: Status Light Behavior
- A: Configuring the Windows XP Firewall
- Step 1 - Determine Which Version of Windows XP is Installed on Your Computer
- To determine Windows XP version:
- Step 2 – Access Your Firewall Software (Windows XP and XP Service Pack 1 Only)
- To obtain your UDP and TCP port numbers:
- To obtain your IP address:
- To obtain the Advanced Settings window:
- Step 3a - Add Settings to the Firewall to Allow Communication with the UBox
- To close the remaining windows:
- Step 3b - Access and Configure Your Firewall Software (Windows XP Service Pack 2 Only)
- To add your UDP port to the firewall:
- To add your TCP port to the firewall:
- B: Compliance – UBox 4100
- CE Mark Declaration of Conformity
- Manufacturer's Name and Address
- Declares that the product:
- Canada Digital Apparatus EMI Standard
- VCCI
- Class B ITE
- Translation:
- Australia/New Zealand
- Disclaimer and Supplementary Information
- RoHS Notice
- Manufacturer's Contact
- C: Compliance – UBox 2100
- Declaration of Conformity
- Radiated and Conducted Emissions
- Immunity
- Direct & Indirect ESD
- RF Electromagnetic Field Immunity
- Electrical Fast Transient/Burst Immunity
- United States
- Canada
- D: Lantronix Software License Agreement
- E: Lantronix Warranty
Brand : Lantronix
Model : UBox 4100
Category : Print Server