xPrintServer Office Edition - Print Server Lantronix - Free user manual and instructions
Find the device manual for free xPrintServer Office Edition Lantronix in PDF.


| Product Type | Print Server |
| Model | xPrintServer Office Edition |
| Brand | Lantronix |
| Dimensions (W x D x H) | 5.5 x 3.7 x 1.2 inches (140 x 94 x 30 mm) |
| Weight | 0.5 lb (225 g) |
| Power Supply | 5V DC, 2A via micro-USB (adapter included) |
| Power Consumption | 5W maximum |
| Network Interface | 10/100 Ethernet, 802.11 b/g/n Wi-Fi |
| Supported Protocols | TCP/IP, DHCP, DNS, SNMP, Bonjour, IPP |
| Print Protocols | AirPrint, Google Cloud Print, Mopria, IPP |
| Number of Printers Supported | Up to 10 network printers |
| Compatible Operating Systems | Windows, macOS, Linux, iOS, Android |
| Management | Web interface, Lantronix Discovery Utility |
| Security | WEP/WPA/WPA2, SSL/TLS, SNMPv3 |
| LED Indicators | Power, Ethernet, Wi-Fi, Status |
| Reset Button | Factory reset via pinhole button |
| Operating Temperature | 0°C to 40°C (32°F to 104°F) |
| Storage Temperature | -20°C to 60°C (-4°F to 140°F) |
| Humidity | 10% to 90% non-condensing |
| Mounting Option | Desktop or wall-mountable (bracket included) |
| Included Accessories | Power adapter, Ethernet cable, quick start guide, mounting screws |
| Warranty | 2 years limited |
| Maintenance | Keep clean and dry; no user-serviceable parts inside |
Frequently Asked Questions - xPrintServer Office Edition Lantronix
User questions about xPrintServer Office Edition Lantronix
0 question about this device. Answer the ones you know or ask your own.
Ask a new question about this device
Download the instructions for your Print Server in PDF format for free! Find your manual xPrintServer Office Edition - Lantronix and take your electronic device back in hand. On this page are published all the documents necessary for the use of your device. xPrintServer Office Edition by Lantronix.
USER MANUAL xPrintServer Office Edition Lantronix
© 2012 Lantronix, Inc. All rights reserved. No part of the contents of this book may be transmitted or reproduced in any form or by any means without the written permission of Lantronix.
Lantronix® is a registered trademark and xPrintServer™ is a trademark of Lantronix, Inc.
Windows®, Active Directory® and Internet Explorer® are registered trademarks of Microsoft Corporation. Mozilla® and Firefox® are registered trademarks of the Mozilla Foundation. Chrome™ is a trademark of Google. AirPrint™ is a trademark of Apple Inc. and Apple®, OS X®, Safari®, iTunes®, Bonjour®, iPod®, iPad® and iPhone® are registered trademarks of Apple Inc. iOS® is a registered trademark of Cisco. Opera™ is a trademark of Opera Software ASA. All other trademarks and trade names are the property of their respective holders.
Contacts
Lantronix Corporate Headquarters
167 Technology Drive
Irvine, CA 92618, USA
Toll Free: 800-526-8766
Phone: 949-453-3990
Fax: 949-450-7249
Technical Support
Online: www.lantronix.com/support
Sales Offices
For a current list of our domestic and international sales offices, go to the Lantronix web site at www.lantronix.com/about/contact.
Disclaimer & Revisions
The information in this guide may change without notice. The manufacturer assumes no responsibility for any errors that may appear in this guide.
Revision History
| Date | Rev. | Comments |
| November 2012 | A | Initial document for firmware release 3.0.0-16. |
Table of Contents
Copyright & Trademark 2
Contacts 2
Disclaimer & Revisions 2
Revision History 2
List of Figures 6
List of Tables 6
1: Introduction 7
Network, Home and Office Editions 7
Key Features 7
Supported iOS Devices 8
Supported Printers and Printer Protocols 8
Supported DHCP Configuration 8
Supported Browsers 9
Product Information 9
Serial Number 9
IP Address 9
2: Installation 10
Package Contents 10
User-Supplied Items 10
Hardware Components 10
Ethernet LEDs 11
Status LEDs 11
Installation Steps 12
Topology Support 13
3: Navigation and Printing 14
Finding the xPrintServer IP Address 14
System Status on the Home Page 16
Logging In 17
Local Authentication Login 18
Remote Authentication Login 18
Logging Off 18
Navigation 19
Printing from an iOS Device 21
Printing from a Mac OS X Lion Desktop 22
Setting Up Printing from a Windows 7 Desktop 23
Performing Add Printer Setup 23
Configuring a Default Printer 25
Setting Up Printing from a Windows XP Desktop 25
Performing Add Printer Setup 25
Configuring a Default Printer 27
4: Configuration 28
User Administration 28
Changing Passwords 28
Adding a New User 30
Deleting a User 30
Printer Access Control (Protecting Printer Access) 31
Protecting Printer Access Using MS Active Directory Services 32
Viewing Configured Printers 33
Configuring Printers 34
Enabling or Disabling Discovery 34
Configuring Printers through Auto Discovery 35
Configuring Printers through Discovery 36
Deleting All Configured Printers 37
Setting Real Time Clock 38
Assigning a Static IP Address to the xPrintServer 39
Admin Printer Configuration Options 39
Printing a Test Page 39
Purging Job History 40
Deleting a Printer 40
Changing Printer Description 41
Changing Printer Location 41
Showing Shared Printer Information 42
Sharing a Printer 43
Hiding a Printer 43
Setting Printer Options 44
Updating Printer IP Addresses 45
Viewing and Exporting Print Jobs 46
Renaming xPrintServer Device 47
Resetting the xPrintServer to Factory Defaults 48
Via the User Interface 48
Via the Hardware Reset Button 48
Restarting the xPrintServer 48
Viewing Logs 49
Printer Drivers 50
Downloading Printer Drivers from the Internet 50
Exporting Printer Drivers 51
Downloading Printer Drivers from a USB Flash Drive 52
Managing Active Directory 53
Updating Active Directory Configuration 53
Testing Remote User Authentication 54
Saving Configuration 55
Restoring Configuration 56
Proxy Server Configuration 57
Testing Proxy Server Connectivity 58
5: Updating Firmware 59
Updating Firmware via the Lantronix Web Services Website ____ 59
Updating Firmware via a Local USB Port 60
6: Technical Specifications 61
A: Technical Support 62
Diagnostic Support 62
Contact Information 62
B: Troubleshooting 63
Problems and Error Messages 63
C: Compliance 64
Declaration of Conformity 64
RoHS Notice 65
D: Warranty 66
Index 67
List of Figures
Figure 1-1 xPrintServer 7
Figure 1-2 Sample Product Information Label (Type 1) 9
Figure 1-3 Sample Product Information Label (Type 2) 9
Figure 1-4 Sample Serial Numbers on Hardware Devices 9
Figure 2-1 xPrintServer LEDs 10
Figure 2-2 Sample xPrintServer Mounting Options 12
Figure 2-3 Quick Connect Diagram 13
Figure 3-1 Serial Number 14
Figure 3-2 Redirected to Login Prompt 15
Figure 3-3 IP System Status Information on the Home Page ____ 16
Figure 3-4 Login Prompt 17
Figure 3-5 Navigating the xPrintServer User Interface 19
Figure 3-6 Tabs Available for Users 20
Figure 3-7 Sample View of Native Print Menu 21
Figure 3-8 Sample View of Printer Options 21
Figure 4-1 Changing Own Password 29
Figure 4-2 Changing Other User Passwords (Admin User Only) 29
Figure 4-3 Adding or Deleting a User (Admin User Only) ____ 30
Figure 4-4 Printer Access Control – Local Users 31
Figure 4-5 Printer Access Control – Remote Users 32
Figure 4-6 Printer Details and Pop-Up Command Menu 33
Figure 4-7 Printer Discovery Page 34
Figure 4-8 Sample Printer Auto Discovery Report 35
Figure 4-9 Expanding Detected Printers Information 36
Figure 4-10 Admin Menu (Defaults to Time-zone Link) 38
Figure 4-11 New Printer Description 41
Figure 4-12 New Printer Location 41
Figure 4-13 Show Share Info Popup 42
Figure 4-14 Sample Printer Options 44
Figure 4-15 Printer IP Address Page 45
Figure 4-16 Print Job Details 46
Figure 4-17 Changing the xPrintServer Name ____ 47
Figure 4-18 Logs 49
Figure 4-19 Drivers List Tab 50
Figure 4-20 Export Drivers Button 51
Figure 4-21 Loaded Drivers Tab 52
Figure 4-22 Active Directory Configuration 53
Figure 4-23 Saving Configuration 55
Figure 4-24 Restoring Configuration 56
Figure 4-25 Configuring Proxy Server 57
Figure 5-1 Firmware Update Options 59
List of Tables
Table 2-1 Status LED, Top of Device 11
Table 4-1 Comparing Admin and Non-Admin User Privileges 28
Table 6-1 Technical Specifications 61
1: Introduction
The xPrintServer is a patent-pending AirPrint print server which provides wireless printing capabilities for iPad, iPhone and other devices with iOS-enabled AirPrint applications for unlimited network printers and 8 USB printers (USB hub not included). xPrintServer Office Edition also enables printing to USB printers from Mac OS X Lion and Windows (XP, 7). Simply plug the xPrintServer into your network (router or switch with wireless access point), then plug your USB printer(s) into the xPrintServer. Within seconds the xPrintServer will auto-discover your printers to enable printing from iPads and iPhones.
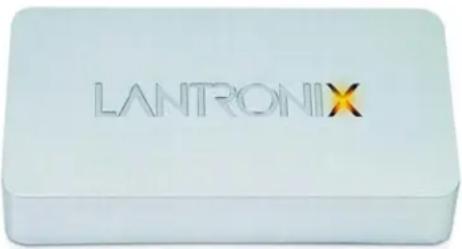
Figure 1-1 xPrintServer
Network, Home and Office Editions
The xPrintServer comes in Network, Home and Office editions. This user guide documents the features and functionality of the xPrintServer Office Edition.
Key Features
- No additional software is needed on the iOS device
- Simple configuration
- Supports up to 8 USB printers via USB hub and an unlimited number of network-attached printers.
Note: Up to 10 network-attached printers is recommended for optimal performance. Print jobs process one at a time regardless of the number of configured printers. The xPrintServer includes one USB port as a part of the unit; an additional USB hub for connecting additional USB printers is not included.
- Automatic printer discovery and configuration (for supported printers)
- Security features
External LED status indicator - Configuration via browser (HTTP)
Supported iOS Devices
xPrintServer supports all iOS-enabled AirPrint applications. AirPrint is included in all newer generation Apple® devices with iOS 4.2 and later. These include:
- iPad (all versions)
iPhone (3GS or later) - iPod Touch (3rd generation or later)
Supported Printers and Printer Protocols
See http://www.lantronix.com/it-management/mobile-print-servers/supported-printer-list.html for the latest list of all supported printers. This list is periodically updated with new printers.
Supported DHCP Configuration
xPrintServer supports both DHCP and Static IP Address Assignments. The following items are configured via Static IP or DHCP.
Supported Browsers
Lantronix supports the latest version of Internet Explorer, Mozilla Suite, Mozilla Firefox, Safari, and Chrome.
Product Information
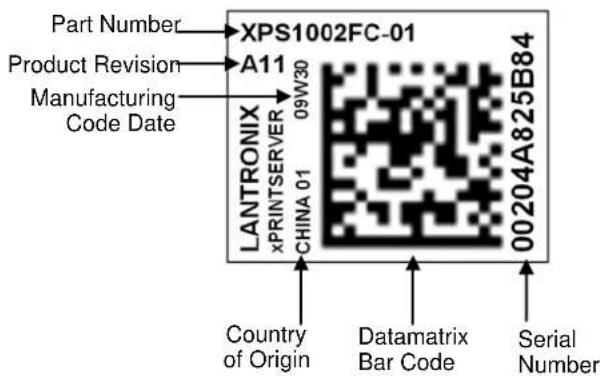
You will need the serial number of your xPrintServer device when setting up your xPrintServer user interface. The serial number can be found on the product information label adhered to your device. One of two types of product information labels will be adhered to your xPrintServer device (see Figure 1-2 or Figure 1-3 below).
Figure 1-2 Sample Product Information Label (Type 1)
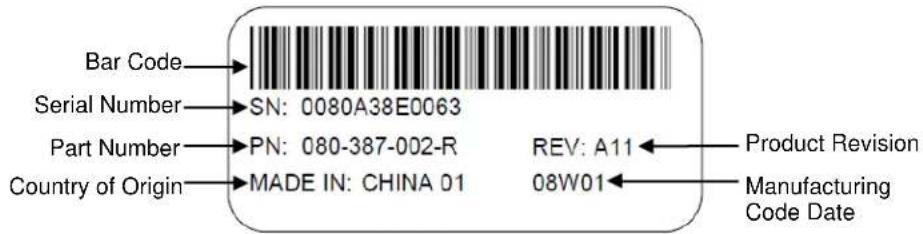
Figure 1-3 Sample Product Information Label (Type 2)
Serial Number
A serial number is a unique, identifying number specific to each hardware device including an xPrintServer, printer or any Apple iOS device.
Figure 1-4 Sample Serial Numbers on Hardware Devices
00-80-A3-8E-00-63 or 00:80:A3:8E:00:63 or 0080A38E0063
IP Address
Every device connected to an IP network must have a unique IP address. The xPrintServer gets a unique IP address from the DHCP server on your network (default method) or can be manually configured with a static IP address.
2: Installation
This chapter describes how to install your xPrintServer.
Package Contents
Your xPrintServer product package includes the following:
One (1) xPrintServer
One (1) Quick Start Guide
One (1) RJ-45 Ethernet Cable (3 ft)
One (1) Power Supply with Regional Adapters
- Mounting Bracket with Two (2) Screws
Four (4) Rubber Feet
User-Supplied Items
You also need the following items to install and operate your xPrintServer:
A working power outlet
WI-FI Access Point
◆ Network-Attached Printer (wired or wireless)
USB Printer (if any)
Your iOS device (e.g., iPad, iPhone) with connection to the network via WI-FI
Hardware Components
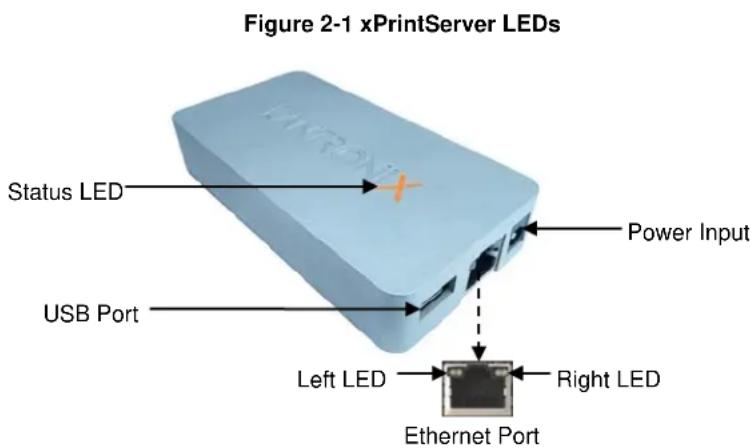
There is one USB port, one power input, one Ethernet port, and two types of LED indicators on the xPrintServer. The LEDs provide information about device activity and status.
Ethernet LEDs
There are two LEDs located on the upper left and right corners of the Ethernet socket (see Figure 2-1). These indicate the status of the connection.
Left LED
Green ON, 100Mbps Ethernet Link
Green Blinking, 100Mbps Activity
Orange ON, 10Mbps Ethernet Link
Orange Blinking, 10Mbps Activity
OFF, No Ethernet Link
Right LED
Always OFF
The Ethernet port can connect to an Ethernet (10Mbps) or Fast Ethernet (100Mbps) network.
Status LEDs
The Status LED on the xPrintServer device is incorporated into the "X" letter of the Lantronix logo on the top of the device. The behavior of this LED indicates the type of activity occurring in the xPrintServer device. The Status LED color is orange when lit, and unique display patterns indicate the specific type of activity. The LED may display a solid light, display no light, slowly glow on, slowly glow off, or flash on/off.
Table 2-1 Status LED, Top of Device
| Orange “X” LED | Description | |
| Solid | A continuous solid light indicates the power is on or the device is booting. | |
| OFF | No light indicates the power is off. | |
| Blinking | Even blinking pattern indicates the device is printing. | |
| Glow/Dim(Repeating Pattern) | Pulsating pattern of glowing and dimming light cycle occurring once every three seconds. Indicates the device is booted, idle and waiting for a job. | |
| Code 1 | A repeating pattern of a single flash followed by two seconds of no light indicates the device is obtaining the DHCP address. | Note: Codes 1 through 7 indicate a grouped number of flashes in the Orange “X” LED separated by a two second interval where the light is off.The specific code/number of flashes separated by a two second no-light interval indicates a specific status as |
| Code 2 | A repeating pattern of two flashes followed by two seconds of no light indicates there are no configured printers. | |
| Code 3 | A repeating pattern of three flashes followed by two seconds of no light indicates a factory default reset. | |
| Code 4 | A repeating pattern of four flashes followed by two seconds of no light indicates a successful firmware update. | |
| Code 5 | A repeating pattern of five flashes followed by two seconds of no light indicates a failed firmware update. | |
| Code 6 | A repeating pattern of six flashes followed by two seconds of no light indicates a printing error. | |
| Code 7 | A repeating pattern of seven flashes followed by two seconds of no light indicates printer discovery is in process. | |
| Code 8 | A repeating pattern of eight flashes followed by two seconds of no light indicates USB device (printer or flash drive) discovery is in progress. | described in the grey cells to the left. |
Installation Steps
With all xPrintServer package contents and the requisite user-supplied items listed above, you may begin installation.
- Make sure printing from your Windows or Mac computer (from which the USB printer is directly attached) is working before proceeding. If you are installing a new USB printer, this may require downloading and installing printer drivers to your desktop from the printer manufacturer.
-
Position the xPrintServer device. The xPrintServer can simply be placed as it is on a desk or other secure flat surface. Here are additional options:
-
To install the rubber feet on the xPrintServer (for added grip and stability on a flat surface), peel to unveil the adhesive strip on each rubber foot and press one foot onto each of all four bottom corners of the xPrintServer.
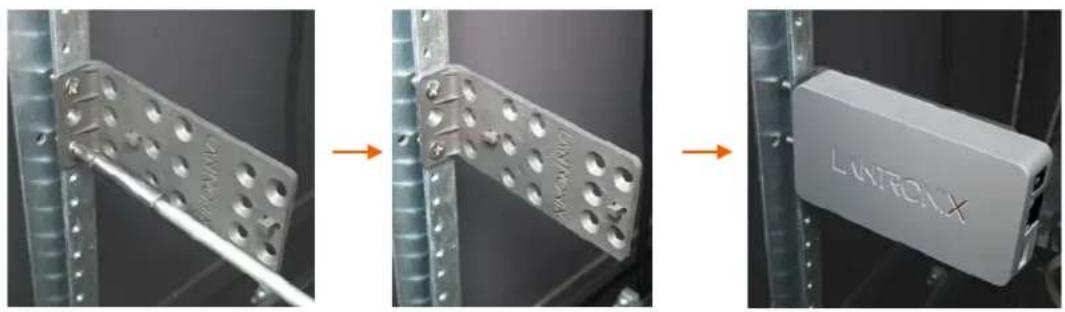
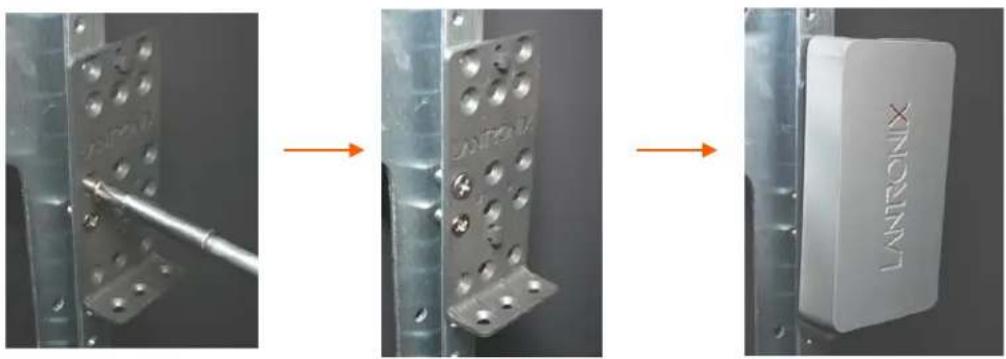
- To secure the xPrintServer into a server rack, utilize the included mounting bracket and screws. There are a variety of ways to mount the bracket and then the xPrintServer unit, including the two sample methods in Figure 2-2.
Figure 2-2 Sample xPrintServer Mounting Options
natural_image
Three-step assembly process showing metal bracket mounting on a wall, with one part labeled 'LWTEOLX' (no text or symbols beyond label)or
natural_image
Three-step assembly process showing metal bracket mounting, screwdriver insertion, and final product with 'XINONAM' label (no text or symbols on main objects)-
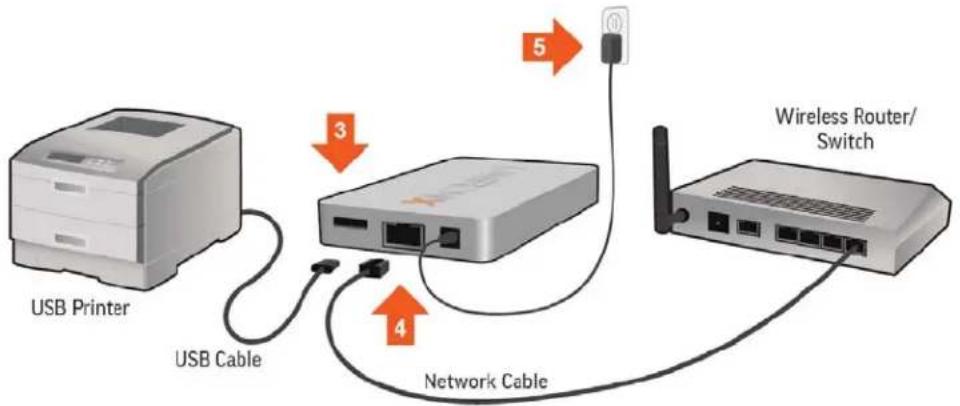
Connect the USB printer cable to the USB port of the xPrintServer (if any).
-
Connect the network cable from the wireless router/switch to the xPrintServer.
-
Power on the xPrintServer with the supplied power cord. The xPrintServer will automatically set-up all printers on your network and/or USB-connected printers. The glowing "X" will blink quickly for about 30 seconds, and then it will pulse slowly to show it's ready for printing.
-
Monitor the LEDs on the xPrintServer for activity and status information (see Ethernet LEDs and Status LEDs).
Figure 2-3 Quick Connect Diagram
flowchart
graph TD
    A["USB Printer"] -->|USB Cable| B["Network Cable"]
    B -->|3| C["Switch 5"]
    B -->|4| D["Switch 4"]
    C --> E["Wireless Router/Switch"]
Topology Support
The xPrintServer is hardwired (via standard CAT-5) cabling to a router, switch or hub. The system requires an Access Point (A/P) be also hardwired and connected to the network. The iOS devices associates with the A/P and communicates to the xPrintServer when a print job is ready to be processed. The xPrintServer communicates with network attached printer(s); the printers may either be wired or wirelessly connected to the network.
For the xPrintServer to auto-detect printers on bootup, the xPrintServer and printers must be on the same subnet. After auto-detection has been completed, the xPrintServer can then be relocated to a different subnet (WI-FI connected subnet that iOS devices are connected to) assuming that subnet can route to the previous subnet.
The xPrintServer uses Zeroconf to advertise print services to the iOS device(s) and requires either one or both of the following:
Both the iOS device and the xPrintServer are on the same subnet.
The iOS device and xPrintServer are on different subnets but multicast traffic is communicated between the subnets.
Multicast configuration and support can be found in the Lantronix knowledgebase. You may perform word searches, such as for "multicast", at http://www.lantronix.com/resources/.
3: Navigation and Printing
This chapter explains how to navigate and use your xPrintServer user interface including directions on how to login and log out, how to change your password, and most importantly, how to print from your iOS device.
Finding the xPrintServer IP Address
Use these directions to find your device IP address through which you may log into your xPrintServer device. Internet access is required.
Every xPrintServer device has a unique, identifying serial number that can be found on the product information label (see Figure 1-2). As part of the initialization/boot up process, the xPrintServer will automatically register its IP address and associated serial number with the Lantronix Web Services website (http://www.lantronix.com/findmyxprintserver) which in turn provides the unique IP address of the xPrintServer device. You may then use the xPrintServer IP address to log into the user interface for printing management.
Use these directions to find the IP address of a new xPrintServer device.
- Open an internet web browser. See Supported Browsers.
- Enter http://www.lantronix.com/findmyxprintserver into the web browser address bar.
-
Press Enter on the keyboard. You will be prompted for the xPrintServer serial number.
-
Enter the serial number of your xPrintServer. The serial number can be found on the product information label attached to your xPrintServer packaging (see Figure 1-2). It is an alphanumeric set of 12 characters.
Figure 3-1 Serial Number
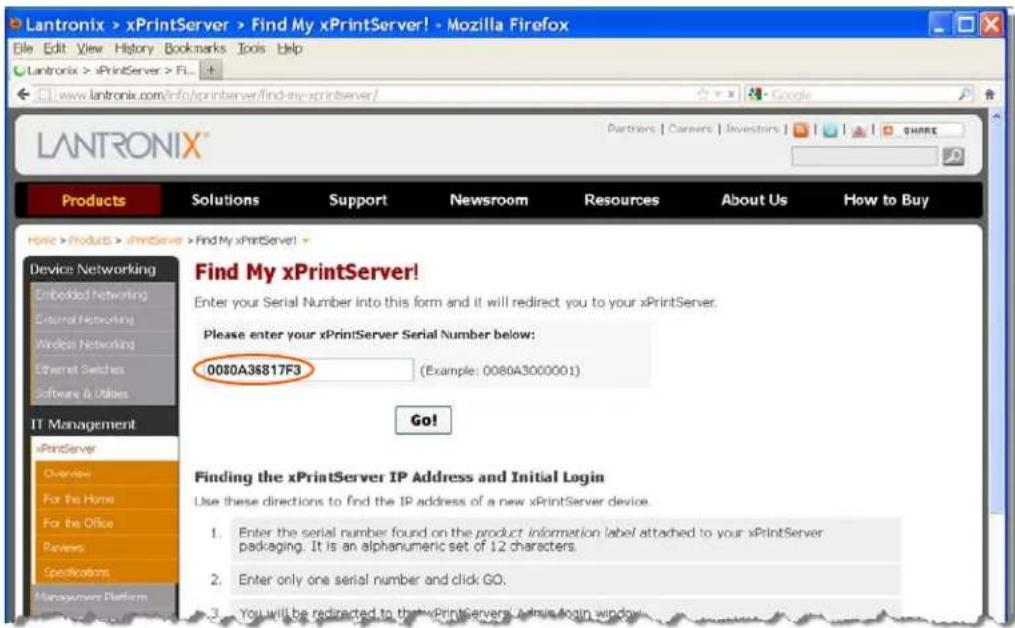
- Click the Go! button. You will be redirected to your xPrintServer URL, after which a login prompt will appear.
Figure 3-2 Redirected to Login Prompt
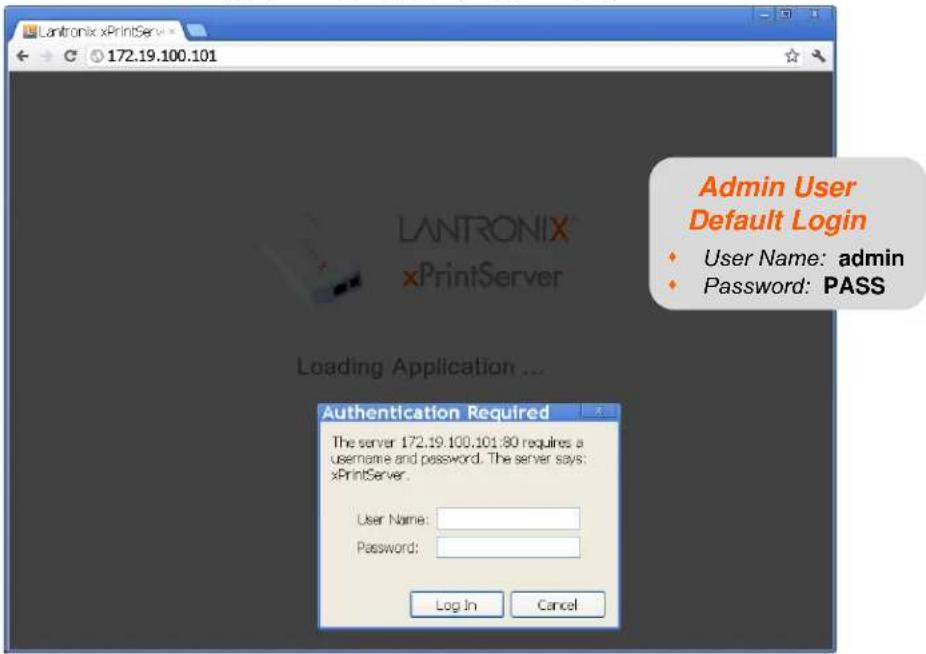
- Enter the default Admin user login information.
User Name: admin
Note: Upon initial login, modify the default "PASS" password as soon as possible for security reasons. See Changing Passwords.
Password: PASS
You will be redirected to your xPrintServer device URL where you will see the System Status on the Home Page.
- Take note of the IP address of your xPrintServer device for all future logins.
Note: Your xPrintServer IP address is assigned by DHCP by default, however, you can manually configure a static IP address. See Assigning a Static IP Address to the xPrintServer.
System Status on the Home Page
You will see your xPrintServer System Status information on the Home page whenever you log into your xPrintServer URL.
Figure 3-3 IP System Status Information on the Home Page
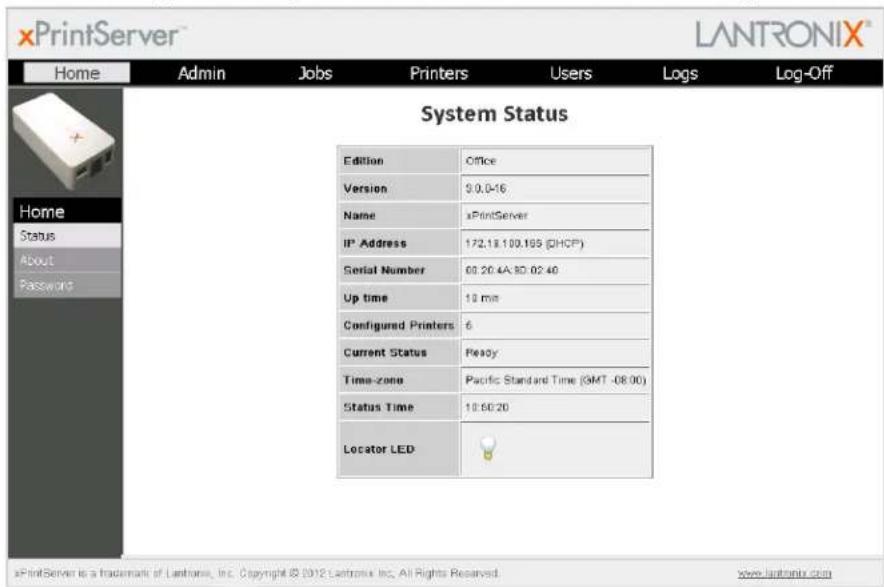
The System Status information includes your IP address along with other important system status information:
Edition
The edition of xPrintServer (Office Edition).
Version
The current version of your firmware.
Name
The configurable name for the xPrintServer device. The default name is xPrintServer.
IP Address
The unique IP address associated with your xPrintServer device. This IP address may be used to directly pull up the user interface of a connected and live xPrintServer.
Serial Number
The unique serial number associated with the xPrintServer device which should match what is on the product information label.
Up time
The amount of time the xPrintServer has been operational since powered on or last restarted.
- Configured Printers
The number of total discovered printers available for use on iOS devices.
Current Status
The current status of the xPrintServer.
Time-zone
The configured time zone (can be changed through the Admin page).
Status Time
The time at which the system status information you see on the screen was captured.
Locator LED
Clicking the light bulb will cause the "X" LED on top of the xPrintServer unit to blink rapidly. Clicking the light bulb again turns off this feature. This feature is useful in situations where you wish to identify a specific xPrintServer amongst multiple units.
Logging In
Once the xPrintServer is installed (see Installation Steps) and the IP address discovered (see Finding the xPrintServer IP Address and Initial Login), you may follow these directions to login to xPrintServer via Local or Remote Authentication at any time.
Note: The xPrintServer does not use the MS Active Directory services for xPrintServer GUI authentication. It will only use the locally configured user database for the xPrintServer GUI authentication.
Figure 3-4 Login Prompt
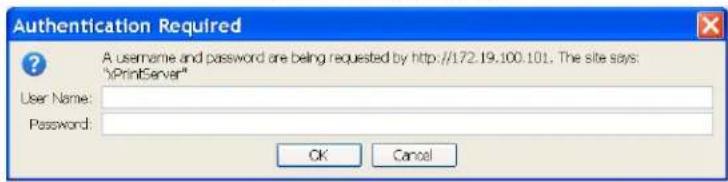
To Login:
-
Open an internet web browser.
-
Enter the IP address of your xPrintServer device.
Note: If Bonjour is installed on your computer or Mac, you may also access the user interface by entering: xPrintServer.local
- Enter your login information when prompted.
User Name
- Password
You are logged into the xPrintServer user interface when you see System Status on the Home Page.
Local Authentication Login
Logging in through local authentication logs you directly into the xPrintServer unit through the local database.
Remote Authentication Login
Remote authentication allows authentication of users through Microsoft Active Directory. This is a feature that can be enabled by the Admin user. If Active Directory is enabled, the xPrintServer communicates with a remote server to authenticate user passwords (see Managing Active Directory). The Admin user must first establish a remote authentication user name and password in Microsoft Active Directory. Once established, users using remote authentication can follow the same steps under Local Authentication Login to login. Remote authentication is disabled by default.
Note: Though the xPrintServer supports remote authentication using MS Active Directory, it is only used for authenticating print jobs sent to xPrintServer-protected printers. The xPrintServer GUI access will only authenticate against the xPrintServer-configured local user database.
Logging Off
- Click the Log-Off tab located at the top far right of any xPrintServer user interface page. You will be prompted to close out of your browser window.
- Close out of your browser to completely log off.
Navigation
Basic navigation features for the xPrintServer user interface are outlined in this section.
Figure 3-5 Navigating the xPrintServer User Interface
![xPrintServer Home Admin Jobs Printers Users Logs Log-Off Double-click to sort table information by column heading Printers List Access Discovery Printer Accounts Printer Drivers Advanced Search When a specific printer on the Printers page is clicked, details about this printer will appear in grey fields beneath the printer list. See Figure 4-6. Printers Description Location Make/Model Status Another HL-2070N series - xPrintServer Auto Discovered Lantronix xPrintServer Idle Canon MX410 series 172.19.130.252 - xPn Auto Discovered Canon PIXMA MX410 Idle EPSON Artisan 610 - xPrintServer Auto Discovered Epson Artisan 918, Ep Idle Epson Stylus NX620 - xPrintServer Auto Discovered Epson Stylus NX620, Idle Photosmart 6510.8111a - xPrintServer Auto Discovered HP Photosmart 6510.1 Idle Clicking the button beside a particular table list item will pull up the popup command menu associated with that item. xPrintServer is a trademark of Lantronix, Inc. Copyright © 2012 Lantronix Inc. All Rights Reserved. xPrintServer - xPrintServer Logs Diagnostic Access Job Status Diagnostic Log Date/Time Message D 24-Aug/2018.10.01.47 Script header: X-Status: OK D 24-Aug/2018.10.01.47 Script header: D 24-Aug/2018.10.01.47 cupsSetBusyState: Not busy: D 24-Aug/2018.10.01.47 PID 1466 (what/his/cups/cgi-bin/ops.cgi) exited with no errors. D 24-Aug/2018.10.01.62 cupsReadClient: 80 GET Apps?C#p=rpc&cat%26/hmp/printerStateCount&a=8&a=-1881865126 HTTP1. D 24-Aug/2018.10.01.62 cupsSetBusyState: Active clients D 24-Aug/2018.10.01.62 cupsAuthenticer: Authenticated as admin using Basic D 24-Aug/2018.10.01.62 [CGI] argv[0] = "user/his/cups/cgi-bin/ops.cgi" D 24-Aug/2018.10.01.62 [CGI] argv[1] = "OP=rpc&cat.%26/hmp/printerStateCount&a=8&a=-1881865126" D 24-Aug/2018.10.01.62 [CGI] envp[0] = "CUPS_CACHEDIFR/year/cache/cups" D 24-Aug/2018.10.01.62 [CGI] envp[1] = "CUPS_DATADR=/usr/share/cups" D 24-Aug/2018.10.01.62 [CGI] envp[2] = "CUPS_DOCTROOT=/usr/share/doc/cups" D 24-Aug/2018.10.01.62 [CGI] envp[3] = "CUPS_FONTPATH=/usr/share/cups/finds" D 24-Aug/2018.10.01.62 [CGI] envp[4] = "CUPS_REQUESTROOT=/usr/cups/requests" D 24-Aug/2018.10.01.62 [CGI] envp[5] = "CUPS_SERVERBIN=/usr/lb/cups" + 1-15 of 575 > xPrintServer is a trademark of Lantronix, Inc. Copyright © 2012 Lantronix Inc. All Rights Reserved. Logs Diagnostic Access Job Status Go to the first page Go backward one page Go to the last page Go to the next page Tabcs allow you to move between xPrintServer pages and to Log-Off xPrintServer - xPrintServer - xPrintServer - xPrintServer - xPrintServer - xPrintServer - xPrintServer - xPrintServer - xPrintServer - xPrintServer - xPrintServer - xPrintServer - xPrintServer - xPrintServer - xPrintServer - xPrintServer - xPrintServer - xPrintServer - xPrintServer - xPrintServer - xPrintServer - xPrintServer - xPrintServer - xPrintServer - xPrintServer - xPrintServer - yPrintServer - yPrintServer - yPrintServer - yPrintServer - yPrintServer - yPrintServer - yPrintServer - yPrintServer - yPrintServer - yPrintServer - yPrintServer - yPrintServer - yPrintServer - yPrintServer - yPrintServer - yPrintServer - yPrintServer - yPrintServer - yPrintServer - yPrintServer - yPrintServer - yPrintServer - yPrintServer - yPrintServer - yPrintServer - uPrintServer - uPrintServer - uPrintServer - uPrintServer - uPrintServer - uPrintServer - uPrintServer - uPrintServer - uPrintServer - uPrintServer - uPrintServer - uPrintServer - uPrintServer - uPrintServer - uPrintServer - uPrintServer - uPrintServer - uPrintServer - uPrintServer - uPrintServer - uPrintServer - uPrintServer - uPrintServer - uPrintServer - uPrintServer - vPrintServer - vPrintServer - vPrintServer - vPrintServer - vPrintServer - vPrintServer - vPrintServer - vPrintServer - vPrintServer - vPrintServer - vPrintServer - vPrintServer - vPrintServer - vPrintServer - vPrintServer - vPrintServer - vPrintServer - vPrintServer - vPrintServer - vPrintServer - vPrintServer - vPrintServer - vPrintServer - vPrintServer - vPrintServer - uPrintServer - uPrintServer - uPrintServer - uPrintServer - uPrintServer - uPrintServer - uPrintServer - uPrintServer - uPrintServer - uPrintServer - uPrintServer - uPrintServer - uPrintServer - uPrintServer - uPrintServer - uPrintServer - uPrintServer - uPrintServer - uPrintServer - u Print Server Page Purge Job History Delete Printer Change Description Change Location Show Share Info Share Printer Hide Printer Set Printer Options Cancel Sometimes multiple pages are necessary to list all the items in the Printers, Jobs and Logs pages. In these circumstances, page navigation features will become available at the bottom of the screen. Go to the first page Go backward one page Go to the last page](/content/2026/05/1024395/images/463653363a4fca9320978f8120c25d880ef890007ffaa105658e81668d2a2c64.jpg)
As illustrated above, basic navigation features for the xPrintServer user interface include the following:
- Tabs
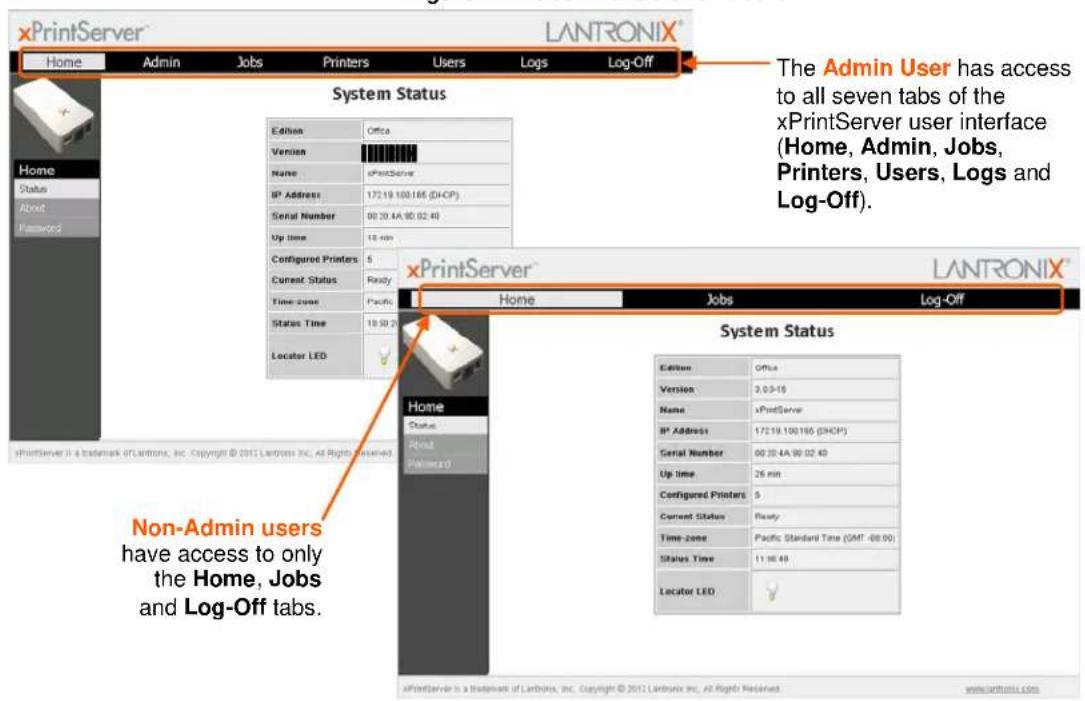
All the functionality of your xPrintServer user interface is divided between the Home, Admin, Jobs, Printers, Logs and Log-Off tabs located across the top of the user interface. Only the Admin user has full access to the functionality of all tabs within the xPrintServer user interface. Non-Admin users only have access to the Home, Jobs and Log-Off tabs. See Figure 3-6 to compare Admin user and Non-Admin user access. Access these pages by clicking the same-named tab along the top of the screen. For instance, click the Jobs tab to get to the Jobs page or click Home to get to the Home page.
Links
Click to select from the links/commands available for each page. All links available for a particular web page are displayed along the left side. For instance, links to Active, Completed and All jobs are available on the left side of the Jobs page.
Search
A Search field is available for the Jobs, Printers and Users tabs. The search field features dynamic filtering that provides results based on the search string entered into the search field. The results dynamically update according to the search parameters entered in the search field. Deleting all contents of the Search field removes the filter and will show all results.
Button
This button may be found beside all items listed on the Jobs and Printers pages. Click the button beside a particular print job or printer on these pages to pull up a popup command menu with commands that are available for that item.
Log-Off Tab
A Log-Off tab located at the far upper right of every xPrintServer user interface page allows you to logout easily.
Figure 3-6 Tabs Available for Users
Printing from an iOS Device
This section explains how to print from your iOS device (e.g., iPad, iPod or iPhone).
Use these steps to print from your iPad, iPhone or other iOS device.
- Connect your xPrintServer according to Installation Steps.
- Using your iPad, iPhone or other iOS device, open web page, email, photo, etc. you wish to print and choose the icon to open the native print menu:
Figure 3-7 Sample View of Native Print Menu
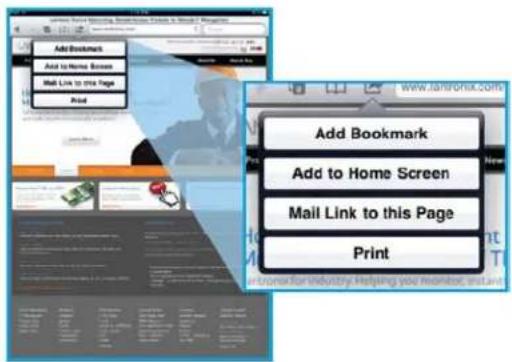
Note: A list of available commands will appear on the native print menu and will differ in appearance according to the type of Apple device.
-
Choose Printer in the Printer Options menu that appears. All available networked printers will display on your iOS device, including protected printers (see Figure 3-8 below).
-
Select the appropriate printer.
-
Login, as necessary. User authentication is required when a protected printer is selected (see Figure 3-8).
-
Select the number of copies to print.
-
Click Print. Your print job will be sent to the selected printer
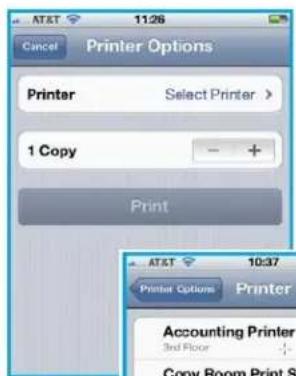
Note: Printer Options appear differently on different iOS devices. Some printers are protected, as indicated by a padlock 🔒 icon.
Figure 3-8 Sample View of Printer Options
Printing from a Mac OS X Lion Desktop
This section explains how to print from your Mac Operating System (OS) desktop. xPrintServer Office Edition supports desktop printing from Mac OS X Lion.
Use these steps to setup printing from your Mac OS through the xPrintServer.
- Connect your xPrintServer according to Installation Steps.
- Go to System Preferences > Hardware.
- Click on Print & Scan.
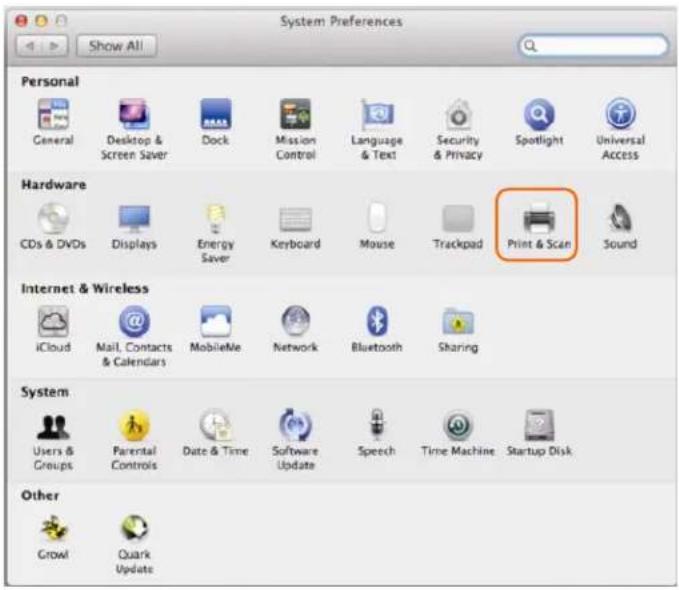
- Click on the + button on the lower left corner. A list of printers appears.
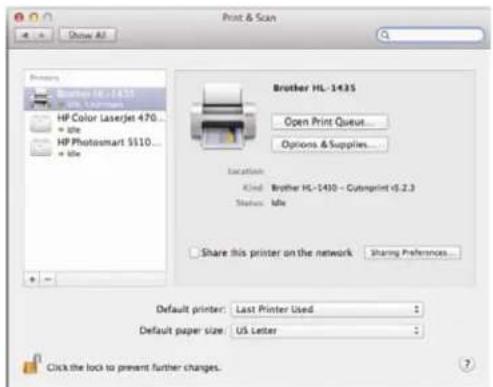
- Select the printer you wish to add.
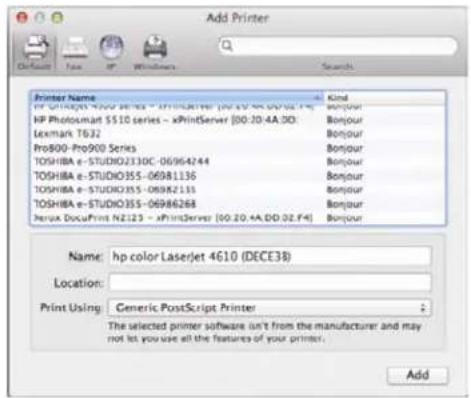
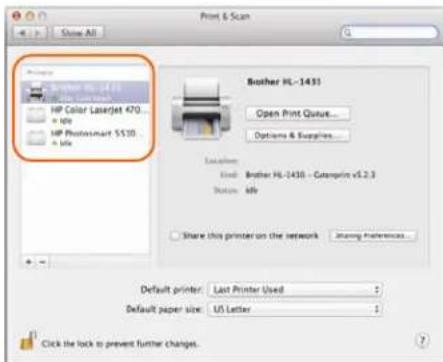
- Click on the Add button. The printer is now added in your available list of printers and is ready to print.
Setting Up Printing from a Windows 7 Desktop
This section explains how to prepare your Windows 7 desktop for printing . xPrintServer Office Edition supports desktop printing from Windows 7 and Windows XP Operating Systems through Bonjour Print Services. You will need to download Bonjour Print Services for Windows v2.0.2 or higher. .
Performing Add Printer Setup
- Connect your xPrintServer according to Installation Steps.
- Download Bonjour Print Services at http://support.apple.com/kb/DL999, following prompts as instructed.
- Launch Bonjour Printer Wizard:
Through Window's Start Menu by clicking Start > Control Panel > Bonjour Print Services > Bonjour Print Wizard.
By double-clicking the Bonjour Print Wizard icon on your desktop.
The Bonjour Printer Wizard appears with a list of discovered printers.
- Click on printer you wish to install.
![Bonjour Printer Wizard Browse for Bonjour Printers Select the printer you want to use from the list below. Shared printers: Canon NX310 Series #2 - xPrintServer [00:80:A3:95:0A:7D] HP LaserJet 4000 Series - xPrintServer [00:80:A3:95:0A:7D] Printer Information Description: Location: Auto Discovered (USB) Next > Cancel](/content/2026/05/1024395/images/4014c7d80420880230d4986663a2bef700bdd905c4a5635ffab9d4c4bdfc3763.jpg)
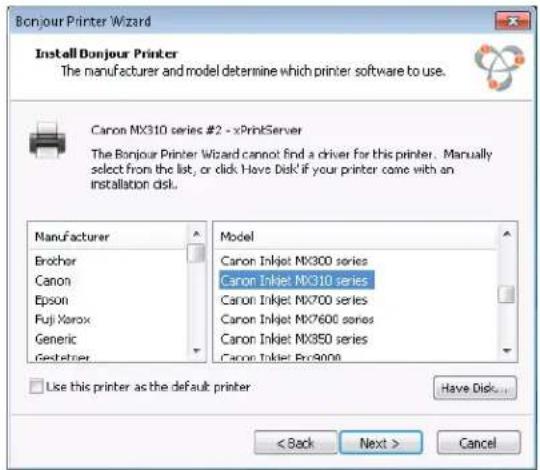
- Search and select your printer by Manufacturer and Model, and click Next.
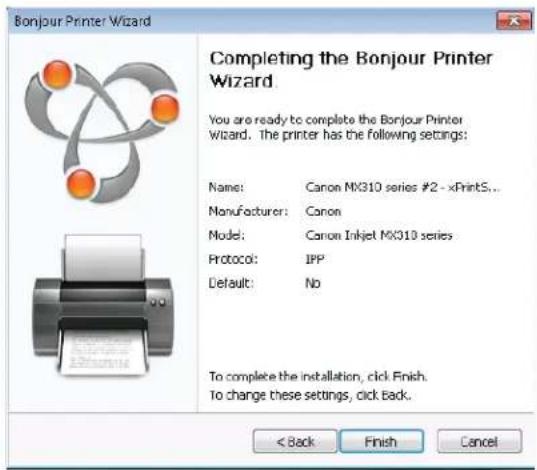
- Click Finish to complete the installation.
Configuring a Default Printer
This section provides instructions on setting an installed printer on your network as the default printer.
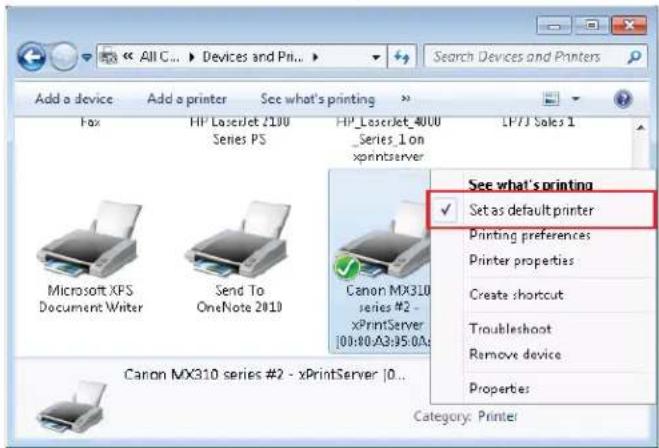
- Click Start > Control Panel on your desktop.
- Double-click to select Devices and Printers.
- Right-click the printer to be set as default and select Set as default printer. The selected printer is now set as the default printer.
Setting Up Printing from a Windows XP Desktop
This section explains how to prepare your Windows XP desktop for printing. xPrintServer Office Edition supports desktop printing from Windows XP and Windows 7 Operating Systems through Bonjour Print Services. You will need to download Bonjour Print Services for Windows v2.0.2 or higher.
Performing Add Printer Setup
- Connect your xPrintServer according to Installation Steps.
- Download Bonjour Print Services at http://support.apple.com/kb/DL999, following prompts as instructed.
-
Launch Bonjour Printer Wizard:
Through Window's Start Menu by clicking Start > Control Panel > Bonjour Print Services > Bonjour Print Wizard.
By double-clicking the Bonjour Print Wizard icon on your desktop.
The Bonjour Printer Wizard appears with a list of discovered printers. -
Click on printer you wish to install.
![Bonjour Printer Wizard Browse for Bonjour Printers Select the printer you want to use from the list below. Shared printers: Canon MX310 series #2 - xPrintServer [00:80:A3:95:0A:7D] HP Laser Jet 4000 Series - xPrintServer [00:80:A3:95:0A:7D] Printer information Description: Location: Auto Discovered (USB) Next > Cancel](/content/2026/05/1024395/images/d1a925dba77430dc29f869701de0e3b7961bf8c99113e5dc2904ecc7e0eeab8e.jpg)
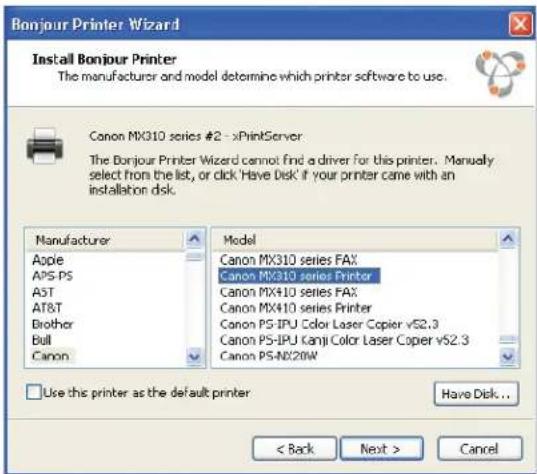
- Search and select your printer by Manufacturer and Model, and click Next.
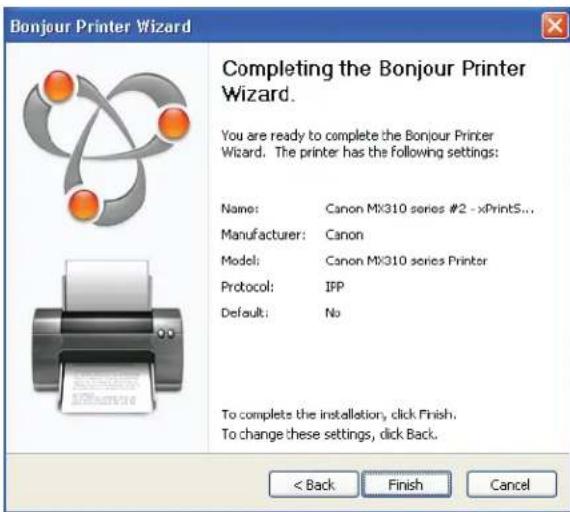
- Click Finish to complete the installation.
Configuring a Default Printer
This section provides instructions on setting an installed printer on your network as the default printer.
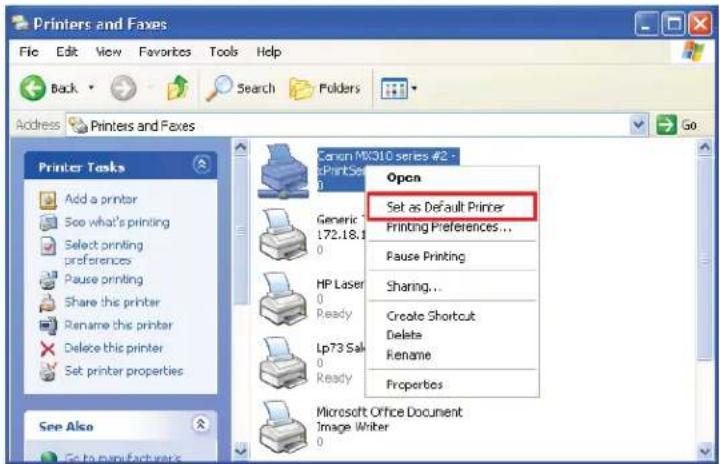
- Click Start > Control Panel on your desktop.
- Double-click to select Printers and Faxes.
- Right-click the printer to be set as default and select Set as default printer. The selected printer is now set as the default printer.
4: Configuration
This chapter describes how to configure your xPrintServer using the xPrintServer user interface.
Admin user: the default and permanent master user login for the xPrintServer. The Admin user has complete access of the xPrintServer user interface functionality including user, printer and job management and configuration capabilities as compared to non-Admin users who can only change their own password, have access to their own print jobs and view basic xPrintServer information.
Table 4-1 Comparing Admin and Non-Admin User Privileges
| Non-Admin User Privileges | Admin User Privileges |
| Access to functionality in the Home and Jobs tab in the xPrintServer user interface.♦ Change user password.♦ View and modify own print jobs (not the print jobs of other users).♦ View basic information about the xPrintServer system status. | Access to Home, Admin, Jobs, Printers, Users and Logs tab pages which includes all the functionality available through the xPrintServer user interface.♦ Change all user passwords.♦ View and manage information about all print jobs, printers and user logins.♦ Ability to update firmware, reset device to default settings, add/delete printers and users, manage printer access, modify time zone, restart the device, view and send diagnostic information, update the name of the xPrintServer unit, and monitor logs. |
User Administration
The Admin user is able to create new users, delete users, specify user access to particular printers and update local and remote user passwords. The Admin user may also utilize the Search feature as necessary to find a particular user. Non-Admin users may only modify the password of their created account.
Changing Passwords
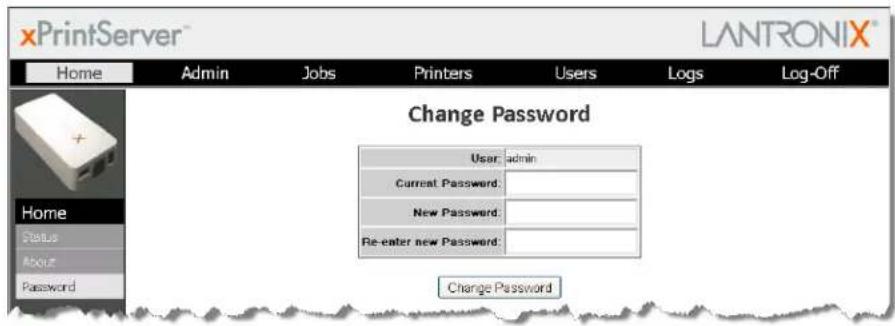
The Admin user and non-Admin users may use the To change your password directions below to change their user password. The Admin user may use the To change a non-Admin user password as the Admin directions below to change the password for any non-Admin user. Password changes are effective immediately.
To change your password:
- Login to the xPrintServer user interface (see Logging In).
- Click the Password link on the left side of the Home page. The Change Password page will appear displaying the User for which the password change is being made.
-
Complete the following fields:
-
Current Password
New Password
Re-enter new Password
Note: Passwords are case-sensitive and may include up to 32 characters. All printable characters may be used with the exception of single and double quotation marks such as: ' or ".
-
Click Change Password.
-
Click OK in the confirmation popup that appears. Your password is changed.
Note: You will be asked to login again if you attempt to navigate to a different user interface page.
Figure 4-1 Changing Own Password
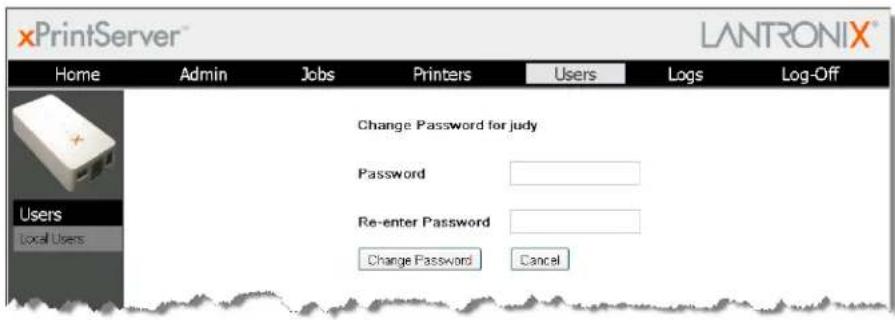
To change a non-Admin user password as the Admin:
- Login to the xPrintServer user interface (see Logging In) as Admin user.
- Click the Users tab to access the Users page. All users are listed here.
- Utilize Search as necessary to find a particular user.
- Click Password button to the right of the User ID to be changed.
- Enter the new password into both fields:
Password
Re-enter Password
Note: Passwords are case-sensitive and may include up to 32 characters. All printable characters maybe used with the exception of single and double quotation marks such as: ' or ".
-
Click Change Password.
-
Click OK in the confirmation popup that appears. User password is changed.
Note: If the Admin user password is changed, you will be asked to login again if you attempt to navigate to a different user interface page.
Figure 4-2 Changing Other User Passwords (Admin User Only)
Adding a New User
The Admin user can use these steps to create new users.
- Login to the xPrintServer user interface (see Logging In).
-
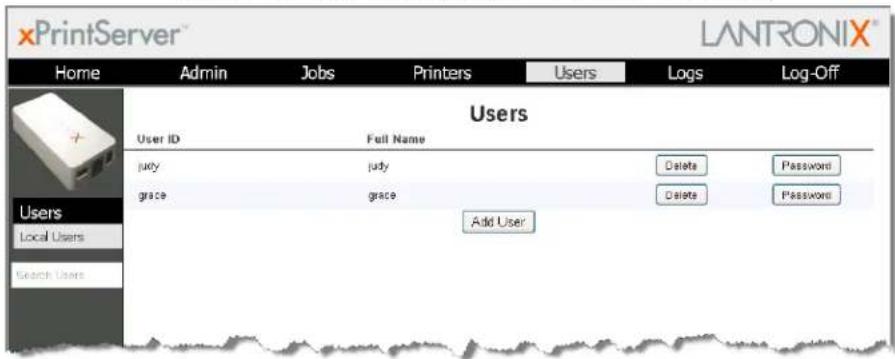
Click the Users tab to access the Users page. All users are listed here.
-
Click Add User.
Note: The Full Name of a new user is case sensitive and may include up to 32 alpha and/or numeric characters.
- Enter the following fields for the new user:
User ID
Full Name
- Password
Re-enter Password
Note: When establishing a new user, please note that the iOS device browser capitalizes the first character of the User ID. Make sure the User ID is correct prior to submitting your request to add user.
- Click Add User (or Cancel if you want to cancel this action). The new user will immediately display on the Users page.
Figure 4-3 Adding or Deleting a User (Admin User Only)
Deleting a User
The Admin user can use these steps to delete users.
- Login to the xPrintServer user interface (see Logging In).
-
Click the Users tab to access the Users page. All users are listed here.
-
Utilize Search as necessary to find a particular user.
-
Click the Delete button to the right of the User ID to be deleted.
-
Click Yes in the confirmation popup that appears (or No if you want to cancel this action). The deleted user will immediately be removed from the list of users on the Users page.
Printer Access Control (Protecting Printer Access)
When a printer is protected, the user on the iOS device must be authenticated before printing is allowed. The user is prompted for a userid and password on the IOS device after the selecting the printer with a padlock icon.
Protecting Printer Access Using xPrintServer Local User Database
The Admin user can use the steps below to change local user access to a specific printer.
Note: xPrintServer will only validate the Admin user account against the xPS Local User Database, even if MS Active Directory is enabled. Printer Access Control does not apply to MS Windows OS printing, since MS Windows printing does not currently support a mechanism for prompting users for print job authentication challenges.
- Login to the xPrintServer user interface (see Logging In).
- Click the Printers tab to access the Printers > List page (see Figure 4-6).
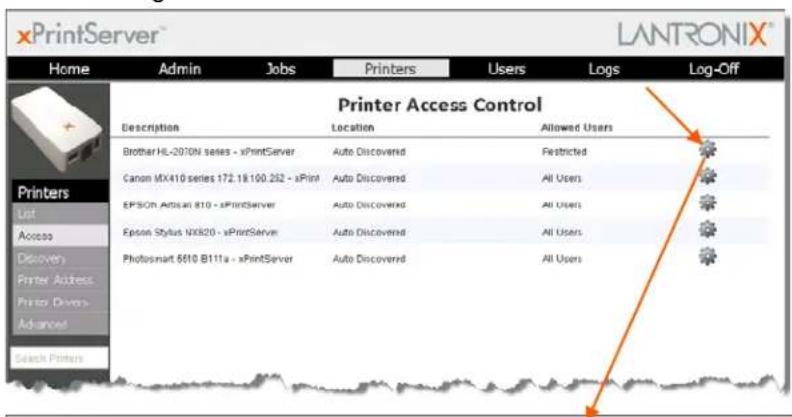
- Click the Access link to the left of the Printers page. A list of configured printers on the network will be listed here.
- Utilize Search as necessary to find a particular printer.
- Click the 🎨 button to the right of the specific printer with user access to be viewed or modified.
Figure 4-4 Printer Access Control – Local Users
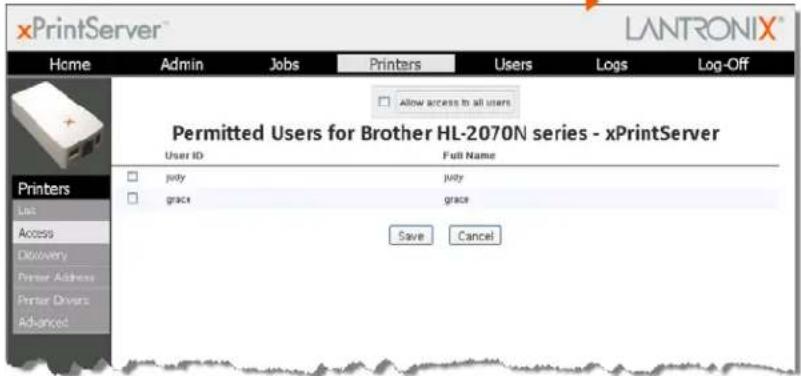
- To allow all users access to this printer, check the Allow access to all users checkbox at the top of the screen. Individual User ID checkboxes that may have specified user access will disappear.
- To allow specific users access to this printer, uncheck the Allow access to all users checkbox at the top of the screen if not already unchecked. Individual User ID checkboxes will appear to allow you to select users allowed access to this printer.
Check the User ID checkbox of users you wish to grant printer access for this printer.
Uncheck the User ID checkbox of users you do not wish to grant printer access for this printer.
- Click Save (or Cancel if you want to cancel this action). The Printer Access Control page list of printers will re-appear with the Allowed Users column immediately updated to show your latest modification.
Protecting Printer Access Using MS Active Directory Services
The Admin user may use the steps below to configure the xPrintServer to use MS Active Directory services as a remote authentication server.
Note: The Active Directory server must first be enabled by the Admin user in order for remote user access to be changed. See Managing Active Directory to enable the Active Directory server. Also, xPS will only validate the Admin user account against the xPS local user database, even if MS Active Directory is enabled. Prior to enabling printer access control using MS Active Directory, you must first remove all xPrintServer local user protection on printers. To verify, disable MS A/D and check each printer on the Printer Access page or remove all configured xPrintServer Local Users.
- Login to the xPrintServer user interface (see Logging In) as Admin user.
- Click the Printers tab to access the Printers page.
- Click the Access link to the left of the Printers page. All printers configured to the xPrintServer are listed here.
Figure 4-5 Printer Access Control – Remote Users
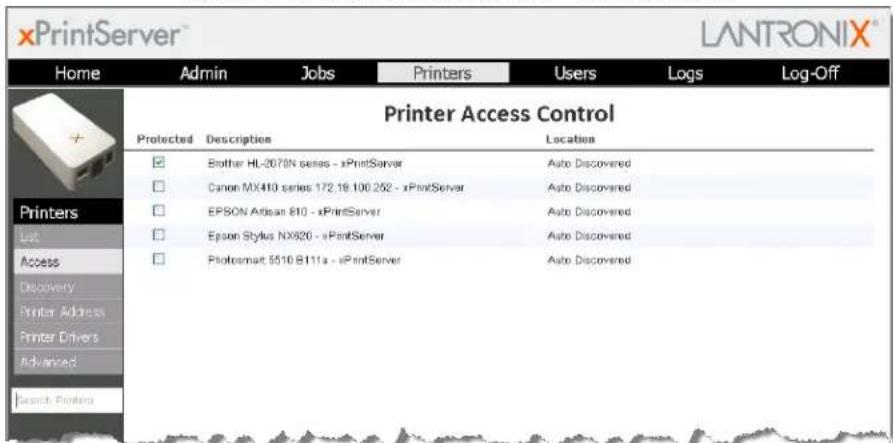
- Utilize Navigation as necessary in situations where there are multiple pages of printers.
- Utilize Search as necessary to find a particular printer.
-
Check or uncheck the Protected checkbox beside a specific printer:
-
Check the Protected checkbox beside a specific printer to require user authentication prior to use for all remote users.
- Uncheck the Protected checkbox beside a specific printer to not require user authentication prior to use.
Note: In some cases, iOS devices will cache the user name and password of the first user authentication login so that a remote user only needs to login that first time.
Viewing Configured Printers
The Admin user may utilize these instructions to view provisioned network-connected printers installed since the xPrintServer last started up or printers on other networks if their IP addresses have been added (see Adding a Printer IP Address).
- Login to the xPrintServer user interface (see Logging In) as Admin user.
- Click the Printers tab to access the Printers > List page. The Description, Location, Make/Model and the most recent Status of all currently configured printers will be listed on this page.
- Utilize Navigation as necessary in situations where there are multiple pages of printers.
- Utilize Search as necessary to find a particular printer.
- Click on any printer in the list to retrieve additional information on that printer. In Figure 4-6 below, the fourth printer in the list was clicked and the associated printer details displayed in a grey field at the bottom of the list of printers.
Figure 4-6 Printer Details and Pop-Up Command Menu
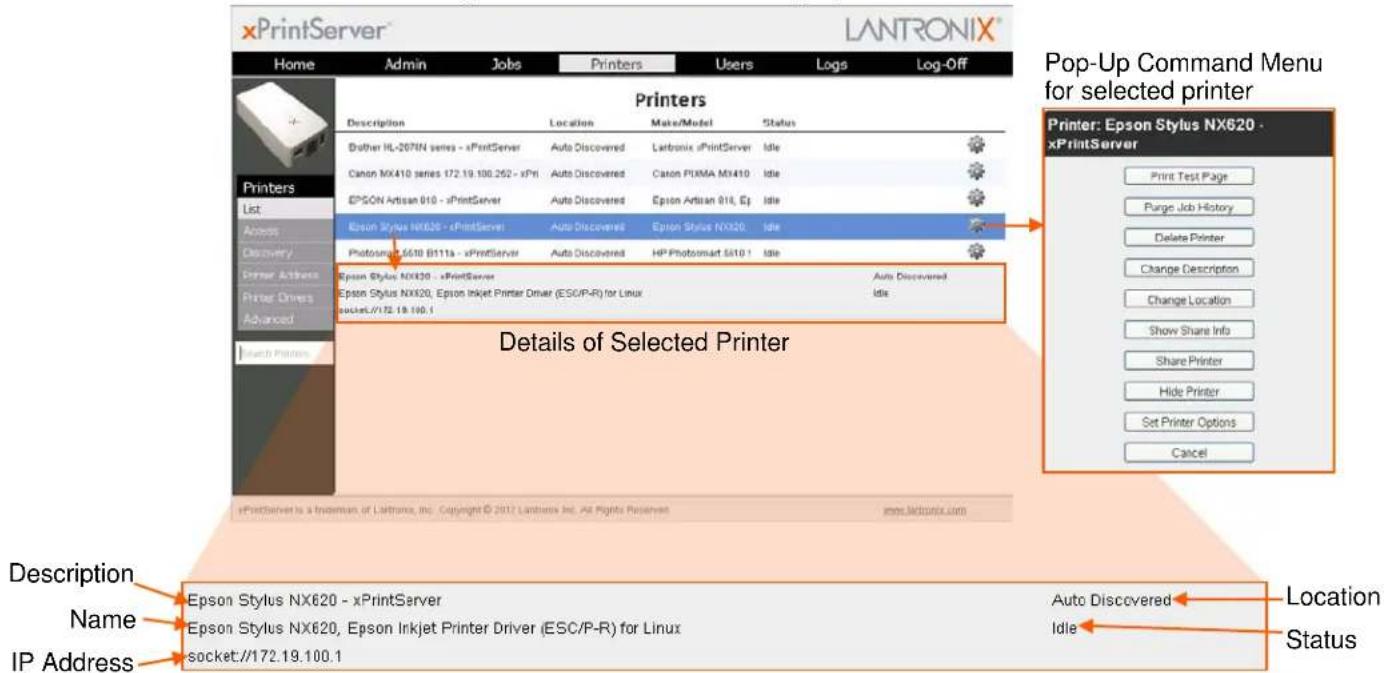
- Click the button to the right of a specific printer to access a pop-up command menu of options available for that printer. Each of these options is explained in greater detail under Admin Printer Configuration Options.
Configuring Printers
Note: Discovery of the xPrintServer from a PC requires Bonjour, which may be installed via iTunes or Safari or Bonjour Print Helper at www.apple.com.
All printers are added and configured to the xPrintServer via discovery where the xPrintServer discovers and provisions all network-connected printers as AirPrint printers. Discovery happens in one of two ways:
Auto Discovery: This is the automatic method of printer discovery and provisioning. Auto discovery is enabled by default so that each time the xPrintServer starts up or a printer is connected to the USB port, the Discovery protocol automatically runs one time, discovering and provisioning all printers connected since the last start up. This automatic feature can be disabled.
Discovery: This is the Admin user-activated method of discovering and provisioning printers that can be initiated after the xPrintServer is up and running. This method is useful in situations where printer(s) have been added since the last xPrintServer start up. A user may wish to discover and provision the printer(s) at a particular moment rather than waiting until the auto discovery opportunity at the next xPrintServer startup.
Note: Only printers listed among the Lantronix xPrintServer published list of printers will be auto-provisioned after Discovery (see http://www.lantronix.com/it-management/mobile-print-servers/supported-printer-list.html). Configuration options to manually add a printer and modify advanced printer settings are available under Printers > Advanced. Use these advanced options only if instructed to do so by Lantronix Technical Support.
Enabling or Disabling Discovery
The auto discovery utility of xPrintServer is enabled by default so that whenever you start up your xPrintServer device, auto discovery will automatically run one time. Auto discovery can be disabled or re-enabled at any time. The Admin user may utilize these instructions to access where you may disable or re-enable auto discovery.
- Login to the xPrintServer user interface (see Logging In) as Admin user.
- Click the Printer tab to access the Printers > List page (see Figure 4-6).
- Click the Discovery link to the left of the page to reach the Printer Discovery page. The current auto discovery mode will be displayed at the top of the page.
Figure 4-7 Printer Discovery Page
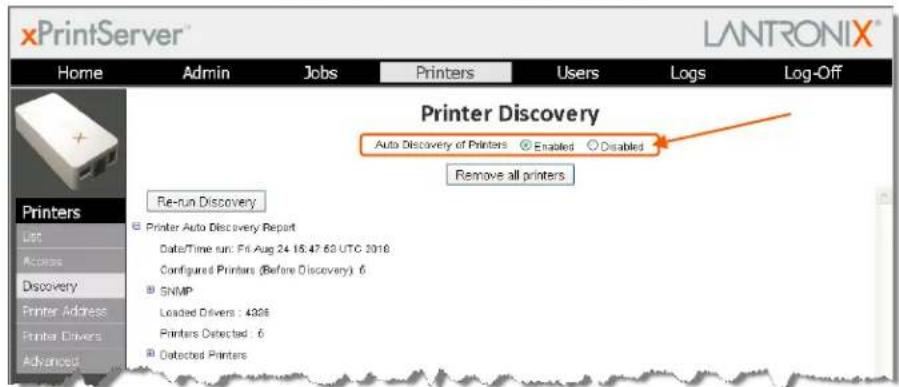
- Check Enabled or Disabled to enable or disable printer discovery, as desired. The auto discovery mode will automatically adjust to your selection in a few seconds and your mode choice will be remembered for subsequent xPrintServer startups.
Configuring Printers through Auto Discovery
Auto discovery of printers happens automatically each time you startup xPrintServer, so long as auto discovery is enabled prior to the startup.
- Make sure auto discovery is enabled (see Enabling or Disabling Discovery above).
- Startup and login to the xPrintServer user interface (see Logging In) as usual. The Discovery protocol runs one time automatically upon startup.
- Click the Printer tab to access the Printers > List page (see Figure 4-6). All printers which were auto discovered at this startup will be listed here with "Auto Discovered" listed under the Location column.
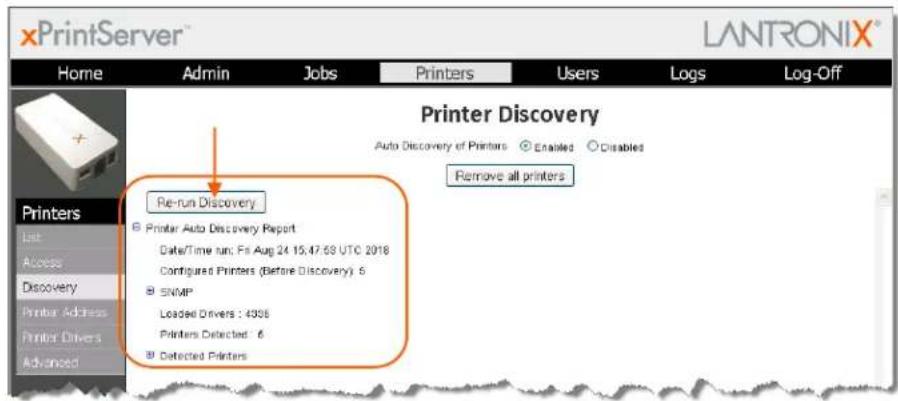
- Click the Discovery link to the left of the page to reach the Printer Discovery page. A Printer Auto Discovery Report will appear showing the current date and time the xPrintServer automatically discovered and configured printers and associated downloaded drivers.
Figure 4-8 Sample Printer Auto Discovery Report
Configuring Printers through Discovery
The Admin user may run Discovery anytime after xPrintServer is started up. Utilize these instructions to discover and provision network printers connected after the xPrintServer last started up or printers on other networks if their IP addresses have been added (see Updating Printer IP Addresses).
- Login to the xPrintServer user interface (see Logging In) as Admin user.
- Click the Printer tab to access the Printers > List page (see Figure 4-6).
- Click the Discovery link to the left of the page to reach the Printer Discovery page. A message stating "Printer Auto Discovery has not yet been run" will appear if printers are available for discovery. If new printers are not available for discovery, you will see a Printer Auto Discovery Report (see Figure 4-8).
- Click the Re-run Discovery button within the Printer Auto Discovery Report to manually check for any new printers. After a few minutes, a new Printer Auto Discovery Report will appear showing the current date and time of the current discovery and configuration of printers and associated downloaded drivers.
- Expand the SNMP field to see configuration information about the discovered printer(s). An example of what you may see in the SNMP field:
Figure 4-9 Expanding Detected Printers Information
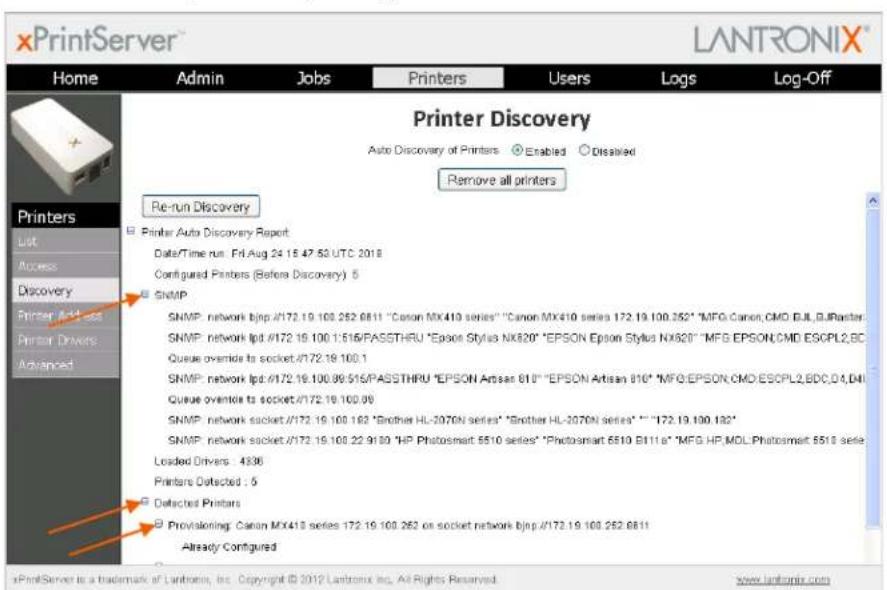
- Expand the Detected Printers field and further expand additional available subcategories (indicated with a icon to the left) to see a list of discovered printers and the status of the provisioning results.
Note: If you expand the Printer Auto Discovery Report, you may need to use the left-right and up-down scroll bar to see the entire contents of your report.
Deleting All Configured Printers
The auto discovery utility of xPrintServer is enabled by default so that whenever you turn on your xPrintServer device, auto discovery will automatically run one time. The Admin user may utilize these instructions to access the area where you can disable or re-enable auto discovery.
- Login to the xPrintServer user interface (see Logging In).
- Click the Printer tab to access the Printers > List page (see Figure 4-6).
- Click the Discovery link to the left of the page to reach the Printer Discovery page.
- Click the Remove all printers button to remove all configured printers, as desired.
- Click Yes in the confirmation popup that appears.
- Log-off (see Logging Off) and close your browser. All printers are deleted.
Setting Real Time Clock
Real Time Clock is a built-in function in xPrintServer which time-stamps printing-related activities such as identifying the time of log activities or print jobs. Real Time Clock is automatically on and syncs time with pool.ntp.org (Network Time Protocol) and is set it at GMT -800 PST (Pacific Standard Time).
To modify the Time-zone
- Login to the xPrintServer user interface (see Logging In) as Admin user.
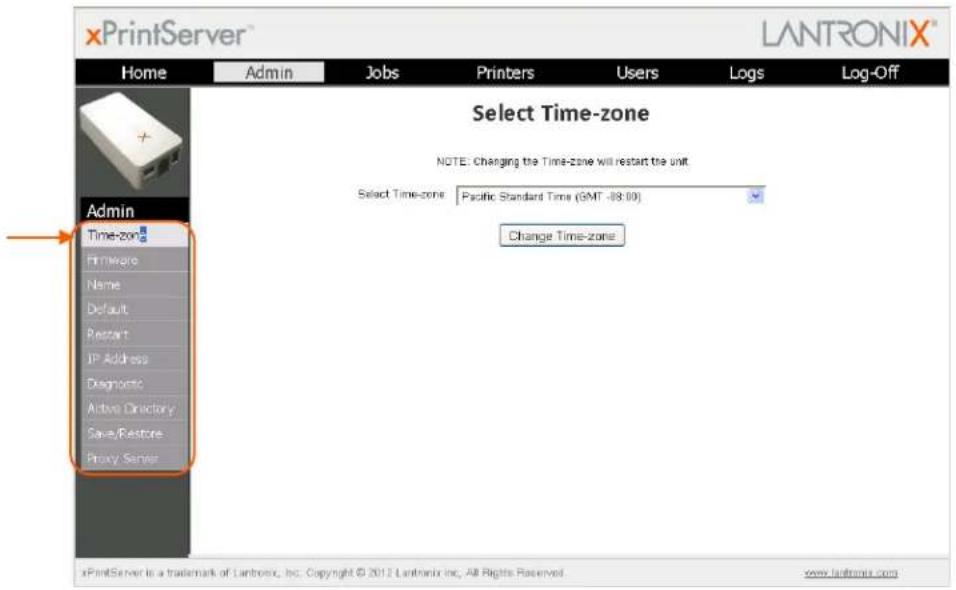
- Click the Admin tab to access the Admin menu. A list of all available Admin user configuration options appears to the left of the screen (see Figure 4-10).
The Select Time-zone page is the default page the Admin user will get to upon clicking on the Admin tab. This page can also be accessed by clicking the Time-zone link on the left side of the Admin page.
Figure 4-10 Admin Menu (Defaults to Time-zone Link)
- Select a new time zone from the Select Time-zone drop-down menu.
- Click the Change Time-zone button.
- Click Yes in the confirmation popup that appears.
- Wait for the xPrintServer to reboot. When the time zone is changed, the xPrintServer device will automatically restart, bringing you back to System Status on the Home Page. The unit is now set to your new chosen time zone.
Assigning a Static IP Address to the xPrintServer
Your xPrintServer IP address is DHCP by default, but can be configured with a static IP address. The Admin user may utilize these instructions to establish a static IP address.
- Login to the xPrintServer user interface (see Logging In) as Admin user.
- Click the Admin tab to access the Admin menu. A list of all available Admin user configuration options appears to the left of the screen (see Figure 4-10).
- Select IP Address to access the Admin > IP Address page.
-
Click the Static radio button near the top of the page to access static IP address configuration fields.
-
Complete the following fields:
IP Address
Netmask
Default Gateway
DNS Server
- Click Save.
- Click OK in the confirmation popup that appears. The unit will automatically restart.
- Close out of your xPrintServer browser and open a new browser.
- Enter the newly assigned static IP address.
- Login to the xPrintServer user interface (see Logging In). The assigned static IP address will appear on the System Status page.
Admin Printer Configuration Options
Configuration options available on a specific printer can be accessed through the Pop-Up Printer Command Menu (see Figure 4-6) of the xPrintServer user interface. The Admin user may utilize the Search feature as necessary to find a particular, previously discovered printer, and access the Pop-Up Printer Command Menu for that printer.
Printing a Test Page
The Admin user may use these directions to print a test page for a selected printer.
- Login to the xPrintServer user interface (see Logging In) as Admin user.
- Click the Printer tab to access the Printers > List page (see Figure 4-6).
- Utilize Navigation as necessary in situations where there are multiple pages of printers.
- Utilize Search as necessary to find a particular printer.
-
Click the 🎨 button beside the printer through which you want to print a test page.
-
Click Print Test Page in the popup command menu that appears (or Cancel within the same menu if you want to back out of it) and a test page print job will be sent to the selected printer..
- Click OK in the confirmation popup providing a print job ID.
Purging Job History
The Admin user may use this selection to purge all printed job history information. Otherwise, by default, xPrintServer maintains a list of the last 50 printed jobs.
- Login to the xPrintServer user interface (see Logging In) as Admin user.
- Click the Printer tab to access the Printers > List page (see Figure 4-6).
- Utilize Navigation as necessary in situations where there are multiple pages of printers.
- Utilize Search as necessary to find a particular printer.
- Click the 🎨 button beside the printer with the job history you want to purge.
- Click Purge Job History in the popup command menu that appears (or Cancel within the same menu if you want to back out of it).
- Click Yes in the confirmation popup to continue (or No to cancel action) and all print jobs not yet printed will be purged from the selected printer.
- Click OK in the second confirmation popup.
Deleting a Printer
The Admin user may use this selection to delete a printer that is currently configured. Printers may later be added and configured according to the directions in the Adding, Finding and Discovering Printers section.
- Login to the xPrintServer user interface (see Logging In) as Admin user.
- Click the Printer tab to access the Printers > List page (see Figure 4-6).
- Utilize Navigation as necessary in situations where there are multiple pages of printers.
- Utilize Search as necessary to find a particular printer.
- Click the 🎨 button beside the printer you want to delete.
- Click Delete Printer in the popup command menu that appears (or Cancel within the same menu if you want to back out of it).
- Click Yes in the confirmation popup to continue (or No to cancel action) and the selected printer will be deleted.
- Click OK in the second confirmation popup.
Changing Printer Description
The Admin user may use this selection to change the advertised printer name of a configured printer as it will be displayed to all users on their iOS devices.
- Login to the xPrintServer user interface (see Logging In) as Admin user.
- Click the Printer tab to access the Printers > List page (see Figure 4-6).
- Utilize Navigation as necessary in situations where there are multiple pages of printers.
- Utilize Search as necessary to find a particular printer.
- Click the 🎨 button beside the printer for which you want to change description.
- Click Change Description in the popup command menu that appears (or Cancel within the same menu if you want to back out of it).
- Modify the new description for the printer in the popup window which appears.
Figure 4-11 New Printer Description

- Click OK. After a few seconds, the printer description will be changed.
Changing Printer Location
The Admin user may use this selection to change the advertised location of a configured printer as it will be displayed to all users on their iOS devices. This command is useful for updating the location of printers initially identified as "Auto Discovery".
- Login to the xPrintServer user interface (see Logging In) as Admin user.
- Click the Printer tab to access the Printers > List page (see Figure 4-6).
- Utilize Navigation as necessary in situations where there are multiple pages of printers.
- Utilize Search as necessary to find a particular printer.
- Click the 🎨 button beside the printer with location to be changed.
- Click Change Location in the popup command menu that appears (or Cancel within the same menu if you want to back out of it).
- Modify the printer location in the popup window which appears.
Figure 4-12 New Printer Location

- Click OK. After a few seconds, the printer location will be changed.
Showing Shared Printer Information
The Admin user may use this selection to make an xPrintServer-provisioned printer visible and available to iPad, iPhone and other iOS devices. Up to 10 network-attached printers can be seen and shared at a time.
- Login to the xPrintServer user interface (see Logging In) as Admin user.
- Click the Printer tab to access the Printers > List page (see Figure 4-6).
- Utilize Navigation as necessary in situations where there are multiple pages of printers.
- Utilize Search as necessary to find a particular printer.
- Click the 🎨 button beside the printer information to be shared.
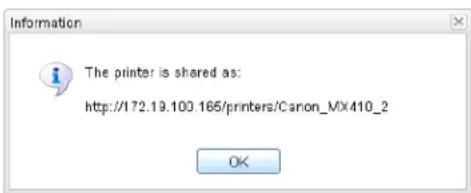
- Click Show Share Info in the popup command menu that appears (or Cancel within the same menu if you want to back out of it). An information popup window appears showing the printer as it is shared:
Figure 4-13 Show Share Info Popup
- Click OK in the share info popup window to close it.
Sharing a Printer
The Admin user may use this selection to make an xPrintServer-provisioned printer visible and available to iPad, iPhone and other iOS devices.
- Login to the xPrintServer user interface (see Logging In) as Admin user.
- Click the Printer tab to access the Printers > List page (see Figure 4-6).
- Utilize Navigation as necessary in situations where there are multiple pages of printers.
- Utilize Search as necessary to find a particular printer.
- Click the 🎨 button beside the printer to be shared.
- Click Share Printer in the popup command menu that appears (or Cancel within the same menu if you want to back out of it).
- Click Yes in the confirmation popup to continue (or No to cancel action) and the selected printer becomes visible and available on iOS devices.
- Click OK in the second confirmation popup.
Hiding a Printer
The Admin user may use this selection to hide an xPrintServer-provisioned printer so that it is no longer visible or available on iPad, iPhone and other iOS devices.
- Login to the xPrintServer user interface (see Logging In) as Admin user.
- Click the Printer tab to access the Printers > List page (see Figure 4-6).
- Utilize Search as necessary to find a particular printer.
- Click the 🎨 button beside the printer you wish to hide.
- Click Hide Printer in the popup command menu that appears (or Cancel within the same menu if you want to back out of it).
- Click Yes in the confirmation popup to continue (or No to cancel action) and the selected printer becomes invisible and no longer available on iOS devices.
- Click OK in the second confirmation popup.
Setting Printer Options
The Admin user may use this selection to view and modify settings in an xPrintServer-provisioned printer.
- Login to the xPrintServer user interface (see Logging In) as Admin user.
-
Click the Printer tab to access the Printers > List page (see Figure 4-6).
-
Utilize Search as necessary to find a particular printer.
-
Click the 🎨 button beside the printer you wish to set printer options.
-
Click Set Printer Options in the popup command menu that appears (or Cancel within the same menu if you want to back out of it). Available printer settings will appear.
Different printers will have different printer settings available for modification.
Some printers will have multiple heading tabs by which all the setting options are organized.
Figure 4-14 Sample Printer Options
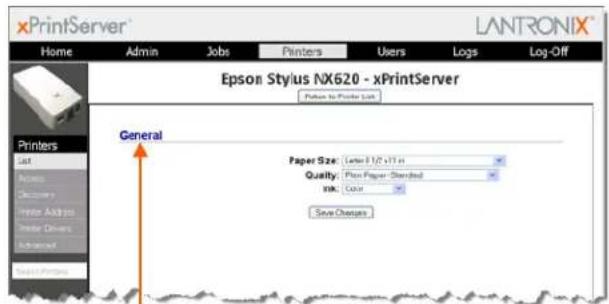
Every printer has different setting options available, organized under one or more heading tab(s) as exemplified by the options available in these printers.
The printer above provides only five modifiable settings under the single heading tab, "General".
The printer to the right — has several more modifiable settings organized beneath each of the three dark blue heading tabs. Clicking any of the blue heading tabs brings you to the printer setting options organized under that tab.
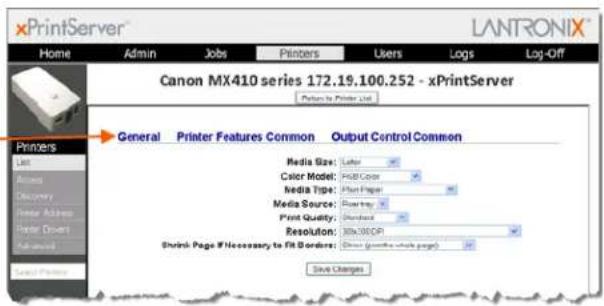
- Click through available tabbed headings (all in dark blue) and make changes as desired.
- Click Save Changes to save. A note verifying that settings have been saved successfully will appear on the screen. Changes to printer settings will remain in place until changed through xPrintServer.
- Click the Return to Printer List button at any time to return to the Printers > List page.
Updating Printer IP Addresses
The Admin user may use this feature to update printer IP addresses on the xPrintServer. This feature allows auto-discovery of printers outside the current subnet.
- Login to the xPrintServer user interface (see Logging In) as Admin user.
- Click the Printers tab to access the Printers > List page (see Figure 4-6).
- Click the Printer Address link on the left side of the Printers page. A list of existing Printer IP Addresses will appear in the Printer IP Addresses page, if any were previously established.
- Click into the large square field in the Printer IP Addresses page.
Figure 4-15 Printer IP Address Page
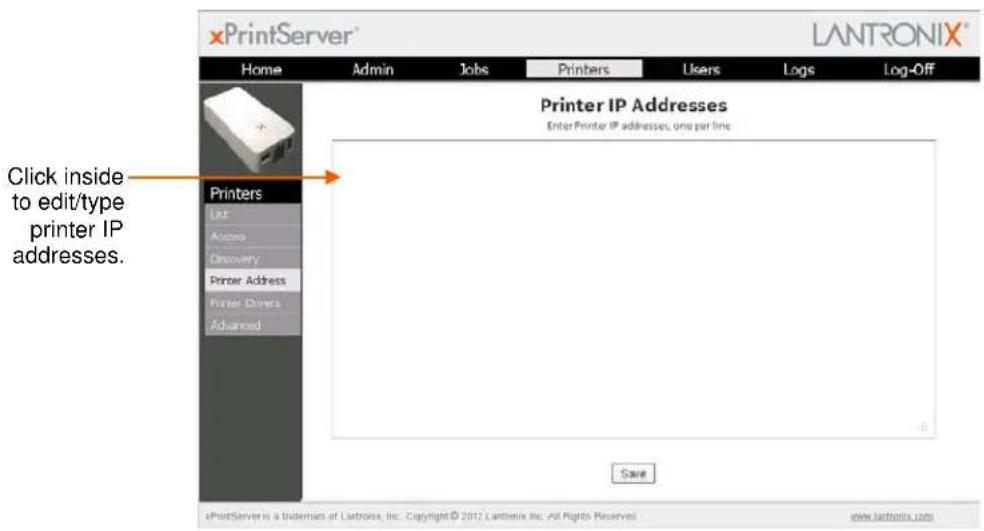
- Update the Printer IP Addresses by adding a new printer IP address, modifying an existing IP address or deleting an address. To add more than one printer IP address, enter one address per line (separated by a paragraph break using the Enter key on the keyboard).
- Click Save to save added or modified IP address(es).
- Click OK in the confirmation popup.
Viewing and Exporting Print Jobs
The Admin user may use these steps to view and export print jobs and the details on a specific print job. Non-Admin users may only view and print their own print jobs and the details of their print jobs. xPrintServer maintains a list of the last 50 printed jobs by default.
- Login to the xPrintServer user interface (see Logging In).
- Click the Jobs tab to access the Jobs page. All Active Jobs are listed here. The information on this page is refreshed every 15 seconds.
- Click the desired link to left to view a desired job category:
Active: to show all jobs that are currently active (default view)
Completed: to show all jobs that have been completed
All: to show all jobs, active or completed.
-
Utilize Navigation as necessary in situations where there are multiple pages of jobs.
-
Utilize Search as necessary to find a particular print job.
-
Click a particular job to bring up information about the job in a grey field below the job list.
Figure 4-16 Print Job Details
![xPrintServer LANTRONIX Home Admin Jobs Printers Users Logs Log-Off All Jobs Printer Name User Page(State) Photosmart 8510.811 NPprint xpinfoserver 1 completed at Wed Aug 22 20:18 50 2018 Brother HL-2070N se NPprint xpinfoserver Unlans completed at Wed Aug 22 20:14 38 2018 Export Jobs Log Brother HL-2070N series - xPrintServer [1] completed at Wed Aug 22 20 14:38 2018 NPprint Joblog-3 [Read-Only] - Microsoft Excel Home Insert Page Layout Formula Data Review View Acrobat Calibn 11 A General Conditional For B/U Format as Table Clippboard Font Alignment Number Styles Calls Editing A B C D E F G H I J K L M N O P Q R Photoshop 3 NPprint xprintservik Unknown held since Release jc Cancel job=org.cups.sid=64774767e1bcb5e7576235eb4bd8796.O=cancel-job&job_id=38 job_printer Canon_Mt 2 NPprint xprintservik 1 processing Cancel job=org.cups.sid=64774767e1bcb5e7576235eb4bd8796.O=cancel-jab&job_id=28 job_printner_un=http tpson_ty 1 NPprint xprintservik Unknown completed at Fri Aug 24 10:55:11 2018 Opening joblog.csv You have chosen to open: joblog.csv which is a: Microsoft Office Excel Comma Separated Values File from: http://172.19.100.165 What should Firefox do with this file? Open with Microsoft Office Excel (default) Save File Do this automatically for files like this from now on. OK Cancel](/content/2026/05/1024395/images/4ee185196ba85420d0c8c1655cb2dec9e55d90985193518eaea8771541e546eb.jpg)
- Click Export Job Log to export all active and completed print jobs to an excel spreadsheet. The same information that can be viewed on the screen will available in the exported jog log.
Renaming xPrintServer Device
As part of the initialization process, the xPrintServer registers a Lantronix-specific Bonjour Service Type (lantronix-ips._tcp which uses the default device name of xPrintServer). As with any Bonjour discovery application, you can find your xPrintServer or any Bonjour-supported web browser using the URL: http://
Note: All Apple devices natively include Bonjour Services. MS Windows Operating Systems do not include Bonjour Service and will require an installation of an application that includes Bonjour Service for Windows, such as the Apple “Bonjour Print Services for Windows” or the Apple Safari for Windows. Once Bonjour Service for Windows has been installed, the xPrintServer can be discovered using the configured
The directions below can be used by the Admin user to rename an xPrintServer device. This is a useful function in situations where there are multiple xPrintServers on a network as each device should have a unique name. Changing the xPrintServer name requires a restart to use the new xPrintServer name.
- Login to the xPrintServer user interface (see Logging In) as Admin user.
- Click the Admin tab to access the Admin menu. A list of all available Admin user configuration options appears to the left of the screen (see Figure 4-10).
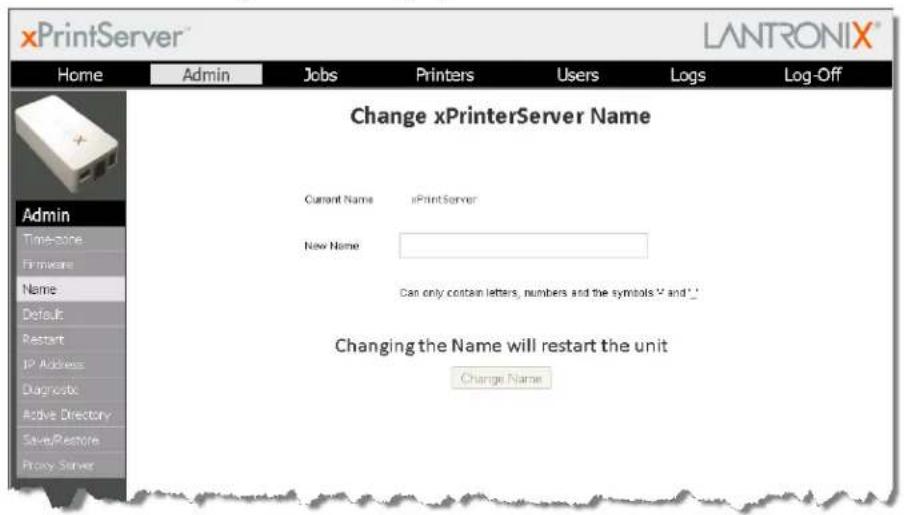
- Click the Name link on the left side of the page to access the Change xPrintServer Name page. The Current Name of your device will display (xPrintServer).
- Type in the New Name (an alpha and/or numeric combination that may include the - and _ characters).
Figure 4-17 Changing the xPrintServer Name
-
Click the Change Name button to submit the new name.
-
Click Yes in the confirmation popup to continue (or No to cancel action) renaming your xPrintServer device.
- Wait for the xPrintServer to reboot. When the renaming of your unit is complete, the xPrintServer device will automatically restart, bringing you back to the Change xPrintServer Name page where your new device name will display.
Resetting the xPrintServer to Factory Defaults
Resetting the xPrintServer to factory default wipes out all configuration information and resets the xPrintServer configuration parameters to the original factory settings. There are two ways to reset the xPrintServer to factory default settings: through the user interface or utilizing the reset button on the xPrintServer device.
Via the User Interface
The Admin user may utilize these directions to reset the xPrintServer to factory default settings through the Reset Unit to Factory Defaults page of the xPrintServer user interface. A device restart automatically follows a reset.
- Login to the xPrintServer user interface (see Logging In) as Admin user.
- Click the Admin tab to access the Admin menu. A list of all available Admin user configuration options appears to the left of the screen (see Figure 4-10).
- Click the Default link on the left side of the page to access the Reset Unit to Factory Defaults page.
- Click the Reset to Factory Defaults button.
- Click Yes in the confirmation popup that appears (or No to cancel this action). The unit automatically restarts in order to complete resetting to factory defaults.
- Wait for the xPrintServer to reboot. When the reset to factory default process is complete and the device restarted, you will be brought back to System Status on the Home Page. Authentication (Logging In) will be required to access the xPrintServer user interface.
Via the Hardware Reset Button
Use these directions to reset the xPrintServer to factory default settings utilizing the Reset button on the bottom of the xPrintServer device. This button is accessible through a hole in the case.
To reset the unit to factory defaults, perform the following steps:
- Place the end of a paperclip or similar object into the reset opening (pin-sized hole on the bottom of the device) and press for a minimum of 10 seconds. Within the 10 seconds, the "X" Status LED on top of the xPrintServer unit will display a solid orange light to indicate the device is rebooting (see Table 2-1) after which it will begin to blink.
- Remove the paperclip to release the button. This procedure restores factory default settings to the configuration and reboots the unit.
Restarting the xPrintServer
The Admin user may utilize these directions to restart the xPrintServer device through the xPrintServer user interface and without changing any settings.
- Login to the xPrintServer user interface (see Logging In) as Admin user.
- Click the Admin tab to access the Admin menu. A list of all available Admin user configuration options appears to the left of the screen (see Figure 4-10).
- Click the Restart link on the left side of the page to access the Restart Unit page.
- Click the Restart Unit button.
- Click Yes in the confirmation popup that appears (or No to cancel this action).
- Wait for the xPrintServer to reboot. The xPrintServer device will restart, bringing you back to System Status on the Home Page. Authentication (Logging In) will be required to access the xPrintServer user interface.
Viewing Logs
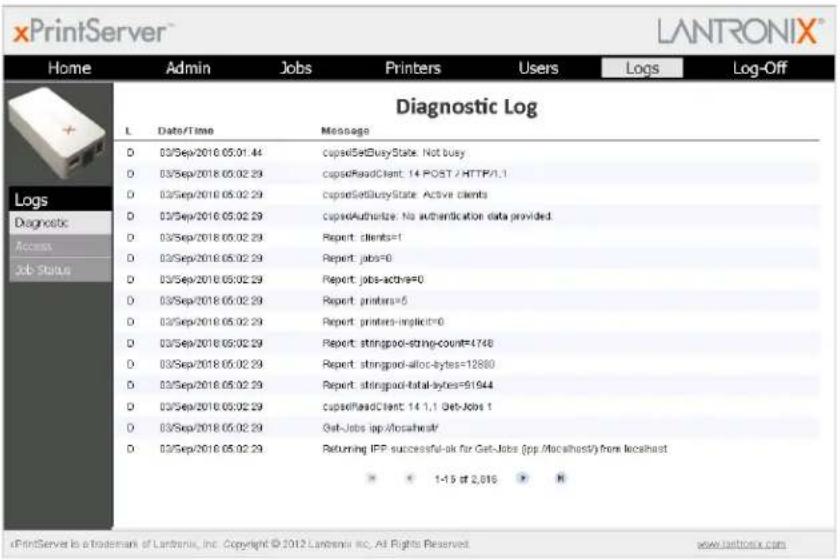
The Admin user may utilize these directions to view logs. xPrintServer user interface provides logs for all diagnostic and access messages.
- Login to the xPrintServer user interface (see Logging In) as Admin user.
- Click the Logs tab to access the Logs page. A list of all Diagnostic logs appears by default.
- Click the Access link to the left to view only access logs.
- Click the Diagnostic link to the left to view only diagnostic logs.
- Click the Job Status link to the left to view only job status logs.
- Utilize Navigation as necessary in situations where there are multiple pages of logs.
Note: The number of logs on the bottom of the page will update each time the Diagnostic or Access link on the left is clicked.
Figure 4-18 Logs
Printer Drivers
The Printer Driver Download page provides two ways to download a printer driver: from the internet or from a USB flash drive. This page also provides a method to export printer drivers onto a USB flash drive for downloading onto other xPrintServers as well as a way to preload drivers onto the xPrintServer unit.
Downloading Printer Drivers from the Internet
The Admin user may utilize these directions to download printer drivers from the internet.
- Login to the xPrintServer user interface (see Logging In) as Admin user.
- Click the Printers tab to access the Printers > List page (see Figure 4-6). All printers configured to the xPrintServer are listed here.
- Click the Printer Drivers link to get to the Printer Driver Download page. You will see a list of drivers that have been previously downloaded by make and model under the Loaded Drivers tab.
- Click the Drivers List tab. A drop-down Manufacturer menu will display on the screen.
Figure 4-19 Drivers List Tab
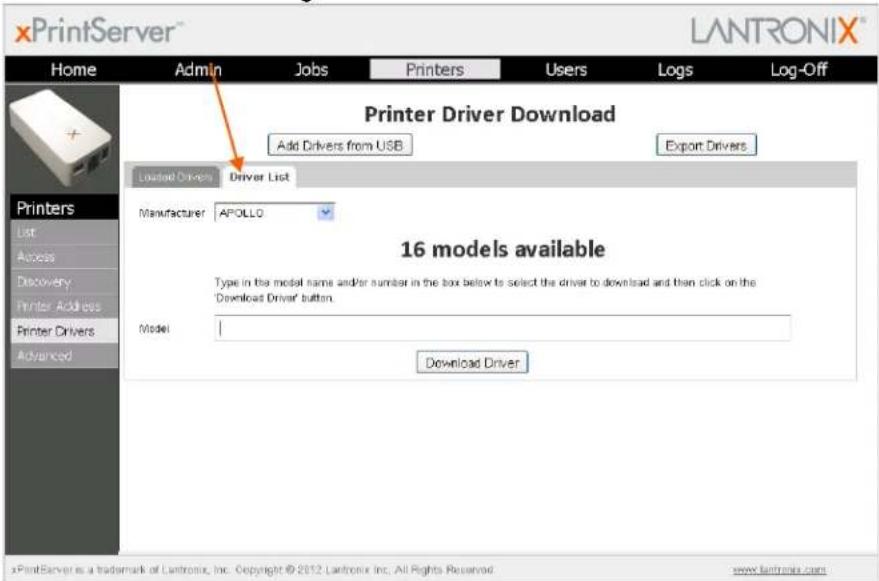
- Select the desired printer Manufacturer from the drop-down menu. The number of printer models associated with that manufacturer and available for download will display on the screen.
- Enter the Printer Model name. Once you begin typing the model name, models with the characters you have typed will appear on the screen.
- Select the correct model from the list of models.
- Click Download Driver to save the file directly to your PC. You will be notified when the driver has been downloaded or if there was any kind of error.
- Click OK.
Exporting Printer Drivers
The Admin user may utilize these directions to export printer drivers from the xPrintServer. Once exported, you may move the printer driver onto a USB flash drive. This is useful in situations where you may wish to use the printer driver on other xPrintServer devices.
- Login to the xPrintServer user interface (see Logging In) as Admin user.
- Click the Printers tab to access the Printers > List page (see Figure 4-6). All printers configured to the xPrintServer are listed here.
- Click the Printer Drivers link to get to the Printer Driver Download page. You will see a list of drivers that have been previously downloaded by make and model under the Loaded Drivers tab.
Note: You must have already downloaded printer drivers under the Loaded Drivers tab.
- Insert USB flash drive to which the printer driver files are to be saved.
Note: The file name of the printer driver must be printerdrivers.bin. Also, the xPrintServer will only recognize USB flash drives formatted with a FAT file system.
-
Click Export Drivers. A popup window will appear.
-
Click OK to save the file directly to your PC. You will be notified when the driver has been exported or if there was any kind of error.
-
Move the exported file onto a USB flash drive if you wish to upload the driver onto another xPrintServer device.
Figure 4-20 Export Drivers Button
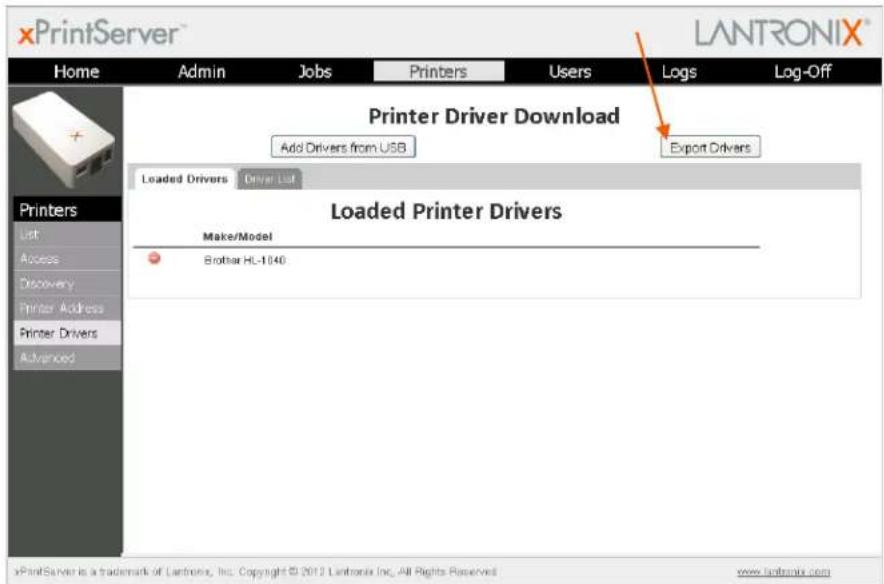
Downloading Printer Drivers from a USB Flash Drive
The Admin user may utilize these directions to download printer drivers from a USB flash drive.
-
Login to the xPrintServer user interface (see Logging In) as Admin user.
-
Click the Printers tab to access the Printers > List page (see Figure 4-6). All printers configured to the xPrintServer are listed here.
Figure 4-21 Loaded Drivers Tab
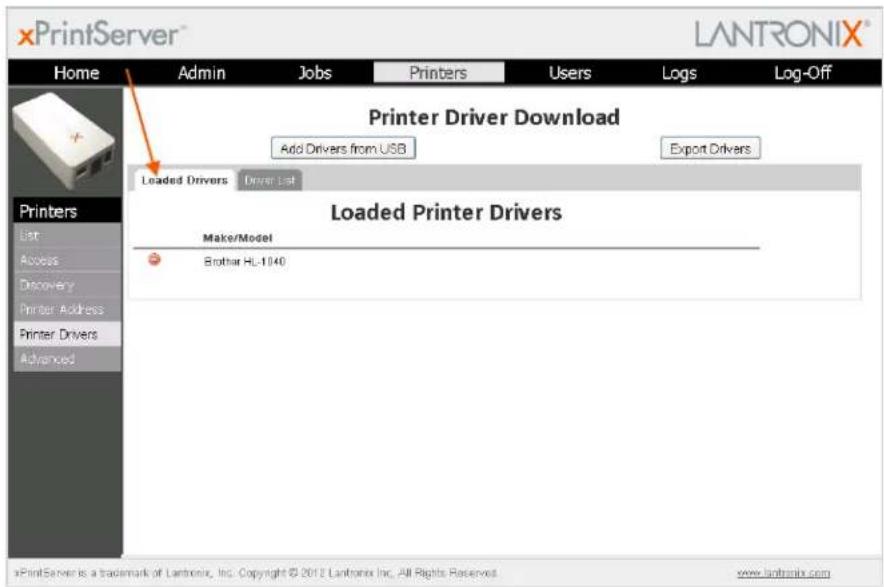
- Click the Printer Drivers link to get to the Printer Driver Download page. You will see a list of drivers that have been previously downloaded by make and model under the Loaded Drivers tab.
- Insert USB flash drive with printer driver files into your PC. See Exporting Printer Drivers for directions on exporting printer drivers onto the USB flash drive.
Note: The file name of the printer driver must be printerdrivers.bin. Also, the xPrintServer will only recognize USB flash drives formatted with a FAT file system.
-
Click the Add Drivers from USB button. xPrintServer will begin an automatic search and download of drivers on the USB flash drive. You will be notified when the driver has been downloaded or if there was any kind of error.
-
Click OK.
Managing Active Directory
The Admin User may utilize the following directions to configure and enable xPrintServer to use MS Active Directory Services for user remote authentication. The xPrintServer uses MS Active Directory Services for xPrintServer Printer Access Authentication.
Note: The xPrintServer does not use the MS Active Directory services for xPrintServer GUI authentication. It will only use the locally configured user database for the xPrintServer GUI authentication.
Updating Active Directory Configuration
- Login to the xPrintServer user interface (see Logging In) as Admin user.
- Click the Admin tab to access the Admin menu. A list of all available Admin user configuration options appears to the left of the screen (see Figure 4-10).
- Click the Active Directory link to the left to access the Active Directory Configuration page.
- Check Enable use of Active Directory to enable (or disable) Active Directory use and remote authorization.
- If enabled, additional Active Directory configuration fields will become available. Continue with remaining steps below.
Note: The Active Directory server must be enabled on the xPrintServer in order to authenticate remote users established in Active Directory.
- If disabled, only the Enable use of Active Directory checkbox option is available on the Active Directory Configuration page. Skip steps 5 – 8 below.
Figure 4-22 Active Directory Configuration
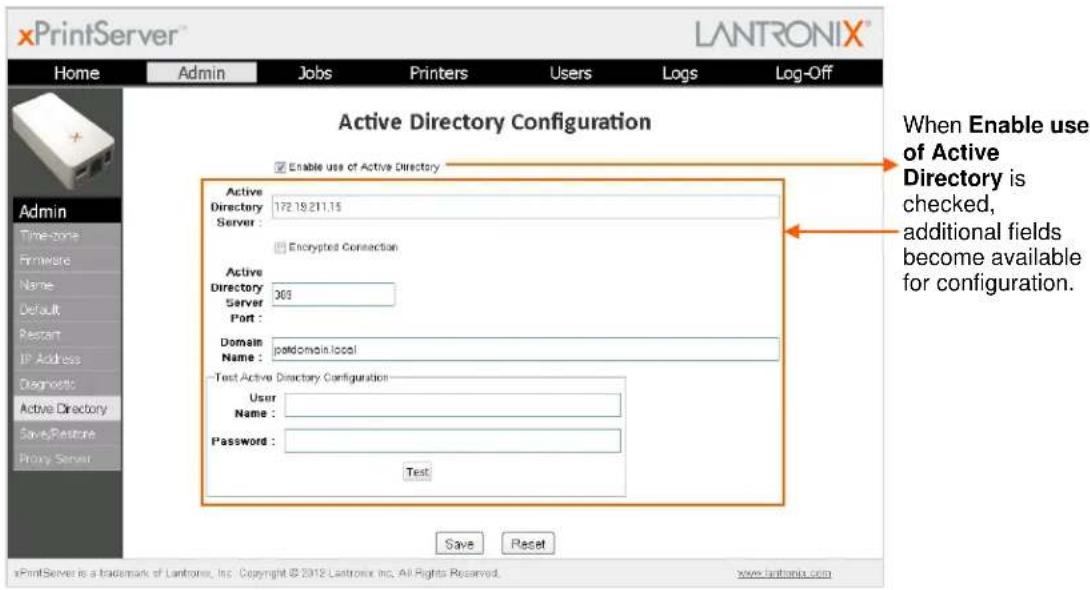
-
Modify the Active Directory Server address, as necessary.
-
Check Encrypted Connection to enable (or disable) encrypted connection.
- Enter the Active Directory Server Port number.
- Enter the Domain Name.
- Click Save to save Active Directory settings.
Testing Remote User Authentication
Note: The user name and password tested in these directions are not saved to the xPrintServer unit.
- Login to the xPrintServer user interface (see Logging In) as Admin user.
- Click the Admin tab to access the Admin menu. A list of all available Admin user configuration options appears to the left of the screen (see Figure 4-10).
- Click the Active Directory link to the left to access the Active Directory Configuration page (see Figure 4-22).
- Enter a configured remote User Name.
- Enter the Password for the remote User Name.
- Click the Test button. You will be notified whether the remote account was authenticated.
Saving Configuration
The Admin user may utilize these directions to save an xPrintServer configuration. Saving an xPrintServer configuration saves all settings to a file which can be backed up to a computer. Information saved includes all configurable parameters and printer driver files (which includes printer driver files downloaded during the xPrintServer auto-discovery process and those manually downloaded by the Admin user via the xPrintServer GUI). This configuration file can later be used to restore the configuration on the xPrintServer or to upload settings of one xPrintServer unit onto others.
- Login to the xPrintServer user interface (see Logging In) as Admin user.
- Click the Admin tab to access the Admin menu. A list of all available Admin user configuration options appears to the left of the screen (see Figure 4-10).
- Insert a USB flash drive on which to save the xPrintServer configuration.
- Click the Save/Restore link to the left to access the Configuration Save and Restore page.
- Click Save under the Configuration Save tab. A popup window will appear.
Figure 4-23 Saving Configuration
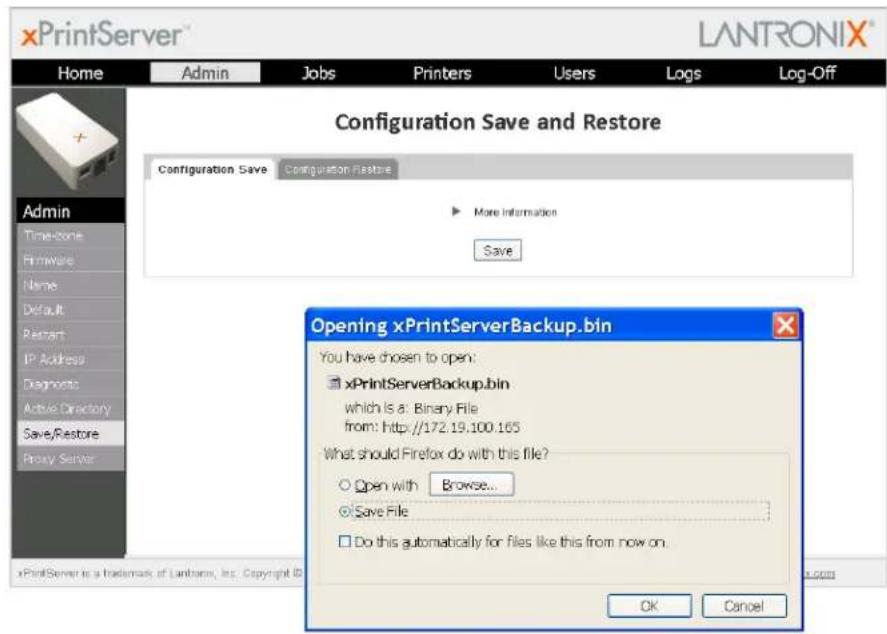
-
Click OK to save the file directly to your PC. You will be notified when the driver has been exported or if there was any kind of error.
-
Move the configuration file onto a USB flash drive if you wish to use the configuration on another xPrintServer device.
Restoring Configuration
The Admin user may utilize these directions to restore to a previously saved xPrintServer configuration. These steps can also be followed to overwrite configurations on other xPrintServer units.
Note: The configuration filename can include alphanumeric and special characters with the exclusion of the following: “|/*?”<>:” (double quotes included). Filename plus path information cannot exceed 250 characters.
- Login to the xPrintServer user interface (see Logging In) as Admin user.
- Click the Admin tab to access the Admin menu. A list of all available Admin user configuration options appears to the left of the screen (see Figure 4-10).
- Click the Save/Restore link to the left to access the Configuration Save and Restore page.
- Insert a USB flash drive on which to retrieve the stored xPrintServer configuration.
- Click the Configuration Restore tab.
Figure 4-24 Restoring Configuration
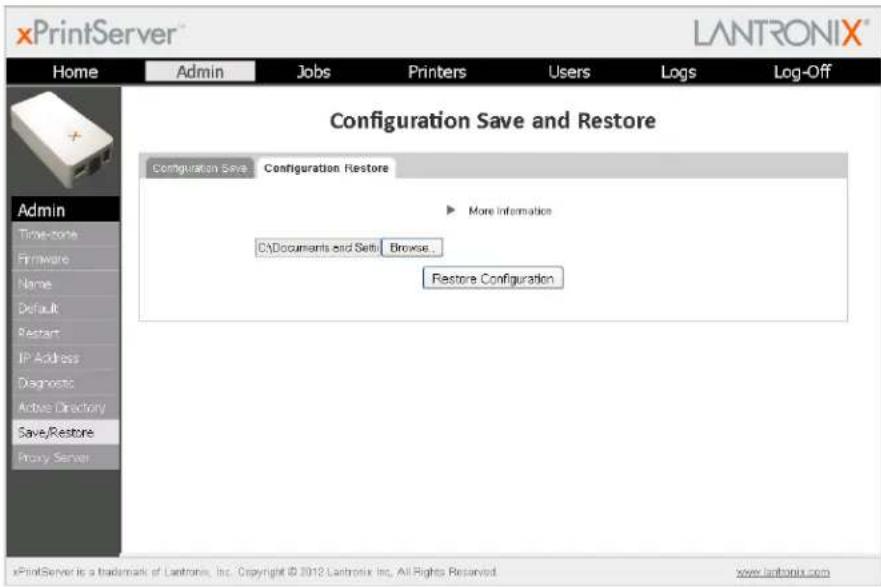
- Click Browse. A popup window will appear.
- Browse to the configuration on your PC or a USB flash drive.
- Double-click the configuration file.
- Click Restore Configuration.
-
Click Yes to confirm to overwriting the current xPrintServer configuration.
-
Click OK to dismiss a confirmation popup indicating success of the restoration. Your xPrintServer will automatically reboot after a few moments.
Proxy Server Configuration
The Admin user may utilize these directions to manage the outbound internet requests made through a proxy server. User authentication may be enabled as a prerequisite to processing any requests. Once configured and enabled, all data request for Lantronix Web Services will be redirected to the configured Proxy Server.
- Login to the xPrintServer user interface (see Logging In) as Admin user.
-
Click the Admin tab to access the Admin menu. A list of all available Admin user configuration options appears to the left of the screen (see Figure 4-10).
-
Click the Proxy Server link to the left to access the Proxy Configuration page.
-
Click the Enable Proxy Server checkbox to enable or disable the proxy server.
- Check the checkbox to enable the proxy server and make additional proxy configuration fields available. In order to continue configuring the proxy server, this checkbox must be checked.
- Uncheck the checkbox to disable the proxy server and hide proxy configuration fields.
Figure 4-25 Configuring Proxy Server
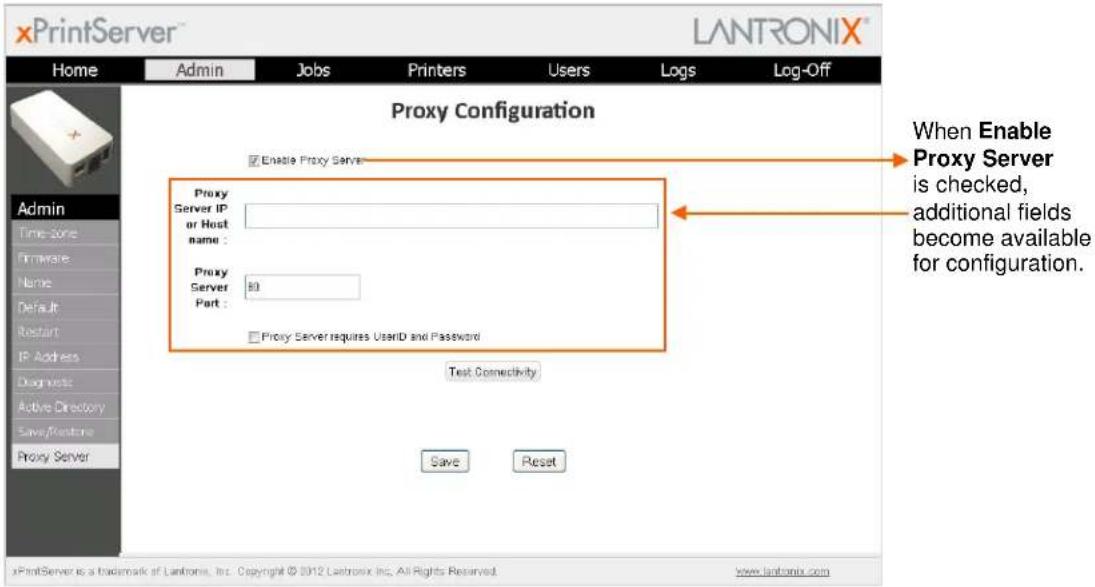
- Enter the Proxy Server IP or Host name.
- Enter the Proxy Server Port.
- Check the Proxy Server requires UserID and Password checkbox to enable or disable remote authentication for proxy server requests.
- Check the checkbox to enable remote authentication and make additional remote authentication configuration fields available.
- Uncheck the checkbox to disable remote authentication and hide remote authentication fields.
-
If Proxy Server requires UserID and Password is checked, enter a UserID and Password.
-
Click Save.
Testing Proxy Server Connectivity
- Login to the xPrintServer user interface (see Logging In) as Admin user.
- Click the Admin tab to access the Admin menu. A list of all available Admin user configuration options appears to the left of the screen (see Figure 4-10).
- Click the Proxy Server link to the left to access the Proxy Configuration page (see Figure 4-25).
- Click Test Connectivity.
- Click OK to dismiss popup indicating success or failure of connection.
5: Updating Firmware
The Admin user may use one of two methods to update firmware through the Admin > Firmware page. Clicking one of the two buttons allows firmware to be uploaded directly from the Lantronix Web services website or through a USB flash drive.
Figure 5-1 Firmware Update Options
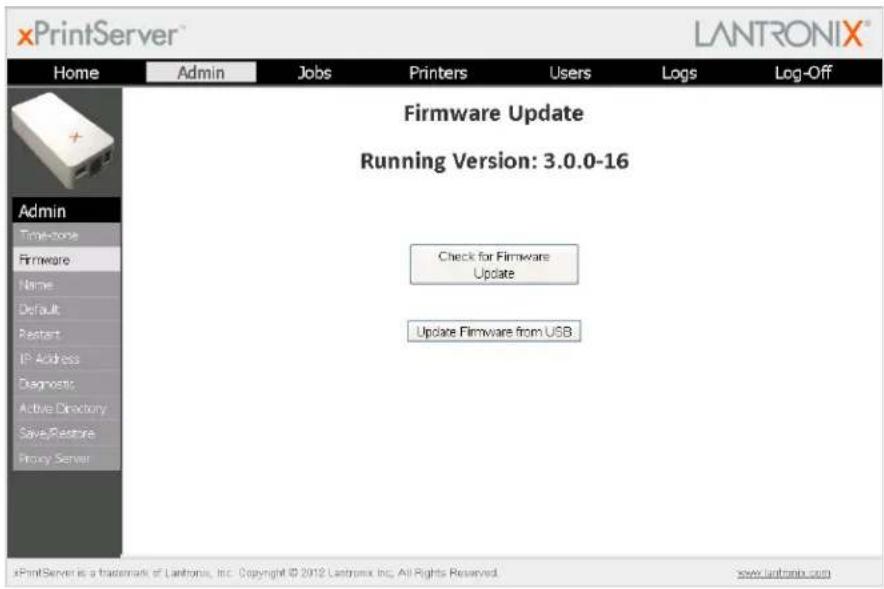
Updating Firmware via the Lantronix Web Services Website
Note: Internet access is required for firmware updates.
This chapter provides directions for updating firmware, which may be necessary from time to time. Only the Admin user may perform a firmware update through the xPrintServer user interface.
- Login to the xPrintServer user interface (see Logging In) as Admin user.
- Click the Admin tab to access the Admin menu. A list of all available Admin user configuration options appears to the left of the screen (see Figure 4-10).
- Click the Firmware link on the left side of the page. The firmware you are currently running will display.
-
Click the Check for Firmware Update button to check if a firmware update is available at this time. After a few seconds, you will receive one of two messages:
-
“Firmware update is available” indicating you may proceed to step 5.
- “You are running the latest version of the firmware” indicating no firmware update is necessary at this time.
Note: If the Check for Firmware Update button is disabled, this indicates that internet connectivity is not available.
-
Click Upgrade Firmware.
-
Click Yes in the confirmation popup that appears. Wait a few minutes while firmware upgrades. When the upgrade is complete, the xPrintServer device will automatically restart, bringing you back to System Status on the Home Page. The list of discovered printers, created users and other custom configuration settings remain unchanged across firmware updates.
Updating Firmware via a Local USB Port
The latest firmware image file can be retrieved from http://www.lantronix.com/support/downloads/.
- Download firmware image to the root folder of the USB thumb drive.
Note: Do not change the firmware file name downloaded from the Lantronix website. Most USB flash drives are compatible but only FAT file systems are supported.
- Insert the USB thumb drive directly into the xPrintServer USB port. See Table 2-1 to decipher LED behavior.
Note: USB thumb drive must be directly inserted into the xPrintServer device and not connected through a USB hub.
-
Login to the xPrintServer user interface (see Logging In) as User Admin.
-
Click the Admin tab to access the Admin menu. A list of all available Admin user configuration options appears to the left of the screen (see Figure 4-10).
-
Click the Firmware link on the left side of the page. The firmware you are currently running will display.
Note: The firmware version is also visible beside the xPrintServer logo on top of all xPrintServer pages.
- Click the Update Firmware from USB button to check if a firmware update is available at this time. After a few seconds, you will receive one of two messages:
- “Firmware update is available…” indicates you may proceed to step 5.
- “You are running the latest version of the firmware” indicates no firmware update is necessary at this time.
-
Click Upgrade Firmware.
-
Click Yes in the confirmation popup that appears. Wait a few minutes while firmware upgrades. When the upgrade is complete, the xPrintServer device will automatically restart, bringing you back to System Status on the Home Page. The list of discovered printers, created users and other custom configuration settings remain unchanged across firmware updates.
6: Technical Specifications
Basic device information is provided in this chapter.
Table 6-1 Technical Specifications
| Category Description | |
| Power Input | 5V DC via supplied wall plugNormal Power Usage: ~1 Watt |
| Network Interface | 1 RJ45 10Base-T/100Base-TX Ethernet port |
| USB Port | 1 USB Port |
| Dimensions | 11.43 x 5.95 x 2.32 cm (4.5 x 2.34 x .91 in) |
| Weight | 19g (.4 lbs) |
| Temperature | Operating range: 0° to 55°CStorage range: -40° to 70°C |
| Relative Humidity | Operating 0% to 90% non-condensing |
| Case | Silver plastic case. |
| Protocols Supported | SNMPJetDirect (AppSocket)LPDLPRIPP |
| Management | HTTP (HTML/browser-based) |
| System Software | AirPrintZeroconfMicrosoft Internet Explorer, Version 8 and 9Firefox Version 7Safari Version 5Chrome Version 16 |
| LEDs | (1) Status LED(2) Ethernet LEDs |
A: Technical Support
This chapter provides directions and contact information for getting live technical support for your xPrintServer device. The xPrintServer user interface provides an easy way for you to directly send helpful diagnostic information to Lantronix. Calling Technical Support after they have received this information will help them better and more quickly assist you.
Diagnostic Support
The Admin user may follow the directions below to send diagnostic support information about your xPrintServer device to the Lantronix Technical Support before calling for assistance.
- Login to the xPrintServer user interface (see Logging In) as Admin user.
- Click the Admin tab to access the Admin menu. A list of all available Admin user configuration options appears to the left of the screen (see Figure 4-10).
- Click the Diagnostic link on the left side of the page.
- Click Send Diagnostic Information. Wait a few moments while diagnostic information is sent to Lantronix Technical support.
- Click OK in the confirmation popup that appears. Diagnostic support information is sent.
Contact Information
Technical Support U.S.
Phone: (800) 422-7044
Please check our online knowledge base or send a question to Technical Support at http://www.lantronix.com/support.
Technical Support Europe, Middle East, Africa
Phone: (33) 13-930-4172
Email: eu_techsupp@lantronix.com or eu_support@lantronix.com
Firmware downloads, FAQs, and the most up-to-date documentation are available at http://www.lantronix.com/support
When you report a problem, please provide the following information:
- Your name, and your company name, address, and phone number
- Lantronix model number
- Lantronix serial number/MAC address
- Firmware version (on the first screen shown when you Telnet to the device and type show)
- Description of the problem
Status of the unit when the problem occurred (please try to include information on user and network activity at the time of the problem)
B: Troubleshooting
Some of the errors encountered setting up or using the xPrintServer are addressed in this appendix. When troubleshooting, always ensure that the physical connections (power cable, network cable) are secure. When troubleshooting the following problems, make sure that xPrintServer is powered up and connected to a good network connection.
Problems and Error Messages
| Problem/Message | Possible Solution |
| LED lights display correctly but printer does not print job. | Make sure that the network printer:♦ Is powered on.♦ Has a good network connection – wired or wireless. This includes proper cabling, correct IP addressing and/or WI-FI connection configuration settings and proper routing if going across routed network environments.♦ Has adequate paper supply.♦ Has adequate ink or toner supply.♦ Has no paper jams.Consult the printer manufacturer to troubleshoot these or other print-specific technical issues. |
| Status LED does not display light. | Make sure that xPrintServer is connected securely to its power supply unit. Otherwise, try another wall outlet. Contact Technical Support if xPrintServer's status LED continues to not display light after confirming good power. |
| Ethernet LED(s) are not displaying light. | Make sure that Ethernet patch cable is securely connected to both xPrintServer's Ethernet port and the Ethernet hub or switch to the network at both ends. Otherwise, swap the patch cable for another known good cable. Use a straight CAT5 (or greater) Ethernet patch cable, not a crossover Ethernet cable to connect to the network drop. |
| Designated banner page is not printing with print job. | Ensure that banners configurations are enabled under Set Default Options in Printers > Advanced page. |
| Document did not print to the correct printer. | Make sure your application output encode is set to ASCII. If not, change it to ASCII. |
| Network-attached printer is not displaying on the iOS device. | 1) Reboot the xPrintServer.2) Manually run Discovery3) Verify that the network-attached printer supports Bonjour. |
| iOS device cannot print or access xPrintServer. | Make sure your iOS device is compatible. See Supported iOS Devices. |
C: Compliance
Declaration of Conformity
Manufacturer's Name & Address:
Lantronix, Inc.
167 Technology Drive, Irvine, CA 92618 USA
Tel: 800-526-8766
Tel: 949-453-3990
Fax: 949-450-7249
Product Name Model: xPrintServer
Conforms to the following standards or other normative documents:
Emissions
FCC Part 15 Class B, VCCI Class B, EN 55022, CISPR22, ICES-003
Safety Agency
UL, CE Mark, and C-Tick
Agency Approvals
RoHS, Reach, Linux OS
RoHS Notice
All Lantronix products in the following families are China RoHS-compliant and free of the following hazardous substances and elements:
- Lead (Pb)
- Mercury (Hg)
- Polybrominated biphenyls (PBB)
• Cadmium (Cd) • Hexavalent Chromium (Cr (VI)) • Polybrominated diphenyl ethers (PBDE)
| Product Family Name | Toxic or hazardous Substances and Elements | |||||
| Lead (Pb) | Mercury (Hg) | Cadmium (Cd) | Hexavalent Chromium (Cr (VI)) | Polybrominated biphenyls (PBB) | Polybrominated diphenyl ethers (PBDE) | |
| DSC | 0 | 0 | 0 | 0 | 0 | 0 |
| EDS | 0 | 0 | 0 | 0 | 0 | 0 |
| IntelliBox | 0 | 0 | 0 | 0 | 0 | 0 |
| MatchPort | 0 | 0 | 0 | 0 | 0 | 0 |
| Micro | 0 | 0 | 0 | 0 | 0 | 0 |
| MSS100 | 0 | 0 | 0 | 0 | 0 | 0 |
| PremierWave | 0 | 0 | 0 | 0 | 0 | 0 |
| SCS | 0 | 0 | 0 | 0 | 0 | 0 |
| SecureBox | 0 | 0 | 0 | 0 | 0 | 0 |
| SLB | 0 | 0 | 0 | 0 | 0 | 0 |
| SLC | 0 | 0 | 0 | 0 | 0 | 0 |
| SLP | 0 | 0 | 0 | 0 | 0 | 0 |
| Spider and Spider Duo | 0 | 0 | 0 | 0 | 0 | 0 |
| UBox | 0 | 0 | 0 | 0 | 0 | 0 |
| UDS1100 and 2100 | 0 | 0 | 0 | 0 | 0 | 0 |
| WiBox | 0 | 0 | 0 | 0 | 0 | 0 |
| WiPort | 0 | 0 | 0 | 0 | 0 | 0 |
| xDirect | 0 | 0 | 0 | 0 | 0 | 0 |
| xPico | 0 | 0 | 0 | 0 | 0 | 0 |
| XPort | 0 | 0 | 0 | 0 | 0 | 0 |
| XPress DR & XPress-DR+ | 0 | 0 | 0 | 0 | 0 | 0 |
| xPrintServer | 0 | 0 | 0 | 0 | 0 | 0 |
| xSenso | 0 | 0 | 0 | 0 | 0 | 0 |
O: toxic or hazardous substance contained in all of the homogeneous materials for this part is below the limit requirement in SJ/T11363-2006.
X: toxic or hazardous substance contained in at least one of the homogeneous materials used for this part is above the limit requirement in SJ/T11363-2006.
D: Warranty
For details on the Lantronix warranty, go to our web site at http://www.lantronix.com/support/warranty/index.html.
Index
A
A/P, 13
Access Log, 49
Access Point, 13
Active Directory, 53
Activity LED, 11
Adding a Printer IP Address, 45
Address IP, 9
Addresses, 8
Admin User, 28
Advanced Options, 34
Agency Approvals, 64
AirPrint, 7, 8, 61
Apple, 8
Assign Static IP Address, 39
Auto Discovery, 34
Auto printer discovery, 7
B
Bonjour, 34, 47
Bonjour Print Services (Windows 7 OS), 23
Bonjour Print Services (Windows XP OS), 25
Bonjour Service Type, 47
C
Cabling, 13
Case, 61
Change Password, 29
Change Printer Description, 41
Change PrinterLocation, 41
Change Time-Zone, 38
Chrome, 61
Compliance, 64
Configuration, 7, 28
Contact Information, 62
Contacts, 2
Copyright, 2
D
Declaration of Conformity, 64
Delete a Printer, 40
Delete All P rinters, 37
Deleting a Printer IP Address, 45
DHCP, 8, 11
Diagnostic Log, 49
Diagnostic Support, 62
Dim, 11
Dimensions, 61
Discovery, 34, 35, 36
Download Printer Drivers, 50
E
Emissions, 64
Ethernet, 61
Ethernet Cable, 10
Ethernet LEDs, 11
Ethernet Port, 11
Export Print Jobs, 46
Export Printer Drivers, 51
F
Factory Defaults, 48
Firefox, 61
Firmware, 59
G
Glow, 11
H
Hide a Printer, 43
Hub, 13
|
Installation, 10
Installation Steps, 12
Internet Explorer, 61
iOS, 7, 8, 13
IOS, 13
IP
Address, 9
IP Address, 14
iPad, 7
iPhone, 7
IPP, 61
J
JetDirect, 61
Job History, 40
Job Status Log, 49
K
Key Features, 7
L
LED, 7, 11
LEDs, 10, 61
Links, 20
Linux OS, 64
Lion, 7
Local Authentication Login, 18
Logging In, 17
Logging Off, 18
Logout, 20
Logs, 49
LPD, 61
LPR, 61
M
Mac OS, 7
Management, 61
Manufacturer's Name & Address, 64
Modifying a Printer IP Address, 45
N
Navigation, 19
Network Interface, 61
Non-Admin User, 28
P
Package Contents, 10
Password, 28
Power Input, 61
Print Job, 13
Print Jobs, 46
Print Test Page, 39
Printer Access, 31
Printer Configuration, 39
Printer Drivers, 50
Printer IP Address, 45
Printing from a Desktop (Mac OS X Lion), 22
Printing from an iOS Device, 21
Problems and Error Messages, 63
Product Information Label, 9, 14
Protocols, 61
Proxy Server Connectivity, 58
Proxy Server Management, 57
Purge Job History, 40
Q
Quick Start Guide, 10
R
Reach, 64, 66–67
Real Time Clock, 38
Relative Humidity, 61
Remote Authentication Login, 18
Rename xPrintServer, 47
Renaming xPrintServer, 47
Reset Button, 48
Resetting, 48
Restarting Unit, 49
Restore Configuration, 56
Restoring, 48
RoHS, 64
RoHS Notice, 65
Router, 13
S
Safari, 61
Safety Agency, 64
Save Configuration, 55
Send Diagnostic Support, 62
Serial Number, 9
Set Printer Options, 44
Setting Up Printing from a Desktop (Windows 7 OS), 23
Setting Up Printing from a Desktop (Windows XP OS), 25
Share a Printer, 43
Show Share Info, 42
SNMP, 36, 61
Software, 61
Solid, 11
Status LED, 11
Subnet, 13
Supported DHCP Configuration, 8
Switch, 13
System Status, 16
T
Tabs, 20
Technical Specifications, 61
Technical Support, 62
Temperature, 61
Test Page, 39
Test Remote User Authentication, 54
Time Zone, 38
Time-Zone, 38
Topology, 13
Trademark, 2
Troubleshooting, 63
U
Universal Power Supply, 10
Updating Firmware, 59
Updating Printer IP Addresses, 45
Upgrade Firmware, 60
USB Port, 61
User, 30
User Administration, 28
V
View Print Jobs, 46
W
Warranty, 66
Weight, 61
X
xPrintServer, 7, 8, 11, 13, 39, 64


- Contacts
- Lantronix Corporate Headquarters
- Technical Support
- Sales Offices
- Disclaimer & Revisions
- Table of Contents
- 1: Introduction 7
- 2: Installation 10
- 3: Navigation and Printing 14
- 4: Configuration 28
- 5: Updating Firmware 59
- 6: Technical Specifications 61
- A: Technical Support 62
- B: Troubleshooting 63
- C: Compliance 64
- D: Warranty 66
- Index 67
- List of Figures
- List of Tables
- 1: Introduction
- Network, Home and Office Editions
- Key Features
- Supported iOS Devices
- Supported Printers and Printer Protocols
- Supported DHCP Configuration
- Supported Browsers
- Product Information
- Serial Number
- IP Address
- 2: Installation
- Package Contents
- User-Supplied Items
- Hardware Components
- Ethernet LEDs
- Left LED
- Right LED
- Status LEDs
- Installation Steps
- Topology Support
- 3: Navigation and Printing
- Finding the xPrintServer IP Address
- System Status on the Home Page
- Edition
- Version
- Name
- Up time
- - Configured Printers
- Current Status
- Time-zone
- Status Time
- Locator LED
- Logging In
- To Login:
- Local Authentication Login
- Remote Authentication Login
- Logging Off
- Navigation
- - Tabs
- Links
- Search
- Button
- Log-Off Tab
- Printing from an iOS Device
- Printing from a Mac OS X Lion Desktop
- Setting Up Printing from a Windows 7 Desktop
- Performing Add Printer Setup
- Configuring a Default Printer
- Setting Up Printing from a Windows XP Desktop
- 4: Configuration
- User Administration
- Changing Passwords
- To change your password:
- To change a non-Admin user password as the Admin:
- Adding a New User
- Deleting a User
- Printer Access Control (Protecting Printer Access)
- Protecting Printer Access Using xPrintServer Local User Database
- Protecting Printer Access Using MS Active Directory Services
- Viewing Configured Printers
- Configuring Printers
- Enabling or Disabling Discovery
- Configuring Printers through Auto Discovery
- Configuring Printers through Discovery
- Deleting All Configured Printers
- Setting Real Time Clock
- To modify the Time-zone
- Assigning a Static IP Address to the xPrintServer
- Admin Printer Configuration Options
- Printing a Test Page
- Purging Job History
- Deleting a Printer
- Changing Printer Description
- Changing Printer Location
- Showing Shared Printer Information
- Sharing a Printer
- Hiding a Printer
- Setting Printer Options
- Updating Printer IP Addresses
- Viewing and Exporting Print Jobs
- Renaming xPrintServer Device
- Resetting the xPrintServer to Factory Defaults
- Via the User Interface
- Via the Hardware Reset Button
- Restarting the xPrintServer
- Viewing Logs
- Printer Drivers
- Downloading Printer Drivers from the Internet
- Exporting Printer Drivers
- Downloading Printer Drivers from a USB Flash Drive
- Managing Active Directory
- Updating Active Directory Configuration
- Testing Remote User Authentication
- Saving Configuration
- Restoring Configuration
- Proxy Server Configuration
- Testing Proxy Server Connectivity
- 5: Updating Firmware
- Updating Firmware via the Lantronix Web Services Website
- Updating Firmware via a Local USB Port
- 6: Technical Specifications
- A: Technical Support
- Diagnostic Support
- Contact Information
- B: Troubleshooting
- C: Compliance
- Declaration of Conformity
- Manufacturer's Name & Address:
- Emissions
- Safety Agency
- Agency Approvals
- RoHS Notice
- D: Warranty
- Index
- A
- B
- C
- D
- E
- F
- G
- H
- |
- J
- K
- L
- M
- N
- P
- Q
- R
- S
- T
- U
- V
Brand : Lantronix
Model : xPrintServer Office Edition
Category : Print Server