
1508 - Media player Fantec - Free user manual and instructions
Find the device manual for free 1508 Fantec in PDF.


| Product Type | Media Player / Home Multimedia Center |
| Brand | Fantec |
| Model | 1508 |
| Dimensions | 86 x 86 x 22 mm |
| Power Supply | DC 5V, 1.5A (AC adapter included) |
| Video Playback Formats | AVI, VOB, MPG, DAT, MP4 (MPEG-1/2/4 ASP, XviD) |
| Audio Playback Formats | MP3, WMA (DRM/Pro/Advanced not supported) |
| Photo Playback Formats | JPEG/JPG (up to 5120x3840 pixels) |
| Video Output | Composite, Component, HDMI up to 720p/1080i |
| Audio Output | Stereo RCA, HDMI |
| USB Interface | USB 2.0 Host (1 port) |
| Card Reader | SD/SDHC/MMC/MS (up to 8GB) |
| Supported File Systems | FAT32, NTFS |
| Remote Control | Yes (included) |
| OSD Languages | English, French, German, Italian, Portuguese, Spanish, Dutch |
| TV System | PAL, NTSC |
| Firmware Upgrade | Via USB or memory card (file bank30.rom) |
| Operating Temperature | +5°C to +35°C |
| Package Contents | Player, A/V cable, Remote control, AC/DC adapter, User manual |
Frequently Asked Questions - 1508 Fantec
User questions about 1508 Fantec
0 question about this device. Answer the ones you know or ask your own.
Ask a new question about this device
Download the instructions for your Media player in PDF format for free! Find your manual 1508 - Fantec and take your electronic device back in hand. On this page are published all the documents necessary for the use of your device. 1508 by Fantec.
USER MANUAL 1508 Fantec
Home Multimedia Center
FANTEC HDMI-miniTV
User's Manual
Table of Contents
1. Introduction......3
1.1 Preface ....3
1.2 Packing List ....3
1.3 Caution 3
1.4 Connection ....5
1.5 First Time Usage....7
2. About the Player....7
2.1 Remote Control....7
2.2 Front Panel 9
2.3 Rear Panel....9
3. Setup Menu....9
3.1 General Setup....9
3.2 Video Setup 10
3.3 Audio Setup 11
3.4 Photo Setup....11
3.5 Firmware Version.... 11
4. Media Playback....12
4.1 Video List....13
4.2 Music List....14
4.3 Photo List....14
4.4 Slide Show....15
4.5 File List 15
4.6 DVD Playback....15
5. Upgrading the Firmware....16
6. Appendixes....17
6.1 Specifications....17
6.2 Frequently Asked Questions....17
6.3 Copyrights and Trademarks....18
6.4 Warranty 19
1. Introduction
1.1 Preface
Thank you very much for purchasing the product. We hope you will enjoy using it as a great home entertainment partner. The FANTEC HDMI-miniTV has the following functionality.
Video Playback - supports AVI, VOB, MPG, DAT, MP4 files with corresponding codec: MPEG-1, MPEG-2, MPEG-4 ASP, XviD (resolution up to D1 quality).
Music Playback - supports MP3, WMA (DRM, Pro and Advanced Profile not supported) Photo Playback - supports JPG/JPEG files.
- supports slide show mode.
USB HOST - direct playback files from USB pen drive and external USB HDD.
Card Reader - supports memory cards: SD/MMC/MS.
We hope that this product will bring you a lot of enjoyment. We are committed to apply multimedia technology in your work, entertainment, family, daily life, car and everywhere! Welcome to us. Thank you again for choosing our product.
1.2 Packing List
| Part | Quantity |
| Player | 1 |
| A/V cable 1 | |
| Remote Control 1 | |
| AC/DC adaptor 1 | |
| User Manual (printed) 1 |
Note:
The actual contents in the package might be different from the packing list in this manual.
1.3 Caution
This player's design and manufacture has your safety in mind. In order to safely and effectively use this player, please read the following before usage.
1.3.1 Usage cautions
User should not modify this player. If commercial hard disk is being used, the environmental temperature should be within +5^ +35^ .
1.3.2 Power
The player's power voltage: DC 5V.
When using this player, please connect the supplied AC adapter or AC adapter cable to the player's power jack. When placing the adapter cable, make sure it can not get damaged or be subject to pressure. To reduce the risk of electric shock, unplug the adapter first before cleaning it. Never connect the adapter to the player in a humid or dusty area. Do not replace the adapter or cable's wire or connector.
1.3.3 Radio interference/compatibility
- If not properly shielded, almost all electronic devices will get radio interference. Under some conditions, your player might get interference.
- The design of this player has followed the FCC/CE standard, and has followed the following rules:
(1) This player may not cause harmful interference;
(2) This player could accept some interference received including interference that may cause undesired operation.
1.3.4 Repair
If the player has a problem, you should take it to an appointed repair center and let the specialists do the repair, never repair the player yourself, you might damage the player or endanger yourself or your data.
1.3.5 Disposing of the player
When you dispose of the player, be sure to dispose it appropriately. Some countries may regulate disposal of electrical device, please consult with your local authority.
1.3.6 Others
When using this player, please do not let the player come into contact with water or other liquid. If water is accidentally spilled on the player, please use a dry cloth to absorb the spillage.
Electronic products are vulnerable, when using please avoid shaking or hitting the player, and do not press the buttons too hard.
Do not let the player come into contact with water or other liquid.
Do not disassemble the player, repair the player or change the design of the player, any damage done will not be included in the repair policy.
Do not press the buttons of the player too hard.
Avoid hitting the player with hard object, avoid shaking the player, and stay away from magnetic fields.
During electrostatic discharge and the strong electromagnetic field, the product will malfunction, then unplug the power cable and the product will return to normal performance next time it is powered on.
1.4 Connection
1.4.1 USB Mass Storage Device (like USB Pen Drive, MP3 player, USB HDD, etc.)
(1) Make sure the player is powered on.
(2) Plug in the USB Pen Drive or USB HDD or other USB devices to the USB HOST port of this player.

flowchart
graph TD
    A["USB Port"] --> B["Rectangular Block 1"]
    B --> C["Rectangular Block 2"]
1.4.2 Memory cards
Memory cards can be used by inserting to the card slot.
(1) Make sure the player is powered on.
(2) Insert your memory card (SD/MMC/MS) to the card slot of this player properly.

flowchart
graph TD
    A["CARD"] --> B["Device 1"]
    B --> C["Device 2"]
1.4.3 TV connection
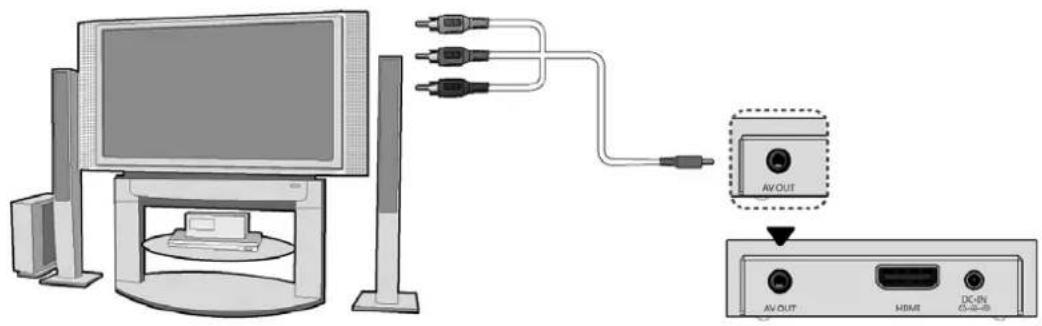
1.4.3.1 A/V OUT
(1) Follow the picture and plug in the connector to the player's A/V OUT jack.
(2) Follow the picture and plug in the 3 color connector to the TV's A/V IN jack. In this way, you can enjoy the content in the player on TV or other display devices.
1.4.3.2 HDMI
(1) Follow the picture and plug one connector on your HDMI cable to the player's HDMI jack.
(2) Follow the picture and plug the other connector on your HDMI cable to the TV's HDMI jack.

In this way, you can have the highest quality video and audio via a single cable.
1.4.4 Power connection
(1) Follow the picture and connect the AC adaptor to the player's DC IN jack.
(2) Follow the picture and plug in the AC adaptor to the power outlet.

1.5 First Time Usage
1. Power on
Plug in the power cord to DC IN jack on the player and the POWER indicator on the front panel will turn blue.
2. Power off
In playback mode press the POWER button of the remote control and the player will enter standby mode and the POWER indicator will turn red.
3. Language control
The system language of this player can be set to English or other languages. In setup menu, the selected language will take effect immediately.
2. About the Player
2.1 Remote Control
All procedures in this manual can be carried out using the remote control. See the following for details on each button and its function:
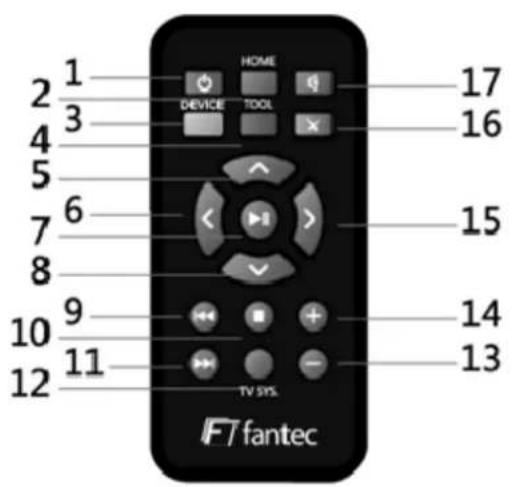
- POWER 2. HOME
- DEVICE 4. TOOL
- UP 6. LEFT
- PLAY / PAUSE 8. DOWN
- PREV 10. STOP
- NEXT 12. TV SYS.
- VOL - 14. VOL +
- RIGHT 16. BACK
- MUTE
| No. | Button | Function |
| 1 | POWER | Press to power off or enter the standby mode. |
| 2 | HOME | Press to return to the main interface. |
| 3 | DEVICE | Press to select the device or partition you wish to browse. |
| 4 | TOOL | Press to activate / hide tool bar in playback mode. |
| 5 | UP | Press to move the highlight up when navigating menus.Press to disable the buttons in tool bar while in file list mode. |
| 6 | LEFT | Press to move the highlight left when navigating menus;Press to enable the buttons in tool bar while in file list mode. |
| 7 | PLAY / PAUSE | Play / Pause. |
| 8 | DOWN | Press to move the highlight down when navigating menus;Press to disable the buttons in tool bar while in file list mode. |
| 9 | PREV | Press to go to previous chapter / file, or page up on list. |
| 10 | STOP | Press to stop playback. |
| 11 | NEXT | Press to go to next chapter / file, or page down on list. |
| 12 | TV SYS. | Press to switch video output modes. |
| 13 | VOL - | Press to decrease the volume. |
| 14 | VOL + | Press to increase the volume. |
| 15 | RIGHT | Press to move the highlight right when navigating menus;Press to enable the buttons in tool bar while in file list mode. |
| 16 | BACK | Press to go back to upper directory. |
| 17 | MUTE | Press to mute audio output, and press again to resume. |
2.2 Side Panel

- Card Slot 2. USB HOST port (B-Type)
2.3 Rear Panel
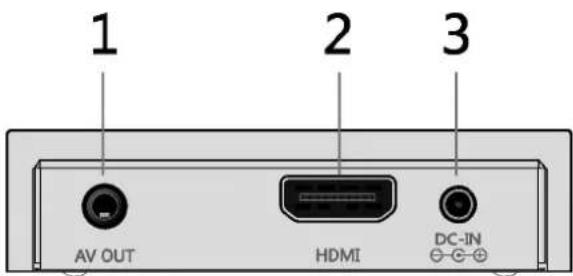
-
A/V OUT jack 2. HDMI jack
-
DC IN jack
3. Setup Menu
The Setup Menu allows you to configure video, audio, photo and system settings. Select Setup icon in the main interface to enter this Menu.
3.1 General Setup
This section allows you to setup OSD Language and other system settings.

| OSDLanguage | To select and change the system language. It supports English, French, German, Italian, Portuguese, Spanish, and Dutch. |
| File Sorting | To select and change the file sorting method. The sorting method contains: A to Z, Z to A, Recent date, Oldest date. |
| Auto Start | You can turn Auto Start on/off. While Auto Start is set to on, your player will play the media files in your storage device automatically next time when you reconnect your storage device. The Auto Start method contains: All, Photo and music, Photo and video. |
| Defaults | Restore to factory settings. |
| Main Page | Back to the main setup menu. |
3.2 Video Setup
This section allows you to configure the video settings.
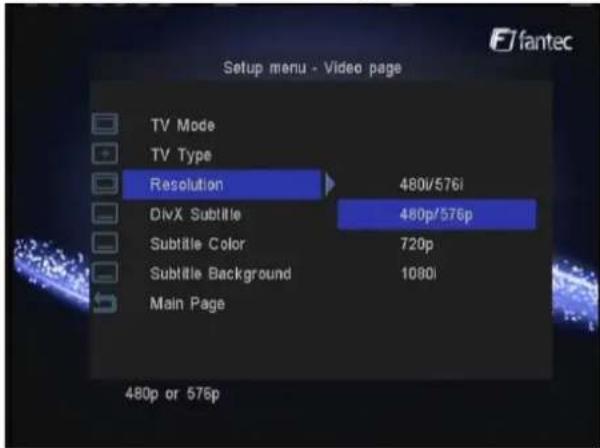
| TV Mode | To set the ratio of the TV display |
| TV Type | To set the TV system |
| Resolution | To set the video output mode: 480i/576i, 480p/576p, 720p, 1080i |
| Divx Subtitle | You can turn subtitle on/off |
| Subtitle Color | You can select the color of the subtitle |
| Subtitle Background | You can select the color of the subtitle background |
| Main Page | Back to the main setup menu |
3.3 Audio Setup
This section allows you to configure the audio settings.

| Audio Output | Select to set Analog, RAW, or PCM |
| Main Page | Back to the main setup menu |
3.4 Photo Setup
This section allows you to configure the photo settings.

| Thumbnail Digest | You can turn Thumbnail Digest on/off |
| Interval Time | To set the interval time of photo slide show : 1s, 3s, 5s, or 10 seconds |
| Transition Mode | To set the transition effect of photo slide show |
| Main Page | Back to the main setup menu |
3.5 Firmware Version
This section displays the firmware version.

4. Media Playback
✨ Main Interface
In the main interface, use the direction keys to select and enter different mode. The main interface contains: Photo, Music, Movie, File and Setup.
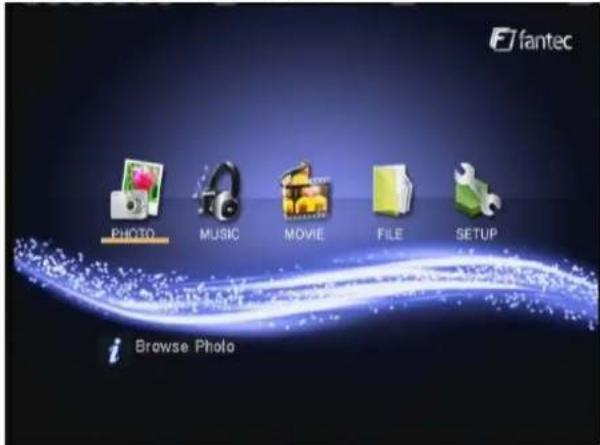
Select the device
Select the Device icon on the remote control to enter this menu, then you can select the device or partition you wish to browse.

4.1 Video List
Select the Video icon in the main interface to enter this menu, and all of the supported video files stored in the device will be displayed. In video list, press the LEFT button to enable the buttons in the tool bar.
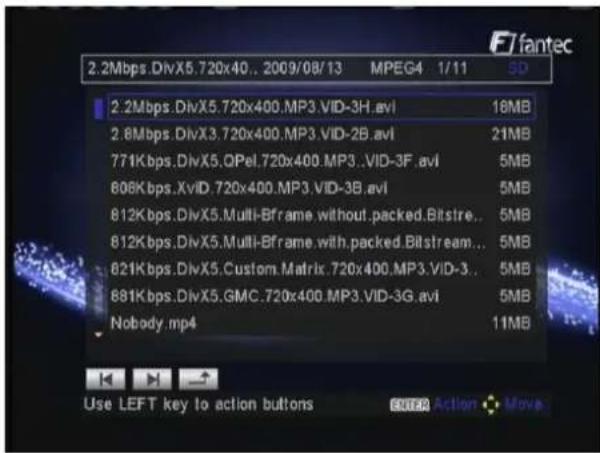
Press the UP / DOWN button to select a video file you wish to play, and press the PLAY / PAUSE button to begin the playback.
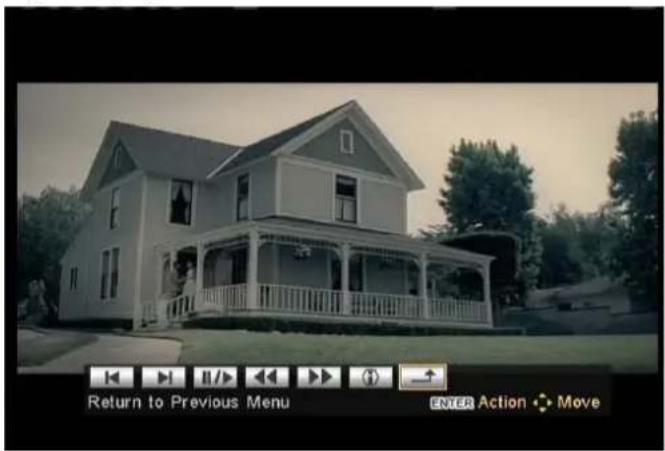
You can access the following functions during playback:
- TOOL: Press to activate or hide the tool bar during playback.
- PREV/NEXT: Press to go to previous/next file.
- STOP: Press to stop the playback.
4.2 Music List
Select the Music icon on the main interface to enter this menu, and all of the supported audio files stored on the device will be displayed.

Press the UP / DOWN button to select a music track you wish to play. In music list, press the LEFT button to enable the buttons in the tool bar.
4.3 Photo List
Select the Photo icon on the main interface to enter this menu and all of the supported pictures stored on the device will be displayed.

Press the UP / DOWN button to select a photo you wish to browse and press the PLAY / PAUSE button to begin the playback.

You can access the following functions during playback:
● TOOL: Press to activate or hide the tool bar during playback.
● PREV/NEXT: Press to go to previous/next file.
- STOP: Press to stop the playback.
4.4 Slide Show
In photo list or music list press the slide show button in the tool bar to activate the photo slide show with background music.
4.5 File List (Recommended Navigation)
Select the File icon on the main interface to enter this menu, and all the folders and supported media files will be displayed. Press the LEFT button to enable the buttons in the tool bar.

Press the UP / DOWN button to select a file you wish to browse, and press the PLAY / PAUSE button to begin the playback.
4.6 DVD Playback
DVD files stored on the portable HDD can be played directly on the player. Enter the folder, make sure the cursor stops on the Play DVD folder icon and press the PLAY / PAUSE button on the remote control to begin playback.

Press the navigational buttons to select options while navigating the DVD root menu. You can access the following functions during playback:
● HOME: Press to return to the root menu during playback.
- TOOL: Press to activate/hide the tool bar during playback.
● PREV/NEXT: Press to go to previous/next chapter.
- STOP: Press to stop the playback.
With the buttons in the tool bar, you can switch the audio languages, subtitle, etc.
Note: The VIDEO_TS and AUDIO_TS directories need to be copied together into the same folder on the portable HDD.
5. Upgrading the Firmware
The firmware is the operating system (OS) installed on the device. Firmware upgrades can bring new features, improvements and bug fixes.
Download the latest firmware from our official website www.fantec.eu. The following points show the necessary steps for upgrading the firmware.
- The file used for upgrade is named "bank30.rom". Copy it to a memory card or an external USB device.
- Connect the device to the player, locate the upgrading file in the FILE LIST and select PLAY / PAUSE button to start the upgrade procedure.
The upgrading process will take about 1 minute, please be patient. When it is finished, the blue indicator on the front cover will turn red, please unplug the power cord and then plug it in again to power interface on the player.
Note:
Do not cut off the power supply during installation.
6. Appendixes
6.1 Specifications
| Video | Format: AVI, DVD IFO (VOB), MPG, DAT, DIVX, XVID |
| Codec: MPEG-1, MPEG-2, MPEG-4 ASP | |
| Resolution: Up to 720x576 (PAL), 720x480 (NTSC) | |
| Subtitle: SRT, SSA, SMI, SUB | |
| Audio | Format: MP3, WMA (DRM, Pro and Advanced Profile not supported) |
| Codec: MP2, MP3, PCM, LPCM | |
| Compression rate: MP3: 32 Kbps~320 Kbps; WMA: 32 Kbps~192 Kbps | |
| Photo | JPG/JPEG (576i/576p/720p/1080i) up to 5120 x 3840 Pixel |
| Slide Show support | |
| A/V Output | Video: Composite, Component, HDM I up to 720p/1080i |
| Audio: Stereo RCA, HDMI | |
| TV System PAL, | NTSC |
| USB Interface USB 2.0 HOST port x 1 | |
| Card Reader SD/SDHC/MMC/MS up to 8GB | |
| File System FAT32, NTFS | |
| Operating Temperature | +5°C to +35°C |
| Power AC-DC Adapter 5V, 1.5A | |
| Dimension | 86x86x22 mm |
Note: The specifications and design of this product are subject to change without notice.
6.2 Frequently Asked Questions
Question 1. Why my player cannot play photo slide show with background music?
Answer:
Make sure your photo and music files are supported, enter the photo list or music list, move the cursor on the photo or music file, then press the slide show button in the tool bar to activate the photo slide show with background music.
Question 2. Why my player cannot play DVD?
Answer:
Make sure the VIDEO_TS and AUDIO_TS directories are copied to the same folder.
Question 3. My files have disappeared from the player.
Answer:
Make sure your files are supported and browse your files via the correct Browser mode which means correct filtered view such as VIDEO, MUSIC, PHOTO or FILE.
Question 4. Why do some supported photo formats, cannot be shown in the photo function?
Answer:
In the JPEG format there are different modes. The player doesn't support all the modes. So you have to change your photo format first as follow:
(1) Use Photoshop to open the photo;
(2) Choose "File" then "save as" from the menu, as the picture on the left hand side shows, select the picture format as JPEG, input the file name and click the "save" icon;
(3) After click on the "save" icon, a new window will appear as the picture on the right hand side shows, select "Baseline (standard)" or "Baseline optimized";
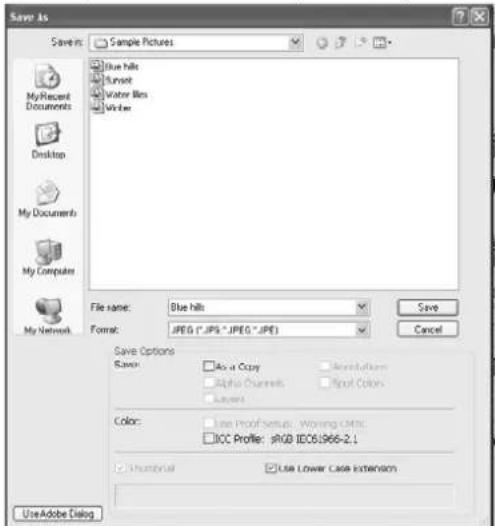
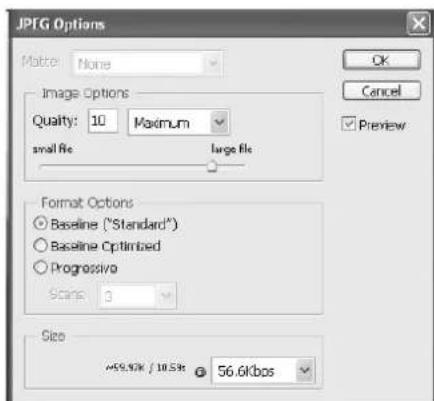
(4) Click the "OK" icon.
Question 5. How can I format a portable HDD (above 32 GB) into a FAT32 partition?
Answer:
Windows 2000/XP/VISTA can view a FAT32 partition, but the format tool in Windows 2000/XP/VISTA is limited to format FAT32 partitions up to the capacity of 32GB. If you need to format any FAT32 partition beyond the capacity of 32GB, please use other third party format tools, like Norton Partition Magic 8.0® or CompuApps SwissKnife®.
6.3 Copyrights and Trademarks
Copyrights
All rights reserved. No part of this manual may be reproduced or transmitted in any form or by any means, whether by electronically or mechanically, without the express written permission from the copyright holder.
Copyrighted materials, such as software, music files, or movies, are protected by local law, and may not be illegally copied or used without permission from the copyright owner.
Trademarks
Microsoft and Windows are registered trademarks of Microsoft Corporation.
All other trademarks are property of their respective holders.
6.4 Warranty
What your warranty does not cover:
-Acts of nature, such as fire, static discharge.
-Damage from unauthorized repair, alteration or accident.
-Damage from misuse or neglect.
-Loss of customer's software, firmware, information, or memory data.
-Improper handling or installation.
-A unit that has been modified or incorporated into other products or is used for institutional or other commercial purposes.



- Home Multimedia Center
- FANTEC HDMI-miniTV
- User's Manual
- Table of Contents
- Introduction......3
- About the Player....7
- Setup Menu....9
- Media Playback....12
- Upgrading the Firmware....16
- Appendixes....17
- Introduction
- Preface
- Packing List
- Note:
- Caution
- Usage cautions
- Power
- Radio interference/compatibility
- Repair
- Disposing of the player
- Others
- Connection
- USB Mass Storage Device (like USB Pen Drive, MP3 player, USB HDD, etc.)
- Memory cards
- TV connection
- A/V OUT
- HDMI
- Power connection
- First Time Usage
- Power on
- Power off
- Language control
- About the Player
- Remote Control
- Side Panel
- Rear Panel
- Setup Menu
- General Setup
- Video Setup
- Audio Setup
- Photo Setup
- Firmware Version
- Media Playback
- ✨ Main Interface
- Select the device
- Video List
- Music List
- Photo List
- Slide Show
- File List (Recommended Navigation)
- DVD Playback
- Upgrading the Firmware
- Appendixes
- Specifications
- Frequently Asked Questions
- Answer:
- Question 4. Why do some supported photo formats, cannot be shown in the photo function?
- Question 5. How can I format a portable HDD (above 32 GB) into a FAT32 partition?
- Copyrights and Trademarks
- Copyrights
- Trademarks
- Warranty
- What your warranty does not cover:
Brand : Fantec
Model : 1508
Category : Media player