
Discovery 10BPM3 - Tablet BLAUPUNKT - Free user manual and instructions
Find the device manual for free Discovery 10BPM3 BLAUPUNKT in PDF.
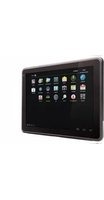


| Product Type | Tablet PC |
| Brand | Blaupunkt |
| Model | Discovery 10BPM3 |
| Operating System | Android 4.0 |
| Processor | ARM Cortex A9 Dual Core 1 GHz (NVIDIA Tegra2 T20) |
| Memory (RAM) | 1 GB DDR3 |
| Internal Storage | 16 GB |
| Display Size | 9.7 inches |
| Display Resolution | 1024 x 768 (WXGA) |
| Display Technology | LED Touch-sensitive, 10-point Capacitive Touch Panel |
| Front Camera | 2 MP (SXGA CMOS, fixed focus) |
| Rear Camera | 5 MP (QSXGA CMOS, auto-focus with flash) |
| Wi-Fi | 802.11 b/g/n |
| Bluetooth | V2.1+ EDR |
| Battery Type | Built-in Li-Ion Polymer, 3.7 V |
| Power Adapter Input | AC 100-240 V, DC 5V/2A |
| Dimensions (W x D x H) | 242 mm x 189 mm x 11.8 mm |
| Weight | Approx. 0.7 kg |
| Operating Temperature | 5°C to 35°C (41°F to 95°F) |
| Storage Humidity | 20% to 93% |
| Ports | Headphone jack, microUSB/charging port, SIM card slot (3G models), docking port |
| Cleaning Instructions | Use a soft, lint-free cloth moistened with water. Do not use chemical cleaners or spray directly. |
| Spare Parts / Repairability | Contact certified service technician. Manufacturer: First Service GmbH, +49 (0) 511/270 496 90, support@firstservice-gmbh.de |
| Safety Precautions | Do not expose to liquids, strong magnetic fields, or temperatures outside 5-35°C. Avoid dropping or pressing on screen. |
Frequently Asked Questions - Discovery 10BPM3 BLAUPUNKT
User questions about Discovery 10BPM3 BLAUPUNKT
0 question about this device. Answer the ones you know or ask your own.
Ask a new question about this device
Download the instructions for your Tablet in PDF format for free! Find your manual Discovery 10BPM3 - BLAUPUNKT and take your electronic device back in hand. On this page are published all the documents necessary for the use of your device. Discovery 10BPM3 by BLAUPUNKT.
USER MANUAL Discovery 10BPM3 BLAUPUNKT
You have made a wise choice.
Naturally, we will also provide you with after-sales service.
For technical queries and/or problems, contact us on +49 (0) 511/270 496 90 by
telephone, or email us at
support@firstservice-gmbh.de
You can get additional accessories for your PAD at blaupunkt.de.
You can also download manuals for other languages and detailed instructions at
blaupunkt.de
Directions
Meanings of icons:

Forbidden! Forbid improper operations to avoid damaging the tablet PC.

Caution! Cautions for operators to avoid potential damages. Please note and remember.

Important! Important information, common notes, definitions, general knowledge and references, etc.
Other trademarks and trade names may be used in this manual to refer to either the entities claiming the marks and names or their products.
The manufacturer disclaims any proprietary interest in trademarks and trade names other than its own.
Information in this manual is subject to change without notice.
Reproduction in any manner whatsoever without the written permission from the manufacturer is strictly forbidden.
Product images in this manual are for your reference only.
Contents
Directions....1
Safety Precautions....5
1 Knowing Your Tablet PC ....7
2 Caring the Tablet PC....9
2-1 Touchscreen....9 2-2 Other accessories....10 2-3 Other Notes 10
3 Traveling with the Tablet PC 11
Attention 11
4 Getting Started .... 12
4-1 Connecting the Power Adapter....12 4-2 Turning on the tablet PC....13
5 Get to know your system....14
5-1 Home Screen....14 5-2 Apps Menu 16 5-3 On-screen Keyboard 17
6 System Settings .... 18
6-1 Wireless & networking....18 6-1-1 Airplane Mode....18 6-1-2 Wi-Fi 18 6-1-3 Bluetooth settings....19 6-1-4 Tethering & portable hotspot....21 6-1-5 VPN settings......Fehler! Textmarke nicht definiert. 6-1-6 Mobile Networks (only for model with 3G function)..22 6-2 Sound....23 6-3 Screen....24
6-4 Location & security 24 6-5 Applications ...... 24 6-6 Accounts & sync....24 6-7 Privacy....24 6-8 Storage....25 6-9 Language & Input 25 6-10 Accessibility 25 6-11 Date & time....25 6-12 About tablet 25
7 Communication 25
7-1 Browser 25 7-2 Contacts 26 7-3 Email 28
8 Fun....32
8-1 camera 32 8-2 Gallery 34 8-3 Music....35
9 System Connection....36
9-1 Inserting SIM Card....37 9-2 Connecting to PC 37 9-3 Connecting to Headphone 38
10 Appendix....39
10-1 Troubleshooting....39 10-2 Specifications 41
Safety Precautions
- DO NOT place the Tablet PC with small items, they may scratch Touchscreen or enter the Tablet PC.
- DO NOT expose the Tablet PC to dirty or dusty environment. Keep the environment clean and dry.
- DO NOT place the Tablet PC on uneven or unstable work surface.
- DO NOT place or drop objects on the top of the Tablet PC. DO NOT shove any foreign objects into the Tablet PC. DO NOT cover the Touchscreen strongly.
- DO NOT expose the Tablet PC to strong magnetic or electrical fields; DO NOT place the floppy disk near or on the Tablet PC, as that may cause loss of data on the floppy disk.
- DO NOT leave the Tablet PC facing the sun, as it can damage the Touchscreen, especially in a car.
- SAFE TEMP: This Tablet PC should only be used in environments with ambient temperatures between 5°C (41°F) and 35°C (95°F).
- DO NOT expose the Tablet PC to or use near liquids, rain, or moisture.
- DO NOT throw the Tablet PC in municipal waste. Check local regulations for disposal of electronic products.
- The Tablet PC and the Adapter may generate some heat during operation or charging. DO NOT leave the Tablet PC on your lap or any part of the body to prevent discomfort or injury from heat exposure.
- INPUT RATING: Refer to the rating label on the Tablet PC and be sure that the Power Adapter complies with the rating. Only use attachments or accessories specified by the manufacturer.
- Check the connections between the main unit and attachments before turning on the Tablet PC.
- DO NOT use the Tablet PC while eating food to avoid dirtying the Tablet PC.
- DO NOT insert anything into the Tablet PC that may result in a short circuit or damage the circuit.
- Disconnect the Tablet PC from the electrical outlet before cleaning. And keep it away from children.
- DO NOT disassemble the Tablet PC; only a certified service technician should perform repairs on your computer. Otherwise, problems may result, and the manufacturer should not hold responsibility for the damage.
1 Knowing Your Tablet PC
Front & Side Panel

- VOL +/- button
- Front Camera
- Light Sensor
- Power Button
- SIM Card Slot (only for model with 3G function)
- LCD
Touch-sensitive Screen
- Headphone Jack
- Charge Indicator
- Port for data and loading cable
Back Panel

- Flash Light 2. Back Camera
2 Caring for the Tablet PC
The tablet PC is a precision device; incorrect operation may damage the device.
2-1 Touchscreen
The touchscreen is the most delicate component of the tablet PC and is made of glass. It may break under external abrupt force. Do not scratch the cover of the tablet PC, as scratches on the cover cannot be removed.
Do not press the touchscreen strongly, or damage may occur. Do not place objects on the device to avoid damaging the screen when you cover the touchscreen. Place the tablet PC in a carrying case to protect it from dirt, water, shock, and scratches before traveling. Do not drop or place heavy objects on the touchscreen. Do not scratch the touchscreen with your fingernails or any hard objects. Use a soft, lint-free cloth to wipe your tablet PC gently to avoid damaging the touchscreen. Shut down the tablet PC if the device will not be used for a long time. Do not clean the touchscreen with chemical cleaners. The touchscreen must not come into contact with hard objects (e.g., cloth buttons and watchbands).
Use a soft, lint-free dry cloth to wipe the touchscreen smoothly. Do not use your hand to wipe the touchscreen directly. Do not spill liquid into the tablet PC, as it can damage the components. Cover the touchscreen smoothly to avoid moving the hinges and flashing the touchscreen.

Do not clean the touchscreen with acidic cleaners or spray cleaning solution directly on the tablet PC.
2-2 Other Accessories
Follow the steps below before cleaning your tablet PC and its accessories.
- Turn off the tablet PC. Disconnect your tablet PC and all external devices from their electrical outlets.
- Moisten a soft, lint-free cloth with water and wipe the surface of the tablet PC smoothly. Do not let liquid seep into the tablet PC to avoid short circuits and damage to the tablet PC.
- Turn on the tablet PC after it has dried.
2-3 Other Notes
Do not expose the tablet PC to a hot environment for a long time, especially in a car. Otherwise, the parts of the tablet PC may deform. Keep the data for future use and back it up regularly.
Update the software regularly to keep the tablet PC compatible and stable. To prolong the battery's life, charge the tablet PC every three months if it is not used for a long time.
3 Traveling with the Tablet PC
Turn off the tablet PC and disconnect all cables before moving it. Follow the steps below if you want to travel with your tablet PC.
Attention!
- Turn off the tablet PC and disconnect it from wall outlets.
- Place the tablet PC in a carrying case to protect it from dirt, water, shock, and scratches before traveling.
- Check that you have taken the AC adapter, power cords, manual, and warranty card. Do not forget the passwords of the tablet PC if you have set them up.
- Find out the voltage type in the countries you will visit. Your tablet PC comes with a universal AC-DC adapter, so you only need to buy different power cords to connect to different outlets, or the hotel may provide universal outlets to support your power cord as well as voltages.

If you drive your car with the tablet PC, do not leave the tablet PC facing the sun. Place it in a shady and cool area.

The connection between the Internet and your tablet PC will be interrupted when the system enters hibernation mode.
4 Getting Started
4-1 Connecting the Power Adapter
The tablet PC comes with a universal AC-DC adapter, and the allowable input voltage of the adapter is from 100V to 240V.
Follow the steps below to connect the adapter:
- Plug one end of the data cable into the docking station port of the tablet PC.
- Plug the other end of the data cable into the adapter.
- Insert the AC end of the adapter into the wall outlet.
- Check that all connections above are correct before turning on the tablet PC.


Your tablet PC and accessories may differ from the pictures shown.
4-2 Turning on the tablet PC
Press the power button for a few seconds to turn on the tablet PC.

Press the power button once to enter standby mode and press again to wake it up.
Press and hold the power button until the pop-up menu appears, then touch OK to turn off the tablet PC.

If the system freezes, press and hold the power button for about 8 seconds to force it off.
5 Get to know your system
The first time you turn on the tablet PC, you need to unlock the screen by dragging the lock icon out of the circle and enter the home screen, which makes it easy for you to access frequently used functions.
5-1 Home Screen


Touch the notification bar to see details and touch it to see quick settings.
Add home screen shortcuts
Touch and then touch and hold the App shortcut and drag the app shortcut to the home screen panel you want.

Widgets: Touch

gets then touch and hold the
Widget and drag the Widget to the home screen panel you want
Delete home screen shortcuts
Touch and hold the shortcuts to be deleted until the remove icon appears at the top of the screen. Drag the shortcuts to the remove icon while it becomes red and release to delete.

5-2 Apps Menu
Touch

me screen to access Apps menu below:

Browser: Surf the Internet for information and entertainment;
Calculator: Perform basic calculation;
Calendar: examine date and add/manage calendar events;
Camera: Capture photos and video with ease;
Clock: Set the alarm function and the alarm time;
Contacts: Arrange your contacts for easy reference;
Downloads: store downloaded files.
Email: Keep in touch via email from this easy-to-use email client;
Gallery: View and manage your photos and video files;
Music: Enjoy the music files and entertainment;
Search: Access the fast search.
Settings: Have settings for the system.
Sound Recorder: Record sounds.
Play Store: Google's marketplace for Android apps.
5-3 On-screen Keyboard

Just touch a text field to open the on-screen keyboard and touch

to close it.
6 System Settings
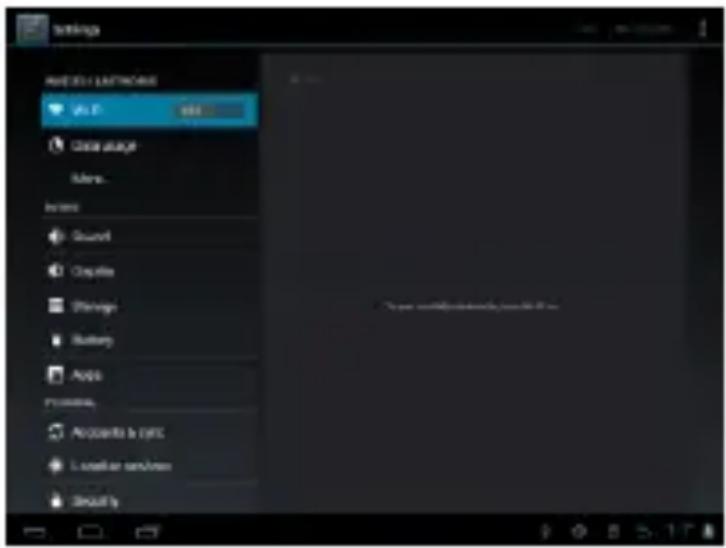
6-1 Wireless & Networking
6-1-1 Airplane Mode
If it's enabled, wireless connecting will be disabled, e.g. Wifi, Bluetooth, etc.
6-1-2 Wi-Fi
Touch > Settings > WiFi > ON/OFF Switch to turn
on the Wifi switch choose one available network in the list after auto-searched. Select one network and input password if necessary to connect.

6-1-3 Bluetooth settings
The Bluetooth enables you to exchange files between the unit and other Bluetooth devices.

Before this step, please active the Bluetooth function of other device (mobile phone, Bluetooth earphone ect.) and make sure the device is in range.


Device settings
Touch on the On/Off Switch to turn on the Bluetooth.
Touch on open the settings for the bluetooth.
rename phone: Change the name of the Bluetooth device.
Visibility timeout: Change the time the device is visibil.
Show received files: to see the received files.

Pairing
- Turn on the Bluetooth function of the unit and the Buletooth device you want to connect.
- Touch "Find nearby device" to scan for devices and then it will enter the found devices list below. Select the desired Bluetooth device to start pairing.
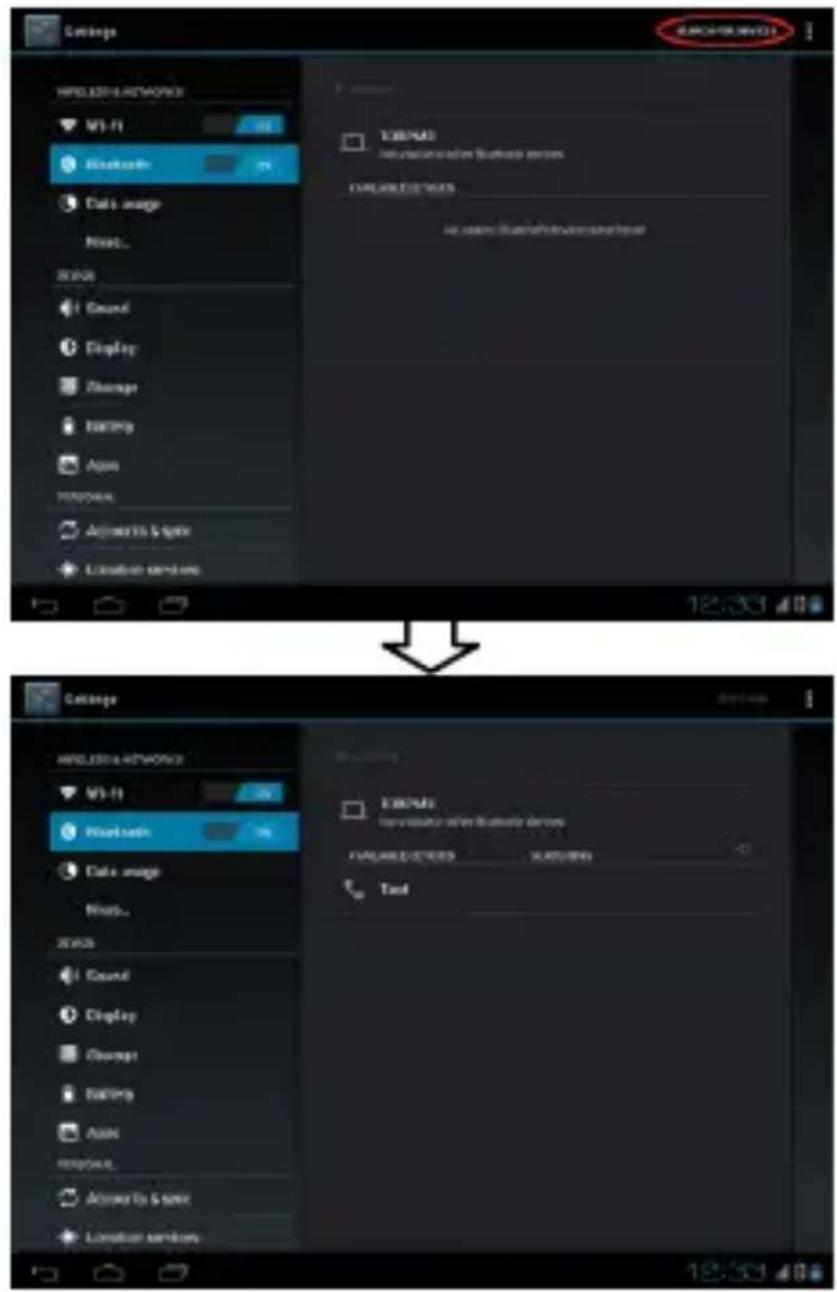
- Type the password as indicated on both sides and complete the connection successfully in seconds.

To make the device visible for other Bluetooth devices, touch on the device name. (Default name is 10BPM3)
After pairing, you can share files between the unit and the Bluetooth device.
6-1-4 Tethering & portable hotspot
You can make your tablet PC a Wi-Fi hotspot to provide portable, convenient internet access to other Wi-Fi enabled devices.

Keep it safe. To protect your tablet and hotspot from unauthorized access, it is strongly recommended that you set up hotspot security (WPA2 is the most secure), including password. To set up your tablet as a Wi-Fi hotspot:
- Turn off Wi-Fi power by touching >


Settings > Wi-Fi > ON/OFF switch.
- Touch > Settings > More... > Tethering & portable hotspot.
- Touch Portable Wi-Fi hotspot to turn on the hotspot.
- Touch Configure Wi-Fi hotspot to change hotspot security and configuration:
Network SSID—Enter a unique name for your hotspot and touch Next. Security—Select Open or WPA2 PSK. If you select a security type, enter a unique password. Other users can access your Wi-Fi hotspot only if they enter the correct password. 5. Touch Save when the settings are complete. When your Wi-Fi hotspot is active, other Wi-Fi enabled devices can connect by entering your hotspot's SSID, selecting a Security type, and entering the correct Wireless password. 6. Please note, that this mode is working with high power-consumption. Short operating-time may result using this function!
6-1-6 Mobile Networks (only for model with 3G function)
- Insert the SIM card and turn the device on. For correct inserting of the SIM card see the next chapter.
- Touch “More…” then go to the “Mobile networks” and touch Access Point Names.
- Touch on the menu icon and choose "New APN"
- Insert the connection details from your provider.
- Touch to save the insert data.
- After several seconds the 3G Symbol appears. Now your device is connected to the internet.

6-1-7 Ethernet Configuration
To connect with your Ethernet with an Ethernet cable, you need a docking station. This is not included with the PAD and if required on our website www.blaupunkt.de or can be ordered by phone over our Service and support center.
A detailed guide on how you set it up to your pad is in the docking station.
6-2 Sound
Volumes: to change the Volume of all sounds except media & alarms.
Touch sounds: make the touch or the screen selection sound.
Screen lock sound: make a sound when the device goes into standby mode.
Vibrate on touch: make the touch or the screen selection vibrate.
6-3 Display

Brightness: adjust the brightness of the screen.
Wallpaper: change wallpaper.
Auto-rotate screen: touch to turn on or off the auto-rotate screen function.
Animation: show windows with animation or not.
Sleep: select the time before the screen automatically enters standby mode.
6-4 Location & security
Set the password for the system to log in.
6-5 App
View and perform more operations on local applications.
6-6 Accounts & sync
Manage user accounts and sync data automatically.
6-7 Backup & reset
Restore to factory status.
6-8 Storage
Check the storage of the device.
6-9 Language & Input

Select the local region and the corresponding language displayed on screen; select input method for the on-screen keyboard, add or remove the user dictionary.
6-10 Accessibility
Look at what other accessibility options are in the system or add some.
6-11 Date & time
Options for setting the current system date and time.
6-12 About tablet
Detailed information about the tablet PC.
7 Communication
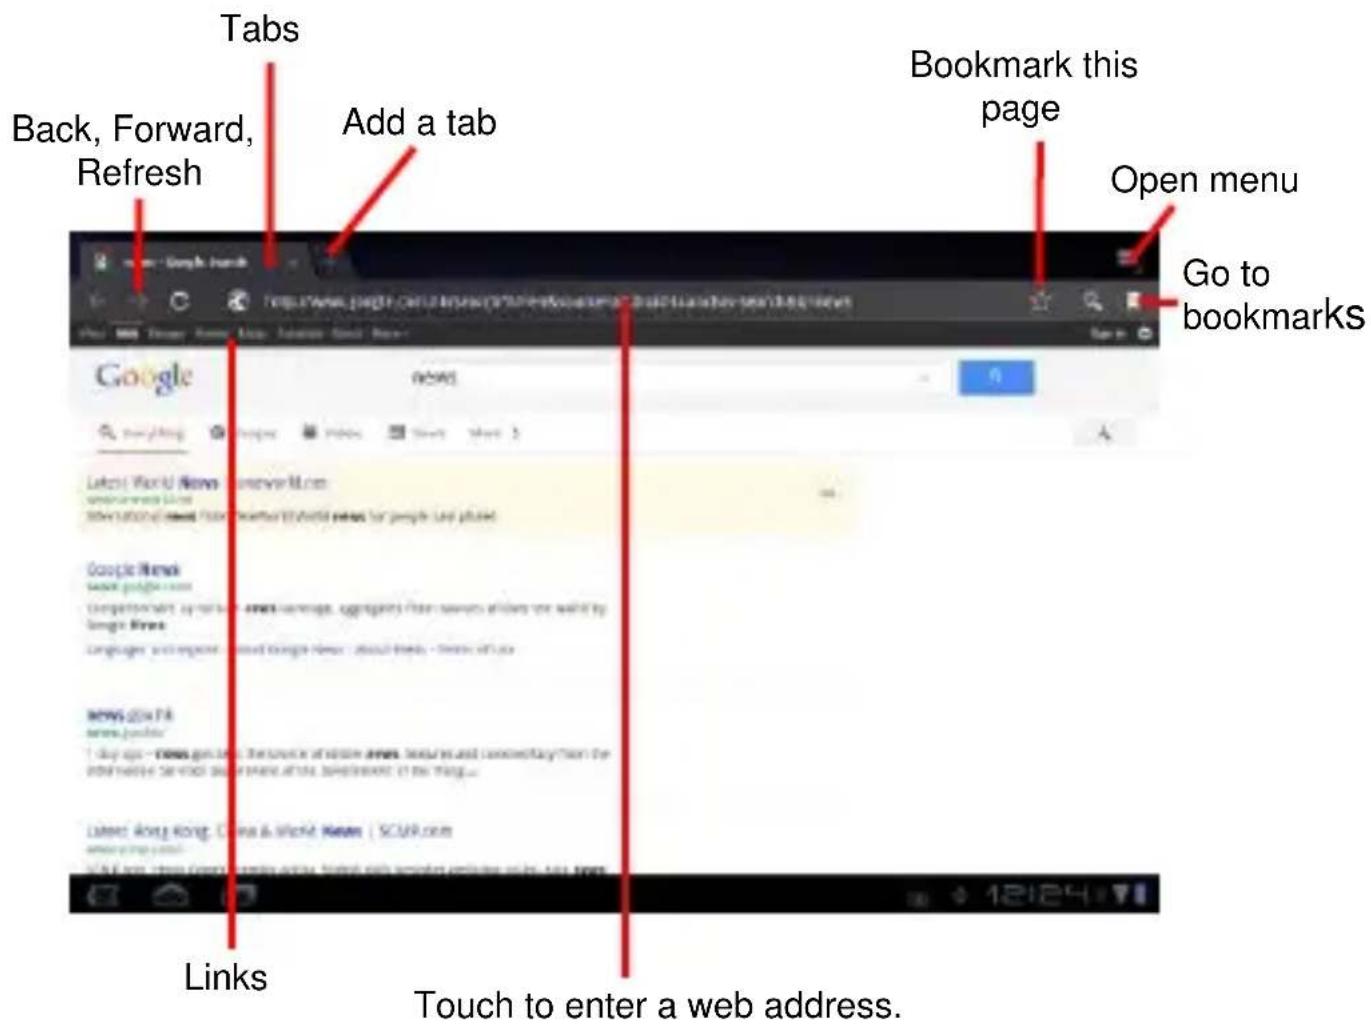
7-1 Browser
Open:


After the network connection is completed, touch the Browser icon to access network browsing, or touch the Bookmarks icon to enter the desired website browsing directly.
7-2 Contacts
Open:


Sign in to an account: configure an exchange account.
Import contacts from a file: import a vCard file from the SD card.
Create a new contact
Touch to open the new contact creation page on the right:
After entering the information, touch Done to save.

7-3 Email
Open:


Set up an account. Please make sure you have all the necessary access data for your mail provider prepared.
- Use the on-screen keyboard to type the available email address and email password, then touch Next:

- Select the incoming server type, e.g., POP3, to go to the outgoing server settings menu below.
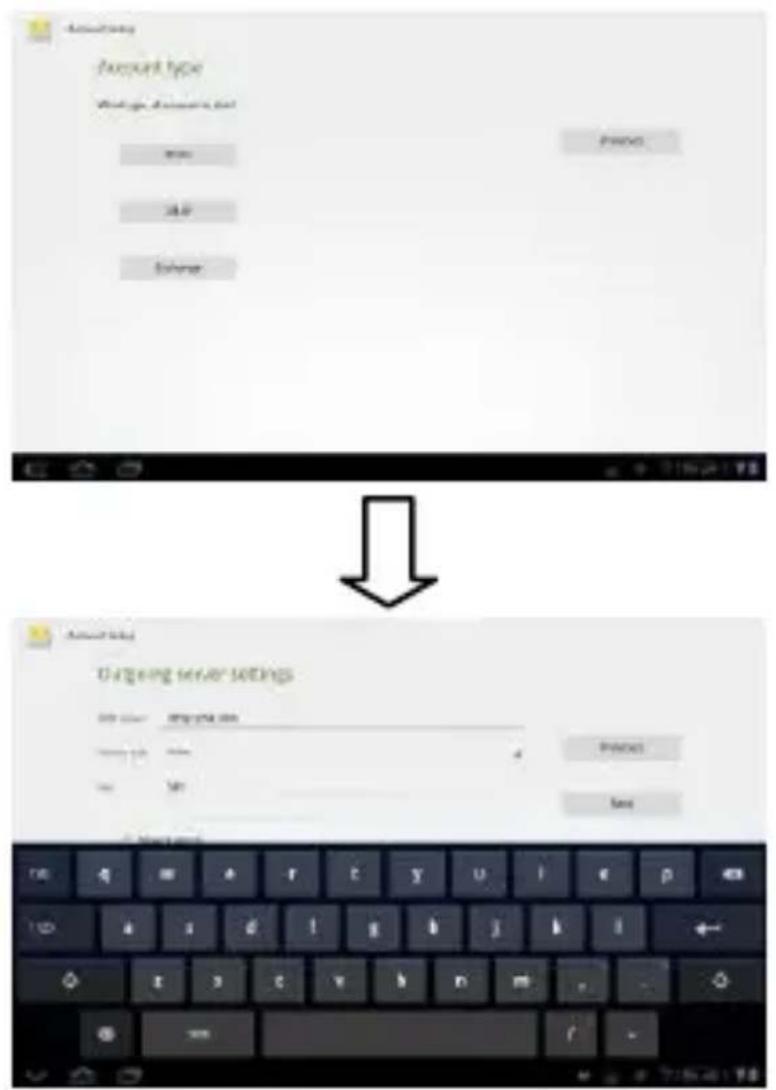

Ensure that you have entered the correct incoming and outgoing server names.
- Check the account information again and touch Next to do account settings. Then touch Next to access the account setup page below:

- After entering names, touch Next to access your mail below:

8 Fun
8-1 Camera
Open:



Taking a photo


Flash: Auto, On, or Off.

White balance: Adjust for lighting conditions.

Color effect: Pick a cool effect.

Scene mode: Choose your environment.

Camera settings: General settings like picture quality.
Recording


Flash: On or Off.

White balance: Adjust for lighting conditions.

Color effect: Pick a cool effect.

Video quality: High, Low, or YouTube (High, 15m).

Time lapse interval: Select time lapse interval or turn off.
8-2 Gallery
Open:



Touch to open
Image playback

: Touch to share the current image via Bluetooth for example.

Touch to delete the current image.

Touch to open menu to see details, rotate, crop, etc.
The touch panel supports multi-finger gestures, which can be applied to customized functions, like Zoom In/Out, Flicking by multi-touch.
| Illustration | Gesture | Function | Illustration | Gesture | Function |
 | Expand | Zoom Out Object |  | Flick Right | Forward |
 | Narrow | Zoom In Object |  | Flick Left | Backward |
8-3 Music
Open:


Touch to change view
Choose any song you like to start playback. During music playback, touch Ⅱ to pause and touch ▶ to resume playback; touch Ⅳ to play the previous/next track.

9 System Connection
9-1 Inserting SIM Card
Your Discovery 10BPM3 Tablet PC is designed with a SIM card port that allows you to insert a SIM card (not supplied by the manufacturer)
into the unit as shown below:
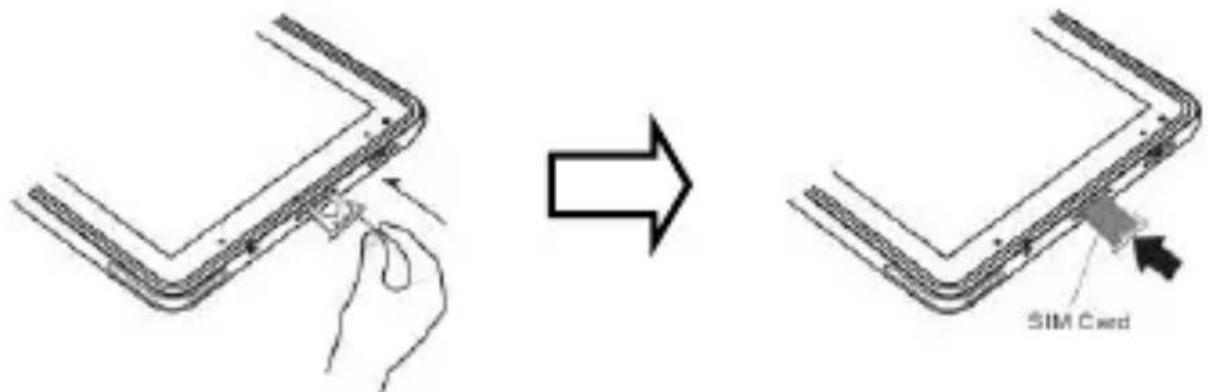
- Use a steel wire to poke the hole on the SIM card port to pop up the SIM card base.
- Place the SIM card on the card base and insert them into the SIM card port for locking.
Don't force it. Popping up and locking should be smooth. If you feel too much resistance, please check the correct orientation of the SIM card.
9-2 Connecting to PC
The docking station port allows you to connect the unit to a PC. See the figure below for details:
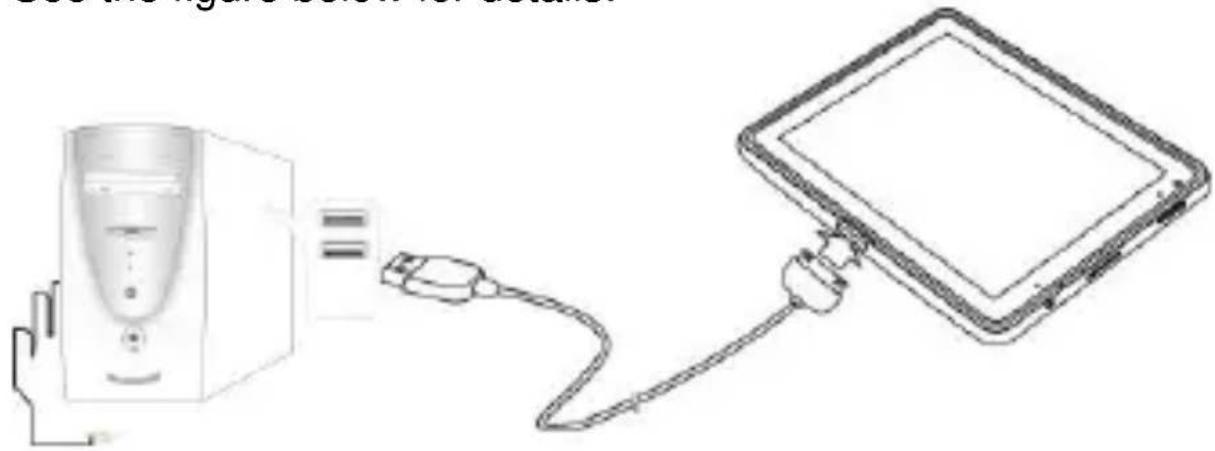
driver on the Microsoft homepage.
9-3 Connecting to Headphone
The tablet PC can be connected to a headphone.


The speaker will turn off automatically after connecting the headphone to the tablet PC. Excessively loud volume could damage your hearing. So turn down the volume before connecting the earphone, and then raise the volume to a comfortable level.
10 Appendix 10-1 Troubleshooting
Q1: How to turn off the tablet PC when the system halts?
A: Press the power button for about 8 seconds to force it off.
Q2: How to check the tablet PC if it cannot be turned on?
A:
- If the battery is low, connect it to a power outlet.
- Make sure the adapter's indicator light is on and the adapter is working properly.
- Remove any external devices.
Q3: What to do if water gets into the tablet PC
A:
- DO NOT turn on the tablet PC.
- Disconnect the power cable to turn off the tablet PC, instead of pressing the power button. Disconnect all external devices, and then send it to a service center for advice.
- DO NOT place the tablet PC into a dirty carrying case again.
Q4: How to restore the factory settings?
A: Go to Settings > Privacy > Factory data reset to restore the system to its default state from the Apps menu.
Q5: How to prolong the usage time of the Battery?
A:
- Adjust the brightness of the Touchscreen to a proper level on the Brightness menu.
- Turn down the volume.
- Set the time amount to a proper level on the Screen timeout menu.
Q6: If the image isn't clear
A: Check that the lens is clear or not; if not, clean it with a soft cloth.
Q7: How to do if the SIM card can't be read? (only for model with 3G function)
A: Please turn off the unit and re-insert the card.
Q8: How to do with the problem like “some problems happen in pairing the Bluetooth”?
A: Be sure whether the time is too long to input the password. (Overtime)
Q9: How to do while the light-sensor is malfunctioning?
A: To turn on Automatic brightness. Please refer to the detailed operation: turn on Settings---Screen---Brightness, tick Automatic brightness.
Q10: Why are Bluetooth, WLAN and 3G disabled? (only for model with 3G)
A: Check if the “Airplane mode” is enabled; if so, the Bluetooth and 3G functions can’t be activated.
10-2 Specifications
| Main Feature | |
| Chipset | NVIDIA Tegra2 T20 |
| Processor | ARM Cortex A9 Dual Core 1 GHz |
| Memory | 1GB DDR3 |
| Operate System | Android 4.0 |
| Storage | |
| Mass Memory | 16GB |
| Display | |
| Size | 9.7" |
| Display Technology | LED Touch-sensitive |
| Resolution | 1024X768 (WXGA) |
| Touch Panel | |
| Type | 10-point Capacitive Touch Panel |
| Camera | |
| Descriptions | Front: 2M pixel; SXGA CMOS; fixed focusBack: 5M pixel; QSXGA CMOS with flash light; auto-focus |
| WIFI | |
| WLAN | 802.11 b/g/n |
| Bluetooth | |
| Bluetooth Specification | V2.1+ EDR |
| Video/Audio Feature | |
| Audio | Stereo |
| Video | HD Output(Supports 1080P Max) |
| Condition | |
| Operating Temperature | 5-35°C |
| Operating Humidity | 35%-85% |
| Storage Temperature | -20-55°C |
| Storage Humidity | 20%-93% |
| Power | |
| Adapter | AC 100~240V; DC 5V/2A |
| Output Power (maximum) | ≤10W |
| Battery (Type) | Built-in Li-Ion Polymer Battery |
| Voltage | 3.7V |
| Port Standard | |
| Audio Port | Headphone Port, Speakers, Built-in Microphone |
| SIM Card Port | WCDMA (3G / UMTS) (only for model with 3G function) |
| Extending Port | Port for a docking station (docking station is optional) |
| Physical Features | |
| Weight | About 0.7Kg |
| Dimension | 242mm x189mm x11.8mm |

Design and specifications are subject to change without notice.
Hotline: +49 (0) 5 11-270 496 90
Address/Contact:
First Service GmbH
Kleine Düwelstr. 21
DE-30171 Hannover
Fax: +(0)5 11-161 25 36
support@firstservice-gmbh.de
www.blaupunkt.de



- DIRECTIONS
- MEANINGS OF ICONS
- CONTENTS
- SAFETY PRECAUTIONS
- KNOWING YOUR TABLET PC
- CARING THE TABLET PC
- TRAVELING WITH THE TABLET PC
- GETTING STARTED
- GET TO KNOW YOUR SYSTEM
- SYSTEM SETTINGS
- COMMUNICATION
- FUN
- SYSTEM CONNECTION
- APPENDIX
- FRONT & SIDE PANEL
- BACK PANEL
- CARING FOR THE TABLET PC
- TOUCHSCREEN
- OTHER ACCESSORIES
- OTHER NOTES
- ATTENTION
- CONNECTING THE POWER ADAPTER
- TURNING ON THE TABLET PC
- HOME SCREEN
- ADD HOME SCREEN SHORTCUTS
- DELETE HOME SCREEN SHORTCUTS
- APPS MENU
- ON-SCREEN KEYBOARD
- WIRELESS & NETWORKING
- AIRPLANE MODE
- WI-FI
- BLUETOOTH SETTINGS
- DEVICE SETTINGS
- PAIRING
- TETHERING & PORTABLE HOTSPOT
- MOBILE NETWORKS (ONLY FOR MODEL WITH 3G FUNCTION)
- ETHERNET CONFIGURATION
- SOUND
- DISPLAY
- LOCATION & SECURITY
- APP
- ACCOUNTS & SYNC
- BACKUP & RESET
- STORAGE
- LANGUAGE & INPUT
- ACCESSIBILITY
- DATE & TIME
- ABOUT TABLET
- BROWSER
- CONTACTS
- CREATE A NEW CONTACT
- OPEN
- CAMERA
- RECORDING
- GALLERY
- IMAGE PLAYBACK
- MUSIC
- INSERTING SIM CARD
- CONNECTING TO PC
- CONNECTING TO HEADPHONE
- APPENDIX 10-1 TROUBLESHOOTING
- SPECIFICATIONS
- ADDRESS/CONTACT
Brand : BLAUPUNKT
Model : Discovery 10BPM3
Category : Tablet