
Breeze - Tablet AOC - Free user manual and instructions
Find the device manual for free Breeze AOC in PDF.


| Type of Product | Tablet |
| Dimensions (L×W×H) | 8.46 × 5.7 × 0.57 in (21.5 × 14.65 × 1.45 cm) |
| Weight | 1.16 lbs (0.525 kg) including battery |
| Display | 8 inch HD TFT LCD touchscreen (resistive single touch), 800 × 600 pixels |
| Operating System | Android OS 2.3 |
| Processor | ARM Cortex-A8 up to 1 GHz |
| Memory | 512 MB RAM, 4 GB built-in Flash storage |
| Storage Expansion | Micro SD (TF) card, up to 32 GB |
| Wireless Connectivity | Wi-Fi IEEE 802.11b/g/n, Bluetooth 2.1+EDR |
| Ports | Mini USB 2.0, OTG, 3.5 mm headset jack, power jack |
| Audio | Built-in microphone, external speaker, stereo headset output |
| Battery | Built-in lithium-ion polymer rechargeable, 3.7 V, 4800 mAh |
| Battery Life (typical) | Audio playback: ~18 hours, Video playback: ~6 hours, Web browsing: ~7 hours |
| Charging Time | ~7 hours with provided charger (power off) |
| Power Adapter | AC input 100-240 V 50/60 Hz, DC output 5 V 2.5 A |
| Accessories Included | USB cable, power adapter, quick start guide, touch pen (×2) |
| Warranty | 1 year for tablet, 6 months for battery (North America) |
Frequently Asked Questions - Breeze AOC
User questions about Breeze AOC
0 question about this device. Answer the ones you know or ask your own.
Ask a new question about this device
Download the instructions for your Tablet in PDF format for free! Find your manual Breeze - AOC and take your electronic device back in hand. On this page are published all the documents necessary for the use of your device. Breeze by AOC.
USER MANUAL Breeze AOC
8" TOUCH SCREEN
VIDEO / CHAT
WEB
music
USB 2.0 PORT
BLUETOOTH
MW0812
USER MANUAL
Table of Contents
CHAPTER 1 PRODUCT OVERVIEW ....1
1.1 Functions overview....1
1.2 Notes ...... 1
1.3 Packaging list ....2
1.4 Technical specifications....3
CHAPTER 2 BUTTONS AND APPEARANCE....5
CHAPTER 3 EASYCONFIG....7
CHAPTER 4 BASIC OPERATIONS....11
4.1 Booting up .... 11
4.2 Shutdown....11
4.3 Network ...... 11
4.4 Locking key ....12
4.5 Reset....12
4.6 Connecting to PC and file transfer....12
4.7 Volume adjustment....12
4.7.1 Adjusting the media volume ....13
4.7.2 Adjusting the alarm volume ....13
4.7.3 Adjusting the notification volume ....13
4.8 Charging ....13
4.9 Touch screen operations ....14
4.10 Search button....14
CHAPTER 5 COMMON FEATURES....15
5.1 Landscape/Portrait display switching ....15
5.2 Using virtual keyboard to type ......16
5.2.1 Android keyboard....16
5.2.2 Editing text....16
5.3 Notification panel....17
5.3.1 Opening notification panel....17
5.3.2 Closing notification panel ....17
5.4 Recently run applications ......17
5.5 Changing wallpaper....18
5.6 Power control ....18
CHAPTER 6 MAIN INTERFACE....19
6.1 Main interface....19
6.2 Applications interface....20
6.3 Browser 21
6.3.1 Opening browser ....21
6.3.2 Going to a webpage .....21
6.3.3 Setting a home page 21
6.3.4 Browsing a webpage....21
6.3.5 Managing bookmarks....23
6.3.6 Other functions....24
6.4 Video player....26
6.4.1 Video playing 26
6.4.2 Delete video ......28
6.5 Audio player ....28
6.5.1 Playlist....29
6.5.2 Playing audio ....29
6.5.3 Sound effects....31
6.6 Picture browser ....32
6.6.1 Browsing pictures....32
6.6.2 Picture file operation....34
CHAPTER 7 APPLICATIONS....36
7.1 Moving a program icon of the interface....36
7.2 Deleting a program icon....36
7.3 Restoring a program icon ....36
7.4 Adding a program icon....36
7.5 Adding a Widget....37
7.6 Creating a folder....37
7.7 Renaming a folder....37
CHAPTER 8 COMMON TOOLS....38
8.1 E-mail....38
8.1.1 Opening e-mail....39
8.1.2 Creating and sending e-mails 39
8.1.3 Receiving and reading e-mail....40
8.1.4 Replying or forwarding e-mail.....40
8.1.5 Managing e-mail 41
8.1.6 Create new account....41
8.1.7 Account settings ....41
8.1.8 Delete e-mail account ....42
8.2 Recorder 42
8.3 Alarm 43
8.3.1 Set alarm ....44
8.3.2 Add alarm....44
8.3.3 Delete alarm 44
8.3.4 Alarm settings....44
8.3.5 Changing alarm display....44
8.4 Calculator....45
8.5 Explorer....45
8.6 Installing applications ....45
8.7 Uninstall application ....45
CHAPTER 9 SETTINGS ....47
9.1 Wireless & network settings....47
9.2 Settings ....51
9.2.1 Wireless & networks ....51
9.2.2 Sound ....51
9.2.3 Display....52
9.2.4 Security ....52
9.2.5 Applications ....53
9.2.6 Accounts & sync ....53
9.2.7 Privacy ....53
9.2.8 Storage ....53
9.2.9 Language & keyboard....54
9.2.10 Voice input & output ....54
9.2.11 Accessibility....54
9.2.12 Date & time....55
9.2.13 Touch screen calibration....55
9.2.14 About device....55
CHAPTER 10 USING MICRO SD (TF) CARD....56
CHAPTER 11 CONNECTING TO USB DRIVE ....57
CHAPTER 12 ABOUT THE BATTERY AND POWER....58
CHAPTER 13 FIRMWARE UPDATING / RESETTING TO FACTORY ....59
CHAPTER 14 FREQUENTLY ASKED QUESTIONS....60
CHAPTER 15 TROUBLESHOOTING....62
Chapter 1 Product Overview
1.1 Functions overview
- 8 inch wide screen True Color TFT touch screen with a high resolution of 800*600 pixels.
- Surf the Internet wirelessly via Wi-Fi to enjoy the Internet on the go.
- Support all mainstream e-mail services for more convenient e-mail sending and receiving.
- Switching between portrait mode and landscape mode is possible through gravity sensing. Four-direction rotation display is supported.
● Support Video Player, Audio Player, Photo Browser and Shelves.
● Equipped with a built-in microphone, enabling audio-recording. - Eco settings enables the brightness to be freely adjusted.
1.2 Notes
- Do not use the unit in an overly hot, cold, wet, or dusty environment. Do not expose it to sunlight.
- Try not to use this unit in an environment with a strong magnetic field or static electricity.
- Avoid dropping this unit or strong impacts.
- The adapter of this product should not be dropped and splashed with liquid. Any object filled with liquid, such as a vase, should not be placed on the top of it.
- There are no user-serviceable parts inside the product. Do not dismantle this unit. Otherwise, the warranty may be voided. Contact servicing personnel if you need help.
● The battery life may vary depending on the use condition and production time. - It is not allowed to replace the battery of the product yourself. Do not dismantle the unit yourself. Explosion may occur if the battery is not properly replaced. Contact the
professional servicing personnel.
- As the workmanship of motherboard manufacturers are different from each other, it is recommend to perform charging using the adapter provided, instead of using the USB port of the motherboard, to ensure charging stability.
- The long life of a lithium battery is due to its much smaller memory effects than that of the regular Nickel-Cadmium battery. But if the lithium battery is degrading, contact the local Service Center directly.
- If the battery is improperly replaced, an explosion may occur. Only use the same brand battery or equivalent for replacement.
- The company is not liable for the data loss or deletion on machine resulting from the misuse of software, improper operation of the battery, servicing, other accidents, or other indirect loss thereof.
- The actual product may be different from that described in the Instructions due to the software update. These Instructions are for informational purposes only.
● This being a mobile product, we recommend you back-up your data regularly.
1.3 Packaging list
AOC Breeze Tablet Unit X1
USB cable X1
Power adapter X1
Quick Start Guide X1
About the Touchscreen X1
Warranty Statement X1
Touch Pen X2
Note: The actual accessories provided with the product may vary.
1.4 Technical specifications
Basic specifications
| Model no. AOC Tablet | MW0812 |
| Installed OS | Android OS 2.3 |
| Processor (CPU) | ARM Cortex-A8,Cpu Frequency Up To 1G Hz |
| Memory 512MB | |
| WLAN | WI-FI IEEE 802.11b/g/n |
| Bluetooth | Bluetooth 2.1 + EDR |
| Storage capacity Built-in | 4GB Flash Memory |
| Expansion cards | Micro SD (TF) card, up to 32 GB. |
| LCD | 8 inch HD TFT LCD touch screen (resistive single touch) with a resolution of 800*600 pixels |
| Audio output | Headset: Stereo output; internal speakers: Mixed output. |
Power specifications
| Voltage | Supply voltage: 5V Charging voltage: 5V |
| Current | Max. current for playback is 1A DC.Max. current for charging is 1A DC. |
| Battery used | Built-in lithium-ion polymer rechargeable battery, 3.7V, 4800mAh |
| Power adapter | AC input: 100-240V 50/60Hz DC input: 5V 2.5A |
| Charging time | It takes about 7 hours for the battery to be fully charged when the provided charger is used with power-down. The charging time may vary depending on the remaining battery level.Note: Do not charge the battery for more than 12 hours when the charger is used. |
| Battery use time(Under the condition that the battery is fully charged in a normal temperature) | Audio: About 18 hoursVideo: About 6 hoursWeb browsing: About 7 hours |
External dimensions
| Dimension (L×W×H) | 8.46 x 5.7 x 0.57 in (21.5 x 14.65 x 1.45 cm) |
| Weight | 1.16 lbs (0.525kg) (with battery) |
| Port | Mini USB 2.0 high speed port, OTG, 3.5mm headset |
Environmental conditions
| Operating temperature | 0°C ~ 40°C |
| Storage temperature | -20°C ~ 55°C |
| Max. humidity | 90% RH (non-condensation) |
| Supported OS | Windows2000/XP/Windows 7/Vista, Macintosh OS X] |
Note: Windows 2000+SP1/SP2 is not supported by this product. The user should upgrade to SP3 or above. This product does not guarantee all video formats are playable. Even if some formats are listed in the Instructions, they may be not properly played. This is normal.
Chapter 2 Buttons and Appearance

| A. Power button | B. Volume “+” and “-” buttons |
| C. Operation indicator | |
| D. Home button: Press to return to the main interface; press and hold to bring out the 8 applications recently run. | |
| E. M button (Menu button): Open the corresponding menu. | F. Back button |
| G. Built-in MIC Recording | H. Touch screen (“Screen”) |
| I. External speaker | |

| J. Headset jack | K. MINI USB port (connecting to PC) |
| L. OTG port (connecting to USB drive) | M. TF card slot |
| N. Power cable jack | O. Reset button |
Note 1: During operation, sounds will be automatically output from the external speaker if there is audio output.
Note 2: In the Instructions, "Press" means tapping a button while "Press and Hold" means continuously pressing a button for 2 3 seconds.
Note 3: The Volume “+” and “-” icons, Back icon, and Menu icon function as the “volume adjustment button”, “back button” and “menu button” on the top and front of the unit. You can make selections based on your preferences. They will not be described in the sections below.
Chapter 3 EasyConfig
When first using the tablet breeze, the EasyConfig window will pop up. It includes Language, Date/Time, Calibration and Wi-Fi settings.

Tap "Click" to setup language, then choose a language you want. If the settings take effect, the "Default Language" bar will show the choice.

Tap "Click" to go to "Date & time settings" interface to setup date, time zone and time.
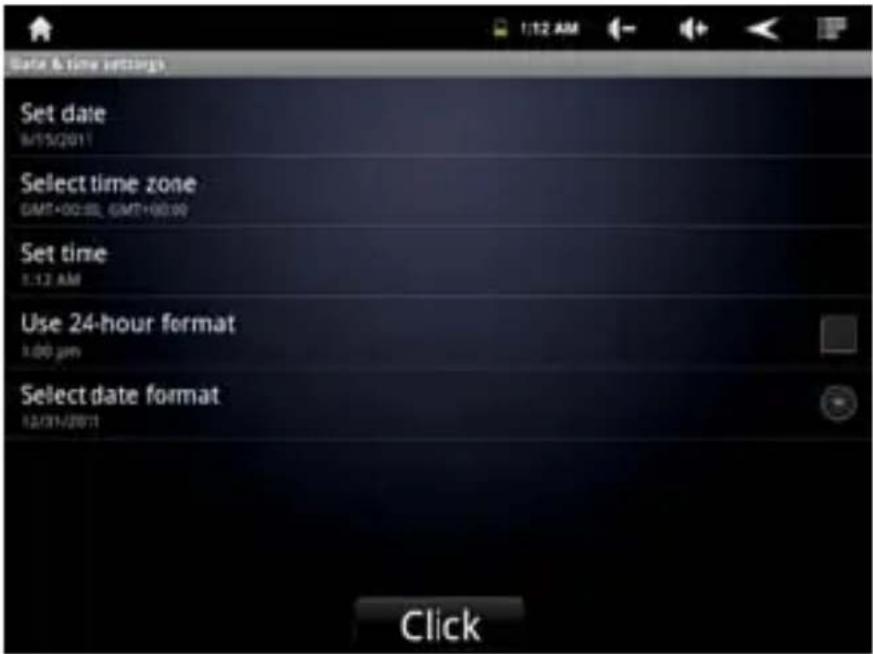
Tap "Click" to setup calibration, then set the touch points according to the steps in the on-screen prompt.

When the calibration setting is successful, the wi-fi settings window will pop up.

Press the M button to configure the "Scan" or "Advanced" settings for Wi-Fi network.
Scan: Search for the available wireless networks in the vicinity.
Advanced settings:
- Tap "Advanced" to set the network address within the IP locale.
- Select "Use static IP" to configure the network settings and enter the IP address, gateway,

network mask, and DNS1 required for Wi-Fi network connection.
After configuration, press the M button, tap "Save" to exit to the the wi-fi settings interface with saving.
Note: When you use dynamic IP addresses, you do not have select "Use static IP addresses" to configure the network settings.
Tap the wireless network you want to connect to. If the connection status under the name of wireless network shows “Connected”, the network connection is successfully. Then tap “End” to finished the easyconfig.
Chapter 4 Basic Operations
4.1 Booting up
Press and hold the Power button for about 2 seconds. After the boot screen is shown (for about 1 minute), the unlock interface is shown. Tap and hold the unlock icon at the bottom left corner of the screen and drag it upward to the dot to unlock it. Once unlocked, the main Interface will be shown.
4.2 Shutdown
In any mode, Press and hold the Power button for about 2 seconds. The device shutdown options will appear:
a. Tap "Power off" to turn off the product.
b. Tap "Silent mode" to turn on or turn off all sound except media & alarms.
Note 1: If the battery is low, the product will shutdown automatically.
Note 2: If the product is connected to the charger, disconnect the charger and perform the shutdown operation again.
Note 3: If the product crashes during operation, press and hold the Power button for 6 seconds to force shutdown.
Note 4: During operation, press the Power button for 1 second to enter Standby mode.
4.3 Network
To surf the Internet wirelessly, make sure the Wi-Fi wireless network signals are present and set the Wi-Fi network connection. There are two ways of going to the
"Wireless & Networks" settings interface:
a. Press the M button in the main interface and tap "Settings->Wireless & Networks".
b. In the main interface, tap the “ ” icon at the right to go to the applications interface, and tap “Settings->Wireless & Networks”.
Note 1: Turn on Wi-Fi in an area where the Wi-Fi wireless network signals are present.
After successful connection, you can surf the Internet through your browser.
Note 2: For detailed settings, refer to "8.1 Network Connection".
4.4 Locking key
During use, you can lock the keypad to lock the keys and touch screen to avoid accidental operation.
Lock: Press the Power button to lock.
Unlock: Press the Power button. After the screen lights up, tap and hold the unlock icon at the bottom left corner of the screen and drag it upward to the dot to unlock it.
Once unlocked, the main Interface will be shown.
4.5 Reset
If the product crashes during operation, you can tap the Reset button on the side to reset the system.
Note: Under normal operation, do not use the Reset button as the Shutdown button.
4.6 Connecting to PC and file transfer
When the product is on, plug the smaller end of the provided USB cable to the MINI USB port on the side, and the larger end to the USB port of PC for the use of the removable disk and data transfer. Then the USB connected interface will pop up, tap "Turn on USB storage". When the word changed to "Turn off USB storage", the connection is successful. You may copy music and video files to the product directly without using third party programs. Finally, tap the "Safely Remove Hardware" icon at the bottom right corner of the PC screen to remove the device safely.
Note: After the product is connected to PC, you can still surf the Internet via Wi-Fi but you cannot play video, music, pictures, or recording voice involving the Flash drive and TF card.
4.7 Volume adjustment
Media volume: Adjust the volume for playing music and video.
Alarm: Adjust the volume of alarm.
Notification volume: Adjust the volume of notification ringtones.
4.7.1 Adjusting the media volume
There are two ways of going to the "Media Volume" adjustment interface:
- In any interface, press or press and hold the Volume +/- button on the top of the product to adjust the media volume.
- In the main interface, press the M button, tap “Settings -> Sound -> Volume”, tap the media volume bar to adjust the volume after the Volume window appears.
4.7.2 Adjusting the alarm volume
There are two ways of going to the "Alarm Volume" adjustment interface:
- In the main interface, press the M button, tap "Settings -> Sound -> Volume", tap the alarm volume bar to adjust the volume after the Volume window appears.
- In the alarm application, press the M button, tap “settings -> Alarm volume”, tap the alarm volume bar to adjust the volume.
4.7.3 Adjusting the notification volume
In the main interface, press the M button, tap "Settings -> Sound -> Volume", tap the notification volume bar to adjust the volume after the Volume window appears.
4.8 Charging
When the battery is low, the provided adapter can be used to charge it.
-
If the product is powered on during charging, the status bar will show the charging icon ( ). After the battery is fully charged, the bar will show the full battery icon ( ).
-
If the product is shutdown during charging, the large charging icon interface will be displayed. After the battery is fully charged, the full battery icon( )will be shown; in the large charging icon interface, press the Power button according to the prompts to turn on.
Note 1: Check the detailed charging percentage through "Settings->About Device->Status->Battery Level".
Note 2: To extend battery life, avoid charging the battery frequently when it is in high
level. (example: more than 90%) It is not recommended to charge the product at this time; if charging is performed at this time, the percentage shown may not be 100%. This is normal.
Note: Please charge timely to ensure the device works well, when the battery is low.
4.9 Touch screen operations
Tip: The display used in this product is a resistive single touch screen. When using, you can operate it by using the buttons on its body or tapping the corresponding buttons on the display with a pen or finger to enable the corresponding functions.
Tap
Tap the screen buttons to release. When you want to use the on-screen keyboard to type, or press the on-screen buttons, touch them using your finger.
Tap and hold
Touch the screen button continuously until the option expands.
Slide
Place and slide your finger on the screen. Slide your finger up or down to scroll up or down; or if the list has a scroll bar, slide your finger up or down in the list to page down or up; when you are browsing pictures, slide your finger to the left or to the right to view the previous or next picture.
4.10 Search button
In the main interface, press the M button and tap the "Search" button to search for the relevant information using the browser.
Chapter 5 Common Features
5.1 Landscape/Portrait display switching
-
In the “Settings” interface, tap “Settings -> Display ->Auto-rotate screen.” When the “√” symbol appeared, the Landscape/Portrait screen display switching is on; when the “√” symbol disappeared, the Landscape/Portrait screen display switching is off.
-
Hold this product vertically with your hands and tilt it to the left or right. When it is tilted to a position 90^ to the horizontal plane, the gravity sensor built in the product senses the action and the screen switches to Portrait mode from Landscape mode.
On the contrary, when it is tilted to a position 0^ to the horizontal plane, the screen switches to Landscape mode from Portrait mode.

Tip: This product supports 4-direction rotation display.
Note 1: For gravity sensing (display orientation), the screen orientation will not change if this product is placed on the level and stationary surface, regardless of how you rotate the product.
Note 2: For some interfaces, such as the main interface, video player interface, and online video interface (full screen mode), gravity sensing will be disabled.
5.2 Using virtual keyboard to type
Tap any text input box to pop up the virtual keyboard as shown below. Use this keyboard to type any text or characters.
5.2.1 Android keyboard
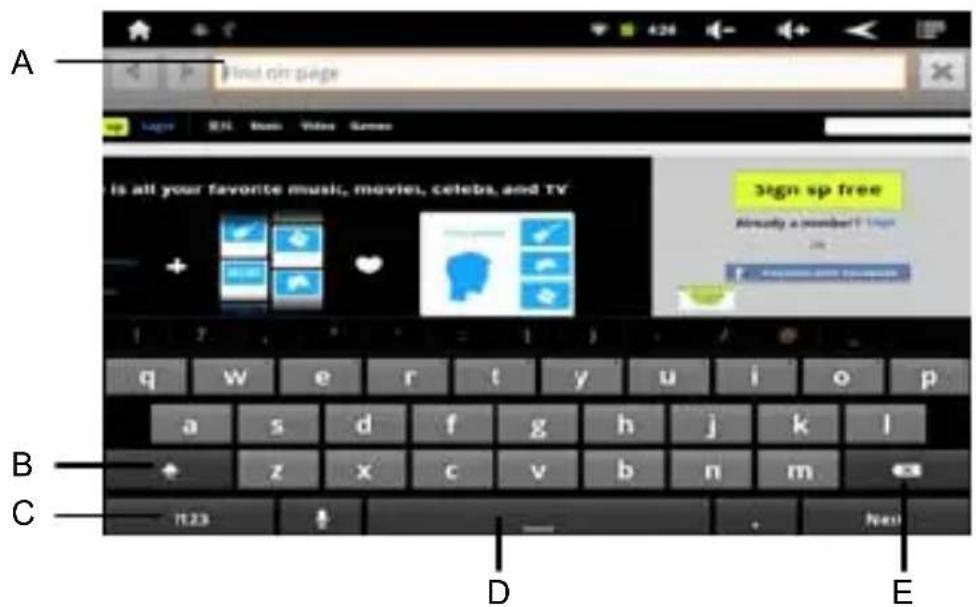
| A. Show box: Show the text typed. Tap and hold this box to display the Edit Text menu for you to cut, copy, and paste the text. Switching between input methods is also possible. |
| B. Tap this button to switch between uppercase and lowercase text. |
| C. Tap this button to switch between numeric keypad and symbol keyboard; For numeric keypad and symbol keyboard, tap the ATL button to display the special symbols (such as ~, ±, ÷, ×,etc.). |
| D. Tap this button to input space. |
| E. Tap to delete the edited text. |
Tip: During the input process, you can move the cursor by tapping a position.
5.2.2 Editing text
The typed text can be edited.
When there is text in the input field, tap and hold the input field (or tap and hold the show box in the keyboard) to open the Edit Text menu. Tap the options in the menu to edit the text.
| Select word | Select one word |
| Select all | Select all text typed |
| Cut | Cut text typed |
| Copy Copy text typed | |
| Paste | Paste cut or copied text |
| Input method Select the Input method | |
| Add “*” to dictionary | Add the text you type to the dictionary. |
5.3 Notification panel
The notification icon appears when a message is received, PC is connected, or music is played. You can open the notification panel to check for messages and played music.
5.3.1 Opening notification panel
After a new notification icon appears in the status bar, tap and hold the status bar and slide your finger downward to open the notification panel.
Tip: In the interface, press the M button and tap "Notifications" to open the notification panel.
5.3.2 Closing notification panel
Tap the control bar at the bottom of the notification panel and slide your finger up on the screen or press the Back button.
5.4 Recently run applications
Press and hold the Home button to show the 8 applications recently run. Tap the icon in the window to open the corresponding application.

5.5 Changing wallpaper
In the main interface, press the M button and tap "Wallpaper," and choose the desire wallpaper from "Live wallpapers", "PhotoBrowser" or "wallpapers".
5.6 Power control
In the main interface, tap and hold the space to pop up the "Add to Home screen" menu, and tap "Widgets → Power Control" to go to the power control interface (as shown below):

| A. Wirelessnetwork on/off | Tap to turn on or off the wireless network. |
| B. Bluetooth | Tap to turn on or off the Bluetooth. |
| C. Sync button | Tap to set whether the wireless network can be used together with other programs. |
| D. Brightnessadjustmentbutton | Tap to adjust the screen brightness. |
Chapter 6 Main Interface
Make sure the Wi-Fi wireless network connection is established to use the following functions.
6.1 Main interface

After booting and unlocking, you can go to the main interface (as shown below).
| A. Notification | Tap the space in the taskbar to show the date.Tap and hold this taskbar and scroll down to see notifications. |
| B. Quick search choice | Tap to choose a search choice. |
| C. Quick search box | Tap to pop up the input keyboard. |
| D. Voice Search | Tap to enter voice search. |
| E. Home button | Tap this icon to return to the main interface |
| F. Wi-Fi signal After the | Wi-Fi network connection is established, |
| indication the signal indication | cation icon appears. When the Wi-Fi network is disconnected, the icon disappears. |
| G. Battery info | Display the current remaining battery level |
| H. Time display | Display the system time |
| I/J. Volume adjustment | Tap to adjust the volume |
| K. Back | Tap to return to the previous level |
| L. Menu button | Tap this icon to open the corresponding menu |
| M. Main interface | Tap this icon to go to the main interface |
| N. Applications | Tap this icon to go to the “Applications” interface |
| O. Interface switching | Tap to switch between interfaces Tap and hold to display the thumbnails of all Interfaces |
6.2 Applications interface
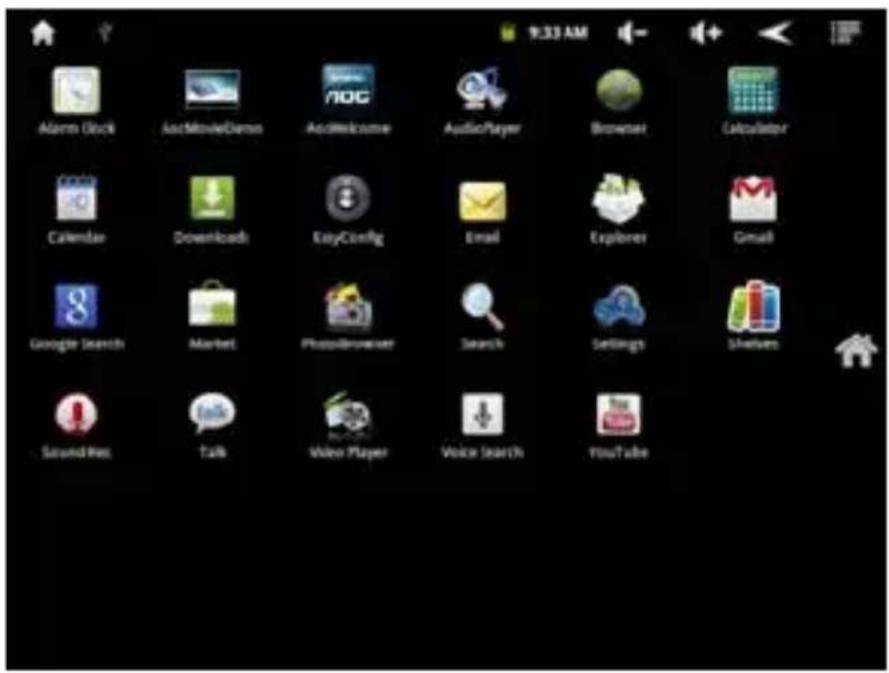
Tap the “ ” icon at the right of the main interface to go to the applications interface, as shown below:

6.3 Browser
Open the browser to enjoy a colorful experience. You can also access news, weather forecast, and sports or traffic information when needed.
6.3.1 Opening browser
In the main interface, tap "Browser" to open a webpage.
Tip: When you tap a webpage link in an e-mail or message, the browser will be opened automatically.
6.3.2 Going to a webpage
-
Type a URL using the keyboard.
-
Tap the "Search" button at the bottom right of the virtual keyboard to open a webpage.
6.3.3 Setting a home page
- Press the M button and tap "More->Setting->Set home page".
- Enter the URL of the webpage or tap "use current page" as home page and tap "OK".
Tap the Back button to return to the previous page. Press the M button, and tap "Windows" to close the currently browsed page, and you can go to the newly set home page.
6.3.4 Browsing a webpage
A browser provides many functions, allowing you to browse a webpage as you do on a PC:
You can simultaneously open several pages and tap one of them to browse;
You can slide your finger around the screen to browse other areas of webpage;
You can also zoom in or out of a webpage for easier browsing;
Press the Back button to return to the previous page;
Press the Menu button to display menu options.
Playing on webpage
Slide your finger on the screen to enable zoom control.

Open new browser window
You can open several browser windows, allowing you to browse between several websites easily. Up to 8 browser windows can be opened.
To open a new window, press the M button, and tap "New Window" to open a new browser window and go to the preset home page.
Tip: If more than two browser windows have been opened, press the M button, and tap "Windows -> New window" to add more browser windows.
Switching between browser windows
- In the browser interface, press the M button, and tap "Windows".

- Tap a URL shown in the window list to switch to the selected webpage. Tap "X" to close the open window.
Selecting link in webpage
The selected link will be put in an orange box.
- Tap it to open a webpage.
- Tap and hold to open the Actions menu, bookmark links, save links, share links, and copy link URL.
Finding text on a webpage

- When browsing a webpage, press the M button and tap "More->Find on Page"
- Type the item to be found. After the content is typed, the shade of the text of the matches is highlighted in green. Tap “◀” or “▶” to skip forward or backward one match. Tap “×” to finish finding.
6.3.5 Managing bookmarks
Bookmarks can be stored while browsing a webpage. In the browser interface, press the M button and tap "Bookmarks" to go to the bookmark management interface where there are three tabs: Browser, Most Visited, and History.

Adding bookmark
- Open the webpage you want to bookmark.
- There are three ways of bookmarking:
- Press the M button, tap the "Bookmarks" button, and tap "Add" at the top of the bookmark interface.
- In the Bookmark tab, press the M button and tap "Bookmark last-Viewed Page".
- Press the M button, tap "More" and tap "Add Bookmark".
- Edit the name of the bookmark if necessary and tap "OK" to add a bookmark.
Opening bookmark
- In the browser interface, press the M button, and tap "Bookmarks".
- In the bookmark interface, perform any of the following steps to open a bookmark:
• Tap the bookmark you want to open.
- Tap and hold the bookmark you want to open, and tap "Open" or "Open in new window".
Editing bookmark
- In the browser interface, press the M button, and tap "Bookmark".
- In the bookmark interface, tap and hold the bookmark you want to edit.
- Tap "Edit Bookmark" in the options to show the Edit Bookmark window.
- Enter your desired changes and tap "OK" to finish editing.
Using bookmark
In any tab, tap and hold a website option in the list to pop up the Actions option: Open, Open in New Window, Add Shortcut to Main Screen, Share Links, Copy Link URL, Delete bookmark, and set as Home Page.
6.3.6 Other functions
In the browser interface, press the M button, and tap "More" to perform more operations: Add Bookmark, Find on Page, Select Text, Page info, Share Webpage, Download, Settings, etc.
Setting options:
page content settings
| Text size | Tiny, Huge, Small, Normal, and Large are selectable. |
| Default zoom | Far, Middle, and Close are selectable. |
| Open pages in overview | Show overview of newly opened pages |
| Text encoding | Select the encoding type of text |
| Block pop-up windows | Select whether the pop-up window should be blocked. |
| Load images | Display images on web pages |
| Auto-fit pages | Format web pages to fit the screen |
| Landscape-only display | Display pages only in the wider, landscape screen orientation |
| Enable JavaScript | Enable JavaScript language |
| Enable plug-ins | Allow plug-ins in a webpage |
| Open in background | Open new windows behind the current one |
| Set home page | Set a webpage URL |
Privacy settings
| Clear cache | Clear locally cached content and databases |
| Clear history | Clear the browser navigation history |
| Accept Cookies | Allow sites to save and read “Cookie” data |
| Clear all Cookie data | Clear all browser Cookies |
| Remember form data | Remember data I type in forms for later use |
| Clear form data | Clear all the saved form data |
| Enable location | Allow the website to access your locationInformation |
| Clear location access | Clear location access for websites |
Security settings
| Remember passwords | Save usernames and passwords for websites |
| Clear passwords | Clear all saved passwords |
| Show security warning | Show warning if there is a problem with a site's security |
Advanced settings
| Set search engine | Select a search engine |
| Website settings View advanced settings for individual websites | |
| Reset to default Clear all browser data and reset all setting to default settings | |
| User agent Select a agent. | |
6.4 Video player
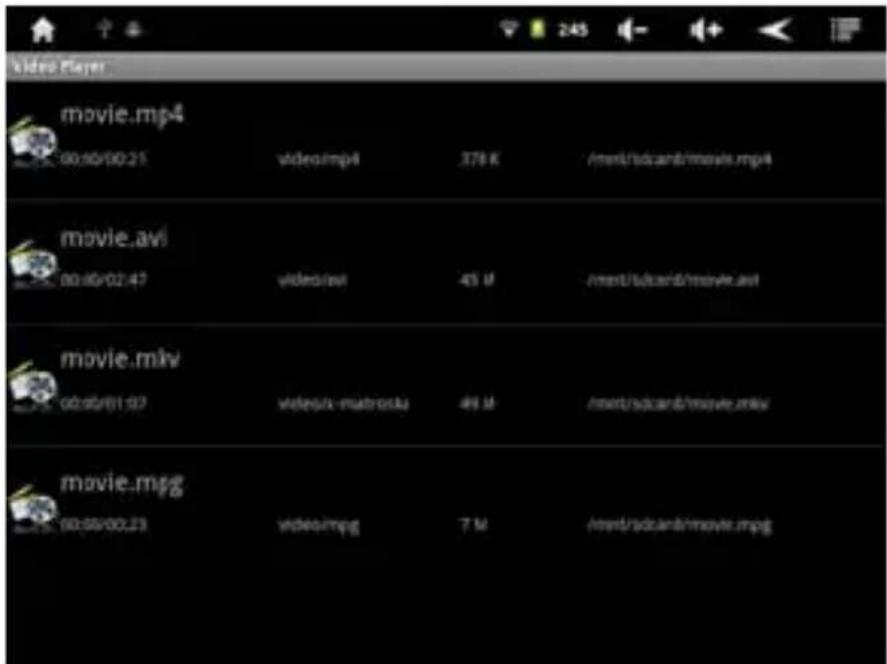
In the main interface, tap "Video Player" to go to the video file list.
6.4.1 Video playing
In the file list, slide your finger up and down to find the videos you want to play. Tap them to play.
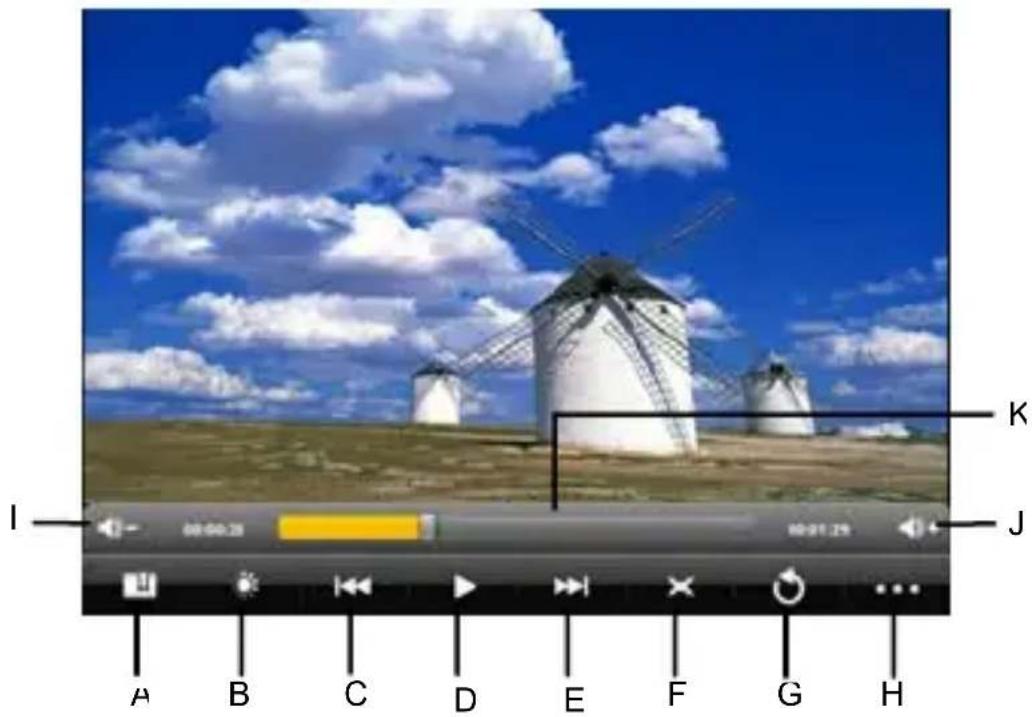
Tap the screen to show the Hide menu:
| A. Add video bookmark | B. Adjust screen brightness | |
| C. Tap: Previous video fileTap and hold: Rewind | E. Tap: Next video fileTap and hold: Fast forward | |
| D. Play/pause | G. Return to the video list | |
| F. Screen extension: Tap to selectFull Screen, Normal,16:9, 4:3 | I/J. Decrease/increase volume | |
| H. More | Delete bookmarks and play from the beginning of the title | Tap this option to delete the video bookmarks and play from the beginning of the title |
| Delete bookmark | Delete the video bookmarks and continue playing | |
| Play mode | Select Repeat mode | |
| Help | Tips button function | |
| Return | Return to the Play interface | |
| K. Playprogress bar | Tap any position of the play progress bar to skip to this position; tap and hold it to move to any position to continue playing. | |
Note 1: It takes a longer time to play a larger video file. Convert video files that exceed the max. resolution supported by the unit.
Note 2: For some supported video sources, a few video files that are partly damaged may not be played by the unit. Convert them on the PC and play the converted files by this unit.
Note 3: This product does not guarantee that all kinds of video files are supported. While some are only recognizable in the system and played, we do not promise to provide further support or services; advanced features, such as fast forward and rewind, may not be used for individual video files.
6.4.2 Delete video
In the video file list, tap and hold the video you want to delete, and tap "Delete->Yes" to delete the video file.
6.5 Audio player
In the main interface, tap "Audio Player" to go to the audio file list.

| Artists Sort by “Artist” | |
| Albums | Sort by “Album” |
| Songs | Display the all music stored on built-in Flash memory, SD card and USB device |
| Playlists Display the play list | |
| Now playing | Go to the currently played music file |
6.5.1 Playlist
In the music file list, tap "playlists" to go to the playlist.
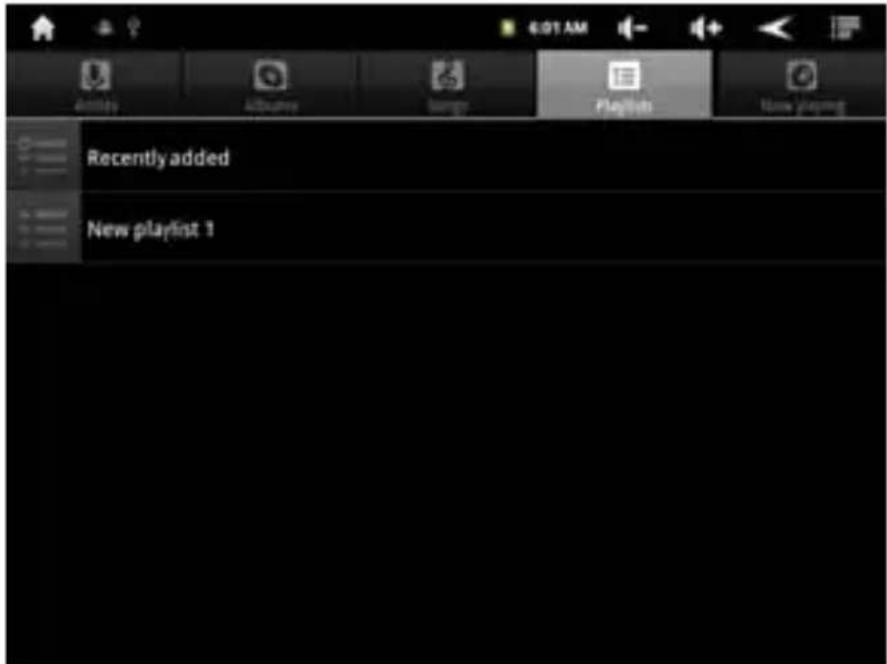
Tap and hold "Recently added" to play or edit the time of the "Recently added" list.
In the music file list, tap and hold a song or a folder, then tap "Add to playlist" to add the song to a new playlist or other playlist.
Tip: You cannot delete the "Recently added" list.
6.5.2 Playing audio
Tap the music you want to played and go to the music playing interface.
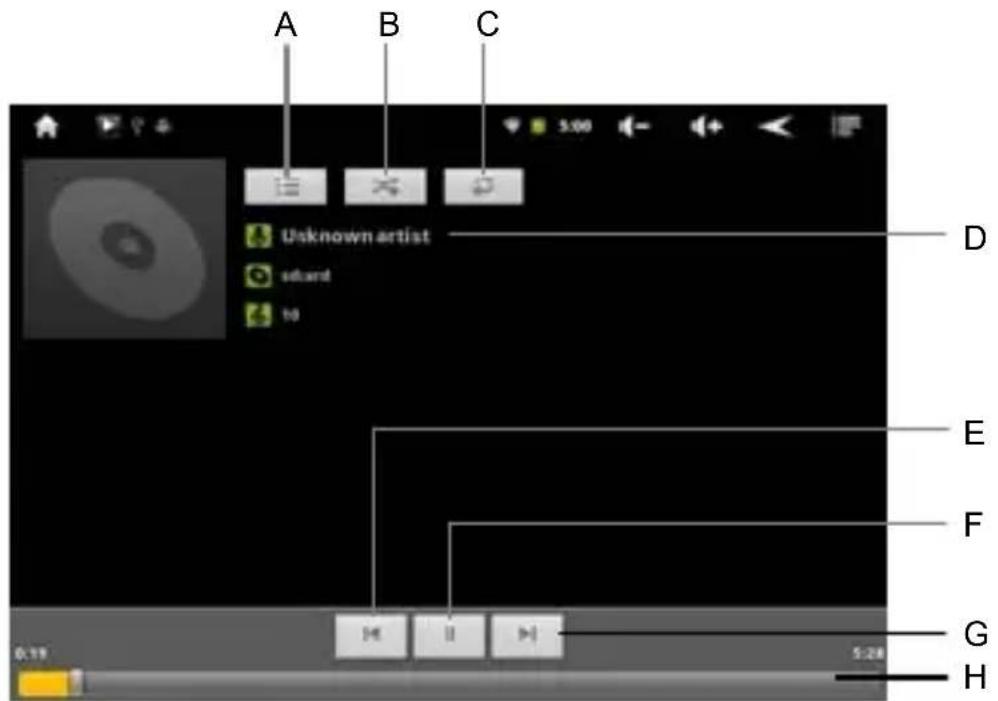
| A. Play list | Tap to open the playlist. |
| B. Shuffle | Playing songs at random mode. |
| C. Play mode | A. Stop after the end song is played. |
| B. Repeat playing all songs in the current directory. | |
| C. Repeat playing the selected single song. | |
| D. File info | When the network connection is established, tape it to check the link information about the currently played music file. |
| E. Rewind/previous | Tap: Switch to the previous song Tap and hold: Rewind |
| F. Play/pause | Play/pause music |
| G. Fast forward/next | Tap: Switch to the next song Tap and hold: Fast forward |
| H. Play progress bar | Tap any position of the play progress bar to skip to this position; tap and hold it to move to any position to continue playing. |
6.5.3 Sound effects
In the music playing interface, press the M button and tap "Sound effects" to go to sound effects settings interface.
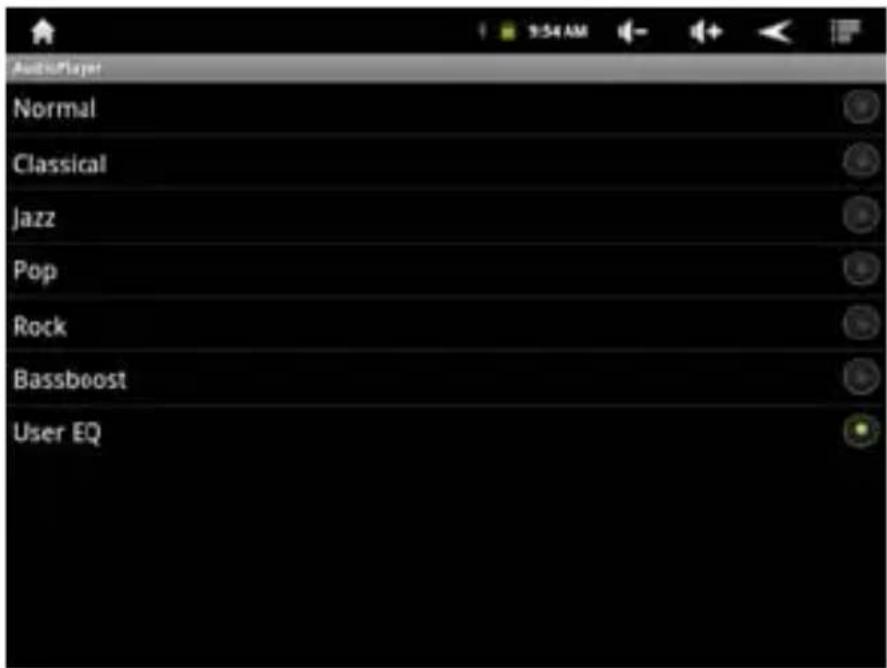
Tap "User EQ" to go to User EQ Select interface. Set your favorite sound effects by sliding your finger left and right on the sound effect bar.

bar
| User EQ Select | Frequency Deviation | | -------------- | ------------------- | | -13 dB | 0 dB | | -15 dB | -3 dB | | -15 dB | -5 dB | | -13 dB | -3 dB | | -13 dB | -2 dB | | 0 dB | 13 dB | | 13 dB | 0 dB | | 15 dB | 15 dB | | 15 dB | 15 dB | | 12 dB | 12 dB | | 13 dB | 13 dB |Note: Few MP3/WMA audio files that are specifically encoded may not be played by the product. Convert them using the audio conversion tool and download the converted files to the product to play.
6.6 Picture browser
In the main interface, tap "Photo Browser" to go to the picture list.

natural_image
Grid of 25 colorful flower images displayed on a blue background, no text or symbols visibleTip: The system will automatically search for all pictures on Flash memory, SD card and USB device and display them as folders.
6.6.1 Browsing pictures
In the directory, tap the pictures you want to browse to open the picture browsing interface.
Tap the screen to pop up or hide the menu:
| A. Slideshow | Automatically browse pictures. |
| B. Menu Tap to show the menu options. | |
| C. Zoom in left/right/up/down on the screen to move the picture left/right/up/down. | |
| D. Zoom out | Zoom the picture out to normal size if it has been zoomed in. |

Press the M button to show the menu options
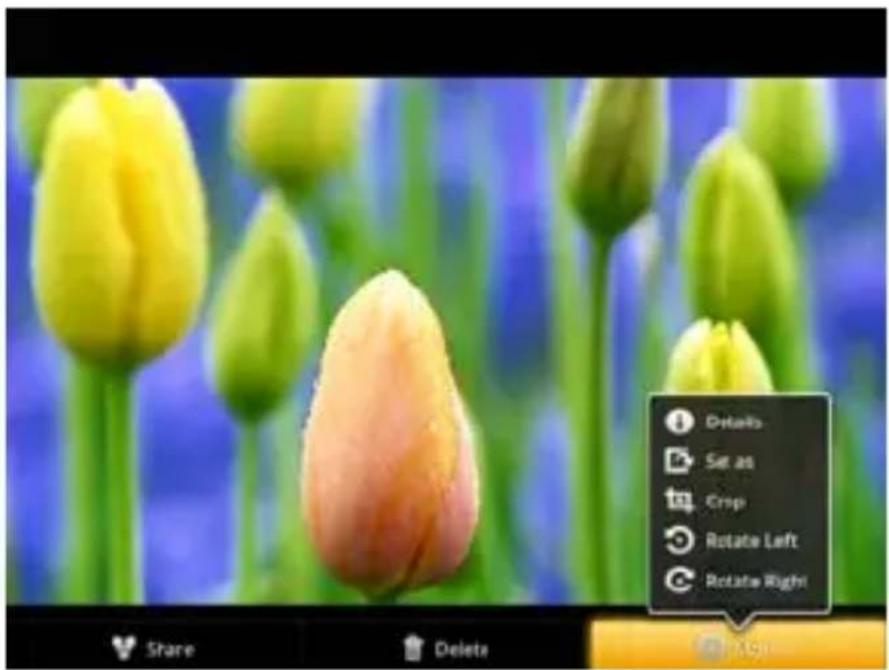
| Share Share the picture through Picasa, Bluetooth or email | |
| Delete Delete the current picture. | |
| Details Show the name of the picture file, its resolution, etc. | |
| Set as Set the picture as desktop background. | |
| Crop Cut the picture. | |
| Rotate right rotate the picture clockwise in the following order:90°, 180°, 270°, Restore. | |
| Rotate left | Rotate the picture 90°anti-clockwise. Tap this button to rotate the picture anti-clockwise in the following order: 90°, 180°, 270°, Restore. |
Tip: When browsing pictures, you can slide your finger to the left or right rapidly to switch to the previous or next picture.
6.6.2 Picture file operation
In the picture list, tap and hold a picture or a folder to pop up the file operation list.

| Select All | Select all the pictures. After select you can share, delete or rotate the selected pictures. |
| X Items Show the number of the selected picture. | |
| Deselect All Cancel all the selected pictures. | |
| Share | Share the picture through Picasa, Bluetooth, Gmail or Email. |
| Delete Delete the selected picture. | |
| Rotate right | Rotate the selected picture 90° clockwise. Tap this button to rotate the picture clockwise in the following order:90°, 180°, 270°, Restore. |
| Rotate left | Rotate the selected picture 90°anti-clockwise. Tap this button to rotate the picture anti-clockwise in the following order: 90°, 180°, 270°, Restore. |
Chapter 7 Applications
In the main interface, click “ [icon]” on the menu sidebar to go to the “Applications” interface in which the installed applications will be shown. Click the “icon” icon to return to the main interface.
7.1 Moving a program icon of the interface
To move a program icon to other interfaces, tap and hold the program icon and the screen will switch to another interface. At this time, place the icon to the desired position and release.
7.2 Deleting a program icon
In the applications interface, tap and hold the program icon you want to move. When the “ ” at right of the screen appears, tap and hold the icon, and drag it to “ ” to delete it.
7.3 Restoring a program icon
Tap and hold the space of the main interface, tap "Shortcuts-Applications", and tap a program to be deleted.
7.4 Adding a program icon
Tap and hold the space of the main interface, tap "Shortcuts-Applications," and tap a
program icon you want to add to the interface; or press the M button on the product to show the menu options and tap "Add" to add program icons.
7.5 Adding a Widget
Tap and hold the space of the main interface, tap "Widgets" and tap the icon you want to add to the desktop.
7.6 Creating a folder
Create a folder in the interface to store the application icons or controls.
Tap and hold the space of the main interface, and tap "Folders" to create a folder in the interface. Tap and hold a program icon on the screen and drag it to the folder.
Tip: To delete a folder, refer to the steps described in "Deleting a program icon".
7.7 Renaming a folder
Open a folder, and tap and hold the title bar to pop up the Renaming Dialog where you can enter a name, and tap OK.
Chapter 8 Common Tools
8.1 E-mail
When you use the e-mail for the first time, you need to create an e-mail account first.
- Enter the address and password for your e-mail account and tap "Next".
- Select an account type. Tap "POP3" for a POP3 account.

- Tap "POP3 Server" and enter "pop.+ account suffix". For example, if the e-mail account is 123456@163.com, enter "pop.163.com" and tap "Next".
Note: If you select IMAP Account in step 2, tap "IMAP Server" and enter "IMAP.163.com".
- Tap "SMTP Server," enter "smtp.+ account suffix," for example "smtp.163.com", and tap "Next".

- Enter the account name, and username to finish settings.
Note: Since the e-mail service providers may vary, configure the server settings based on the actual e-mail account. This product can support the accounts provided by the popular e-mail service providers, such as yahoo, sohu, etc.
8.1.1 Opening e-mail
In the "Tools" interface, tap "E-mail" to enter.
Tip 1: By default, this product can be used to browse the inbox after the e-mail application is performed. All e-mails you received will be put into the inbox.
Tip 2: Tap "Load more messages" to send or receive a new e-mail and synchronize your e-mails with your Internet e-mail accounts.
8.1.2 Creating and sending e-mails
-
Press the M button and tap the "Compose" button.
-
In "Receiver", enter the e-mail address of the receiver.
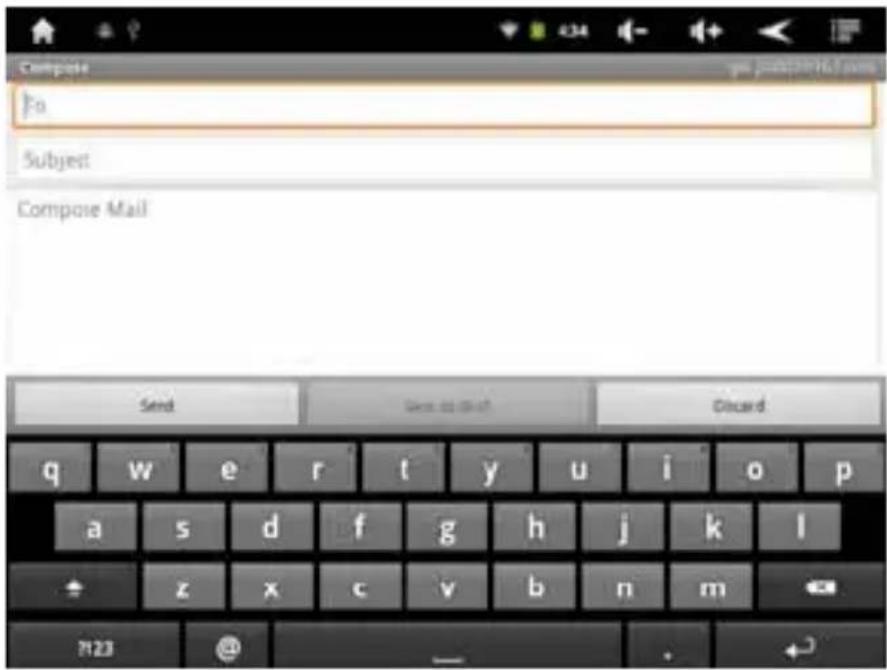
Tip: If you want to send a carbon copy or a blind carbon copy e-mail to other recipients, the M button and tap "Add Cc/Bcc".
- Enter the e-mail subject and compose your e-mail.
Tip: If you want to add a picture attachment, press the M button, tap "Add attachment," select the picture you want to attach, and tap it to confirm or tap the "X" button to cancel attaching.
- After composing your e-mail, tap "Send".
Tip: When you compose your e-mail, tap the "Save as draft" or "Back" button to save your e-mail to Draft.
8.1.3 Receiving and reading e-mail
When a new e-mail is received, the notification area in the status bar will show the new e-mail( 📧 ) icon.
Perform one of the following to read your e-mail:
- Tap and hold the status bar at the top of the screen, slide your finger down to open the notification panel, and tap a new e-mail to read. - Tap the unread e-mails in the Inbox to read.
8.1.4 Replying or forwarding e-mail
- Open an e-mail, and tap "Reply," "Reply All".
- Or open an e-mail, press the M button, and tap "Forward," "Reply," "Reply All".
- If you select "Reply," "Reply All," enter what you want to reply.
If you select "Forward," enter the address of the recipients. - Tap "Send" to reply or forward the e-mail.
8.1.5 Managing e-mail
Tap and hold an e-mail to show the menu:
| Open | Open and read an e-mail |
| Delete | Delete an e-mail |
| Forward | Forward an e-mail |
| Reply All | Replay all with an e-mail |
| Reply | Reply the sender with an e-mail |
| Mark as read | The unread e-mails in the Inbox are displayed with a green line to the left. |
8.1.6 Create new account
In the e-mail interface, press the M button, and tap "Accounts" to display the set e-mail account. Press the M button and tap "Add Account" to add a new e-mail account.
Note: You can set several e-mail accounts. The default account will show whenever you perform e-mail applications.
8.1.7 Account settings
In the e-mail interface, press the M button, and tap "Account settings".
| Account name | Display and change an account name |
| Your name | Display and change the sender's name of the account. |
| Signature | |
| Inbox check | Set the interval of receiving e-mails. There are six |
| frequency | options available: Never, Every 5 minutes, Every 10 minutes, Every 15 minutes, Every 30 minutes, and Every hour. |
| Default account | Send e-mails form this account by default. |
| E-mail notifications | Notify in status bar when e-mail arrives |
| Select ringtone | Set the ringtone used when an e-mail is received |
| Incoming settings | Display and change the receiving server settings |
| outgoing settings | Display and change the sending server settings |
8.1.8 Delete e-mail account
In the e-mail interface, press the M button to display the e-mail menu. Tap
"Accounts". Tap and hold the e-mail account you want to delete until the account options appear, tap "Remove account," and tap OK.
8.2 Recorder
In the "Tools" interface, tap "Sound Rec" to go to the record interface.
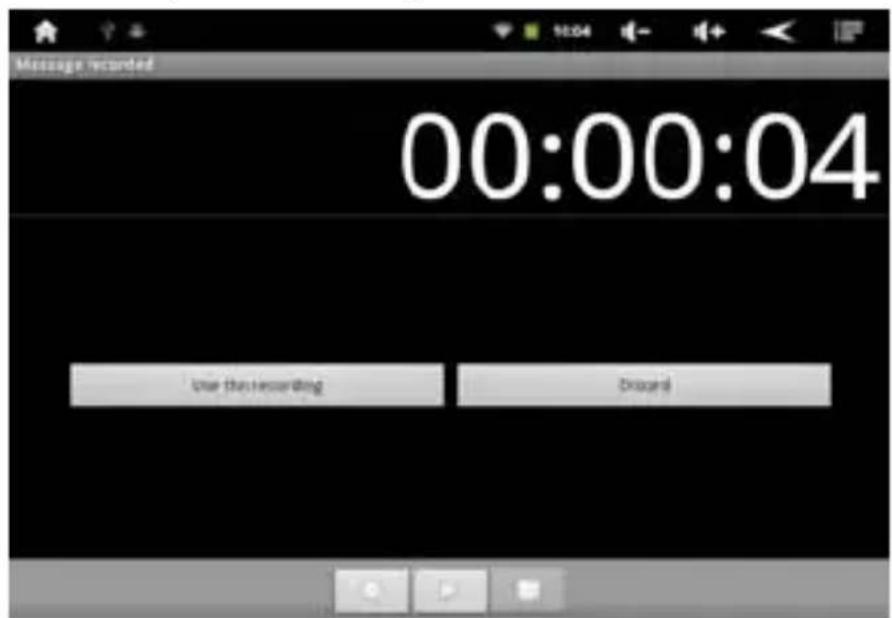
Tap “” to start recording or “” to stop recording.
After recording is finished, tap “ [ ]” to play the previously recorded file. Tap “Use this recording” to save the previously recorded file or tap “Discard” not to save the
previously recorded file.
Note 1: The recorded file can be automatically saved in the "RECORD" folder so that you can find them in the AudioPlayer " playlists ->My recordings" to play.
Note: The naming rule of the recorded file: recording_Year+Month+Date_Serial Number.
8.3 Alarm
In the main interface, tap "Alarm Clock" to the clock interface.

Tap the icon of Clock to enable the alarm function.

8.3.1 Set alarm
- Tap the preset alarm to set the selected alarm, or tap "add alarm" to add new alarm.
- Tap "Time", and set the time for the alarm. Tap "+" or "-" to adjust the time, and tap "Set" to complete.
- Tap "Repeat," select the date you want the alarm to ring, and tap "OK".
- Tap "Ringtones" and select alarm ringtones. After selection, the ringtone will be played temporarily.
- Tap the "Label", set the name of the alarm.
- Tap the "Done" button to go back to the alarm interface.
Tip: Tap “ √ ” to temporarily disable the alarm.
Note: When it is shut down, the alarm is not affected.
8.3.2 Add alarm
If you want to add an alarm, press the M button, and tap "Add alarm". The number of alarms you can add is unlimited.
8.3.3 Delete alarm
Tap and hold the alarm you want to delete, and tap "Delete Alarm -> OK" to delete it.
8.3.4 Alarm settings
Press the M button, and tap "Settings" to show the settings interface.
| Alarm in silent mode | Play alarm even the unit is in silent mode. |
| Alarm volume | Set the volume of alarms. |
| Snooze duration | Set the ring interval for the alarm. |
| Volume Buttons | Set what the volume buttons do when pressed during an alarm. |
8.3.5 Changing alarm display
In the alarm interface, tap the clock to go to the clock interface.
How to change: Quickly slide your finger to the left or right on the clock to show more clocks and tap your desired one to change.
Note: To change the format of the date and time of the alarm, see the following section
"Date and Time".
8.4 Calculator
In the applications interface, tap the "Calculator" icon to go to the calculator interface.
You can perform the basic math operations by this calculator.
8.5 Explorer
In the main interface, tap "Explorer" to go to the Explorer interface that includes the following options:
| Home | Tap to return to the root directory. |
| Level Up | Tap to return to the upper level directory. |
| Multi | Tap to select multiple files |
| Editor | Allow you to Copy, delete, move, paste or rename a file. |
| Back | Back to the previous operation |
| Next | Back to the next operation |
Note: This product complies with the fat32 file system. When you name a file, do not use special characters, or you may not rename it later.
8.6 Installing applications
- Copy the setup file to your PC. (Make sure the format of the setup file is xxx.apk format supported by this product.)
- Connect the device to PC using USB cable.
- Copy the setup file xxx.apk to the device.
- Disconnect the device and PC.
- Turn on the device and activate Explorer.
- Locate the xxx.apk file and tap it to open.
- Install the application according to the on-screen prompts.
- After completion, you will see the installed application in the applications interface.
8.7 Uninstall application
-
In the main interface, press the M button to show the menu.
-
Select "Settings" to go to the settings menu.
- Select "Applications".
- Select "Manage Application".
- Tap the application you want to uninstall.
- Tap "Uninstall".
- Tap "OK" to start uninstalling.
Tip: You cannot delete the pre-installed factory default applications on this product.
Chapter 9 Settings
In the main interface, tap the "Settings" icon or press the M button to show the settings button to go to the "Settings" interface.
9.1 Wireless & network settings
9.1.1 Wi-Fi network connection
Connection
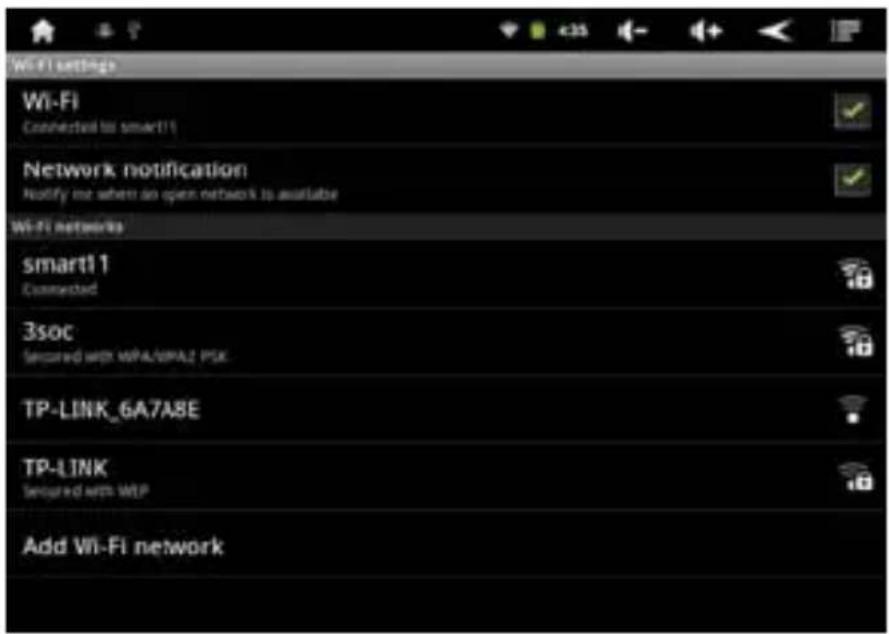
- Tap "Wi-Fi" to enable Wi-Fi and this product scans for available wireless networks.
- Tap "Wi-Fi Settings" and the Wi-Fi network zone shows the name and security settings (open or encrypted network) of the detected wireless networks.
- Tap one to connect to it. When you select an open network, the product can connect to it automatically. If you select an encrypted one, you have to enter a password and tap "Connect".
Note 1: When you connect Wi-Fi for the first time and the prompt “Failed” appears, disconnect Wi-Fi and reconnect it.
Note 2: You do not have to re-enter the password when you re-connect to the previously connected wireless network that is encrypted, unless you reset the product to the factory settings.
Note 3: Auto search for Wi-Fi is performed, i.e., no additional steps are required to connect to the Wi-Fi network. For some closed wireless networks, the username or password may be required.
Note 4: The availability of Wi-Fi signals may depend on the amount, infrastructure, and objects through which a signals must pass.
- Tap "Wi-Fi" to disconnect the network.
Scan
Press the M button to configure the "Scan" or "Advanced" settings for Wi-Fi network.
Scan: Search for the available wireless networks in the vicinity.
Advanced settings
- Press the M button, and tap "Advanced" to set the network address within the IP locale.
- Select "Use static IP" to configure the network settings and enter the IP address, gateway, network mask, and DNS1 required for Wi-Fi network connection. After configuration, press the M button, tap "Save," and press the "Back" button to exit the interface.

Note: When you use dynamic IP addresses, you do not have select "Use static IP addresses" to configure the network settings.
- After "IP settings", go back to the Wi-Fi settings interface and tap the wireless network you want to connect to. After the network connection is successfully
established, you can login to the network to surf the Internet.
Checking status of wireless network
You can check the status of the currently connected Wi-Fi through the following methods:
- Status bar
After the product is connected to the wireless network, the Wi-Fi indicator on the top of it lights up and the status bar shows the Wi-Fi icon “ ” and signal strength (the number of the bars lighting up) .
- Wi-Fi network
In the network connection interface, tap "Wi-Fi settings" and tap the currently connected wireless network to show the information, such as name, status, speed, signal strength, and security.
Tip: If you want to remove the network settings, tap "Forget" in this window; if you want to connect to this network, the settings above should be configured again.
Connecting to other Wi-Fi networks
- In the network connection interface, tap "Wi-Fi settings". The detected Wi-Fi networks will be shown in the Wi-Fi network zone.
Tip: If you want to manually scan for available networks, press the M button and tap "Scan".
- Tap another Wi-Fi network to connect to it.
Tip 1: If the network you want to connect to is not listed in the detected network list, Tap "Add Wi-Fi network," enter the corresponding network settings, and tap "Save".

Tip 2: Not all wireless networks are connected to the Internet. Some wireless networks may be connected to several computers and cannot be connected to the Internet.
9.1.2 Bluetooth connection
Turn on Bluetooth
- Tap "Bluetooth" to enable Bluetooth.
- Tap "Bluetooth settings" and the Bluetooth zone show the name of the available Bluetooth device.
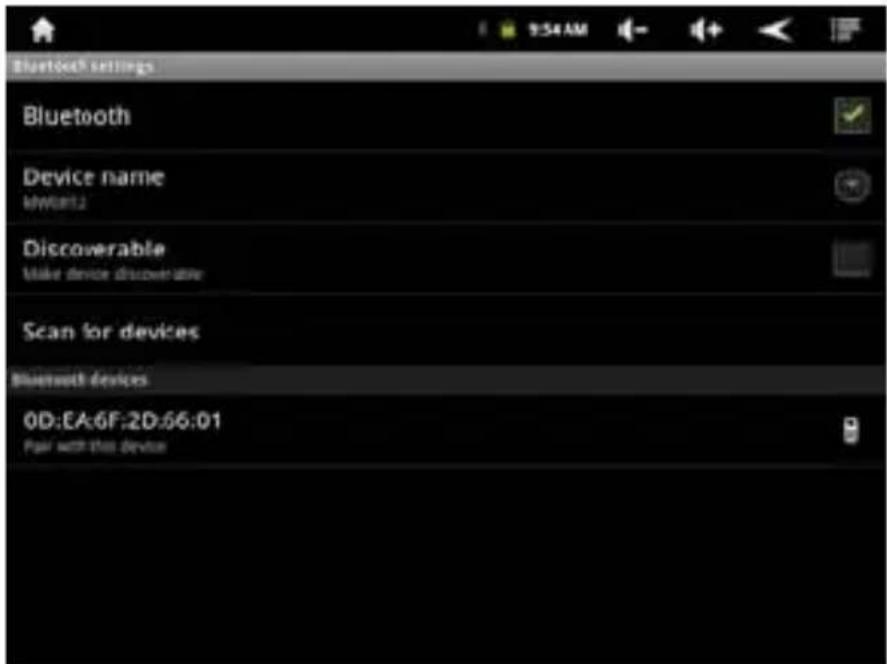
Deviee nam
Tap to change the name of your device.
Discoverable
Tap to make your device discoverable so that the other device can search to your device. After 120 seconds, your device will recover to non-discoverable.
Scan for devices
Tap to search for the available Bluetooth device in the vicinity.
Paring
Tap one of the available devices. The devices which you want to connect will be required to
input pairing code. Input 0000 or 1234, and the breeze will pop up the "Bluetooth pairing request" window. Input the same pairing code and tap "Ok" to finish pairing.
Connection
If you want to use Bluetooth keyboard or headset, tap and hold the name of the device to connect.
9.2 Settings
9.2.1 Wireless & networks
| Wi-Fi Tu | rn on or off the Wi-Fi network. |
| Wi-Fi settings | etwork Enter Wi-Fi settings. Refer to connection" for details. |
| Bluetooth Turn on or off | the Bluetooth. |
| Bluetooth settings | Enter Bluetooth settings. Connect with Bluetooth headset, Bluetooth Keyboard and other Bluetooth device. |
9.2.2 Sound
| Silent mode | Silence all sounds except media & alarms. | |
| Volume | Media | Set the media volume for music and video. Tap the volume bar to adjust the volume level. |
| Alarm | Set the alarm volume by tapping the volume bar to adjust the volume level. | |
| Notification | Set the notification volume by tapping the volume bar to adjust the volume level. | |
| Notification It notification ringtone | Set your defau ringtone. | |
| Audible selection | when making screen Play sound selection | |
| Screen lock sounds | Play sounds when locking and unlocking the screen. | |
9.2.3 Display
| Brightness | Adjust the screen brightness. Tap the brightness bar to adjust the volume level and tap “OK” to save. |
| Auto-rotate screen | When unit is turned on/off or rotated, the Landscape/Portrait switching feature is enabled.This product supports 4-direction rotation display. |
| Animation | when a window is Dis opened or closed. |
| Screen timeout | Select the delay time before the screen automatically closes. There are six options available: 15 seconds, 30 seconds, 1 minute, 2 minutes, 10 minutes, and 30 minutes. |
9.2.4 Security
| networks | Location determined by Wi-Fi. Use wireless |
| Set up screen lock Lock screen with a pattern, PIN, or password. | |
| Visible passwords | After this feature is enabled, the password is shown when the keyboard is used to type it. |
| Select device administrators | Add or remove device administrators. |
| Use secure credentials | Allow applications to access secure certificates and other credentials. |
| Install form SD card ed certificates from SD card Install encrypt | |
| Set password Set or change the credential storage password. | |
| Clear storage | Clear credential storage of all contents an reset its password. |
9.2.5 Applications
| Unknown sources | After enabled, this allows installation of non-Market applications. |
| Manage applications | Manage and delete the installed applications: For Installed(or uninstall) software, move applications to device or SD card, clear data, cache, and default, and force stop. |
| Running services | View and control currently running services. |
| Storage use View storage used by applications. | |
| Development | Set the development options of the application: Includes USB debugging, stay awake (the screen will not enter hibernation mode during charging), allow mock locations. |
9.2.6 Accounts & sync
| Background data | After enabled, applications can sync, send, and receive data at any time. |
| Auto-sync Allow applications sync data automatically. | |
| Add account Add corporate or Google account. | |
9.2.7 Privacy
| Back up my settings | Back up my settings of the device |
| Automatic restore Restore backed up settings or other data when reinstalled an application. | |
| Factory data reset | Erases all data on device |
9.2.8 Storage
| SD card | Total spaceAvailable card. space | Show the total capacity of the SD card. When an SD card is inserted, the total actual capacity of it will be shown. When an SD card is not inserted, it shows unavailable.Show the free space on an SD When an SD card is inserted, its total actual free space will be shown. When a TF card is not inserted, it shows unavailable. |
| Unmount SD card | Safely remove the SD card locally. | |
| Erase SD card | Erase all data on the SD card. | |
| Internal Memory | Total space | Show the total capacity of the Internal Memory. |
| Available space | Show the remaining free space of the built-in Flash memory. | |
| Erase Internal Memory | Erases all data on the Internal Memory. | |
| System Memory | space | Show the available storage space of Avai the system |
9.29 Language & keyboard
| Select language Show the text in corresponding language based on the selection. | |
| Use dictionary | Add & remove words form user dictionary |
| Android keyboard | Tap to set onscreen keyboard. |
9.2.1pVoice input & out
| Voice recognizer Tsettings and show hints. | ap to set language, SafeSearch, block offensive words |
| Text-to-speech guagesettings | Tapitovsetherlme spoken text,set the speed at which the text is spoken, and ect. |
9.2.11yAccessibilit
Tap to set accessibility so that the device can access these services.
9.2.12 Date & time
| Set date | Set year, month, day. |
| Select time zone | Select the time zone of each major cities in the world |
| Set time | Set hour, minute, second |
| Use 24-hour format | Show 24-hour or 12-hour format |
| Select date format | Select the format used for date display. |
9.2.13 Touch screen calibrat
When the touch screen is not sensitive or the cursor drifts, you can use the calibration settings.
Set the touch points according to the steps in the on-screen prompt.
Tip: After the product is used for a period of time, it is recommended to calibrate the touch screen for operational accuracy and sensitivity.

9.2deviAbout
This option allows you to check information about the battery status, legal information, model number, Android version, kernel version and build number.
Chapter 10 Using Micro SD (TF) Card
The external card supported by this product is a Micro SD card, through which the capacity of storage can be expanded. Meanwhile, Insert the silk screen chip out of the Micro SD card into the card slot until it is fully inserted into the product. When you remove it, press the Micro SD card downward to eject it.
Note:
- Do not bend the card. The chip on the card should be protected cautiously;
- Keep the chip clean and avoid dust and chemicals.
- Format the new Micro SD card first;
- Avoid insertion and removal of the Micro SD card during its use to avoid damage to the data on card;
- This product does not support the write-protect feature of the Micro SD card.
Therefore, back up the files on card before deleting data to avoid file loss due to malfunction.
Chapter 11 Connecting to USB Drive
Insert your USB drive into the OTG port at the right side of the product. Open Explorer and you can see the "USB" directory. This directory is your USB drive. Tap USB to check the files on USB drive. Note that when this unit is connected to the USB drive, it should shutdown; avoid insertion and removal when the files on USB drive are played to avoid damaging the data on USB drive.
Chapter 12 About the Battery and Power
This product uses a built-in 4800mAh polymer lithium battery to charge the battery. When the product operates individually, power is fed from the lithium battery. When the provided charger is inserted, the charger is powered automatically via the charger.
When you charge this product for the first time, it is recommended to shutdown the product and continuously charge it for more than 8 hours for optimal battery use.
For the use of a new product, it should be fully charged and discharged for the first three times to activate it.
If charging is performed when the product is turned on, it takes a longer time to charge.
Charging time: It typically takes about 7 hours to charge. The actual time depends on the remaining battery level.
It is recommended to fully charge and discharge the product once every 3 months to maintain the lithium battery.
Do not plug the charger into the electric outlet when the product is not connected.
When it will not be used for an extended period of time, fully charge the battery. It should be charged and discharged every three months.
When the battery is too hot, the charging protection circuit will automatically close the charging circuit to protect the lithium battery.
When the battery is low, charge it first. When it is running out of power, charge the machine using the charger and connect it to PC. Charge it if:
A. The battery charging icon indicates that battery is exhausted.
B. The system automatically shuts down. It also shuts down quickly after reboot.
C. After you press buttons, there is no response.
Chapter 13 Firmware Updating / Resetting to Factory
- Go to for the website (www.aoc.com) to download the current /latest firmware for your device,
(current-.img). - Copy the downloaded firmware to the built-in flash in the product.
- Safely disconnect the product and PC and the screen shows a prompt similar to one shown below:
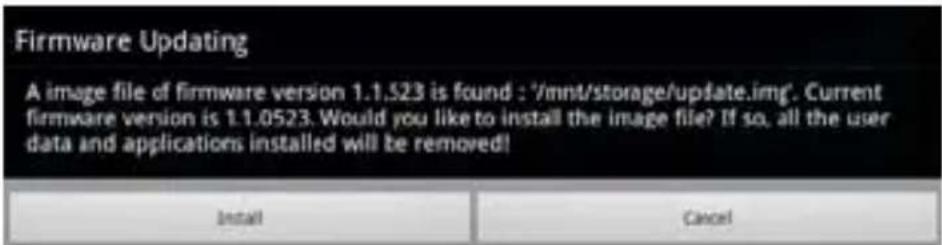
Tap "Install".
After a short while, the updating message is displayed..
It may take a few minutes, please be patient.

- After successful upgrade, the system will automatically reboot and the downloaded version firmware takes effect.
Note : During the upgrade / resetting process, it is best to have the device plugged into electric power, using the supplied power adapter.
Chapter 14 Frequently Asked Questions
• Product cannot be turned on or boot abnormal
Check if the battery is charged
Connect the power adapter and check it again.
Tap the Reset button on the side of the product and turn it on.
Shutdown, then press the "volume + "button and Back button at the same time till insert charger. Enter into Android system recovery utility interface and choose "Factory reset". It will restore factory default compulsory and erase all data on device.
Note: In Android system recovery utility interface, move cursor through volume “+” and “-” buttons and the M button is used for entering.
If it cannot be turned on after charged and reset and restore factory default compulsory, contact our seller.
• No sounds from headset
Check if the volume is set to 0
Check if the headset is properly connected
- Loud noises
Check if the plug of the headset is clean. Dirt may result in noise.
Check if the file is damaged. Play other music files to confirm this. If it is damaged, it may cause loud noise or sound skipping.
• Screen shows garbled codes
Check if the correct language is set. Set your language in (System)=>(Language Selection)
- Cannot download files
Make sure that the computer is properly connected to the product
Make sure that the storage space is not full
Make sure that the USB cable is not damaged
- Connect to Wi-Fi but cannot surf the Internet
Make sure that there is wireless network nearby.
If static IP addresses are needed, make to enter a valid IP address. If dynamic IP addresses are used,
static IP addresses should be disabled while the network is connected.
- Touch the keyboard on the touch screen and the response is not the expected / desired result.
Perform touch screen calibration
For better performance, use a pen or your fingernail
- Cannot be connected to computer
Make sure the product is turned on
Make sure the product is not in sleep mode
Make sure to use the proper USB cable
- Cannot view files in AudioPlayer, PhotoBrowser, Video Player, Shelves and Explorer. Or cannot record sound.
Make sure the files is downloads to your device.
Make sure your device is not connecting to PC.
Wait a few minutes for refresh the media Library.
- Cannot find Wi-Fi wireless network.
Make sure there is no problem with the Wi-Fi signal.
In main interface, tap "Settings ->Wireless & network settings ->Wi-Fi settings, press the M button, tap "Advanced ->Regulatory domain" to adjust the domain and search again.
Chapter 15 Troubleshooting
1. When I view JEPG pictures, some cannot be viewed. Why?
Some JPEG files may have a non-standard resolution, they may not be viewed in full screen, or zoomed in or out. If an error prompt appears, press the ESC button to exit or tap the Reset button on the side of the product to solve the problem.
2. The product cannot play my videos. Why?
Make sure the video format is supported by this product. Some video files are encoded in different formats and versions. We cannot guarantee that all formats are playable.
3. Why does image lag occurs when the video files are played?
Upgrade system software to the latest version.
In addition, this also depends on the video file, high bit-rate streaming video, and high resolution video:
① High bit-rate streaming video. For example, the motion scenes of some videos have a bit-rate of 5\~6M and image lag may occur.
② High resolution video. If the max frames are reached, non-synchronization may occur.
③ The upper limit size of a single file is 2 GB.
4. Enter into “Application settings - >Manage applications”, and tap one applications to manage. There is an option “Move to SD card”. Actually it moves the application to Flash. Why?
Applications can be installed into System Memory or Flash. The system treated Flash as virtual SD card, so “Move to SD card” means moving application to Flash and “Move to device” means moving to System Memory.
5. Product does not respond to operations.
Some various reasons, such as misuse, may cause the product to be unable to shutdown or render the buttons and touch screen unable to respond. You can tap the Reset button on the side of the product (using a paper-clip), or press and hold the Power button for 6 seconds to force the product to shutdown. After restarting, the problem is
usually solved.
6. The space available on PC is not consistent with that shown on the tablet.
The space on a PC is calculated by 1024 bytes while this tablet's capacity is calculated by 1000 bytes. So the actual free space of the tablet will be slightly different from indicated capacity, also the operating system uses part of the available space.
7. Product can not boot up.
① Plug the AC adapter.
② Press the reset button, and then boot up.
③ Press and hold the Power button for 6 seconds, and then boot up.
breeze
TABLET
aoc.com
V1.1
Information provided in this manual may vary depending on the model. Therefore, your model may not have some of the features described in this user guide. We reserve the right to change any information in this user guide without prior notice.
READ THIS FIRST!

About the Touchscreen
Your Breeze Tablet is designed with a resistive touchscreen display. The touchscreen is the main way you interact with your tablet; simply use your fingertip (or the included stylus) to manipulate icons, menu items, the onscreen keyboard, and other items displayed on the screen.
Important! A thin film has been applied to the touchscreen to protect it during shipping. Before use, grasp a corner of the film and peel it away from the screen to remove it.
The touchscreen is designed for precision and responds best if you perform the calibration test with the included stylus.
- For best results, use the pointed tip of the included stylus to touch the screen.
• Alternately, use the tip of your fingemail to touch the screen. The hard, curved edge of the fingemail makes contact with the touchscreen at a small point, allowing for much greater precision than if you were to use the flat pad of your finger.

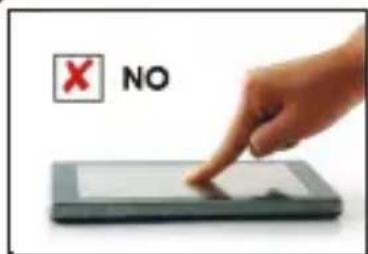
You can perform the following actions on the touchscreen using your fingertip or stylus.
Touch To activate an on-screen item (e.g., application icons, buttons, menu items, and the letter/symbols of the on-screen keyboard), simply touch the item with your fingertip/stylus.
Touch and Hold: Some on-screen items have an alternate action if you touch and hold it (e.g., opening an alternate menu, or to activate the drag function). To touch and hold an item, touch the item and do lift your fingertip/stylus until the action occurs.
Drag: Drag an on-screen item to change its position. To drag an item, touch and hold it for a moment, then without lifting your fingertip/stylus, move your fingertip/stylus on the screen until the item reaches its target destination.
Swipe: Swipe up/down on the screen to scroll through a list. On some screens, you can swipe left/right to change the view. To swipe, touch the screen and then quickly move your fingertip/stylus across the screen without lifting your fingertip/stylus.
Double-tap: Quickly tap the screen twice on a webpage or other application screen to zoom (the application must support the double-tap/zoom function).
WARRANTY STATEMENT
For AOC Media Tablet Products Sold in North America
Envision Peripherals, Inc. ("EPI") warrants AOC Tablet PC to be free from defects in material and workmanship for a period of One year from the original date of consumer purchase. Battery Warranty for period of 6 months from the original date of consumer purchase. During this period, EPI will, at its option, either repair the defective product with new or rebuilt parts, or replace it with a rebuilt product at no charge except as *stated below. The parts or product that is replaced become the property of EPI.
EPI will only accept purchase receipts from authorized resellers as proof of purchase.
Concerning software products.EPI limited warranty applies only to a failure to execute programming instruction. EPI does not guarantee the operation of any product will be uninterrupted or error free.
To obtain service under this limited warranty, call EPI at toll free (888)662-9888 to obtain information on Authorized Service Center in your area and request a Return Merchandise Authorization ("RMA") number. Or, you may request an RMA number online at www.AOC.com.
After receive the RMA number, you may either deliver in person or ship the defective product freight pre paid, along with the proof of purchase, to EPI Authorized Service Center. If you are unable to deliver the product in person, you must:
- Pack it in its original shipping container (or equivalent)
- Put the RMA number on the address label
- Put the RMA number on the shipping carton
- Insure it (or assume the risk of loss / damage during shipment)
• Pay all shipping charges
EPI is not responsible for damage to inbound product that was not properly packaged.
EPI is not responsible (a) for any data stored on the return products. Customers should back up their data prior to shipping the defective unit back to EPI. (b) Hard Drives or other memory storage system will be reformatted during the repair process.
EPI will pay the return shipment charges within Continental USA, Alaska and Hawaii
*This limited warranty does not cover any losses or damages that occur as a result of:
• Shipping or improper installation or maintenance
- Misuse
- Neglect
- Any cause other than ordinary commercial or industrial application
- Adjustment by non authorized source
- Repair, modification, or installation of options or parts by anyone other than an EPI Authorized Service Center
- Improper environment
- Damage Incurred to the LCD screen or scratch.
- Excessive or inadequate heating or air conditioning or electrical power failures, surges, or other irregularities This One year limited warranty does not cover any of the product's firmware or hardware that you or any third party have modified or altered; you bear the sole responsibility and liability for any such modification or alteration.
ALL EXPRESS AND IMPLIED WARRANTIES FOR THIS PRODUCT (INCLUDING THE WARRANTIES OF MERCHANTABILITY AND FITNESS FOR A PARTICULAR PURPOSE) ARE LIMITED IN DURATION TO A PERIOD OF ONE YEAR FOR TABLET PCS AND LABOR AND SIX MONTHS FOR BATTERY FROM THE ORIGINAL DATE OF CONSUMER PURCHASE. NO WARRANTIES (EITHER EXPRESSED OR IMPLIED) APPLY AFTER THIS PERIOD. IN THE UNITED STATES OF AMERICA, SOME STATES DO NOT ALLOW LIMITATIONS ON HOW LONG AN IMPLIED WARRANTY LASTS, SO THE ABOVE LIMITATIONS MAY NOT APPLY TO YOU.
EPI OBLIGATIONS AND YOUR REMEDIES HEREUNDER ARE SOLELY AND EXCLUSIVELY AS STATED HERE.EPI'LIABILITY,WHETHER BASED ON CONTRACT, TORT. WARRANTY, STRICT LIABILITY,OR OTHER THEORY,SHALL NOT EXCEED THE PRICE OF THE INDIVIDUAL UNIT WHOSE DEFECT OR DAMAGE IS THE BASIS OF THE CLAIM. IN NO EVENT SHALL ENVISION PERIPHERALS, INC. BE LIABLE FOR ANY LOSS OF PROFITS, LOSS OF USE OR FACILITIES OR EQUIPMENT OR OTHER INDIRECT,INCIDENTAL,OR CONSEQUENTIAL DAMAGE. IN THE UNITED STATES OF AMERICA, SOME STATES DO NOT ALLOW THE EXCLUSION OR LIMITATION OF INCIDENTAL OR CONSEQUENTIAL DAMAGES. SO THE ABOVE LIMITATION MAY NOT APPLY TO YOU.ALTHOUGH THIS LIMITED WARRANTY GIVES YOU SPECIFIC LEGAL RIGHTS. YOU MAY HAVE OTHER RIGHTS WHICH MAY VARY FROM STATE TO STATE.



- Table of Contents
- CHAPTER 1 PRODUCT OVERVIEW ....1
- CHAPTER 2 BUTTONS AND APPEARANCE....5
- CHAPTER 3 EASYCONFIG....7
- CHAPTER 4 BASIC OPERATIONS....11
- CHAPTER 5 COMMON FEATURES....15
- CHAPTER 6 MAIN INTERFACE....19
- CHAPTER 7 APPLICATIONS....36
- CHAPTER 8 COMMON TOOLS....38
- Chapter 1 Product Overview
- Functions overview
- Notes
- Packaging list
- Technical specifications
- Chapter 3 EasyConfig
- Advanced settings:
- Chapter 4 Basic Operations
- Booting up
- Shutdown
- Network
- Locking key
- Reset
- Connecting to PC and file transfer
- Volume adjustment
- Adjusting the media volume
- Adjusting the alarm volume
- Adjusting the notification volume
- Charging
- Touch screen operations
- Tap
- Tap and hold
- Slide
- Search button
- Chapter 5 Common Features
- Landscape/Portrait display switching
- Using virtual keyboard to type
- Android keyboard
- Editing text
- Notification panel
- Opening notification panel
- Closing notification panel
- Recently run applications
- Changing wallpaper
- Power control
- Chapter 6 Main Interface
- Main interface
- Applications interface
- Browser
- Opening browser
- Going to a webpage
- Setting a home page
- Browsing a webpage
- Playing on webpage
- Open new browser window
- Switching between browser windows
- Selecting link in webpage
- Managing bookmarks
- Adding bookmark
- Opening bookmark
- Editing bookmark
- Using bookmark
- Other functions
- Setting options:
- Video player
- Video playing
- Delete video
- Audio player
- Playlist
- Playing audio
- Sound effects
- Picture browser
- Browsing pictures
- Picture file operation
- Chapter 7 Applications
- Moving a program icon of the interface
- Deleting a program icon
- Restoring a program icon
- Adding a program icon
- Adding a Widget
- Creating a folder
- Renaming a folder
- Chapter 8 Common Tools
- Opening e-mail
- Creating and sending e-mails
- Receiving and reading e-mail
- Replying or forwarding e-mail
- Managing e-mail
- Create new account
- Account settings
- Delete e-mail account
- Recorder
- Alarm
- Set alarm
- Add alarm
- Delete alarm
- Alarm settings
- Changing alarm display
- Calculator
- Explorer
- Installing applications
- Uninstall application
- Chapter 9 Settings
- Wireless & network settings
- Wi-Fi network connection
- Connection
- Scan
- Advanced settings
- Checking status of wireless network
- Connecting to other Wi-Fi networks
- Bluetooth connection
- Turn on Bluetooth
- Deviee nam
- Discoverable
- Scan for devices
- Paring
- Settings
- Wireless & networks
- Sound
- Display
- Security
- Applications
- Accounts & sync
- Privacy
- Storage
- Language & keyboard
- 9.2.1pVoice input & out
- 9.2.11yAccessibilit
- Date & time
- Touch screen calibrat
- 9.2deviAbout
- Chapter 10 Using Micro SD (TF) Card
- Note:
- Chapter 11 Connecting to USB Drive
- Chapter 12 About the Battery and Power
- Chapter 13 Firmware Updating / Resetting to Factory
- Chapter 14 Frequently Asked Questions
- • Product cannot be turned on or boot abnormal
- • No sounds from headset
- - Loud noises
- • Screen shows garbled codes
- - Cannot download files
- Chapter 15 Troubleshooting
- When I view JEPG pictures, some cannot be viewed. Why?
- The product cannot play my videos. Why?
- Why does image lag occurs when the video files are played?
- Enter into “Application settings - >Manage applications”, and tap one applications to manage. There is an option “Move to SD card”. Actually it moves the application to Flash. Why?
- Product does not respond to operations.
- The space available on PC is not consistent with that shown on the tablet.
- Product can not boot up.
- breeze
- TABLET
- V1.1
- READ THIS FIRST!
- About the Touchscreen
- WARRANTY STATEMENT
- For AOC Media Tablet Products Sold in North America
Brand : AOC
Model : Breeze
Category : Tablet