16420224 - Vacuum Cleaner Melissa - Free user manual and instructions
Find the device manual for free 16420224 Melissa in PDF.


| Product Type | Vacuum Cleaner |
| Brand | Melissa |
| Model | 16420224 |
| Power Supply | 230 V, 50 Hz |
| Filtration System | HEPA exhaust filter + motor filter |
| Dust Bag Type | Replaceable paper dust bag |
| Suction Control | Air valve on handle |
| Floor Nozzle | With brush function (hard floor/carpet) |
| Accessories | Crevice/brush nozzle, telescopic tube |
| Cord Rewind | Automatic |
| Bag Change Indicator | Yes |
| Usage | Indoor domestic use only |
| Carrying Handle | Yes |
| Storage Bracket | For floor nozzle on back |
| Motor Filter | Washable (gently in warm water) |
| Exhaust Filter | Replace every 4-6 months |
| Safety Features | Do not use without filters or bag |
| Warranty | Subject to conditions (see manual) |
Frequently Asked Questions - 16420224 Melissa
User questions about 16420224 Melissa
0 question about this device. Answer the ones you know or ask your own.
Ask a new question about this device
Download the instructions for your Vacuum Cleaner in PDF format for free! Find your manual 16420224 - Melissa and take your electronic device back in hand. On this page are published all the documents necessary for the use of your device. 16420224 by Melissa.
USER MANUAL 16420224 Melissa
natural_image
Black and white photo of a vacuum cleaner with coiled hose and handle (no text or symbols visible)16420219/16420223/16420224/16420225
DK Støvsuger....2
SE Dammsugare....6
NO Støvsuger....10
FI Pölynimuri....14
UK Vacuum cleaner....18
DE Dammsugare....22
PL Odkurzacz....26
DK
INTRODUKTION
OVERSIGT OVER APPARATETS DELE
KLARG∅RING AF APPARATET
UDSKIFTNING AF ST∅VPOSE
KLARGJ∅RING AV APPARATET
To get the best out of your new appliance, please read this user guide carefully before using the appliance for the first time. Take particular note of the safety precautions. We also recommend that you keep the instructions for future reference, so that you can remind yourself of the functions of your appliance.
SAFETY MEASURES
General
- Incorrect use of this appliance may cause personal injury and damage.
- Use for its intended purpose only. The manufacturer is not responsible for any injury or damage resulting from incorrect use or handling (see also Guarantee Terms).
- For domestic use only. Not for outdoor or commercial use.
• For connection to 230 V, 50 Hz only. - Do not immerse the appliance, cord or plug in water or any other liquid and make sure no water enters the appliance.
- Never touch the appliance, cord or plug with wet or damp hands.
- Do not expose to direct sunlight, high temperatures, humidity or corrosive substances.
- Never leave the appliance unattended when it is switched on.
- This appliance can be used by children aged from 8 years and above and persons with reduced physical, sensory or mental capabilities or lack of experience and knowledge if they have been given supervision or instruction concerning use of the appliance in a safe way and understand the hazards involved. Children shall not play with the appliance. Cleaning and user maintenance shall not be made by children without supervision.
- The appliance shall not be operated by means of an external timer, or a separate remote control system.
- Do not use if the exhaust filter (HEPA filter) motor filter and dust bag are not fitted, as this could damage the appliance.
- Only use accessories manufactured or recommended by the manufacturer.
Use
- Do not use the appliance on wet surfaces.
• Take particular care when vacuuming stairs, due to the risk of falling. - Do not use the kit to vacuum up matches, hot ashes, cigarette butts, hard or sharp objects, wet or damp substances, combustible materials (petrol, solvents, etc.) or vapour from these.
- Do not use to vacuum fine sand or dust – e.g. plaster, brick dust and the like.
- Ensure that you keep clothing, hair and body parts away from the nozzle and moving parts of the appliance.
- Never insert anything into the openings of the appliance.
- Do not cover the appliance's suction or exhaust port.
Cord and plug
- Keep the cord and appliance away from heat sources, hot objects and naked flames.
- Take care to prevent bending and kinking of the cord and avoid pulling the cord around sharp corners or jamming it in doors, etc.
- Switch off the appliance and unplug it when it is not in use, and before you replace the dust bag and clean or replace the filters.
o Avoid pulling the cord when removing the plug from the socket. Instead, hold the plug.
o Keep hold of the plug when rewinding the cord, so that it does not bump against the appliance or any other objects in the vicinity.
- Check regularly that neither cord nor plug is damaged. Do not use if they are damaged or if the appliance has been dropped or damaged in any other way.
- If the appliance, cord or plug have been damaged, have the appliance inspected and if necessary repaired by an authorised repairer. Never try to repair the appliance yourself. Please contact the store where you bought the appliance for repairs under the guarantee. Unauthorised repairs or modifications to the appliance will invalidate the guarantee.
KEY TO THE MAIN COMPONENTS OF THE APPLIANCE
- Carrying handle
- ON/OFF button
- Bag change indicator
- Lid
- Hose connector port
- Air valve
- Handle
- Hose
-
Hose connector
-
Telescopic tube
-
Brush function button
-
Floor nozzle
-
Crevice/brush nozzle
-
Motor filter
-
Exhaust filter
-
Exhaust grille
-
Exhaust (behind the grille)
-
Storage bracket
-
Button for automatic cord rewind
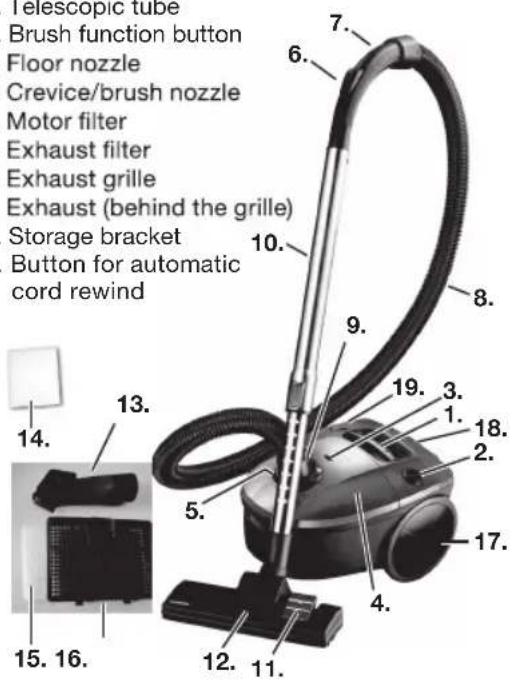
PREPARING THE APPLIANCE
IMPORTANT! Before using the appliance, open the lid (4) and make sure the motor filter (14) and the dust bag have been fitted to the appliance. Also check that the exhaust filter (15) is in place in the exhaust port (17). See Replacing filter and dust bag below.
- Attach the hose (8) to the appliance by inserting the hose connector (9) in the hole on the hose connector port (5) on the top of the appliance, until you hear a click.
To remove the hose, press the buttons on the side of the hose connector and pull the hose out.
- Attach the handle of the hose (7) to one end of the tube and attach the floor nozzle (12) to the opposite end of the tube
USING THE APPLIANCE
-
Pull the cord out of the appliance. The cord may not be pulled out further than the yellow mark. Plug in and switch on the power.
-
Press the On/Off button (2) to switch the appliance on and off.
-
Suction strength can also be adjusted by opening and closing the air vent (6) on the handle.
When the valve is closed, full suction is achieved. This is the normal setting.
When the vent opens, more air is allowed in, reducing the suction power at the floor nozzle. This function is ideal for cleaning curtains and other light items which can easily get sucked into the nozzle at maximum suction strength.
-
The floor nozzle brushes have two settings which can be selected using the brush function button (11) on top of the nozzle.
-
When cleaning hard surfaces (stone flooring, tiles, etc.), the nozzle brushes should be extended.
When cleaning carpets and rugs, the brushes should be retracted into the nozzle. -
If the bag change indicator (3) indicates that the bag is full or if suction force is significantly reduced, the bag must be replaced (see section Replacing Dust Bag, below). If the indicator continues to indicate that the bag is full after you have replaced it, this may be due to one of the following:
o The hose or nozzle is clogged.
o The exhaust filter is dirty.
Investigate and resolve the problem. Do not use the appliance if the indicator indicates that the dust bag is full. This may cause irreparable damage to the motor.
- NOTE! Switch off the appliance on the On/Off button, disconnect the plug from the mains socket and allow the appliance to cool off for approx. 1 hour. Clean the filters and replace the dust bag (see the sections on replacement of filters and dust bag below), before using the appliance again.
Tips
- If you need to take a break during vacuum cleaning, you can slide the floor nozzle into the storage bracket (18) on the back of the appliance.
- The small crevice and brush nozzle (13) can be used with and without brushes, as they can easily be extended or withdrawn. The nozzle can be stored in the storage space on the back of the appliance when it is not in use.
- You can lift and carry the appliance using the carrying handle (1). Never pull or lift the appliance by the cord.
REPLACING THE DUST BAG
If the bag change indicator indicates that the bag is full or if the suction force is significantly reduced, this may mean that the dust bag needs replacing. Never use the appliance if the bag is full or with no bag at all.
- Turn off the appliance.
- Detach the hose.
- Open the lid by pressing the button underneath the edge of the lid and lifting the lid until it locks into place.
- Remove the dust bag.
- Place the bag carefully in a refuse bin. Make sure that there are no holes in it. Avoid bending or squeezing the bag.
- Place a new dust bag in the appliance. Check that the bag is secure and facing in the right direction.
- Close the lid and ensure it clicks into place.
REPLACING THE MOTOR FILTER
The motor filter is the filter behind the dust bag. The appliance must not be used without a motor filter.
- Turn off the appliance.
- Detach the hose.
- Open the lid by pressing the button underneath the edge of the lid and lifting the lid until it locks into place.
- Remove the dust bag from the appliance.
- Remove the motor filter from the holder and replace the filter or clean it as described in the section on cleaning below.
- Replace the motor filter in the holder.
- Check the dust bag is correctly fitted onto the rails before closing the lid.
We recommend cleaning the filter at least twice a year, or whenever it is dirty.
REPLACING THE EXHAUST FILTER
The exhaust filter is used to filter exhaust air from the appliance. The appliance must not be used without an exhaust filter.
- Remove the exhaust grille (16) on the side of the appliance by pressing the release button on the grille.
- Remove the exhaust filter from the back of the grille and replace the filter or clean it as described in the section on cleaning below.
- Replace the exhaust filter on the back of the grille.
- Fit the exhaust grille and ensure it clicks into place.
We recommend replacing the exhaust filter after 4 to 6 months' use, when it becomes soiled, or if the vacuum cleaner's suction force is reduced.
STORAGE
- Before putting the appliance away, rewind the cord. Switch off at the mains, remove the plug and press the automatic cord rewind button on the left side of the carrying handle until the cord is completely rewound. Hold the plug during rewinding to prevent it from hitting the appliance as this could damage either the appliance or the plug.
- The floor nozzle can be stored in the storage bracket at the rear end of the appliance.
- Store the appliance in a clean and dry place.
- Do not place heavy objects on top of the appliance.
CLEANING
When cleaning the appliance, you should pay attention to the following:
• Unplug the appliance before cleaning it.
- Never submerge the appliance in water and make sure no water enters the appliance.
- Clean the appliance by wiping it with a damp cloth. A little detergent can be added if the appliance is heavily soiled.
- Do not use scouring pads, steel wool or any form of strong solvents or abrasive cleaning agents to clean the appliance, as they may damage the external surfaces of the appliance.
- IMPORTANT! Allow to dry completely after cleaning. Do not use the appliance if it is damp.
• Take care to keep the filters clean.
o Remove the filters as described above.
o Shake and beat the filters carefully to remove dust and dirt.
o The filter pad can be gently washed in warm water.
o Check they are completely dry before replacing in the appliance. NEVER insert a wet filter into the appliance.
o Replace filters with the same type when worn or cannot be cleaned properly.
FOR UNITED KINGDOM ONLY
Plug wiring:
This product is fitted with a BS 1363 13-amp plug. If you have to replace the fuse, only those that are ASTA or BSI approved to BS1362 and with a rated current of 13 amps should be used. If there is a fuse cover fitted, this cover must be refitted after changing the fuse. If the fuse cover is lost or damaged, the plug must not be used. You must also check if the socket outlets in your home fit with the plug of the appliance. If the socket outlet in your home does not fit with the plug, the plug must be removed and disposed of safely as insertion of the plug into the socket is likely to cause electric hazard.
As this product is a class II appliance, the pin of BS plug for earth connection is false.
INFORMATION ON DISPOSAL AND RECYCLING OF THIS PRODUCT
Please note that this Adexi product is marked
with this symbol:
This means that this product must not be disposed of along with ordinary household waste, as electrical and electronic waste must be disposed of separately.
In accordance with the WEEE directive, every member state must ensure correct collection, recovery, handling and recycling of electrical and electronic waste. Private households in the EU can take used equipment to special recycling stations free of charge. In certain member states, used appliances can be returned to the retailer where they were bought on the condition you buy new products.
Contact your retailer, distributor or the municipal authorities for further information on what to do with electrical and electronic waste.
GUARANTEE TERMS
The guarantee does not apply:
- if the above instructions have not been followed
• if the appliance has been tampered with
- if the appliance has been mishandled, subjected to rough treatment, or has suffered any other form of damage
- if the appliance is faulty due to faults in the electricity supply.
Due to the constant development of our products in terms of function and design, we reserve the right to make changes to the product without prior warning.
FREQUENTLY ASKED QUESTIONS
If you have any questions regarding the use of the appliance and cannot find the answer in this user guide, please try our website at www.adexi.eu.
Go to the "Consumer Services" menu and click on "Frequently Asked Questions" to view the most frequently asked questions.
You can also see contact details on our website if you need to contact us for technical questions, repairs, accessories or spare parts.
IMPORTER
Adexi Group
www.adexi.eu
We cannot be held responsible for any printing errors.
DE
EINLEITUNG
PRZYGOTOWANIE URZĄDZENIA
- DK
- INTRODUKTION
- OVERSIGT OVER APPARATETS DELE
- KLARG∅RING AF APPARATET
- UDSKIFTNING AF ST∅VPOSE
- KLARGJ∅RING AV APPARATET
- SAFETY MEASURES
- General
- Use
- Cord and plug
- KEY TO THE MAIN COMPONENTS OF THE APPLIANCE
- PREPARING THE APPLIANCE
- USING THE APPLIANCE
- Tips
- REPLACING THE DUST BAG
- REPLACING THE MOTOR FILTER
- REPLACING THE EXHAUST FILTER
- STORAGE
- CLEANING
- FOR UNITED KINGDOM ONLY
- Plug wiring:
- INFORMATION ON DISPOSAL AND RECYCLING OF THIS PRODUCT
- GUARANTEE TERMS
- FREQUENTLY ASKED QUESTIONS
- IMPORTER
- DE
- EINLEITUNG
- PRZYGOTOWANIE URZĄDZENIA
Brand : Melissa
Model : 16420224
Category : Vacuum Cleaner