
Internet Security Suite 2006 - Antivirus MCAFEE - Free user manual and instructions
Find the device manual for free Internet Security Suite 2006 MCAFEE in PDF.


| Type | Antivirus & Internet Security Suite |
| Brand | McAfee |
| Model | Internet Security Suite 2006 |
| Version | 2006 |
| Compatible Operating Systems | Windows XP, Windows 2000, Windows ME, Windows 98 |
| Minimum Processor | Pentium II 300 MHz or higher |
| Minimum RAM | 256 MB |
| Minimum Hard Disk Space | 300 MB |
| Key Features | Virus protection, firewall, anti-spyware, phishing protection, parental controls |
| Installation Method | CD-ROM |
| License Type | 1-year subscription for 1-3 PCs |
| Update Frequency | Automatic updates (typically daily) |
| User Interface | McAfee SecurityCenter |
| Firewall Features | Inbound and outbound protection |
| Anti-Spyware | Real-time scanning and removal |
| Parental Controls | Web filtering, time limits |
| Spam Filtering | Email spam protection (Outlook/Outlook Express) |
| Support | Online knowledge base, email support |
Frequently Asked Questions - Internet Security Suite 2006 MCAFEE
User questions about Internet Security Suite 2006 MCAFEE
0 question about this device. Answer the ones you know or ask your own.
Ask a new question about this device
Download the instructions for your Antivirus in PDF format for free! Find your manual Internet Security Suite 2006 - MCAFEE and take your electronic device back in hand. On this page are published all the documents necessary for the use of your device. Internet Security Suite 2006 by MCAFEE.
USER MANUAL Internet Security Suite 2006 MCAFEE
internetsecuritysuite
User Guide
COPYRIGHT
Copyright © 2005 McAfee, Inc. All Rights Reserved. No part of this publication may be reproduced, transmitted, transcribed, stored in a retrieval system, or translated into any language in any form or by any means without the written permission of McAfee, Inc., or its suppliers or affiliate companies.
TRADEMARK ATTRIBUTIONS
ACTIVE FIREWALL, ACTIVE SECURITY, ACTIVESECURITY (AND IN KATAKANA), ACTIVESHIELD, ANTIVIRUS ANYWARE AND DESIGN, CLEAN-UP, DESIGN (STYLIZED E), DESIGN (STYLIZED N), ENTERCEPT, ENTERPRISE SECURECAST, ENTERPRISE SECURECAST (AND IN KATAKANA), EPOLICY ORCHESTRATOR, FIRST AID, FORCEFIELD, GMT, GROUPSHIELD, GROUPSHIELD (AND IN KATAKANA), GUARD DOG, HOMEGUARD, HUNTER, INTRUSHIELD, INTRUSION PREVENTION THROUGH INNOVATION, M AND DESIGN, MCAFEE, MCAFEE (AND IN KATAKANA), MCAFEE AND DESIGN, MCAFEE.COM, MCAFEE VIRUSSCAN, NA NETWORK ASSOCIATES, NET TOOLS, NET TOOLS (AND IN KATAKANA), NETCRYPTO, NETOCTOPUS, NETSCAN, NETSHIELD, NETWORK ASSOCIATES, NETWORK ASSOCIATES COLLISEUM, NETXRAY, NOTESGUARD, NUTS & BOLTS, OIL CHANGE, PC MEDIC, PCNOTARY, PRIMESUPPORT, RINGFENCE, ROUTER PM, SECURECAST, SECURESELECT, SPAMKILLER, STALKER, THREATSCAN, TIS, TMEG, TOTAL VIRUS DEFENSE, TRUSTED MAIL, UNINSTALLER, VIREX, VIRUS FORUM, VIRUSCAN, VIRUSSCAN, VIRUSSCAN (AND IN KATAKANA), WEBSCAN, WEBSHIELD, WEBSHIELD (AND IN KATAKANA), WEBSTALKER, WEBWALL., WHAT'S THE STATE OF YOUR IDS?, WHO'S WATCHING YOUR NETWORK, YOUR E-BUSINESS DEFENDER, YOUR NETWORK. OUR BUSINESS. are registered trademarks or trademarks of McAfee, Inc. and/or its affiliates in the US and/or other countries. Red in connection with security is distinctive of McAfee brand products. All other registered and unregistered trademarks herein are the sole property of their respective owners.
LICENSE INFORMATION
License Agreement
NOTICE TO ALL USERS: CAREFULLY READ THE APPROPRIATE LEGAL AGREEMENT CORRESPONDING TO THE LICENSE YOU PURCHASED, WHICH SETS FORTH THE GENERAL TERMS AND CONDITIONS FOR THE USE OF THE LICENSED SOFTWARE. IF YOU DO NOT KNOW WHICH TYPE OF LICENSE YOU HAVE ACQUIRED, PLEASE CONSULT THE SALES AND OTHER RELATED LICENSE GRANT OR PURCHASE ORDER DOCUMENTS THAT ACCOMPANTES YOUR SOFTWARE PACKAGING OR THAT YOU HAVE RECEIVED SEPARATELY AS PART OF THE PURCHASE (AS A BOOKLET, A FILE ON THE PRODUCT CD, OR A FILE AVAILABLE ON THE WEB SITE FROM WHICH YOU DOWNLOADED THE SOFTWARE PACKAGE). IF YOU DO NOT AGREE TO ALL OF THE TERMS SET FORTH IN THE AGREEMENT, DO NOT INSTALL THE SOFTWARE. IF APPLICABLE, YOU MAY RETURN THE PRODUCT TO MCAFEE OR THE PLACE OF PURCHASE FOR A FULL REFUND.
Attributions
This product includes or may include:
- Software developed by the OpenSSL Project for use in the OpenSSL Toolkit (http://www.openssl.org/). - Cryptographic software written by Eric A. Young and software written by Tim J. Hudson. - Some software programs that are licensed (or sublicensed) to the user under the GNU General Public License (GPL) or other similar Free Software licenses which, among other rights, permit the user to copy, modify and redistribute certain programs, or portions thereof, and have access to the source code. The GPL requires that for any software covered under the GPL which is distributed to someone in an executable binary format, that the source code also be made available to those users. For any such software covered under the GPL, the source code is made available on this CD. If any Free Software licenses require that McAfee provide rights to use, copy or modify a software program that are broader than the rights granted in this agreement, then such rights shall take precedence over the rights and restrictions herein. - Software originally written by Henry Spencer, Copyright 1992, 1993, 1994, 1997 Henry Spencer. - Software originally written by Robert Nordier, Copyright © 1996-7 Robert Nordier. - Software written by Douglas W. Sauder. - Software developed by the Apache Software Foundation (http://www.apache.org/). A copy of the license agreement for this software can be found at www.apache.org/licenses/LICENSE-2.0.txt. - International Components for Unicode ("ICU") Copyright © 1995-2002 International Business Machines Corporation and others. - Software developed by CrystalClear Software, Inc., Copyright © 2000 CrystalClear Software, Inc. - FEAD® Optimizer® technology, Copyright Netopsystems AG, Berlin, Germany. - Outside bViewer Technology © 1992-2001 Stellent Chicago, Inc. and/or Outside In® HTML Export, © 2001 Stellent Chicago, Inc. - Software copyrighted by Thai Open Source Software Center Ltd. and Clark Cooper, © 1998, 1999, 2000. - Software copyrighted by Expat maintainers. - Software copyrighted by The Regents of the University of California, © 1989. - Software copyrighted by Gunnar Ritter. - Software copyrighted by Sun Microsystems®, Inc. © 2003. - Software copyrighted by Cisle Aas. © 1995-2003. - Software copyrighted by Michael A. Chase, © 1999-2000. - Software copyrighted by Neil Winton, © 1995-1996. - Software copyrighted by RSA Data Security, Inc., © 1990-1992. - Software copyrighted by Sean M. Burke, © 1999, 2000. - Software copyrighted by Martijn Koster, © 1995. - Software copyrighted by Brad Appleton, © 1996-1999. - Software copyrighted by Michael G. Schwern, © 2001. - Software copyrighted by Graham Barr, © 1998. - Software copyrighted by Larry Wall and Clark Cooper, © 1998-2000. - Software copyrighted by Frodo Looijaard, © 1997. - Software copyrighted by the Python Software Foundation, Copyright © 2001, 2002, 2003. A copy of the license agreement for this software can be found at www.python.org. - Software copyrighted by Beman Dawes, © 1994-1999, 2002. - Software written by Andrew Lumsdaine, Lie-Quan Lee, Jeremy G. Siek © 1997-2000 University of Notre Dame. - Software copyrighted by Simone Bordet & Marco Cravero, © 2002. - Software copyrighted by Stephen Purcell, © 2001. - Software developed by the Indiana University Extreme! Lab (http://www.extreme.indiana.edu/). - Software copyrighted by International Business Machines Corporation and others, © 1995-2003. - Software developed by the University of California, Berkeley and its contributors. - Software developed by Ralf S. Engelschall rse@engelschall.com for use in the mod_ssl project (http://www.modssl.org/). - Software copyrighted by Kevlin Henney, © 2000-2002. - Software copyrighted by Peter Dimov and Multi Media Ltd. © 2001, 2002. - Software copyrighted by David Abrahams, © 2001, 2002. See http://www.boost.org/libs/bind/bind.html for documentation. - Software copyrighted by Steve Cleary, Beman Dawes, Howard Hinnant & John Maddock, © 2000. - Software copyrighted by Boost.org, © 1999-2002. - Software copyrighted by Nicolai M. Josultis, © 1999. - Software copyrighted by Jeremy Siek, © 1999-2001. - Software copyrighted by Daryle Walker, © 2001. - Software copyrighted by Chuck Allison and Jeremy Siek, © 2001, 2002. - Software copyrighted by Samuel Krempp, © 2001. See http://www.boost.org for updates, documentation, and revision history. - Software copyrighted by Doug Gregor (gregod@cs.rpi.edu), © 2001, 2002. - Software copyrighted by Cadenza New Zealand Ltd., © 2000. - Software copyrighted by Jens Maurer, © 2000, 2001. - Software copyrighted by Jaakko Järvi (jaakko.jarvi@cs.utu.fi), © 1999, 2000. - Software copyrighted by Ronald Garcia, © 2002. - Software copyrighted by David Abrahams, Jeremy Siek, and Daryle Walker, © 1999-2001. - Software copyrighted by Stephen Cleary (shammah@voyager.net), © 2000. - Software copyrighted by Housemarque Oy http://www.housemarque.com, © 2001. - Software copyrighted by Paul Moore, © 1999. - Software copyrighted by Dr. John Maddock, © 1998-2002. - Software copyrighted by Greg Colvin and Beman Dawes, © 1998, 1999. - Software copyrighted by Peter Dimov, © 2001, 2002. - Software copyrighted by Jeremy Siek and John R. Bandela, © 2001. - Software copyrighted by Joerg Walter and Mathias Koch, © 2000-2002.
Quick Start Card
If you are installing your product from a CD or a Web site, print this convenient reference page.
![graph TD A["Are you installing your product from a CD?"] --> B{Yes} B -->|No| C["Are you installing your product from a Web site?"] C --> D{Yes} D -->|Yes| E["1. Go to the McAfee Web site, and click My Account."] E --> F["2. If prompted, enter your subscribing e-mail address and password, then click…](/content/2026/05/857814/images/ed265a30e714f1b0a12bcdd17a1008d341ab29f55a83a4289f45172547e8f89f.jpg)
McAfee reserves the right to change Upgrade & Support Plans and policies at any time without notice. McAfee and its product names are registered trademarks of McAfee, Inc. and/or its affiliates in the US and/or other countries.
© 2005 McAfee, Inc. All Rights Reserved.
For more information
To view the User Guides on the product CD, ensure that you have Acrobat Reader installed; if not, install it now from the McAfee product CD.
1 Insert your product CD into your CD-ROM drive.
2 Open Windows Explorer: Click Start on your Windows desktop, and click Search.
3 Locate the Manuals folder, and double-click the User Guide .PDF you want to open.
Registration benefits
McAfee recommends that you follow the easy steps within your product to transmit your registration directly to us. Registration ensures that you receive timely and knowledgeable technical assistance, plus the following benefits:
■ FREE electronic support
■ Virus definition (.DAT) file updates for one year after installation when you purchase VirusScan software
Go to http://www.mcafee.com/ for pricing of an additional year of virus signatures.
■ 60-day warranty that guarantees replacement of your software CD if it is defective or damaged
■ SpamKiller filter updates for one year after installation when you purchase SpamKiller software
Go to http://www.mcafee.com/ for pricing of an additional year of filter updates.
■ McAfee Internet Security Suite updates for one year after installation when you purchase MIS software
Go to http://www.mcafee.com/ for pricing of an additional year of content updates.
Technical Support
For technical support, please visit http://www.mcafeehelp.com/.
Our support site offers 24-hour access to the easy-to-use Answer Wizard for solutions to the most common support questions.
Knowledgeable users can also try our advanced options, which include a Keyword Search and our Help Tree. If a solution cannot be found, you can also access our FREE Chat Now! and E-mail Express! options. Chat and e-mail help you to quickly reach our qualified support engineers through the Internet, at no cost. Otherwise, you can get phone support information at http://www.mcafeehelp.com/.
Contents
Quick Start Card .... iii
1 Introduction 11
McAfee Internet Security software 12
System requirements 12
Supported e-mail programs 13
Toolbar plug-in requirements 13
Supported instant messaging programs 13
Using McAfee SecurityCenter 13
Removing Internet Security Suite programs 15
2 McAfee VirusScan 17
New features 17
Testing VirusScan 19
Testing ActiveShield 19
Testing Scan 19
Using McAfee SecurityCenter 21
Using ActiveShield 21
Enabling or disabling ActiveShield 21
Configuring ActiveShield options 23
Understanding security alerts 32
Manually scanning your computer 35
Manually scanning for viruses and other threats 35
Automatically scanning for viruses and other threats 38
Understanding threat detections 40
Managing quarantined files 41
Creating a Rescue Disk 43
Write-protecting a Rescue Disk 44
Using a Rescue Disk 44
Updating a Rescue Disk 44
Automatically reporting viruses 44
Reporting to the World Virus Map 45
Viewing the World Virus Map 46
Updating VirusScan 47
Automatically checking for updates 47
Manually checking for updates 47
3 McAfee Personal Firewall Plus 49
New features 49
Removing other firewalls 51
Setting the default firewall 51
Setting the security level 52
Testing McAfee Personal Firewall Plus 54
Using McAfee SecurityCenter 54
About the Summary page 55
About the Internet Applications page 60
Changing application rules 61
Allowing and blocking Internet applications 61
About the Inbound Events page 62
Understanding events 63
Showing events in the Inbound Events log 65
Responding to inbound events 67
Managing the Inbound Events log 71
About alerts 72
Red alerts 73
Green alerts 78
Blue alerts 80
4 McAfee Privacy Service 81
Features 81
The Administrator 81
Setting up Privacy Service 82
Setting up a Pre-installed version of Privacy Service 82
Retrieving the Administrator Password 83
Removing Privacy Service with Safe Mode 83
The Startup user 84
Configuring the Administrator as Startup User 84
Using McAfee SecurityCenter 84
Launching McAfee Privacy Service 85
Launching and signing in to Privacy Service 85
Disabling Privacy Service 85
Updating McAfee Privacy Service 85
Removing and Re-installing Privacy Service 86
Removing Privacy Service 87
Installing Privacy Service 87
Setting the password 88
Setting the age group 88
Setting the cookie blocker 88
Setting the Internet Time limits 89
Creating Web Site Permissions with Keywords 89
Changing passwords 90
Changing a user's information 91
Changing cookie blocker setting 91
Editing the Accept and Reject Cookie List 91
Changing the age group 92
Changing Internet time Limits 92
Changing the Startup user 93
Removing users 93
Blocking Web sites 93
Allowing Web sites 93
Blocking information 94
Adding information 94
Editing information 94
Removing personal information 94
Blocking Web bugs 95
Blocking advertisements 95
Allowing cookies from specific Web sites 96
Date and time 96
User 96
Summary 96
Event Details 96
Saving the Current Log 96
Viewing Saved Logs 97
Erasing files permanently using McAfee Shredder 97
Why Windows leaves file remnants 98
What McAfee Shredder erases 98
Permanently erasing files in Windows Explorer 98
Emptying the Windows Recycle Bin 98
Customizing Shredder settings 98
Backing up the Privacy Service database 99
Restoring the Backup Database 99
Changing your password 100
Changing your user name 100
Clearing your cache 101
Accepting cookies 101
If you need to remove a web site from this list: 101
Rejecting cookies 102
If you need to remove a web site from this list: 102
5 McAfee SpamKiller 103
User options 103
Filtering 103
Features 104
Understanding the top pane 104
Understanding the Summary page 105
Microsoft Outlook and Outlook Express integration 105
Using McAfee SecurityCenter 106
Disabling SpamKiller 107
Adding e-mail accounts 107
Adding an e-mail account 108
Pointing your e-mail client to SpamKiller 108
Deleting e-mail accounts 109
Deleting an e-mail account from SpamKiller 109
Editing e-mail account properties 109
POP3 accounts 109
MSN/Hotmail accounts 112
MAPI accounts 113
Adding users 115
User passwords and protecting children from spam 116
Logging on to SpamKiller in a multi-user environment 117
Opening a Friends List 119
Importing address books 119
Importing an address book by automatic import 120
Importing an address book manually 120
Editing address book information 121
Deleting an address book from the automatic import list 121
Adding friends 122
Adding friends from the Blocked E-mail or Accepted E-mail page 122
Adding friends from the Friends page 123
Adding friends from Microsoft Outlook 123
Editing friends 123
Deleting friends 124
Blocked E-mail page 125
Accepted E-mail page 127
Tasks for Blocked E-mail and Accepted E-mail 128
Rescuing messages 129
From the Blocked E-Mail page 129
From the SpamKiller folder in Microsoft Outlook or Outlook Express 129
Blocking messages 129
From the Accepted E-mail page 129
From Microsoft Outlook 130
Where are the blocked messages 130
Deleting a message manually 130
Modifying how spam messages are processed 130
Tagging 130
Blocking 130
Modifying how SpamKiller processes spam messages 131
Using the AntiPhishing filter 131
Adding friends to a Friends List 132
Adding filters 132
Regular expressions 134
Reporting spam to McAfee 137
Sending complaints manually 137
Sending error messages 137
Sending an error message manually 138
SpamKiller is unable to communicate with its server 138
Starting the SpamKiller server manually 138
SpamKiller server is blocked by firewalls or internet filtering programs ..... 138
Cannot connect to the e-mail server 139
Verifying your connection to the Internet 139
Verifying the POP3 server address for SpamKiller 139
Index 141
Introduction
1
The Internet provides a wealth of information and entertainment at your fingertips. However, as soon as you connect, your computer is exposed to a multitude of privacy and security threats. Protect your privacy and secure your computer and data with McAfee Internet Security Suite. Incorporating McAfee's award-winning technologies, Internet Security Suite is one of the most comprehensive sets of privacy and security tools available. McAfee Internet Security Suite destroys viruses, outwits hackers, secures your personal information, privatizes your Web browsing, blocks ads and pop-ups, manages your cookies and passwords, locks down your files, folders and drives, filters objectionable content, and puts you in control of your computer's incoming and outgoing Internet connections.
McAfee Internet Security Suite is a proven security solution that provides powerful protection for today's Internet users.
McAfee Internet Security Suite comprises the following products:
■ McAfee VirusScan on page 17
■ McAfee Personal Firewall Plus on page 49
■ McAfee Privacy Service on page 81
■ McAfee SpamKiller on page 103
McAfee Internet Security software
McAfee SecurityCenter — Assesses, informs, and warns you about your computer’s security vulnerability. Each security index quickly evaluates your exposure to security and Internet-based threats, and then provides recommendations to quickly and securely protect your computer.
■ McAfee VirusScan — Scans, detects, fixes, and removes Internet viruses. You can customize virus scans and determine the response and action when a virus is detected. You can also configure VirusScan to log virus-related actions performed on your computer.
McAfee Personal Firewall Plus — Protects your computer while it is connected to the Internet, and secures your computer's outgoing and incoming Internet connections.
■ McAfee Privacy Service — Combines personal information protection, online advertisement blocking, and content filtering. It secures your personal information while providing greater control over your family's Internet experience. McAfee's Privacy Service ensures that you do not expose confidential information to online threats and protects you and your family from inappropriate online content.
McAfee SpamKiller — The rise of fraudulent, inappropriate and offensive e-mail to adults, children and businesses makes spam protection an essential component of your computer’s security strategy.
System requirements
■ Microsoft ® Windows 98, Me, 2000, or XP
■ Personal computer with Pentium-compatible processor
◆ Windows 98, 2000: 133 MHz or higher
◆ Windows Me: 150 MHz or higher
◆ Windows XP (Home and Pro): 300 MHz or higher
RAM
◆ Windows 98, Me, 2000: 64 MB
◆ Windows XP (Home and Pro): 128 MB
■ 100 MB hard disk space
■ Microsoft® Internet Explorer 5.5 or later
NOTE: To upgrade to the latest version of Internet Explorer, visit
the Microsoft Web site at http://www.microsoft.com/.
Supported e-mail programs
■ POP3 (Outlook Express, Outlook, Eudora, Netscape)
■ MAPI (Outlook)
■ Web (MSN/Hotmail, or e-mail account with POP3 access)
Toolbar plug-in requirements
■ Outlook Express 6.0 or later
■ Outlook 98, 2000 with SP3, 2003, or XP
■ Internet Explorer 6.0 or later
Supported instant messaging programs
■ AOL Instant Messenger 2.1 or later
■ Yahoo Messenger 4.1 or later
■ Microsoft Windows Messenger 3.6 or later
■ MSN Messenger 6.0 or later
Using McAfee SecurityCenter
McAfee SecurityCenter is your one-stop security shop, accessible from its icon in your Windows system tray or from your Windows desktop. With it, you can perform these useful tasks:
■ Get free security analysis for your computer.
■ Launch, manage, and configure all your McAfee subscriptions from one icon.
■ See continuously updated virus alerts and the latest product information.
- Get quick links to frequently asked questions and account details at the McAfee web site.
NOTE
For more information about SecurityCenter features, click Help in the SecurityCenter dialog box.
While SecurityCenter is running and all of the McAfee features installed on your computer are enabled, a red M icon displays in the Windows system tray. This area is usually in the lower-right corner of the Windows desktop and contains the clock.
If one or more of the McAfee applications installed on your computer are disabled, the McAfee icon changes to black M
To open McAfee SecurityCenter:
1 Right-click the McAfee icon in the Windows system tray.
2 Click Open SecurityCenter.
To access your McAfee product:
1 Right-click the McAfee icon in the Windows system tray.
2 Point to the appropriate McAfee product and select the feature you want to use.
Removing Internet Security Suite programs
In some situations, you might want to remove Internet Security Suite or some of its programs.
NOTE
Users must have Administrator rights to uninstall Internet Security Suite.
1 Save all your work and close any open applications.
2 Open Control Panel.
On your Windows taskbar, select Start, point to Settings, and then click Control Panel (Windows 98, ME, and 2000).
On your Windows taskbar, select Start, and then click Control Panel (Windows XP).
3 Click Add/Remove Programs.
4 Select the McAfee Uninstall Wizard, then one or more programs, and then click Uninstall. To remove all the Internet Security products, click Select All, then Uninstall.
5 To proceed with the removal, click Yes.
6 If prompted, restart your computer.
McAfee VirusScan
2
Welcome to McAfee VirusScan.
McAfee VirusScan is an anti-virus subscription service offering comprehensive, reliable, and up-to-date virus protection. Powered by award-winning McAfee scanning technology, VirusScan protects against viruses, worms, Trojan horses, suspect scripts, hybrid attacks, and other threats.
With it, you get the following features:
ActiveShield — Scan files when they are accessed by either you or your computer.
Scan — Search for viruses and other threats in hard drives, floppy disks, and individual files and folders.
Quarantine — Encrypt and temporarily isolate suspect files in the quarantine folder until an appropriate action can be taken.
Hostile activity detection — Monitor your computer for virus-like activity caused by worm-like activity and suspect scripts.
New features
This version of VirusScan provides the following new features:
■ Spyware and adware detection and removal
VirusScan identifies and removes spyware, adware, and other programs that jeopardize your privacy and slow down your computer performance.
■ Daily automatic updates
Daily automatic VirusScan updates protect against the latest identified and unidentified computer threats.
■ Fast background scanning
Fast unobtrusive scans identify and destroy viruses, Trojans, worms, spyware, adware, dialers, and other threats without interrupting your work.
■ Real-time security alerting
Security alerts notify you about emergency virus outbreaks and security threats, and provide response options to remove, neutralize, or learn more about the threat.
■ Detection and cleaning at multiple entry points
VirusScan monitors and cleans at your computer's key entry points: e-mail, instant message attachments, and Internet downloads.
■ E-mail monitoring for worm-like activity
WormStopper ™ monitors suspect mass-mailing behaviors and stops viruses and worms from spreading through e-mail to other computers.
■ Script monitoring for worm-like activity
ScriptStopper ™ monitors suspect script executions and stops viruses and worms from spreading through e-mail to other computers.
■ Free instant messaging and e-mail technical support
Live technical support provides prompt, easy assistance using instant messaging and e-mail.
Testing VirusScan
Before initial use of VirusScan, it's a good idea to test your installation. Use the following steps to separately test the ActiveShield and Scan features.
Testing ActiveShield
NOTE
To test ActiveShield from the VirusScan tab in SecurityCenter, click Test VirusScan to view an online Support FAQ containing these steps.
To test ActiveShield:
1 Go to http://www.eicar.com/ in your web browser.
2 Click the The AntiVirus testfile eicar.com link.
3 Scroll to the bottom of the page. Under Download, you will see four links.
4 Click eicar.com.
If ActiveShield is working properly, it detects the eicar.com file immediately after you click the link. You can try to delete or quarantine detected files to see how ActiveShield handles possible threats. See Understanding security alerts on page 32 for details.
Testing Scan
Before you can test Scan, you must disable ActiveShield to prevent it from detecting the test files before Scan does, then download the test files.
To download the test files:
1 Disable ActiveShield: Right-click the McAfee icon, point to VirusScan, then click Disable.
2 Download the EICAR test files from the EICAR web site:
a Go to http://www.eicar.com/.
b Click the The AntiVirus testfile eicar.com link.
c Scroll to the bottom of the page. Under Download, you will see these links:
eicar.com contains a line of text that VirusScan will detect as a virus.
eicar.com.txt (optional) is the same file, but with a different file name, for those users who have difficulty downloading the first link. Simply rename the file "eicar.com" after you download it.
eicar_com.zip is a copy of the test virus inside a .ZIP compressed file (a WinZip TM file archive).
eicarcom2.zip is a copy of the test virus inside a .ZIP compressed file, which itself is inside a .ZIP compressed file.
d Click each link to download its file. For each one, a File Download dialog box appears.
e Click Save, click the Create New Folder button, then rename the folder VSO Scan Folder.
f Double-click VSO Scan Folder, then click Save again in each Save As dialog box.
3 When you are finished downloading the files, close Internet Explorer.
4 Enable ActiveShield: Right-click the McAfee icon, point to VirusScan, then click Enable.
To test Scan:
1 Right-click the McAfee icon, point to VirusScan, then click Scan.
2 Using the directory tree in the left pane of the dialog box, go to the VSO Scan Folder where you saved the files:
a Click the + sign next to the C drive icon.
b Click the VSO Scan Folder to highlight it (do not click the + sign next to it).
This tells Scan to check only that folder. You can also put the files in random locations on your hard drive for a more convincing demonstration of Scan's abilities.
3 In the Scan Options area of the Scan dialog box, ensure that all options are selected.
4 Click Scan on the lower right of the dialog box.
VirusScan scans the VSO Scan Folder. The EICAR test files that you saved to that folder appear in the List of Detected Files. If so, Scan is working properly.
You can try to delete or quarantine detected files to see how Scan handles possible threats. See Understanding threat detections on page 40 for details.
Using McAfee SecurityCenter
McAfee SecurityCenter is your one-stop security shop, accessible from its icon in your Windows system tray or from your Windows desktop. With it, you can perform these useful tasks:
■ Get free security analysis for your computer.
■ Launch, manage, and configure all your McAfee subscriptions from one icon.
■ See continuously updated virus alerts and the latest product information.
- Get quick links to frequently asked questions and account details at the McAfee web site.
NOTE
For more information about its features, click Help in the SecurityCenter dialog box.
While SecurityCenter is running and all of the McAfee features installed on your computer are enabled, a red M icon appears in the Windows system tray. This area is usually in the lower-right corner of the Windows desktop and contains the clock.
If one or more of the McAfee applications installed on your computer are disabled, the McAfee icon changes to black 📂
To open the McAfee SecurityCenter:
1 Right-click the McAfee icon .
2 Click Open SecurityCenter.
To access a VirusScan feature:
1 Right-click the McAfee icon .
2 Point to VirusScan, then click the feature you want to use.
Using ActiveShield
When ActiveShield is started (loaded into computer memory) and enabled, it is constantly protecting your computer. ActiveShield scans files when they are accessed by either you or your computer. When ActiveShield detects a file, it automatically tries to clean it. If ActiveShield cannot clean the virus, you can quarantine or delete the file.
Enabling or disabling ActiveShield
ActiveShield is started (loaded into computer memory) and enabled (denoted by the red icon in your Windows system tray) by default as soon as you restart your computer after the installation process.
If ActiveShield is stopped (not loaded) or is disabled (denoted by the black icon), you can manually run it, as well as configure it to start automatically when Windows starts.
Enabling ActiveShield
To enable ActiveShield for this Windows session only:
Right-click the McAfee icon, point to VirusScan, then click Enable. The McAfee icon changes to red 📂
If ActiveShield is still configured to start when Windows starts, a message tells you that you are now protected from threats. Otherwise, a dialog box appears that lets you configure ActiveShield to start when Windows starts (Figure 2-1 on page 23).
Disabling ActiveShield
To disable ActiveShield for this Windows session only:
1 Right-click the McAfee icon, point to VirusScan, then click Disable.
2 Click Yes to confirm.
The McAfee icon changes to black
If ActiveShield is still configured to start when Windows starts, your computer will be protected from threats again when you restart your computer.
Configuring ActiveShield options
You can modify ActiveShield starting and scanning options in the ActiveShield tab of the VirusScan Options dialog box (Figure 2-1), which is accessible via the McAfee icon in your Windows system tray.
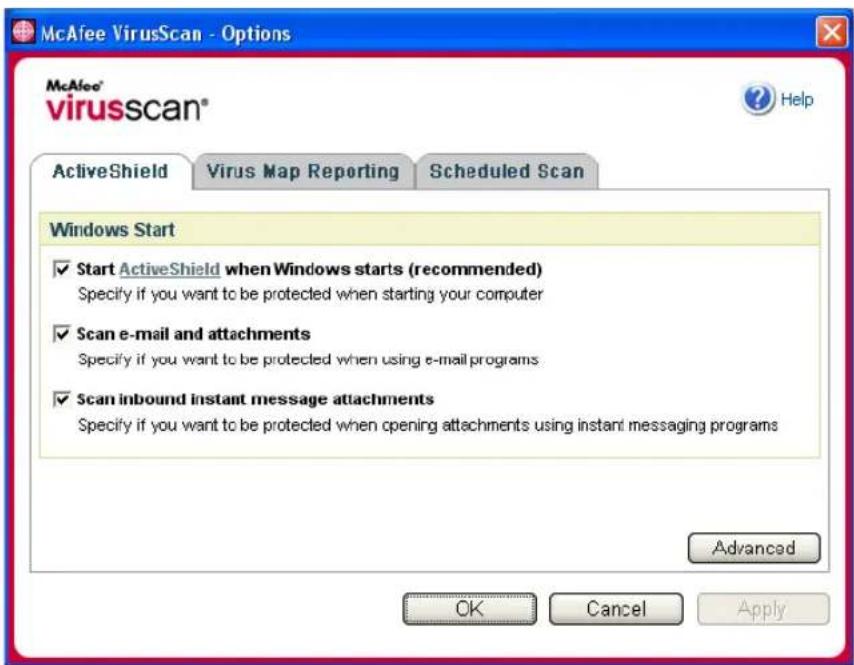
Figure 2-1. ActiveShield Options
Starting ActiveShield
ActiveShield is started (loaded into computer memory) and enabled (denoted by red 🎯 by default as soon as you restart your computer after the installation process.
If ActiveShield is stopped (denoted by black 📂 you can configure it to start automatically when Windows starts (recommended)).
NOTE
During updates to VirusScan, the Update Wizard might exit ActiveShield temporarily to install new files. When the Update Wizard prompts you to click Finish, ActiveShield starts again.
To start ActiveShield automatically when Windows starts:
1 Right-click the McAfee icon, point to VirusScan, then click Options.
The VirusScan Options dialog box opens (Figure 2-1 on page 23).
2 Select the Start ActiveShield when Windows starts (recommended) checkbox, then click Apply to save your changes.
3 Click OK to confirm, then click OK.
Stopping ActiveShield
WARNING
If you stop ActiveShield, your computer is not protected from threats. If you must stop ActiveShield, other than for updating VirusScan, ensure that you are not connected to the Internet.
To stop ActiveShield from starting when Windows starts:
1 Right-click the McAfee icon, point to VirusScan, then click Options.
The VirusScan Options dialog box opens (Figure 2-1 on page 23).
2 Deselect the Start ActiveShield when Windows starts (recommended) checkbox, then click Apply to save your changes.
3 Click OK to confirm, then click OK.
Scanning e-mail and attachments
By default, e-mail scanning and automatic cleaning are enabled via the Scan e-mail and attachments option (Figure 2-1 on page 23).
When this option is enabled, ActiveShield automatically scans and attempts to clean inbound (POP3) and outbound (SMTP) detected e-mail messages and attachments for most popular e-mail clients, including the following:
◆ Microsoft Outlook Express 4.0 or later
◆ Microsoft Outlook 97 or later
◆ Netscape Messenger 4.0 or later
Netscape Mail 6.0 or later
◆ Eudora Light 3.0 or later
Eudora Pro 4.0 or later
Eudora 5.0 or later
◆ Pegasus 4.0 or later
NOTE
E-mail scanning is not supported for these e-mail clients:
Web-based, IMAP, AOL, POP3 SSL, and Lotus Notes.
However, ActiveShield scans e-mail attachments when they are opened.
If you disable the Scan e-mail and attachments option, the E-mail Scan options and the WormStopper options (Figure 2-1 on page 26) are automatically disabled. If you disable outbound e-mail scanning, the WormStopper options are automatically disabled.
If you change your e-mail scanning options, you must restart your e-mail program to complete the changes.
Inbound e-mail
If an inbound e-mail message or attachment is detected, ActiveShield performs the following steps:
■ Tries to clean the detected e-mail
■ Tries to quarantine or delete an uncleanable e-mail
■ Includes an alert file in the inbound e-mail that contains information about the actions performed to remove the possible threat
Outbound e-mail
If an outbound e-mail message or attachment is detected, ActiveShield performs the following steps:
■ Tries to clean the detected e-mail
■ Tries to quarantine or delete an uncleanable e-mail
NOTE
For details about outbound e-mail scanning errors, see the online help.
Disabling e-mail scanning
By default, ActiveShield scans both inbound and outbound e-mail. However, for enhanced control, you can set ActiveShield to scan only inbound or outbound e-mail.
To disable scanning of inbound or outbound e-mail:
1 Right-click the McAfee icon, point to VirusScan, and then click Options.
2 Click Advanced, then click the E-mail Scan tab (Figure 2-1).
3 Deselect Inbound e-mail messages or Outbound e-mail messages, then click OK.
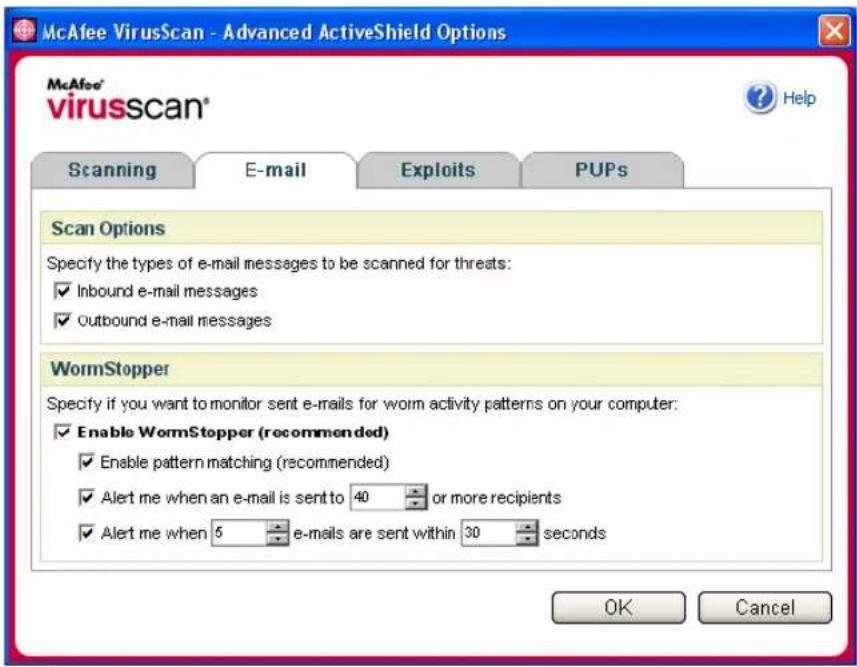
Figure 2-1. Advanced ActiveShield Options - E-mail tab
Scanning for worms
VirusScan monitors your computer for suspect activity that might indicate a threat is present on your computer. While VirusScan cleans viruses and other threats, WormStopper TM prevents viruses and worms from spreading further.
A computer “worm” is a self-replicating virus that resides in active memory and might send copies of itself through e-mail. Without WormStopper, you might notice worms only when their uncontrolled replication consumes system resources, slowing performance or halting tasks.
The WormStopper protection mechanism detects, alerts, and blocks suspect activity. Suspect activity might include the following actions on your computer:
■ An attempt to forward e-mail to a large portion of your address book
■ Attempts to forward multiple e-mail messages in rapid succession
If you set ActiveShield to use the default Enable WormStopper (recommended) option in the Advanced Options dialog box, WormStopper monitors e-mail activity for suspect patterns and alerts you when a specified number of e-mails or recipients has been exceeded within a specified interval.
To set ActiveShield to scan sent e-mail messages for worm-like activity:
1 Right-click the McAfee icon, point to VirusScan, then click Options.
2 Click Advanced, then click the E-mail tab.
3 Click Enable WormStopper (recommended) (Figure 2-2).
By default, the following detailed options are enabled:
- Pattern matching to detect suspect activity
- Alerting when e-mail is sent to 40 or more recipients
- Alerting when 5 or more e-mails are sent within 30 seconds
NOTE
If you modify the number of recipients or seconds for monitoring sent e-mails, it might result in invalid detections. McAfee recommends that you click No to retain the default setting. Otherwise, click Yes to change the default setting to your setting.
This option can be automatically enabled after the first time a potential worm is detected (see Managing potential worms on page 33 for details):
◆ Automatic blocking of suspect outbound e-mails
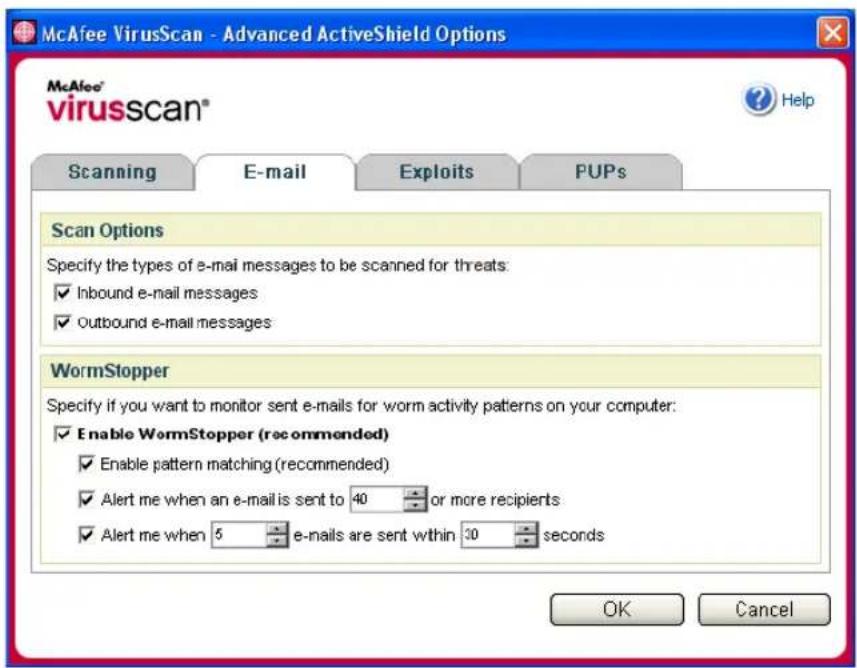
Figure 2-2. Advanced ActiveShield Options - E-mail tab
Scanning inbound instant message attachments
By default, scanning of instant message attachments is enabled via the Scan inbound instant message attachments option (Figure 2-1 on page 23).
When this option is enabled, VirusScan automatically scans and attempts to clean inbound detected instant message attachments for most popular instant messaging programs, including the following:
MSN Messenger 6.0 or later
- Yahoo Messenger 4.1 or later
♦ AOL Instant Messenger 2.1 or later
NOTE
For your protection, you cannot disable auto-cleaning of instant message attachments.
If an inbound instant message attachment is detected, VirusScan performs the following steps:
■ Tries to clean the detected message
■ Prompts you to quarantine or delete an uncleanable message
Scanning all files
If you set ActiveShield to use the default All files (recommended) option, it scans every file type that your computer uses, as your computer attempts to use it. Use this option to get the most thorough scan possible.
To set ActiveShield to scan all file types:
1 Right-click the McAfee icon, point to VirusScan, and then click Options.
2 Click Advanced, then click the Scanning tab (Figure 2-3 on page 29).
3 Click All files (recommended), then click OK.
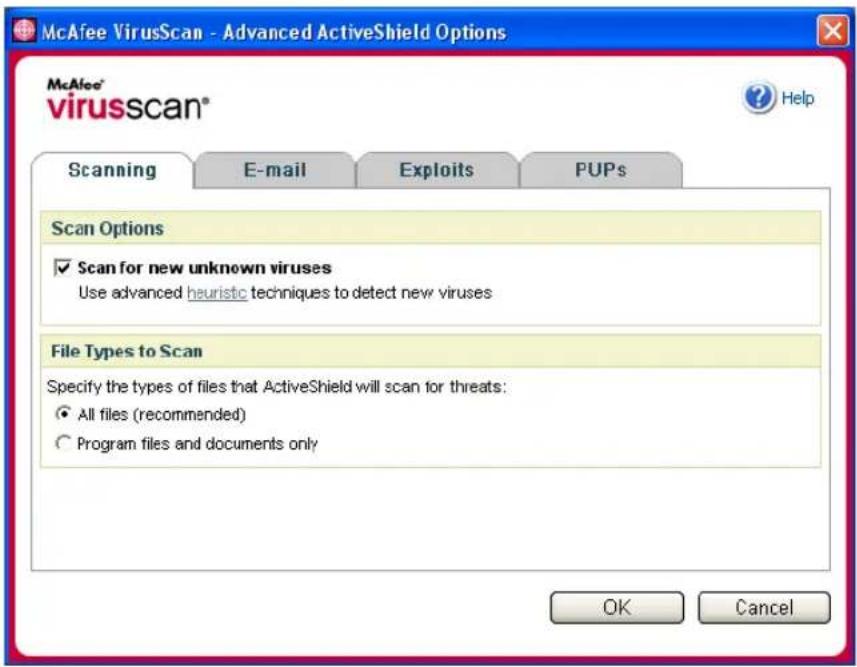
Figure 2-3. Advanced ActiveShield Options - Scanning tab
Scanning program files and documents only
If you set ActiveShield to use the Program files and documents only option, it scans program files and documents, but not any other files used by your computer. The latest virus signature file (DAT file) determines which file types that ActiveShield will scan. To set ActiveShield to scan program files and documents only:
1 Right-click the McAfee icon, point to VirusScan, and then click Options.
2 Click Advanced, then click the Scanning tab (Figure 2-3).
3 Click Program files and documents only, then click OK.
Scanning for new unknown viruses
If you set ActiveShield to use the default Scan for new unknown viruses (recommended) option, it uses advanced heuristic techniques that try to match files to the signatures of known viruses, while also looking for telltale signs of unidentified viruses in the files.
To set ActiveShield to scan for new unknown viruses:
1 Right-click the McAfee icon, point to VirusScan, and then click Options.
2 Click Advanced, then click the Scanning tab (Figure 2-3).
3 Click Scan for new unknown viruses (recommended), then click OK.
Scanning for scripts
VirusScan monitors your computer for suspect activity that might indicate a threat is present on your computer. While VirusScan cleans viruses and other threats, ScriptStopperTM prevents Trojan horses from running scripts that spread viruses further.
A “Trojan horse” is a suspect program that pretends to be a benign application. Trojans are not viruses because they do not replicate, but they can be just as destructive.
The ScriptStopper protection mechanism detects, alerts, and blocks suspect activity. Suspect activity might include the following action on your computer:
A script execution that results in the creation, copying, or deletion of files, or the opening of your Windows registry
If you set ActiveShield to use the default Enable ScriptStopper (recommended) option in the Advanced Options dialog box, ScriptStopper monitors script execution for suspect patterns and alerts you when a specified number of e-mails or recipients has been exceeded within a specified interval.
To set ActiveShield to scan running scripts for worm-like activity:
1 Right-click the McAfee icon, point to VirusScan, then click Options.
2 Click Advanced, then click the Exploits tab (Figure 2-4).
3 Click Enable ScriptStopper (recommended), then click OK.
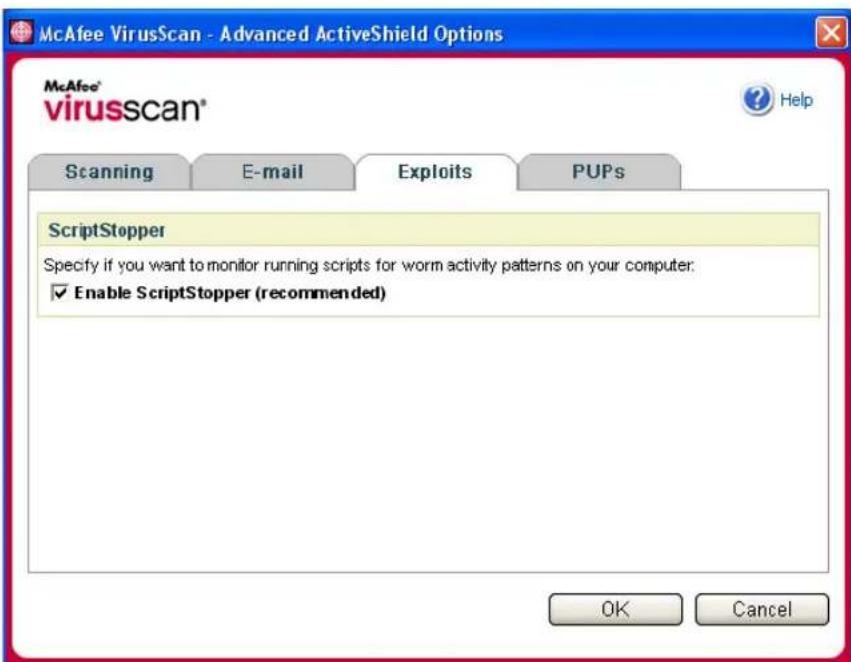
Figure 2-4. Advanced ActiveShield Options - Exploits tab
Scanning for Potentially Unwanted Programs (PUPs)
NOTE
If McAfee AntiSpyware is installed on your computer, it manages all Potentially Unwanted Program activity. Open McAfee AntiSpyware to configure your options.
If you set ActiveShield to use the default Scan Potentially Unwanted Programs (recommended) option in the Advanced Options dialog box, Potentially Unwanted Program (PUP) protection quickly detects, blocks, and removes spyware, adware, and other programs that gather and transmit your private data without your permission.
To set ActiveShield to scan for PUPs:
1 Right-click the McAfee icon, point to VirusScan, and then click Options.
2 Click Advanced, then click the PUPs tab (Figure 2-5).
3 Click Scan Potentially Unwanted Programs (recommended), then click OK.
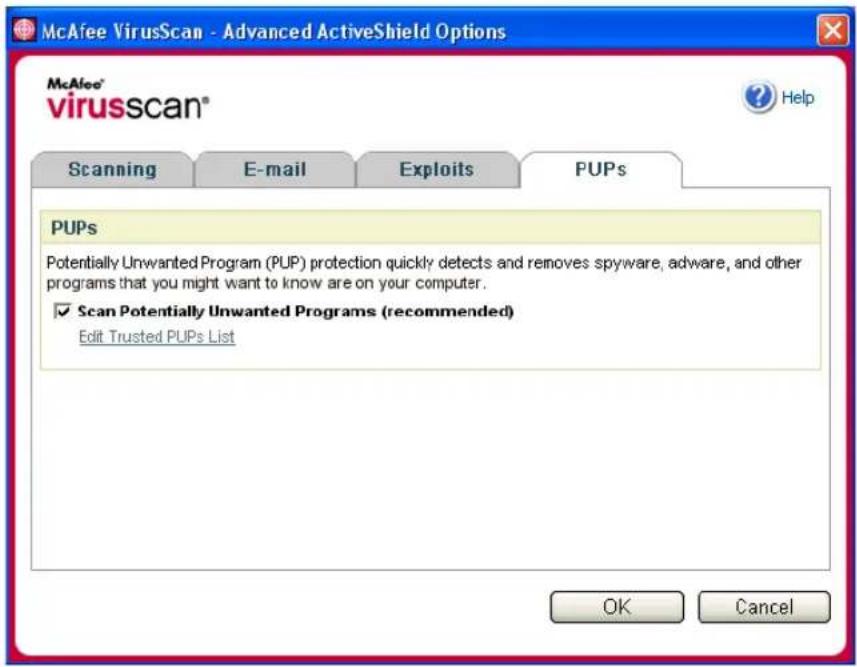
Figure 2-5. Advanced ActiveShield Options - PUPs tab
Understanding security alerts
If ActiveShield finds a virus, a virus alert similar to Figure 2-6 appears. For most viruses, Trojan horses, and worms, ActiveShield automatically tries to clean the file and alerts you. For Potentially Unwanted Programs (PUPs), ActiveShield detects the file, automatically blocks it, and alerts you.
![McAfee VirusScan A Virus Has Been Detected! The file C:\Documents and Settings\atokumoto\Local Settings\Temporary Internet Files\Content.JE5\C5I/VWXON veicar[1].com is infected by the EICAR test file virus and cannot be cleaned. I want to... Delete the detected file Quarantine the detected file Find…](/content/2026/05/857814/images/8111b10890bd7ed9dcc79cf494377b24116930b4a1916573673f54c942de99d7.jpg)
Figure 2-6. Virus alert
You can then choose how to manage detected files, detected e-mail, suspect scripts, potential worms, or PUPs, including whether to submit detected files to the McAfee AVERT labs for research.
For added protection, whenever ActiveShield detects a suspect file, you are prompted to scan your entire computer immediately. Unless you choose to hide the scan prompt, it will periodically remind you until you perform the scan.
Managing detected files
1 If ActiveShield can clean the file, you can learn more or ignore the alert:
Click Find out more information to view the name, location, and virus name associated with the detected file.
Click Continue what I was doing to ignore the alert and close it.
2 If ActiveShield cannot clean the file, click Quarantine the detected file to encrypt and temporarily isolate suspect files in the quarantine directory until an appropriate action can be taken.
A confirmation message appears and prompts you to check your computer for threats. Click Scan to complete the quarantine process.
3 If ActiveShield cannot quarantine the file, click Delete the detected file to try to remove the file.
Managing detected e-mail
By default, e-mail scanning automatically tries to clean detected e-mail. An alert file included in the inbound message notifies you whether the e-mail was cleaned, quarantined, or deleted.
Managing suspect scripts
If ActiveShield detects a suspect script, you can find out more and then stop the script if you did not intend to initiate it:
Click Find out more information to view the name, location, and description of the activity associated with the suspect script.
- Click Stop this script to prevent the suspect script from running.
If you are sure that you trust the script, you can allow the script to run:
- Click Allow this script this time to let all scripts contained within a single file run once.
Click Continue what I was doing to ignore the alert and let the script run.
Managing potential worms
If ActiveShield detects a potential worm, you can find out more and then stop the e-mail activity if you did not intend to initiate it:
- Click Find out more information to view the recipient list, subject line, message body, and description of the suspect activity associated with the detected e-mail message.
- Click Stop this e-mail to prevent the suspect e-mail from being sent and delete it from your message queue.
If you are sure that you trust the e-mail activity, click Continue what I was doing to ignore the alert and let the e-mail be sent.
Managing PUPs
If ActiveShield detects and blocks a Potentially Unwanted Program (PUP), you can find out more and then remove the program if you did not intend to install it:
- Click Find out more information to view the name, location, and recommended action associated with the PUP.
- Click Remove this PUP to remove the program if you did not intend to install it.
A confirmation message appears.
- If (a) you do not recognize the PUP or (b) you did not install the PUP as part of a bundle or accept a license agreement in connection with such programs, click OK to remove the program using the McAfee removal method.
- Otherwise, click Cancel to exit the automatic removal process. If you change your mind later, you can manually remove the program using the vendor's uninstaller.
- Click Continue what I was doing to ignore the alert and block the program this time.
If you (a) recognize the PUP or (b) you might have installed the PUP as part of a bundle or accepted a license agreement in connection with such programs, you can allow it to run:
- Click Trust this PUP to whitelist this program and always let it run in the future.
See "Managing trusted PUPs" for details.
Managing trusted PUPs
The programs that you add to the Trusted PUPs list will not be detected by McAfee VirusScan.
If a PUP is detected and added to the Trusted PUPs list, you can later remove it from the list if necessary.
If your Trusted PUPs list is full, you must remove some items before you can trust another PUP.
To remove a program from your Trusted PUPs list:
1 Right-click the McAfee icon, point to VirusScan, and then click Options.
2 Click Advanced, then click the PUPs tab.
3 Click Edit Trusted PUPs List, select the checkbox in front of the file name, and click Remove. When you are finished removing items, click OK.
Manually scanning your computer
The Scan feature lets you selectively search for viruses and other threats on hard drives, floppy disks, and individual files and folders. When Scan finds a suspect file, it automatically tries to clean the file, unless it is a Potentially Unwanted Program. If Scan cannot clean the file, you can quarantine or delete the file.
Manually scanning for viruses and other threats
To scan your computer:
1 Right-click the McAfee icon, point to VirusScan, then click Scan.
The Scan dialog box opens (Figure 2-7).

Figure 2-7. Scan dialog box
2 Click the drive, folder, or file that you want to scan.
3 Select your Scan Options. By default, all of the Scan Options are pre-selected to provide the most thorough scan possible (Figure 2-7):
Scan subfolders — Use this option to scan files contained in your subfolders. Deselect this checkbox to allow checking of only the files visible when you open a folder or drive.
Example: The files in Figure 2-8 are the only files scanned if you deselect the Scan subfolders checkbox. The folders and their contents are not scanned. To scan those folders and their contents, you must leave the checkbox selected.
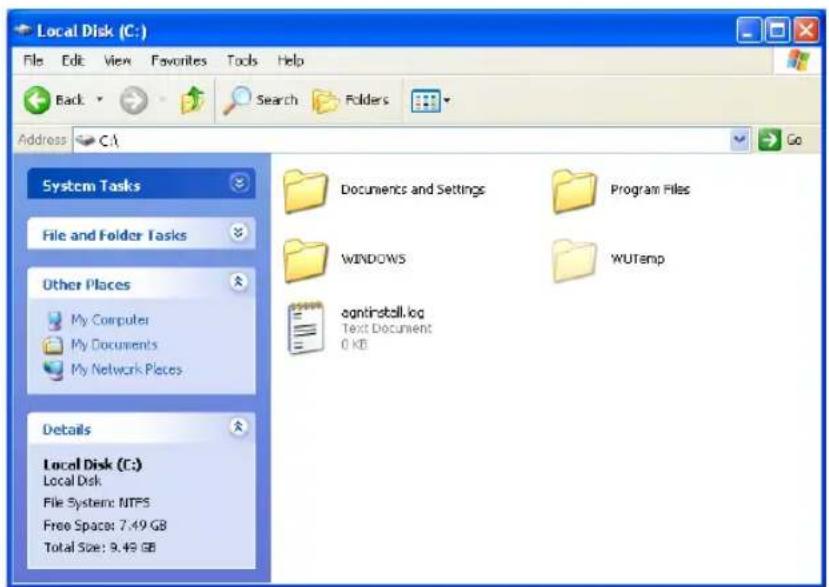
Figure 2-8. Local disk contents
- Scan all files — Use this option to allow the thorough scanning of all file types. Deselect this checkbox to shorten the scanning time and allow checking of program files and documents only.
Scan within compressed files — Use this option to reveal hidden files within .ZIP and other compressed files. Deselect this checkbox to prevent checking of any files or compressed files within the compressed file.
Sometimes virus authors plant viruses in a .ZIP file, then insert that .ZIP file into another .ZIP file in an effort to bypass anti-virus scanners. Scan can detect these viruses as long as you leave this option selected.
Scan for new unknown viruses — Use this option to find the newest viruses that might not have existing “cures.” This option uses advanced heuristic techniques that try to match files to the signatures of known viruses, while also looking for telltale signs of unidentified viruses in the files.
This scanning method also looks for file traits that can generally rule out that the file contains a virus. This minimizes the chances that Scan gives a false indication. Nevertheless, if a heuristic scan detects a virus, you should treat it with the same caution that you would treat a file that you know contains a virus.
This option provides the most thorough scan, but is generally slower than a normal scan.
Scan for Potentially Unwanted Programs — Use this option to detect spyware, adware, and other programs that gather and transmit your private data without your permission.
NOTE
Leave all options selected for the most thorough scan possible. This effectively scans every file in the drive or folder that you select, so allow plenty of time for the scan to complete. The larger the hard drive and the more files you have, the longer the scan takes.
4 Click Scan to start scanning files.
When the scan is finished, a scan summary shows the number of files scanned, the number of files detected, the number of Potentially Unwanted Programs, and the number of detected files that were automatically cleaned.
5 Click OK to close the summary, and view the list of any detected files in the Scan dialog box (Figure 2-9).
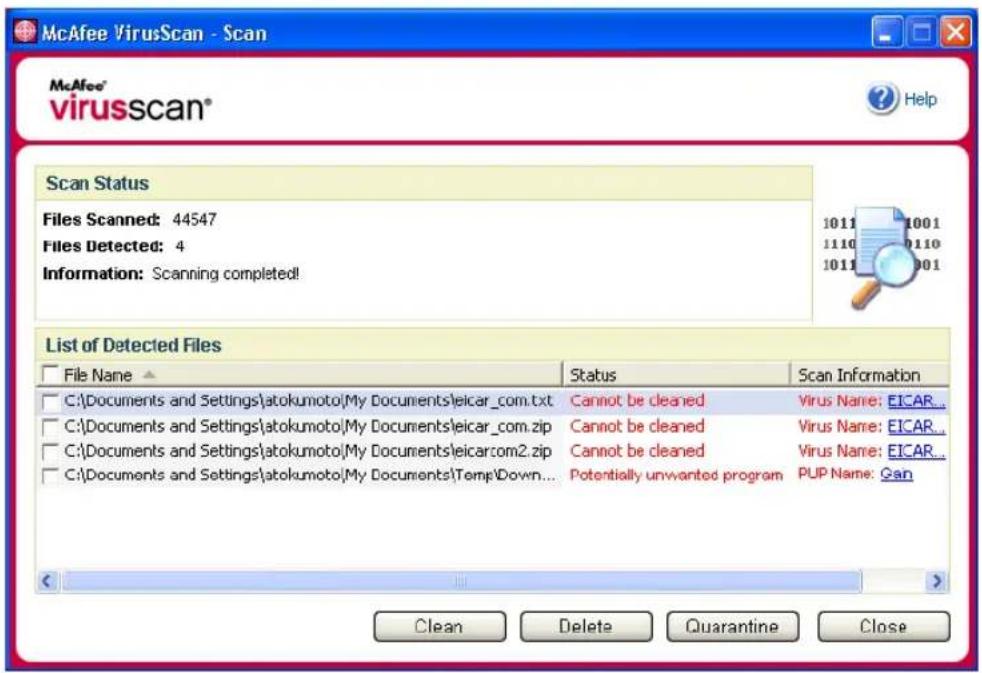
Figure 2-9. Scan results
NOTE
Scan counts a compressed file (.ZIP, .CAB, etc.) as one file within the Files Scanned number. Also, the number of files scanned can vary if you have deleted your temporary Internet files since your last scan.
6 If Scan finds no viruses or other threats, click Back to select another drive or folder to scan, or click Close to close the dialog box. Otherwise, see Understanding threat detections on page 40.
Scanning via Windows Explorer
VirusScan provides a shortcut menu to scan selected files, folders, or drives for viruses and other threats from within Windows Explorer.
To scan files in Windows Explorer:
1 Open Windows Explorer.
2 Right-click the drive, folder, or file that you want to scan, and then click Scan.
The Scan dialog box opens and starts scanning files. By default, all of the default Scan Options are pre-selected to provide the most thorough scan possible (Figure 2-7 on page 35).
Scanning via Microsoft Outlook
VirusScan provides a toolbar icon to scan for viruses and other threats in selected message stores and their subfolders, mailbox folders, or e-mail messages containing attachments from within Microsoft Outlook 97 or later.
To scan e-mail in Microsoft Outlook:
1 Open Microsoft Outlook.
2 Click the message store, folder, or e-mail message containing an attachment that you want to scan, and then click the e-mail scanning toolbar icon
The e-mail scanner opens and starts scanning files. By default, all of the default Scan Options are pre-selected to provide the most thorough scan possible (Figure 2-7 on page 35).
Automatically scanning for viruses and other threats
Although VirusScan scans files when they are accessed by either you or your computer, you can schedule automatic scanning in Windows Scheduler to thoroughly check your computer for viruses and other threats at specified intervals.
To schedule a scan:
1 Right-click the McAfee icon, point to VirusScan, then click Options.
The VirusScan Options dialog box opens.
2 Click the Scheduled Scan tab (Figure 2-10 on page 39).
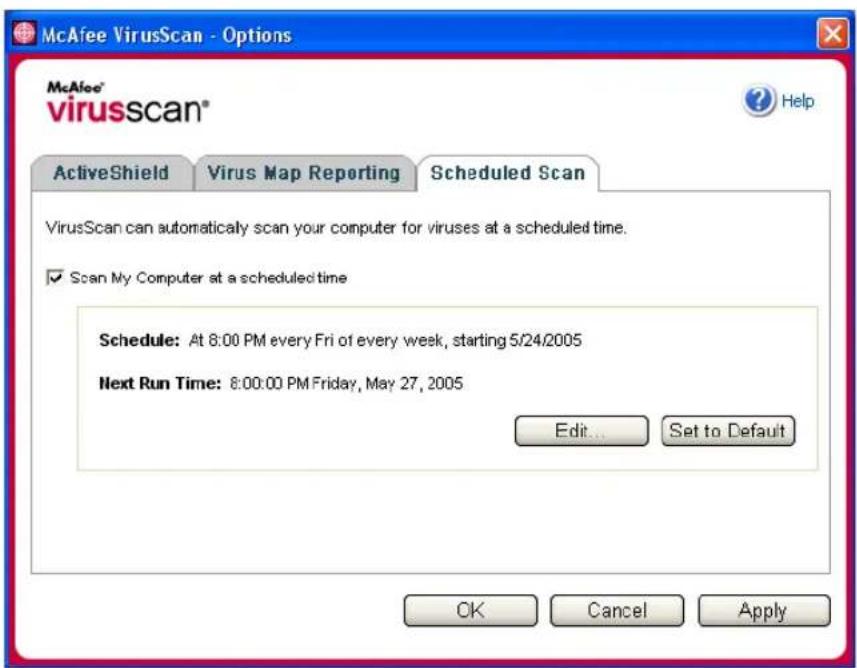
Figure 2-10. Scheduled Scan Options
3 Select the Scan My Computer at a scheduled time checkbox to enable automatic scanning.
4 Specify a schedule for automatic scanning:
To accept the default schedule (8PM every Friday), click OK.
To edit the schedule:
a. Click Edit.
b. Select how often to scan your computer in the Schedule Task list, and then select additional options in the dynamic area below it:
Daily - Specify the number of days between scans.
Weekly (the default) - Specify the number of weeks between scans as well as the names of the day(s) of the week.
Monthly - Specify which day of the month to scan. Click Select Months to specify which months to scan, and click OK.
Once - Specify which date to scan.
NOTE
These options in Windows Scheduler are not supported: At system startup, When idle, and Show multiple schedules. The last supported schedule remains enabled until you select from among the valid options.
c. Select the time of day to scan your computer in the Start time box.
d. To select advanced options, click Advanced.
The Advanced Schedule Options dialog box opens.
i. Specify a start date, end date, duration, end time, and whether to stop the task at the specified time if the scan is still running.
ii. Click OK to save your changes and close the dialog box. Otherwise, click Cancel.
5 Click OK to save your changes and close the dialog box. Otherwise, click Cancel.
6 To revert to the default schedule, click Set to Default. Otherwise, click OK.
Understanding threat detections
For most viruses, Trojans, and worms, Scan automatically tries to clean the file. You can then choose how to manage detected files, including whether to submit them to the McAfee AVERT labs for research. If Scan detects a potentially unwanted program, you can manually try to clean, quarantine, or delete it (AVERT submission is unavailable).
To manage a virus or potentially unwanted program:
1 If a file appears in the List of Detected Files, click the checkbox in front of the file to select it.
NOTE
If more than one file appears in the list, you can select the checkbox in front of the File Name list to perform the same action on all of the files. You can also click the file name in the Scan Information list to view details from the Virus Information Library.
2 If the file is a Potentially Unwanted Program, you can click Clean to try to clean it.
3 If Scan cannot clean the file, you can click Quarantine to encrypt and temporarily isolate suspect files in the quarantine directory until an appropriate action can be taken. (See Managing quarantined files on page 41 for details.)
4 If Scan cannot clean or quarantine the file, you can do either of the following:
- Click Delete to remove the file.
- Click Cancel to close the dialog box without taking any further action.
If Scan cannot clean or delete the detected file, consult the Virus Information Library at http://us.mcafee.com/virusInfo/default.asp for instructions on manually deleting the file.
If a detected file prevents you from using your Internet connection or from using your computer at all, try using a Rescue Disk to start your computer. The Rescue Disk, in many cases, can start a computer if a detected file disables it. See Creating a Rescue Disk on page 43 for details.
For more help, consult McAfee Customer Support at http://www.mcafeehelp.com/.
Managing quarantined files
The Quarantine feature encrypts and temporarily isolates suspect files in the quarantine directory until an appropriate action can be taken. Once cleaned, a quarantined file can then be restored to its original location.
To manage a quarantined file:
1 Right-click the McAfee icon, point to VirusScan, then click Manage Quarantined Files.
A list of quarantined files appears (Figure 2-11).
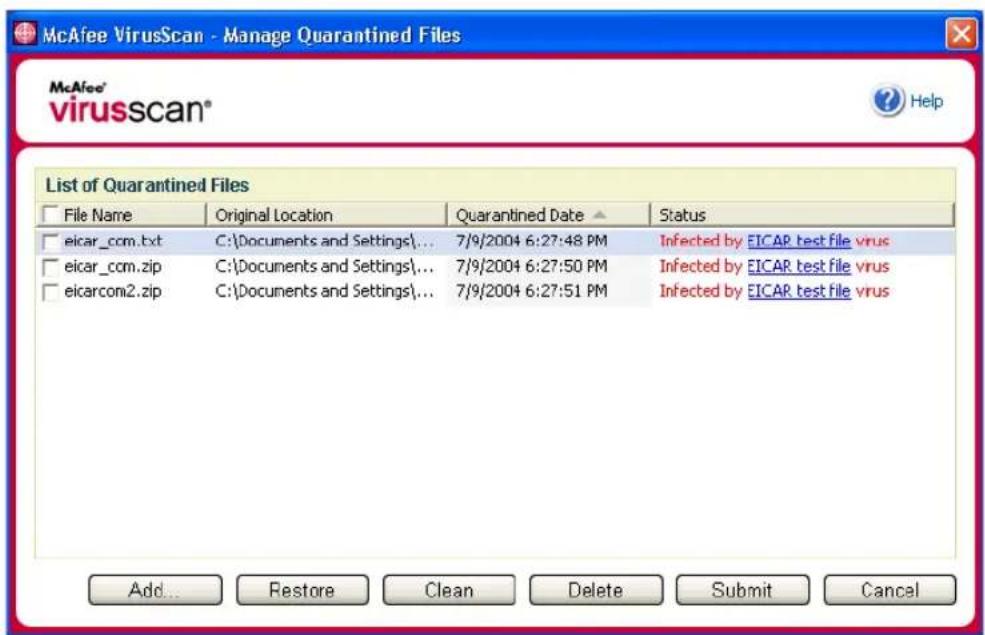
Figure 2-11. Manage Quarantined Files dialog box
2 Select the checkbox next to the file(s) you want to clean.
NOTE
If more than one file appears in the list, you can select the checkbox in front of the File Name list to perform the same action on all of the files. You can also click the virus name in the Status list to view details from the Virus Information Library.
Or, click Add, select a suspect file to add to the quarantine list, click Open, then select it in the quarantine list.
3 Click Clean.
4 If the file is cleaned, click Restore to move it back to its original location.
5 If VirusScan cannot clean the virus, click Delete to remove the file.
6 If VirusScan cannot clean or delete the file, and if it is not a Potentially Unwanted Program, you can submit the file to the McAfee AntiVirus Emergency Response Team (AVERT TM ) for research:
a Update your virus signature files if they are more than two weeks old.
b Verify your subscription.
c Select the file and click Submit to submit the file to AVERT.
VirusScan sends the quarantined file as an attachment with an e-mail message containing your e-mail address, country, software version, OS, and the file's original name and location. The maximum submission size is one unique 1.5-MB file per day.
7 Click Cancel to close the dialog box without taking any further action.
Creating a Rescue Disk
Rescue Disk is a utility that creates a bootable floppy disk that you can use to start your computer and scan it for viruses if a virus keeps you from starting it normally.
NOTE
You must be connected to the Internet to download the Rescue Disk image. Also, Rescue Disk is available for computers with FAT (FAT 16 and FAT 32) hard drive partitions only. It is unnecessary for NTFS partitions.
To create a Rescue Disk:
1 On a non-infected computer, insert a non-infected floppy disk in drive A. You might want to use Scan to ensure that both the computer and the floppy disk are virus-free. (See Manually scanning for viruses and other threats on page 35 for details.)
2 Right-click the McAfee icon, point to VirusScan, then click Create Rescue Disk.
The Create a Rescue Disk dialog box opens (Figure 2-12).
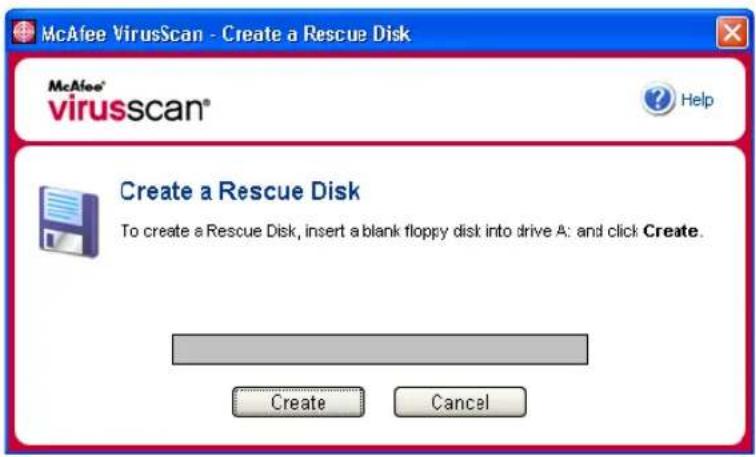
Figure 2-12. Create a Rescue Disk dialog box
3 Click Create to create the Rescue Disk.
If this is your first time creating a Rescue Disk, a message tells you that Rescue Disk needs to download the image file for the Rescue Disk. Click OK to download the component now, or click Cancel to download it later.
A warning message tells you that the contents of the floppy disk will be lost.
4 Click Yes to continue creating the Rescue Disk.
The creation status appears in the Create Rescue Disk dialog box.
5 When the message "Rescue disk created" appears, click OK, then close the Create Rescue Disk dialog box.
6 Remove the Rescue Disk from the drive, write-protect it, and store it in a safe location.
Write-protecting a Rescue Disk
To write-protect a Rescue Disk:
1 Turn the floppy disk label-side down (the metal circle should be visible).
2 Locate the write-protect tab. Slide the tab so the hole is visible.
Using a Rescue Disk
To use a Rescue Disk:
1 Turn off the infected computer.
2 Insert the Rescue Disk into the drive.
3 Turn the computer on.
A gray window with several options appears.
4 Choose the option that best suits your needs by pressing the Function keys (for example, F2, F3).
NOTE
Rescue Disk starts automatically in 60 seconds if you do not press any of the keys.
Updating a Rescue Disk
It is a good idea to update your Rescue Disk regularly. To update your Rescue Disk, follow the same instructions for creating a new Rescue Disk.
Automatically reporting viruses
You can anonymously send virus tracking information for inclusion in our World Virus Map. Automatically opt-in for this free, secure feature either during VirusScan installation (in the Virus Map Reporting dialog box), or at any time in the Virus Map Reporting tab of the VirusScan Options dialog box.
Reporting to the World Virus Map
To automatically report virus information to the World Virus Map:
1 Right-click the McAfee icon, point to VirusScan, then click Options.
The VirusScan Options dialog box opens.
2 Click the Virus Map Reporting tab (Figure 2-13).
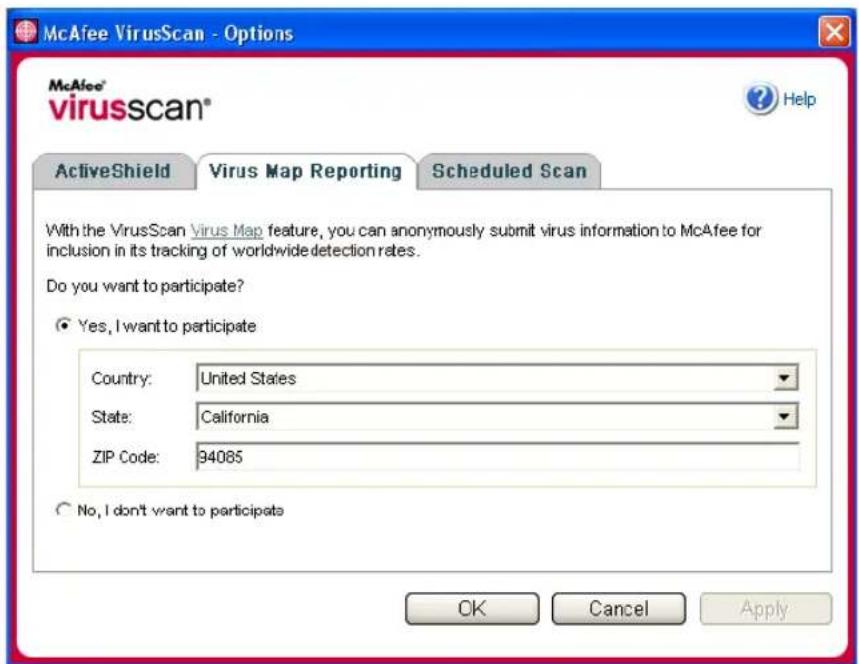
Figure 2-13. Virus Map Reporting Options
3 Accept the default Yes, I want to participate to anonymously send your virus information to McAfee for inclusion in its World Virus Map of worldwide detection rates. Otherwise, select No, I don't want to participate to avoid sending your information.
4 If you are in the United States, select the state and enter the zip code where your computer is located. Otherwise, VirusScan automatically tries to select the country where your computer is located.
5 Click OK.
Viewing the World Virus Map
Whether or not you participate in the World Virus Map, you can view the latest worldwide detection rates via the McAfee icon in your Windows system tray.
To view the World Virus Map:
■ Right-click the McAfee icon, point to VirusScan, then click World Virus Map.
The World Virus Map web page appears (Figure 2-14).
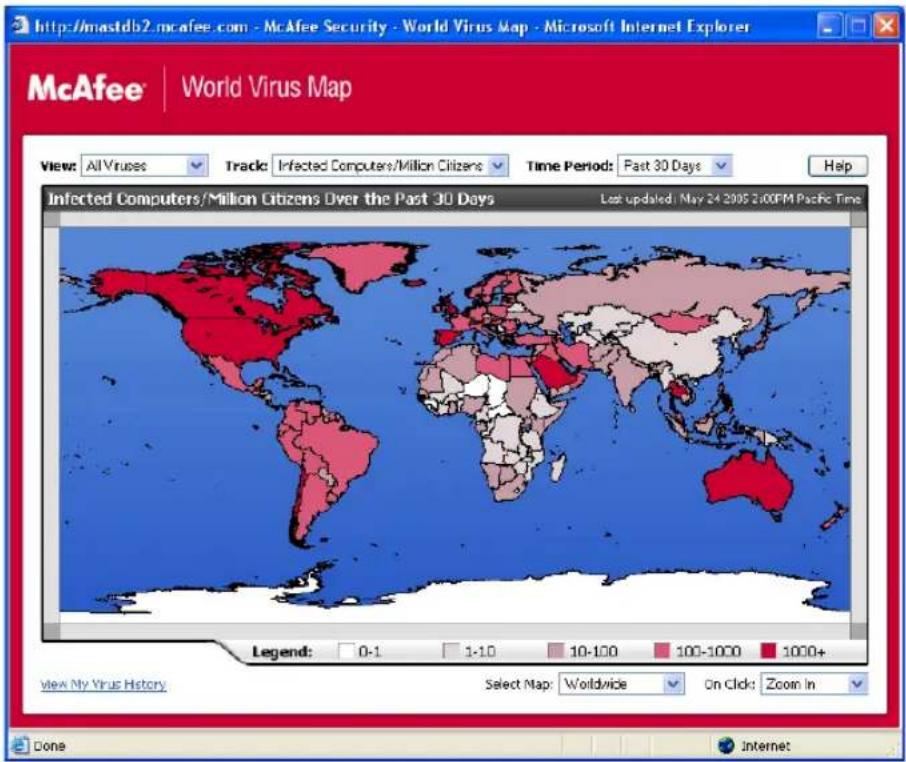
Figure 2-14. World Virus Map
By default, the World Virus Map shows the number of detected computers worldwide over the past 30 days, and also when the reporting data was last updated. You can change the map view to show the number of detected files, or change the time period to show only the results over the past 7 days or the past 24 hours.
The Virus Tracking section lists cumulative totals for the number of scanned files, detected files, and detected computers that have been reported since the date shown.
Updating VirusScan
When you are connected to the Internet, VirusScan automatically checks for updates every four hours, then automatically downloads and installs weekly virus definition updates without interrupting your work.
Virus definition files are approximately 100 KB and thus have minimal impact on system performance during download.
If a product update or virus outbreak occurs, an alert appears. Once alerted, you can then choose to update VirusScan to remove the threat of a virus outbreak.
Automatically checking for updates
McAfee SecurityCenter is automatically configured to check for updates for all of your McAfee services every four hours when you are connected to the Internet, then notify you with alerts and sounds. By default, SecurityCenter automatically downloads and installs any available updates.
NOTE
In some cases, you will be prompted to restart your computer to complete the update. Be sure to save all of your work and close all applications before restarting.
Manually checking for updates
In addition to automatically checking for updates every four hours when you are connected to the Internet, you can also manually check for updates at any time.
To manually check for VirusScan updates:
1 Ensure your computer is connected to the Internet.
2 Right-click the McAfee icon, then click Updates.
The SecurityCenter Updates dialog box opens.
3 Click Check Now.
If an update exists, the VirusScan Updates dialog box opens (Figure 2-15 on page 48). Click Update to continue.
If no updates are available, a dialog box tells you that VirusScan is up-to-date. Click OK to close the dialog box.
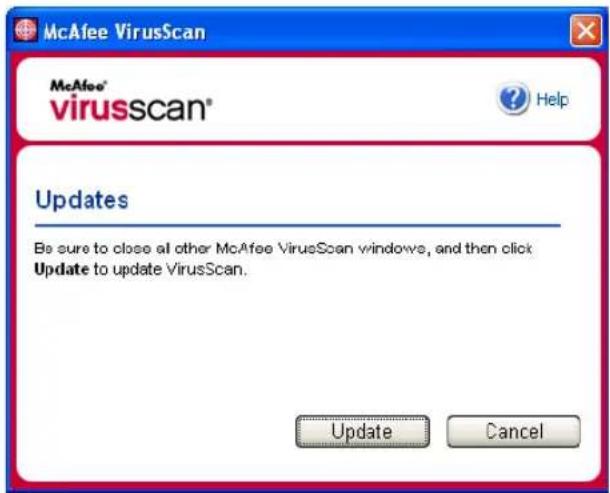
Figure 2-15. Updates dialog box
4 Log on to the web site if prompted. The Update Wizard installs the update automatically.
5 Click Finish when the update is finished installing.
NOTE
In some cases, you will be prompted to restart your computer to complete the update. Be sure to save all of your work and close all applications before restarting.
McAfee Personal Firewall Plus
3
Welcome to McAfee Personal Firewall Plus.
McAfee Personal Firewall Plus software offers advanced protection for your computer and your personal data. Personal Firewall establishes a barrier between your computer and the Internet, silently monitoring Internet traffic for suspicious activities.
With it, you get the following features:
■ Defends against potential hacker probes and attacks
■ Complements anti-virus defenses
■ Monitors Internet and network activity
- Alerts you to potentially hostile events
■ Provides detailed information on suspicious Internet traffic
■ Integrates Hackerwatch.org functionality, including event reporting, self-testing tools, and the ability to email reported events to other online authorities
■ Provides detailed tracing and event research features
New features
■ Improved Gaming Support
McAfee Personal Firewall Plus protects your computer from intrusion attempts and suspicious activities during full-screen gameplay, but can hide alerts if it detects intrusion attempts or suspicious activities. Red alerts appear after you exit the game.
■ Improved Access Handling
McAfee Personal Firewall Plus lets users dynamically grant applications temporary access to the Internet. Access is restricted to the time the application launches until the time it closes. When Personal Firewall detects an unknown program, attempting to communicate with the Internet, a Red Alert provides the option to grant the application temporary access to the Internet.
■ Enhanced Security Control
Running the Lockdown feature in McAfee Personal Firewall Plus allows you to instantly block all incoming and outgoing Internet traffic between a computer and the Internet. Users can enable and disable Lockdown from three locations in Personal Firewall.
■ Improved Recovery Options
You can run Reset Options to automatically restore the default settings to Personal Firewall. If Personal Firewall exhibits undesirable behavior that you cannot correct, you can choose to undo your current settings and revert to the product's default settings.
■ Internet Connectivity Protection
To prevent a user from inadvertently disabling his or her Internet connection, the option to ban an Internet address is excluded on a Blue Alert when Personal Firewall detects an Internet connection originates from a DHCP or DNS server. If the incoming traffic does not originate from a DHCP or DNS server, the option appears.
■ Enhanced HackerWatch.org Integration
Reporting potential hackers is easier than ever. McAfee Personal Firewall Plus improves the functionality of HackerWatch.org, which includes event submission of potentially malicious events to the database.
■ Extended Intelligent Application Handling
When an application seeks Internet access, Personal Firewall first checks whether it recognizes the application as trusted or malicious. If the application is recognized as trusted, Personal Firewall automatically allows it access to the Internet so you do not have to.
■ Advanced Trojan Detection
McAfee Personal Firewall Plus combines application connection management with an enhanced database to detect and block more potentially malicious applications, such as Trojans, from accessing the Internet and potentially relaying your personal data.
■ Improved Visual Tracing
Visual Trace includes easy-to-read graphical maps showing the originating source of hostile attacks and traffic worldwide, including detailed contact/owner information from originating IP addresses.
■ Improved Usability
McAfee Personal Firewall Plus includes a Setup Assistant and a User Tutorial to guide users in the setup and use of their firewall. Although the product is designed to use without any intervention, McAfee provides users with a wealth of resources to understand and appreciate what the firewall provides for them.
■ Enhanced Intrusion Detection
Personal Firewall's Intrusion Detection System (IDS) detects common attack patterns and other suspicious activity. Intrusion detection monitors every data packet for suspicious data transfers or transfer methods and logs this in the event log.
■ Enhanced Traffic Analysis
McAfee Personal Firewall Plus offers users a view of both incoming and outgoing data from their computers, as well as displaying application connections including applications that are actively “listening” for open connections. This allows users to see and act upon applications that might be open for intrusion.
Removing other firewalls
Before you install McAfee Personal Firewall Plus software, you must uninstall any other firewall programs on your computer. Please follow your firewall program's uninstall instructions to do so.
NOTE
If you use Windows XP, you do not need to disable the built-in firewall before installing McAfee Personal Firewall Plus. However, we recommend that you do disable the built-in firewall. If you do not, you will not receive events in the Inbound Events log in McAfee Personal Firewall Plus.
Setting the default firewall
McAfee Personal Firewall can manage permissions and traffic for Internet applications on your computer, even if Windows Firewall is detected as running on your computer.
When installed, McAfee Personal Firewall automatically disables Windows Firewall and sets itself as your default firewall. You then experience only McAfee Personal Firewall functionality and messaging. If you subsequently enable Windows Firewall via Windows Security Center or Windows Control Panel, letting both firewalls run on your computer might result in partial loss of logging in McAfee Firewall as well as duplicate status and alert messaging.
NOTE
If both firewalls are enabled, McAfee Personal Firewall does not show all the blocked IP addresses in its Inbound Events tab. Windows Firewall intercepts most of these events and blocks those events, preventing McAfee Personal Firewall from detecting or logging those events. However, McAfee Personal Firewall might block additional traffic based upon other security factors, and that traffic will be logged.
Logging is disabled in Windows Firewall by default, but if you choose to enable both firewalls, you can enable Windows Firewall logging. The default Windows Firewall log is C:\Windows\pfirewall.log
To ensure that your computer is protected by at least one firewall, Windows Firewall is automatically re-enabled when McAfee Personal Firewall is uninstalled.
If you disable McAfee Personal Firewall or set its security setting to Open without manually enabling Windows Firewall, all firewall protection will be removed except for previously blocked applications.
Setting the security level
You can configure security options to indicate how Personal Firewall responds when it detects unwanted traffic. By default, the Standard security level is enabled. In Standard security level, when an application requests Internet access and you grant it access, you are granting the application Full Access. Full Access allows the application the ability to both send data and receive unsolicited data on non-system ports.
To configure security settings:
1 Right-click the McAfee icon 📂 in the Windows system tray, point to Personal Firewall, then select Options.
2 Click the Security Settings icon.
3 Set the security level by moving the slider to the desired level.
The security level ranges from Lockdown to Open:
Lockdown — All Internet connections on your computer are closed. You can use this setting to block ports you configured to be open in the System Services page.
Tight Security — When an application requests a specific type of access to the Internet (for example, Outbound Only Access), you can allow or disallow the application an Internet connection. If the application later requests Full Access, you can then grant Full Access or restrict it to Outbound Only access.
Standard Security (recommended) — When an application requests and then is granted Internet access, the application receives full Internet access to handle incoming and outgoing traffic.
- Trusting Security — All applications are automatically trusted when they first attempt to access the Internet. However, you can configure Personal Firewall to use alerts to notify you about new applications on your computer. Use this setting if you find that some games or streaming media do not work.
Open — Your firewall is disabled. This setting allows all traffic through Personal Firewall, without filtering.
NOTE
Previously blocked applications continue to be blocked when the firewall is set to the Open or Lockdown security setting. To prevent this, you can either change the application's permissions to Allow Full Access or delete the Blocked permission rule from the Internet Applications list.
4 Select additional security settings:
NOTE
If your computer runs Windows XP and multiple XP users have been added, these options are available only if you are logged on to your computer as an administrator.
Record Intrusion Detection (IDS) Events in Inbound Events Log — If you select this option, events detected by IDS will appear in the Inbound Events log. The Intrusion Detection System detects common attack types and other suspicious activity. Intrusion detection monitors every inbound and outbound data packet for suspicious data transfers or transfer methods. It compares these to a “signature” database and automatically drops the packets coming from the offending computer.
IDS looks for specific traffic patterns used by attackers. IDS checks each packet that your machine receives to detect suspicious or known-attack traffic. For example, if Personal Firewall sees ICMP packets, it analyzes those packets for suspicious traffic patterns by comparing the ICMP traffic against known attack patterns.
- Accept ICMP ping requests — ICMP traffic is used mainly for performing traces and pings. Pinging is frequently used to perform a quick test before attempting to initiate communications. If you are using or have used a peer-to-peer file-sharing program, you might find yourself being pinged a lot. If you select this option, Personal Firewall allows all ping requests without logging the pings in the Inbound Events log. If you do not select this option, Personal Firewall blocks all ping requests and logs the pings in the Inbound Events log.
Allow restricted users to change Personal Firewall settings — If you run Windows XP or Windows 2000 Professional with multiple users, select this option to allow restricted XP users to modify Personal Firewall settings.
5 Click OK if you are finished making changes.
Testing McAfee Personal Firewall Plus
You can test your Personal Firewall installation for possible vulnerabilities to intrusion and suspicious activity.
To test your Personal Firewall installation from the McAfee system tray icon:
■ Right-click the McAfee icon M in the Windows system tray, and select Test Firewall.
Personal Firewall opens Internet Explorer and goes to http://www.hackerwatch.org/, a web site maintained by McAfee. Please follow the directions on the Hackerwatch.org Probe page to test Personal Firewall.
Using McAfee SecurityCenter
McAfee SecurityCenter is your one-stop security shop, accessible from its icon in your Windows system tray or from your Windows desktop. With it, you can perform these useful tasks:
■ Get free security analysis for your computer.
■ Launch, manage, and configure all your McAfee subscriptions from one icon.
■ See continuously updated virus alerts and the latest product information.
■ Get quick links to frequently asked questions and account details at the McAfee web site.
NOTE
For more information about its features, click Help in the SecurityCenter dialog box.
While SecurityCenter is running and all of the McAfee features installed on your computer are enabled, a red M icon appears in the Windows system tray. This area is usually in the lower-right corner of the Windows desktop and contains the clock.
If one or more of the McAfee applications installed on your computer are disabled, the McAfee icon changes to black 📂
To launch the McAfee SecurityCenter:
1 Right-click the McAfee icon M, then select Open SecurityCenter.
To launch Personal Firewall from McAfee SecurityCenter:
1 From SecurityCenter, click the Personal Firewall Plus tab.
2 Select a task from the I want to menu.
To launch Personal Firewall from Windows:
1 Right-click the McAfee icon in the Windows system tray, then point to Personal Firewall.
2 Select a task.
To open Personal Firewall:
■ Right-click the McAfee icon M in the Windows system tray, point to Personal Firewall, and select a task.
About the Summary page
The Personal Firewall Summary includes four summary pages:
Main Summary
Application Summary
Event Summary
HackerWatch Summary
The Summary pages contain a variety of reports on recent inbound events, application status, and world-wide intrusion activity reported by HackerWatch.org. You will also find links to common tasks performed in Personal Firewall.
To open the Main Summary page in Personal Firewall:
■ Right-click the McAfee icon M in the Windows system tray, point to Personal Firewall, then select View Summary (Figure 3-1).
![McAfee Personal Firewall Plus File Edit View Event Help McAfee personalfirewallplus Main Summary [Change View] Summary Internet Applications Inbound Events Options McAfee® personalfirewallplus Your firewall is currently set to Standard Security. 60 new events have been blocked today. 3 application r…](/content/2026/05/857814/images/a5b62169bae8078ad253b897664983b84c4958ef4a89f5d29212f58553dc7f30.jpg)
Figure 3-1. Main Summary page
Click the following to navigate to different Summary pages:
Item Description
| Change View | Click Change View to open a list of Summary pages. From the list, select a Summary page to view. |
| Right arrow Click the right arrow icon to view the next Summary page. | |
| Left arrow Click the left arrow icon to view the previous Summary page. | |
| Home | Click the home icon to return to the Main Summary page. |
The Main Summary page provides the following information:
Item Description
Security Setting The security setting status tells you the level of security at which the firewall is set. Click the link to change the security level.
Blocked Events The blocked events status displays the number of events that have been blocked today. Click the link to view event details from the Inbound Event page.
Item Description
| Application Rule Changes | The application rule status displays the number of application rules that have been changed recently. Click the link to view the list of allowed and blocked applications and to modify application permissions. |
| What's New? | What's New? shows the latest application that was granted full access to the Internet. |
| Last Event | Last Event shows the latest inbound events. You can click a link to trace the event or to trust the IP address. Trusting an IP address allows all traffic from the IP address to reach your computer. |
| Daily Report | Daily Report displays the number of inbound events that Personal Firewall blocked today, this week, and this month. Click the link to view event details from the Inbound Event page. |
| Active Applications | Active Applications displays the applications that are currently running on your computer and accessing the Internet. Click an application to view which IP addresses the application is connecting to. |
| Common Tasks | Click a link in Common Tasks to go to Personal Firewall pages where you can view firewall activity and perform tasks. |
To view the Application Summary page:
1 Right-click the McAfee icon M in the Windows system tray, point to Personal Firewall, then select View Summary.
2 Click Change View, then select Application Summary.
The Application Summary page provides the following information:
Item Description
| Traffic Monitor | The Traffic Monitor shows inbound and outbound Internet connections over the last fifteen minutes. Click the graph to view traffic monitoring details. |
| Active Applications | Active Applications shows the bandwidth use of your computer's most active applications during the last twenty-four hours.Application—The application accessing the Internet.%—The percentage of bandwidth used by the application.Permission—The type of Internet access that the application is allowed.Rule Created—When the application rule was created. |
| What's New? | What's New? shows the latest application that was granted full access to the Internet. |
Item Description
| Active Applications | Active Applications displays the applications that are currently running on your computer and accessing the Internet. Click an application to view which IP addresses the application is connecting to. |
| Common Tasks | Click a link in Common Tasks to go to Personal Firewall pages where you can view application status and perform application-related tasks. |
To view the Event Summary page:
1 Right-click the McAfee icon in the Windows system tray, point to Personal Firewall, then select View Summary.
2 Click Change View, then select Event Summary.
The Event Summary page provides the following information:
Item Description
| Port Comparison | Port Comparison shows a pie chart of the most frequently attempted ports on your computer during the past 30 days. You can click a port name to view details from the Inbound Events page. You can also move your mouse pointer over the port number to see a description of the port. |
| Top Offenders | Top Offenders shows the most frequently blocked IP addresses, when the last inbound event occurred for each address, and the total number of inbound events in the past thirty days for each address. Click an event to view event details from the Inbound Events page. |
| Daily Report | Daily Report displays the number of inbound events that Personal Firewall blocked today, this week, and this month. Click a number to view the event details from the Inbound Events log. |
| Last Event | Last Event shows the latest inbound events. You can click a link to trace the event or to trust the IP address. Trusting an IP address allows all traffic from the IP address to reach your computer. |
| Common Tasks | Click a link in Common Tasks to go to Personal Firewall pages where you can view details of events and perform event-related tasks. |
To view the HackerWatch Summary page:
1 Right-click the McAfee icon 📂 in the Windows system tray, point to Personal Firewall, then select View Summary.
2 Click Change View, then select HackerWatch Summary.
The HackerWatch Summary page provides the following information.
Item Description
| World Activity | World Activity shows a world map identifying recently blocked activity monitored by HackerWatch.org. Click the map to open the Global Threat Analysis Map in HackerWatch.org. |
| Event Tracking | Event Tracking shows the number of inbound events submitted to HackerWatch.org. |
| Global Port Activity | Global Port Activity shows the top ports, in the past 5 days, that appear to be threats. Click a port to view the port number and port description. |
| Common Tasks | Click a link in Common Tasks to go to HackerWatch.org pages where you can get more information on world-wide hacker activity. |
About the Internet Applications page
Use the Internet Applications page to view the list of allowed and blocked applications.
To launch the Internet Applications page:
■ Right-click the McAfee icon 📂 in the Windows system tray, point to Personal Firewall, then select Applications (Figure 3-2).
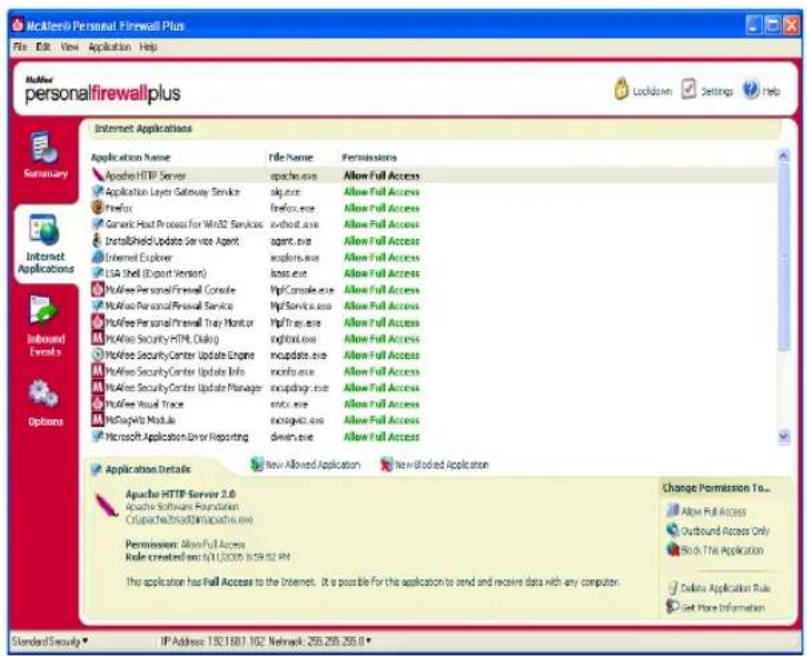
Figure 3-2. Internet Applications page
The Internet Applications page provides the following information:
■ Application names
File names
■ Current permission levels
■ Application details: application name and version, company name, path name, permission, timestamps, and explanations of permission types
Changing application rules
Personal Firewall lets you change access rules for applications.
To change an application rule:
1 Right-click the McAfee icon, point to Personal Firewall, then select Internet Applications.
2 In the Internet Applications list, right-click the application rule for an application, and select a different level:
Allow Full Access — Allow the application to establish outbound and inbound Internet connections.
Outbound Access Only — Allow the application to establish an outbound Internet connection only.
Block This Application — Disallow the application Internet access.
NOTE
Previously blocked applications continue to be blocked when the firewall is set to the Open or Lockdown. To prevent this from, you can either change the application's access rule to Full Access or delete the Blocked permission rule from the Internet Applications list.
To delete an application rule:
1 Right-click the McAfee icon M in the Windows system tray, point to Personal Firewall, then select Internet Applications.
2 In the Internet Applications list, right-click the application rule, then select Delete Application Rule.
The next time the application requests Internet access, you can set its permission level to re-add it to the list.
Allowing and blocking Internet applications
To change the list of allowed and blocked Internet applications:
1 Right-click the McAfee icon M in the Windows system tray, point to Personal Firewall, then select Internet Applications.
2 On the Internet Applications page, click one of the following options:
- New Allowed Application — Allow an application full Internet access.
- New Blocked Application — Disallow an application Internet access.
◆ Delete Application Rule — Remove an application rule.
About the Inbound Events page
Use the Inbound Events page to view the Inbound Events log, generated when Personal Firewall blocks unsolicited Internet connections.
To launch the Inbound Events page:
■ Right-click the McAfee icon M in the Windows system tray, point to Personal Firewall, then select Inbound Events (Figure 3-3).
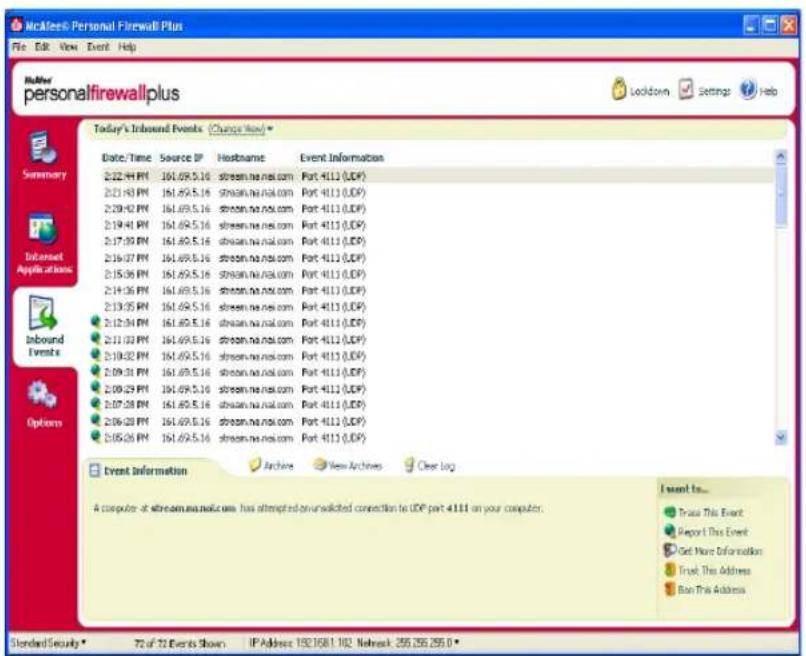
Figure 3-3. Inbound Events page
The Inbound Events page provides the following information:
■ Timestamps
Source IPs
Hostnames
■ Service or application names
■ Event details: connection types, connection ports, host name or IP, and explanations of port events
Understanding events
About IP addresses
IP addresses are numbers: four numbers each between 0 and 255 to be precise. These numbers identify a specific place that traffic can be directed to on the Internet.
IP address types
Several IP addresses are unusual for various reasons:
Non-routable IP addresses — These are also referred to as "Private IP Space." These IP addresses cannot be used on the Internet. Private IP blocks are 10.x.x.x, 172.16.x.x - 172.31.x.x, and 192.168.x.x.
Loop-back IP addresses — Loop-back addresses are used for testing purposes. Traffic sent to this block of IP addresses comes right back to the device generating the packet. It never leaves the device, and is primarily used for hardware and software testing. The Loop-Back IP block is 127.x.x.x.
Null IP address — This is an invalid address. When detected, Personal Firewall indicates that the traffic used a blank IP address. Frequently, this indicates that the sender is deliberately obscuring the origin of the traffic. The sender will not be able to receive any replies to their traffic unless the packet is received by an application that understands the contents of the packet that will include instructions specific to that application. Any address that starts with 0 (0.x.x.x) is a null address. For example, 0.0.0.0 is a null IP address.
Events from 0.0.0.0
If you see events from IP address 0.0.0.0, there are two likely causes. The first, and most common, is that your computer has received a badly formed packet. The Internet isn't always 100% reliable, and bad packets can occur. Since Personal Firewall sees the packets before TCP/IP can validate them, it might report these packets as an event.
The other situation occurs when the source IP is spoofed, or faked. Spoofed packets can be a sign that someone is scanning your computer for Trojans. Personal Firewall blocks this kind of activity, so your computer is safe.
Events from 127.0.0.1
Events will sometimes list their source IP as 127.0.0.1. This is called a loopback address or localhost.
Many legitimate programs use the loopback address for communication between components. For example, you can configure many personal E-mail or Web servers through a Web interface. To access the interface, you type "http://localhost/" in your Web browser.
Personal Firewall allows traffic from these programs, so if you see events from 127.0.0.1, it is likely that the source IP address is spoofed, or faked. Spoofed packets are usually indicate that another computer is scanning yours for Trojans. Personal Firewall blocks such intrusion attempts, so your computer is safe.
Some programs, notably Netscape 6.2 and higher, require you to add 127.0.0.1 to the Trusted IP Addresses list. These programs' components communicate between each other in such a manner that Personal Firewall cannot determine if the traffic is local or not.
In the example of Netscape 6.2, if you do not trust 127.0.0.1, then you will not be able to use your buddy list. Therefore, if you see traffic from 127.0.0.1 and all of the applications on your computer work normally, then it is safe to block this traffic. However, if a program (like Netscape) experiences problems, add 127.0.0.1 to the Trusted IP Addresses list in Personal Firewall.
If placing 127.0.0.1 in the trusted IP list fixes the problem, then you need to weigh your options: if you trust 127.0.0.1, your program will work, but you will be more open to spoofed attacks. If you do not trust the address, then your program will not work, but you will remain protected against certain malicious traffic.
Events from computers on your LAN
Events can be generated from computers on your local area network (LAN). To show that these events are generated by your network, Personal Firewall displays them in green.
In most corporate LAN settings, you should select Make all computers on your LAN Trusted in the Trusted IP Addresses options.
In some situations, your “local” network can be as dangerous than the Internet, especially if your computer runs on a high-bandwidth DSL or cable modem based network. In this case, do not to select Make all computers on your LAN Trusted. Instead, add the IP addresses of your local computers to the Trusted IP Addresses list.
Events from private IP addresses
IP addresses of the format 192.168.xxx.xxx, 10.xxx.xxx.xxx, and 172.16.0.0 - 172.31.255.255 are referred to as non-routable or private IP addresses. These IP addresses should never leave your network, and can be trusted most of the time.
The 192.168.xxx.xxx block is used with Microsoft Internet Connection Sharing (ICS). If you are using ICS, and see events from this IP block, you might want to add the IP address 192.168.255.255 to your Trusted IP Addresses list. This will trust the entire 192.168.xxx.xxx block.
If you are not on a private network, and see events from these IP ranges, the source IP address might be spoofed, or faked. Spoofed packets are usually signs that someone is scanning for Trojans. It's important to remember that Personal Firewall blocked this attempt, so your computer is safe.
Since private IP addresses refer to different computers depending on what network you are on, reporting these events will have no effect, so there's no need to do so.
Showing events in the Inbound Events log
The Inbound Events log displays events in a number of ways. The default view limits the view to events which occur on the current day. You can also view events that occurred during the past week, or view the complete log.
Personal Firewall also lets you display inbound events from specific days, from specific Internet addresses (IP addresses), or events that contain the same event information.
For information about an event, click the event, and view the information in the Event Information pane.
Showing today's events
Use this option to review the day's events.
To show today's events:
1 Right-click the McAfee icon in the Windows system tray, point to Personal Firewall, then select Inbound Events.
2 On the Inbound Events log, right-click an entry, then click Show Today's Events.
Showing this week's events
Use this option to review weekly events.
To show this week's events:
1 Right-click the McAfee icon in the Windows system tray, point to Personal Firewall, then select Inbound Events.
2 On the Inbound Events log, right-click an entry, then click Show This Week's Events.
Showing the complete Inbound Events log
Use this option to review all events.
To show all of the events in the Inbound Events log:
1 Right-click the McAfee icon, point to Personal Firewall, and click Inbound Events.
2 On the Inbound Events log, right-click an entry, then click Show Complete Log.
The Inbound Events log displays all events from the Inbound Events log.
Showing events from a specific day
Use this option to review events from a specific day.
To show a day's events:
1 Right-click the McAfee icon in the Windows system tray, point to Personal Firewall, then select Inbound Events.
2 On the Inbound Events log, right-click an entry, then click Show Only Events From this Day.
Showing events from a specific Internet address
Use this option to review other events which originate from a particular Internet address.
To show events of an Internet address:
1 Right-click the McAfee icon in the Windows system tray, point to Personal Firewall, and click Inbound Events.
2 On the Inbound Events log, right-click an entry, then click Show Only Events From Selected Internet Address.
Showing events that share identical event information
Use this option to review other events in the Inbound Events log that have the same information in the Event Information column as the event you selected. You can find out how many times this event happened, and if it is from the same source. The Event Information column provides a description of the event and, if known, the common program or service that uses that port.
To show events that share identical event information:
1 Right-click the McAfee icon in the Windows system tray, point to Personal Firewall, and click Inbound Events.
2 On the Inbound Events log, right-click an entry, then click Show Only Events with the same Event Information.
Responding to inbound events
In addition to reviewing details about events in the Inbound Events log, you can perform a Visual Trace of the IP addresses for an event in the Inbound Events log, or get event details at the anti-hacker online community HackerWatch.org web site.
Tracing the selected event
You can try to perform a Visual Trace of the IP addresses for an event in the Inbound Events log.
To trace a selected event:
1 Right-click the McAfee icon in the Windows system tray, point to Personal Firewall, and select Inbound Events.
2 On the Inbound Events log, right-click the event you want to trace, then click Trace Selected Event. You can also double-click an event to trace an event.
By default, Personal Firewall begins a Visual Trace using the integrated Personal Firewall Visual Trace program.
Getting advice from HackerWatch.org
To get advice from HackerWatch.org:
1 Right-click the McAfee icon, point to Personal Firewall, and select Inbound Events.
2 Select the event's entry on the Inbound Events page, then click Get More Information on the I want to pane.
Your default Web browser launches and opens the HackerWatch.org to retrieve information about the event type, and advice about whether to report the event.
Reporting an event
To report an event that you think was an attack on your computer:
1 Right-click the McAfee icon in the Windows system tray, point to Personal Firewall, and select Inbound Events.
2 Click the event you want to report, then click Report This Event in the I want to pane.
Personal Firewall reports the event to the HackerWatch.org using your unique ID.
Signing up for HackerWatch.org
When you first open the Summary page, Personal Firewall contacts HackerWatch.org to generate your unique user ID. If you are an existing user, your sign-up is automatically validated. If you are a new user, you must enter a nickname and email address, then click the validation link in the confirmation email from HackerWatch.org to be able to use the event filtering/e-mailing features at its web site.
You can report events to HackerWatch.org without validating your user ID. However, to filter events and email events to a friend, you must sign up for the service.
Signing up for the service allows your submissions to be tracked and lets us notify you if HackerWatch.org needs more information or further action from you. We also require you to sign up because we must confirm any information we receive for that information to be useful.
All email addresses provided to HackerWatch.org are kept confidential. If a request for additional information is made by an ISP, that request is routed through HackerWatch.org; your email address is never exposed.
Trusting an address
You can use the Inbound Events page to add an IP address to the Trusted IP Addresses list to allow a permanent connection.
If you see an event in the Inbound Events page that contains an IP address that you need to allow, you can have Personal Firewall allow connections from it at all times.
To add an IP address to the Trusted IP Addresses list:
1 Right-click the McAfee icon in the Windows system tray, point to Personal Firewall, and select Inbound Events.
2 Right-click the event whose IP address you want trusted, and click Trust the Source IP Address.
Verify that the IP address displayed in the Trust This Address dialog is correct, and click OK. The IP address is added to the Trusted IP Addresses list.
To verify that the IP address was added:
1 Right-click the McAfee icon in the Windows system tray, point to Personal Firewall, and select Options.
2 Click the Trusted & Banned IPs icon, then the Trusted IP Addresses tab.
The IP address appears checked in the Trusted IP Addresses list.
Banning an address
If an IP address appears in your Inbound Events log, this indicates that traffic from that address was blocked. Therefore, banning an address adds no additional protection unless your computer has ports that are deliberately opened through the System Services feature, or unless your computer has an application that has permission to receive traffic.
Add an IP address to your banned list only if you have one or more ports that are deliberately open and if you have reason to believe that you must block that address from accessing open ports.
If you see an event in the Inbound Events page that contains an IP address that you want to ban, you can configure Personal Firewall to prevent connections from it at all times.
You can use the Inbound Events page, which lists the IP addresses of all inbound Internet traffic, to ban an IP address that you suspect is the source of suspicious or undesirable Internet activity.
To add an IP address to the Banned IP Addresses list:
1 Right-click the McAfee icon in the Windows system tray, point to Personal Firewall, then select Inbound Events.
2 The Inbound Events page lists the IP addresses of all inbound Internet traffic. Select an IP address, and then do one of the following:
Right-click the IP address, and then select Ban the Source IP Address.
- From the I want to menu, click Ban This Address.
3 In the Add Banned IP Address Rule dialog, use one or more of the following settings to configure the Banned IP Address rule:
A Single IP Address: The IP address to ban. The default entry is the IP address that you selected from the Inbound Event page.
An IP Address Range: The IP addresses between the address you specify in From IP Address and the IP address you specify in To IP Address.
Make this rule expire on: Date and time in which the Banned IP Address rule expires. Select the appropriate drop down menus to select the date and the time.
◆ Description: Optionally describe the new rule.
Click OK.
4 In the dialog box, click Yes to confirm your setting. Click No to return to the Add Banned IP Address Rule dialog.
If Personal Firewall detects an event from a banned Internet connection, it will alert you according to the method you specified on the Alert Settings page.
To verify that the IP address was added:
1 Click the Options tab.
2 Click the Trusted & Banned IPs icon, then click the Banned IP Addresses tab.
The IP address appears checked in the Banned IP Addresses list.
Managing the Inbound Events log
You can use the Inbound Events page to manage the events in the Inbound Events log generated when Personal Firewall blocks unsolicited Internet traffic.
Archiving the Inbound Events log
You can archive the current Inbound Events log to save all of the logged inbound events, including their date and times, source IPs, hostnames, ports, and event information. You should archive your Inbound Events log periodically to prevent the Inbound Events log from growing too large.
To archive the Inbound Events log:
1 Right-click the McAfee icon in the Windows system tray, point to Personal Firewall, then select Inbound Events.
2 On the Inbound Events page, click Archive.
3 On the Archive Log dialog, click Yes to proceed with the operation.
4 Click Save to save the archive in the default location, or browse to a location where you want to save the archive.
Note: By default, Personal Firewall automatically archives the Inbound Events log. Check or clear Automatically archive logged events in the Event Log Settings page to enable or disable the option.
Viewing an archived Inbound Events log
You can view any Inbound Events log that you previously archived. The saved archive includes date and times, source IPs, hostnames, ports, and event information for the events.
To view an archived Inbound Events log:
1 Right-click the McAfee icon in the Windows system tray, point to Personal Firewall, then select Inbound Events.
2 On the Inbound Events page, click View Archives.
3 Select or browse for the archive file name and click Open.
Clearing the Inbound Events log
You can clear all information from the Inbound Events log.
WARNING
After you clear the Inbound Events log, you cannot recover it. If you think you will need the Events Log in the future, you should archive it instead.
To clear the Inbound Events log:
1 Right-click the McAfee icon, point to Personal Firewall, then select Inbound Events.
2 On the Inbound Events page, click Clear Log.
3 Click Yes in the dialog to clear the log.
Copying an event to the Clipboard
You can copy an event to the clipboard so that you can paste it in a text file using Notepad.
To copy events to the clipboard:
1 Right-click the McAfee icon, point to Personal Firewall, then select Inbound Events.
2 Right-click the event in the Inbound Events log.
3 Click Copy Selected Event to Clipboard.
4 Launch Notepad.
- Type notepad on the command line or click the Windows Start button, point to Programs, then Accessories. Select Notepad.
5 Click Edit, and then click Paste. The event text appears in Notepad. Repeat this step until you have all of the necessary events.
6 Save the Notepad file in a safe place.
Deleting the selected event
You can delete events from the Inbound Events log.
To delete events from the Inbound Events log:
1 Right-click the McAfee icon in the Windows system tray, point to Personal Firewall, then select Inbound Events.
2 Click the event's entry on the Inbound Events page that you want to delete.
3 On the Edit menu, click Delete Selected Event. The event is deleted from the Inbound Events log.
About alerts
We strongly recommend that you become familiar with the types of alerts you will encounter while using Personal Firewall. Review the following types of alerts that can appear and the possible responses you can choose, so that you can confidently respond to an alert.
NOTE
Recommendations on alerts help you decide how to handle an alert. For recommendations to appear on alerts, click the Options tab, click the Alert Settings icon, then select either Use Smart Recommendations (the default) or Display Smart Recommendations only from the Smart Recommendations list.
Red alerts
Red alerts contain important information that requires your immediate attention:
■ Internet Application Blocked — This alert appears if Personal Firewall blocks an application from accessing the Internet. For example, if a Trojan program alert appears, McAfee automatically denies this program access to the Internet and recommends that you scan your computer for viruses.
■ Application Wants to Access the Internet — This alert appears when Personal Firewall detects Internet or network traffic for new applications.
■ Application Has Been Modified —This alert appears when Personal Firewall detects that an application, previously allowed to access the Internet, has changed. If you have not recently upgraded the application, be careful about granting the modified application access to the Internet.
■ Application Requests Server Access — This alert appears when Personal Firewall detects that an application you have previously allowed to access the Internet has requested Internet access as a server.
NOTE
The Windows XP SP2 default Automatic Updates setting downloads and installs updates for the Windows OS and other Microsoft programs running on your computer without messaging you. When an application has been modified from one of Windows silent updates, McAfee Personal Firewall alerts appear the next time the Microsoft application is run.
IMPORTANT
You must grant access to applications that require Internet access for online product updates (such as McAfee services) to keep them up-to-date.
Internet Application Blocked alert
If a Trojan program alert appears (Figure 3-4), Personal Firewall automatically denies this program access to the Internet and recommends that you scan your computer for viruses. If McAfee VirusScan is not installed, you can launch McAfee SecurityCenter.
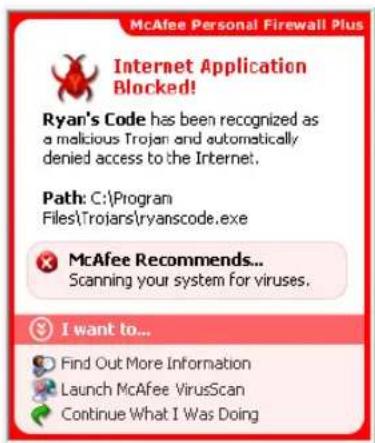
Figure 3-4. Internet Application Blocked alert
View a brief description of the event, then choose from these options:
■ Click Find Out More Information to get details about the event through the Inbound Events log (see About the Inbound Events page on page 62 for details).
■ Click Launch McAfee VirusScan to scan your computer for viruses.
- Click Continue What I Was Doing if you do not want to take action beyond what Personal Firewall has already done.
- Click Grant Outbound Access to allow an outbound connection (Tight security).
Application Wants to Access the Internet alert
If you selected Standard or Tight security in the Security Settings options, Personal Firewall displays an alert (Figure 3-5) when it detects Internet or network connections for new or modified applications.
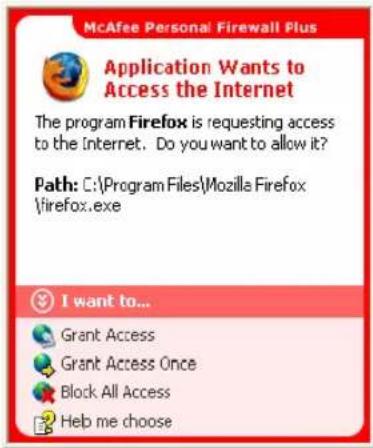
Figure 3-5. Application Wants to Access the Internet alert
If an alert appears recommending caution in allowing the application Internet access, you can click Click here to learn more to get more information about the application. This option appears on the alert only if Personal Firewall is configured to use Smart Recommendations.
McAfee might not recognize the application trying to gain Internet access (Figure 3-6).
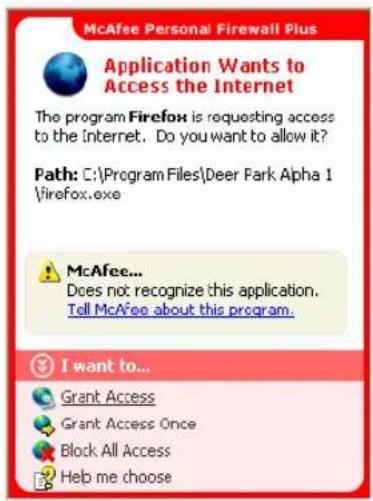
Figure 3-6. Unrecognized Application alert
Therefore, McAfee cannot give you a recommendation on how to handle the application. You can report the application to McAfee by clicking Tell McAfee about this program. A web page appears and asks you for information related to the application. Please fill out as much information as you know.
The information you submit is used in conjunction with other research tools by our HackerWatch operators to determine whether an application warrants being listed in our known applications database, and if so, how it should be treated by Personal Firewall.
View a brief description of the event, then choose from these options:
- Click Grant Access to allow the application an outbound and inbound Internet connection.
- Click Grant Access Once to grant the application a temporary Internet connection. Access is limited to the time the application launches to the time it closes.
■ Click Block All Access to prohibit an Internet connection. - Click Grant Outbound Access to allow an outbound connection (Tight security).
- Click Help me choose to view online Help about application access permissions.
Application Has Been Modified alert
If you selected Trusting, Standard, or Tight security in the Security Settings options, Personal Firewall displays an alert (Figure 3-7) when Personal Firewall detects that an application you have previously allowed to access the Internet has changed. If you have not recently upgraded the application in question, be careful about granting the modified application access to the Internet.
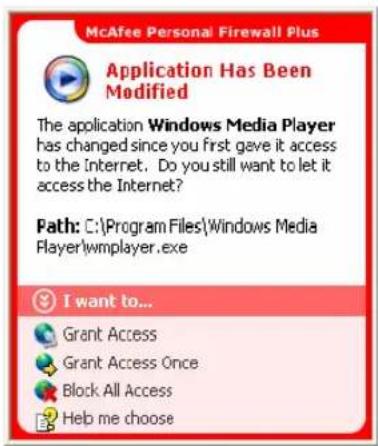
Figure 3-7. Application Has Been Modified alert
View a brief description of the event, then choose from these options:
■ Click Grant Access to allow the application an outbound and inbound Internet connection.
- Click Grant Access Once to grant the application a temporary Internet connection. Access is limited to the time the application launches to the time it closes.
■ Click Block All Access to prohibit an Internet connection.
■ Click Grant Outbound Access to allow an outbound connection (Tight security).
- Click Help me choose to view online Help about application access permissions.
Application Requests Server Access alert
If you selected Tight security in the Security Settings options, Personal Firewall displays an alert (Figure 3-8) when it detects that an application you have previously allowed to access the Internet has requested Internet access as a server.
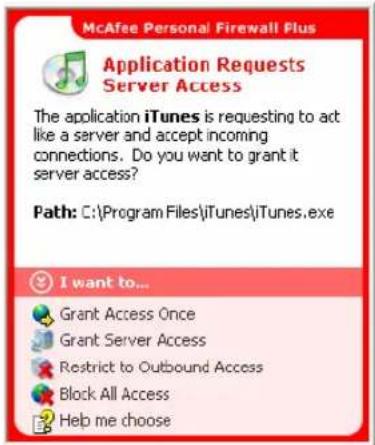
Figure 3-8. Application Requests Server Access alert
For example, an alert appears when MSN Messenger requests server access to send a file during a chat.
View a brief description of the event, then choose from these options:
- Click Grant Access Once to allow the application temporary Internet access. Access is limited to the time the application launches to the time it closes.
- Click Grant Server Access to allow the application an outbound and inbound Internet connection.
■ Click Restrict to Outbound Access to prohibit an incoming Internet connection.
■ Click Block All Access to prohibit an Internet connection.
■ Click Help me choose to view online Help about application access permissions.Green alerts
Green alerts
Green alerts notify you of events in Personal Firewall, such as applications that have been automatically granted Internet access.
Program Allowed to Access the Internet — This alert appears when Personal Firewall automatically grants Internet access for all new applications, then notifies you (Trusting Security). An example of a modified application is one with modified rules to automatically allow the application Internet access.
Application Allowed to Access the Internet alert
If you selected Trusting security in the Security Settings options, Personal Firewall automatically grants Internet access for all new applications, then notifies you with an alert (Figure 3-9).
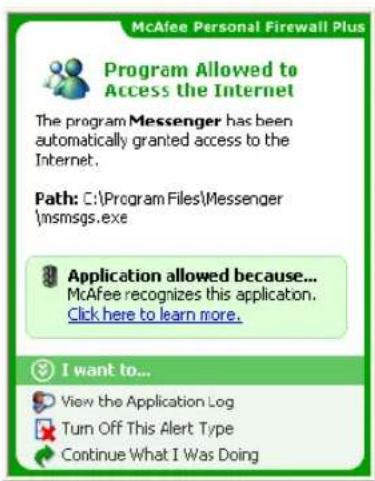
Figure 3-9. Program Allowed to Access the Internet
View a brief description of the event, then choose from these options:
■ Click View the Application Log to get details about the event through the Internet Applications Log (see About the Internet Applications page on page 60 for details).
■ Click Turn Off This Alert Type to prevent these types of alerts from appearing.
■ Click Continue What I Was Doing if you do not want to take action beyond what Personal Firewall has already done.
■ Click Block All Access to prohibit an Internet connection.
Application Has Been Modified alert
If you selected Trusting security in the Security Settings options, Personal Firewall automatically grants Internet access for all modified applications. View a brief description of the event, then choose from these options:
- Click View the Application Log to get details about the event through the Internet Applications Log (see About the Internet Applications page on page 60 for details).
- Click Turn Off This Alert Type to prevent these types of alerts from appearing.
- Click Continue What I Was Doing if you do not want to take action beyond what Personal Firewall has already done.
- Click Block All Access to prohibit an Internet connection.
Blue alerts
Blue alerts contain information, but require no response from you.
■ Connection Attempt Blocked — This alert appears when Personal Firewall blocks unwanted Internet or network traffic. (Trusting, Standard, or Tight Security)
Connection Attempt Blocked alert
If you selected Trusting, Standard, or Tight security, Personal Firewall displays an alert (Figure 3-10) when it blocks unwanted Internet or network traffic.
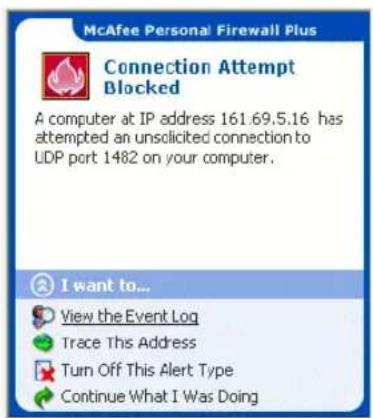
Figure 3-10. Connection Attempt Blocked alert
View a brief description of the event, then choose from these options:
■ Click View the Event Log to get details about the event through the Personal Firewall Inbound Events log (see About the Inbound Events page on page 62 for details).
■ Click Trace This Address to perform a Visual Trace of the IP addresses for this event.
- Click Ban This Address to block this address from accessing your computer. The address is added to the Banned IP Addresses list.
- Click Trust This Address to allow this IP address to access your computer.
■ Click Continue What I Was Doing if you do not want to take action beyond what Personal Firewall has already done
McAfee Privacy Service
4
Thank you for purchasing McAfee® Privacy Service™. McAfee Privacy Service software offers advanced protection for you, your family, your personal data, and your computer.
Features
This release of McAfee Privacy Service includes the following features:
- Internet time usage rules - Specify days and times when users can access the Internet.
- Custom keyword filtering - Create keyword rules that permit or block users from accessing Web sites.
- Privacy Service backup and restore - Save and restore Privacy Service settings at any time.
■ Web bug blocker—Block Web bugs (objects obtained at potentially harmful web sites) so that they are not loaded within browsed web pages.
■ Pop-up blocker—Prevent pop-up windows from displaying as you browse the Internet.
■ Shredder—McAfee Shredder protects your privacy by quickly and safely erasing unwanted files.
The Administrator
The Administrator specifies which users can access the Internet, when they can use it, and what they can do on the Internet.
NOTE
The Administrator is considered an adult and as such can access all web sites but is prompted to allow or prevent the transmission of added personal identifiable information (PII).
Setting up Privacy Service
The Setup Assistant allows you to create the Administrator, manage global settings, enter personal information, and add users.
Remember your Administrator password and security answer so that you can logon to Privacy Service. If you cannot logon, you cannot use Privacy Service and the Internet. Keep your password secret so only you can change Privacy Service settings. Some Web sites require that cookies are enabled to work properly. Privacy Service always accepts cookies from McAfee.com.
NOTE
If your PC includes a pre-installed copy of Privacy Service, some steps described in this documentation may not appear. For more information, see Setting up a Pre-installed version of Privacy Service on page 82 and your PC manufacturer's documentation.
Setting up a Pre-installed version of Privacy Service
If Privacy Service is pre-installed on Windows XP, you must logon to Windows with a Windows Administrator account to set up the product.
To configure a pre-installed version of Privacy Service:
1 If you have not done so already, launch the Setup Assistant using one of the following methods:
Right-click the McAfee icon in the Windows system tray, point to Privacy Service, and then select Setup Privacy Service.
From the Windows Start menu, point to McAfee, and then select McAfee Privacy Service.
Double-click the McAfee Privacy Service desktop icon.
Launch the McAfee SecurityCenter, click the privacy service tab, and then Setup Privacy Service to launch the Setup Assistant.
2 Proceed to and complete each step that is provided.
NOTE
To cancel configuration, click Cancel.
Retrieving the Administrator Password
If you forget the Administrator password, you can access the password using the security information you entered when you created the Administrator profile.
To retrieve the Administrator password:
1 Right-click the McAfee icon M in the Windows system tray, point to McAfee Privacy Service, then select Sign In.
2 Select Administrator from the User Name pull-down menu.
3 Click Forgot your password?
4 Enter the answer to the security question that appears, and then click Get Password. A message appears containing your password. If you forget the answer to the security question, you must remove McAfee Privacy Service from Safe Mode (Windows 2000 and Windows XP only).
Removing Privacy Service with Safe Mode
To remove Privacy Service with Safe Mode:
1 Click Start and point to Shut Down. The Shut Down Windows dialog box appears.
2 Select Shut down from the menu and then click OK.
3 Wait until the It is now safe to turn off the computer message appears, and then turn the computer off.
4 Turn the computer back on.
5 Begin immediately pressing the F8 key, every other second, until the Windows Startup menu appears.
6 Select Safe Mode and press Enter.
7 When Windows starts, a message appears explaining Safe Mode. Click OK.
8 Proceed to Add or Remove Programs, located in the Windows Control Panel. When you are done, reboot the PC.
9 Re-install McAfee Privacy Service and specify the Administrator password. Make a note of the password you specify.
NOTE
You can remove Privacy Service in Safe Mode in Windows 2000 or Windows XP only.
The Startup user
The Startup user is automatically signed in to Privacy Service when the computer is started.
For example, if a user is on the computer or Internet more than the others, you can make that user, including the Administrator, the Startup user. When the Startup user uses the computer, the user is not required to sign in to Privacy Service.
If you have young children, you can also set the Startup user to the youngest. This way, when an older user uses the computer, they can log off from the young user's account and then log in again using their own user name and password. This protects younger users from seeing inappropriate Web sites.
Configuring the Administrator as Startup User
To configure the Administrator as Startup user:
1 From the Please Sign In dialog, select your user name from the User name pull-down menu.
2 Enter your password in the Password field.
3 Select Make this user the Startup User, and then sign in.
Using McAfee SecurityCenter
McAfee SecurityCenter is your one-stop security shop, accessible from its icon in your Windows system tray or from your Windows desktop. With it, you can access Privacy Service and perform other useful tasks:
■ Get free security analysis for your computer.
■ Launch, manage, and configure all your McAfee subscriptions from one icon.
■ See continuously updated virus alerts and the latest product information.
- Get quick links to frequently asked questions and account details at the McAfee web site.
For more information about SecurityCenter features, click Help in the SecurityCenter dialog box.
When SecurityCenter is running and all of the McAfee features installed on your computer are enabled, a red M icon appears in the Windows system tray. This area is usually in the lower-right corner of the Windows desktop and contains the clock.
If one or more of the McAfee applications installed on your computer are disabled, the McAfee icon changes to black 📂
To launch McAfee SecurityCenter:
Right-click the McAfee icon in the Windows system tray, then select SecurityCenter.
Open
Launching McAfee Privacy Service
After you install McAfee Privacy Service, the McAfee icon appears in the Windows system tray, which is located near the system clock. From the McAfee icon, you can access McAfee Privacy Service, McAfee SecurityCenter, and other McAfee products installed on your computer.
NOTE
If your product is pre-installed, you must first set it up. For more information, see Setting up a Pre-installed version of Privacy Service on page 82.
Launching and signing in to Privacy Service
1 Right-click the McAfee icon in the Windows system tray, point to McAfee Privacy Service, and then select Sign In.
2 Select your user name from the User name pull-down menu.
3 Enter your Password in the Password field.
4 Click Sign In.
Disabling Privacy Service
You must be logged in to Privacy Service as the Administrator to disable it.
To disable Privacy Service:
■ Right-click the McAfee icon M, point to McAfee Privacy Service, and then select Sign Out.
NOTE
If Sign In is in the place of Sign Out, then you are already signed out.
Updating McAfee Privacy Service
McAfee SecurityCenter regularly checks for updates to Privacy Service while your computer is running and connected to the Internet. If an update is available, McAfee SecurityCenter prompts you to update Privacy Service.
To manually check for updates:
■ Click the Updates icon

located in the top pane.
Removing and Re-installing Privacy Service
You must be logged in to Privacy Service as the Administrator to un-install the product.
If this McAfee product is pre-installed on your computer, see your PC manufacturer's documentation for information about removing and re-installing Privacy Service.
NOTE
Removing Privacy Service erases all Privacy Service data.
Removing Privacy Service
To remove Privacy Service:
1 Save all of your work and close any open applications.
2 Open the Control Panel:
Windows 98, Windows Me, and Windows 2000 users-Select Start, point to Settings, and then click Control Panel.
■ Windows XP users-On your Windows taskbar, select Start, and then click Control Panel.
3 Open the Add/Remove Programs dialog box:
■ Windows 98, Me, and 2000 users-Double-click Add/Remove Programs.
■ Windows XP users-Click Add or Remove Programs.
4 Select McAfee Privacy Service from the list of programs, and then click Change/Remove.
5 When asked to confirm the operation, click Yes.
6 When you are prompted to restart your system, click Close. Your computer restarts to complete the un-installation process.
Installing Privacy Service
To install Privacy Service:
1 Go to the McAfee Web site and navigate to the Privacy Service page.
2 Click the Download link on the Privacy Service page.
3 Click Yes on any messages that appear asking if you want to download files from the McAfee web site.
4 Click Start Installation on the Privacy Service Installation window.
5 When the download is complete, click Restart to restart your computer. Or, click Close if you need to save any work or quit any programs, then restart your computer as you normally would. You must restart your computer in order for Privacy Service to work properly.
After the computer restarts, you need to create the Administrator again.
If this McAfee product is pre-installed on your computer, see your PC manufacturer's documentation for information about re-installing Privacy Service.
To add users, you must sign in to Privacy Service as the Administrator.
1 Right-click the McAfee icon in the Windows system tray.
2 Point to McAfee Privacy Service, then select Manage Users. The Select A User dialog box appears.
3 Click Add and enter the new user's name in the User name field.
Setting the password
1 Enter a password in the Password field. The password can be up to 50 characters and can contain uppercase and lowercase letters and numbers.
2 Enter the password again in the Confirm Password field.
3 Select Make this user the Startup user if you want this user to be the Startup user.
4 Click Next.
When assigning passwords, consider the age of the person. For example, if you assign a password to a young child, make the password simple. If you assign a password to an older teenager or an adult, make the password more complex.
Setting the age group
Select the appropriate age-based setting, and then click Next.
Setting the cookie blocker
Select the appropriate option, and then click Next.
■ Reject all cookies—Renders cookies unreadable to the web sites that sent them. Some web sites require you to enable cookies to work properly.
- Prompt user to accept cookies—Enables you to decide if you want to accept or reject cookies on a case-by-case basis. Privacy Service notifies you when a web site you are about to view wants to send a cookie to your computer. After you make your choice, you are not asked about that cookie again.
■ Accept all cookies—Allows web sites to read the cookies they send to your computer.
NOTE
Some web sites, to work properly, require that cookies are enabled.
Privacy Service accepts cookies from McAfee at all times.
Setting the Internet Time limits
To grant unrestricted Internet use:
1 Select Can use Internet anytime.
2 Click Create. The new user appears in the Select A User list.
To grant limited Internet use:
1 Select Restrict Internet usage, and then click Edit.
2 On the Internet Time Limits page, drag across the time grid to select the time and day the user can access the Internet.
You can specify time limits in thirty-minute intervals. Green portions of the grid are the periods a user can access the Internet. Red portions show when a user cannot access the Internet. If a user tries to use the Internet when they are not allowed to, Privacy Service displays a message telling the user that they are not allowed to use the Internet at this time. To modify the periods a user can access the Internet, drag across the green portions of the grid.
3 Click Done.
4 Click Create. The new user appears in the Select A User page. If a user tries to use the Internet when they are not allowed to, Privacy Service displays a message telling the user that they are not allowed to use the Internet at this time.
To prohibit Internet use:
Select Restrict Internet Usage, and then click Create. When the user uses the computer, they are prompted to sign in to Privacy Service. They can use the computer, but not the Internet.
Creating Web Site Permissions with Keywords
Privacy Service maintains a default list of keywords and corresponding rules, which determines whether a user of a certain age level is permitted to browse a Web site where a keyword exists.
The Administrator can add his or her own allowable keywords to the Privacy Service database and associate these with certain age levels. Keyword rules, added by the Administrator, will override the rule associated with any matching keyword in the default Privacy Service database. An Administrator can either lookup existing keywords or specify new keywords to associate with certain age levels.
To create keyword Web site permissions:
1 Right-click the McAfee icon in the Windows system tray, point to Privacy Service, then select Options.
2 Click the Keywords tab.
3 In the Word Lookup field, type a word for an age level.
4 In the Permissions pane, select the age level to associate with the word. Age levels include the following:
Young Child
Child
Younger Teenager
- Older Teenager
Adult
The keyword and its selected age group appear in the Word List.
Age levels that appear above the associated level are blocked from accessing Web sites which contain the word.
| ○ Young Child | Blocked |
| ○ Child | Blocked |
| ● Younger Teenager | Allowed |
The age level, to which the word was assigned, and those that appear below it, are allowed to access Web sites where the word exists.
| ○ Younger Teenager | Allowed |
| ○ Older Teenager | Allowed |
| ○ Adult | Allowed |
To modify existing Web site permissions:
1 Right-click the McAfee icon in the Windows system tray, point to Privacy Service, then select Options.
2 Click the Keywords tab.
3 In the Word Lookup field, type a word that you want to modify, and click Lookup. The word appears if it exists in the Privacy Service database.
To edit users, you must sign in to Privacy Service as the Administrator.
Changing passwords
1 Select the user whose information you are changing and click Edit.
2 Select Password, and enter the user's new password in the New password field. The password can be up to 50 characters and can contain uppercase and lowercase letters and numbers.
3 Enter the same password in the Confirm password field, and then click Apply.
4 Click OK in the confirmation dialog box.
NOTE
An Administrator can change a user's password without knowing the user's current password.
Changing a user's information
1 Select the user whose information you are changing and click Edit.
2 Select User Info.
3 Enter the new user name in the New user name field.
4 Click Apply, and then click OK in the confirmation dialog box.
5 To restrict a user to viewing the web sites in the Allowed Web Sites list, select Restrict this user to Web sites in the "Allowed Web Sites" list.
Changing cookie blocker setting
1 Select the user whose information you are changing and click Edit.
2 Select Cookies, and then select the appropriate option.
Reject all cookies—Renders cookies unreadable to the web sites that sent them. Some web sites require you to enable cookies to work properly.
Prompt user to accept cookies—Enables you to decide if you want to accept or reject cookies on a case-by-case basis. Privacy Service notifies you when a web site you are about to view wants to send a cookie to your computer. After you make your choice, you are not asked about that cookie again.
- Accept all cookies—Allows web sites to read the cookies they send to your computer.
3 Click Apply, and then click OK in the confirmation dialog box.
Editing the Accept and Reject Cookie List
1 Select Prompt user to accept cookies and click Edit to specify which web sites are allowed to read cookies.
2 Specify the list you are modifying by selecting Web sites that can set cookies or Web sites that cannot set cookies.
3 In the http:// field, enter the address of the web site that you are accepting or rejecting cookies from.
4 Click Add. The web site appears in the Web site list.
5 Click Done when you are finished making changes.
NOTE
Some web sites, to work properly, require that cookies are enabled.
Privacy Service accepts cookies from McAfee at all times.
Changing the age group
1 Select the user whose information you are changing and click Edit.
2 Select Age Group.
3 Select a new Age Group for the user, and then click Apply.
4 Click OK in the confirmation dialog box.
Changing Internet time Limits
1 Select the user whose information you are changing and click Edit.
2 Select Time Limits and do the following:
To permit unlimited Internet access:
1 Select Can use Internet anytime and click Apply.
2 Click OK in the confirmation dialog box.
To restrict Internet access:
1 Select Restrict Internet usage and click Edit.
2 On the Internet Time Limits page, select a green or red square, and then drag across the grid to change existing times and days a user can access the Internet. You can specify time limits in thirty-minute intervals. Green portions of the grid are the periods a user can access the Internet. Red portions show when a user cannot access the Internet. If a user tries to use the Internet when they are not allowed to, Privacy Service displays a message telling the user that they are not allowed to use the Internet at this time.
3 Click Apply.
4 On the Time Limits page, click OK.
5 In the McAfee Privacy Service McAfee Privacy Service confirmation dialog, click OK.
Changing the Startup user
The Administrator can change the Startup user at any time. If a Startup user already exists, you do not have to deselect them as a Startup user.
1 Select the user that you want to designate as the Startup user, and then click Edit.
2 Select User Info.
3 Select Make this user the Startup user.
4 Click Apply and then click OK in the confirmation dialog box.
NOTE
You can assign a Startup user from the Please Sign In dialog also. For more information, see The Startup user on page 84
Removing users
1 Select the user you want to remove, and then click Remove.
2 Click Yes in the confirmation dialog box.
3 Close the Privacy Service window when you are finished making changes.
To configure Privacy Service options, you must sign in to Privacy Service as the Administrator.
Blocking Web sites
1 Click Options, and then select Block List.
2 In the http:// field, enter the URL of the web site that you want to block, and then click Add. The web site appears in the Blocked Web Sites list.
NOTE
Users (including Administrators) that belong to the Adult group level can access all web sites, even if the web sites are in the Blocked Web Sites list. To test blocked web sites, Administrators must log in as non-adult users.
Allowing Web sites
The Administrator can allow all users to view specific web sites. This overrides Privacy Service's default settings and web sites added to the Blocked list.
1 Click Options, and then select Allow List.
2 In the http:// field, enter the URL of the web site that you want to allow, and then click Add. The web site appears in the Allowed Web Sites list.
Blocking information
The Administrator can prevent other users from sending specific personal information over the Internet (the Administrator can still send this information).
When Privacy Service detects personal identifiable information (PII) in something about to be sent out, the following occurs:
If you are an Administrator, you are prompted, and can decide whether to send the information or not.
If the logged in user is not the Administrator, the blocked information is replaced with MFEMFEMFE. For example, if you send the e-mail Lance Armstrong wins tour, and Armstrong is set as personal information that is to be blocked, then the e-mail that is actually sent is Lance MFEMFEMFE wins tour.
Adding information
1 Click Options, and then select Block Info.
2 Click Add. The Select Type pull-down menu appears.
3 Select the type of information that you want to block.
4 Enter the information in the appropriate fields, and then click OK. The information you entered appears in the list.
Editing information
1 Click Options, and then select Block Info.
2 Select the information that you want to edit, and click Edit.
3 Make the appropriate changes, and then click OK. If the information does not need to be changed, click Cancel.
Removing personal information
1 Click Options, and then select Block Info.
2 Select the information that you want to remove, and click Remove.
3 Click Yes in the confirmation dialog box.
Blocking Web bugs
Web bugs are small graphic files that can send messages to third parties, including tracking your Internet browsing habits or transmitting personal information to an external database. Third parties can then use this information to create user profiles.
To prevent web bugs from being loaded within browsed web pages, select Block Web Bugs on this computer.
Blocking advertisements
Advertisements are typically graphics served from a third party domain into a web page or pop-up window. Privacy Service does not block ads that are served from the same domain as the host web page.
Pop-ups are secondary browser windows presenting unwanted advertisements, which automatically display when as you visit a web site. Privacy Service only blocks those pop-ups that are automatically loaded when a web page loads.
Pop-ups initiated by clicking a link are not blocked by Privacy Service. To display a blocked pop-up, hold down the CTRL key and refresh the web page.
Configure Privacy Service to block advertisements and pop-ups when you are using the Internet.
1 Click Options, and then select Block Ads.
2 Select the appropriate option.
Block ads on this computer—Blocks advertisements while you are using the Internet.
Block Pop-Ups on this computer—Blocks pop-ups while you are using the Internet.
3 Click Apply, and then click OK in the confirmation dialog box.
To disable pop-up blocking, right-click the web page, point to McAfee Pop-Up Blocker, and deselect Enable Pop-up Blocker.
Allowing cookies from specific Web sites
If you block cookies or require to be prompted before they are accepted, and find that certain web sites do not function properly, then configure Privacy Service to allow the site to read its cookies.
1 Click Options, and then select Cookies.
2 In the http:// field, enter the address of the web site that needs to read its cookies, and then click Add. The address appears in the Accept Cookie Web Sites list.
To view the event log, you must sign in to Privacy Service as the Administrator. Then, select Event Log and click any log entry to view its details. To save or view a saved log, select the Saved Logs tab.
Date and time
By default, the Event Log displays information in chronological order, with the most recent events at the top. If the Event Log entries are not in chronological order, click the Date and Time heading.
The date is displayed in a month/day/year format, and the time is displayed in the A.M./P.M. format.
User
The user is the person who was logged in and using the Internet at the time Privacy Service recorded the event.
Summary
Summaries display a short, concise description of what Privacy Service is doing to protect users and what users are doing on the Internet.
Event Details
The Event Details field displays entry details.
Saving the Current Log
The Current Log page displays information about recent administrative and user actions. You can save this information to view at a future date.
To save a current event log
1 Sign In to Privacy Service as the Administrator.
2 Select Event Log.
3 On the Current Log page, click Save Log.
4 In the File name field, type the name for the log file.
5 Click Save.
Viewing Saved Logs
The Current Log page displays information about recent administrative and user actions. You can save this information to view at a future date.
To view a saved log
1 Sign In to Privacy Service as the Administrator.
2 Select Event Log.
3 On Current Log page, click Open Log.
4 In the Select a saved log to view dialog, select the backup database file, and click Open.
To access the utilities, you must sign in to Privacy Service as the Administrator, and then click Utilities.
To remove files, folders, or the entire contents of disks, click McAfee Shredder. To save your Privacy Service database settings, click Backup. To restore your settings, click Restore.
Erasing files permanently using McAfee Shredder
McAfee Shredder protects your privacy by quickly and safely erasing unwanted files.
Deleted files can be recovered from your computer even after you empty your Recycle Bin. When you delete a file, Windows merely marks that space on your disk drive as no longer being in use, but the file is still there.
Why Windows leaves file remnants
To permanently delete a file, you must repeatedly overwrite the existing file with new data. If Microsoft Windows securely deleted files, every file operation would be very slow. Shredding a document does not always prevent that document from being recovered because some programs make temporary hidden copies of open documents. If you only shred documents that you see in Explorer, you could still have temporary copies of those documents. We recommend that you periodically shred the free space on your disk drive to insure that these temporary copies are permanently deleted.
NOTE
With computer forensics tools, tax records, job resumes, or other documents that you had deleted, could be obtained.
What McAfee Shredder erases
With McAfee Shredder, you can securely and permanently erase:
■ One or more files or folders
■ An entire disk
■ The trails that your web surfing leaves behind
Permanently erasing files in Windows Explorer
To shred a file via Windows Explorer:
1 Open Windows Explorer, then select the file or files that you want to shred.
2 Right-click your selection, point to Send To, and then select McAfee Shredder.
Emptying the Windows Recycle Bin
If files are in your Recycle Bin, McAfee Shredder offers a more secure method of emptying your Recycle Bin.
To shred the contents of the Recycle Bin:
1 On your Windows desktop, right-click the Recycle Bin.
2 Select Shred Recycle Bin, then follow the on-screen instructions.
Customizing Shredder settings
You can:
■ Specify the number of shredding passes.
■ Show a warning message when you shred files.
■ Check your hard disk for errors before shredding.
■ Add McAfee Shredder to your Send To menu
■ Place a Shredder icon on your Windows desktop.
To customize Shredder settings, open McAfee Shredder, click Properties, and then follow the on-screen instructions.
Backing up the Privacy Service database
You can restore the Privacy Service database two ways. If your database becomes corrupted or is deleted, Privacy Service prompts you to restore the Privacy Service database. Alternatively, you can restore your database settings while running Privacy Service.
1 Click Utilities, and then select Backup.
2 Click Browse to select a location for the database file, and then click OK.
3 Enter a password in the Password field.
4 Enter the password again in the Confirm password field, and then click Backup.
5 Click OK in the confirmation dialog box.
6 Close the Privacy Service window when you are finished.
NOTE
Keep this password secret, and do not forget it. You cannot restore Privacy Service settings without this password.
Restoring the Backup Database
1 Privacy Service provides two ways to restore your original settings:
- Load your backup database file after Privacy Service prompts you to restore your settings because the database is corrupt or deleted.
- Load your backup database file while running Privacy Service.
To restore your Privacy Service Settings when prompted:
1 Click Browse to locate the file.
2 Type your password in the Password field.
3 Click Restore.
If you did not back up the Privacy Service database, or you forgot your Backup password, or restoring the database does not work, please remove and re-install Privacy Service.
To restore your Privacy Settings while running Privacy Service:
1 Click the Utilities tab.
2 Click Restore.
3 Click Browse, and type the path and name for the backup file.
4 Click Open.
5 Type your password in the Password field.
6 Click Restore, and then click OK in the McAfee Privacy Service confirmation dialog.
These instructions do not apply to the Administrator.
You can change your password and user name. We recommend that you change your password after the Administrator gives it to you. We also recommend that you change your password once a month, or if you think someone knows your password. This helps prevent others from using the Internet with your user name.
Changing your password
1 Right-click the McAfee icon, point to McAfee Privacy Service, and then select Options.
2 Click Password and enter your old password in the Old password field.
3 Enter your new password in the New password field.
4 Type your new password again in the Confirm password field, and then click Apply.
5 Click OK in the confirmation dialog box. You now have a new password.
Changing your user name
1 Right-click the McAfee icon, point to McAfee Privacy Service, and then select Options.
2 Click User Info.
3 Type your new user name in the New user name field and then click Apply.
4 Click OK in the confirmation dialog box. You now have a new user name.
Clearing your cache
We recommend that you clear your cache so that a child does not access web pages you recently visited. To clear your cache, do the following.
1 Open Internet Explorer.
2 From the Tools menu, click Internet Options. The Internet Options dialog box appears.
3 In the Temporary Internet Files section, click Delete Files. The Delete Files dialog box appears.
4 Select Delete all offline content, and then click OK.
5 Click OK to close the Internet Options dialog box.
Accepting cookies
This option is available only if the Administrator allows you to accept or reject cookies as they are intercepted.
If you access web sites that require cookies, you can allow those sites permission to read cookies.
1 Right-click the McAfee icon, point to McAfee Privacy Service, and then select Options.
2 Click Accepted Cookies.
3 Enter the URL of the web site in the http:// field, and then click Add. The web site appears in the Web Site list.
If you need to remove a web site from this list:
1 Select the web site's URL in the Web site list.
2 Click Remove, and then click Yes in the confirmation dialog box.
Rejecting cookies
This option is available only if the Administrator allows you to accept or reject cookies as they are intercepted.
If you access web sites that do not require cookies, you can reject the cookies without being prompted.
1 Right-click the McAfee icon, point to McAfee Privacy Service, and then select Options.
2 Click Rejected Cookies.
3 Enter the URL of the web site in the http:// field, and then click Add. The web site appears in the Web site list.
If you need to remove a web site from this list:
1 Select the web site's URL in the Web Site list.
2 Click Remove, and then click Yes in the confirmation dialog box.
McAfee SpamKiller
5
Welcome to McAfee SpamKiller.
McAfee SpamKiller software helps stop spam from entering your e-mail Inbox. With it, you get the following features:
User options
■ Block spam using filters, and quarantine spam outside of your Inbox
■ View blocked and accepted messages
■ Monitor and filter multiple e-mail accounts
- Import friends' addresses into the Friends List
■ Fight back against spammers (report spam, complain about spam, create custom filters)
■ Protect children from viewing spam messages
■ One-click block and one-click rescue
■ Double-byte character set support
■ Multi-user support (for Windows 2000 and Windows XP)
Filtering
■ Update filters automatically
■ Create custom filters to block e-mail that contain mostly images, invisible text, or invalid formatting
■ Multi-tiered core filtering engine
■ Dictionary attack filter
■ Multi-level adaptive filtering
■ Security filters
Features
This version of SpamKiller offers the following features:
■ Filtering - advanced filtering options provide new filtering techniques, including support for meta-character filtering and junk text identification.
■ Phishing - AntiPhishing browser plug-in via an Internet Explorer toolbar easily identifies and blocks potential phishing Web sites.
■ Microsoft Outlook and Outlook Express integration - toolbar provides a folder within your mail client to block spam directly.
■ Installation - streamlined setup and configuration. Automatic account detection assures smooth setup, configuration, and integration with existing e-mail accounts.
■ Updates - auto-updates run silently in the background, always vigilant to minimize your exposure to emerging spam threats.
■ Interface - intuitive user interface for keeping your computer free of spam.
■ Support - free live instant messaging and e-mail technical support for easy, prompt, and live customer service.
- Spam message processing - by default, spam messages are tagged as [SPAM] and placed in the SpamKiller folder in Outlook and Outlook Express, or your Inbox. Tagged messages also appear on the Accepted E-mail page.
Understanding the top pane
The following icons appear in the top pane of each SpamKiller page:
- Click Switch User 📁 to log on as a different user.
Note: Switch user is available only if your computer runs Windows 2000 or Windows XP, multiple users have been added to SpamKiller, and you are logged on to SpamKiller as an administrator.
- Click Support 📋 to open the online Support page for McAfee, which provides hot topics on SpamKiller and other McAfee products, answers to frequently asked questions, and more. You must be connected to the Internet to access the Support page.
- Click Help 🔒 to open the online Help, which provides detailed instructions on setting up and using SpamKiller.
Understanding the Summary page
Click the Summary tab to open the Summary page (Figure 5-1).
Overview of your SpamKiller status - indicates if filtering is enabled, when a Friends List was last updated, and the number of spam messages you received today. From here you can disable or enable SpamKiller filtering, update Friends Lists, and open the Blocked E-mail page.
■ Most recent e-mails that were identified as spam and blocked - the latest spam messages that SpamKiller blocked (messages removed from your Inbox).
■ E-mail Overview - the total number of e-mail, spam (blocked messages), and percentage of total spam you have received.
■ Recent Spam - a breakdown of the type of spam you received in the past 30 days.
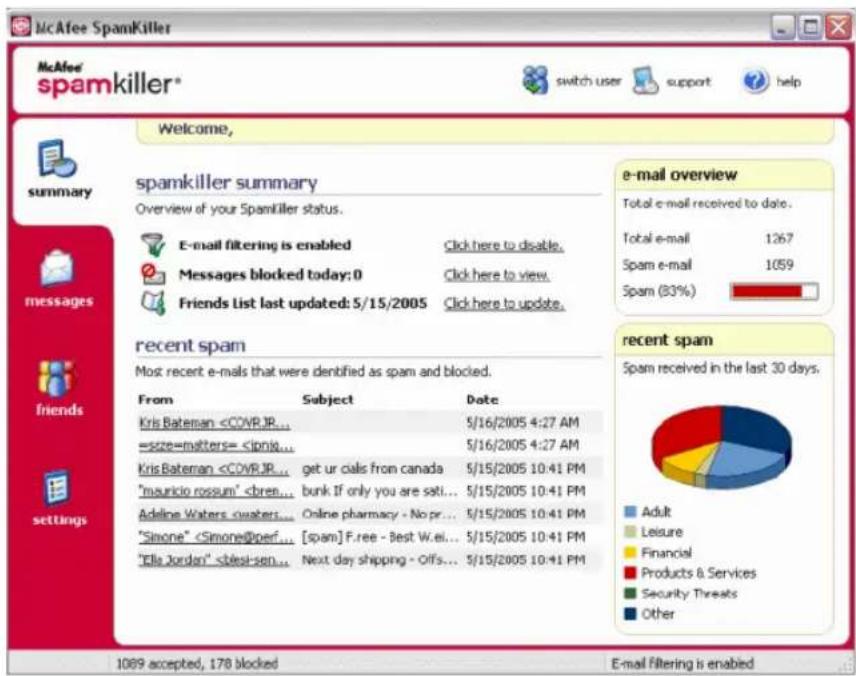
Pointing your e-mail client to SpamKiller
If you add an account that SpamKiller does not detect (the account does not appear in the Select Account dialog box), or you want to read your MSN/Hotmail e-mail as a POP3 account in SpamKiller, point your e-mail client to SpamKiller by changing the incoming e-mail server. For example, if your incoming e-mail server is "mail.mcafee.com", change it to "localhost".Deleting e-mail accounts
Delete an e-mail account from SpamKiller if you no longer want SpamKiller to filter it.Deleting an e-mail account from SpamKiller
1 Click the Settings tab, and then select E-mail Accounts. The E-mail Accounts dialog box appears and displays all e-mail accounts added to SpamKiller.NOTE
If multiple users were added to SpamKiller, the list displays the e-mail accounts of the user who is currently logged on to SpamKiller. 2 Select an account, and then click Delete.Editing e-mail account properties
You can edit information about an e-mail account you added to SpamKiller. For example, change the e-mail address, the account description, server information, how often SpamKiller checks the account for spam, and how your computer connects to the Internet.POP3 accounts
Editing POP3 accounts
1 Click the Settings tab, and then click E-mail Accounts. The E-mail Accounts dialog box appears and displays all e-mail accounts added to SpamKiller.NOTE
If multiple users were added to SpamKiller, the list displays the e-mail accounts of the user who is currently logged on to SpamKiller. 2 Select a POP3 account, and then click Edit. 3 Click the General tab to edit the account description and e-mail address. Description - description of the account. You can type any information in this box. E-mail address - e-mail address of the account. 4 Click the Servers tab to edit server information. \- Incoming e-mail - name of the server that receives incoming mail. User name - user name you use to access the account. Also known as Account Name. ◆ Password - password you use to access the account. Outgoing e-mail - name of the server that sends outgoing mail. Click More to edit authentication requirements for the outgoing server. 5 Click the Checking tab to edit how often SpamKiller checks the account for spam: a Select Check every or Check daily at, and then type or select a time in the corresponding box. If you enter the number zero, SpamKiller only checks the account when it connects. b Select additional times for SpamKiller to filter the account: Check on startup - if you have a direct connection, and you want SpamKiller to check the account every time your computer starts. Check when a connection is dialed - if you have a dial-up connection, and you want SpamKiller to check the account every time you connect to the Internet. 6 Click the Connection tab to specify how SpamKiller dials an Internet connection so that it can check your Inbox for new messages to filter. - Never dial a connection - SpamKiller does not automatically dial a connection for you. You must first manually start your dial-up connection. - Dial when needed - an Internet connection is not available, SpamKiller automatically attempts to connect using your default dial-up Internet connection. Always dial - SpamKiller automatically attempts to connect using the dial-up connection you specify. - Stay connected after filtering is done - your computer stays connected to the Internet after filtering is finished. 7 Click the Advanced tab to edit advanced options. Leave spam messages on the server - if you want a copy of blocked messages to remain on your e-mail server. You can view mail from your e-mail client and the SpamKiller Blocked E-mail page. If the checkbox is not selected, you can only view blocked messages from the Blocked E-mail page. - POP3 port - (POP3 port number) POP3 server handles incoming messages. - SMTP port - (SMTP port number) SMTP server handles outgoing messages. Server timeout - length of time SpamKiller waits to receive e-mail before timing out and stopping. Increase the server time-out value if you have problems receiving mail. Your e-mail connection might be slow; therefore, increasing the server time-out value allows SpamKiller to wait longer before timing out. 8 Click OK.MSN/Hotmail accounts
Editing MSN/Hotmail accounts
1 Click the Settings tab, and then click E-mail Accounts. The E-mail Accounts dialog box appears and displays all e-mail accounts added to SpamKiller.NOTE
If multiple users were added to SpamKiller, the list displays the e-mail accounts of the user who is currently logged on to SpamKiller. 2 Select an MSN/Hotmail account, and then click Edit. 3 Click the General tab to edit the account description and e-mail address. Description - description of the account. You can type any information in this box. ◆ E-mail address - e-mail address of the account. 4 Click the Servers tab to edit server information. \- Incoming e-mail - name of the server that receives incoming mail. ◆ Password - password you use to access the account. Outgoing e-mail - name of the server that sends outgoing mail. Use an SMTP server for outgoing e-mail - if you plan to send error messages and do not want to include the MSN signature line in the error message. The MSN signature line makes it easy for spammers to recognize that the error message is fake. Click More to change authentication requirements for the outgoing server. 5 Click the Checking tab to specify how often SpamKiller checks the account for spam: a Select Check every or Check daily at, and then type or select a time in the corresponding box. If you enter the number zero, SpamKiller only checks the account when it connects. b Select additional times for SpamKiller to filter the account: Check on startup — Select this option if you have a direct connection, and you want SpamKiller to check the account every time SpamKiller starts. Check when a connection is dialed — Select this option if you have a dial-up connection, and you want SpamKiller to check the account every time you connect to the Internet. 6 Click the Connection tab to specify how SpamKiller dials an Internet connection so that it can check your Inbox for new messages to filter. - Never dial a connection - SpamKiller does not automatically dial a connection for you. You must first manually start your dial-up connection. - Dial when needed - when an Internet connection is not available, SpamKiller automatically attempts to connect using your default dial-up Internet connection. Always dial - SpamKiller automatically attempts to connect using the dial-up connection you specify. - Stay connected after filtering is done - your computer stays connected to the Internet after filtering is finished.7 Click OK.
Configuring a Hotmail account to block spam in Outlook or Outlook Express
SpamKiller can filter Hotmail accounts directly. See the online help for details. However, you cannot block messages or add friends using the SpamKiller toolbar in Outlook or Outlook Express until you configure your Hotmail account. 1 Configure your Hotmail account in MSK. 2 If you have an existing Hotmail account in Outlook or Outlook Express, you must remove it first. 3 Add your Hotmail account to Outlook or Outlook Express. Ensure that you select POP3 for the account type and incoming mail server type. 4 Name the incoming server as localhost. 5 Type the name of the available outgoing SMTP server (required). 6 Complete the account configuration process. You can now block new Hotmail spam e-mail or add a friend.MAPI accounts
The following conditions are required for SpamKiller to successfully integrate with MAPI in Outlook: ■ Only for Outlook 98, Outlook was initially installed with Corporate/Workgroup support. ■ Only for Outlook 98, the first e-mail account is a MAPI account. ■ The computer is logged on to the domain.Editing MAPI accounts
1 Click the Settings tab, and then click E-mail Accounts. The E-mail Accounts dialog box appears and displays all e-mail accounts added to SpamKiller.NOTE
If multiple users were added to SpamKiller, the list displays the e-mail accounts of the user who is currently logged on to SpamKiller. 2 Select a MAPI account, and then click Edit. 3 Click the General tab to edit the account description and e-mail address. Description - description of the account. You can type any information in this box. E-mail address - e-mail address of the account. 4 Click the Profile tab to edit profile information. ◆ Profile - MAPI profile for the account. - Password - password that corresponds with the MAPI profile if you have set one up (not necessarily the e-mail account password). 5 Click the Connection tab to specify how SpamKiller dials an Internet connection so that it can check your Inbox for new messages to filter: - Never dial a connection - SpamKiller does not automatically dial a connection for you. You must first manually start your dial-up connection. - Dial when needed - when an Internet connection is not available, SpamKiller automatically attempts to connect using your default dial-up Internet connection. - Always dial - SpamKiller automatically attempts to connect using the dial-up connection you specify. - Stay connected after filtering is done - your computer stays connected to the Internet after filtering is finished. 6 Click OK.Adding users
SpamKiller can set up multiple users, corresponding to the users set up on your Windows 2000 or Windows XP operating system. When SpamKiller is installed on your computer, an administrator user profile is automatically created for the Windows user who was logged on. If you add e-mail accounts to SpamKiller during installation, the e-mail accounts are added to that administrator's user profile. Before you add more e-mail accounts to SpamKiller, determine if you need to add more SpamKiller users. Adding users is beneficial if multiple people use your computer and have their own e-mail accounts. Each user's e-mail account is added to their user profile, allowing users to manage their e-mail accounts, personal settings, personal filters, and Personal Friends List. User types define the tasks a user can perform in SpamKiller. The following table is a summary of permissions for each user type. Administrators can perform all tasks while limited users can only perform tasks according to their personal profiles. For example, administrators can view the whole content of blocked messages, while limited users can only view the subject line. Tasks Administrator Limited User| Manage personal e-mail accounts, Personal Filters, Personal Friends List, and personal sound settings | X | X |
| Manage personal Blocked E-mail and Accepted E-mail pages | X | X |
| View message text of blocked messages X | ||
| View message text of accepted messages X X | ||
| Manage Global Filters and the Global Friends List X | ||
| Report spam to McAfee X X | ||
| Send complaints and error messages X X | ||
| Manage complaints and error messages (create, edit, and delete message templates) | X | |
| Manage users (create, edit, and remove users) X | ||
| Backup and restore SpamKiller X | ||
| View the Summary page of spam received X X |
User passwords and protecting children from spam
Creating a user password enhances the privacy level. A user's personal settings, Friends List, and Accepted E-mail list cannot be accessed by another user without the log on password. Creating passwords is also beneficial in preventing children from accessing SpamKiller and viewing the content of spam messages.Creating a password for an existing SpamKiller user
1 Click the Settings tab, and then click Users. 2 Select a user, and then click Edit. 3 Type a password in the Password box. When the user accesses SpamKiller, they must use the password to log on.IMPORTANT
If you forget your password, you cannot retrieve it. Only a SpamKiller administrator user can create a new password for you.Adding a user to SpamKiller
1 Click the Settings tab, and then click Users. 2 Click Add. A list of Windows users appears. To add a user who does not appear on the list, create a Windows user account for that person. Then, the new user must log on to your computer at least once. Afterwards, add the user to SpamKiller.NOTE
Windows users with administrator rights have SpamKiller administrator rights. 3 Select a user to add, and then click OK. The user is added to SpamKiller, and the user name appears in the list of SpamKiller users. 4 Click Close when you are finished adding users. To create a password for a user, see Creating a password for an existing SpamKiller user on page 116. The next time the user logs on to your computer, they are prompted to add an e-mail account to their SpamKiller user profile. You can add e-mail accounts to the user profile if you are logged on to SpamKiller as the user and have the necessary e-mail account information. For details, see Adding e-mail accounts on page 107.Editing SpamKiller user profile
1 Click the Settings tab, and then click Users. A list of SpamKiller users appears. 2 Select a user, and then click Edit. 3 Type a new name and password.Deleting a SpamKiller user profile
WARNING
When you remove a user profile, you also remove the user's e-mail accounts from SpamKiller. 1 Click the Settings tab, and then click Users. A list of SpamKiller users appears. 2 Select a user from the list, and then click Delete.Logging on to SpamKiller in a multi-user environment
When users log on to your computer and open SpamKiller, they are automatically logged on to SpamKiller under their user profiles. If SpamKiller passwords are assigned to users, they must type their passwords in the Log On dialog box that appears.Switching between users
You must be logged on to SpamKiller as an administrator. 1 Click Switch User located at the top of the page. The Switch User dialog box appears. 2 Select a user, and then click OK. If the user has a password, the Log On dialog box appears. Type the user password in the Password box, and then click OK. We recommend that you add your friends' names and e-mail addresses to a Friends List. SpamKiller does not block messages from those on the list; therefore, adding friends helps ensure that legitimate messages get through. SpamKiller enables you to add names, e-mail addresses, domains, and mailing lists to the Friends Lists. You can add addresses one at a time, or all at once by importing an address book from your e-mail program. SpamKiller maintains two types of lists: ■ Global Friends List - affects all the e-mail accounts for the users in SpamKiller. If multiple users were added, you must be logged on to SpamKiller as an administrator in order to manage this list. ■ Personal Friends List - affects all the e-mail accounts associated with a specific user. If multiple users were added, you must be logged on to SpamKiller as the user in order to manage this list. You can add friends to a Friends List to ensure their e-mail is not blocked. The Friends page displays names and addresses that you added to the Friends List. The Friends page also shows the date you added a friend and the total number of messages received from that friend. Click the E-mail Addresses tab to view e-mail addresses on the Friends List. Click the Domains tab to view domain addresses on the list. Click the Mailing Lists tab to view mailing lists in the Friends List. To switch between the Global Friends List and your Personal Friends List, click the down arrow located on the E-mail Address, Domains, or Mailing Lists tab, and then select Personal Friends List.Opening a Friends List
1 To open a Friends List, click the Friends tab. The Friends page appears (Figure 5-3). 2 Click the E-mail Address, Domains, or Mailing List tab. The Global Friends List appears. To view your Personal Friends List, click the down arrow on one of the tabs, and then select Personal Friends List.NOTE
If your computer runs Windows 2000 or Windows XP, and multiple users were added to SpamKiller, limited users can only view their Personal Friends List.  Figure 5-3. Friends pageImporting address books
Import address books into a Friends List manually or by automatic import. Automatic import enables SpamKiller to check your address books regularly for new addresses and automatically import them into a Friends List. You can import address books from the following e-mail programs: ■ Microsoft Outlook (version 98 and later) ■ Microsoft Outlook Express (all versions) ■ Netscape Communicator (version 6 and earlier versions if exported as an LDIF file) ■ Qualcomm Eudora (version 5 and later) IncrediMail Xe ■ MSN/Hotmail ■ Any program that can export its address book as a plain text fileImporting an address book by automatic import
You can update your Personal Friends List regularly by creating a schedule for importing addresses from address books. 1 Click the Settings tab, and then click Address Books. The Import Address Books dialog box appears, which shows a list of address books that SpamKiller checks regularly and imports new addresses from. 2 Click Add. The Import Schedule dialog box appears. 3 Select the Type of address book to import and the address book Source. 4 From the Schedule box, select how often SpamKiller must check the address book for new addresses. 5 Click OK. After an update, new addresses appear in your Personal Friends List.Importing an address book manually
You can manually import address books into your Personal Friends List or the Global Friends List.NOTE
If your computer runs Windows 2000 or Windows XP, and multiple users were added to SpamKiller, you must be logged on as an administrator to add friends to the Global Friends List. 1 Click the Friends tab, and then click Import Address Book. The Import Address Book dialog box appears, showing a list of address book types that you can import. 2 Select a type of address book to import, or click Browse to import addresses stored in a file. To import the address book into your Personal Friends List only, ensure that the Add to Personal Friends List checkbox is selected. To import the address book into the Global Friends List only, ensure that the checkbox is not selected. 3 Click Next. A confirmation page lists the number of addresses that SpamKiller added. 4 Click Finish. The addresses appear in the Global Friends List or your Personal Friends List.Editing address book information
Edit information for an address book that was imported automatically. 1 Click the Settings tab, and then click Address Books. 2 Select an address book, and then click Edit. 3 Edit address book information, and then click OK.Deleting an address book from the automatic import list
Remove an address book entry when you no longer want SpamKiller to automatically import addresses from that book. 1 Click the Settings tab, and then click Address Books. 2 Select an address book, and then click Delete. A confirmation dialog box appears. 3 Click Yes to remove the address book from the list.Adding friends
To ensure that you receive all e-mail from friends, add your friends' names and addresses to a Friends List. You can add friends from the Friends page, the Blocked E-mail page, the Accepted E-mail page, and from Microsoft Outlook or Outlook Express.NOTE
If your computer runs Windows 2000 or Windows XP, and multiple users were added to SpamKiller, you must be logged on as an administrator to add friends to the Global Friends List.Adding friends from the Blocked E-mail or Accepted E-mail page
1 Click the Messages tab, and then click the Blocked E-mail or Accepted E-mail tab. Or From the SpamKiller menu in Microsoft Outlook or Outlook Express, select View Blocked Messages to open the Blocked E-mail page for that account. The Blocked E-mail or Accepted E-mail page appears. 2 Select a message from a sender that you want to add to a Friends List, and then click Add a Friend. 3 In the Address box, type the address to add to the Friends List. The Address box might already contain the address from the selected message. 4 Type the name of the friend in the Name box. 5 Select the address type you want to add from the Friend type box: Single e-mail address - the sender's e-mail address is added to the Domains section in the Friends List. Everyone at a domain - the domain name is added to Domains section in the Friends List. SpamKiller accepts all e-mail coming from the domain. - Mailing list - the address is added to the Mailing List section in the Friends List. To add the address to your Personal Friends List only, ensure that the Add to Personal Friends List checkbox is selected. To add the address to the Global Friends List only, ensure that the checkbox is not selected. 6 Click OK. All messages from that friend are marked as being messages from a friend and appear in the Accepted E-Mail page.Adding friends from the Friends page
1 Click the Friends tab, and then click Add a Friend. The Friend Properties dialog box appears. 2 In the Address box, type the address to add to the Friends List. 3 Type the name of your friend in the Name box. 4 Select the address type you want to add from the Friend type box: Single e-mail address - the sender's e-mail address is added to the Domains section in the Friends List. Everyone at a domain - the domain name is added to Domains section in the Friends List. SpamKiller accepts all e-mail coming from the domain. - Mailing list - the address is added to the Mailing List section in the Friends List. To add the address to your Personal Friends List only, ensure that the Add to Personal Friends List checkbox is selected. To add the address to the Global Friends List only, ensure that the checkbox is not selected. 5 Click OK. All messages from that friend are marked as being messages from a friend and appear in the Accepted E-Mail page.Adding friends from Microsoft Outlook
1 Open your e-mail account in Microsoft Outlook or Outlook Express. 2 Select a message from a sender that you want to add to a Friends List. 3 Click 📋 in the Microsoft Outlook toolbar. All messages from that friend are marked as being messages from a friend and appear in the Accepted E-Mail page.Editing friends
1 Click the Friends tab, and then click the E-mail Addresses, Domains, or Mailing Lists tab. The Global Friends List appears. To view your Personal Friends List, click the down arrow on one of the tabs, and then select Personal Friends List.NOTE
If your computer runs Windows 2000 or Windows XP, and multiple users were added to SpamKiller, only administrators can access the Global Friends List. 2 Select an address from the list, and then click Edit. 3 Edit the appropriate information, and then click OK.Deleting friends
Remove addresses you no longer want in a Friends List. 1 Click the Friends tab, and then click the E-mail Addresses, Domains, or Mailing Lists tab. The Global Friends List appears. To view your Personal Friends List, click the down arrow on one of the tabs, and then select Personal Friends List.NOTE
If your computer runs Windows 2000 or Windows XP, and multiple users were added to SpamKiller, only administrators can access the Global Friends List. 2 Select an address from the list, and then click Delete a friend. A confirmation dialog box appears. 3 Click Yes to delete the friend. Click the Messages tab to open the Messages page (Figure 5-4) and access your blocked and accepted messages. The Blocked E-mail and Accepted E-mail pages have similar features.  Figure 5-4. Messages pageBlocked E-mail page
Click the Blocked E-mail tab in the Messages page to view blocked messages.NOTE
You can also access blocked messages in Microsoft Outlook by selecting the SpamKiller menu, and then clicking View Blocked Messages. Blocked messages are messages that SpamKiller identified as spam, removed from your Inbox, and placed in the Blocked E-mail page. The Blocked E-mail page displays all spam messages that were removed from your e-mail accounts. To view blocked e-mail for a specific account, click the down arrow located on the Blocked E-mail tab, and then select the account to view. The top message pane lists spam messages and are sorted by date. The most recent message appears first. The bottom preview pane contains the message text for the selected message.NOTE
If your computer runs Windows 2000 or Windows XP, multiple users have been added to SpamKiller, and you are logged on to SpamKiller as a limited user, the message contents do not appear in the bottom preview pane. The middle pane shows message details. Click the down arrows to expand the message details pane and view the message text and headers in native format, including any HTML formatting tags. The message details pane shows the following. ■ Action - how SpamKiller processed the spam message. Action is associated with the action of the filter that blocked the message. ■ Reason - why SpamKiller blocked the message. You can click the reason to open the filter editor and view the filter. The filter editor displays what the filter looks for in a message, and the action that SpamKiller takes against messages found by the filter. ■ From - the sender of the message. ■ Date - the date the message was sent to you. ■ To - to whom the message was sent. ■ Subject - the topic that appears in the message subject line. The left column contains icons next to messages if manual complaints or error messages have been sent. \- Complaint sent 🔒 - a complaint was sent about the message. - Error message sent 🔒 - an error message was sent to the reply address in the spam message. - Complaint and error messages sent - Both a complaint and error message were sent. For more information on where blocked messages are, see Where are the blocked messages on page 130.Accepted E-mail page
Click the Accepted E-mail tab in the Messages page to view accepted messages. The Accepted E-mail page displays all Inbox messages in all of your e-mail accounts. However, for MAPI accounts, the Accepted E-mail page does not contain internal e-mail. To view accepted e-mail for a specific account, click the down arrow on the Accepted E-mail tab, and then select an account to view.NOTE
SpamKiller is designed to accept legitimate e-mail. However, if legitimate e-mail appears in the Blocked E-mail list, you can move the messages back to your Inbox (and the Accepted E-mail list) by selecting the messages, and then clicking Rescue this message. Like the Blocked E-mail page, the top message pane lists messages that are sorted by date. The bottom preview pane contains the message text of the selected message. The middle pane explains if a message was sent by someone on a Friends List, or if the message fits the criteria of a filter, but the filter action was set to either Accept or Mark as Possible Spam. Click the down arrows to expand the message details pane, view the message text and headers in native format, including any HTML formatting tags. The message details pane shows the following. ■ Action - how SpamKiller processed the message. ■ Reason - if a message was flagged, explains why SpamKiller flagged the message. ■ From - the sender of the message. ■ Date - the date the message was sent to you. ■ To - to whom the message was sent. ■ Subject - the topic that appears in the message subject line. One of the following icons appears next to a message. E-mail from a friend 📄 - SpamKiller detected that the sender of the message is on a Friends List. This message is one you want to keep. - Possible spam 📋 - the message matches a filter with an action set to Mark as possible spam. - Complaint sent 🔒 - a complaint was sent about the message. - Error message sent 📋 - an error message was sent to the reply address on the spam message. \- Complaint and error messages sent -Both a complaint and error message were sent.Tasks for Blocked E-mail and Accepted E-mail
The right panel on the Blocked E-mail and Accepted E-mail pages lists tasks you can perform. ■ Block this message - remove a message from your Inbox and put it in the SpamKiller Blocked E-mail page. (This option appears on the Accepted E-mail page only.) - Rescue this message - put a message back in your Inbox (this option appears on the Blocked E-mail page only) and open the Rescue Options dialog box. You can automatically add the sender to your Friends list and rescue all messages from the sender. ■ Delete this message - remove a selected message. - Add a friend - add the sender's name, e-mail address, domain, or a mailing list to a Friends List. ■ Add a filter - create a filter. ■ Report to McAfee - inform McAfee of specific spam messages you receive. - Send a complaint - send a complaint about spam to the administrator of the sender's domain or to another e-mail address you type. - Send an error - send an error message to the reply address of a spam message.Rescuing messages
If the Blocked E-mail page or the SpamKiller folder in Microsoft Outlook and Outlook Express contains legitimate mail, you can put those messages back in your Inbox.From the Blocked E-Mail page
1 Click the Messages tab, and then click the Blocked E-mail tab. Or From the SpamKiller menu in Microsoft Outlook or Outlook Express, select View Blocked Messages to open the Blocked E-mail page for that account. 2 Select a message and click Rescue this message 📋. The Rescue Options dialog box appears. - Add Friend - add the sender to your Friends list. - Rescue all from same sender - rescue all blocked messages from the sender of the selected message. 3 Click OK. The message is put back in your Inbox and the Accepted E-mail page.From the SpamKiller folder in Microsoft Outlook or Outlook Express
Select the message(s) and click Rescue Selection from the SpamKiller menu or toolbar. Your selection is put back in the Inbox and the message tag ([SPAM] by default) is removed.Blocking messages
Block spam messages that are currently in your Inbox. When you block a message, SpamKiller automatically creates a filter to remove that message from your Inbox. You can block Inbox messages from the Accepted E-mail page, or from Microsoft Outlook or Outlook Express.From the Accepted E-mail page
1 Click the Messages tab, and then click the Accepted E-mail tab. The Accepted E-mail page appears and displays messages that are currently in your Inbox. 2 Select a message, and then click Block this message. The message is removed from your Inbox and the Accepted E-mail page, and copy of the message appears in the Blocked E-mail page.From Microsoft Outlook
In Microsoft Outlook, messages from members of an Exchange server are considered safe and are not filtered by SpamKiller. Only messages from external sources are filtered. 1 Open your Microsoft Outlook or Outlook Express Inbox. 2 Select a message, and then click . A copy of the message is put in the Blocked E-mail page.Where are the blocked messages
By default, spam messages are tagged as [SPAM] and placed in the SpamKiller folder in Outlook and Outlook Express, or your Inbox. Tagged messages also appear on the Accepted E-mail page.Deleting a message manually
1 Click the Messages tab, and then click the Blocked E-mail tab. Or From the SpamKiller menu in Microsoft Outlook or Outlook Express, select View Blocked Messages to open the Blocked E-mail page for that account. 2 Select a message to delete. 3 Click Delete this message. A confirmation dialog box appears. 4 Click Yes to delete the message.Modifying how spam messages are processed
When spam is found, the message is tagged or blocked. Spam messages are removed from your server every time SpamKiller connects to it.Tagging
The e-mail subject line is tagged with [SPAM] and the message goes in your Inbox or SpamKiller folder, if you have Microsoft Outlook or Outlook Express.Blocking
The message is removed and placed in the SpamKiller Blocked E-mail page. If legitimate mail is blocked, you can rescue the message (see Rescuing messages). SpamKiller automatically removes blocked messages from the Blocked E-mail page after 15 days. You can change how often blocked messages are removed. SpamKiller does not automatically remove messages from the Accepted E-mail page since this page reflects the messages currently in your Inbox.Modifying how SpamKiller processes spam messages
1 Click the Settings tab, and then click the Filtering Options icon. 2 Click the Processing tab. Put spam in Blocked E-mail box - spam messages are removed from your Inbox and put in the SpamKiller Blocked E-mail page. Tag spam and keep in Inbox - this is the default setting. Spam messages remain in your Inbox, but the subject line of the message includes [SPAM]. Keep blocked e-mail for ____ days - blocked messages remain in the Blocked E-mail page for the duration you specify. Keep accepted e-mail for ____ days - accepted messages remain in the Accepted E-mail page for the duration you specify. 3 Click OK.Using the AntiPhishing filter
Unsolicited e-mail is categorized as spam (e-mails soliciting you to purchase), or phishing (e-mails soliciting you to provide personal information to a known or potential scam Web site). The McAfee AntiPhishing filter helps protect you from Web sites that are blacklisted (confirmed phishing or related scam Web sites), or graylisted (contain some dangerous content or links to blacklisted Web sites). If you browse to a known or potential scam Web site, you are redirected to the McAfee AntiPhishing Filter page. To change AntiPhishing settings, follow these steps. 1 Open Internet Explorer. 2 In the Tools menu, select McAfee AntiPhishing Filter. ■ Enable Web site filtering - enabled by default. To disable AntiPhishing filtering, clear this checkbox. \- Allow access to blacklisted Web sites - places a link on the redirection page for blacklisted sites. Clicking this link takes you to the Web site. - Allow access to graylisted Web sites - places a link on the redirection page for graylisted sites. Clicking this link takes you to the Web site. 3 When you are finished, click OK.Adding friends to a Friends List
See Adding friends from the Blocked E-mail or Accepted E-mail page on page 122.Adding filters
For more information on filters, see Working With Filters in the online Help. 1 To create a Global Filter, click the Settings tab, select Global Filters, and click Add. Or To create a Personal Filter, click the Settings tab, select Personal Filters, and click Add. Or Click the Messages tab, click the Blocked E-mail or Accepted E-mail tab, and click Add a Filter. 2 Click Add to begin creating a filter condition. The Filter Condition dialog box appears. 3 Create a filter condition by following these steps. A filter condition is a statement that tells SpamKiller what to look for in a message. In the example “The message text contains mortgage,” the filter searches for messages containing the word “mortgage.” For more information, see Filter Conditions in the Online Help. a Select a condition type from the first box. b Select or type values in the subsequent boxes. c If the following options appear, select them to further define the filter condition. Also look in formatting codes - this option appears only if the filter condition is defined to search the message text. If you select this checkbox, SpamKiller searches both the message text and the message formatting codes for the text you indicated. Match variations - allows SpamKiller to detect common deliberate misspellings used by spammers. For example, the word "common" might be misspelled as "c0mm0n" to evade filters. Regular Expressions (RegEx) - allows you to specify character patterns used in filter conditions. To test a character pattern, click Test RegEx. Case-sensitive - this option only appears for conditions in which you typed a condition value. If you select this checkbox, SpamKiller distinguishes between upper-case and lower-case letters in the value you typed. d Click OK. 4 Create another filter condition as follows, or go to Step 5 to select a filter action. a Click Add, and then create the filter condition. Click OK when you are finished creating the filter condition. Both filter conditions appear in the Filter Conditions list and are joined by and. The and indicates that SpamKiller looks for messages that match both filter conditions. If you want SpamKiller to look for messages that match either one of the conditions, change and to or by clicking and, and then selecting or from the box that appears. b Click Add to create another condition, or go to Step 5 to select a filter action. If you created a total of three or more filter conditions, you can group filter conditions to create clauses. For examples of grouping, see Grouping Filters in the online Help. To group filter conditions, select a filter condition, and click Group. To ungroup filter conditions, select a grouped condition, and click Ungroup. 5 Select a filter action from the Action box. The filter action tells SpamKiller how to process messages found by that filter. For more information, see Filter Actions in the online Help. 6 Click Advanced to select advanced filter options (selecting advanced options is not required). For more information, see Advanced Filter Options in the online Help. 7 Click OK when you are finished creating the filter.NOTE
To edit a condition, select it and click Edit. To delete a condition, select it and click Delete.Regular expressions
Regular expressions are only available for the following filter conditions: The subject, The message text, At least one of the following phrases. These special characters and sequences can be used as regular expressions when defining filter conditions. For example: The regular expression [0-9]*[0-9]+ matches floating point numbers given non engineering notation. The regular expression matches: “12.12”, “.1212”, and “12.0”, but not “12” and “12”. The regular expression D*[0-9]+D* matches all words with numbers: "SpamKi1er" and V1AGRA" but not "SpamKiller" and "VIAGRA". \ Marks the next character as either a special character or a literal. For example, "n" matches the character "n". "\n" matches a new line character. The sequence "\\" matches “\” and “\(\)” matches “(. ^ Matches the beginning of input. \$ Matches the end of input. * Matches the preceding character zero or more times. For example, "zo*" matches either "z" or "zoo". \+ Matches the preceding character one or more times. For example, "zo+" matches "zoo" but not "z". ? Matches the preceding character zero or one time. For example, "a?ve?" matches the "ve" in "never". . Matches any single character except a new line character.(pattern)
Matches pattern and remembers the match. The matched substring can be retrieved from the resulting Matches collection, using Item [0]...[n]. To match parentheses characters (), use “\(\)” or “\)\).x|y
Matches either x or y. For example, "z | wood" matches "z" or "wood". "(z | w)oo" matches "zoo" or "wood".{n}
The n is a non negative integer. Matches exactly n times. For example, "o{2}" does not match the "o" in "Bob," but matches the first two o's in "fooood".{n,}
The n is a non negative integer. Matches at least n times. For example, "o{2,}" does not match the "o" in "Bob" and matches all the o's in "fooood." "o{1,}" is equivalent to "o+". "o{0,}" is equivalent to "o*".{n,m}
The m and n are non negative integers. Matches at least n and at most m times. For example, “o{1,3}” matches the first three o's in “foooooood.” “o{0,1}” is equivalent to “o?”.[xyz]
A character set. Matches any one of the enclosed characters. For example, "[abc]" matches the "a" in "plain".[^xyz]
A negative character set. Matches any character not enclosed. For example, "[^abc]" matches the "p" in "plain".[a-z]
A range of characters. Matches any character in the specified range. For example, "[a-z]" matches any lowercase alphabetic character in the range "a" through "z".[^m-z]
A negative range characters. Matches any character not in the specified range. For example, “[m-z]” matches any character not in the range “m” through “z”.\b
Matches a word boundary, that is, the position between a word and a space. For example, "er\b" matches the "er" in "never" but not the "er" in "verb". Matches a non-word boundary. "ea*r\B" matches the "ear" in "never early".\d
Matches a digit character. Equivalent to [0-9].| \D |
| Matches a non-digit character. Equivalent to [^0-9]. |
| \f |
| Matches a form-feed character. |
| \n |
| Matches a new line character. |
| \r |
| Matches a carriage return character. |
| \s |
| Matches any white space including space, tab, form-feed, etc. Equivalent to "[\f\n\r\t\v]". |
| \S |
| Matches any nonwhite space character. Equivalent to "[^ \f\n\r\t\v]". |
| \t |
| Matches a tab character. |
| \v |
| Matches a vertical tab character. |
| \w |
| Matches any word character including underscore. Equivalent to "[A-Za-z0-9_]" |
| \W |
| Matches any non-word character. Equivalent to "[^A-Za-z0-9_]" |
| \num |
| Matches num, where num is a positive integer. A reference back to remembered matches. For example, "(.)\1" matches two consecutive identical characters. |
| \n |
\xn
Matches n, where n is a hexadecimal escape value. Hexadecimal escape values must be exactly two digits long. For example, "\x41" matches "A". "\x041" is equivalent to "\x04" & "1". Allows ASCII codes to be used in regular expressions.Reporting spam to McAfee
You can report spam to McAfee, where they analyze it to create filter updates. 1 Click the Messages tab, and then click the Blocked E-mail or Accepted Mail tab. The Blocked E-mail or Accepted E-mail page appears. 2 Select a message, and then click Report to McAfee. A confirmation dialog box appears. 3 Click Yes. The message is automatically sent to McAfee.Sending complaints manually
Send a complaint to prevent a sender from sending you more spam. For more information on sending complaints, see Sending Complaints and Error Messages in the online Help. 1 Click the Messages tab, and then click the Blocked E-mail or Accepted E-mail tab. A list of messages appears. 2 Select a message to complain about, and then click Send a complaint. The Send Complaint dialog box appears. 3 Select whom you want to send the complaint to.WARNING
In most cases you should not select Sender. Sending a complaint to the sender of the spam validates your e-mail address, which can increase the number of spam you receive from that sender. 4 Click Next, and then follow the instructions on the dialog boxes that appear.Sending error messages
For more information on sending error messages, see Sending Complaints and Error Messages in the online Help. Send an error message to prevent a sender from sending you more spam.Sending an error message manually
1 Click the Messages tab, and then click the Blocked E-mail or Accepted E-mail tab. A list of messages appears. 2 To send an error message about a specific spam message, select the message, and then click Send error. An error message is sent to the reply address in the spam message.SpamKiller is unable to communicate with its server
If the SpamKiller server does not start or is being blocked by another application, it cannot communicate with its server.Starting the SpamKiller server manually
This section only applies to Microsoft Windows 2000 and XP users. 1 Click Start and select Run. 2 Type SERVICES.MSC and click OK. 3 Right-click the McAfee SpamKiller Server and select Start. The server service starts.SpamKiller server is blocked by firewalls or internet filtering programs
If the SpamKiller Server service is already started and running, follow these steps. 1 Verify that SpamKiller Server and/or MSKSrvr.exe have full access for any installed firewall programs, including McAfee Personal Firewall. 2 Verify that LocalHost and/or 127.0.0.1 are not blocked or banned in any installed firewall program, including McAfee Personal Firewall. 3 Disable any internet privacy or internet filtering programs.Cannot connect to the e-mail server
If the SpamKiller server attempts to connect to the POP3 server and the connection fails, follow these steps.Verifying your connection to the Internet
Dial-up Users
1 Click Continue what I was doing on the error message (if necessary). 2 Establish a connection to the Internet. 3 Maintain the connection for at least 15 minutes to see if the message re-appears.Broadband (Cable, DSL)
1 Click Continue what I was doing on the error message (if necessary). 2 Verify that you are connected to the Internet by surfing to a site.Verifying the POP3 server address for SpamKiller
1 Right-click the McAfee icon in the system tray (lower right hand corner), point to SpamKiller, and select Settings. 2 Click E-mail Accounts. 3 Highlight the e-mail account in the error message. 4 Click Edit. 5 Select the Servers tab. 6 Note the server address in the Incoming e-mail box and compare it with the Incoming e-mail server address your Internet Service Provider (ISP) has listed for your e-mail account. The server addresses should match. 7 Verify the password by re-entering the password provided by your ISP for your e-mail account. 8 Click OK. 9 Click Close.Index
A
Accepted E-mail adding to a Friends List, 132 icons in the accepted messages list, 127 sending error messages, 137 tasks, 128 Accepted E-mail page, 127 ActiveShield cleaning a virus, 32 default scan setting, 24, 26 to 31 disabling, 23 enabling, 22 scan options, 23 scanning all file types, 28 scanning all files, 28 scanning e-mail and attachments, 24 scanning for new unknown viruses, 29 scanning for Potentially Unwanted Programs (PUPs), 31 scanning for scripts, 30 scanning for worms, 26 scanning inbound instant message attachments, 28 scanning program files and documents only, 29 starting, 24 stopping, 24 testing, 19 adding an e-mail address to a Friends List, 122 adding e-mail accounts, 107 adding filters, 132 adding users, 87 content blocking, 88 cookie blocking, 88 Internet time limits, 89 administrator, 81, 115 to 116 retrieving password, 83 alerts Application Has Been Modified, 73 Application Requests Internet Access, 73 Application Requests Server Access, 73 Connection Attempt Blocked, 80 for detected e-mail, 33 for detected files, 32 for potential worms, 33 for PUPs, 34 for suspect scripts, 33 for viruses, 32 Internet Application Blocked, 73 New Application Allowed, 78 AntiPhishing filter, using, 131 AVERT, submitting suspect files to, 42B
Blocked E-mail adding to a Friends List, 132 icons in the blocked messages list, 125 modifying how spam messages are processed, 130 rescuing messages, 129 sending error messages, 137 tasks, 128 where are the blocked messages, 130 Blocked E-mail page, 125 blocking messages, 129C
configuring VirusScan ActiveShield, 21 Scan, 35 creating a Rescue Disk, 43D
default firewall, setting the, 51E
editing users, 90 age group, 92 cookie blocking, 91 Internet time limits, 92 password, 90 removing users, 93 startup user, 93 user information, 91 editing whitelists, 34 e-mail accounts adding, 107 deleting, 109 editing, 109 editing MAPI accounts, 113 editing MSN/Hotmail accounts, 112 editing POP3 accounts, 109 pointing your e-mail client to SpamKiller, 108 e-mail and attachments auto-cleaning enabling, 24 scanning disabling, 25 enabling, 24 errors, 25 Event Log about, 62 managing, 71 viewing, 71 event log, 96 events about, 62 archiving the Event Log, 71 clearing the Event Log, 71 copying, 72 deleting, 72 exporting, 72 from 0.0.0.0, 63 from 127.0.0.1, 63 from computers on your LAN, 64 from private IP addresses, 64 HackerWatch.org advice, 67 loopback, 63 more information, 67 reporting, 68 responding to, 67 showing all, 65 from one address, 66 one day's, 66 this week's, 65 today's, 65 with same event info, 67 tracing understanding, 62 viewing archived Event Logs, 71F
features, 81, 104 filtering disabling, 107 enabling, 107 filters, adding, 132 Friends List adding an e-mail address, 122 adding friends from the Blocked E-mail or Accepted E-mail page, 122 importing an address book, 119 Friends page, 119H
HackerWatch.org advice, 67 reporting an event to, 68 signing up, 68 Help icon, 104|
importing an address book into a Friends List, 119 inbound instant message attachments auto-cleaning, 28 scanning, 28 Internet applications about, 60 allowing and blocking, 61 changing application rules, 61 IP addresses about, 63 banning, 69 trusting, 68L
list of detected files (Scan), 37, 40 logging on to SpamKiller in a multi-user environment, 117M
McAfee Privacy Service, 85 disabling, 85 opening, 85 signing in, 85 updating, 84 to 85 McAfee Security Center, 84 McAfee SecurityCenter, 13, 21, 54, 106 Messages page, 124 Microsoft Outlook, 38N
new features, 17, 490
options, 93 allowing cookies, 96 allowing web sites, 93 backup, 99 blocking advertisements, 95 blocking information, 94 blocking web sites, 93 web bugs, 95P
passwords, 116 Personal Firewall testing, 54 pointing your e-mail client to SpamKiller, 108 Potentially Unwanted Programs (PUPs), 31 alerts, 34 cleaning, 40 deleting, 41 detecting, 40 quarantining, 40 removing, 34 trusting, 34 protecting children, 116Q
Quarantine adding suspect files, 41 cleaning files, 41 to 42 deleting files, 41 deleting suspect files, 42 managing suspect files, 41 restoring cleaned files, 41 to 42 submitting suspect files, 42 Quick Start Card, iiiR
regular expressions, 134 reporting an event, 68 reporting spam to McAfee, 137 Rescue Disk creating, 43 updating, 44 using, 41, 44 write-protecting, 44 rescuing messages, 129S
Scan automatic scanning, 38 cleaning a virus or Potentially Unwanted Program, 40 deleting a virus or Potentially Unwanted Program, 41 manual scanning, 35 manual scanning via Microsoft Outlook toolbar, 38 manual scanning via Windows Explorer, 38 quarantining a virus or Potentially Unwanted Program, 40 Scan all files option, 36 Scan for new unknown viruses option, 36 Scan for Potentially Unwanted Programs option, 37 Scan subfolders option, 35 Scan within compressed files option, 36 testing, 19 to 20 Scan all files option (Scan), 36 Scan for new unknown viruses option (Scan), 36 Scan for Potentially Unwanted Programs option (Scan), 37 scan options ActiveShield, 23, 28 to 29 Scan, 35 Scan subfolders option (Scan), 35 Scan within compressed files option (Scan), 36 scanning all files, 28, 36 compressed files, 36 for new unknown viruses, 36 for Potentially Unwanted Programs (PUPs), 31 for scripts, 30 for worms, 26 program files and documents only, 29 scheduling automatic scans, 38 subfolders, 35 via Microsoft Outlook toolbar, 38 via Windows Explorer, 38 scheduling scans, 38 scripts alerts, 33 allowing, 33 stopping, 33 ScriptStopper, 30 SecurityCenter, 106 Settings page, 108 setup assistant, 82 showing events in the Event Log, 65 Shredder, 97 SpamKiller Accepted E-mail page, 127 Blocked E-mail page, 125 disabling filtering, 107 enabling filtering, 107 Startup user, 84, 88 submitting suspect files to AVERT, 42 Summary Page, 55 Summary page, 105 Support icon, 104 Switch User icon, 104 switching users, 117T
tasks for blocked and accepted messages, 128 technical support, 41 testing Personal Firewall, 54 testing VirusScan, 19 tracing an event, 67 Trojans alerts, 32 detecting, 40 Trusted PUPs List, 34U
uninstalling other firewalls, 51 uninstalling McAfee Privacy Service, 87 from Safe Mode, 83 Update Wizard, 24 updating a Rescue Disk, 44 VirusScan automatically, 47 manually, 47 user options, 100 accepting cookies, 101 changing your password, 100 changing your user name, 100 clearing your cache, 101 rejecting cookies, 102 users adding users, 115 creating passwords, 116 deleting user profiles, 117 editing user profiles, 117 logging on to SpamKiller, 117 switching users, 117 user types, 115 using a Rescue Disk, 44 utilities, 97V
viruses alerts, 32 allowing suspect scripts, 33 cleaning, 32, 40 deleting, 32, 40 deleting detected files, 32 detecting, 40 detecting with ActiveShield, 32 quarantining, 32, 40 quarantining detected files, 32 removing PUPs, 34 reporting automatically, 44, 46 stopping potential worms, 33 stopping suspect scripts, 33 VirusScan reporting viruses automatically, 44, 46 scanning via Microsoft Outlook toolbar, 38 scanning via Windows Explorer, 38 scheduling scans, 38 testing, 19 updating automatically, 47 updating manually, 47W
whitelisted programs, 34 whitelisting PUPs, 34 Windows Automatic Updates, 73 Windows Explorer, 38 Windows Firewall, 51 World Virus Map reporting, 44 viewing, 46 worms alerts, 32 to 33 detecting, 32, 40 stopping, 33 WormStopper, 26 write-protecting a Rescue Disk, 44




- INTERNETSECURITYSUITE
- USER GUIDE
- COPYRIGHT
- TRADEMARK ATTRIBUTIONS
- LICENSE INFORMATION
- LICENSE AGREEMENT
- ATTRIBUTIONS
- QUICK START CARD
- FOR MORE INFORMATION
- REGISTRATION BENEFITS
- TECHNICAL SUPPORT
- CONTENTS
- QUICK START CARD .... III
- 1 INTRODUCTION 11
- 2 MCAFEE VIRUSSCAN 17
- 3 MCAFEE PERSONAL FIREWALL PLUS 49
- 4 MCAFEE PRIVACY SERVICE 81
- 5 MCAFEE SPAMKILLER 103
- INTRODUCTION
- 1
- MCAFEE INTERNET SECURITY SOFTWARE
- SYSTEM REQUIREMENTS
- SUPPORTED E-MAIL PROGRAMS
- TOOLBAR PLUG-IN REQUIREMENTS
- SUPPORTED INSTANT MESSAGING PROGRAMS
- USING MCAFEE SECURITYCENTER
- NOTE
- TO OPEN MCAFEE SECURITYCENTER
- TO ACCESS YOUR MCAFEE PRODUCT
- REMOVING INTERNET SECURITY SUITE PROGRAMS
- MCAFEE VIRUSSCAN
- 2
- NEW FEATURES
- TESTING VIRUSSCAN
- TESTING ACTIVESHIELD
- TESTING SCAN
- TO TEST SCAN
- USING ACTIVESHIELD
- ENABLING OR DISABLING ACTIVESHIELD
- ENABLING ACTIVESHIELD
- DISABLING ACTIVESHIELD
- CONFIGURING ACTIVESHIELD OPTIONS
- STARTING ACTIVESHIELD
- STOPPING ACTIVESHIELD
- WARNING
- SCANNING E-MAIL AND ATTACHMENTS
- INBOUND E-MAIL
- OUTBOUND E-MAIL
- DISABLING E-MAIL SCANNING
- SCANNING FOR WORMS
- 3 CLICK ENABLE WORMSTOPPER (RECOMMENDED) (FIGURE 2-2)
- SCANNING INBOUND INSTANT MESSAGE ATTACHMENTS
- SCANNING ALL FILES
- SCANNING PROGRAM FILES AND DOCUMENTS ONLY
- SCANNING FOR NEW UNKNOWN VIRUSES
- SCANNING FOR SCRIPTS
- SCANNING FOR POTENTIALLY UNWANTED PROGRAMS (PUPS)
- UNDERSTANDING SECURITY ALERTS
- MANAGING DETECTED FILES
- MANAGING DETECTED E-MAIL
- MANAGING SUSPECT SCRIPTS
- MANAGING POTENTIAL WORMS
- MANAGING PUPS
- MANAGING TRUSTED PUPS
- MANUALLY SCANNING YOUR COMPUTER
- MANUALLY SCANNING FOR VIRUSES AND OTHER THREATS
- SCANNING VIA WINDOWS EXPLORER
- SCANNING VIA MICROSOFT OUTLOOK
- AUTOMATICALLY SCANNING FOR VIRUSES AND OTHER THREATS
- UNDERSTANDING THREAT DETECTIONS
- MANAGING QUARANTINED FILES
- CREATING A RESCUE DISK
- WRITE-PROTECTING A RESCUE DISK
- USING A RESCUE DISK
- UPDATING A RESCUE DISK
- AUTOMATICALLY REPORTING VIRUSES
- REPORTING TO THE WORLD VIRUS MAP
- VIEWING THE WORLD VIRUS MAP
- UPDATING VIRUSSCAN
- AUTOMATICALLY CHECKING FOR UPDATES
- MANUALLY CHECKING FOR UPDATES
- MCAFEE PERSONAL FIREWALL PLUS
- 3
- IMPROVED GAMING SUPPORT
- IMPROVED ACCESS HANDLING
- ENHANCED SECURITY CONTROL
- IMPROVED RECOVERY OPTIONS
- INTERNET CONNECTIVITY PROTECTION
- ENHANCED HACKERWATCH.ORG INTEGRATION
- EXTENDED INTELLIGENT APPLICATION HANDLING
- ADVANCED TROJAN DETECTION
- IMPROVED VISUAL TRACING
- IMPROVED USABILITY
- ENHANCED INTRUSION DETECTION
- ENHANCED TRAFFIC ANALYSIS
- REMOVING OTHER FIREWALLS
- SETTING THE DEFAULT FIREWALL
- SETTING THE SECURITY LEVEL
- TESTING MCAFEE PERSONAL FIREWALL PLUS
- ABOUT THE SUMMARY PAGE
- ABOUT THE INTERNET APPLICATIONS PAGE
- CHANGING APPLICATION RULES
- ALLOWING AND BLOCKING INTERNET APPLICATIONS
- ABOUT THE INBOUND EVENTS PAGE
- UNDERSTANDING EVENTS
- ABOUT IP ADDRESSES
- IP ADDRESS TYPES
- EVENTS FROM 0.0.0.0
- EVENTS FROM 127.0.0.1
- EVENTS FROM COMPUTERS ON YOUR LAN
- EVENTS FROM PRIVATE IP ADDRESSES
- SHOWING EVENTS IN THE INBOUND EVENTS LOG
- SHOWING TODAY'S EVENTS
- SHOWING THIS WEEK'S EVENTS
- SHOWING THE COMPLETE INBOUND EVENTS LOG
- SHOWING EVENTS FROM A SPECIFIC DAY
- SHOWING EVENTS FROM A SPECIFIC INTERNET ADDRESS
- SHOWING EVENTS THAT SHARE IDENTICAL EVENT INFORMATION
- RESPONDING TO INBOUND EVENTS
- TRACING THE SELECTED EVENT
- GETTING ADVICE FROM HACKERWATCH.ORG
- REPORTING AN EVENT
- SIGNING UP FOR HACKERWATCH.ORG
- TRUSTING AN ADDRESS
- BANNING AN ADDRESS
- MANAGING THE INBOUND EVENTS LOG
- ARCHIVING THE INBOUND EVENTS LOG
- VIEWING AN ARCHIVED INBOUND EVENTS LOG
- CLEARING THE INBOUND EVENTS LOG
- COPYING AN EVENT TO THE CLIPBOARD
- DELETING THE SELECTED EVENT
- ABOUT ALERTS
- RED ALERTS
- IMPORTANT
- INTERNET APPLICATION BLOCKED ALERT
- APPLICATION WANTS TO ACCESS THE INTERNET ALERT
- APPLICATION HAS BEEN MODIFIED ALERT
- APPLICATION REQUESTS SERVER ACCESS ALERT
- GREEN ALERTS
- APPLICATION ALLOWED TO ACCESS THE INTERNET ALERT
- BLUE ALERTS
- CONNECTION ATTEMPT BLOCKED ALERT
- MCAFEE PRIVACY SERVICE
- 4
- FEATURES
- THE ADMINISTRATOR
- SETTING UP PRIVACY SERVICE
- SETTING UP A PRE-INSTALLED VERSION OF PRIVACY SERVICE
- RETRIEVING THE ADMINISTRATOR PASSWORD
- REMOVING PRIVACY SERVICE WITH SAFE MODE
- THE STARTUP USER
- CONFIGURING THE ADMINISTRATOR AS STARTUP USER
- LAUNCHING MCAFEE PRIVACY SERVICE
- LAUNCHING AND SIGNING IN TO PRIVACY SERVICE
- DISABLING PRIVACY SERVICE
- UPDATING MCAFEE PRIVACY SERVICE
- REMOVING AND RE-INSTALLING PRIVACY SERVICE
- REMOVING PRIVACY SERVICE
- INSTALLING PRIVACY SERVICE
- SETTING THE PASSWORD
- SETTING THE AGE GROUP
- SETTING THE COOKIE BLOCKER
- SETTING THE INTERNET TIME LIMITS
- CREATING WEB SITE PERMISSIONS WITH KEYWORDS
- CHANGING PASSWORDS
- CHANGING A USER'S INFORMATION
- CHANGING COOKIE BLOCKER SETTING
- EDITING THE ACCEPT AND REJECT COOKIE LIST
- CHANGING THE AGE GROUP
- CHANGING INTERNET TIME LIMITS
- CHANGING THE STARTUP USER
- REMOVING USERS
- BLOCKING WEB SITES
- ALLOWING WEB SITES
- BLOCKING INFORMATION
- ADDING INFORMATION
- EDITING INFORMATION
- REMOVING PERSONAL INFORMATION
- BLOCKING WEB BUGS
- BLOCKING ADVERTISEMENTS
- ALLOWING COOKIES FROM SPECIFIC WEB SITES
- DATE AND TIME
- USER
- SUMMARY
- EVENT DETAILS
- SAVING THE CURRENT LOG
- TO SAVE A CURRENT EVENT LOG
- VIEWING SAVED LOGS
- ERASING FILES PERMANENTLY USING MCAFEE SHREDDER
- WHY WINDOWS LEAVES FILE REMNANTS
- WHAT MCAFEE SHREDDER ERASES
- PERMANENTLY ERASING FILES IN WINDOWS EXPLORER
- EMPTYING THE WINDOWS RECYCLE BIN
- CUSTOMIZING SHREDDER SETTINGS
- BACKING UP THE PRIVACY SERVICE DATABASE
- RESTORING THE BACKUP DATABASE
- CHANGING YOUR PASSWORD
- CHANGING YOUR USER NAME
- CLEARING YOUR CACHE
- ACCEPTING COOKIES
- IF YOU NEED TO REMOVE A WEB SITE FROM THIS LIST
- REJECTING COOKIES
- MCAFEE SPAMKILLER
- 5
- USER OPTIONS
- FILTERING
- UNDERSTANDING THE TOP PANE
- UNDERSTANDING THE SUMMARY PAGE
- MICROSOFT OUTLOOK AND OUTLOOK EXPRESS INTEGRATION
- REQUIRED FOR THE TOOLBAR PLUG-IN
- DISABLING SPAMKILLER
- ADDING E-MAIL ACCOUNTS
- ADDING AN E-MAIL ACCOUNT
- POINTING YOUR E-MAIL CLIENT TO SPAMKILLER
- DELETING E-MAIL ACCOUNTS
- DELETING AN E-MAIL ACCOUNT FROM SPAMKILLER
- EDITING E-MAIL ACCOUNT PROPERTIES
- POP3 ACCOUNTS
- EDITING POP3 ACCOUNTS
- MSN/HOTMAIL ACCOUNTS
- EDITING MSN/HOTMAIL ACCOUNTS
- 7 CLICK OK
- CONFIGURING A HOTMAIL ACCOUNT TO BLOCK SPAM IN OUTLOOK OR OUTLOOK EXPRESS
- MAPI ACCOUNTS
- EDITING MAPI ACCOUNTS
- ADDING USERS
- USER PASSWORDS AND PROTECTING CHILDREN FROM SPAM
- CREATING A PASSWORD FOR AN EXISTING SPAMKILLER USER
- ADDING A USER TO SPAMKILLER
- EDITING SPAMKILLER USER PROFILE
- DELETING A SPAMKILLER USER PROFILE
- LOGGING ON TO SPAMKILLER IN A MULTI-USER ENVIRONMENT
- SWITCHING BETWEEN USERS
- OPENING A FRIENDS LIST
- IMPORTING ADDRESS BOOKS
- IMPORTING AN ADDRESS BOOK BY AUTOMATIC IMPORT
- IMPORTING AN ADDRESS BOOK MANUALLY
- EDITING ADDRESS BOOK INFORMATION
- DELETING AN ADDRESS BOOK FROM THE AUTOMATIC IMPORT LIST
- ADDING FRIENDS
- ADDING FRIENDS FROM THE BLOCKED E-MAIL OR ACCEPTED E-MAIL PAGE
- ADDING FRIENDS FROM THE FRIENDS PAGE
- ADDING FRIENDS FROM MICROSOFT OUTLOOK
- EDITING FRIENDS
- DELETING FRIENDS
- BLOCKED E-MAIL PAGE
- ACCEPTED E-MAIL PAGE
- TASKS FOR BLOCKED E-MAIL AND ACCEPTED E-MAIL
- RESCUING MESSAGES
- FROM THE BLOCKED E-MAIL PAGE
- FROM THE SPAMKILLER FOLDER IN MICROSOFT OUTLOOK OR OUTLOOK EXPRESS
- BLOCKING MESSAGES
- FROM THE ACCEPTED E-MAIL PAGE
- FROM MICROSOFT OUTLOOK
- WHERE ARE THE BLOCKED MESSAGES
- DELETING A MESSAGE MANUALLY
- MODIFYING HOW SPAM MESSAGES ARE PROCESSED
- TAGGING
- BLOCKING
- MODIFYING HOW SPAMKILLER PROCESSES SPAM MESSAGES
- USING THE ANTIPHISHING FILTER
- ADDING FRIENDS TO A FRIENDS LIST
- ADDING FILTERS
- REGULAR EXPRESSIONS
- (PATTERN)
- X|Y
- {N}
- {N,}
- {N,M}
- [XYZ]
- [^XYZ]
- [A-Z]
- [^M-Z]
- B
- D
- XN
- REPORTING SPAM TO MCAFEE
- SENDING COMPLAINTS MANUALLY
- SENDING ERROR MESSAGES
- SENDING AN ERROR MESSAGE MANUALLY
- SPAMKILLER IS UNABLE TO COMMUNICATE WITH ITS SERVER
- STARTING THE SPAMKILLER SERVER MANUALLY
- SPAMKILLER SERVER IS BLOCKED BY FIREWALLS OR INTERNET FILTERING PROGRAMS
- CANNOT CONNECT TO THE E-MAIL SERVER
- VERIFYING YOUR CONNECTION TO THE INTERNET
- DIAL-UP USERS
- BROADBAND (CABLE, DSL)
- VERIFYING THE POP3 SERVER ADDRESS FOR SPAMKILLER
- INDEX
- A
- C
- E
- F
- H
- L
- M
- N
- 0
- P
- Q
- R
- S
- T
- U
- V
- W
Brand : MCAFEE
Model : Internet Security Suite 2006
Category : Antivirus