
PS-3000 - Keyboard CASIO - Free user manual and instructions
Find the device manual for free PS-3000 CASIO in PDF.


| Product Type | Digital Piano |
| Model | PS-3000 |
| Brand | Casio |
| Keyboard | 88 piano keys with touch response |
| Polyphony | 64 notes (max) |
| Tones | 8 (Grand Piano, Mellow Piano, Grand Piano 2, Elec Piano 1, Elec Piano 2, Harpsichord, Pipe Organ, Strings) |
| Digital Effects | Reverb (4 types: Room, Stage, Hall 1, Hall 2), Chorus |
| Demo Tunes | 8 (playable in sequence or individually) |
| Memory | Approx. 2,500 notes (one song); real-time recording/playback; lithium battery backup (5 years) |
| Pedals | Damper, Soft/Sostenuto (selectable via power-on procedure) |
| Metronome | Beat: 0, 2-6; Tempo: 30-255 bpm; volume adjustable |
| Transpose | ±1 octave (F to C to F) in semitone steps |
| Tuning | A4 = 440 Hz ± 50 cents (adjustable) |
| Touch Select | 3 types (Light, Middle, Heavy) + Off |
| MIDI | Multi-timbre 16 channels; IN/OUT terminals |
| Inputs/Outputs | Headphones (stereo mini jack), Pedal jacks (standard, x2), DC 12V, MIDI IN/OUT |
| Speakers | 12 cm x 2 (8.0 W + 8.0 W) |
| Power Supply | AC Adaptor AD-12 (12V DC, 18W) |
| Dimensions (Piano + Stand) | 135.9 × 29.9 × 76.3 cm (53 9/16 × 11 3/4 × 30 1/16 in) |
| Weight (Piano + Stand) | Approx. 36.5 kg (80.5 lbs) |
| Cleaning | Use a soft cloth dampened with mild neutral detergent; wring out excess water; avoid benzene, alcohol, thinner |
| Safety | Use only specified AC adaptor AD-12; keep away from moisture; do not disassemble; refer servicing to qualified personnel |
| Assembly | Requires two people; use included screws and stand parts; attach cable clip |
Frequently Asked Questions - PS-3000 CASIO
User questions about PS-3000 CASIO
0 question about this device. Answer the ones you know or ask your own.
Ask a new question about this device
Download the instructions for your Keyboard in PDF format for free! Find your manual PS-3000 - CASIO and take your electronic device back in hand. On this page are published all the documents necessary for the use of your device. PS-3000 by CASIO.
USER MANUAL PS-3000 CASIO
CASIO®
PS3000-ES-1
NOTICE
This equipment has been tested and found to comply with the limits for a Class B digital device, pursuant to Part 15 of the FCC Rules. These limits are designed to provide reasonable protection against harmful interference in a residential installation. This equipment generates, uses and can radiate radio frequency energy and, if not installed and used in accordance with the instructions, may cause harmful interference to radio communications. However, there is no guarantee that interference will not occur in a particular installation. If this equipment does cause harmful interference to radio or television reception, which can be determined by turning the equipment off and on, the user is encouraged to try to correct the interference by one or more of the following measures:
- Reorient or relocate the receiving antenna.
- Increase the separation between the equipment and receiver.
- Connect the equipment into an outlet on a circuit different from that to which the receiver is connected.
- Consult the dealer or an experienced radio/TV technician for help.
FCC WARNING
Changes or modifications not expressly approved by the party responsible for compliance could void the user's authority to operate the equipment.
TO REDUCE THE RISK OF FIRE OR ELECTRIC SHOCK, REFER SERVICING TO QUALIFIED SERVICE PERSONNEL.
Important!
Please note the following important information before using this product.
- Before using the optional AD-12 Adaptor to power the unit, be sure to check the AC Adaptor for any damage first. Carefully check the power cord for breakage, cuts, exposed wire and other serious damage. Never let children use an AC adaptor that is seriously damaged.
- The product is not intended for children under 3 years.
- Use only CASIO AD-12 adaptor.
• The AC adaptor is not a toy. - Be sure to disconnect the AC adaptor before cleaning the product.

CASIO ELECTRONICS CO., LTD. Unit 6, 1000 North Circular Road London NW2 7JD, U.K.
This mark is valid in the EU countries only. Please keep all information for future reference.
417A-E-002A

Safety Precautions
Congratulations on your selection of the CASIO Digital Piano. This digital piano is a sophisticated musical instrument that blends the very best of traditional piano feel and sound quality with the latest that modern electronics technology has to offer.
- Before using the product, be sure to carefully read through the instructions contained in this manual.
- Please keep all information for future reference.
Symbols
Various symbols are used in this user's guide and on the product itself to ensure that the product is used safely and correctly, and to prevent injury to the user and other persons as well as damage to property. Those symbols along with their meanings are shown below.

WARNING
This indication stipulates matters that have the risk of causing death or serious injury if the product is operated incorrectly while ignoring this indication.

CAUTION
This indication stipulates matters that have the risk of causing injury as well as matters for which there is the likelihood of occurrence of physical damage only if the product is operated incorrectly while ignoring this indication.
Symbol Examples

This triangle symbol ( means that the user should be careful. (The example at left indicates electrical shock caution.)

This circle with a line through it (⊗) means that the indicated action must not be performed. Indications within or nearby this symbol are specifically prohibited. (The example at left indicates that disassembly is prohibited.)

The black dot (●) means that the indicated action must be performed. Indications within this symbol are actions that are specifically instructed to be performed. (The example at left indicates that the power plug must be unplugged from the electrical socket.)

Safety Precautions

WARNING
Smoke, Strange Odor, Overheating
Continued use of the product while it is emitting smoke, a strange odor, or heat creates the risk of fire and electric shock.
Take the following steps immediately.
- Turn off power.
- If you are using the AC adaptor for power, unplug it from the wall outlet.
- Contact your original retailer or an authorized CASIO Service Provider.
AC Adaptor
Misuse of the AC adaptor creates the risk of fire and electric shock. Always make sure you observe the following precautions.
- Be sure to use only the AC adaptor that is specified for this product.
- Use only a power source whose voltage is the within the rating marked on the AC adaptor.
- Do not overload electrical outlets and extension cords.
AC Adaptor
Misuse of the AC adaptor's electric cord can damage or break it, creating the risk of fire and electric shock. Always make sure you observe the following precautions.
- Never place heavy objects on the cord or subject it to heat.
- Never try to modify the cord or subject it to excessive bending.
- Never twist or stretch the cord.
- Should the electric cord or plug become damaged, contact your original retailer or authorized CASIO Service Provider.
AC Adaptor
Never touch the AC adapter while your hands are wet.
Doing so creates the risk of electric shock.


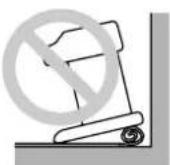
Do not locate the piano on an unstable surface.
Never locate the piano on a surface that is wobbly, tilted, or otherwise unstable*. An unstable surface can cause the piano to fall over, creating the risk of personal injury.
* Avoid areas where there are multiple layers of carpeting, and where cables are running under the piano.
Always make sure you secure the piano to the stand with the screws that are provided. An unsecured piano can fall from the stand, creating the risk of personal injury.

Never climb onto the piano or stand.
Never climb onto the piano or hang from its edges. Doing so can cause the piano to fall over, creating the risk of personal injury. Special care concerning this point is required in households where there are small children.


Never dispose of the piano by burning it.
Never dispose of the piano by burning it. Doing so creates the risk of fire and personal injury due to explosion.

Do not place containers containing water or other liquids on the product.
Do not place the following objects on the instrument. Placing such objects on the product may cause fire or electrical shock if they spill and get inside the product.


- Containers filled with water or other liquids (including vases, potted plants, cups, cosmetics and medicines)
- Small metal objects (including hairpins, sewing needles and coins)
- Flammable objects
- Naked flame sources, such as lighted candles
In the event a foreign object should happen to get inside the product, please take the following actions:
- Turn off power.
- If you are using the AC adaptor for power, unplug it from the wall outlet.
- Contact your original retailer or an authorized CASIO Service Provider.
Do not expose this piano to rain or moisture.
To reduce the risk of fire or electric shock, do not expose this piano to rain or moisture.

Never try to take the piano apart or modify it.
Never try to take the piano apart or modify it in any way. Doing so creates the risk of electric shock, burn injury, or other personal injury. Leave all internal inspection, adjustment, and repair up to your original retailer or an authorized CASIO service provider.

Avoid dropping the piano and other strong impact.
Continued use of the piano after it has been damaged by dropping or by other external impact creates the risk of fire and electric shock. Immediately perform the following steps whenever the piano is damaged by impact.

- Turn off power.
- If you are using the AC adaptor for power, unplug it from the wall outlet.
- Contact your original retailer or an authorized CASIO Service Provider.
Do not put plastic bags over your head or in your mouth.
Never allow the plastic bags that the piano and its accessories come in to be placed over the head or swallowed. Doing so creates the risk of suffocation. Special care concerning this point is required in households where there are small children.

Opening and closing the keyboard cover
Make sure that the keyboard cover is completely opened as far as it will go. When closing the keyboard cover, hold the front of the cover and close it slowly. Pinching your fingers between the piano and keyboard cover creates the risk of personal injury.

CAUTION
AC Adaptor
Misuse of the AC adaptor creates the risk of fire and electric shock. Always make sure you observe the following precautions.
- Do not locate the electric cord near a stove or other sources of heat.
- Never pull on the cord when unplugging from the electrical outlet. Always grasp the AC adaptor when unplugging.

AC Adaptor
Misuse of the AC adaptor creates the risk of fire and electric shock. Always make sure you observe the following precautions.
- Insert the AC adaptor into the wall outlet as far as it will go.
- Unplug the AC adaptor from the wall outlet during lightening storms or before leaving on a trip or other long-term absence.
- At least once a year, unplug the AC Adaptor from the wall outlet and wipe away any dust that is built up in the area around the prongs of the plug.

Relocating the Product
Before relocating the product, always unplug the AC adaptor from the wall outlet and disconnect all other cables and connecting cords. Leaving cords connected creates the risk of damage to the cords, fire, and electric shock.

Cleaning
Before cleaning the product, always unplug the AC adaptor from the wall outlet first. Leaving the AC adaptor plugged in creates the risk of damage to the AC adaptor, fire, and electric shock.

Never climb onto the piano or stand.
Doing so can cause the piano to fall over, creating the risk of personal injury. Special care concerning this item is required in households where there are small children.

Connector
Connect only the specified devices to the piano's connectors. Connecting non-specified items creates the risk of fire and electric shock.


Safety Precautions
Location
Avoid locating the piano in the following types of areas. Subjecting the piano to the conditions described below creates the risk of fire and electric shock.
- Areas expose to high humidity or large amounts of dust
• Near food preparation areas and other areas where it is exposed to oil smoke - Near a heater, on a heated carpet, in direct sunlight, inside a closed automobile parked in the sun, and any other area subjected to very high temperature
Never place the piano directly onto furniture or other item that has a finished surface. The rubber feet on the bottom of the piano can react with the paint or other coatings, resulting in soiling of or damage to the finished surface. Be sure to lay felt or some other material on the finished surface before placing the piano on it.
Do not place heavy objects on the piano.
Never place heavy objects on top of the piano. Doing so can cause the stand to tip over and the object to fall, creating the risk of personal injury.
Volume setting
Do not play at very loud volumes for a long time. This precaution is especially important when using the headphones. Long-term exposure to very loud sound can damage your hearing.
Assemble the stand properly.
Failure to do so can cause the stand to fall over and the piano to fall from the stand, creating the risk of personal injury.
Make sure your assemble the stand in accordance with the instructions that come with it, and ensure that all connections are secure. Also make sure that you choose an appropriate location for the stand.
- When placing the piano onto the stand, take care that you do not pinch your fingers between the piano and the stand.
- At least two people should lift the piano when placing it onto the stand or moving it. Trying to move the piano alone can cause the stand to fall over, creating the risk of personal injury.


- Do not drag the stand or tilt it forward or back when placing the piano onto the stand or moving it. Doing so can cause the piano to fall over, creating the risk of personal injury.
- Periodically check the screws that secure the piano to the stand for looseness. If a screw is loose, retighten it. Loose screws can cause the stand to tip over and the piano to fall, creating the risk of personal injury.


Main Features
78 versatile tones
- Eight instrument tones including piano and pipe organ provide plenty of performance versatility.
- Other features include digital effects that control the acoustical characteristic of tones, as well as three pedal effects for all the nuances of an acoustic piano.
Metronome
- A simple operation lets you set the tempo and the beat of the metronome to suit the tune you want to play. It's the perfect practice tool for players of all levels.
78 demo tunes
- Eight demo tunes demonstrate how to use each of the built-in tones.
□Memory
- Built-in memory lets you store a performance for later playback. You can play along with playback on the keyboard, and even create an ensemble effect by using a keyboard tone that is different from the recorded tone.
☐Powerful keyboard setting functions
- A selection of powerful keyboard setting functions help you get create exactly the musical mood you want.
Transpose adjusts the key of the keyboard in semitone steps.
Tuning provides a means to tune with another musical instrument.
Touch Select adjusts the intensity of the output sound in accordance with the amount of pressure you apply to the keyboard.
□MIDI terminal
- Connecting to another MIDI musical instrument lets you play two instruments from the keyboard of this digital piano. You can also connect to a commercially available MIDI sequencer to increase the number of parts you can play.
Contents
Safety Precautions ...... E-1
Main Features ...... E-5
Contents..... E-6
General Guide...... E-8
Power Supply ...... E-10
Using the AC Adaptor ....E-10
Connections ...... E-11
Connecting Headphones E-11
Connecting to a PEDAL Jack ...... E-11
Accessories and Options ...... E-11
Basic Operations...... E-12
Using Tones ...... E-12
Using the Pedals ......E-14
Using the Metronome ....E-14
Using the Memory ...... E-16
About the Memory ...... E-16
Recording E-16
Playback....E-17
Deleting Memory Contents ....E-17
Using Demo Tunes...... E-18
Keyboard Settings ...... E-19
Using Touch Select ....E-19
Using Transpose ......E-19
Adjusting the Tuning of the Piano ...... E-20
MIDI.... E-21
What is MIDI?......E-21
What you can do with MIDI .....E-21
MIDI Connections ......E-21
MIDI Channels E-21
Simultaneous Receive Over Multiple
Channels (Multi-Timbre) E-21
Setting the Keyboard Channel ...... E-22
Sending Memory Playback Data ...... E-22
Program Change Number Settings ..... E-23
Turning Local Control On and Off ...... E-24
MIDI Data Notes ......E-25
Troubleshooting ...... E-26
Assembly Instructions...... E-27
Assembling the Stand ..... E-27
Attaching the AC Adaptor and
Pedal to the Piano E-29
Specifications ...... E-30
Operational Precautions..... E-31
Appendix ......A-1
Initial Power On Settings ...... A-1
MIDI Data Format......A-2
Channel Messages ......A-2
System Messages ...... A-7
MIDI Implementation Chart


natural_image
Two stylized gray icons with flag-like shapes on white background, no text or symbols present
natural_image
Abstract illustration of musical notes including a treble clef, a key signature, and a treble clef (no text or symbols)417A-E-009A

General Guide
• See page E-27 for details on the stand.
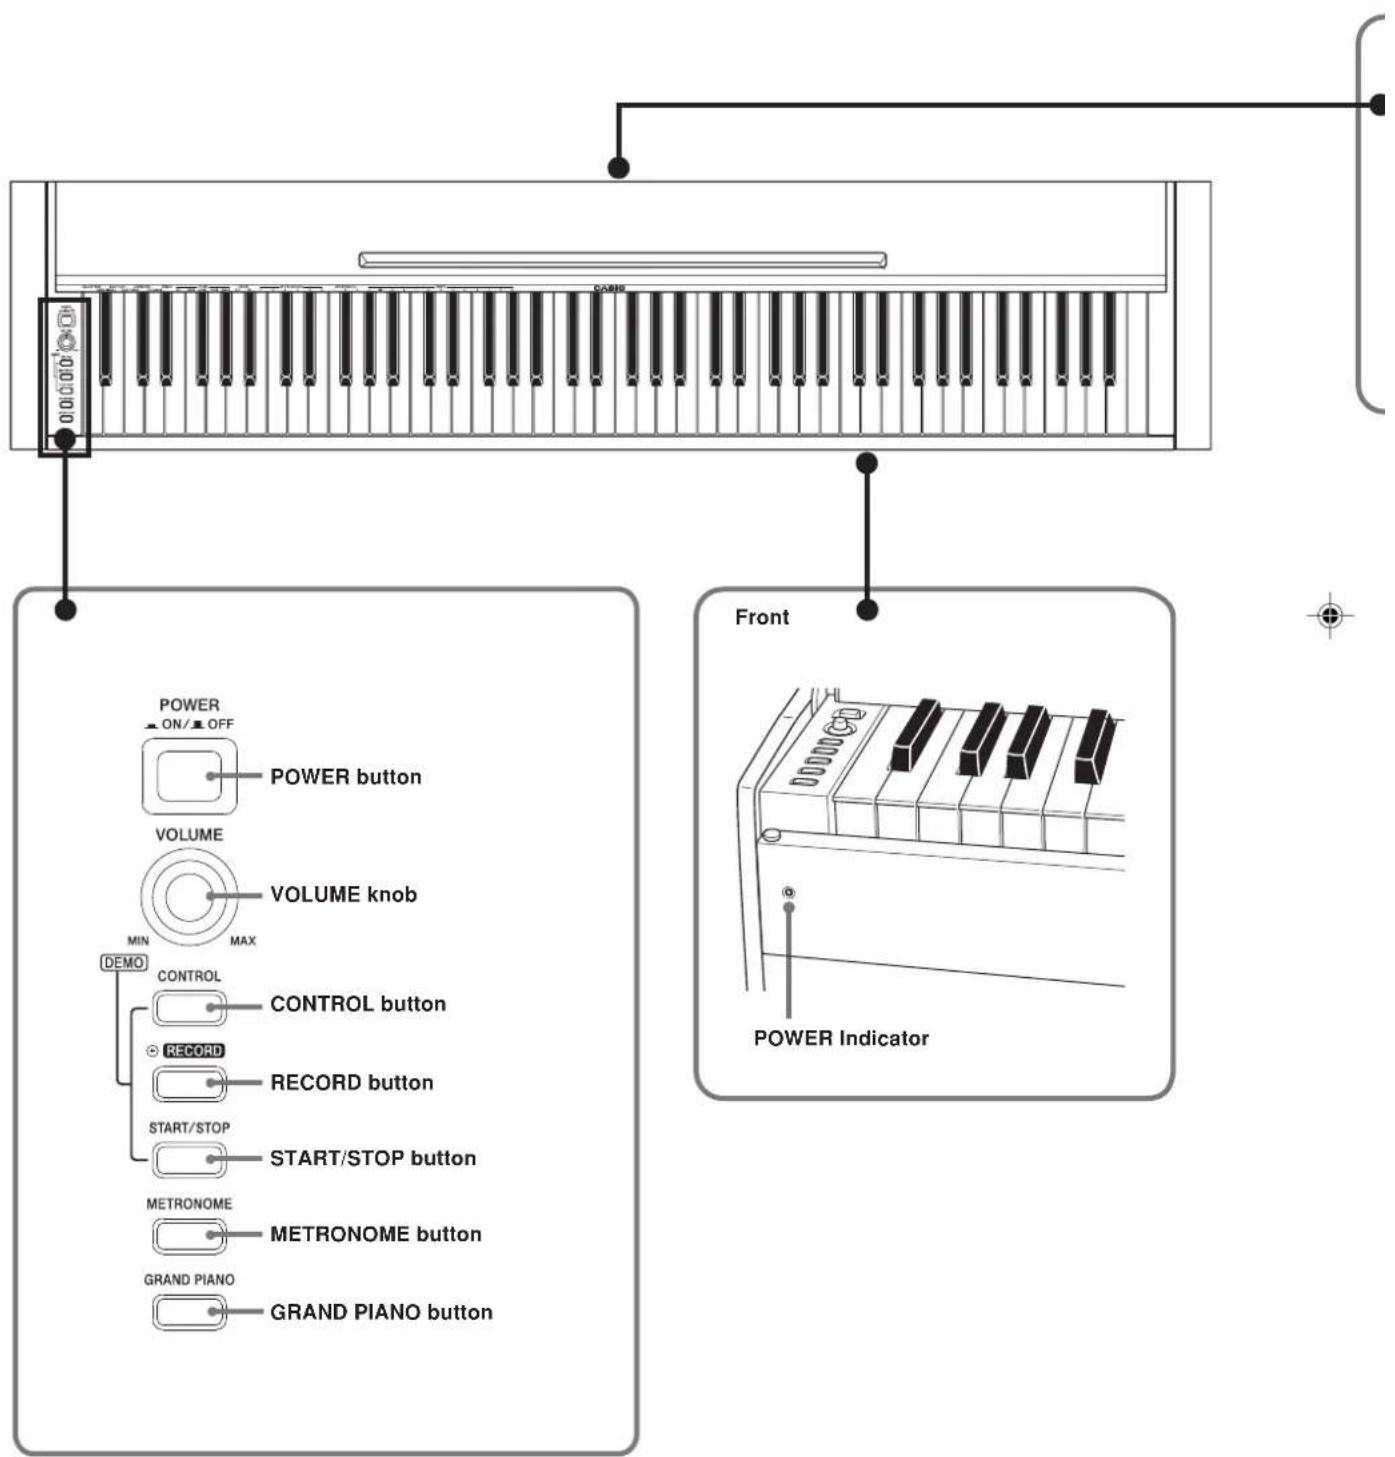
E-8
417A-E-010A
CAUTION
• The keyboard cover is designed so it closes slowly. This is to avoid injury caused by pinching your fingers with the cover.
- When using the piano, make sure that you fully open the keyboard cover so it does not close accidentally as you play.

Music Stand
You can use the music stand when the keyboard cover is open, as shown in the illustration below.

natural_image
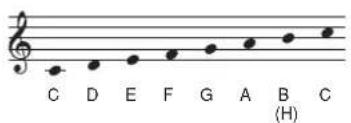
Line drawing of a piano with a sheet music piece and an arrow indicating sound or vibration (no text or symbols)Note Names A value next to a note name indicates the relative position of the note
on the keyboard as shown below.

417A-E-011A
E-9

Power Supply
You can power this digital piano by plugging it into a standard household power outlet.
Be sure you turn off power and unplug the power cord from the electrical outlet whenever the digital piano is not in use.
Using the AC Adaptor
Make sure that you use only the AC adaptor specified for this digital piano.
Specified AC Adaptor: AD-12
[Bottom]

Also note the following important warnings and precautions when using the AC adaptor.

WARNING
Misuse of the AC adaptor creates the risk of fire and electric shock. Always make sure you observe the following precautions.
- Be sure to use only the AC adaptor that is specified for this product.
- Use only a power source whose voltage is within the rating marked on the AC adaptor.
- Do not overload electrical outlets and extension cords.
- Never place heavy objects on the cord or subject it to heat.
- Never try to modify the cord or subject it to excessive bending.
- Never twist or stretch the cord.
- Should the electric cord or plug become damaged, contact your original retailer or authorized CASIO Service Provider.
- Never touch the AC adaptor while your hands are wet. Doing so creates the risk of electric shock.


CAUTION
Misuse of the AC adaptor creates the risk of fire and electric shock. Always make sure you observe the following precautions.
- Do not locate the electric cord near a stove or other sources of heat.
- Never pull on the cord when unplugging from the electrical outlet. Always grasp the AC adaptor when unplugging.
- Insert the AC adaptor into the wall outlet as far as it will go.
- Unplug the AC adaptor from the wall outlet during lightening storms or before leaving on a trip or other long-term absence.
- At least once a year, unplug the AC adaptor from the wall outlet and wipe away any dust that is built up in the area around the prongs of the plug.
IMPORTANT!
- Make sure that the product is turned off before connecting or disconnecting the AC adaptor.
- Using the AC adaptor for a long time can cause it to become warm to the touch. This is normal and does not indicate malfunction.
Using the Cable Clip
After connecting the AC adaptor and pedal (page E-14) to the piano, use the cable clip to bundle their cables together.
• To fasten the clip
As shown in Figure 1, press down on (a) to force the tip of the clip into the slot. Press down until you hear the clip click securely into place.

• To release the clip
As shown in Figure 2, press (b) in the direction indicated by the arrow.


Connections
Bottom

IMPORTANT!
- Whenever connecting external equipment, first set the VOLUME knob of the digital piano and the volume controller of the external equipment to relatively low volume settings. You can later adjust volume to the level you want after connections are complete.
- Be sure also to refer to the documentation that comes with the external equipment for its proper connection procedures.
Connecting Headphones ①
Connect commercially available headphones to the digital piano's headphones jack. This cuts off the built-in speakers, which means you can practice even late at night without disturbing others. To protect your hearing, make sure that you do not set the volume level too high when using headphones.
Connecting to a PEDAL Jack ②
Depending on the type of operation you want the pedal (SP-20) to perform, connect the pedal's cable to the digital piano's DAMPER jack or SOFT/SOSTENUTO jack. If you want to use both jacks at the same time, you need to purchase another optionally available SP-20 pedal.
See "Using the Pedals" on page E-14 for information about using a pedal.
Accessories and Options
Use only the accessories and options specified for this digital piano. Use of non-authorized items creates the danger of fire, electric shock, and personal injury.

Basic Operations
Using Tones
The following procedures describe everything you need to know about selecting and using tones.
Selecting a Tone
This digital piano has a selection of 8 built-in tones.
- The names of the tones are marked above the keyboard keys to which they are assigned.

• The GRAND PIANO tone was recorded with stereo sampling.
To select a tone
1 Press the POWER button to turn on the digital piano power.
2 Select the tone you want.
• To select GRAND PIANO
Press the GRAND PIANO button. Note that GRAND PIANO is the initial default tone setting whenever you turn on power.
• To select one of the other tones
While holding down the CONTROL button, press the keyboard key that corresponds to the tone you want to select.
* A note does not sound when you press a keyboard key while holding down the CONTROL button.
3 Use the VOLUME knob to adjust the volume.
- It is a good idea to set the volume to a relatively low level at first.
- Moving the knob towards MIN decreases volume, while moving it towards MAX increases volume.
4 Play something on the keyboard.
- Adjust volume to the level you want as you play.
5 After you are finished playing, press the POWER button to turn off power.
E-12
Using Digital Effects
This digital piano provides you with a selection of digital effects that you can apply to tones. The following provides general descriptions of each effect, but the best way to find out how they affect tones is to experiment for yourself.
Digital Effect Types
- REVERB The REVERB effect gives you a choice of the four variations listed below. Each one simulates the acoustics of different environments.
ROOM ..... Small, intimate live house STAGE ..... Small stage
HALL 1 .... Stage area of a large hall HALL 2 .... Audience area of a large hall
- CHORUS The CHORUS effect is most effective for the E.PIANO tone.
- The names of the settings are marked above the keyboard keys to which they are assigned.

To select a digital effect

While holding down the CONTROL button, press the keyboard key that corresponds to the digital effect you want to select.
- A note does not sound when you press a keyboard key while holding down the CONTROL button.
Power on effect settings
The table below shows the effect settings that are assigned to each tone whenever you turn on the digital piano power.
| Tone Name | Digital Effect Setting | |
| REVERB CHORUS | ||
| GRAND PIANO HALL 1 OFF | ||
| MELLOW PIANO HALL 1 OFF | ||
| GRAND PIANO 2 HALL 1 OFF | ||
| ELEC PIANO 1 HALL 1 ON | ||
| ELEC PIANO 2 HALL 1 ON | ||
| HARPSICHORD HALL 1 OFF | ||
| PIPE ORGAN HALL 1 OFF | ||
| STRINGS HALL 1 OFF | ||
- The above digital effect settings can be changed after you turn on power.
NOTE
- Selecting a tone automatically selects the digital effects currently assigned to it.
- Changes you make to digital effect settings are assigned to the currently selected tone only.
- Digital effect settings remain in effect until you turn off the digital piano power.
• Demo tunes have their own digital effect settings, which are automatically selected whenever you select a demo tune.
More about tones
Polyphony
This piano can play up to 64 notes at the same time. Also note that some of the tones offer only 32-note polyphony (GRAND PIANO, MELLOW PIANO, ELEC PIANO 1, HARPSICHORD, STRINGS).
Touch Response
The touch response feature of this piano causes the volume of the tones and the sound of the tones themselves to change slightly in accordance with how much pressure you apply to the keyboard, just like with an acoustic piano. Touch response affects the HARPSICHORD tone only slightly, because the original musical instrument normally produces the same sound, no matter how much pressure is applied.
Digitally Sampled Tones
The tones of this piano are produced using digitally recorded samples of actual musical instruments. Not all of the instruments, however, can produce tones across the entire range played by this piano (A0 through C8). In such a case, digital recordings are used for the range that actually can be produced by the original instrument, and synthesized tones are used for notes that cannot be produced naturally. Because of this, you may notice very slight differences between natural notes and synthesized notes in sound quality and in results produced when using effects. These differences are normal and do not indicate malfunction.
417A-E-015A

Basic Operations
Using the Pedals
The digital piano is equipped with two pedal jacks, one for a damper pedal and one for a soft/sostenuto pedal. Whether the pedal connected to the SOFT/SOSTENUTO jack operates as a soft pedal or sostenuto pedal depends on what you do when you turn on the digital piano power.

Pedal functions
- Damper pedal Pressing this pedal causes notes to reverberate and to sustain longer.
- Soft pedal Pressing this pedal dampens notes and slightly reduces their volume. Only notes played after the pedal is depressed are affected, and any notes played before the pedal is pressed sound at their normal volume.
- Sostenuto pedal Like the damper pedal, this pedal causes notes to reverberate and to sustain longer. The difference between the two pedals is the timing when they are pressed. With the sostenuto pedal, you press the pedal after depressing the notes you want to sustain. Only the notes whose keyboard keys are depressed when the sostenuto pedal is pressed are affected.
To use the SOFT/SOSTENUTO pedal as a soft pedal
Press the POWER button to turn on the digital piano power. Soft pedal is the normal effect of the pedal connected to the SOFT/SOSTENUTO jack.
To use the SOFT/SOSTENUTO pedal as a sostenuto pedal
While holding down the pedal connected to the SOFT/SOSTENUTO jack, turn on the digital piano power.
NOTE.
- The following shows how pedal effects are applied during different types of operations.
Memory playback, demo tune play ...... Pedal effects applied to notes played on the keyboard only.
Using the Metronome
The metronome provides a reference beat that you can use during your performances or practice sessions. You can change the beat and the tempo of the metronome.
- The names of the settings are marked above the keyboard keys to which they are assigned.

Using the Metronome
PREPARATION.
- Check to make sure that the indicator above the RECORD button is off. If the indicator is on, press the RECORD button to turn it off.
• See the section of this User's Guide covering the memory for details on using the metronome in combination with the function.
To use the metronome
1 Press the METRONOME button to start the metronome.
• This starts the metronome sound.
2 Set the beat of the metronome.
While holding down the CONTROL button, press the keyboard key that corresponds to the beat setting you want to select.
- A note does not sound when you press a keyboard key while holding down the CONTROL button.
- The first value of the beat can be set to a value of 2 through 6, or 0 (unaccented beat).
E-14
417A-E-016A
3 Change the tempo setting as described below.
- A note does not sound when you press a keyboard key while holding down the CONTROL button.
- While holding down the CONTROL button, press keyboard key A2 (-) to decrease tempo or B2 (+) to increase it. Holding down either keyboard key changes the setting at high speed. Pressing keyboard key A2 (120) changes the tempo setting to 120.
- You can also change the tempo setting(beats per minute) by holding down the CONTROL button and using keyboard keys B2 through A3 to input values from 0 to 9. You can input a two-digit or three-digit tempo value. Note that the tempo value you input is applied when you release the CONTROL button. The tempo setting does not change if you input a one-digit value or a value that is outside of the allowable setting range.
- The tempo can be set within the range of 30 to 255 (beats per minute).
4 When you want to stop the metronome, press the METRONOME button again.
- Pressing the METRONOME button again restarts the metronome sound using the current beat and tempo setting.
- If you want to change both the tempo and the beat before restarting the metronome, perform the above procedure here.
NOTE
- You can change metronome beat and tempo settings at any time, even while the metronome is sounding.
- You can also use the metronome in combination with memory play. See the section of this User's Guide covering the function for details.
Adjusting the Metronome Volume
Use the following procedure to increase and decrease the volume of the metronome beat.
To adjust the metronome volume
1 While holding down the CONTROL button, press the keyboard key that corresponds to the metronome volume setting you want to select.
- A note does not sound when you press a keyboard key while holding down the CONTROL button.
- You can set a value from 1 to 3.
NOTE
- The metronome volume is automatically set to 2 whenever you turn on piano power.
417A-E-017A

Using the Memory
This section describes how to record keyboard play to memory and playback data from memory.
About the Memory
Memory Capacity
Memory can hold up to 2,500 notes (one song).
- Recording stops automatically and the indicator above the RECORD button goes out whenever memory becomes full.
Recorded Data
The following is a list of the data that can be recorded in memory once recording starts.
- Anything you played on the keyboard (Received MTDI data is not recorded.)
- Tone settings and any tone setting changes
- Beat setting used during recording
- Pedal operations
Recorded Data Storage
This piano has a lithium battery to supply power to retain memory contents even while power is off.* The life of the lithium battery is five years after the date of manufacture of the piano. Be sure to contact your CASIO dealer about having the lithium battery replaced every five years.
* Never turn off the digital piano power while a record operation is in progress.
IMPORTANT!
- Recording new data to a song memory area automatically deletes any data previously stored in that song memory area.
- Turning off power while a record operation is in progress deletes anything recorded up to that point.
- CASIO shall not be held responsible for any losses by you or any third party due to loss of data caused by malfunction or repair of this piano, or by battery replacement.
Recording
To record notes from the keyboard
PREPARATION
- Select the tone and effects you want to start with.
- If you want to use the metronome during recording, start the metronome. Use the procedure under "Using the Metronome" on page E-14 to set the beat and the tempo.
1 Press the RECORD button to put the piano into record standby.
• The indicator above the RECORD button flashes.
- You can also change the metronome's beat setting at this time.
- If you want the metronome to sound while you are recording, press the METRONOME button here to start the metronome.
2 Play something on the keyboard to start recording.
- When you start recording, the indicator above the RECORD button stops flashing and remains lit.
• What you play sounds from the speakers and is recorded into memory. - You can also start recording by pressing the START/STOP button. In this case, blank space is inserted in memory from the point that you press the START/STOP button up to the point you start to play on the keyboard.
3 After you are finished recording, press the START/STOP button to stop the record operation.
- At this time the indicator above the RECORD button goes out.
• To stop the metronome, press the METRONOME button.
• Here you can press the START/STOP button and playback the data you just recorded.
E-16
417A-E-018A
Playback
Use the following procedure to play back from memory.
To playback from memory

If you want the metronome to sound during playback of your recording, hold down the CONTROL button and press keyboard key B3 to turn on the metronome.

- Using the metronome comes in handy, for example, when you want to record the left-hand part and then practice the right hand-part while playing back.

Press the START/STOP button to start playback.
- If you turned on the metronome in step 1, the metronome sounds during playback.
- You can toggle the playback metronome sound on and off by pressing the METRONOME button.
- Playback stop automatically when the end of the tune is reached.
- To stop part way through, press the START/STOP button.
- To stop the metronome, press the METRONOME button.
NOTE.
- You can change the playback tempo while playing back from memory.
- You cannot change the tone when playing back from memory.
Deleting Memory Contents
IMPORTANT!
• The delete operation cannot be undone. Make sure you play back memory contents and confirm that you no longer need it before performing the following procedure.
To delete memory contents
1 Press the RECORD button to put the piano into record standby.
2 Press the START/STOP button twice to delete the contents of the selected song area.
417A-E-019A
E-17

Using Demo Tunes
This digital piano comes with eight built-in demo tunes, each of which features one of the eight built-in tones.
To play the demo tunes in sequence

While holding down the CONTROL button, press the START/STOP button.
- All the demo tunes play in sequence, starting from the Tune 1.
To play a specific demo tune
• To play the first of the demo tunes, start sequential demo tune play and then press the GRAND PIANO button.
- To play another of the demo tunes, start sequential demo tune play and then hold down the CONTROL button and press the keyboard key that corresponds to the tune you want to play.
- The tune you select continues to repeat until you stop it.

To stop demo tune play

Press the START/STOP button to stop demo tune play.
NOTE.
- You cannot change the tempo or tone, or turn on the metronome while a demo tune is playing.
- Playing on the keyboard during demo tune play plays notes using the demo tune's tone.
- You can adjust volume while demo playback is in progress.
- Tone, digital effect, transpose, and tuning settings are changed automatically when a demo tune is played. These changes are temporary, and remain in effect only while the demo tune is playing.
- Pedal operations performed during demo tune play are applied to notes played on the keyboard only. They are not applied to demo tune playback.
• Demo tune notes cannot be sent as MIDI data.
Demo Tune List
| Tone (Keyboard Key) | Title | Composer | Time |
| GRAND PIANO | Valse brillante Op.34-1 | F.F.Chopin | 2'01" |
| MELLOW PIANO | Träumerei | R.Schumann | 2'04" |
| GRAND PIANO 2 | Variatio 30 [Goldberg-Variationen] | J.S.Bach | 1'05" |
| ELEC PIANO 1 | Original | — | 1'59" |
| ELEC PIANO 2 | Original | — | 1'01" |
| HARPSICHORD | Pracludium [Partita 1] | J.S.Bach | 1'51" |
| PIPE ORGAN | Jesus Bleibet Meine Freude | J.S.Bach | 1'18" |
| STRINGS | Original | — | 1'35" |
NOTE.
- Note that demo tunes are arranged in order to highlight the features of this digital piano, and so they may sound different from their original versions.
E-18
417A-E-020A

Keyboard Settings
Using Touch Select
This setting lets you adjust the touch of the keyboard to suit your own playing style. This means you can select a stronger touch for those with powerful hands, and a lighter touch for beginners and anyone else with less strength.
Use the keys shown below to change the Touch Select setting.
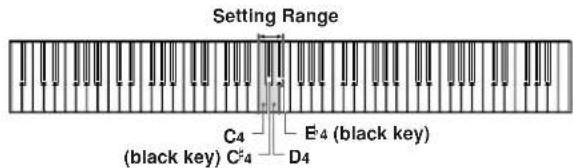
Touch Select Settings
C4 .... .... ....
C_4^+ ....
This setting produces strong output, even when light pressure is applied to the keyboard.
D4 ....
This is the standard setting.
E ^1 ....
This setting requires relatively strong keyboard pressure to produce normal output.
To change the Touch Select setting

While still holding down the CONTROL button, select the key touch by pressing one of the keyboard keys illustrated below.
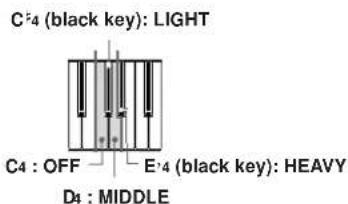
- A note does not sound when you press a keyboard key while holding down the CONTROL button.
NOTE.
- Touch select is automatically set to MIDDLE whenever you turn on the digital piano power.
Using Transpose
Transpose lets you adjust the pitch of this digital piano in semitone steps. This means you can change the key of the piano to suit the voice of a vocalist or the key of another musical instrument, without having to learn to play a piece in another key.
Use the keys shown below to change the transpose setting.

To change the transpose setting

While holding down the CONTROL button, select a key by pressing one of the keyboard illustrated below.

- A note does not sound when you press a keyboard key while holding down the CONTROL button.
NOTE.
- The transpose value is automatically set to 0 (C) whenever you turn on the digital piano power.
417A-E-021A

Keyboard Settings
Adjusting the Tuning of the Piano
You can adjust the overall tuning of the piano for play along with another instrument. You can adjust tuning within a range of ±50 cents from A4 = 440.0Hz.
Use the keyboard keys noted below to adjust the tuning of the piano.

To adjust the tuning of the piano
Adjust the tuning as described below.

While holding down the CONTROL button, press keyboard key E4 (-) to lower the tuning or F4 (+) to raise it. Each press of a key changes the tuning by about 0.8 cents (1/128 semitone).
- A note does not sound when you press a keyboard key while holding down the CONTROL button.
NOTE
- Holding down the CONTROL button and pressing keyboard keys E4 (-) and F4 (+) at the same time returns tuning to the standard A4 = 440.0Hz.
* 100 cents is equivalent to one semitone.
E-20

MIDI
What is MIDI?
The letters MIDI stand for Musical Instrument Digital Interface, which is the name of a worldwide standard for digital signals and connectors that makes it possible to exchange musical data between musical instruments and computers (machines) produced by different manufacturers. MIDI compatible equipment can exchange keyboard key press, key release, tone change, and other data as messages. Though you do not need any special knowledge about MIDI to use this digital piano as a stand-alone unit, MIDI operations require a bit of specialized knowledge. This section provides you with an overview of MIDI that will help to get you going.
What you can do with MIDI
Send

flowchart
graph TD
    A["Sender Receiver"] --> B["MIDI cable: MK-5"]
    B --> C["MIDI musical instrument"]
    B --> D["MIDI sound module"]
    B --> E["MIDI sequencer"]
    B --> F["Other MIDI device"]
- What you play on the digital piano can be sent to the connected device as MIDI messages ^*1 . The connected device sounds notes in accordance with the messages it receives.
- MIDI messages ^1 can be sent from the digital piano to a commercially available MIDI sequencer ^2 for recording.
Receive
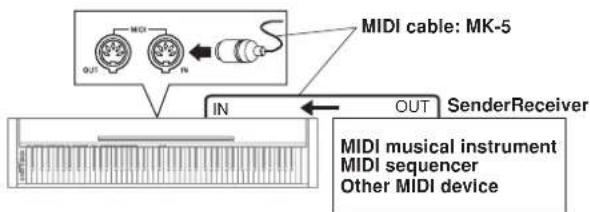
- The digital piano can be used to sound notes sent as MIDI messages from a connected device.
- Commercially available MIDI piano data can be sent from a MIDI sequencer ^82 or MIDI-capable personal computer for playback on the digital piano. Up to 16 parts can be played simultaneously by the digital piano.
*1 Keyboard play and memory playback data can be sent as MIDI data. Demo tunes cannot be sent as MIDI data.
*2 A device that contains memory storage for MIDI data. Some MIDI sequencers feature external storage capabilities, which let you record a virtually unlimited number of tunes.
MIDI Connections
Two MIDI cables, one for sending and one for receiving, are required for two-way recording and playback capabilities with a connected MIDI sequencer or other device.
MIDI Channels
MIDI allows you to send the data for multiple parts at the same time, with each part being sent over a separate MIDI channel. There are 16 MIDI channels, numbered 1 through 16, and MIDI channel data is always included whenever you exchange data (key press, pedal operation, etc.).
Both the sending machine and the receiving machine must be set to the same channel for the receiving unit to correctly receive and play data. If the receiving machine is set to Channel 2, for example, it receives only MIDI Channel 2 data, and all other channels are ignored.
This digital piano is equipped with multi-timbre capabilities, which means it can receive messages over all 16 MIDI channels and play up to 16 parts at the same time.
Keyboard and pedal operations performed on this digital piano are sent out by selecting a MIDI channel (1 to 16) and then sending the appropriate message.
Simultaneous Receive Over Multiple Channels (Multi-Timbre)
The Multi-Timbre mode makes it possible to assign the piano's built-in tones to MIDI channels 1 through 16. Then you can simultaneously sound multiple channels to play from a commercially available multi-track sequencer.
NOTE.
- See "Assigning Tones to Individual Channels" on page E-22 for details on assigning tones to each channel.
- Up to 16 channels can be received simultaneously (Channel 1 through channel 16).
- The number of channels to be received simultaneously must be predetermined. If it becomes necessary to cancel a channel, the cancel operation must be performed on the sending side.
417A-E-023A

MIDI
Setting the Keyboard Channel
This parameter sets the channel for MIDI messages to an external device. You can set any MIDI channel in the range of 1 to 16 as the keyboard channel.
To set the Keyboard Channel

While still holding down the CONTROL button, select the Keyboard channel by pressing one of the keyboard keys illustrated below.
Example: Channel 8

- A note does not sound when you press a keyboard key while holding down the CONTROL button.
NOTE.
• The Keyboard Channel is automatically set to 1 whenever you turn on the digital piano power.
Assigning Tones to Individual Channels
You can assign tones to channels using a Program Change message sent from a connected MIDI device. You cannot change the tone assigned to each channel from the digital piano.
NOTE
- The tone GRAND PIANO is automatically assigned to all channels whenever you turn on the digital piano power.
Sending Memory Playback Data
You can send memory playback as MIDI data. The send channel used depends on the Keyboard Channel setting, as shown in the table below.
| Keyboard Play | Keyboard Channel |
| Memory | Keyboard Channel + 1* |
* When you have Channel 16 set as the keyboard channel, memory playback is send over Channel 1.
- Pedal effect data recorded to the memory is applied to playback from the memory, and does not affect your performance on the keyboard. Likewise, pedal operations on the digital piano are applied to the keyboard only, and not to playback from the memory.
E-22
417A E 024A
Program Change Number Settings
The tones of this digital piano have two different sets of program numbers: Type 1 sequential numbers and Type 2 numbers that correspond to the General MIDI System (see "General MIDI" on page E-24). The tables below show the program numbers that are assigned, depending on whether you select Type 1 or Type 2 using the procedure under "To change the program change number type" on page E-24.
| Tone Name | Type 1 | |||||
| Send Receive | ||||||
| Bank Select | Program numbers | Bank Select | Program numbers | |||
| MSB LSB | MSB LSB | |||||
| GRAND PIANO 0 0 0 0 0 | 0 | |||||
| MELLOW PIANO 0 0 1 0 | 0 1 | |||||
| GRAND PIANO 2 0 0 2 0 | 0 2 | |||||
| ELEC PIANO 1 0 0 3 0 0 3 | ||||||
| ELEC PIANO 2 0 0 4 0 0 4 | ||||||
| HARPSICHORD 0 0 5 0 0 5 | 5 | |||||
| PIPE ORGAN 0 0 6 0 0 6 | ||||||
| STRINGS 0 0 7 0 0 7 | ||||||
| Tone Name | Type 2 | Corresponding General MIDI Sound | |||||
| Send Receive | |||||||
| Bank Select | Program numbers | Bank Select | Program numbers | ||||
| MSB LSB | MSB LSB | ||||||
| GRAND PIANO 200200— | |||||||
| MELLOW PIANO | 300300— | ||||||
| GRAND PIANO 2 | 000000 | Acoustic Grand Piano | |||||
| ELEC PIANO 1 | 16 | 0 | 4 | 16 | 0 | 4 | — |
| ELEC PIANO 2 | 004004 | Electric Piano 1 | |||||
| HARPSICHORD | 006006 | Harpsichord | |||||
| PIPE ORGAN | 24 | 0 | 19 | 24 | 0 | 19 | — |
| STRINGS | 0 | 0 | 48 | 0 | 0 | 48 | Strings Ensemble 1 |

MIDI
To change the program change number type
1 While still holding down the CONTROL button, select the Program Change Mode by pressing one of the keyboard keys illustrated below.
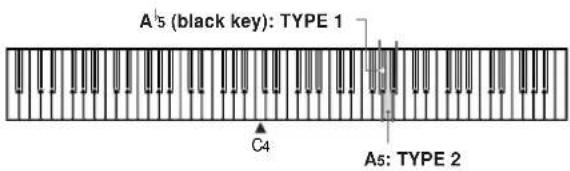
- A note does not sound when you press a keyboard key while holding down the CONTROL button.
• See the table on page E-23 for detailed information about Type 1 and Type 2.
General MIDI
The General MIDI System is a set of specifications for sound generating devices agreed upon by world MIDI manufacturers. These specifications were developed to allow the creation of music data that is not limited to specific equipment makers and models. Among other things, General MIDI defines the tone number sequence and the number of MIDI channels that can be used. Any device equipped with a sound source that supports General MIDI is able to produce sounds of similar nuances, regardless of the manufacturer or model.
The Type 2 program change numbers of this digital piano assign program numbers to tones so they comply with the General MIDI System.
Type 2 program change numbers make it possible to receive General MIDI System data from a connected sequencer or other device, and play it using the digital piano's tones. Tone switching is performed only when a program number that corresponds to any of the digital piano's non-bass tones is received. No tone switching is performed when any other program number is received.
The table on page E-23 shows the program number assignments for Type 1 and Type 2.
Turning Local Control On and Off
This setting effectively determines whether or not the keyboard and pedals of the digital piano are connected to the digital piano's sound source, as illustrated below.

flowchart
graph TD
    A["Keyboard Pedals"] --> B["ON"]
    B --> C["OFF Local Control"]
    D["MIDI"] --> E["OUT"]
    F["IN"] --> G["Sound source"]
    style A fill:#f9f,stroke:#333
    style B fill:#ccf,stroke:#333
    style C fill:#cfc,stroke:#333
    style D fill:#fcc,stroke:#333
    style E fill:#cff,stroke:#333
    style F fill:#ffc,stroke:#333
    style G fill:#fcc,stroke:#333
When Local Control is on (the normal setting), anything played on the keyboard is sounded by the internal sound source and simultaneously output from the MIDI OUT terminal. When off, anything played on the keyboard is output from the MIDI OUT terminal only, without being sounded by the sound source.
Local Control can be turned off when you are using the digital piano as the sound source of a connected sequencer or other device, and you want to guard against sound being produced should the digital piano keyboard be pressed accidentally.
To turn Local Control on and off
While still holding down the CONTROL button, switch Local Control on and off by pressing one of the keyboard keys illustrated below.

- A note does not sound when you press a keyboard key while holding down CONTROL.
NOTE
- Note that no sound will be produced from the digital piano's speakers if you press the keyboard while Local Control is turned off.
- Local Control is turned on automatically whenever you turn on the digital piano power or play a demo tune.
E-24
417A E 026A
MIDI Data Notes
This section provides details about the MIDI data this digital piano sends and receives. You can also find further technical information in the "MIDI Data Format" and "MIDI Implementation Chart"* at the end of this User's Guide.
* The MIDI Implementation Chart is a standard format summary of how data is transferred between this digital piano and a connected MIDI device.
Keyboard Data (Note On, Note Off, Note Number, Velocity)
The following four types of keyboard data can be sent and received.
| Data Meaning |
| Note On Keyboard key is pressed. |
| Note Off Keyboard key is released. |
| Note Number Which key is pressed. |
| Velocity Pressure applied |
Tone Change Data (Program Change)
Whenever you change the tone on the digital piano, tone change data (Program Change) is also sent out as MIDI data. Conversely, receipt of a Program Change from a connected MIDI device causes the digital piano to change to the applicable tone. See "Program Change Number Settings" on page E-23 for details.
Pedal and Effect Operation Data (Control Change and Universal System Exclusive Message)
Control Change is used to send and receive data about damper, soft, and sostenuto pedal* depress and release operations, as well as data about digital effects.
* You can connect up to two pedals to this digital piano. You can also specify either soft or sostenuto as the effect of the pedal connected to the SOFT/SOSTENUTO jack. Pressing a pedal connected to the SOFT/SOSTENUTO jack sends data that corresponds to the effect (soft or sostenuto) currently selected for the pedal.

Troubleshooting
| Symptom Possible Cause Action | Reference | ||
| No sound produced when keyboard keys are pressed. | 1. VOLUME knob set to MIN.2. Headphones connected to the piano.3. Local Control turned off. | 1. Move VOLUME knob more towards the MAX side.2. Disconnect the headphones from the piano.3. Turn on Local control. | Page E-12Page E-11Page E-24 |
| Keyboard out of tune. | 1. Transpose is set to a value other than 0.2. Incorrect tuning setting | 1. Change the transpose setting to 0, or turn the digital piano power off and then back on again.2. Correct the tuning setting, or turn the digital piano power off and then back on again. | Page E-19Page E-20 |
| Pedal effect continues to be applied even though pedals are not pressed. | Problem with the connection between the pedals and piano. | Turn off the digital piano power and then check to make sure that the pedal plug is securely connected to the piano's PEDAL jack. | Page F-11 |
| No sound produced by demo tune play. | 1. VOLUME knob set to MIN.2. Headphones connected to the piano. | 1. Move VOLUME knob more towards the MAX side.2. Disconnect the headphones from the piano. | Page E-12Page E-11 |
| Memory contents deleted. | Lithium battery is dead. | Contact your CASIO Service Provider for replacement of the lithium battery. | Page E-31 |
| No sound produced by connected external MIDI sound source when the digital piano keys are pressed. | 1. The digital piano Keyboard Channel does not match the Keyboard Channel of the MIDI sound source.2. Volume or expression setting of the external sound source is set to 0. | 1. Change the Keyboard Channel settings so they are identical.2. Change the volume or expression setting of the external sound source to an appropriate value. | Page E-22See the documentation that comes with the external sound source. |

Assembly Instructions
Caution
- This stand should be assembled by two people working together.
- When assembling the stand, you should have the piano standing up with its back facing downwards, as shown in Figure 3.
- Do not remove the tape securing the keyboard cover in place until assembly is complete. Removing the tape can cause the keyboard cover to open and close during assembly, creating the risk of personal injury to your hands and fingers.
- During assembly, be sure to exercise sufficient caution to avoid personal injury.
IMPORTANT!
- Be sure to assemble the stand on a flat surface.
- This stand does not include any of the tools required to assemble it. You should have a large Phillips head (+) screwdriver on hand for assembly.
- Check the items that come with the unit to make sure that everything shown in Figure 1 (A through F) is included. All screws are in a plastic bag inside of the packing cardboard.
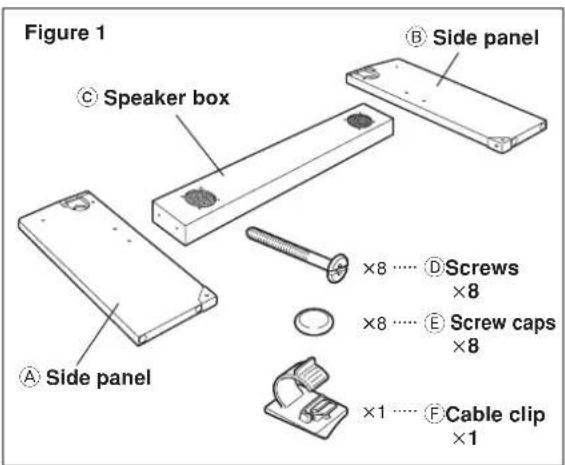
- Before starting assembly of the stand, divide the polystyrene foam packing material into four parts (Figure 2).
Figure 2

natural_image
Diagram showing a mechanical assembly being cut down into a 3D block structure (no text or symbols present)Assembling the Stand
When assembling the stand, you should have the piano standing up with its back facing downwards.
PREPARATION
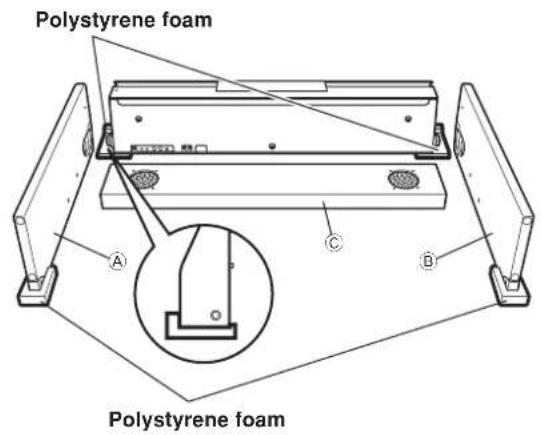
- Use the four pieces of polystyrene foam to secure side panels A and B in place. There should be some space between the edges of the side panels and the floor as shown in Figure 3.
- If you do not have any packing material available, use a magazine or some other thick item.
Figure 3

Assembly Instructions
Perform the following steps.
Figure 4

- Attach side panel Ⓐ to the piano. Secure the side panel in place using two screws Ⓓ (Figure 4).
- Be sure to tighten the screws securely.
- Attach side panel Ⓑ to the other side of the piano. Secure the side panel in place using two screws Ⓓ (Figure 4).
- In this case, do not tighten the screws all the way. If you do, you will not be able to insert the speaker box Ⓒ in the following steps.
- Attach speaker box Ⓒ to side panels A and B.
- Secure the speaker box in place using four screws (Figure 4).
-
Lift up the speaker box © so its screw holes align with the screw holes in the side panels, and then tighten the screws Ⓓ.
-
Partially tighten the screws on one side of the speaker box © and then tighten the screws on the other side completely.
-
Fully tighten the two screws you partially tightened in step 2, above.
-
Next, fully tighten the screws that you partially tightened on one side of the speaker box.
-
After ensuring that all of the screws are fully tightened, remove the packing material and stand up the piano (Figure 5).
-
Two people, one at either end, should hold the front and back of the piano when standing it up.
- Connect the cable to the speaker connector (★ in Figure 5).
- Install the screw caps Ⓔ on each of the eight screws (Figure 4, 5).

-
Attach the cable clip Ⓔ to the bottom of the piano (Figure 6).
-
Use the cable clip to bundle the adapter and pedal cables together.
- See "Power Supply" on page E-10 for information about using the cable clip.

Protecting the Piano Against Tipping Over
Locating the piano against a wall is normally enough to protect it against tipping over. If you need to locate it away from a wall, be sure to perform the following steps in order to ensure that it is secure.
- Remove the metal pieces at the bottom of side panels ① and ②.
- Repositioning the metal pieces so they are facing outwards reinstall them onto the side panels (Figure 7).
- If you have trouble inserting the bolts that come pre-installed in the side panels into the joint connector screw holes, use a screwdriver to rotate the joint connector so the bolts can enter the holes (★ in Figure 7).

Attaching the AC Adaptor and Pedal to the Piano
After assembling the stand, connect the AC adaptor and pedal to the bottom of the piano. For details, see "Power Supply" on page E-10 and "Connections" on page E-11.
417A-E-031A
Specifications
| Model: PS-3000 | |
| Keyboard: 88 piano keys (with touch response) | |
| Polyphony: 64 notes, maximum | |
| Tones: 8 | |
| Digital Effects: Reverb (4 types), Chorus | |
| Demo TunesNumber of Tunes: 8Playback: Repeat (all tunes, one tune) | |
| MemoryOperations: Real-time recording, playbackCapacity: Approximately 2,500 notes (one song)Memory Backup: Built-in lithium battery (Battery Life: 5 years) | |
| Pedals: Damper, Soft/Sostenuto (Selectable) | |
| Other FunctionsMetronome: Beat (6 types), Tempo (= 30 to 255)Touch Select: 3 types, offTranspose: 1 octave (FTuning: | to C to F) A_4 = 440Hz ± 50 cents (adjustable) |
| MIDI: | 16 multi-timbre receive |
| Input/OutputHeadphones:Pedal:Power: | Stereo mini jacks × 2 Standard jacks × 2 12V DCMIDI (OUT) (IN) |
| Speakers: | 12 cm × 2 (Output: 8.0W + 8.0W) |
| Power Supply: | AC Adaptor : AD-12 |
| Power Consumption: | 12V --- 18W |
| DimensionsPiano + Stand: | 135.9 × 29.9 × 76.3 cm ( 53^9/_16 × 11^3/_4 × 30^1/_16 inch) |
| WeightPiano + Stand: | Approximately 36.5 kg (80.5 lbs) |
- Design and specifications are subject to change without notice.
E-30
417A-E-032A

Operational Precautions
Locating the Unit
Avoid the following locations.
- Areas exposed to direct sunlight and high humidity.
- Areas subjected to very low temperatures.
- Near a radio, TV, video deck, or tuner (unit can cause interference with audio or video signals)
Care of the Unit
- Never use benzene, alcohol, thinner or other such chemicals to clean the exterior of the unit.
- To clean the keyboard, use a soft cloth dampened with a weak solution of a mild neutral detergent and water. Wring out all excess moisture from the cloth before wiping.
- Severe impact can cause problems.
When transporting the piano, use soft cloth to pack around the keyboard and buttons to protect them against damage.
- Never try to repair or modify any part of the piano.
Any attempt to repair or modify the piano can cause problems with operation.
- Avoid using this piano near televisions, radios, etc.
Because this piano uses digital circuitry, it may cause interference with other electronic devices such as televisions, radios, etc. - In case of a problem, check that buttons and connections are correct, as indicated in this manual. If the piano still does not work properly, contact your retailer or a nearby dealer. Never try to repair the piano yourself.
Lithium Battery
This unit is equipped with a lithium battery to provide power needed to retain memory contents while unit power is turned off. Should the lithium battery go dead, all memory contents will be lost whenever you turn unit power off. The normal life of the lithium battery is five years from the time that the battery was installed. Be sure to periodically contact your retailer or authorized service provider to have the lithium battery replaced. Note that you will be charged separately for lithium battery replacement.
- Note that CASIO COMPUTER CO., LTD. shall not be held liable for any damages or losses or any claims by third parties arising from corruption or loss of data caused by malfunction or repair of the unit, or from battery replacement.
You may notice lines in the finish of the case of this piano. These lines are the result of the molding process used to shape the plastic of the case. They are not cracks or breaks in the plastic, and are no cause for concern.
NOTE.
- Unauthorized reproduction of this manual in its entirety or in part is expressly forbidden. All rights reserved.
- CASIO COMPUTER CO., LTD. shall not be held liable for any damages or losses or any claims by third parties arising from use of this product or this manual.
- The contents of this manual are subject to change without notice.
417A-E-033A

Appendix/Apéndice
Initial Power On Settings
The table below shows the initial settings of the digital piano whenever power is turned on.
| Item Setting | |
| Tone GRAND PIANO | |
| Reverb HALL 1 (GRAND PIANO) | |
| Chorus Off (GRAND PIANO) | |
| Touch Select MIDDLE | |
| Transpose C |
| Item Setting | |
| Tuning A4 = 440.0Hz | |
| Keyboard Channel Channel 1 | |
| Local Control | On |
| Program Change Mode | Type 1 |
Items marked "★" are receive only.
Channel Messages
Note Messages
Note Off
Recognition
Format
| Byte 1 Byte 2 Byte 3 | |
| 8nH kkH vvH | |
| 9nH kkH 00H |
n ..... Voice Channel Number = 0H to FH (Ch1 to Ch16)
kk .... Note Number = 00H to 7FH
vv .... Note Off Velocity = 00H to 7FH
Remarks
Note Off Velocity value is ignored.
Send
Format
n ..... Voice Channel Number = 0H to FH (Ch1 to Ch16)
kk .... Note Number = 15H to 6CH
n ..... Voice Channel Number = 0H to FH (Ch1 to Ch16)
kk .... Note Number = 00H to 7FH
vv .... Note Off Velocity = 00H to 7FH
Send
Format
| Byte 1 Byte 2 Byte 3 | |
| 9nH kkH vvH |
n ..... Voice Channel Number = 0H to FH (Ch1 to Ch16)
kk .... Note Number = 15H to 6CH
vv .... Note Off Velocity = 01 to 7FH
Control Change
Bank Select
Format
n ..... Voice Channel Number = 0H to FH (Ch1 to Ch16) mm .. Bank Number MSB = 00H, 02H, 03H, 10H, 18H ll ..... Bank Number LSB = 00H
Send
A Bank Select message is sent at the same time when you select a tone on the instrument.
Modulation Wheel ★
Format
n ..... Voice Channel Number = 0H to FH (Ch1 to Ch16) vv .... Modulation Depth = 00H to 7FH
Portamento Time ★
Format
n ..... Voice Channel Number = 0H to FH (Ch1 to Ch16) vv .... Portamento Time = 00H to 7FH
Data Entry
Format
| Byte 1 | Byte 2 | Byte 3 | |
| BnH 06H | mmH | (Data Entry MSB) | |
| BnH 26H | IIH | (Data Entry LSB) | |
n ..... Voice Channel Number = 0H to FH (Ch1 to Ch16) mm .. Data entry MSB value for the parameter that is selected by RPN and NRPN
ll ...... Data entry LSB value for the parameter that is selected by RPN and NRPN
A-2
417A-E-068A
Channel Volume ★
Format
n ..... Voice Channel Number = 0H to FH (Ch1 to Ch16) vv .... Volume = 00H to 7FH
Pan ★
Format
n ..... Voice Channel Number = 0H to FH (Ch1 to Ch16) vv .... Pan = 00H (left) to 40H (center) to 7FH (right)
Expression Controller ★
Format
n ..... Voice Channel Number = 0H to FH (Ch1 to Ch16) vv .... Expression = 00H to 7FH
Hold 1 (Damper Pedal)
Format
n ..... Voice Channel Number = 0H to FH (Ch1 to Ch16) vv .... Hold 1 = 00H to 7FH (00H to 3FH:OFF, 40H to 7FH:ON)
Send
n ..... Voice Channel Number = 0H to FH (Ch1 to Ch16) vv .... Hold 1 = 00H,7FH(00H:OFF, 7FH:ON)
Portamento ★
Format
n ..... Voice Channel Number = 0H to FH (Ch1 to Ch16) vv .... Portamento = 00H to 7FH (00H to 3FH:OFF, 40H to 7FH:ON)
Sostenuto
Format
n ..... Voice Channel Number = 0H to FH (Ch1 to Ch16) vv .... Sostenuto = 00H to 7FH (00H to 3FH:OFF, 40H to 7FH:ON)
Send
n ..... Voice Channel Number = 0H to FH (Ch1 to Ch16) vv .... Sostenuto = 00H, 7FH (00H:OFF, 7FH:ON)
Soft
Format
n ..... Voice Channel Number = 0H to FH (Ch1 to Ch16) vv .... Soft = 00H to 7FH (00H to 3FH:OFF, 40H to 7FH:ON)
Send
n ..... Voice Channel Number = 0H to FH (Ch1 to Ch16) vv .... Soft = 00H, 7FH(00H:OFF, 7FH:ON)
Resonance ★
Format
n ..... Voice Channel Number = 0H to FH (Ch1 to Ch16) vv .... Filter Resonance = 00H to 7FH
Release Time ★
Format
n ..... Voice Channel Number = 0H to FH (Ch1 to Ch16) vv .... AMP Release Time = 00H to 7FH
Attack Time ★
Format
n ..... Voice Channel Number = 0H to FH (Ch1 to Ch16) vv .... AMP Attack Time = 00H to 7FH
417A-E-069A

MIDI Data Format
Brightness ★
Format
n ..... Voice Channel Number = 0H to FH (Ch1 to Ch16) vv .... Filter Cutoff Frequency = 00H to 7FH
Portamento Control ★
Format
n ..... Voice Channel Number = 0H to FH (Ch1 to Ch16) kk .... Source Note Number = 00H to 7FH
Effect 1 Depth (Reverb Send Level)
Format
n ..... Voice Channel Number = 0H to FH (Ch1 to Ch16) vv .... Reverb Send Level = 00H to 7FH
Effect 3 Depth (Chorus Send Level)
Format
n ..... Voice Channel Number = 0H to FH (Ch1 to Ch16) vv .... Chorus Send Level = 00H to 7FH
NRPN (Non-Registered Parameter Numbers) ★
With the instrument, NRPN are defined as tone editing parameters and drawbar parameters. The MSB and LSB of an NRPN specify the parameter being controlled, while the specified parameter's value is set in accordance with the subsequent data entry.
The following table shows the relationship between parameters and NRPN as defined by the instrument.
| NRPN MSB | NRPN LSB | Parameter |
| 01H 08H | Vibrato Rate | |
| 01H 09H | Vibrato Depth | |
| 01H | 0AH | Vibrato Delay |
| 01H 20H | TVF Cut Off Frequency | |
| 01H 21H | TVF Resonance | |
| 01H 63H | TVF/TVA Envelope Attack Time | |
| 01H 64H | TVF/TVA Envelope Decay Time | |
| 01H 66H | TVF/TVA Envelope Release Time |
See "Vibrato Rate" through "TVF/TVA Envelope Release Time" for the data entry MSB value range and other details.
Format
| Byte 1 Byte 2 Byte 3 | ||
| BnH | 63H | pmH (MSB) |
| BnH | 62H | pIH (LSB) |
n ..... Voice Channel Number = 0H to FH (Ch1 to Ch16) pm ... MSB of NRPN pl ..... LSB of NRPN
Recognition
- NRPN messages not defined by the instrument can also be received, but subsequent data entry values after undefined NRPN messages are ignored.
- After the NRPN MSB and LSB are received and the applicable control parameters settings are made, the value is set by receipt of the MSB of the subsequent data entry. The data entry LSB is ignored.
Vibrato Rate
NRPN MSB = 01H
NRPN LSB = 08H
Data Entry MSB = mmH
mm .. Vibrato Rate = 0011 to 4011 to 7FH (-64 to 0 to +63)
Recognition
When the instrument receives this message, the preset Vibrato Rate value for the tone is changed to the Vibrato Rate value that corresponds to the data entry MSB of the received message. There is no change when the value of the data entry MSB is 40H(0).
Vibrato Depth
NRPN MSB = 01H
NRPN LSB = 09H
Data Entry MSB = mmH
mm .. Vibrato Depth = 00H to 40H to 7FH (-64 to 0 to +63)
Recognition
When the instrument receives this message, the preset Vibrato Depth value for the tone is changed to the value that corresponds to the data entry MSB of the received message. There is no change when the value of the data entry MSB is 40H(0).
Vibrato Delay
NRPN MSB = 01H
NRPN LSB = 0AH
Data Entry MSB = mmH
mm .. Vibrato Delay = 00H to 40H to 7FH (-64 to 0 to +63)
Recognition
When the instrument receives this message, the preset Vibrato Delay value for the tone is changed to the value that corresponds to the data entry MSB of the received message. There is no change when the value of the data entry MSB is 40H(0).
A-4
417A-E-070A
Filter Cut Off Frequency
NRPN MSB = 01H
NRPN LSB = 20H
Data Entry MSB = mmH
$$ \begin{array}{l} \text { mm..Cut Off Frequency } = 0 0 \mathrm{Hto40Hto7FH(-64to0to} \ + 6 3) \end{array} $$
Recognition
When the instrument receives this message, the preset Filter Cut off Frequency value for the tone is changed to the value that corresponds to the data entry MSB of the received message. There is no change when the value of the data entry MSB is 40H(0).
Filter Resonance
NRPN MSB = 01H
NRPN LSB = 21H
Data Entry MSB = mmH
$$ \begin{array}{l} \text { mm..Filter Resonance = 00H to 40H to 7FH(-64 to 0 to } \ \quad + 6 3) \end{array} $$
Recognition
When the instrument receives this message, the preset Filter Resonance value for the tone is changed to the value that corresponds to the data entry MSB of the received message. There is no change when the value of the data entry MSB is 40H(0).
Filter/AMP Envelope Attack Time
NRPN MSB = 01H
NRPN LSB = 63H
Data Entry MSB = mmH
$$ \begin{array}{l} \text { mm..Filter / AMP Envelope Attack Time = 00H to 40H} \ \text { to 7FH (-64 to 0 to +63) } \end{array} $$
Recognition
When the instrument receives this message, the preset Filter/AMP Envelope Attack Time value for the tone is changed to the value that corresponds to the data entry MSB of the received message. There is no change when the value of the data entry MSB is 40H(0).
Filter/AMP Envelope Decay Time
NRPN MSB = 01H
NRPN LSB = 64H
Data Entry MSB = mmH
$$ \begin{array}{l} \text { mm..Filter / AMP Envelope Decay Time = 00H to 40H} \ \text { to 7FH (-64 to 0 to +63) } \end{array} $$
Recognition
When the instrument receives this message, the preset Filter/AMP Envelope Decay Time value for the tone is changed to the value that corresponds to the data entry MSB of the received message. There is no change when the value of the data entry MSB is 40H(0).
Filter/AMP Envelope Release Time
NRPN MSB = 01H
NRPN LSB = 66H
Data Entry MSB = mmH
$$ \begin{array}{l} \text { mm..Filter / AMP Envelope Release Time = 00H to 40H} \ \text { to 7FH (-64 to 0 to +63) } \end{array} $$
Recognition
When the instrument receives this message, the preset Filter/AMP Envelope Release Time value for the tone is changed to the value that corresponds to the data entry MSB of the received message. There is no change when the value of the data entry MSB is 40H(0).
RPN (Registered Parameter Numbers)
On the instrument, RPNs are defined as settings for the following parameters.
| NRPN MSB | NRPN LSB Parameter | |
| 00H 00H | Pitch Bend Sensitivity | |
| 00H 01H | Master Fine Tuning | |
| 00H 02H | Master Coarse Tuning | |
| 7FH 7FH | RPN Null | |
The MSB and LSB of an RPN specify the parameter being controlled, while the specified parameter's value is set in accordance with the MSB of the subsequent data entry.
See "Pitch Bend Sensitivity" through "RPN Null" for the data entry MSB value range and other details.
Format
| Byte 1 Byte 2 Byte 3 | ||
| BnH 65H | qmH (MSB) | |
| BnH 64H | qIH (LSB) | |
n ..... Voice Channel Number = 0H to FH (Ch1 to Ch16) qm ... MSB of RPN
ql ..... LSB of RPN
Recognition
- RPN messages not defined by the instrument can also be received, but subsequent data entry values after undefined RPN messages are ignored.
- After the MSB and LSB of an RPN are received and the applicable control parameters settings are made, the value is set by receipt of the MSB of the subsequent data entry. The data entry LSB is ignored.
Send
An RPN is sent whenever an operation that changes the parameter assigned to the RPN is performed.
417A-E-071A
A-5

MIDI Data Format
Pitch Bend Sensitivity ★
RPN MSB = 00H
RPN LSB = 00H
Data Entry MSB = mmH
mm .. Pitch Bend Sensitivity = 00H to 18H (0 to 24 semitones)
Recognition
The data entry LSB is always ignored.
Master Fine Tuning
RPN MSB = 00H
RPN LSB = 01H
Data Entry MSB = mmH
Data Entry LSB = 11H
mm ll Master Fine Tuning = 00 00H to 40H 00H to 7FH 7FH (-100 to 0 to +99.99 cents)
Master Coarse Tuning
RPN MSB = 00H
RPN LSB = 02H
Data Entry MSB = mmH
mm .. Master Coarse Tuning = 28H to 40H to 58H (-24 to 0 to +24 semitones)
Recognition
The data entry LSB is always ignored.
RPN Null
RPN MSB = 7FH
RPN LSB = 7FH
Recognition
Once an RPN Null is sent, all received data entry MSBs and LSBs are ignored until another RPN message other than RPN Null or an NRPN message is received.
Program Change
Format
pp .... Program Number = 00H to 7FH
Send
Program Change messages are sent when you select a tone on the instrument.
Pitch Bend Change ★
Format
n ..... Voice Channel Number = 0H to FH (Ch1 to Ch16)
ll ..... Pitch Bend Change LSB = 00H to 7FH
mm .. Pitch Bend Change MSB = 00H to 7FH
Recognition
- The value 11H mmH is 00H 00H at the lowest pitch, 00H 40H at mid-pitch, and 7FH 7FH at the highest pitch.
- You have to set both the LSB and MSB together to form a 14-bit value and make a Pitch Bend Change message recognized by the instrument.
Channel Mode Message
All Sound Off ★
Format
n ..... Voice Channel Number = 0H to FH (Ch1 to Ch16)
Recognition
Receipt of this message immediately mutes all tones playing over the MIDI channels.
Reset All Controller ★
Format
n ..... Voice Channel Number = 0H to FH (Ch1 to Ch16)
Recognition
Receipt of the Reset All Controller message causes the following controllers to be reset.
| Controller Name Reset Value |
| Modulation Wheel vvH = 00H |
| Expression Controller vvH = 7FH |
| Hold 1 vvH = 00H |
| Portamento vvH = 00H |
| Sostenuto vvH = 00H |
| Soft vvH = 00H |
| NRPN msb = 7FH, Isb = 7FH |
| RPN msb = 7FH, Isb = 7FH |
| Pitch Bend Change IIH mmH = 00H 40H |
A-6
417A-E-072A
All Note Off
Format
n ..... Voice Channel Number = 0H to FH (Ch1 to Ch16)
Recognition
Receipt of the All Note Off message mutes all tones being played by data received over the MIDI channels (note off).
If Hold 1 or Sostenuto is turned on when the All Note Off message is received, notes are sustained in accordance with the corresponding pedal operation.
Send
This message is sent when the CONTROL button is pressed and when memory playback is stopped.
Omni Mode Off ★
Format
n ..... Voice Channel Number = 0H to FH (Ch1 to Ch16)
Recognition
Receipt of an Omni Mode On message does not turn on the instrument Omni Mode. Receipt of an Omni Mode On message is treated as an All Note Off message.
Omni Mode On ★
Format
n ..... Voice Channel Number = 0H to FH (Ch1 to Ch16)
Recognition
Receipt of an Omni Mode On message does not turn on the instrument Omni Mode. Receipt of an Omni Mode On message is treated as an All Note Off message.
Mono Mode On ★
Format
n ..... Voice Channel Number = 0H to FH (Ch1 to Ch16) vv .... Number of Mono Mode Channels = 00H to 10H
Recognition
Receipt of a Mono Mode On message does not turn on the instrument Mono Mode. Receipt of a Mono Mode On message is treated as an All Sound Off message.
Poly Mode On ★
Format
n ..... Voice Channel Number = 0H to FH (Ch1 to Ch16)
Receive
Receipt of a Poly Mode On message by the instrument sets Channel n to Mode 3 and is processed as if an All Sound Off message and All Note Off message were received.
System Messages
Universal System Exclusive Message
GM System On ★
Format
F0H 7EH 7FH 09H 01H F7H
Send
This message cannot be sent.
Reverb Type
Format
F0 7F 7F 04 05 01 01 01 01 01 00 vv F7
| Parameter (vv) Setting GM | Level 2 Equivalent | |
| 00H ROOM Small Room | ||
| 02H STAGE Large Room | ||
| 03H HALL 1 Medium Hall | ||
| 04H HALL 2 Large Hall | ||
Chorus Type
Format
F0 7F 7F 04 05 01 01 01 01 02 00 vv F7
| Parameter (vv) | Setting GM Level 2 Equivalent | |
| 02H | CHORUS | Chorus 3 |
417A-E-073A
A-7

F0H 7EH 7FH 09H 01H F7H
Envío
| 7484 | ^X | O | BrightnessPortamento Control |
| 91 | O | O | Reverb send |
| 93 | O | O | Chorus send |
| 98, 99 | X | O | NRPN LSB, MSB |
| 100, 101 | O | O | RPN LSB, MSB |
| 120 | X | O | All sound off |
| 121 | X | O | Reset all controller |
| ProgramChange: True # | O 0-7 | O 0-7 | Equipped with General MIDI compatible mode (switchable type). |
| ********** | 0-7 | ||
| System Exclusive | O^*2 | O^*2 | |
| System : Song Pos | X | X | |
| Common : Song Sel | X | X | |
| : Tune | X | X | |
| System : Clock | X | X | |
| Real Time : Commands | X | X | |
| Aux : Local ON/OFF | X | X | |
| : All notes OFF | O | O | |
| Messages : Active Sense | X | O | |
| : System Reset | X | X | |
| Remarks *1 Fine tune and coarse tune send/receive, and RPN Null, pitch bend sense, vibrato rate, vibrato depth, vibrato delay, Filter cut off frequency, Filter resonance, Filter/AMP envelope attack time, Filter/AMP envelope decay time and Filter/AMP envelope release time receives *2 GM System On [F0][7E][7F][09][01][F7]Reverb Type [F0][7F][7F][04][05][01][01][01][01][00][XX][F7]XX=00:ROOM, 02:STAGE, 03:HALL 1, 04:HALL 2Chorus Type [F0][7F][7F][04][05][01][01][01][01][02][00][YY][F7]YY=02:CHORUS | |||
O: Yes X: No
Mode 1 : OMNI ON, POLY Mode 2 : OMNI ON, MONO
Mode 3 : OMNI OFF, POLY Mode 4 : OMNI OFF, MONO

This recycle mark indicates that the packaging conforms to the environmental protection legislation in Germany.
- NOTICE
- FCC WARNING
- Important!
- Safety Precautions
- Symbols
- WARNING
- CAUTION
- Symbol Examples
- Smoke, Strange Odor, Overheating
- AC Adaptor
- Do not locate the piano on an unstable surface.
- Never climb onto the piano or stand.
- Never dispose of the piano by burning it.
- Do not place containers containing water or other liquids on the product.
- Do not expose this piano to rain or moisture.
- Never try to take the piano apart or modify it.
- Avoid dropping the piano and other strong impact.
- Do not put plastic bags over your head or in your mouth.
- Opening and closing the keyboard cover
- Relocating the Product
- Cleaning
- Connector
- Location
- Do not place heavy objects on the piano.
- Volume setting
- Assemble the stand properly.
- Main Features
- versatile tones
- Metronome
- demo tunes
- □Memory
- ☐Powerful keyboard setting functions
- □MIDI terminal
- Contents
- Safety Precautions ...... E-1
- Main Features ...... E-5
- Contents..... E-6
- General Guide...... E-8
- Power Supply ...... E-10
- Connections ...... E-11
- Basic Operations...... E-12
- Using the Memory ...... E-16
- Using Demo Tunes...... E-18
- Keyboard Settings ...... E-19
- MIDI.... E-21
- Troubleshooting ...... E-26
- Assembly Instructions...... E-27
- Specifications ...... E-30
- Operational Precautions..... E-31
- Appendix ......A-1
- MIDI Data Format......A-2
- MIDI Implementation Chart
- General Guide
- Music Stand
- Power Supply
- Using the AC Adaptor
- Specified AC Adaptor: AD-12
- Using the Cable Clip
- • To fasten the clip
- • To release the clip
- Connections
- Connecting Headphones ①
- Connecting to a PEDAL Jack ②
- Accessories and Options
- Basic Operations
- Using Tones
- Selecting a Tone
- To select a tone
- Using Digital Effects
- Digital Effect Types
- To select a digital effect
- Power on effect settings
- NOTE
- More about tones
- Polyphony
- Touch Response
- Digitally Sampled Tones
- Using the Pedals
- Pedal functions
- To use the SOFT/SOSTENUTO pedal as a soft pedal
- To use the SOFT/SOSTENUTO pedal as a sostenuto pedal
- NOTE.
- Using the Metronome
- PREPARATION.
- To use the metronome
- Change the tempo setting as described below.
- When you want to stop the metronome, press the METRONOME button again.
- Adjusting the Metronome Volume
- To adjust the metronome volume
- While holding down the CONTROL button, press the keyboard key that corresponds to the metronome volume setting you want to select.
- Using the Memory
- About the Memory
- Memory Capacity
- Recorded Data
- Recorded Data Storage
- Recording
- PREPARATION
- Playback
- To playback from memory
- Deleting Memory Contents
- To delete memory contents
- Using Demo Tunes
- To play the demo tunes in sequence
- To play a specific demo tune
- To stop demo tune play
- Keyboard Settings
- Using Touch Select
- Touch Select Settings
- To change the Touch Select setting
- Using Transpose
- To change the transpose setting
- Adjusting the Tuning of the Piano
- To adjust the tuning of the piano
- MIDI
- What is MIDI?
- What you can do with MIDI
- MIDI Connections
- MIDI Channels
- Simultaneous Receive Over Multiple Channels (Multi-Timbre)
- Setting the Keyboard Channel
- To set the Keyboard Channel
- Assigning Tones to Individual Channels
- Sending Memory Playback Data
- Program Change Number Settings
- To change the program change number type
- General MIDI
- Turning Local Control On and Off
- To turn Local Control on and off
- MIDI Data Notes
- Keyboard Data (Note On, Note Off, Note Number, Velocity)
- Tone Change Data (Program Change)
- Pedal and Effect Operation Data (Control Change and Universal System Exclusive Message)
- Assembly Instructions
- Assembling the Stand
- Protecting the Piano Against Tipping Over
- Attaching the AC Adaptor and Pedal to the Piano
- Operational Precautions
- Locating the Unit
- Care of the Unit
- Lithium Battery
- Appendix/Apéndice
- Initial Power On Settings
- Channel Messages
- Note Messages
- Note Off
- Recognition
- Send
- Control Change
- Bank Select
- Modulation Wheel ★
- Portamento Time ★
- Data Entry
- Channel Volume ★
- Pan ★
- Expression Controller ★
- Hold 1 (Damper Pedal)
- Portamento ★
- Sostenuto
- Soft
- Resonance ★
- Release Time ★
- Attack Time ★
- MIDI Data Format
- Brightness ★
- Portamento Control ★
- Effect 1 Depth (Reverb Send Level)
- Effect 3 Depth (Chorus Send Level)
- NRPN (Non-Registered Parameter Numbers) ★
- Vibrato Rate
- Vibrato Depth
- Vibrato Delay
- Filter Cut Off Frequency
- Filter Resonance
- Filter/AMP Envelope Attack Time
- Filter/AMP Envelope Decay Time
- Filter/AMP Envelope Release Time
- RPN (Registered Parameter Numbers)
- Format
- Pitch Bend Sensitivity ★
- Master Fine Tuning
- Master Coarse Tuning
- RPN Null
- Program Change
- Pitch Bend Change ★
- Channel Mode Message
- All Sound Off ★
- Reset All Controller ★
- All Note Off
- Omni Mode Off ★
- Omni Mode On ★
- Mono Mode On ★
- Poly Mode On ★
- Receive
- System Messages
- Universal System Exclusive Message
- GM System On ★
- Reverb Type
- Chorus Type
Brand : CASIO
Model : PS-3000
Category : Keyboard