
Keyboard Darfon - Keyboard ACER - Free user manual and instructions
Find the device manual for free Keyboard Darfon ACER in PDF.
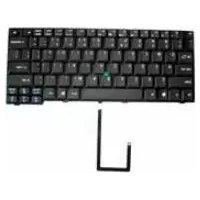


| Product Type | Laptop Keyboard |
| Brand | Acer |
| Model | Keyboard Darfon |
| Compatibility | Acer TravelMate C210 series notebooks |
| Keyboard Layout | 84/85/88 keys, inverted "T" cursor layout |
| Number of Keys | 84 to 88 keys |
| Special Keys | 12 function keys, 4 cursor keys, 2 Windows keys, hotkey controls, embedded numeric keypad, international language support |
| Numeric Keypad | Embedded numeric keypad (Num Lock activated) |
| Hotkeys | Fn+ key combinations for brightness, volume, sleep, display toggle, screen blank, touchpad toggle, speaker toggle |
| Windows Keys | Two Windows logo keys |
| Cursor Keys | Four arrow keys |
| Function Keys | 12 function keys (F1-F12) |
| International Support | Yes, multi-language layouts available |
| Material | Plastic, rubber dome switches |
| Dimensions (Approx.) | 280 mm x 120 mm |
| Weight (Approx.) | 200 g |
| Power Source | Supplied via notebook motherboard connector |
| Connectivity | Integrated flex cable to notebook mainboard |
| Maintenance | Clean with soft, dry cloth; avoid liquids and abrasive cleaners |
| Safety | Avoid static discharge; disconnect laptop power before removal |
| Repairability | Replaceable by removing screws and cable; follow service guide disassembly procedures |
Frequently Asked Questions - Keyboard Darfon ACER
User questions about Keyboard Darfon ACER
0 question about this device. Answer the ones you know or ask your own.
Ask a new question about this device
Download the instructions for your Keyboard in PDF format for free! Find your manual Keyboard Darfon - ACER and take your electronic device back in hand. On this page are published all the documents necessary for the use of your device. Keyboard Darfon by ACER.
USER MANUAL Keyboard Darfon ACER
Acer TravelMate C210 Series
Service Guide
Service guide files and updates are available on the ACER/CSD web; for more information, please refer to http://csd.acer.com.tw
PRINTED IN TAIWAN
Revision History
Please refer to the table below for the updates made on TravelMate C210 service guide.
| Date Chapter Updates | ||
Copyright
Copyright © 2006 by Acer Incorporated. All rights reserved. No part of this publication may be reproduced, transmitted, transcribed, stored in a retrieval system, or translated into any language or computer language, in any form or by any means, electronic, mechanical, magnetic, optical, chemical, manual or otherwise, without the prior written permission of Acer Incorporated.
Disclaimer
The information in this guide is subject to change without notice.
Acer Incorporated makes no representations or warranties, either expressed or implied, with respect to the contents hereof and specifically disclaims any warranties of merchantability or fitness for any particular purpose. Any Acer Incorporated software described in this manual is sold or licensed "as is". Should the programs prove defective following their purchase, the buyer (and not Acer Incorporated, its distributor, or its dealer) assumes the entire cost of all necessary servicing, repair, and any incidental or consequential damages resulting from any defect in the software.
Acer is a registered trademark of Acer Corporation.
Intel is a registered trademark of Intel Corporation.
Pentium and Pentium II/III are trademarks of Intel Corporation.
Other brand and product names are trademarks and/or registered trademarks of their respective holders.
Conventions
The following conventions are used in this manual:
| SCREEN MESSAGES | Denotes actual messages that appear on screen. |
| NOTE Gives bits and pieces of additional information related to the current topic. | |
| WARNING Alerts you to any damage that might result from doing or not doing specific actions. | |
| CAUTION Gives precautionary measures to avoid possible hardware or software problems. | |
| IMPORTANT Reminds you to do specific actions relevant to the accomplishment of procedures. | |
Preface
Before using this information and the product it supports, please read the following general information.
- This Service Guide provides you with all technical information relating to the BASIC CONFIGURATION decided for Acer's "global" product offering. To better fit local market requirements and enhance product competitiveness, your regional office MAY have decided to extend the functionality of a machine (e.g. add-on card, modem, or extra memory capability). These LOCALIZED FEATURES will NOT be covered in this generic service guide. In such cases, please contact your regional offices or the responsible personnel/channel to provide you with further technical details.
- Please note WHEN ORDERING FRU PARTS, that you should check the most up-to-date information available on your regional web or channel. If, for whatever reason, a part number change is made, it will not be noted in the printed Service Guide. For ACER-AUTHORIZED SERVICE PROVIDERS, your Acer office may have a DIFFERENT part number code to those given in the FRU list of this printed Service Guide. You MUST use the list provided by your regional Acer office to order FRU parts for repair and service of customer machines.
Table of Contents
Chapter 1 System Specifications 1
Features 1
System Block Diagram 3
Board Layout 4
Top View 4
Bottom View ....5
A TravelMate Tour 7
Top View 7
Open front view 8
Closed front view 8
Left view 9
Right view 10
Rear view 11
Base view 11
Indicators 13
Easy-launch buttons 14
Trackpoint and click buttons 15
Trackpoint basics 15
Scrolling basics 15
Using the keyboard 16
Lock keys and embedded numeric keypad 16
Windows Keys 16
Hot Keys 17
Special keys 18
Acer Empowering Technology .....20
Empowering Technology password ....20
Acer eNet Management (for selected models) .....20
Acer ePower Management .....22
Acer ePresentation Management 24
Acer eDataSecurity Management (for selected models) .....25
Acer eLock Management .....27
Acer eRecovery Management .....28
Acer eSettings Management 29
Acer ePerformance Management 29
Hardware Specifications and Configurations 31
Chapter 2 System Utilities 35
BIOS Setup Utility 41
Navigating the BIOS Utility 42
Information 43
Main 44
Advanced 45
Security 46
Boot 49
Exit 50
BIOS Flash Utility 51
Remove HDD/BIOS Utility 52
Chapter 3 Machine Disassembly and Replacement 47
General Information ....58
Before You Begin .....58
Disassembly Procedure Flowchart .....59
Removing the Battery Pack 60
Removing the HDD Module/ODD Module/Memory/
Table of Contents
Wireless LAN Card/ LCD Module and the Keyboard . . . . . . . . . . . . . . . . . . . . . . . . . . . . . . . . . . . . . . . . . . . . . . . . . . . . . . . . 61
Removing the Hard Disk Drive Module 61
Removing the Optical Disk Drive Module 61
Removing the Memory 61
Removing the Wireless LAN Card 61
Removing the LCD Module 62
Removing the Keyboard 63
Disassembling the Main Unit 64
Separating the Main Unit into the Upper Case
And the Lower Case Assembly 64
Disassembling the Upper Case, the Lower Case
and the Main Board Assembly 65
Disassembling the LCD Module 67
Disassembling the External Modules .....69
Disassembling the HDD Module 69
Disassembling the Optical Disc Drive Module 69
Chapter 4 Troubleshooting 63
System Check Procedures 72
External Diskette Drive Check 72
External CD-ROM Drive Check 72
Keyboard or Auxiliary Input Device Check 72
Memory check....73
Power System Check 73
Touchpad check 74
Power-On Self-Test (POST) Error Message 75
Index of Error Messages 76
POST Codes 78
Index of Symptom-to-FRU Error Message 82
Intermittent Problems 86
Undetermined Problems 87
Chapter 5 Jumper and Connector Locations 81
Top View 89
Bottom View 90
Chapter 6 FRU (Field Replaceable Unit) List 83
Appendix A Model Definition and Configuration 94
TravelMate C210 Series 106
Appendix B Test Compatible Components 95
Microsoft® Windows® XP Pro Environment Test .....112
Microsoft® Windows® XP Home Environment Test .....115
Appendix C Online Support Information 103
System Specifications
Features
This computer was designed with the user in mind. Here are just a few of its many features:
Performance
Intel® Centrino® Duo mobile technology, featuring Intel® Core 2 Duo processor T5500/T5600 (2MB L2 cache, 1.66/1.83 GHz, 667 MHz FSB) and T7200/T7400 (4 MB L2 cache, 2/2.16 GHz, 667 MHz FSB) Intel® Core Duo processor T2300/T2400/T2500/T2600 (2MB L2 cache, 1.66/1.83/2/2.16 GHz, 667 MHz FSB) Mobile Intel® 945GM/945PM + ICH7M Intel® PRO/Wireless 3945ABG network connection (dual-band tri-mode 802.11a/b/g) or Intel® PRO/Wireless 3945BG network connection (dual-mode 802.11b/g) Wi-Fi CERTIFIED™ solution, supporting Acer SignalUp™ wireless technology. Up to 2 GB of DDR2 533/677 MHz system memory, upgradeable to 4 GB using two soDIMM modules (dual-channel support).
Display
12.1" XGA Thin-Film Transistor (TFT) liquid-crystal display (LCD) supporting pen-based input, with 16.7 million colors at 1024x768 resolution. LCD slides to convert from notebook to tablet mode. NVIDIA® GeForce® Go 7300 up to 256 MB TurboCache (128 MB of dedicated GDDR2 VRAM, up to 128 MB of shared system memory), supporting Microsoft® DirectX 9.0, Shader Model 3.0, OpenEXR High Dynamic Range (HDR) technology, NVIDIA® PowerMizer™ 6.0 PCI Express® (for discrete models). Mobile Intel® 945GM Express chipset with integrated 3D graphics, featuring Intel® Graphics Media Accelerator (GMA) 950, up to 224 MB of shared system memory, supporting Microsoft® DirectX® 9.0 dual independent display (for UMA models). Up to 2048 x 1536 resolution via non-interlaced CRT display, 16.7 million colors. Simultaneous LCD and CRT display, with LCD panel refresh rate at 70Hz. MPEG-2/DVD hardware-assisted capability. DualView™ support.
Storage subsystem
60/80/100/120/160 GB hard disk drive. Optical drive options: 8X DVD-Super Multi double-layer, slot-loaded DVD/CD-RW combo (for selected models). 4-in-1 card reader, supporting Memory Stick™ (MS), Memory Stick PRO™ (MS PRO), MultiMediaCard (MMC) and Secure Digital (SD).
Communication
Modem: 56K ITU V.92 with PTT approval; Wake-on-Ring ready.
LAN: gigabit Ethernet; Wake-on-LAN ready. WLAN: Intel® PRO/Wireless 3945ABG network connection (dual-band tri-mode 802.11a/b/g) or Intel® PRO/Wireless 3945BG network connection (dual-mode 802.11b/g) Wi-Fi CERTIFIED™ solution, supporting Acer SignalUp™ wireless technology. WPAN: integrated Bluetooth® 2.0+EDR (Enhanced Data Rate).
Input devices
☐ Biometric fingerprint reader provides the notebook with advanced security protection ☐ 84-/85-key keyboard with inverted "T" cursor layout ☐ Built-in trackpoint with two buttons ☐ 12 function keys, four cursor keys, two Windows® key, hotkey controls, embedded numeric keypad, international language support ☐ Four easy-launch buttons: Internet, email, Empowering Key, user-programmable button ☐ Four tablet-mode buttons: Windows Security, Screen Rotate, Function, Escape ☐ 3-way scroll wheel (up/down/enter) ☐ Electromagnetic Resonance (EMR) pen with eraser
Audio
☐ Audio system with one built-in 1W speaker and microphone ☐ Sound Blaster Pro™ and MS-Sound compatible Intel® High-Definition audio support
I/O interface
☐ 124-pin Acer ezDock connector ☐ PC card slot (Type II) ☐ Biometric fingerprint reader ☐ 4-in-1 card reader (MS/MS PRO/MMC/SD) ☐ Three USB 2.0 ports ☐ IEEE 1394 port ☐ Fast infrared (FIR) port ☐ External display (VGA) port ☐ Headphones/speaker/line-out jack ☐ Microphone jack ☐ Line-in jack ☐ Ethernet (RJ-45) port ☐ Modem (RJ-11) port ☐ DC-in jack for AC adapter
Environment
Temperature: operating: 5°C to 35°C Non-operating: -20°C to 65°C ☐ Humidity (non-condensing): operating: 20%~80% Non-operating: 20%~80%
System Block Diagram
![graph TD A["AT4 66/100"] --> B["MDIC1.5"] B --> C["ALC883 (Codec) & 2 AMP"] B --> D["Multi-Bay (ODD or second Battery) Page 32"] B --> E["Multi-Link (DDB or Second Battery) Page 32"] B --> F["Multi-Link (DDB or Second Battery) Page 32"] B --> G["Multi-Link (DDB or Second Battery) Page 32"] B --> H["…](/content/2026/05/857506/images/95c090ddfed69ce3e19301fc86377a46f827e64706145aea5cb933c1295fd5b9.jpg)
TM C210
Page 3 ICS954310BECFESC452 CLOCKS Generator
Page 36 CPU VR
+1.05V/+1.8VSUS/+1.8V/+0.9V +1.5V/+2.5V Page 35, 37, 38, 39
G5@:LAN 5705E G7@:LAN 5787 G9@:LAN 5709
INT@:UMA EXT@:DIScrete VGA V6@:64M VRAM V12@:128M VRAM
Board Layout
Top View
![[01] [02] [03] [04] [05] [06] [07] [08] [55] [10] [09] [11] [12] [13] [14] [15] [16] [17] [18] [19] [20] [21] [21]](/content/2026/05/857506/images/cb55de7aafbcafde0b22de15a182dfd78d4e2cfdddd6ea633e5df49e17f5bc1e.jpg)
1 U3 LAN Controller 12 CN5 Quick Button Board Connector
2 CN2 LCD Connector 13 U20 Clock Generator
3 U4 VRAM1 14 U29 EC (Keyboard Controller)
4 CN1 Lid Switch 15 CN7 BT Connector
5 U16 Super I/O Controller 16 CN8 Jogdial Board Connector
6 U10 DVI Transmitter 17 CN9 Pen Switch Board Connector
7 CN3 PCI Debug Card Connector 18 CON1/ BIOS ROM (Reserved) U34
8 U17/ IDE Buffer 19 CN10 Internal MIC U19
| 9 U23 PCMCIA/1394/Card Reader Controller | 20 BT1 RTC Battery Connector | ||||
| 10 | U22 | Track Point Controller | 21 | CN11 | Intetnal Speaker |
| 11 | CN6 | Keyboard Connector | 55 | CN4 | Track Point Connector |
Bottom View
![[22] [24] [26] [27] [28] [29] [30] [31] [32] [33] [34] [35] [36] [37] [38] [39] [40] [41] [42] [43] [44] [45] [46] [47] [48] [49] [50] [51] [52] [53] [54] [55] [56] [57] [58]](/content/2026/05/857506/images/201f4566157af10663d7dccea4bd91bc5289b70d05b36b1c7ba6ca77aeb1d42d.jpg)
22 CN13 EZ Docking Connector 41 CN30 Memory Card Reader
23 CN12 AC Power Jack 42 J1 MDC Connector
24 CN15 RJ11/RJ45 Connector 43 CN28 PCMCIA Board Connector
25 CN14 CRT Connector 44 CN26 MINI Card Connector
26 CN16 Modem Connector 45 U54 South Bridge (ICH7)
27 CN17 Main Battery Connector 46 CN24 PATA HDD Connector
28 JDIM1 DDR Socket 1 47 U57 FIR
29 JDIM2 DDR Socket 2 48 CN25 External Line In
30 U44 VRAM2 49 CN27 External MIC In
31 CN18 USB Dual Connector 50 CN29 External Headphone
32 CN19 1394 Connector 51 U55 Speaker Amplifier (MAX9710)
33 U45 VGA Chip (NV72MV) 52 U56 Headphone (MAX4411)
34 CN20 CD-ROM Board Connector 53 SW4 Bluetooth Enable Switch
35 U46 CPU Socket 54 SW5 WLAN Enable Switch
36 CN22 Second Battery Connector 56 LED3 BT LED
37 CN21 FAN Connector 57 LED4 WLAN LED
38 U48 North Bridge (945GM/PM) 58 LED1 Battery LED
39 U52 Audio Codec Controller 59 LED2 HDD LED
40 CN23 USB Connector
A TravelMate Tour
Now let us show you around the new TravelMate computer.
Top View

| # Item | Description | |
| 1 Display screen Also called LCD (liquid-crystal display), displays computer output. Electromagnetic resonate (EMR) stylus is used to input data in tablet mode. Use only an EMR-compatible stylus to input data on the screen. | ||
| 2 Tablet-mode button Escape button for use in tablet PC mode. | ||
| 3 Tablet-mode button Function button for use in tablet PC mode. | ||
| 4 Tablet-mode button Screen rotate button for use in tablet PC mode. | ||
| 5 | Biometric fingerprint reader | Provides fingerprint-verified access to operating system applications. |
| 6 Windows Security lock button | A tablet-mode button, it functions like CLT-ALT-DEL to lock the access to the operating system. | |
| 7 Power switch Turns the computer on and off. | ||
Open front view
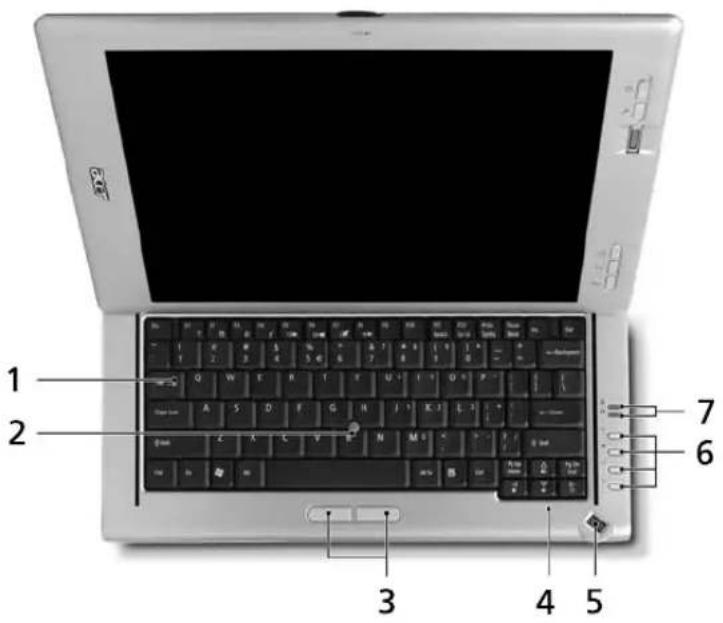
| # Item | Description | |
| 1 Keyboard For entering data in notebook PC mode. | ||
| 2 | Built-in trackpoint | Touch-sensitive pointing device which functions likea computer mouse when used together with the click buttons. |
| 3 | Click buttons (left and right) | Function like the left and right mouse buttons when used together with the center-keyboard trackpoint. |
| 4 Built-in microphone | Internal microphone for sound recording. | |
| 5 Scroll wheel | For up, down and one-touch accelerated scrolling. | |
| 6 Easy-launch buttons | Buttons for launching frequently used programs. | |
| 7 Indicator lights | Light up when Caps Lock or Num Lock are activated. | |
Closed front view

| # Icon | Item Description |
| 1 Wireless[SY5Z] | communication button/indicator | Press to enable/disable the wireless function. Lights to indicated the status of wireless LAN communication. |
| 2 Bluetooth[808A] | communication button/indicator | Press to enable/disable Bluetooth functions. Lights to indicated the status of Bluetooth communications. |
| 3 Speaker Provides sound. | ||
| 4 Battery indicator Lights up when battery is being charged. | ||
| 5 Fast infrared (FIR) port Interfaces with infrared printers, other FIR-aware devices. | ||
| 6 HDD indicator Indicates when [T476] | the hard disk drive is active. | |
| 7 Electromagnetic | resonance (EMR) pen with eraser | For entering data in tablet PC mode. |
Left view

| # Icon | Item Description | ||
1 Ethernet (RJ-45) port Connects to a gigabit Ethernet network. | |||
2 Modem (RJ-11) port Connects to a phone line. | |||
| 3 Optical drive eject | button | Ejects the optical drive tray. | |
| 4 LED indicator Lights up when the optical drive is active. | |||
| 5 Opticla drive Accepts recordable DVDs and CDs, depending on teh drive type. | |||
6 PC Card slot Accepts one Type II PC Card. | |||
| 7 PC Card slot eject | button | Eject the PC Card from the slot. |
8 4-in-1 card reader Accepts Memory Stick, Memory Stick    [8522] [8522] | Pro, MultiMediaCard (MMC), Secure Digital (SD). Note: Only one card can operate at any given time. |
Right view
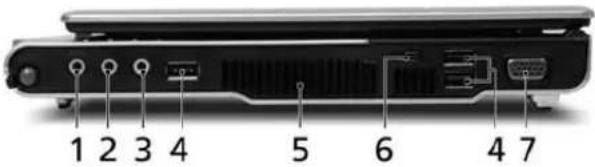
| # Icon | Item Description | ||
1 Headphone/speakers | line-out jack | Connects to audio line-out devices. | |
| 2 Microphone/line-in jack Accepts audio line-in devices (e.g. microphone or audio CD player). | |||
| 3 IEEE 1394 port Connects to IEEE 1394 devices.[1394] | |||
4 USB 2.0 port Connects to USB 2.0 devices (e.g. USB mouse  ) ) | |||
| 5 Ventilation slots Keep computer cool during use. | |||
6 USB 2.0 port Connects to USB 2.0 devices (e.g. USB mouse  ) ) | |||
7 External display (VGA) | port | Connects to a display device (e.g. monitor or projector). | |
Rear view

| # Icon | Item Description | ||
| 1 | Kensington lock slot Connects to a Kensington-compatible security lock. | ||
| 2 | DC-in jack Connects to an AC adapter. | ||
| 3 | Latch Locks and release the LCD unit to convert from tablet to notebook mode. | ||
| 4 | Acer ezDock port Connects to an Acer ezDock (optional). | ||
Base view

| # Item | Description | |
| 1 Battery bay Houses the computer's | battery pack. | |
| 2 Battery lock latch Locks the battery | in place. | |
| 3 | Memory compartment | Houses the computer's main memory (secured with two screws). |
| 4 Cooling fan Cools computer during use. Note: Do not cover or obstruct the opening of the fan. | |
| 5 Hard disk bay Houses the computer's hard disk (secured with two screws). | |
| 6 Optical drive Internal optical drive (hot -swappable Acer MediaBay drive moudel is optional). | |
| 7 Optical drive release latch Release the optical drive module fo removal. | |
| 8 Battery lock latch Locks the battery in place. |
Indicators
The computer has two easy-to-read status indicators to the right of the keyboard, and four on the front panel.

The power, media, Bluetooth and wireless communication status indicators are visible even when the LCD display is closed.
| Icon Function | Description | |
 | Caps Lock Lights up when | Caps Lock is activated. |
 | Num Lock Lights up when | Num Lock is activated. |
[Y7CB] | HDD activity Indicates when the hard disk or optical drive is active. | |
 | Battery indicator Lights up when the computer is on. | |
| [25AH] | Bluetooth Indicates the status of Bluetooth communication. | |
| [ACWS] | Wireless LAN Indicates the status of wireless LAN communication. | |
Easy-launch buttons
Located to the right of the keyboard are four buttons. These buttons are called easy-launch buttons. They are: mail, Web browser, Acer Empowering Key < and one user-programmable button.
Press to run Acer Empowering Technology. The mail and Web browser buttons are pre-set to email and Internet programs, but can be reset by users. To set the Web browser, mail and programmable buttons, run Acer Launch Manager.

| Easy-launch button | Default application |
| P User-programmable | |
| e | Acer Empowering Technology (user-programmable) |
| Internet browser (user-programmable) | |
| Mail Email application (user-programmable) | |
Trackpoint and click buttons
The built-in trackpoint is a pointing device that senses movement on its surface. This means the cursor responds as you use your finger to move the trackpoint. Its central location on the palmrest provides optimal comfort and support.

NOTE: If you are using an external USB mouse, you can press Fn-F7 to disable the touchpad.
Trackpoint basics
The following items show you how to use the trackpoint and click buttons:
Using your finger, apply light, steady pressure on the trackpoint (1) to move the cursor. Press the left (2) and right (3) buttons located below the keyboard to perform selection and execution functions. These two buttons are similar to the left and right buttons on a mouse.
Scrolling basics
The 3-way scroll wheel is enabled for tablet- and keyboard-mode use.
Use the scroll wheel (4) to scroll up or down on a page. A click on the scroll wheel executes the Enter function, similar to clicking the left click button or the left button of a mouse.
| Function | Left Button | Right Button | Scroll Wheel |
| Execute Quickly click twice Click on the job | wheel. | ||
| Select Click once | |||
| Drag Click and hold, then use finger on the trackpoint to drag the cursor. | |||
| Access context menu | Click once | ||
| Scroll Use finger to roll | scroll wheel lightly up or down in tablet or notebook mode. |
NOTE: When using these inputs, keep them - and your fingers - dry and clean. The scroll wheel is sensitive to finger movement; hence, the lighter the touch, the better the response. Tapping harder will not increase click button responsiveness.
Using the keyboard
Lock keys and embedded numeric keypad
The keyboard has full-sized keys with an embedded numeric keypad, as well as separate lock, cursor and Windows keys, and hotkey controls.
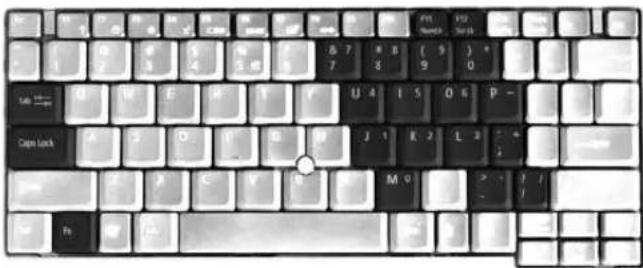
| Lock Key Description | |
| Caps Lock When | Caps Lock is on, all alphabetic characters typed are in uppercase. |
| Num Lock+ | When Num Lock is on, the embedded keypad is in numeric mode. The keys function as a calculator (complete with the arithmetic operators +, -, *, and /). Use this mode when you need to do a lot of numeric data entry. Another solution would be connect an external keypad. |
| Scroll Lock+ | When Scroll Lock is on, the screen moves one line up or down when you press the up or down arrow keys respectively. Scroll Lock does not work with some applications. |
The embedded numeric keypad functions like a desktop numeric keypad. It is indicated by small characters located on the upper right corner of the keycaps. To simplify the keyboard legend, cursor-control key symbols are not printed on the keys.
| Desired access Num | Lock on Num Lock off | |
| Number keys on embedded keypad | Type numbers in a normal manner. | |
| Cursor-control keys on embedded keypad | Holdwhile using cursor-control keys. | Holdwhile using cursor-control keys. |
| Main keyboard keys | Holdwhile typing letters on embedded keypad. | Type the letters in a normal manner. |
Windows Keys
The keyboard has two keys that perform Windows-specific functions.
| Key Icon Description | ||
Windows key Pressed alone, this  | key has the same effect as clicking on the Windows Start button; it launches the Start menu. It can also be used with other keys to provides a variety of functions: : Activates the next taskbar button : Activates the next taskbar button +: Opens the My Computer window. +: Opens the My Computer window. : Opens Help and Support Center. : Opens Help and Support Center. : Opens the Search Results window. : Opens the Search Results window. : Opens the Run dialog box. : Opens the Run dialog box. : Minimizes all windows.+ : Minimizes all windows.+  : Undoes the minimize all windows action. : Undoes the minimize all windows action. | |
| Application key |  | This key has the same effect as clicking the right mouse button; it opens the application's context menu. |
Hot Keys
The computer employs hotkeys or key combinations to access many computer controls, including screen brightness, volume output and the BIOS utility.
To activate hotkeys, press and hold the key before pressing the other key in the hotkey combination.

| Hot Key Icon Function Description | ||
| Hotkey help Displays help on hotkeys. | ||
| Acer eSettings Launches Acer eSettings in Acer Empowering Technology. | ||
| Acer ePower [2013] | Display the Power Options Properties used by the computer (function available if supported by operating system).See “Power management” on page 25. | |
| Hot Key | Icon | Function | Description |
| +Sleep Puts the computer in Sleep mode. [S4YD] | See “Power management” on page 25. | ||
| +Display toggle switches display output between external monitor (if connected) and both the display screen and external monitor. | en the display screen, external monitor (if connected) and both the display screen and external monitor. | ||
+Screen blank Turns the display screen backlight off to save power.  | Press any key to return. | ||
| +Touchpad toggle Turns the internal touchpad on and off. [47KB] | on and off. | ||
| +Speaker toggle Turns the speakers on and off. [IMAGE] | off. | ||
 |  | Volume up Increases the speaker volume. | |
 |  | Volume down Decreases the speaker volume. | |
| [245Z] |  | Brightness up Increases the screen brightness. | |
| [50HH] |  | Brightness down | Decreases the screen brightness |
Special keys
You can locate the Euro symbol and the US dollar sign at the upper-center and/or bottom-right of your keyboard.

The Euro symbol
- Open a text editor or word processor.
- Either press <€> at the bottom-right of the keyboard, or hold and then press the <5> key at the upper-center of the keyboard.
NOTE: Some fonts and software do not support the Euro symbol. Please refer to www.microsoft.com/ typography/faq/faq12.htm for more information.
The US dollar sign
- Open a text editor or word processor.
- Either press the <$> key at the bottom-right of the keyboard, or hold the <Fn> key and then press the <4> key at the upper-center of the keyboard.
NOTE: This function varies according to the language settings.
Acer Empowering Technology
Acer's innovative Empowering Technology makes it easy for you to access frequently used functions and manage your new Acer notebook. It features the following handy utilities:
☐ Acer eNet Management (for selected models) hooks up to location-based networks intelligently. ☐ Acer ePower Management extends battery power via versatile usage profiles. ☐ Acer ePresentation Management connects to a projector and adjusts display settings conveniently. ☐ Acer eDataSecurity Management (for selected models) protects data with passwords and advanced encryption algorithms. ☐ Acer eLock Management (for selected models) limits access to external storage media. ☐ Acer eRecovery Management backs up and recovers data flexibly, reliably and completely. ☐ Acer eSettings Management accesses system information and adjusts settings easily. ☐ Acer ePerformance Management improves system performance by optimizing disk space, memory and registry settings.

For more information, press the < > key to launch the Empowering Technology menu, then click on the appropriate utility and select the Help or Tutorial function.
Empowering Technology password
Before using Acer eLock Management and Acer eRecovery Management, you must initialize the Empowering Technology password. Right-click on the Empowering Technology toolbar and select "Password Setup" to do so. If you do not initialize the Empowering Technology password, you will be prompted to do so when running Acer eLock Management or Acer eRecovery Management for the first time.
Acer eNet Management (for selected models)
Acer eNet Management helps you to quickly and easily connect to both wired and wireless networks in a variety of locations. To access this utility, either click on the "Acer eNet Management" icon on your notebook, or start the program from the Start menu. You also have the option to set Acer eNet Management to start automatically when you boot up your PC.
Acer eNet Management automatically detects the best settings for a new location, while offering you the freedom to manually adjust the settings to match your needs.

Acer eNet Management can save network settings for a location to a profile, and automatically switch to the appropriate profile when you move from one location to another. Settings stored include network connection settings (IP and DNS settings, wireless AP details, etc.), as well as default printer settings.
Security and safety concerns mean that Acer eNet Management does not store username and password information.

Acer ePower Management

Acer ePower Management features a straightforward user interface. To launch it, select Acer ePower Management from the Empowering Technology interface.
AC Mode (Adapter mode)
The default setting is "Maximum Performance." You can adjust CPU speed, LCD brightness and other settings, or click on buttons to turn the following functions on/off: Wireless LAN, Bluetooth, CardBus, FireWire (1394), Wired LAN and Optical Device if supported.
DC Mode (Battery mode)
There are four pre-defined profiles - Entertainment, Presentation, Word Processing, and Battery Life. You can also define up to three of your own.
To create new power profile
- Change power settings as desired.
- Click "Save as..." to save to a new power profile.
- Name the newly created profile.
- Select whether this profile is for Adapter or Battery mode, then click OK.
- The new profile will appear in the profile list.
Battery status
For real-time battery life estimates based on current usage, refer to the panel on the lower left-hand side of the window.

For additional options, click "Settings" to:
Set alarms. ☐ Re-load factory defaults. ☐ Select what actions will be taken when the cover is closed or the power button is pressed. ☐ View information about Acer ePower Management.

Acer ePresentation Management

Acer ePresentation Management lets you project your computer's display to an external device or project using the hot key: Fn + F5. If auto-detection hardware is implemented in the system, your system display will be automatically switched out when an external display is connected to the system.

Acer eDataSecurity Management (for selected models)
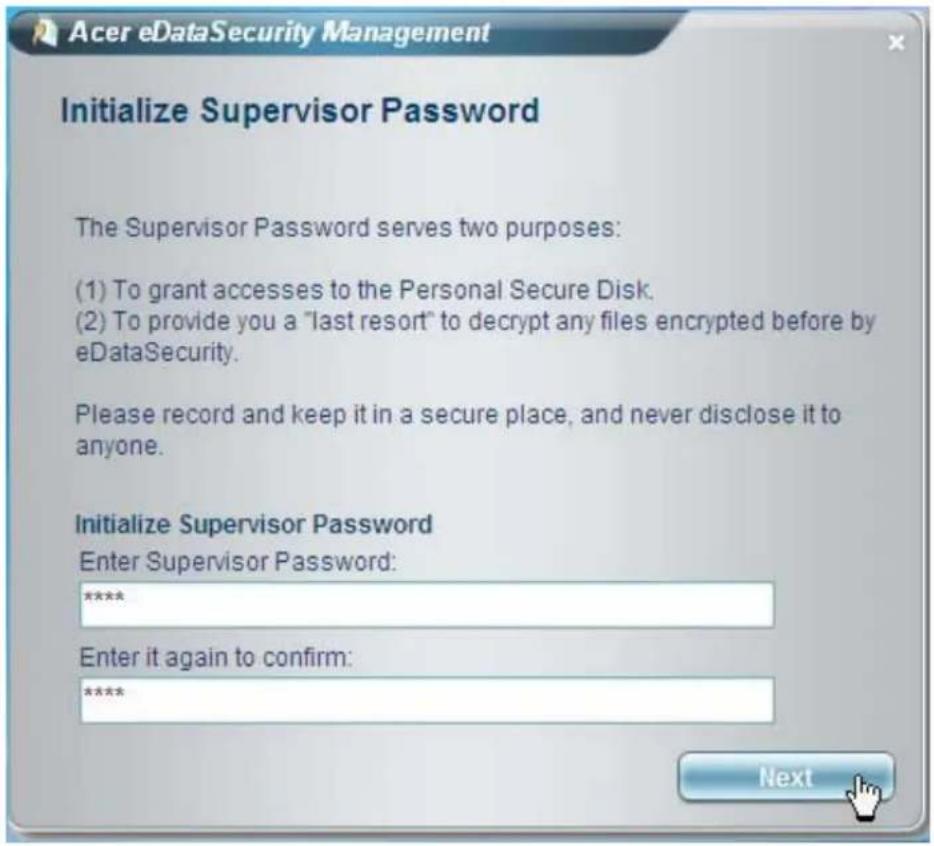
Acer eDataSecurity Management is a handy file encryption utility that protects your files from being accessed by unauthorized persons. It is conveniently integrated with Windows explorer as a shell extension for quick and easy data encryption/decryption and also supports on-the-fly file encryption for MSN Messenger and Microsoft Outlook.
The Acer eDataSecurity Management setup wizard will prompt you for a supervisor password and default encryption. This encryption will be used to encrypt files by default, or you can choose to enter your own file-specific password when encrypting a file.
NOTE: The password used to encrypt a file is the unique key that the system needs to decrypt it. If you lose the password, the supervisor password is the only other key capable of decrypting the file. If you lose both passwords, there will be no way to decrypt your encrypted file! Be sure to safeguard all related passwords!

Acer eLock Management

Acer eLock Management is a security utility that allows you to lock your removable data, optical and floppy drives to ensure that data can't be stolen while your notebook is unattended.
☐ Removable data devices - includes USB disk drives, USB pen drives, USB flash drives, USB MP3 drives, USB memory card readers, IEEE 1394 disk drives and any other removable disk drives that can be mounted as a file system when plugged into the system. ☐ Optical drive devices - includes any kind of CD-ROM or DVD-ROM drives. ☐ Floppy disk drives - 3.5-inch disks only. ☐ Interfaces - includes serial ports, parallel port, infrared (IR), and Bluetooth.
To activate Acer eLock Management, a password must be set first. Once set, you can apply locks to any of the devices. Lock(s) will immediately be set without any reboot necessary, and will remain locked after rebooting, until unlocked.
NOTE: If you lose your password, there is no method to reset it except by reformatting your notebook or taking your notebook to an Acer Customer Service Center. Be sure to remember or write down your password.

Acer eRecovery Management

Acer eRecovery Management is a powerful utility that does away with the need for recovery disks provided by the manufacturer. The Acer eRecovery Management utility occupies space in a hidden partition on your system's HDD. User-created backups are stored on D:\ drive. Acer eRecovery Management provides you with:
☐ Password protection. ☐ Recovery of applications and drivers. ☐ Image/data backup:
☐ Back up to HDD (set recovery point). ☐ Back up to CD/DVD.
☐ Image/data recovery tools:
☐ Recover from a hidden partition (factory defaults). ☐ Recover from the HDD (most recent user-defined recovery point). ☐ Recover from CD/DVD.

For more information, please refer to "Acer eRecovery Management"
NOTE: If your computer did not come with a Recovery CD or System CD, please use Acer eRecovery Management's "System backup to optical disk" feature to burn a backup image to CD or DVD. To ensure the best results when recovering your system using a CD or Acer eRecovery Management, detach all peripherals (except the external Acer ODD, if your computer has one), including your Acer ezDock.
Acer eSettings Management

Acer eSettings Management allows you to inspect hardware specifications and to monitor the system health status. Furthermore, Acer eSettings Management enables you to optimize your Windows operating system, so your computer runs faster, smoother and better.
Acer eSettings Management also:
☐ Provides a simple graphical user interface for navigating. ☐ Displays general system status and advanced monitoring for power users.

Acer ePerformance Management

Acer ePerformance Management is a system optimization tool that boosts the performance of your Acer notebook. It provides an express optimization method to release unused memory and disk space quickly. The user can also enable advanced options for full control over the following options:
☐ Memory optimization - releases unused memory and checks usage. ☐ Disk optimization - removes unneeded items and files. ☐ Speed optimization - improves the usability and performance of your Windows XP system.

Hardware Specifications and Configurations
Processor
| Item Specification | |
| CPU type | Intel®Core 2 Duo processor T5500/T5600 (2MB L2 cache, 1.66/1.83 GHz, 667 MHz FSB) and T7200/T7400 (4 MB L2 cache, 2/2.16 GHz, 667 MHz FSB)Intel®Core Duo processor T2300/T2400/T2500/T2600 (2MB L2 cache, 1.66/1.83/2/2.16 GHz, 667 MHz FSB) |
| CPU package Intel 479 pin Micro-FCBGA | |
| CPU core voltage Vcc-Core:1.2875V (highest frequency mode) to 0.8375V (low frequency mode)Vcc-Core: 0.75V (Deep sleep mode) | |
CPU Fan True Value Table
| Level | Fan Speed (rpm) | Temperature | Sound pressure level (dBA) | ||
| Average Left | Right | ||||
| BGN 0 0 15.0 14.9 | 15.0 | ||||
| Fan-off 0 0 17.0 16 | 6 17.3 | ||||
| Low 3380 50 28.5 | 26.1 30.9 | ||||
| Middle 3910 66 28 | 7 31.0 26.3 | ||||
| High 4510 78 38.0 | 35.8 40.2 | ||||
| Full | 4800 90 39.9 37.7 | 42.0 | |||
Performance Mode

• Level 0: Fan on = 50°C; Fan off = 45°C, Fan RPM = 3380 • Level 1: Fan on = 66°C; Fan off = 55°C, Fan RPM = 3910 • Level 2: Fan on = 78°C; Fan off = 70°C, Fan RPM = 4510 • Level 3: Fan on = 90°C; Fan off = 85°C, Fan RPM = 4800
Sound Pressure Level
Sound pressure level at different RPM
BIOS
Item Specification
BIOS vendor: Phoenix
BIOS version: V1.00
BIOS ROM type: Flash ROM (SST SST39VF080)
BIOS ROM size: 1 Mbyte
BIOS package: TSOP
Supported protocols: ACPI 1.0b, PC Card 95, SM BIOS 2.3, EPP/IEEE 1284, ECP/IEEE 1284
1.7 & 1.9, PCI 2.2, PnP 1.0a, DMI 2.0, PS/2 keyboard and mouse, USB
2.0, VGA BIOS, CD-ROM bootable, IEEE 1394
BIOS password control: Set by setup manual
Second Level Cache
Item Specification
Cache controller Built-in CPU
Cache size 2MB for Intel® Pentium® M processor
1MB for Intel® Celeron® M processor
1st level cache control Always enabled
2nd level cache control Always enabled
Cache scheme control Fixed in write-back
System Memory
Item Specification
Memory controller Built in Intel 945PM/GM
Memory size 0MB (no on-board memory)
DIMM socket number 2 sockets
Supports memory size per socket 256MB, 512MB, 1024MB
Supports maximum memory size 2GB (by two 1024MB DDRII RAM module)
Supports DIMM type soDIMM
Supports DIMM Speed 533/677 MHz
Supports DIMM voltage 1.8V and 0.9V
Supports DIMM package 200-pin soDIMM
Memory Combinations
| Slot 1 Slot 2 Total Memory | ||
| 0MB 256MB 256MB | ||
| 0MB 512MB 512MB | ||
| 0MB 1024MB 1024MB | ||
| 256MB 0MB 256MB | ||
| 256MB 256MB 512MB | ||
| 256MB 512MB 768MB | ||
| 256MB 1024MB 1280MB | ||
| 512MB 0MB 512MB | ||
| 512MB 256MB 768MB | ||
| 512MB 512MB 1024MB | ||
| 512MB 1024MB 1536MB | ||
| 1024MB 0MB 1024MB | ||
| 1024MB 256MB 1280MB | ||
| 1024MB 512MB 1536MB | ||
| 1024MB 1024MB 2048MB |
NOTE: Above table lists some system memory configurations. You may combine DIMMs with various capacities to form other combinations. On above table, the configuration of slot 1 and slot 2 could be reversed.
Modem Interface
| Item Specification | |
| Data modem data baud rate (bps) 56K | |
| Supports modem protocol V92 MDC | |
| Modem connector type RJ11 | |
| Modem connector location | Left side |
LAN Interface
| Item | Specification |
| Chipset | BroadCom BCM5787M/5789M |
| Supports LAN protocol | 10/100/1000 Mbps |
| LAN connector type | RJ45 |
| LAN connector location | Left side |
Bluetooth Interface
| Item Specification | |
| Chipset | Built-in ICH7M |
| Data throughput | 723 bps (full speed data rate) |
| Protocol | Bluetooth 1.1 (Upgradeable to Bluetooth 1.2 when SIG specification is ratified). |
| Interface | USB 1.1 |
| Connector type | Mini-USB |
Wireless Module 802.11a/b/g
| Item Specification | |
| Chipset Built-in ICH7M | |
| Data throughput 11~54 Mbps | |
| Protocol 802.11a+b+g or 802.11b+g | |
| Interface PCI bus |
Four-in-One Card Reader
| Item Specification | |
| Chipset Intetrated on TI PC7411 | |
| Data throughput USB 1.1 | |
| Protocol Memory Stick (MS), MS PRO, MultiMedia | Card, Secure Digital (SD) |
Hard Disk Drive Interface
| Item Specification | ||||
| Vendor & Model Name | HGST MORAGA+HTS541060G9AT00SEAGATE ST96812ALF MERCURYTOSHIBAMK6034GAX | HGST MORAGA+HTS541080G9AT00ROHS F/W:A60ASEAGATE ST98823ALF MERCURY 2TOSHIBAMK8032GAX | HGST MORAGA+HTS541010G9AT00SEAGATEST9100824ALFMERCURYTOSHIBAMK1032GAX | SEAGATEST9120821ATOSHIBAMK1234GAXWD WD1200UE |
| Capacity (GB) 60 80 100 120 | ||||
| Bytes per sector | 512 512 512 512 | |||
| Data heads 2 2/3 3/4 for Toshiba | 4 | |||
| Logical heads | 16 16 16 16 | |||
| Logical sectors | 63 63 63 63 | |||
| Drive Format | ||||
| Disks | 1 1/2 2/3 for Toshiba | 2 | ||
| Logical cylinders | 16383 | 16383 | 16383 | 16383 |
| Spindle speed (RPM) | 5400 RPM | 5400 RPM | 5400 RPM | 5400 RPM |
| Performance Specifications | ||||
| Buffer size | 2MB | 2MB | 8MB/2MB for Toshiba | 8MB |
| AT Interface | ATA/ATAPI-6ATA-5 for Toshiba | ATA/ATAPI-6ATA-5 for Toshiba | ATA/ATAPI-6ATA-5 for Toshiba | ATA/ATAPI-6 |
| Data transfer rate (buffer to/from media Mbytes/s) | 350 350 350/450 | 350 | ||
| Data transfer rate (host~buffer, Mbytes/s) | 100 MB/Sec.Ultra DMA mode-5 | 100 MB/Sec.Ultra DMA mode-5 | 100 MB/Sec.Ultra DMA mode-5 | 100 MB/Sec.Ultra DMA mode-5 |
| DC Power Requirements | ||||
Hard Disk Drive Interface
| Item Specification | ||||
| Voltage tolerance | 5V(DC) +/- 5% 5V(DC) | +/- 5% 5V(DC) +/- 5% 5V(DC) +/- 5% | ||
DVD/CDRW Interface
| Item Specification | ||
| Vendor & model name LITEON | SSC-2485K,GBASPANASONIC UJDA-770, GBASE | |
| Performance Specification With | CD Diskette With DVD Diskette | |
| Transfer rate (KB/sec) Sustained: | Max 3.6Mbytes/sec | Sustained:Max 10.8Mbytes/sec |
| Data Buffer Capacity 128 KBytes | ||
| Interface IDE/ATAPI (ATA/ATAPI-5) | ||
| Applicable disc format (for SONY) | For Panasonic UJDA770:CD: CD-DA, CD-ROM, CD-R, CD-RW, CD-ROM XA, Photo CD (Multi session), Video CD, CD-Extra (CD+), CD-textDVD:DVD-ROM, DVD-Video, DVD-RAM (2.6GB/4.7GB), DVD-R, DVD-RW (ver. 1.1) (Supporting Multi Border) DVD+R,DVD+RW (Supporting Multi Session) | |
| Applicable disc format (for QSI) | DVD: DVD-ROM (DVD-5, DVD-9, DVD-10, DVD-18), DVD-R,DVD-RW, DVD+R, DVD+RW, DVD-RAM (optional)CD: CD-DA, CD-ROM/XA, CD-i, Karaoke CD, Video CD, Multi-session Photo CD, Enhanced CD, itrax CD, CD extra, CD Plus, CD-Text, CD-R and CD-RW discs | |
| Loading mechanism Load: Manual | Release: (a) Electrical Release (Release Button)(b) Release by ATAPI command(c) Emergency Release | |
| Power Requirement | ||
| Input Voltage 5 V +/- 5 % (Operating) | ||
DVD Super Multi Interface
| Item Specification | ||
| Vendor & model name PANASOCNIC UJ-85J | ||
| Performance Specification With | CD Diskette With DVD Diskette | |
| Transfer rate (KB/sec) Sustained:Max 3.6Mbytes/sec | Sustained:Max 10.8Mbytes/sec | |
| Data Buffer Capacity 128 KBytes | ||
| ATAPI Interface SFF-8020i, SFF8090 Ver5 | ||
| Applicable disc format Applicable disc formatCD: CD-DA, CD-ROM, CD-ROM XA, PhotoCD (multi-session), Video CD, Cd-Extra (CD+), CD-textDVD: DVD-VIDEO, DVD-ROM, DVD-R (3.9GB, 4.7GB) DVD-R DL, DVD-RW, DVD-RAM, DVD+R, DVD+R DL, DVD+RW | ||
| Loading mechanism Load: ManualRelease: (a) Electrical Release (Release Button)(b) Release by ATAPI command(c) Emergency Release | ||
| Power Requirement | ||
| Input Voltage 5 V +/- 5 % (Operating) | ||
Speaker
| Item Specification | |
| Number of speaker 1 | |
| Rated input 1W | |
| Connector type Headphone out, microphone in and line-in | |
Video Interface
| Item Specification | |
| Chipset | Intel 945GM (UMA) or Nvidia NV72MV (NVIDIA® GeForceTM Go 7300) |
| Interface PCI-E | |
| Supports ZV (Zoomed Video) port No | |
| Maximum resolution LCD 1600X1200 (UXGA) | |
| Maximum resolution CRT 2048X1536@75HZ |
Audio Interface
| Item Specification | |
| Audio Controller Realtek ALC883 Azalia and Amplifier Maxim MAX9710 (for internal speaker) & MAX4411 (for headphone) | |
| Audio onboard or optional Built-in | |
| Mono or Stereo Stereo | |
| Resolution 18 bit stereo full duplex | |
| Compatibility HD audio Interface; S/PDIF output for PCM or AC-3 content | |
| Sampling rate | 1Hz resolution VSR (Variable Sampling Rate) |
| Internal microphone | Yes |
| Internal speaker / Quantity | Yes/2 (1.5W speakers) |
Video Memory
| Item Specification | |
| Fixed or Upgradeable | Fixed for UMAUpgradeable for NVIDIA NV44M-V (NVIDIA GeForce TM Go 6200) |
| Vendor | Intel/NVIDIA |
| Memory size | UMA: up to 224MB (of system shared memory)NVIDIA: up to 256MB turbocache(128 MB of dedicated GDDR2 VRAM, up to 128 MB of shared system meory) |
| Interface PCI-E |
USB Port
| Item Specification | |
| Chipset | built-in ICH7-M |
| USB Compliancy Level | 2.0 |
| EHCI | USB 2.0 (supporting data transfer rate up to 60MB per second) |
| Number of USB port | 3 |
| Location | Right side |
USB Port
| Item Specification | |
| Serial port function control Enable/Disable by BIOS | Setup |
IEEE 1394 Port
| Item Specification | |
| Chipset TI 7411 | |
| InterfaceUSB Compliancy Level IEEE 1394 1.0 | |
| Number of IEEE 1394 port 1 | |
| Location | Right side |
| Connector type IEEE 1394 |
PCMCIA Port
| Item Specification | |
| PCMCIA controller TI PC7411 | |
| Supports card type Type-II | |
| Number of slots One type-II | |
| Access location Left panel | |
| Supports ZV (Zoomed Video) port No ZV support | |
| Supports 32 bit CardBus Yes (IRQ10) |
System Board Major Chips
| Item | Controller |
| Core logic | Intel® 945GM/PM+ ICH7-M |
| VGA | Intel® 945GM (UMA)NVIDIA® NV72MV (NVIDIA® GeForceTM Go 7300) |
| LAN | Broad Com 5787M/5789M |
| IEEE 1394 | TI PC7411 |
| USB 2.0 | ICH7-M intergrated |
| Super I/O controller | PC 87391 |
| MODEM | Conexant MC3Z MDC1.5_Azalia |
| Blue tooth | FOX_BRM_2.0 |
| Wireless 802.11 b | Intel 3945abg/Intel 3945bg |
| PCMCIA | TI PC7411 |
| Audio | Codec: Realtek ALC883 |
| Four-in-one card reader | TI PC7411 |
| Trackpoint | EC NCD97551 |
Keyboard
| Item Specification | |
| Keyboard controller | EC NSC97551 |
| Keyboard vendor & model name | DARFON |
| Total number of keypads | 84/85/88 |
| Windows logo key | Yes |
Keyboard
| Item | Specification |
| Internal & external keyboard work simultaneously | NoNote: Internal and external keyboard can not work simultaneously by software specification. |
Battery
| Item Specification | |
| Vendor & model name Sanyo | Sony |
| Battery Type Li-ion | |
| Pack capacity 4000 MAH or 4800 MAH | |
| Cell voltage 3.7V/cell | |
| Number of battery cell 6 | |
| Package configuration 3 cells in series, 2 series in parallel | |
| Package voltage 14.8V | |
LCD
| Item Specification | |
| Vendor & model name | 12.1XGA TABLET HYDIS HT12X21 |
| Mechanical Specifications | |
| LCD display area (diagonal, inch) | 12.1 |
| Display technology TFT | |
| Resolution XGA (1024x768) | |
| Supports colors 262K | |
| Optical Specification | |
| Brightness control keyboard hotkey | |
| Contrast control | No |
| Typical White Luminance | 180 |
| Contrast ratio | 450 |
| Response time (msec) | 40 (Tr+Td) |
| Electrical Specification | |
| Supply voltage for LCD display (V) | 3.0 (Min.), 3.3 (Typ.), 3.6 (Max.) |
| Viewing Angle Range | 80 (left/right/down/up) |
AC Adaptor
| Item | Specification |
| Model number | LiteOn PA-1650 19V 65W (3 PIN) |
| AC input | 90~264V, 47Hz to 63Hz |
| Output power | 65W, 19V@3.42V |
System Power Management
| ACPI mode Power Management | |
| Mech. Off (G3) All devices in the system are turned off completely. | |
| Soft Off (G2/S5) OS initiated shutdown. All devices in the system are turned off completely. | |
| Working (G0/S0) Individual devices such as the CPU and hard disk may be power managed in this state. | |
| Suspend to RAM (S3) CPU set power down | VGA SuspendPCMCIA Suspend |
Memory Address Map
| Memory Address Size Function | |
| 00100000h-000F0000h 512 KB System BIOS | |
| 000CFFFFh-000C0000h VGA BIOS | |
| 00009FFFFh-00000000h 640KB Conventional memory |
I/O Address Map
| I/O Address | Function |
| 0000-001F, 0081-008F, 0090-0091, 0093-009F, 00C0-00DF, 040B, 04D6 | DMA controller |
| 0D00-FFFF | PCI bus |
| 0020-0021, 0024-0025, 0028-0029, 002C-002D, 0030-0031, 0034-0035, 0038-0039, 003C-003D, 00A0-00A1, 00A4-00A5, 00A8-00A9, 00AC-00AD, 00B0-00B1, 00B4-00B5, 00B8-00B9, 00BC-00BD, 00C0-00DF | Programmable interrupt controller |
| 0040-0043, 0050-0053 | System timer |
| 0060, 0064 | Acer Tablet PC Keyboard Buttons (101/102 key) |
| 002E-002F, 004E-004F, 0061, 0063, 0065, 0067, 0080, 0092, 00B2-00B3, 0200-020F, 0600-060F, 0700-070F, 0800-080F, 1000-107F, 1180-11BF, | Main board resources |
| 0066 | Microsoft ACPI-Compliant Embedded Controller |
| 0070-0077 | System CMOS/real time clock |
| 00F0 | Numeric data processor |
| 0170-0177, 0376 | Secondary IDE Channel |
| 01F0-01F7, 03F6 | Primary IDE Channel |
| 0274-0277, 0279, 0A79, | ISAPNP Read Data Port |
| 0378-037F, 0778-077B | Printer Port (LPT1) |
| 03B0-03BB, 03C0-03DF, 1800-1807, | Intel (R) 82852/82855 GM/GME Graphics Controller |
| 06F8-06FF | Wacom Serial Pen Tablet |
| 1810-181F | Intel (R) 82801DBM Ultra ATA Storage Controller-24CA |
| 1820-183F | Intel (R) 82801DB/DBM USB Universal Host Controller-24C2 |
| 1840-185F | Intel (R) 82801DB/DBM USB Universal Host Controller-24C4 |
| 1860-187F | Intel (R) 82801DB/DBM USB Universal Host Controller-24C7 |
| 1880-189F | Intel (R) 82801DB/DBM SMBus Controller-24C3 |
I/O Address Map
| I/O Address Function | |
| 18C0-18FF, 1C00-1CFF Crystal WDM AC97 Driver for ICH4 | |
| 2000-207F, 2400-24FF Agere System AC97 Modem | |
| FB00-FBFE O2Micro SmartCardBus Reader | |
| FC00-FCFF, FD00-FDFF, FE00-FEFF, FF00-FFFF | Generic Cardbus Controller |
IRQ Assignment Map
| Interrupt Channel System timer | |
| IRQ00 System time | |
| IRQ01 Keyboard | |
| IRQ02 Programmable Interrupt Controller | |
| IRQ03 FIR | |
| IRQ04 Communications Port (COM1) | |
| IRQ05 Free | |
| IRQ06 Wacom Serial Pen Tablet/Standard Floppy Disk Controller | |
| IRQ07 ECP Printer Port (LPT1)/O2Micro Smart CardBus Reader | |
| IRQ08 Real Time Clock | |
| IRQ09 SCI | |
| IRQ10 PCI Device (LAN, Audio, Modem...) | |
| IRQ11 USB 1.1, USB 2.0, VGA | |
| IRQ12 PS/2 Mouse | |
| IRQ13 Numeric data processor | |
| IRQ14 1st EIDE device (hard disk) | |
| IRQ15 2nd EIDE device (optical drive) | |
DMA Channel Assignment
| Item Specification | |
| 00 PnP Audio System CODEC | |
| 01 Free | |
| 02 Standard Floppy Disck Controller | |
| 03 ECP Printer Port |
System Utilities
BIOS Setup Utility
The BIOS Setup Utility is a hardware configuration program built into your computer's BIOS (Basic Input/Output System).
Your computer is already properly configured and optimized, and you do not need to run this utility. However, if you encounter configuration problems, you may need to run Setup. Please also refer to Chapter 4 Troubleshooting when problem arises.
To activate the BIOS Utility, press F2 during POST (when "Press to enter Setup" message is prompted on the bottom of screen).
Press F2 to enter setup. Press F12 during POST to enter multi-boot menu. In this menu, user can change boot device without entering BIOS SETUP Utility.
Navigating the BIOS Utility
There are six menu options: Information, Main, Advanced, Security, Boot, and Exit.
Follow these instructions:
To choose a menu, use the cursor left/right keys (←→). To choose a parameter, use the cursor up/down keys (↑↓). To change the value of a parameter, press + or -. A plus sign (+) indicates the item has sub-items. Press ENTER to expand this item. Press ESC while you are in any of the menu options to go to the Exit menu. In any menu, you can load default settings by pressing F9. You can also press F6 to save any changes made and exit the BIOS Setup Utility.
NOTE: You can change the value of a parameter if it is enclosed in square brackets. Navigation keys for a particular menu are shown on the bottom of the screen. Help for parameters is found in the Item Specific Help part of the screen. Read this carefully when making changes to parameter values.
This menu provides you with information about the system.
Information
| Parameter Description | |
| IDE1 Model Name Shows the | Model name of HDD installed on Primary IDE master. The hard disk model name is automatically detected by the system. If there is no hard disk present or unknown type, “None” should be shown on this field. |
| IDE1 Serial # This field display | the Serial number of HDD installed on Primary IDE master. If no Hard disk or other devices are installed on Primary IDE master, then it will display a blank line. |
| IDE2 Model Name | This item will show the Model name of device installed on Secondary IDE master. The hard disk or CD-ROM model name is automatically detected by the system. If there is no hard disk or CD-ROM present or unknown type, “None” should be shown on this field. |
| IDE2 Serial # This item will show | show the Serial number of HDD installed on Secondary IDE master. If no hard disk or other devices are installed on Primary IDE master, then it will display a blank line. |
| Serial Number This field displays | the serial number of this unit. |
| UUID Number UUID=32bytes | |
Main
The Main screen displays a summary of your computer hardware information, and also includes basic setup parameters. It allows the user to specify standard IBM PC AT system parameters.
NOTE: The screen above is for reference only. Actual values may differ.
The table below describes the parameters in this screen. Settings in boldface are the default and suggested parameter settings.
| Parameter Description | Format/Option | |
| System Time Sets the system | time. Format: HH:MM:SS | (hour:minute:second) System Time |
| System Date Sets the system | date. Format MM/DD/YYYY (month/day/ | year)System Date |
| System Memory This field reports the memory size of the system.Memory size is fixed to 640MB | ||
| Extended Memory This field reports the memory size of the extended memory in the system.Extended Memory size=Total memory size-1MB | ||
| VGA Memory Shows the VGA | memory size. The default value is set to 8MB.Note: 8MB is VGA memory size under DOS mode. Dynamic video memory allocation up to 64MB in Windows mode. | |
| Quiet Boot Determines if Customer Logo will be displayed or not; shows Summary Screen is disabled or enabled.Enabled: Customer Logo is displayed, and Summary Screen is disabled.Disabled: Customer Logo is not displayed, and Summary Screen is enabled. | Option:Enabledor Disabled | |
| Power on display Auto: During | power process, the system will detect if any display device is connected on external video port. If any external display device is connected, the power on display will be in CRT (or projector) only mode. Otherwise it will be in LCD only mode.Both: Simultaneously enable both the integrated LCD screen and the system's external video port (for an external CRT or projector). | Option:Autoor Both |
| LCD Auto Dim | Determines if the system will automatically dim the LCD brightness in order to save power when AC is not present. | Option:Enabledor Disabled |
| PXE (Preboot Execution Environment) Boot From LAN | Indicates that whether the notebook can boot from LAN or not. | Option:Enabledor Disabled |
| F12 Boot Menu | Determines if the OEM POST screen will have “PressChange Boot Device” or not during user's quite boot. | Option:Enabledor Disabled |
NOTE: The sub-items under each device will not be shown if the device control is set to disable or auto. This is because the user is not allowed to control the settings in these cases.
Advanced
The Advanced menu screen contains parameters involving your hardware devices. It also provides advanced settings of the system.
| PhoenixBIOS Setup Utility | |||||
| Information | Main | Advanced | Security | Boot | Exit |
| Infrared/Serial port: [Disabled] | Item Specific Help | ||||
| F1 Help ↑↓ Select Item F5/F6 Change Values F9 Setup DefaultsEsc Exit ↔ Select Menu Enter Select ▶ Sub-Menu F10 Save and Exit | |||||
The table below describes the parameters in the screen. Settings in boldface are the default and suggested parameter settings.
| Parameter Description | Options | |
| Infrared/Serial port Enables, | disables the infrared/serial port. | Enabled/Disabled |
Security
The Security screen contains parameters that help safeguard and protect your computer from unauthorized use.
| PhoenixBIOS Setup Utility | |||||
| Information | Main | Advanced | Security | Boot | Exit |
| User Password is Clear | Item Specific Help | ||||
| Supervisor Password is Clear | Supervisor Password controls accesses of the whole setup utility. It can be used to boot up when Password on boot is enabled. | ||||
| Set User Password | [Enter] | ||||
| Set Supervisor Password | [Enter] | ||||
| Password on boot: | [Enabled] | ||||
The table below describes the parameters in this screen. Settings in boldface are the default and suggested parameter settings.
| Parameter Description Option | ||
| User Password is Shows the setting of the user password. | Clear or Set | |
| Supervisor Password is Shows the setting of the Supervisor password | Clear or Set | |
| Set User Password Press Enter to set the user password. When set, this password protects the BIOS Setup Utility from unauthorized access. | ||
| Set Supervisor Password Press | Enter to set the supervisor password.When set, this password protects the BIOS Setup Utility from unauthorized access. | |
| Password on Boot Defines whether a password is required or not while the events defined in this group happened. The following sub-options are all requires the Supervisor password for changes and should be grayed out if the user password was used to enter setup. | Disabled or Enabled | |
NOTE: When you are prompted to enter a password, you have three tries before the system halts. Don't forget your password. If you forget your password, you may have to return your notebook computer to your dealer to reset it.
Setting a Password
Follow these steps as you set the user or the supervisor password:
- Use the ↑ and ↓ keys to highlight the Set Supervisor Password parameter and press the ENTER key. The Set Supervisor Password box appears:
Set Supervisor Password
Enter New Password [ ]
Confirm New Password [ ]
- Type a password in the "Enter New Password" field. The password length cannot exceed 8 alphanumeric characters (A-Z, a-z, 0-9, not case sensitive). Retype the password in the "Confirm New Password" field.
IMPORTANT: Be very careful when typing your password because the characters do not appear on the screen.
- Press ENTER.
After setting the password, the computer sets the User Password parameter to "Set".
- If desired, you can opt to enable the Password on boot parameter.
- When you are done, press ☐ to save the changes and exit the BIOS Setup Utility.
Removing a Password
Follow these steps:
- Use the [F] and [I] keys to highlight the Set Supervisor Password parameter and press the [m-n] key. The Set Password box appears:
Set Supervisor Password
Enter current password [ ]
Enter New Password [ ]
Confirm New Password [ ]
- Type the current password in the Enter Current Password field and press ENTER.
- Press ENTER twice without typing anything in the Enter New Password and Confirm New Password fields. The computer then sets the Supervisor Password parameter to "Clear".
- When you have changed the settings, press ☑ to save the changes and exit the BIOS Setup Utility.
Changing a Password
- Use the [↑] and [↓] keys to highlight the Set Supervisor Password parameter and press the [nC] key. The Set Password box appears:
Set Supervisor Password
Enter current password [ ]
Enter New Password [ ]
Confirm New Password [ ]
- Type the current password in the Enter Current Password field and press ENTER.
- Type a password in the Enter New Password field. Retype the password in the Confirm New Password field.
- Press ENTER. After setting the password, the computer sets the User Password parameter to "Set".
- If desired, you can enable the Password on boot parameter.
- When you are done, press ☑ to save the changes and exit the BIOS Setup Utility.
If the verification is OK, the screen will display as following.
Setup Notice
Changes have been saved.
[ continue]
The password setting is complete after the user presses [F10].
If the current password entered does not match the actual current password, the screen will show you the Setup Warning.
Setup Warning
Invalid password
Re-enter Password
[ continue]
If the new password and confirm new password strings do not match, the screen will display the following message.
Setup Warning
Password do not match
Re-enter Password
Boot
This menu allows the user to decide the order of boot devices to load the operating system. Bootable devices include the diskette drive in module bay, the onboard hard disk drive and the CD-ROM in module bay.
| PhoenixBIOS Setup Utility | |||||
| Information | Main | Advanced | Security | Boot | Exit |
| Hard DriveRemovable DeviceCD-ROM Drive | Item Specific Help | ||||
| Keys used to view or configure devices:expnads or Collapses Devices with a + or -expnads all enables or disables a device. <+> and <-> moves the device up or down.May move removable device between Hard Disk or Removable Disk.Remove a device that is not installed. | |||||
| F1 Help ↑↓ Select Item F5/F6 Change Values F9 Setup DefaultsEsc Exit ←→ Select Menu Enter Select ▶ Sub-Menu F10 Save and Exit | |||||
Exit
The Exit screen contains parameters that help safeguard and protect your computer from unauthorized use.
| PhoenixBIOS Setup Utility | |||||
| Information | Main | Advanced | Security | Boot | Exit |
| Exit Saving ChangesExit Discarding ChangesLoad Setup DefaultsDiscard ChangesSave Changes | Item Specific Help | ||||
| Exit System Setup and save your changes to CMOS. | |||||
| F1 Help ↑↓ Select Item F5/F6 Change Values F9 Setup DefaultsEsc Exit ←→ Select Menu Enter Select ▶ Sub-Menu F10 Save and Exit | |||||
The table below describes the parameters in this screen.
| Parameter Description | |
| Exit Saving Changes Exit System Setup and save your changes to CMOS. | |
| Exit Discarding Changes Exit utility without saving setup data to CMOS. | |
| Load Setup Default Load default values for all SETUP item. | |
| Discard Changes Load previous values from CMOS for all SETUP items. | |
| Save Changes Save Setup Data to CMOS. |
BIOS Flash Utility
The BIOS flash memory update is required for the following conditions:
□ New versions of system programs □ New features or options ☐ Restore a BIOS when it becomes corrupted.
Use the Phlash utility to update the system BIOS flash ROM.
NOTE: If you do not have a crisis recovery diskette at hand, then you should create a Crisis Recovery Diskette before you use the Phlash utility.
NOTE: Do not install memory-related drivers (XMS, EMS, DPMI) when you use the Phlash.
NOTE: Please use the AC adaptor power supply when you run the Phlash utility. If the battery pack does not contain enough power to finish BIOS flash, you may not boot the system because the BIOS is not completely loaded.
Follow the steps below to run the Phlash.
- Prepare a bootable diskette.
- Copy the Phlash utilities to the bootable diskette.
- Then boot the system from the bootable diskette. The Phlash utility has auto-execution function.
Remove HDD/BIOS Utility
This section provides you with removing HDD/BIOS method:
Remove HDD Password:
☐ If you key in wrong HDD password for three times, "HDD password error code" would display on the screen. See the image below.
![HDD password error code [15494]](/content/2026/05/857506/images/96c405a34d738bb531202bf6c761edc81ce266b6c159374c2f098bc2c43b4cfe.jpg)
☐ If you need to solve HDD password locked problem, you can run HDD_PW.EXE
- Key in "hdd_pw 15494 0"
- Select "2"
- Choose one upper-case string
![C:\WINDOWS\system32\cmd.exe F:\>cd password F:\password>dir/w Volume in drive F has no label. Volume Serial Number is D4F6-0236 Directory of F:\password [.] [..] BIOS_PW.EXE HDD_PW.EXE 2 File(s) 35,354 bytes 1. 2 Dir(s) 487,895,040 bytes free F:\password>hdd_pw 15494 0 unlock6.exe v1.1 2 May 2003 Ch…](/content/2026/05/857506/images/404dad5e6d2a8f8180dee7de572c7403d56286f1f73df228ccfd5fb1316fef49.jpg)
☐ Reboot system and key in "0KJFN42" or "UVEIQ96" to HDD user password.
![Enter Primary Master HDD User Password [ ]](/content/2026/05/857506/images/0ac6dac075b3b02ddf80c9f3c338ae5d13892a38d6e73499ee422d36d7d3e007.jpg)
Remove BIOS Password:
☐ If you key in wrong Supervisor Password for three time, "System Disabled" would display on the screen. See the image below.
![System Disabled [14452]](/content/2026/05/857506/images/969f287b6d6862a66370623a35d945b7a7e00eeafe040405d1a41db3563b765c.jpg)
☐ If you need to solve BIOS password locked problem, you can run BIOS_PW.EXE
- Key in "bios_pw 14452 0"
- Choose one upper-case string
![C:\WINDOWS\system32\cmd.exe Microsoft Windows XP [Version 5.1.2600] (C) Copyright 1985-2001 Microsoft Corp. C:\Documents and Settings\M54>d: D:\>bios_pw 14452 0 1. unlockb.exe v1.0 1 July 1997 qjjg9vy 0?yqmjd cjl14tm 6mbzjaj 2. D:\>](/content/2026/05/857506/images/0ec354c29dd6ca91baa49abdc5416972b0712c550ad339bb81833c87cb50e402.jpg)
☐ Reboot the system and key in "qjjg9vy" or "07yqmjd" to BIOS user password.

Machine Disassembly and Replacement
This chapter contains step-by-step procedures on how to disassemble the notebook computer for maintenance and troubleshooting.
To disassemble the computer, you need the following tools:
□ Wrist grounding strap and conductive mat for preventing electrostatic discharge □ Philips screw drivers ☐ Flat head screwdriver
NOTE: The screws for the different components vary in size. During the disassembly process, group the screws with the corresponding components to avoid mismatch when putting back the components. When you remove the middle cover, please be careful not to scrape the cover.
General Information
Before You Begin
Before proceeding with the disassembly procedure, make sure that you do the following:
- Turn off the power to the system and all peripherals.
- Unplug the AC adapter and all power and signal cables from the system.
- Remove the battery pack.
NOTE: TravelMate C210 series product uses tape to fasten the antenna/cable, you may need to tear the tape before you remove the antenna.
NOTE: The disassembly is based on an engineering sample, therefore, the number of the screws and the color of the system may differ from a finish-good unit.
Disassembly Procedure Flowchart
The flowchart on the succeeding page gives you a graphic representation on the entire disassembly sequence and instructs you on the components that need to be removed during servicing. For example, if you want to remove the system board, you must first remove the then disassemble the inside assembly frame in that order.
![graph TD A["Start"] --> B["Battery"] B --> C["HDD Cover"] B --> D["ODD Module DIMM Cover"] B --> E["Keyboard"] B --> F["*1 *2"] B --> G["Mini PCI Cover"] B --> H["Wireless LAN Card"] C --> I["HDD Module"] I --> J["HDD Holder HDD Drive"] J --> K["Optical Drive"] J --> L["Optical Device Board"] J -->…](/content/2026/05/857506/images/cd6af439b6eebb5bbfaf2e45c9a794515494830ae459428c91a94abc33413c4a.jpg)
Removing the Battery Pack
- Release the battery lock.
- Slide the battery latch then remove the battery.

Removing the HDD Module/ODD Module/Memory/Wireless LAN Card/LCD Module and the Keyboard
Removing the Hard Disk Drive Module
- Remove the two screws fastening the HDD cover.
- Detach the HDD cover from the notebook.
- Pull out the hard disk drive then detach it from the main unit.


Removing the Optical Disk Drive Module
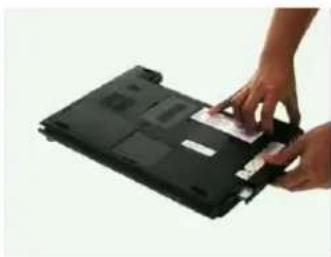
- Slide the ODD latch then remove the ODD module from the main unit carefully.
Removing the Memory
- Remove the two screws that fasten the DIMM door.
- Detach the DIMM door.
- Pop out the memory then remove it.


Removing the Wireless LAN Card
- Remove the two screws holding the wireless LAN cover.
- Detach the wireless cover.

- Disconnect wireless main and auxiliary antenna.
- Pop out the wireless LAN card then remove it.

Removing the LCD Module
- Remove two screws holding the left and the right hinge cover.
- Remove the right hinge cover.
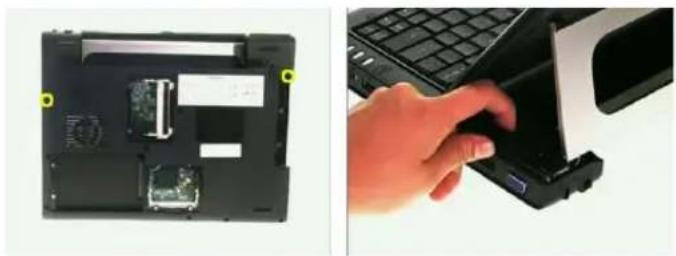
- Remove the left hinge cover.
- Turn over the entire LCD module as shown.
- Disconnect the six screws fastening the middle cover.

- Detach the middle cover carefully.
- Then disconnect the LCD cable.

- Disconnect the wireless LAN antenna.
- Remove the four screws fastening the LCD module to the main unit.
- Detach the LCD module from the main unit.


Removing the Keyboard
- Remove the screw fastening the keyboard on the bottom.
- Disconnect the trackpoint cable.
- Disconnect the keyboard cable then remove the keyobar.


Disassembling the Main Unit
Separating the Main Unit into the Upper Case and the Lower Case Assembly
- Remove the 11 screws fastening the upper case and the lower case assembly.
- Then remove the 10 screws holding the upper case and the lower case assembly on the bottom side.
- Disconnect the launch board FFC.


- Disconnect the joystick board FFC as shown.
- Disconnect the bluetooth cable from the main board as shown.
- Tear off the capton fastening the wireless LAN antenna set, then pull out the wireless LAN antenna set.


- Detach the upper case assembly carefully.
- Disconnect the dynamic board cable from the main board, then remove it.
- Remove the two screws fastening the dynamic board, then detach the dynamic board from the main board.


- Disconnect the speaker cable from the main board.
- Detach the main board assembly from the lower case carefully.

Disassembling the Upper Case, the Lower Case, and the Main Board Assembly
- Remove the speaker from the lower case.
- Remove the three screws fastening the launch board.
- Then detach the launch board from the lower case.


- Disconnect the launch board FFC.
- Remove the two screws fastening the joystick board.
- Remove the joystick board assembly from the lower case.


- Disconnect the joystick board FFC.
- Remove the two screws fastening the Bluetooth module.
- Remove the Bluetooth module from the lower case carefully.


- Disconnect the Bluetooth cable from the Bluetooth module.
- Remove the eight screws fastening the thermal module.
- Detach the thermal module from the main board and disconnect the fan cable then remove the thermal module.

- Use a flat-headed screwdriver to release the CPU lock.
- Remove the CPU from the socket carefully.
- Remove the three screws fastening the PCMCIA slot.

- Detach the PCMCIA slot from the main board.
- Remove the two screws fastening the modem board.
- Disconnect the modem board from the main board and disconnect the modem board cable, then remove the board.

Disassembling the LCD Module
- Remove the four LCD screw caps.
- Then remove the six screws fastening the LCD bezel.
- Remove one screw holding the LCD support on one side.


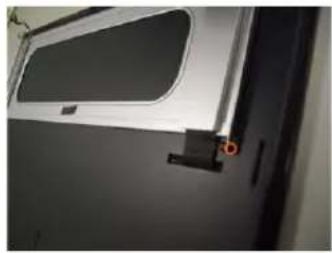
- Remove another screw holding the LCD support on the other side as shown.
- Open the cover as shown.
- Open the other cover protecting the antenna set as shown, then remove the LCD support.


- Detach the LCD bezel from the LCD module carefully.
- Remove the four screws fastening the LCD assembly.
- Remove the two screws fastening the finger board.


- Turn over the finger board and disconnect the cable, then remove the finger board.
- Remove the two screws fastening the power board.
- Lift the LCD as shown to take out the power board.


- Turn over the power board and disconnect the cable, then remove the board.
- Remove the two screws fastening the launch board.
- Disconnect the launch board cable, then remove the launch board.


- Disconnect the inverter cable, then remove the inverter.
- Take out the LCD assembly from the LCD panel (the LCD support has been removed in steps 3 to 6).
- Disconnect the LCD cable from the LCD, then remove the cable.


- Remove the three screws fastening the digitizer.
- Then detach the digitizer as shown.


Disassembling the External Modules
Disassembling the HDD Module
- Remove two screws fastening the HDD bracket on one side.
- Remove another two screws holding the HDD bracket on another side.
- Then remove the last screws fastening the HDD bracket.

- Detach the HDD from the HDD bracket carefully.
- Disconnect the HDD connector as shown.

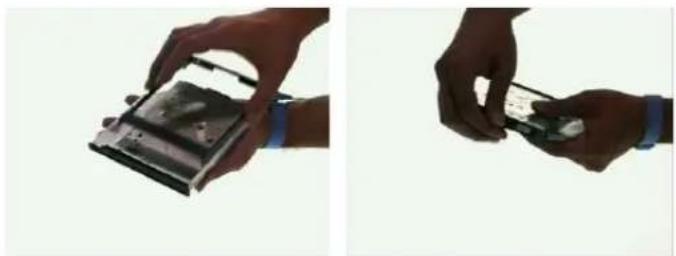
Disassembling the Optical Disc Drive Module
- Remove two screws fastening the ODD holder on one side.
- Remove another two screws holding the ODD holder on its rear side.
- Then remove the last screws fastening the ODD holder.

- Remove the ODD holder from the ODD.
- Disconnect the ODD connector from the ODD.
Troubleshooting
Use the following procedure as a guide for computer problems.
NOTE: The diagnostic tests are intended to test this model. Non-Acer products, prototype cards, or modified options can give false errors and invalid system responses.
- Duplicate symptom and obtain the failing symptoms in as much detail as possible.
- Distinguish symptom. Verify the symptoms by attempting to re-create the failure by running the diagnostic test or by repeating the same operation.
- Disassemble and assemble the unit without any power sources.
- If any problem occurs, you can perform visual inspection before you follow this chapter's instructions. You can check the following:
power cords are properly connected and secured; there are no obvious shorts or opens; there are no obviously burned or heated components; all components appear normal.
- Use the following table with the verified symptom to determine which page to go to.
| Symptoms (Verified) Go To | |
| Power failure. (The power indicator does not go on or stay on.) | “Power System Check” on page 73. |
| POST does not complete. No beep or error codes are indicated. | “Power-On Self-Test (POST) Error Message” on page 75“Undetermined Problems” on page 87 |
| POST detects an error and displayed messages on screen. | “Error Message List” on page 76 |
| Other symptoms (i.e. LCD display problems or others). | “Power-On Self-Test (POST) Error Message” on page 75 |
| Symptoms cannot be re-created (intermittent problems). | Use the customer-reported symptoms and go to “Power-On Self-Test (POST) Error Message” on page 75“Intermittent Problems” on page 86“Undetermined Problems” on page 87 |
System Check Procedures
External Diskette Drive Check
Do the following to isolate the problem to a controller, driver, or diskette. A write-enabled, diagnostic diskette is required.
NOTE: Make sure that the diskette does not have more than one label attached to it. Multiple labels can cause damage to the drive or cause the drive to fail.
Do the following to select the test device.
- Boot from the diagnostics diskette and start the diagnostics program.
- See if FDD Test is passed as the program runs to FDD Test.
- Follow the instructions in the message window.
If an error occurs with the internal diskette drive, reconnect the diskette connector on the system board.
If the error still remains:
- Reconnect the external diskette drive/DVD-ROM module.
- Replace the external diskette drive/CD-ROM module.
- Replace the main board.
External CD-ROM Drive Check
Do the following to isolate the problem to a controller, drive, or CD-ROM. Make sure that the CD-ROM does not have any label attached to it. The label can cause damage to the drive or can cause the drive to fail.
Do the following to select the test device:
- Boot from the diagnostics diskette and start the diagnostics program.
- See if CD-ROM Test is passed when the program runs to CD-ROM Test.
- Follow the instructions in the message window.
If an error occurs, reconnect the connector on the System board. If the error still remains:
- Reconnect the external diskette drive/CD-ROM module.
- Replace the external diskette drive/CD-ROM module.
- Replace the main board.
Keyboard or Auxiliary Input Device Check
Remove the external keyboard if the internal keyboard is to be tested.
If the internal keyboard does not work or an unexpected character appears, make sure that the flexible cable extending from the keyboard is correctly seated in the connector on the system board.
If the keyboard cable connection is correct, run the Keyboard Test.
If the tests detect a keyboard problem, do the following one at a time to correct the problem. Do not replace a non-defective FRU:
- Reconnect the keyboard cables.
- Replace the keyboard.
- Replace the main board.
The following auxiliary input devices are supported by this computer:
□ Numeric keypad External keyboard
If any of these devices do not work, reconnect the cable connector and repeat the failing operation.
Memory check
Memory errors might stop system operations, show error messages on the screen, or hang the system.
- Boot from the diagnostics diskette and start the diagnostics program (please refer to the main board).
- Go to the diagnostic memory in the test items.
- Press F2 in the test items.
- Follow the instructions in the message window.
NOTE: Make sure that the DIMM is fully installed into the connector. A loose connection can cause an error.
Power System Check
To verify the symptom of the problem, power on the computer using each of the following power sources:
- Remove the battery pack.
- Connect the power adapter and check that power is supplied.
- Disconnect the power adapter and install the charged battery pack; then check that power is supplied by the battery pack.
If you suspect a power problem, see the appropriate power supply check in the following list:
☐ "Check the Battery Pack" on page 74
Check the Battery Pack
To check the battery pack, do the following:
From Software:
- Check out the Power Management in Control Panel.
- In Power Meter, confirm that the parameters shown on the screen for Current Power Source and Total Battery Power Remaining are correct.
- Repeat steps 1 and 2 for both battery and adapter.
- This helps you identify first whether the problem is in recharging or discharging.
From Hardware:
- Power off the computer.
- Remove the battery pack and measure the voltage between battery terminals 1(+) and 6(ground). See the following figure.
- If the voltage is still less than 7.5 Vdc after recharging, replace the battery.
To check the battery charge operation, use a discharged battery pack or a battery pack that has less than 50% of the total power remaining when installed in the computer.
If the battery status indicator does not light up, remove the battery pack and let it return to room temperature. Re-install the battery pack.
If the charge indicator still does not light up, replace the battery pack. If the charge indicator still does not light up, replace the DC/DC charger board.
Touchpad check
If the touchpad doesn't work, do the following actions one at a time to correct the problem. Do not replace a non-defective FRU:
- After rebooting, run Tracking Pad PS2 Mode Driver. For example, run Syn touch driver.
- Run utility with the PS/2 mouse function and check if the mouse is working.
- If the PS/2 mouse does not work, then check if the main board to switch board FPC is connected O.K.
- If the main board to switch board FPC is connected well, then check if the FFC on touch pad PCB connects properly.
- If the FFC on touch pad PCB connects properly, then check if LS851 JP1 Pin6=5V are pulses. If yes, then replace switch board. If no, then go to next step.
- Replace touch pad PCB.
- If the touch pad still does not work, then replace FPC on Track Pad PCB.
After you use the touchpad, the pointer drifts on the screen for a short time. This self-acting pointer movement can occur when a slight, steady pressure is applied to the touchpad pointer. This symptom is not a hardware problem. No service actions are necessary if the pointer movement stops in a short period of time.
Power-On Self-Test (POST) Error Message
The POST error message index lists the error message and their possible causes. The most likely cause is listed first.
NOTE: Perform the FRU replacement or actions in the sequence shown in FRU/Action column, if the FRU replacement does not solve the problem, put the original part back in the computer. Do not replace a non-defective FRU.
This index can also help you determine the next possible FRU to be replaced when servicing a computer.
If the symptom is not listed, see "Undetermined Problems" on page 87.
The following lists the error messages that the BIOS displays on the screen and the error symptoms classified by function.
NOTE: Most of the error messages occur during POST. Some of them display information about a hardware device, e.g., the amount of memory installed. Others may indicate a problem with a device, such as the way it has been configured.
NOTE: If the system fails after you make changes in the BIOS Setup Utility menus, reset the computer, enter Setup and install Setup defaults or correct the error.
Index of Error Messages
Error Message List
| Error Messages FRU/Action in Sequence | |
| Struck Key See “‘‘Keyboard or Auxiliary Input Device Check” on page 72 | |
| System CMOS checksum bad - Default configuration used | RTC batteryRun BIOS Setup Utility to reconfigure system, then reboot system. |
| Real time clock error RTC battery | Run BIOS Setup Utility to reconfigure system time, then reboot system.Main board |
| Previous boot incomplete - Default configuration used | “Load Default Settings” in BIOS Setup Utility.RTC batterMain baord. |
| Invalid System Configuration Data “Load Default Settings” in BIOS Setup Utility.Main board. | |
| Operating system not found | Enter Setup and see if fixed disk and drive A are properly identified.Dikette driveHard disk driveMain board. |
Error Message List
| No beep Error Messages FRU/Action | in Sequence |
| Power-on indicator turns off and LCD is blank. | Power source (battery pack and power adapter.) See “Power System Check” on page 73Ensure every connector is connected tightly and correctly.Reconnect the DIMM.Main board. |
| Power-on indicator turns on and LCD is blank. | Power source (battery pack and power adapter.) See “Power System Check” on page 73Reconnect the LCD connectorHard disk driveLCD cableLCD inverterLCDMain board |
| Power-on indicator turns on and LCD is blank.But you can see POST on an external CRT. | Reconnect the LCD connectors.LCD cableLCD inverterLCDMain board |
| Power-on indicator turns on and a blinking cursor shown on LCD during POST. | Ensure every connector is connected tightly and correctly.Main board |
POST Codes
| Code Beeps POST | Routine Description | |
| 02h Verify Real Mode | ||
| 03h Disable Non-Maskable Interrupt (NMI) | ||
| 04h Get CPU type | ||
| 06h Initialize system hardware | ||
| 08h Initialize chipset with initial POST values | ||
| 09h Set IN POST flag | ||
| 0Ah Initialize CPU registers | ||
| 0Bh Enable CPU cache | ||
| 0Ch Initialize caches to initial POST values | ||
| 0Eh Initialize I/O component | ||
| 0Fh Initialize the local bus IDE | ||
| 10h Initialize Power Management | ||
| 11h Load alternate registers with initial POST values | ||
| 12h Restore CPU control word during warm boot | ||
| 13h Initialize PCI Bus Mastering devices | ||
| 14h Initialize keyboard controller | ||
| 16h 1-2-2-3 BIOS ROM checksum | ||
| 17h Initialize cache before memory autosize | ||
| 18h 8254 timer initialization | ||
| 1Ah 8237 DMA controller initialization | ||
| 1Ch Reset Programmable Interrupt Controller | ||
| 20h 1-3-1-1 Test DRAM refresh | ||
| 22h 1-3-1-3 Test 8742 Keyboard Controller | ||
| 24h Set ES segment register to 4 GB | ||
| 26h Enable A20 line | ||
| 28h Autosize DRAM | ||
| 29h Initialize POST Memory Manager | ||
| 2Ah Clear 215 KB base RAM | ||
| 2Ch 1-3-4-1 RAM failure on address line xxxx | ||
| 2Eh 1-3-4-3 RAM failure on data bits xxxx of low byte of memory bus | ||
| 2Fh Enable cache before system BIOS shadow | ||
| 30h 1-4-1-1 RAM failure on data bits xxxx of high byte of memory bus | ||
| 32h Test CPU bus-clock frequency | ||
| 33h Initialize Phoenix Dispatch Manager | ||
| 36h Warm start shut down | ||
| 38h Shadow system BIOS ROM | ||
| 3Ah Autosize cache | ||
| 3Ch Advanced configuration of chipset registers | ||
| 3Dh Load alternate registers with CMOS values | ||
| 42h Initialize interrupt vectors | ||
| 45h POST device initialization | ||
| 46h 2-1-2-3 Check ROM copyright notice | ||
| Code Beeps POST Routine Description | ||
| 48h Check video configuration against CMOS | ||
| 49h Initialize PCI bus and devices | ||
| 4Ah Initialize all video adapters in system | ||
| 4Bh QuietBoot start (optional) | ||
| 4Ch Shadow video BIOS ROM | ||
| 4Eh Display BIOS copyright notice | ||
| 50h Display CPU type and speed | ||
| 51h Initialize EISA board | ||
| 52h Test keyboard | ||
| 54h Set key click if enabled | ||
| 58h 2-2-3-1 Test for unexpected interrupts | ||
| 59h Initialize POST display service | ||
| 5Ah Display prompt “Press F2 to enter SETUP” | ||
| 5Bh Disable CPU cache | ||
| 5Ch Test RAM between 512 and 640 KB | ||
| 60h Test extended memory | ||
| 62h Test extended memory address lines | ||
| 64h Jump to User Patch1 | ||
| 66h Configure advanced cache registers | ||
| 67h Initialize Multi Processor APIC | ||
| 68h Enable external and CPU caches | ||
| 69h Setup System Management Mode (SMM) area | ||
| 6Ah Display external L2 cache size | ||
| 6Bh Load custom defaults (optional) | ||
| 6Ch Display shadow-area message | ||
| 6Eh Display possible high address for UMB | recovery | |
| 70h Display error messages | ||
| 72h Check for configuration errors | ||
| 76h Check for keyboard errors | ||
| 7Ch Set up hardware interrupt vectors | ||
| 7Eh Initialize coprocessor if present | ||
| 80h Disable onboard Super I/O ports and IRQs | ||
| 81h Late POST device initialization | ||
| 82h Detect and install external RS232 ports | ||
| 83h Configure non-MCD IDE controllers | ||
| 84h Detect and install external parallel ports | ||
| 85h Initialize PC-compatible PnP ISA devices | ||
| 86h Re-initialize onboard I/O ports | ||
| 87h Configure Motherboard Configurable Devices | (optional) | |
| 88h Initialize BIOS Area | ||
| 89h Enable Non-Maskable Interrupts (NMIs) | ||
| 8Ah Initialize Extended BIOS Data Area | ||
| 8Bh Test and initialize PS/2 mouse | ||
| 8Ch Initialize floppy controller | ||
| 8Fh Determine number of ATA drives (optional) | ||
| 90h Initialize hard-disk controllers | ||
| 91h Initialize local-bus hard-disk controllers | ||
| 92h Jump to UserPatch2 | ||
| 93h Build MPTABLE for multi-processor boards | ||
| 95h Install CD ROM for boot | ||
| 96h Clear huge ES segment register | ||
| 97h Fixup Multi Processor table | ||
| 98h 1-2 Search for option ROMs. One long, two short | beeps on checksum failure. | |
| 99h Check for SMART drive (optional) | ||
| 9Ah Shadow option ROMs | ||
| 9Ch Set up Power Management | ||
| 9Dh Initialize security engine (optional) | ||
| 9Eh Enable hardware interrupts | ||
| 9Fh Determine number of ATA and SCSI drives | ||
| A0h Set time of day | ||
| A2h Check key lock | ||
| A4h Initialize Typematic rate | ||
| A8h Erase F2 prompt | ||
| AAh Scan for F2 key stroke | ||
| ACh Enter SETUP | ||
| AEh Clear Boot flag | ||
| B0h Check for errors | ||
| B2h POST done- prepare to boot operating system | ||
| B4h 1 One short beep before boot | ||
| B5h Terminate QuietBoot (optional) | ||
| B6h Check password (optional) | ||
| B9h Prepare Boot | ||
| BAh Initialize DMI parameters | ||
| BBh Initialize PnP Option ROMs | ||
| BCh Clear parity checkers | ||
| BDh Display MultiBoot menu | ||
| BEh Clear screen (optional) | ||
| BFh Check virus and backup reminders | ||
| C0h Try to boot with INT 19 | ||
| C1h Initialize POST Error Manager (PEM) | ||
| C2h Initialize error logging | ||
| C3h Initialize error display function | ||
| C4h Initialize system error handler | ||
| C5h PnPnd dual CMOS (optional) | ||
| C6h Initialize notebook docking (optional) | ||
| C7h Initialize notebook docking late | ||
| C8h Force check (optional) | ||
| C9h Extended checksum (optional) | ||
| D2h Unknown interrupt | ||
| Code Beeps For Boot Block in Flash ROM | ||
| E0h Initialize the chipset | ||
| E1h Initialize the bridge | ||
| E2h Initialize the CPU | ||
| E3h Initialize the system timer | ||
| E4h Initialize system I/O | ||
| E5h Check force recovery boot | ||
| E6h Checksum BIOS ROM | ||
| E7h Go to BIOS | ||
| E8h Set Huge Segment | ||
| E9h Initialize Multi Processor | ||
| EAh Initialize OEM special code | ||
| EBh Initialize PIC and DMA | ||
| ECH Initialize Memory type | ||
| EDh Initialize Memory size | ||
| EEh Shadow Boot Block | ||
| EFh System memory test | ||
| F0h Initialize interrupt vectors | ||
| F1h Initialize Run Time Clock | ||
| F2h Initialize video | ||
| F3h Initialize System Management Mode | ||
| F4h 1 Output one beep before boot | ||
| F5h Boot to Mini DOS | ||
| F6h Clear Huge Segment | ||
| F7h Boot to Full DOS | ||
Index of Symptom-to-FRU Error Message
LCD-Related Symptoms
| Symptom / Error Action in Sequence | |
| LCD backlight doesn't work First, plug a monitor to | CRT port. Next, enter BIOS utility to running“Load Default Settings” then reboot the system.Reconnect the LCD connectors spacecraft (if the brightness function key doesn't work).LCD cableLCD inverterLCDMain board |
| LCD is too darkLCD brightness cannot be adjusted | Enter BIOS Utility to execute “Load Setup Default Settings”, then reboot system.Reconnect the LCD connectors spacecraft (if the brightness function key doesn't work).LCD cableLCD inverterLCDMain board |
| Unreadable LCD screenMissing pels in charactersAbnormal screenWrong color displayedLCD has extra horizontal or vertical lines displayed. | Reconnect the LCD cableLCD cableLCDMain board |
Indicator-Related Symptoms
| Symptom / Error Action in Sequence | |
| Indicator incorrectly remains off or on, but system runs correctly | Main board |
| HDD/CD-ROM active indicators cannot work HDD | CD-ROM driveDevice driverMain board |
Power-Related Symptoms
| Symptom / Error Action in Sequence | |
| Power shuts down during operation Power source | (battery pack and power adapter). See “Power System Check” on page 73.Battery packAC adapterSee if the thermal module is overheat (Heat sink or fan).Main board |
| The system cannot power-on. Power source (battery) | ry pack and power adapter). See “Power System Check” on page 73.Battery packPower adapterCPUMain board |
| The system cannot power-off. | In Windows XP operating system, hold and press the power switch for more than 4 seconds. If the system can power off, then the main board is OK. Verify OS in the HDD.Main board |
Power-Related Symptoms
| Symptom / Error Action in Sequence | |
| Battery can’t be charged or discharged See “Check the Battery Pack” on page 74.Battery packMain board | |
| System hang during POST ODD/HDD/FDD/RAM moduleMain board |
PCMCIA-Related Symptoms
| Symptom / Error Action in Sequence | |
| System cannot detect the PC Card (PCMCIA) PC | MCIA slot assemblyMain board |
| PCMCIA slot pin is damaged. PCMCIA slot assembly | |
| PC Card cannot be inserted or ejected Check if the | PCMCIA slot is blockedMain board |
Memory-Related Symptoms
| Symptom / Error Action in Sequence | |
| Memory count (size) appears different from actual size. | Enter BIOS Setup Utility to execute “Load Default Settings” then reboot system.RAM moduleMain boardCheck BIOS revision |
| System can power on, but you hear two long beeps: “B--, B--” and the LCD is blank. | Reinsert DIMMDIMMMain board |
Speaker-Related Symptoms
| Symptom / Error Action in Sequence | |
| In Windows, multimedia programs, no sound comes from the computer. | OS volume controlAudio driverSpeakerMain board |
| Internal speakers make noise or emit no sound. SpeakerMain board | |
| Microphone cannot work Audio driver | Volume control in Windows XPMain board |
Power Management-Related Symptoms
| Symptom / Error Action in Sequence | |
| The system will not enter hibernation mode Power | option in Windows XPHard disk driveMain board |
| The system doesn't enter standby mode after closing the lid of the portable computer. | Driver of Power Option PropertiesLid close switch in upper caseMain board |
Power Management-Related Symptoms
| Symptom / Error Action in Sequence | |
| The system doesn't resume from hibernation/ standby mode. | Connect AC adapter then check if the system resumes from Standby/Hibernation mode.Check if the battery is low.Hard disk driveMain board |
| The system doesn't resume from standby mode after opening the lid of the portable computer. | LCD cover switchMain board |
| Battery fuel gauge in Windows doesn't go higher than 90%. | Refresh battery (continue use battery until power off, then charge battery).Battery packMain board |
| System hangs intermittently. Reconnect hard disk/ | CD-ROM drives.Main board |
Peripheral-Related Symptoms
| Symptom / Error Action in Sequence | |
| System configuration does not match the installed devices. | Enter BIOS Setup Utility to execute “Load Setup defaults”, then reboot system.Reconnect hard disk/CD-ROM drives/FDD or other peripherals.Main board |
| External display does not work correctly. Press Fn | +F5, LCD/CRT/Both display switchingKeyboardMain board |
| USB does not work correctly Main board | |
| Print problems. Enter BIOS Setup Utility to execute | “Load Default Settings” then reboot the system.Run printer self-test.Printer driverPrinter cablePrinterMain board |
| Parallel port device problems | Enter BIOS Setup Utility to execute “Load Default Settings” then reboot the system.Device driverDevice cableDeviceMain board |
Keyboard/Touchpad-Related Symptoms
| Symptom / Error Action in Sequence | |
| Keyboard (one or more keys) does not work. Reconnect the keyboard cable. | |
| Touchpad does not work. Reconnect touchpad cable. | |
Modem/LAN-Related Symptoms
| Symptom / Error Action in Sequence | |
| Internal modem does not work correctly. Phone cable | DriverReconnect the Internal modem cable to the main board tightly.Main board |
| Internal LAN does not work correctly Lan cable | DriverMain board |
NOTE: If you cannot find a symptom or an error in this list and the problem remains, see "Undetermined Problems" on page 87.
Intermittent Problems
Intermittent system hang problems can be caused by a variety of reasons that have nothing to do with a hardware defect, such as: cosmic radiation, electrostatic discharge, or software errors. FRU replacement should be considered only when a recurring problem exists.
When analyzing an intermittent problem, do the following:
- Run the diagnostic test for the system board in loop mode at least 10 times.
- If no error is detected, do not replace any FRU.
- If any error is detected, replace the FRU. Rerun the test to verify that there are no more errors.
Undetermined Problems
The diagnostic problems does not identify which adapter or device failed, which installed devices are incorrect, whether a short circuit is suspected, or whether the system is inoperative.
Follow these procedures to isolate the failing FRU (do not isolate non-defective FRU).
NOTE: Verify that all attached devices are supported by the computer.
NOTE: Verify that the power supply being used at the time of the failure is operating correctly. (See “Power System Check” on page 73):
- Power-off the computer.
- Visually check them for damage. If any problems are found, replace the FRU.
- Remove or disconnect all of the following devices:
□ Non-Acer devices ☐ Printer, mouse, and other external devices Battery pack □ Hard disk drive DIMM PC Cards
- Power-on the computer.
- Determine if the problem has changed.
- If the problem does not recur, reconnect the removed devices one at a time until you find the failing FRU.
- If the problem remains, replace the following FRU one at a time. Do not replace a non-defective FRU:
□ System board □ LCD assembly
Jumper and Connector Locations
Top View![[01] [02] [03] [04] [05] [06] [07] [08] [55] [10] [09] [11] [12] [13] [14] [15] [16] [17] [18] [19] [20] [21]](/content/2026/05/857506/images/ac35e5318facd9335d7e00f1d639356aab323153acabfa35ec079dcce13be3b2.jpg)
1 U3 LAN Controller 12 CN5 Quick Button Board Connector
2 CN2 LCD Connector 13 U20 Clock Generator
3 U4 VRAM1 14 U29 EC (Keyboard Controller)
4 CN1 Lid Switch 15 CN7 BT Connector
5 U16 Super I/O Controller 16 CN8 Jogdial Board Connector
6 U10 DVI Transmitter 17 CN9 Pen Switch Board Connector
7 CN3 PCI Debug Card Connector 18 CON1/ BIOS ROM (Reserved) U34
8 U17/ IDE Buffer 19 CN10 Internal MIC U19
| 9 U23 PCMCIA/1394/Card Reader Controller | 20 BT1 RTC Battery Connector | ||||
| 10 | U22 | Track Point Controller | 21 | CN11 | Intetnal Speaker |
| 11 | CN6 | Keyboard Connector | 55 | CN4 | Track Point Connector |
Bottom View
![[22] [24] [26] [27] [28] [29] [30] [31] [32] [33] [34] [35] [36] [37] [38] [39] [40] [41] [42] [43] [44] [45] [46] [47] [48] [49] [50] [51] [52] [53] [54] [55] [56] [57] [58] [59]](/content/2026/05/857506/images/38ac39ffb185cfd07fdc2fc2f9f2997f01cc39e793e4233329eb4e25db09cdb4.jpg)
22 CN13 EZ Docking Connector 41 CN30 Memory Card Reader
23 CN12 AC Power Jack 42 J1 MDC Connector
24 CN15 RJ11/RJ45 Connector 43 CN28 PCMCIA Board Connector
25 CN14 CRT Connector 44 CN26 MINI Card Connector
26 CN16 Modem Connector 45 U54 South Bridge (ICH7)
27 CN17 Main Battery Connector 46 CN24 PATA HDD Connector
28 JDIM1 DDR Socket 1 47 U57 FIR
29 JDIM2 DDR Socket 2 48 CN25 External Line In
30 U44 VRAM2 49 CN27 External MIC In
31 CN18 USB Dual Connector 50 CN29 External Headphone
32 CN19 1394 Connector 51 U55 Speaker Amplifier (MAX9710)
33 U45 VGA Chip (NV72MV) 52 U56 Headphone (MAX4411)
34 CN20 CD-ROM Board Connector 53 SW4 Bluetooth Enable Switch
35 U46 CPU Socket 54 SW5 WLAN Enable Switch
36 CN22 Second Battery Connector 56 LED3 BT LED
37 CN21 FAN Connector 57 LED4 WLAN LED
38 U48 North Bridge (945GM/PM) 58 LED1 Battery LED
39 U52 Audio Codec Controller 59 LED2 HDD LED
40 CN23 USB Connector
FRU (Field Replaceable Unit) List
This chapter gives you the FRU (Field Replaceable Unit) listing in global configurations of TravelMate C210 series products. Refer to this chapter whenever ordering for parts to repair or for RMA (Return Merchandise Authorization).
Please note that when ordering FRU parts, you should check the most up-to-date information available on your regional web or channel. For whatever reasons a part number change is made, it will not be noted on the printed Service Guide. For ACER AUTHORIZED SERVICE PROVIDERS, your Acer office may have a DIFFERENT part number code from those given in the FRU list of this printed Service Guide. You MUST use the local FRU list provided by your regional Acer office to order FRU parts for repair and service of customer machines.
NOTE: To scrap or to return the defective parts, you should follow the local government ordinance or regulations on how to dispose it properly, or follow the rules set by your regional Acer office on how to return it.
Exploded Diagram
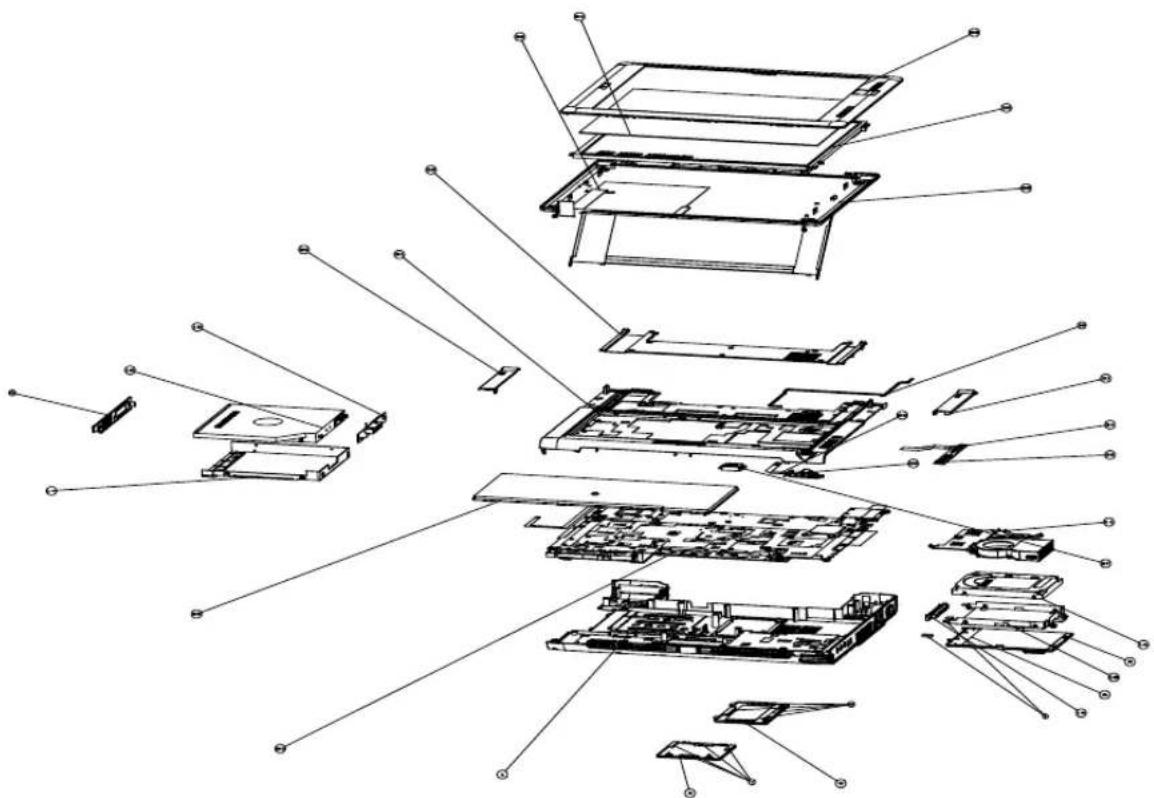
NOTE: The exploded diagram is not ready as the service guide released. We will update the section later.
NOTE: The photos below are taken from an engineering sample. The cover of the engineering sample's case is not what you would see on the finish-good shipping product.
NOTE: TravelMate C210 FRU list is not ready as the service guide released. We will update the FRU list as soon as we got the spare part list.
TravelMate C200 FRU List
| Picture | No. | Partname And Description | Part Number |
| Adapter | |||
 | LITE-ON NB ADAPTER PA-1650-02QR, 19V, 3 PINS, 65W | AP.06503.010 | |
| LSE NB ADAPTER SLS0335A19A57LF 19V 3 PINS 65W | AP.06506.002 | ||
| Battery | |||
 | LI-ION SANYO 3S1P 2.0AH high rate W/O IND (W/Z SANYO PACK CELLS) | BT.00303.003 | |
| LI-ION SANYO 3S2P 4.8AH W/O IND (W/Z SANYO PACK CELLS) | BT.T4803.001 | ||
| LI-ION SANYO 3S3P 4.8AH W/O IND (W/Z SANYO PACK CELLS) | BT.00903.001 | ||
TravelMate C200 FRU List
| Picture | No. | Partname And Description | Part Number |
 | MODEM BOARD 54.TAKV7.001 | ||
 | BLUETOOTH MODULE W/ANTENNA 54.TADV7.001 | ||
 | WIRELESS LAN BOARD (802.11b+g) INTEL KI.CAX01.008 | ||
| WIRELESS LAN BOARD (802.11a/b/g) INTEL EU | KI.CAX01.010 | ||
| WIRELESS LAN BOARD (802.11a/b/g) INTEL NA | KI.CAX01.009 | ||
| WIRELESS LAN BOARD (802.11a/b/g) INTEL RW | KI.CAX01.011 | ||
 | JOYSTICK BOARD 55.TADV7.001 | ||
 | PCMCIA SLOT MODULE 55.TADV7.002 | ||
 | LAUNCH BOARD 55.TADV7.003 | ||
 | PEN SENSOR BOARD 55.TADV7.004 | ||
TravelMate C200 FRU List
| Picture | No. | Partname And Description | Part Number |
 | PEN SENSOR BOARD CABLE 50.TADV7.001 | ||
 | FFC- JOYSTICK BOARD TO MB 50.TADV7.002 | ||
 | FFC - LAUNCH BOARD TO MB 50.TADV7.003 | ||
 | BLUETOOTH CABLE 50.TADV7.004 | ||
| MODEM CABLE LEAD FREE 50.TADV7.005 | |||
 | POWER CORD AF (3 PIN) 27.T48V7.001 | ||
| POWER CORD DANISH (3 PIN) 27.A03V7.006 | |||
| POWER CORD AU W/LABEL (3 PIN) 27.A50V7.003 | |||
| POWER CORD AF-S (INDIA) 27.A50V7.001 | |||
| POWER CORD UK (3 PIN) 27.A03V7.004 | |||
| POWER CORD PRC (3 PIN) 27.A03V7.003 | |||
| POWER CORD US (3 PIN) 27.A03V7.001 | |||
| POWER CORD KOERA ( Pin) 27.T23V7.006 | |||
| POWER CORD EU (3 PIN) 27.A03V7.002 | |||
| POWER CORD ITALIAN (3 PIN) 27.A03V7.005 | |||
| POWER CORD- SWISS 27.A03V7.007 | |||
| POWER CORD ISRAEL (3 PIN) | 27.A50V7.002 | ||
TravelMate C200 FRU List
| Picture | No. | Partname And Description | Part Number |
 | MIDDLE COVER 42.TADV7.001 | ||
| [600x4] | HINGE COVER R 42.TADV7.002 | ||
| [800Y] | HINGE COVER L 42.TADV7.003 | ||
 | UPPER CASE W/ ANTENNA 60.TADV7.001 | ||
 | LOWER CASE W/ SPEAKER 60.TADV7.002 | ||
| [RYHZ] | PCI DOOR 42.TADV7.004 | ||
 | RAM DOOR 42.TADV7.005 | ||
 | PCMCIA SUPPORT BRACKET 33.TDAV7.001 |
TravelMate C200 FRU List
| Picture | No. | Partname And Description | Part Number |
| ZE1 PCMCIA DUMMY Card 42.TADV7.006 | |||
| CPU | |||
 | Celeron M 350 (1.3G 1M) C0 KC.NC001.350 | ||
| Celeron M 360 (1.4G 1M) C0 KC.NC001.360 | |||
| Celeron M 370 (1.5G 1M) C0 KC.NC001.370 | |||
| CELERON M 380 (1.6G 1M) C0 KC.NC001.380 | |||
| Pentium M 725 (1.6G 2M 400FSB) KC.N0001.725 | |||
| Pentium M 730 (1.6G 2M 533FSB) KC.N0001.730 | |||
| Pentium M 740 (1.73G 2M 533FSB) KC.N0001.740 | |||
| Pentium M 750 (1.87G 2M 533FSB) KC.N0001.750 | |||
| Pentium M 760 (2.0G 2M 533FSB) KC.N0001.760 | |||
| Pentium M 770 (2.13G 2M 533FSB) KC.N0001.770 | |||
 | DVD CDRW COMBO ASSY(PANASONIC)STNB/S | 6M.TADV7.001 | |
 | DVD/CDRW (COMBO) UJDA770AC-A KO.02406.013 | ||
 | ODD CONNECTOR BOARD 55.TADV7.005 | ||
 | ODD HOLDER 42.TADV7.007 | ||
 | DVD COMBO BEZEL ASSY 42.TADV7.008 | ||
TravelMate C200 FRU List
| Picture | No. | Partname And Description | Part Number |
 | 6M.TADV7.002 | ||
 | DVD DUAL(DL), LITEON SOLW-831S, SLOT-IN, F/W:WRT9 | KU.00804.016 | |
 | ODD CONNECTOR BOARD 55.TADV7.005 | ||
 | ODD HOLDER 42.TADV7.007 | ||
 | DVD DUAL LITE-ON SLOT IN BEZEL ASSY 42.T | ADV7.009 | |
 | 100G SEAGATE 2.5' 4200RPM N2.2ST9100825A F/W:3.04 | KH.10001.003 | |
| 100G TOSHIBA 2.5' 4200RPM ARES MK1031GAS (ROHS) F/W AA204A | KH.10004.001 | ||
| 100G HGST 2.5' 4200RPM HAKONE-A F/ W:A70G | KH.10007.002 | ||
| 40G TOSHIBA 2.5' 4200RPM PLUTO MK4025GAS (ROHS) F/W KA100A | KH.04004.005 | ||
| 40G HGST 2.5' 4200RPM HAKONA-A F/W :A70G | KH.04007.013 | ||
| 60G SEAGATE 2.5' 4200RPM N2.2ST960812A F/W:3.04 | KH.06001.003 | ||
| 60G HGST 2.5' 4200RPM HAKONE-A F/W :A70G | KH.06007.009 |
TravelMate C200 FRU List
| Picture | No. | Partname And Description | Part Number |
| 80G SEAGATE 2.5' 4200RPM N2.2ST980829A F/W:3.04 | KH.08001.013 | ||
| 80G HGST 2.5' 4200RPM HAKONE-A F/W:A70G | KH.08007.011 | ||
| 40G SEAGATE 2.5 IN. 4200RPM N2.1ST9402113A F/W:3.01 | KH.04001.016 | ||
| 60G TOSHIBA 2.5 IN. 4200RPM PLUTO MK6025GAS CZK(ROHS) F/W:KA200A | KH.06004.004 | ||
| 80G TOSHIBA 2.5 IN. 4200RPM PLUTO MK8025GAS (ROHS) F/W:KA023A | KH.08004.003 | ||
 | HDD CONNECTOR 55.TADV7.006 | ||
 | HDD COVER 42.TADV7.010 | ||
 | HDD BRACKET 33.TADV7.002 | ||
| Keyboard | |||
 | TMC200 KEYBOARD DARFON US International KB.TAD07.001 | ||
| TMC200 KEYBOARD DARFON Chinese KB.TAD07.002 | |||
| TMC200 KEYBOARD DARFON Thai KB.TAD07.004 | |||
| TMC200 KEYBOARD DARFON Czech KB.TAD07.016 | |||
| TMC200 KEYBOARD DARFON Brazilian Protugese | KB.TAD07.005 | ||
| TMC200 KEYBOARD DARFON Russian KB.TAD07.025 | |||
| TMC200 KEYBOARD DARFON Turkish KB.TAD07.020 | |||
| TMC200 KEYBOARD DARFON Belgium KB. TAD07.014 | |||
| TMC200 KEYBOARD DARFON Sweden KB.TAD07.015 | |||
| TMC200 KEYBOARD DARFON UK KB.TAD07.007 | |||
| TMC200 KEYBOARD DARFON French KB.TAD07.010 | |||
| TMC200 KEYBOARD DARFON German KB.TAD07.008 | |||
| TMC200 KEYBOARD DARFON Italian KB.TAD07.009 | |||
| TMC200 KEYBOARD DARFON Japanese KB.TAD07.022 | |||
TravelMate C200 FRU List
| Picture | No. | Partname And Description | Part Number |
| TMC200 KEYBOARD DARFON Danish KB.TAD07.019 | |||
| TMC200 KEYBOARD DARFON Spanish KB.TAD07.003 | |||
| TMC200 KEYBOARD DARFON Arabic KB.TAD07.013 | |||
| TMC200 KEYBOARD DARFON Swiss/G KB.TAD07.011 | |||
| TMC200 KEYBOARD DARFON Portuguese KB.TAD07.012 | |||
| TMC200 KEYBOARD DARFON Norway KB.TAD07.018 | |||
| TMC200 KEYBOARD DARFON Korea KB.TAD07.006 | |||
| TMC200 KEYBOARD DARFON Hungaiian KB.TAD07.017 | |||
| TMC200 KEYBOARD DARFON Canadian French | KB.TAD07.021 | ||
| TMC200 KEYBOARD DARFON Hebrew KB.TAD07.024 | |||
| TMC200 KEYBOARD DARFON Greek KB.TAD07.023 | |||
 | ZE1 LCD 12.1 IN. XGA ASSY HYDIS HT12X21 6M.TADV7.011 | ||
 | LCD(TFT) 12.1 IN. HYDIS HT12X21-220(XGA) LF W/PROTECT COVER | 56.TADV7.001 | |
 | INVERTER BOARD LF 19.TADV7.001 | ||
 | POWER BUTTON/B ASSY | 55.TADV7.007 | |
 | TABLET BUTTON/B ASSY | 55.TADV7.008 | |
 | FINGER PRINT BOARD | 55.TADV7.009 |
TravelMate C200 FRU List
| Picture | No. | Partname And Description | Part Number |
 | CABLE ASSY - FINGER12.1(50/55P,1A)LF 50.TADV7.006 | ||
 | LCD STAND 33.TADV7.003 | ||
 | LCD BEZEL 60.TADV7.003 | ||
 | LCD COVER W/ANTENNA - HYDIS 60.TADV7.004 | ||
 | DIGITIZER PANEL -WACOM SU-1201E-02X 56.TADV7.002 | ||
| ZE1 LCD 12.1 IN. XGA ASSY HYDIS HT12X21 W/O FINGER | 6M.TADV7.021 | ||
| LCD(TFT) 12.1 IN. HYDIS HT12X21-220(XGA) LF W/PROTECT COVER | 56.TADV7.001 | ||
| INVERTER BOARD LF 19.TADV7.001 | |||
| POWER BUTTON/B ASSY 55.TADV7.007 | |||
| TABLET BUTTON/B ASSY 55.TADV7.008 | |||
| CABLE ASSY - W/O FINGER12.1(50/55P,1A)LF 50.TADV7.007 | |||
| LCD STAND 33.TADV7.003 | |||
| LCD BEZEL W/O FINGER 60.TADV7.008 | |||
| LCD COVER W/ANTENNA - HYDIS 60.TADV7.004 | |||
| DIGITIZER PANEL -WACOM SU-1201E-02X 56.TADV7.002 | |||
| ZE1 LCD 12.1 IN. XGA ASSY TOSHIBA LTD121KA0Q | 6M.TADV7.012 | ||
| LCD(TFT)12.1 IN. TOSHIBA LTD121KA0Q LF W/PROTECT COVER | 56.TADV7.002 | ||
| INVERTER BOARD LF 19.TADV7.001 |
TravelMate C200 FRU List
| Picture | No. | Partname And Description | Part Number |
| POWER BUTTON/B ASSY 55.TADV7.007 | |||
| TABLET BUTTON/B ASSY 55.TADV7.008 | |||
| FINGER PRINT BOARD 55.TADV7.009 | |||
| CABLE ASSY - FINGER12.1(50/55P,1A)LF 50.TADV7.006 | |||
| LCD STAND 33.TADV7.003 | |||
| LCD BEZEL 60.TADV7.003 | |||
| LCD COVER W/ANTENNA - TOSHIBA 60.TADV7.009 | |||
| DIGITIZER PANEL -WACOM SU-1201E-02X 56.TADV7.002 | |||
| ZE1 LCD 12.1 IN. XGA ASSY TOSHIBALTD121KA0Q W/O FINGER | 6M.TADV7.022 | ||
| LCD(TFT)12.1 IN. TOSHIBA LTD121KA0Q LFW/PROTECT COVER | 56.TADV7.002 | ||
| INVERTER BOARD LF 19.TADV7.001 | |||
| POWER BUTTON/B ASSY 55.TADV7.007 | |||
| TABLET BUTTON/B ASSY 55.TADV7.008 | |||
| CABLE ASSY - W/O FINGER12.1(50/55P,1A)LF 50.TADV7.007 | |||
| LCD STAND 33.TADV7.003 | |||
| LCD BEZEL W/O FINGER 60.TADV7.008 | |||
| LCD COVER W/ANTENNA - TOSHIBA 60.TADV7.009 | |||
| DIGITIZER PANEL -WACOM SU-1201E-02X 56.TADV7.002 | |||
 | MAINBOARD UMA W/MODEM CABLE, 4 IN 1W/O CPU MEMORY | LB.TAD06.001 | |
| MAINBOARD NVIDIA NV44M64 W/MODEMCABLE, 4 IN 1 W/O CPU MEMORY | LB.TAU06.001 | ||
| RTC BATTERY - ML1220 23.T42V7.001 | |||
 | MEMORY INFINEON DDRII533256MHYS64T32000HDL-3.7-A 32X64 CL4 | KN.25602.023 | |
| SO-DIMM DDRII533 256MBNT256T64UH4A0FN-37B LF | KN.25603.020 | ||
| SO-DIMM DDRII533 256MB MT8HTF3264HDY-53EB3 LF | KN.25604.023 | ||
| MEMORY DDRII 533 256MB M470T3354CZ3-CD5 (PB-FREE), SAMSUNG | KN.2560B.016 | ||
| SO-DIMM DDRII533 256MB HYMP532S64P6-C4 LF | KN.2560G.006 | ||
| MEMORY SO-DIMM DDRII 533 256MBHYMP532S64P6-C4, HYNIX | KN.51202.021 |
TravelMate C200 FRU List
| Picture | No. | Partname And Description | Part Number |
| MEMORY SO-DIMM DDRII 533 512MBNT512T64UH8A0FN-37B, NANYA | KN.51203.018 | ||
| SO-DIMM DDRII533 512MB M470T6554CZ3-CD500 LF | KN.5120B.015 | ||
| SO-DIMM DDRII533 512MB HYMP564S64P6-C4 LF | KN.5120G.005 | ||
| SPEAKER SET 23.TADV7.001 | |||
 | THERMAL MODULE 60.TADV7.005 | ||
 | STYLUS 60.TADV7.006 | ||
| LATCH RUBBER 47.TADV7.001 | |||
 | LCD RUBBERNote: Larger one is LCD rubber. | 47.TADV7.002 | |
 | LCD RUBBER MIDNote: Smaller one is LCD rubber mid. | 47.TADV7.003 | |
 | LOWER CASE RUBBER FOOT 47.TADV7.004 | ||
| WEIGHT SAVER | |||
| SCREW M2.0*2.5-I(NI)(NYLOK) | |||
| SCREW M2.0*5-I(NI)(NYLOK) | |||
| SCREW M2.5*4.0-I(NI)(NYLOK) | |||
| SCREW M2.0*6 I-BNI | |||
| SCREW M2.5*3-I(NI,NYLOK) | |||
| SCREW M2*5-I(BNI)(NYLOK)(D3H0.3)LF |
Model Definition and Configuration
TravelMate C210 Series
| Model | RO | Country | Acer Part no | Description | Group1 | CPU |
| TMC213TMi China China LX.TD | G0E.003 TMC21 | 13TMi XPTSC8 | G72MV128 2*512/100/BT/6L+3H/4R_abg | TMC213T C2DT | 5500 | |
| TMC213TMi China Hong Kong | LX.TDG0E.001 | TMC213TMi XPTHK6 | G72MV128 2*512/100/BT/6L+3H/4R_abg | TMC213T C2DT | 5500 | |
| TMC213TMi China China LX.TD | G0E.004 TMC21 | 13TMi XPTSC8 | G72MV128 2*512/100/BT/6L+3H/4R_abg_FP | TMC213T C2DT | 5500 | |
| TMC213TMi China Hong Kong | LX.TDG0E.002 | TMC213TMi XPTHK6 | G72MV128 2*512/100/BT/6L+3H/4R_abg_FP | TMC213T C2DT | 5500 | |
| TMC213TMi AAP Australia/New Zealand | LX.TDG0E.006 TM | TMC213TMi XPTAU1G72MV128 2*512/100/BT/6L+3H/4R_abg | TMC213TMi XPTAU1G72MV128 2*512/100/BT/6L+3H/4R_abg | TMC213T C2DT | 5500 | |
| TMC213TMi AAP Singapore LX | TDG0E.013 TM | C213TMi XPTSG1 | G72MV128 2*512/100/BT/6L+3H/4R_abg | TMC213T C2DT | 5500 | |
| TMC213TMi AAP India LX.TDG | OE.009 TMC213 | TMi XPTIL1 | G72MV128 2*512/100/BT/6L+3H/4R_abg | TMC213T C2DT | 5500 | |
| TMC213TMi AAP Indonesia | LX.TDG0E.01 | TMC213TMi XPTIN1 | TMC213TMi AAP Indonesia | TMC213T C2DT | 5500 | |
| TMC213TMi AAP Philippines | LX.TDG0E.01 | TMC213TMi XPTPH1 | TMC213TMi AAP Philippines | TMC213TMi AAP Philippines | 5500 | |
| TMC213TMi AAP Thailand | LX.TDG0E.01 | TMC213TMi XPTTH2 | TMC213TMi AAP Thailand | TMC213TMi AAP Thailand | 5500 | |
| TMC213TMi AAP Vietnam | LX.TDG0E.01 | TMC213TMi XPTVN1 | TMC213TMi AAP Vietnam | TMC213TMi AAP Vietnam | 5500 | |
| TMC213TMi AAP Malaysia | LX.TDG0E.01 | TMC213TMi XPTMA2 | TMC213TMi AAP Malaysia | TMC213TMi AAP Malaysia | 5500 | |
| TMC213TMi PA | USA/Canada LX | X.TDG0E.007 T | MC213TMi XPTEN | 4G72MV128 2*512/100/BT/6L+3H/4R_abg | TMC213T C2DT | 5500 |
| TMC213TMi PA | ACLA- | Spanish | LX.TDG0E.008 T | MC213TMi XPTES4G72MV128 2*512/100/BT/6L+3H/4R_abg | TMC213T C2DT | 5500 |
| TMC215TMi PA | USA/Canada LX | X.TDG0E.018 T | MC215TMi XPTEN | 4G72MV128 2*1G/160/BT/6L+3H/4R_abg_FP | TMC215T C2DT | 7200 |
| TMC215TMi PA | ACLA- | Spanish | LX.TDG0E.019 T | MC215TMi XPTES4G72MV128 2*1G/160/BT/6L+3H/4R_abg_FP | TMC215T C2DT | 7200 |
| TMC215TMi AAP | Australia/New Zealand | Zealand | LX.TDG0E.017 T | MC215TMi XPTAU1G72MV128 2*1G/160/BT/6L+3H/4R_abg_FP | TMC215T C2DT | 7200 |
| TMC215TMi AAP | Thailand LX.T | DG0E.025 TMC | 215TMi XPTTH2 | G72MV128 2*1G/160/BT/6L+3H/4R_bg_FP | TMC215T C2DT | 7200 |
| TMC215TMi AAP | Singapore LX | TDG0E.024 TMC | 215TMi XPTSG1 | G72MV128 2*1G/160/BT/6L+3H/4R_abg_FP | TMC215T C2DT | 7200 |
| TMC215TMi AAP | India LX.TDG | OE.020 TMC215 | TMi XPTIL1 | G72MV128 2*1G/160/BT/6L+3H/4R_abg_FP | TMC215T C2DT | 7200 |
| TMC215TMi AAP | Indonesia LX | TDG0E.021 TMC | 215TMi XPTIN1 | G72MV128 2*1G/160/BT/6L+3H/4R_abg_FP | TMC215T C2DT | 7200 |
| TMC215TMi AAP | Philippines LX | TDG0E.023 TMC | 215TMi XPTPH1 | G72MV128 2*1G/160/BT/6L+3H/4R_abg_FP | TMC215T C2DT | 7200 |
| TMC215TMi AAP | Malaysia LX.T | DG0E.022 TMC | 215TMi XPTMA2 | G72MV128 2*1G/160/BT/6L+3H/4R_abg_FP | TMC215T C2DT | 7200 |
| TMC215TMi AAP | Vietnam LX.T | DG0E.026 TMC | 215TMi XPTVN1 | G72MV128 2*1G/160/BT/6L+3H/4R_abg_FP | TMC215T C2DT | 7200 |
| TMC213TMi EMEA Germany | LX.TDG0E.060 TMC213TMi XP | PTDECG72MV128 2*512/100/BT/6L+3H/4R_abg_FP | TMC213T C2DT | 5500 | ||
| TMC213TMi EMEA Belgium | LX.TDG0E.061 TMC213TMi XP | PTBE7G72MV128 2*512/100/BT/6L+3H/4R_abg_FP | TMC213T C2DT | 5500 | ||
| TMC213TMi EMEA Middle East | LX.TDG0E.049 | TMC213TMi XPTA | ARAG72MV128 2*512/100/BT/6L+3H/4R_abg_FP | TMC213T C2DT5500 | ||
| TMC213TMi EMEA Germany LX | TDG0E.043 TM | C213TMi XPTDE | G72MV128 1*512/80/BT/6L+3H/4R_abg | TMC213T C2DT5500 | ||
| TMC213TMi EMEA Belgium LX | TDG0E.038 TM | C213TMi XPTBE7 | G72MV128 1*512/80/BT/6L+3H/4R_abg | TMC213T C2DT5500 | ||
| TMC213TMi EMEA Denmark LX | TDG0E.041 TM | C213TMi XPTDK5 | G72MV128 1*512/80/BT/6L+3H/4R_abg | TMC213T C2DT5500 | ||
| TMC213TMi EMEA Middle East | LX.TDG0E.030 | TMC213TMi XPTA | ARAG72MV128 1*512/80/BT/6L+3H/4R_abg | TMC213T C2DT5500 | ||
| TMC213TMi EMEA France LX | TDG0E.042 TM | C213TMi XPTFRD | G72MV128 1*512/80/BT/6L+3H/4R_abg | TMC213T C2DT5500 | ||
| TMC213TMi EMEA Spain LX | TDG0E.032 TM | C213TMi XPTESE | G72MV128 1*512/80/BT/6L+3H/4R_abg | TMC213T C2DT5500 | ||
| TMC213TMi EMEA Italy LX | TDG0E.034 TM | C213TMi XPIT5 | G72MV128 1*512/80/BT/6L+3H/4R_abg | TMC213T C2DT5500 | ||
| TMC213TMi EMEA Holland LX | TDG0E.039 TM | C213TMi XPTNL7 | G72MV128 1*512/80/BT/6L+3H/4R_abg | TMC213T C2DT5500 | ||
| TMC213TMi EMEA Norway LX | TDG0E.040 TM | C213TMi XPNO4 | G72MV128 1*512/80/BT/6L+3H/4R_abg | TMC213T C2DT5500 | ||
| TMC213TMi EMEA Italy LX | TDG0E.047 TM | C213TMi XPIT5 | G72MV128 2*512/100/BT/6L+3H/4R_abg_FP | TMC213T C2DT5500 | ||
| TMC213TMi EMEA Holland LX | TDG0E.056 TM | C213TMi XPTNL7 | G72MV128 2*512/100/BT/6L+3H/4R_abg_FP | TMC213T C2DT5500 | ||
| TMC213TMi EMEA Denmark LX | TDG0E.055 TM | C213TMi XPTDK5 | G72MV128 2*512/100/BT/6L+3H/4R_abg_FP | TMC213T C2DT5500 | ||
| TMC213TMi EMEA France LX | TDG0E.050 TM | C213TMi XPTRD | G72MV128 2*512/100/BT/6L+3H/4R_abg_FP | TMC213T C2DT5500 | ||
| TMC213TMi EMEA Spain LX | TDG0E.051 TM | C213TMi XPTESE | G72MV128 2*512/100/BT/6L+3H/4R_abg_FP | TMC213T C2DT5500 | ||
| TMC213TMi EMEA Portugal LX | TDG0E.052 TM | C213TMi XPPT4 | G72MV128 2*512/100/BT/6L+3H/4R_abg_FP | TMC213T C2DT5500 | ||
| TMC213TMi EMEA Norway LX.T | DG0E.057 TMC | 213TMi XPTNO4 | G72MV128 2*512/100/BT/6L+3H/4R_abg_FP | TMC213T C2DT | 5500 | |
| TMC213TMi EMEA Russia LX.T | DG0E.058 TMC | 213TMi XPTRU7 | G72MV128 2*512/100/BT/6L+3H/4R_abg_FP | TMC213T C2DT | 5500 | |
| TMC213TMi EMEA Sweden/ | Finland | LX.TDG0E.053 T | TMC213TMi XPTRU7 | G72MV128 2*512/100/BT/6L+3H/4R_abg_FP | TMC213T C2DT | 5500 |
| TMC213TMi EMEA Russia LX.T | DG0E.035 TMC | 213TMi XPTRU7 | G72MV128 1*512/80/BT/6L+3H/4R_abg | TMC213T C2DT | 5500 | |
| TMC213TMi EMEA Sweden/ | Finland | LX.TDG0E.036 T | TMC213TMi XPTRU7 | G72MV128 1*512/80/BT/6L+3H/4R_abg | TMC213T C2DT | 5500 |
| TMC213TMi EMEA South Africa | LX.TDG0E.059 | TMC213TMi XPTRU7 | SA3 | G72MV128 2*512/100/BT/6L+3H/4R_abg_FP | TMC213T C2DT | 5500 |
| TMC213TMi EMEA South Africa | LX.TDG0E.046 | TMC213TMi XPTRU7 | SA3 | G72MV128 1*512/80/BT/6L+3H/4R_abg | TMC213T C2DT | 5500 |
| TMC213TMi EMEA Portugal LX | TDG0E.033 TMC | 213TMi XPTRU7 | G72MV128 1*512/80/BT/6L+3H/4R_abg | TMC213T C2DT | 5500 | |
| TMC213TMi EMEA Switzerland | LX.TDG0E.031 TMC | 213TMi XPTRU7 | W5 | G72MV128 1*512/80/BT/6L+3H/4R_abg | TMC213T C2DT | 5500 |
| TMC213TMi EMEA UK LX.TDG | OE.028 TMC213 | TMi XPTRU6 | G72MV128 1*512/80/BT/6L+3H/4R_abg | TMC213T C2DT | 5500 | |
| TMC213TMi EMEA Turkey LX.T | DG0E.029 TMC | 213TMi XPTRU4 | G72MV128 1*512/80/BT/6L+3H/4R_abg | TMC213T C2DT | 5500 | |
| TMC213TMi EMEA Eastern | Europe | LX.TDG0E.037 T | TMC213TMi XPTRU4 | G72MV128 2*512/100/BT/6L+3H/4R_abg_FP | TMC213T C2DT | 5500 |
| TMC213TMi EMEA Turkey LX.T | DG0E.048 TMC | 213TMi XPTRU4 | G72MV128 2*512/100/BT/6L+3H/4R_abg_FP | TMC213T C2DT | 5500 | |
| TMC213TMi EMEA Switzerland | LX.TDG0E.044 T | TMC213TMi XPTRU6 | W5 | G72MV128 2*512/100/BT/6L+3H/4R_abg_FP | TMC213T C2DT | 5500 |
| TMC213TMi EMEA UK LX.TDG | OE.045 TMC213 | TMi XPTRU6 | G72MV128 2*512/100/BT/6L+3H/4R_abg_FP | TMC213T C2DT | 5500 | |
| TMC213TMi EMEA Eastern | Europe | LX.TDG0E.054 T | TMC213TMi XPTRU6 | G72MV128 2*512/100/BT/6L+3H/4R_abg_FP | TMC213T C2DT | 5500 |
| TMC213TMi AAP Singapore LX | TDG0E.062 TM | C213TMi XPTSG1 | G72MV128 1*512/80/BT/6L+3H/4R_abg_FP | TMC213T C2DT5500 | ||
| TMC213TMi AAP Australia/New Zealand | LX.TDG0E.063 TM | TMC213TMi XPTAU1G72MV128 1*1G/120/BT/6L+3H/4R_abg | TMC213T C2DT5500 | |||
| TMC213TMi AAP Australia/New Zealand | LX.TDG0E.064 TM | TMC213TMi XPTAU1G72MV128 1*1G/120/BT/6L+3H/4R_abg_FP | TMC213T C2DT5500 | |||
| TMC215TMi AAP Philippines LX | TDG0E.065 TM | C215TMi XPTPH1G72MV128 1*1G/160/BT/6L+3H/4R_abg_FP | TMC215T C2DT7200 | |||
Test Compatible Components
This computer's compatibility is tested and verified by Acer's internal testing department. All of its system functions are tested under Windows® XP Home and Windows® XP Pro environments.
Refer to the following lists for components, adapter cards, and peripherals which have passed these tests. Regarding configuration, combination, and test procedures, please refer to the TravelMate C210 series Compatibility Test Report released by the Acer Mobile System Testing Department.
Microsoft® Windows® XP Pro Environment Test
| Item Specification | |
| CRT Port Test | |
| CRT Monitor View Sonic E72f 17" Perfect | Flat color CRT Area with 1280*1024 |
| LCD Monitor COMPAQ FP 7317 17" LCD | area with 1024*768Gateway FPD1730 17"(1280*1024) |
| DVI Monitor CMV CM-930D (1280*1024) | |
| Projector BenQ FB8225 | |
| TV FERGUSON DV3 | |
| Audio Jacks Port Test | |
| Microphone V008 | |
| Head Phone TP-M06 R | |
| Printer HP Deskjet 840C | |
| USB Port Test | |
| USB 1.1-Mouse Logitech Wheel Mouse(Optical, USB|PS/2)Huaerte USB Stroll Mouse 2-button HM-28Microsoft Track Ball Explorer(USB|PS/2)USB Stroll Mouse 2-button HM-28(Scroll, wheel)Logitech(Optical)Microsoft IntelliMouse optical ps2/USBMicrosoft IntelliMouse Explorer ps2/USBMicrosoft Optical Mouse Blue USB and PS/2 CompatibleLogitech Cordless TrackMan Fx(Trackball, Optical)Microsoft Wireless Optical Mouse Blue(USB PS/2)Microsoft Wheel Mouse Optical(USB|PS/2) | |
| USB 1.1-keyboard NewMen TECHNOLOGY Basic KeyboardHP USB KeyboardViewSonic ViewMate Internet/Multimedia KeyboardChang yang Kb-MED-U T3A158NMB The Right Touch!SILITEK SK-6000USB KeyPad: ZIPPY USB Keyboard TK323 | |
| USB 2.0-Speaker | JAZZ HIPSTER CORRPORATION MODELGJ 1301USB OZAKI USB206USB J-S J1321 |
| USB 1.1-FDD | TEAC FD-05PUB USB1.0 DeviceYE-DATA USB1.1 Floppy Disk Drvie YU-8U10SMSC USB1.1 external Floppy DriveIBM USB1.1 external Floppy Drive |
| USB 1.1-Camera / CCD | Logitech USB1.1 QuickCam for Notebooks pro |
| USB 1.1-HUB | UNIONSTAR USB1.1 HUB 4 Port |
| USB 1.1-Gamepad | Logitech WingMan Stike forcee 3DMicrosoft GamepadLogitech WingMan Force J-UA9 |
| USB 1.1-Card Reader | IWILL 6in1 USB1.1 Card Reader/WriterHP USB 1.0 digital drive |
| Item | Specification |
| USB 2.0-HDD Istyle USB2.0/1394 HDD | NEWMAN USB2.0 HDDViPowER SmartFamily USB2.0 HDD |
| USB 2.0-DVD/CD-RW VP-6228V2 CDROM | MBOX |
| USB 2.0-HUB Highlight High-Speed 4-port | USB 2.0 hubD-Link DUB-H4 4-Port Hi-SPEED USB 2.0 HubHi-Speed 4-Port USB 2.0 HUB( IOGEAR) |
| USB 2.0-Cable Goodman USB Turbo Link | |
| USB to LAN Cable BUFFALD USB-10/100 | M Ethernet LUA-TX |
| USB 2.0-Handy Drive Apacer USB2.0 Handy Drive | dy Drive |
| USB 2.0-Camera/CCD Logitech QuickCam | 5.0.1(USB2.0 ) |
| USB 2.0-Scanner HP ScanJet 3500C USB | 2.0 digital flatbed Scanner |
| PCMCIA Test | |
| PCI Express Card Express card 5in1 adapter | (YE-DATA YD-8V30)Express Gigabit Lan Card (AboCom) |
| SCSI Card Ultra Slim SCSI 1480B | Ultra Slim SCSI 1460D |
| Modem Card billionton 56Kbps FAX Modem | m PC CardXircom CreditCard Modem 56-GlobalAccess |
| 32 bit Lan Card | NETGEAR Gigabit PC card GA511TDK10/100 Lan CardBus LAC-CB100xD-Link DFE-690TXD 32bit 10/100Mb PC Card |
| 1394 CardBus Card | VIA OHCI Compliant IEEE 1394 Host Controllere-sense PCMCIA 1394d CardBus 2 Ports |
| USB2.0 CardBus Card IOGEAR USB 2.0 | 2-Port CardBus CardUSB 2.0 Hi-speed CardBus AdapterINTOPIC USB 2.0 4-Port Notebook Card(CardBus) |
| Wireless Lan Card | BUFFALD 54M Wireless LAN PC Card WLI-CB-G54AGIGABYTE GN-WMGA 802.11 b/g Wireless LAN PC CardGemtek Wireless LAN PC Card WL-211F 802.11b 2.4GHzLINKSYS Wireless-B Notebook Adapter 2.4GHz |
| ATA Card | SanDisk 1G ATA PC CardIBM Microdrive 1GB |
| PS/2 Port Test | |
| Mouse | Microsoft FCC ID:C3KKZB1GS S100TECH SWW-25Logitech Serial Mouse M-M35 |
| Keyboard | DELL PS2 keyboard |
| COM/Serial Port Test | |
| Mouse | Logitech Serial Mouse M-M35 |
| Memory Card Test (SD/MS/MMC/SM/CF/Microdrive/XD) | |
| MMC Card | ScanDisk 32MB MMC CardTranscend 512MB MMC CardTranscend 1GB MMC Card |
| Item Specification | |
| SD Card Panasonic 2.0G SD Card | Transcend 2.0G SD CardSandisk 256MB SD CardSimpletech 128MB SD CardSandisk 1.0G SD CardX Digital Media SD 256MBSimpletech 512MB SD Card |
| MS Card Sony 128MB MS Card | SanDisk stick Pro 1GBLEXAR 256MB MS CardSandisk 64MB MS CardSONY 32MB MS CardSONY 256MB MS Card |
| XD Card OLYMPUS XD Picture Card 256MB | OLYMPUS XD Picture Card 1GB |
| CF Card Prctec 256MB CF Card | Compact Flash Adapter 128MB |
| Card Reader POW four-in-one memory media PCMCIA | |
Microsoft® Windows® XP Home Environment Test
| Item Specification | |
| CRT Port Test | |
| CRT Monitor View Sonic E72f 17" Perfect | Flat color CRT Area with 1280*1024 |
| LCD Monitor COMPAQ FP 7317 17" LCD | area with 1024*768Gateway FPD1730 17"(1280*1024) |
| DVI Monitor CMV CM-930D (1280*1024) | |
| Projector BenQ FB8225 | |
| TV FERGUSON DV3 | |
| Audio Jacks Port Test | |
| Microphone V008 | |
| Head Phone TP-M06 R | |
| Printer HP Deskjet 840C | |
| USB Port Test | |
| USB 1.1-Mouse Logitech Wheel Mouse(Optical, USB|PS/2)Huaerte USB Stroll Mouse 2-button HM-28Microsoft Track Ball Explorer(USB|PS/2)USB Stroll Mouse 2-button HM-28(Scroll, wheel)Logitech(Optical)Microsoft IntelliMouse optical ps2/USBMicrosoft IntelliMouse Explorer ps2/USBMicrosoft Optical Mouse Blue USB and PS/2 CompatibleLogitech Cordless TrackMan Fx(Trackball, Optical)Microsoft Wireless Optical Mouse Blue(USB PS/2)Microsoft Wheel Mouse Optical(USB|PS/2) | |
| USB 1.1-keyboard NewMen TECHNOLOGY Basic KeyboardHP USB KeyboardViewSonic ViewMate Internet/Multimedia KeyboardChang yang Kb-MED-U T3A158NMB The Right Touch!SILITEK SK-6000USB KeyPad: ZIPPY USB Keyboard TK323 | |
| USB 2.0-Speaker | JAZZ HIPSTER CORRPORATION MODELGJ 1301USB OZAKI USB206USB J-S J1321 |
| USB 1.1-FDD | TEAC FD-05PUB USB1.0 DeviceYE-DATA USB1.1 Floppy Disk Drvie YU-8U10SMSC USB1.1 external Floppy DriveIBM USB1.1 external Floppy Drive |
| USB 1.1-Camera / CCD | Logitech USB1.1 QuickCam for Notebooks pro |
| USB 1.1-HUB | UNIONSTAR USB1.1 HUB 4 Port |
| USB 1.1-Gamepad | Logitech WingMan Stike forcee 3DMicrosoft GamepadLogitech WingMan Force J-UA9 |
| USB 1.1-Card Reader | IWILL 6in1 USB1.1 Card Reader/WriterHP USB 1.0 digital drive |
| Item | Specification |
| USB 2.0-HDD Istyle USB2.0/1394 HDD | NEWMAN USB2.0 HDDViPowER SmartFamily USB2.0 HDD |
| USB 2.0-DVD/CD-RW VP-6228V2 CDROM | MBOX |
| USB 2.0-HUB Highlight High-Speed 4-port | USB 2.0 hubD-Link DUB-H4 4-Port Hi-SPEED USB 2.0 HubHi-Speed 4-Port USB 2.0 HUB( IOGEAR) |
| USB 2.0-Cable Goodman USB Turbo Link | |
| USB to LAN Cable BUFFALD USB-10/100 | M Ethernet LUA-TX |
| USB 2.0-Handy Drive Apacer USB2.0 Handy Drive | dy Drive |
| USB 2.0-Camera/CCD Logitech QuickCam | 5.0.1(USB2.0 ) |
| USB 2.0-Scanner HP ScanJet 3500C USB | 2.0 digital flatbed Scanner |
| PCMCIA Test | |
| PCI Express Card Express card 5in1 adapter | (YE-DATA YD-8V30)Express Gigabit Lan Card (AboCom) |
| SCSI Card Ultra Slim SCSI 1480B | Ultra Slim SCSI 1460D |
| Modem Card billionton 56Kbps FAX Modem | m PC CardXircom CreditCard Modem 56-GlobalAccess |
| 32 bit Lan Card | NETGEAR Gigabit PC card GA511TDK10/100 Lan CardBus LAC-CB100xD-Link DFE-690TXD 32bit 10/100Mb PC Card |
| 1394 CardBus Card | VIA OHCI Compliant IEEE 1394 Host Controllere-sense PCMCIA 1394d CardBus 2 Ports |
| USB2.0 CardBus Card IOGEAR USB 2.0 | 2-Port CardBus CardUSB 2.0 Hi-speed CardBus AdapterINTOPIC USB 2.0 4-Port Notebook Card(CardBus) |
| Wireless Lan Card | BUFFALD 54M Wireless LAN PC Card WLI-CB-G54AGIGABYTE GN-WMGA 802.11 b/g Wireless LAN PC CardGemtek Wireless LAN PC Card WL-211F 802.11b 2.4GHzLINKSYS Wireless-B Notebook Adapter 2.4GHz |
| ATA Card | SanDisk 1G ATA PC CardIBM Microdrive 1GB |
| PS/2 Port Test | |
| Mouse | Microsoft FCC ID:C3KKZB1GS S100TECH SWW-25Logitech Serial Mouse M-M35 |
| Keyboard | DELL PS2 keyboard |
| COM/Serial Port Test | |
| Mouse | Logitech Serial Mouse M-M35 |
| Memory Card Test (SD/MS/MMC/SM/CF/Microdrive/XD) | |
| MMC Card | ScanDisk 32MB MMC CardTranscend 512MB MMC CardTranscend 1GB MMC Card |
| Item Specification | |
| SD Card Panasonic 2.0G SD Card | Transcend 2.0G SD CardSandisk 256MB SD CardSimpletech 128MB SD CardSandisk 1.0G SD CardX Digital Media SD 256MBSimpletech 512MB SD Card |
| MS Card Sony 128MB MS Card | SanDisk stick Pro 1GBLEXAR 256MB MS CardSandisk 64MB MS CardSONY 32MB MS CardSONY 256MB MS Card |
| XD Card OLYMPUS XD Picture Card 256MB | OLYMPUS XD Picture Card 1GB |
| CF Card Prctec 256MB CF Card | Compact Flash Adapter 128MB |
| Card Reader POW four-in-one memory media PCMCIA | |
Online Support Information
This section describes online technical support services available to help you repair your Acer Systems.
If you are a distributor, dealer, ASP, or TPM, please refer your technical queries to your local Acer branch office. Acer Branch Offices and Regional Business Units may access our website. However, some information sources will require a user ID and password. These can be obtained directly from Acer CSD Taiwan.
Acer's Website offers you convenient and valuable support resources whenever you need them.
In the Technical Information section you can download information on all of Acer's Notebook, Desktop, and Server models including:
□ Service guides for all models □ User's manuals □ Training materials □ BIOS updates □ Software utilities □ Spare parts lists □ TABs (Technical Announcement Bulletin)
For these purposes, we have included an Acrobat File to facilitate the problem-free downloading of our technical material.
Also contained on this website are:
□ Detailed information on Acer's International Traveler's Warranty (ITW) ☐ Returned material authorization procedures
An overview of all the support services we offer, accompanied by a list of telephone, fax and email contacts for all your technical queries.
We are always looking for ways to optimize and improve our services, so if you have any suggestions or comments, please do not hesitate to communicate these to us.
A
ACPI 1.0a 32
AFLASH Utility 51
Audio 36
B
Battery Pack 60
BIOS 32
package 32
password control 32
ROM size 32
ROM type 32
vendor 32
Version 32
BIOS Setup Utility 41
BIOS Supports protocol 32
BIOS Utility 41
Basic System Settings 45
Navigating 42
Onboard Device Configuration 47
Startup Configuration 46
System Information 42
System Security 50
Board Layout 4
Bottom View 5
Top View 4, 89
C
Cache
controller 32
size 32
CardBus 37
CPU
core voltage 31
package 31
type 31
CPU Fan True Value Table 31
D
DIMM
Combinations 33
external 61, 64
removing 61, 64
Disassembly
Battery Pack 59
LCD Module 67
Procedure Flowchart 59
Display 3
E
Easy-launch buttons 14
Error Symptom-to-Spare Part Index 75
External CD-ROM Drive Check 72
External Diskette Drive Check 72
F
Features 1
Flash Utility 51
Floppy Disk
removing the 67
FRU (Field Replaceable Unit) List 93
H
Hard disk 34
HDD 34
|
Indicators 13
Intermittent Problems 86
J
Jumper and Connector Locations 89
Top View 89
Bottom View 90
K
Keyboard 37
Keyboard or Auxiliary Input Device Check 72
L
L2 cache 32
M
Memory Check 73
Model Definition 106
Modem 33
0
Online Support Information 119
P
Panel
right 8
PC Card 37
PCMCIA 37
Power System Check 73
Battery Pack 74
Processor 31
R
RMA 93
S
Second Level Cache 32
System
Block Diagram 3
Layout 4
System Memory 32
System Utilities 41
T
Test Compatible Components 111
Touchpad Check 74
Troubleshooting 71
U
Undetermined Problems 87
USB 36, 37
utility
BIOS 41
V
View
Base view 11
Closed front view 8
Left view 9
Open front view 8
Rear view 11
Right view 10
Top View 7
W
Windows XP Pro Environment Test 112
Windows XP Home Environment test 115
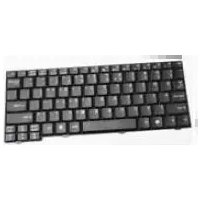


- ACER TRAVELMATE C210 SERIES
- REVISION HISTORY
- COPYRIGHT
- DISCLAIMER
- CONVENTIONS
- PREFACE
- TABLE OF CONTENTS
- CHAPTER 1 SYSTEM SPECIFICATIONS
- CHAPTER 2 SYSTEM UTILITIES
- CHAPTER 3 MACHINE DISASSEMBLY AND REPLACEMENT
- CHAPTER 4 TROUBLESHOOTING
- CHAPTER 5 JUMPER AND CONNECTOR LOCATIONS
- CHAPTER 6 FRU (FIELD REPLACEABLE UNIT) LIST
- APPENDIX A MODEL DEFINITION AND CONFIGURATION
- APPENDIX B TEST COMPATIBLE COMPONENTS
- APPENDIX C ONLINE SUPPORT INFORMATION
- SYSTEM SPECIFICATIONS
- FEATURES
- PERFORMANCE
- DISPLAY
- STORAGE SUBSYSTEM
- COMMUNICATION
- INPUT DEVICES
- AUDIO
- I/O INTERFACE
- ENVIRONMENT
- SYSTEM BLOCK DIAGRAM
- TM C
- BOARD LAYOUT
- TOP VIEW
- BOTTOM VIEW
- A TRAVELMATE TOUR
- OPEN FRONT VIEW
- CLOSED FRONT VIEW
- LEFT VIEW
- RIGHT VIEW
- REAR VIEW
- BASE VIEW
- INDICATORS
- EASY-LAUNCH BUTTONS
- TRACKPOINT AND CLICK BUTTONS
- TRACKPOINT BASICS
- SCROLLING BASICS
- USING THE KEYBOARD
- LOCK KEYS AND EMBEDDED NUMERIC KEYPAD
- WINDOWS KEYS
- HOT KEYS
- SPECIAL KEYS
- THE EURO SYMBOL
- THE US DOLLAR SIGN
- ACER EMPOWERING TECHNOLOGY
- EMPOWERING TECHNOLOGY PASSWORD
- ACER ENET MANAGEMENT (FOR SELECTED MODELS)
- ACER EPOWER MANAGEMENT
- AC MODE (ADAPTER MODE)
- DC MODE (BATTERY MODE)
- TO CREATE NEW POWER PROFILE
- BATTERY STATUS
- ACER EPRESENTATION MANAGEMENT
- ACER EDATASECURITY MANAGEMENT (FOR SELECTED MODELS)
- ACER ELOCK MANAGEMENT
- ACER ERECOVERY MANAGEMENT
- ACER ESETTINGS MANAGEMENT
- ACER EPERFORMANCE MANAGEMENT
- HARDWARE SPECIFICATIONS AND CONFIGURATIONS
- BIOS
- ITEM SPECIFICATION
- SECOND LEVEL CACHE
- SYSTEM MEMORY
- SYSTEM UTILITIES
- BIOS SETUP UTILITY
- NAVIGATING THE BIOS UTILITY
- INFORMATION
- MAIN
- ADVANCED
- SECURITY
- SETTING A PASSWORD
- REMOVING A PASSWORD
- CHANGING A PASSWORD
- BOOT
- EXIT
- BIOS FLASH UTILITY
- REMOVE HDD/BIOS UTILITY
- REMOVE HDD PASSWORD
- REMOVE BIOS PASSWORD
- MACHINE DISASSEMBLY AND REPLACEMENT
- GENERAL INFORMATION
- BEFORE YOU BEGIN
- DISASSEMBLY PROCEDURE FLOWCHART
- REMOVING THE BATTERY PACK
- REMOVING THE HDD MODULE/ODD MODULE/MEMORY/WIRELESS LAN CARD/LCD MODULE AND THE KEYBOARD
- REMOVING THE HARD DISK DRIVE MODULE
- REMOVING THE OPTICAL DISK DRIVE MODULE
- REMOVING THE MEMORY
- REMOVING THE WIRELESS LAN CARD
- REMOVING THE LCD MODULE
- REMOVING THE KEYBOARD
- DISASSEMBLING THE MAIN UNIT
- SEPARATING THE MAIN UNIT INTO THE UPPER CASE AND THE LOWER CASE ASSEMBLY
- DISASSEMBLING THE UPPER CASE, THE LOWER CASE, AND THE MAIN BOARD ASSEMBLY
- DISASSEMBLING THE LCD MODULE
- DISASSEMBLING THE EXTERNAL MODULES
- DISASSEMBLING THE HDD MODULE
- DISASSEMBLING THE OPTICAL DISC DRIVE MODULE
- TROUBLESHOOTING
- SYSTEM CHECK PROCEDURES
- EXTERNAL DISKETTE DRIVE CHECK
- EXTERNAL CD-ROM DRIVE CHECK
- KEYBOARD OR AUXILIARY INPUT DEVICE CHECK
- MEMORY CHECK
- POWER SYSTEM CHECK
- CHECK THE BATTERY PACK
- TOUCHPAD CHECK
- POWER-ON SELF-TEST (POST) ERROR MESSAGE
- INDEX OF ERROR MESSAGES
- POST CODES
- INDEX OF SYMPTOM-TO-FRU ERROR MESSAGE
- INTERMITTENT PROBLEMS
- UNDETERMINED PROBLEMS
- JUMPER AND CONNECTOR LOCATIONS
- FRU (FIELD REPLACEABLE UNIT) LIST
- EXPLODED DIAGRAM
- MODEL DEFINITION AND CONFIGURATION
- TEST COMPATIBLE COMPONENTS
- MICROSOFT® WINDOWS® XP PRO ENVIRONMENT TEST
- MICROSOFT® WINDOWS® XP HOME ENVIRONMENT TEST
- ONLINE SUPPORT INFORMATION
- A
- B
- C
- D
- E
- F
- H
- J
- K
- L
- M
- P
- R
- S
- T
- U
- V
- W
Brand : ACER
Model : Keyboard Darfon
Category : Keyboard